Time to break ground. This chapter shows you how to install the most popular patio materials in your yard. When you’re ready to begin your paving project, be sure to read the Layout & Surface Preparation section starting on the next page. This includes detailed steps for setting up reference lines and creating a stable foundation for any type of patio surface.
If you’re still weighing your options with different patio materials, consider ease of installation: the fastest and easiest patios to build are those made with loose materials. Next are sandset surfaces; these require careful planning and layout, but the good news is that it’s relatively easy to correct mistakes. With mortared surfaces, you’re working against the clock to get everything set and cleaned up before the mortar hardens, and mistakes are tough to fix. Poured concrete is the most challenging material, due to the time sensitivity and the finer points of finishing.
In This Chapter:
 Layout & Surface Preparation
The first major step of any patio project is to set up guide strings. Once that’s finished, excavation begins and then a layer of gravel is added. The gravel is an essential element of patio construction: like your house’s foundation, it creates a flat, stable base for building upon; and it protects the surface material by providing drainage underneath to minimize shifting and settling caused by seasonal freeze-thaw cycles.
There are a few matters to take care of before you begin the layout and surface prep work. The first is to determine the thickness of each layer of the patio construction. This includes the thicknesses of the surface material, the sand bed (if required), and the gravel subbase. For most patio types, the gravel layer should be four inches thick (after compaction). Concrete slab patios call for six inches of gravel, but this is subject to the local building code and may vary by region. The combined thicknesses of the layers minus the distance the patio surface will stand above the ground gives you the depth of the excavation.
The height of the finished patio aboveground is up to you. The standard minimum height is one inch. This ensures the patio will drain properly, but it’s low enough to cut any bordering grass with a mower.
The next factor to determine is the total drop distance—the change in elevation from the high end to the low end of the patio surface. This creates the slope necessary for water runoff. Your patio should slope away from the house foundation or other adjacent structure (and preferably away from main traffic routes) at a rate of 1/8-inch per linear foot. For example, if your patio will extend 12 inches from your house, the drop distance of the patio surface will be 1 1/2 inches. In the following project, you’ll calculate the drop distance by measuring from the house (or high edge of the patio) to the batterboards at the low edge. The batterboards are set about 12" beyond the finished patio edges, and this additional amount makes the final drop distance more accurate than using the finished patio dimensions.
The final step before you start digging is to locate underground utility lines in the project site. Call your utility service providers or a national provider (see Resources, page 236) to have your lines marked.
Tools & Materials 
Drill
Circular saw
Hammer
Level
Hand maul
Mason’s string
Line level
Power sod cutter or lawn edger
Excavation tools
Bow rake
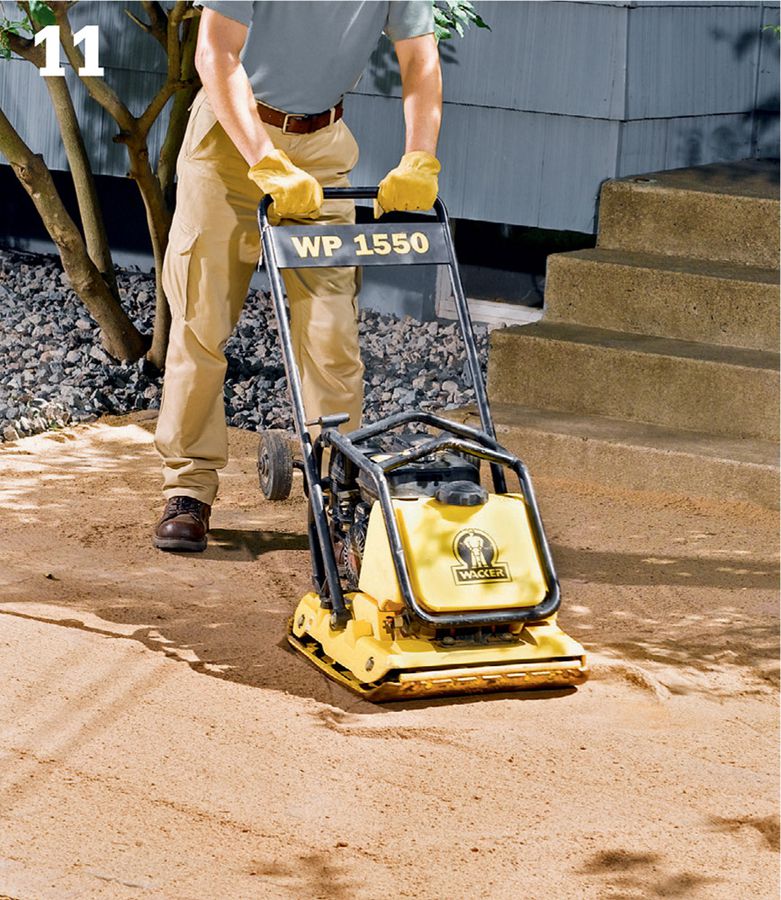
Plate compactor or hand tamp
Shovel
Wheelbarrow
Plumb bob
Lumber (2 × 2, 2 × 4)
2 1/2" coarse-thread drywall screws
Common nails
Compactable gravel
Eye and ear protection
Work gloves
Rope or garden hose
Marking paint
Flat spade
U-shaped wire stakes (optional)
Landscape fabric (optional)

Set up batterboards for the layout strings so you can easily remove and replace the strings without losing the slope and layout settings. A story pole—measured against temporary cross strings—makes it easy to check the depth of each layer as you work. Remember to call utility companies to have them mark utility lines in or near the project site before excavating.
 How to Prepare & Excavate a Patio Site
Construct the batterboards from 2 × 4 lumber and 2 1/2" screws: cut the batterboard legs 24" long, and then taper the ends to a point. Cut the cross- pieces at 24". Align and fasten the legs perpendicular to the ends of the cross- pieces. Use a nail or screw at the top center of each crosspiece.

Roughly mark the patio corners with 2 × 2 stakes. Cut the 2 × 2 ends to a taper (the greater the angle, the easier it will be to drive into the ground). Tap the tapered end into the ground with a hand maul or sledgehammer.

Drive pairs of batterboards about 2 ft. behind the stakes, holding them plumb and level. The tops of the crosspieces should be about 12" above the ground. If the patio abuts the house, drive a single 2 × 4 stake at each corner so one face of the stake is even with the planned edge of the patio.

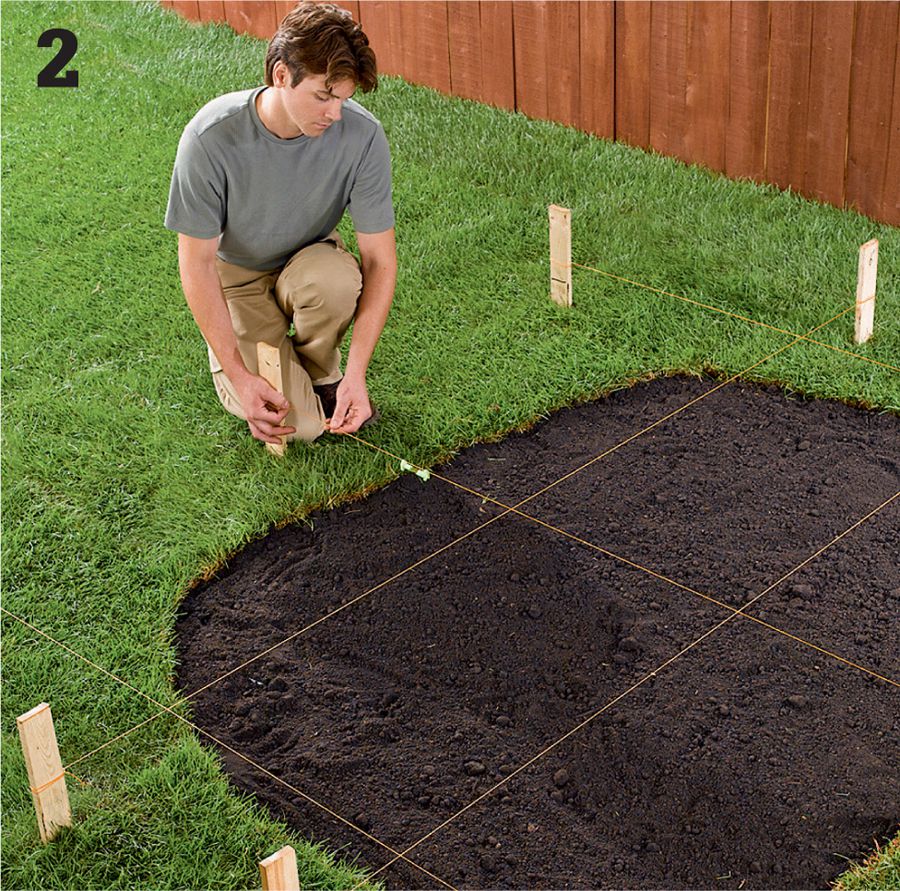
Tie a mason’s string taut between an outer batterboard nail and one of the house-side (or high edge of the patio) stakes. Attach a line level (inset) to the string and adjust the stakes as needed until the string is perfectly level.

Begin setting the slope on the first layout string: stand the pole next to the batterboard and mark the height of the level mason’s string. Measure between the house (or high side) stake to the batterboard, then calculate the drop distance for the string—a common slope is 1/4" per linear foot.
Using the story pole as a guide, drive the batterboard down until the string is even with the drop distance mark. Make sure the crosspiece remains level across the top so the string’s height won’t change if you move the string later.

Set up the remaining three string lines so they are even with the outer edges of the finished patio and are just touching the first string. First install the two strings parallel to the house, and use the line level to confirm they are level. The final string (parallel to the first string) will have the proper slope when it touches the intersecting strings.
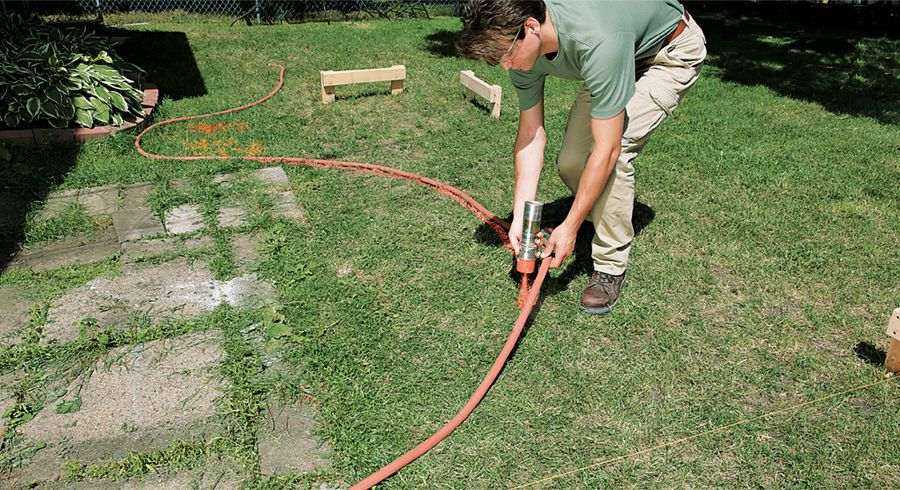
Variation: Use a rope or a garden hose to lay out curved or freeform patio edges. Mark the outline onto the ground with marking paint. Once you complete the subbase, you can repeat the process to guide the installation. Note: Curving patios still need a string layout to guide the excavation and base prep.
Make sure the string layout is perfectly square using the 3-4-5 squaring technique: starting at one of the string intersections, measure along one string and make a mark at 3 ft. (or a multiple of 3 ft.). Measure along the perpendicular string and mark at 4 ft. Measure between the two marks: the distance should equal 5 ft. If not, adjust the strings as needed until the measurements come out correctly. Repeat the process at the diagonally opposed corner. Mark the string positions onto the batterboard crosspieces.
Checking for Square 
The traditional 3-4-5 technique can also be used for larger multiples of 3, 4, and 5. This provides greater accuracy for larger patios. For example, use 6, 8, and 10 ft.
Alternatively, you can use a long tape to measure between opposing corners of the layout. When the measurements are equal, the layout is square.

Determine the finished height of the patio surface. If the patio abuts the house, the finished surface should be 1 to 3" below the typical threshold of an entry door. At the low end of the patio it’s desirable to have the finished surface rise at least 1" above the surrounding ground to facilitate drainage and prevent dirt and mud from washing onto the patio.

On your story pole, mark a top line for the distance from the string line (measured at the high edge of the patio) to the full excavation depth. A second line represents the distance from the string to the top of the compacted gravel base. Be sure to account for the thickness of the paving material and sand bed as needed.
Cut the sod along the project outline using a flat-end spade or a power lawn edger. To compensate for edging, extend the excavation about 6" beyond the finished patio outline. Reserve healthy sod for covering soil backfill behind the edging.
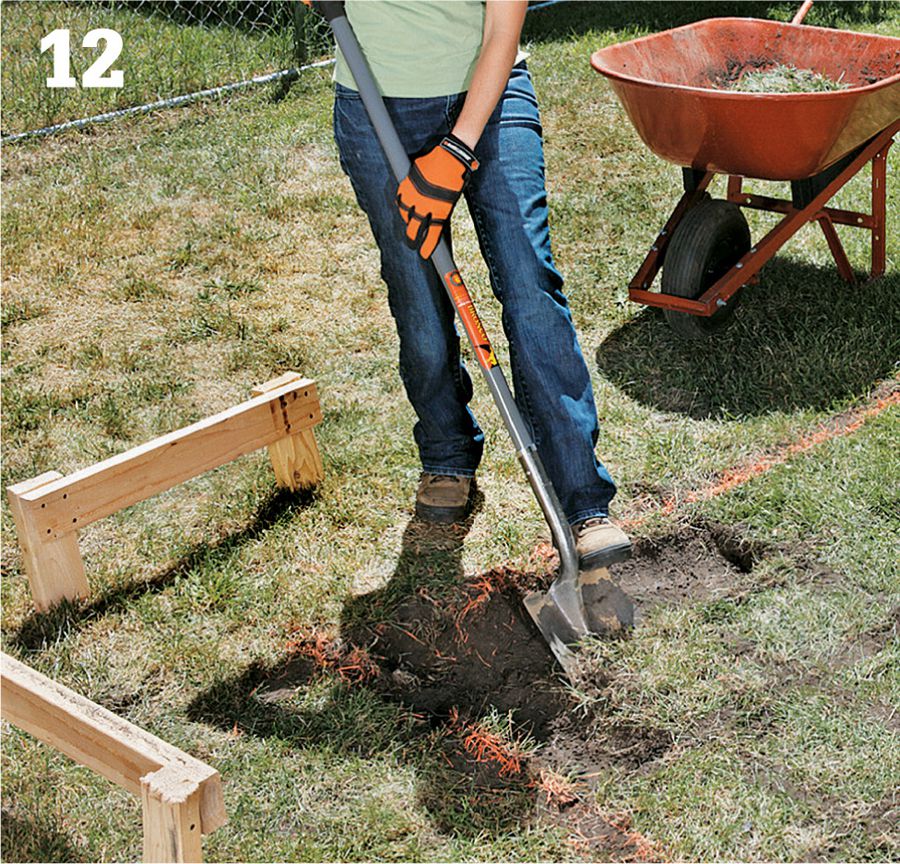
Strip the sod or vegetation inside the outlined area and then excavate the construction area to a depth that allows for a 6"-thick gravel subbase, a 1" layer of sand, and the paver thickness; account for the finished height aboveground also.

Grade and compact the soil. First use a bow rake to achieve the proper slope, and then compact the soil with a rented plate or hand tamper. Set up temporary cross strings for reference to simplify the excavation and the gravel installation later.

Use the story pole to check the depth as you work. Drive a pair of 2 × 2 stakes outside of the original string layout, and tie on the cross string so it’s just touching the layout strings. Check the depth at several points along the cross string, removing or adding soil as needed to achieve the proper depth. Once that’s done, move the cross string to the next section and repeat. Note: Thoroughly tamp any soil that’s been added to a low spot to minimize future settling. For the same reason, it’s best to use soil from the immediate area (instead of purchased topsoil) or fill low areas with compacted sand or gravel.
Variation: For loose-fill patios, install a layer of high-quality landscape fabric to inhibit weed growth before adding the gravel base. Overlap rows of fabric by at least 6". If desired, pin the fabric in place with U-shaped wire stakes.

Add the first layer of compactable gravel (or start with landscape fabric; see Variation this page). Dump wheelbarrow loads of gravel into evenly distributed pods, then spread out each pod in all directions with a shovel and a bow rake. Use the rake to create a flat, smooth surface.

Thoroughly tamp each layer of gravel before adding more, as needed. If using a hand tamper, compact the gravel in 2"-thick layers; if using a plate compactor, compact every 4" of gravel. Use cross strings and the story pole to check the gravel height as you work. A straight 2 × 4 also helps for smoothing gravel prior to compacting and for checking for high and low spots.

Extend a plumb bob from the layout strings to the base to mark the exact corners and edges of the finished patio for the surface installation. Mark each point with paint or a small stake. Find and mark the corners of the patio by hanging the plumb bob from each string intersection. Proceed to the installation portion of your project.
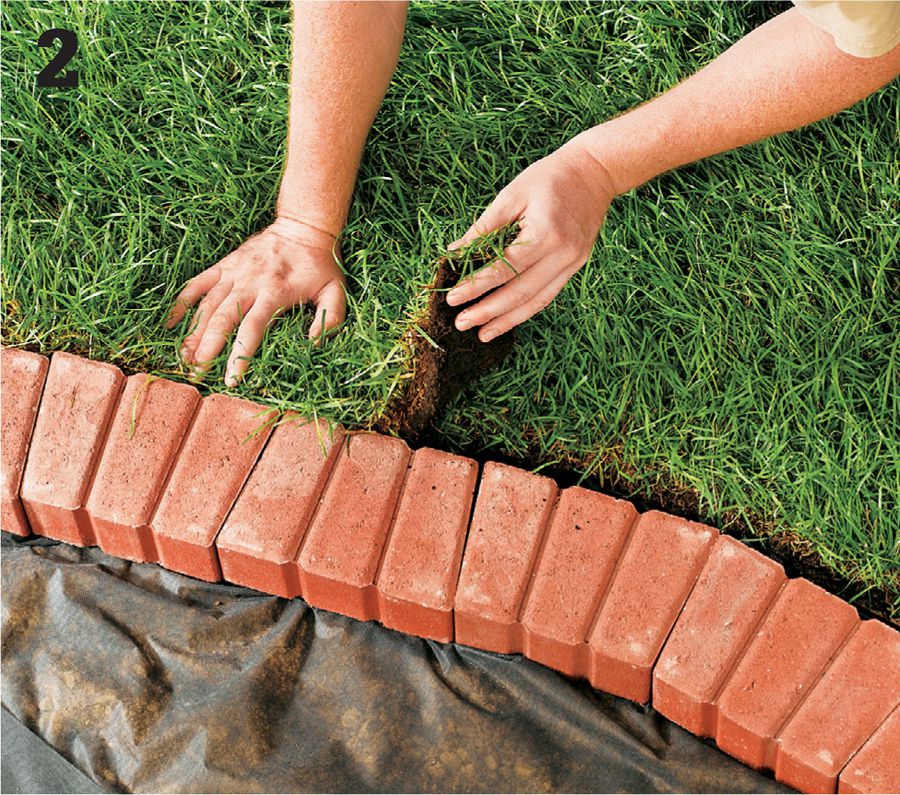
Patio EdgingEdging can play many different roles in patio and walkway design. Its most practical purpose is containment—keeping the surface material in place so paving doesn’t drift off into the yard. As a decorative feature, edging creates a visual border that adds a sense of order or closure to the path or patio space. This effect can be enhanced by edging with a material that contrasts with the surface material or can be made more subtle by using the same material, perhaps in a slightly different pattern. Finally, edging can serve to strengthen the patio or walkway as a hard, protective curb that stands up to years of foot traffic.
The best time to install edging depends on your application. For most sandset paving and loose material surfaces, edging is typically installed on top of the compacted gravel subbase. Edging along existing concrete slabs can be applied on top of the slab or along the sides, with the proper order determined by the finish materials.
To minimize the number of cuts required for paving, install edging after the patio surface is complete. You can also install two adjacent sides of edging to form a right angle, providing an accurate guide for starting the paver pattern, and then install the remaining two sides up against the laid pavers. A third option is to set up temporary 2 × 4 edging, which can be easily replaced with the real thing after the paving is finished.

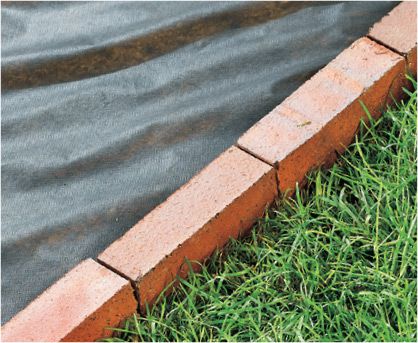
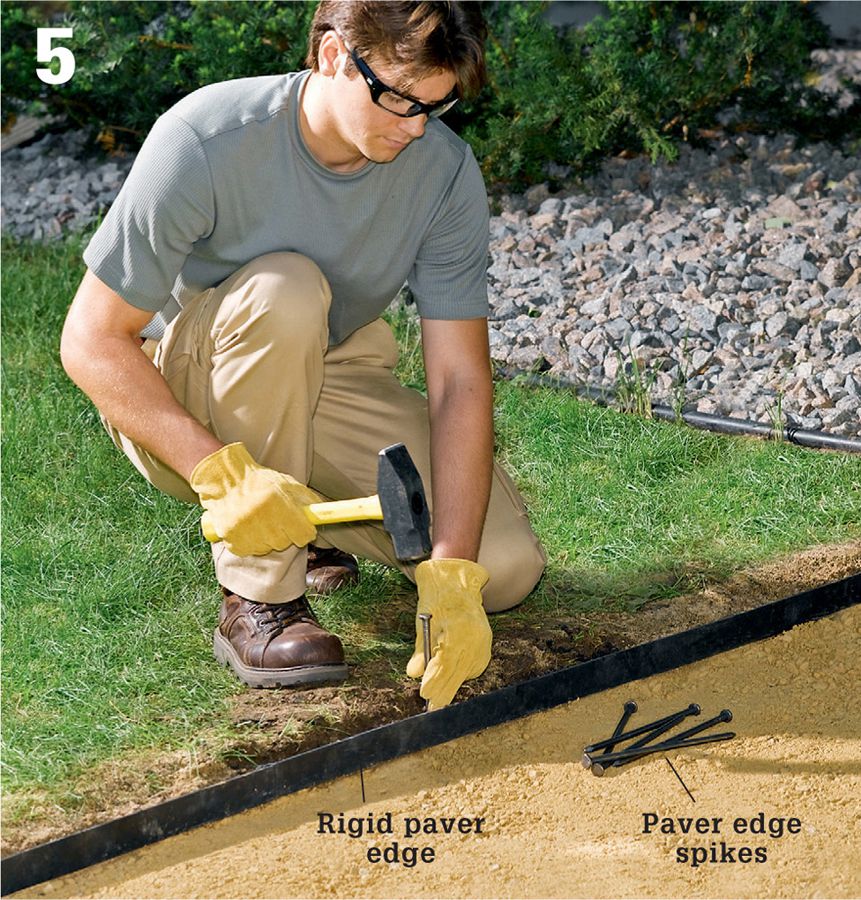
Install professional-grade paver edging along chalk lines (chalk lines are snapped directly below the outlines you’ve created with the mason’s strings). The paver edge should rest on the compacted gravel.
 Rigid Paver Edging
Choose heavy-duty edging that’s strong enough to contain your surface materials. If your patio or walkway has curves, buy plenty of notched, or flexible, edging for the curves. Also, buy 12-inch-long galvanized spikes: one for every 12 inches of edging plus extra for curves.
Tools & Materials
Maul
Snips or saw (for cutting edging)
Heavy-duty plastic edging
12" galvanized spikes
Invisible Edging
Invisible edging is so named for its low-profile edge that stops about halfway up the side edges of pavers. The exposed portion of the edging is easily concealed under soil and sod or groundcover.

Rigid plastic edging installs easily and works well for both curved and straight walkways made from paving stones or brick pavers set in sand.
How to Install Rigid Paver Edging
Set the edging on top of a compacted gravel base covered with landscape fabric. Using your layout strings as guides, secure the edging with spikes driven every 12" (or as recommended by the manufacturer). Along curves, spike the edging at every tab, or as recommended.
Cover the outside of the edging with soil and/or sod after the paving is complete. Tip: On two or more sides of the patio or path, you can spike the edging minimally, in case you have to make adjustments during the paving. Anchor the edging completely after the paving is done.
Brick Paver EdgingBrick edging can be laid in several different configurations (see below): on-end with its edge perpendicular to the paved surface (“soldiers”); on its long edges; or laid flat, either parallel or perpendicular to the paving. For mortared surfaces, brick can also be mortared to the edge of a concrete slab for a decorative finish (see pages 76 to 79 and 168 to 171).
Tools & Materials
Flat shovel
Rubber mallet
2 × 4 (about 12" long)
Bricks
Hand tamper
Garden spade
Work gloves
Gravel
Landscape fabric
Eye protection
Brick Edging Configurations

Brick soldier edging with ends upward
Brick set on long edges

Brick set on faces, edge-to-edge or end-to-end
How to Install Brick Paver Edging
Excavate the edge of the patio or walkway site using a flat shovel to create a clean, vertical edge. The edge of the soil (and sod) will support the outsides of the bricks. For edging with bricks set on-end, dig a narrow trench along the perimeter of the site, setting the depth so the tops of the edging bricks will be flush with the paving surface (or just above the surface for loose materials).

Set the edging bricks into the trench after installing the gravel subbase and landscape fabric. If applicable, use your layout strings to keep the bricks in line and to check for the proper height. Backfill behind the bricks with soil and tamp well as you secure the bricks in place. Install the patio surface material. Tap the tops of the bricks with a rubber mallet and a short 2 × 4 to level them with one another (inset).
Stone EdgingCut stone or dressed stone makes better edging than flagstone, which often has jagged edges that create an uneven border. Semi-dressed stone, with one or more flat sides, is a good option for a more natural look.
Tools & Materials
Rubber mallet
Maul
Stone chisel
Pitching chisel
Pointing chisel
Garden spade
Edging stones
Sand
Eye and ear protection
Work gloves
Mason’s hammer
Shovel
Gravel base
Landscape fabric
Trimming Stone
Trim irregular stones for a tight fit: first score a cutting line with a small stone chisel and maul, then complete the cut with a pitching chisel. Use a pointing chisel or the pick end of a mason’s hammer to knock off small bumps and smooth rough edges.
 How to Install Stone Edging
Excavate the patio or walkway site and dig a perimeter trench to accommodate the stone edging. Add the landscape fabric and then a gravel base, as required. Place each stone into the trench and tap it with a rubber mallet to set it into the gravel. Use your layout strings to keep the edging in line and at the proper height.

Backfill behind the stones with soil and tamp with a shovel handle or a board to secure the stones in the trench. If desired, fill the spaces between stones with sand or soil to help lock them together.
Concrete Curb EdgingPoured concrete edging is perfect for curves and custom shapes, especially when you want a continuous border at a consistent height. Keeping the edging low to the ground (about one inch above grade) makes it work well as a mowing strip, in addition to a patio or walkway border. Use fiber-reinforced concrete mix, and cut control joints into the edging to help control cracking.
Tools & Materials
Rope or garden hose
Excavation tools
Mason’s string
Hand tamp
Maul
Circular saw
Drill
Concrete mixing tools
Margin trowel
Wood concrete float
Concrete edger
1 × 1 wood stakes
1/4" hardboard
1" wood screws
Fiber-reinforced concrete
Acrylic concrete sealer
Eye and ear protection
Work gloves

Concrete edging draws a sleek, smooth line between surfaces in your yard and is especially effective for curving paths and walkways.
How to Install Concrete Curb Edging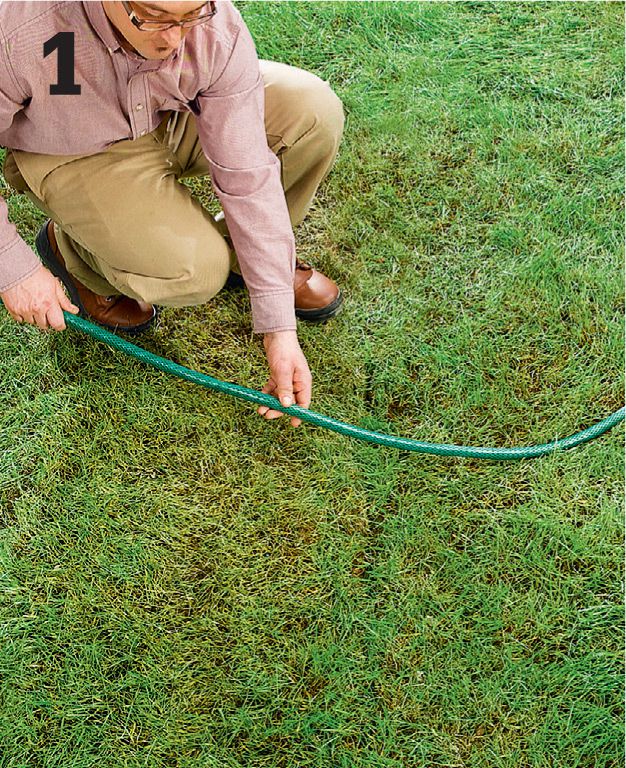
Lay out the contours of the edging using a rope or garden hose. For straight runs, use stakes and mason’s string to mark the layout. Make the curb at least 5" wide.

Dig a trench between the layout lines 8" wide (or 3" wider than the finished curb width) at a depth that allows for a 4"-thick (minimum) curb at the desired height above grade. Compact the soil to form a flat, solid base.

Stake along the edges of the trench, using 1 × 1 × 12" wood stakes. Drive a stake every 18" along each side edge.

Build the form sides by fastening 4"-wide strips of 1/4" hardboard to the insides of the stakes using 1" wood screws. Bend the strips to follow the desired contours.
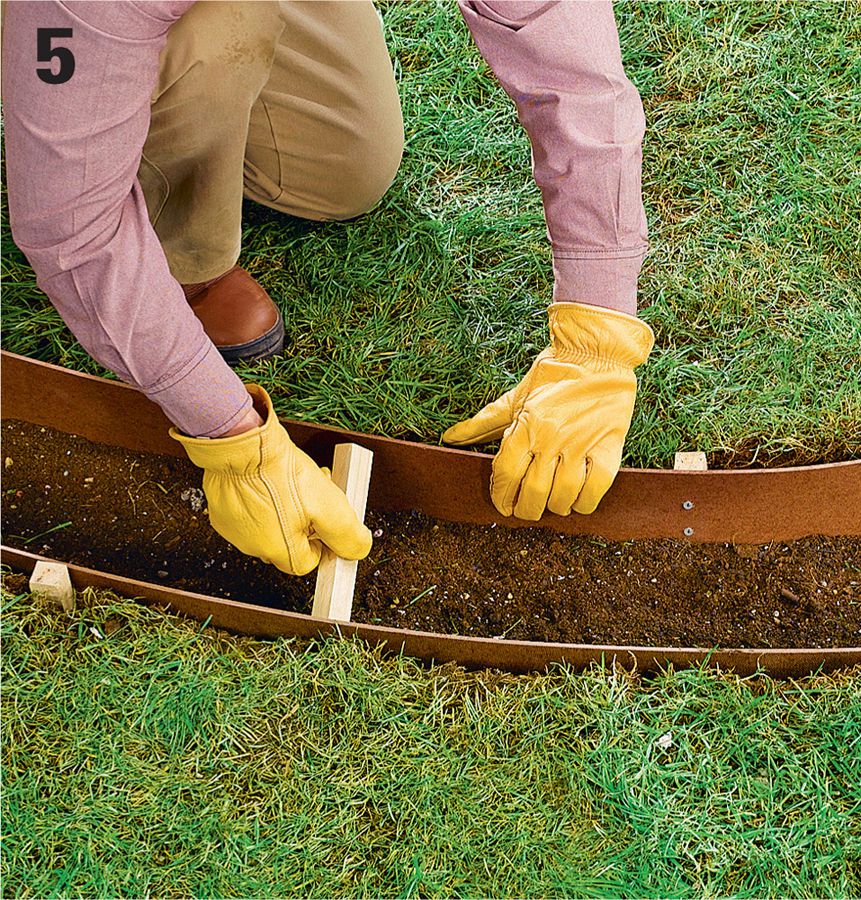
Add spacers inside the form to maintain a consistent width. Cut the spacers from 1 × 1 to fit snugly inside the form. Set the spacers along the bottom edges of the form at 3-ft. intervals.

Fill the form with concrete mixed to a firm, workable consistency. Use a margin trowel to spread and consolidate the concrete.

Tool the concrete: once the bleed water disappears, smooth the surface with a wood float. Using a margin trowel, cut 1"-deep control joints across the width of the curb at 3-ft. intervals. Tool the side edges of the curb with an edger. Allow to cure. Seal the concrete, as directed, with an acrylic concrete sealer, and let it cure for 3 to 5 days before removing the form.
Landscape Timber EdgingPressure-treated landscape or cedar timbers make attractive, durable edging that’s easy to install. Square-edged timbers are best for geometric pavers like brick and cut stone, while loose materials and natural flagstone look best with rounded or squared timbers. Choose the size of timber depending on how bold you want the border to look.
Tools & Materials
Excavation tools
Plate compactor (available for rent)
Maul
Reciprocating saw with wood-cutting and metal-cutting blades, circular saw, or handsaw
Drill and 1/2" bit
Compacted gravel
Landscape fabric
Sand (optional)
Landscape timbers (pressure-treated or rot-resistant species only)
1/2"-diameter (#4) rebar
Eye and ear protection
Lumber or timber edging can be used with any patio surface material. Here, this lumber edging is not only decorative, it also holds all of the loose material in place.
How to Install Timber Edging
During the site excavation, dig a perimeter trench for the timbers so they will install flush with the top of the patio or walkway surface (or just above the surface for loose material). Add the compacted gravel base, as required, including a 2 to 4" layer in the perimeter trench. Cut timbers to the desired length using a reciprocating saw with a long wood-cutting blade, a circular saw, or a handsaw.

Drill 1/2" holes through each timber, close to the ends and every 24" in between. Cut a length of 1/2"-diameter (#4) rebar at 24" for each hole using a reciprocating saw and metal-cutting blade. Set the timbers in the trench and make sure they lie flat. Use your layout strings as guides for leveling and setting the height of the timbers. Anchor the timbers with the rebar, driving the bar flush with the wood surface.
Lumber EdgingDimension lumber makes for an inexpensive edging material and a less-massive alternative to landscape timbers; 2 × 4 or 2 × 6 lumber works well for most patios and walkways. Use only pressure-treated lumber rated for ground contact or all-heart redwood or cedar boards to prevent rot. For the stakes, use pressure-treated lumber, since they will be buried anyway and appearance is not a concern.
Tools & Materials
Excavation tools
Circular saw
Compactable gravel
Drill
2 × lumber for edging
2 × 4 lumber for stakes
Wood preservative
Compacted gravel
Landscape fabric
Sand
2 1/2" galvanized deck screws
Eye and ear protection

Wood edging is a popular choice for simple flagstone or paver walkways and for patios with a casual look.
How to Install Lumber Edging
Excavate the patio site, and dig a perimeter trench for the boards so they will install flush with the top of the patio surface (or just above the surface for loose material). Add the gravel base, as required, including a 2 to 4" layer of gravel in the trench. Cut the edging boards to length, and seal the ends with wood preservative. Cut 2 × 4 stakes about 16" long. Set the edging boards in the trench and drive a stake close to the ends of each board and every 24" in between.

Fasten the boards to the stakes with pairs of 2 1/2" deck screws. Where boards meet at corners and butt joints, fasten them together with screws. Use your layout strings as guides for leveling and setting the height of the edging. Backfill behind the edging to support the boards and hide the stakes.
Sandset Brick PatioTraditional clay brick pavers set in sand make for one of the simplest yet most rewarding patio projects. The installation process is straightforward and, because there’s no mortar involved, you can complete the work at your own pace. The overall installation time depends on the patio’s design.
Square-edged patios require fewer cuts and thus less time than curved designs. But if you want something out of the ordinary, sandset brick is a good material to work with—the small units are perfect for making curves and custom features; even if you have a lot of cuts, you can make them quickly and accurately with a rented masonry saw.
To pave with any of the classic patterns, such as running bond or herringbone, you’ll start at one corner of your patio border or edging. To ensure accurate layout, check that the sides of the edging form a 90-degree angle at the starting corner. If you’re not using edging or any kind of formal border, set up mason’s strings to guide the brick placement.
If you go with clay brick without spacing lugs, use spacers cut from a sheet of 1/8-inch-thick hardboard to help set accurate sand-joint gaps as you lay the units.
Tools & Materials
Tape measure
Circular saw
Drill
Excavation tools
Mason’s string
Stakes
Line level
Plate compactor (available for rent)
Hand tamp
4-ft. level
Rubber mallet
Push broom
Brick paver units
Lumber (2 × 2, 2 × 4)
2 1/2" drywall screws
Compactable gravel
Work gloves
Professional-grade landscape fabric
U-shaped wire stakes (optional)
Rigid paver edging
1"-dia. pipe
Coarse sand
Straight 2 × 4
1/8" hardboard
Plywood scrap
Paver joint sand
Rake
Trowel
Masonry saw
Eye and ear protection
Maul
Galvanized spikes (for edging)

Brick pavers set in sand create a classic patio surface that’s more casual than mortared pavers. The inherent flexibility of the sandset finish allows for easy repair and maintenance or changes in the design over time. It also creates good drainage.
How to Install a Sandset Brick Patio
Set up batterboards and layout strings in a square or rectangle that’s about 1 ft. larger than the excavation area (see pages 42 to 47 for detailed steps on layout and site preparation). Measure to make sure the string layout is square, and set the strings to follow a 1/8" per foot downward slope in the desired direction using a line level for guidance. Mark the excavation corners with stakes. The edges of the excavation should extend about 6" beyond the finished patio footprint.

Remove all sod and vegetation inside the area, reserving healthy sod for patching in around the finished patio.

Excavate the area to a depth that allows for a 6"-thick gravel subbase, a 1" layer of sand, and the paver thickness; account for the desired height of the finished surface above the surrounding ground. Use cross strings and a story pole to check the depth as you work.

Add an even 3"-layer of compactable gravel over the entire site, and then tamp with a plate compactor. Repeat with another 3" layer. The completed 6" gravel base prior to compacting must be smooth and flat, and it must follow the slope of the layout strings.

Install a layer of high-quality landscape fabric. Overlap rows of fabric by at least 6". If desired, pin the fabric in place with U-shaped wire stakes.
Install rigid paver edging along two adjacent sides of the patio area, creating a perfect 90° corner. Option: If you’ve laid out the pavers and taken precise measurements, you can install edging along three or four sides of the patio, as desired. Trim the fabric along the back of the edging. Lay down lengths of 1"-dia. pipe in parallel lines about 3 to 6 ft. apart.

Add a 1"-thick layer of coarse sand. Smooth it out with a rake so it just covers the pipes. Dampen the sand with water, then pack it down lightly with a hand tamp.

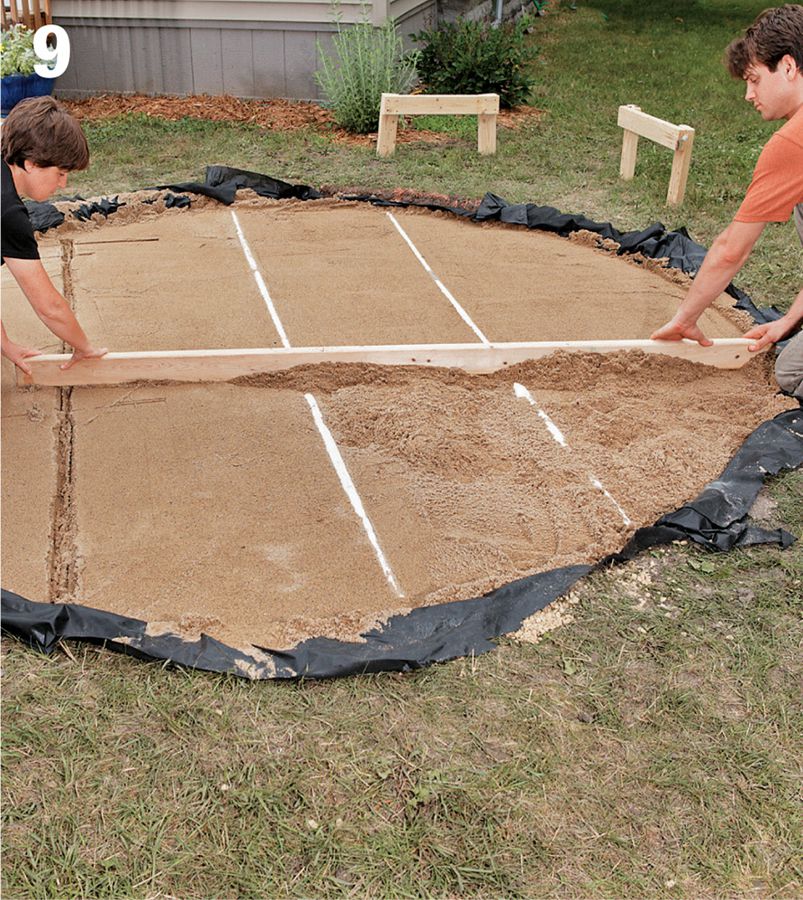
Screed the sand perfectly flat using a straight, long 2 × 4: rest the board on top of the pipes, and pull it backward with a side-to-side sawing motion. Fill in low spots with sand as you work. Dampen, tamp, and screed the sand again until the surface is smooth and flat and firmly packed. Remove the pipe(s) in the area where you will begin the paving.
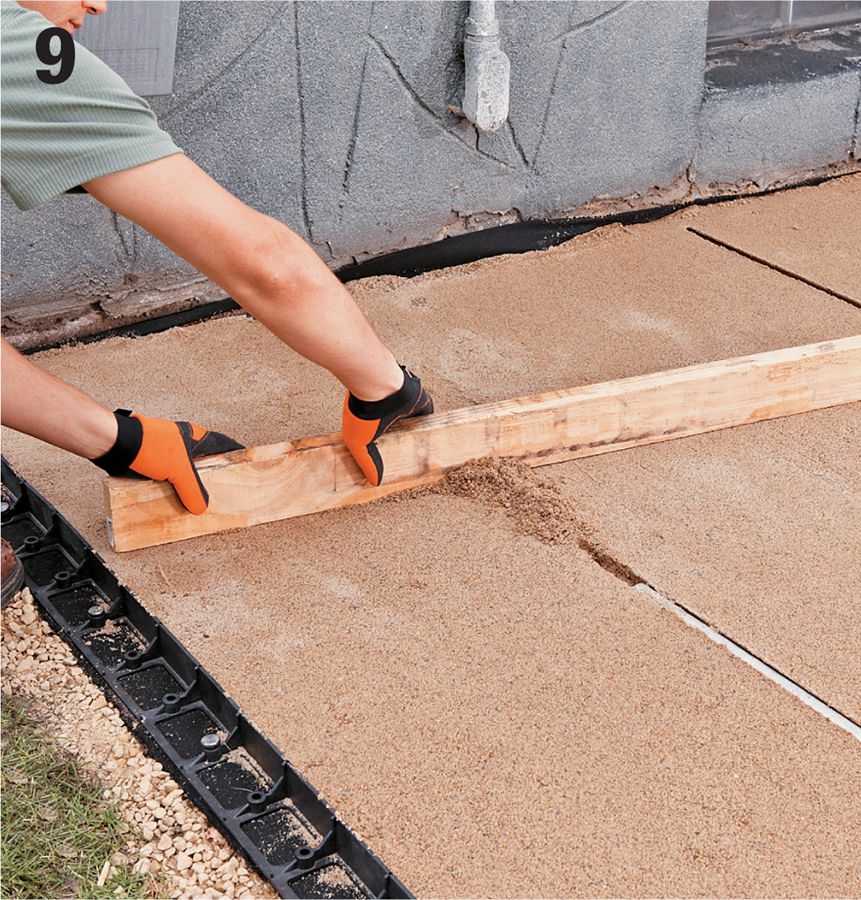
Fill the depression left by the pipe with sand, and then smooth it out with a short board or a trowel. Tamp the area with the hand tamp, and smooth again as needed so the filled-in area is perfectly flat. Note: Repeat this step as needed during the paving process.
Begin setting the border bricks, starting at the right-angle corner of the patio edging, using 1/8" hardboard spacers if necessary. Complete the border row that will be parallel to the first course of field brick, and continue several feet up the perpendicular side edge. For gentle curves, use full bricks set with slightly angled (wedge-shaped) sand joints; tighter curves require cut bricks for a good fit.

Set the first course of field brick. These bricks should be centered over the sand joints of the completed border row. Use a mason’s string tied between two bricks to align the leading edges of the first-course bricks. After setting several bricks, tap them with a rubber mallet to bed them into the sand layer. Complete the first field course, and then add some border units along the edge.

Snug a piece of edging against the installed brick and anchor it in place. Note: Install the remaining edging as the paving progresses. Continue setting the brick using the mason’s string and spacers for consistent spacing and alignment.
Cutting Pavers & Bricks
If your design requires cuts, use a masonry saw (tub saw). These water-lubricated cutting tools are available for rent at most building centers and stone yards.

Check each 4-ft. section for level to make sure the bricks are even across the top. Remove low or high bricks and add or remove sand beneath to bring them flush with the surrounding bricks. Work atop a plywood platform to prevent displacing the bricks. Complete the paving.

Variation: If your patio design includes curves or rounded corners, mark bricks for cutting curves by holding each brick in position and marking the desired cutting line onto the top face, then make the cuts with a masonry saw. For complex curves, it might be easier to leave off the border bricks and run the field brick long at the edges, then mark the curved cuts onto the field brick (see page 152).

Spread sand over the surface, then sweep the sand to fill the joints. Sweep the surface clean, and then tamp the surface with the plate compactor to settle the sand in the joints and lock the bricks in place.

Fill and tamp the sand joints one or more times until the joints are completely filled after compaction. Sweep up any loose sand.

Soak the surface with water and let it dry. If necessary, fill and tamp again, then hose off the surface and let it dry.
More Paver Patterns
90° herringbone patterns require bricks that are twice as long as they are wide. Start the pattern with two bricks set in the corner of your edging (edging must form a precise 90° angle). Add half-bricks next to the ends of the first two bricks. Complete the next row, zigzagging full bricks following the first row. Repeat the zigzag pattern for the remaining field bricks, adding half-bricks at the ends of rows as needed.

45° herringbone patterns require bricks that are twice as long as they are wide. Starting from a precise 90° corner, set the first row with two right-angle half-bricks. Complete the second row with two right-angle half-bricks flanking a full brick. Begin each remaining field row zig-zagging full bricks and finishing with right-angle half-bricks or trimmed bricks beveled at 45°.

Basketweave patterns require bricks that are twice as long as they are wide. To avoid cuts (on square or rectangular patios), you can install edging on only one side and use it as a baseline for the paving. Install the remaining three sides of edging after all bricks are laid. Snap a chalk line down the center of the sand bed, making sure it is perpendicular (90°) to the baseline edging. Working from the centerline out for each section, lay bricks in a pyramid shape, setting 12 bricks total in the first row, 8 in the second row, and 4 in the third row. Complete the paving by adding to each row incrementally to maintain the pyramid shape. This ensures that every row stems from the centerline to keep the layout straight.

Pinwheels allow you to avoid cuts (on square or rectangular patios) by installing edging on only two adjacent sides, starting from a precise 90° corner. Install the remaining edging after the paving is complete. Set each square pattern using four full bricks, as shown here, then fill the center cavity with a half-brick. For added accent, the centerpiece can be a unique color, but it must be the same thickness as the full bricks. Do not use a thinner brick for the center and compensate for the difference with additional sand; the brick will eventually sink and create an uneven surface.
These convenient interlocking pavers are made with DIYers in mind. They are easy to install and often come with fully plotted patterns for simple design preparation and installation.
Cobblestone Paver PatioConcrete pavers have advanced by leaps and bounds from the monochromatic, cookie-cutter bricks and slabs associated with first-generation versions. The latest products feature subtle color blends that lend themselves well to organic, irregular patterns. A tumbling process during manufacturing can further “age” the pavers so they look more like natural cobblestones. The technological advances in the casting and finishing processes have become so sophisticated that a well-selected concrete paver patio could look as suitable in a traditional European square as in a suburban backyard.
When choosing pavers for a patio, pick a style and blend of shapes and sizes that complements your landscape. Use the materials used on your house’s exterior and other stone or masonry in your yard to inform your decisions on colors and shade. Be aware that some paver styles require set purchase amounts, and it’s not always possible to return partially used pallets of material, so order carefully.
In this project, we lay a cobblestone patio that uses three sizes of pavers (see page 64). Such pavers may be purchased by a fraction of a pallet, or band, minimizing leftovers. We’ve also included a row of edge pavers to create a pleasing border around the patio. When shopping for your own patio materials, bring a drawing of your patio plans with exact measurements to your stone yard or landscape supplier. Based on your chosen pattern, the sales staff will be able to tell you how much stone in each size you’ll need to purchase.
The patio in this project was created using the following sizes and proportions of cobblestone concrete pavers:
Field pavers—70 percent 6 × 9" cobble rectangles, 30 percent 6 × 6" cobble squares
Border pavers—3 × 6" cobble rectangles
Tools & Materials
Excavation tools
Wheelbarrow
4-ft. level
Hand maul
Wood stakes
Chalk line
Mason’s string
Line level
Square-nose spade
1"-dia. metal pipes
2 × 4 lumber
Scrap plywood
Plate compactor
Masonry saw
Push broom
Concrete pavers
Compactable gravel
Coarse sand
Plastic edging and spikes
Joint sand
Eye and ear protection
Work gloves
Tape measure
Shovel
Cobblestones
Today, the word cobblestone more often refers to cast concrete masonry units that mimic the look of natural cobblestones. Although they are tumbled to give them a slightly aged appearance, cast concrete cobbles are more uniform in shape, size, and color. This is an advantage when it comes to installation, but purists object to the appearance.
 Cobblestone Paver Patio—Construction Details
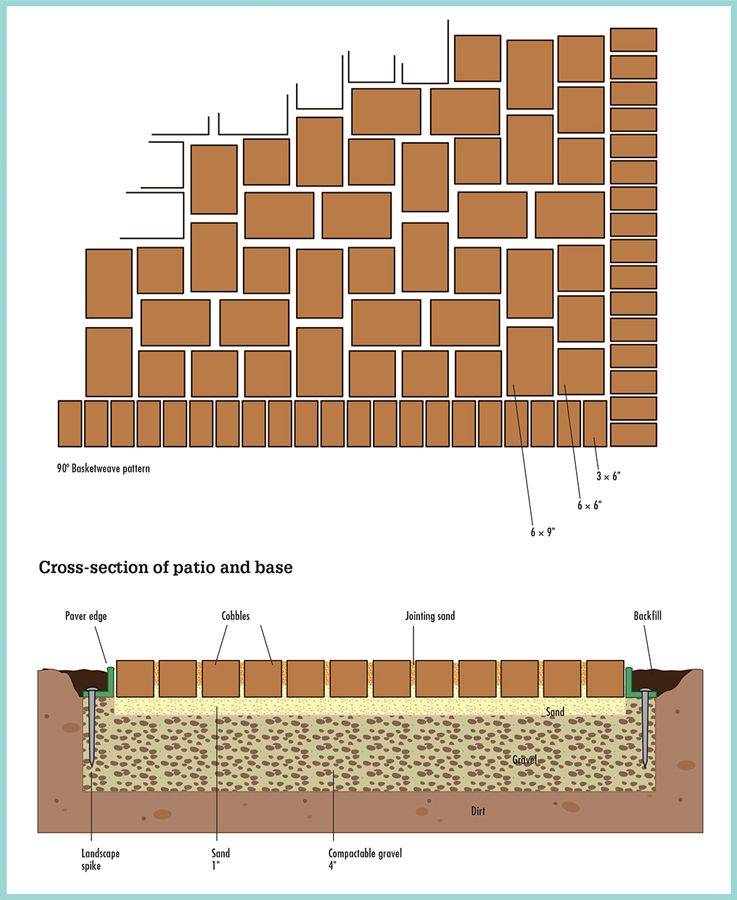 How to Build a Cobblestone Paver Patio
Mark the corners of the finished patio with stakes, and remove any sod or other plantings in the area. Set up grade stakes and mason’s strings to guide the excavation and establish a downward slope of 1/8" per foot away from the house foundation.

Variation: Use batterboards and mason’s strings to establish the layout of the project area. See pages 40 to 45 for detailed instructions.

Excavate the site to a depth that accommodates a 4" gravel subbase, a 1" layer of sand, and the thickness of the pavers (minus the desired height above the ground). Extend the excavation 6" beyond the patio footprint. Use the layout strings or grade stakes to check the depth and slope as you work. Tamp the soil with a plate compactor.

Add compactable gravel for a 4"-thick layer after compaction. Screed the gravel flat with a straight 2 × 4 and use a level or the layout strings to make sure the surface is properly sloped. Compact the gravel thoroughly with a plate compactor.
Set up a new string layout to guide the edging installation using stakes and mason’s string. The strings should represent the inside edges of the edging material. To make sure the layout has square corners, measure diagonally between the corners: the layout is square when the measurements are equal. See pages 40 to 45.
Install rigid paver edging along one side edge of the patio: snap a chalk line directly under the layout string along the edge, and then remove that string. Set the edging to the line and secure it with paver edge spikes, driving in the spikes only partially (in case you have to make adjustments later).

Lay lengths of 1"-dia. metal pipe in the project area to serve as screed guides. Fill the patio area with coarse building sand to the tops of the pipes. Screed the sand smooth and flat using a long, straight 2 × 4, pulling the board back and forth with a sawing motion. Remove the pipes, fill the voids with sand, and smooth the surface flat. Tip: Dampen the sand before screeding.
Set the pavers in the chosen pattern, starting at the 90° corner formed by the patio edging and an adjacent layout string (called the bond line). Lay border pavers along one or both edges before setting the field pavers. For now, simply lay the pavers in place; later, you will bed them into the sand with the plate vibrator.

Option: Use additional layout strings to help guide the paver pattern. Set up a string that is perpendicular to the bond line, using it to align courses every few feet. Tie equidistant strings between the corners and the end of the perpendicular string to assure a right angle with the bond line.
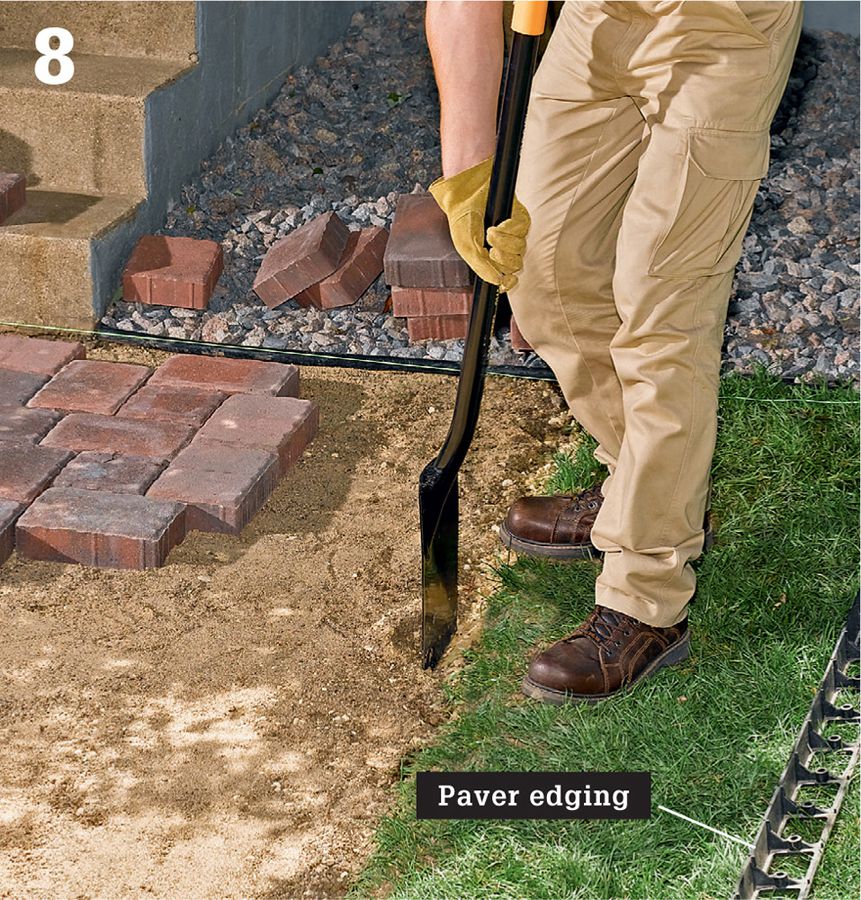
Install the remaining pieces of edging as you near the opposite side and end of the patio, leaving enough room for the final course of field pavers (plus border units, if applicable). Cut away the edges of the sand bed so the edging rests on the gravel base only. Tip: If you don’t need to cut pavers along the edges, you can install the edging after all of the pavers are laid.

Cut pavers to fit as needed to complete the paving using a rented masonry saw (also see Making Curves on page 68). It’s preferable to cut pavers a little too small than to have very tight fits; the joint sand will fill small gaps. With the paving complete, drive the edging stakes into the rigid edging to lock the pavers in place.
Sweep joint sand over the pavers using a push broom. Continue adding sand and sweeping until the joints between pavers are nearly filled to the top surface.
Tamp the patio surface with the plate compactor. Move the compactor in circular motions, working from the outside in and overlapping rings as you go. Repeat Steps 10 and 11 until the joints are completely filled after compaction. Note: Some paver manufacturers recommend sweeping excess sand from the pavers before compacting.
Making Curves
At rounded corners and curves, install border pavers (A) in a fan pattern with even gaps between the pavers. Gentle curves may accommodate full-sized border pavers, but for sharper turns you usually need to cut tapers into the paver edges so you don’t end up with wide gaps at the outside. When using border pavers in a curved layout, the field pavers will need to be trimmed to fit the odd spaces created where the field and borders intersect (B).


Choosing Pavers & Patterns
The number of purchasing options available when you shop for pavers makes it possible to create just about any patio layout pattern you can imagine. There is nothing stopping you from going wild and creating a layout that’s truly one-of-a-kind. Most landscape centers will also work with you to create a layout for your patio that employs tested design ideas and uses pavers in a very efficient manner and with as little cutting as possible.
Another option for DIY designers is to visit the website of the paver manufacturer (you should be able to get the information from your paver dealer). Many of these have applications where you can choose a basic style you like (such as the patterns shown here) and enter the size of your planned patio. You’ll receive a printout of what the pattern should look like, along with a shopping list for the materials you’ll need, all the way down to sand and spikes for your paver edging.

This basketweave pattern is made with squares and large rectangles. A border of small rectangles completes the design.

Cobblestone paving with squares and large and small rectangles create this circular pattern.
Circular Paver PatioConcrete pavers are available in a range of sizes and shapes, making it easy to create distinctive patterns without a lot of cuts. This circular patio is made with a complete set of shaped concrete pavers. To create a perfect circle, all you have to do is set the pavers following the manufacturer’s installation diagram, and no cuts are needed (although some sets have center pieces that must be cut before installation).
Circular paver sets are commonly sold in fixed starter sizes, and you can add units as needed to enlarge the circle. You may have to purchase additional pavers as complete sets or in full-pallet quantities and use only what you need. Circular pavers are ideal for building freestanding patios because their shape makes for a nice decorative feature.
As a design feature, a circle naturally draws the eye toward its center. This makes a circular patio the perfect setting for a round patio table and chairs or for highlighting a central decorative feature, such as a fountain or statuary. A circle is also the best configuration for creating an intimate seating area surrounding a fire pit. In addition to patio spaces, small circles can be used as landing areas along a curving paver walkway, while an open ring of circular pavers can be used as a border around a planting bed.
The patio in this project follows a standard sandset installation. Mortaring a patio like this would be far more difficult than sandsetting, due to the irregularity of the paver joints. For the sandset process, it’s easiest to lay the pavers first, and then install flexible plastic edging around the perimeter to lock the units in place. If your patio plan calls for numerous cuts, rent a masonry saw, or tub saw, for making the cuts. Otherwise, you can make a few cuts with a circular saw fitted with a masonry blade. Before you get started, it will help to review the detailed information on laying out the project site and preparing the gravel base (see pages 40 to 45).
Tools & Materials
Circular saw
Hammer
Drill
Excavation tools
Mason’s string
Line level
Plate compactor
Trowel
Flathead screwdriver
Shovel
Push broom
Circular paver units
16d nails
Duct tape
Lumber (2 × 2, 2 × 4)
Marking paint
2 1/2" drywall screws
Compactable gravel
Landscape fabric
1 or 1 1/2" pipe
Straight 2 × 4
Washed concrete sand
Scrap plywood
Plastic patio edging
Paver joint sand
Eye and ear protection
Work gloves
Tape measure

A circular patio is visually dynamic and its shape makes it uniquely suited to intimate outdoor dining and entertaining spaces. When shopping for pavers, ask about color and texture options. Some suppliers may allow you to mix and match finishes for a personalized look.
Circular Paver Materials

Most circular paver patios are made up of a few different paver shapes. The paver manufacturer should supply a detailed drawing showing the paver layout for each ring of the patio. Typically, the joints between pavers are offset with those of neighboring rings. If the pavers have mixed coloring, plan the layout carefully for the desired decorative effect.

Fan-shaped pavers offer an eye-catching twist on circular patio designs.

Combine paver sets to create intersecting circular patio sections for custom shaping and sizing. Consult the paver distributor to learn about altering standard circular layouts.
How to Install a Circular Paver Patio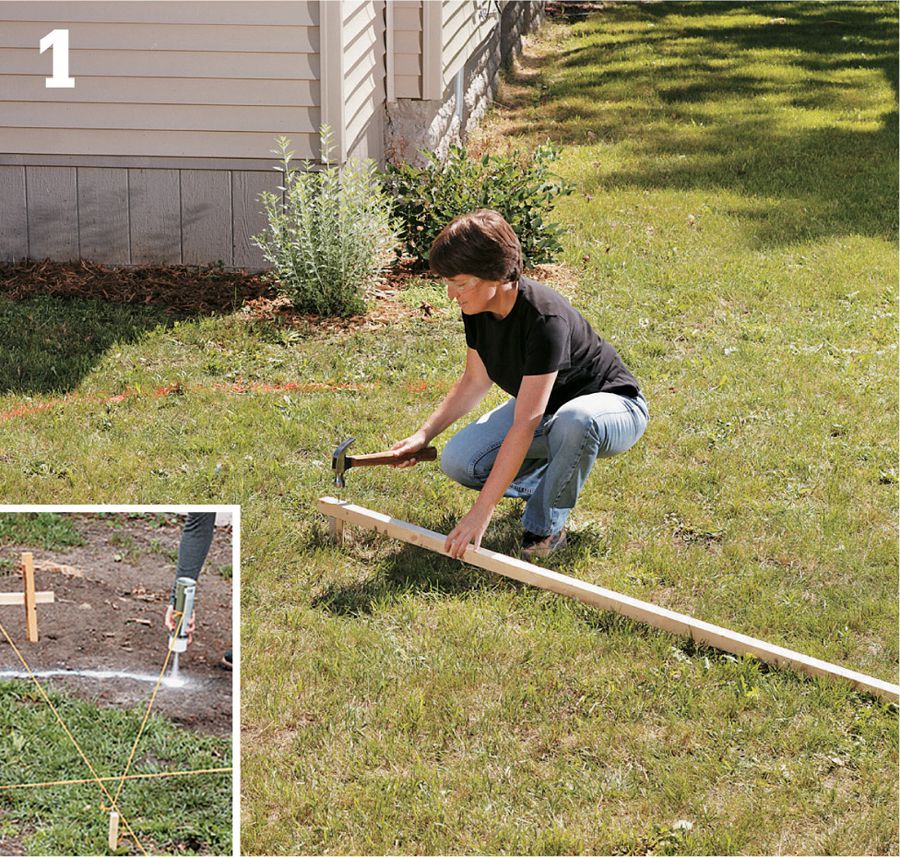
Create a center pivot for defining the patio layout. Drive a stake at the exact center of the desired location for the finished patio. Cut a straight 2 × 2 about 12" longer than the radius of the patio. Drill a large pilot hole at one end of the board, and fasten the board to the center of the stake with a single nail. Note: For large patio areas, use a string tied to a center nail instead of a board (inset).

Mark the ground for excavation. Measuring out from the nail, mark the board at a distance equal to the radius, plus 6". Tape a can of marking paint to the board so the spray nozzle is centered on the mark (inset). Spray a continuous line onto the ground while pivoting the board to create a complete circle. Set up batterboards and leveled layout strings in a square that’s about 1 ft. larger than the excavated area. Remove all sod and other vegetation inside the marked circle.

Measure diagonally between opposing corners and adjust the strings as needed until the measurements are equal (the layout is square). Slope two of the parallel layout strings at 1/4" per foot using the distance between the batterboards to calculate the drop distance generally dropping away from your house.

Excavate the site to the depth recommended by the paver manufacturer. Make sure the soil is smooth, well compacted, and properly sloped to 1/8" per foot.
Prepare the subbase with a 4" layer of gravel. Thoroughly compact the gravel with a plate compactor.

Check the depth with cross strings and a story pole as you work (shown). The completed base must be smooth and flat and follow the slope setting.

Install landscape fabric over the gravel subbase. Overlap the edges of fabric strips by 6". Trim the fabric as needed, leaving the ends a little long for now. Note: This helps keep the sand base in place longer.

Set two lengths of 1 "- dia. pipe on top of the landscape fabric so that one piece spans the full diameter of the gravel base and the other spans across the base about 1/4 of the way in from the side of the circle. Align the pipes parallel to each other. Fill half of the patio site with sand even with the tops of the pipes.
Use a straight 2 × 4 to screed the sand level with the pipes. Move the short pipe to the opposite side of the site to complete the other half of the sand layer. Remove the pipes and then fill all depressions with sand. Tip: Moisten sand prior to screeding.
Position the center paver, then measure out to the edge of the site in several places to confirm that it is centered. Tip: Work on top of a piece of plywood to avoid disturbing the sand bed.

Set the first ring of pavers around the center paver. Check their positions carefully, and make sure the spacing lugs are oriented correctly. If the pavers don’t have lugs, gap them according to the manufacturer’s specifications. Note: Do not hammer or tamp the pavers into the sand bed unless the manufacturer directs otherwise.

Set the remaining pavers, completing each ring according to your layout diagram. Be sure to offset the paver joints between rows. The pavers may be labeled, requiring them to be installed in a specific order as you work around the circle. After a sizable area is laid, work from your plywood platform set atop the pavers.

Install rigid paver edging along the patio’s perimeter. Set the edging on top of the gravel subbase but not the sand bed. Tip: Dampening the sand bed along the patio edge makes it easy to cut the sand away cleanly with a trowel before setting the edging.
Inspect the paving to make sure all joints are aligned properly and all gaps are consistent. Make minor adjustments to pavers as needed using a flathead screwdriver as a pry bar. Be careful not to mar the paver edges as you pry.

Shovel joint sand over the entire patio surface, then use a push broom to sweep the sand over the pavers to fill the joints. Repeat as needed until the joints are completely filled, then sweep off excess sand.
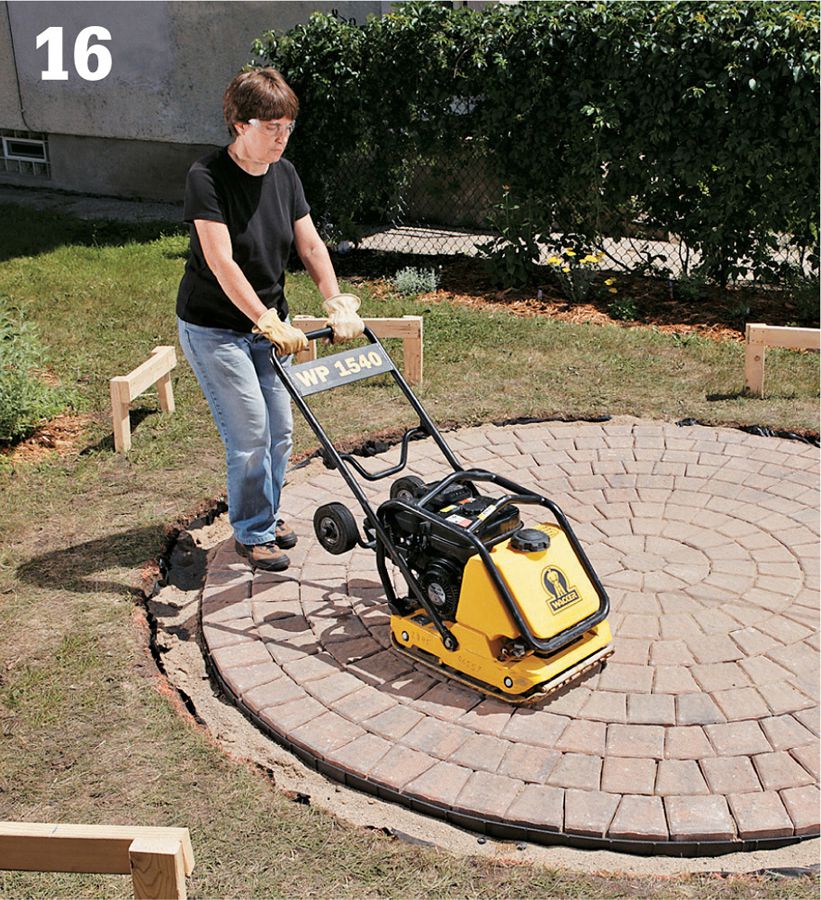
Set the pavers into the sand bed using a plate compactor. Make a first pass along the perimeter of the patio, then compact the interior with parallel back-and-forth passes, overlapping the preceding pass slightly as you go. Note: Avoid excessive tamping to prevent damage to the paver surfaces. Add another application of sand. Tamp the surface, but make the interior passes perpendicular to those of the first tamping runs.

Refill the joints with sand a final time and sweep the surface clean. Spray thoroughly with water to settle the joint sand.
Mortared Paver PatioSetting brick or concrete pavers into mortar is one of the most beautiful—and permanent—ways to dress up an old concrete slab patio. The paving style used most often for mortared pavers is the standard running bond pattern, also the easiest pattern to install.
Mortared pavers are appropriate for old concrete slabs that are flat, structurally sound, and relatively free of cracks. Minor surface flaws are generally acceptable, however existing slabs with significant cracks or any evidence of shifting or other structural problems will most likely pass on those same flaws to the paver finish. When in doubt, have your slab assessed by a qualified mason or concrete contractor to learn about your options.
Pavers for mortaring include natural clay brick units in both standard thickness (2 3/8 inch) and thinner versions (1 1/2 inch) and concrete pavers in various shapes and sizes. Any type you choose should be square-edged, to simplify the application and finishing of the mortar joints. When shopping for pavers, discuss your project with an expert masonry supplier. Areas that experience harsh winters call for the hardiest pavers available, graded SW or SX for severe weather. Also make sure the mortar you use is compatible with the pavers to minimize the risk of cracking and other problems.
Tools & Materials
Stiff brush or broom
Rented masonry saw
Mason’s trowel
Mortar mixing tools
4-ft. level
Rubber mallet
Mortar bag
Jointing tool
Pointing trowel
Concrete cleaner or pressure washer
Brick or concrete pavers
3/8 or 1/2" plywood
Spray bottle
Isolation board
Mortar
Burlap
Plastic sheeting
Notched board
Mason’s string
Straight 2 × 4
Eye and ear protection
Push broom
Work gloves

Nothing dresses up an old concrete patio like mortared pavers. The mortaring process takes more time and effort than many finishing techniques, but the look is timeless; and the surface is extremely durable.
How to Install a Mortared Paver Patio
Prepare the patio surface for mortar by thoroughly cleaning the concrete with a commercial concrete cleaner and/or a pressure washer. Make sure the surface is completely free of dirt, grease, oil, and waxy residue.

Mist the concrete with water to prevent premature drying of the mortar bed, and then mix a batch of mortar as directed by the manufacturer. Tip: Install isolation board along the foundation wall if the paving abuts the house; this prevents the mortar from bonding with the foundation.

Dry-lay the border pavers along the edge of the patio slab. Gap the pavers to simulate the mortar joints using spacers cut from plywood equal to the joint thickness (3/8 or 1/2" is typical). Adjust the pavers as needed to create a pleasing layout with the fewest cuts possible. Mark the paver locations on the slab and then set pavers aside.

Begin laying the border pavers by spreading a 1/2"-thick layer of mortar for three or four pavers along one edge of the patio using a mason’s trowel. Lay the first few pavers, buttering the leading edge of each with enough mortar to create the desired joint thickness. Press or tap each paver in place to slightly compress the mortar bed. If necessary, cut bricks with a rented masonry saw.
Remove excess mortar from the tops and sides of the pavers. Use a level to make sure the pavers are even across the tops, and check the mortar joints for uniform thickness. Tool the joints with a jointer as you go. Repeat the process to lay the remaining border pavers. Allow mortar to dry.

Option: To conceal the edges of a raised slab, build wood forms similar to concrete forms (see page 161). Set a gap between the forms and slab equal to the paver thickness plus 1/2".

Dry lay the field pavers without buttering them. Use the plywood spacers to set the gaps for mortar joints. Cut end pavers as needed with a rented masonry saw. Tip: Keep the courses straight by setting the pavers along a string line referenced from the border pavers. Remove dry-laid pavers.

Spread and then screed mortar for the field pavers. Trowel on a 1/2"-thick layer of mortar inside the border, covering only about 3 or 4 sq. ft. to allow for working time before the mortar sets. Screed the mortar to a uniform 1/2" thickness using a notched board set atop the border pavers (set the interior end on a lumber spacer, as needed).
As you work, check the heights of the pavers with a level or a straight 2 × 4 to make sure all units are level with one another. If a paver is too high, press it down or tap it with a rubber mallet; if too low, lift it out and butter its back face with mortar and reset it. Repeat steps 6 through 8 to complete the paver installation, and then let the mortar bed dry.

Fill the paver joints with fresh mortar using a mortar bag to keep the paver faces clean. Within each working section, fill the long joints between courses first, and then do the short joints between the paver ends. Overfill the joints slightly.

Tool the joints with a jointing tool—again, complete the long joints first and then fill the next section. As the mortar begins to set (turns from glossy wet to flat gray) in each tooled section, scrape off excess mortar with a pointing trowel, being careful not to smear mortar onto the pavers.

Let the mortar joints dry for a few hours, and then scrub the pavers with a wet burlap rag to remove excess mortar and any other residue. Cover the surface with plastic for 48 hours. Remove the plastic, and let the surface cure undisturbed for one week before using the patio.
Sandset flagstone patios blend nicely with natural landscapes. Although flagstone evokes a natural feel, the patio can appear rustic or formal. This patio has clean, well-tamped joints and straight, groomed edges along the perimeter that lends to a formal feel. Plantings in the joints or a rough, natural perimeter would give the same patio a more relaxed, rustic feel.
Sandset Flagstone PatioFlagstones make a great, long-lasting patio surface with a naturally rough texture and a perfectly imperfect look and finish. Randomly shaped stones are especially suited to patios with curved borders, but they can also be cut to form straight lines. Your patio will appear more at home in your landscape if the flagstones you choose are of the same stone species as other stones in the area. For example, if your gravel paths and walls are made from a local buff limestone, look for the same material in limestone flags.
Flagstones usually come in large slabs, sold as flagstone, or in smaller pieces (typically 16" or smaller), sold as steppers. You can make a patio out of either. Larger stones will make a solid patio with a more even surface, but the bigger ones can require three strong people to position, and large stones are hard to cut and fit tightly. If your soil drains well and is stable, flagstones can be laid on nothing more than a layer of sand. However, if you have unstable clay soil that becomes soft when wet, start with a 4-inch-thick foundation of compactable gravel (see pages 42 to 47) under your sand.
There are a few different options for filling the spaces between flagstones. One popular treatment is to plant them with low-growing perennials suited to crevice culture. For best results, use sand-based soil between flagstones when planting. Also, stick to very small plants that can withstand foot traffic. If you prefer not to have a planted patio, simply fill the joints with sand or fine gravel—just be sure to add landscape fabric under your sand base to discourage weed growth.
The following project includes steps for building a classic flagstone patio. You’ll also find instructions for building low dry stone walls, the ultimate add-on to a stone patio surface. If you’re new to working with natural stone, see pages 88 to 89 for some basic cutting tips.
Tools & Materials
Mason’s string
Line level
Rope or hose
Excavation tools
Spud bar
Broom
Stakes
Marking paint
1" (outside diameter) pipe
Coarse sand
Straight 2 × 4
Flagstone
Spray bottle
Stone edging
Sand-based soil or joint sand
Lumber (2 × 2, 2 × 4)
Drill
Mason’s trowel
Stiff-bristle brush
Circular saw with masonry blade
Plugs or seeds for groundcover
Eye and ear protection
Work gloves
3/4" plywood
3 1/2" deck screws
Pointing chisel
Pitching chisel
Stone chisel
Hand maul
Dust mask
Chalk or a crayon
Square-nose spade
Crushed stone
Ashlar
Mortar
Capstones
Adding a Stone Wall
A dry stone wall is a simple, beautiful addition to a flagstone patio. A wall functions as extra seating, a place to set plants, or extra countertop or tabletop space. It also provides visual definition to your outdoor space. See page 86 for how to build a stone wall.
Construction Details
Lay flagstones so their tops are approximately 1/2 to 1" above the surrounding ground. Because natural stones are not uniform in thickness, you will need to adjust sand or dirt beneath each flagstone, as needed.

A typical sandset patio has a layer of coarse sand for embedding the flagstones. A subbase of compactable gravel is an option for improved stability and drainage. The joints between stones can be filled with sand, gravel, or soil and plants. Edging material is optional.

Irregular flagstones look natural and are easy to work with in round layouts.

Flagstones that are cut into rectangular shapes can be laid in square or rectangular patterns with uniform gaps.
How to Build a Sandset Flagstone Patio
Outline the patio base using string and stakes for straight lines and/or a rope or hose for curves. The base should extend at least 2 to 4" beyond the edges of the flagstones, except where the patio will butt up to a wall. Transfer the outline to the ground with marking paint. Remove any sod and vegetation within the base area.
Set up layout strings to guide the excavation using stakes or batterboards (see pages 40 to 45 for detailed steps on layout and site preparation). Excavate the base to a depth of 2" plus the stone thickness plus 1/2 to 1". Slope the ground away from the house foundation at a rate of 1/4" per foot.

Lay sections of 1" pipe across the project area to serve as screed gauges. These allow you to strike off sand at a consistent depth when you drag a screed board over them. Note: Since large flagstones can be held in place adequately by the surrounding soil, edging for the patio is optional; it often looks best to allow neighboring groundcover to grow up to the edges of the stones. If you do plan to use edging, install it now.

Fill the site with coarse sand slightly above the screed gauges. With a helper, drag a straight 2 × 4 across the screed gauges to level off the sand. Use a screed board that’s long enough so that you can avoid stepping in the sand. Work the screed in a back-and-forth sawing motion. Remove the pipes once each section is finished, fill in the voids, and smooth the surface flat.
Arrange your flagstones into groups according to size and shape. As a general rule, start paving with the broadest stones and fill in around them with increasingly smaller pieces, but appearance and sight lines are also important: if there is one nice stone with a flat surface and good color, feature it in the center of the patio. Or, if some of the patio will be visible from the house, choose nicer stones for these areas.

Begin by laying large, thick stones around the perimeter of the patio. Leave a consistent gap of about 1" between stones by matching pieces like a puzzle and cutting and dressing stones as needed (see pages 88 to 89). The outer edge of the patio should form smooth curves (or straight lines) without jutting pieces or abrupt irregularities. Level stones as needed by prying up with a spud bar and adding or removing sand underneath.

Fill in around the larger stones with smaller pieces cut to fit the spaces, as needed, working from the outside in. After setting a band of stones a few courses wide, lay a 2 × 4 across the stones to make sure they’re level with one another. Add or remove sand below to adjust their height, and dampen the sand occasionally to make it easier to work with.

Fill the joints between stones with sand-based, weed-seed-free soil (see page 79). Sweep the soil across the patio surface to fill the cracks, and then water the soil so it settles. Repeat as needed until the soil reaches the desired level. Plant plugs or seeds for groundcover to grow up between the stones, if desired.
Variation: To finish the patio with sand instead of soil and plants, spread sand over the patio and sweep across the stones with a push broom to fill the joints. Pack the sand with your fingers or a piece of wood. Spray the entire area with water to help compact the sand. Let the patio dry. Repeat filling and spraying until the joints are full and the stones are securely locked in place.
Choosing Soil & Plants for Your Patio
Sand-based soil (also called “patio planting” soil) is the best material to use for planting between flagstones. This mixture of soil and sand sweeps easily into joints, and it resists tight compaction to promote healthy plant growth, as well as surface drainage. Regular soil can become too compacted for effective planting and drainage and soil from your yard will undoubtedly contain weeds. Sand-based soil is available in bulk or by the bag and is often custom-mixed at most large garden centers.
As for the best plants to use, listed below are a few species that tend to do well in a patio application. Ask a local supplier what works best for your climate.
• Alyssum | • Saxifrage |
• Rock cress | • Sedum |
• Thrift | • Thymus |
• Miniature dianthus | • Scotch moss |
• Candytuft | • Irish moss |
• Lobelia | • Woolly thyme |
• Forget-me-not | • Mock strawberry |

Patio “planting soil” (for planting between stones) is available in bulk or bags at most garden centers. It is good for filling cracks because the sand base makes it dry and smooth enough to sweep into cracks, yet the black compost will support plant growth. Because it is bagged, you can be assured it doesn’t come with weeds.
Building a Dry Stone Patio WallStone walls are beautiful, long-lasting structures that are surprisingly easy to build, provided you plan carefully. A low stone wall can be constructed without mortar, using a centuries-old method known as dry laying. With this technique, the wall is actually formed by two separate stacks that lean together slightly. The position and weight of the two stacks support each other, forming a single, sturdy wall. A dry stone wall can be built to any length, but its width must be at least half of its height.
You can purchase stone for this project from a quarry or stone supplier, where different sizes, shapes, and colors of stone are sold, priced by the ton. The quarry or stone center can also sell you type M mortar—necessary for bonding the capstones to the top of the wall.
Building dry stone walls requires patience and a fair amount of physical effort. The stones must be sorted by size and shape. You’ll probably also need to shape some of the stones to achieve consistent spacing and a general appearance that appeals to you.
It’s easiest to build a dry stone wall with ashlar—stone that has been split into roughly rectangular blocks. Ashlar stone is stacked in the same running bond pattern used in brick wall construction; each stone overlaps a joint in the underlying course. This technique prevents long vertical joints that weaken the structure and detract from its appearance.
A low dry stone wall is the perfect complement for a flagstone patio. Walls can enclose one or more sides of the patio or even provide seating along the perimeter. For comfortable seating, build your wall 16 to 18" tall and top it with smooth capstones for a flat, clean finish. In most cases, it’s easiest to build walls before laying the patio surface.
How to Build a Dry Stone Wall
Lay out the wall site, using stakes and mason’s string. Dig a 6"-deep trench that extends 6" beyond the wall on all sides. Add a 4" crushed stone subbase to the trench, creating a “V” shape by sloping the subbase so the center is about 2" deeper than the edges.

Select appropriate stones and lay the first course. Place pairs of stones side by side, flush with the edges of the trench and sloping toward the center. Use stones of similar height; position uneven sides face down. Fill any gaps between the shaping stones with small filler stones.
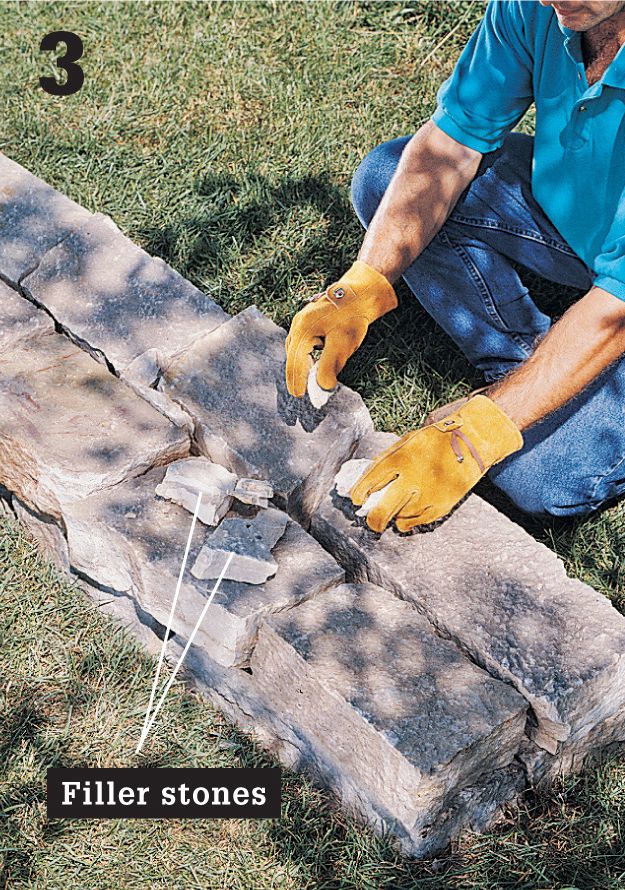
Lay the next course, staggering the joints. Use pairs of stones of varying lengths to offset the center joint. Alternate stone length, and keep the height even, stacking pairs of thin stones if necessary to maintain consistent height. Place filler stones in the gaps.

Every other course, place a tie stone every 3 ft. You may need to split the tie stones to length. Check the wall periodically for level.

Mortar the capstones to the top of the wall, keeping the mortar at least 6" from the edges so it’s not visible. Push the capstones together and mortar the cracks in between. Brush off dried excess mortar with a stiff-bristle brush. Add patio, if desired (see page 81).
You can cut most stone by placing it directly on a bed of flat, soft ground, such as grass or sand, that will absorb some of the shock when the maul strikes the chisel. If you plan to do a lot of cutting or splitting, construct a banker, a simple sand-bed table that provides a sturdy, shock-absorbent work surface (shown below).
For basic cuts and cleaning up stone faces (called dressing), the best tools are a pointing chisel, a pitching chisel, a basic stone chisel, and a hand maul. A circular saw also comes in handy for when you need a very straight edge or to help reduce the work of scoring many stones with a chisel. Always wear eye protection when cutting or dressing stone.

To build a banker for cutting stone, construct two square frames out of 2 × 2s, and sandwich a matching piece of 3/4" plywood between the frames. Fasten the pieces together with 3 1/2" deck screws driven through both sides. Fill one side of the banker with sand to complete the work surface.
Cutting Stone with a Circular Saw
A circular saw lets you precut stones with broad surfaces with greater control and accuracy than most people can achieve with a chisel. It’s a noisy tool, so wear earplugs, along with a dust mask and safety goggles. Install a toothless masonry blade on your saw and start out with the blade set to cut 1/8" deep. (Make sure the blade is designed for the material you’re cutting. Some masonry blades are designed for hard materials like concrete, marble, and granite. Others are for soft materials, like concrete block, brick, flagstone, and limestone.) Wet the stone before cutting to help control dust, then make three passes, setting the blade 1/8" deeper with each pass. Repeat the process on the other side. A thin piece of wood under the saw protects the saw foot from rough masonry surfaces. Remember: always use a GFCI outlet or extension cord when using power tools outdoors.
How to Cut Flagstone
Mark the stone for cutting on both sides using chalk or a crayon. If there is a fissure nearby, mark your line there, since the stone will likely break there naturally. Note: To prevent unpredicted breaks when cutting off large pieces, plan to chip off small sections at a time.
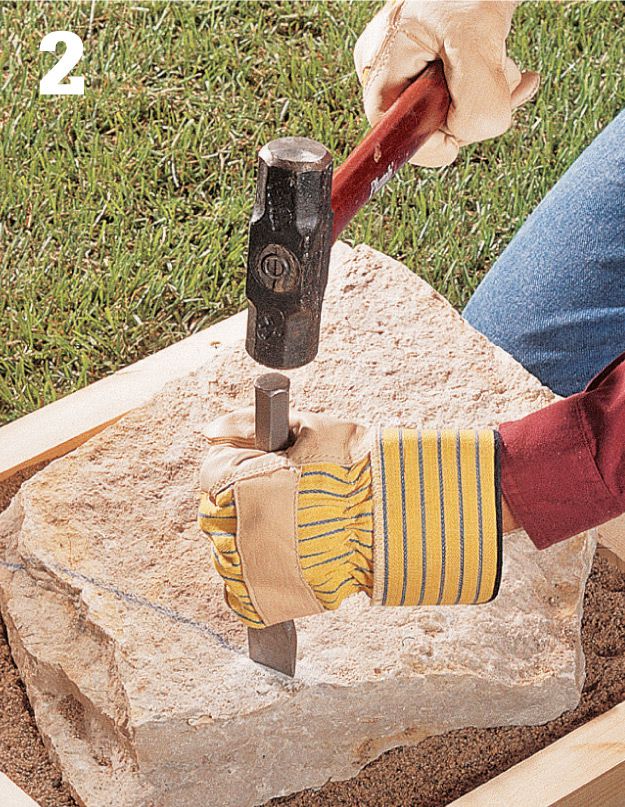
Score along the cut line on the backside of the stone (the side that won’t be exposed) by moving a stone chisel along the line and striking it with moderate blows with a maul. As an alternative, you can do this step with a circular saw.

Break the stone to complete the cut: first, turn the stone over and rest it on a metal pipe or a 2 × 4 so the scored edge is directly over the support. Then, strike forcefully near the end of the waste portion to break the stone along the cut line.
Dressing Stones for Walls
Laying stones works best when the sides (including the top and bottom) are roughly square. If a side is sharply skewed, score and split it with a pitching chisel, and chip off smaller peaks with a pointing chisel or mason’s hammer. Remember: a stone should sit flat on its bottom or top side without much rocking.

“Dress” a stone using a pointing chisel and maul to remove jagged edges or undesirable bumps. Position the chisel at a 30 to 45° angle at the base of the piece to be removed. Tap lightly all around the break line, then more forcefully, to chip off the piece. Position the chisel carefully before each blow with the maul.
Mortared Flagstone PatioWith its permanent, solid finish, mortared flagstone provides a more formal patio setting than sandset stone. It also has a cleaner feel, because there’s no sand to get kicked up out of the joints. Yet the mortared application offers the same organic appeal and dramatic lines of any natural flagstone surface. You can achieve an even more formal look with cut flagstone installed in a grid layout.
The proper base for mortaring flagstone is a structurally sound concrete slab. If you’re covering an old concrete patio, inspect the slab for signs of structural problems. Wide cracks and uneven surfaces indicate shifting soil or an insufficient subbase. This movement most likely will continue, leading to cracks in your new stone surface. You should remove the old slab and pour a new one or consider sand-setting the stone over the slab.
One of the nice things about mortaring stone over concrete is that you don’t need edging to contain the stones. This gives you the option of leaving the edges rough to enhance the natural look, or you can hang the outer stones over the edges of the slab to conceal the concrete below.
Tools & Materials
Paint roller
Stone chisel
Maul
Circular saw with masonry blade
Mortar box or wheelbarrow
Masonry hoe
Mason’s trowel
Concrete float
Rubber mallet
4-ft. level
Straight 2 × 4
Grout bag
Stiff-bristle brush
Sponge or coarse rag
Jointing tool
Whiskbroom
Concrete bonding agent
Mortar
Flagstone
Stone sealer (optional)
Eye and ear protection
Work gloves
Concrete cleaning supplies
Chalk
Tape measure
Acrylic fortifier
Loose gravel and small rocks

The flagstone patio is a classic element of modern landscape design. Bluestone (above) is one of the most popular types, but may not be available in all areas since specific types vary by region.
How to Build a Mortared Flagstone Patio
Thoroughly clean the concrete slab. While the slab doesn’t need to be in perfect condition, it does need to be sound. Repair large cracks or holes. After repairs have cured, apply a latex bonding agent to the patio surface, following the manufacturer’s instructions.

Once the bonding agent has set up per the manufacturer’s recommendations, dry-lay stones on the patio to determine an appealing layout. Work from the center outward and evenly distribute large stones and smaller ones, with 1/2 to 1" joints between them.

Cut stones to size as needed: mark the cutting lines with chalk, then cut the stones with a stone chisel (or circular saw) and maul (see pages 88 to 89 for tips on cutting stone).

Variation: For a more rustic appearance, allow stones to overhang the edges of the slab. Stones thicker in size can overhang as much as 6", provided that the slab supports at least two-thirds of the stone. Thinner stones should not overhang more than 3". After stones are mortared in place, fill in beneath the overhanging stones with soil.
Mix a stiff batch of Type N or S mortar, following the manufacturer’s directions. Starting near the center of the patio, set aside some of the stone, maintaining the layout pattern. Spread a 2"-thick layer of mortar onto the slab using a concrete float.

Firmly press the first large stone into the mortar, in its same position as in the layout. Tap the stone with a rubber mallet or the handle of the trowel to set it. Use a 4-ft. level and a scrap 2 × 4 to check for level; make any necessary adjustments.

Using the first stone as a reference for the course height, continue to lay stones in mortar, working from the center of the slab to the edges. Maintain 1/2 to 1" joints.

Check for level often as you work, using a straight length of 2 × 4 and the 4-ft. level. Tap stones to make minor adjustments. Once you’re done, let the mortar set for a day or two before walking on it or grouting.
Use a grout bag to fill the joints with mortar (add acrylic fortifier to the mix to make the mortar more elastic). Do not overfill the joints. Pack loose gravel and small rocks into gaps first to conserve mortar and make stronger joints. Wipe up spilled mortar.

Once the mortar is stiff enough that your thumb leaves an impression without mortar sticking to it, rake the joints just enough so the mortar is even with the surface of the stone, so water cannot pool. Use a whisk broom to shape the mortar.

Allow the mortar to cure for a few days, then clean the patio with water and a stiff-bristle brush. After the mortar cures for a week, apply a stone sealer, following the manufacturer’s instructions.
The moldable nature of poured concrete makes it ideal for creating patios with curves and custom shapes in addition to perfect squares and rectangles. If your patio plans call for a neighboring concrete walkway, see pages 158 to 163.
Concrete Slab PatioFew outdoor surfaces are as heavy-duty as a properly poured concrete slab. As a patio material, poured concrete is tough to beat. The surface is flat, smooth, easy to clean, and about as close to maintenance-free as you can get. A concrete slab is also the best foundation for permanent finishes like mortared brick, tile, and stone. And if you like the simplicity and durability of a bare concrete patio but flat gray doesn’t suit your design scheme, you can always apply an acid stain, dry pigment colors, or concrete paint (rated for exterior use) for custom coloring effects without compromising the surface’s performance.
If you’ve never worked with poured concrete before, you’ll find that most of the work lies in preparing the site and building the forms for containing and shaping the wet concrete. Once the concrete is mixed or delivered to your site, time is of the essence, and the best way to ensure quality results is to be prepared with strong forms, the right tools, and an understanding of each step of the process. And it never hurts to have help: you’ll need at least two hardworking assistants for the placing and finishing stages.
This patio project follows the steps for building a small (100 square feet or so) slab that can be poured and finished all at once. The patio featured here is a circular, freestanding structure slightly more than 10 ft. in diameter. If you are building a patio of any shape that abuts your house, always isolate it from the house with an isolation board and slope the surface so water drains away from the foundation. A smaller slab is much more manageable for amateurs. Larger slabs often require that you place and tool the wet concrete in workable sections, and these steps must continue simultaneously until the entire slab is filled and leveled before the concrete begins to set. Therefore, it’s a good idea to seek guidance and/or assistance from a concrete professional if your plans call for a large patio.
Because they are permanent structures, concrete patios are often governed by local building codes, and you might need a permit for your project—especially if the patio abuts a permanent structure. Before you get started, contact your city’s building department to learn about permit requirements and general construction specifications in your area, including:
• Zoning restrictions
• Depth of gravel subbase
• Concrete composition
• Slab thickness and slope
• Internal reinforcement (wire mesh, rebar, etc.)
• Control joints
• Moisture barrier under slab (not a common requirement)
Concrete Coverage
Volume |
Slab Thickness |
Surface Area |
1 cubic yard |
2" |
160 square feet |
1 cubic yard |
3" |
110 square feet |
1 cubic yard |
4" |
80 square feet |
1 cubic yard |
5" |
65 square feet |
1 cubic yard |
6" |
55 square feet |
1 cubic yard |
8" |
40 square feet |
Drill
Circular saw
Hand maul or sledgehammer
Mason’s string
Stakes
Marking paint
Line level
Excavation tools
Bow rake
Level
Plate compactor or hand tamper
Eye protection
Plumb bob
Chalk line
Hammer
Hardboard lap siding
Bolt cutters
Concrete mixing tools
Shovel or masonry hoe
Wheelbarrow
Bull float
Edger
1" groover
Magnesium trowel
Push broom
Lumber (1 × 2, 2 × 4)
Compactable gravel
Screws
6 × 6" 10/10 welded wire mesh
Tie wire
2" wire bolsters
Work gloves
Square-nose spade
Safety protection
Isolation board and construction adhesive
Concrete form release agent
4,000 psi concrete (or as required by local code)
Clear polyethylene sheeting
Lawn edger (available for rent)
Construction Details
Well-constructed forms and properly-prepared foundational elements will ensure your slab is structurally sound.
When is Concrete Ready to Finish?
Floating wet concrete causes the heavy materials in the mix to sink below the surface, leaving a layer of water—know as bleed water—on the surface. To achieve an attractive and durable finish, let the bleed water disappear before proceeding with the final finishing steps (edging, control joints, and finish troweling). How long this takes depends on the air temperature, humidity, and sun exposure; you just have to watch and wait.
Once the bleed water dries, test the concrete for hardness by stepping on it: if your foot sinks in no more than 1/4", the concrete is ready for finishing. Be extra diligent with any areas exposed to the sun or wind, as they can dry much faster than other spots. Note: Air-entrained concrete (commonly used for cold-weather pours) doesn’t show bleed water, so you have to rely on the step test to know when it’s time to start finishing.
How to Build a Round Concrete Patio
Establish layout lines for the site excavation using batterboards, mason’s string, and inverted marking paint. Set the lines so they reach at least 12" beyond the work area on all sides. Plan for the gravel base to extend 12" beyond the slab. Use two pairs of perpendicular batterboards with strings to establish the centerpoint of a round patio (where the strings intersect). To create a rough outline for the patio excavation, drive a stake at the centerpoint and then attach a string to the top of the stake. Tape the other end of the string to a can of inverted marking paint so the distance from the stake to the can equals the radius of the circle, including the gravel base; mark the outline.

Cut the sod on the perimeter of the excavation area to define where to dig. For better access, first remove the batterboards (or at least the strings). A lawn edger works well for cutting the outline into the sod (be sure to wear safety equipment).

Excavate the site for a 6 to 8"-thick compactable gravel subbase plus any sub-grade (below ground level) portion of the slab. If building next to your house, grade the soil so it slopes away from the house at 1/8" per foot. Measure down from the leveled cross strings with a story pole to gauge the depth as you work. Compact the soil after grading using a plate compactor or a hand tamper.
If your patio will butt up to a house or another permanent structure, you should use the house or structure as your starting point for setting slope and establishing a patio layout. Snap a chalk line onto the house foundation at the precise elevation of the top of the finished slab. This should be 1 to 3" below any patio door threshold. You can use this line for reference during the site prep, the concrete pour, and finishing.


Fill the excavation area with a 4"-thick layer of compactable gravel. Use an upside-down bow or garden rake to move the rock around. Rake the rock until it is level and follows the grade of the soil base.

Use a plate compactor to tamp the first 4" of graded compactable gravel. Add another 2 to 4" layer of gravel until the top surface will compact to the finished level. Use cross strings and the story pole to make sure the subbase is uniform and follows the 1/8" per ft. slope. Tamp until the gravel is compacted and at the correct height relative to your lines.
Set level lines for the form height. Replace batterboards and retie the mason’s lines so they are level. If you are making a circular patio, as seen here, add intermediate stakes between the batterboards and the tie lines to divide the circle into at least eight segments. Drop a plumb bob from the point where the lines intersect, and drive a stake at this centerpoint. Use this stake to create a string guide and redraw the patio outline (inset).

Drive stakes for anchoring the forms around the perimeter of the patio, just outside the outline. Drive the stakes deep enough that they will be beneath the tops of the forms. Use a hand maul or sledgehammer to drive the stakes. To prevent them from splitting, use a scrap 2 × 4 as a hammer block to absorb the blows. Drive a stake at each point where a string intersects the patio outline.

Install forms. Here, 7/16"-thick pieces of hardboard lap siding have been rip-cut into 3 1/2" strips to make bendable forms. Cut each strip long enough to span three stakes as it follows the patio outline. Screw the strip to the middle stake first, making sure the top is the correct distance down from the layout string. Bend the form to follow the outline and attach it to the other stakes.

Drive stakes behind the forms anywhere where the strips require additional bending or anchoring to follow the round outline. Attach the forms to the stakes. Note: If you are installing straight 2 × 4 forms, drive screws through the outsides of the stake and into the form boards to make them easier to remove later.
Lay wire mesh over the gravel base, keeping the edges 1 to 2" from the insides of the form. Overlap the mesh strips by 6" and tie them together with tie wire. Prop up the mesh on 2" wire bolsters placed every few feet and tied to the mesh with wire. If required, install isolation board along the house foundation.

Place 4000 psi concrete in the form, starting at the side furthest from the concrete source. Before pouring, construct access ramps so wheelbarrows can roll over the forms without damaging them, and coat the insides of the form with a release agent or vegetable oil to prevent the forms from sticking. Distribute the concrete with a shovel or masonry hoe. As you fill, hammer against the outsides of the forms to eliminate air pockets.

Screed the surface with a long, straight 2 × 4: have two people pull the board backward in a side-to-side sawing motion, with the board resting on top of the form. As you work, shovel in extra concrete to fill the low spots or remove concrete from high spots, and re-screed. The goal is to create a flat surface that’s level with the top of the form.

Float the concrete surface with a bull float: without applying pressure, push and pull the float in straight, parallel passes, overlapping each pass slightly with the next. Slightly tip up the leading edge of the float to prevent gouging the surface. Stop floating once the surface is relatively smooth and has a wet sheen. Be careful not to over-float, indicated by water pooling on the surface. Allow the bleed water to disappear.
Use an edger to shape all edges of the slab that contact the wood form. Carefully run the edger back and forth along the form to create a smooth, rounded corner. Slightly lift the leading edge of the tool as needed to prevent gouging.

Cut a control joint (if required) using a 1" groover guided by a straight 2 × 4. In most cases, you’ll need to erect a temporary bridge to allow access for cutting in the center of the patio. Take great care here. Be sure to cut grooves while concrete is still workable. Make several light passes back and forth until the groove reaches full depth, lifting the leading edge of the tool to prevent gouging.

Flatten ridges and create a smooth surface with a magnesium trowel. This will create a smooth surface that takes a finish well once the concrete has dried. Another finishing option is simply to skip the additional floating. Then, before the concrete dries completely, brush lightly with a push broom to create a nonslip “broomed” surface.

Cure the concrete by misting the slab with water, then covering it with a single piece of polyethylene sheeting. Smooth out any air pockets (which can cause discoloration), and weight the sheeting along the edges. Mist the slab and reapply the plastic daily for 1 to 2 weeks.
Tiled Concrete SlabOutdoor tile can be made of several different materials and is available in many colors and styles. Using natural stone tiles with different shapes and complementary colors, as demonstrated in this project, is a great way to draw attention to the elegant surface. Tile manufacturers may offer brochures giving you ideas for modular patterns that can be created from their tiles. Make sure the tiles you select are intended for outdoor use.
When laying a modular, geometric pattern with tiles of different sizes, it’s crucial that you test the layout before you begin and that you place the first tiles very carefullly. The first tiles will dictate the placement of all other tiles in your layout.
You can pour a new concrete slab on which to install your tile patio (see pages 94 to 101), but another option is to finish an existing slab by veneering it with tile—the scenario shown here.
Outdoor tile must be installed on a clean, flat, and stable surface. When tiling an existing concrete slab, the surface must be free of flaking, wide cracks, and other major imperfections. A damaged slab can be repaired by applying a one- to two-inch-thick layer of new concrete over the old surface before laying tile.
Tools & Materials
Tape measure
Pencil
Chalk line
Tile cutter or wet saw
Tile nippers
Square-notched trowel
2 × 4 padded with carpet
Hammer
Grout float
Grout sponge
Caulk gun
Tile spacers
Buckets
Paint roller
Plastic sheeting
Thinset mortar
Modular tile
Grout
Grout additive
Grout sealer
Tile sealer
Ear and eye protection
Work gloves
Mason’s trowel
Cloth
Foam brush
Note: Wear eye protection when cutting tile, and handle cut tiles carefully—the cut edges of some materials may be very sharp.

Stone tiles can be laid as veneer over a concrete patio slab—a very easy way to create an elegant patio.
Tile options for landscape installations: Slate and other smooth, natural stone materials are durable and blend well with any landscape, but are usually expensive. Quarry tile is less expensive, though only available in limited colors. Exterior-rated porcelain or ceramic tiles are moderately priced and available in a wide range of colors and textures, with many styles imitating the look of natural stone. Terra cotta tile is made from molded clay for use in warm, dry climates only. Many of these materials require application of a sealer to increase durability and prevent staining and moisture penetration.

Exterior tile installation tools include: a wet saw for cutting tile quickly and easily (available at rental centers—make certain to rent one that is big enough for the tile size you install), an angle grinder with a diamond-edged cutting blade (also a rental item) for cutting curves or other complex contours, a trowel with square notches (of the size required for your tile size) for spreading the mortar adhesive, spacers for accurate aligning of tiles and setting consistent joint widths, a straight length of 2 × 4 padded along one edge (carpet pad works well) for helping align tile surfaces, a grout float for spreading grout to fill the joints, and a sponge for cleaning excess grout from tile surfaces.

Exterior tile installation materials include: latex-modified thinset mortar adhesive that is mixed with water (if you can’t find thinset that is latex modified, buy unmodified thinset and mix it with a latex additive for mortar following manufacturer’s directions), exterior-rated grout available in a variety of colors to match the tile you use, grout additive to improve durability, grout sealer to help protect grout from moisture and staining, and tile sealer required for some tile materials (follow tile manufacturer’s requirements).
Evaluating Concrete SurfacesA good surface is free from any major cracks or badly flaking concrete (called spalling). You can apply patio tile directly over a concrete surface that is in good condition if it has control joints (see below).

A fair surface may exhibit minor cracking and spalling but has no major cracks or badly deteriorated spots. Install a new concrete subbase over a surface in fair condition before laying patio tile.

A poor surface contains deep or large cracks, broken, sunken, or heaved concrete, or extensive spalling. If you have this kind of surface, remove the concrete completely and replace it with a new concrete slab before you lay patio tile.
Cutting Control Joints in a Concrete Patio
Cut new control joints into existing concrete patios that are in good condition but do not have enough control joints. Control joints allow inevitable cracking to occur in locations that don’t weaken the concrete or detract from its appearance. They should be cut every 5 or 6 ft. in a patio. Plan the control joints so they will be below tile joints once the tile layout is established (photo, above right). Use a circular saw with a masonry blade set to 3/8" depth to cut control joints. Cover the saw base with duct tape to prevent it from being scratched.
How to Tile a Patio Slab
To establish a layout for tile with a modular pattern, you must carefully determine the location of the first tile. On the clean and dry concrete surface, measure and mark a centerline down the center of the slab. Test-fit tiles along the line—because of the modular pattern used here, the tiles are staggered. Mark the edge of a tile nearest the center of the pad, then create a second line perpendicular to the first and test-fit tiles along this line.

Make adjustments as needed so the modular pattern breaks evenly over the patio surface and is symmetrical from side to side. You may need to adjust the position of one or both lines. The intersection of the lines is where your tile installation will begin. Outline the position of each group of tiles on the slab.
Variation: To establish a traditional grid pattern, test-fit rows of tiles so they run in each direction, intersecting at the center of the patio. Adjust the layout to minimize tile cutting at the sides and ends, then mark the final layout and snap chalk lines across the patio to create four quadrants. As you lay tile, work along the chalk lines and in one quadrant at a time.

Following manufacturer’s instructions, mix enough thinset mortar to work for about 2 hours (start with 4 to 5" deep in a 5-gallon bucket). At the intersection of the two layout lines, use a notched-edge trowel to spread thinset mortar over an area large enough to accommodate the layout of the first modular group of tiles. Hold the trowel at a 45° angle to rake the mortar to a consistent depth.

Set the first tile, twisting it slightly as you push it into the mortar. Align it with both adjusted layout lines, then place a padded 2 × 4 over the center of the tile and give it a light rap with a hammer to set the tile.

Position the second tile adjacent to the first with a slight gap between them. Place spacers on end in the joint near each corner and push the second tile against the spacers. Make certain the first tile remains aligned with the layout lines. Set the padded 2 × 4 across both tiles and tap to set. Use a damp cloth to remove any mortar that squeezes out of the joint or gets on tile surfaces. Joints must be at least 1/8"-deep to hold grout.
Lay the remaining tiles of the first modular unit using spacers. Using the trowel, scrape the excess mortar from the concrete slab in areas you will not yet be working on to prevent it from hardening and interfering with the installation.

With the first modular unit set, continue laying tile following the pattern established. You can use the chalk lines for general reference, but they will not be necessary as layout lines. To prevent squeeze-out between tiles, scrape a heavy accumulation of mortar 1/2" away from the edge of a set tile before setting the adjacent tile.
Cutting Curves in Tile
To make convex (left) or concave (right) curves, mark the profile of the curve on the tile, then use a wet saw to make parallel straight cuts, each time cutting as close to the marked line as possible. Use a tile nippers to break off small portions of tabs, gradually working down to the curve profile. Finally, use an angle grinder to smooth off the sharp edges of the tabs. Make sure to wear a particle mask when using the tile saw and wear sturdy gloves when using the nippers.

After installing the tile, cover the tiled area with plastic, and let the thinset mortar cure according to the manufacturer’s instructions. When tile has fully set, remove the plastic and mix grout, using a grout additive instead of water. Grout additive is especially important in outdoor applications, because it creates joints that are more resilient in changing temperatures.

Use a grout float to spread grout over an area that is roughly 10 sq. ft. Push down with the face of the float to force grout into the joints, then hold the float edge at a 45° angle to the tile surface and scrape off the excess grout.

Once you’ve grouted this area, wipe off the grout residue using a damp sponge. Wipe with a light, circular motion—you want to clean tile surfaces without pulling grout out of the joints. Don’t try to get the tile perfectly clean the first time. Wipe the area several times, rinsing out the sponge frequently
Once the grout has begun to set (usually about 1 hour, depending on temperature and humidity), clean the tile surfaces again. You want to thoroughly clean grout residue from tile surfaces because it is difficult to remove once it has hardened. Buff off a light film left after final cleaning with a cloth.
Grouting Porous Tiles
Some tiles, such as slate, have highly porous surfaces that can be badly stained by grout. For these tiles, apply grout by filling an empty caulk tube (available at tile stores and some building centers) with grout, and apply the grout to the joints with a caulk gun. Cut the tip to make an opening just large enough to allow grout to be forced out. Run the tip down the joint between tiles as you squeeze out the grout. Remove the grout that gets on the tile surface with a wet sponge. You may need to use your finger to force grout into the joint—protect your skin by wearing a heavy glove to do this.


Cover the pad with plastic and let the grout cure according to manufacturer’s instructions. Once the grout has cured, use a foam brush to apply grout sealer to only the grout, wiping any spillover off of tile surfaces.

Apply tile sealer to the entire surface using a paint roller. Cover the patio with plastic and allow the sealer to dry completely before exposing the patio to weather or traffic.
Loose Materials PatioGravel, crushed stone, wood chips, and other loose materials are very easy to install and are a surprisingly attractive patio surface. The versatile nature of loose material lends itself to everything from creative mixed-media designs to plain surfaces that evoke the simple beauty of Zen rock gardens.
The basic installation of a loose materials patio starts with excavating the site, then adding a two-inch layer of compacted gravel and edging material. Edging is required for this project to contain the loose surface material. From this point, the installation depends on the type of material you’re using.
For crushed stone, gravel, and other small aggregates, add one to two inches of surface material and tamp flat; for river rock, add two inches or more (based on rock size); for wood chips, add at least a two-inch-thick layer and rake smooth.
For the smoothest, hardest surface, use a highly compactable material, such as decomposed granite (DG), for the finish material—or you can cover a coarser gravel base with granite fines (rock dust). Compact either surface with a plate compactor.
Tools & Materials
Drill
Circular saw
Sledgehammer
Mason’s string
Line level
Excavation tools
Bow rake
Plate compactor
Plumb bob
Lumber (2 × 2, 2 × 4)
2 1/2" drywall screws
Professional-grade landscape fabric
Compactable gravel
Edging
Gravel or other fill material
Eye and ear protection
Work gloves
A loose material patio provides a casual, natural environment for any type of patio. The footing is not as solid underfoot, so it is best used where that is not a concern.
How to Create a Loose Material Patio
Plan and excavate the site. Lay out the patio site with batterboards and mason’s strings, planning for a slope of 1/8" per foot (see pages 40 to 45 for detailed steps on layout and site preparation). Excavate the site to a depth of 4" (or as desired, depending on the surface material and your application), and tamp the soil with a plate compactor. Cover the site with landscape fabric, overlapping the edges by at least 6".

Add compactable gravel and edging: cover the site with compactable gravel, rake it flat and smooth, and then tamp it thoroughly with a plate compactor. The layer should be about 2" thick after compaction. Install patio edging as desired, setting it at least 1/2" higher than the top of the finished patio surface to help contain the surface material.

Option: Install accent pavers. Set pavers (stone, concrete, wood, or other material) onto the gravel base, as desired. For flagstone and other materials that might not be flat on the bottom, add sand underneath to prevent wobbling.
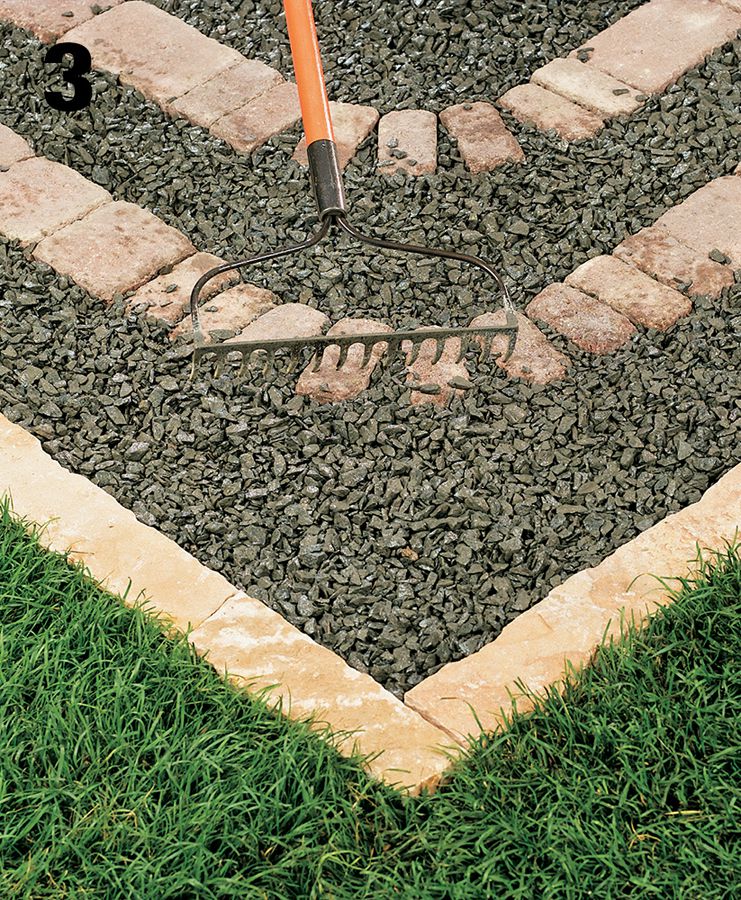
Spread out the surface material over the patio area, raking it into an even layer of the desired thickness.

Tamp the surface material, if appropriate, with a hand tamp, plate compactor, or drum roller to create an even, flat surface. If the surface material is stone or other masonry, spray the patio with water to wash away dirt and dust.
Loose-fill Patio with Fire PitA fire pit makes a wonderful focal point for backyard gatherings. Many local codes stipulate that a fire pit area should be at least 20 feet across, including the surrounding circular area that can be outfitted with chairs and benches. Dressed with rock (trap rock is shown here), this area creates a safety zone between the pit and structures or combustible yard elements, such as landscape plants and dry lawns. For comfort and safety, fire pits should be installed only on level ground. If your proposed seating area is on a slope, you can build a retaining wall on the high side, and the wall itself can provide another surface for seating or setting down plates and drinks.
The fire pit featured here is constructed around a metal liner that you can buy from landscape supply centers. A liner will keep the fire pit wall from overheating and cracking if cooled suddenly by rain or a bucket of water. The liner seen here is a section of 36-inch-diameter corrugated culvert pipe. Other types of suitable liners are often sold as “barbecue rings” or “fire rings.” Typically made of steel or iron, rings may include integral grills or have flanges for setting in a removable barbecue grate. The wall of the fire pit in this project is built with ashlar stones that are relatively uniform in size and have flat sides that make for easy stacking. But you can use any type of stone you like, as well as cast concrete retaining wall blocks. Whatever material you choose, set the wall stones on a solid foundation of compactable gravel, as with a paver patio. It’s most efficient to prep the base for the seating area at the same time as the fire pit.
Tools & Materials
Wheelbarrow
Marking paint
Excavation tools
Hand tamp
Plate compactor
Level
Straight 2 × 4
Hand maul or sledgehammer
1"-dia. pipe
Landscape edging
Metal fire pit liner
Compactable gravel
Dressing rock
Wall stones
Rake
Eye and ear protection
Work gloves
Stakes
Square-nose spade

A loose-fill patio and stone fire pit is what you’d expect to find in the Old West or on trails deep in the forest. Why not bring this to your backyard? It’s a simple DIY project that incorporates a compactable gravel foundation topped with a decorative rock or loose stone material and an excavated area reserved for the fire pit.
Construction Details How to Build a Loose-fill Patio with Fire Pit
Mark the patio outline: drive a length of pipe into the center of the pit area. Measure out from the pipe a distance equal to the outside radius of the seating area. Use a cord with a loop in it and a can of marking paint to draw a circle with this radius onto the ground around the pipe.
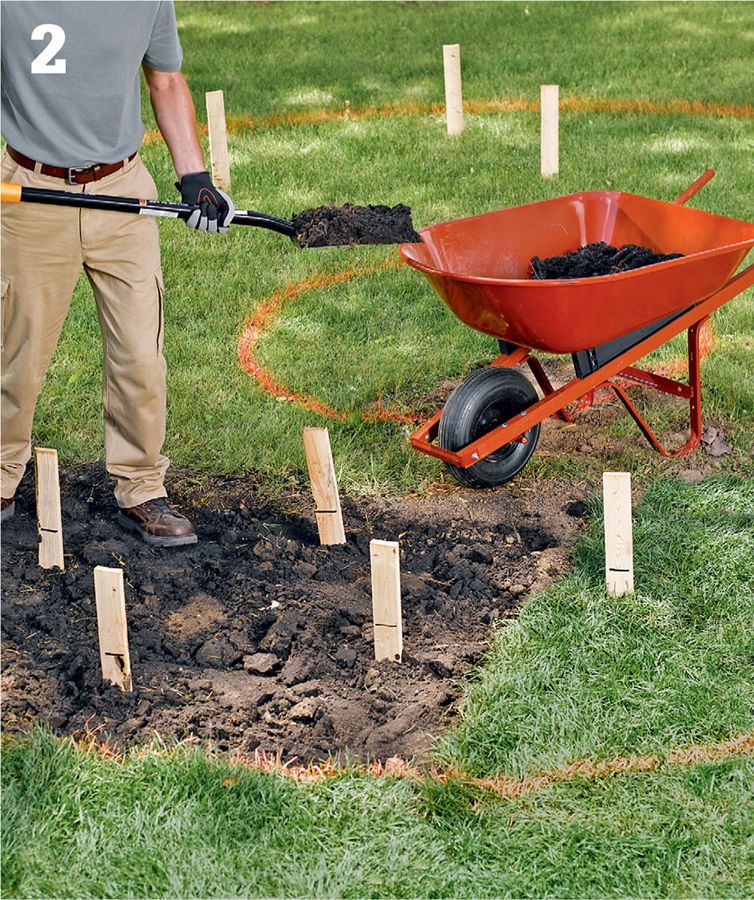
Cut out the sod and excavate the site to a level plane 4" below grade (or as appropriate for the surface material) over the entire circled area, from pipe to perimeter (leave the pipe in place for now).
Excavate the fire pit wall area. Draw two more circles around the center pipe: an inner circle with a radius 6" smaller than the radius of the pit liner and an outer circle with a radius 6" larger than the outside radius of the finished fire pit. These lines mark the base for supporting the wall stones. Excavate an additional 4" down within this ring and compact the soil at the bottom of the trench with a hand tamp.

Fill the trench with compactable gravel and tamp it thoroughly so it is very hard. Fill the entire patio area with compactable gravel to 2" below grade. Use a level on a straight 2 × 4 to flatten and level the gravel (the area in the wall trench must be perfectly flat and level. Do not compact the top layer of gravel.

Position the metal fire pit liner so it is centered around the pipe and is perfectly level. Add or remove gravel beneath to level the liner, as needed.

Lay the first course of wall stones around the liner. Adjust the stones so they maintain a consistent spacing to the liner and between one another. Check with a level as you work to make sure the stones are level across the top.
Lay the remaining courses of wall stones, staggering the vertical joints between courses. If desired, top the fire pit wall with a cap row of smooth, flat stones. The top of the wall should be at least slightly higher than the edge of the liner.

Compact the gravel in the surrounding area with a plate compactor. This will stabilize the area and form a hard subbase that inhibits weed growth. Install the edging of your choice along the perimeter of the loose fill area.

Add a 2"-layer of top-dressing rock in the seating area, raking it flat and level. Compact the layer with a plate compactor. Tip: Angular rock, such as the trap rock seen here, makes a better walking surface than smooth, rounded gravel.