
A walkway or path can do much more than provide a route for foot traffic. A path can be a versatile design element, creating an attractive border along a house, a patio, or landscape features. It can also become an attractive transition between two areas, such as a lawn and a planting bed.
Walkways and paths are also effective at unifying spaces in the landscape. For example, imagine a backyard with a patio at one end, a beautiful flower garden at the other, and a solid swath of lawn in-between. By adding a footpath, you connect all of the areas.
In terms of construction techniques and material, a walkway is essentially a patio in a different configuration. All of the same materials that make great patio surfaces are equally as suitable for walkways. In this chapter, you’ll find complete projects utilizing all major walkway materials, plus some you might not have thought of. As in the chapter on patio projects, there’s also a special section with tips for planning your walkway project and laying out the site (see pages 148 to 151).
 Designing & Laying Out Walkways & Steps
Designing and planning a new walkway starts with a careful assessment of how the path will be used. Landscape designers commonly group outdoor walkways into three main categories, according to use and overall design goals.
The first is a primary walkway: a high-traffic path used by household members and visitors, such as a walkway between the street and the home’s main entry door. A main path should provide the quickest and easiest route from point A to point B. Any unnecessary twists and turns are likely to be cross-cut by walkers, leaving you with a less manicured path through the yard. To allow two people to walk side-by-side, a main path should be 42 to 48 inches wide. Surface materials should be durable, slip-resistant, and easy to shovel (if you live in a snowy climate), such as poured concrete, pavers, or flat stones.
A secondary walkway typically connects the house to a patio or outbuilding or a patio to a well-used area in the yard. A comfortable width for single-person travel is 24 to 36 inches. Surfaces should be flat and level underfoot and provide good drainage and slip-resistance in all seasons.
The third type, a tertiary path, is informal, perhaps nothing more than a line of stepping stones meandering through a flower garden or a simple gravel path leading to a secluded seating area. Design tertiary paths for a comfortable stride, with a minimum width of 12 to 16 inches.
Once you’ve established the design criteria for your walkway or path, spend some time testing the size and configuration of the route to be sure it will meet your needs. See page 151 for help with planning a set of stairs for your walkway or landscape.
As an important part of a home’s curb appeal, a primary walkway should be styled to complement the house exterior and street-side landscaping.
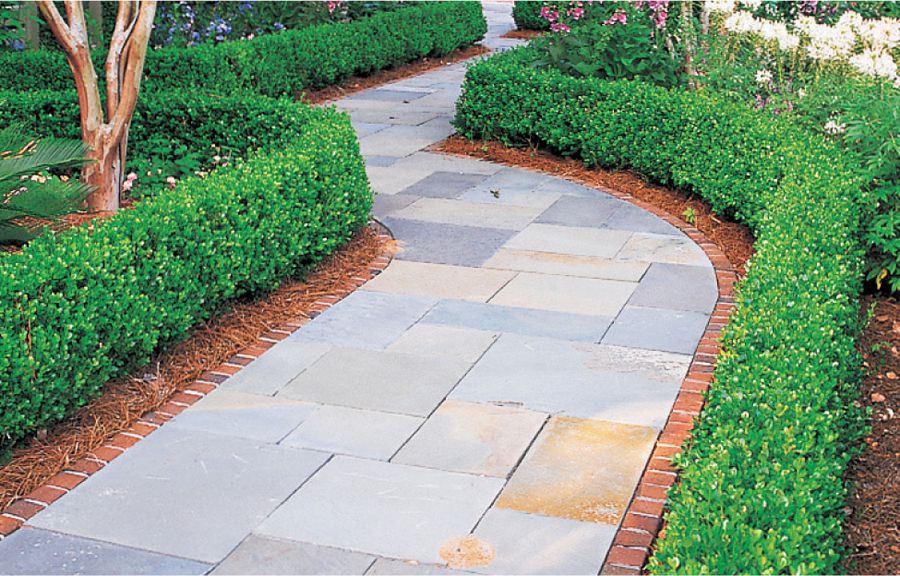
Secondary walkways can be a blend of practicality and decoration. A gentle curve here and there adds interest without slowing travel too much.
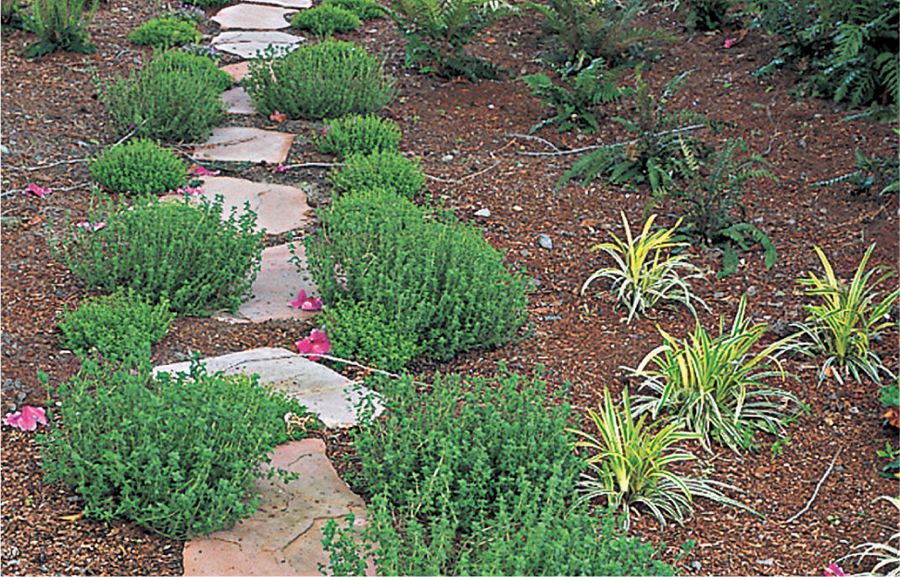
A tertiary path can be as rustic or creative as you like. It can serve as an invitation to stroll through a garden or an access path for tending plants—or both.
 How to Lay Out a Straight Walkway
Use temporary stakes and mason’s string to plan the walkway layout. Drive stakes at the ends of each section and at any corners, then tie the strings to the stakes to represent the edges of the finished path. Run a second set of strings 6" outside the first lines.
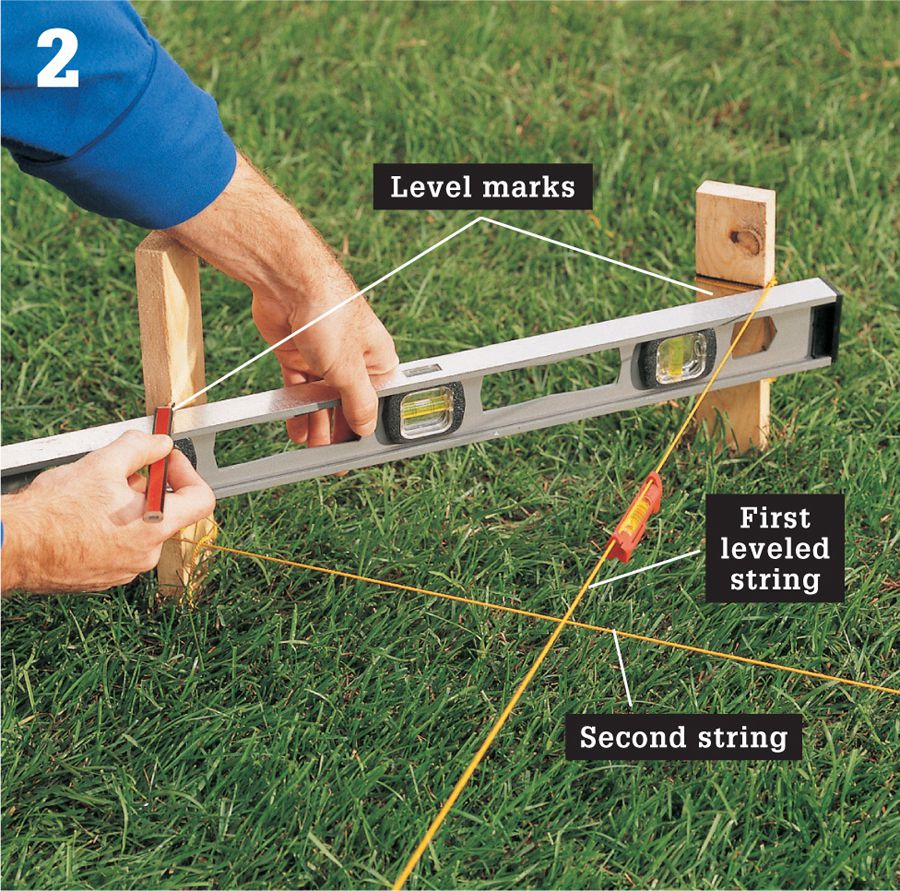
Set up a new string layout to mark the precise borders of the finished walkway. Along the high edge of the walkway, set the strings to the finished surface height. Use a line level to make sure the strings are level. Tip: For 90° turns, use the 3-4-5 technique to set the strings accurately at 90° (see page 43).
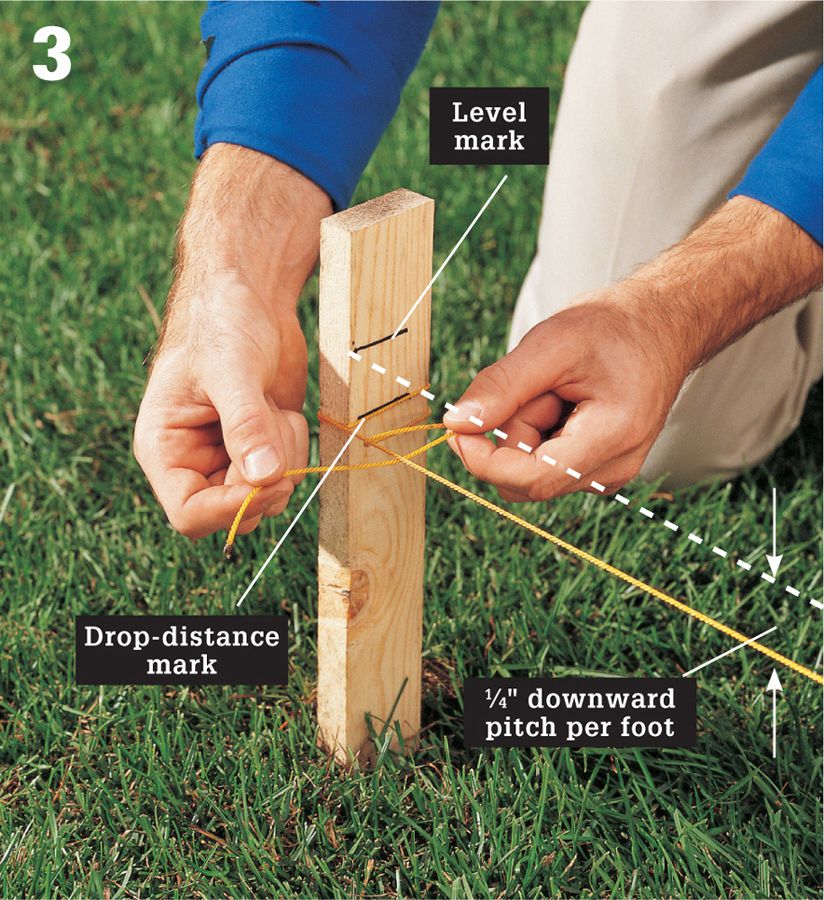
Set the border strings lower for the slope. The finished surface follows a downward slope of 1/4" per foot on the opposite side of the walkway. Use a homemade slope gauge to set the height of the strings. Fine-tune the gravel base to follow the slope setting, and prepare for the sand bed and/or surface material.
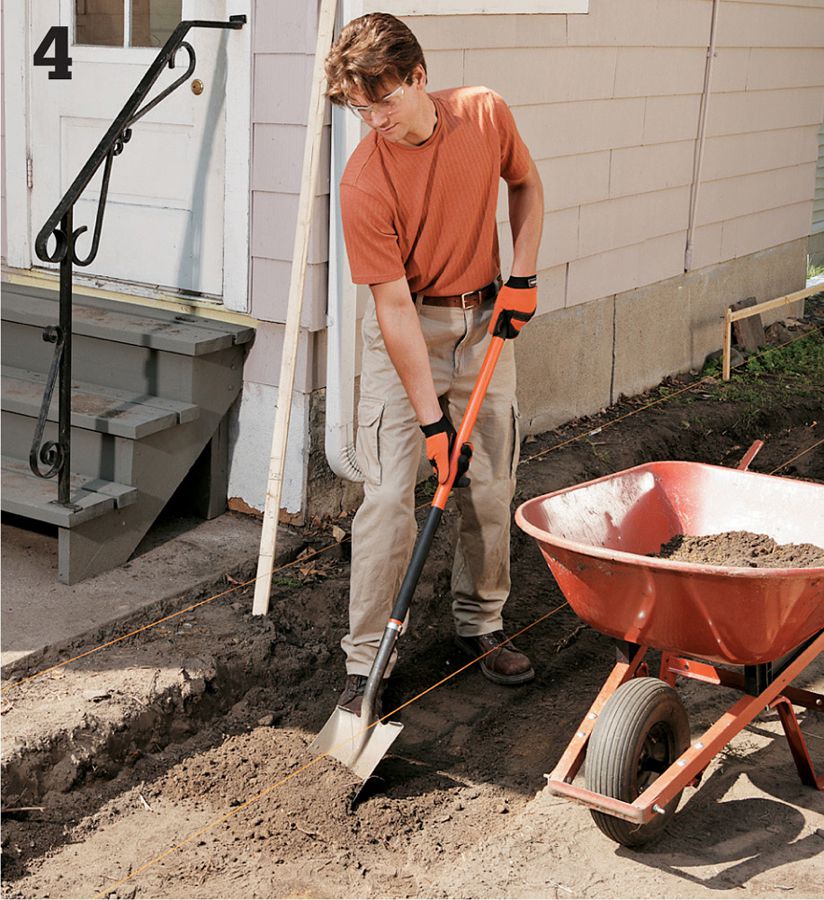
Excavate the area within the string lines. First, cut sod along the inside edge of the second string line. Remove all grass and plantings from the excavation area. Add the gravel subbase.
 How to Lay Out Curving or Irregular Walkways
Experiment with different sizes and shapes for the walkway using two lengths of 3/4" braided rope or a garden hose. To maintain a consistent width, cut spacers from 1 × 2 lumber and use them to set the spacing between the rope outlines.
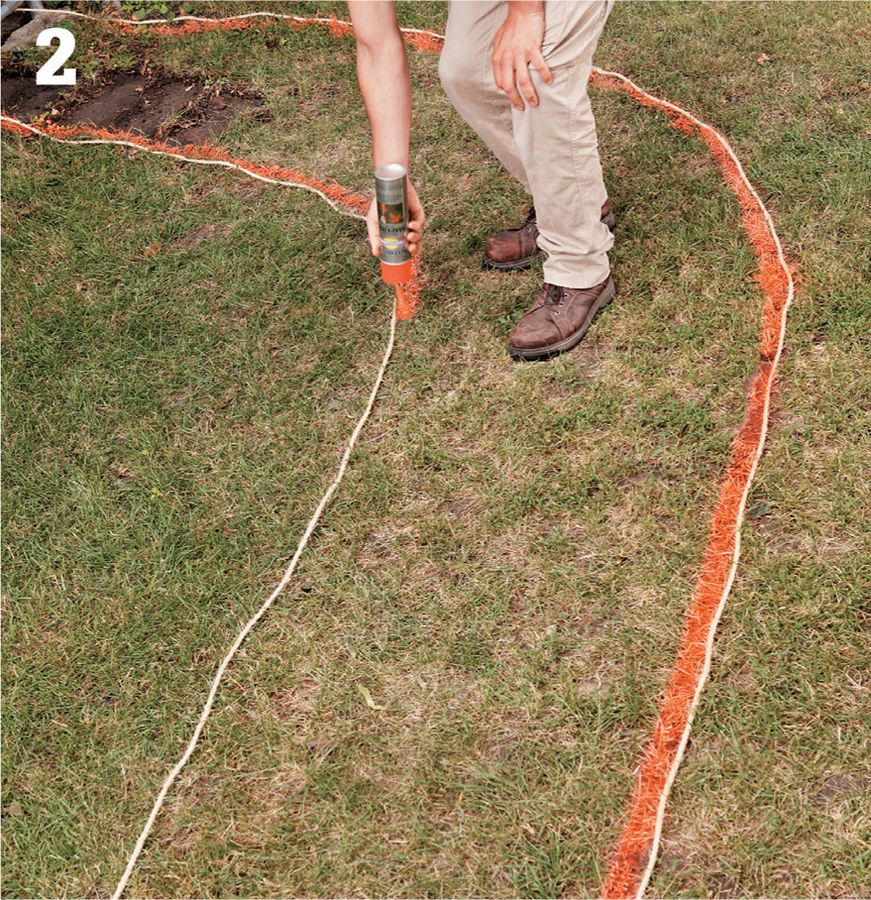
Mark the ground with marking paint, following the final outline of the ropes. Excavate the area 6" beyond the marked outline (or as required for your choice of edging.) If desired, you can set up a string layout to guide the installation of the gravel subbase (see page 149).
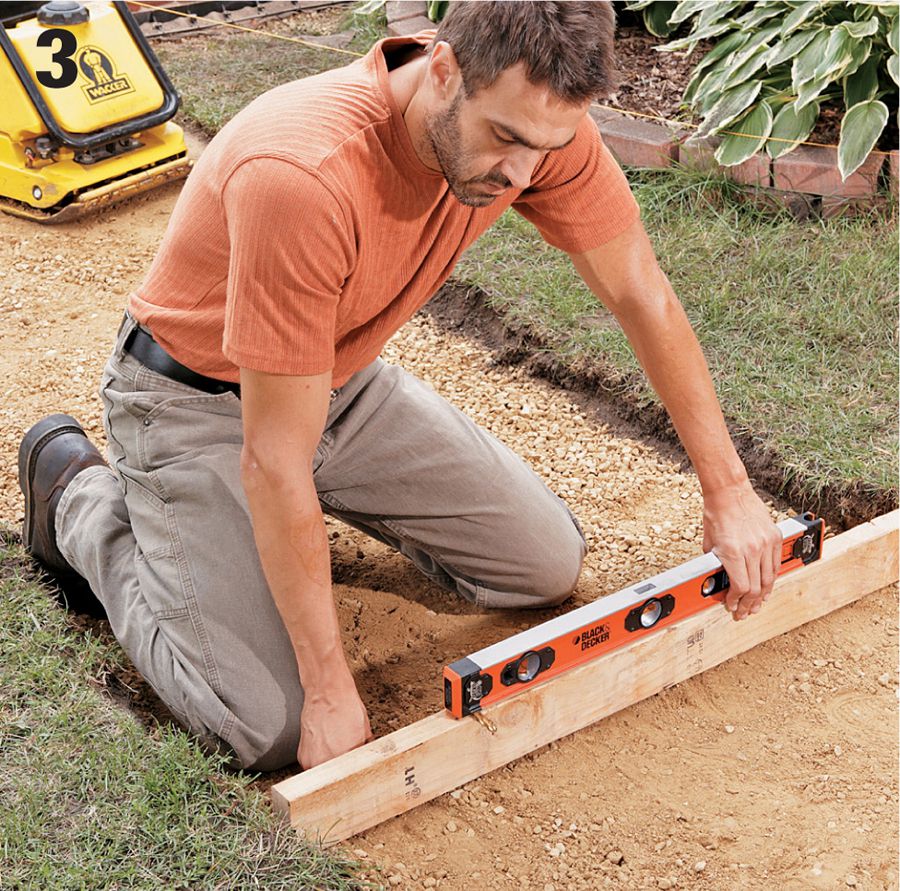
Create a slope gauge for checking the slope of your gravel base, edging, or surface material. Tape a level and a drill bit to a straight 2 × 4 that’s a little longer than the width of the walkway. The slope should be 1/4" per foot: for a 2-ft. level, use a 1/2"-dia. bit or spacer; for a 4-ft. level, use a 1"-thick spacer. The slope is correct when the level reads level.
 How to Plan Landscape Steps
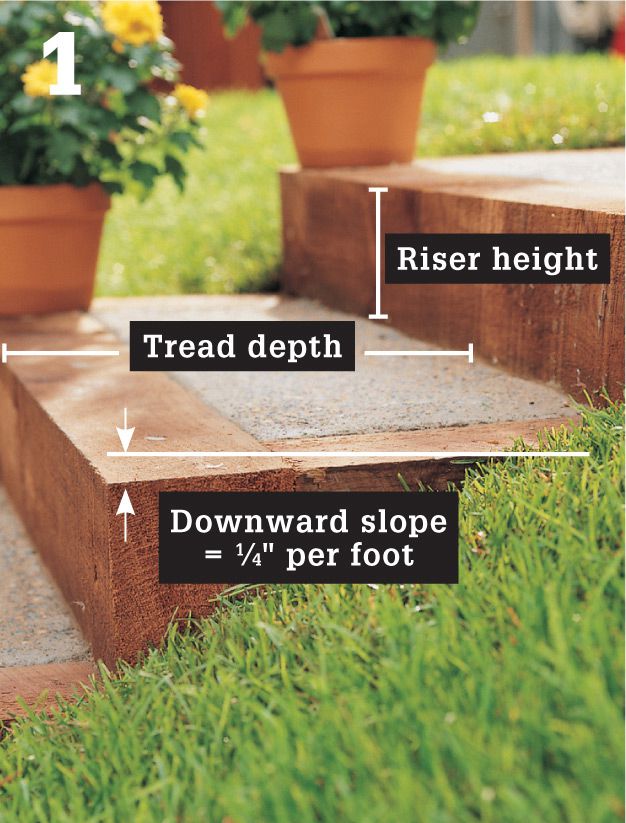
Landscape steps are best with a riser height (vertical dimension) of 6" or less and a tread depth (horizontal dimension) of 11" or more. Plan to build each tread with a downward slope of 1/4" per foot from back to front. Complete the following steps to calculate the tread and riser dimensions for your steps.
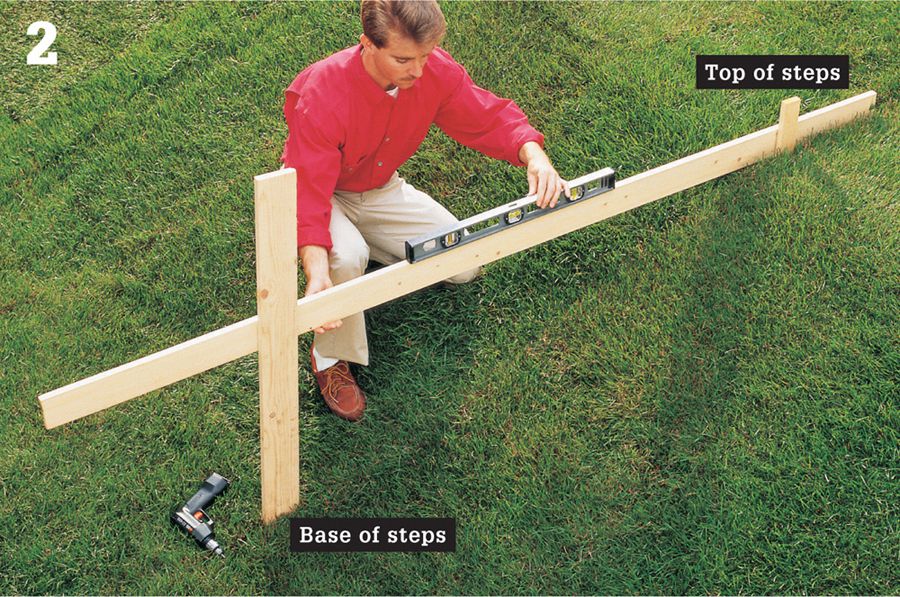
Drive a tall stake into the ground at the base of the stairway site. Adjust the stake so it is perfectly plumb. Drive a shorter stake at the top of the site. Position a long, straight 1 × 4 or 2 × 4 against the stakes, with one end touching the ground next to the top stake. Adjust the 1 × 4 so it is level, then attach it to the stakes with screws. For long spans, use a mason’s string instead of a board.
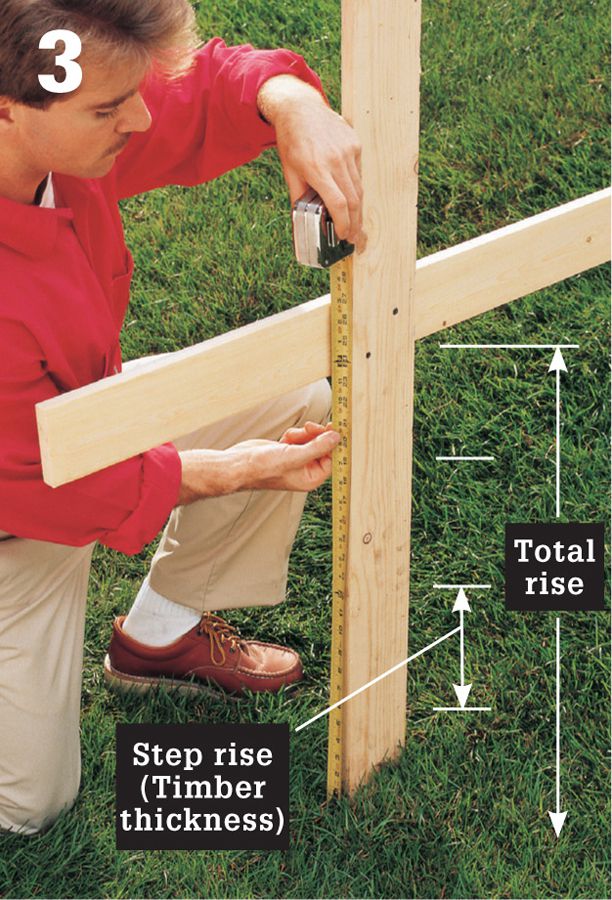
Measure from the ground to the bottom of the 1 × 4 to find the total rise of the stairway. Divide the total rise by the desired riser height to find the number of steps you need. If the result contains a fraction, drop the fraction and divide the rise by the whole number to find the exact riser dimension.
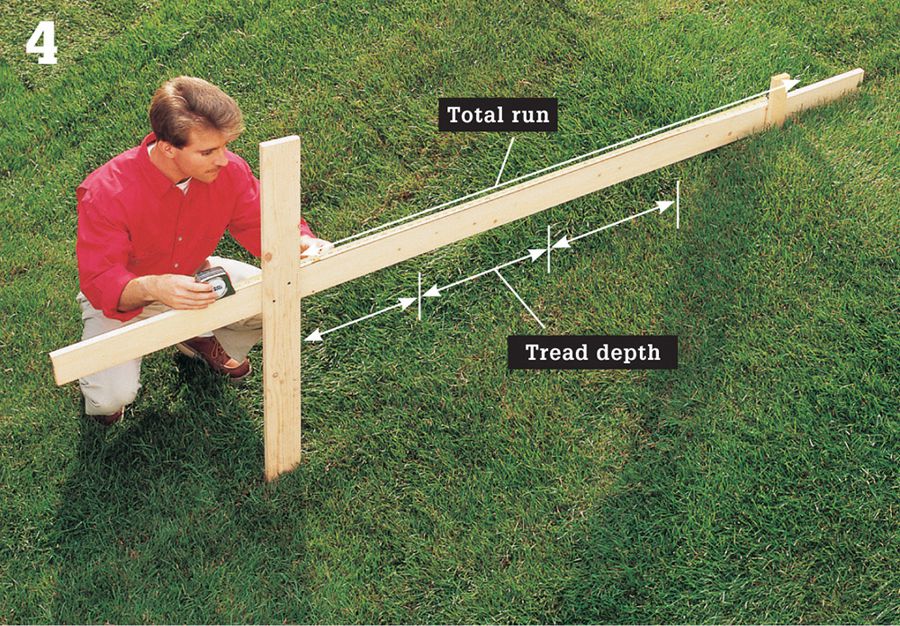
Measure along the 1 × 4 between the stakes to find the total horizontal run of the stairway. Divide the total run by the number of steps to find the depth of each step tread. If the depth is less than 11", revise the step layout to extend the depth of the treads.
 Sandset Brick Walkway
Sandset brick is a good choice of material for a walkway for the same reasons that make it a great patio surface—it’s easy to work with, it lends itself equally well to traditional paving patterns and creative custom designs, and it can be installed at a leisurely pace because there’s no mortar or wet concrete involved. The timeless look of natural clay brick is especially well-suited to walkways, where the rhythmic patterns of geometric lines create a unique sense of movement that draws your eye down the path toward its destination.
In this walkway project, all of the interior (field) bricks are arranged in the installation area and then the curving side edges of the walk are marked onto the set bricks to ensure perfect cutting lines. After the edge bricks are cut and reset, border bricks are installed followed by rigid paver edging to keep everything in place. This is the most efficient method for installing a curving path. Straight walkways can follow the standard process of installing the edging and border bricks (on one or both sides of the path, as applicable) before laying the field brick, as is done in the brick patio project.
With standard brick, you’ll need to set the gaps with spacers cut from 1/8-inch hardboard, as shown in this project.
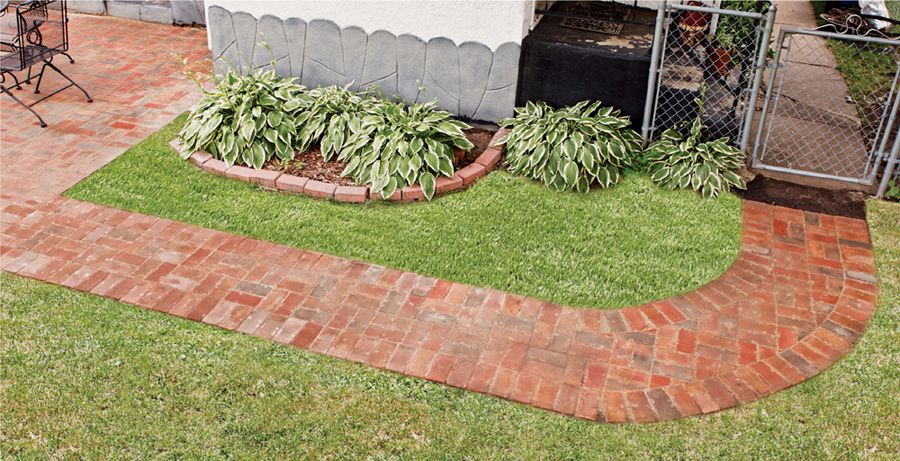
A curving brick walkway can be as much a design statement as a course for easy travel. Curves require more time than straight designs, due to the extra cutting involved, but the results can be all the more stunning.
 How to Install a Sandset Brick Walkway
Lay out the walkway curved edges using 3/4" braided rope (or use mason’s strings for straight sections; shown as variation). Cut 1 × 2 or 2 × 2 spacers to the desired path width and then place them in-between the ropes for consistent spacing. Mark the outlines along the inside edges of the ropes onto the ground with marking paint.
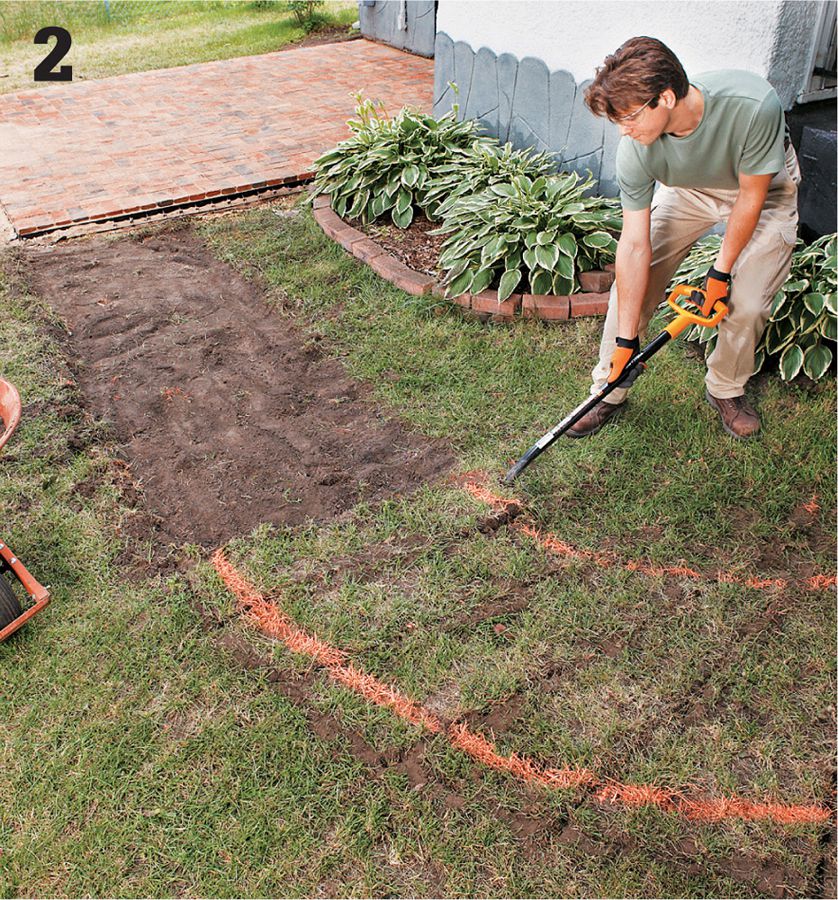
Excavate the area 6" outside of the marked lines along both sides of the path. Remove soil to allow for a 4"-thick subbase of gravel, a 1" layer of sand, and the thickness of the brick pavers (minus the height of the finished paving above the ground). The finished paving typically rests about 1" aboveground for ease of lawn maintenance. Thoroughly tamp the area with a plate compactor.
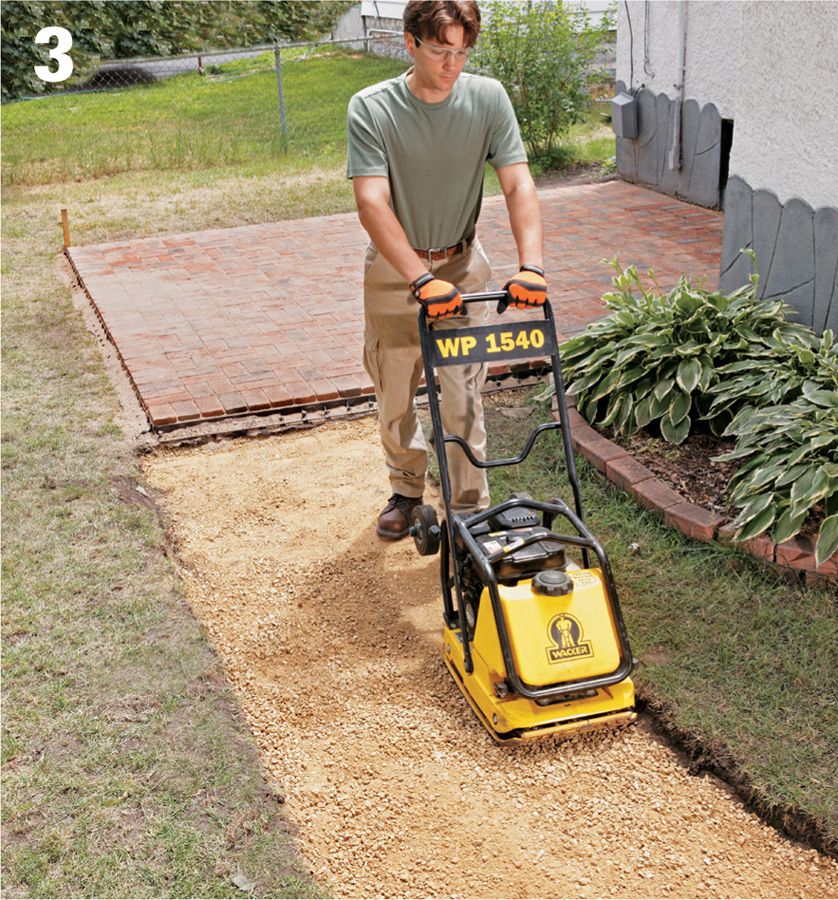
Spread out an even layer of compactable gravel—enough for a 4"-thick layer after compaction. Grade the gravel to follow a downward slope of 1/4" per foot (most long walkways slope from side to side, while shorter paths or walkway sections can be sloped along their length). Use a homemade slope gauge to screed the gravel smooth and to check the slope as you work (see step 3, page 150). Tamp the subbase thoroughly with the plate compactor, making sure the surface is flat and smooth and properly sloped.
Cover the gravel base with professional-grade landscape fabric, overlapping the strips by at least 6". If desired, tack the fabric in place with landscape staples.
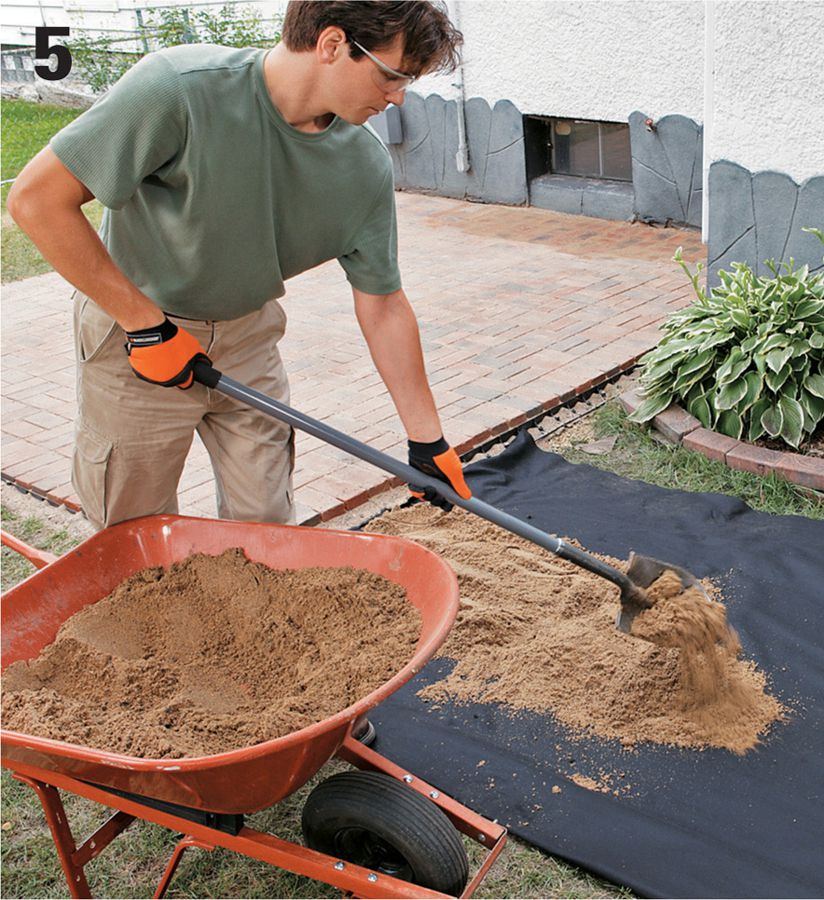
Spread a 1" layer of coarse sand over the landscape fabric. Screed the sand with a board so it is smooth, even, and flat.
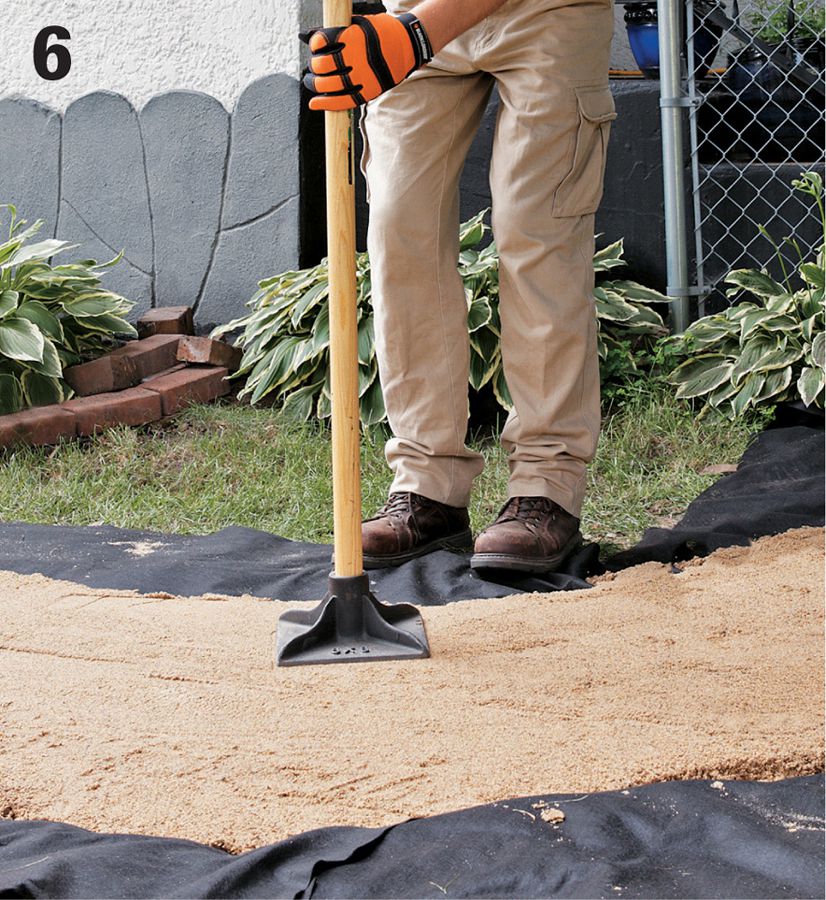
Tamp the screeded sand with a hand tamper or a plate compactor. Check the slope of the surface as you go.
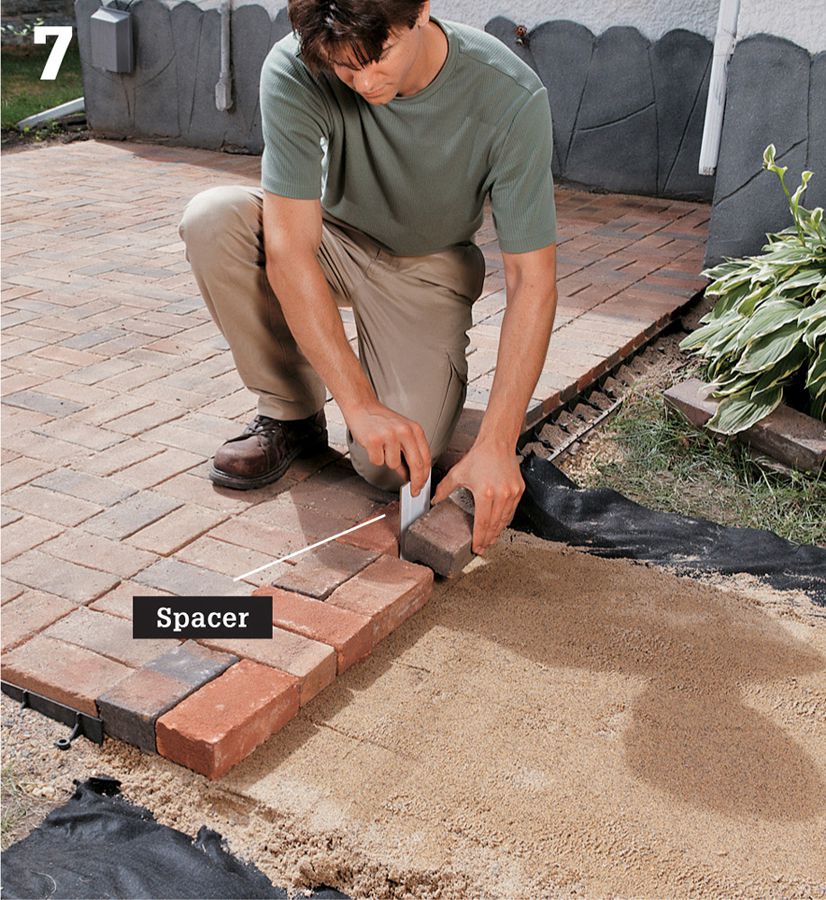
Begin the paving at one end of the walkway, following the desired pattern. Use 1/8"-thick hardboard spacers in-between the bricks to set the sand-joint gaps. Tip: It’s best to start the paving against a straightedge or square corner. If your walkway does not connect to a patio or stoop, set a temporary 2 × 4 with stakes at the end of the walkway to create a straight starting line.
Option: If your walkway includes long straight sections between curves, set up guidelines with stakes and mason’s strings to keep the ends of the courses straight as you pave.
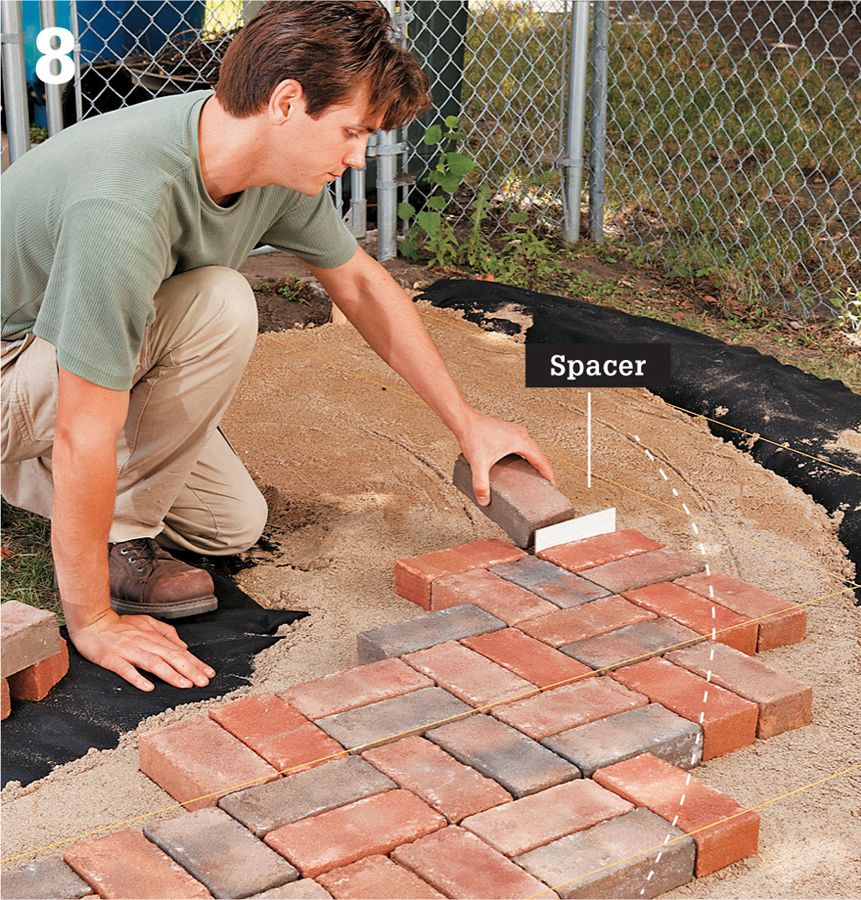
Set the next few courses of brick, running them long over the side edges. With the first few courses in place, tap the bricks with a rubber mallet to bed them into the sand.
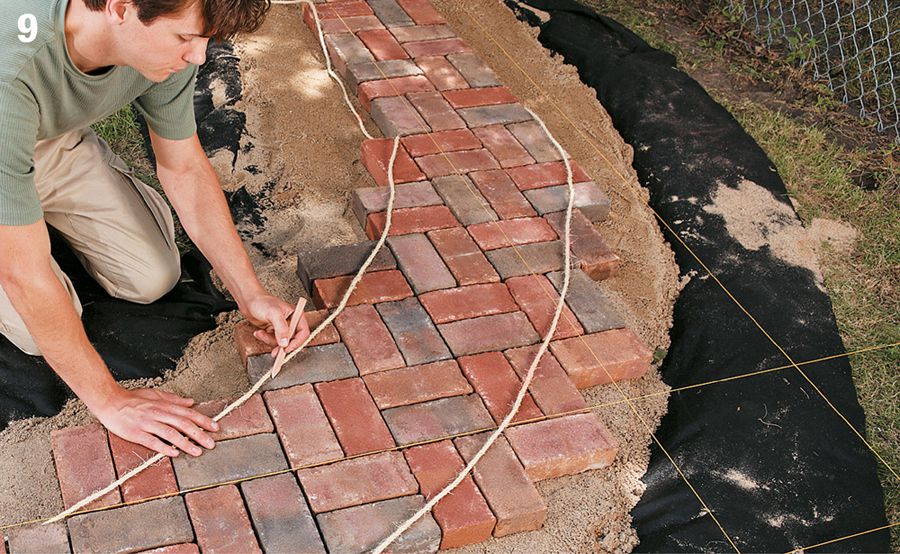
Lay out the curved edges of the finished walkway using 3/4" braided rope. Adjust the ropes as needed so that the cut bricks will be roughly symmetrical on both edges of the walkway. Also measure between the ropes to make sure the finished width will be accurate according to your layout. Trace along the ropes with a pencil to mark the cutting lines onto the bricks.
Variation: Cut field bricks after installing the edging. Mark each brick for cutting by hlding it in position and drawing the cut line across the top face.
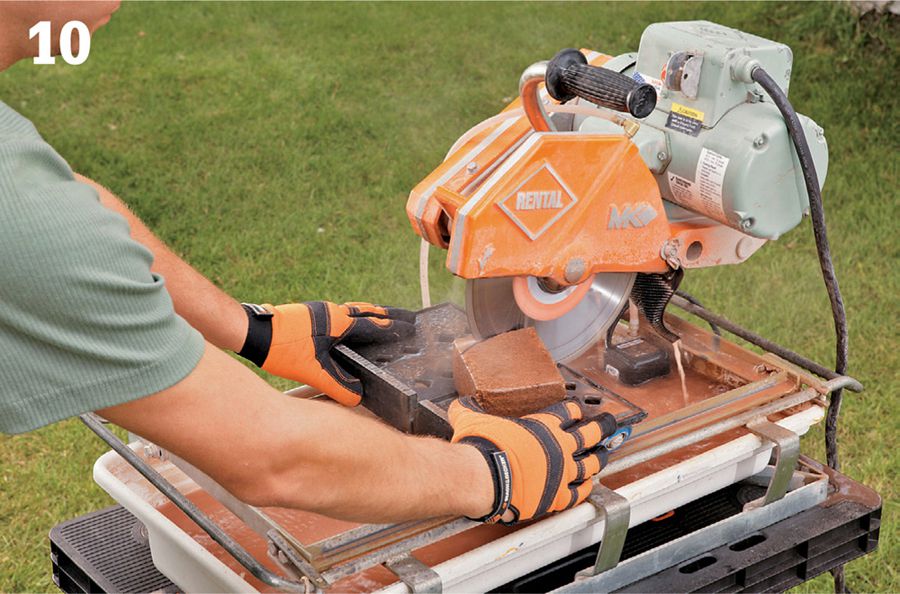
Cut the bricks with a rented masonry saw (wet saw), following the instructions from the tool supplier. Make straight cuts with a single, full-depth cut. Curved cuts require multiple straight cuts made tangentially to the cutting line. After cutting a brick, reset it before cutting the next brick.
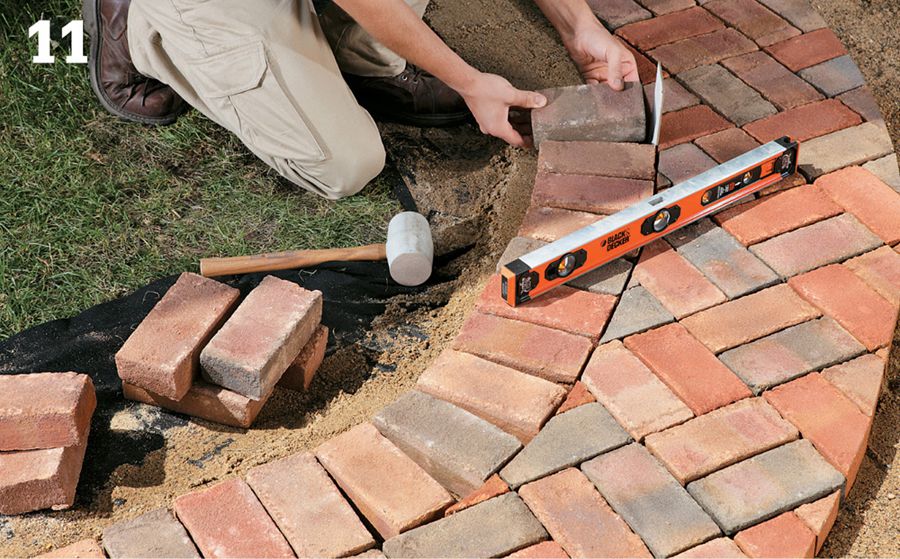
Align the border bricks (if applicable) snug against the edges of the field paving. Use a straightedge or level to make sure the border units are flush with the tops of the field bricks Set the border bricks with a rubber mallet. Dampen the exposed edges of the sand bed, and then use a trowel to slice away the edge so it’s flush with the paving.
Install rigid paver edging (bendable) or other edge material tight against the outside of the walkway.
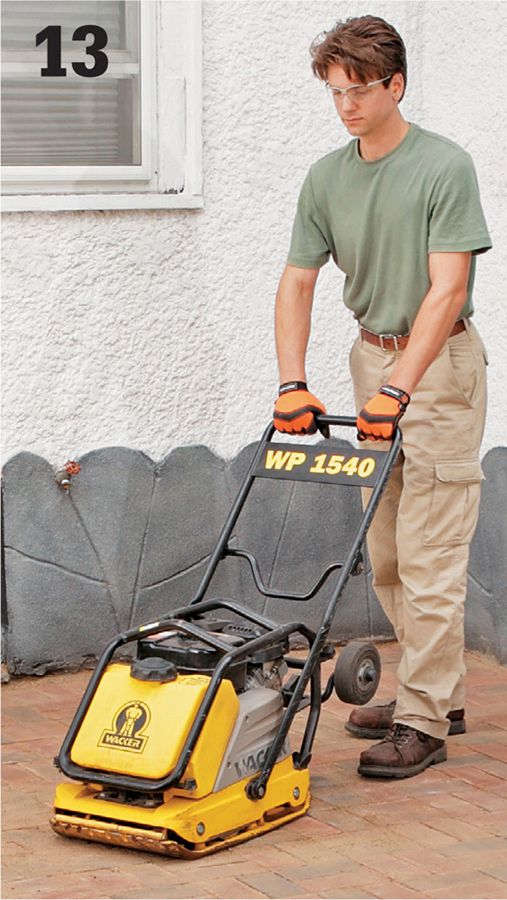
Fill and tamp the sand joints one or more times until the joints are completely filled. Sweep up any loose sand (see page 60).
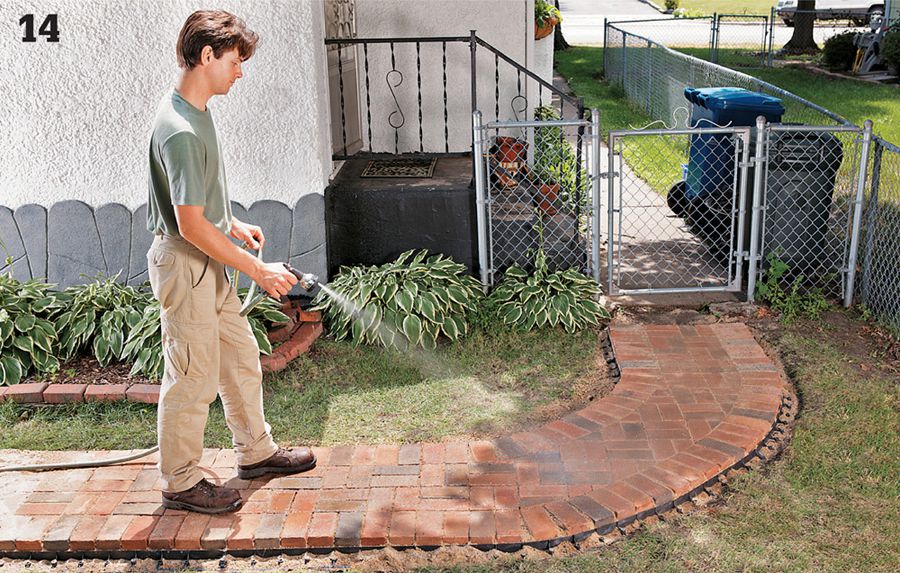
Soak the surface with water and let it dry. Cover the edging sides with soil and sod or other material, as desired.
 Poured Concrete Walkway
If you’ve always wanted to try your hand at creating with concrete, an outdoor walkway is a great project to start with. The basic elements and construction steps of a walkway are similar to those of a poured concrete patio or other landscape slab, but the smaller scale of a walkway makes it a much more manageable project for first-timers. Placing the wet concrete goes faster, and you can easily reach the center of the surface for finishing from either side of the walkway.
Like a patio slab, a poured concrete walkway also makes a good foundation for mortared surface materials, like pavers, stone, and tile. If that’s your goal, be sure to account for the thickness of the surface material when planning and laying out the walkway height. A coarse broomed or scratched finish on the concrete will help create a strong bond with the mortar bed of the surface material.
The walkway in this project is a 4-inch-thick by 26-inch-wide concrete slab with a broom finish for slip resistance. It consists of two straight, 12-ft.-long runs connected by a 90° elbow. After curing, the walkway can be left bare for a classic, low-maintenance surface, or it can be colored with a permanent acid stain. When planning your walkway project, consult your city’s building department for recommendations and construction requirements.
Poured concrete walkways can be designed with straight lines, curves, or any angles you desire. The flat, hardwearing surface is ideal for frequently traveled paths and will stand up to heavy equipment and decades of snow shoveling.
 Sloping a Walkway
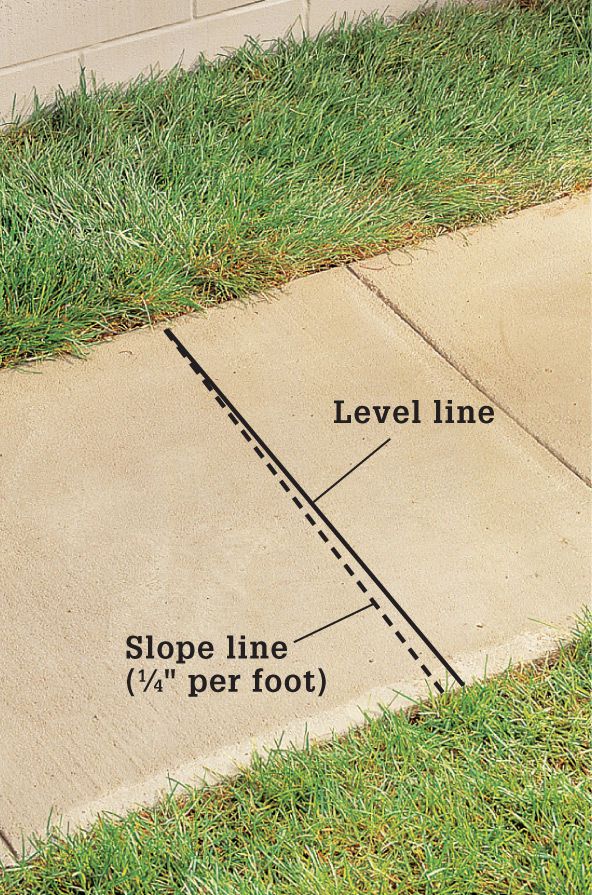
Straight slope: Set the concrete form lower on one side of the walk-way so the finished surface is flat and slopes downward at a rate of 1/4" per foot. Always slope the surface away from the house foundation or, when not near the house, toward the area best suited to accept water runoff.
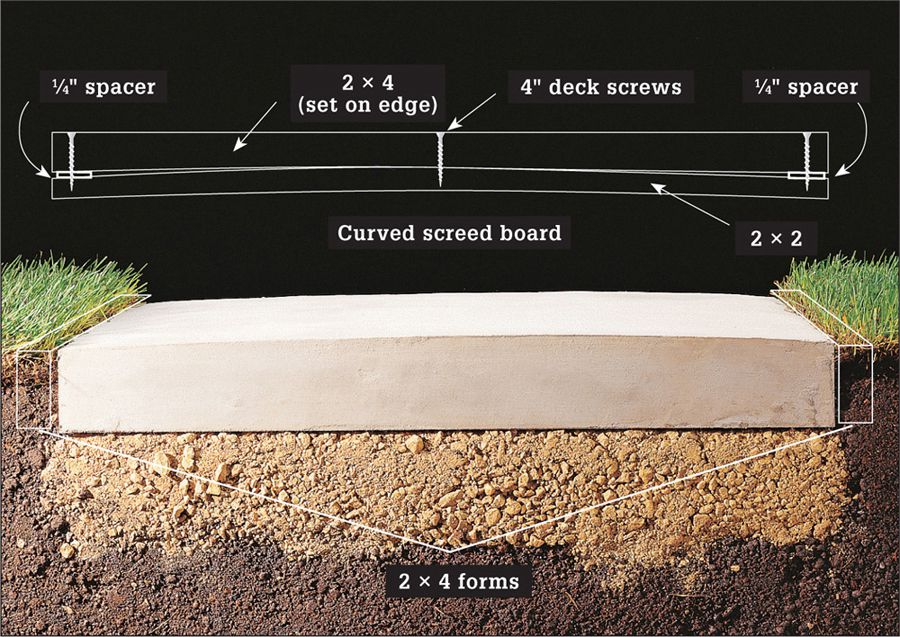
Crowned slope: When a walkway does not run near the house foundation, you have the option of crowning the surface so it slopes down to both sides. To make the crown, construct a curved screed board by cutting a 2 × 2 and a 2 × 4 long enough to rest on both sides of the concrete form. Sandwich the boards together with a 1/4"-thick spacer at each end, then fasten the assembly with 4" deck screws driven at the center and the ends. Use the board to screed the concrete (see step 8, page 162).
 Reinforcing a Walkway
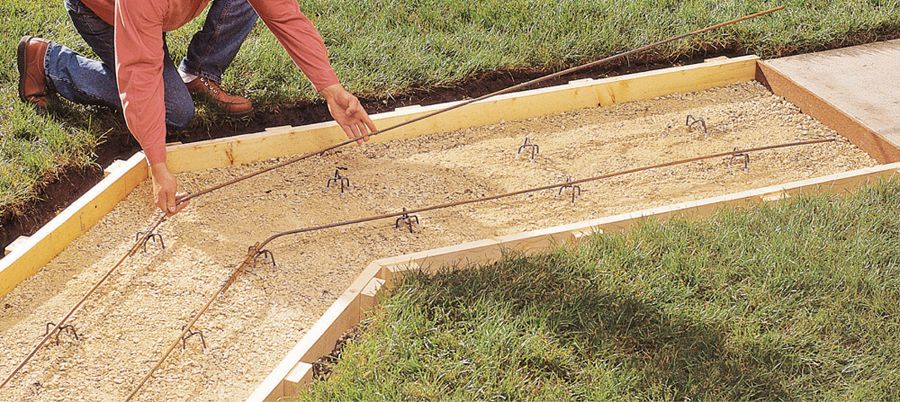
As an alternative to the wire mesh reinforcement used in the following project, you can reinforce a walkway slab with metal rebar (check with the local building code requirements). For a 3-ft.-wide walkway, lay two sections of #3 rebar spaced evenly inside the concrete form. Bend the rebar as needed to follow curves or angles. Overlap pieces by 12" and tie them together with tie wire. Use wire bolsters to suspend the bar in the middle of the slab’s thickness.
 How to Install a Poured Concrete Walkway
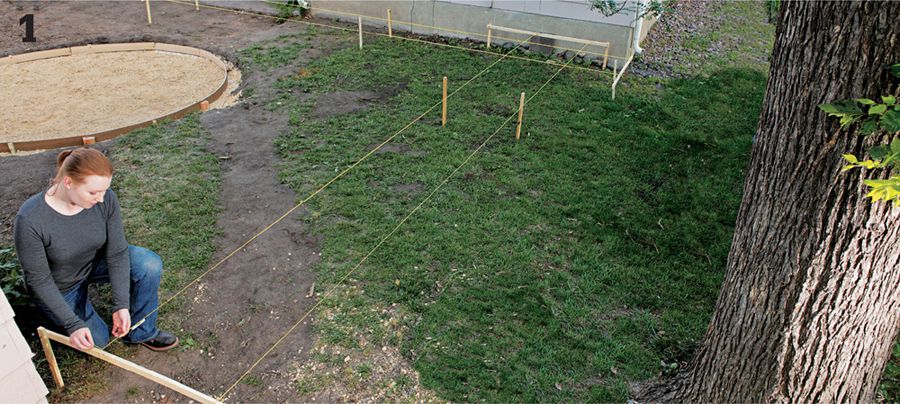
Lay out the precise edges of the finished walkway using stakes (or batterboards) and mason’s string (see pages 42 to 45 for additional help with setting up and using layout strings). Where possible, set stakes 12" or so outside of the walkway edges so they’re out of the way. Make sure any 90° corners are square using the 3-4-5 measuring technique. Level the strings, then lower the strings on one side of the layout to create a downward slope of 1/4" per foot (if the walkway will be crowned instead of sloped to one side, keep all strings level with one another. Cut away the sod or other plantings 6" beyond the layout lines on all sides of the site.
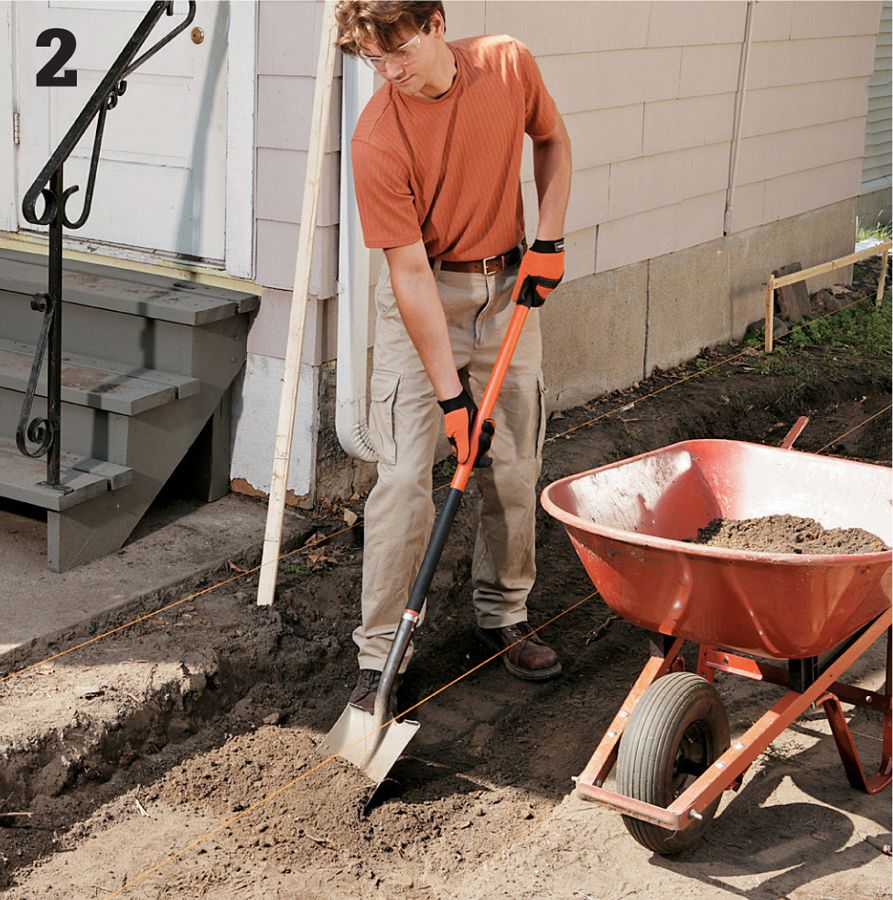
Excavate the site for a 4- to 6"-thick gravel subbase, plus any subgrade (below ground level) portion of the slab, as desired. Measure the depth with a story pole (see page 45) against the high-side layout strings, then use a slope gauge (see page 150) to grade the slope. Tamp the soil thoroughly with a plate compactor.
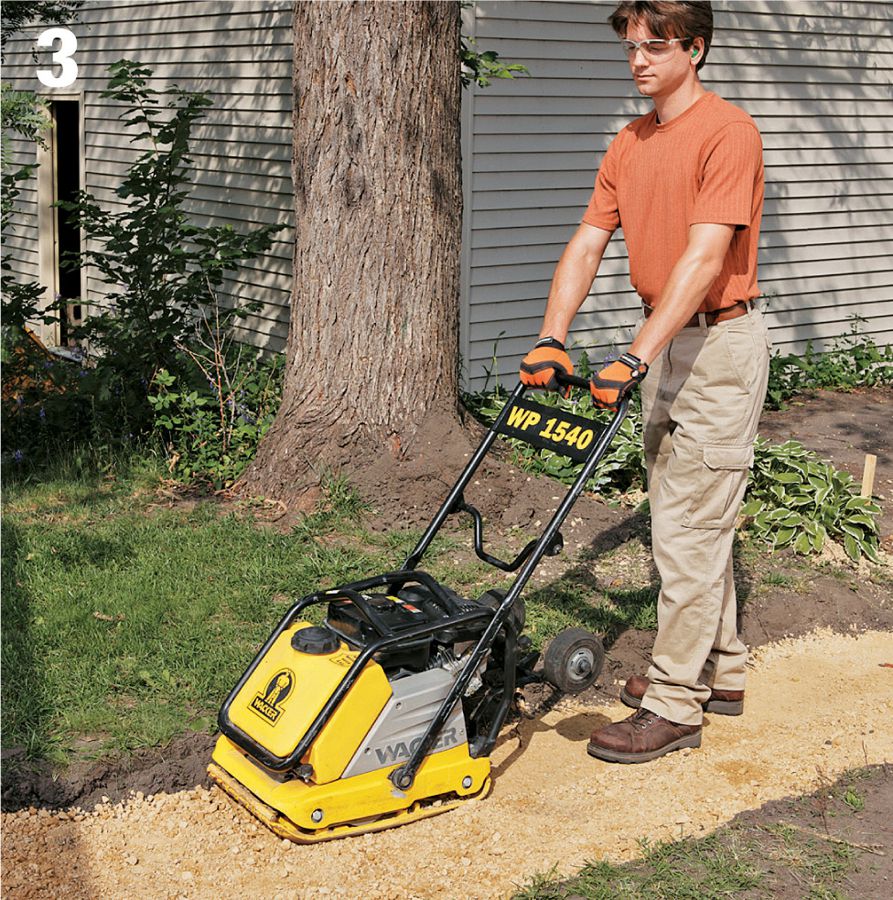
Cover the site with a 4- to 6"-layer of gravel and screed the surface flat, checking with a slope gauge to set the proper grade. Compact the gravel so the top surface is 4" below the finished walkway height. Reset the layout strings at the precise height of the finished walkway.
Build the concrete form with straight 2 × 4 lumber so the inside faces of the form are aligned with the strings. Drive 2 × 4 stakes for reinforcement behind butt joints. Align the form with the layout strings, and then drive stakes at each corner and every 2 to 3 ft. in-between. Fasten the form to the stakes so the top inside corner of the form boards are just touching the layout strings. The tops of the stakes should be just below the tops of the form.
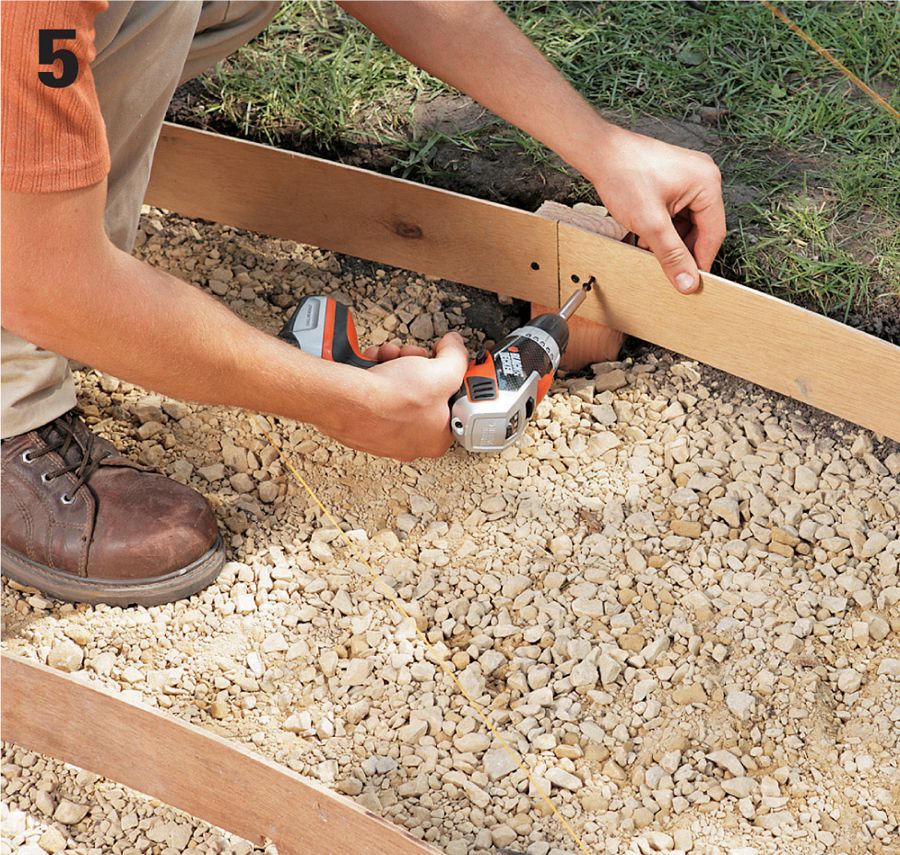
Add curved strips made from 1/4- to 3/8"-thick plywood hardboard or lauan to create curved corners, if desired. Secure curved strips by screwing them to wood stakes. Recheck the gravel bed inside the concrete form, making sure it is smooth and properly sloped.
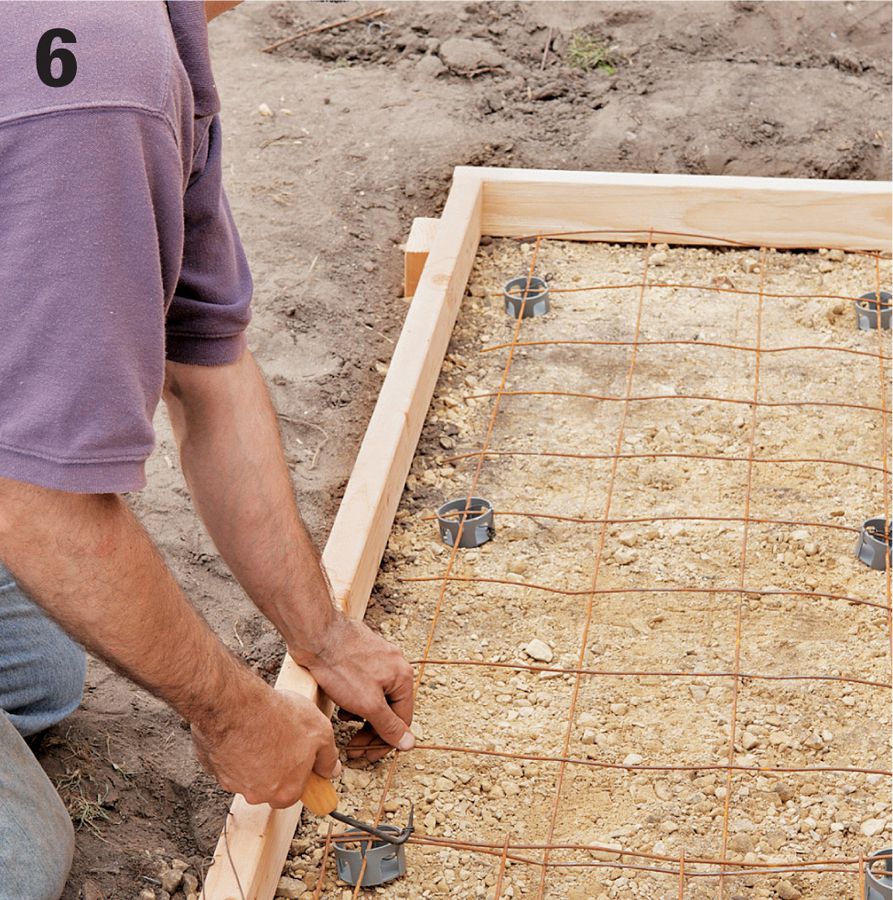
Lay reinforcing wire mesh over the gravel base, keeping the edges 1 to 2" from the insides of the form. Overlap the mesh strips by 6" (one square) and tie them together with tie wire. Prop up the mesh on 2" bolsters placed every few feet and tied to the mesh with wire. Install isolation board where the walkway adjoins other slabs or structures. When you’re ready for the concrete pour, coat the insides of the form with a release agent or vegetable oil.
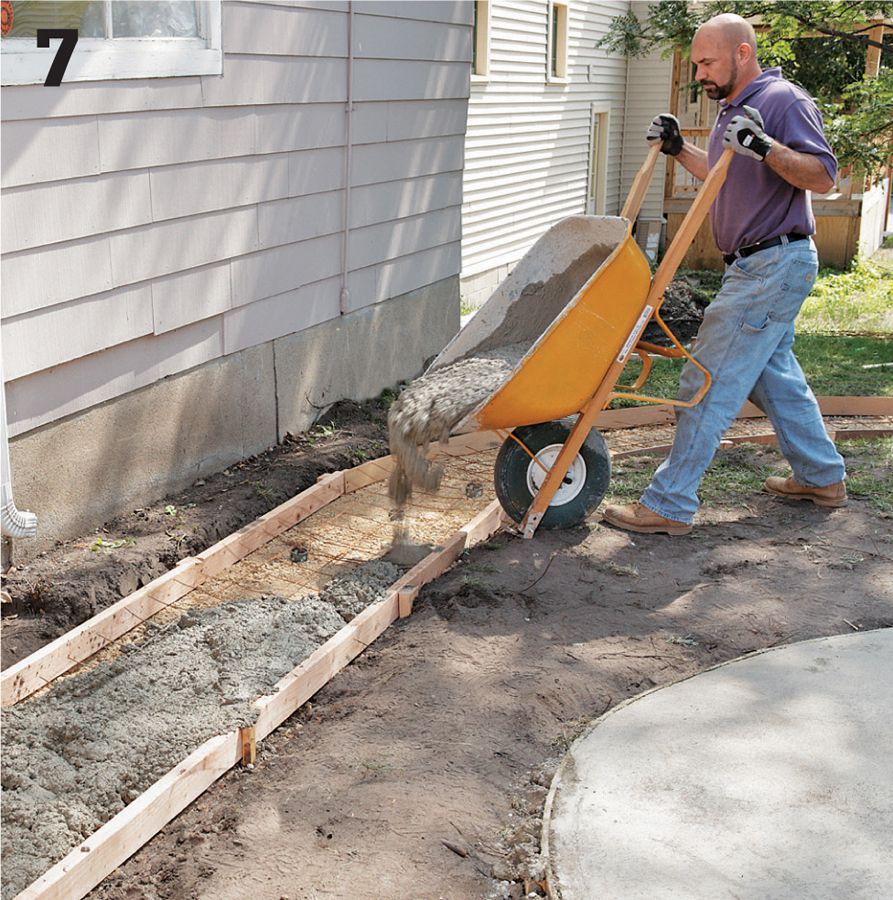
Drop the concrete in pods, starting at the far end of the walkway. Distribute it around the form by placing it (don’t throw it) with a shovel. As you fill, stab into the concrete with the shovel, and tap a hammer against the back sides of the form to eliminate air pockets. Continue until the form is evenly filled, slightly above the tops of the form.
Immediately screed the surface with a straight 2 × 4: two people pull the board backward in a side-to-side sawing motion with the board resting on top of the form. As you work, shovel in extra concrete to fill low spots or remove concrete from high spots, and re-screed. The goal is to create a flat surface that’s level with the top of the form.
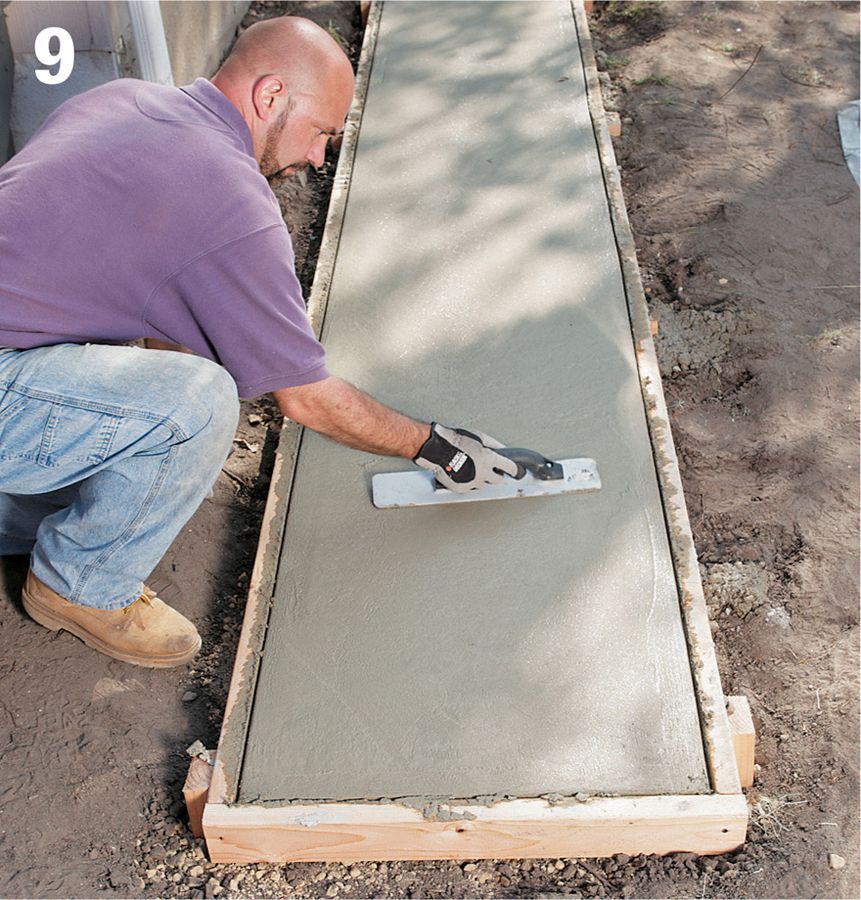
Float the concrete surface with a magnesium float, working back and forth in broad arching strokes. Tip up the leading edge of the tool slightly to prevent gouging the surface. Stop floating once the surface is relatively smooth and has a wet sheen. Be careful not to over-float, indicated by water pooling on the surface. Allow the bleed water to disappear and the concrete to harden sufficiently (see page 96).

Use an edger to shape the side edges of the walkway along the wood form. Carefully run the edger back and forth along the form to create a smooth, rounded corner, lifting the leading edge of the tool slightly to prevent gouging.
Mark the locations of the control joints onto the top edges of the form boards, spacing the joints at intervals 1 1/2 times the width of the walkway.
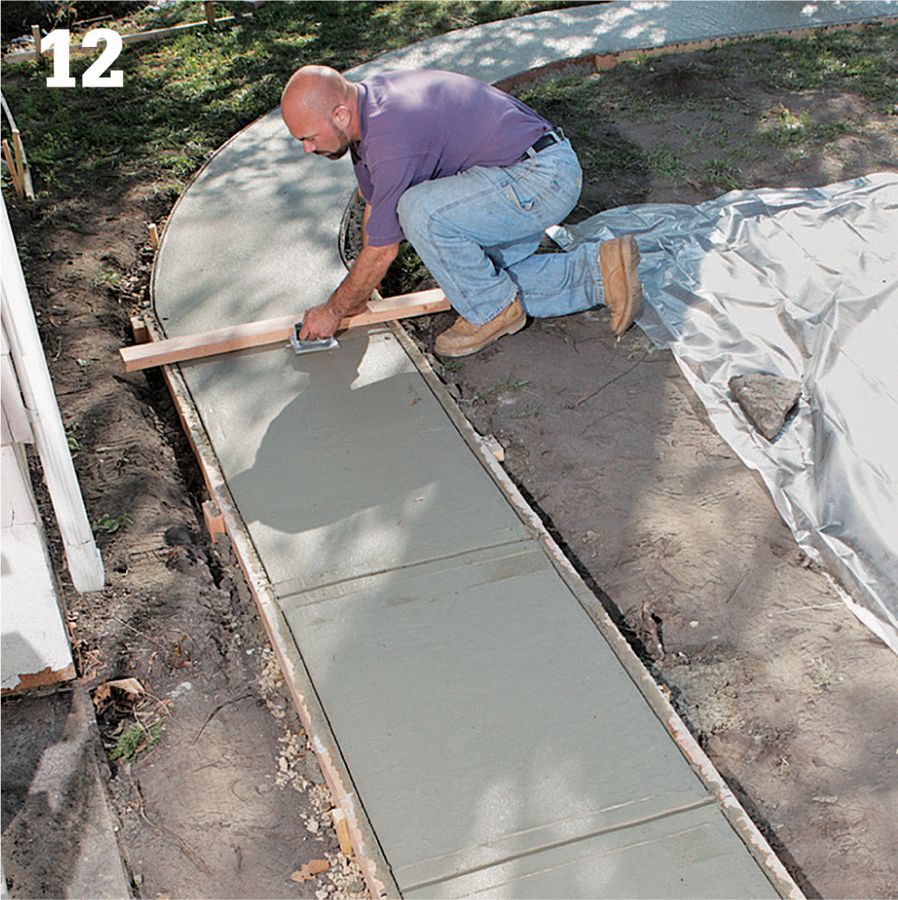
Cut the control joints with a 1" groover guided by a straight 2 × 4 held (or fastened) across the form at the marked locations. Make several light passes back and forth until the groove reaches full depth, lifting the leading edge of the tool to prevent gouging. Remove the guide board once each joint is complete. If desired, smooth out the marks made by the groover using a magnesium trowel.
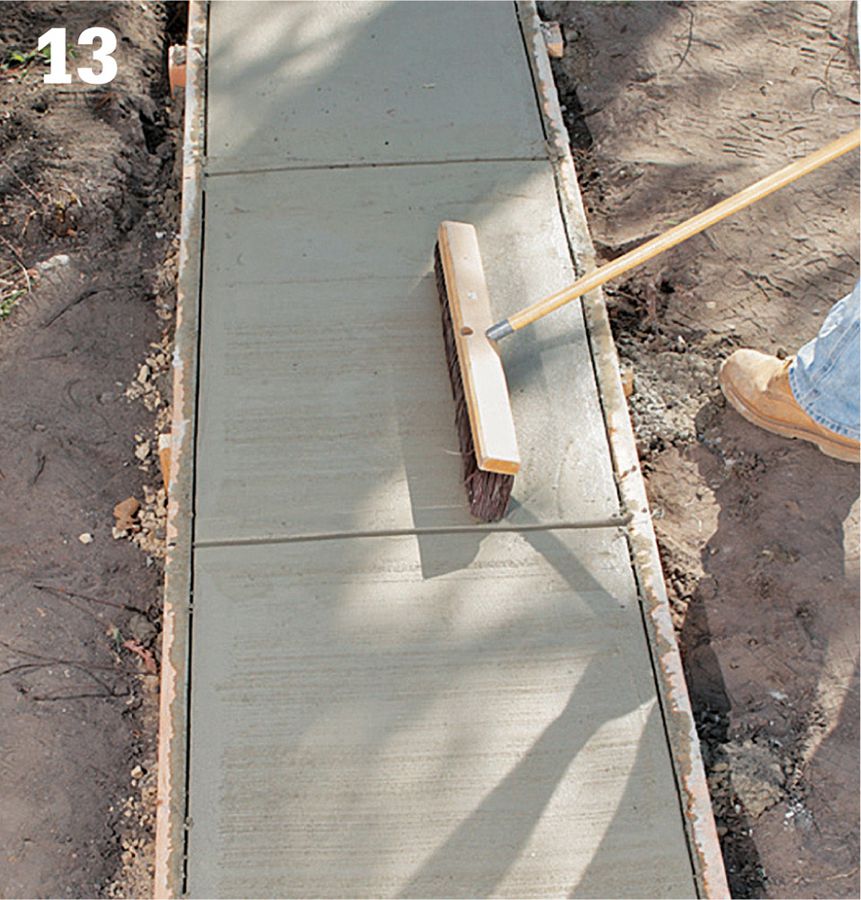
Create a nonslip surface with a broom finish: starting at the far side edge of the walkway, steadily drag a broom backward over the surface in a straight line using a single pulling motion. Repeat in single, parallel passes (with minimal or no overlap), and rinse off the broom bristles after each pass. The stiffer and coarser the broom, the rougher the texture will be.
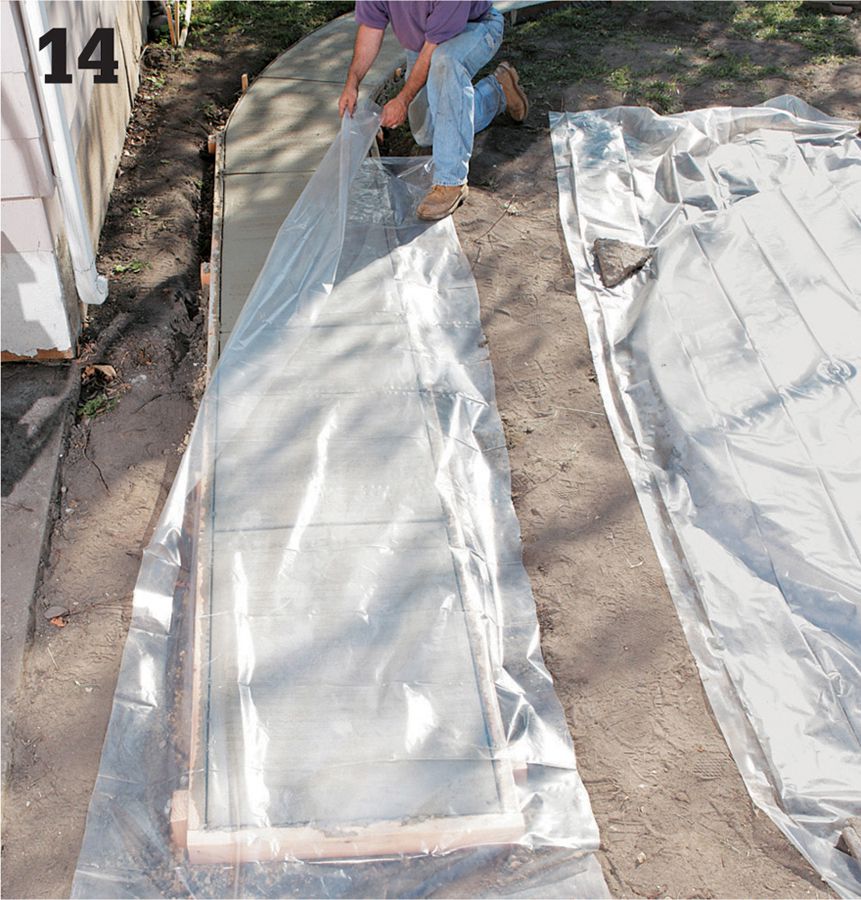
Cure the concrete by misting the walkway with water, then covering it with clear polyethylene sheeting. Smooth out any air pockets (which can cause discoloration), and weight down the sheeting along the edges. Mist the surface and reapply the plastic daily for 1 to 2 weeks.
 Decorative Concrete Path
A well-made walkway or garden path not only stands up to years of hard use, it enhances the natural landscape and complements a home’s exterior features. While traditional walkway materials like brick and stone have always been prized for both appearance and durability, most varieties are quite pricey and often difficult to install. As an easy and inexpensive alternative, you can build a new concrete path using manufactured forms. The result is a beautiful pathway that combines the custom look of brick or natural stone with all the durability and economy of poured concrete.
Building a path is a great do-it-yourself project. Once you’ve laid out the path, you mix the concrete, set and fill the form, then lift off the form to reveal the finished design. After a little troweling to smooth the surfaces, you’re ready to create the next section—using the same form. Simply repeat the process until the path is complete. Each form creates a section that’s approximately two square feet using one 80-lb. bag of premixed concrete. This project shows you all the basic steps for making any length of pathway, plus special techniques for making curves, adding a custom finish, or coloring the concrete to suit your personal design.
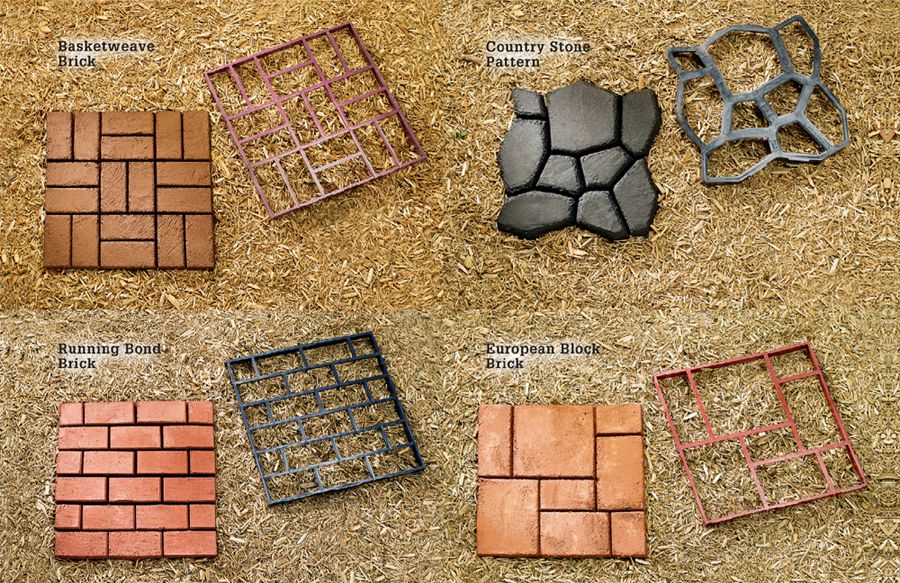
Concrete path molds are available in a range of styles and decorative patterns. Coloring the wet concrete is a great way to add a realistic look to the path design.
 How to Create a Straight or 90° Decorative Concrete Path
Prepare the project site by leveling the ground, removing sod or soil as needed. For a more durable base, excavate the area and add 2 to 4" of compactable gravel. Grade and compact the gravel layer so it is level and flat. See pages 148 to 151 for detailed steps on layout and site preparation.
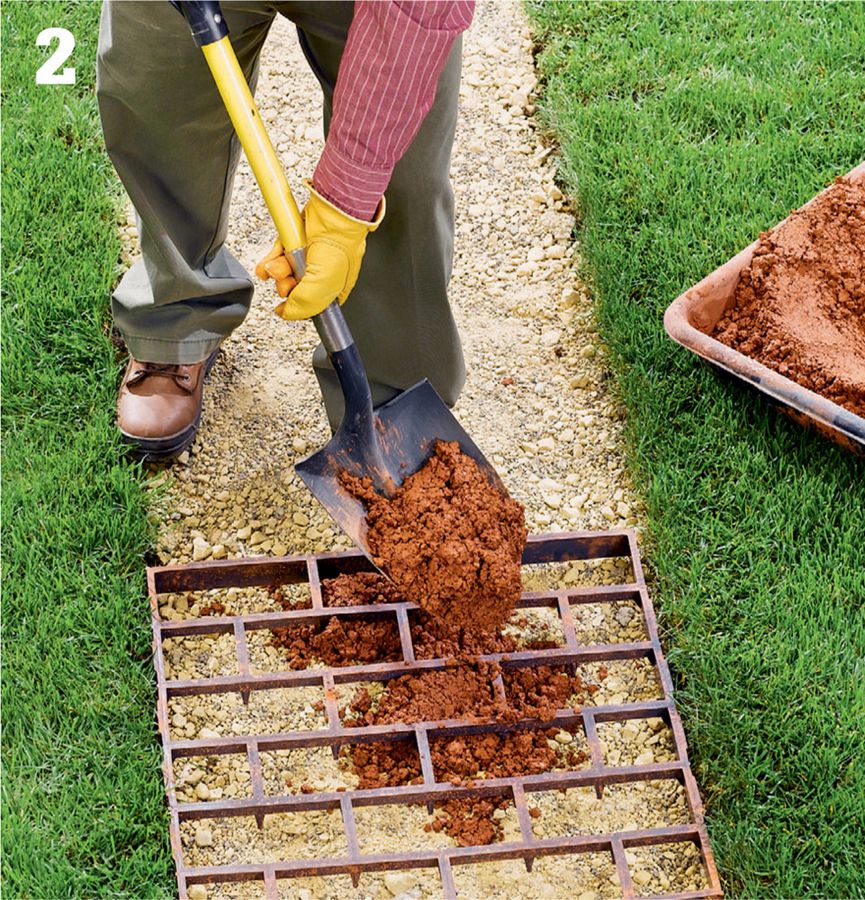
Mix a batch of concrete for the first section, following the product directions (see page 166 to add color, as we have done here). Place the form at the start of your path and level it, if desired. Shovel the wet concrete into the form to fill each cavity. Consolidate and smooth the surface of the form using a concrete margin trowel.

Promptly remove the form, and then trowel the edges of the section to create the desired finish (it may help to wet the trowel in water). For a nonslip surface, broom the section or brush it with a stiff brush. Place the form against the finished section and repeat steps 2 and 3 to complete the next section.

After removing each form, remember to trowel the edges of the section to create the desired finish. Repeat until the path is finished. If desired, rotate the form 90° with each section to vary the pattern. Cure the path by covering it with polyethylene sheeting for 5 to 7 days, lifting the plastic and misting the concrete with water each day.
Fill walkway joints with sand or mortar mix to mimic the look of hand-laid stone or brick. Sweep the sand or dry mortar into the section contours and spaces between sections. For mortar, mist the joints with water so they harden in place.
 How to Create a Curved Decorative Concrete Path
After removing the form from a freshly poured section (see page 165, steps 1 through 3), reposition the form in the direction of the curve and press down to slice off the inside corner of the section.
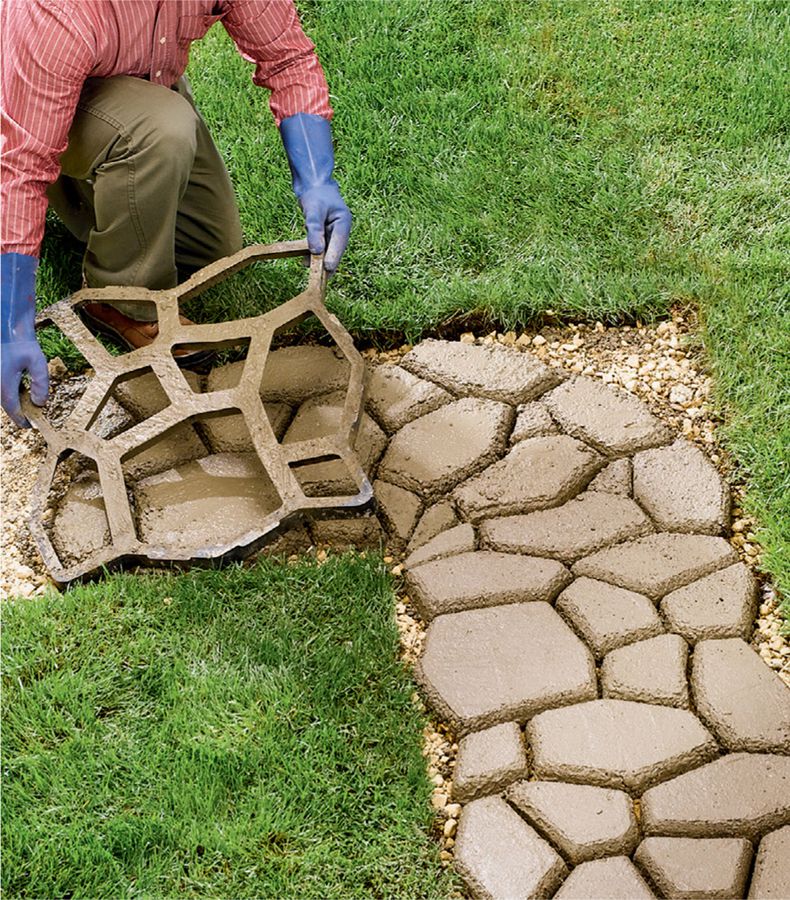
Trowel the cut edge (and the rest of the section) to finish. Pour the next section following the curve. Cut off as many sections as needed to complete the curve. Cure the path by covering it with plastic sheeting for 5 to 7 days, lifting the plastic and misting the concrete with water each day.

Sprinkle the area around the joint or joints between pavers with polymer-modified jointing sand after the concrete has cured sufficiently so that the sand does not adhere. Sweep the product into the gap to clean the paver surfaces while filling the gap.
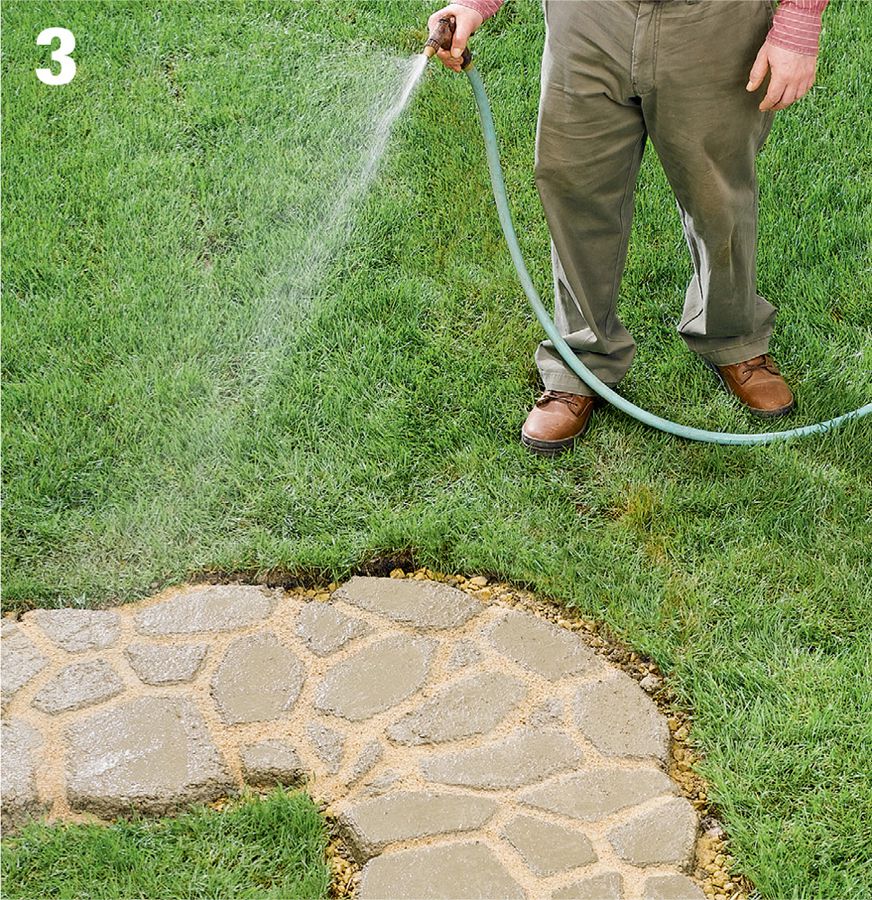
Mist the jointing sand with clean water, taking care not to wash the sand out of the joint. Once the water dries, the polymers in the mixture will have hardened the sand to look like a mortar joint. Refresh as needed.
 Mortared Brick Over a Concrete Path
If you’re looking to makeover an aging concrete walkway, you can’t beat the looks and performance of mortared brick paving. The flat, finished surface is ideal for both heavy foot traffic and garden equipment and is nearly as maintenance-free as plain concrete, while the formal elegance of brick is a dramatic upgrade over a timeworn, gray slab. If your plans include new paving over an old concrete patio, a walkway is also the perfect opportunity to develop your skills before tackling the larger patio surface—the materials and techniques are the same for both applications.
Start your walkway project with a careful examination of the concrete path: as the structural foundation of your new surface, the concrete must be stable and relatively flat. Large cracks and uneven surfaces indicate movement of the concrete structure, often due to problems with the gravel base and/or inadequate drainage under the slab. Since these ailments won’t go away with the new paving, you can either decide to replace the old concrete with a newly poured walkway or consider a mortarless surface, such as sandset brick. With that in mind, minor surface problems, such as fine cracks and cosmetic flaws, will not likely affect new mortared paving.
When shopping for pavers, consider the added height of the new surface, the paving pattern you desire, and the material of the pavers themselves. Natural clay brick pavers are available in standard (approximately 2 3/8-inch) and thinner (approximately 1 1/2-inch) thicknesses. Concrete pavers are installed using the same techniques, and they come in a range of sizes, thicknesses, and shapes. In any case, be sure to choose straight-sided pavers, as irregular or interlocking shapes make for unnecessarily tricky mortar work. Consult with knowledgeable staff at your masonry supplier to learn about paver materials and mortar suitable for your project and the local climate.
The natural, warm color of brick is a dramatic yet DIY-friendly upgrade for a tired-looking gray slab.
 How to Install Mortared Brick over a Concrete Path
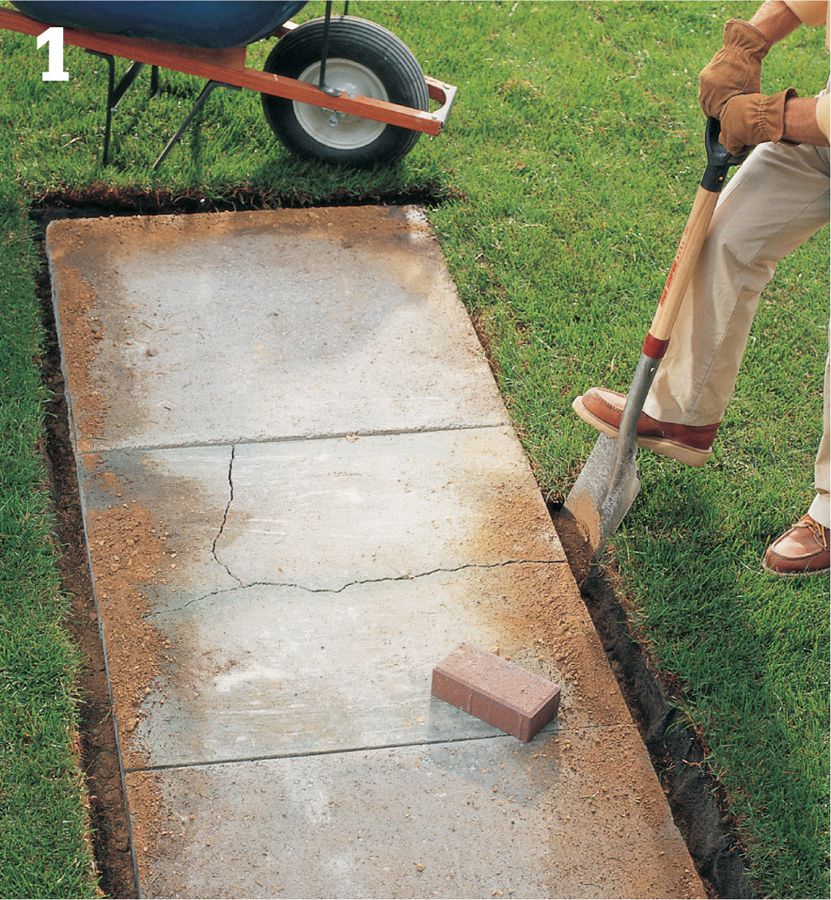
Dig a trench around the concrete path, slightly wider than the thickness of one paver. Dig the trench so it is about 3 1/2" below the concrete surface (for standard-sized pavers).
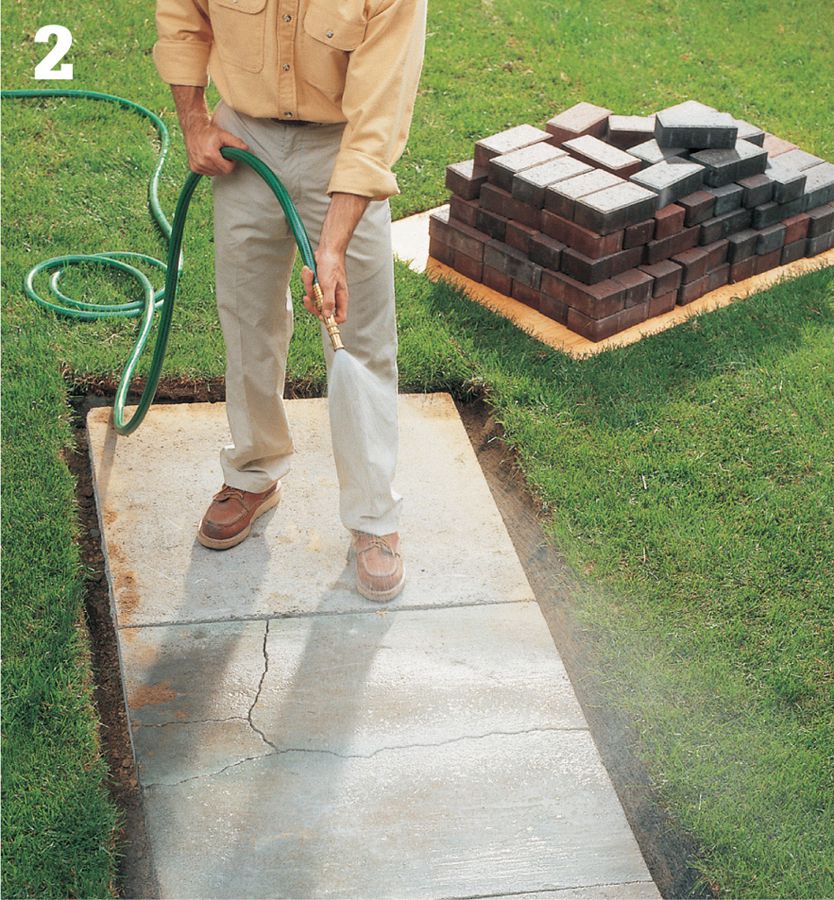
Sweep the old concrete, then hose off the surface and sides with water to clear away dirt and debris. Soak the pavers with water before mortaring; dry pavers absorb moisture, weakening the mortar strength. Mix a small batch of mortar according to manufacturer’s directions. For convenience, place the mortar on a scrap of plywood.
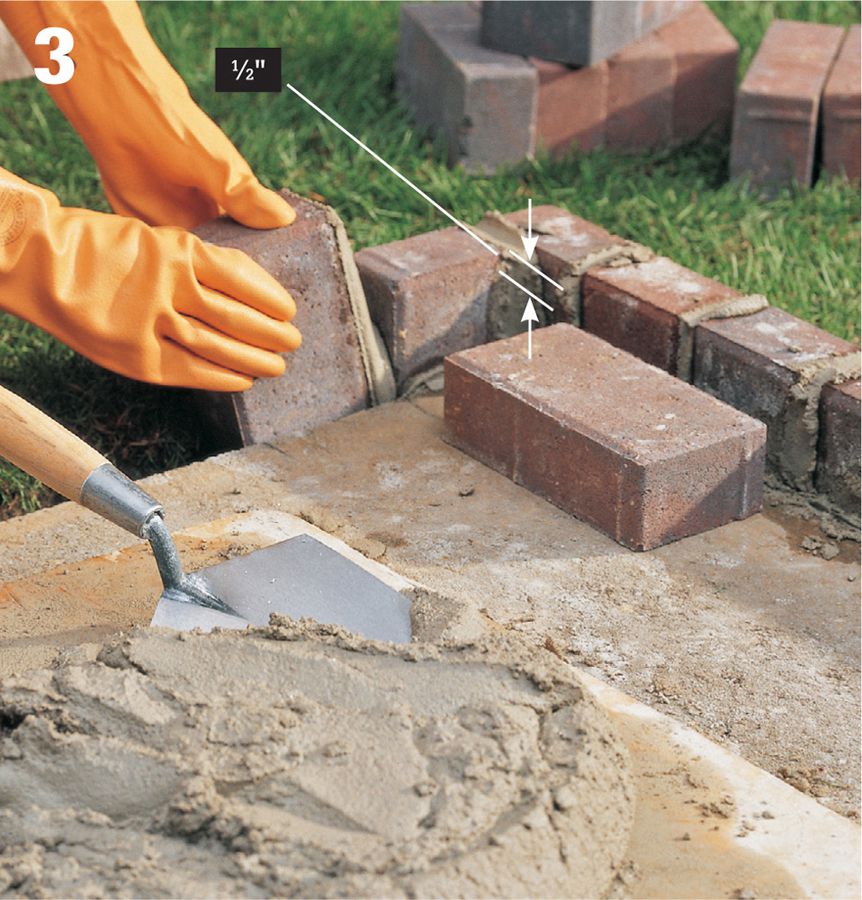
Install edging bricks by applying a 1/2" layer of mortar to the side of the concrete slab and to one side of each brick. Set bricks into the trench, against the concrete. Brick edging should be 1/2" higher than the thickness of the brick pavers.
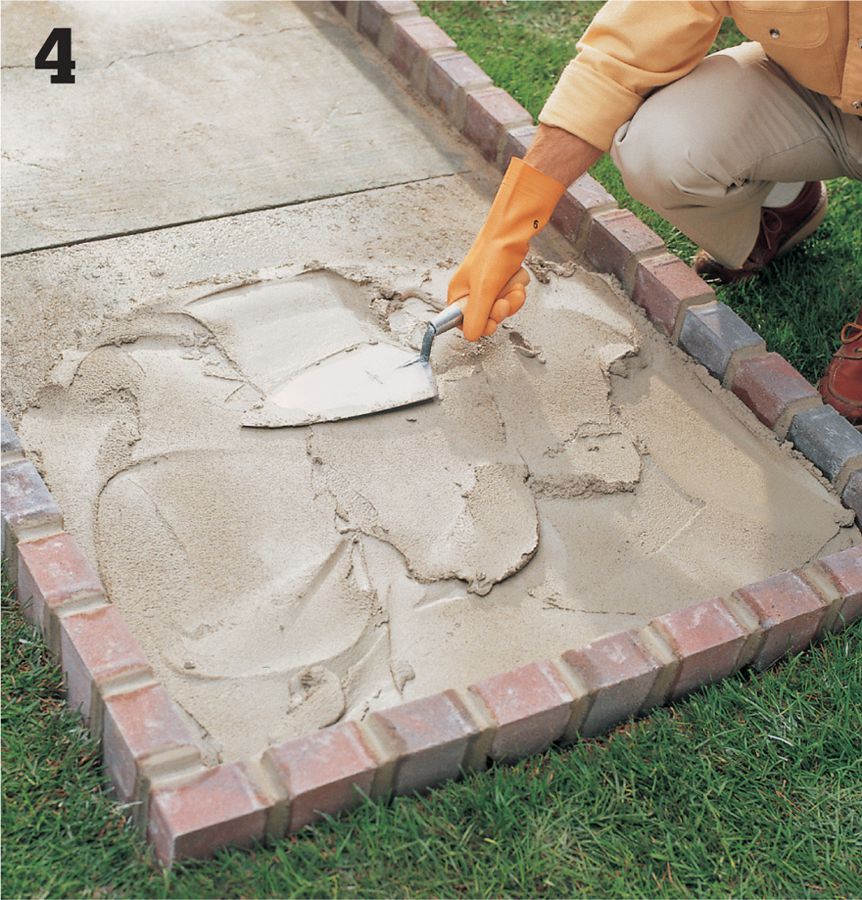
Finish the joints on the edging bricks with a V-shaped mortar tool, then mix and apply a 1/2"-thick bed of mortar to one end of the sidewalk using a trowel. Mortar hardens very quickly, so work in sections no larger than 4 sq. ft.
Make a screed board for smoothing the mortar by notching the ends of a straight 2 × 4 or 2 × 6 to fit between the edging bricks. The depth of the notches should equal the thickness of the pavers. Drag the screed across the mortar bed until the mortar is smooth.
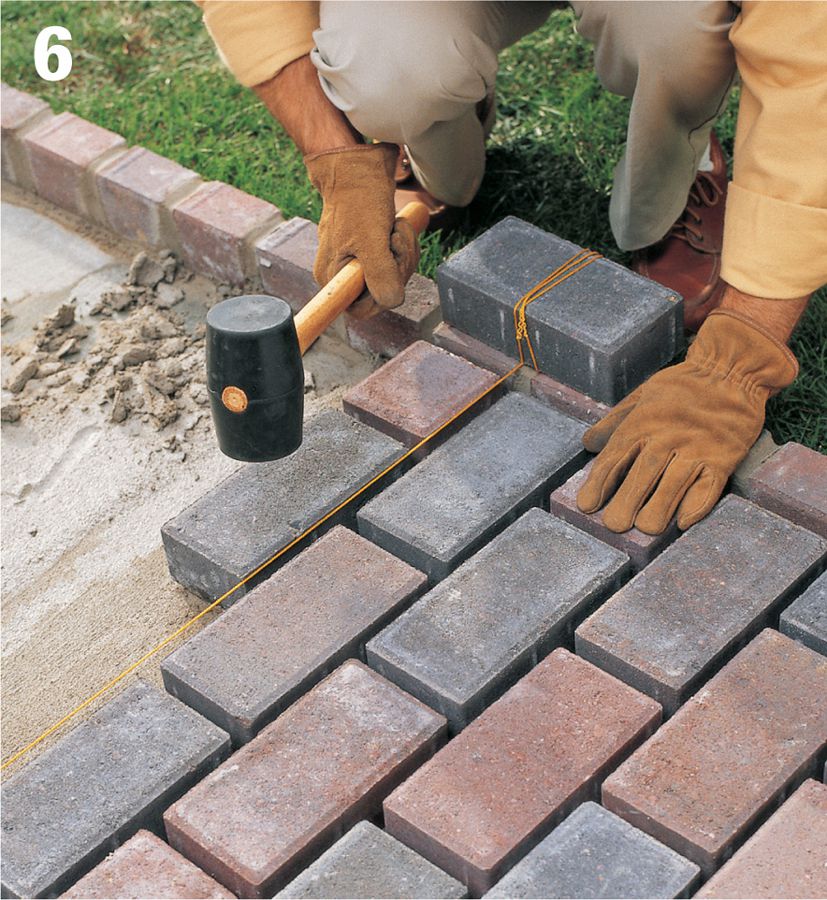
Lay the paving bricks one at a time into the mortar, maintaining a 1/2" gap between pavers. (A piece of scrap plywood works well as a spacing guide.) Set the pavers by tapping them lightly with a rubber mallet.
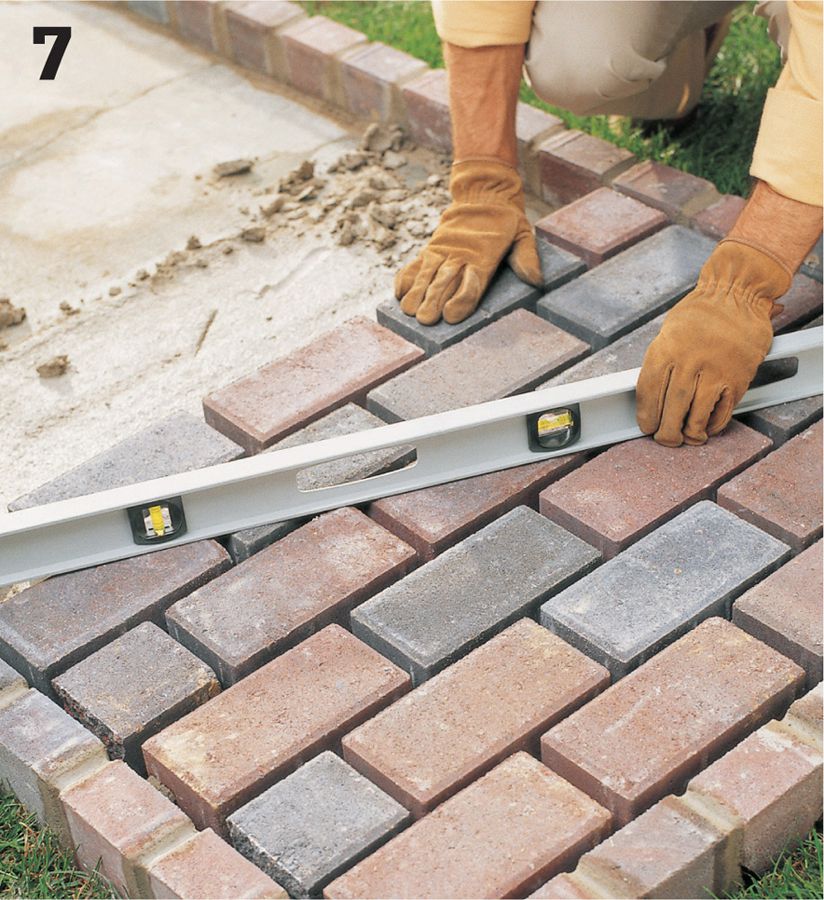
As each section of pavers is completed, check with a straightedge or level to make sure the tops of the pavers are even. If a paver is too high, press it down or tap it with the rubber mallet; if too low, lift it out and butter its back face with mortar and reset it.
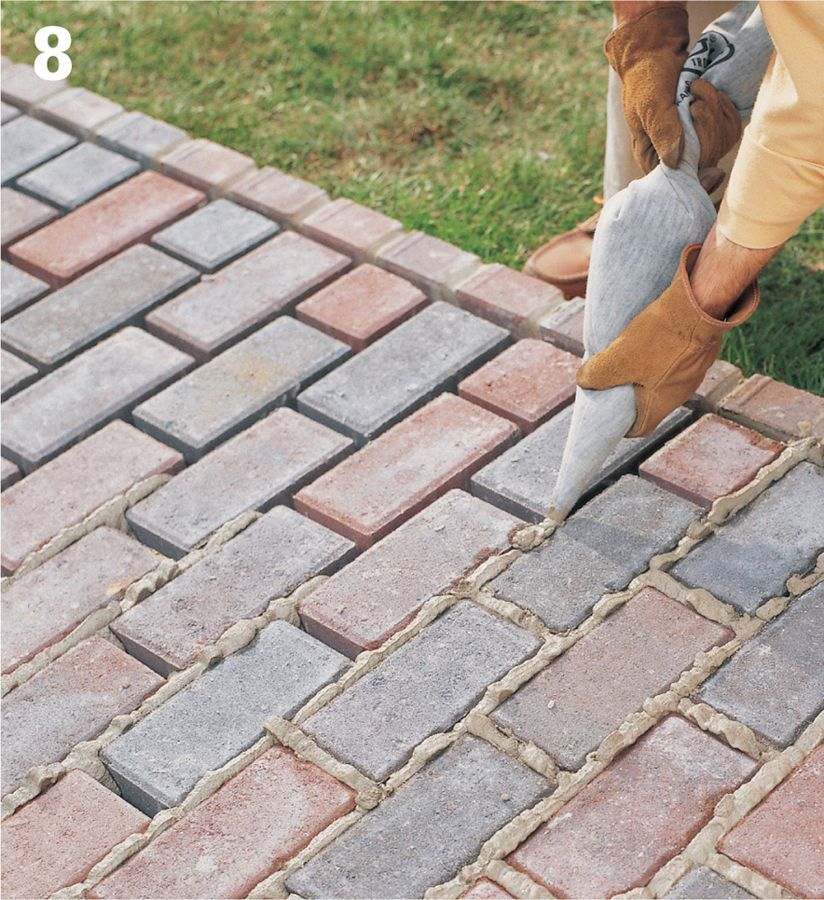
When all the pavers are installed, use a mortar bag to fill the joints between the pavers with fresh mortar. Work in 4-sq.-ft. sections, and avoid getting mortar on the tops of the pavers.
Use a V-shaped mortar tool to finish the joints as you complete each 4-sq.-ft. section. For best results, finish the longer joints first, then the shorter joints. Use a trowel to remove excess mortar.
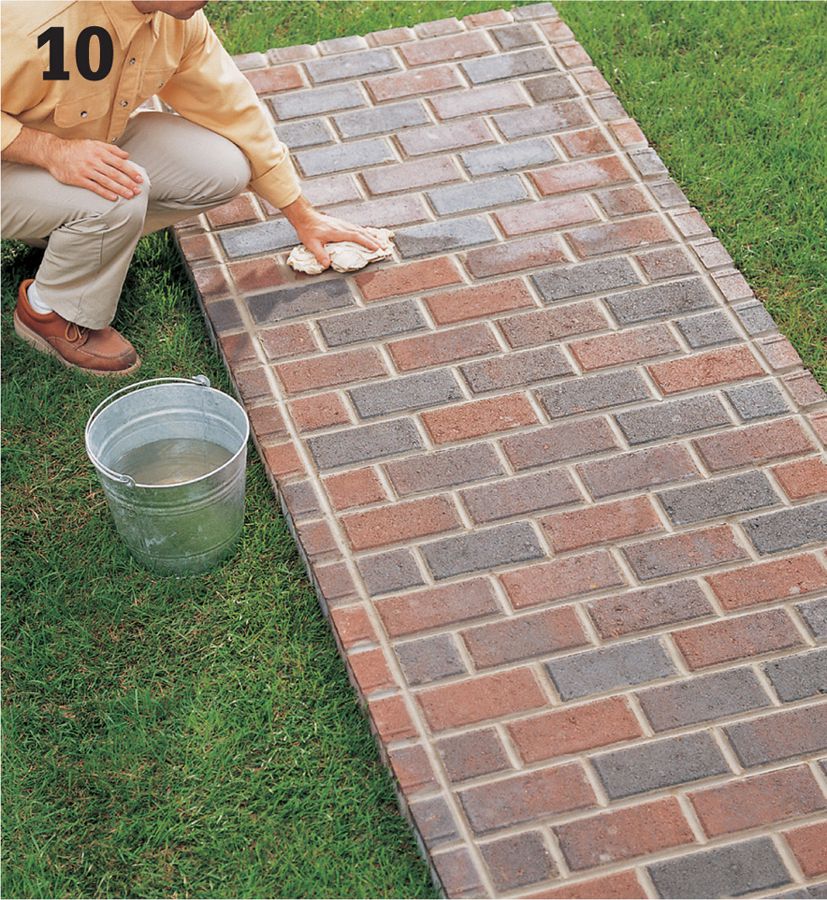
Let the mortar dry for a few hours, then scrub the pavers with a coarse rag and water. Cover the walkway with polyethylene sheeting and let the mortar cure for at least 24 hours. Remove sheeting, but do not walk on the pavers for at least three days.
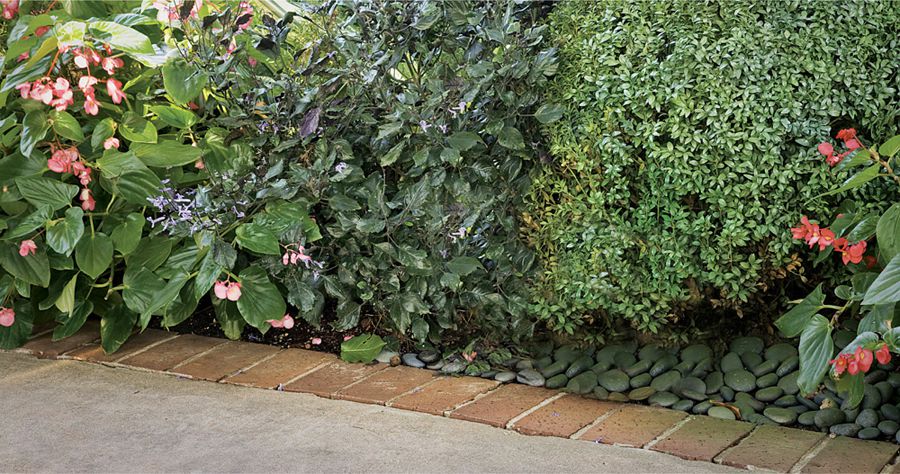
Variation: As an alternative to paving over an entire walkway (if the old concrete still looks good), add a decorative touch with a border of mortared pavers along the edges. The same treatment is great for dressing up the exposed edges of a concrete patio, stoop, or steps. To install edging along a walkway, follow the basic techniques shown in steps 1 to 4 on page 169, but set the pavers flush with the walkway surface. Position the pavers horizontally or vertically, depending on the height of the walkway and the desired effect. After the pavers are set and tooled, follow step 10 above to complete the job.
 Flagstone Walkway
Natural flagstone is an ideal material for creating landscape floors. It’s attractive and durable and blends well with both formal and informal landscapes. Although flagstone structures are often mortared, they can also be constructed with the sand-set method. Sand-setting flagstones is much faster and easier than setting them with mortar.
There are a variety of flat, thin sedimentary rocks that can be used for this project. Home and garden stores often carry several types of flagstone, but stone supply yards usually have a greater variety. Some varieties of flagstone cost more than others, but there are many affordable options. When you buy the flagstone for your project, select pieces in a variety of sizes from large to small. Arranging the stones for your walkway is similar to putting together a puzzle, and you’ll need to see all the pieces laid out.
The following example demonstrates how to build a straight flagstone walkway with wood edging. If you’d like to build a curved walkway, select another edging material, such as brick or cut stone. Instead of filling gaps between stones with sand, you might want to fill them with topsoil and plant grass or some other ground cover between the stones. See pages 148 to 149 for help with designing a walkway and preparing the project site.
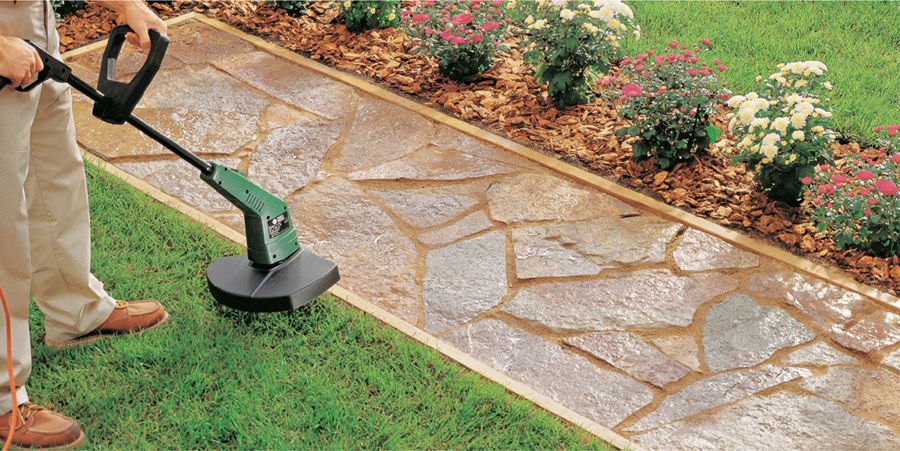
Flagstone walkways combine durability with beauty and work well for casual or formal landscapes.
 How to Build a Flagstone Walkway
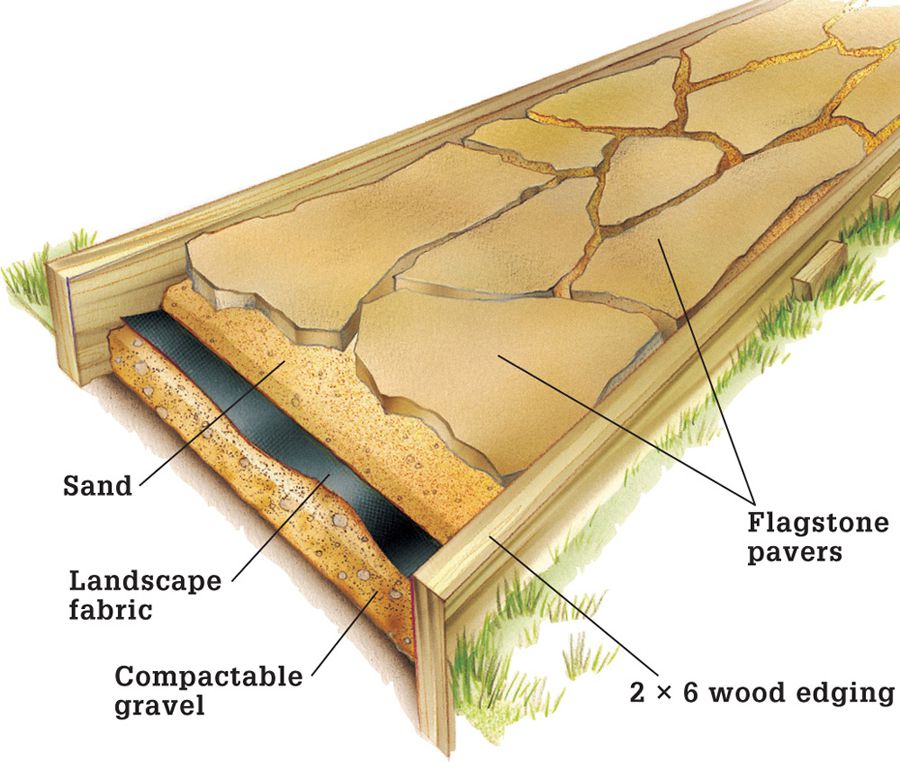
Lay out, excavate, and prepare the base for the walkway. Form edging by installing 2 × 6 pressure-treated lumber around the perimeter of the pathway. Drive stakes on the outside of the edging, spaced 12" apart. The tops of the stakes should be below ground level. Drive galvanized screws through the edging and into the stakes.
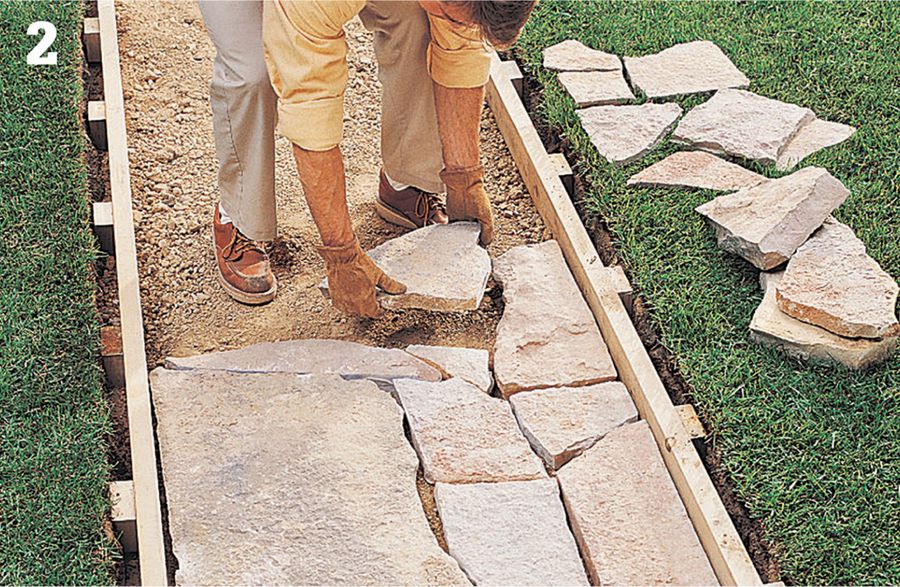
Test-fit the stones over the walkway base, finding an attractive arrangement that limits the number of cuts needed. The gaps between the stones should range between 3/8 and 2" wide. Use a pencil to mark the stones for cutting, then remove the stones and place them beside the walkway in the same arrangement. Score along the marked lines with a circular saw and masonry blade set to 1/8" blade depth. Set a piece of wood under the stone, just inside the scored line. Use a masonry chisel and maul to strike along the scored line until the stone breaks.
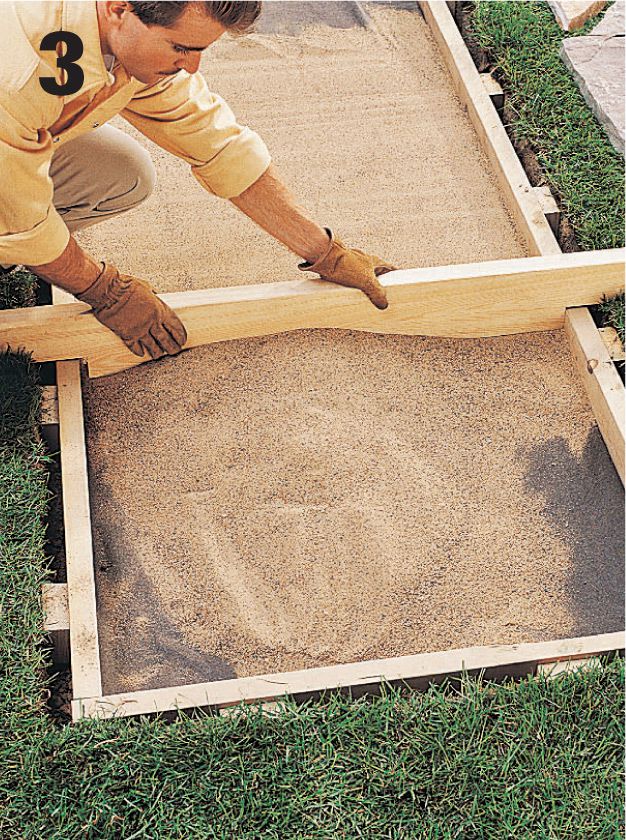
Lay overlapping strips of landscape fabric over the walkway base and spread a 2"-layer of sand over it. Make a screed board from a short 2 × 6, notched to fit inside the edging. Pull the screed from one end of the walkway to the other, adding sand as needed to create a level base.
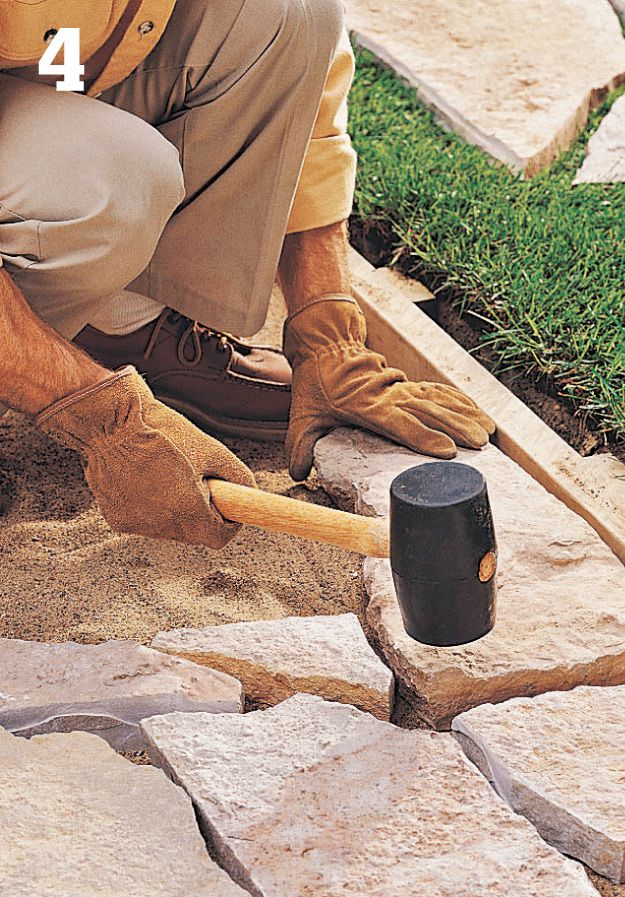
Beginning at one corner of the walkway, lay the flagstones onto the sand base. Repeat the arrangement you created in step 2, with 3/8- to 2"-wide gaps between stones. If necessary, add or remove sand to level the stones, then set them by tapping them with a rubber mallet or a length of 2 × 4.
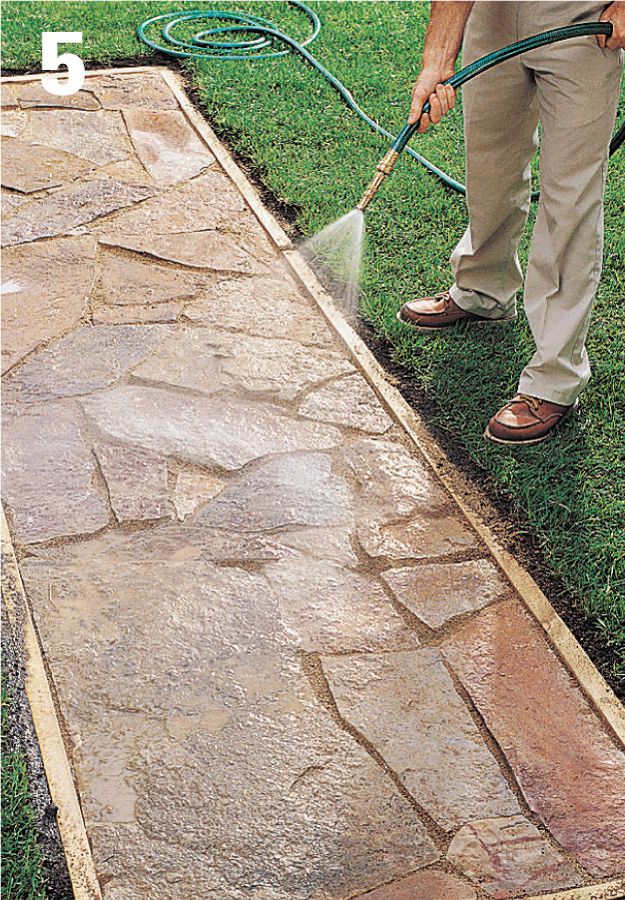
Fill the gaps between the stones with sand. (Use topsoil if you’re going to plant grass or ground cover between the stones.) Pack sand into the gaps, then spray the entire walkway with water to help settle the sand. Repeat until the gaps are completely filled and tightly packed with sand.
Loose materials can be used as filler between solid surface materials, like flagstone, or laid as the primary ground cover, as shown here.
 Simple Gravel Path
Loose-fill gravel pathways are perfect for stone gardens, casual yards, and other situations where a hard surface is not required. The material is inexpensive, and its fluidity accommodates curves and irregular edging. Since gravel may be made from any rock, gravel paths may be matched to larger stones in the environment, tying them in to your landscaping. The gravel you choose need not be restricted to stone, either. Industrial and agricultural byproducts, such as cinder and ashes, walnut shells, seashells, and ceramic fragments may also be used as path material.
For a more stable path, choose angular or jagged gravel over rounded materials. However, if your preference is to stroll throughout your landscape barefoot, your feet will be better served with smoother stones, such as river rock or pond pebbles. With stone, look for a crushed product in the 1/4-to 3/4-inch range. Angular or smooth, stones smaller than that can be tracked into the house, while larger materials are uncomfortable and potentially hazardous to walk on. If it complements your landscaping, use light-colored gravel, such as buff limestone. Visually, it is much easier to follow a light pathway at night because it reflects more moonlight.
Stable edging helps keep the pathway gravel from migrating into the surrounding mulch and soil. When integrated with landscape fabric, the edge keeps invasive perennials and trees from sending roots and shoots into the path. Do not use gravel paths near plants and trees that produce messy fruits, seeds, or other debris that will be difficult to remove from the gravel. Organic matter left on gravel paths will eventually rot into compost that will support weed growth.
A base of compactable gravel under the surface material keeps the pathway firm underfoot. For best results, embed the surface gravel material into the paver base with a plate compactor. This prevents the base from showing through if the gravel at the surface is disturbed. An underlayment of landscape fabric helps stabilize the pathway and blocks weeds, but if you don’t mind pulling an occasional dandelion and are building on firm soil, it can be omitted.
 Construction Details
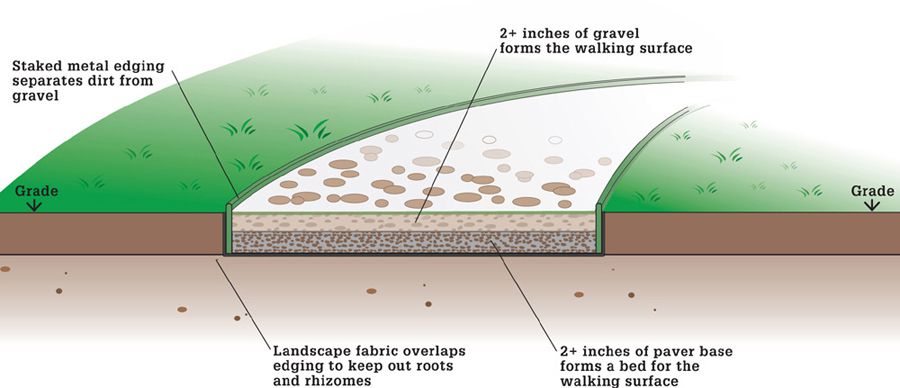
 How to Create a Gravel Pathway
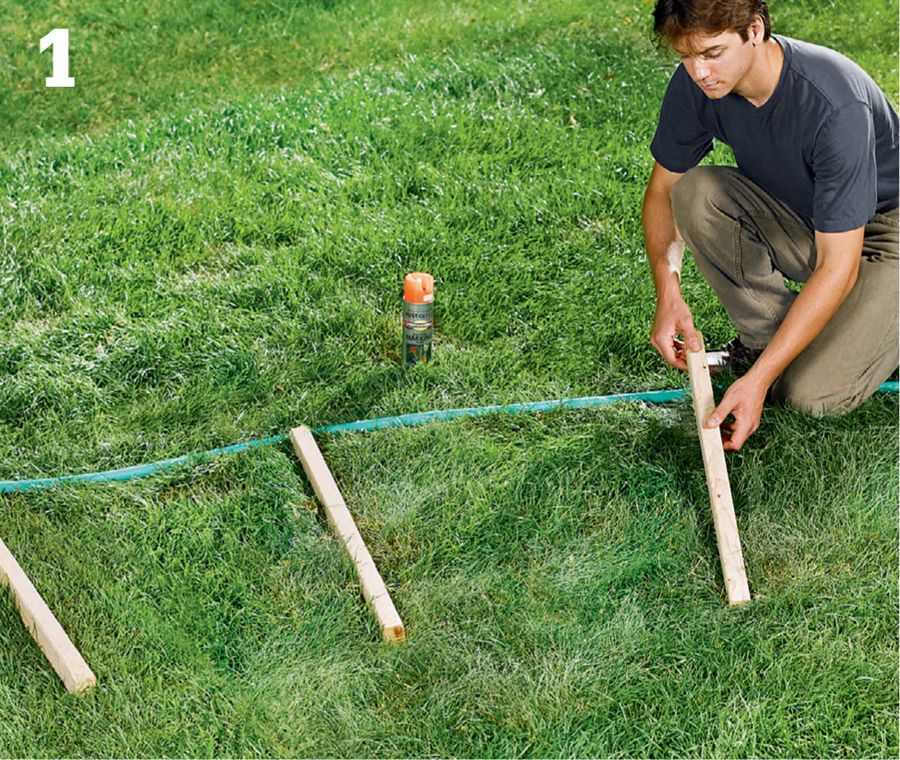
Lay out one edge of the path excavation. Use a section of hose or rope to create curves, and use stakes and string to indicate straight sections (see pages 148 to 149 for detailed steps on designing and laying out a walkway). Cut 1 × 2 spacers to set the path width and establish the second pathway edge; use another hose and/or more stakes and string to lay out the other edge. Mark both edges with marking paint.
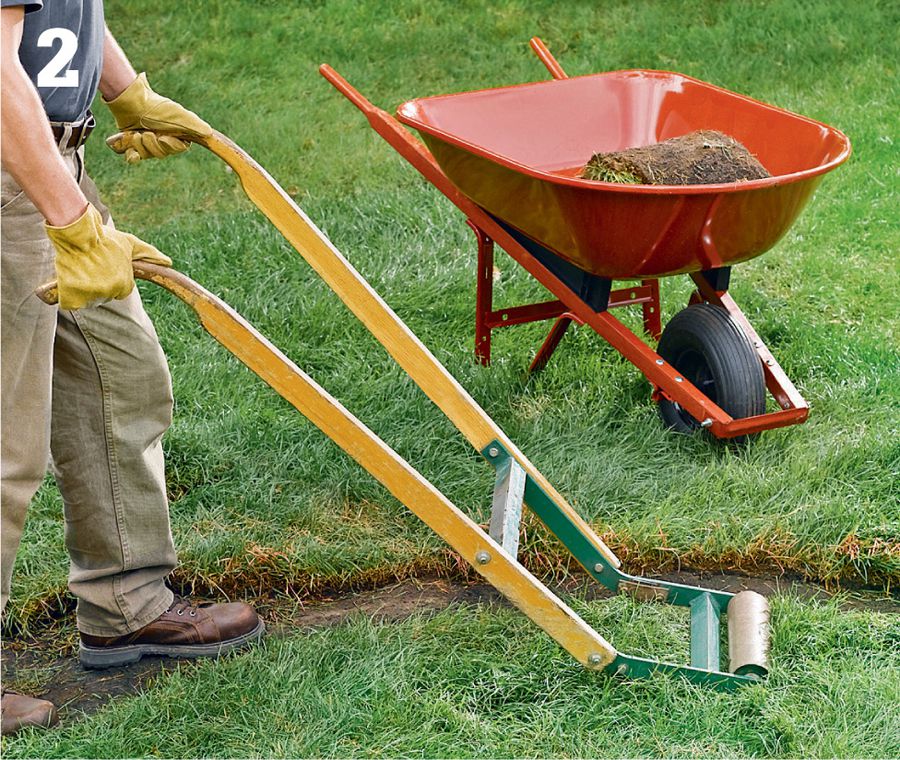
Remove sod in the walkway area using a sod stripper or a power sod cutter (see option, at right). Excavate the soil to a depth of 4 to 6". Measure down from a 2 × 4 placed across the path bed to fine-tune the excavation. Grade the bottom of the excavation flat using a garden rake. Note: If mulch will be used outside the path, make the excavation shallower by the depth of the mulch. Compact the soil with a plate compactor.
Option: Use a power sod cutter to strip grass from your pathway site. Available at most rental centers and large home centers, sod cutters excavate to a very even depth. The cut sod can be replanted in other parts of your lawn.
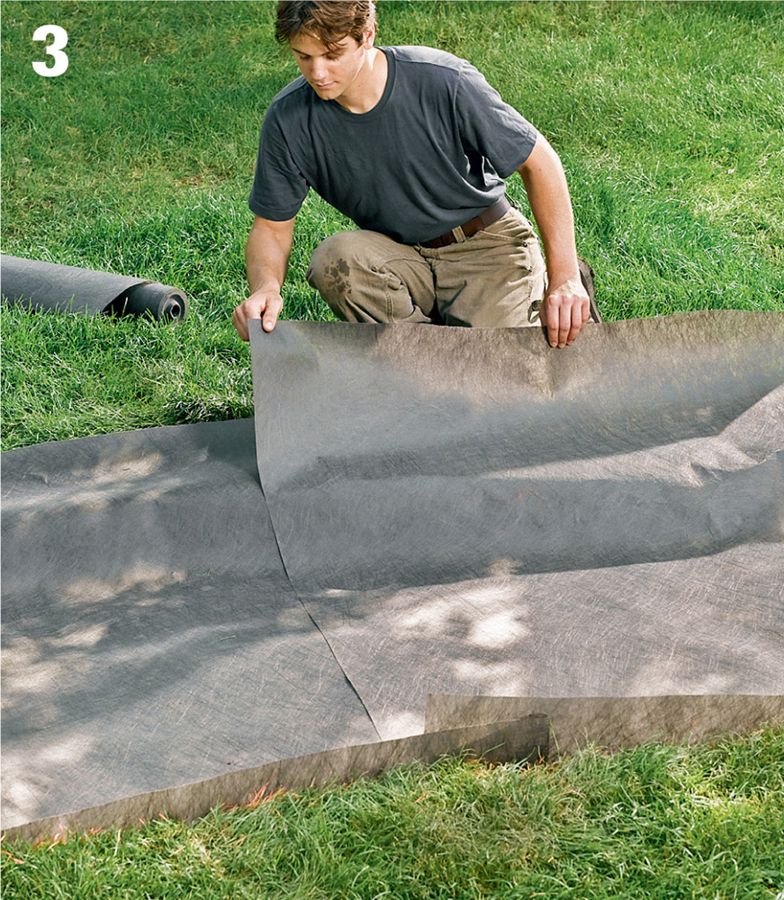
Lay landscaping fabric from edge to edge, lapping over the undisturbed ground on either side of the path. On straight sections, you may be able to run parallel to the path with a single strip; on curved paths, it’s easier to lay the fabric perpendicular to the path. Overlap all seams by 6".
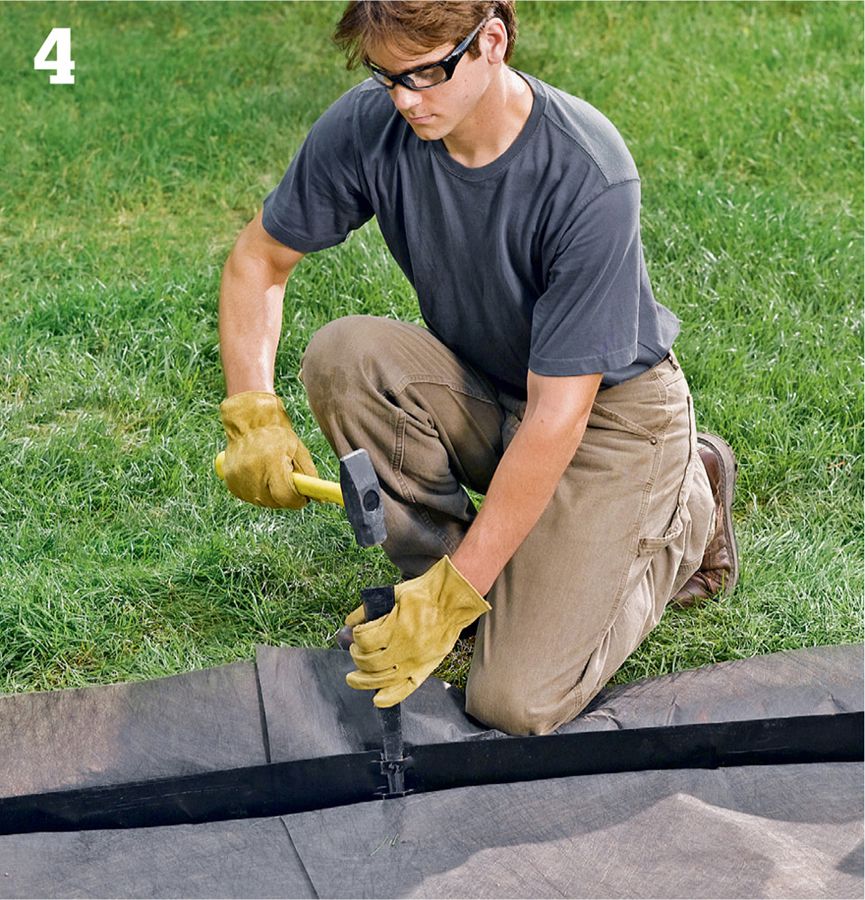
Install edging over the fabric. Shim the edging with small stones, if necessary, so the top edge is 1/2" above grade (if the path passes through grass) or 2" above grade (if it passes through a mulched area). Secure the edging with spikes. To install the second edge, use a 2 × 4 spacer gauge that’s been notched to fit over your edging (see page 176).
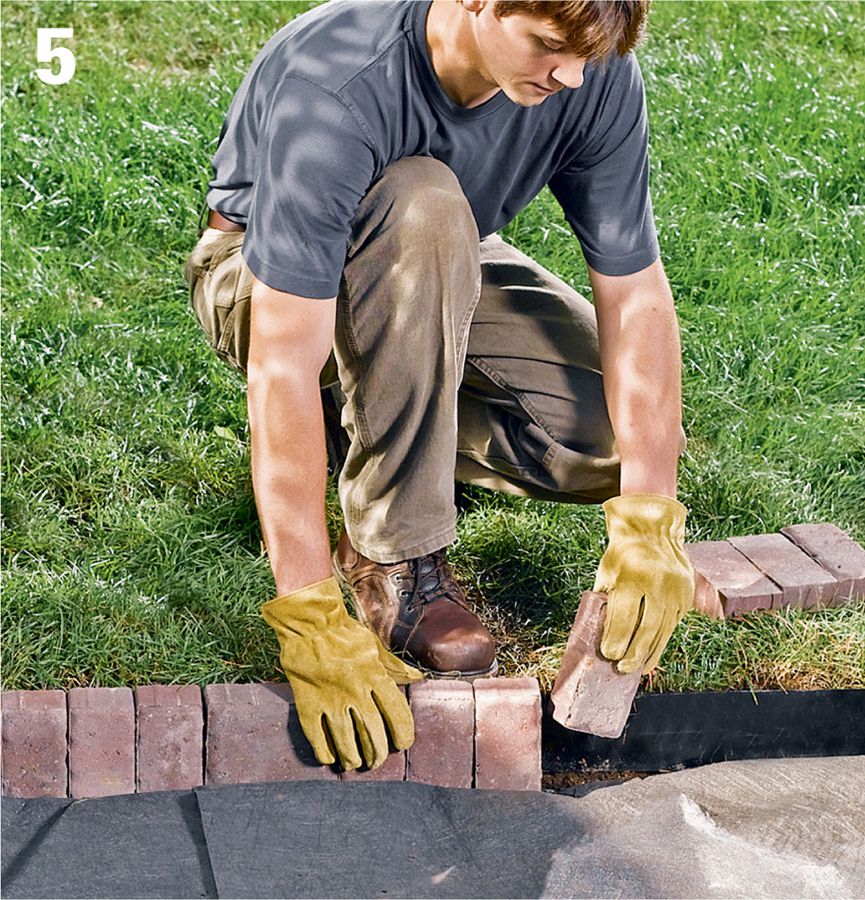
Stone or vertical-brick edges may be set in deeper trenches at the sides of the path. Place these on top of the fabric also. You do not have to use additional edging with paver edging, but metal (or other) edging will keep the pavers from wandering.
Trim excess fabric, then backfill behind the edging with dirt and tamp it down carefully with the end of a 2 × 4. This secures the edging and helps it to maintain its shape.
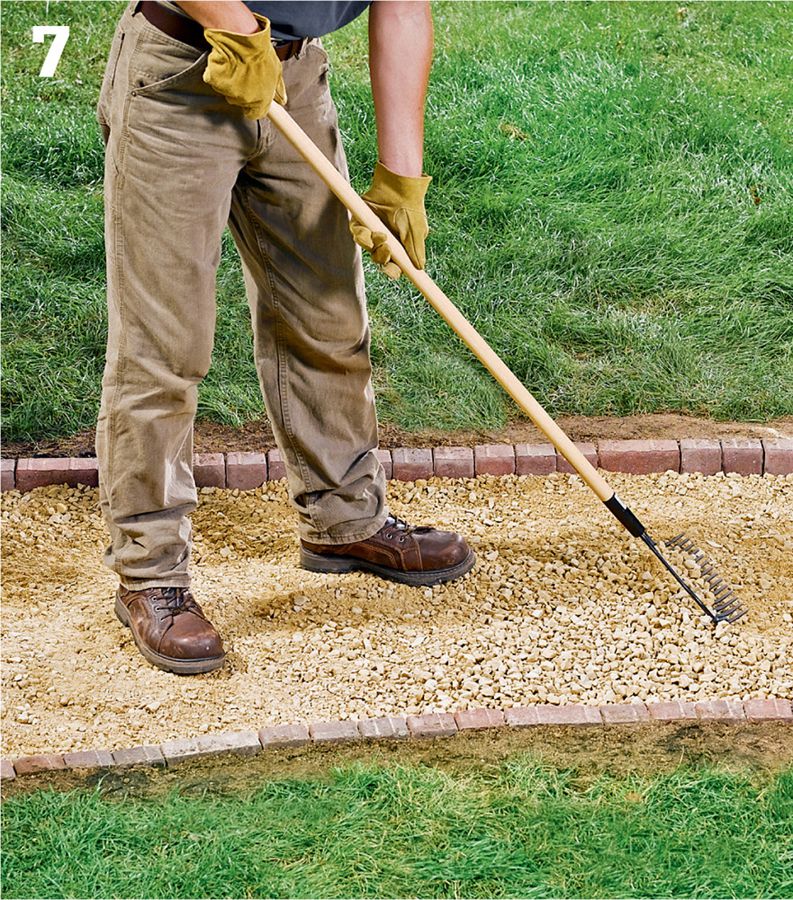
Add a 2- to 4"-thick layer of compactable gravel over the entire pathway. Rake the gravel flat. Then, spread a thin layer of your surface material over the base gravel.
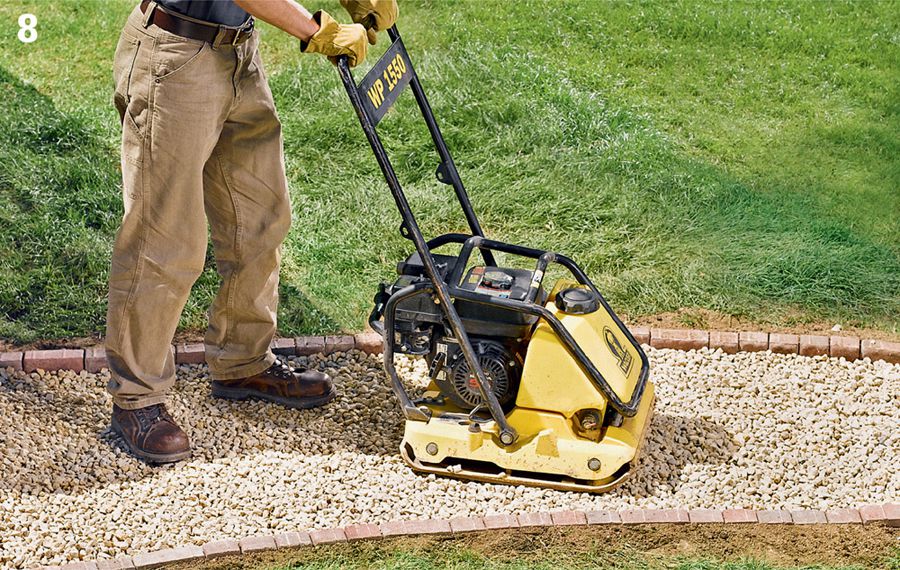
Tamp the base and surface gravel together using a plate compactor. Be careful not to disturb or damage the edging with the compactor.
Fill in the pathway with the remaining surface gravel. Drag a 2 × 4 across the tops of the edging using a sawing motion, to level the gravel flush with the edging.
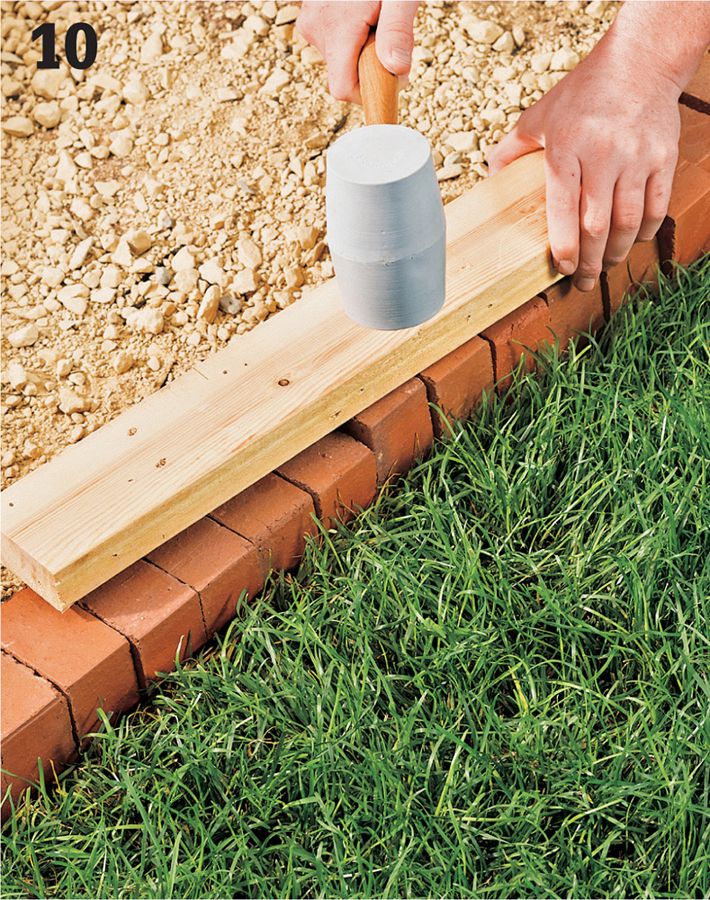
Set the edging brick flush with the gravel using a mallet and 2 × 4.
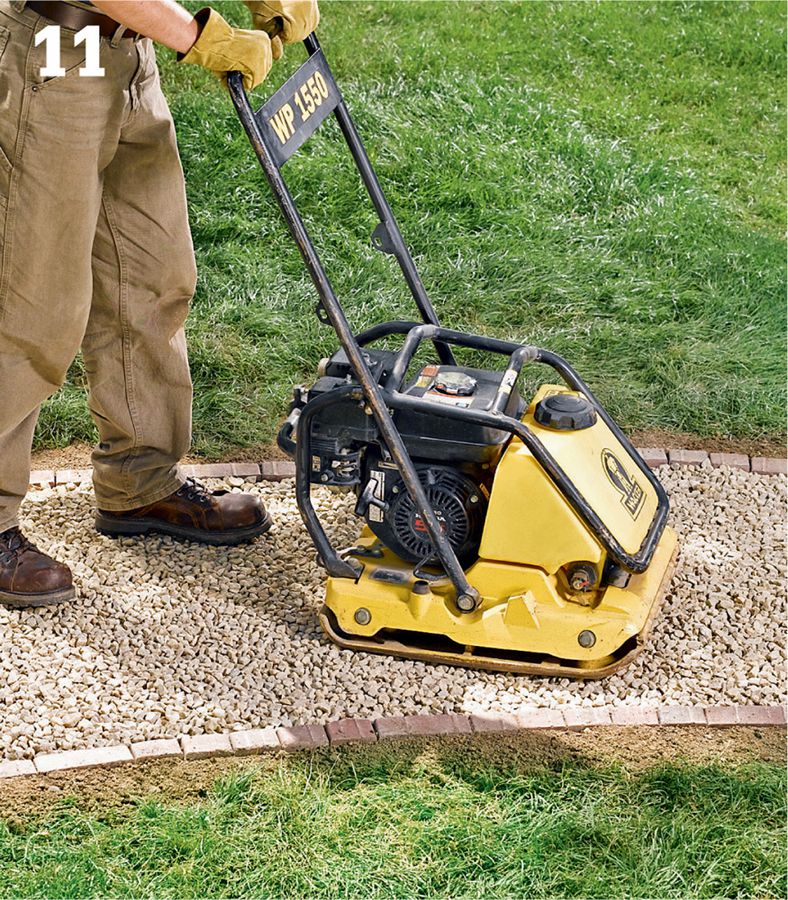
Tamp the surface again using the plate compactor or a hand tamper. Compact the gravel so it is slightly below the top of the edging. This will help keep the gravel from migrating out of the path.

Rinse off the pathway with a hose to wash off dirt and dust and bring out the true colors of the materials.
Stepping stones blend beautifully into many types of landscaping, including rock gardens, ponds, flower or vegetable gardens, or manicured grass lawns.
 Pebbled Stepping Stone Path
A stepping stone path is both a practical and appealing way to traverse a landscape. With large stones as foot landings, you are free to use pretty much any type of fill material in between. You could even place stepping stones on individual footings over ponds and streams, making water the temporary infill that surrounds the stones. The infill does not need to follow a narrow path bed, either. Steppers can be used to cross a broad expanse of gravel, such as a Zen gravel panel or a smaller graveled opening in an alpine rock garden.
Stepping stones in a path serve two purposes: they lead the eye, and they carry the traveler. In both cases, the goal is rarely fast, direct transport, but more of a relaxing stroll that’s comfortable, slow-paced, and above all, natural. Arrange the stepping stones in your walking path according to the gaits and strides of the people that are most likely to use the pathway. Keep in mind that our gaits tend to be longer on a utility path than in a rock garden.
Sometimes steppers are placed more for visual effect, with the knowledge that they will break the pacing rule with artful clusters of stones. Clustering is also an effective way to slow or congregate walkers near a fork in the path or at a good vantage point for a striking feature of the garden.
In the project featured here, landscape edging is used to contain the loose infill material (small aggregate), however a stepping stone path can also be effective without edging. For example, setting a series of steppers directly into your lawn and letting the lawn grass grow between them is a great choice as well.
 How to Make a Pebbled Stepping Stone Path
Excavate and prepare a bed for the path as you would for the gravel pathway (see pages 176 to 178), but use coarse building sand instead of compactable gravel for the base layer. Screed the sand flat so it’s 2" below the top of the edging. Do not tamp the sand. Tip: Low-profile plastic landscape edging is a good choice because it does not compete with the pathway.
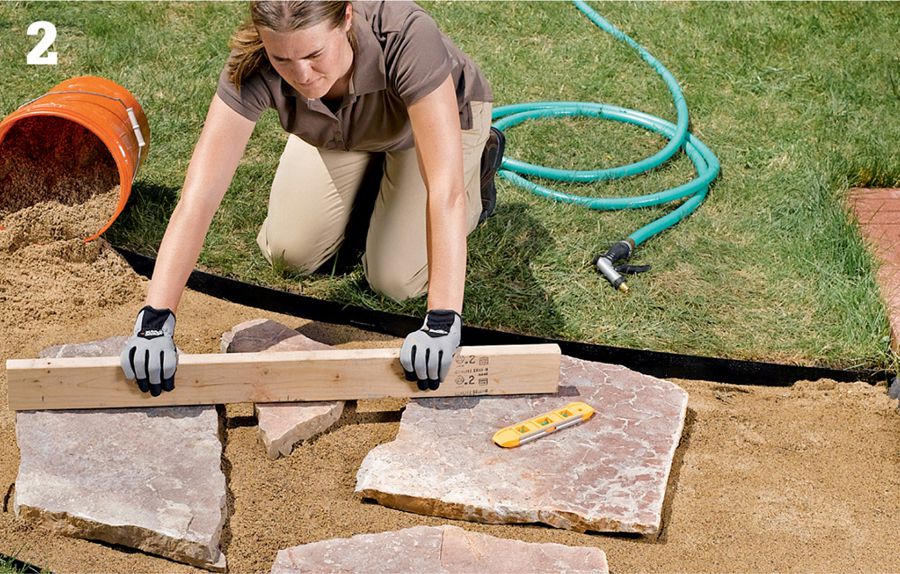
Moisten the sand bed, then position the stepping stones in the sand, spacing them for comfortable walking and the desired appearance. As you work, place a 2 × 4 across three adjacent stones to make sure they are even with one another. Add or remove sand beneath the steppers, as needed, to stabilize and level the stones.
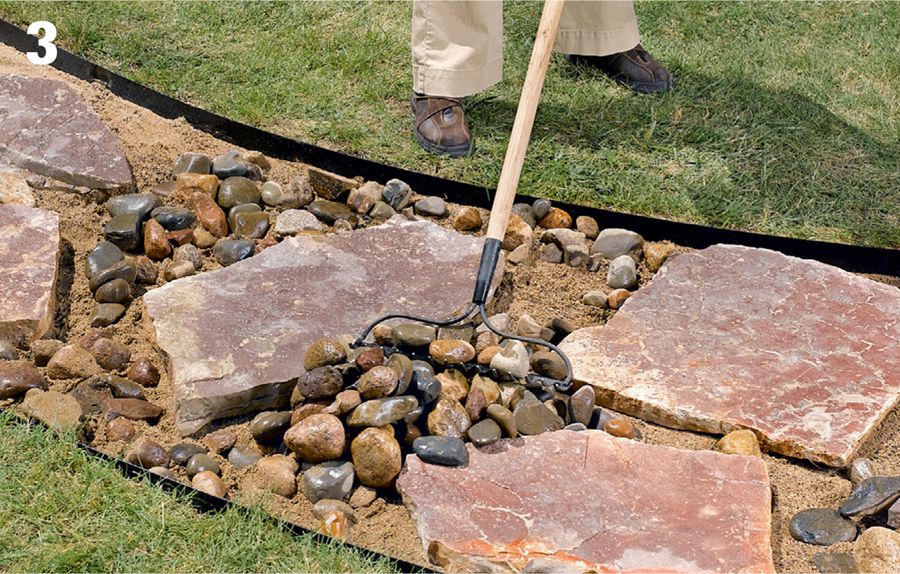
Pour in a layer of larger infill stones (2"-dia. river rock is seen here). Smooth the stones with a garden rake. The infill should be below the tops of the stepping stones. Reserve about 1/3 of the larger diameter rocks.
Add the smaller infill stones that will migrate down and fill in around the larger infill rocks. To help settle the rocks, you can tamp lightly with a hand tamper, but don’t get too aggressive—the larger rocks might fracture easily.

Scatter the remaining large infill stones across the infill area so they float on top of the other stones. Eventually, they will sink down lower in the pathway and you will need to lift and replace them selectively to maintain the original appearance.
 Variations
Move from a formal space to a less orderly area of your landscape by creating a pathway that begins with closely spaced steppers on the formal end and gradually transforms into a mostly-gravel path on the casual end, with only occasional clusters of steppers.
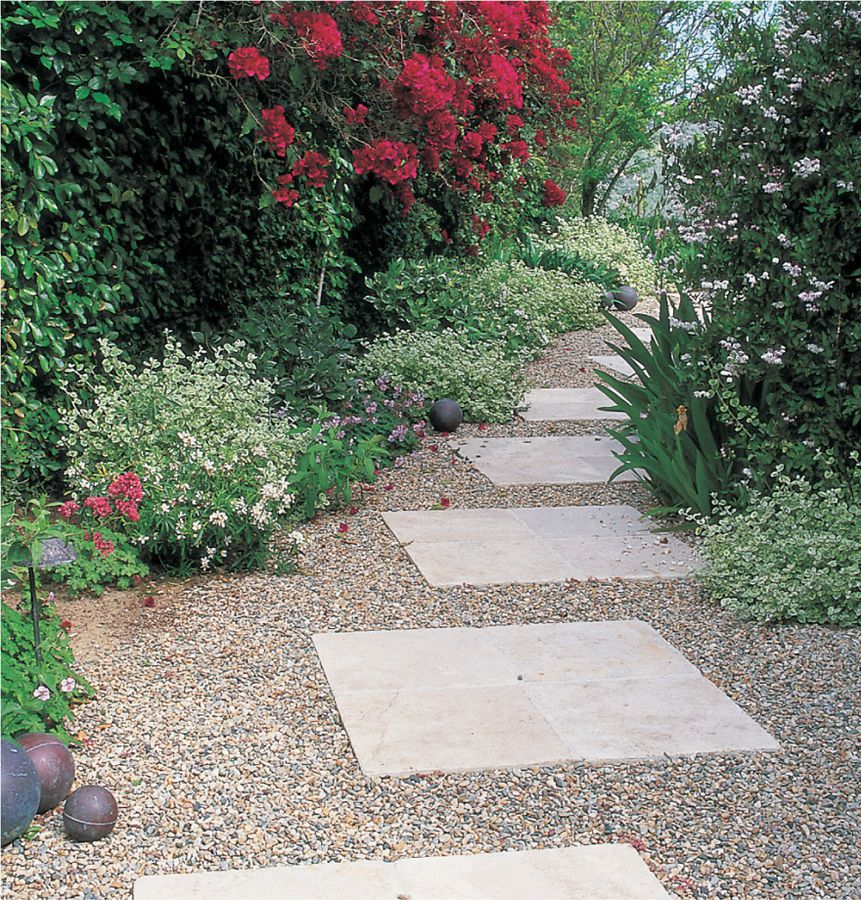
Combine concrete stepping pavers with crushed rock or other small stones for a path with a cleaner, more contemporary look. Follow the same basic techniques used on pages 182 to 183, setting the pavers first, then filling in- between with the desired infill material(s).
Here we use gravel (small aggregate river rock), a common surface for paths and rock gardens, for the tread surfaces. Other tread surfaces include bricks, cobbles, and stepping stones. Even large flagstones can be fit to the tread openings.
 Timber Garden Steps
Timberframed steps provide a delightfully simple and structurally satisfying way to manage slopes. They are usually designed with shallow steps that have long runs and large tread areas, that can be filled with a variety of materials. Two popular methods are shown here—gravel and with poured concrete. Other tread surfaces you might consider are bricks, cobbles, and stepping stones. Even large flagstones can be cut to fit the tread openings.
Timber steps needn’t follow the straight and narrow, either. You can vary the lengths of the left and right returns to create swooping helical steps that suggest spiral staircases. Or, increase the length of both returns to create a broad landing on which to set pots or accommodate a natural flattening of the slope. Want to soften the steps? Use soil as a base near the sides of the steps and plant herbs or ground cover. Or for a spring surprise, plant daffodils under a light pea gravel top dressing at the edges of the steps.
Timber steps don’t require a frost footing, because the wooden joints flex with the earth rather than crack like solid concrete steps would. However, it’s a good idea to include some underground anchoring to keep loose muddy soil from pushing the steps forward. To provide longterm stability, the gravel-filled steps shown here are secured to a timber cleat at the base of the slope, while the concrete-filled steps are anchored at the base with long sections of pipe driven into the ground.
Designing steps is an important part of the process. Determine the total rise and run of the hill and translate this into a step size that conforms to this formula: 2 × (rise) + run = 26 inches. Your step rise will equal your timber width, which can range from approximately 3 1/2 inches (for 4 × 4 timbers or 4 × 6 on the flat) to 7 1/4 inches or 7 1/2 inches (for 8 × 8 timbers). See page 151 for more help with designing and laying out landscape steps. As with any steps, be sure to keep the step size consistent so people don’t trip.
 How to Build Timber & Gravel Garden Steps
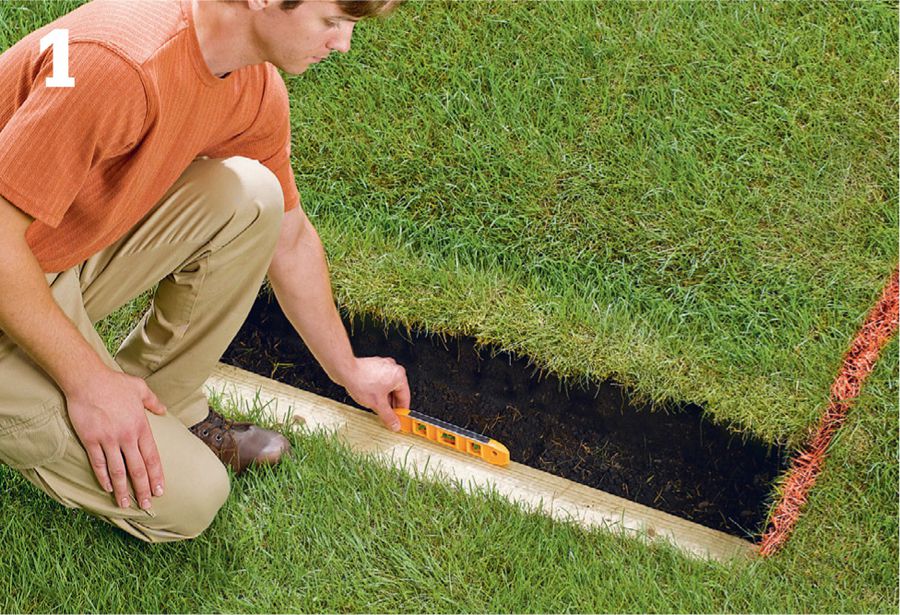
Install and level the timber cleat: mark the outline of the steps onto the ground using marking paint. Dig a trench for the cleat at the base of the steps. Add 2 to 4" of compactable gravel in the trench and compact it with a hand tamp. Cut the cleat to length and set it into the trench. Add or remove gravel beneath the cleat so it is level and its top is even with the surrounding ground or path surface.
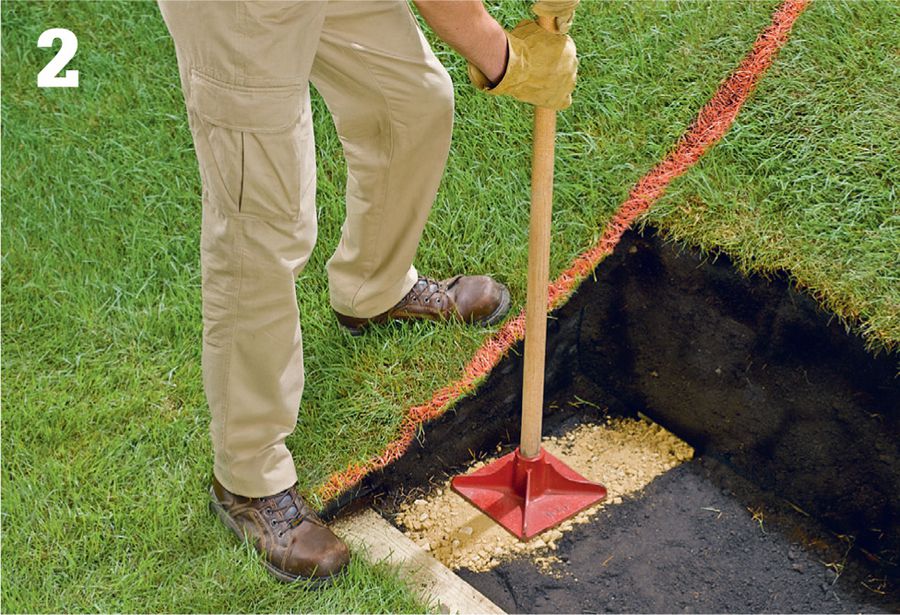
Create trenches filled with tamped gravel for the returns (the timbers running back into the hill, perpendicular to the cleat and risers). The returns should be long enough to anchor the riser and returns of the step above. Dig trenches back into the hill for the returns and compact 2 to 4" of gravel into the trenches so each return will sit level on the cleat and gravel.
 Construction Details: Timber Step Frames
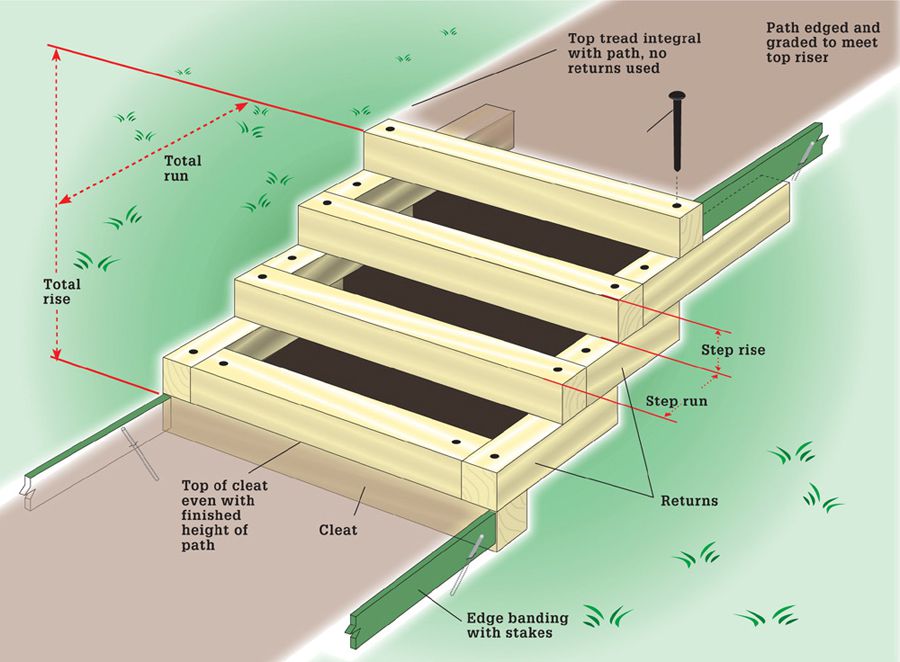
Cut and position the returns and the first riser. Using a 2 × 4 as a level extender, check to see if the backs of the returns are level with each other and adjust by adding or removing gravel in the trenches. Drill four 3/8"-dia. holes and fasten the first riser and the two returns to the cleat with spikes.
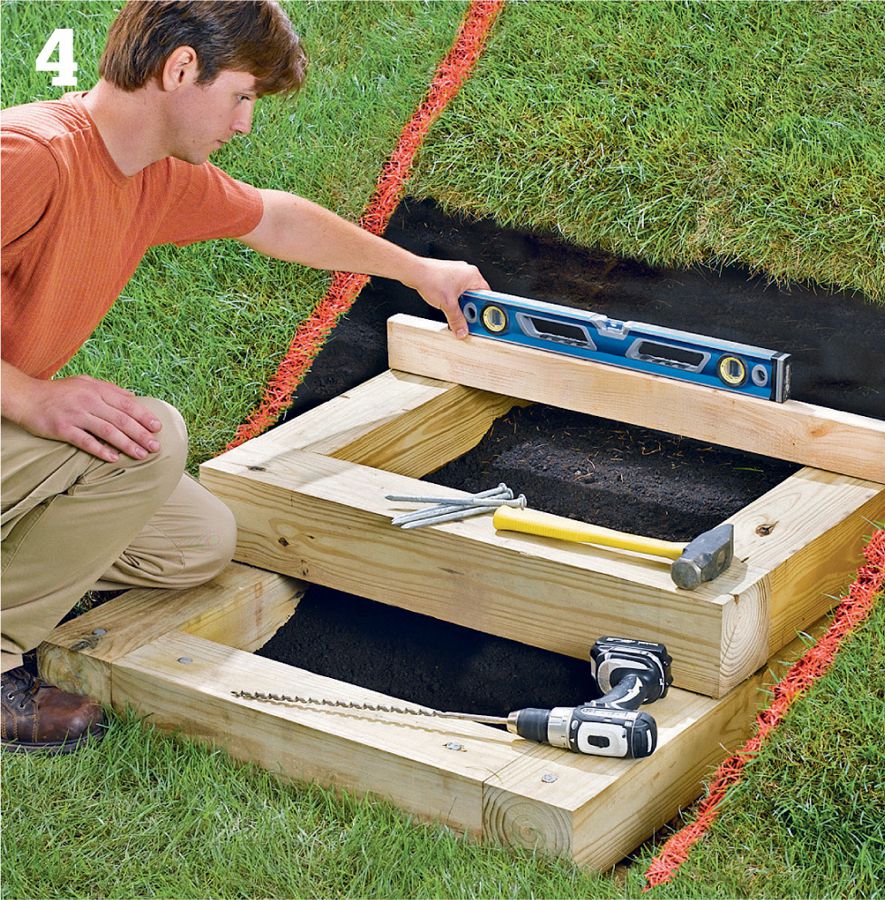
Excavate and add tamped gravel for the second set of returns. Cut and position the second riser across the ends of the first returns, leaving the correct unit run between the riser faces. Note that only the first riser doesn’t span the full width of the steps. Cut and position the returns, check for level, then pre-drill and spike the second riser and returns to the returns below.

Build the remaining steps in the same fashion. As you work, it may be necessary to alter the slope with additional excavating or backfilling (few natural hills follow a uniform slope). Add or remove soil as needed along the sides of the steps so that the returns are exposed roughly equally on both sides. Also, each tread should always be higher than the neighboring ground.
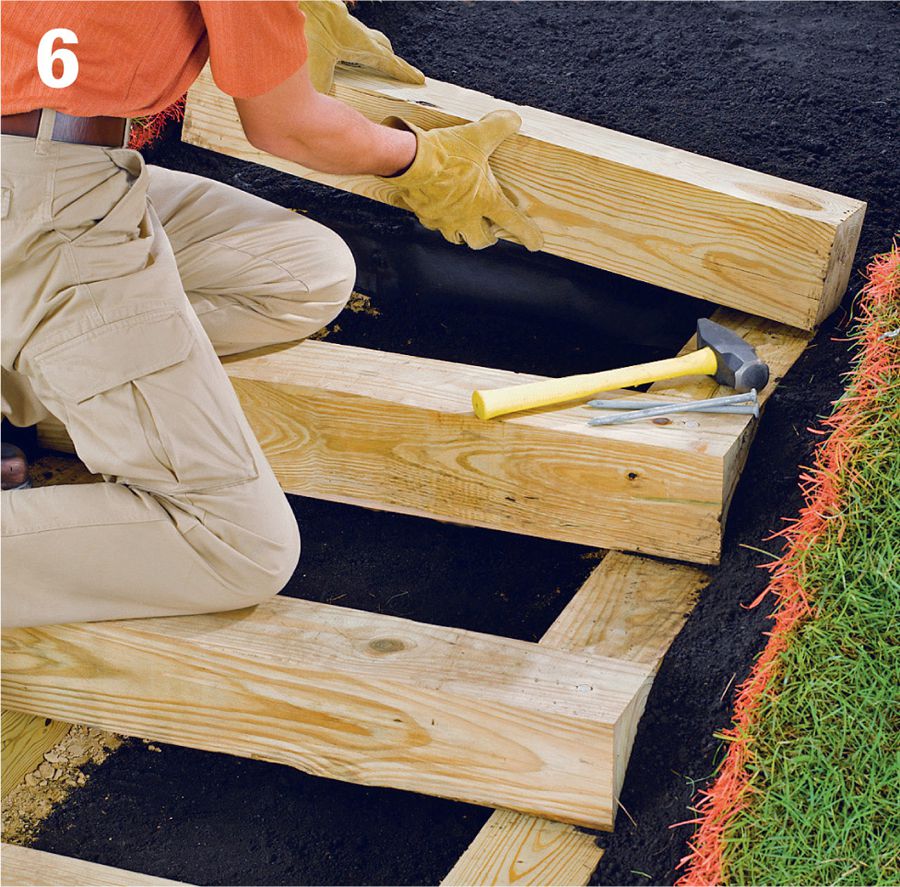
Install the final riser. Typically, the last timber does not have returns because its tread surface is integral with the path or surrounding ground. The top of this timber should be slightly higher than the ground. As an alternative, you can use returns to contain pathway material at the top of the steps.
Lay and tamp a base of compactable gravel in each step tread area. Use a 2 × 4 as a tamper. For proper compaction, tamp the gravel in 2" or thinner layers before adding more. Leave about 2" of space in each tread for the surface material.
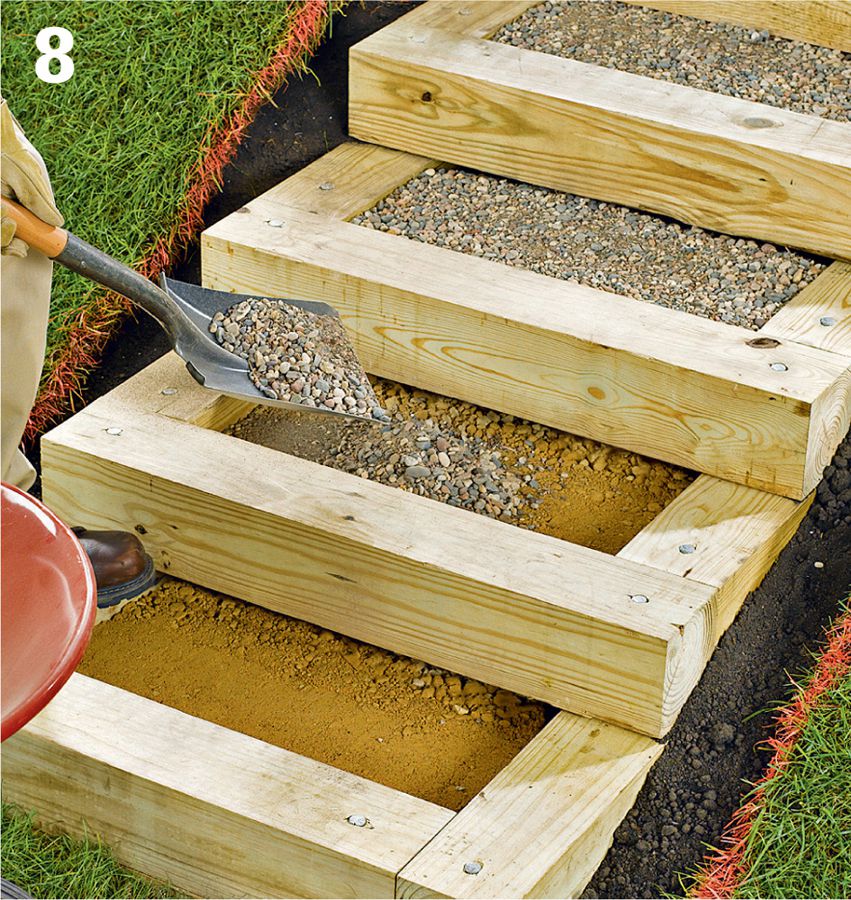
Fill up the tread areas with gravel or other appropriate material. Irregular crushed gravel offers maximum surface stability, while smooth stones, like the river rock seen here, blend into the environment more naturally and feel better underfoot than crushed gravel and stone.
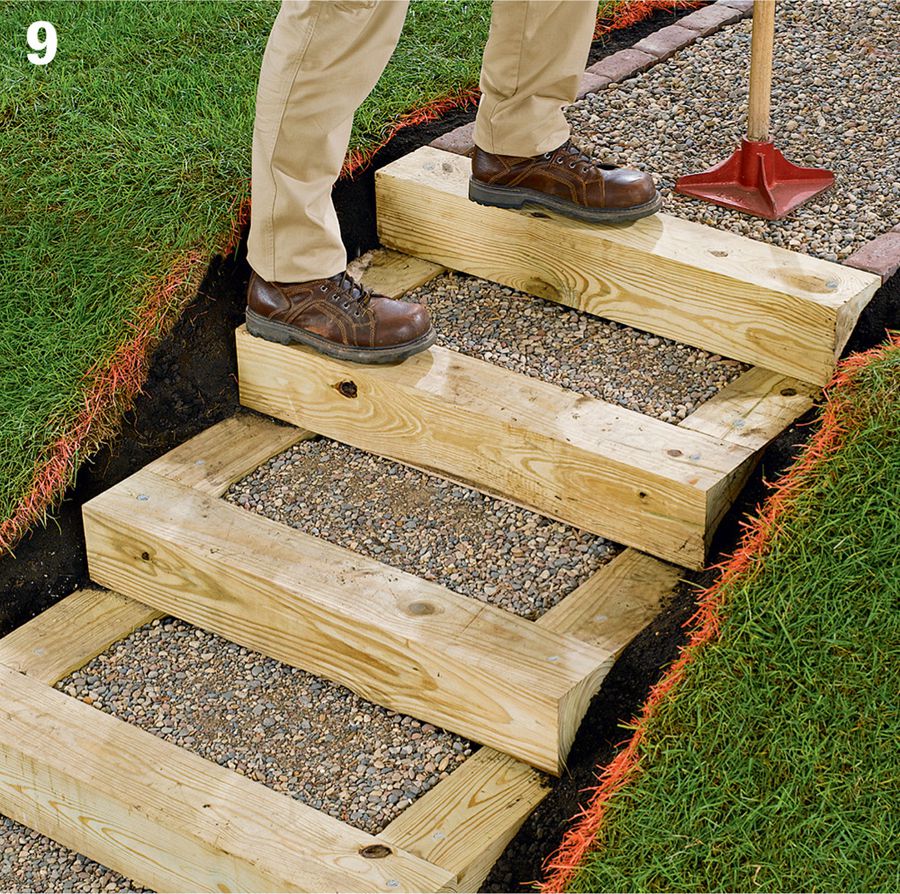
Create or improve pathways at the top and bottom of the steps. For a nice effect, build a loose-fill walkway using the same type of gravel that you used for the steps. Install a railing, if desired or if required by the local building code.
 Flagstone Garden Steps
Flagstone steps are perfect structures for managing natural slopes. Our design consists of broad flagstone treads and blocky ashlar risers, commonly sold as wall stone. The risers are prepared with compactable gravel beds on which the flagstone treads rest. For the project featured here, we purchased both the flagstone and the wall stone in their natural split state (as opposed to sawn). It may seem like overkill, but you should plan on purchasing 40 percent more flagstone, by square foot coverage, than your plans say you need. The process of fitting the stones together involves a lot of cutting and waste.
The average height of your risers is defined by the height of the wall stone available to you. These rough stones are separated and sold in a range of thicknesses (such as 3 to 4 inches), but hand-picking the stones helps bring them into a tighter range. The more uniform the thicknesses of your blocks, the less shimming and adjusting you’ll have to do. (Remember, all of the steps must be the same size, to prevent a tripping hazard.) You will also need to stock up on slivers of rocks to use as shims to bring your risers and returns to a consistent height; breaking and cutting your stone generally produces plenty of these.
Flagstone steps work best when you create the broadest possible treads: think of them as a series of terraced patios. The goal, once you have the stock in hand, is to create a tread surface with as few stones as possible. This generally means you’ll be doing quite a bit of cutting to get the irregular shapes to fit together. For a more formal look, cut the flagstones along straight lines so they fit together with small, regular gaps.
 Construction Details
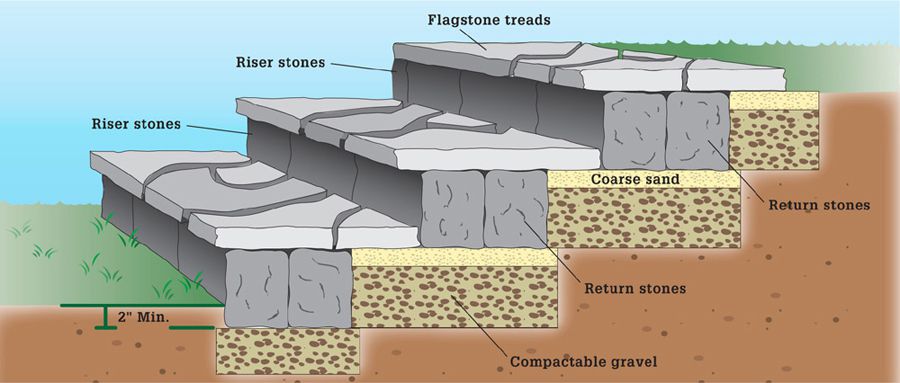
 How to Build Flagstone Garden Steps
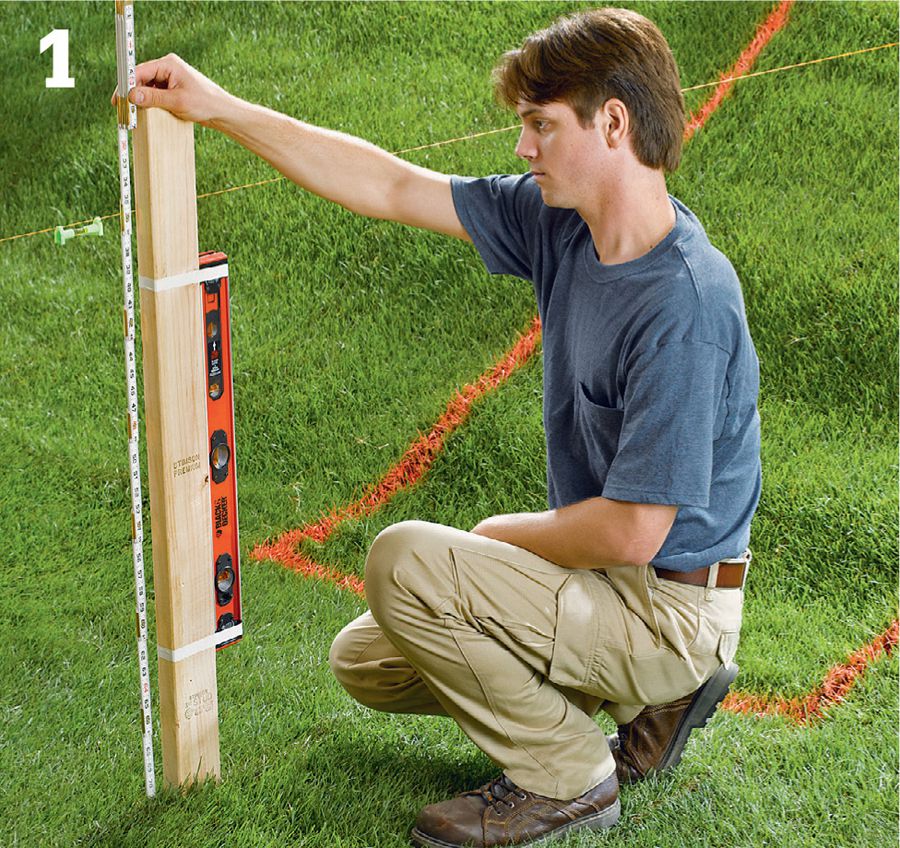
Measure the height and length of the slope to calculate the rise and run dimensions for each step (see page 151 for help with designing and laying out steps). Plot the footprint of your steps on the ground using marking paint. Purchase wall stones for your risers and returns in a height equal to the rise of your steps. Also buy flagstone (with approx. 40% overage) for the step treads.
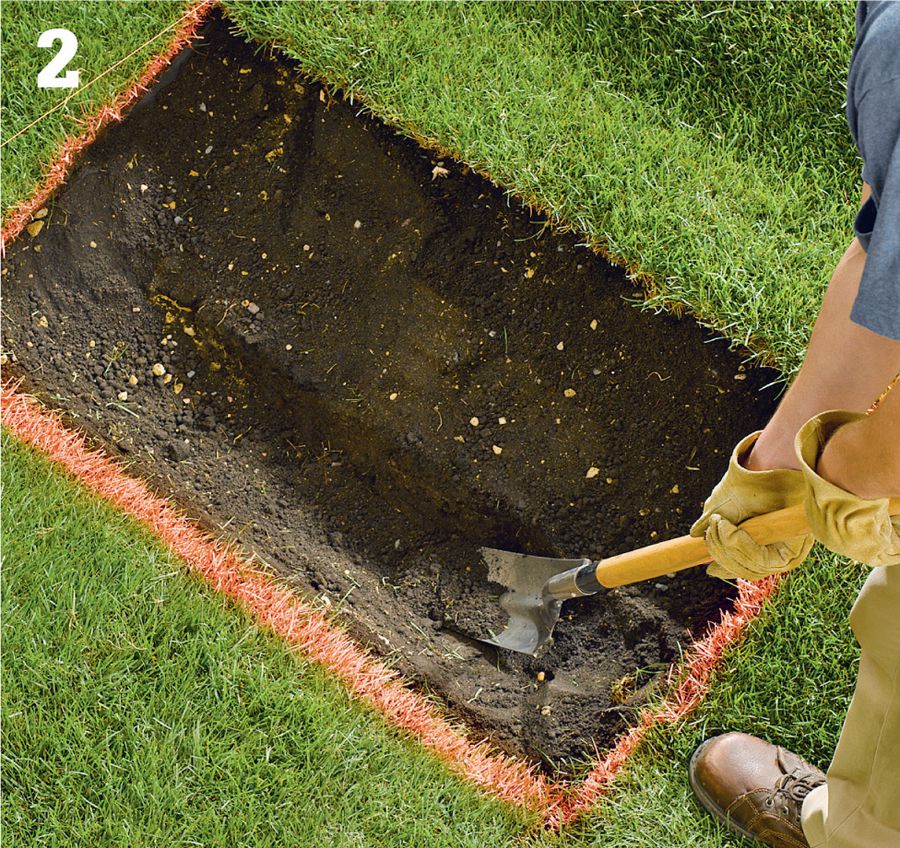
Begin the excavation: for the area under the first riser and return stones, dig a trench to accommodate a 4" layer of gravel, plus the thickness of an average flagstone tread. For the area under the back edge of the first step’s tread and the riser and return stones of the second step, dig to accommodate a 4" layer of gravel, plus a 1" layer of sand. Compact the soil with a 2 × 4 or 4 × 4.
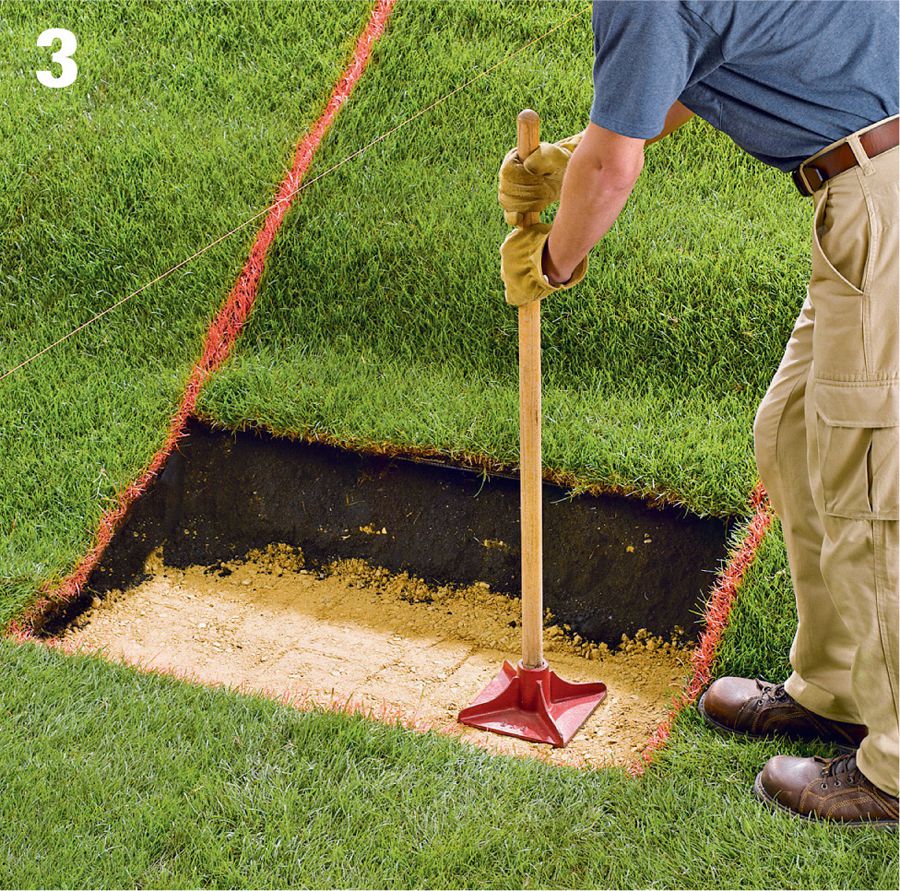
Add a layer of compactable gravel to within 1" of the planned height and tamp. Add a top layer of compactable gravel and level it side to side and back to front. This top layer should be a flagstone’s thickness below grade. This will keep the rise of the first step the same as the following steps. Leave the second layer of gravel uncompacted for easy adjustment of the riser and return stones.
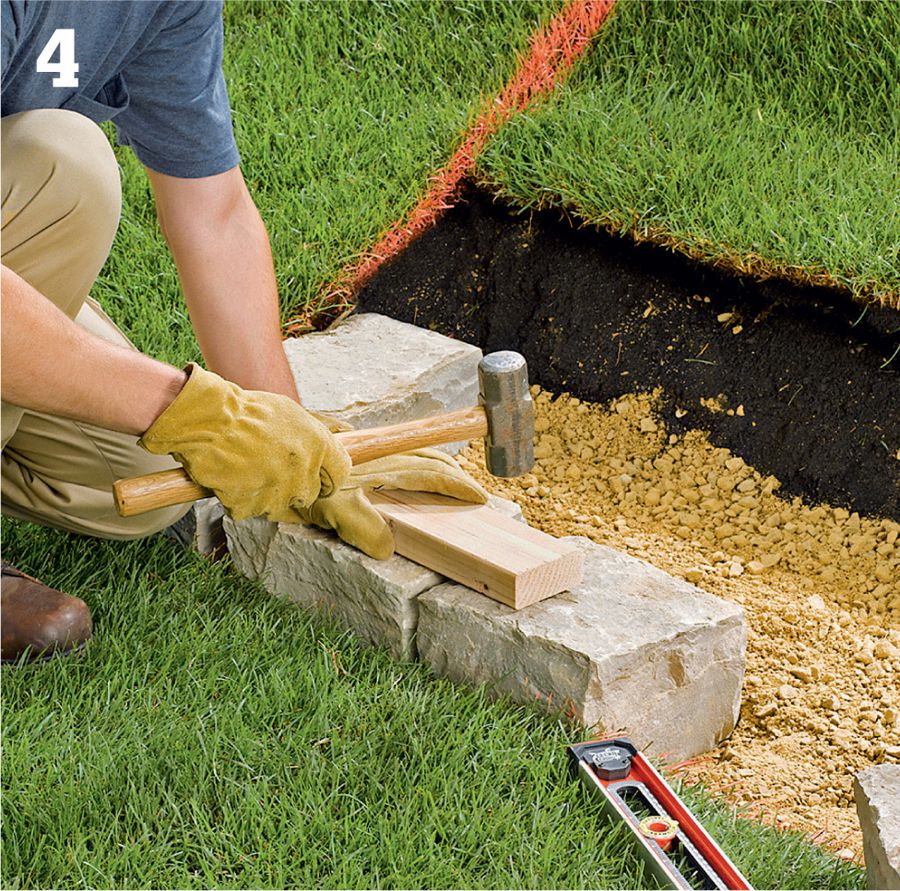
Set the riser stones and one or two return stones onto the gravel base. Level the riser stones side to side by adding or removing gravel as needed. Level the risers front to back with a torpedo level. Allow for a slight up-slope for the returns (the steps should slope slightly downward from back to front so the treads will drain). Seat the stones firmly in the gravel with a hand maul, protecting the stone with a wood block.
Line the excavated area for the first tread with landscape fabric, draping it to cover the insides of the risers and returns. Add layers of compactable gravel and tamp down to within 1" of the tops of the risers and returns. Fill the remainder of the bed with sand and level it side to side with a 2 × 4. Slope it slightly from back to front. This layer of sand should be a little above the first risers and returns so that the tread stones will compact down to sit on the wall stones.
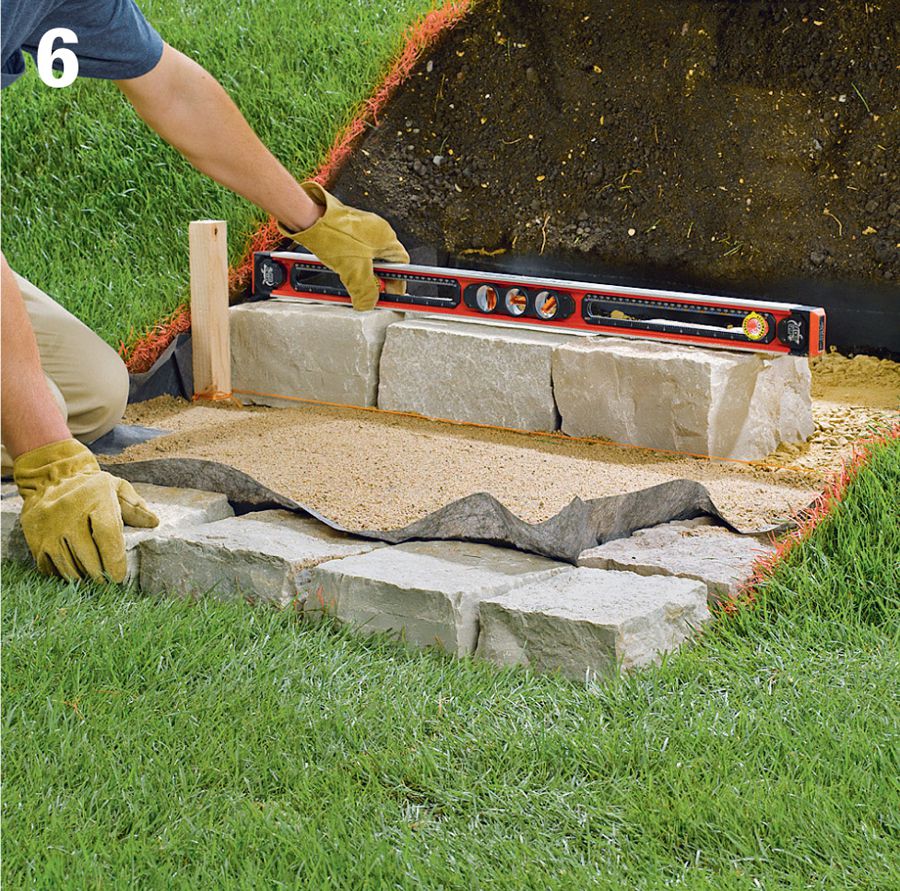
Set the second group of risers and returns: first, measure the step/run distance back from the face of your first risers and set up a level mason’s string across the sand bed. Position the second-step risers and returns as you did for the first step, except these don’t need to be dug in on the bottom because the bottom tread will reduce the risers’ effective height.
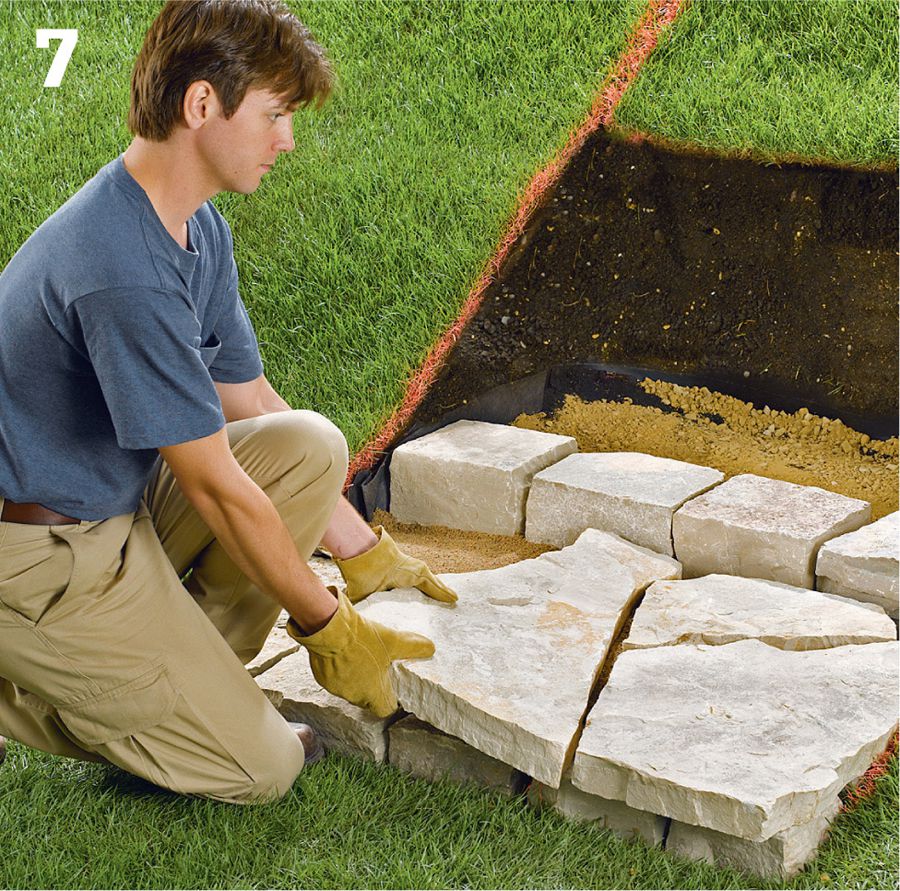
Fold the fabric over the tops of the risers and trim off the excess. Set the flagstone treads of the first step like a puzzle, leaving a consistent distance between stones. Use large, heavy stones with relatively straight edges at the front of the step, overhanging the risers by about 2".
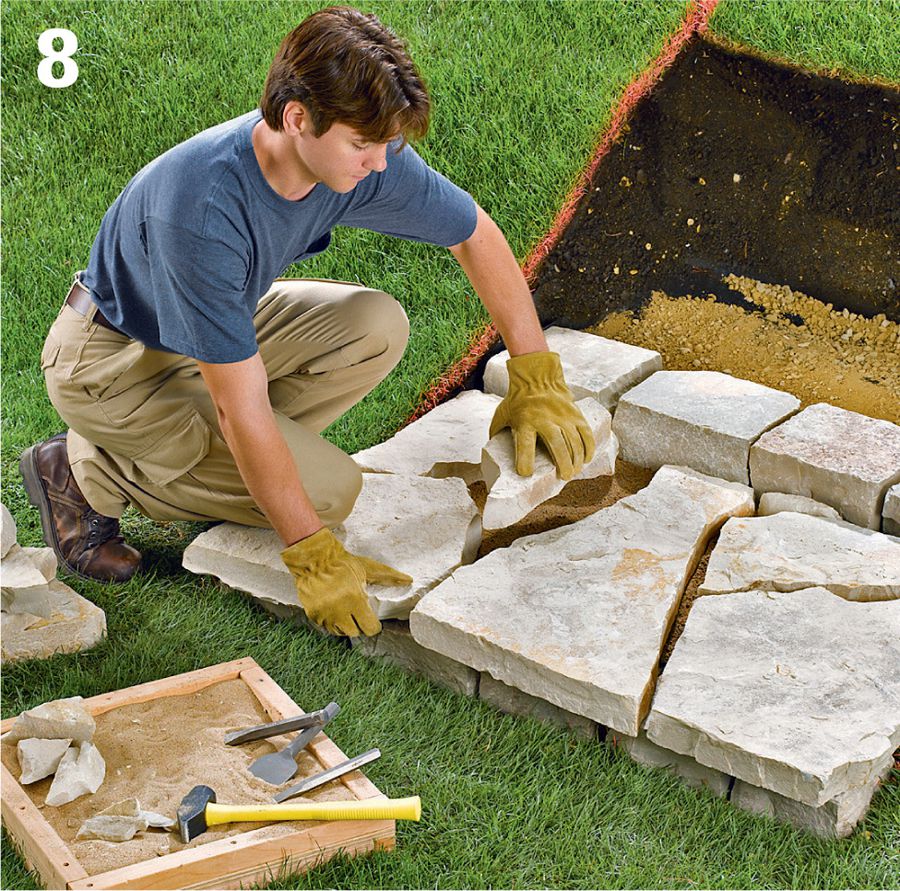
Fill in with smaller stones near the back. Cut and dress stones where necessary using stone chisels and a maul or mason’s hammer (see pages 88 to 89 for tips on cutting stone). Finding a good arrangement takes some trial and error. Strive for fairly regular gaps, and avoid using small stones as they are easily displaced. Ideally, all stones should be at least as large as a dinner plate.
Adjust the stones so the treads form a flat surface. Use a level as a guide, and add wet sand under thinner stones or remove sand from beneath thicker stones until all the flags come close to touching the level and are stable.
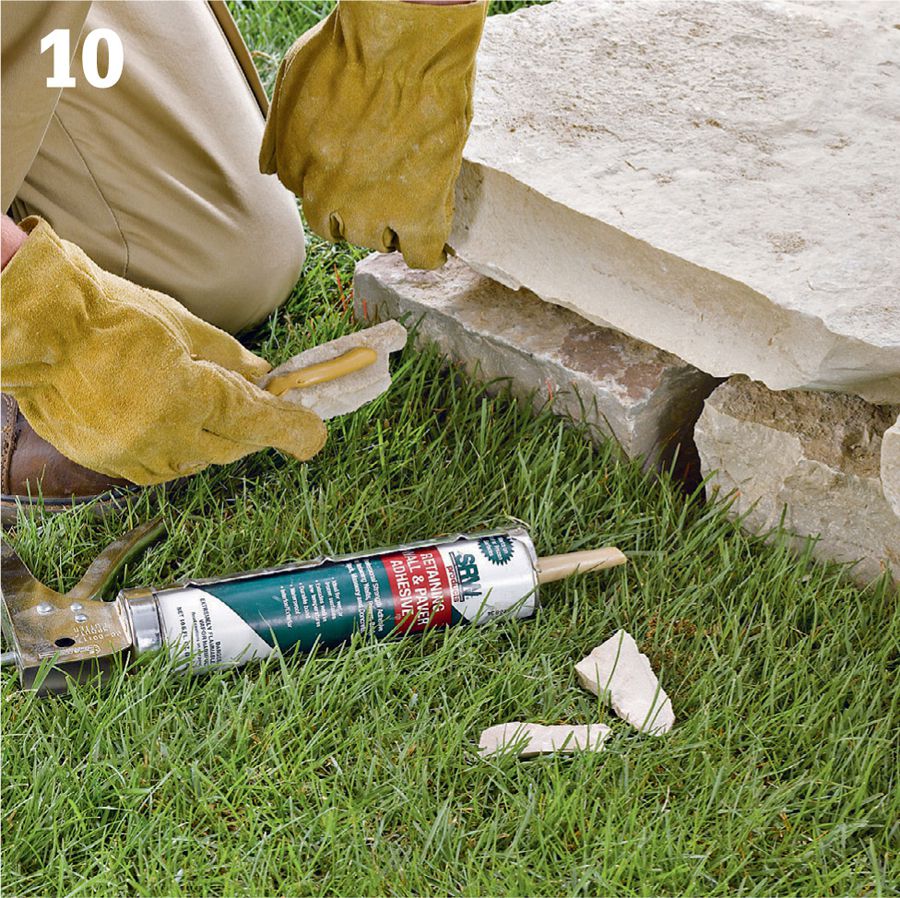
Shim between treads and risers with thin shards of stone. (Do not use sand to shim here). Glue the shards in place with block and stone adhesive. Check each step to make sure there is no path for sand to wash out from beneath the treads. You can settle smaller stones in sand with a mallet, but cushion your blows with a piece of wood.
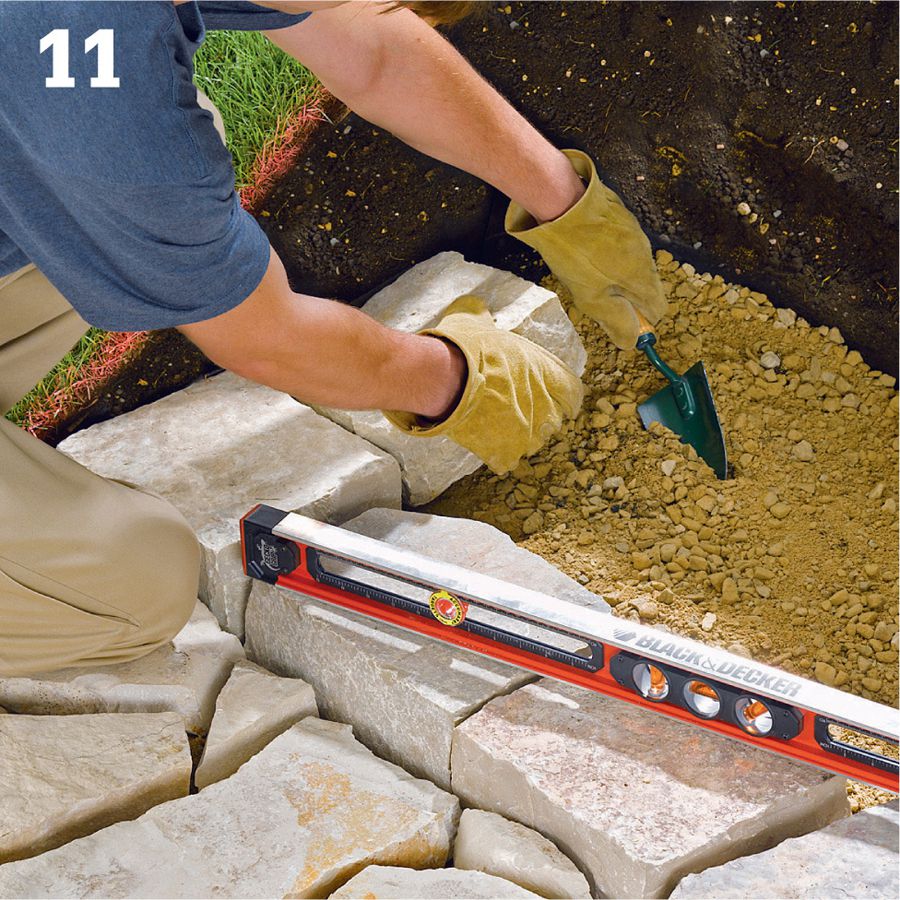
Complete the second step in the same manner as the first. The bottoms of the risers should be at the same height as the bottoms of the tread on the step below. Continue building steps to the top of the slope. Note: The top step often will not require returns.
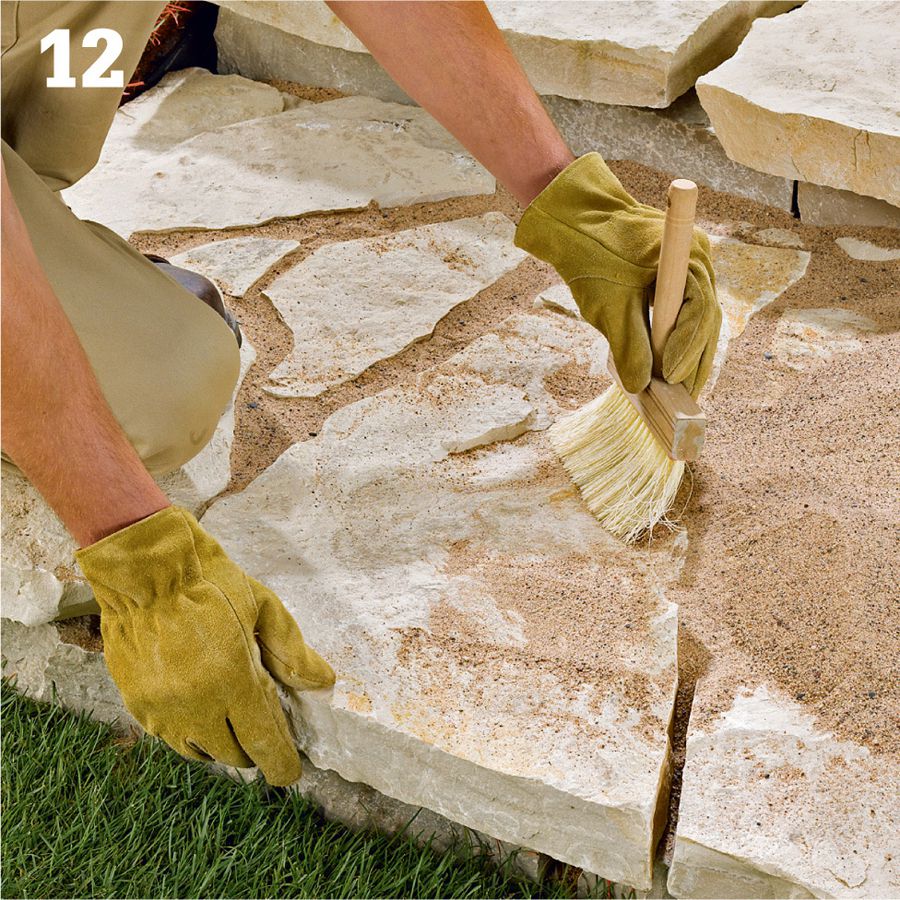
Fill the joints between stones with sand by sweeping the sand across the treads. Use coarse, dark sand such as granite sand, or choose polymeric sand, which resists washout better than regular builder’s sand. Inspect the steps regularly for the first few weeks and make adjustments to the heights of stones as needed.