7
Android App Development with Kotlin: Kudoo App
Whether you think you can, or you think you can’t—you’re right.
Henry Ford
This chapter first explains how to set up Kotlin projects for Android and proceeds to implement a simple to-do list app called Kudoo. This app uses Android Architecture Components, a RecyclerView, and other fundamental Android components so that you can learn how to use these with Kotlin.
Setting Up Kotlin for Android
This section guides you through the required setup for your first Kotlin Android app. You’ll learn what changes are made to the Gradle build configuration files and how you can use Android Studio effectively to set up Android projects using Kotlin.
Using Kotlin in Android Studio
Kotlin comes preinstalled since Android Studio version 3, in accordance with Google’s statement to officially support Kotlin as a language on Android. For you, this means there’s no need to install the Kotlin plugin separately anymore.
Auto-Generated Gradle Configuration
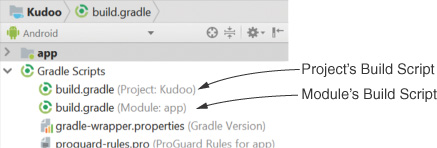
Before diving into the Gradle configuration, notice that your Android project has two different Gradle build scripts, both called build.gradle. To follow along in this chapter and Chapter 8, Android App Development with Kotlin: Nutrilicious, you must be able to differentiate between the two scripts.
First, there is the project’s
build.gradlefile. This one resides in the project’s root directory. In Android Studio, you can find it in the Android project view that is located on the left-hand side of the IDE by default.More important, the module’s
build.gradlefile is the one you will be changing frequently in the following two chapters. It’s located inside the app directory under the project root. In Android Studio’s project view, which shows all Gradle scripts in one place, you can find it under the module’sbuild.gradlefile, as shown in Figure 7.1.
When creating a new project in Android Studio 3, Kotlin is automatically configured and activated. For existing Java projects, you can invoke Android Studio’s action Configure Kotlin in Project in order to perform the necessary changes.
First, it adds the kotlin-gradle-plugin dependency to your project’s Gradle build file. This plugin is responsible for compiling your Kotlin sources. With this, the project’s build file has a structure as in Listing 7.1.
Listing 7.1 Project’s build.gradle File
buildscript {
ext.kotlin_version = "1.2.60" // Adjust to your current version
// …
dependencies {
// …
classpath "org.jetbrains.kotlin:kotlin-gradle-plugin:$kotlin_version"
}
}
// …
Second, it includes the Kotlin standard library in your module’s Gradle build file to make it available inside that module. Third, it applies the required plugin kotlin-android to target Android during build.
In the current version of Android Studio 3, the plugin kotlin-android-extensions is also included by default, even though it is not required to build a Kotlin project targeting Android. However, the Kotlin Android Extensions are extremely useful, so I recommend you use them, and they will be used in both apps presented in this book. The module’s resulting Gradle build file should look similar to Listing 7.2.
Listing 7.2 Module’s build.gradle File
apply plugin "com.android.application"
apply plugin "kotlin-android"
apply plugin "kotlin-android-extensions" // Recommended
...
dependencies {
...
implementation "org.jetbrains.kotlin:kotlin-stdlib:$kotlin_version"
}
}
Tip
With Android Studio’s default key bindings, you can use Ctrl+Shift+A (or Cmd+Shift+A on Mac) to invoke the Find Action command. From there, start typing the name of the action you want to perform, for instance, “configure kotlin,” and select the desired action.1
1. https://developer.android.com/studio/intro/keyboard-shortcuts
You can further improve your workflow by making use of fuzzy search in Android Studio so that you only need to type the first letter of each word to find the action, for instance, “ckip” for Configure Kotlin in Project. This same scheme can be used in any search panel in Android Studio (and IntelliJ IDEA).
Adapting Your Gradle Configuration
If you want to separate your Kotlin files into a directory, such as src/main/kotlin, you’ll need to add the code from Listing 7.3 to your module’s build.gradle file to make this directory known to Android Studio for indexing. Alternately, you can place your Kotlin files alongside your Java files under src/main/java, which is what we do in this book.
Listing 7.3 Add Separate Kotlin Sources Directory to Gradle (Optional)
android {
...
sourceSets {
main.java.srcDirs += "src/main/kotlin"
}
}
In case you don’t need to target JDK 6 with your app but rather JDK 7 or 8, you can use the corresponding specialized dependency shown in Listing 7.4 instead of the one in Listing 7.2. These add additional extensions for APIs introduced in JDK 7 or 8. The targeted JDK version can be changed under Kotlin Compiler in the Android Studio settings.
Listing 7.4 Dependencies for Targeting JDK 7 or 8
implementation "org.jetbrains.kotlin:kotlin-stdlib-jdk7:$kotlin_version" // JDK 7
implementation "org.jetbrains.kotlin:kotlin-stdlib-jdk8:$kotlin_version" // JDK 8
Similarly, if you want to use Kotlin’s reflection or testing APIs, you must add the appropriate dependencies from Listing 7.5.
Listing 7.5 Dependencies for Kotlin Reflection and Test Libraries
implementation "org.jetbrains.kotlin:kotlin-reflect:$kotlin_version"
testImplementation "org.jetbrains.kotlin:kotlin-test:$kotlin_version"
testImplementation "org.jetbrains.kotlin:kotlin-test-junit:$kotlin_version"
Other dependencies can be added in the same way. But this covers all essential Kotlin-related dependencies you may want to use for Android.
Using Annotation Processors
If you use libraries that contain annotation processors, like Dagger for dependency injection, the Kotlin plugin must be configured to make them work with Kotlin classes. As shown in Listing 7.6, you need to replace the android-apt plugin for annotation processing with Kotlin’s kapt plugin.
Listing 7.6 Configuring kapt for Annotation Processing (Example: Dagger 2)
apply plugin: 'kotlin-kapt' // Enables kapt for annotation processing
// …
dependencies {
implementation 'com.google.dagger:dagger:2.17'
kapt 'com.google.dagger:dagger-compiler:2.17' // Uses kapt
}
The first step is to enable the plugin kotlin-kapt, which replaces android-apt for annotation processing—it will handle annotations on Java files as well, so any dependencies on apt can be removed. After that, dependencies can be added to the kapt configuration, such as the dagger-compiler in Listing 7.6, while normal dependencies are still added as usual.
To process annotations in test and androidTest sources, you can use the more specialized kaptTest and kaptAndroidTest configurations to add the required dependencies. Any dependencies from the kapt configuration are inherited to these two, however, so there is no need to include them twice—dependencies added using kapt are available in both test and production code.
Converting Java Code to Kotlin
If you’re not starting with a fresh Kotlin project but want to mix Kotlin into an existing Java project, you can do so by first invoking the Configure Kotlin in Project action as above. After that, you can make use of the Java-to-Kotlin converter to transpile an existing Java file to a Kotlin file. To do this, you can click Convert Java File to Kotlin File under the Code menu. Alternately, you can use Ctrl+Shift+A (or Cmd+Shift+A on Mac) and type “cjtk” (for Convert Java to Kotlin) to fuzzy-search for that same action and invoke it.
Be aware that you may want to keep a copy of the original Java file, especially if you’re doing this with a production app. Ideally, I recommend you start introducing Kotlin into an existing app by converting non-business-critical parts of your app, or better yet, start by migrating a pet project. Chapter 10, Migrating to Kotlin, covers processes and best practices to migrate Java apps to Kotlin.
Note
The quality of autoconverted Kotlin code may not be production-ready. For instance, it won’t make use of Kotlin’s powerful language features where appropriate. So, although the converter is good for getting used to the basic syntax and features of Kotlin, it will not open up all the possibilities that the language offers you.
In short, Android Studio 3 has strong support for Kotlin and avoids the need for any manual configuration for basic Kotlin projects. You can use Kotlin out of the box and integrate it into existing Java apps. In all this, Android Studio supports your workflow with actions you can easily invoke that, for instance, adjust the Gradle build or convert Java files to Kotlin.
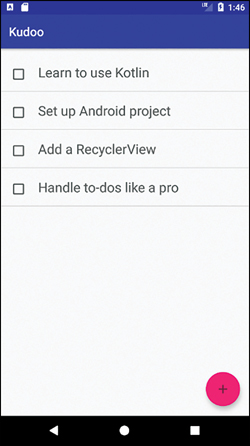
App #1: Kudoo, a To-Do List App
It’s time to write your first app with Kotlin: Kudoo. This simple to-do list app lets users create to-do items and check them off when they’re completed. Although this app is basic, it already introduces several fundamental Android components and Kotlin language features. Most important are the following:
Android Architecture Components to split the app into loosely coupled layers
Recycler Views to improve the list view performance
Kotlin Android Extensions to omit
findViewByIdIntents to switch between activities and share data
Coroutines for database operations
Figure 7.2 shows the finished app.
Let’s start by creating a new project with a basic activity.
Creating the Project
Under the File menu, select New and New Project. Name the app Kudoo, as shown in Figure 7.3, and use any unique company domain; example.com will do if you don’t have one as you won’t be publishing this app to the Play Store. Finally, select Include Kotlin support.

Note
In case the following screenshots do not exactly match the most current version of Android Studio that you’re using, please follow the up-to-date instructions from the Android Developers website2 to create a project with a Basic Activity and Kotlin support.
2. https://developer.android.com/studio/projects/create-project
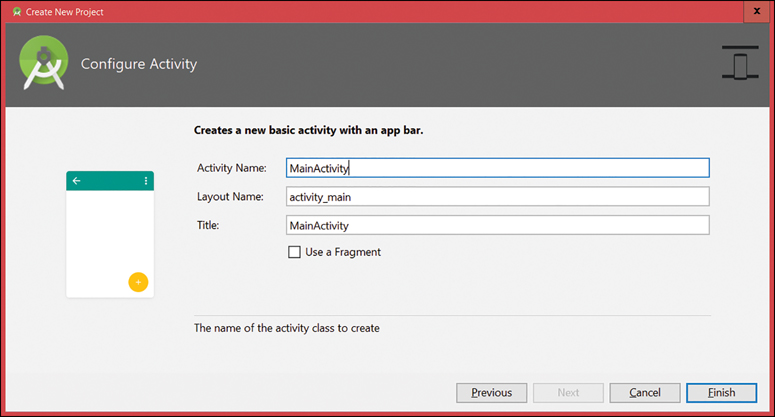
After clicking Next, you can keep Phone & Tablet selected with the default minimum SDK (API 19 at the time of writing). Click Next again and select Basic Activity (not Empty Activity) as the template. Click Next, and keep the defaults in order to generate a MainActivity.kt file along with its layout file (see Figure 7.4). Click Finish, and Android Studio will set up and build your project.
MainActivity with its layout
Once it’s done, make sure that the module’s build.gradle file is set up correctly. You can easily navigate to it using Ctrl+Shift+N (Cmd+Shift+O on Mac) and typing in “build.gradle,” then selecting the one from the app module, or by using the Android project view as was shown in Figure 7.1. You should see the following two lines in there:
apply plugin: 'kotlin-android'
apply plugin: 'kotlin-android-extensions'
You now have a barebones app that should run fine when you launch it (using the green arrow button or Shift+F10/Ctrl+R on Mac). This is a good time to try running it to make sure everything’s working as expected and to set up an Android Virtual Device (AVD)3 if you don’t have one yet.
3. Set up a virtual device: https://developer.android.com/studio/run/managing-avds
To finish up the project template, you can remove the menu because you won’t need that for this simple app. To do that, remove the methods onCreateOptionsMenu and onOptionsItemSelected from MainActivity.kt and remove the resources folder res/menu. With this, you’re all set to start writing the app.
Note
If you want to use Git while working on this app, you can visit gitignore.io to generate the content for the .gitignore file. I recommend using one configured for Android, Android Studio, Kotlin, and Java.4
4. https://www.gitignore.io/api/java%2Ckotlin%2Candroid%2Candroidstudio
Android Studio creates a .gitignore file automatically, you can use Ctrl+Shift+N (Cmd+ Shift+O on Mac) and type in “.gitignore” to find it (it doesn’t show up in the Android project view), then choose the one in the root directory, the one with the (Kudoo) suffix. Replace all its contents with the ones from gitignore.io. To run git init, the integrated Terminal comes in handy; you can open that using Alt+F12 from inside Android Studio.
The code for the Kudoo app is on GitHub5 and the repository has a directory for each working state of the app, corresponding to the results after each section in this book. So if you get an error, you can always compare to the directory corresponding to the section you are reading. Definitely do write the apps yourself while reading this chapter and Chapter 8; I guarantee you will learn a lot more this way.
5. https://github.com/petersommerhoff/kudoo-app
Adding the Recycler View
The app’s central element will be the list of to-do items, implemented using a RecyclerView. A RecyclerView is a list view that avoids lag even for very long lists by reusing the view objects required to display the list. A good way to start out with this app is to implement the basic RecyclerView and feed it some sample data to show. Here’s an overview of the involved steps to achieve this (which are covered in this section).
First, adjust and create all the required layouts in XML.
Create a simple to-do item class that represents the data shown in each list item.
Implement the
RecyclerViewadapter that feeds the recycler view with data.Set up the
RecyclerViewin theMainActivity.
Setting up the Recycler View Layouts
Because you chose Basic Activity during project setup, there is an activity_main.xml layout file inside the res/layout directory. This layout includes the content_main.xml layout. Inside the content_main.xml, replace the TextView with a RecyclerView so that the layout file looks as it does in Listing 7.7.
Listing 7.7 RecyclerView Layout
<android.support.constraint.ConstraintLayout
app:layout_behavior="@string/appbar_scrolling_view_behavior" …>
<android.support.v7.widget.RecyclerView
android:id="@+id/recyclerViewTodos"
android:scrollbars="vertical"
android:layout_width="match_parent"
android:layout_height="match_parent" />
</android.support.constraint.ConstraintLayout>
With this setup, the RecyclerView takes up all the height and width of its container so that it effectively fills the whole screen. Note that the ConstraintLayout that was generated for you enables scrolling if the list overflows the screen via its layout_behavior attribute.
Note
If the RecyclerView cannot be found, make sure you have the Design Support Library in your module’s dependencies:
implementation 'com.android.support:design:27.1.1'
Next, let’s create the layout that each list item in the RecyclerView will use. This comprises a TextView to show the to-do list title with a CheckBox beside it to check it off. Under res/layout, add a new layout resource file called todo_item.xml. A simple LinearLayout as in Listing 7.8 will do; add it to the newly created layout file.
Listing 7.8 RecyclerView Item Layout
<?xml version="1.0" encoding="utf-8"?>
<LinearLayout xmlns:android="http://schemas.android.com/apk/res/android"
android:layout_width="match_parent"
android:layout_height="wrap_content"
android:orientation="horizontal">
<CheckBox
android:id="@+id/cbTodoDone"
android:layout_width="wrap_content"
android:layout_height="wrap_content"
android:layout_marginStart="@dimen/margin_medium" />
<TextView
android:id="@+id/tvTodoTitle"
android:layout_width="match_parent"
android:layout_height="wrap_content"
android:padding="@dimen/padding_large"
android:textSize="@dimen/font_large" />
</LinearLayout>
To add the missing dimension resources (the ones starting with @dimen), press Alt+Enter with the cursor inside them and click the suggested action Create dimen value resource. The margin_medium and padding_large should be 16dp, font_large should be 22sp. Alternately, you can add these resources to res/values/dimens.xml6 by hand.
6. https://github.com/petersommerhoff/kudoo-app/blob/master/01_AddingRecyclerView/app/src/main/res/values/dimens.xml
Note
Android uses several types of resources. Dimensions are one of them; others include strings, layouts, and drawables. All reside in the res directory, and simple values like dimensions and strings are inside the res/values subdirectory. Looking at the files inside res/values, you will see they all share the same basic structure. You can add resources into these files manually as well, instead of using Android Studio’s actions to create them for you.
All resources are accessed programmatically via the generated R class, such as R.string. enter_todo or R.layout.activity_main.
That’s all the required layout for now, so you can now dive into the actual Kotlin code, beginning with the model.
Model
Models represent the entities used in your app. The only model this app needs is one to represent a to-do item, and Kotlin’s data classes greatly simplify its declaration, as Listing 7.9 shows. Place this class into a new model package directly under the kudoo package.
Listing 7.9 TodoItem Data Class
data class TodoItem(val title: String)
This simple to-do item model that carries only a title is all you need as models for this app.
The RecyclerView Adapter
The main work when using RecyclerView is implementing the adapter. The adapter provides the data for the RecyclerView (the list items) and handles how the item views are reused. This is how the RecyclerView improves performance: It reuses existing views from a so-called view holder to avoid creating a new object and more importantly to avoid inflating the layouts for these views. In contrast, a normal ListView would create and inflate dedicated views for every list item, without any reuse.
The first step is to add a new package view with subpackage main (you can do this in one step in Android Studio by typing in view.main as the package name in the package creation dialog) and to add a new Kotlin class RecyclerListAdapter inside it, as in Listing 7.10. In total, the package should now be com.example.kudoo.view.main, assuming you used example.com as your company domain during project creation.
Listing 7.10 RecyclerListAdapter Signature
import android.support.v7.widget.RecyclerView
import com.example.kudoo.model.TodoItem
class RecyclerListAdapter(
private val items: MutableList<TodoItem>
) : RecyclerView.Adapter<RecyclerListAdapter.ViewHolder>() { // ViewHolder impl. next
// …
}
Because the RecyclerView will show to-do items and users may add or remove items on the list, the adapter carries a MutableList<TodoItem>, which represents the data that will be shown in the RecyclerView.
This class extends Android’s RecyclerView.Adapter and thus has to override three methods:
onCreateViewHolder: This method creates aViewHolderobject, meaning an object that is used to hold all the views for a single list item. In this case, oneTextViewand oneCheckBox. As mentioned, the point is that the recycler view then reuses these view objects to avoid unnecessary object creations and expensive layout inflations.onBindViewHolder: This method binds a givenTodoItemto such aViewHolder, meaning that it populates the views with the data from theTodoItem. Here, it shows the to-do title in the text view.getItemCount: This must return the number of items to be shown in the list.
It’s common practice to add the custom ViewHolder class that implements RecyclerView.ViewHolder as a nested class into the adapter. This view holder class holds all views for a single list item (the text view and the check box) and knows how to bind a TodoItem to them. Listing 7.11 shows the ViewHolder for this app.
Listing 7.11 Custom ViewHolder
import android.support.v7.widget.RecyclerView
import android.view.View
import android.widget.*
import com.example.kudoo.R
import com.example.kudoo.model.TodoItem
class RecyclerListAdapter(…) : … {
// …
class ViewHolder(listItemView: View) : RecyclerView.ViewHolder(listItemView) {
// ViewHolder stores all views it needs (only calls ‘findViewById’ once)
val tvTodoTitle: TextView = listItemView.findViewById(R.id.tvTodoTitle)
fun bindItem(todoItem: TodoItem) { // Binds a to-do item to the views
tvTodoTitle.text = todoItem.title // Populates the text view with the to-do
cbTodoDone.isChecked = false // To-do items are always 'not done' (or deleted)
}
}
}
As you can see, the ViewHolder caches all its views and only calls findViewById once when initialized. This is part of how a RecyclerView improves performance compared to the old ListView: it reuses existing view objects and populates them with the desired data in bindItem, without doing any expensive operations.
You must use findViewById here because the ViewHolder is not a LayoutContainer. If you want, you can change this using the Kotlin Android Extensions by enabling experimental features (where experimental does not mean unstable). To do so, simply add the code from Listing 7.12 to the module’s build.gradle file and sync the project. You can place it below the dependencies { … } section.
Listing 7.12 Enabling Experimental Kotlin Android Extensions
androidExtensions {
experimental = true
}
With this, you can now get rid of findViewById in the ViewHolder by implementing the LayoutContainer interface that’s now available, as shown in Listing 7.13. All that’s required to implement this interface is to override the containerView property, which is what was called listItemView in Listing 7.11. Thus, you can override it directly in the constructor parameter. Then, you can access the UI elements directly by the ID you gave them in the XML layout file, here tvTodoTitle and dbTodoDone. Being able to access UI elements like this, without explicitly calling findViewById, is one of the popular benefits of Kotlin on Android and is enabled by the Kotlin Android Extensions.
Listing 7.13 ViewHolder Without findViewById
// … (imports from before here)
import kotlinx.android.extensions.LayoutContainer
import kotlinx.android.synthetic.main.todo_item.* // Note synthetic import
class RecyclerListAdapter(…) : … {
// …
class ViewHolder(
override val containerView: View // Overrides property from LayoutContainer
) : RecyclerView.ViewHolder(containerView), LayoutContainer {
fun bindItem(todoItem: TodoItem) {
tvTodoTitle.text = todoItem.title // Still calls findViewById only once
cbTodoDone.isChecked = false
}
}
}
Note that the LayoutContainer caches all views as well, although it is not directly apparent. You can see that this is the case by looking at the decompiled Java code—remember, you can use Ctrl+Shift+A (Cmd+Shift+A), then type “Show Kotlin Bytecode” or simply “skb” and then click Decompile. Alternately, you can use the Tools menu; under Kotlin there’s the option Show Kotlin Bytecode.
With this, all that’s left to do is to override the three methods mentioned above in the adapter. First, onCreateViewHolder must create a ViewHolder object and should use the list item layout (todo_item.xml) you’ve created to inflate the view’s layout. This is commonly done using a LayoutInflater, as shown in Listing 7.14.
Listing 7.14 RecyclerListAdapter.onCreateViewHolder()
// … (imports from before)
import android.view.LayoutInflater
import android.view.ViewGroup
class RecyclerListAdapter(…) : … {
// …
override fun onCreateViewHolder(parent: ViewGroup, layoutId: Int): ViewHolder {
val itemView: View = LayoutInflater.from(parent.context)
.inflate(R.layout.todo_item, parent, false) // Creates a list item view
return ViewHolder(itemView) // Creates a view holder for it
}
}
This first creates a new view (a list item) by inflating the list item layout. It does so without attaching the view to any parent yet because the third argument of inflate is set to false. Then it passes that to a new ViewHolder that manages this view from then on and will let the recycler view reuse it later.
Next up is onBindViewHolder, which should bind a given TodoItem to a ViewHolder. The logic for this is already implemented in ViewHolder.bindItem so that you can delegate to that method, as done in Listing 7.15. Place this into the RecyclerListAdapter class, like onCreateViewHolder.
Listing 7.15 RecyclerListAdapter.onBindViewHolder()
override fun onBindViewHolder(holder: ViewHolder, position: Int) {
holder.bindItem(items[position]) // Populates the list item with to-do data
}
Lastly, getItemCount is the easiest to implement since the RecyclerView should render as many items as the list of to-do items given to its adapter. Listing 7.16 implements this method. This also goes into the RecyclerListAdapter class.
Listing 7.16 RecyclerListAdapter.getItemCount()
override fun getItemCount() = items.size
Putting everything together, the RecyclerListAdapter looks as it does in Listing 7.17.
Listing 7.17 Complete RecyclerListAdapter
import android.support.v7.widget.RecyclerView
import android.view.*
import com.example.kudoo.R
import com.example.kudoo.model.TodoItem
import kotlinx.android.extensions.LayoutContainer
import kotlinx.android.synthetic.main.todo_item.*
class RecyclerListAdapter(
private val items: MutableList<TodoItem>
) : RecyclerView.Adapter<RecyclerListAdapter.ViewHolder>() {
override fun onCreateViewHolder(parent: ViewGroup, layoutId: Int): ViewHolder {
val itemView: View = LayoutInflater.from(parent.context)
.inflate(R.layout.todo_item, parent, false)
return ViewHolder(itemView)
}
override fun getItemCount() = items.size
override fun onBindViewHolder(holder: ViewHolder, position: Int) {
holder.bindItem(items[position])
}
class ViewHolder(
override val containerView: View
) : RecyclerView.ViewHolder(containerView), LayoutContainer {
fun bindItem(todoItem: TodoItem) {
tvTodoTitle.text = todoItem.title
cbTodoDone.isChecked = false
}
}
}
The MainActivity
With the RecyclerView ready to go, now you only need to set it up in the MainActivity and populate it with some sample data. Thanks to Kotlin Android Extensions, the RecyclerView can be accessed directly by its layout ID, recyclerViewTodos, so that you can again avoid findViewById. Listing 7.18 shows the setup logic.
Listing 7.18 Setting Up the RecyclerView with the Adapter
// … (imports from before)
import android.support.v7.widget.*
import com.example.kudoo.model.TodoItem
import com.example.kudoo.view.main.RecyclerListAdapter
import kotlinx.android.synthetic.main.activity_main.* // From Kotlin Android Ext.
import kotlinx.android.synthetic.main.content_main.* // From Kotlin Android Ext.
class MainActivity : AppCompatActivity() {
// …
private fun setUpRecyclerView() = with(recyclerViewTodos) {
adapter = RecyclerListAdapter(sampleData()) // Populates adapter/list with data
layoutManager = LinearLayoutManager(this@MainActivity) // Uses linear layout
itemAnimator = DefaultItemAnimator() // Optional layout niceties
addItemDecoration(
DividerItemDecoration(this@MainActivity, DividerItemDecoration.VERTICAL))
}
private fun sampleData() = mutableListOf(
TodoItem("Implement RecyclerView"),
TodoItem("Store to-dos in database"),
TodoItem("Delete to-dos on click")
)
}
In setUpRecyclerView, the adapter is assigned to an instance of your RecyclerListAdapter, with sample data passed in as the list of to-do items that should be displayed. Next, a simple LinearLayoutManager is used to lay out the items as a vertical list. As an optional bonus, an item animator is added to improve the delete animation and a divider item decorator adds a separator line between each item. Note how this code makes use of the with function and shorthand function syntax.
Note
Beware not to import R.id.recyclerViewTodos instead of the synthetic property even when it cannot be found. If Android Studio marks these references in red, rebuild the project using Ctrl+F9 (Cmd+F9 on Mac) or by running the app.
In autocompletions, Android Studio marks the correct imports with an (Android Extensions) suffix. They’re from packages like kotlinx.android.synthetic.main.content_main.*.
Now, you just need to call setUpRecyclerView in onCreate and you should see the three sample to-do items displayed in your app. This is shown in Listing 7.19.
Listing 7.19 Adjusting onCreate
override fun onCreate(savedInstanceState: Bundle?) {
// …
setUpRecyclerView()
}
The most central component is now ready, but the data is hard-coded in the MainActivity. In the next step, you’ll use Room to retrieve sample data from a SQLite database instead.
Adding a Room Database
With this section, you’ll start integrating Android Architecture Components into this app. Introduced at Google I/O 2017, this library of architecture components has rapidly gained widespread use. Room is a component that handles database access and greatly simplifies the use of SQLite. The ViewModel and LiveData architecture components will be integrated afterward.
To be able to use Room, you must add the dependencies from Listing 7.20 to your module’s build.gradle file (you can also extract dependency versions into the project’s build.gradle file if you prefer).
Listing 7.20 Gradle Dependencies for Room
dependencies {
// …
def room_version = "1.1.1" // Use latest version 1.x if you want
implementation "android.arch.persistence.room:runtime:$room_version"
kapt "android.arch.persistence.room:compiler:$room_version"
}
Remember to use kapt instead of annotationProcessor when using Kotlin, and add the corresponding plugin at the top of the build.gradle file, as in Listing 7.21.
Listing 7.21 Enabling the Kotlin Annotation Processor Plugin
apply plugin: 'kotlin-android-extensions' // Should already exist
apply plugin: 'kotlin-kapt' // Added now for annotation processing
Room makes it easy to store models to a database, but first you’ll have to tell Room which models to store. For this app, only the TodoItem class should be mapped to the database. To let Room know, you must annotate it with @Entity. In addition, a @PrimaryKey is required to uniquely identify each to-do item in the database. Listing 7.22 shows the adjusted model.
Listing 7.22 TodoItem as an Entity
import android.arch.persistence.room.Entity
import android.arch.persistence.room.PrimaryKey
@Entity(tableName = "todos") // Indicates that this is a database entity
data class TodoItem(val title: String) {
@PrimaryKey(autoGenerate = true) // Unique primary key must identify an object
var id: Long = 0 // 0 is considered 'not set' by Room
}
Inside @Entity, you can specify a custom name for the associated database table; here, it will be todos. An additional id serves as the primary key. Room will autogenerate these IDs for you when setting autoGenerate = true; it does so by simply incrementing it by one for each new record. Note that the id is initialized to zero because Room will consider zero as being not set, thus allowing it to set it to the autogenerated value.
With only these few lines of code, Room has all the information it needs to map TodoItem objects to a database table. What’s next is to access that table using a data access object (DAO)—this is your access point for all database operations and will be generated by Room as well. All you have to do is define an interface with the operations and queries you want to use. This is shown in Listing 7.23. You can place this TodoItemDao class in a new db package, directly under the kudoo package.
Listing 7.23 TodoItemDao for Database Access
import android.arch.persistence.room.*
import android.arch.persistence.room.OnConflictStrategy.IGNORE
import com.example.kudoo.model.TodoItem
@Dao
interface TodoItemDao {
@Query("SELECT * FROM todos")
fun loadAllTodos(): List<TodoItem> // Allows retrieving all to-do items
@Insert(onConflict = IGNORE) // Does nothing if entry with ID already exists
fun insertTodo(todo: TodoItem) // Allows inserting a new to-do item
@Delete
fun deleteTodo(todo: TodoItem) // Allows deleting an existing to-do item
}
By annotating the interface with @Dao, you let Room know to generate its implementation. Inside the DAO, you can use @Query, @Insert, @Update, and @Delete. The latter three need no further setup. For @Insert and @Update, you may set a strategy for the on-conflict case, which defines how Room behaves if an element with the same ID already exists. @Query allows you to implement arbitrary queries on your database. The only query you need here is one to load all to-do items. Room validates your queries at compile-time and Android Studio analyzes them instantly as well, giving you a very fast feedback loop.
You’re almost done implementing the database. The last step is to implement a RoomDatabase. This is done using an abstract class that extends RoomDatabase and is annotated with @Database. Also, it should provide an instance of itself to the outside. In Listing 7.24, AppDatabase fills that role. This also belongs into the db package.
Listing 7.24 AppDatabase
import android.arch.persistence.room.*
import android.content.Context // Needs access to Android context to build DB object
import com.example.kudoo.model.TodoItem
@Database(entities = [TodoItem::class], version = 1) // TodoItem is only DB entity
abstract class AppDatabase : RoomDatabase() {
companion object {
private var INSTANCE: AppDatabase? = null
fun getDatabase(ctx: Context): AppDatabase { // Builds and caches DB object
if (INSTANCE == null) {
INSTANCE = Room.databaseBuilder(ctx, AppDatabase::class.java, "AppDatabase")
.build()
}
return INSTANCE!!
}
}
abstract fun todoItemDao(): TodoItemDao // Triggers Room to provide an impl.
}
The @Database annotation requires all entities the database should contain as well as a version number. Whenever the schema changes, you must increase this version number.
Recall that companion object members work like static members in languages like Java. The AppDatabase caches an instance of itself in a private INSTANCE property that is initialized lazily when first accessed. This initialization uses Room’s database builder to build an implementation of the abstract AppDatabase. Lastly, add abstract methods for any DAOs you want to expose for accessing this database—here, you only need the TodoItemDao.
With this, the database will be set up correctly and is in principle ready to be used in the MainActivity. However, there’s no sample data in it. The clean way to prepopulate a Room database is to add a callback when instantiating it. Room’s callbacks allow you to override an onCreate method, which is exactly what you need to add sample data when the database is created. Listing 7.25 shows the adjusted code for the companion object. You will only need this code temporarily until users can create their own to-do items.
Listing 7.25 Populating the AppDatabase with Sample Data
// … (imports from before)
import android.arch.persistence.db.SupportSQLiteDatabase
import kotlinx.coroutines.experimental.*
val DB = newSingleThreadContext("DB") // CoroutineContext for DB operations
@Database(entities = [TodoItem::class], version = 1)
abstract class AppDatabase : RoomDatabase() {
companion object {
private var INSTANCE: AppDatabase? = null
fun getDatabase(ctx: Context): AppDatabase {
if (INSTANCE == null) {
INSTANCE = Room.databaseBuilder(ctx, AppDatabase::class.java, "AppDatabase")
.addCallback(prepopulateCallback(ctx)) // Adds callback to database
.build()
}
return INSTANCE!!
}
private fun prepopulateCallback(ctx: Context): Callback {
return object : Callback() {
override fun onCreate(db: SupportSQLiteDatabase) { // Uses onCreate callback
super.onCreate(db)
populateWithSampleData(ctx)
}
}
}
private fun populateWithSampleData(ctx: Context) { // Adds sample data to DB
launch(DB) { // DB operations must be done on a background thread
with(getDatabase(ctx).todoItemDao()) { // Uses DAO to insert items into DB
insertTodo(TodoItem("Create entity"))
insertTodo(TodoItem("Add a DAO for data access"))
insertTodo(TodoItem("Inherit from RoomDatabase"))
}
}
}
}
abstract fun todoItemDao(): TodoItemDao
}
Here, you extend Room’s Callback to override its onCreate method and insert the sample data. Inserting data is a database operation and therefore must be performed on a background thread. As you can see, the code uses launch { … } to perform the database operations in the background. It uses a dedicated single-thread context for database operations because CommonPool is intended for CPU-bound operations. To make this code work, you need to include the coroutine dependencies in your module’s build.gradle file, as in Listing 7.26.
Listing 7.26 Gradle Dependencies for Kotlin Coroutines
def coroutines_version = "0.24.0" // Use latest version if you want
implementation "org.jetbrains.kotlinx:kotlinx-coroutines-core:$coroutines_version"
implementation "org.jetbrains.kotlinx:kotlinx-coroutines-android:$coroutines_version"
With this, the database is finished and will even be populated with sample data when first created. All that’s left to do is use it in MainActivity, as shown in Listing 7.27.
Listing 7.27 Using the Database from MainActivity
// … (imports from before)
import kotlinx.coroutines.experimental.android.UI
import kotlinx.coroutines.experimental.*
import com.example.kudoo.db.*
class MainActivity : AppCompatActivity() {
private lateinit var db: AppDatabase // Stores an AppDatabase object
override fun onCreate(savedInstanceState: Bundle?) {
// …
db = AppDatabase.getDatabase(applicationContext)
setUpRecyclerView() // Sets up recycler view *after* db reference is initialized
// …
}
private fun setUpRecyclerView() = with(recyclerViewTodos) {
launch {
val todos = sampleData().toMutableList()
withContext(UI) { adapter = RecyclerListAdapter(todos) } // Uses UI context
}
layoutManager = LinearLayoutManager(this@MainActivity)
itemAnimator = DefaultItemAnimator()
addItemDecoration(
DividerItemDecoration(this@MainActivity, DividerItemDecoration.VERTICAL))
}
private suspend fun sampleData() =
withContext(DB) { db.todoItemDao().loadAllTodos() } // Uses DB context
}
For now, the MainActivity holds a reference to the AppDatabase to access the database via the DAO. This reference can only be initialized inside onCreate once the application context is available, so it uses a late-initialized property.
As a database operation, the actual call to loadAllTodos must be performed in the background. For this, it uses withContext(DB) { … } to run it on the dedicated database dispatcher and retrieve a result. Due to the withContext call, sampleData must be a suspend function, so its call is wrapped inside a launch { … } in setUpRecyclerView.
That’s it! You’ve now set up a simple Room database with Kotlin, written sample data into the database, and retrieved it back to show in the UI. You can run this app now to see the sample data from the database.
Troubleshooting
If something went wrong trying to prepopulate the database the first time, you can delete it in order to trigger onCreate again. To do so, use Android Studio’s Device File Explorer to remove the directory data/data/com.example.kudoo/databases.
Also, at the time of writing, Apply Changes can cause issues in combination with coroutines. If you get an error mentioning “CoroutineImpl.label is inaccessible,” try re-running the app normally without Apply Changes.
As the next step, you will introduce a ViewModel to avoid the direct dependency on AppDatabase in MainActivity.
Using a ViewModel
A view model is an Android Architecture Component that holds the data for an associated activity. There are several benefits to this approach:
Activities only need to know of their view model(s) to get all the data they need, unaware of whether that data comes from a cache, a database, a network call, or another data source. In other words, it decouples the activity from the data source.
Android’s
ViewModelis lifecycle-aware, meaning that it automatically preserves data across configuration changes such as screen rotations. This way, data doesn’t need to be reloaded after each configuration change.Activities should not perform asynchronous calls themselves because these may potentially take a long time and the activity has to manage them to avoid memory leaks. Separating this concern into its own class is therefore cleaner and avoids huge activity classes that try to perform all app logic themselves.
Let us reap these benefits by using Android’s ViewModel class in the Kudoo app. The first step is to add the required dependencies shown in Listing 7.28. These already include LiveData as well, which you’ll incorporate in the next step.
Listing 7.28 Gradle Dependencies for ViewModel (and LiveData)
dependencies {
// …
def lifecycle_version = "1.1.1" // Replace with latest version if you want
implementation "android.arch.lifecycle:extensions:$lifecycle_version"
kapt "android.arch.lifecycle:compiler:$lifecycle_version"
}
Next, add a new package viewmodel (under kudoo) and add a new TodoViewModel class, which will be the view model for MainActivity. A view model should extend either the ViewModel or the AndroidViewModel class—the latter is required if the ViewModel requires an application context. Thus, the TodoViewModel will extend AndroidViewModel to be able to construct an AppDatabase because the database needs the application context. So you get the class header shown in Listing 7.29.
Listing 7.29 Class Header of TodoViewModel
import android.app.Application
import android.arch.lifecycle.AndroidViewModel
class TodoViewModel(app: Application) : AndroidViewModel(app) { … }
Every subclass of AndroidViewModel must accept an Application object in its constructor and pass it along to its parent. This is how the view model becomes aware of the application context. This view model wraps the database and provides a clean API for the MainActivity to use. Listing 7.30 introduces the required members.
Listing 7.30 Complete TodoViewModel
// … (imports from before)
import com.example.kudoo.db.*
import com.example.kudoo.model.TodoItem
import kotlinx.coroutines.experimental.*
class TodoViewModel(app: Application) : AndroidViewModel(app) {
private val dao by lazy { AppDatabase.getDatabase(getApplication()).todoItemDao() }
suspend fun getTodos(): MutableList<TodoItem> = withContext(DB) {
dao.loadAllTodos().toMutableList()
}
fun add(todo: TodoItem) = launch(DB) { dao.insertTodo(todo) }
fun delete(todo: TodoItem) = launch(DB) { dao.deleteTodo(todo) }
}
This view model lazily requests a database instance when it’s accessed for the first time. It provides a suspending function to retrieve all to-do items from the database. Additionally, it exposes methods to add and delete to-do items, which launch the corresponding database operations in the background.
With this, you can now replace the AppDatabase in MainActivity with the new TodoViewModel. To this end, remove the AppDatabase property and add the TodoViewModel instead, as shown in Listing 7.31.
Listing 7.31 Integrating the TodoViewModel into MainActivity
class MainActivity : AppCompatActivity() {
private lateinit var viewModel: TodoViewModel // Now references view model, not DB
override fun onCreate(savedInstanceState: Bundle?) {
// …
viewModel = getViewModel(TodoViewModel::class) // ‘getViewModel’ is impl. next
setUpRecyclerView()
}
private fun setUpRecyclerView() = with(recyclerViewTodos) {
launch(UI) { adapter = RecyclerListAdapter(viewModel.getTodos()) }
// …
}
}
The view model is again late-initialized because it requires the activity to be attached to the application—and this is the case in onCreate. You can remove the sampleData method and simply pass in viewModel.getTodos() to the RecyclerView’s adapter. Because this performs a database operation, it is wrapped inside launch. In this regard, the MainActivity is not yet completely independent of the implementation details of the ViewModel—but we’ll fix this using LiveData in the next step.
For now, you have to add the getViewModel extension function to make this code compile. Remember that extensions are your best friend on Android to work around API boilerplate. Here, you use it to retrieve view models more easily. Create a new package view.common and add a new file ViewExtensions.kt to it. Inside this file, you can define the extension shown in Listing 7.32 as a file-level function.
Listing 7.32 Extension to Retrieve View Models
import android.arch.lifecycle.*
import android.support.v4.app.FragmentActivity
import kotlin.reflect.KClass
fun <T : ViewModel> FragmentActivity.getViewModel(modelClass: KClass<T>): T =
ViewModelProviders.of(this).get(modelClass.java)
It’s an extension on the FragmentActivity class that simply accepts a KClass<T> (a Kotlin class) where T must be a ViewModel. In this way, it provides a more natural API to retrieve your view models. You must import it into your MainActivity to resolve the remaining error.
Tip
Kotlin’s extension functions are extraordinarily useful to avoid repeating boilerplate around Android APIs. For a collection of extensions that help you write concise and expressive code, and that is maintained by Google themselves, check out Android KTX.7
7. https://developer.android.com/kotlin/ktx
At the time of writing, Android KTX is still in alpha and APIs are prone to change. So to make sure you can follow along these apps seamlessly, they are not used here. When you’re reading this, Android KTX may be stable, and if so, I recommend exploring the extensions.
You have now integrated Android’s ViewModel into your app, preserving your data across configuration changes and helping to separate concerns between activities and data-handling code—the activity should only be responsible for showing the data and providing notifications of user actions. However, so far the to-do items retrieved from the view model don’t automatically reflect changes to the data. You can verify this by calling viewModel.add(…) after some delay—the new item will not yet show up in the UI. To handle this idiomatically with Android Architecture Components, let’s integrate LiveData next.
Integrating LiveData
LiveData is a lifecycle-aware data holder. App components like activities and fragments can observe a LiveData object to automatically reflect data changes in the UI. Because it’s lifecycle aware, LiveData makes sure to notify only active observers. For instance, it doesn’t update activities that are currently in the background or that have been destroyed by Android to recover memory. Like ViewModel, this has several benefits.
Activities don’t have to handle lifecycles, they can simply observe a
LiveData, which makes sure not to send data to inactive consumers (which would crash the app).Data is automatically kept up to date whenever the activity is active. For instance, after configuration change, the activity will immediately receive the latest data.
LiveDatamakes all its observers perform cleanups when their associated lifecycle is destroyed so that memory leaks are prevented.
Integrating LiveData into the app is fairly simple because it works well with Room and ViewModel out of the box. As a first step, the DAO should return a LiveData instead of just a List<TodoItem> so that it can be observed for data changes. Fortunately, Room can do this for you automatically; just wrap the return value into LiveData as in Listing 7.33 and Room will perform the required transformation.
Listing 7.33 Returning LiveData from the DAO
// … (imports from before)
import android.arch.lifecycle.LiveData
@Dao
interface TodoItemDao {
// …
@Query("SELECT * FROM todos")
fun loadAllTodos(): LiveData<List<TodoItem>> // Wraps return type in LiveData now
}
Next, you’ll have to adjust TodoViewModel.getTodos accordingly, as done in Listing 7.34.
Listing 7.34 Returning LiveData from the ViewModel
// … (imports from before)
import android.arch.lifecycle.LiveData
class TodoViewModel(app: Application) : AndroidViewModel(app) {
// Now uses a LiveData of a read-only list
suspend fun getTodos(): LiveData<List<TodoItem>> = withContext(DB) {
dao.loadAllTodos()
}
// …
}
Now you’re ready to observe the LiveData in MainActivity, as shown in Listing 7.35.
Listing 7.35 Observing the LiveData from MainActivity
// … (imports from before)
import android.arch.lifecycle.LiveData
import kotlinx.coroutines.experimental.android.UI
class MainActivity : AppCompatActivity() {
// …
private fun setUpRecyclerView() { // No longer uses shorthand notation
with(recyclerViewTodos) {
adapter = RecyclerListAdapter(mutableListOf()) // Initializes with empty list
// …
}
launch(UI) { // Uses UI thread to access recycler view adapter
val todosLiveData = viewModel.getTodos() // Runs in DB context
todosLiveData.observe(this@MainActivity, Observer { todos ->
// Observes changes in the LiveData
todos?.let {
val adapter = (recyclerViewTodos.adapter as RecyclerListAdapter)
adapter.setItems(it) // Updates list items when data changes
}
})
}
}
}
Here, the RecyclerView adapter is first initialized with an empty list. Note that you no longer need launch to assign the adapter. To add data to the list, the view model’s LiveData is observed for changes—on any change, the adapter will show the new list of to-do items. In effect, when a new record is inserted into or removed from the database, Room automatically reflects this in the LiveData, which in turn notifies its observers (the MainActivity) of the data change, finally causing the RecyclerView to update.
To make this code compile, you must add the setItems method to the RecyclerListAdapter class, as shown in Listing 7.36.
Listing 7.36 Adding setItems to the RecyclerListAdapter
class RecyclerListAdapter(
private val items: MutableList<TodoItem>
) : RecyclerView.Adapter<RecyclerListAdapter.ViewHolder>() {
// …
fun setItems(items: List<TodoItem>) {
this.items.clear()
this.items.addAll(items)
notifyDataSetChanged() // Must notify recycler view of changes to the data
}
}
After updating the list of items the RecyclerView should display, remember to call notifyDataSetChanged to trigger redrawing the view. For large lists, you would want to use DiffUtil8 to improve performance, but it’s not necessary for this simple to-do list.
8. https://developer.android.com/reference/android/support/v7/util/DiffUtil
This is all that’s required to react to data changes using LiveData and immediately update your UI to show the latest data. You can verify this works by calling viewModel.add(…) in your MainActivity to add a new item (you may want to use delay as well to see it appear). Or you can wait until you complete the next step that allows users to add new to-do items.
Adding New To-Do Items
All infrastructure for data persistence and data presentation in the UI is set up now. So what’s left is to allow users to change this data. In this section, you will implement a second activity that allows users to add new to-do items, and after this you will also allow them to check off to-do items to delete them.
To add the new activity, create a new package view.add and add a new activity to it by right-clicking the package. Choose New, then Activity, and then Empty Activity. Name it AddTodoActivity and let Android Studio generate the layout file activity_add_todo.xml. Let’s first set up the layout. A simple LinearLayout as in Listing 7.37 will do for this activity.
Listing 7.37 Layout for AddTodoActivity
<?xml version="1.0" encoding="utf-8"?>
<LinearLayout xmlns:android="http://schemas.android.com/apk/res/android"
xmlns:tools="http://schemas.android.com/tools"
android:layout_width="match_parent"
android:layout_height="match_parent"
android:orientation="vertical"
tools:context=".view.add.AddTodoActivity">
<EditText
android:id="@+id/etNewTodo"
android:hint="@string/enter_new_todo"
android:layout_width="match_parent"
android:layout_height="wrap_content"
android:layout_margin="@dimen/margin_medium"
android:textAppearance="@android:style/TextAppearance.Medium"
tools:text="@string/enter_new_todo"
android:inputType="text" />
<Button
android:id="@+id/btnAddTodo"
android:layout_width="wrap_content"
android:layout_height="wrap_content"
android:text="@string/add_to_do"
android:textAppearance="@android:style/TextAppearance"
android:layout_gravity="center_horizontal" />
</LinearLayout>
Add the missing string resources using Android Studio’s suggested actions or by editing res/values/strings.xml. I used "Add to-do" and "Enter new todo…" as the values. Before implementing the logic inside this new activity, let’s adjust the floating action button in MainActivity—first its layout and then its click handler.
Instead of showing an email icon, the floating action button should have a simple plus icon. To this end, navigate to res/drawable, right-click, choose New, and then Image Asset. Fill in the required information:
Icon Type: Action Bar and Tab Icons
Name:
ic_addAsset type: Clip Art
Click on the Clip Art button, search for “add,” and select the simple plus icon
Theme: HOLO_LIGHT
Click Next and then Finish. Now you can use this image asset in activity_main.xml by replacing the existing app:srcCompat attribute, as shown in Listing 7.38.
Listing 7.38 Layout for the FloatingActionButton
<android.support.design.widget.CoordinatorLayout …>
<!-- … -->
<android.support.design.widget.FloatingActionButton …
app:srcCompat="@drawable/ic_add" />
</android.support.design.widget.CoordinatorLayout>
With the looks in place, it’s time to adjust the floating action button’s behavior. To this end, go into MainActivity, remove the existing default click listener in onCreate, and introduce a new setup function, as shown in Listing 7.39.
Listing 7.39 Setting Up the FloatingActionButton
// … (imports from before)
import android.content.Intent
import com.example.kudoo.view.add.AddTodoActivity
class MainActivity : AppCompatActivity() {
// …
private fun setUpFloatingActionButton() {
fab.setOnClickListener {
val intent = Intent(this, AddTodoActivity::class.java)
startActivity(intent) // Switches to AddTodoActivity
}
}
}
This helper method enables switching to the new activity when clicking the floating action button. It sets up an intent to switch to the new AddTodoActivity, where users can then add a new to-do. Now you can call this new setup method in onCreate, as shown in Listing 7.40.
Listing 7.40 Adjusting onCreate()
class MainActivity : AppCompatActivity() {
// …
override fun onCreate(savedInstanceState: Bundle?) {
// …
setUpRecyclerView()
setUpFloatingActionButton()
}
}
With this, the MainActivity is all set. So now it’s time to make the new AddTodoActivity play its part. It has to use the text the user enters in order to store a new to-do into the database. Listing 7.41 provides all code required for this activity.
Listing 7.41 Implementing the AddTodoActivity
import android.os.Bundle
import android.support.v7.app.AppCompatActivity
import com.example.kudoo.R
import com.example.kudoo.db.DB
import com.example.kudoo.model.TodoItem
import com.example.kudoo.view.common.getViewModel
import com.example.kudoo.viewmodel.TodoViewModel
import kotlinx.android.synthetic.main.activity_add_todo.*
import kotlinx.coroutines.experimental.launch
class AddTodoActivity : AppCompatActivity() {
private lateinit var viewModel: TodoViewModel // Uses the view model as well
override fun onCreate(savedInstanceState: Bundle?) {
super.onCreate(savedInstanceState)
setContentView(R.layout.activity_add_todo)
viewModel = getViewModel(TodoViewModel::class)
setUpListeners()
}
private fun setUpListeners() { // Adds new to-do item to DB when clicking button
btnAddTodo.setOnClickListener {
val newTodo = etNewTodo.text.toString()
launch(DB) { viewModel.add(TodoItem(newTodo)) } // Initiates DB transaction
finish() // Switches back to MainActivity
}
}
}
The click listener for the Add to-do button first reads out the user’s text from the EditText and then starts a new coroutine that stores the new to-do item to the database. Then the activity finishes, causing the current activity to fade out so that the user gets back to the MainActivity, where the to-do item automatically shows up thanks to LiveData.
Tip
When you test your app in the emulator, you may want to enable keyboard input to type a lot faster in the emulator. If it’s not activated, open the AVD Manager in Android Studio, click on the pen icon for the virtual device you’re using, click Show Advanced Settings, then scroll down to the bottom and check Enable Keyboard Input.
This concludes the requirement to let users add their own to-do items. You can now run your app, click on the plus to switch activities, enter your to-do item, and see it pop up in the RecyclerView automatically. This is the power of Room working together with a LiveData bound to a RecyclerView.
As a final touch, you may want to allow users to navigate up from the AddTodoActivity to the MainActivity without entering a to-do item, and you can do so by making it a child activity of MainActivity in your AndroidManifest.xml file. Listing 7.42 shows how to modify the activity tag under application to achieve this.
Listing 7.42 Enabling Navigating Up from AddTodoActivity to MainActivity
<activity android:name=".view.add.AddTodoActivity"
android:parentActivityName=".MainActivity">
<meta-data android:name="android.support.PARENT_ACTIVITY"
android:value="com.example.kudoo.MainActivity" />
</activity>
With this, you’ll see an arrow at the top of AddTodoActivity that allows users to go back without entering a to-do item.
At this point, you may have lots of to-do items created in your app that you no longer want. So the next and final step is to allow users to check off their to-do items, removing them from the database and therefore from the list.
Enabling Checking Off To-Do Items
In this section, you’ll learn how to handle clicks on RecyclerView items to let users delete completed to-do items by checking them off in the RecyclerView. First, the adapter must be extended to receive a click handler that it can assign to the checkbox when binding to a view holder. Listing 7.43 shows the required changes.
Listing 7.43 Assigning Event Handlers in the RecyclerView Adapter
class RecyclerListAdapter(
private val items: MutableList<TodoItem>,
private val onItemCheckboxClicked: (TodoItem) -> Unit
) : RecyclerView.Adapter<RecyclerListAdapter.ViewHolder>() {
// …
inner class ViewHolder(…) : … { // Note that this is now an ‘inner’ class
fun bindItem(todoItem: TodoItem) {
// …
cbTodoDone.setOnCheckedChangeListener { _, _ -> // Adds listener to check box
onItemCheckboxClicked(todoItem)
}
}
}
}
The adapter now accepts a click handler in its constructor, which must be a function that accepts the selected TodoItem. This function is used in bindItem to assign a change listener to the checkbox that is associated with the given to-do item. To easily access the onItemCheckboxClicked property from the outer scope, make the ViewHolder an inner class.
Now, the MainActivity can pass in the desired event handler as in Listing 7.44.
Listing 7.44 Assigning Event Handlers in the RecyclerView Adapter
// … (imports from before)
import kotlinx.coroutines.experimental.android.UI
class MainActivity : AppCompatActivity() {
// …
private fun setUpRecyclerView() {
with(recyclerViewTodos) {
adapter = RecyclerListAdapter(mutableListOf(), onRecyclerItemClick())
// …
}
// …
}
private fun onRecyclerItemClick(): (TodoItem) -> Unit = { todo ->
launch(DB) { viewModel.delete(todo) }
}
}
The creation of the click handler is encapsulated into its own method so that every method has a single responsibility. The click handler starts a coroutine to delete the TodoItem from the database. So in this app, to-do items are immediately deleted once they are checked off.
This is all that’s required to make this use case work. You can now click the checkbox next to any to-do item to delete that item from the database and, therefore, from the RecyclerView.
Summary
The app you created in this chapter covered many fundamental components and concepts from both Kotlin and Android.
First, you learned how Android Architecture Components (Room,
ViewModel, andLiveData) can facilitate setting up a database and handling lifecycles on Android.Next, you used the Kotlin Android Extensions to make your
ViewHolderaLayoutContainerand to avoid callingfindViewByIdexplicitly.You also saw how to implement a
RecyclerViewin Kotlin, and how to attach click handlers to its list items.Lastly, throughout the app, you made use of Kotlin’s language features like data classes, companion objects, and top-level declarations to solve tasks in a more concise and idiomatic way.
With this, you are now able to implement basic apps for Android using Kotlin following state-of-the-art tools and coding practices.