8
Android App Development with Kotlin: Nutrilicious
The food you eat can be either the safest and most powerful form of medicine or the slowest form of poison.
Ann Wigmore
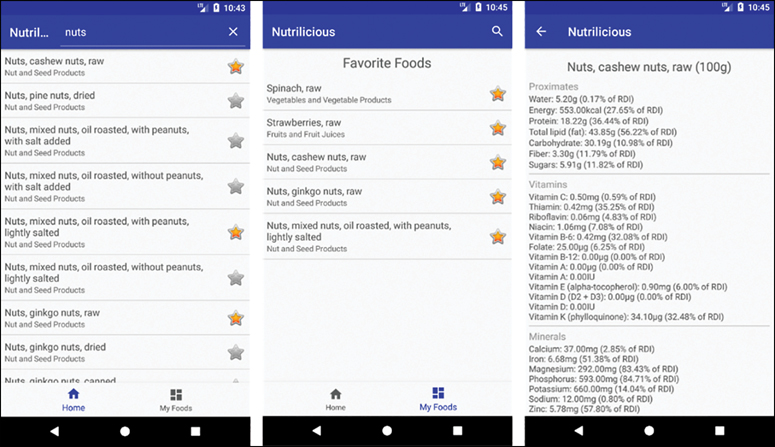
In this chapter, you’ll implement the “Nutrilicious” app: a more fleshed-out app that allows users to explore food and nutrition data from the U.S. Department of Agriculture to make healthier diet decisions. Figure 8.1 shows the finished app as you will create it in this chapter.
While developing this sample app, you will recap the fundamental concepts by getting more practice. But you will also dive deeper and implement network access, map JSON data to domain classes, map these domain classes to a Room database, and introduce a repository as the single source of truth for data used in your app.
Setting Up the Project
Every app is born by setting up a new Android project. The setup works the same way as before except that this time you choose a Bottom Navigation Activity as your MainActivity.
Note
In case Android Studio’s project wizard changed, you can get the exact project template used in this chapter from the app’s GitHub repository1 (just like the code for every step).
1. https://github.com/petersommerhoff/nutrilicious-app
To adapt the template for this app, start by adjusting the bottom navigation. In res/menu/navigation.xml, remove the last item titled Notifications—this app only needs two menu items. Next, change the ID and title of the menu item titled Dashboard to represent a menu item showing the user’s favorite foods. You can use Shift+F6 to rename the ID, or right-click, select “Refactor,” and then click “Rename….” Listing 8.1 shows the resulting code for the bottom menu in res/menu/navigation.xml.
Listing 8.1 Bottom Navigation Menu
<?xml version="1.0" encoding="utf-8"?>
<menu xmlns:android="http://schemas.android.com/apk/res/android">
<item android:id="@+id/navigation_home"
android:icon="@drawable/ic_home_black_24dp"
android:title="@string/title_home" />
<item android:id="@+id/navigation_my_foods"
android:icon="@drawable/ic_dashboard_black_24dp"
android:title="@string/title_my_foods" />
</menu>
The res/values/strings.xml file must contain the used string resource, as in Listing 8.2.
Listing 8.2 String Resources for Bottom Navigation Menu
<string name="title_home">Home</string>
<string name="title_my_foods">My Foods</string>
Next, remove unnecessary code from MainActivity, namely the when case for the Notifications menu item in the navigation listener. Also, adjust the when case for the Dashboard item to your new My Foods item. You may also want to rename the listener to a more concise name. Your resulting code should be similar to Listing 8.3.
Listing 8.3 MainActivity Setup for the Bottom Navigation Menu
class MainActivity : AppCompatActivity() {
private val navListener = BottomNavigationView.OnNavigationItemSelectedListener {
when(it.itemId) {
R.id.navigation_home -> { // Defines action for when ‘Home’ is clicked
return@OnNavigationItemSelectedListener true
}
R.id.navigation_my_foods -> { // Defines action for when ‘My Foods’ is clicked
return@OnNavigationItemSelectedListener true
}
}
false
}
// …
}
Clicking the menu items doesn’t do much yet but it will change which item is shown as being active because you’re returning true from the listener—you may set the text of the TextView according to the selected item at this point, but that TextView will be replaced in the next step. Running the app should present you with a simple text view and the bottom navigation with two items that indicate correctly which one was selected. This is the basic template that you can build on for the remainder of this chapter.
Adding a RecyclerView to the Home Screen
As in many apps, especially ones that present data, the centerpiece of this app is a RecyclerView. It will show all foods that were found for a user query. The setup follows the same steps as always.
Define the layout for the activity containing the
RecyclerView.Define the layout for each list item in the
RecyclerView.Implement the adapter that provides data for the
RecyclerView.Set up the
RecyclerViewin the activity that shows it.
Layout for MainActivity
The MainActivity layout will consist of the RecyclerView covering the screen and, of course, the bottom navigation. To this end, replace the TextView in activity_main.xml with the recycler view, as shown in Listing 8.4. Also, add scrolling behavior to the ConstraintLayout so that the list of foods is scrollable.
Listing 8.4 MainActivity Layout
<?xml version="1.0" encoding="utf-8"?>
<android.support.constraint.ConstraintLayout
app:layout_behavior="@string/appbar_scrolling_view_behavior" …>
<android.support.v7.widget.RecyclerView
android:id="@+id/rvFoods"
android:layout_width="match_parent"
android:layout_height="0dp"
app:layout_constraintTop_toTopOf="parent"
app:layout_constraintBottom_toTopOf="@id/navigation" />
<android.support.design.widget.BottomNavigationView
android:id="@+id/navigation"
android:layout_width="match_parent"
android:layout_height="wrap_content"
app:layout_constraintBottom_toBottomOf="parent"
android:background="?android:attr/windowBackground"
app:menu="@menu/navigation" />
</android.support.constraint.ConstraintLayout>
Here, a layout behavior was added to the ConstraintLayout so that the view can be scrolled when the RecyclerView overflows the screen, and the recycler view was added. Also, the BottomNavigationView layout was simplified.
Layout for RecyclerView Items
In res/layout, add a new layout resource file titled rv_item.xml that represents a list item. It shows a food name with a short description and an image view containing a star that will be used to indicate favorite foods. Listing 8.5 implements this layout using a ConstraintLayout that aligns the text views below each other, with the image view to their right.
Listing 8.5 Layout for RecyclerView Items
<?xml version="1.0" encoding="utf-8"?>
<android.support.constraint.ConstraintLayout
xmlns:android="http://schemas.android.com/apk/res/android"
xmlns:tools="http://schemas.android.com/tools"
xmlns:app="http://schemas.android.com/apk/res-auto"
android:layout_width="match_parent"
android:layout_height="wrap_content"
android:padding="@dimen/medium_padding">
<TextView
android:id="@+id/tvFoodName"
android:layout_width="wrap_content"
android:layout_height="wrap_content"
android:textSize="@dimen/medium_font_size"
app:layout_constraintRight_toLeftOf="@id/ivStar"
app:layout_constraintStart_toStartOf="parent"
app:layout_constraintTop_toTopOf="parent"
tools:text="Gingerbread" />
<TextView
android:id="@+id/tvFoodType"
tools:text="Sweets and Candy"
android:layout_width="wrap_content"
android:layout_height="wrap_content"
app:layout_constraintTop_toBottomOf="@+id/tvFoodName"
app:layout_constraintStart_toStartOf="@id/tvFoodName"
app:layout_constraintRight_toLeftOf="@id/ivStar"
android:textColor="@color/lightGrey"
android:textSize="@dimen/small_font_size" />
<ImageView
android:id="@+id/ivStar"
android:layout_width="32dp"
android:layout_height="32dp"
android:contentDescription="@string/content_description_star"
app:layout_constraintBottom_toBottomOf="parent"
app:layout_constraintEnd_toEndOf="parent"
app:layout_constraintTop_toTopOf="parent" />
</android.support.constraint.ConstraintLayout>
Note that you can use tools:text to show a given text in Android Studio’s Design View and make the layout come to life. All attributes from the tools namespace are used only for tooling, typically for Android Studio’s Design View; they don’t affect the app at runtime. This layout again requires several new resources, and they are given in Listing 8.6.
Listing 8.6 Resources for RecyclerView Item Layout
// In res/values/strings.xml
<string name="content_description_star">favorite</string>
// In res/values/dimens.xml
<dimen name="tiny_padding">4dp</dimen>
<dimen name="medium_padding">8dp</dimen>
<dimen name="medium_font_size">16sp</dimen>
<dimen name="small_font_size">13sp</dimen>
// In res/values/colors.xml
<color name="lightGrey">#888888</color>
With this, all layouts are ready. So now it’s time to write some Kotlin code!
Implementing the Food Model
To implement the adapter, it is useful to have a model that encapsulates the data shown in each list item. This app shows foods, so you need a Food class. Thanks to data classes, this is easy to do. Create a new package model and add a data class Food to it, as in Listing 8.7. This one line of code is all you need for your models, for now.
Listing 8.7 Food Data Class
data class Food(val name: String, val type: String, var isFavorite: Boolean = false)
Implementing the RecyclerView Adapter
As always, implementing the recycler view adapter requires overriding the class RecyclerView.Adapter<YourViewHolder> and overriding the three methods onCreateViewHolder, onBindViewHolder, and getItemCount. Remember, you can make the ViewHolder a LayoutContainer to use the Kotlin Android Extensions there as well. For this purpose, enable experimental extensions at the very bottom of your module’s build.gradle file, as shown in Listing 8.8.
Listing 8.8 Enabling the Experimental Kotlin Android Extensions
androidExtensions {
experimental = true
}
With this setup, you can follow the same structure as in Kudoo to implement the adapter. Create a new package view.main and add a new class SearchListAdapter to it. This will be the adapter for the list. Also, move the MainActivity into this new package because it’s intended to contain everything related to the MainActivity. Listing 8.9 shows the code for the adapter, which is very similar to the one in the Kudoo app. Try to implement it yourself first to see if you stumble upon any roadblocks.
Listing 8.9 RecyclerView Adapter
import android.support.v7.widget.RecyclerView
import android.view.*
import com.example.nutrilicious.R
import com.example.nutrilicious.model.Food
import kotlinx.android.extensions.LayoutContainer
import kotlinx.android.synthetic.main.rv_item.* // Imports synthetic properties
class SearchListAdapter(
private var items: List<Food> // Uses a read-only list of items to display
) : RecyclerView.Adapter<ViewHolder>() {
override fun onCreateViewHolder(parent: ViewGroup, viewType: Int): ViewHolder {
val view = LayoutInflater.from(parent.context) // Inflates layout to create view
.inflate(R.layout.rv_item, parent, false)
return ViewHolder(view) // Creates view holder that manages the list item view
}
override fun getItemCount(): Int = items.size
override fun onBindViewHolder(holder: ViewHolder, position: Int) {
holder.bindTo(items[position]) // Binds data to a list item
}
// In this app, we'll usually replace all items so DiffUtil has little use
fun setItems(newItems: List<Food>) {
this.items = newItems // Replaces whole list
notifyDataSetChanged() // Notifies recycler view of data changes to re-render
}
inner class ViewHolder(
override val containerView: View
) : RecyclerView.ViewHolder(containerView), LayoutContainer {
fun bindTo(food: Food) { // Populates text views and star image to show a food
tvFoodName.text = food.name
tvFoodType.text = food.type
val image = if (food.isFavorite) {
android.R.drawable.btn_star_big_on
} else {
android.R.drawable.btn_star_big_off
}
ivStar.setImageResource(image)
}
}
}
In addition to the basic overrides that every adapter needs and the custom ViewHolder class, this implementation already provides a setItems method to update the list of items shown in the RecyclerView—this method will be used later. Also, the ViewHolder already displays the correct ImageView, depending on whether the food is a favorite or not. As you can see, these adapters always follow the same basic structure.
Adding the RecyclerView to MainActivity
Setting up the RecyclerView in your activities also works mostly the same way every time. For now, the adapter is populated with hard-coded sample data again to see if the layout and adapter work as expected. Listing 8.10 encapsulates the RecyclerView setup into a method.
Listing 8.10 Setting Up the RecyclerView in MainActivity
import android.support.v7.widget.*
class MainActivity : AppCompatActivity() {
// …
private fun setUpSearchRecyclerView() = with(rvFoods) {
adapter = SearchListAdapter(sampleData())
layoutManager = LinearLayoutManager(this@MainActivity)
addItemDecoration(DividerItemDecoration(
this@MainActivity, LinearLayoutManager.VERTICAL
))
setHasFixedSize(true)
}
}
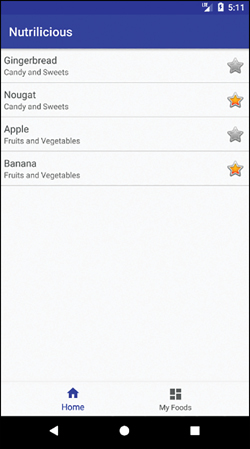
As sample data, you can use a list of sample foods as in Listing 8.11. Note that this sample data is used only temporarily. Generally, you should not use hard-coded strings in your Android app and use string resources instead. Here, we skip this step for the sake of brevity.
Listing 8.11 Hard-Coding the Sample Data
import com.example.nutrilicious.model.Food
class MainActivity : AppCompatActivity() {
// …
private fun sampleData() = listOf( // Only temporary sample data, thus hard-coded
Food("Gingerbread", "Candy and Sweets", false),
Food("Nougat", "Candy and Sweets", true),
Food("Apple", "Fruits and Vegetables", false),
Food("Banana", "Fruits and Vegetables", true)
)
}
Finally, call the setup method in onCreate, as in Listing 8.12.
Listing 8.12 Calling the Setup Method in onCreate
override fun onCreate(savedInstanceState: Bundle?) {
super.onCreate(savedInstanceState)
setContentView(R.layout.activity_main)
setUpSearchRecyclerView()
navigation.setOnNavigationItemSelectedListener(navListener)
}
With this, the MainActivity should present the sample foods just like it will in the final app. It should also indicate two of the items as favorites with an active star, as shown in Figure 8.2.
Because it always follows a similar process, implementing a RecyclerView is straightforward once you have done it a few times. Even if you were not familiar with it before, I hope these two examples took the magic out of the implementation of RecyclerViews.
Fetching Data from the USDA Nutrition API
The next major step towards the final app is to actually fetch food data. The U.S. Department of Agriculture (USDA) provides an open API2 to access its extensive database of food and nutrition details. There are two endpoints that you will use in this app.
2. https://ndb.nal.usda.gov/ndb/doc/index
The Search API to search for foods that match the user’s input
Documentation: https://ndb.nal.usda.gov/ndb/doc/apilist/API-SEARCH.md
Endpoint: https://api.nal.usda.gov/ndb/search/
The Details API to retrieve the nutrient amounts for foods
Documentation: https://ndb.nal.usda.gov/ndb/doc/apilist/API-FOOD-REPORTV2.md
Endpoint: https://api.nal.usda.gov/ndb/V2/reports/
To use this API, you need to get a free API key from https://ndb.nal.usda.gov/ndb/doc/index by clicking on the Sign up now link in the middle of the page and entering your information.
For this app, you will use OkHttp3 to access the network, Retrofit4 to access the API endpoints, and Moshi5 to map the JSON data to Kotlin objects. As always, the first step is to add the corresponding dependencies to your module’s build.gradle file as in Listing 8.13.
3. https://github.com/square/okhttp
4. https://github.com/square/retrofit
5. https://github.com/square/moshi
Listing 8.13 Gradle Dependencies for Network and API Access
dependencies {
// …
def retrofit_version = "2.4.0"
implementation "com.squareup.retrofit2:retrofit:$retrofit_version"
implementation "com.squareup.retrofit2:converter-moshi:$retrofit_version"
def okhttp_version = "3.6.0"
implementation "com.squareup.okhttp3:logging-interceptor:$okhttp_version"
implementation "com.squareup.okhttp3:okhttp:$okhttp_version"
}
Using Retrofit
With the dependencies in place, the next step is to initialize Retrofit to make API calls. As a first step, add a new package data.network that contains all network-related code. Inside this package, add a new file HttpClient.kt that will use OkHttp and Retrofit to set up a Retrofit object that acts as the HTTP client for this app.
At the top of the file, add the constants that you will need inside this file, as in Listing 8.14. For this app, you need the API key that you received from the USDA website and the base URL.
Listing 8.14 Constants Used for Retrofit
import com.example.nutrilicious.BuildConfig
private const val API_KEY = BuildConfig.API_KEY
private const val BASE_URL = "https://api.nal.usda.gov/ndb/"
As you can see, the API key will come from Gradle’s BuildConfig. To set this up, you first have to add the key to your personal Gradle properties, located in the .gradle folder in your user directory. The typical locations are
On Windows:
C:\Users\<USERNAME>\.gradle\gradle.propertiesOn Mac:
/Users/<USERNAME>/.gradle/gradle.propertiesOn Linux:
/home/<USERNAME>/.gradle/gradle.properties
You may have to create the gradle.properties file (if it doesn’t exist yet), then add the key to it as shown in Listing 8.15.
Listing 8.15 Adding API Keys to Your Gradle Properties
Nutrilicious_UsdaApiKey = "<YOUR_API_KEY_HERE>"
You can name the property as you like. Here, the project name is used as a prefix so that properties are grouped by project. The next step is to add this property to the project’s build configuration. To this end, go to your module’s build.gradle file and under buildTypes, and add a new debug build type that makes the key accessible in the project in debug builds. This is shown in Listing 8.16.
Listing 8.16 Adding a Build Config Field
buildTypes {
debug {
buildConfigField 'String', "API_KEY", Nutrilicious_UsdaApiKey // From properties
}
release { … }
}
This makes the API key accessible as BuildConfig.API_KEY from anywhere in the project in debug builds (running the app normally from Android Studio always triggers a debug build). You can add the same build config field to the release build type if you want to use the same API key in release builds. After Gradle finishes syncing the project, the API key should be available and allow the assignment from Listing 8.14 that accesses BuildConfig.API_KEY.
The next step in HttpClient.kt is to start building the Retrofit object using its builder. From there, you’ll go down the rabbit hole to construct all the required objects it uses, until you’re finally building the complete Retrofit instance with all its dependencies. Listing 8.17 starts off with the function to construct the actual object. Like all other functions in HttpClient.kt, it’s declared on the file level.
Listing 8.17 Building the Retrofit Object
import retrofit2.Retrofit
import retrofit2.converter.moshi.MoshiConverterFactory
// …
private fun buildClient(): Retrofit = Retrofit.Builder() // Builds Retrofit object
.baseUrl(BASE_URL)
.client(buildHttpClient())
.addConverterFactory(MoshiConverterFactory.create()) // Uses Moshi for JSON
.build()
The base URL is already declared and the MoshiConverterFactory comes from the dependency to retrofit2:converter-moshi. But building the HTTP client is still to be done using OkHttp. This way, Retrofit relies on OkHttp for the actual HTTP request, and OkHttp allows adding interceptors to perform logging, add the API key to the query, and more. Listing 8.18 sets up an OkHttp client that does exactly that.
Listing 8.18 Building the HTTP Client
import okhttp3.OkHttpClient
import java.util.concurrent.TimeUnit
// …
private fun buildHttpClient(): OkHttpClient = OkHttpClient.Builder()
.connectTimeout(30, TimeUnit.SECONDS)
.readTimeout(30, TimeUnit.SECONDS)
.addInterceptor(loggingInterceptor()) // Logs API responses to Logcat
.addInterceptor(apiKeyInterceptor()) // Adds API key to request URLs
.build()
As you can see, OkHttp makes it easy to set timeouts and attach interceptors. In this app, you’ll use a logging interceptor that logs any request results to the Logcat and an interceptor that injects the API key into the request URL.
Creating the interceptors is the last step to finally build the entire Retrofit object. Listing 8.19 implements the logging interceptor.
Listing 8.19 Building the HTTP Client
import okhttp3.logging.HttpLoggingInterceptor
// …
private fun loggingInterceptor() = HttpLoggingInterceptor().apply {
level = if (BuildConfig.DEBUG) {
HttpLoggingInterceptor.Level.BODY // Only does logging in debug mode
} else {
HttpLoggingInterceptor.Level.NONE // Otherwise no logging
}
}
The HTTPLoggingInterceptor from OkHttp already implements the basic logic. All that’s left to do is to set the appropriate logging level for development and production. This is done using the predefined BuildConfig.DEBUG flag so that logging is only performed during development. Note that the apply function allows declaring this function as a single expression.
The next interceptor adds the API key as a query parameter to the URL. Listing 8.20 encapsulates the setup of this kind of interceptor into a separate function.
Listing 8.20 Encapsulating Interceptor Creation
import okhttp3.Interceptor
// …
private fun injectQueryParams(
vararg params: Pair<String, String>
): Interceptor = Interceptor { chain ->
val originalRequest = chain.request()
val urlWithParams = originalRequest.url().newBuilder()
.apply { params.forEach { addQueryParameter(it.first, it.second) } }
.build()
val newRequest = originalRequest.newBuilder().url(urlWithParams).build()
chain.proceed(newRequest)
}
Because Interceptor is a SAM interface coming from Java, you can use Kotlin’s SAM conversions to create an interceptor with lambda syntax. This implicitly overrides Interceptor.intercept to intercept the request chain and add query parameters to it. The details of this method are OkHttp-specific, but notice how apply can be extremely useful in combination with builder-style methods.
Using this helper function, setting up the remaining interceptor is a matter of passing in the query parameter for the API key, as shown in Listing 8.21.
Listing 8.21 Creating the Interceptor that Adds the API Key to the Query
private fun apiKeyInterceptor() = injectQueryParams(
"api_key" to API_KEY
)
Due to the use of Pair in the helper function, the definition of query parameters becomes clean and readable using Kotlin’s to function. It would be trivial to add or remove additional query parameters or to create another interceptor without duplicating code.
You’re now out of the rabbit hole and the buildClient function is able to create a Retrofit object. The next step is to call it to create an object that is used to access the Search API. With Retrofit, you first need an interface that defines any requests to make to an endpoint based on the base URL. Listing 8.22 defines the interface needed to access the Search API. Place this into a new file UsdaApi in the data.network package.
Listing 8.22 Defining the Retrofit Interface to Access the Search API
import okhttp3.ResponseBody
import retrofit2.Call
import retrofit2.http.*
interface UsdaApi {
@GET("search?format=json") // Is appended to the base URL
fun getFoods(
@Query("q") searchTerm: String, // Only non-optional parameter
@Query("sort") sortBy: Char = 'r', // Sorts by relevance by default
@Query("ds") dataSource: String = "Standard Reference",
@Query("offset") offset: Int = 0
): Call<ResponseBody> // Allows to retrieve raw JSON for now
}
The @GET annotation indicates that this performs a GET request and its argument will be appended to the base URL, resulting in the endpoint for the Search API. The @Query annotation indicates that the argument is appended to the URL as the value for the corresponding query parameter, such as q or sort. Thus, the final request URL is built based on the BASE_URL, the @GET suffix, the query parameter from @Query, and any query parameters from interceptors. A resulting request URL has the following form:
https://api.nal.usda.gov/ndb/search?format=json&q=raw&api_key=<YOUR_API_KEY>&sort=r
&ds=Standard%20Reference&offset=0.
The Call<T> in the return value is Retrofit’s implementation of a future. Like every future, it wraps the result of the asynchronous call, which is performed off the main thread. Here, you parse the result into an OkHttp ResponseBody to fetch the raw JSON data and see if the request itself works—mapping the JSON result to domain classes is done in the next section.
To finish the infrastructure for API requests, you just need to build the Retrofit object and then use it to create an implementation of this interface. Listing 8.23 demonstrates how to do this in the HttpClient.kt file.
Listing 8.23 Building the Search API Object
private val usdaClient by lazy { buildClient() }
val usdaApi: UsdaApi by lazy { usdaClient.create(UsdaApi::class.java) } // Public
Note that the usdaApi object is the only declaration in HttpClient.kt that is exposed to the outside—all other declarations are private and define the internal details of how this object is created. Because this object is expensive to create, its initialization is deferred using lazy. This also makes sure it is instantiated only once and then cached.
Performing API Requests
You can use the usdaApi object to perform the API request. To test your setup, you can perform a temporary test request in MainActivity. But first, you’ll need to add the internet permission to your app and include Kotlin’s coroutines to perform the network request in a background thread. First, in your AndroidManifest.xml, add the permission as in Listing 8.24.
Listing 8.24 Enabling Internet Access
<manifest …>
<uses-permission android:name="android.permission.INTERNET" />
<application …>…</application>
</manifest>
To perform asynchronous network requests, add the coroutine dependencies in your module’s Gradle build file as in Listing 8.25.
Listing 8.25 Gradle Dependencies for Kotlin Coroutines
def coroutines_version = "0.24.0" // Latest version may differ slightly in use
implementation "org.jetbrains.kotlinx:kotlinx-coroutines-core:$coroutines_version"
implementation "org.jetbrains.kotlinx:kotlinx-coroutines-android:$coroutines_version"
As a final preparation step, create a dedicated coroutine dispatcher for network calls. For this, add a new file NetworkDispatcher into the data.network package. Inside it, you can declare a thread pool using two threads for network access, as in Listing 8.26.
Listing 8.26 Coroutine Dispatcher for Network Calls
import kotlinx.coroutines.newFixedThreadPoolContext
val NETWORK = newFixedThreadPoolContext(2, "NETWORK") // Dedicated network context
With this, you can now perform a test request in MainActivity.onCreate to check your setup. Thanks to the logging interceptor, you can observe the request and its results in Android Studio’s Logcat. Listing 8.27 demonstrates how to use the usdaApi. This use is just temporary and of course not encouraged in production. Later, you will again incorporate view models for asynchronous requests.
Listing 8.27 Performing an API Request
import com.example.nutrilicious.data.network.*
import com.example.nutrilicious.model.Food
import kotlinx.android.synthetic.main.activity_main.*
import kotlinx.coroutines.launch
// …
class MainActivity : AppCompatActivity() { // …
override fun onCreate(savedInstanceState: Bundle?) {
// …
launch(NETWORK) {
usdaApi.getFoods("raw").execute() // Logs results to Logcat due to interceptor
}
}
}
This calls the getFoods method from the UsdaApi interface and executes the asynchronous Call<T> in the background to perform the request. When you run the app, you should now see logging entries from OkHttp and see the retrieved JSON data. You can open Logcat using Alt+6 or from the bottom toolbar and search for “OkHttp” to filter out the other entries.
Note
There’s an issue in Android Studio at the time of writing where Apply Changes does not play well with coroutines. If you get an error “CoroutineImpl.label is inaccessible...,” try re-running the app normally without using Apply Changes (using Shift+F10 or Ctrl+R on Mac).
You’re now able to perform network requests using Retrofit to fetch data from the USDA in JSON format. Of course, users do not want to see raw JSON data. So in the following section, you will map the data to domain classes.
Mapping JSON Data to Domain Classes
At this point, you have your raw JSON data and your model class Food. So let’s map the JSON data to the Food class in order to work with it in the app. The typical approach using Moshi is to first parse the JSON data into data transfer objects (DTOs) and then map those to your model classes.
Moshi officially supports Kotlin, meaning it knows how to handle things like primary constructors and properties when mapping to classes. For Moshi itself, add the dependencies from Listing 8.28 to the module’s build script.
Listing 8.28 Gradle Dependencies for Moshi
def moshi_version = "1.6.0"
implementation "com.squareup.moshi:moshi:$moshi_version"
kapt "com.squareup.moshi:moshi-kotlin-codegen:$moshi_version"
To map JSON data to your DTOs, Moshi can either use reflection or code generation. In this app, you use code generation—thus the moshi-kotlin-codegen dependency. Using reflection, you would transitively depend on kotlin-reflect, which adds over 2MB and around 16K methods to your Android PacKage (APK)6 (without ProGuard) so I’d recommend avoiding it.
6. Android PacKage is the distribution format for Android apps.
The code generation approach relies on annotations (like Room). So you need to apply the kotlin-kapt plugin for annotation processing at the top of your build.gradle file, as shown in Listing 8.29.
Listing 8.29 Enabling the Kotlin Annotation Processor
apply plugin: 'kotlin-kapt'
Mapping JSON to DTOs
To let Moshi map the JSON data to a DTO class, the DTO must replicate the structure of the JSON data. More specifically, they must use the same property names to indicate that a property should be populated with the data from the corresponding JSON field.
Tip
To write down your DTOs, I’d recommend creating a .json file in your project that contains sample data from the API. You can use it to explore the structure and write your DTOs. In Android Studio, you can create a Sample Data Directory and place it there.
You can simply copy and paste the data from your browser7 and then use Code, Reformat Code from the menu to fix the code formatting in Android Studio if necessary.
7. https://api.nal.usda.gov/ndb/search/?format=json&ds=Standard%20Reference&q=raw&sort=r&max=10&api_key=DEMO_KEY
Once you have the file, you can use Window, Editor Tabs, then Split Vertically from the menu to open another editor. This way, you can open the .json file in one of them and write down your DTO alongside it. This makes it easier to map the structure correctly.
For the Search API, the returned JSON data has the format shown in Listing 8.30.
Listing 8.30 Search API JSON Format
{
"list": {
"q": "raw",
"ds": "Standard Reference",
"sort": "r",
…
"item": [
{
"offset": 0,
"group": "Vegetables and Vegetable Products", // Type of the food
"name": "Coriander (cilantro) leaves, raw", // Food title
"ndbno": "11165", // Unique identifier
"ds": "SR",
"manu": "none"
},
// More items here…
]
}
}
The actual data you need is nested into the object’s list property, which again wraps it into an item property. Thus, you need to create wrapper DTOs that, intuitively speaking, navigate down that hierarchy. To do so, add a new package data.network.dto and add a new file SearchDtos.kt to it. Listing 8.31 shows the definition of the wrapper types to navigate down the list and item properties.
Listing 8.31 Wrapper DTOs for the Search API
import com.squareup.moshi.JsonClass
@JsonClass(generateAdapter = true)
class ListWrapper<T> {
var list: T? = null // Navigates down the ‘list’ object
}
@JsonClass(generateAdapter = true)
class ItemWrapper<T> {
var item: T? = null // Navigates down the ‘item’ array
}
typealias SearchWrapper<T> = ListWrapper<ItemWrapper<T>>
Moshi will map the JSON list property to the corresponding field in the ListWrapper class, and because you will use ListWrapper<ItemWrapper<T>>, the JSON item property will be mapped to the property in ItemWrapper. The typealias allows using a more concise syntax when using the DTOs. Because the two wrappers are never used separately, you only need the SearchWrapper<T> outside of this file. The @JsonClass annotations tell Moshi to include these classes in the JSON mapping process.
Now that the wrappers navigate to the actual data, you can add the DTO that contains this data, the FoodDto. Listing 8.32 shows its declaration, which also belongs to SearchDtos.kt.
Listing 8.32 Food DTO for the Search API
@JsonClass(generateAdapter = true)
class FoodDto { // Uses lateinit for properties that must be populated by Moshi
lateinit var ndbno: String
lateinit var name: String
lateinit var group: String
}
There are more properties available in the JSON data, but for this app you only need the nutrition database number (NDBNO) that uniquely identifies a food, its name, and its group (its category). Using late-initialized properties, you can avoid creating nullables here. This is a great use case for lateinit, namely when there is a library or tool that is responsible for initialization. Note that the NDBNO is declared as a String because it may be left-padded with zeros, and while the API finds a food for the NDBNO "09070", it will not find one for "9070". The NDBNO will be used later to retrieve details about a specific food.
Now that you have mapped the JSON data to DTOs, you can tell Retrofit to return a DTO from its asynchronous call. It then uses Moshi to perform the mapping. So in UsdaApi.kt, update the return type as shown in Listing 8.33.
Listing 8.33 Returning the DTO from Retrofit Calls
import com.example.nutrilicious.data.network.dto.*
fun getFoods(@Query("q") searchTerm: String, …): Call<SearchWrapper<List<FoodDto>>>
Mapping DTOs to Models
Mapping the DTOs to your domain classes is straightforward and can be done by a secondary constructor in the models. Listing 8.34 shows how to do it for the Food class.
Here, the model was extended with an id and a secondary constructor that performs the mapping from a DTO. In this example, the mapping is just a matter of renaming properties. This is one of the typical tasks when mapping to your models because DTOs typically use the property names given in the JSON data.
Listing 8.34 Secondary Constructor to Map DTO to Model
data class Food(
val id: String, // New property
val name: String,
val type: String,
var isFavorite: Boolean = false
) {
constructor(dto: FoodDto) : this(dto.ndbno, dto.name, dto.group) // Maps from DTO
}
For simple mappings like this, you don’t necessarily have to separate your DTO and model. Instead, you could use @SerializedName to specify the JSON names and then choose different property names. Here, we use separate DTOs consistently to illustrate the process. In general, more complex transformations of the data may be required. In these cases, you should separate your DTOs from the models.
You are now all set to map the raw JSON data to the classes you actually want to use in your app, so you can call it again in the MainActivity to sanity-check the mapping. Because the data is eventually represented as a List<Food>, you can easily populate the RecyclerView with it to display the API data in the app. In Listing 8.35, MainActivity.onCreate is adjusted accordingly. Again, this is just temporary use. You should not perform asynchronous requests from onCreate like this in production because of potential memory leaks.
Listing 8.35 Displaying Mapped Data in RecyclerView
import kotlinx.coroutines.android.UI
import kotlinx.coroutines.withContext
// …
class MainActivity : AppCompatActivity() {
override fun onCreate(savedInstanceState: Bundle?) {
// …
launch(NETWORK) {
val dtos = usdaApi.getFoods("raw").execute()?.body()?.list?.item!!
val foods: List<Food> = dtos.map(::Food) // Maps all DTOs to Food models
withContext(UI) { // Must use main thread to access UI elements
(rvFoods.adapter as SearchListAdapter).setItems(foods)
}
}
}
}
This executes the request and accesses the data stored inside wrappers. After that, it maps the list of DTOs to a list of models by calling the Food constructor with each DTO. In the UI thread, this food list can then be shown in the RecyclerView by passing it to the adapter.
At this point, you can remove the sampleData and initialize the adapter with an empty list instead. It will then be populated when the request data is ready. Listing 8.36 shows the necessary adjustment in setUpRecyclerView.
Listing 8.36 Removing the Sample Data
adapter = SearchListAdapter(emptyList())
When you run the app now, it should fetch JSON data from the USDA API, map it to your domain models, and display it in the RecyclerView. With this, the barebones app functionality is already in place. However, performing the asynchronous request from onCreate is not safe because it is not lifecycle aware and the call remains active even if the activity is destroyed, potentially causing memory leaks. So before you extend the existing functionality, let’s refactor the architecture to avoid asynchronous calls directly from MainActivity—you already know how this is done.
Introducing a ViewModel for Search
The MainActivity should get its data from a view model. This automatically allows lifecycle-aware asynchronous requests across configuration changes, in addition to cleaning up the architecture. Let’s include the dependencies for all required Android Architecture Components already as they will be used later. Listing 8.37 shows the dependencies.
Listing 8.37 Gradle Dependencies for Architecture Components
def room_version = "1.1.0"
implementation "android.arch.persistence.room:runtime:$room_version"
kapt "android.arch.persistence.room:compiler:$room_version"
def lifecycle_version = "1.1.1"
implementation "android.arch.lifecycle:extensions:$lifecycle_version"
Now add a new package viewmodel and add a new file SearchViewModel.kt. This view model can extend the ViewModel class instead of AndroidViewModel because it does not require the application context. It provides a clean interface for all calls to the Search API. To do so, it uses a helper function to perform to actual call, as shown in Listing 8.38.
This executes the API request, reads the response, and navigates down through the list and item properties of the SearchWrapper. The elvis operator handles not only the case that doRequest or any property returns null but also the case that an exception occurs. In both cases, the method returns an empty list.
Listing 8.38 Step 1: Implementing the SearchViewModel
import android.arch.lifecycle.ViewModel
import com.example.nutrilicious.data.network.dto.*
import retrofit2.Call
class SearchViewModel : ViewModel() {
private fun doRequest(req: Call<SearchWrapper<List<FoodDto>>>): List<FoodDto> =
req.execute().body()?.list?.item ?: emptyList()
}
The view model uses this helper to implement a suspending function that performs the asynchronous call using withContext (that can return back a result) as in Listing 8.39.
Listing 8.39 Step 2: Implementing the SearchViewModel
import com.example.nutrilicious.data.network.*
import com.example.nutrilicious.model.Food
import kotlinx.coroutines.withContext
class SearchViewModel : ViewModel() {
suspend fun getFoodsFor(searchTerm: String): List<Food> { // Fetches foods from API
val request: Call<SearchWrapper<List<FoodDto>>> = usdaApi.getFoods(searchTerm)
val foodDtos: List<FoodDto> = withContext(NETWORK) { doRequest(request) }
return foodDtos.map(::Food)
}
// …
}
This performs the asynchronous call using the network dispatcher and maps all retrieved DTOs to Food objects. With the view model in place, you can now reference it in MainActivity as usual, using a late-initialized property that is initialized in onCreate, as done in Listing 8.40.
Listing 8.40 Using the SearchViewModel in MainActivity
import com.example.nutrilicious.view.common.getViewModel // Created next
class MainActivity : AppCompatActivity() {
private lateinit var searchViewModel: SearchViewModel
// …
override fun onCreate(savedInstanceState: Bundle?) {
// …
navigation.setOnNavigationItemSelectedListener(navListener)
searchViewModel = getViewModel(SearchViewModel::class)
// …
}
// …
}
The getViewModel function is defined in a ViewExtensions.kt file as in the Kudoo app. You can simply copy and paste the view.common package to this project (as well as future projects). Listing 8.41 recaps this useful extension.
Listing 8.41 getViewModel Extension Function
import android.arch.lifecycle.*
import android.support.v4.app.FragmentActivity
import kotlin.reflect.KClass
fun <T : ViewModel> FragmentActivity.getViewModel(modelClass: KClass<T>): T {
return ViewModelProviders.of(this).get(modelClass.java)
}
Finally, remove the asynchronous call in onCreate and therefore the dependency to usdaApi from your MainActivity and use the view model instead, as in Listing 8.42.
Listing 8.42 Using the SearchViewModel in MainActivity
override fun onCreate(savedInstanceState: Bundle?) {
// …
searchViewModel = getViewModel(SearchViewModel::class)
launch(NETWORK) { // Uses network dispatcher for network call
val foods = searchViewModel.getFoodsFor("raw")
withContext(UI) { // Populates recycler view with fetched foods (on main thread)
(rvFoods.adapter as SearchListAdapter).setItems(foods)
}
}
}
This is all that is required to set up this view model in your project. Now the MainActivity only has a reference to its view model that provides it with all the data it needs, and in a lifecycle-aware way. The app should still show the results fetched for “raw” when launched.
Letting Users Search Foods
As a next step, the app should display what the user searches using a search field at the top. In other words, it should make an API request whenever the user issues a search. First, you should encapsulate the logic for a request into a method in MainActivity, as in Listing 8.43.
Listing 8.43 Encapsulating the Logic For Requests
private fun updateListFor(searchTerm: String) {
launch(NETWORK) {
val foods = searchViewModel.getFoodsFor(searchTerm)
withContext(UI) {
(rvFoods.adapter as SearchListAdapter).setItems(foods)
}
}
}
This method still contains the launch call to perform the API request on a background thread so updateListFor is not a suspending function and can therefore be called from outside a coroutine. Next, remove the test request in onCreate. Instead, you’ll implement a proper Android Search Interface8 that lets users search the foods in which they are interested.
8. https://developer.android.com/training/search/setup
Implementing a Search Interface
The first step is to add a menu resource representing the search bar that will be displayed at the top of the screen. For this, add a new menu resource res/menu/search_menu.xml, and set it up as in Listing 8.44 with just a single menu item of type SearchView.
Listing 8.44 Menu Resource for Search Interface
<?xml version="1.0" encoding="utf-8"?>
<menu xmlns:app="http://schemas.android.com/apk/res-auto"
xmlns:android="http://schemas.android.com/apk/res/android">
<item android:id="@+id/search"
android:title="@string/search_title"
android:icon="@android:drawable/ic_menu_search"
app:showAsAction="always"
app:actionViewClass="android.widget.SearchView" />
</menu>
This uses a new string resource, shown in Listing 8.45.
Listing 8.45 String Resource for Search Menu
<string name="search_title">Search food…</string>
Next, you need a so-called searchable configuration that defines the behavior of the search view. This is defined in a new resource file res/xml/searchable.xml, as in Listing 8.46.
Listing 8.46 Searchable Configuration
<?xml version="1.0" encoding="utf-8"?>
<searchable xmlns:android="http://schemas.android.com/apk/res/android"
android:label="@string/app_name"
android:hint="@string/search_title" />
The label must be the same as the label of the application tag from your AndroidManifest.xml file, thus using @string/app_name. Also, the hint helps users know what to enter into the search field. Here, the search title from before is reused as a hint.
Next, the Android Manifest must be extended by three things: first, metadata that tells it where to find the search interface; second, which activity should handle the search intents; and third, the main activity must use launch mode singleTop to be able to handle the search intents itself. All changes must be made to the activity tag for the main activity in the AndroidManifest.xml, as shown in Listing 8.47.
Listing 8.47 Setting Up Search in the Android Manifest
<activity
android:launchMode="singleTop" // Reuses existing instance
android:name=".view.main.MainActivity"
android:label="@string/app_name">
<meta-data android:name="android.app.searchable" // Where to find searchable conf.
android:resource="@xml/searchable" />
<intent-filter>
<action android:name="android.intent.action.SEARCH" /> // Handles search intents
</intent-filter>
…
</activity>
The singleTop launch mode tells Android to route any intents to MainActivity to the existing instance of the activity. Without it, Android would create a new instance of MainActivity for each intent, causing its state to be lost. Thus, to handle its own searches itself, the activity must use singleTop as launch mode.
To inflate a menu into an activity, you must override the onCreateOptionsMenu method. So in MainActivity, override this method as shown in Listing 8.48 to inflate the search menu.
Listing 8.48 Inflating and Setting Up the Search Menu
import android.app.SearchManager
import android.widget.SearchView
import android.content.Context
import android.view.Menu
// …
class MainActivity : AppCompatActivity() {
// …
override fun onCreateOptionsMenu(menu: Menu): Boolean {
menuInflater.inflate(R.menu.search_menu, menu)
// Associates searchable configuration with the SearchView
val searchManager = getSystemService(Context.SEARCH_SERVICE) as SearchManager
(menu.findItem(R.id.search).actionView as SearchView).apply {
setSearchableInfo(searchManager.getSearchableInfo(componentName))
}
return true
}
}
Finally, to handle search intents (when a user initiates a search), override the onNewIntent method and filter for the ACTION_SEARCH intent, as demonstrated in Listing 8.49.
Listing 8.49 Handling Search Intents
import android.content.Intent
// …
class MainActivity : AppCompatActivity() {
// …
override fun onNewIntent(intent: Intent) {
if (intent.action == Intent.ACTION_SEARCH) { // Filters for search intents
val query = intent.getStringExtra(SearchManager.QUERY)
updateListFor(query)
}
}
}
When you run the app now, you should be able to search for any food you want and get the relevant results displayed in the RecyclerView. If nothing is shown, make sure to enter a query that returns a result, such as “raw”—the app does not handle empty responses yet.
Introducing Fragments I: The Search Fragment
At this point, the Home Screen is almost finished, except for the listeners for the RecyclerView. These will be added later and will also be used by the My Foods Screen. In order to prevent the MainActivity from becoming a god activity that tries to handle everything itself, you will now modularize the MainActivity into fragments.
Fragments encapsulate a part of the UI to make it reusable. Typically, an activity is made up of multiple fragments. In this app, you will create one for each item in the bottom navigation menu, so a SearchFragment and a FavoritesFragment. In this section, you’ll modularize your existing code into a SearchFragment and use it in the MainActivity, thus making the latter a lot smaller. In the next section, it will then be easy to incorporate the FavoritesFragment.
As always, let’s start by creating the necessary layout files. In res/layout, add a new file fragment_search.xml that contains a SwipeRefreshLayout with the RecyclerView from activity_main.xml as its only child—you can cut and paste the recycler view layout from there. Remove any “constraint” attributes that refer to the ConstraintLayout used in activity_main.xml and give it a layout_weight instead. Listing 8.50 shows the layout.
Listing 8.50 Layout for the SearchFragment
<?xml version="1.0" encoding="utf-8"?>
<android.support.v4.widget.SwipeRefreshLayout
xmlns:android="http://schemas.android.com/apk/res/android"
android:id="@+id/swipeRefresh"
android:layout_width="match_parent"
android:layout_height="match_parent">
<android.support.v7.widget.RecyclerView
android:id="@+id/rvFoods"
android:layout_width="match_parent"
android:layout_height="0dp"
android:layout_weight="1"/>
</android.support.v4.widget.SwipeRefreshLayout>
Having cut this element from activity_main.xml, the next step is to add a placeholder for the fragment in its place. The placeholder defines where fragments will be attached to the activity. Listing 8.51 uses an empty FrameLayout for this.
Listing 8.51 Layout for the MainActivity
<android.support.constraint.ConstraintLayout …>
<!-- Placeholder for fragments -->
<FrameLayout
android:id="@+id/mainView"
android:layout_width="match_parent"
android:layout_height="wrap_content"
android:orientation="vertical" />
<android.support.design.widget.BottomNavigationView … />
</android.support.constraint.ConstraintLayout>
This wraps up the layout side, so now you can start implementing the search fragment. In view.main, add a new file SearchFragment.kt (not using Android Studio’s wizards to create a fragment). This fragment class must extend android.support.v4.app.Fragment.
Fragments have slightly different lifecycle methods you can override to initialize the UI, populate dependencies, and perform other setup logic. The search fragment overrides three lifecycle methods, which are called in the given order:
onAttach: called when the fragment first gets attached to its context (the activity)onCreateView: called afteronAttach(andonCreate) to initialize the UIonViewCreated: called directly afteronCreateViewreturns
The search fragment uses onAttach to get a reference to its SearchViewModel, onCreateView is used to inflate the layout, and in onViewCreated, all views are ready to be initialized. Listing 8.52 shows the SearchFragment class this far.
Listing 8.52 Overriding Lifecycle Methods for the Search Fragment
import android.content.Context
import android.os.Bundle
import android.support.v4.app.Fragment
import android.view.*
import com.example.nutrilicious.R
import com.example.nutrilicious.view.common.getViewModel
import com.example.nutrilicious.viewmodel.SearchViewModel
class SearchFragment : Fragment() {
private lateinit var searchViewModel: SearchViewModel
override fun onAttach(context: Context?) {
super.onAttach(context)
searchViewModel = getViewModel(SearchViewModel::class)
}
override fun onCreateView(inflater: LayoutInflater, container: ViewGroup?,
savedInstanceState: Bundle?): View? {
return inflater.inflate(R.layout.fragment_search, container, false)
}
override fun onViewCreated(view: View, savedInstanceState: Bundle?) {
super.onViewCreated(view, savedInstanceState)
setUpSearchRecyclerView() // Will come from MainActivity
setUpSwipeRefresh() // Implemented later
}
}
Even though the lifecycle methods are slightly different, the concepts and structure are the same as in activities—such as using a late-initialized property for the view model. Recall that you can use Ctrl+O (also on Mac) to override members.
The setUpSearchRecyclerView method referenced in onViewCreated already exists but not yet in the fragment. You can now move it from MainActivity to the SearchFragment. Also, move updateListFor to the search fragment and make it public. After this, MainActivity should have no more private members other than the navigation listener (it no longer needs a reference to the view model either). In MainActivity, you can remove all references to the removed members (setUpSearchRecyclerView, updateListFor, and searchViewModel).
This code uses a different getViewModel extension, which is defined on the Fragment class, as shown in Listing 8.53.
Listing 8.53 getViewModel Extension for Fragments
fun <T : ViewModel> Fragment.getViewModel(modelClass: KClass<T>): T {
return ViewModelProviders.of(this).get(modelClass.java)
}
Because you are now using fragments, you should always consider the possibility that the fragment is not attached to its activity so that views are inaccessible. In Kotlin, this can be handled concisely using the safe call operator on the UI elements. Listing 8.54 adjusts updateListFor accordingly.
Listing 8.54 Accessing UI Elements Safely
fun updateListFor(searchTerm: String) { // Is now public
launch(NETWORK) { // …
withContext(UI) {
(rvFoods?.adapter as? SearchListAdapter)?.setItems(foods) // Uses safe ops.
}
}
}
Next, adjust setUpSearchRecyclerView by replacing references to this@MainActivity with the fragment’s context, as in Listing 8.55.
Listing 8.55 Adjusting the RecyclerView Setup
private fun setUpSearchRecyclerView() = with(rvFoods) {
adapter = SearchListAdapter(emptyList())
layoutManager = LinearLayoutManager(context)
addItemDecoration(DividerItemDecoration(
context, LinearLayoutManager.VERTICAL
))
setHasFixedSize(true)
}
There is one new layout component to set up in this fragment, the SwipeRefreshLayout. It requires an action that reissues the last search when swiping down to refresh the data. Listing 8.56 adds a simple setup method for it, and a lastSearch property to remember the last search.
Listing 8.56 Setting Up the SwipeRefreshLayout
class SearchFragment : Fragment() {
private var lastSearch = ""
// …
private fun setUpSwipeRefresh() {
swipeRefresh.setOnRefreshListener {
updateListFor(lastSearch) // Re-issues last search on swipe refresh
}
}
fun updateListFor(searchTerm: String) {
lastSearch = searchTerm // Remembers last search term
// …
}
}
At this point, there should be no more errors in onViewCreated because all methods exist. This concludes the SearchFragment class; it was mostly a matter of moving parts of the MainActivity to this new fragment to split responsibilities.
Naturally, the MainActivity now needs adjustments to use this fragment. First, remove any references to the removed methods and to the SearchViewModel—the activity itself no longer needs to access a view model or retrieve data. Instead, add a property of type SearchFragment to hold the search fragment, as in Listing 8.57.
Listing 8.57 Adding a Property for the Fragment
class MainActivity : AppCompatActivity() {
private lateinit var searchFragment: SearchFragment
// …
}
Adding fragments to an activity is done using fragment transactions. To get started, let’s add an extension function that encapsulates the boilerplate necessary to add a fragment to an activity. Listing 8.58 shows this new extension from ViewExtensions.kt.
Listing 8.58 Extension Function to Include Fragments
import android.support.v7.app.AppCompatActivity
// …
fun AppCompatActivity.replaceFragment(viewGroupId: Int, fragment: Fragment) {
supportFragmentManager.beginTransaction()
.replace(viewGroupId, fragment) // Replaces given view group with fragment
.commit()
}
Any fragment transaction is initiated via the activity’s supportFragmentManager. The given viewGroupId refers to the placeholder view that shall be replaced by the fragment. With this, you could now add this new fragment to the activity in onCreate, as shown in Listing 8.59.
Listing 8.59 Including a Fragment into the UI
import com.example.nutrilicious.view.common.replaceFragment
class MainActivity : AppCompatActivity() {
// …
override fun onCreate(savedInstanceState: Bundle?) {
super.onCreate(savedInstanceState)
setContentView(R.layout.activity_main)
searchFragment = SearchFragment()
replaceFragment(R.id.mainView, searchFragment) // Replaces the placeholder
navigation.setOnNavigationItemSelectedListener(navListener)
}
}
However, this creates a completely new SearchFragment every time onCreate is called; for instance, when the user rotates the screen or switches to another app and back. This causes any state in the fragment to be cleared after such actions, which evokes a feeling of discontinuity for the user. Instead, you want to keep the search fragment—and its state—alive as long as Android does not garbage-collect it. Storing a fragment is also done using fragment transactions. Listing 8.60 shows a new extension to ViewExtensions.kt that adds a fragment to an activity’s state.
Listing 8.60 Extension to Store Fragment in Activity’s State
import android.support.annotation.IdRes
// …
fun AppCompatActivity.addFragmentToState(
@IdRes containerViewId: Int,
fragment: Fragment,
tag: String
) {
supportFragmentManager.beginTransaction()
.add(containerViewId, fragment, tag) // Stores fragment with given tag
.commit()
}
Now, instead of plainly creating a new fragment each time in onCreate, you can implement a helper method that tries to recover an existing fragment first and only creates one if required. Listing 8.61 shows the necessary code.
Listing 8.61 Restoring an Existing Fragment
import com.example.nutrilicious.view.common.*
// …
class MainActivity : AppCompatActivity() {
// …
private fun recoverOrBuildSearchFragment() {
val fragment = supportFragmentManager // Tries to load fragment from state
.findFragmentByTag(SEARCH_FRAGMENT_TAG) as? SearchFragment
if (fragment == null) setUpSearchFragment() else searchFragment = fragment
}
private fun setUpSearchFragment() { // Sets up search fragment and stores to state
searchFragment = SearchFragment()
addFragmentToState(R.id.mainView, searchFragment, SEARCH_FRAGMENT_TAG)
}
}
The recoverOrBuildSearchFragment method first tries to read an existing fragment from the activity’s state and otherwise falls back to creating a new one. When creating a new one, the fragment is automatically added to the activity’s state for next time. The tag is a unique identifier for the fragment that you can declare above the MainActivity as in Listing 8.62.
Listing 8.62 Adding a Fragment Tag
private const val SEARCH_FRAGMENT_TAG = "SEARCH_FRAGMENT"
class MainActivity : AppCompatActivity() { … }
Next, call the new helper method in onCreate to recover the fragment instead of creating a new instance, as shown in Listing 8.63.
Listing 8.63 Adjusting onCreate
override fun onCreate(savedInstanceState: Bundle?) {
// …
recoverOrBuildSearchFragment() // Replaces SearchFragment() constructor call
replaceFragment(R.id.mainView, searchFragment)
}
You can now delegate to the fragment to handle search intents because this is no longer the activity’s responsibility. Listing 8.64 adjusts the intent handler accordingly.
Listing 8.64 Delegating Searches to the Search Fragment
override fun onNewIntent(intent: Intent) {
if (intent.action == Intent.ACTION_SEARCH) {
val query = intent.getStringExtra(SearchManager.QUERY)
searchFragment.updateListFor(query) // Uses the search fragment
}
}
The final enhancement in this section is to indicate progress properly using the swipe refresh layout. Currently, the swipe refresh indicator doesn’t show up when issuing a search via the menu and will not disappear once it has been triggered by swiping down. You can fix both issues easily inside the updateListFor method by setting the swipe refresh state appropriately, as shown in Listing 8.65.
Listing 8.65 Handling Swipe Refresh
private fun updateListFor(searchTerm: String) {
lastSearch = searchTerm
swipeRefresh?.isRefreshing = true // Indicates that app is loading
launch(NETWORK) {
val foods = searchViewModel.getFoodsFor(searchTerm)
withContext(UI) {
(rvFoods?.adapter as? SearchListAdapter)?.setItems(foods)
swipeRefresh?.isRefreshing = false // Indicates that app finished loading
}
}
}
Note that this also uses the safe call operator because the fragment may already be detached from its activity by the time the network request returns, making swipeRefresh inaccessible.
Now everything should work as before (plus the swipe refresh functionality). Users do not notice if the app uses fragments, but it does improve the internal structure. In particular, it prevents god activities by separating concerns on a more fine-grained level.
Introducing Fragments II: The Favorites Fragment
Now that the app uses fragments, it is time to add the favorites fragment and make the bottom navigation work by showing the appropriate fragment. As always, the first step is to create the required layouts. For this, add a new file fragment_favorites.xml in res/layout that defines the layout for the new fragment. This fragment shows the list of user-selected favorite foods. Listing 8.66 shows the corresponding layout.
Listing 8.66 Layout for the Favorites Fragment
<?xml version="1.0" encoding="utf-8"?>
<android.support.constraint.ConstraintLayout
xmlns:android="http://schemas.android.com/apk/res/android"
xmlns:app="http://schemas.android.com/apk/res-auto"
app:layout_behavior="@string/appbar_scrolling_view_behavior"
android:layout_width="match_parent"
android:layout_height="match_parent">
<TextView
android:id="@+id/tvHeadline"
android:layout_width="wrap_content"
android:layout_height="wrap_content"
app:layout_constraintLeft_toLeftOf="parent"
app:layout_constraintRight_toRightOf="parent"
app:layout_constraintTop_toTopOf="parent"
android:padding="@dimen/medium_padding"
android:text="@string/favorites"
android:textSize="@dimen/huge_font_size" />
<android.support.v7.widget.RecyclerView
android:id="@+id/rvFavorites"
android:layout_width="match_parent"
android:layout_height="wrap_content"
app:layout_constraintTop_toBottomOf="@+id/tvHeadline" />
</android.support.constraint.ConstraintLayout>
This simple layout consists of a headline and a recycler view to show all the user’s favorite foods. Although this uses the more modern ConstraintLayout, you could easily implement this as a vertical LinearLayout as well. To finish the layout, you must again add the missing resources as shown in Listing 8.67.
Listing 8.67 Resources for the Layout
// In res/values/dimens.xml
<dimen name="huge_font_size">22sp</dimen>
// In res/values/strings.xml
<string name="favorites">Favorite Foods</string>
That’s all the layout needed for this fragment. Now, create a new file FavoritesFragment.kt in view.main and add the necessary overrides to inflate and initialize the layout components. As shown in Listing 8.68, this follows the same structure as in the search fragment. For now, the fragment uses hard-coded sample data because users cannot select favorites yet.
Listing 8.68 Implementing the Favorites Fragment
import android.os.Bundle
import android.support.v4.app.Fragment
import android.support.v7.widget.*
import android.view.*
import com.example.nutrilicious.R
import com.example.nutrilicious.model.Food
import kotlinx.android.synthetic.main.fragment_favorites.*
class FavoritesFragment : Fragment() {
override fun onCreateView(inflater: LayoutInflater,
container: ViewGroup?,
savedInstanceState: Bundle?): View? {
return inflater.inflate(R.layout.fragment_favorites, container, false)
}
override fun onViewCreated(view: View, savedInstanceState: Bundle?) {
super.onViewCreated(view, savedInstanceState)
setUpRecyclerView()
}
private fun setUpRecyclerView() = with(rvFavorites) {
adapter = SearchListAdapter(sampleData())
layoutManager = LinearLayoutManager(context)
addItemDecoration(DividerItemDecoration(
context, LinearLayoutManager.VERTICAL
))
setHasFixedSize(true)
}
// Temporary! Should use string resources instead of hard-coded strings in general
private fun sampleData(): List<Food> = listOf(
Food("00001", "Marshmallow", "Candy and Sweets", true),
Food("00002", "Nougat", "Candy and Sweets", true),
Food("00003", "Oreo", "Candy and Sweets", true)
)
}
Again, the layout is inflated in onCreateView and then all views are initialized in onViewCreated because that is when they are ready to be manipulated. This initialization works just fine. However, note how the initialization for the RecyclerView is now duplicated—it works just the same way in the search fragment. This is because both use the same adapter and should look exactly the same. The only difference between the two is which items are shown. To avoid code duplication, you should move the logic to a place where both fragments can access it. Because this particular logic is related to the MainActivity, let’s place it there, as shown in Listing 8.69.
Listing 8.69 Moving Common Logic into MainActivity
import android.support.v7.widget.*
import com.example.nutrilicious.model.Food
// …
class MainActivity : AppCompatActivity() {
// …
companion object {
fun setUpRecyclerView(rv: RecyclerView, list: List<Food> = emptyList()) {
with(rv) {
adapter = SearchListAdapter(list)
layoutManager = LinearLayoutManager(context)
addItemDecoration(DividerItemDecoration(
context, LinearLayoutManager.VERTICAL
))
setHasFixedSize(true)
}
}
}
}
Placing this method in a companion object allows you to call it more conveniently, directly on the activity class. By delegating to this method from both fragments, your code becomes DRY again (“Don’t Repeat Yourself”). Listing 8.70 demonstrates the changes.
Listing 8.70 Removing Duplicated Code from the Fragments
// In FavoritesFragment.kt
private fun setUpRecyclerView() {
MainActivity.setUpRecyclerView(rvFavorites, sampleData())
}
// In SearchFragment.kt
private fun setUpSearchRecyclerView() {
MainActivity.setUpRecyclerView(rvFoods)
}
This way, the logic to set up the recycler view is encapsulated in one place and the fragments delegate to it. You can now use the fragments to make the bottom navigation menu work. Thanks to the extension that wraps fragment transactions, this is easy now. Listing 8.71 adjusts the navigation listener in MainActivity accordingly.
Listing 8.71 Implementing the Bottom Navigation Menu
private val handler = BottomNavigationView.OnNavigationItemSelectedListener {
when (it.itemId) {
R.id.navigation_home -> {
replaceFragment(R.id.mainView, searchFragment) // Uses existing search fragment
return@OnNavigationItemSelectedListener true
}
R.id.navigation_my_foods -> {
replaceFragment(R.id.mainView, FavoritesFragment()) // Creates new fragment
return@OnNavigationItemSelectedListener true
}
}
false
}
When clicking to the Home Screen, the activity switches to the existing search fragment that it keeps in the searchFragment property. For the favorites fragment, this is not necessary. Its state will be based on which foods are stored in the database as favorites. Thus, a new fragment is created whenever the user navigates to the My Foods Screen.
Currently, the search fragment will be empty after switching to the favorites fragment and back. So as a final step, the search fragment should remember the most recent search results and use them to populate the list when returning to the search fragment. Listing 8.72 shows the required changes in SearchFragment.
Listing 8.72 Retaining the Last Search Results
import com.example.nutrilicious.model.Food
class SearchFragment : Fragment() {
// …
private var lastResults = emptyList<Food>()
override fun onViewCreated(view: View, savedInstanceState: Bundle?) {
// …
(rvFoods?.adapter as? SearchListAdapter)?.setItems(lastResults) // Recovers state
}
// …
fun updateListFor(searchTerm: String) {
// …
launch(NETWORK) {
val foods = searchViewModel.getFoodsFor(searchTerm)
lastResults = foods // Remembers last search results
withContext(UI) { … }
}
}
}
Store User’s Favorite Foods in a Room Database
The next step is to store a user’s favorite foods in a database and show those in the favorites fragment. This gives you another chance to familiarize yourself with Room. Setting it up requires the same three steps as in Chapter 7, Android App Development with Kotlin: Kudoo App:
Define the entities that should be stored in the database.
Create the DAOs that offer all desired operations to access the database.
Implement an abstract subclass of
RoomDatabasethat provides the DAOs.
Because the dependencies for all Android Architecture Components are already included, you can start creating the entities right away. For this app, that’s the Food class. Listing 8.73 shows the required changes.
Listing 8.73 Making Food an Entity
import android.arch.persistence.room.*
// …
@Entity(tableName = "favorites") // Signals Room to map this entity to the DB
data class Food(
@PrimaryKey val id: String, // Unique identifier for a food (the NDBNO)
val name: String,
val type: String,
var isFavorite: Boolean = false
) { … }
Only two annotations are necessary to turn the class into an entity that Room can work with. The table name “favorites” better highlights the purpose than the default name “food.” The existing NDBNO is used as the primary key.
Next step is to add the DAO to perform queries on the favorites table. To this end, add a new package data.db and add a FavoritesDao interface to it, as implemented in Listing 8.74.
Listing 8.74 Adding the DAO to Access Favorites
import android.arch.lifecycle.LiveData
import android.arch.persistence.room.*
import android.arch.persistence.room.OnConflictStrategy.IGNORE
import com.example.nutrilicious.model.Food
@Dao
interface FavoritesDao {
@Query("SELECT * FROM favorites")
fun loadAll(): LiveData<List<Food>> // Note LiveData return type
@Query("SELECT id FROM favorites")
fun loadAllIds(): List<String>
@Insert(onConflict = IGNORE) // Do nothing if food with same NDBNO already exists
fun insert(food: Food)
@Delete
fun delete(food: Food)
}
The DAO offers all database-related capabilities the Nutrilicious app needs: fetching all favorites (to display them in the fragment), fetching only the IDs of all favorite foods (to highlight them with a star), and adding and deleting favorites (for when the user clicks on a star). Room makes it straightforward to implement the corresponding queries using basic SQL queries. Also note that fetchAll makes use of LiveData so that updates to favorites can be reflected immediately in the favorites fragment.
The third and last step is to add an abstract subclass of RoomDatabase, which here is named AppDatabase. This always follows the structure so Listing 8.75 simply shows its definition.
Listing 8.75 Adding the AppDatabase
import android.arch.persistence.room.*
import android.content.Context
import com.example.nutrilicious.model.Food
@Database(entities = [Food::class], version = 1)
abstract class AppDatabase : RoomDatabase() {
companion object {
private var INSTANCE: AppDatabase? = null
fun getInstance(ctx: Context): AppDatabase {
if (INSTANCE == null) { INSTANCE = buildDatabase(ctx) }
return INSTANCE!!
}
private fun buildDatabase(ctx: Context) = Room
.databaseBuilder(ctx, AppDatabase::class.java, "AppDatabase")
.build()
}
abstract fun favoritesDao(): FavoritesDao // Provides access to the DAO
}
You can use this as a template. All that needs adjustment for other databases is which entities to include in the @Database annotation, and which DAOs to expose. Here, the only DAO is exposed via the favoritesDao method so that Room generates an implementation for it.
In order to decouple the fragments and activities that use data from the database, you should add a FavoritesViewModel to the viewmodel package. Listing 8.76 shows this view model.
Listing 8.76 The View Model to Access Favorite Foods
import android.app.Application
import android.arch.lifecycle.*
import com.example.nutrilicious.data.db.*
import com.example.nutrilicious.model.Food
import kotlinx.coroutines.*
class FavoritesViewModel(app: Application) : AndroidViewModel(app) {
private val dao by lazy { AppDatabase.getInstance(getApplication()).favoritesDao()}
suspend fun getFavorites(): LiveData<List<Food>> = withContext(DB) {
dao.loadAll()
}
suspend fun getAllIds(): List<String> = withContext(DB) { dao.loadAllIds() }
fun add(favorite: Food) = launch(DB) { dao.insert(favorite) }
fun delete(favorite: Food) = launch(DB) { dao.delete(favorite) }
}
The view model wraps the DAO’s methods and provides a clean interface for them. Retrieving all the user’s favorite foods returns a LiveData object so that you can observe changes. Both methods with return value use withContext in order to use the natural return type instead of a Deferred, whereas adding and deleting elements is taken care of in dedicated “fire-and-forget” coroutines. Note that this view model is a subclass of AndroidViewModel because it needs a reference to the application context to retrieve the database object.
This implementation uses a dedicated dispatcher for all database-related actions. It is declared in DatabaseDispatcher.kt inside the data.db package, as in Listing 8.77.
Listing 8.77 Coroutine Dispatcher for Database Operations
import kotlinx.coroutines.newSingleThreadContext
val DB = newSingleThreadContext("DB") // Single dedicated thread for DB operations
This concludes the database setup. The next step is to make use of it when the user clicks on a star to mark or unmark it as a favorite. In other words, the ImageView needs a click handler. This click handler should be passed into the adapter, and it should know which Food object and which list position a click refers to. Listing 8.78 adjusts the SearchListAdapter accordingly.
Listing 8.78 Adjusting the Adapter to Handle Star Icon Clicks
class SearchListAdapter( // …
private val onStarClick: (Food, Int) -> Unit
) : … {
// …
inner class ViewHolder(…) : … {
fun bindTo(food: Food) {
// …
ivStar.setOnClickListener { onStarClick(food, this.layoutPosition) }
}
}
}
Only two additional lines of code are necessary to pass in and assign the click handler. You now have to pass in a handler when creating the adapter in MainActivity. That handler should toggle a food as being a favorite. Since this will be possible from both fragments, the toggling logic should be placed in MainActivity (or in a separate file) to avoid code duplication.
First, adjust the RecyclerView setup as shown in Listing 8.79 to construct the adapter. Also, to avoid a large companion object with lots of effectively static methods, I’d suggest removing the companion object at this point. You will adjust their calls in the fragments later.
Listing 8.79 Creating the Adapter with Click Listener
class MainActivity : AppCompatActivity() {
// …
fun setUpRecyclerView(rv: RecyclerView, list: List<Food> = emptyList()) {
with(rv) {
adapter = setUpSearchListAdapter(rv, list)
// …
}
}
private fun setUpSearchListAdapter(rv: RecyclerView, items: List<Food>) =
SearchListAdapter(items,
onStarClick = { food, layoutPosition -> // Toggles favorite on click
toggleFavorite(food)
rv.adapter.notifyItemChanged(layoutPosition)
})
}
The adapter creation is now encapsulated into its own method because it has become a little more complex. The action for onStarClick toggles the food that corresponds to the click as a favorite and notifies the adapter of the change to that particular item. This causes that single item to be redrawn so that the star icon updates correctly—thus the need for the layout position in the click handler.
Now it’s time to implement the method that toggles a favorite. For this, the MainActivity needs a reference to the FavoritesViewModel in order to add or delete favorites. Listing 8.80 presents the required changes.
Listing 8.80 Toggling Favorites on Star Icon Click
import com.example.nutrilicious.viewmodel.FavoritesViewModel
class MainActivity : AppCompatActivity() {
// …
private lateinit var favoritesViewModel: FavoritesViewModel
override fun onCreate(savedInstanceState: Bundle?) {
// …
favoritesViewModel = getViewModel(FavoritesViewModel::class)
}
// …
private fun toggleFavorite(food: Food) {
val wasFavoriteBefore = food.isFavorite
food.isFavorite = food.isFavorite.not() // Adjusts Food object’s favorite status
if (wasFavoriteBefore) {
favoritesViewModel.delete(food)
toast("Removed ${food.name} from your favorites.")
} else {
favoritesViewModel.add(food)
toast("Added ${food.name} as a new favorite of yours!")
}
}
}
Toggling a food as favorite changes the corresponding property in the Food object and also triggers an insert or delete in the database. This automatically makes them appear or disappear in the favorites fragment due to the use of LiveData. Toast messages give the user feedback on his or her action. Note that they may appear before the database operation is actually completed (because add and delete use launch internally), but this will be unnoticeable for users. As you may expect, creating toasts this way is enabled by an extension function in ViewExtensions.kt, the one shown in Listing 8.81.
Listing 8.81 Extension Function to Create Toasts
import android.widget.Toast
// …
fun AppCompatActivity.toast(msg: String) {
Toast.makeText(this, msg, Toast.LENGTH_SHORT).show()
}
This concludes the changes to the activity. What is left are the changes to the two fragments: The favorites fragment should display all favorites, and the search fragment should indicate which of the found foods are already favorites.
First, let’s adjust the FavoritesFragment. It should now use the FavoritesViewModel to retrieve all favorites and observe changes to the LiveData to update the RecyclerView. So at this point, the sample data can be removed as well. Listing 8.82 shows the changes.
Listing 8.82 Favorites Fragment with View Model
import android.content.Context
import com.example.nutrilicious.view.common.getViewModel
import com.example.nutrilicious.viewmodel.FavoritesViewModel
import kotlinx.coroutines.android.UI
import kotlinx.coroutines.launch
import android.arch.lifecycle.Observer
// …
class FavoritesFragment : Fragment() {
private lateinit var favoritesViewModel: FavoritesViewModel
override fun onAttach(context: Context?) {
super.onAttach(context)
favoritesViewModel = getViewModel(FavoritesViewModel::class)
}
// …
override fun onViewCreated(view: View, savedInstanceState: Bundle?) {
// …
observeFavorites()
}
private fun observeFavorites() = launch { // Updates list when favorites change
val favorites = favoritesViewModel.getFavorites()
favorites.observe(this@FavoritesFragment, Observer { foods ->
foods?.let {
launch(UI) { (rvFavorites.adapter as? SearchListAdapter)?.setItems(foods) }
}
})
}
private fun setUpRecyclerView() {
(activity as? MainActivity)?.setUpRecyclerView(rvFavorites, emptyList())
}
}
This fragment gets a new property to hold the LiveData of foods. It can be initialized already in onAttach because it is independent of any views. The observeFavorites method reflects changes on the LiveData in the RecyclerView. The setUpRecyclerView method is now called by accessing the fragment’s activity property to get a reference to the MainActivity because it’s no longer a companion object method, and it passes in an empty list to start with.
The favorites fragment now displays the correct list of favorite foods and the user is able to choose which foods those are. However, there’s one more step: indicating favorites in the search fragment. It gets its data from the API, so you have to use the NDBNO to connect it to the corresponding entry in the database, as shown in Listing 8.83.
Listing 8.83 Search Fragment
import com.example.nutrilicious.viewmodel.FavoritesViewModel
// …
class SearchFragment : Fragment() {
// …
private lateinit var favoritesViewModel: FavoritesViewModel
override fun onAttach(context: Context?) {
// …
favoritesViewModel = getViewModel(FavoritesViewModel::class)
}
// …
private fun updateListFor(searchTerm: String) {
lastSearch = searchTerm
swipeRefresh?.isRefreshing = true
launch {
val favoritesIds: List<String> = favoritesViewModel.getAllIds()
val foods: List<Food> = searchViewModel.getFoodsFor(searchTerm)
.onEach { if (favoritesIds.contains(it.id)) it.isFavorite = true }
lastResults = foods
withContext(UI) { … }
}
}
private fun setUpSearchRecyclerView() {
(activity as? MainActivity)?.setUpRecyclerView(rvFoods)
}
}
The view model takes care of retrieving the IDs of all favorites, allowing you to augment the data retrieved from the API with the information regarding whether it is a favorite. Like forEach, onEach performs the given action on each item. But in contrast to forEach, it returns the resulting collection, here the list of foods with their adjusted isFavorite property. Note that the setup method for the recycler view is adjusted to call the member method correctly.
With this, users are able to choose their favorite foods, view them in the My Foods Screen, see which found foods already are favorites, and add or remove favorites by clicking on the star icon. This is a working app but not yet particularly helpful, except to discover foods users were not previously aware existed. In the following section, you dive deeper into the USDA API to retrieve and show detailed nutritional information and help users make healthier diet choices.
Fetching Detailed Nutrition Data from the USDA Food Reports API
Accessing another endpoint of the USDA API is fairly easy at this point because you can build upon the existing code. To fetch nutrition details from the USDA Food Reports API,9 you just have to add the corresponding GET request to the UsdaApi interface, as shown in Listing 8.84.
9. https://ndb.nal.usda.gov/ndb/doc/apilist/API-FOOD-REPORTV2.md
Listing 8.84 Adding a New Endpoint to the API Interface
@GET("V2/reports?format=json")
fun getDetails(
@Query("ndbno") id: String, // Only non-optional parameter is food ID
@Query("type") detailsType: Char = 'b' // b = basic, f = full, s = stats
): Call<DetailsWrapper<DetailsDto>>
With this, the UsdaApi interface now allows two different GET requests. This second one appends “V2/reports” to the base URL and accepts the NDBNO of the requested food. You could again retrieve the raw JSON data first. But this time, let’s map the data to DTOs directly. The structure is similar to the Search API, with a DetailsWrapper enclosing the actual DetailsDto to navigate down the JSON structure. These wrappers and DTOs will be created next. Setting the result type to “b” tells the API to return basic info, which is already more than detailed enough for this app.
I’d recommend adding another JSON file with the result format10 to the project (for instance, in the sampledata directory) to easily explore it. You can call it detailsFormat.json and use the Reformat Code action to fix line breaks and indentation if necessary. Listing 8.85 portrays a relevant chunk of the JSON data.
10. https://api.nal.usda.gov/ndb/V2/reports?ndbno=09070&type=b&format=json&api_key=DEMO_KEY
Listing 8.85 JSON Format for Nutrition Details
{
"foods": [
{
"food": {
"sr": "Legacy",
"type": "b",
"desc": { // Basic food data
"ndbno": "09070",
"name": "Cherries, sweet, raw",
"ds": "Standard Reference",
"manu": "",
"ru": "g"
},
"nutrients": [ // Nutrient data for food above
{
"nutrient_id": "255", // Unique nutrient ID
"name": "Water", // Nutrient name
"derivation": "NONE",
"group": "Proximates", // Nutrient category
"unit": "g", // Unit used by ‘value’ below
"value": "82.25", // Amount of this nutrient per 100g of food
"measures": [ … ]
}, …
]
}
}
]
}
This time, the actual data you need is wrapped into the properties foods and food (just like list and item before). The list of nutrients is long and contains everything from water to macros to vitamins, minerals, and fats. All values refer to 100 grams of the food. For instance, you can see from Listing 8.85 that 100g of cherries contain 82.25g of water. In this app, you will not use the alternative measures that come with the result (such as oz, cups, or pieces).
Let’s map this data to DTOs. In data.network.dto, add a new file DetailsDtos.kt into which you can place your DTOs. Listing 8.86 provides the DTO wrappers that navigate to the interesting data.
Listing 8.86 DTO Wrappers
import com.squareup.moshi.JsonClass
@JsonClass(generateAdapter = true)
class FoodsWrapper<T> {
var foods: List<T> = listOf() // Navigates down the ‘foods’ list from JSON
}
@JsonClass(generateAdapter = true)
class FoodWrapper<T> {
var food: T? = null // Navigates down the ‘food’ object
}
typealias DetailsWrapper<T> = FoodsWrapper<FoodWrapper<T>>
When writing these DTOs, be careful about which JSON property holds a list (indicated by square brackets) and which holds an object (indicated by curly braces), and map them accordingly. In this example, foods is a list and food is an object; the Food Reports API allows fetching details for multiple foods in one request, thus the list of foods.
Next, Listing 8.87 provides the DTO declarations with property names matching those in the JSON data, so that Moshi knows how to map them.
Listing 8.87 Details DTOs
@JsonClass(generateAdapter = true)
class DetailsDto(val desc: DescriptionDto, val nutrients: List<NutrientDto>) {
init {
nutrients.forEach { it.detailsId = desc.ndbno } // Connects the two DTOs below
}
}
@JsonClass(generateAdapter = true)
class DescriptionDto { // Property names must match JSON names
lateinit var ndbno: String
lateinit var name: String
}
@JsonClass(generateAdapter = true)
class NutrientDto { // Property names must match JSON names
var nutrient_id: Int? = null // Cannot use lateinit with Int
var detailsId: String? = null // Only field not coming from JSON
lateinit var name: String
lateinit var unit: String
var value: Float = 0f
lateinit var group: String
}
The response contains a description with the NDBNO and name of the requested food, followed by the list of nutrient details. The NutrientDto contains one property that is not populated from the JSON data, namely the detailsId. This is used to reference which food (identified by the NDBNO) the nutrient details belong to. It is initialized in the DetailsDto when merging the description and nutrient data. This works similar to a foreign key in SQL.
You are now all set to retrieve and map detailed nutrition data from the USDA API. Finally, you can map this to domain classes that are decoupled from the JSON property names and formats. So in model, add a new file FoodDetails.kt that will contain data classes for the food details. Listing 8.88 presents the required data classes.
Listing 8.88 Domain Classes for Food Details
import com.example.nutrilicious.data.network.dto.*
data class FoodDetails(
val id: String,
val name: String,
val nutrients: List<Nutrient>
) {
constructor(dto: DetailsDto) : this(
dto.desc.ndbno,
dto.desc.name,
dto.nutrients.map(::Nutrient)
)
}
data class Nutrient(
val id: Int,
val detailsId: String,
val name: String,
val amountPer100g: Float,
val unit: String,
val type: NutrientType
) {
constructor(dto: NutrientDto) : this(
dto.nutrient_id!!,
dto.detailsId!!,
dto.name,
dto.value,
dto.unit,
NutrientType.valueOf(dto.group.toUpperCase())
)
}
enum class NutrientType {
PROXIMATES, MINERALS, VITAMINS, LIPIDS, OTHER
}
There are three domain classes. The entry point is the FoodDetails class that contains a list of nutrients, each of which has a specific nutrient type. Like last time, secondary constructors map the DTOs to these domain classes. In case a late-initialized property was not populated by Moshi or a nullable property remains null, the code crashes immediately when trying to map at runtime (and you would be able to identify the causing property easily). As for the nutrient type, there are only five possible values returned by the API, so you can map this to an enum.
This concludes accessing the Food Reports API. You can sanity-check it in MainActivity.onCreate with a temporary test call as shown in Listing 8.89.
Listing 8.89 Making a Test Request
import com.example.nutrilicious.data.network.*
import kotlinx.coroutines.launch
class MainActivity : AppCompatActivity() {
override fun onCreate(savedInstanceState: Bundle?) {
// …
launch(NETWORK) { usdaApi.getDetails("09070").execute() } // Temporary
}
}
When running the app, you should see a response with the details in JSON format in the Logcat. Now you are ready to implement a detail activity that presents the user with more actionable information about each food in the app.
Integrating the Details Activity
In this section, you will create a second activity to display the nutritional information about a selected food. To this end, create a new package view.details, and inside it generate a new Empty Activity along with its layout file using Android Studio’s wizard (using right-click, New, Activity, and then Empty Activity). Name it DetailsActivity and use the default name activity_details.xml for the layout.
As always, let’s deal first with the layout. This layout file is quite long because it has four sections for macronutrients (“proximates” in the API response), vitamins, minerals, and lipids (fats). Each section will have a headline and a text view that is populated with data programmatically, followed by a horizontal divider. This divider is a custom view defined in res/layout/horizontal_divider.xml as shown in Listing 8.90.
Listing 8.90 Horizontal Divider Layout
<?xml version="1.0" encoding="utf-8"?>
<View xmlns:android="http://schemas.android.com/apk/res/android"
android:layout_width="match_parent"
android:layout_height="@dimen/divider_height"
android:minHeight="@dimen/divider_minheight"
android:layout_marginTop="@dimen/divider_margin"
android:layout_marginBottom="@dimen/divider_margin"
android:background="?android:attr/listDivider" />
This renders as a horizontal line that is 2dp thick but at least 1px to avoid being invisible. For the dimensions, add the missing resources from Listing 8.91 to res/values/dimens.xml.
Listing 8.91 Divider Dimensions
<dimen name="divider_height">2dp</dimen>
<dimen name="divider_minheight">1px</dimen>
<dimen name="divider_margin">5dp</dimen>
With this, you are ready to implement the details activity layout, as shown in Listing 8.92. This code belongs in res/layout/activity_details.xml.
Listing 8.92 Details Activity Layout
<?xml version="1.0" encoding="utf-8"?>
<ScrollView xmlns:android="http://schemas.android.com/apk/res/android"
xmlns:tools="http://schemas.android.com/tools"
android:layout_width="match_parent"
android:layout_height="match_parent">
<LinearLayout
android:layout_width="match_parent"
android:layout_height="wrap_content"
android:orientation="vertical"
android:padding="@dimen/medium_padding"
tools:context=".view.detail.FoodDetailsActivity">
<TextView
android:id="@+id/tvFoodName"
android:layout_width="match_parent"
android:layout_height="wrap_content"
android:layout_gravity="center"
android:gravity="center"
android:padding="@dimen/medium_padding"
android:textSize="@dimen/huge_font_size" />
<TextView
android:layout_width="match_parent"
android:layout_height="wrap_content"
android:text="@string/proximates"
android:textColor="@android:color/darker_gray"
android:textSize="@dimen/medium_font_size" />
<TextView
android:id="@+id/tvProximates"
android:layout_width="match_parent"
android:layout_height="wrap_content"
android:lineSpacingMultiplier="1.1" />
<include layout="@layout/horizontal_divider" />
<TextView
android:layout_width="match_parent"
android:layout_height="wrap_content"
android:text="@string/vitamins"
android:textColor="@android:color/darker_gray"
android:textSize="@dimen/medium_font_size" />
<TextView
android:id="@+id/tvVitamins"
android:layout_width="match_parent"
android:layout_height="wrap_content" />
<include layout="@layout/horizontal_divider" />
<TextView
android:layout_width="match_parent"
android:layout_height="wrap_content"
android:text="@string/minerals"
android:textColor="@android:color/darker_gray"
android:textSize="@dimen/medium_font_size" />
<TextView
android:id="@+id/tvMinerals"
android:layout_width="match_parent"
android:layout_height="wrap_content" />
<include layout="@layout/horizontal_divider" />
<TextView
android:layout_width="match_parent"
android:layout_height="wrap_content"
android:text="@string/lipids"
android:textColor="@android:color/darker_gray"
android:textSize="@dimen/medium_font_size" />
<TextView
android:id="@+id/tvLipids"
android:layout_width="match_parent"
android:layout_height="wrap_content" />
</LinearLayout>
</ScrollView>
It is a simple ScrollView containing a vertical LinearLayout with all the sections stacked up. There is nothing particular to note about this layout; however, to make it work, you have to add the missing string resources for the headline, shown in Listing 8.93.
Listing 8.93 String Resources For Headlines
<string name="proximates">Proximates</string>
<string name="minerals">Minerals</string>
<string name="vitamins">Vitamins</string>
<string name="lipids">Lipids</string>
At this point, the new activity is already usable, although it will only show static texts and no nutrition data yet. To incorporate it into the app, it should be shown when the user clicks on a food item in a RecyclerView. Handling these clicks requires a small change in the adapter, as shown in Listing 8.94.
Listing 8.94 Adding an Item Click Listener to the Adapter
class SearchListAdapter(…,
private val onItemClick: (Food) -> Unit,
private val onStarClick: (Food, Int) -> Unit
) : RecyclerView.Adapter<ViewHolder>() {
// …
inner class ViewHolder(…) : … {
fun bindTo(food: Food) {
// …
containerView.setOnClickListener { onItemClick(food) }
}
}
}
The containerView property corresponds to the whole list item, so it should be the target for this click handler. The handler accepts the food that corresponds to the clicked item in order to pass on the NDBNO to the DetailsActivity and show the correct data. This behavior is defined in MainActivity, as shown in Listing 8.95.
Listing 8.95 Defining the Click Handler for List Items
import com.example.nutrilicious.view.details.DetailsActivity
// …
class MainActivity : AppCompatActivity() {
private fun setUpSearchListAdapter(rv: RecyclerView, items: List<Food>) =
SearchListAdapter(items,
onItemClick = { startDetailsActivity(it) },
onStarClick = { … }
)
private fun startDetailsActivity(food: Food) {
val intent = Intent(this, DetailsActivity::class.java).apply {
putExtra(FOOD_ID_EXTRA, food.id) // Stores the desired food’s ID in the Intent
}
startActivity(intent) // Switches to DetailsActivity
}
}
Note the use of apply to initialize the Intent and add an extra that carries the NDBNO of the food to display. The FOOD_ID_EXTRA identifier is declared as a file-level property in DetailsActivity.kt (see Listing 8.96).
Listing 8.96 Identifier for the Intent Extra
const val FOOD_ID_EXTRA = "NDBNO"
class DetailsActivity : AppCompatActivity() { … }
You can now click on any list item in the app to be taken to the details activity. However, it shows only static headlines at this stage. So the next step is to actually retrieve the desired data. Again, the activity should get its data from a view model. To this end, add a new file DetailsViewModel.kt to the viewmodel package, as in Listing 8.97.
Listing 8.97 View Model for Details
import android.arch.lifecycle.ViewModel
import com.example.nutrilicious.data.network.*
import com.example.nutrilicious.data.network.dto.*
import com.example.nutrilicious.model.FoodDetails
import kotlinx.coroutines.withContext
import retrofit2.Call
class DetailsViewModel : ViewModel() {
suspend fun getDetails(foodId: String): FoodDetails? {
val request: Call<DetailsWrapper<DetailsDto>> = usdaApi.getDetails(foodId)
val detailsDto: DetailsDto = withContext(NETWORK) {
request.execute().body()?.foods?.get(0)?.food // Runs request and extracts data
} ?: return null
return FoodDetails(detailsDto)
}
}
This view model defines only one method, which retrieves the details for a given food and provides a cleaner interface for the network call by wrapping the usdaApi object. Executing the Retrofit call works as in SearchViewModel, this time accessing only the first item of the foods list (there is only one because you pass a single NDBNO to the API) and its food property. If this ends up being null or throwing an exception, the withContext block passes this on. Consequently, the whole method returns null because of the elvis operator after withContext. In the success case, the DTO is mapped to a FoodDetails object that is returned.
Next, remove the test call in MainActivity.onCreate. The API is now used by the view model as it should be. In the DetailsActivity, add a property for the view model and initialize it in onCreate as shown in Listing 8.98.
Listing 8.98 Adding the View Model to the DetailsActivity
import android.support.v7.app.AppCompatActivity
import android.os.Bundle
import com.example.nutrilicious.R
import com.example.nutrilicious.view.common.getViewModel
import com.example.nutrilicious.viewmodel.DetailsViewModel
class DetailsActivity : AppCompatActivity() {
private lateinit var detailsViewModel: DetailsViewModel
override fun onCreate(savedInstanceState: Bundle?) {
// …
detailsViewModel = getViewModel(DetailsViewModel::class)
}
}
Finally, you can read the desired NDBNO from the intent extra (which was attached by the item click handler), fetch the data for it, and show it to the user. Listing 8.99 reads the NDBNO and performs the request as the first step.
Listing 8.99 Using the View Model in the Details Activity
import kotlinx.coroutines.android.UI
import kotlinx.coroutines.*
// …
class DetailsActivity : AppCompatActivity() {
// …
override fun onCreate(savedInstanceState: Bundle?) {
// …
val foodId = intent.getStringExtra(FOOD_ID_EXTRA) // Reads out desired food’s ID
updateUiWith(foodId)
}
private fun updateUiWith(foodId: String) {
if (foodId.isBlank()) return
launch {
val details = detailsViewModel.getDetails(foodId) // Retrieves details
withContext(UI) { bindUi(details) } // Populates UI
}
}
}
After reading the intent extra, a helper function handles the network request and updates the UI. Here, launch does not need an explicit dispatcher because getDetails dispatches to the network context internally. Note that, as a suspending function, getDetails behaves synchronously by default so that the details variable is ready to be used in the line after its declaration. Listing 8.100 shows the code to bind the data to the views.
Listing 8.100 Displaying the Data
import com.example.nutrilicious.model.*
import kotlinx.android.synthetic.main.activity_details.*
// …
class DetailsActivity : AppCompatActivity() {
// …
private fun bindUi(details: FoodDetails?) {
if (details != null) {
tvFoodName.text = "${details.name} (100g)"
tvProximates.text = makeSection(details, NutrientType.PROXIMATES)
tvMinerals.text = makeSection(details, NutrientType.MINERALS)
tvVitamins.text = makeSection(details, NutrientType.VITAMINS)
tvLipids.text = makeSection(details, NutrientType.LIPIDS)
} else {
tvFoodName.text = getString(R.string.no_data)
}
}
private fun makeSection(details: FoodDetails, forType: NutrientType) =
details.nutrients.filter { it.type == forType }
.joinToString(separator = "\n", transform = ::renderNutrient)
private fun renderNutrient(nutrient: Nutrient): String = with(nutrient) {
val displayName = name.substringBefore(",") // = whole name if it has no comma
"$displayName: $amountPer100g$unit"
}
}
Displaying the data is just a matter of reading out each nutrient and showing it in the corresponding text view. To avoid code duplication, makeSection filters to the nutrients of a specific type and shows each in a new line, with its name and amount in 100g of the food. Displaying each single nutrient is handled by renderNutrient. If you want to, you can extend the app to include the nutrient type “other” as well.
Add the missing string resource in res/values/strings.xml to display “No data available” in case something goes wrong and the API call returns null (see Listing 8.101).
Listing 8.101 String Resource Indicating No Data
<string name="no_data">No data available</string>
As a final step, you can allow users to navigate up by making the DetailsActivity a child of the MainActivity. Listing 8.102 adjusts the AndroidManifest.xml accordingly.
Listing 8.102 Providing Up Navigation
<application …>
…
<activity android:name=".view.details.DetailsActivity"
android:parentActivityName=".view.main.MainActivity">
<meta-data
android:name="android.support.PARENT_ACTIVITY"
android:value=".view.main.MainActivity" />
</activity>
</application>
With this, the Nutrilicious app is already a lot more actionable for users. They can explore foods and see how much of each nutrient it contains, for instance, to see if their favorite foods have a good nutrient profile.
Storing Food Details in the Database
In the following, you’ll cache food details in the database when first retrieved. This avoids unnecessary network requests when the user frequently accesses the same foods, such as his or her favorites. To arbitrate between the database and the API as alternative data sources for food details, a repository will be introduced, as described in “Guide to App Architecture” on the Android Developers website.11
11. https://developer.android.com/topic/libraries/architecture/guide.html
Because Room is already included in the project, you can start creating the entities immediately. In this case, this means turning the FoodDetails class into an entity. In Listing 8.103, the required annotations are added to the data classes in FoodDetails.kt.
Listing 8.103 Defining the Entities
import android.arch.persistence.room.*
// …
@Entity(tableName = "details")
@TypeConverters(NutrientListConverter::class) // Is implemented next
data class FoodDetails(
@PrimaryKey val id: String,
// …
) { constructor(dto: DetailsDto) : this(…) }
@TypeConverters(NutrientTypeConverter::class)
data class Nutrient(…) { … }
Because the nutrients don’t need to be queried on their own, they can be inlined into the details table using type converters to keep the schema simple. Thus, only the FoodDetails class gets an @Entity annotation and a primary key. To inline the List<Nutrient> it carries, it uses a NutrientListConverter that defines how to map the list to a string and back. Similarly, the Nutrient class uses a type converter to store its NutrientType as a string and restore it back.
These two converters must be implemented manually. For this, create a file Converters.kt under data.db. First, the NutrientListConverter uses Moshi to encode the nutrient list as a JSON string and decode it when reading from the database. This is done in Listing 8.104.
Listing 8.104 Type Converter for List<Nutrient>
import android.arch.persistence.room.TypeConverter
import com.example.nutrilicious.model.*
import com.squareup.moshi.*
class NutrientListConverter {
private val moshi = Moshi.Builder().build()
private val nutrientList = Types.newParameterizedType( // Represents List<Nutrient>
List::class.java, Nutrient::class.java
)
private val adapter = moshi.adapter<List<Nutrient>>(nutrientList) // Builds adapter
@TypeConverter
fun toString(nutrient: List<Nutrient>): String = adapter.toJson(nutrient)
@TypeConverter fun toListOfNutrient(json: String): List<Nutrient>
= adapter.fromJson(json) ?: emptyList()
}
The main work is to set up a Moshi adapter that knows how to transform a List<Nutrient> into a string. Setting it up is a little verbose and could be encapsulated, but this is only used once in this app so we’ll go with it. To tell Room which methods it should use to map types to and from the database, you must annotate them with @TypeConverter. This way, if Room encounters a List<Nutrient>, it knows it can use NutrientListConverter.toString.
The second converter is simpler because it only needs the Kotlin-generated enum members, as shown in Listing 8.105. This is also placed into Converters.kt.
Listing 8.105 Type Converter for NutrientType
class NutrientTypeConverter {
@TypeConverter
fun toString(nutrientType: NutrientType) = nutrientType.name // Type -> String
@TypeConverter
fun toNutrientType(name: String) = NutrientType.valueOf(name) // String -> Type
}
This enables Room to use these two type converters. Note that, in FoodDetails.kt, the classes use the @TypeConverters (with an “s” at the end) to denote which converters to use, whereas the converters themselves use @TypeConverter to tell Room that it’s a converter method.
The next step is to add the DAO. So in data.db, add a new DetailsDao.kt as in Listing 8.106.
Listing 8.106 DAO for Food Details
import android.arch.persistence.room.*
import com.example.nutrilicious.model.FoodDetails
@Dao
interface DetailsDao {
@Query("SELECT * FROM details WHERE id = :ndbno")
fun loadById(ndbno: String): FoodDetails?
@Insert(onConflict = OnConflictStrategy.REPLACE)
fun insert(food: FoodDetails)
}
Regarding this details entity, the app must be able to insert new data (to cache it in the database) and retrieve the data for a specific food to display it in the DetailsActivity.
The last step is different from before. There is already an AppDatabase, so you can extend that with the new entity (because both entities should be stored in the same database). Listing 8.107 includes the new entity and exposes the DetailsDao.
Listing 8.107 Extending the AppDatabase
import com.example.nutrilicious.model.FoodDetails
// …
@Database(entities = [Food::class, FoodDetails::class], version = 2) // Version 2
abstract class AppDatabase : RoomDatabase() {
// …
abstract fun favoritesDao(): FavoritesDao
abstract fun detailsDao(): DetailsDao // Now exposes a DetailsDao as well
}
The first two changes are inside the @Database annotation. First, the FoodDetails class is added to the array of entities to include in the database. Second, the version is increased by one because the schema has changed (there is a new entity). Lastly, there is a new method to get an implementation of the new DAO.
If you run the app now, it will clash with the existing database on your device. During development, you can use destructive migration so that Room simply deletes the old database. This will cause any stored favorites to disappear, but nothing more. Listing 8.108 adjusts buildDatabase to enable destructive migration in debug builds (during development).
Listing 8.108 Enabling Destructive Database Migration in Development
import com.example.nutrilicious.BuildConfig
// …
private fun buildDatabase(ctx: Context) = Room
.databaseBuilder(ctx, AppDatabase::class.java, "AppDatabase")
.apply { if (BuildConfig.DEBUG) fallbackToDestructiveMigration() }
.build()
The BuildConfig.DEBUG property is true when working in Android Studio or exporting an unsigned APK to test on your device but not when you finally publish a signed APK. Alternately, you could remove the old database manually from your AVD by using the Device File Explorer to remove the directory data/data/<YOUR_PACKAGE_NAME>/databases.
The database is now extended to store food details in addition to favorite foods. For food details, there are now two competing data sources: the USDA API and the database. If available, the database should be used because this avoids network requests, improves performance, and works offline. To enforce this behavior, you introduce a repository that all consumers should use to access details data—it is the single source of truth for this data.
For the repository, add a new class DetailsRepository to the data package. This repository offers a clean interface for all operations related to FoodDetails and uses both the network and the database. Listing 8.109 shows its implementation.
Listing 8.109 Details Repository as Single Source of Truth
import android.content.Context
import com.example.nutrilicious.data.db.*
import com.example.nutrilicious.data.network.*
import com.example.nutrilicious.data.network.dto.*
import com.example.nutrilicious.model.FoodDetails
import kotlinx.coroutines.*
import retrofit2.Call
class DetailsRepository(ctx: Context) {
private val detailsDao by lazy { AppDatabase.getInstance(ctx).detailsDao() }
fun add(details: FoodDetails) = launch(DB) { detailsDao.insert(details) }
suspend fun getDetails(id: String): FoodDetails? {
return withContext(DB) { detailsDao.loadById(id) } // Prefers database
?: withContext(NETWORK) { fetchDetailsFromApi(id) } // Falls back to network
.also { if (it != null) this.add(it) } // Adds newly fetched foods to DB
}
private suspend fun fetchDetailsFromApi(id: String): FoodDetails? {
val request: Call<DetailsWrapper<DetailsDto>> = usdaApi.getDetails(id)
val detailsDto: DetailsDto = withContext(NETWORK) {
request.execute().body()?.foods?.get(0)?.food // Same as before
} ?: return null
return FoodDetails(detailsDto)
}
}
First, the repository has a reference to the DetailsDao to access the database. This is used to add new entries to the database via this.add. It is also used in getDetails to probe for data. If none is available in the database, the method falls back to a network call using fetchDetailsFromApi and caches the retrieved data in the database for subsequent calls. Note that, in a more fleshed-out implementation, you may want to invalidate database entries after a certain time to allow for updates of the data.
The code for the network call is taken from DetailsViewModel that now uses the repository as its single source of truth for data, as shown in Listing 8.110.
Listing 8.110 Using the Repository in the View Model
import com.example.nutrilicious.data.DetailsRepository
// …
class DetailsViewModel(app: Application) : AndroidViewModel(app) {
private val repo = DetailsRepository(app)
suspend fun getDetails(foodId: String): FoodDetails? = repo.getDetails(foodId)
}
As you can see, the view model now simply delegates its task to the repository. Because the repository requires a context, the view model now extends AndroidViewModel.
Your app should now cache the details for foods when you first access them. In the emulator, the network call may take a few seconds to complete so that you should notice subsequent clicks on the same food to show the data faster. Accordingly, there should be no log entries from network calls in your Logcat when clicking the same food a second time.
Adding RDIs for Actionable Data
In this section, you will further improve this app by making the data more actionable for users. More specifically, the app should show how much of the recommended daily intake (RDI) each of the nutrient contents represents. For instance, users should see instantly that 100g of raw spinach have 20.85% of a person’s daily need of iron.
RDI information will be stored statically in the app in a simple map. To this end, create a new file RDI.kt in the model package. In order to store the RDIs, Listing 8.111 introduces classes to properly represent the data.
Listing 8.111 Classes to Represent RDIs
data class Amount(val value: Double, val unit: WeightUnit)
enum class WeightUnit {
GRAMS, MILLIGRAMS, MICROGRAMS, KCAL, IU
}
To keep things simple, the app uses roughly averaged RDIs for adult females and males. In reality, the RDI depends on age, gender, lifestyle, and other factors. Also, a more accurate representation would use minimum and maximum targets for each nutrient. For this sample app, we shall be content with a rough indicator to compare foods.
With the two domain classes above, storing the RDIs is now a matter of writing them down, as shown in Listing 8.112. As all other code, you can find this on GitHub12 to copy and paste.
12. https://github.com/petersommerhoff/nutrilicious-app/blob/master/12_AddingRdisForActionableData/app/src/main/java/com/petersommerhoff/nutrilicious/model/RDI.kt
Listing 8.112 Storing RDIs Statically
import com.example.nutrilicious.model.WeightUnit.*
internal val RDI = mapOf(
255 to Amount(3000.0, GRAMS), // water
208 to Amount(2000.0, KCAL), // energy
203 to Amount(50.0, GRAMS), // protein
204 to Amount(78.0, GRAMS), // total fat (lipids)
205 to Amount(275.0, GRAMS), // carbohydrates
291 to Amount(28.0, GRAMS), // fiber
269 to Amount(50.0, GRAMS), // sugars
301 to Amount(1300.0, MILLIGRAMS), // calcium
303 to Amount(13.0, MILLIGRAMS), // iron
304 to Amount(350.0, MILLIGRAMS), // magnesium
305 to Amount(700.0, MILLIGRAMS), // phosphorus
306 to Amount(4700.0, MILLIGRAMS), // potassium
307 to Amount(1500.0, MILLIGRAMS), // sodium
309 to Amount(10.0, MILLIGRAMS), // zinc
401 to Amount(85.0, MILLIGRAMS), // vitamin c
404 to Amount(1200.0, MICROGRAMS), // vitamin b1 (thiamin)
405 to Amount(1200.0, MICROGRAMS), // vitamin b2 (riboflavin)
406 to Amount(15.0, MILLIGRAMS), // vitamin b3 (niacin)
415 to Amount(1300.0, MICROGRAMS), // vitamin b6 (pyridoxine)
435 to Amount(400.0, MICROGRAMS), // folate
418 to Amount(3.0, MICROGRAMS), // vitamin b12 (cobalamine)
320 to Amount(800.0, MICROGRAMS), // vitamin a
323 to Amount(15.0, MILLIGRAMS), // vitamin e (tocopherol)
328 to Amount(15.0, MICROGRAMS), // vitamin d (d2 + d3)
430 to Amount(105.0, MICROGRAMS), // vitamin k
606 to Amount(20.0, GRAMS), // saturated fats
605 to Amount(0.0, GRAMS), // transfats
601 to Amount(300.0, MILLIGRAMS) // cholesterol
)
The new data class Amount is useful to improve the Nutrient class as well. Listing 8.113 combines its amountPer100g and unit properties into a single new property with type Amount and adjusts the DTO mapping accordingly.
Listing 8.113 Using the Amount Class in Nutrient
@TypeConverters(NutrientTypeConverter::class)
data class Nutrient(
// …,
val amountPer100g: Amount, // Combines amount and unit into single property
// …
) {
constructor(dto: NutrientDto) : this(
// …,
Amount(dto.value.toDouble(), WeightUnit.fromString(dto.unit)),
// …
)
}
Note that the type converter still works as before and that Room is still able to map this class to the database, even without a schema change.
To make WeightUnit.fromString work, the WeightUnit enum should know which string each instance corresponds to, such as “g” mapping to WeightUnit.GRAMS. Note that this is different from Kotlin’s default string representation of each enum instance using valueOf. Thus, Listing 8.114 adds the fromString method. Additionally, the toString method is overridden to display the weight unit correctly in the UI later.
Listing 8.114 Mapping WeightUnit to String And Vice Versa
enum class WeightUnit {
GRAMS, MILLIGRAMS, MICROGRAMS, KCAL, IU; // Mind the semicolon
companion object {
fun fromString(unit: String) = when(unit) { // Transforms string to weight unit
"g" -> WeightUnit.GRAMS
"mg" -> WeightUnit.MILLIGRAMS
"\u00b5g" -> WeightUnit.MICROGRAMS
"kcal" -> WeightUnit.KCAL
"IU" -> WeightUnit.IU
else -> throw IllegalArgumentException("Unknown weight unit: $unit")
}
}
override fun toString(): String = when(this) { // Transforms weight unit to string
WeightUnit.GRAMS -> "g"
WeightUnit.MILLIGRAMS -> "mg"
WeightUnit.MICROGRAMS -> "\u00b5g"
WeightUnit.KCAL -> "kcal"
WeightUnit.IU -> "IU"
}
}
Note that the when expression is exhaustive when mapping enum instances to a string but not the other way around. The logic itself is simply a matter of exploring which units the API returns and mapping them accordingly.
All required RDI data is now in place. You can use this information to enhance the DetailsActivity. The methods bindUi and makeSection can stay as they are, only renderNutrient must be adjusted because of the additional information you want to show for each single nutrient. Listing 8.115 shows the extended method.
Listing 8.115 Displaying a Nutrient
private fun renderNutrient(nutrient: Nutrient): String = with(nutrient) {
val name = name.substringBefore(",")
val amount = amountPer100g.value.render()
val unit = amountPer100g.unit
val percent = getPercentOfRdi(nutrient).render() // Is implemented next
val rdiNote = if (percent.isNotEmpty()) "($percent% of RDI)" else ""
"$name: $amount$unit $rdiNote"
}
private fun Double.render() = if (this >= 0.0) "%.2f".format(this) else ""
The amount and unit are now extracted from the Amount object. Additionally, the RDI percentage is calculated and displayed if it is greater than or equal to zero—in other words, if no error occurred. The render function is a simple extension on Double that displays it with two decimal places.
Next, you must implement getPercentOfRdi, which calculates how much of the RDI the given nutrient’s amount represents. Listing 8.116 shows its implementation.
Listing 8.116 Calculating the Percentage of RDI
private fun getPercentOfRdi(nutrient: Nutrient): Double {
val nutrientAmount: Double = nutrient.amountPer100g.normalized() // Impl. next
val rdi: Double = RDI[nutrient.id]?.normalized() ?: return -1.0
return nutrientAmount / rdi * 100
}
The percentage of the RDI is a simple division of how much of the nutrient the food contains and what the RDI is. In case no RDI is found, the method returns a negative result due to the default value of -1.0. If this happens, no percentage is displayed by the render method.
The nutrient values may be given in different units, such as grams and micrograms. Thus, the Amount class gets a method to normalize the value, as shown in Listing 8.117. This method should be called before performing any calculations based on this class.
Listing 8.117 Calculating the Percentage of RDI
data class Amount(val value: Double, val unit: WeightUnit) {
fun normalized() = when(unit) { // Normalizes milligrams and micrograms to grams
GRAMS, KCAL, IU -> value
MILLIGRAMS -> value / 1000.0
MICROGRAMS -> value / 1_000_000.0
}
}
Kilocalories and international units (IU) require no normalization. As for the weights, this method normalized them to a value in grams, but you could choose any of the three weight units as the normalized form.
Users can now immediately see how much of the RDI a food provides and thus choose foods that satisfy their nutritional needs. This is all the functionality this sample app should have. If you want to extend it further, you can turn it into a nutrition-tracking app in which users can enter how much of each food they ate and see what percentage of each RDI they have reached for that day.
Improving the User Experience
Although this concludes the app functionality, there are a few finishing touches you can make to improve this app by providing better feedback to the user. Subtleties like this go a long way when it comes to user experience.
Indicating Empty Search Results
In the search fragment, users are already shown a progress indicator, which is good. But if no foods are found for a search term, users are not notified and simply presented with an empty screen. Luckily, it is easy to show feedback in a snackbar if no foods were found. Listing 8.118 adjusts updateListFor to show this feedback.
Listing 8.118 Showing a Snackbar to Indicate Empty Search
private fun updateListFor(searchTerm: String) = launch {
// …
withContext(UI) {
(rvFoods?.adapter as? SearchListAdapter)?.setItems(foods)
swipeRefresh?.isRefreshing = false
if (foods.isEmpty() && isAdded) {
snackbar("No foods found")
}
}
}
If a search returns an empty list and the fragment is still attached to its activity, this shows a snackbar to tell the user that no foods were found for the given search term. The snackbar method is an extension defined in ViewExtensions.kt (see Listing 8.119).
Listing 8.119 Extension Function to Show Snackbar
import android.support.design.widget.Snackbar
import android.view.View
fun Fragment.snackbar(
msg: String, view: View = activity!!.findViewById<View>(android.R.id.content)) {
Snackbar.make(view, msg, Snackbar.LENGTH_SHORT).show()
}
This method relies on the fragment being attached to its activity because it uses an unsafe call in its default value. Thus, you must always check isAdded before calling this method, or pass in a view manually. After importing this function into the search fragment, you can run the app.
Indicate Progress in the Details Activity
Similarly, a progress indicator should be shown in the DetailsActivity to let the user know the data is being fetched. This activity has no SwipeRefreshLayout, so the first step is to add a ProgressBar to activity_details.xml as in Listing 8.120. Also, the linear layout is given an ID in order to show and hide it later when appropriate.
Listing 8.120 Adding a ProgressBar to the Layout
<ScrollView …>
<ProgressBar
android:id="@+id/progress"
android:layout_width="wrap_content"
android:layout_height="wrap_content"
android:layout_gravity="center"
android:visibility="gone"
style="?android:attr/progressBarStyle" />
<LinearLayout android:id="@+id/content" …>
<!-- sections as before -->
</LinearLayout>
</ScrollView>
The progress bar’s default visibility is GONE, meaning that it is not only hidden but does not affect the layout at all. The logic for showing and hiding it is similar as in the search fragment. Listing 8.121 introduces a new helper method to DetailsActivity and adjusts updateUiWith to show and hide the progress bar.
Listing 8.121 Showing and Hiding the Progress Bar
import android.view.View
// …
class DetailsActivity : AppCompatActivity() {
// …
private fun updateUiWith(foodId: String) {
if (foodId.isBlank()) return
setLoading(true) // Indicates that app is loading
launch {
val details = detailsViewModel.getDetails(foodId)
withContext(UI) {
setLoading(false) // Indicates that app finished loading
bindUi(details)
}
}
}
private fun setLoading(isLoading: Boolean) {
if (isLoading) {
content.visibility = View.GONE
progress.visibility = View.VISIBLE
} else {
progress.visibility = View.GONE
content.visibility = View.VISIBLE
}
}
}
The helper method setLoading toggles between showing the progress bar and hiding the content, and vice versa. With this, the progress bar is shown until the data is received.
Tweaks like these go a long way to improve the app’s usability. Therefore, even though not strictly Kotlin related, they were included here to indicate aspects that improve user experience.
Summary
Having finished this chapter and Chapter 7, you now have two Kotlin apps under your belt, along with best practices for Android and Kotlin development and a collection of useful extension functions. You are able to implement recycler views, use fragments, and create domain classes, DTOs, and DAOs concisely, and you have familiarized yourself with essential tools such as Retrofit, Moshi and the Android Architecture Components. You have also written idiomatic code using scope operators, delegated properties, immutability where possible, null handling, and other language features. You can build on all of this in your future apps.