
As with any endeavor, drawing the head is only difficult if you don’t know the steps. By drawing the head in stages, you will see that what appears complicated is, in reality, only a logical progression. Up until now, you have probably been more concerned with the aesthetics, or the expression of the human head. We’re going to focus, instead, on the spatial relationships among the features of the face. Let’s begin:
1
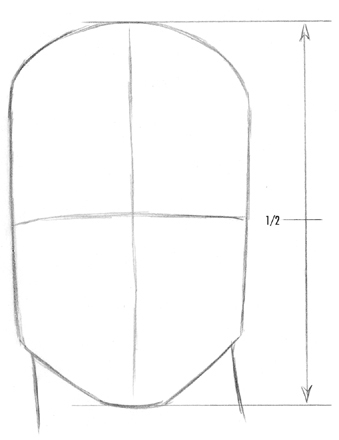
Draw the basic shape of the head. Notice the guidelines. They will be very helpful. The horizontal guideline is exactly halfway up the head. The vertical line goes straight down the middle, which will help keep the face symmetrical.
2
The eyes rest upon this horizontal guideline, which means that they are located in the middle of the head, not toward the top, as most of us assume. The head is five “eye lengths” across, as indicated.

3
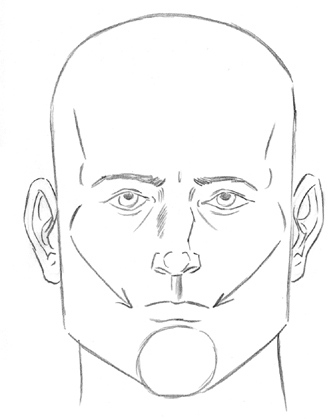
In drawing the nose, notice that the width of the nostrils is the same as the width between the two eyes.

4
The eyebrows and the top of the ear are at the same height. The bottom of the ears dips slightly below the bottom of the nose.

5
The bottom of the lips is on the same level as the angle of the jaw.

6
Notice that the protrusion of the cheekbones peaks at about the middle of the ears, and the contour of the cheekbones travels down to the edges of the lips.
7
Add thickness to the side of the head, and draw a layer of hair. Notice the contour of bone around the eyes, as indicated by the small arrows.

8
Now add details, such as the indications of the muscles of the face, which is explained more fully later in the chapter.

9
Finish up by shading the pockets of the eyes.

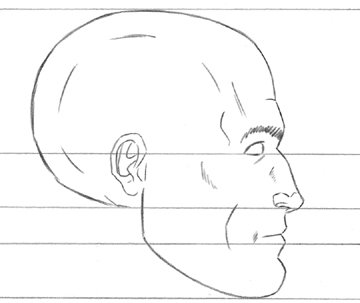
1
Just as in the front view, the eyes appear halfway down the head.

2
The opening of the ear canal appears just behind the halfway mark of the head.

3
The eye is located about one eye-length deep in the profile.

4
Add more details and contours. Later in this chapter, we will go into detail on why the contours of the face are where they are.

These are the general patterns that are made by the bones and muscles of the face. Of course, they can be subtle or pronounced, depending upon the amount of fat the person has.

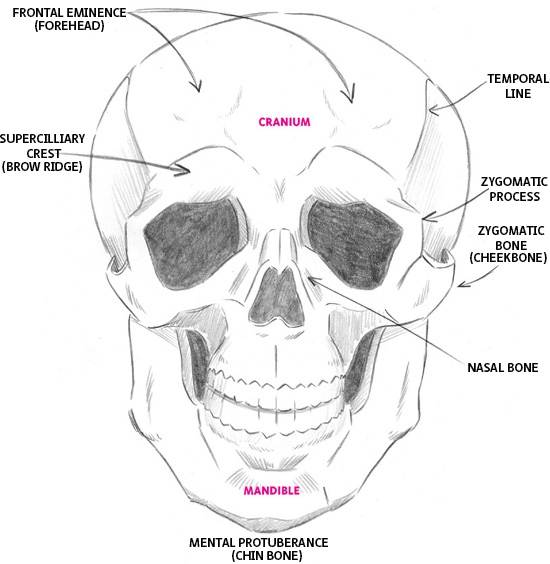
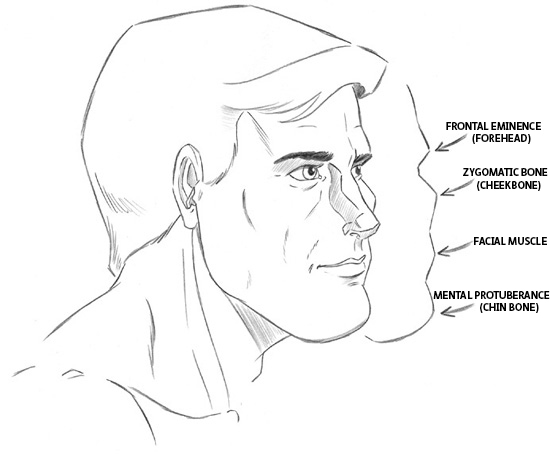
The skull is the architectural blueprint of the head. It dictates the overall shape of the face. The head is made up of two major masses, the cranium, which goes from the top of the skull to the upper teeth, and the mandible, which includes the jaw and the bottom teeth—the moveable part of the skull. The eyes sink inside the face because the eye sockets are, quite literally, holes in the head. Our cheeks tend to sink in, because of the empty pockets of space surrounding the jaw. The cheekbone, or zygomatic bone, and the chin bone, or mental protuberance, are always prominent.

When the teeth are clenched, the jaw becomes more pronounced because of a bulge in the masseter, a muscle in the jaw.
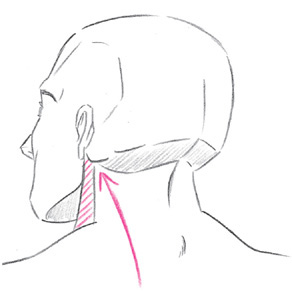
This bone protrusion, called the mastoid process, is located on the rear of the skull and below the ear. The word “process” refers to a projecting part of a bone. The mastoid process connects the largest set of neck muscles, the sternomastoid, to the head. The sternomastoid travels around to the front and attaches to the inner end of the collarbone.
Now you can see the reason why it is necessary to have a working familiarity of the skull. Many of the bones of the skull partially show through when you look at the human face. The skull affects the shape and shading of the contours of the face. But do not slavishly copy every bone when drawing the face. A small indication here and there is sufficient. In heavyset characters, very few bones will show through.

Notice that the nose is mostly made up of cartilage and is not part of the structure of the skeleton. This contributes to the difficulty some people have in drawing the nose. They believe that the nose is either all bone or completely malleable, when it is in fact a combination of the two. In order to draw the nose accurately, it is important to know where the bone ends and the cartilage begins. We will cover the nose in depth in the next chapter.

Keep a light touch, but show some bones. By doing so, you give your drawing a feeling of authority and anchor it in reality. It has all of the landmarks of a real face, and people will subconsciously respond to its authenticity.

It’s surprising to see just how many different muscles are at play in the face. We usually think of the face as bone and skin, but it is the facial muscles that enable us to raise an eyebrow, crinkle a nose, bite our lip, yawn, and make any expression. All movement is possible because of muscles alone. Without them, we are reduced to an inanimate skeleton and a circulatory system.
There is no need to commit all of these muscles to memory. Just observe. Notice the circular muscles that orbit the eyes, and the oval muscles that frame the lips. Also notice where there are no muscles—the pockets that allow our cheeks to sink inward.
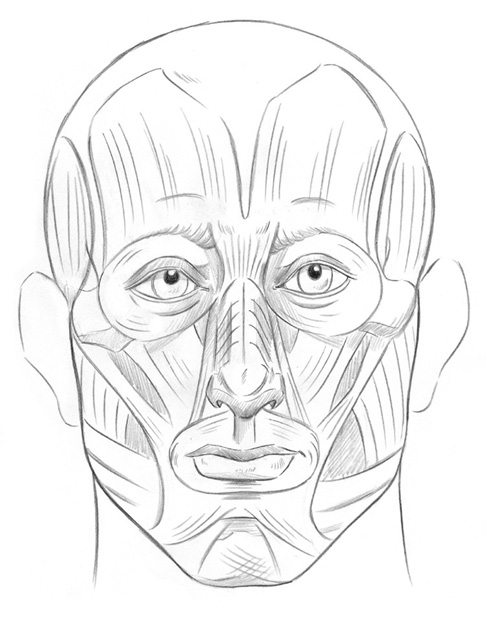
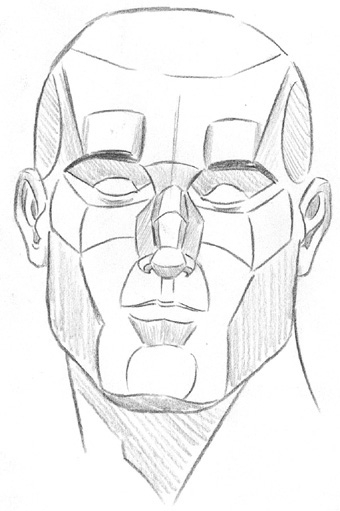
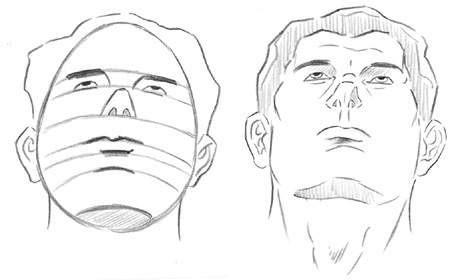
The face is not a smooth surface. It is formed by “hills and valleys.” The light, which is usually overhead in the form of incandescent light or sunlight, hits the hills and casts shadows on the valleys. Each hill and valley create new planes of the face.
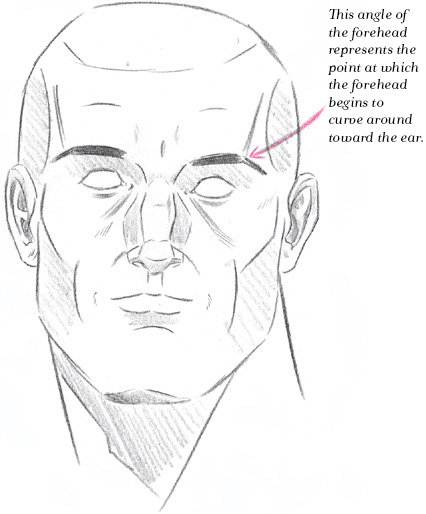
The semicircular line just above the ear delineates the temporal line, which is formed by the temporal bone.
FRONT VIEW


PROFILE
Usually, the planes of the face are subtler, unless the lighting is unduly harsh or the drawing is supposed to be dramatic. By making subtle use of the planes, you can draw the face more convincingly, moving almost imperceptibly from one plane of the face to the next. What follows are the topographic high points of the face.


It is difficult, if not impossible, to add shadows to the face without an awareness of the planes of the face, because shadows bring them out. The shadows of the face occur not only in the valleys, as we have already noted, but also in deeper facial creases. Shadows also tend to pool together. For example, notice the line of the cheekbone and how it merges, by way of shadows, with the line of a smile crease, which also merges with the line of the chin, to form one long shadow along the side of the face. There is almost always a shadow on the neck, just under the jaw, unless the face is being lit from underneath.

DRAWING THE FACE IN ¾ VIEW
The 3/4 view may seem challenging, but it is perhaps the easiest pose to draw, once you have given it a little practice. While the front view tends to flatten out the face (which you must work against by accenting the hills and valleys), and the profile is a dispassionate angle, the 3/4 view has the advantage of inherent drama. In the 3/4 view, the face always makes use of perspective, as one side of the face is closer to the viewer than the other. In addition, the perimeter of the face in 3/4 view reveals very clear, hard angles.
MALE VERSUS FEMALE FOREHEADS
All of the bones and joints on a man are slightly thicker and bigger than those of a woman’s, and that includes the skull. But perhaps the biggest difference—aside from the more slender, delicate nose—is the forehead, which has a clear indentation on a man in the 3/4 view, but should be avoided in the female forehead in the same pose, as demonstrated in the following example.
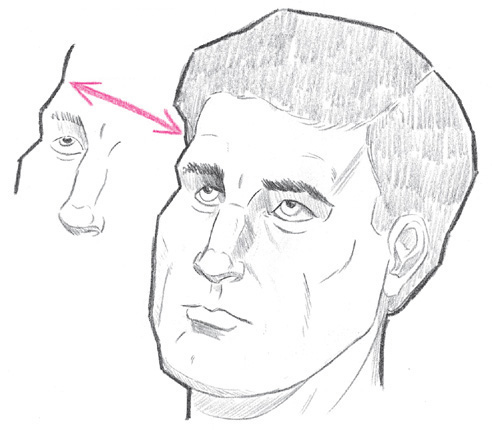
Forehead is formed by a line indented in the middle.

Forehead is formed by a single, curved line.
If there is one exercise that can ferret out an art student’s strengths as well as weaknesses, it would have to be head rotations. This is an excellent exercise to practice. Don’t worry about the expression, simply draw a head in these various positions. By using the horizontal lines, you can spot check to be sure that each head maintains the correct proportions.

FRONT VIEW

¾ VIEW
PROFILE

¾ LEFT, UP TILT

FRONT, UP TILT

¾ RIGHT, UP TILT
When the head tilts up or down, the length of the head and the features appear compressed. This is first accomplished by drawing curved guidelines on the face. To demonstrate this, look at the picture of the three eggs. The head is basically an egg shape. Look at the first egg, the one with no lines on it. Now look at the two eggs with guidelines drawn in. The second egg appears to be tilted down, while the third egg appears to be tilted back. Now get ready for the shocker: the last two eggs are identically drawn! Only their curved guidelines are different. That’s right—on the egg that appears to be tilted down, the guidelines curve upward, and on the egg that is tilted back, the guidelines are curving downward. By using this same principle on the head, we can also create the illusion that the head is tilted down or back.


BASIC CONSTRUCTION: LOOKING DOWN
BASIC CONSTRUCTION: LOOKING UP
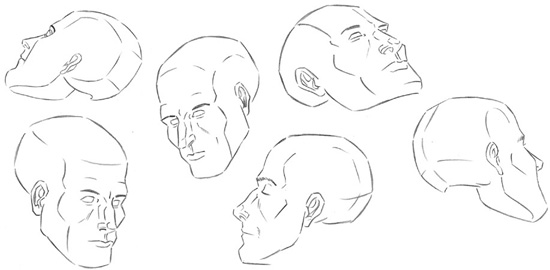
HEAD SHOTS: MORE ANGLES
More angles to practice on.