There are a lot of fun things you can do in Flash, but one that's sure to put a smile on your face is the motion tween. Using the motion tween, it's surprisingly easy to make the objects in your animation move, change shape, change color, or fade to nothingness. The first step is to convert the graphics you want to tween to Flash symbols; then you can change the properties of the symbols at any given point in time—or more specifically, at any point along the timeline. For example, if you have a redwood tree and you want to make it grow, you'd change the height (H) property. For example, in Frame 12, you can set the H property to, say, 100 (pixels), then set it to 150 in Frame 24, 200 in Frame 36, and so on. The tree appears to grow before your audience's eyes. Want to move a car across the stage? Just change the X and Y properties, which set the position on the stage, to create the illusion of movement. (For a rundown on the X/Y coordinate system, see the box on Use X/Y Coordinates to Set Stage Position.)
Chapter 1 showed you how to apply the bounce-smoosh motion preset to a wheel symbol. Motion presets are motion tweens that are predesigned to create certain effects. In the case of bounce-smoosh, it made the wheel drop from the top of the stage to the bottom. When it hit ground, it squashed like a cartoon character and then bounced a couple of times until it came to rest. In the next few exercises, you will create your own version of the bounce-smoosh tween.

Figure 3-10. Choose View→Rulers to display the handy horizontal and vertical rulers shown here. The rulers mark off the X/Y coordinates of the Flash stage. Want to see the X/Y coordinates for your cursor? Go to Window→Info. The cursor position (circled) shows in the lower-right corner of the Info panel.
The new document opens, and you see an empty stage.
Note
As always, you can find the sample file on the Missing CD page, www.missingmanuals.com/cds.
In the Panels dock, click the Library tab.
As shown in Figure 3-11, the Library is your warehouse for graphics you want to reuse. There are three items in this Library. For now, focus your attention on the Wheel symbol.
Figure 3-11. Click the Library tab to see the symbols stored in your Flash document. Click a symbol's name to see it previewed at the top of the panel. In Flash, symbols can be movie clips, graphics, or buttons. They have a number of special abilities, one of which is the ability to work with the motion tween.
In the Library, click the word "Wheel."
The wheel appears in the Library's preview window. Notice that images in the Library have different icons next to their names. The gear icon indicates that the wheel is a movie clip symbol. The icon for StairStep shows three different shapes, indicating that it's a graphic icon. You'll learn about the subtle differences between symbols on Symbols and Instances.
Drag the wheel to the top of the stage.
When you drag a symbol from the Library to the stage, you're creating an instance of the symbol. The original remains safe in the Library, where it can be used again. You can change the size, color, and other properties of your wheel instance without affecting the original.
With the wheel on the stage selected, choose Insert→Motion Tween.
In the timeline, several frames are added to Layer 1, and the background color for the span changes to blue, the color for a motion tween. The playhead automatically moves to the last frame in the tween.
Note
Flash can't tween an image unless it's a symbol (Symbols and Instances). If you try to apply a tween to an object that's not a symbol, Flash asks if you want it converted to a symbol.
Drag the wheel to the bottom of the stage.
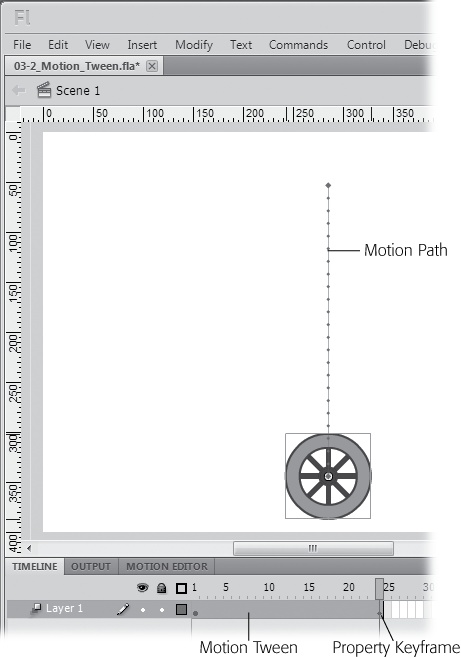
After you drag the wheel to a new position, a dotted line marks the path from the first position to the last (Figure 3-12). This is the motion path, and each dot represents a frame in the animation. A small diamond appears in the last frame of the timeline. The diamond marks the point for a property keyframe, indicating that one of the wheel's properties changed.
Press Enter (Return).
You see the result of your first motion tween as the wheel moves along the motion path. You can drag the playhead along the timeline to see the position of the wheel at any frame—or in other words, at any point in time. Animators and filmmakers call dragging the playhead manually scrubbing.

For another way to grasp how the motion tween works, examine your symbol's properties. Click the Properties tab and then click the wheel on the stage. In the Properties panel, the Y property (under Position and Size) marks the vertical position of the wheel on the stage. Drag the playhead to a new position, and then select the wheel again. The value of the Y property changes to show the wheel's current position.
The motion tween uses property keyframes, which are similar to standard keyframes except that they track all the individual properties of an object during a tween. For example, property keyframes keep track of the wheel symbol's X and Y coordinates. You animate the symbol by making adjustments to these properties in different frames. It's a two-step process: Move the playhead to mark the point in time, and then change the property. When you change the property, Flash automatically creates a property keyframe in the timeline. In the previous example, Flash automatically moved the playhead when you created the motion tween. You manually changed the Y (position) property when you moved the wheel. In the next example, you'll change the shape of the wheel by adjusting the W (width) and H (height) properties in the Properties panel.
The steps on Making It Move with Motion Tweens showed how to animate the beginning of the bounce-smoosh—the drop. The next step is to add some smoosh. To do so, you need to make the wheel wider and shorter at the moment of impact. To begin, you want to extend the tween and the timeline beyond the bottommost point of the bounce.
Note
This exercise continues the exercise begun on Making It Move with Motion Tweens.
Click the frame that's four frames beyond the end frame of the tween.
The tween ends where the blue highlight ends.
Choose Insert→Timeline→Frame or press F5.
Frames are added to the end of the animation, and the blue highlight of a motion tween extends to the new end point.
Drag the playhead to the last frame in the tween.
On the stage, the wheel looks like it did in the previous frame. That won't last long as you begin to fiddle with the properties in the next step.
Click the Properties tab, and then click the wheel on the stage.
The Properties panel displays the wheel's properties, as shown in Figure 3-13. Note that the H and W properties for the perfectly round wheel are 85 pixels—you'll use this number later.
Tip
Don't forget to click the wheel if you want to examine the wheel properties. Otherwise, you may be looking at the properties for the document, the frame, or even the tween itself.
Figure 3-13. Select an object on the stage, and you see the W (width) and H (height) properties in the Properties panel. Here the wheel X and Y properties (circled) are set to 85 pixels. When the chain link icon to the left is broken, you can change the W and H properties independently; otherwise changing one dimension automatically changes the other, keeping an object's proportions. Click the chain link to toggle it on or off.
In the Properties panel, under Position and Size, change the W property to 150. Then change the H property to 60.
You can change properties by clicking and typing in a new number, or you can click and drag to scrub in a new value.
Press Enter (Return) to test the animation.
The wheel gradually changes shape from a perfect circle to an oval (Figure 3-14); however, it begins changing shape at the very beginning of the animation. For a proper smoosh, it should change shape on impact with the ground. You can accomplish that with a couple of property tweaks.
Drag the playhead back to the first diamond-shaped property keyframe. Select the wheel and change the W and H properties to 85.
The wheel returns to its pristine, perfectly round shape.
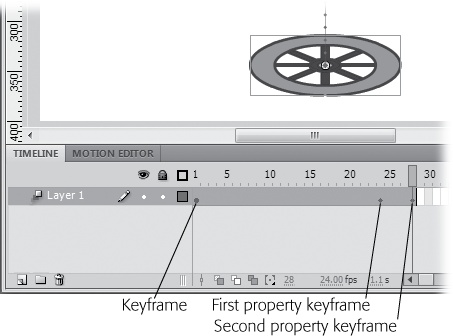
Figure 3-14. Every animation begins with a keyframe (round icon). This motion tween also has two property keyframes (diamond icon) that hold values for the position and shape of the wheel. With the playhead positioned at the second property keyframe, you see the wheel smooshed because the W (width) property is set to 150 and the H (height) property is set to 60.
Press Enter (Return) to test the animation.
Now, when the animation plays, the wheel retains its roundness until it reaches the bottom of the motion. Then it appears to flatten as it hits the ground.

Flash automatically makes the height and width changes occur smoothly and evenly. Originally, that transition started in Frame 1 and continued through the final frame of the tween. By making the H and W properties identical in Frame 1 and the first property keyframe, the height and width remain the same at the beginning, and the shape change at the end of the animation is faster and more dramatic.
The steps on Tweening a Symbol's Dimension Properties show how to change an object's dimensions using the H and W properties, which are accurate down to the pixel. But what if you prefer to eyeball it? In that case, you can change a symbol's dimensions using the Transform tool. Just make sure the playhead is at the right frame, and then press Q to choose the Transform tool. Click the symbol you want to reshape, and it sprouts handles like the ones shown in Figure 3-15. Drag the handles to modify your symbol, and Flash stores the dimensions with the property keyframe.
Not only can you work faster and get the benefit of visual feedback with Transform, but it's also the Swiss Army knife of Flash tools. It does a lot more than just change dimensions. You can use it to skew and rotate an object, too. Go ahead and make those changes in your motion tween, and the changes are stored in the property keyframe.
As any school kid can tell you, for every action there's a reaction. Your wheel needs to bounce back from its precarious state. In a word, it needs to de-smoosh. Ideally, you want the next five frames in the animation to be the reverse actions of the last five frames of the tween. You could do that manually, but why reinvent the wheel? (Sorry about the pun.) Instead, you can copy the last five frames, paste them back in at the end of the tween, and then reverse their order. This may sound more complicated than it really is.
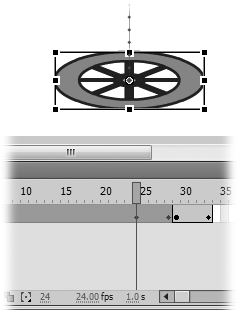
Figure 3-15. Flash doesn't care if you make dimension changes using the Properties panel or the Transform tool. Either way, it remembers the H and W values in a property keyframe.
Note
The next exercise follows from the steps begun on Making It Move with Motion Tweens. You can use the same Flash document, or download 03-3_Copy_Frames.fla from www.missingmanuals.com/cds.
Here's how to copy and paste frames:
Ctrl-click (⌘-click) the first property keyframe, and then drag to the last frame in the timeline.
The selected frames at the end of the tween show a dark blue highlight.
Right-click (Control-click) the selected frames, and then choose Copy Frames from the shortcut menu.
There's no visual response when you copy frames in the timeline, but rest assured that the selected frames are copied and stored so you can paste them in somewhere else on the timeline.
Right-click (Control-click) the first frame after the tween, and then choose Paste Frames from the shortcut menu (Figure 3-16).
The copied frames are pasted on the end of the timeline. If you press Enter (Return) to preview your animation now, you see that the squashing frames are repeated at the end of the animation.
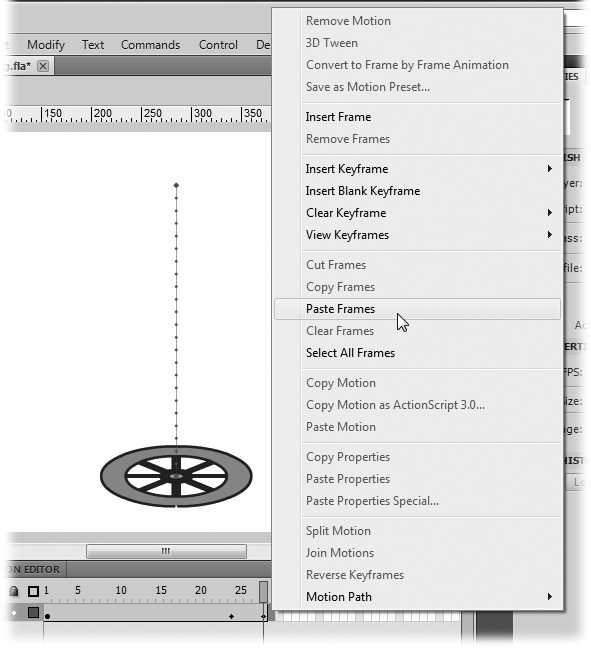
Figure 3-16. After you've copied frames from the timeline, you can right-click any frame in the timeline to paste those frames to a new location. Here, the first frame after the motion tween was right-clicked. The Paste Frames command is near the center of a lengthy shortcut menu.
When you paste the frames on the end of the timeline, Flash creates a second motion tween in Layer 1. You can tell by the solid vertical line followed by a circle keyframe symbol. If you click on frames in either motion tween, you can see the dark blue highlight. The unselected tween has a light blue highlight.
Swapping the order of keyframes in a motion tween lets you do cool things like make a smooshed wheel round again. Simply right-click (Control-click) any frame in the tween and then choose Reverse Keyframes, as shown in Figure 3-17. In the case of your bouncing wheel, the keyframes at the beginning and end of the tween trade places. Preview your animation, and it looks pretty good: The wheel drops down, smooshes, and then recovers its round shape.
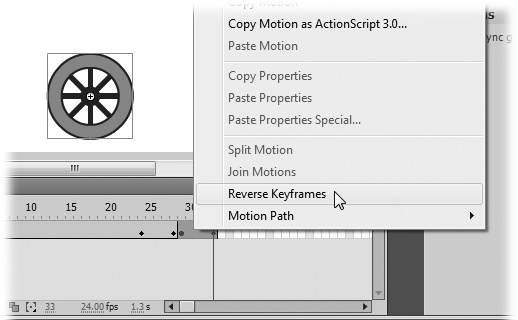
Figure 3-17. When you right-click (Control-click) on a motion tween, you see a lengthy shortcut menu. The Reverse Keyframes command is near the bottom. Reverse Keyframes is a handy command when you're developing repetitive, pendulum-like motions. Here, reversing the pasted frames at the end of the animation makes the smooshed wheel round again.