The secret to productivity is to work smarter, not harder. And the secret to smart work is to avoid doing the same thing more than once. Flash understands. The program gives you ways to reuse bits and pieces of your animations—everything from simple shapes to complex drawings, multiframe sequences, and even entire animations. Create something once; reuse it as many times as you like. Reusing animation elements can save you more than just time and effort—Flash lets you store pieces of animation as reusable master copies that can actually whittle the size of your finished animation file. That's great news if you plan to put your animation up on a website or shoot it out to handhelds. The smaller your file size, the faster it downloads, which makes you less likely to lose your audience to impatience.
Templates are another work- and time-saving feature in your Flash arsenal. You can use these predesigned Flash documents as starting points for your own projects. Even better, you can save documents as templates. You can also save templates containing the pictures, logos, and other elements that appear in just about all your documents. Then you don't have to start from scratch next month when you have a similar project.
Tip
With Flash Professional CS5, Adobe has included several new templates that serve as hands-on learning tools. Want to learn how to create random movement? Check out the templates in the Animation category. You'll find several button examples, as well as techniques for creating rain and snow effects. In the Sample Files category, some of the examples include handwriting simulations, menu navigation tools, and walking figures.
Copying and pasting is the most obvious way to reuse something you've created, but while that time-honored technique saves time, it doesn't save space. Say, for example, you need to show a swarm of cockroaches in the Flash advertisement you're creating for New and Improved Roach-B-Gone. You draw a single cockroach, then copy and paste it 100 times. Congratulations: You've got yourself 100 cockroaches…and one massive Flash document.
Instead, you should take that first cockroach and save it in Flash as a symbol. Symbols give you a way to reuse your work and keep your animation's finished file size down to a bare minimum. When you create a symbol, Flash stores the information for the symbol, or master copy, in your document as usual. But every time you create a copy (an instance) of that symbol, all Flash adds to your file is the information it needs to keep track of where you positioned that particular instance and any modifications you make to it on the stage.
So, to create the illusion of a swarm of roaches, you drag instances of the symbol onto the stage. Neither you nor Flash have to duplicate the work of drawing each roach. You can even vary the roach instances a little for variety and realism (so important in a pesticide ad) by changing their color, position, size, and even their skew. If symbols offered only file optimization, they'd be well worth using. But symbols give you additional benefits:
Consistency. By definition, all the instances of a symbol look pretty much the same. You can change certain instance characteristics—color and position on the stage, for example—but you can't redraw them; Flash simply won't let you. (You can't turn a roach into a ladybug, for example.) For situations where you really need basic consistency among objects, symbols help save you from yourself.
Instantaneous update. Suppose you want to change the roach color from brown to black. Edit the "master" roach stored in your Library, and Flash automatically updates all the instances of that symbol. So, for example, say you create a symbol showing the packaging for Roach-B-Gone. You use dozens and dozens of instances of the symbol throughout your animation, and then your boss tells you the marketing team has redesigned the packaging. If you'd used Copy and Paste to create all those boxes of Roach-B-Gone, you'd have to find and change each one manually. But with symbols, all you need to do is change the symbol in the Library. Flash automatically takes care of updating all the symbol's instances for you.
Does that mean you can't make changes to one of the roaches already on the stage? No, not at all. You can change an instance without affecting any other instances or the symbol itself. (You can turn one roach light brown, for example, without affecting any of the dark-brown roaches.)
Nesting. Symbols can contain other symbols. Sticking symbols inside other symbols is called nesting symbols, and it's a great way to create unique, complex-looking images for a fraction of the file size you'd need to create them individually. Suppose you've drawn the perfect bug eye. You can turn it into a symbol and place it inside your symbols for roaches, ladybugs, and any other insect you want.
Flash lets you create three types of symbols: graphic symbols, movie clip symbols, and button symbols. As you see in Figure 7-1 Flash stores all three types of symbols in the Library.

Figure 7-1. The Library is your one-stop shop for symbols. From this panel, you can create symbols, edit them, and drag instances of them onto the stage. Note the icons and descriptions that tell you each symbol's type—graphic, button, or movie clip. If you don't see the Library panel, press Ctrl+L (⌘-L) or go to Window→Library. To display all the information in the Library panel, you may want to undock the panel by dragging the tab away from the Properties dock. Then, you can resize it.
You can tell Flash to turn everything from a simple shape (like a circle or a line) to a complex drawing (like a butterfly) into a symbol. You can also nest graphic symbols. For example, you can nest butterfly wing symbols inside a butterfly symbol, as shown Figure 7-2.
A graphic symbol isn't even limited to a static drawing. You can save a series of frames as a multiframe graphic symbol that you can add to other animations.
Note
Another kind of symbol that contains multiple frames is a movie clip symbol (Editing a multiframe graphic symbol). But there are big differences between the two, as described in the box on Multiframe Graphic Symbol vs. Movie Clip.

Figure 7-2. If you're really serious about paring down the size of your animation file, consider nesting your symbols. Here, a single wing symbol is used for both the butterfly's wings. The wing instance on the left was flipped horizontally Modify→Transform→Flip Horizontal). Flash lets you flip, resize, and recolor symbol instances, so you can create surprisingly different effects using just a few basic shapes—all while keeping your animation's file size as small as possible.
Flash gives you two options for creating a graphic symbol:
You can create a regular image on the stage and then convert it to a graphic symbol. This is the best approach for those times when you're drawing an image (or a multiframe animated scene) and suddenly realize it's so good that you want to reuse it.
You can create your symbol from scratch using Flash's symbol editing mode. If you know going in that you want to create a reusable image or series of frames, it's just as easy to create it in symbol editing mode as it is to create it on your main animation's stage and timeline—and you get to save the conversion step. The following sections show you both approaches.
If you've already got an image on the stage that you'd like to turn into a symbol, you're in luck: The process is quick and painless.
To convert an existing image on the stage to a graphic symbol:
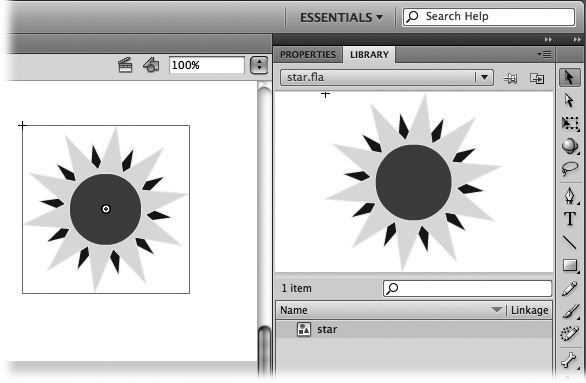
On the stage, select the image (or images) you want to convert.
Flash's selection tools are described on Selecting Objects on the Stage. Converting a grouped or editable image into a graphic symbol is quick and easy. Figure 7-3 shows three separate images selected that, all together, form a star.
Figure 7-3. You use the little grid labeled Registration to position the registration point of your symbol. Most of the time, it's fine to leave the registration point in the upper-left corner; see the box on page 246 for the full story. If necessary, you can reposition it later by editing your symbol (page 248).
Select Modify→Convert to Symbol.
The Convert to Symbol dialog box appears.
In the Name text box, type a name for your symbol.
Because you'll be creating a bunch of instances of this copy over the course of the next several hours, days, or weeks (and because you may end up with dozens of symbols before you're finished with your animation), you want a unique, short, descriptive name.
Set the Type drop-down menu next to Graphic, and then click OK.
Flash creates the new graphic symbol, places it into the Library, and automatically replaces the selected image on the stage with a selected instance of the symbol (Figure 7-4). Notice the instance's single bounding box (the original three images in this example had three).
Figure 7-4. You get two clues that Flash has converted your image on the stage to an instance of the newly created symbol: the cross in the upper-left corner of the instance (the instance's registration point) and the little round circle (the instance's transformation point). Flash uses the transformation point if you decide to transform the instance, as described in Chapter 5. You'll learn more about these points in the box on page 246.
Tip
If you're already poking around the Library panel, you can create a new graphic symbol quickly by clicking the Library panel's New Symbol button (Figure 7-1) or by clicking the Library panel's Options menu, and then, from the pop-up menu that appears, selecting New Symbol. Either way tells Flash to display the Create New Symbol dialog box.

If you want to create a symbol from scratch without going through the conversion step described above, you can use Flash's symbol editor—the same symbol editor you use to modify your symbols.
To create a graphic symbol in symbol editing mode:
Select Insert→New Symbol.
The Create New Symbol dialog box shown in Figure 7-5 (top) appears.
Figure 7-5. Top: You use the same Create New Symbol dialog box to create a symbol from scratch as you do to convert an existing image to a symbol. Bottom: Here, you see the symbol editing workspace, which looks deceptively similar to the regular animation workspace. The only way you know you're in symbol editing mode is the graphic icon and symbol name (ladybug) in the Edit bar and the registration point (cross) in the middle of the symbol editing stage.
In the Name text box, type a name for your symbol.
Shoot for unique, short, and descriptive.
From the drop-down menu, choose Graphic, and then click OK.
Flash displays the symbol editing workspace shown in Figure 7-5 (bottom). The symbol editing workspace looks very much like an animation workspace, even down to the background color. Here are the key differences that indicate you're in symbol editing mode:
The name of the symbol you're currently editing appears in the Edit bar. To see the Edit bar, select Window→Toolbars, and then turn on the checkbox next to Edit Bar. There's no "stage" when you're editing symbols, so you won't see any backstage work area either.
The Back arrow and Current Scene icons in the Edit bar appear clickable, or active.
A cross (the registration point for the symbol you're about to create) appears in the middle of the symbol editing workspace. The registration point is the reference point Flash uses to position your symbol on the stage, as explained in the box above. Technically, you can position your symbol anywhere you like with respect to the registration point; but out of the box, Flash puts the registration point for most graphics in the upper-left corner. For consistency's sake, you may want to do the same when you create symbols. Just create your artwork below and to the right of the registration point.
On the symbol editing workspace, create a graphic symbol.
You can use Flash's drawing tools, instances of other symbols, or even an imported image (Chapter 10), just as you can on the main stage. As you draw, Flash displays a thumbnail version of your symbol in the Library preview window, as shown in Figure 7-7. Note that the use count is zero, until you drag an instance of the symbol onto the stage. The use count is the number of instances of this symbol that have been dragged onto the main animation stage.
When you're finished creating your symbol, head to the Edit bar, and then click the Back arrow or click the current scene icon. (Or use the menu command Edit→Edit Document.)
Flash brings you back to your main animation workspace.
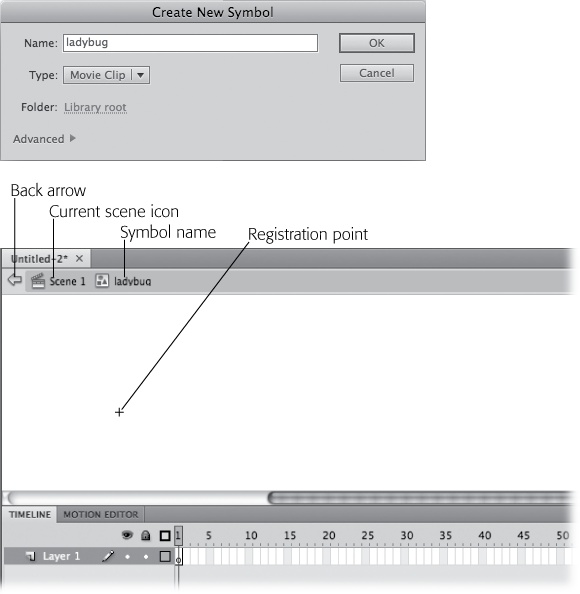

Figure 7-6. Using the X, Y settings in the Properties panel, both of these rectangles are positioned at 200, 200. The difference? The small rectangle (selected) has a centered registration point, while the larger rectangle has its registration point in the upper-left corner.
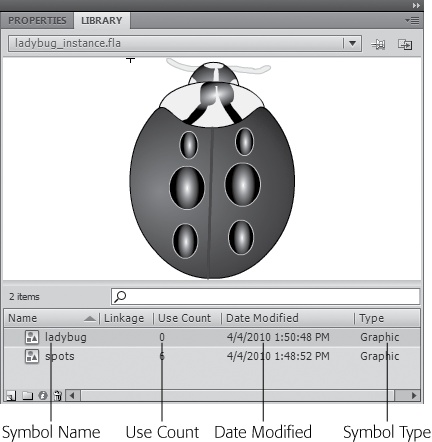
Figure 7-7. The ladybug symbol here was just created, so the Library is showing a use count of 0. The registration point appears in the upper-left corner. The Library panel provides other details, including when the symbol was last changed and how it's linked to other Flash and ActionScript documents.
After you've created a symbol, you use it by creating an instance of that symbol and then placing the instance somewhere in your animation.
Follow these steps to add an instance of a graphic symbol to your animation:
Make sure the Library panel containing the graphic symbol you want is visible. If it isn't, select Window, and then turn on the checkbox next to Library.
Flash displays the Library panel.
On the timeline, click to select the keyframe and layer where you want to put the instance.
Flash highlights the selected keyframe.
In the Library panel, click the name of the symbol you want to use.
A thumbnail version of the symbol appears in the Library's preview window.
Drag the thumbnail onto the stage (Figure 7-8).
Flash creates an instance of the symbol and places it on the stage. You can transform or recolor this instance, as shown in the following section, without affecting any other instances or the symbol itself.
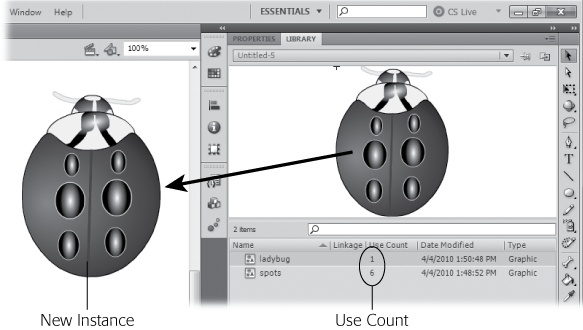
Figure 7-8. Creating an instance of a symbol is as easy as dragging the symbol from the Library and dropping it onto the stage. Flash has bumped up the use count for the ladybug symbol by 1. Because the ladybug uses spots symbols, the count for spots has bumped up to 6.
Tip
You can always convert an instance of a graphic symbol back into an editable image—perhaps because you want to use a symbol as a starting point for a brand-new image. To convert an instance of a graphic symbol back into an editable image, first select the instance, and then choose Modify→Break Apart. If your instance contains nested instances, you may want to choose Modify→Break Apart once for each nested instance to convert the entire symbol into editable pixels.
The whole point of graphic symbols is to help you reuse images (and to help Flash keep down file size while you're doing it). So it should come as no surprise that you can't completely rework the instances you create. You can't, for example, create an instance of a ladybug, erase it, draw a toad in its place, and expect Flash to consider that toad an instance of the ladybug symbol.
But while you can't use Flash's drawing and painting tools to change your instance, you can change certain characteristics of an instance, including color, transparency, tint, and brightness using the Properties panel; and scale, rotation, and skew using the Transform panel.
Note
When you transform or recolor an instance, only that instance changes; the other instances you've added to your animation aren't affected, and neither is the symbol itself. If you want to change multiple instances en masse, you need to edit the original symbol as described below.
You can also edit an instance by swapping one instance of a graphic symbol for another. Say, for example, that you've created a nature backdrop using multiple instances of three symbols: a tree, a bush, and a flower. If you decide you'd rather replace a few trees with bushes, Flash gives you a quick and easy way to do that, as shown in the following steps:
On the stage, select the instance you want to replace.
Flash displays the Properties panel to show instance-related properties. (If you don't see the Properties panel, choose Window→Properties to display it.)
In the Properties panel, click Swap (Figure 7-9).
The Swap Symbol dialog box appears.
In the Swap Symbol dialog box, click to select the symbol with which you'd like to replace the original. When you finish, click OK.
On the stage, Flash replaces the selected instance with an instance of the symbol you chose in the Swap Symbol dialog box.
Recoloring or transforming an instance changes only that instance, but editing a symbol changes every single instance of that symbol, immediately, wherever you've placed them in your animation.

Figure 7-9. The Swap button is active only when you have a single instance selected on the stage. The Swap Symbol dialog box is misnamed; it should be called the Swap Instance dialog box. That's because you use it to replace an instance of one symbol with an instance of another symbol; the symbols themselves don't change.
The good news about editing symbols, of course, is that it can save you a boatload of time. Say you've added hundreds of instances of your company's logo to your animation and the brass decides to redo the logo. Instead of the mind-numbing chore of slogging through your animation finding and changing each instance by hand, all you have to do is edit one little image—your logo symbol. The minute you do, Flash automatically ripples your changes out to each and every instance of that symbol.
The bad news, of course, is that you might edit a symbol by mistake, thinking you're editing an instance (Editing an instance of a graphic symbol). Editing a symbol is for keeps. You can select Edit→Undo if you realize your mistake in time, but once you close your Flash document and Flash erases your Undo history, it's all over but the crying: You're stuck with your edited symbol, for better or for worse.
Tip
If the thought of editing a symbol makes you leery—say you've got 500 instances of your symbol scattered around your animation and you don't want to have to redraw it if you goof up the edit job—play it safe and make a duplicate of the symbol before you edit it. In the Library panel, click the Options menu in the upper-right corner. Then, from the pop-up menu that appears, select Duplicate. When you do, Flash displays the Duplicate Symbol window, which lets you give your backup copy a unique, descriptive name (like logo_backup).
Flash gives you three ways to edit symbols: Edit, Edit in Place, and Edit in New Window.
Edit is the most common way to edit symbols, and it's the method Flash uses when you right-click a symbol name in the Library and then choose Edit. You can also use the menu command Edit→Edit Symbols or keyboard shortcut Ctrl+E (⌘-E). The stage temporarily disappears, to be replaced by a window showing only the contents of the symbol. If you have the Edit toolbar showing (Windows→Toolbars→Edit Bar), you see the symbol's name, as shown in Figure 7-10. After you finish your edits, click the Scene name or the Back button to return to the stage.
Editing in place lets you edit a symbol right there on the stage, surrounded by any other objects you may have on the stage. (Flash grays out the other objects; they're just for reference. The only thing you can edit in this mode is the symbol.)
If you're not ready for it, this option is right up there with the more confusing features the Flash design team has ever come up with. As you can see in Figure 7-11, mixing the symbol editing mode with the appearance of the main stage makes it incredibly easy to assume you're changing an instance of a symbol (instead of the symbol itself) with frustrating results. Double-clicking a symbol on the stage or selecting Edit→Edit in Place from the main menu or from the pop-up menu that appears when you right-click an instance on the stage all tell Flash that you want to edit in place.
Figure 7-10. When you edit your symbol in its very own window, there's no ambiguity: You know you're editing a symbol (and not merely an instance). You edit a symbol using the same tools and panels you use to edit any other image. As you make your changes, Flash automatically updates the symbol in the Library, as well as all the instances of that symbol, wherever they may be in your Flash document.
Edit in New Window creates a new window tab where you edit your symbol, as shown in Figure 7-12. Right-click (Control-click) a symbol on the stage, and then choose Edit in New Window from the pop-up menu. Flash opens the symbol under a new tab, and your work area looks similar to the basic Edit mode. As you make changes, Flash updates all existing instances to match the newly edited symbol. This makes it easy to jump back and forth between the symbol editing workspace and the stage, so you can see how the edited symbol looks in context. When you're finished making changes, just click the Close button.


Figure 7-11. It's hard to tell that the large ladybug (the one that's not grayed out) is a symbol and not just an instance of a symbol. (Your one clue: the symbol name "ladybug" that Flash displays above the stage.) Editing a symbol when you mean to edit an instance can have pretty serious consequences, so if you find yourself second-guessing, then stick to editing in a new window, as described in Figure 7-10.
In a nutshell, to tell Flash you want to edit a symbol, do any of the following.
In the Library panel:
Double-click the symbol, either in the list or in the preview window. The symbol opens in Edit in Place mode.
Select a symbol from the list, and then click the Options menu. From the pop-up menu that appears, choose Edit. The symbol opens in Edit mode, where you see the symbol by itself.
Right-click a symbol in the list. From the pop-up menu that appears, choose Edit, Edit in Place, or Edit in New Window. The pop-up menu lets you select exactly how you'd like to view the symbol while editing.
On the stage:
Select an instance of the symbol, and then choose Edit→Edit Selected.
Right-click an instance of the symbol, and then, from the pop-up menu that appears, choose Edit, Edit in Place, or Edit in New Window.
In the Edit bar (Window→Toolbars→Edit Bar), click Edit Symbols (the icon on the right that looks like a jumble of shapes).

No matter which method you choose—editing, editing in place, or editing in a new window—you get out of symbol editing mode and return to the main stage the same way: by selecting Edit→Edit Document (Ctrl+E on a PC or ⌘-E on a Mac).
You can delete the graphic symbols you create. Just remember that when you do, Flash automatically deletes all the instances of that symbol, wherever you've placed them in that document.
To delete a graphic symbol:
In the Library panel, click to select the graphic symbol you want to delete.
Flash highlights the selected symbol's name and type.
Right-click the graphic symbol icon, and then, from the pop-up menu that appears, choose Delete.
Flash removes the graphic symbol from the Library panel. It also removes all the instances of that symbol from your animation. Another option is to click the trash can icon at the bottom of the Library panel.
Multiframe graphic symbols are a kind of hybrid symbol halfway between single frame graphic symbols and movie clip symbols. Multiframe graphic symbols can't contain sounds or actions the way movie clip symbols can, but they can contain multiple frames, which regular single-frame graphic symbols can't. As explained in the box on Multiframe Graphic Symbol vs. Movie Clip, multiframe graphic symbols synchronize frame-for-frame to the animation in which you place them.
Tip
For many common Flash chores, it makes sense to use movie clips instead of multiframe graphics. As a designer, you have more control over movie clips, and you don't have to worry about the synchronization issues that come with multiframe graphics. Movie clips are the symbols to choose if you want animate or control them with ActionScript. However, one small advantage multiframe graphic symbols have over movie clips is that they take up slightly less space in the SWF file when you publish your animation.
Flash gives you the same two options for creating multiframe graphics symbols as it does for single-frame graphic symbols: You can create a series of frames as usual and then convert it into a reusable symbol, or you can use Flash's editing mode to create a multiframe graphic symbol from scratch and save yourself the conversion step. This section shows both approaches.
To convert a series of frames to a multiframe graphic symbol:
On the timeline, select the frames you want to convert.
You can easily select a series by clicking at one end of the series and then Shift-clicking at the other end. Flash automatically selects all the frames in between.
Choose Edit→Timeline→Copy Frames or press Ctrl+Alt+C (Option-⌘-C). Then choose Insert→New Symbol.
The Create New Symbol dialog box appears.
In the Create New Symbol dialog box, turn on the Graphic radio button. Type a short, descriptive name for your symbol, and then click OK.
The name of your symbol appears in the Library panel and in the Edit bar above your stage to let you know you're in symbol editing mode. In addition, Flash replaces your animation stage with the symbol editing stage. You can recognize the symbol editing stage by the cross (your symbol's registration point) that appears in the middle of the symbol editing stage.
In the symbol timeline, click to select the first keyframe (Frame 1).
Flash highlights the selected keyframe.
Select Edit→Timeline→Paste Frames.
Flash pastes the copied frames in the symbol's timeline. The Library panel's preview window shows you the contents of your new symbol's first keyframe (along with a minicontroller, as shown in Figure 7-13).
Figure 7-13. Get into the habit of previewing your multiframe graphic symbols in the Library before you add instances of each symbol to your animation. If you do, you'll save yourself the hassle that can result from incorporating instances of a symbol that doesn't run properly. To preview your symbol, click the Play button as shown. Flash displays the contents of each frame of your symbol, one after the other, in the Preview window.
Preview your symbol by clicking the minicontroller's Play button.
Flash runs a thumbnail version of the symbol in the preview window.
Get out of symbol editing mode by choosing Edit→Edit Document.

Flash hides the symbol editing stage and brings you back to your main animation's stage and timeline. To create a multiframe graphic symbol from scratch in symbol editing mode, follow the steps you see on Creating a graphic symbol in symbol editing mode, adding the content for as many frames as you need in step 5.
Creating an instance of a multiframe graphic symbol is like creating an instance of a movie clip symbol, but it's not identical. When you insert a multiframe graphic symbol into a timeline, the graphic synchronizes frame-for-frame with that timeline. If the timeline doesn't have enough frames, Flash lops off any frames of the graphic that don't fit. If the timeline has more frames than the graphic, Flash loops the graphic frames unless you provide other instructions in the Properties panel. If it's important that every frame of the graphic plays, make sure the timeline has enough frames. The following steps show you how.
To create an instance of a multiframe graphic symbol:
In your main animation, click to select the keyframe where you want to place an instance of a multiframe graphic symbol.
Only keyframes can contain new content (see Creating a Frame-by-Frame Animation for the skinny on keyframes). So if you try to place a symbol in a regular frame, Flash "backs up" and places your symbol in the keyframe immediately preceding the selected frame anyway.
Make sure you have exactly as many frames after the selected keyframe as you need for this instance.
If you're creating an instance of a symbol that contains 10 frames, make sure 10 frames exist, including the selected keyframe. If the symbol contains 20 frames, make sure 20 frames exist. To add frames after your selected keyframe, choose Insert→Timeline→Frame (or press F5) once for each frame you want to add.
Warning
If you forget this step and add a multiframe graphic symbol to a timeline that doesn't contain exactly as many frames as the symbol, Flash doesn't issue any warnings. Instead, it matches as many of the instance frames to your timeline frames as it can. If you don't have enough room on your timeline, Flash quietly snips off the instance frames that don't fit. If you have too much room, Flash repeats the instance frames until all your main animation's frames are filled.
In the Library, click to select the multiframe graphic symbol of which you want to create an instance.
You can either click the symbol's icon from the list or click the symbol's thumbnail in the preview window. The Library lists the type of both single and multiframe graphics the same—Graphic—but you can always tell a multiframe graphic by the minicontroller that appears along with the symbol's content in the Library's preview window, as shown in Figure 7-13.
Drag the symbol to the stage.
Flash creates an instance of the symbol and places it in the keyframe you selected in step 1. As you see in Figure 7-14, Flash colors your frames a nice solid gray to let you know that they now contain content. But Flash doesn't display the individual keyframes of your instance in your main timeline. (By the same token, if your symbol contains multiple layers, you don't see those on your main timeline, either. This visual simplification is one of the benefits of using symbols, as opposed to just copying and pasting frames.) To preview your instance, select Control→Test Movie→Test.
If you need the flexibility to individually change each keyframe of a multiframe graphic instance, you're out of luck, but you can use the Transform tool and the Properties panel to make tweaks that affect every frame of your multiframe graphics. Use the Properties panel to change the size, position, and color of your graphic, as shown in Figure 7-15. Changes you make here affect every frame in the multiframe graphic.

Figure 7-14. The solid gray bar you see beginning with the keyframe (Frame 1) lets you know that Frames 1–10 now contain content: in this case, an instance of a multiframe graphic symbol. If testing your animation yields an unexpected result, check to make sure that the frame span to which you've added the symbol matches your symbol frame for frame.
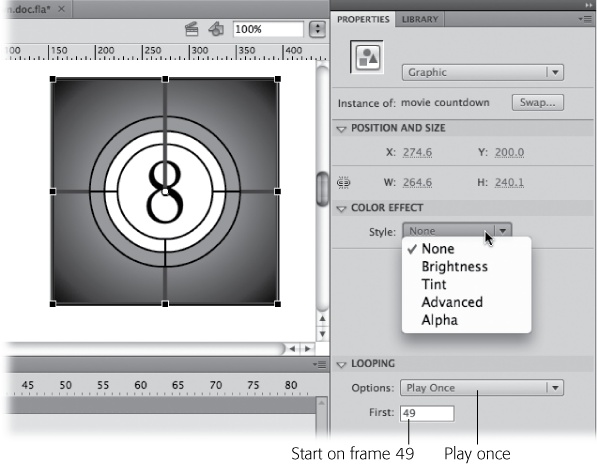
Figure 7-15. This multiframe graphic shows a countdown similar to the ones that appear before old movies. In the Properties panel, the Looping→First option is set to Frame 49, so that the countdown begins with the number 8.
Flash lets you change the contents of the first keyframe of your instance, just the way you can an instance of a single-frame graphic (Editing an instance of a graphic symbol). But Flash automatically applies those changes to the contents of every keyframe in your instance. Skew the frog in your first keyframe and turn it blue, for example, and every image in every frame of your instance appears skewed and blue.
Using the Properties panel, you can tweak the playback settings for a multiframe graphic. Under Looping→Options you can choose between Loop, Play Once, and Single Frame. In the First box, you can choose the first frame that Flash displays. For example, suppose you have a nifty countdown multiframe graphic like the ones at the beginning of old newsreels. Your graphic counts down from 10, but for this project you'd like to start it at 8, like in the movies. Simply adjust the starting frame so that it begins when the 8 is showing, as shown in Figure 7-15.
Note
The file 07-1_Multiframe_Countdown.fla, shown in Figure 7-15, is available at www.missingmanuals.com/cds. It shows how multiframe graphic symbols can be made up of several different graphic elements, layers, and symbols. A second file, 07-2_Movie_Clip_Countdown.fla, shows the differences between multiframe graphic symbols and movie clip symbols.
You edit a multiframe graphic symbol the same way you edit a single-frame graphic symbol: by switching to symbol editing mode (Editing a graphic symbol). In both cases, Flash immediately applies the changes you make to the symbol to all the instances of that symbol.
You delete a multiframe graphic symbol the same way you delete any other symbol in Flash: through the Library panel. Just remember that when you delete a symbol, Flash automatically deletes all the instances of that symbol, wherever you've placed them.
To delete a graphic symbol:
In the Library panel, click to select the graphic symbol you want to delete.
Flash highlights the selected symbol's name and type.
Right-click the graphic symbol icon, and then, from the pop-up menu that appears, choose Delete.
Flash removes the graphic symbol from the Library panel. It also removes all the instances of that symbol from your animation.
A movie clip symbol (Figure 7-16) is a reusable, self-contained chunk of animation, which you can drop into a single frame in another animation.
Unlike multiframe graphic symbols, you can add sounds (Chapter 11) and actions (Chapter 12) to movie clip symbols. Also unlike multiframe graphic symbols, movie clip symbols run independently from the animations to which you add them.
So movie clips give you the opportunity to create nonsequential effects like repeating, or looping, scenes, as well as interactive graphics—for example, buttons, checkboxes, and clickable images that tell Flash to display something different, depending on what your audience clicks.

Figure 7-16. When you select a movie clip symbol in the Library, the Library panel's preview window shows you the first frame of the symbol, as well as a minicontroller you can use to play (and stop) the movie clip right there in the Library before you go to all the trouble of dragging an instance of the movie clip to the stage. (You see this same minicontroller when you select a multiframe graphic in the Library.)
As you'll see in the following section, movie clip symbols have their very own timelines, so an instance of a movie clip symbol always takes up just one frame in the animation to which you add it, no matter how many frames the movie clip symbol actually contains.
Creating a movie clip symbol in Flash is similar to creating a multiframe graphic symbol (Multiframe Graphic Symbols). You can either create a series of frames (including sounds and actions, if you like) and convert it into a movie clip symbol, or you can use Flash's editing mode to create a movie clip symbol from scratch and save yourself the conversion step.
In fact, as the following steps show, only one minor but important difference exists between creating a multiframe graphic symbol and creating a movie clip symbol, and that's selecting the correct drop-down menu option in step 4.
Warning
Modify→Convert to Symbol works only when you're converting an image to a single-frame graphic symbol; it doesn't let you convert a series of frames into a movie clip symbol. But if you try it, Flash won't give you an error. Instead, it'll chug along happily, pretending it's creating a movie clip symbol. But in reality, the symbol you create this way contains just one frame.
To convert a series of existing frames to a movie clip symbol:
On the timeline, select the frames you want to convert.
It's easy to select a series of frames. Click at one end of the series, and then Shift-click at the other end of the series. Flash automatically selects all the frames in between. If your frames contain layers, make sure you select all the layers in each frame.
Choose Edit→Timeline→Copy Frames or press Ctrl+Alt+C (Option-⌘-C).
Flash copies the frames.
Choose Insert→New Symbol.
The Create New Symbol dialog box appears.
In the Create New Symbol dialog box, make sure to choose Movie Clip from the drop-down menu.
If it's not selected, click to select it.
Type a name for your movie clip symbol, and then click OK.
The name of your movie clip symbol appears in the Library panel, and in the Edit bar above your stage, to let you know you're in symbol editing mode. Another tip-off that you're in symbol editing mode is the cross, or registration point, that appears in the middle of the symbol editing stage.
In the symbol timeline, click to select the first keyframe (Frame 1).
Flash highlights the selected keyframe.
Select Edit→Timeline→Paste Frames.
Flash pastes the copied frames onto the symbol's timeline and displays the first keyframe of the new symbol (along with a minicontroller) in the Library panel's preview window.
In the Library panel, preview your symbol by clicking the minicontroller's Play button.
Flash runs a thumbnail version of the movie clip symbol in the preview window.
Get out of symbol editing mode by choosing Edit→Edit Document.
Flash brings you back to the workspace and your main animation.
To create a movie clip symbol from scratch in symbol editing mode, follow the steps on Creating a graphic symbol in symbol editing mode, adding the content for as many frames as you need.
Because movie clip symbols have their own timelines, they're completely self-contained. You don't have to worry about matching your movie clip symbol to your main animation's timeline the way you do with a multiframe graphic symbol (Multiframe Graphic Symbols); movie clip instances live on a single frame in your main animation, no matter how many frames the instances themselves contain. As a matter of fact, as you'll see next, creating an instance of a movie clip symbol is as easy as dragging and dropping.
To create an instance of a movie clip symbol:
In your main animation, click to select the keyframe where you want to place an instance of a movie clip symbol.
Only keyframes can contain new content. So if you try to place a symbol in a regular frame, Flash "backs up" and places your symbol in the keyframe immediately preceding the selected frame anyway.
In the Library, click to select the movie clip symbol of which you want to create an instance.
You can either click the symbol's icon from the list or click the symbol's thumbnail in the preview window.
Drag the symbol to the stage.
Flash creates an instance of the symbol and places it in the keyframe you selected in step 1, as shown in Figure 7-17.
To preview your instance, select Control→Test Movie→Test.
You'll notice that even if you turn looping off in the Control panel (which you do by selecting Control, and then, from the pop-up menu that appears, turning off the checkbox next to Loop) your movie clip instance continues to loop. The movie clip behaves this way because it's running on its own timeline (not the timeline Flash associates with your main animation). One way to tell Flash to stop looping your movie clip instance is to add a keyframe to your timeline after the keyframe that contains your movie clip instance. It can be a blank keyframe or a keyframe with content other than the movie clip you intend to stop.

Figure 7-17. Dragging a movie clip symbol from the Library to the stage tells Flash to create an instance of the symbol. No matter how many frames (or layers) your movie clip instance contains, it takes up only one frame on your animation (circled), which makes movie clips perfect for creating animated buttons.
Note
Flash automatically loops the movie clip instance (plays it over and over again) until it encounters the next keyframe on the timeline, or until it encounters an ActionScript statement that tells it to stop (like stop() or goToAndStop(), for example). You can see an example of controlling playback with ActionScript in Chapter 15.
You edit a movie clip symbol the same way you edit a single-frame graphic symbol: by switching to symbol editing mode (Editing a graphic symbol). In both cases, Flash immediately applies your changes to all the instances of that symbol.
Similar to multiframe graphic symbols, Flash lets you change the contents of the first keyframe of your movie clip instance, just the way you can an instance of a single-frame graphic (Editing a graphic symbol). But Flash automatically applies those changes to the contents of every frame in your instance. So, for example, if you apply a sepia tint to the first keyframe, your entire movie clip instance looks old-timey. You can also apply filters (Editing an instance of a button symbol) and blending effects to movie clip instances.
The easiest way to make your animation interactive is to add a button someone can click at runtime to perform a task, like replaying your entire animation, choosing which of several scenes to play, loading a web page, and so on.
To make creating a button easy, Flash has button symbols (Figure 7-19). A button symbol has four frames. Each frame has a specific function that helps you control the appearance of the button as it's being used by your audience:
Up. In this frame, you draw the button as you want it to appear before your audience mouses over it.
Over. In this frame, you draw the button as you want it to appear after your audience mouses over it.
Figure 7-19. Because button symbols are like specialized movie clip symbols, you see the same minicontroller in the Library's preview window when you click a button symbol as you see when you select a movie clip or multiframe graphic symbol. Clicking Play cycles through the button symbol's four frames, so you get to see 1) how the button looks before the cursor mouses over it, 2) how it looks after the cursor mouses over it, 3) how it looks when clicked, and 4) the button's clickable area. When you create a button symbol, Flash spots you the four frames; all you have to do is customize them, as shown in the following sections.
Down. In this frame, you draw the button as you want it to appear when your audience clicks it.
Hit. In this frame, you draw the active, or "clickable," area of your button. In most cases, you want the active area to be identical to the button itself. But in other cases—for example, if you want to create a bullseye-shaped button that responds only when your audience clicks the tiny red dot in the center—you draw that center dot here, in the fourth frame (the Hit frame). You can also use this frame to create invisible buttons, as explained on Using a button symbol (creating an instance of a button symbol), or buttons that are the shape of an image in your animation, like a car.
For the designer, button symbols are handy. Flash automatically gives you the four Up, Over, Down, and Hit frames—all you have to do is plug in your drawings and go. As you'll see in the following section, Flash also gives you a handful of built-in graphic effects, called filters, which you can apply to your buttons to get professional-looking results. Button symbols aren't the only way to provide clickable interactivity to your projects. ActionScript coders often create their own buttons or use button components (Adding Components).
Note
To get your button to actually do something when someone clicks it—to display a different section of the timeline, for example, or some dynamic text—you need to tie a snippet of ActionScript code to your button. Chapter 13 shows you how.
When you create a button symbol, you start out basically as if you're creating any graphic symbol from scratch (Creating a graphic symbol in symbol editing mode), but since button symbols have those four possible states, you can create up to four different graphics. When you choose Button in the New Symbol dialog box, Flash gives you a separate frame to hold each drawing so that you won't get confused.
In this example, you'll create a round, red button that turns yellow when your audience mouses over it and green when your audience clicks it.
Click Insert→New Symbol.
The Create New Symbol dialog box appears.
In the Name text box, type bullseye. Make sure the drop-down menu is set to Button, and then click OK.
When you create a new button symbol, Flash gives you four named frames (Figure 7-20). It's up to you which frames you want to modify, but at the very least, you need to add a drawing to the Up frame, to show the button before it's clicked or moused over. For a more sophisticated button, you'll also add a drawing to the Over frame (as shown below) to let someone know when his mouse is over the button.
Figure 7-20. Flash pops you into symbol editing mode. In the symbol's timeline, you see four named frames: Up, Over, Down, and Hit.
Tip
Flash comes with a blue million button symbols already spiffed up and ready for you to drop into your animations. So before you get too carried away drawing your own button, choose Window→Common Libraries→Buttons to see if Flash already has a button symbol that fits your bill. (You still have to write ActionScript code to tell Flash what you want to do when your audience clicks your button. Find out how in Chapter 13.)
Draw your button as you want it to appear initially by using the Oval tool to add a red circle to the first keyframe (the Up frame).
Keep the registration point (the cross) in the upper-left corner of your button image as you draw. When you finish, your workspace should look similar to the one in Figure 7-21.
Right-click Frame 2 (the Over frame), and then, from the pop-up menu that appears, select Insert Keyframe.
Flash displays a circle in Frame 2 to let you know you've successfully added a keyframe. On the stage, you see a copy of the button you drew in Frame 1.
Here's how you make the button change when a cursor passes over it: On the stage, select the circle. In the Properties panel, click the Fill Color icon, and then, from the color picker that appears, choose a yellow swatch.
Flash recolors the circle yellow. If you don't see the Properties panel, select Window→Properties. If you still don't see it, make sure you've selected the circle on the stage.
Right-click Frame 3 (the Down frame), and then, from the pop-up menu that appears, select Insert Keyframe.
Flash displays a circle in Frame 3 to let you know you've successfully added a keyframe (and, therefore, can change the content of the frame).
Here's how you draw the button as you want it to appear when a cursor clicks it: Select the button. In the Properties panel, click the Fill Color icon once again, and then, from the color picker that appears, choose a green swatch.
Flash recolors the circle green.
Right-click Frame 4 (the Hit frame), and then, from the pop-up menu that appears, select Insert Keyframe.
Flash displays a circle in Frame 4 to let you know you've successfully added another keyframe. As you can see on the stage, Flash assumes you want the entire button to respond to a mouse click—and in a lot of cases, that's exactly what you do want. But you can make the clickable portion of your button smaller or larger. To do so:
On the stage, click the circle to select it. Then choose Window→Transform to display the Transform panel.
In the Transform panel, type 50 into the Width and Height boxes, and then press Enter or Return. Figure 7-22 shows you a scaled-down circle that should look similar to the one you see on your workspace.
Return to your animation by choosing Edit→Edit Document.
Flash hides your symbol editing workspace and displays your animation workspace.


Figure 7-22. Normally, you want to draw the same size shape in the Hit frame as you do in the other frames so that the entire button responds to mouse clicks. Drawing a smaller (or even different-shaped) image for the Hit frame lets you create more sophisticated buttons: clickable images, for example, or invisible buttons that let the content of your frame itself appear to respond to mouse clicks (see the box on page 269). Here, the clickable portion of the button is exactly half the size of the visible portion.
You can find the work file from the previous exercise 07-3_Bullseye_Button at www.missingmanuals.com/cds.
To create an instance of a button symbol:
Click to select the first keyframe (Frame 1) in your animation.
Flash highlights the selected frame.
In the Library panel's preview window, drag your button symbol's thumbnail onto the stage.
On the stage, Flash creates an instance of the button symbol and surrounds it with a selection box.
Test your button instance. To do so, choose Control→Test Movie→Test.
A red circle appears in the middle of the test window (Figure 7-23).
In the test window, drag your mouse over the red circle.
When your mouse nears the center of the red circle, your arrow cursor turns into a pointing finger, and the red circle turns yellow.
With your pointing-finger cursor, click the yellow circle.
The yellow circle turns green.
Note
Chapter 13 shows you how to add an action to your button so that clicking it does something useful.

You can't change the individual frames of your button instance individually. But Flash does let you apply the same changes to all the frames of your button instance. Creating a button symbol shows you the steps you can take to apply color, transparency, and transforms to your button instances. (The steps are identical to those you take to edit a single-frame graphic instance.) But you can also apply filters, or visual effects, to your buttons. Filters can turn even a plain oval button into something that looks like you spent hours tweaking it.
Note
Filters aren't just for buttons. You can also apply filters to text blocks (Chapter 6) and movie clip instances.
To apply a filter to a button instance:
On the stage, select the button instance.
Flash draws a blue selection box around the instance.
In the Properties panel, click the Filters subpanel.
If the Filters subpanel is closed, click the triangular button to expand it.
Click the Add Filter button (lower-left corner).
A pop-up menu appears (Figure 7-25) listing the following filter options:
Drop Shadow. Displays a shadow on the right and bottom edges of the button.
Blur. Redraws the surface of the button so that it appears soft and blurred.
Glow. Similar to a drop shadow, creates a fuzzy aura in the color of your choosing.
Bevel. Applies brightness and shadow on opposite sides of the button to create a 3-D effect.
Gradient Glow. Similar to Glow (above), but lets you specify bands of different colors (instead of just one color).
Gradient Bevel. Similar to Bevel (above), but lets you choose bands of different colors for the brightness and shadow.
Adjust Color. Lets you individually adjust the brightness, contrast, saturation, and hue of your button.
From the menu, select Glow.
A red, glowing effect appears around your button, and the Filter panel displays the Glow properties.
Click the down arrow next to Blur X, and then drag the slider to 40.
On the stage, the glow diffuses.
Click the Shadow Color icon, and then, from the color picker that appears, click the black swatch.
On the stage, the glow turns from red to black, yielding a subtle 3-D effect (Figure 7-26).
Test your newly edited button by selecting Control→Test Movie→Test.
In the test window that appears, you see your button with the Glow effect applied.
In the test window, move your mouse over your button.
Flash applies filters to the entire instance (not just the contents of the keyframe to which you apply them), so the Glow effect remains even when you mouse over the button.

Tip
With filters, you can quickly make a button instance look both unique and spiffy. Flash lets you change the properties of your filters—for example, you can change the size of a blur or the color of a drop shadow—so the drop shadow you apply to one instance doesn't have to look the same as the drop shadow you apply to another instance of the same symbol.
To remove a filter you've applied: In the Filter panel, select the filter you want to remove, and then click the Delete Filter button (trash can).

Figure 7-26. When you apply a Glow filter to a button, you can change the horizontal and vertical width of the glow (Blur X and Blur Y), the density of the blur (Strength), and how far out the blur extends (Quality). You can also choose a different color for your blur or apply a Knockout effect (which leaves the blur but erases the button) or "Inner glow" (which erases the blur and then uses the blur color to repaint the surface of the button).
Tip
Applying a filter isn't an either/or proposition. You can add multiple filters to the same instance to create different effects: For example, you can add both a glow and a drop shadow, as shown in Figure 7-27.
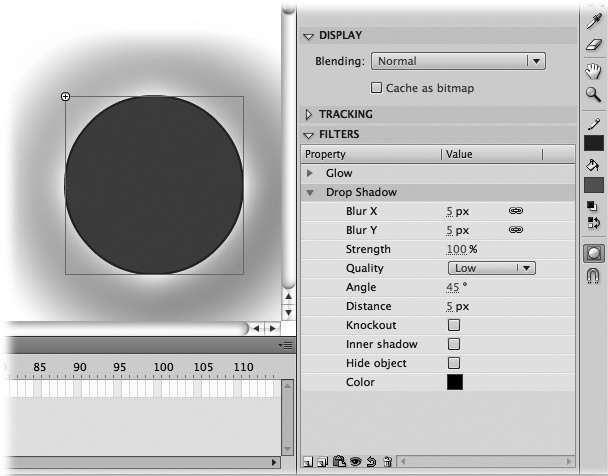
Figure 7-27. Flash applies filters in top-down order, so adding a glow and a drop shadow yields a different result than adding a drop shadow and then a glow. You can even add the same filter more than once to compound the effect. To change the order of your filters, simply drag them to reposition them in the Filter panel.
You edit a multiframe graphic symbol, like a button, the same way you edit a single-frame graphic symbol: by switching to symbol editing mode (Editing a graphic symbol). In both cases, Flash immediately applies the changes you make to the button symbol itself, as well as all the instances of that button symbol.