Ordinarily, Flash assumes you want to play your animation in sequential order from the first frame in your timeline to the last. But sometimes "start at the beginning and quit at the end" isn't exactly what you want. Fortunately, by using a combination of scenes, frame labels, and ActionScript (Chapter 12),you can control your animation virtually any way you like.
For example, say you're putting together an instructional animation. You want to start with an introductory section, move on to the meat of your topic, and then wrap up with a question-and-answer section. If you organize these sections into separately named scenes, then you can play with the order of your animation quickly and easily. If you decide to reposition the question-and-answer scene directly after the introduction as a kind of pretest, for example, you can do that with a simple drag of your mouse. You can even add buttons that the trainee can click to replay the question-and-answer scene over and over, as many times as she likes.
In this chapter, you'll see how to stop and start playback using ActionScript code. You'll see how to use Flash labels, scenes, and ActionScript to make the most common types of nonsequential playback effects, including looping (replaying a section of your animation over and over again). To make these effects easy to test, you'll also see how to add interactive buttons to your animations. To start it off, this chapter describes how to control the overall speed at which Flash plays your animation on your audience's computers.
As you saw in Chapter 1, animations are nothing more than a series of content-containing frames that Flash plays one after another so quickly that your eyes interpret the overall effect as continuous movement.
You get a pretty good idea of how it will appear to your audience when you test it on your own computer. But the speed at which Flash actually displays your frames on someone else's computer depends on several factors, many of which you can't control:
Your audience's computer hardware. Both processor speed and memory affect animation playback, especially if the animation is very long or includes multimedia, like bitmaps, sound, or video clips (Chapter 11). You have no control over this factor unless you're developing an animation for playback on a specific set of machines: for example, if you're creating a tutorial in Flash that you know will be played only on the computers in your company's training room.
Your audience's Internet connection. If you've added your animation to a web page, the speed of your audience's Internet connection affects how quickly your animation downloads and plays on their computers. You have little or no control over this factor (beyond preloading, which you can learn about in Chapter 19) because, even if you're targeting your animation for specific machines with slower connections, Internet congestion may force download speeds of much less than that.
The delivery option you've chosen (if you've added video). If you've incorporated a video clip into your animation (Chapter 11), you've had to tell Flash whether you want to:
Embed the video into your Flash document. If you've chosen this option, your animation won't begin to play until the person has downloaded the entire (enormous) Flash document, video clip and all. When the animation does begin to play, however, neither his Internet connection speed nor overall Internet traffic affect playback.
Stream the video at runtime. If you've chosen not to embed the video clip into your Flash document, the person's Flash Player begins playing the animation as soon as a few frames' worth of the animation file have finished downloading to his computer. When the animation does begin to play, however, it might run in fits and starts, depending on his computer hardware, Internet connection speed, Internet traffic, and the size of your animation or video file.
The size and configuration of your finished animation file. Large animation files—files containing complex animated effects, lots of gradients and transparent images, video clips, and so on—take longer than small files to download or stream over the Internet. They can also take longer to play, because large files tend to suck up all the memory on a computer. You can control this factor by optimizing your animation to keep the file size as small as possible and by preloading sections of your animation. (Chapter 19 shows you how.)
The frame rate you've applied to your animation. In your animation's timeline, you can tell Flash the maximum frame rate you want it to shoot for, in frames per second (fps).
The easiest factor to control—and the only one covered in this chapter—is the last one: the frame rate. The following section shows you how to set a new frame rate for an animation.
When you create a new animation, Flash assumes a maximum frame rate of 24 fps (frames per second). In other words, given the constraints listed in the previous section, Flash tries its best to display one frame every 1/24th of a second. Here's another way to look at frame rate: If your animation spans 240 frames, you're looking at roughly 10 seconds of screen time.
Note
Previous versions of Flash started out using 12 fps because most people had slower Internet connections. At 24 fps, Flash matches the frame rate used for years by motion pictures.
In many cases, the standard 24 fps works just fine, but if you're planning to put your animation up on a website, you may want to consider a slower rate, like 12 fps. Your rule of thumb should be to use the lowest frame rate that still provides smooth action for your animation. Usually, you decide on a frame rate when you create a new Flash document. But you can change the frame rate at any time using the document properties (as shown in Figure 15-1) or using ActionScript. Changing the frame rate has some pretty significant side effects. First and most importantly, higher frame rates speed up your document. If you have a 4-minute animation with a 12 fps frame rate and you change it to 24 fps, your animation now finishes in 2 minutes. Too high a frame rate can make animation look blurry. Too slow a frame rate creates herky-jerky movements and may cause audio syncing problems.

Figure 15-1. Flash can play your movies at frame rates from 0.01 frames per second (that is, a super-slow 100 seconds per frame) to a blistering 120 frames per second. Going with a super-low or super-high frame rate, though, can cause audio synchronization problems. Also, setting a frame rate doesn't ensure that your animation will actually play at that frame rate; it's just a suggested maximum. Several other factors (page 493) affect playback, regardless of the frame rate you set.
The next few examples use a Flash document, 15-1_Frame_Rate.fla, that you can find on the Missing CD page at www.missingmanuals.com/cds.
To see the effects of different frame rates, follow these steps and feel free to add some of your own experiments:
Open 15-1_Frame_Rate.fla, and then press Ctrl+Enter (⌘-Return on a Mac) to test the animation.
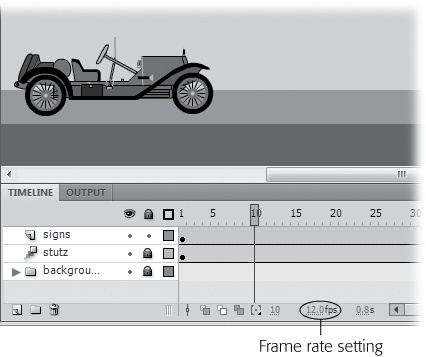
The Stutz Bearcat auto races across your screen at a blazing 12 frames per second (fps). The car is the only animated object in the movie and uses a motion tween to move from left to right across the screen.
Below the timeline, click the Frame Rate setting (fps), and then type 8 (Figure 15-2).
You can click the Frame Rate and then type a new number, or you can drag to change the setting.
Figure 15-2. In addition to clicking the Frame Rate setting (circled) in the timeline, Flash gives you two additional ways to set your animation's frame rate. You can select Modify→Document (which pops up the window in Figure 15-1) or click the stage and then change the frame rate directly in the Properties panel (Properties→ Properties→FPS). Flash doesn't prevent you from changing your frame rate in the middle of building an animation, but it's such a basic characteristic that you typically want to set it once up front and change it later only if you absolutely have to.
Test the animation by pressing Ctrl+Enter (⌘-Return).
The car moves across the screen in a decidedly herky-jerky fashion.
Click Modify→Document to open the Document Properties box, as shown in Figure 15-1, and then for Frame rate, type a number from 24 to 120. Click OK.
Flash lets you type in a frame rate of anything between 0.01 and 120. But in most cases, you want to stick with a frame rate of somewhere between 12 and 24 (the standard Hollywood movie frame rate). Every animation is different, of course, and you might actually want to create an unusual effect. The Document Properties window disappears. In the timeline, you see the new frame rate.
Test your new frame rate by choosing Control→Test Movie.
If you type in a frame rate greater than 24, the car moves noticeably faster and may even look a bit blurry.
Note
Frame rate affects the playback speed of the entire animation. Base your frame rate decisions on how smooth you want the animation to be and the capabilities of your intended audience, as explained on Slowing Down (or Speeding Up) Animation. If you want to speed up (or slow down) only certain sections of your animation, change the rates by removing (or adding) frames, as described on Inserting and Deleting Keyframes and Frames.
ActionScript gives you the tools to change the frame rate for your animation, too, since the stage has a frameRate property. (If you need more basics on ActionScript and properties, see Chapter 12.) When you use ActionScript to set the frameRate property for the stage, it has the same effect as setting a new frame rate in the timeline when you're designing your animation.
Add a new layer for actions to the timeline.
If you're going to add code to the timeline, it's good practice to add a special layer at the top just for code and to name it something like "actions." That way, it's much easier later if you have to hunt down and debug your code.
In the actions layer, click the first frame, and then open the Actions panel (Window→Actions).
The Actions panel opens, as shown in Figure 15-3. For more details about the tools available in the Actions panel, see Writing ActionScript Code in the Timeline.
In the Actions panel, type the following line of code:
stage.frameRate=
60;Even though you're changing the frameRate in ActionScript, the rate showing below the time line still shows a frame rate of 24 fps (or whatever you used in the last setting). In fact, the frameRate doesn't officially change until the actions on Frame 1 of the timeline are processed.
Click the 22nd frame in the actions layer of the timeline, and then press F7.
Flash inserts a blank keyframe in the timeline.
In the Actions panel, type the following code:
stage.frameRate=
6;Make sure that the 25th frame in the timeline is selected when you type in the code, because you want the frame rate to change at that point in the animation. The Current Selection tab should change to show a frame symbol and the words actions : Frame 22.
Test your animation using Ctrl+Enter (⌘-Return on a Mac).
The Stutz Bearcat races up to the stop sign and performs a Hollywood stop, slowing down and rolling through the intersection, and then off the stage.
Tip
Though you can change the frame rate of a timeline midstream, as shown in this example, in most cases, it's better to keep your frame rate at a single speed. Instead, to speed up the action, remove frames from the sequence; if you want to slow things down, add frames. If you want to slow down or speed up a tweened motion, that's easy to do using the Motion Editor, as described on Editing a Tween Span.
