It's rare that your first crack at any given animation will be your last. Typically, you'll start with a few keyframes, test the result, add a few frames, delete a few frames, and so on until you get precisely the look you're after.
This section shows you how to perform the basic frame-level edits you need to take your animation from rough sketch to finished production: inserting, copying, pasting, moving, and deleting frames.
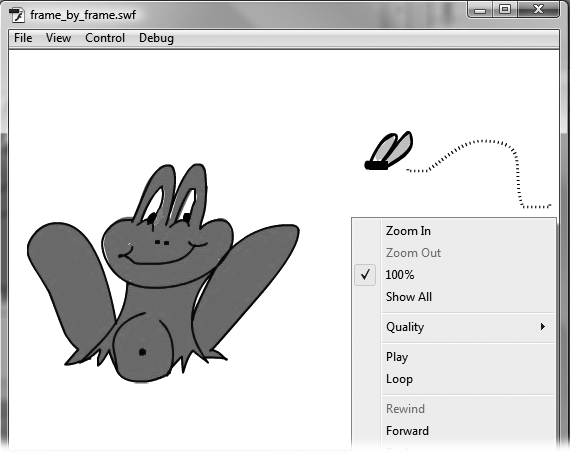
Figure 3-7. The first time you run your animation in Flash Player, Flash assumes that you want to run it over and over (and over and over). Fortunately, you can rid Flash of this annoying assumption. Right-click (Control-click) your animation, and then click Loop to remove the checkmark. Other useful options include stopping your animation, rewinding it, and even stepping through it frame by frame. Chapter 19 covers animation testing in depth.
Selecting a single frame or keyframe is as easy as zipping down to the timeline and clicking the frame or keyframe you want to select.
But if you want to select multiple frames, Flash gives you four additional selection alternatives:
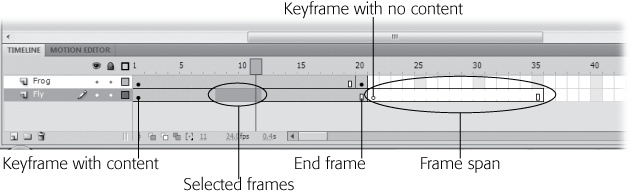
To select multiple contiguous frames. Click the first frame you want to select, and then drag your mouse to the last frame you want to select. The selected frames show a highlight, as shown in Figure 3-8. Alternatively, click the first frame you want to select, and then Shift-click the last frame.
To select multiple noncontiguous frames. Ctrl-click (⌘-click) each frame you want to select.
To select an entire frame span. Double-click any frame in the frame span. A frame span starts with a keyframe and ends with the end frame marker, as shown in Figure 3-8.
Figure 3-8. To select a single frame (including a keyframe), simply click the frame. To select multiple frames, drag or choose one of Flash's other two multiple-frame-selection options. A frame span comprises a keyframe, an end frame, and all the frames in between. If you've added multiple layers to your animation, then make sure you select frames from the correct layer.
To select all the frames on a layer. Click the name of the layer. In the example in Figure 3-8, clicking Fly automatically selects all the frames in the Fly layer.
No matter which method you use, Flash highlights the frames to let you know you've successfully selected them.
The smoothness of your finished animation depends on timing, and timing is controlled by the number of keyframes and regular frames you've included. This section shows you how to add and delete both.
Typically, you'll start with a handful of keyframes and need to insert additional keyframes to smooth out the animation and make it appear more realistic (less herky-jerky).
For example, say you're working on an animation showing a dog wagging its tail. You've got a keyframe showing the tail to the left of the dog, one showing the tail straight behind the dog, and a final keyframe showing the tail to the right of the dog. You test the animation and it looks okay, but a little primitive.
Inserting additional keyframes showing the dog's tail in additional positions (just a bit to the left of the dog's rump, a little bit further to the left, a little further, and then all the way to the left) will make the finished sequence look much more detailed and realistic.
Note
Technically speaking, you don't actually insert a keyframe even though the Flash menus call it that. In most cases, you turn a regular frame into a keyframe. If you actually inserted a keyframe, you'd be making your timeline longer and changing the timing of your animation.
To insert a keyframe into an existing animation:
In the timeline, select the regular frame you want to turn into a keyframe.
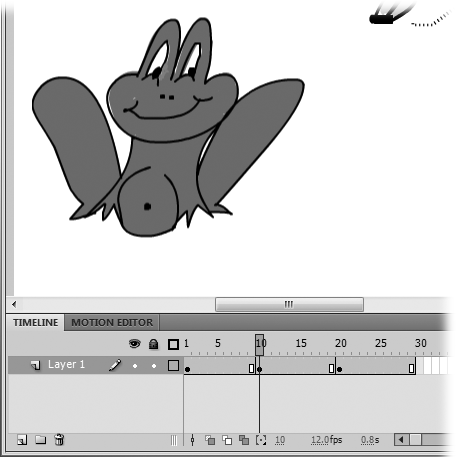
If you want to add a keyframe midway between Frame 1 and Frame 20 on Layer 1, for example, then click in Layer 1 to select Frame 10, as shown in Figure 3-9.
Flash moves the playhead to the frame you selected.
Press F6 (or choose Insert→Timeline→Keyframe) to tell Flash to carry over the content from the previous keyframe so that you can edit it. As an alternative, press F7 or (or choose Insert→Timeline→Blank Keyframe) to tell Flash to clear the stage.
On the stage, Flash either displays the image associated with the previous keyframe or, if you inserted a blank keyframe, displays nothing at all.
Using the drawing and painting tools, add content for your new keyframe to the stage.
If you've already created drawings in another program, you can import them, as described on Importing Graphics.
Regular frames in Flash act as placeholders; they mark time while the contents of the previous keyframe are displayed. Without regular frames to stretch it out, your audience would have only a twenty-fourth of a second to see the image! Insert additional frames when you want to slow down the action a little. In fact, inserting frames is sort of like having a director yell, "Hold camera!" with the contents of the last keyframe remaining onscreen.
To insert a frame into an existing animation:
In the timeline, click to select the frame after which you want to add a frame.
Flash moves the playhead to the frame you selected. Make sure the stage shows the graphics you want to hold onscreen.
Choose Insert→Timeline→Frame (or press F5).
Flash inserts a new frame after the frame you selected, bumping up the total number of frames in your animation by one.
If your animation runs at the standard 24 frames per second, then inserting a single frame doesn't change the timing all that much. Often you want to insert several static frames. If you want to insert five static frames, select any five regular frames and then press F5. (When you insert multiple frames, they're always inserted at the beginning point of your selection.)
As explained on Creating a Frame-by-Frame Animation, keyframes mark the points in your animation where you've added unique content to the stage. If you want to remove that unique content, you clear the keyframe. Once cleared, the frame, and the following frame span, show the content from the previous keyframe. Clearing a keyframe doesn't change the length of the animation—that is, you aren't removing any frames.
To clear a keyframe and turn it back into a static frame:
Right-click (Control-click) the keyframe you want to clear.
The playhead moves to that keyframe, and the frame is highlighted. A pop-up menu appears with several frame-related options.
Choose Clear Keyframe.
Flash demotes the frame from a keyframe to a plain old static frame. Any special content the frame had is relegated to the bit bucket.
Tip
Clearing a keyframe means you lose anything you've drawn or imported to the stage for that keyframe. If your immediate reaction after clearing a keyframe is "Oops!" then press Ctrl+Z (⌘-Z) to undo the action. Then you can save that worthy drawing or graphic to a symbol (Symbols and Instances) or a separate file (Exporting Flash to Other Formats).
Deleting frames—like inserting them—lets you control the pace of your animation. But instead of making your animation run longer, the way inserting frames does, deleting frames shrinks the timeline and makes your animation run shorter.
For example, say you're working on the animation showing a frog catching a fly. You've created three keyframes: one showing the frog noticing the fly, one showing the frog actually catching the fly, and one showing the frog enjoying the fly. If you space out these three keyframes evenly (say, at Frame 1, Frame 15, and Frame 30), then all three images spend the same amount of time onscreen. That's perfectly serviceable—but you can create a much more realistic effect by shortening the number of frames between the second and third keyframes (in others words, by deleting a bunch of frames between Frame 15 and Frame 30 to speed up the portion of the animation where the frog's tongue snags the fly).
To delete frames:
In the timeline, select the frame (or frames) you want to delete.
Flash highlights the selected frame(s) and moves the playhead to the last selected frame.
Right-click (Control-click) the selection, and choose Remove Frames from the pop-up menu.
Flash deletes the selected frames and shortens the timeline by the number of deleted frames.