In the olden days of animation, artists had to create a drawing for each frame of a movie by hand. Sure, they had their shortcuts, but since most movie frames click by at 24 frames per second, that's a labor-intensive endeavor. To keep costs down, animation production companies had their best, highest-paid artists draw the most important images, where major changes took place, and then had lesser talents and beginners draw the in-between images. Those most important images are known as keyframes. The in-betweeners are called tweens.
This chapter is your introduction to keyframes and tweens from Flash's point of view. In this case, you're the high-paid artist who gets to create the keyframes, while your computer does the grunt work of drawing all the tweens. You'll learn about two types of tweens—the motion tween and the shape tween. But first, you need to understand the various types of frames you see in Flash's timeline.
Note
"Tween" is one of those words that makes you smile—it just sounds funny. It's even funnier when you realize that it's used as both a noun and a verb. Not only can you create a tween, but you can also tween a drawn object, such as a car. ("I tweened the car to make it drive down the road.")
An animation is nothing more than a series of framed images displayed one after the other to create the illusion of motion. If you want to, you can use Flash to make your animation the old-fashioned way, by drawing each frame individually. Whether you animate frame by frame or use computer-generated tweens, you need to be able to decode the timeline symbols to understand how your animation works. Figure 3-1 shows some of the hieroglyphics you'll find on the timeline. Here are some more details:
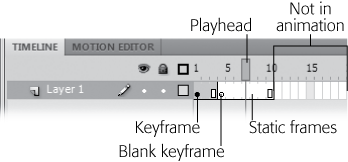
Figure 3-1. From left to right on this little strip of timeline you see several frames. Frame 1 is a keyframe with a solid circle. Frame 4 is an empty keyframe, shown as a hollow circle. The playhead is positioned at Frame 7, and the entire animation ends at Frame 10. The rectangles from Frame 11 on are not part of this animation, even though they're visible in the timeline.
Static frames represent a unit of time. If your animation runs at 24 frames per second, then that unit is one twenty-fourth of a second. You control the timing in your animation by adding or removing frames. For example, if you want an image to remain on screen for a longer period of time, then you insert frames into the timeline. Static frames appear to be empty in the timeline—that is, they don't display any special symbol, as keyframes do.
Keyframes are the important frames—the frames you designate to hold distinct images. Keyframes mark changes in your animation. For example, if you want to add text to your animation at a certain point in time, you create a keyframe in the timeline and then add the text to the stage at that point of the timeline. On the timeline, keyframes are shown as a solid circle. If there's no visible content on the stage, then you see a blank keyframe, as explained next.
Blank keyframes are keyframes with no visible graphics or text in the frame. As soon as you add text or graphics to a blank keyframe, it becomes a plain old keyframe. On the timeline, a blank keyframe is shown as a hollow circle.
Property keyframes come into play when you create a motion tween, as described on Making It Move with Motion Tweens. Motion tweens change the appearance of a graphic or movie clip symbol. Property keyframes are shaped like small diamonds, and they mark a change to one of the symbol's properties. On the timeline, the frames devoted to a motion tween are tinted light blue.
Frames not in animation. You can't move the playhead beyond the last frame in your animation. Beyond that point, you see rectangles that represent frames not in your animation. If you want to make your animation run longer, you can add or insert frames, as explained on Test Your Frame-by-Frame Animation.
As you work with your animation, you use the playhead to manage time and build your animation. Drag the playhead to Frame 15, and you see the contents of the stage at that moment in time.
Flash lets you animate virtually any visible object you place on the stage. You can animate cartoon-style drawings, photos, videos, or even text.
Follow these steps to see how frame-by-frame animation works:
Open a blank Flash document by choosing File→New and then selecting ActionScript 3.0 and pressing OK.
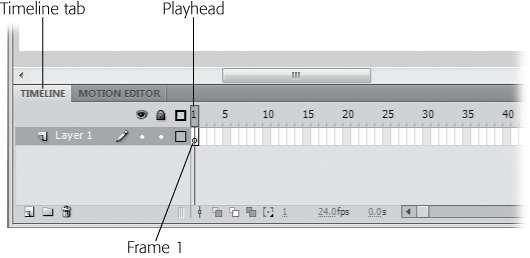
You have a spanking new Flash document. As the timeline in Figure 3-2 shows, Flash starts you out in Layer 1, Frame 1, because initially, a Flash document has only one frame, a keyframe at Layer 1, Frame 1.
Tip
If you don't see the timeline, then select Window→Timeline or use the shortcut Ctrl+Alt+T (Option-⌘-T).
The red rectangle over Frame 1 is the playhead. It marks the current frame—the one displayed on the stage. When you begin a new document, you can't move the playhead until you add more frames, as described in step 3.
Using Flash's paint and drawing tools, draw an image on the stage.
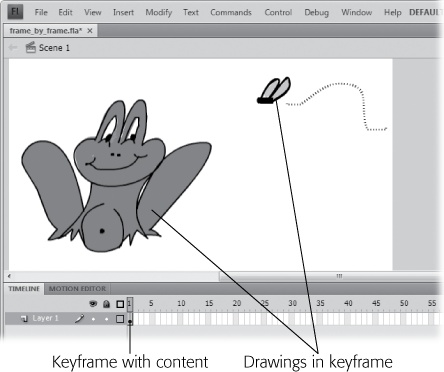
Figure 3-3 shows an example drawing of a frog with a tempting fly overhead, but you can use any drawing or shape for this exercise. As soon as you add a drawing or any visual content to a keyframe, the hollow circle fills in, becoming a solid circle. The hollow circle marks an empty keyframe (no content). The solid circle marks a keyframe with content—in other words, there are graphics displayed on the stage.
Note
If you have an existing image stored on your computer, you can bring it onto the stage. Select File→Import→Import to Stage, and then, in the Import window that appears, type in (or browse to) the name of the file you want to pull in. When you finish, click Open (Import on a Mac). (Chapter 10 covers importing files in more detail.)
Figure 3-3. Flash associates the selected keyframe with all the images you place on the stage—whether you draw them directly on the stage using the drawing and painting tools, drag them from the Library, or import them from previously created files. Here, Flash associates the frog-and-fly drawing with the keyframe in Frame 1.
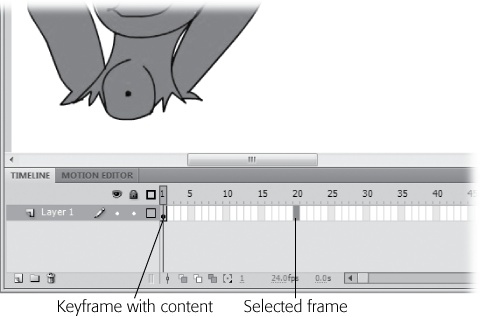
In the timeline, click the rectangle under the number 20.
Flash highlights the rectangle, as shown in Figure 3-4. Notice that the playhead doesn't move, because at this point your animation contains only one frame.
Turn the selected frame into a blank keyframe by pressing F7.
Flash moves the playhead to the selected frame (Frame 20 in Figure 3-4), inserts a keyframe icon, and clears the stage.
Tip
In Flash, you often have several ways to do the same thing, and that's true with inserting frames and keyframes. You can use the menu: Select Insert→Timeline and then choose Frame, Keyframe, or Blank Keyframe. Or you can right-click (Control-click) a frame in the timeline and choose one of the options from the pop-up menu.
Draw a second image on the stage.
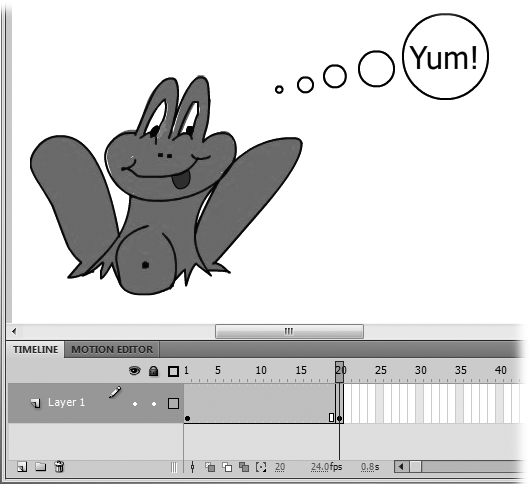
The second keyframe in Figure 3-5 shows the frog drawn again, with a thought balloon instead of a fly. But if your two images are fairly similar, then you can avoid having to completely redraw the image for your second keyframe, as you'll see in the next step.
Figure 3-5. Here, the playhead is over the second keyframe, which tells Flash to place the content on the stage in the second keyframe (Frame 20). When it detects a new keyframe, Flash displays only the new contents, so Frames 2–19 carry forward the content from Frame 1 (the first keyframe). You can verify this behavior by dragging the playhead from Frame 20 back to Frame 1.
Click further out in the timeline (Frame 40, say), and press F6.
Just as when you inserted the blank keyframe, Flash moves the playhead and inserts a keyframe icon; but instead of clearing the stage, Flash carries over the content from the previous keyframe, all ready for you to tweak and edit.
Repeat the previous step to create as many keyframes as you want.
To get the hang of frame-by-frame animation, adding two or three keyframes is plenty. But when you're building an actual animation, you'll likely need to add dozens or even hundreds of keyframes (or even more, depending on the length and complexity you're shooting for).
Adding frames, keyframes, and blank keyframes is a recurring activity as you work in Flash. As explained in the note on Note, you can use menus to do the job, but it's faster and easier to remember the three function keys that do the job:
F5: Insert a frame.
F6: Insert a keyframe.
F7: Insert a blank keyframe.
Sooner or later you want to test your animation. Sometimes you want to take a quick peek at a few frames to see if the mechanics are in order. Other times you want to review the entire animation exactly the way your audience will see it. Flash has options for both situations:
Press Enter (Return on a Mac) for a quick view of your animation action. The animation plays out on the same stage where you built it. The playback begins at the playhead's position, so you don't have to watch the entire animation when you want to review only a few frames. If you prefer, you can use the menu option Control→Play.
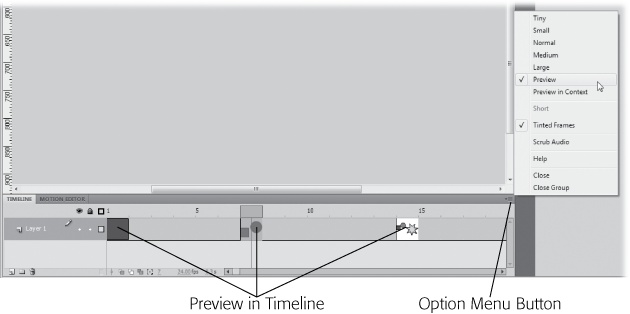
Figure 3-6. Click the Option menu button to see the menu shown here. Use the Tiny through Large options to change the timeline's frame size. Use the Preview options to display thumbnail images in the keyframes, as shown here.
This view doesn't always give you the same view your audience will see. For example, selected objects still appear selected, ruler guides still remain visible, and objects on the backstage are still visible. If you want a more accurate view of your finished animation, then use the next viewing option.
Press Ctrl-Enter (⌘-Return) to view your animation from beginning to end for the most accurate preview. Or you can use the menu option Control→Test Movie→in Flash Professional. Your animation opens in a window that uses Flash Player to display the images. This "display engine" is called a runtime, and it's the same engine that your audience's computers use to show your animation. Your animation starts playing at the first frame and plays all the way through to the end. When it reaches the last frame, it starts over again. This is called looping, and you can turn it off in the Flash Player window by choosing Control→Loop (Figure 3-7) or right-clicking (Control-clicking) the animation.
This viewing method takes a little longer, but it's the most accurate way to view your animation. You're actually seeing what your audience will eventually see, from beginning to end.