If you're new to Flash, here's a tip that will save you hours of frustration. Write these words on a sticky note on your monitor: Flash has two drawing modes—merge mode and object mode. When drawings don't behave as expected, I'm suffering from mode confusion.
Lines and shapes drawn in merge mode behave differently from those drawn in object mode. This phenomenon becomes apparent when you try to move drawings around the screen or arrange them in front of or behind other graphics. You use a simple toggle button or shortcut key to change from one mode to the other. Keep in mind that you can use both drawing modes in a single Flash document, and there's a good chance you'll want to work that way. You can even have graphics drawn in merge mode in the same layer and frame as graphics drawn in object mode. Both types of graphics retain their native characteristics and eccentricities unless you purposely convert them to the other format.
Note
Want to check out the differences between the two modes? The Missing CD (www.missingmanuals.com/cds) has two example files. 02-1_Merge_Drawing_Mode.fla shows an oval and a rectangle drawn in merge drawing mode. 02-2_Object_Drawing_Mode.fla shows a similar oval and rectangle drawn in object mode.
Originally, Flash offered only merge mode. It's unlike drawing tools you find in most programs, but merge mode works great for web animations because it keeps file sizes small and animations fast. Flash assumes you want to use the merge drawing mode unless you tell it otherwise. Graphics drawn in merge mode are called shapes. In this mode, if one shape overlaps another shape, Flash erases the hidden portion of the bottom shape underneath—a fact you discover when you move the overlapping shape, as shown in Figure 2-8 (bottom). Many Flash veterans love merge mode, because they can draw quickly, using overlapping shapes like cookie cutters.
Out of the box, Flash assumes you want to work in merge drawing mode, so you don't have to do anything special to activate it the first time you use Flash. But if you (or someone you share your copy of Flash with) has activated object drawing mode, then you need to toggle it back to merge mode. In the following steps, you'll learn how to make sure you're in merge mode and discover some of its idiosyncrasies.
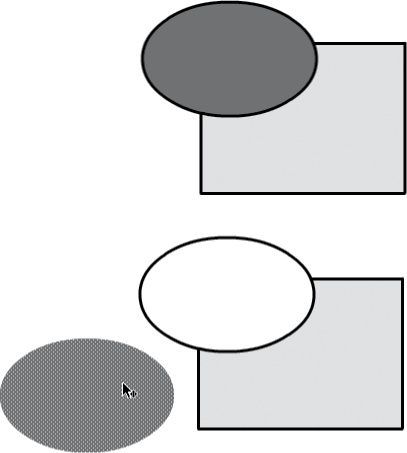
Figure 2-8. Top: Say you're in merge mode and you draw a rectangle and then an oval that overlaps it. At first, it looks and behaves like any old graphic element. Bottom: That changes when you select the shape and it sports a dotted pattern, as shown on the oval. Drag the selected oval away, and you'll see that Flash has erased the overlapped portion of the rectangle. Notice that Flash repositioned the oval's fill but left the outline in place. That's typical in merge drawing mode, where Flash treats shapes not as complete objects, but as a collection of disparate elements.
In the Tools panel, click the Rectangle tool (or press the R key).
When the Rectangle tool is selected, the Options section at the bottom of the Tools panel displays the Object Drawing icon (Figure 2-9 left). If the icon (a circle in a square) appears pressed-down, then you're in object drawing mode and need to switch back to merge drawing mode.
If necessary, click the Object Drawing button (or press J) to deselect object mode.
When the Object Drawing button is deselected, you're in merge mode.
Draw a rectangle on the stage.
You can set the stroke and fill however you want before you draw the rectangle.
Select the Oval tool (O) and then change the fill and stroke color. Set the stroke height to about 3 or 4 pixels.
If you need a refresher on setting the stroke and fill properties, see Drawing a Shape.
Draw an oval that partially overlaps the rectangle, as shown at the top of Figure 2-8.
The oval is drawn on top of the rectangle. In general, Flash places the most recently drawn graphic on top of previous graphics; however, there are some gotchas when you mix and match merge and object graphics.
With the Selection tool (V), click the middle of the oval.
The fill portion of the oval displays a dotted highlight. When you see a dotted highlight like this, it's a signal that the graphic was drawn in merge mode. And, sure enough, the Properties panel identifies the selection as a Shape.
Drag the oval away from the rectangle.
As you drag, the fill moves away from the rectangle, leaving the empty stage beneath. When shapes drawn in merge mode overlap, the bottom shape is erased. Notice that the stroke portion of the oval remains behind. A single click on the fill selects only the fill portion of the oval. If you want to select the fill and the stroke, then double-click the fill. There are more tips on using the Selection tool on Selecting Objects on the Stage.
As shown in Figure 2-8 (bottom), when you overlap objects in merge drawing mode, Flash erases the hidden portions of the objects underneath. You'll probably want to use merge mode if you fall into one of the following three categories:
You want to be able to select portions of objects or create a deliberate "cutout" effect by overlapping objects and letting Flash do the cutting for you.
You plan to create no more than one shape or object per timeline layer, so overlapping isn't an issue. For more details on layers, see Working with Multiple Layers.
You're familiar (and comfortable) with an older version of Flash. Merge was the only drawing mode before Flash 8.
The object drawing mode tells Flash to think of shapes the way most humans naturally think of them: as individual, coherent objects. Overlapping shapes in object mode doesn't erase anything, and when you select a shape, you select the entire shape—not just the fill, or line, or portion of the shape you selected. If you've used Adobe Illustrator or the drawing tools in Microsoft Office, this drawing mode will seem familiar. To get a feeling for object mode characteristics, repeat the steps that begin on Merge Drawing Mode. In step 2, toggle object drawing mode on by making sure the Object Drawing button is depressed, as shown at left in Figure 2-9. As you draw, your shapes look similar to the ones drawn in merge mode. However, when you select the oval in step 6, you won't notice the dotted selection pattern. Instead, you see a rectangular outline around the oval, as shown bottom right in Figure 2-9. That's the object mode's way to show that an object is selected. The words "Drawing object" at the top of the Properties panel are another clue that you selected an object mode graphic.
Tip
The selection box for graphics drawn in object mode is rectangular. That makes it a little difficult to spot when the selected object is a rectangle or a straight line. In those cases, if you need to double-check, look for the words "Drawing object" in the Properties panel.
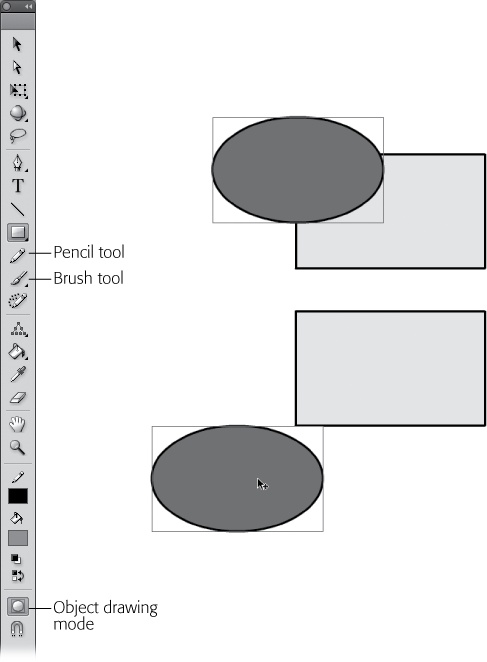
Figure 2-9. Left: To activate Flash's object drawing mode, first click the Pencil, Pen, Line, Brush, or any of the Shape tools, and then click the Object Drawing icon that appears in the Options section of the Tools panel. Top right: After you've activated the object drawing mode, you draw your lines, fills, and shapes as normal—with one difference. When you select (V) an object, it's all or nothing: Flash highlights the entire selection with a selection box (like around the oval selected here). Bottom right: Unlike the shapes you create using the merge drawing mode, the shapes you create in object mode retain their integrity—even when you overlap them and move them around.
Tip
You can mix and match modes in a single document. For example, you can use object drawing mode for some shapes and merge drawing mode for others. The drawing mode button on the Tools panel is a toggle, so the mode you choose remains in effect until you change it. Flash even remembers the setting from one document to another. So if you decide to use only object drawing mode, you can set it once and forget it.
In early versions of Flash, you had to create your objects on separate layers if you wanted to overlap them with impunity. In Flash CS5, simply activate object drawing mode and bingo—Flash lets you stack and overlap your objects on a single layer as easily as a deck of playing cards.
Choose object mode if you want to work with entire objects (as opposed to portions of them).
Choose object mode if you're used to working in programs like Adobe Illustrator and want a familiar graphics editing environment.
Flash's original drawing system, merge drawing mode, is unlike most other programs' drawing tools, while the object drawing mode will seem familiar if you're coming from other programs, like Adobe Illustrator. Even if this is your first adventure with a computer-based drawing program, you may find the object drawing mode easier to learn and use. Each exercise in this book will clearly explain which drawing mode is used.
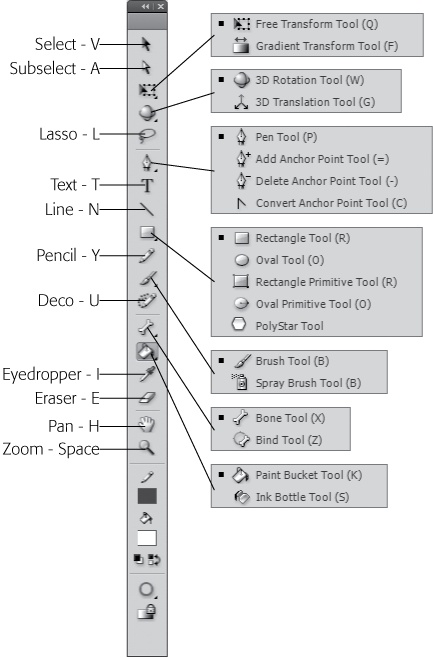
Figure 2-10. Each tool in the Tools panel (except the PolyStar tool) has a single-letter shortcut key. Just press the key to activate that tool. Some tools, such as the Brush tool and the Spray Brush tool, share the same shortcut key, so pressing the key toggles between the two tools. Learning the shortcuts for the tools you use most often lets you work much faster.
You can use merge mode shapes and object mode graphics together in the same Flash document. Here are a few tips that will make life with mixed graphics a little easier:
Merge mode shapes always appear underneath object mode graphics if they're on the same timeline layer. To make merge mode shapes appear on top of object graphics, place them on a separate timeline layer, as described on Working with Multiple Layers.
If you've already created a drawing object using the object mode, you can convert it to a shape by selecting it and then choosing Modify→Break Apart.
If you've already created a shape in merge drawing mode and want to convert it to a drawing object, select the shape and then choose Modify→Combine Objects→Union. The entire selection becomes an object.
Once you draw a line or a shape on your stage, you need to select it if you want to do anything else to it—for example, if you want to change its color, make it bigger, move it, or delete it.
As you can see in Figure 2-11, the Tools panel has three tools that let you select an object on the stage—Selection, Subselection, and Lasso. How these tools behave depends on whether you've created your drawings in merge or object drawing mode (see the previous section).

Figure 2-11. Selecting an object on the stage to work with should be easy—and most of the time, it is; all you have to do is click the Selection tool (circled) and then either click your object or click near it and drag a selection box around it. But if your stage is crowded and you're trying to pick out just one little tiny angle of a line or a portion of a drawing to manipulate, you may need to use either the Subselection tool or the Lasso tool.
This tool lets you select entire shapes, strokes, and fills, as well as symbols and bitmaps. (If you've created objects in merge mode, the Selection tool also lets you select rectangular portions of those objects.) After you've made your selection, you can then work with it—move the object around the stage by dragging, for example.
Using the Selection tool in merge mode. To select a symbol, a bitmap, or one element of a shape (just the fill portion of a rectangle, for example) simply click the symbol, bitmap, or element. To show that an object is selected, Flash covers selected merge mode graphic with a dotted pattern. To select both the fill and stroke of a merge mode graphic, double-click the fill. In merge mode, a single click on the stroke portion of a shape selects one line segment. Double-clicking selects the entire stroke.
To select a rectangular portion of a shape you've drawn in merge mode, click near (but not on) the shape and drag your cursor to create a selection box around just the portion you want to select. To select an entire shape, create a selection box around the whole shape, or double-click the shape.
Using the Selection tool in object mode. To select an object created in object mode, click it. A rectangular outline appears around the selected object.
The Subselection tool lets you reposition the individual points that define and control your strokes and fills. These points are called anchor points, and the connecting lines are called segments.
Using the Subselection tool in merge mode. To select a stroke or a fill created in merge mode, click the Subselection tool, and then click the stroke or outline of the fill you want to move or change. Flash automatically redisplays that line as a bunch of individual anchor points and segments. As you move your cursor over the selection, the arrow cursor displays either a black or a white box. To move the entire stroke or fill, click and drag when a black move box appears on the cursor. To change the shape of an object, click and drag when a white edit box appears on the cursor. (See The Subselection Tool for details on editing graphics with anchor points.)
Using the Subselection tool in object mode. The Subselection tool works in a similar way on objects drawn in object mode. You can use it to move or change the shape of an object. Move the cursor over the stroke or outline of an object, and you see the black move box or the white edit box.
Tip
You can't select an object's fill with the Subselection tool; however, you can "open up" an object graphic and edit it as if it were a merge shape. Double-click the object with the Selection (V) tool. Other graphics on the stage fade, and the drawing object opens in edit mode. At this point it behaves like a merge shape. When you're finished editing, you close the graphic by clicking the left-pointing arrow in the upper-left corner of the work window.
The Lasso tool is the one to use when you want to select a weirdly shaped portion of an object—say, you want to create a hand-shaped hotspot in the middle of a square bitmap—or when you need to select a weirdly shaped object that's super-close to another object.
Using the Lasso tool in merge mode. To select a nonrectangular portion of an object drawn in merge mode, first click the Lasso tool; then click near (or on) the object and drag your cursor (as if you were drawing with a pencil) to create a nonrectangular shape.
Using the Lasso tool in object mode. To select an entire object drawn in object mode, select the Lasso tool, click near the object, and then drag your cursor over the edge of the object. In object mode, dragging over a portion of the object selects the whole object.
Note
If you need to deselect an object after you've selected it (say, you changed your mind and don't want to change the object's color after all), you have several choices. You can press Esc; you can press Ctrl+Shift+A (Shift-⌘-A); you can click an empty spot on the stage; or you can select Edit→Deselect All.
Special note to Photoshop fans: Ctrl+D (⌘-D on the Mac) works differently in Flash than it does in other Adobe programs. In Photoshop or Photoshop Elements, Ctrl+D (⌘-D) is the keyboard shortcut that deselects an object. In Flash, the same keystroke creates a duplicate of the selected object.
In Flash, a cigar isn't just a cigar. A circle isn't even just a circle. As explained earlier, every drawing you create using Flash's drawing and painting tools is composed of strokes and fills. As shown in Figure 2-12, you create strokes and fills with a variety of drawing tools:

Figure 2-12. Here you see examples of strokes and fills. The strokes appear black, while the fills show as gray. Flash doesn't automatically create fills when you create shapes with the Line, Pencil, and Brush tools, so as you see in the triangle shapes, the center remains the same color as the stage. Later you'll see how to manually create a fill or change a fill color with the Paint Bucket tool (page 83).
Strokes. A stroke in Flash looks just like the stroke you make when you write your name on a piece of paper. It can either be a plain line or the outline of a shape. Strokes can be dotted or dashed lines. You draw strokes in Flash using the Pen, Pencil, and Line tools. When you use one of the Shape tools (for example, to create a square or polygon), Flash includes a stroke outline free of charge.
Fills. Flash recognizes two kinds of fills: the marks you make with the Brush tool, and the interior of a shape (in other words, everything inside the strokes that form the outline of a shape).
In a lot of cases, your shapes comprise both strokes and fills. You can create fill- and stroke-containing shapes in one fell swoop using Flash's shape tools—Oval, Rectangle, and PolyStar. If you draw a shape by hand using the Pen, Pencil, or Line tools, then you need to manually add a fill if you want one using the Paint Bucket tool. That process is described on Changing the Color of a Fill.
Why the emphasis on the technical terms "stroke" and "fill" when all you want to do is draw a smiley face? For one very important reason: Flash treats strokes and fills differently. You use different tools to create them and different tools to modify them. If you don't know the difference between a stroke and a fill, you won't be able to do a whole lot with the drawing and painting tools described in this chapter.