There's a difference between using a pencil to create stick drawings and using a pencil to create a carefully shaded portrait. Chapter 2 covered drawing basics, explaining exactly how the Pencil, Pen, Brush, Line, and Shape tools work. This chapter explains how to use the tools in a more creative and nuanced manner. In real life—whether you're pounding out Flash animations for your boss or for your own personal website—you're rarely going to be satisfied with a simple drawing. For each keyframe of your animation, you're going to want to start with a basic sketch and then play with it, changing its color, moving a line here and there, adding a graphic element or two, and repositioning it until it looks exactly the way you want it to look.
In this chapter, you'll get more acquainted with Flash's selection tools—the tools you use to tell Flash which specific part of a drawing you want to change. Then you'll apply Flash's editing tools from basic (copying, pasting, and moving) to advanced (scaling, rotating, stacking, grouping, and more). You'll also do more with color in Flash drawings than you saw in Chapter 2. After a quick background in color theory, this chapter covers applying color effects like brightness and transparency, and even creating custom colors. The chapter wraps up with some special tools that let you create complex patterns with a click of your mouse.
With few exceptions, before you can modify an object on the stage, you first have to select the object. It's the same in a word processor, where you have to highlight a word with your cursor before you can edit or delete it. Since Flash deals with more complex objects than words, it gives you a variety of selection tools for different purposes. The Tools panel (Figure 5-1) has three different selection tools. Each is good for selecting different types of objects.
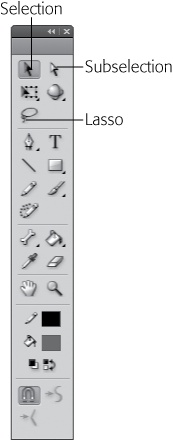
Figure 5-1. Flash gives you three different ways to select the strokes, fills, bitmaps, symbols, and other graphic elements that make up your images: Selection, Subselection, and Lasso. By the way, you can adjust the width of the Tools panel to your liking by dragging the panel's edge to resize it. Here, two columns of tools are shown.
There are a couple of exceptions to this rule: specifically, modifying fill color using the Paint Bucket tool (Changing the Color of a Fill) and reshaping lines and curves using the Selection tool (next page). But in general, you need to select stuff in Flash before you can work with it.
Selection. The black arrow selects entire strokes, fills, shapes, and objects (like bitmaps and symbols), as well as individual portions of those strokes, fills, shapes, and objects.
Subselection. The white arrow lets you select the individual points that make up lines and curves.
Lasso. This tool, which looks like a miniature lasso, is great for selecting groups of objects, oddly shaped objects, or portions of objects. When objects are close together on the stage, you can use the lasso to carefully select around them.
The following sections describe each of these tools in detail.
Note
The selection tools behave differently depending on whether you've drawn your objects on the stage using object drawing mode or chosen to stick with merge drawing mode (which Flash assumes you want until you tell it differently). See Choosing a Drawing Mode for a rundown on the two drawing modes.
The aptly named Selection tool (V) is the workhorse of Flash's selection tools; with it, you can select individual graphic elements like strokes, fills, shapes, symbols, text blocks, and grouped objects. You can also use the Selection tool to select a portion of any object, as shown in Figure 5-2 or to move or reshape an object (a process sometimes referred to as transforming an object).
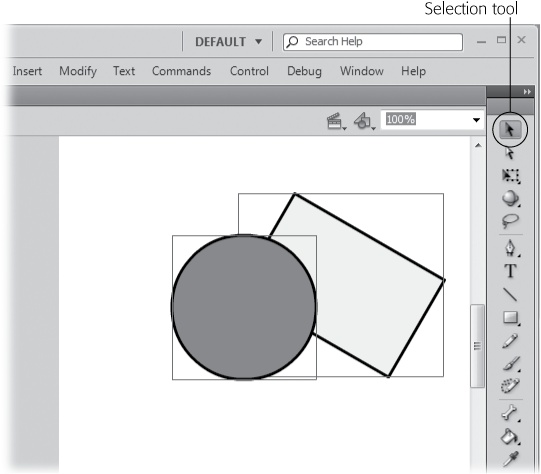
Figure 5-2. Using the Selection tool is the easiest way to select just about any object, whether it's a shape, a stroke, a bitmap, a fill, or a text block. To use the Selection tool: In the Tools panel, click the tool; then, on the stage, click the object you want to select. To select groups of objects, you have a choice: You can either Shift-click each object, or click outside the group and then drag until Flash displays a selection box around your group.
The most common thing you're going to want to do with the Selection tool is select an entire graphic element—a circle, a line, a block of text, a bitmap, a hand-drawn kangaroo—so that you can apply color to it, copy it, skew it, or make some other modification to it.
Note
To deselect a selected object (regardless of which tool you used to select it), simply click any blank spot on the stage or press Ctrl+Shift+A (Shift-⌘-A).
To select an entire graphic element (or group of elements) using the Selection tool:
In the Tools panel, click the Selection tool.
Flash highlights the Selection tool, and Selection tool–specific options appear in the Options section at the bottom of the Tools panel (Figure 5-3).
Figure 5-3. Flash displays a selection box around selected objects (like the circle and rectangle shown here), symbols, and text blocks to let you know you've successfully selected them. When you're using the Selection tool, you see special options at the bottom of the Tools panel. For example, the magnet button toggles the "Snap to Objects" option described on page 185.
Either click the object you want to select, or (best for lines and groups of objects) click near the object, and then drag your cursor until the selection box surrounds the object.
Tip
You can also select more than one object with the Selection tool. Select the first object, then Shift-click each additional object you want to select.
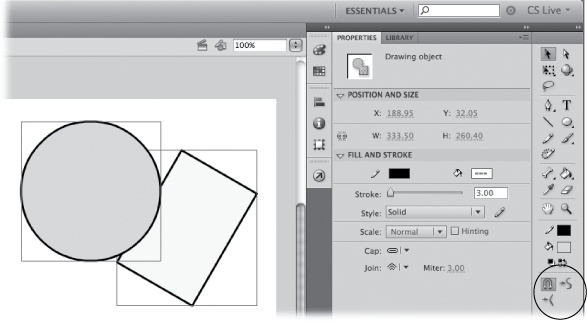
Flash highlights the selected object either by displaying a selection box around the object as shown on the left in Figure 5-4 or covering the selected area with the selection pattern shown on the right. Either way, the Properties panel changes to reflect the object you've selected.
Note
When you select a straight line or a rectangular object, you may find it tough to see the selection box because Flash draws it so closely around the line that it almost looks like part of the line itself.
With the object selected, you can make any modifications you want to the object using the main menu options, Flash's Color or Transform tools (pages Adding Color and Copying and Pasting Frames), or any of the panels, like the Properties panel.
Note
If you use the Selection tool to select an ungrouped line or shape, Flash displays the Straighten and Smooth options (check out the Options section of the Tools panel). These options let you tweak your lines and shapes—useful if you've got a shape almost the way you want it, but not quite (and you don't want to have to start over and redraw the whole thing). To incrementally straighten a curved line, with the line selected, click the Straighten option. To incrementally turn a series of straight-line angles into a curve, with the line selected, click the Smooth option.
Here's yet another case when shapes drawn in object drawing mode behave differently from shapes drawn in merge mode. Select a shape created in object drawing mode and it's an all-or-nothing deal. Flash thinks of those shapes as a unit. However, if you create a shape in merge mode, it's easy to select just a portion of the shape. A single click selects the fill or the stroke—maybe just a segment of the stroke. That's why shapes drawn in merge mode are sometimes called ungrouped shapes. Because they're ungrouped, you can select or carve a chunk off the shape. Maybe you want to apply a gradient effect to a portion of the shape. Or maybe you want to sculpt a complex shape from a rectangle or oval, by removing bits and pieces. Using the Selection tool, you can drag a rectangle anywhere over an ungrouped shape to tell Flash to select just a portion.
So, is it impossible to edit parts of a shape drawn in object mode? No, not at all. Double-click a drawing object, and it opens for editing as an ungrouped shape. Other objects on the stage are dimmed and un-selectable. The Edit bar above the stage lists "Drawing Object" to indicate that you're editing a drawing object. To close the object, click the scene name or the blue Back arrow in the Edit bar. The drawing object closes, and no matter how you've changed its appearance, it still behaves as a drawing object. For example, a single click selects the object and the Properties panel describes it as a drawing object.
Tip
While it's open for editing, you can cut a drawing object into two or more parts. You can even add a separate, unconnected shape to the drawing. Once you're through editing and the object is closed, Flash still treats it as a single drawing object.
If you want, you can convert a drawing object into an ungrouped shape. Select the shape, and then choose Modify→Ungroup. Flash gives you visual clues so you can tell a grouped shape from an ungrouped shape, as shown in Figure 5-4. Your object drawing becomes an ungrouped shape as if it were drawn in merge mode. You can confirm this by selecting the shape and checking the Properties panel, where it's listed as a Shape.
Note
If you want to select a free-form portion of an object—for example, you've drawn a jungle scene and you want to cut the shape of a baboon's head out of it—you need the Lasso tool (Subselection tool (shortcut key: A)). The Selection tool lets you select only a rectangular shape.
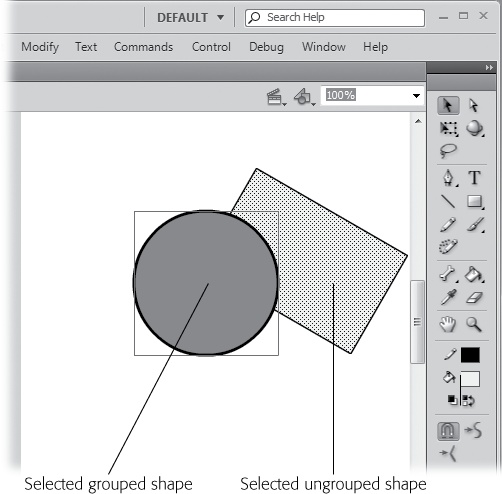
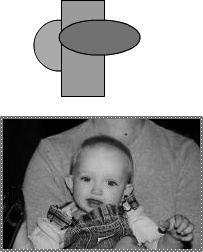
Figure 5-4. Grouped shapes and ungrouped shapes behave differently when it comes to selection tools. They even look different when you select them. The circle here is a selected grouped shape; it shows a marquee. The rectangle is a selected ungrouped shape; it shows the dotted highlight pattern on the selected portions.
To select just a portion of an ungrouped shape using the Selection tool:
In the Tools panel, click the Selection tool.
Flash highlights the Selection tool.
Click near the object, and then drag your cursor until the selection box surrounds just the portion of the ungrouped object you want to select (Figure 5-5).
When you let go of the mouse, Flash highlights the selected portion of the object, as shown in Figure 5-5.
The Selection tool does more than just select objects. It also moves and reshapes, or transforms, them. This is great—as long as you know what to expect. (Many's the budding Flashionado who's sat down to select part of an image and been totally dismayed when the object suddenly, inexplicably, developed a barnacle-like bulge.)
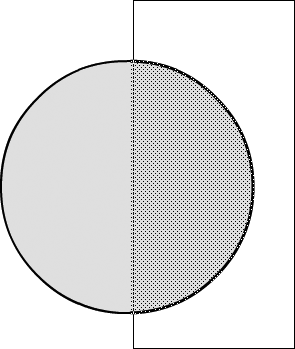
Figure 5-5. The Selection tool lets you select using only a rectangular selection box. You can make it a large rectangle or a small one, but it's still a rectangle. If you need to select an irregular portion of an object, then you need the Lasso tool. If Flash insists on selecting the entire shape (or bitmap) when all you want to do is select a piece of it, ungroup the shape (or break apart the bitmap).
Note
Whether or not Flash treats your shape as a single cohesive entity or independent elements depends on whether you drew that shape in object or merge drawing mode, as explained on the previous page.
Here's how it works: If you click the Selection tool and then position your cursor directly over an unselected fill or stroke, Flash displays, next to your cursor, one of three icons: a cross with arrowheads, a curve, or an angle.
Moving (cross with arrowheads). The cross with arrowheads (Figure 5-6) tells you that you can drag the selected object to move it.
Reshaping (curve). When you see the curve icon shown in Figure 5-7 dragging reshapes the stroke or edge beneath your cursor (in other words, it lets you add or modify a curve).
Reshaping (angle). Dragging the angle icon (Figure 5-8) lets you reshape one of the corners of your object.

When you want to modify the individual points and segments that make up your shapes, use the Subselection tool, the white arrow in the Tools panel.
Click a stroke or the edge of a fill with the Subselection tool, and you see the anchor points that define the stroke or shape. To change the stroke or shape, drag one of the anchor points. To adjust a curved line segment, click an anchor point adjacent to the curve, and you see control handles connected to the anchor. These control handles work like the ones used with the Pen tool (Pen tool). To change a curve, drag a control handle, and the curve changes its path. You can move a fill or stroke using the Subselection tool—just make sure you don't click on an anchor point. The cursor shows a hollow square when it's over an anchor point and a solid square when it's over a line segment.
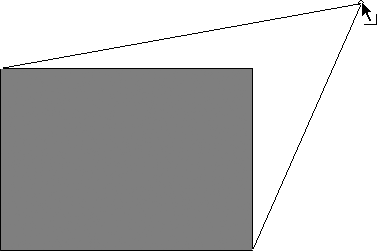
Figure 5-8. When you mouse over an object's corner and see the angle icon shown here, dragging lets you pull the corner in any direction to reshape it. Releasing the mouse finishes the modification. Here, the upper-right corner of a rectangle is being reshaped.
To use the Subselection tool to move an object:
In the Tools panel, click the Subselection tool (Figure 5-9).
Flash highlights the Subselection tool, and the cursor becomes a white arrow.
Click the object you want to modify (or click near the object, and then drag your cursor until the selection box surrounds the object).
Flash redisplays the object as a series of segments and selectable points.
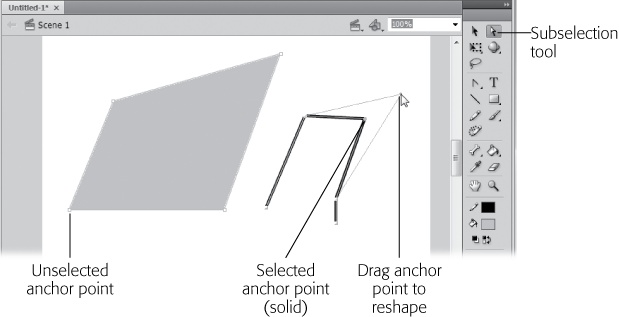
Figure 5-9. If you click the Subselection tool and then click an object you've created using any drawing tool (Pen, Pencil, Brush, Line, or Shape), Flash redisplays the line as a series of segments and points. Click any segment (the cursor displays a tiny black square as you mouse over a segment), and Flash lets you move the entire object. Click a point (a hollow square) instead, and Flash lets you change the object's shape.
Mouse over any of the line segments in the object.
The cursor displays a black square when the cursor is over a line segment, but it displays a hollow square when the cursor is over an anchor point.
While the cursor displays a black square, click and drag to move the object. When you're satisfied, let go of the mouse.
Flash displays your moved object.
To use the Subselection tool to move an anchor point (and, by association, the segments attached to that point):
In the Tools panel, click the Subselection tool.
Flash highlights the Subselection tool.
Click the object you want to work with (or click near the object, and then drag your cursor until the selection box surrounds the object).
Flash redisplays the object as a series of segments and selectable points.
Mouse over the point you want to modify.
Flash displays a hollow square.
Drag the anchor point to reshape your object. When you're satisfied, let go of the mouse.
Flash displays your modified object. You can see an example in Figure 5-10.
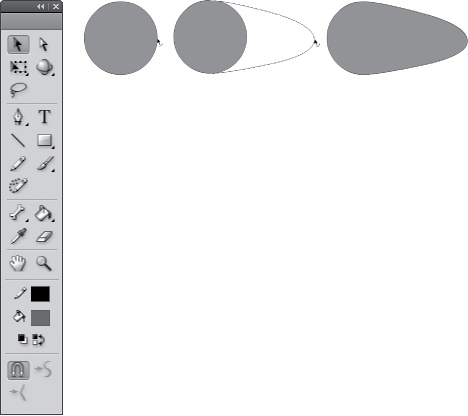
Figure 5-10. Left: You know your mouse is over a selectable point when you see the hollow square next to your cursor. Middle: Drag the point in any direction to reshape your object. Right: When you let go of the mouse, Flash displays your transformed object.
Tip
If the anchor point defines a curve (in other words, if you see a hollow square at the end of a curved line), clicking the point tells Flash to display control handles that are used to define the curve. You can drag one of the control handles to adjust the curve. To convert a line segment to a curve, hold the Subselection tool over an anchor point and then press Alt (Option), and you can drag a control handle from the anchor point. Use the new control handles to form the curve.
Sometimes a rectangular selection just can't encompass the objects you want to select. Say you want to select an irregular shape inside an oval so you can recolor it or remove it. Or perhaps your stage is so jam-packed with images that you can't select the image you want with the Selection tool without inadvertently selecting parts of images you don't want. Those situations call for the Lasso tool (L). Draw a line around your selection with the Lasso tool and you can grab it, as shown in Figure 5-11. The lasso has two modes—freehand mode and polygon mode. You'll learn how to use both here.

Figure 5-11. Use the Lasso tool when you want to select an irregular shape. With the Lasso, you draw a line around the objects or parts that you want to select. Then you can modify, move, or remove the selection.
Tip
As explained earlier in this chapter (Selecting part of a shape or object), you can only select portions of ungrouped shapes. If it's a drawing object, then double-click the object to open it for editing, or convert it to an ungrouped shape with Modify→Ungroup.
Depending on how steady your hands are, drawing a freehand lasso around an object (or around the portion of an object you want to select) is the quickest way to select what you want. Straight out of the box, this is how the Lasso works. To use the Lasso tool to select objects (and portions of objects) freehand:
In the Tools panel, click the Lasso tool (Figure 5-12, left).
Flash highlights the Lasso tool, and in the Options section of the Tools panel, the Lasso-related options appear.
Click near the object you want to select, and then drag your mouse to encircle the object.
Figure 5-12 (right) shows you an example.
When you've completely encircled your object, let go of the mouse button.
Flash selects everything inside the loop you drew with the Lasso tool.

Tip
You can have a tricky time drawing a precise loop using the Lasso, especially if you're using a mouse instead of a graphics tablet. Fortunately, Flash has got your back; if you don't completely close the loop, Flash closes it for you, using a straight line. If this action isn't what you want, just select Edit→Undo Lasso, and then start over. If you're still having trouble, try using the Zoom tool to enlarge the stage, or try the Lasso's polygon mode, described in the following section.
The Lasso is great for those irregular shapes, but sometimes you may want to outline your selection with straight lines.
In these cases, freehand just doesn't cut it; one slip, and you have to start over. You're better off taking advantage of the Lasso tool's polygon mode, which lets you click to surround an area. (Flash takes care of filling in the straight lines between your clicks so you don't have to.)
To use the Lasso tool to select objects (and portions of objects) by pointing and clicking:
In the Tools panel, click the Lasso tool.
Flash highlights the Lasso tool. In the options section of the Tools panel, the Lasso-related options appear.
Click the polygon mode option (Figure 5-12). Then, using a series of clicks, enclose the object you want to select.
Flash automatically connects your clicks with straight-line segments.
Double-click to complete your selection.
Flash selects everything inside the loop you drew with the Lasso tool.
Just because you start out in freehand or polygon mode doesn't mean you're stuck with it for the entire selection. For example, you can start off your selection in freehand mode by dragging the mouse to trace lines. Then, hold down the Alt (Option) key to switch to polygon mode. Continue your selection by clicking on points to create straight lines. Double-click when you're ready to finish off your selection, and Flash draws the last straight line to connect the beginning and end points.
Tip
You may find that the Lasso—especially in polygon mode—doesn't want to quit when you do. In other words, when you go to use the main menu or a panel or another drawing tool, you find you can't because Flash keeps insisting that you need to keep lassoing. The best way to get rid of a sticky Lasso is to double-click and then press Ctrl+Shift+A (Shift-⌘-A) to deselect all.
Flash treats bitmaps—for example photos in the JPEG format—differently from the way it treats the shapes you create using its drawing tools. And if you take a look at Figure 5-13, you'll see why.
While you can't manipulate bitmaps in Flash anywhere near as easily or as completely as you can manipulate the shapes and lines you draw directly onto the stage, Flash does have a special tool specifically for selecting ranges of colors in bitmaps: the Magic Wand. After you select color ranges, you can then recolor them or cut them out of the bitmap completely.
To select color ranges in a bitmap using the Magic Wand:
On the stage, select the bitmap you want to work with.
Flash displays a light-colored border around the selected bitmap.
Choose Modify→Break Apart.
Flash redisplays the bitmap as a selected fill.
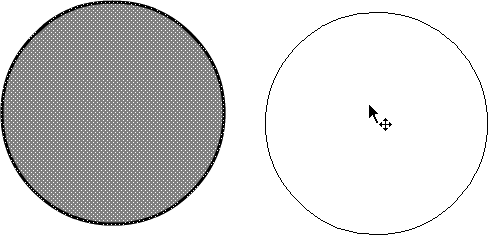
Figure 5-13. Top: The drawing is clearly composed of three shapes, each of which you can click to select separately. Bottom: The bitmap image is much more complex, with no easily identifiable shape outlines. When you click to select the image on the bottom, Flash highlights the entire rectangular image; it makes no distinction among the colors and shapes inside.
From the Tools panel, select the Lasso. Then, in the Options section of the Tools panel, click the Magic Wand (Figure 5-14, top).
As you mouse over the bitmap, your cursor turns into a tiny magic wand.
Figure 5-14. Top: The first time you click the Magic Wand, Flash notes the color you choose. Bottom: The second (and subsequent) times you click the Magic Wand, Flash selects the bits of color nearby that match your first selection. Selecting colored areas of bitmaps with the Magic Wand can be slow going. Don't expect the precision you enjoy when you're working with primitive shapes, like squares and circles. Still, depending on the effect you're after, the Magic Wand can be useful. Here, most of the background was selected with the Magic Wand tool and primed for repainting.
Click the bitmap to select a color range.
Flash highlights bits of selected color.
Click the bitmap again (click a similarly colored area).
Flash highlights the bits of color that match your selection. You can modify the highlighted bits of fill color as you go (cut them, recolor them using the Eyedropper tool described on Copying Color with the Eyedropper, and so on), or continue to click the bitmap as you did in step 4 to add to the selection.
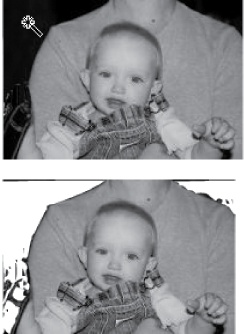
In Figure 5-14 (bottom), the designer first selected, and then cut (Edit→Cut) the pixels to make the selected areas easier to see.