Color is one of the most primitive and powerful communicative devices at your disposal. With color, a skillful animator can engender anxiety or peacefulness, hunger or confusion. She can jar, confuse, delight, soothe, entertain, or inform—all without saying a word.
Color theory is too large a topic to cover completely here. What you will find in this chapter is a quick introduction to basic color theory, as well as tips on how to work with color in Flash. You'll see how to change the colors of the shapes, lines, and images you create with Flash's drawing tools; how to create and reuse custom color palettes (especially useful if you're trying to match the colors in your Flash animation to those of a corporate logo, for example, or to a specific photo or piece of art); and how to apply sophisticated color effects including gradients, transparency, and bitmap fills.
The red you see in a nice, juicy watermelon—or any other color, for that matter—is actually made up of a bunch of different elements, each of which you can control using Flash's Color panel:
Hue is what most people think of when someone says "color." Red, orange, yellow, green, blue, indigo, and violet are all hues. Out of the box, Flash has 216 different hues. These are sometimes called web-safe hues because, in the early days of the web, they were the colors most computers could display. You can also blend your own custom hues by mixing any number of these basic 216 hues.
Saturation refers to the amount of color (hue) you apply to something. A light wash of red, for example, looks pink; pile on more of the same color and you get a rich, vibrant red.
Brightness determines how much of any given color you can actually see. A lot of light washes out a color; too little light, and the color begins to look muddy. At either end of the spectrum, you have pitch black (no light at all) and white (so much light that light is all you can see). In between these two extremes, adding light to a hue creates a tint. For example, if you add enough light to a rich strawberry-ice-cream pink, you get a delicate pastel pink.
Transparency refers to how much background you can see through a color, from all of it (in which case the color is completely transparent, or invisible) to no background at all (in which case the color is opaque). In Flash, you set the transparency (technically, the opacity) for a color using the Alpha field.
Color doesn't exist in a vacuum. The colors you get when you mix pigments aren't the same as the colors you get when you mix different-colored lights (which is how a computer monitor works). Artists working in oil paint or pastel use the red-yellow-blue color model, for example, and commercial printers use the cyan-magenta-yellow-black color model. In the world of computer graphics and animation, though, the color model you use is red-green-blue, or RGB.
This model means you can tell Flash to display any color imaginable just by telling it precisely how much red, green, and blue to display. But if you don't happen to know how much red, green, and blue make up, say, a certain shade of lilac, Flash gives you three more ways to specify a particular color:
HSB. You can tell Flash the hue, saturation, and brightness you want it to display.
Hexadecimal. You can type the hexadecimal number (see Specifying Colors for ActionScript) for the color you want Flash to display. Because hexadecimal notation is one of the ways you specify colors in HTML, you can use hexadecimal numbers to match a web page color precisely to a color in Flash.
Selection. In the Color panel, you can drag your cursor around on the color picker (Figure 5-33) until you find a color you like. This option is the easiest, of course, and the best part is, after you decide on a color, Flash tells you the color's RGB, HSB, and hexadecimal numbers (all of which come in handy if you want to recreate the color precisely, either in another Flash animation or in another graphics program altogether).
In the next section, you'll see how to specify a custom color using Flash's Color panel.
Out of the box, Flash has 216 web-safe colors. But if you can't find the precise shade you want among those 216 colors, you're free to mix and match your own custom colors using Flash's Color panel.
Here's how:
Select Window→Color.
The Color panel shown in Figure 5-38 appears with the Color tab selected.
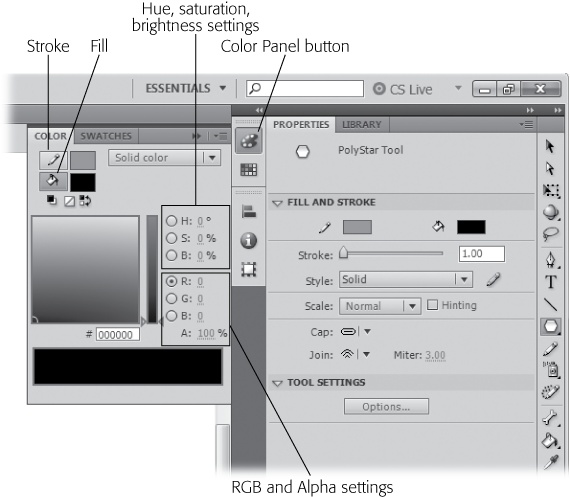
Figure 5-38. You can choose Window→Color to open this panel, or you can click the Color Panel button. Flash packs a lot of power into the tiny Color tab. But most of the time, you can safely ignore everything except the Stroke and Fill icons (one of which you need to choose before you begin working with the Color tab) and the Color and Brightness windows, which you use to select a custom color.
On the Color tab, click either the Fill icon or the Stroke icon, depending on whether you plan to apply your custom color to a fill or a stroke.
Drawing a Shape gives you the lowdown on the difference between the two.
Select a custom color. You can do this one of these ways:
You can drag around on the color picker circle and slider until you see a color you like in the Preview window (Figure 5-38).
If you know them, you can type values for the RGB (red, green, and blue) or HSB (hue, saturation, brightness) colors next to their respective letters in the Color panel. (See the box on Specifying RGB Colors.)
You can type a hexadecimal value in the Hexadecimal Color Designator box. (Hexadecimal, or base 16, values can contain only the following digits: 0–9 and A–F. Folks who spend a lot of time writing HTML code are usually comfortable with hex numbers; if you're not one of them, you can safely skip this option.)
To customize your color even further, you can use the drop-down menu to specify one of the following:
Color type. Choose from Solid (what you want most of the time), Linear (a type of gradient effect described on Applying a Gradient), Radial (another type of gradient also described on Applying a Gradient), and Bitmap (lets you color an object using an image rather than a hue, as on Using an Image As a Fill "Color").
To change the opacity (transparency) of your color, change the percentage in the A setting.
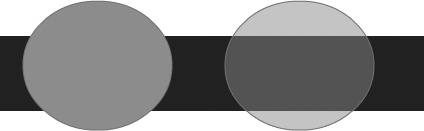
Zero percent tells Flash to make your color completely transparent (see-through); 100% tells Flash to make your color completely opaque (Figure 5-39).
Tip
Invisible color sounds like an oxymoron, but zero percent opacity actually has a place in your bag of Flash tricks. As you'll see on Applying an Ease Preset, you can create a nifty appearing/disappearing effect using see-through color and a shape tween by changing Alpha settings.
Figure 5-39. When you use a transparent color, background objects and the stage itself show through, giving the appearance of a different color altogether. Here, the two ovals are actually the same color, but they don't look like it: The selected oval on the right is 50% opaque, while the oval on the left is 100% opaque.
In the Tools panel, select a drawing tool, and then begin drawing on the stage.
Your strokes (or fills, depending on which icon you selected in step 1) appear in your brand-new custom color.
ActionScript is Flash's programming language. As you'll learn in later chapters, you can use ActionScript to automatically perform the same tasks that you do by hand—including specify colors. Suppose your animation is selling cars. Using ActionScript, you can let your audience change a car's color with the click of a button. ActionScript uses the RGB color system described in the previous section, but identifies individual colors using hexadecimal numbers. Hexadecimal numbers are base 16 instead of the base 10 numbers people use. (How's that for a flashback to math class?) The hexadecimal number system uses 16 symbols to represent numbers instead of the usual 0–9. When the common numeric symbols run out, hexadecimal uses letters. So, the complete set of number values looks like this: 0, 1, 2, 3, 4, 5, 6, 7, 8, 9, A, B, C, D, E, F.
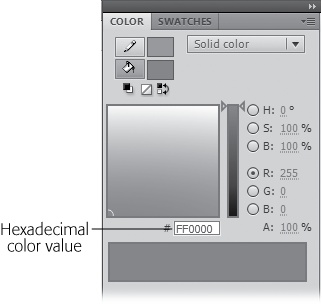
Hexadecimal RGB numbers use six places to describe each color. The first two numbers represent shades of the color red, the second two numbers represent shades of the color green, and the final two numbers represent shades of the color blue. So a color specification might look this: 0152A0. Or this: 33CCFF. At first, it seems odd to see the letters in numbers, but after a while you get the hang of it. So, the hexadecimal number FF0000 is a bright, pure red, while 0000FF is a bright blue. When you choose a color from a color picker, or Flash's Color panel (Window→Color) as shown in Figure 5-40, you're actually choosing an RGB color, whether you know it or not. Select a color, and then find the hexadecimal number in the box below.
You usually use the hexadecimal notation to specify RGB colors in ActionScript. Notice that the hexadecimal number in the color picker box is preceded by a pound sign (#), which is one common way to indicate that this is a hexadecimal number. (Not all hexadecimal numbers include letters, so this notation prevents hexadecimal numbers from being confused with regular numbers.) ActionScript code uses another method to indicate that a number is a hexadecimal number. In ActionScript, you precede all color codes with two characters: 0x. So, if you want to use the color shown in Figure 5-40 in your ActionScript code, you'd specify the color as 0xFF0000. You'll see plenty of other examples of specifying colors in ActionScript, starting with Chapter 12.
After you go to all the hard work of creating a custom color as described in the preceding section, you're probably going to want to save that color as a virtual swatch so you can reuse it again without having to try to remember how you mixed it.
To save a custom color swatch, first create a custom color, as described in the preceding section. You see your custom color displayed in the rectangle at the bottom of the Color panel. In the upper-right corner, click the panel's Options menu and choose Add Swatch. Your color is automatically added the Swatches panel. Click the Swatches tab and you see your new swatch at the bottom of the list next to the gradients, as shown in Figure 5-41.
After you've saved a custom swatch, you can use it to change the color of a stroke or a fill, as you see in Figure 5-42.
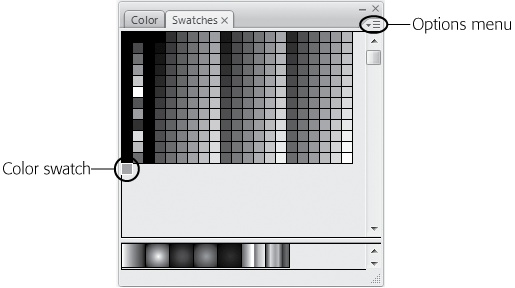
Figure 5-41. Saving a specific color as a color swatch—whether it's one you custom-mixed or a standard color you found on the palette and liked—is kind of like saving the empty paint can after you paint your kitchen. The next time you want to use that particular color, all you have to do is grab the swatch (instead of relying on your memory or spending hours trying to recreate the exact shade). If you work with color a lot, swatches can make your life a whole lot easier.
Instead of choosing or blending a custom color, you can select an image to use as a fill "color," as shown in Figure 5-42. You can select any image in Flash's Library panel (Properties subpanels), or from anywhere on your computer, and apply that image to any size or shape of fill to create some pretty interesting effects.
As you can see in the following pages, the result depends on both the size and shape of the fill and the image you choose.
To use an image as a fill color:
Select all the fills you want to "color."
Figure 5-43 shows an example of two fills: a star, and a free-form fill created using the Brush.
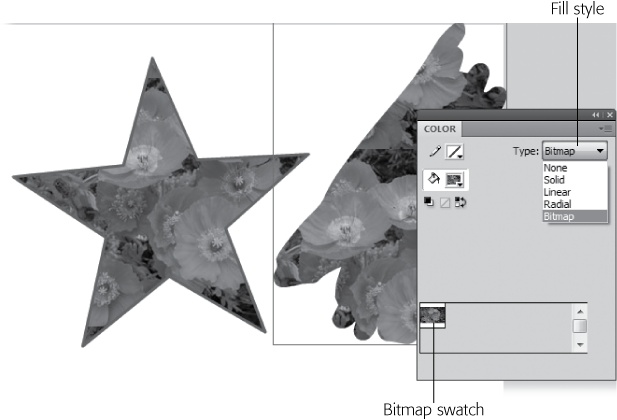
In the Color panel, click the arrow next to Type, and then, from the drop-down list that appears, choose Bitmap (Figure 5-43).
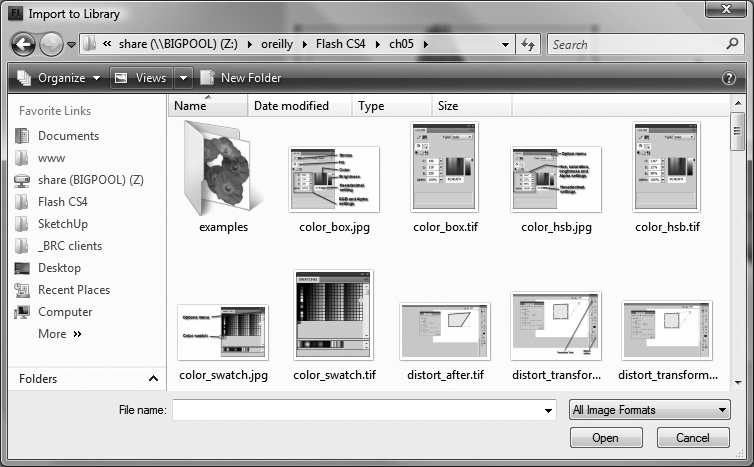
Flash displays the Import to Library window (Figure 5-44).
Tip
To import additional image files to use as fills, in the Color panel, click the button marked Import. Then, with the fill on the stage selected, click the image you want to use.
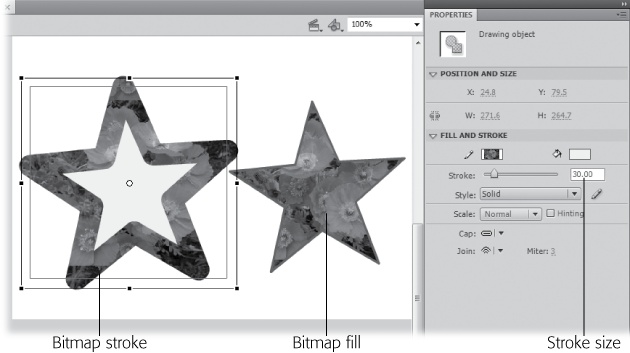
Figure 5-42. You can apply your bitmap swatch to any shape or object that accepts a fill or stroke. If you're using a bitmap on a stroke, you'll want to set the stroke size to 30 or more.
Figure 5-43. Click the Type drop-down menu in the Color panel, and then choose Bitmap to see your bitmap swatches. After you've added a bitmap, it appears as a swatch in your Color panel.
Figure 5-44. The first time you head to the Color panel and set the Type menu to Bitmap, Flash pops open this Import to Library window. Despite the name (Bitmap), Flash lets you import JPEG and other types of image files; you're not limited to .bmp files. Browse your computer for the image file you want, and then click Open.
In the Import to Library window, select the image file you want, and then click Open.
Flash displays the image in the bottom of the Color panel, as well as next to the Fill icon, and "paints" your image with the bitmap. You can apply the bitmap to both fills and strokes, as shown in Figure 5-42. If your fill is larger than your image, Flash tiles the image (Figure 5-45).
Tip
If you apply the new fill "color" to an image by clicking the Paint Bucket icon and then clicking the fill, Flash tiles super-tiny versions of the image inside the fill to create a textured pattern effect.
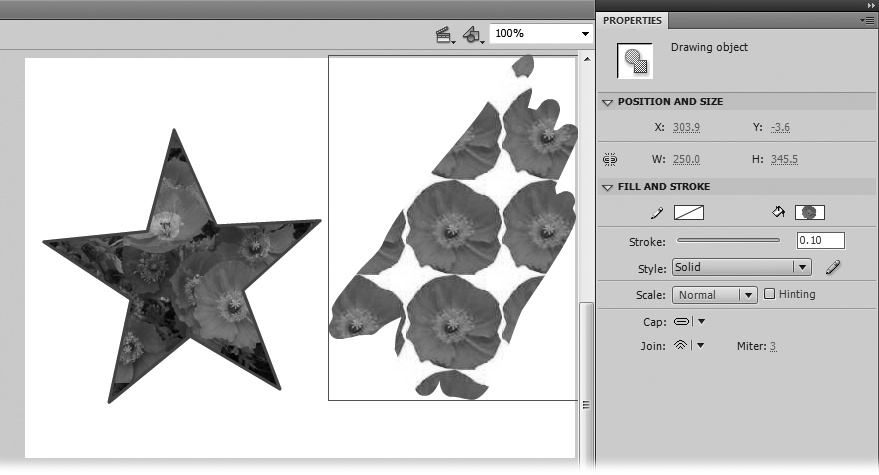
Figure 5-45. How Flash applies your image to your fill depends on the size of your fill and the size of your image (and whether you select the fill, and then change the Style type to Bitmap, or vice versa). Here, the star is smaller than the image imported into Flash, so Flash shows a single image framed by the star's outline. Because the freeform fill is larger than the image, Flash tiles the image inside the freeform fill. Note, too, that Flash sticks the image you imported into the Library panel.
A gradient is a fill coloring effect that blends bands of color into one another. Flash has linear gradients (straight up-and-down, left-to-right bands of color) and radial gradients (bands of color that begin in the center of a circle and radiate outward).
By applying a gradient to your fills, you can create the illusion of depth and perspective. For example, you can make a circle that looks like a sphere, a line that looks like it's fading, and text that looks like it's reflecting light (Figure 5-46).

Figure 5-46. Applying one of the preset radial gradients that Flash provides turns this circle into a ball, and makes this text look shiny, like it's reflecting light. The thin rectangle beneath the text is sporting a linear gradient; its bands of color blend from left to right.
You can apply a gradient swatch to your fills, or you can create your own custom gradients in Flash, much the same way you create your own custom colors (RGB and HSB).
To apply a gradient swatch to an object:
On the stage, select the object to which you want to add a gradient.
Flash highlights the selected object.
Click the Fill Color icon.
Flash displays the color picker (Figure 5-47).
From the color picker, choose one of the seven gradient swatches that come with Flash.
Flash automatically displays your object using the gradient swatch you chose. Figure 5-47 shows a red radial gradient applied to a plain circle to create a simple 3-D effect.
To create a custom gradient:
On the stage, select the object to which you want to apply a custom gradient.
Flash highlights the selected object.
Apply a gradient swatch to the object (see Saving Color Swatches).
If you like, change the color of the gradient, as described next.
In the Color panel, double-click the first color pointer to select it.
Flash displays a color picker.
In the color picker, click to select a color.
In your selected object, Flash turns the color at the center (for a radial gradient) or at the very left (for a linear gradient) to the color you chose. Repeat these two steps for each color pointer to change the color of each band of color in your gradient. If you like, change the thickness and definition of your gradient's color bands, as described next.
In the Color panel, drag the first color pointer to the right.
The farther to the right you drag it, the more of that color appears in your custom gradient. The farther to the left you drag it, the less of that color appears in your custom gradient. Repeat this step for each band of color in your gradient.
Next, if you like, you can add a new band of color to your custom gradient.
Figure 5-47. Applying a gradient swatch is just as easy as applying a color. Flash comes with four radial gradient swatches (white, red, green, and blue) and three linear gradient swatches (white/ black, blue/yellow, and rainbow). If one of these creates the effect you want, great. If not, you can change any of them to create your own custom gradient effects, as you see on page 202.
In the Color panel, click anywhere on the Gradient edit bar.
Flash creates a new color pointer (see Figure 5-48), which you can edit as described in step 3. You can add as many as 15 color pointers (new bands of color) to your gradient.
For even more excitement, apply one or more gradient transforms to your object, as described next.
In the Tools panel, choose the Gradient Transform tool (F). It shares a fly-out menu with the Free Transform tool.
Flash displays a rotation arrow, a stretch arrow, and a reposition point.
You can drag the rotation arrow to rotate the gradient; drag the stretch arrow to stretch the bands of color in your gradient, as shown in Figure 5-49; or drag the reposition point to reposition the center of the gradient, also shown in Figure 5-49.

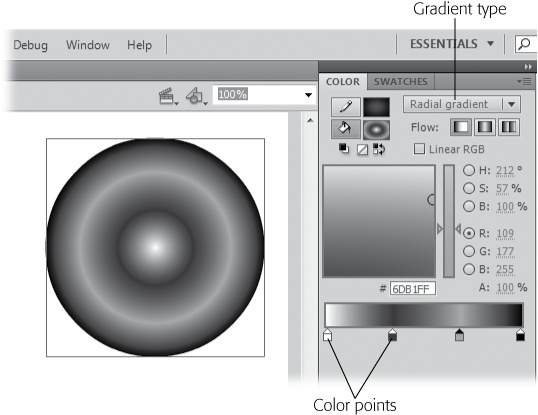
Figure 5-48. Creating a custom gradient is more art than science. As you create new color bands, adjust the colors, and widen and narrow each band using the color pointers, keep an eye on the gradient preview window and on your selected object, too; Flash updates both as you edit your gradient, so you can see at a glance whether you like the effects you're creating.
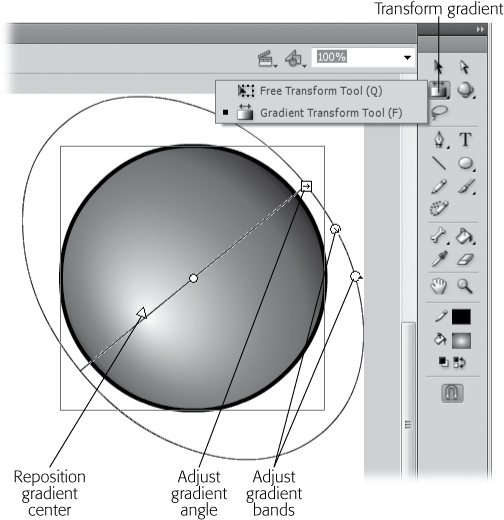
Figure 5-49. Just as regular transforms let you poke and prod regular images to create interesting effects, gradient transforms let you manipulate gradients (with respect to the shapes you originally applied them to) to create interesting effects. Here, dragging the stretch arrow pulls the bands of color, widening the bands at the center and discarding the bands at the edges. Use the circular rotate control to adjust the gradient angle. Drag the reposition point to move the center of the gradient away from the center of the object. This effect is especially useful for creating the illusion that the object is reflecting light streaming in from a different angle.
Depending on the type of animation you're creating in Flash, you might find it easier to import a custom color palette than to try to recreate each color you need. For example, say you're working on a promotional piece for your company, and you want the colors you use in each and every frame of your animation to match the colors your company uses in all its other marketing materials (its brochures, ads, and so on). Rather than eyeball all the other materials or spend time contacting printers and graphics teams to try and track down the RGB values for each color, all you need to do is import a GIF file into Flash that contains all the colors you need: a GIF file showing your company's logo, for example, or some other image containing the colors you need to match.
To import a custom color palette:
In the Swatches panel (Window→Swatches), click the Options menu.
A pop-up menu appears.
From the pop-up menu, select Clear Colors.
Flash clears out the entire color palette on the Color Swatches tab, leaving just black, white, and a gradient (Figure 5-50, right).
Once again, click the Options menu.
The pop-up menu reappears.
From the pop-up menu, select Add Colors.
Flash displays the Import Color Swatch window.
Figure 5-50. Left: Here's what the typical Swatches tab looks like before you clear it (by clicking the Options menu and then selecting Clear Colors). Think twice before you clear the palette: You can get back Flash's basic color palette, but you lose any custom color swatches you've saved in this document. Right: After you clear the color palette, you're left with black, white, and a gradient.
In the Import Color Swatch window (Figure 5-51), click to choose a GIF file, and then click Open.
Flash imports the custom color palette, placing each color in its own swatch in the Swatches panel (Figure 5-50, left).
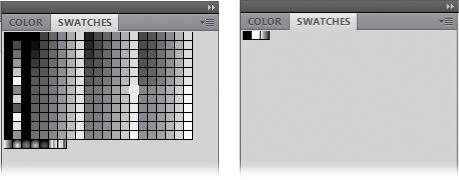

Figure 5-51. When you head to the Swatches panel, click the Options menu, and then choose Add Colors to import a custom color palette, Flash displays an Import Color Swatch window that should look pretty familiar if you've ever had occasion to open a file on a computer. Here, you click to browse your files. When you find the .clr file containing your custom color palette, click Open. Flash brings you back to your Color Mixer panel, where you see that Flash has pulled in each separate color in your .clr file as a separate swatch, ready for you to use.
Tying color elements together is a subtle—but important—element of good design. It's the same principle as accessorizing: Say you buy a white shirt with purple pinstripes. Add a pink tie, and you're a candidate for the Worst Dressed list. But a purple tie that matches the pinstripes somehow pulls the look together.
In Flash, you may find you've created a sketch and colored it just the right shade of green, and you want to use that color in another part of the same drawing. Sure, you could slog through the Color panel, write down the hexadecimal notation for the color and then recreate the color. Or, if you know you're going to be working a lot with that particular color, you could create a custom color swatch (Saving Color Swatches). But if you want to experiment with placing bits of the color here and there on the fly, the Eyedropper tool is the way to go. The Eyedropper tool lets you click the color on one image and apply it instantly to another color on another image.
Note
The Eyedropper tool lets you transfer color only from a bitmap or a fill to a fill, and from a stroke to another stroke. If you want to transfer color to a bitmap, you need the Magic Wand (Lasso).
To copy color from one object to another:
Select Edit→Deselect All.
Alternatively, you can press Ctrl+Shift+A (Shift-⌘-A) or click an empty spot on the stage.
From the Tools panel, click to select the Eyedropper tool.
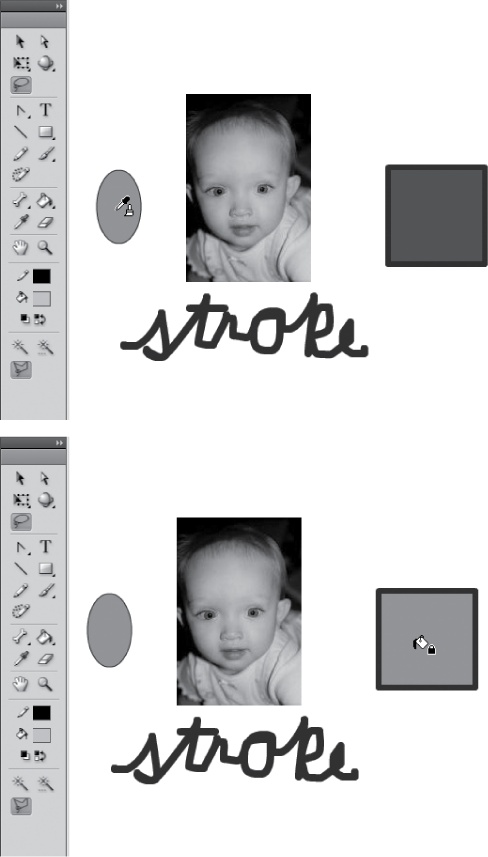
As you mouse over the stage, your cursor appears as an eyedropper while it's over a blank part of the stage; an eyedropper and a brush when it's over a fill (as shown in Figure 5-52, top); and an eyedropper and a pencil when it's over a stroke.
Click the bitmap, fill, or stroke color you want to copy from (imagine sucking the color up into your eyedropper).
If you click to copy from a fill or a bitmap, your cursor turns immediately into a paint bucket; if you click to copy from a stroke, the cursor turns into an ink bottle.
Note
You can copy from a stroke, a fill, or a bitmap using the Eyedropper tool; you can't copy from a symbol or a grouped object.
Figure 5-52. Top: After you click the Eyedropper tool, your cursor changes to remind you what it's passing over. If it's over a fill or a bitmap, you see a little brush next to the eyedropper; it it's over a stroke, you see a little pencil next to the eyedropper. Here, the Eyedropper tool is selecting a fill (the oval). Bottom: Here, the Paint Bucket icon lets you know you need to click a fill.
Click the bitmap, fill, or stroke you want to copy to (imagine squeezing the color out of your eyedropper). If you copied color from a bitmap or a fill, you need to click a fill; if you copied color from a stroke, you need to click a stroke.
Flash recolors the stroke, fill, or bitmap you click, applying the from color to the to color, as shown in Figure 5-52, bottom.