Before you can create an animation, you have to have something to animate. You start with one drawing and then create a bunch more (often by altering the first drawing slightly). For example, if you want to create an animation showing a raccoon marching in place, you need to draw a picture of a raccoon standing still; another picture of the same raccoon lifting its left foot; and still more pictures showing the raccoon putting its left foot down, lifting its right foot, and so on. Put them all together using Flash's timeline (Chapter 3), and you've got yourself an animation.
Note
You're not limited to using your own drawings. Flash lets you import, or pull in, existing drawings and photos—and even sound and video clips. Moving Bones shows you how to import files.
This section shows you how to use basic Flash tools to create a simple stick person drawing. You'll see the Line, Pencil, Pen, Brush, and shape tools (Oval, Rectangle, and PolyStar) in action and learn the differences among them (some are better for creating certain effects than others). You'll also find out how to add color to a Flash drawing and how to erase your mistakes.
One of the true beauties of creating digital artwork—besides not having to clean up a mess of paint spatters and pencil shavings—is that you don't have to track down your art supplies—the one pen that feels good in your hand, the right kind of paper, the sable brush that smells like paint thinner. Instead, all you need to do is display Flash's Tools panel.
In this section, you'll see Flash's drawing and painting tools in action: the Line, Pen, Pencil, Brush, and shape tools. You'll have a chance to use the Selection, Subselection, and Lasso tools. And finally, you'll get a quickie introduction to color—specifically, how to change the colors of strokes and fills.
You use the Line tool in Flash to draw nice, straight lines—perfect all by themselves or for creating fancy shapes like exploding suns and spiky fur.
Make sure you're in object drawing mode, and then follow these steps to start drawing your stick figure using the Line tool:
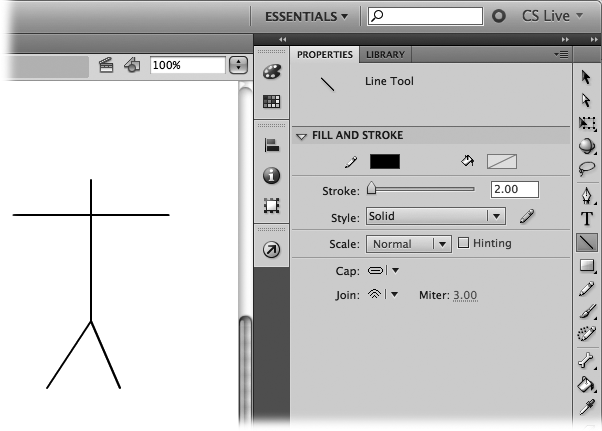
In the Tools panel, click the Line tool, as shown in Figure 2-13.
Flash highlights the Line tool in the Tools palette to let you know you've successfully selected it. When you move your cursor over the stage, you see it's turned into crosshairs.
Click anywhere on the stage and drag to create a short horizontal line. To end your line, let go of the mouse.
Your line (technically called a stroke) appears on the stage.
Click above the horizontal line, and drag down to create a vertical line.
The result is a cross. Next, you'll add legs by drawing diagonal lines.
Click the bottom of the vertical line and drag down and to the left; then click the bottom of the vertical line again and drag down and to the right.
Figure 2-13 shows the result. It doesn't look like much yet, but it's actually the basis for a stick figure you'll create as you experiment with Flash's drawing and painting tools in the following sections.
Figure 2-13. The Line tool is the easiest, quickest way to create straight lines in Flash (like the four straight lines you see here). If you'd like to customize the way your lines look, head to the Properties panel. There you find options that let you make a line thicker, change it to a different color—even turn it into a dashed or dotted line, instead of a plain solid line. (If you don't see the Properties panel, choose Window→Properties to display it.)
The Pencil tool lets you draw free-form strokes on the stage, similar to the way you draw using a regular pencil on a regular sheet of paper. Unlike the Line tool, the Pencil tool doesn't make you stick to the straight and narrow, so it lends itself to curving lines and fine details, like hands and faces. Here's how to use the Pencil tool:
In the Tools panel, click the Pencil tool.
Flash outlines the Pencil tool to let you know you've successfully selected it, and Pencil-related options appear in the Options section at the bottom of the Tools panel. When you move your cursor over the stage, you see it's turned into a miniature pencil.
In the Options section at the bottom of the Tools panel, click the down arrow.
A fly-out menu appears.
In the fly-out menu, turn on the checkbox next to Smooth.
The Smooth option gently corrects any jiggles you make as you draw with the pencil—essential when you're trying to draw small lines, like this stick figure's face and hands.
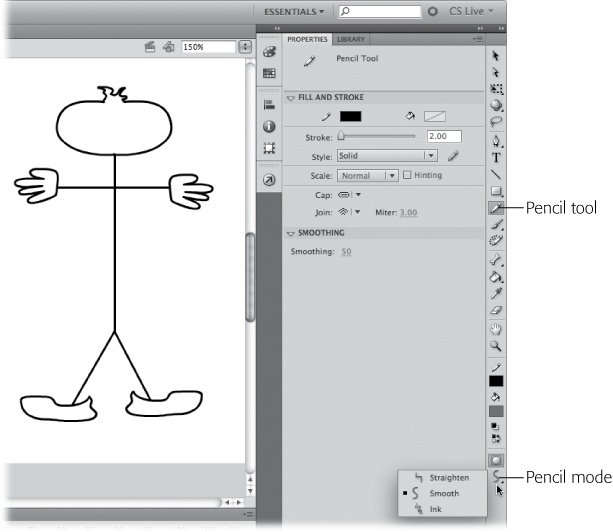
Click the stage and drag to draw a little face, hands, and feet similar to the ones in Figure 2-14.
While you're on the Options section, there are other ways you can modify how the Pencil tool works: The Straighten option emphasizes the corners you draw with the Pencil (for example, turning squarish circles into squares or roundish squares into circles—definitely not what you want when you're trying to draw the feet you see in Figure 2-14), and the Ink option leaves your Pencil strokes just as they are, jiggles and all.
Figure 2-14. Don't be surprised if your results look a bit shakier than you might expect. If you've got an extra hundred bucks lying around, you can buy a graphics tablet (see the box on the next page) to make drawing in Flash a bit easier, but most people start out using a computer mouse to draw—and it's a lot harder than it looks. Fortunately, Flash has Pencil options you can use to help you control your drawing results.
Here are some tips for drawing with the Pencil tool:
If the object you're drawing with the Pencil is small, press Ctrl+= (⌘-=) to get a better view. You can use the Hand tool (H) to position the stage where you want it. When you're ready to zoom out, press Ctrl+hyphen (⌘-hyphen). For more tips on changing the view, zoom over to Zoom In and Out.
Don't do the same work twice. For example, in Figure 2-14, a hand and shoe were drawn once, then duplicated (Ctrl+D or ⌘-D). While still selected, they were flipped horizontally using Modify→Transform→Flip Horizontal.
You can also straighten or smooth a line you've already drawn. To do so, select the line you want to modify using any selection tool—the Lasso tool (Subselection tool (shortcut key: A)) works great. When a line is selected, buttons for the Straighten and Smooth commands also appear in the Options section of the Tools panel. You can click multiple times to increase the effect.
If you want to create a complex shape consisting of a lot of perfect arcs and a lot of perfectly straight lines, then the Pen tool is your best choice.
To create straight lines with the Pen tool, click the stage to create anchor points, which Flash automatically connects using perfectly straight segments. The more times you click, the more segments Flash creates—and the more precisely you can modify the shape you draw, since you can change each point and segment individually (see Chapter 5). When you want to stop creating anchor points, double-click the mouse or press the Esc key.
If you drag the Pen tool (instead of just clicking), the Pen lets you create perfectly curved arcs.
Note
Working with the Pen tool is a lot (a whole lot) less intuitive than working with the other Flash drawing tools. Because you can easily whip out a triangle with the Line tool or a perfect circle with the Oval tool, save the Pen tool for when you're trying to draw a more complex shape—like a baby grand piano—and need more control and precision than you can get freehanding it with the Pencil or Brush.
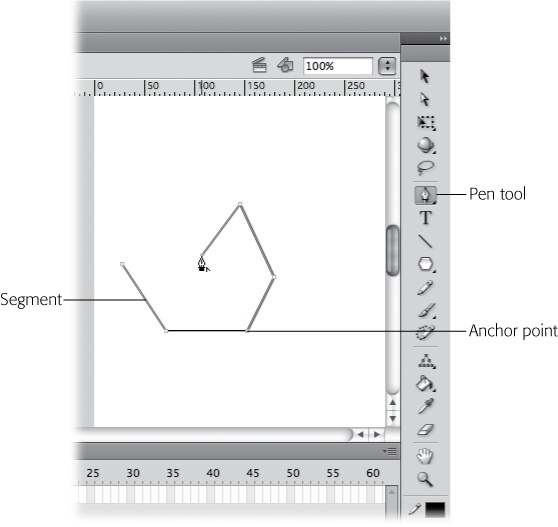
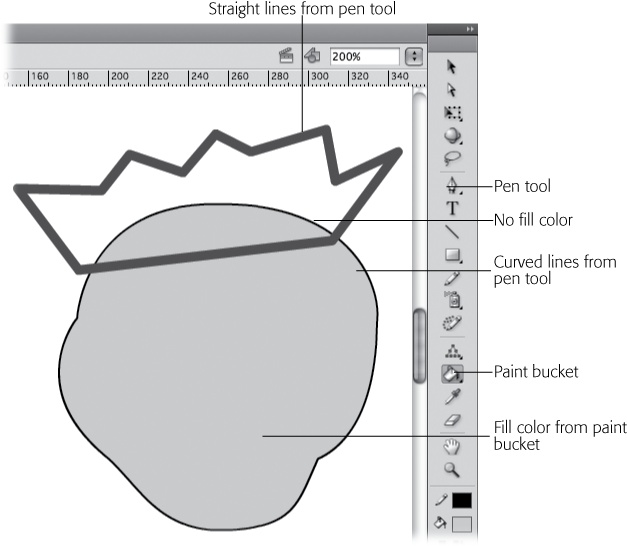
As you can see in the Tools panel in Figure 2-15, the Pen tool icon looks like the nib of an old-fashioned fountain pen.
To draw a straight line with the Pen tool:
Select the Pen tool.
Your cursor changes into a miniature pen nib.
Click the stage, move your cursor an inch or so to the right, and then click again.
Two anchor points appear, connected by a straight segment.
Move the cursor again, stopping where you want to anchor the line, and then change direction again.
Figure 2-15 shows the results of several clicks. Flash keeps connecting each anchor point every time you click the stage. To break a line and start a new one, double-click where you want the first line to end.
To draw a curve with the Pen tool:
Select the Pen tool.
Your cursor changes into a miniature pen nib.
Click the stage once, and then move your cursor an inch or so to the right.
A single anchor point appears.
Note
Flash lets you change the way it displays anchor points, as well as the way your cursor appears, when you're using the Pen tool. You can even tell Flash to preview line segments for you, much as it previews curves. To change any of these preferences, select Edit→Preferences (Flash→Preferences for the Mac). Then, in the Preferences window, select the Drawing category. The Pen tool preferences appear at the top of the Preferences window.
Click again, but this time, without letting go of the mouse button, drag the cursor around.
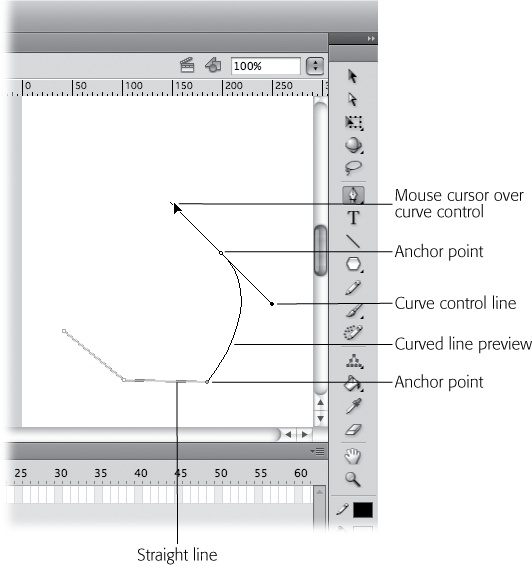
As you drag, the anchor point you create sprouts two control lines, and your cursor turns into an arrow. As you can see in Figure 2-16, something different is happening. Flash displays a preview curve and a control line that lets you adjust the angle of the curve. Drag the end of the control line, and the shape of the curve changes.
Figure 2-16. To create a curve using the Pen, click the stage to begin the curve. Then move your cursor an inch or so, click again, and then drag. While you're dragging, Flash displays a temporary line with two small handles. These control lines don't show in your document; you use them to shape your curve. Drag the handles on the ends of the control lines. As you adjust the control lines, the curve changes shape.
Release the mouse button.
When you let go of the mouse button, Flash draws the curve on the stage. The control lines disappear when you choose another tool. Using the Pen tool, you can create both straight lines and curves, as shown in Figure 2-17.
Continue drawing connected lines by clicking other points on the stage.
Click, move, and click to draw straight lines. Click, move, and drag to create curves. Adjust the curves using the handles on the end of the curve control lines. If you've never used tools like these before, don't worry; you'll get better with a little practice.
Create a closed loop shape by clicking the first point you created in step 2.
When the cursor is over a point that closes the loop, you see a small circle to the right of the Pen tool cursor.
Figure 2-17. Here's an example of two finished shapes drawn with the Pen tool. The head shape is made from curves that create a closed loop. The fill color was created with the Paint Bucket tool, as described on page 84. The hat is made of connected straight lines with the stroke thickness set to 5 pixels.
Once you feel comfortable drawing straight lines and curved lines, use curves to create a cartoon head, similar to the one in Figure 2-17. Then use straight lines to make a hat for your creation.
Drawing curves can be a bit tough until you get the hang of controlling the shape of the curves as you draw. One of the great things about the Pen tool is that you can make adjustments after the fact. Here are some tips for working with the Pen tool:
You can change the path of a line or the shape of an object by moving anchor points with the Subselection tool (A).
To change the arc of a curve, click an adjacent anchor point with the Subselection tool. The anchor point sprouts control lines, and you can adjust the curve by dragging the points on the end of the control lines.
Use the Convert Anchor Point tool (C) to turn hard angles into curves and vice versa.
Use the Add Anchor Point tool (=) to—you guessed it—add anchor points to a line segment. The Delete Anchor Point tool (-) removes anchor points but leaves a line segment between the remaining anchor points.
Once you get used to the Pen tool's drawing system, you'll find that you can draw very precise shapes. (Plus, all your practice with the Pen tool will pay off if you ever use Adobe Illustrator or similar programs that use the same Bezier curves to draw complex shapes.)
You use the Brush tool to create free-form drawings, much like the Pencil tool described on Pencil tool. The differences between the two include the following:
You can change the shape and size of the Brush tool. You can choose a brush tip that's fat, skinny, round, rectangular, or even slanted.
The Brush tool creates fills, while the Pencil tool creates strokes. This distinction becomes important when it comes time to change the color of your drawings (see Adding Color).
Note
The Brush tool really shows its stuff when you use it with a graphics tablet, as described in the box on Mouse vs. Graphics Tablet. That's because the Brush tool makes great use of the tablet's ability to sense pressure. Press hard for thick, bold lines. Lessen the pressure for thin, delicate lines. With practice, you can create great calligraphic effects.
To use the Brush tool:
On the Tools panel, click the Brush tool (the little paintbrush icon).
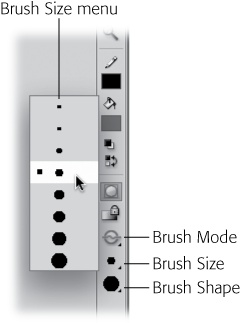
Flash displays your Brush options—including Brush Mode, Brush Size, and Brush Shape—in the Options section of the Tools panel. If you have a graphics tablet, you also see Brush Pressure and Use Tilt buttons.
From the Brush Size drop-down menu (Figure 2-18), select the third- or fourth-smallest brush size.
The larger brushes let you paint great, sweeping strokes on the stage. But in this example, you'll be drawing hairs on your fellow's head, so a modest brush size is more appropriate. Your cursor changes to reflect your choice (you can see this change if you mouse over the stage).
From the Brush Shape drop-down menu, choose the round brush shape.
Each brush shape gives you a dramatically different look. To draw hair, as in this example, you may choose round because it most closely approximates the results you get with a real brush. Once again, your cursor changes to reflect your choice.
Click the down arrow next to Brush Mode, and then, from the pop-up menu that appears, choose Paint Normal.
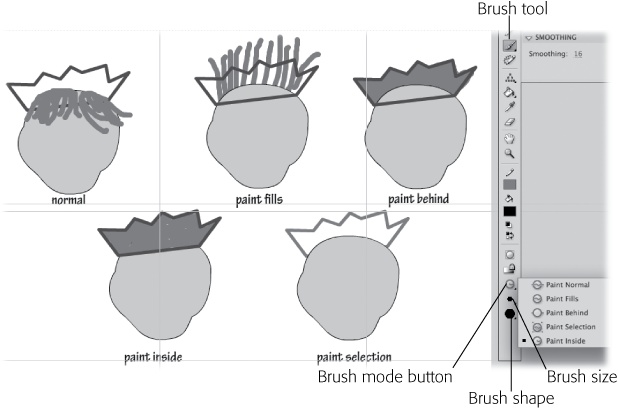
Brush modes change the way the Brush tool paints over or under strokes and fills already in your drawing. Figure 2-19 shows the different effects. Here you choose Paint Normal to draw hair that shows over the head shape and the hat. Later, you'll see how to tuck that hair under the hat.
Figure 2-19. Here you get an idea of how the different brush modes work. The hair was brushed into this picture using the five different brush modes.
Here's a rundown of all the brush modes you can choose from:
Paint Normal. Flash uses this mode unless you tell it otherwise. If you brush over an existing object on the stage using Paint Normal, your brush stroke appears on top of the shape.
Paint Fill. When you brush over an existing object on the stage using Paint Fill, your brush stroke appears on top of the fill portion of the object, behind the stroke, and on the stage.
Paint Behind. When you brush over an existing object on the stage using Paint Behind, your brush stroke always appears behind the object.
Paint Selection. When you brush over an existing object on the stage using Paint Selection, your brush stroke appears only on the parts of the shape that are both fills and that you've previously selected.
Paint Inside. If you brush over an existing object on the stage using Paint Inside and begin inside the stroke outline, your brush stroke appears only inside the lines of an object (even if you color outside the lines). If you begin outside the lines, then your brush stroke appears only outside (even if you try to color inside them).
Click the stage just about where your stick person's hair should be and drag your mouse upward; release the mouse button when the hair is the length you want it.
Your paintbrush stroke appears on the stage.
Repeat to create additional locks of hair.
You should see a result similar to the one shown in Figure 2-19.
When you draw in object mode, each part of your drawing (the head, the hat, the hair) is an object, and you can place it in front of or behind the other objects. Imagine that the head, hat, and hair are each cardboard cutouts that you're placing on your desktop. You set them down so that the head is at the bottom, the hair cutout covers the top of the head, and the hat covers part of the hair. Perfect! Flash works the same way. When you draw objects, Flash places each new object in front of the last. But what if you don't draw them in the proper order? Suppose, in the cartoon face example, that you drew the hair on top of the hat? Flash can help. Follow these steps to move the hat to the front.
Note
If you don't have a drawing handy for this exercise, you can download 02-3_Arrange_Objects.fla from the Missing CD page at www.missingmanual.com/cds.
With the Selection tool, click the hat's outline.
Before you can rearrange the stacking order, you need to select an object to move.
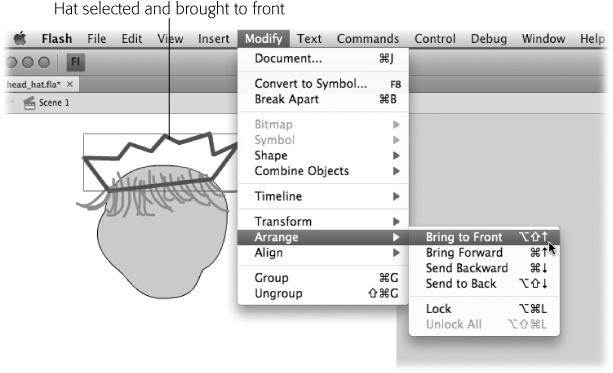
Go to Modify→Arrange→Bring to Front or press Shift+Ctrl+up arrow (Windows) or Option-Shift-up arrow (Mac) to move the hat to the front.
The hat moves in front of both the head shape and the hair, as shown in Figure 2-20. You can still move the hat, hair, or head around the stage with the Selection tool. They stay in the same stacking order (head on bottom, hair in middle, hat on top) until you make another change using the Modify→Arrange commands.
Figure 2-20. Use the Modify→Arrange commands to position parts of your drawing in front of or behind other objects. Here the hat is brought to the front so that it partially covers the head and the hair. You can find a copy of this 02-3_Arrange_Objects.fla on the Missing CD page (www.missingmanuals.com/cds).
There are four commands that help you arrange the stacking order of the objects you've drawn:
Bring to Front. Moves the selected object to the very front of the stack.
Bring Forward. Moves the selected object forward one level in the stack.
Send to Back. Moves the selected object to the very back of the stack.
Send Backward. Moves the selected object back one level in the stack.
As an alternative to using menu commands, you can select an object and then use Ctrl+up arrow or Ctrl+down arrow (⌘-up arrow or ⌘-down arrow) to move the selected object forward or backward. Add the Shift key (Shift+Ctrl+up arrow or Shift+Ctrl+down arrow for PCs; Shift-⌘-up arrow or Shift-⌘-down arrow for Macs) to move all the way to the front or all the way to the back.
Tip
Remember, shapes drawn in merge drawing mode always appear behind objects drawn in object drawing mode. If you want to rearrange mixed graphics, then you need to use the timeline layers, as explained in Chapter 4.
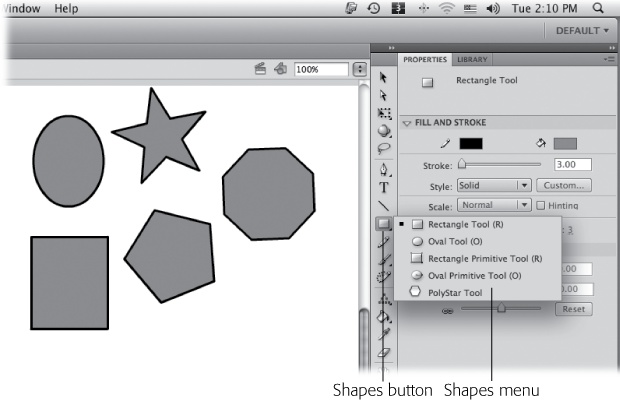
Flash gives you a quick way to create basic shapes: the Oval tool, which lets you draw everything from a narrow cigar shape to a perfect circle; the Rectangle tool, which lets you draw rectangles, from long and skinny to perfectly square; and the PolyStar tool, which you can use to create multisided polygons (the standard five-sided polygon, angled correctly, creates a not-too-horrible side view of a house) and star shapes.
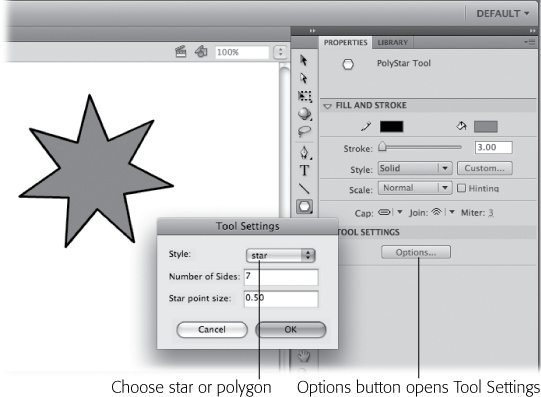
You can see the Oval, Rectangle, and PolyStar tools in Figure 2-21; Figure 2-22 shows you how to configure the PolyStar tool.
Figure 2-21. The Oval, Rectangle, and PolyStar tools are all tucked under the same button on the Tools panel. The icon and related tooltip for the last-used shape appear on the button. The small triangle in the lower-right corner of the button is your clue that there are more options. To see the other shape options, click and hold down the button. A small menu appears showing all the options.
Figure 2-22. One of the shape tools is called PolyStar because it creates polygons and stars. After choosing PolyStar on the Tools panel, click the Options button in the Properties panel. Then, in the Tool Settings box, choose either "polygon" or "star" from the drop-down menu.
Tip
You can always create a circle, a square, or a star using one of the other drawing tools, like the Pencil or the Line tool. But most people find the shape tools quicker and easier.
To create a shape:
Click the shape tool you want (choose from Oval, Rectangle, or PolyStar, as shown in Figure 2-21).
Your cursor changes into a cross.
Click the stage where you want to start your shape, and then drag your cursor to form the shape. When you're satisfied with the way your shape looks, release your mouse button.
Flash displays your shape on the stage.
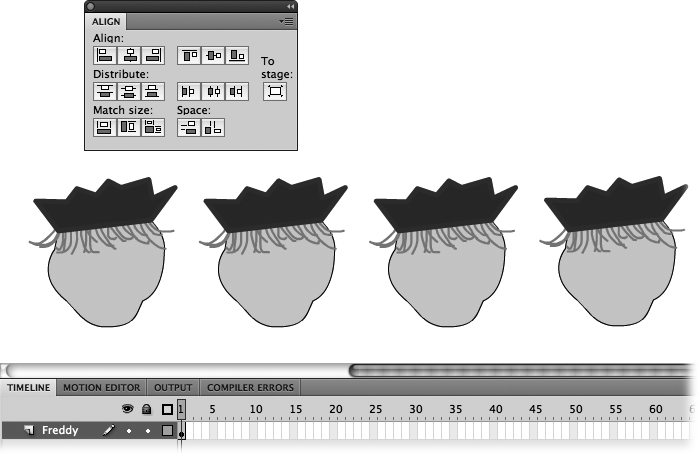
Sometimes dragging stuff around the stage and eyeballing the result works just fine. Other times, you want to position your graphic elements with pinpoint precision. Using the Align panel, you can align graphic elements based on their edges (top, bottom, right, left) or by their centers. And you can base this alignment on the objects themselves (for example, you can line up the tops of all your objects) or relative to the stage (useful if you want to position, say, several Freddy Flash heads precisely at the bottom of the stage, as shown in Figure 2-23). You can even distribute individual objects evenly with respect to one another.
To display the Align panel, select Window→Align or press Ctrl+K (Windows) or ⌘-K (Mac).
Figure 2-23. The Align panel gives you the opportunity to align a single object (or whole groups of selected objects) along the left side, right side, top, or bottom of the stage, and more. First select Modify→Align→To Stage. Select the objects you want to align, and then click the alignment icon from the Align panel.
Only in the digital realm does an eraser work so effectively. Try erasing a goof on paper or canvas, and you not only have shredded eraser everywhere, but you're also left with ghostly streaks of paint, lead, or charcoal.
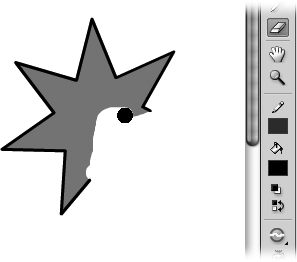
No so in Flash. Using the Eraser tool (Figure 2-24), you can effectively wipe anything off the stage, from a little speck to your entire drawing.
Figure 2-24. Here the Eraser tool is rubbing out the PolyStar shape. Erasing in Flash isn't useful just for fixing mistakes; you can create cool effects (like patterns) by erasing, too. If you happen to start erasing the wrong thing, no problem; just press Ctrl+Z (⌘-Z).
Note
Using the Eraser tool is similar to selecting Edit→Undo only in the sense that they both remove objects from your drawing. The difference: Edit→Undo tells Flash to work sequentially backward to undo your last actions or changes, the most recent one first. The Eraser tool, on the other hand, lets you wipe stuff off the stage regardless of the order in which you added it.
To use the Eraser tool:
In the Tools section of the Tools panel, click the Eraser tool to select it.
Your cursor changes to the size and shape of eraser Flash assumes you want. To make your eraser larger or smaller, head to the Options section at the bottom of the Tools panel and, from the Eraser Shape pop-up menu (Figure 2-25), select the eraser size and shape you want. (You want a nice fat eraser if you have a lot to erase, or a skinny one if you're just touching up the edges of a drawing.)
On the stage, click where you want to begin erasing, and drag your cursor back and forth.
Flash erases everything your cursor touches (or not, depending on the Eraser mode you've chosen—see the following section for details).
Tip
To erase a line or a fill in one fell swoop, click the Faucet option, and then click the line or fill you want to erase. To erase everything on the stage and the Pasteboard (the area surrounding the stage) double-click the Eraser icon on the Tools panel.
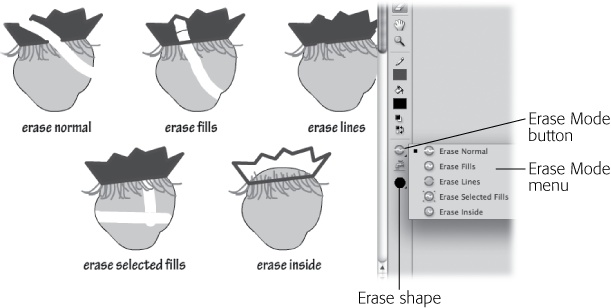
Flash has a ton of Eraser modes you can use to control how the Eraser tool works (and what it erases). To see them, click the Erase Mode button in the Options area (Figure 2-25), and then, from the fly-out menu that appears, select one of the following modes.
Note
The Eraser tool works only on editable objects. It doesn't work on closed groups or symbols. To remove grouped objects and symbols, click them with the Selection tool and then press Delete.
Erase Normal. Flash uses this mode unless you tell it otherwise. When you erase over an existing object on the stage using Erase Normal, Flash erases everything, fill and stroke included.
Erase Fill. When you erase over an existing object on the stage using Erase Fill, only the fill portion of the object disappears.
Erase Lines. When you erase over an existing object on the stage using Erase Lines, only the stroke portion of the object disappears.
Erase Selected Fills. When you erase over an existing object on the stage using Erase Selected Fills, you erase only those parts of the object that are both fills and that you've previously selected (using one of the selection tools described on Selecting Objects on the Stage).
Erase Inside. If you erase over an existing object on the stage using Erase Inside, Flash erases the inside (fill) of the object as long as you begin erasing inside the stroke outline; if you begin erasing outside the line, it erases only outside the line.
You can cut an irregular shape out of the middle of an object using the Eraser tool. If you're going for precision, for example, then you can use an eraser with a small head to outline the area you're erasing and then use the Faucet tool to quickly erase the rest. For example, say you want to draw a donut. Here's how:
Select the Oval tool on the Tools panel.
If you don't see the Oval tool, it's probably hiding under the Rectangle tool or the PolyStar tool. Notice the little triangle that indicates that there are more options on the menu? Make sure you choose the Oval tool and not the Oval Primitive tool. The Oval Primitive tool has a dot in the center.
Drag out a decent-sized oval on the stage.
You're drawing a donut, so there's no need to make a perfect circle, but do make it large enough so that you can cut out a donut hole.
On the Tools panel, click the Eraser tool.
When you move the cursor over the stage, you see that it's changed to a black dot. That's the Eraser, and the dot cursor shows how big the eraser head is.
In the Options section at the bottom of the Tools panel, choose a small eraser head.
At the bottom of the Tools panel is the drop-down menu that sets the size and shape of the Eraser.
Using the Eraser, draw a circle within your oval to outline the donut hole.
As you drag, the fill color disappears, and you see the stage color beneath. (Make sure you complete the circle, or the Faucet will erase the entire fill color in your donut.)
On the Tools panel, click the Faucet, and then click the donut hole.
The rest of donut hole disappears as the Faucet tool erases all the fill color from inside the cutout.
