When it comes to moving objects around the stage, the motion path rules. That means you need to know how to change the path. As explained back on Making It Move with Motion Tweens, you make symbols move on the stage using the X and Y position properties. If the values change from one property keyframe to the next, then the symbol moves. You set the X and Y properties by moving the playhead to a frame and then moving the object or changing the X and Y properties in the Properties panel. Either way, your symbol moves, and it sprouts a motion path, like the one shown in Figure 3-18.
Suppose you've got the perfect motion, and everything's working just the way you want. The only problem is that it's on the wrong place on the stage. You can move the entire motion path and the symbol that's being animated in one fell swoop. Here are the steps:
With the Selection tool (solid arrow), click anywhere on the motion path.
The path becomes slightly thicker—that's its version of a selection highlight.
Move the cursor over any point on the path.
The cursor shows the move icon—a cross with four arrows.
Click, drag, and then release the mouse button.
The motion path and the symbol move as a single unit. Once you release the mouse button, the path is in a new location, but everything else about the tween, the timing and the property changes, is the same.
Moving an entire motion path is easy for you, but Flash is working hard behind the scenes. It's changing all the X and Y properties for every property keyframe and calculating the new values for the tween.
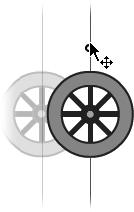
The shortest distance between two points is a straight line, and that's exactly what Flash uses when you first make a symbol move. You're not stuck with that choice, though—it's easy to make the line curve.
With the Selection tool, move the cursor to an unselected motion path.
If the path is unselected, you see the curve cursor shown in Figure 3-19. The key here is that the path must not be selected. If it's selected, Flash shows the move cursor (the cross with four arrows).
Click, drag, and then release the mouse button.
As you drag, you see a preview of the new curved motion path. When you release the mouse button, the path is set.

Figure 3-19. Left: Move the Selection cursor near a motion path, and you see the curve icon appear. Right: Click and drag to create a curved path.
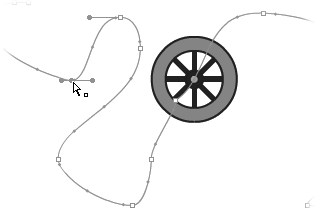
This method for creating curves works well, but it takes some practice to create just the path you want. You can also combine the curve technique with fixed property keyframes along the motion path. For example, to create a double curve, start with a straight path and pull it into a curve, as shown at right in Figure 3-19. Move the playhead to a frame so that the wheel is centered on the path. Then, drag the wheel in the opposite direction of the curve. Moving the wheel creates a new property keyframe on the path and creates a motion path similar to the one in Figure 3-20.

If you want to reposition one of the end points without moving the rest of the motion path, use the Subselection tool (A), which looks like a hollow arrow. Click the motion path with the Subselection tool, and the path end points appear as hollow squares. With the Subselection tool, you can click and drag these points to a new location.
Here's one last motion path trick to learn. Suppose you want to create a complex motion path with lots of curves or lots of sharp angles. You can do that manually, using the techniques already described in this chapter, but there's a faster method. You can draw a line and then paste it into your tween. You can't draw directly in the tween, so you need to draw the path in a separate layer or even in a separate Flash document.
Draw a line using either the Pencil, Pen, or Line tool.
The Pencil is best for freehand paths. The Pen works best for paths where you need precise control. The line must be simple, with a clear starting and ending point. For example, an X will not work as a motion path, and a line that crosses over itself may not work as expected.
Select the entire path, and then press Ctrl+C (⌘-C).
Flash copies the line to the Clipboard. If you've got a long, twisty, curvy line, then you may have to double-click to select the entire line.
Select the path in your tween, and press Ctrl+V (⌘-V).
The new path replaces the old path. It uses the same starting point as the original, so you may need to move the entire path (as described on Editing the Motion Path) to position it properly on the stage.
You can also paste a hand-drawn path into a motion tween that doesn't yet have a path. Just select the symbol you want to move, and then press Ctrl+V (⌘-V). There's an extra benefit to drawing a path with the Pencil or Pen tool. As shown in Figure 3-21, drawn paths have anchor points within the line. You can use these points to accurately reshape the line.