The Motion Editor is like a powerful microscope that lets you examine a motion tween's innards. Combining the features of the timeline and the Properties panel, the Motion Editor focuses on a single tween span, showing you its workings at a seemingly molecular level. Not only that, but the Motion Editor also gives you the power to make a change to any tweenable property at any point in time. With all this firepower, you can create very complex tweens and control them with better precision than ever before.
To open the Motion Editor, go to Window→Motion Editor. The Motion Editor won't show its stuff unless you select either a tweened object on the stage or a tween span in the timeline. (If you want to experiment with an existing tween, you can download 08-4_Motion_Editor.fla from the Missing CD page at www.missingmanuals.com/cds.) At first glance, the Motion Editor may look a little intimidating, with lots of properties, numbers, widgets, and graph lines. Don't be put off—it's not tough to master these elements and bend those motion tweens to your iron will. If you've used Flash's custom easing feature before (it's been around since Flash 8), you have a head start.
Tip
Using the Essentials workspace, which this book uses throughout, the Motion Editor appears as a tab below the stage, next to the timeline (Figure 8-12). If you have room, though, you may want to drag the tab to a new location—like a second monitor. Giving the Motion Editor more room makes your work easier and faster.
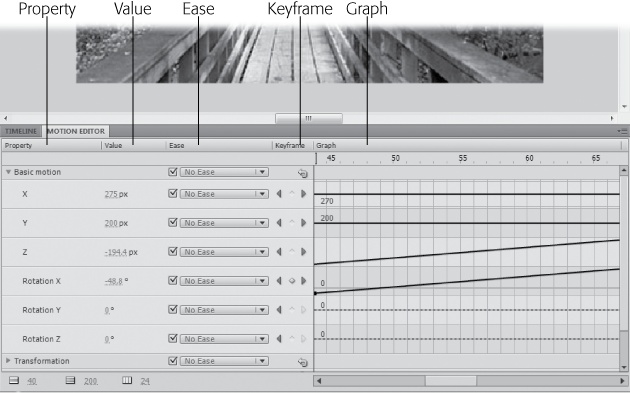
Figure 8-12. At first, the Motion Editor may seem more like a tool for math geeks than one for graphic artists. Give it a chance, though. Master a couple of Motion Editor principles, and you'll enjoy the control and precision it provides.
There's a lot going on with the Motion Editor, so it's best to introduce yourself a section at a time. At the very top, there are labels for each of its sections:
Below the Property label, you see the same properties that you've used in the Properties panel, like the X/Y position coordinates, the W/H (width and height) properties, and so on.
The Value settings should look familiar by now. For each property, you can click and type a new value, or you can drag to scrub in a value.
The Ease tools (covered on Easing Tweens) let you speed up or slow down specific portions of your tweens. For example, you could make a moving car start off slowly and then gain speed.
The triangle buttons under Keyframe give you a way to jump forward and backward among the property keyframes. You use the diamond button to add and delete property keyframes.
The Graph gives you a visual representation of the way properties change over time, showing the property values as they increase and decrease. The vertical axis displays property values, while the horizontal axis measures time—just the way things are in the main timeline. The squares on the graph represent property keyframes. The graph isn't just some way to show you the geeky innards of your tween; it's a design tool. You can drag the graph elements around to make changes in your animation. (More on that on A Tour of the Motion Editor.)
You won't see anything at all in the Motion Editor unless you select a tween span in the timeline or a tweened object on the stage. Most of the time, you want to set up the basic framework of your tween in the main timeline before you work with the Motion Editor. That way, you can establish the timing for the major events in the tween, using some of the steps described on Editing a Tween Span. Using a famous cartoon example, you might have the roadrunner run off a cliff at Frame 6; then up to Frame 12 the Coyote hangs in midair, feet churning; from Frame 12 to Frame 18, the Coyote drops to the desert floor, and so on. After you have the basic timing for these major positions worked out, you can turn to the Motion Editor to perfect the details. The Motion Editor breaks down all the tweenable properties into five categories:
"Basic motion" is where you change the X, Y, and Z properties, positioning tweened objects in two and three dimensions. (You can move only movie clips and text fields in three dimensions, so those are the only types of objects to which you can apply the Z property.)
Under Transformation, you tween properties like Scale X (width), Scale Y (height), Skew X, and Skew Y.
Color Effect includes properties for Alpha, Brightness, Tint, and Advanced Color (a combination of color effects).
Use the Filters panel to apply filters like Glow, Blur, and Drop Shadow.
Eases give you the ability to speed up or slow down property changes at specific points in the timeline. The details are on Easing Tweens.
Within each of those categories you can do the following:
Add and remove property keyframes (Adding and Removing Property Keyframes).
Move property keyframes to change values and timing (Moving Property Keyframes).
Fine-tune and smooth property changes using Bezier curves (Moving Property Keyframes).
Add and remove color effects and filters (Adding and Removing Color Effects).
Apply easing to change the timing of property changes (Easing Tweens).
Tip
Keep in mind that a visual effect, like the aforementioned Coyote, can be composed of several different tweened objects. The spinning legs can be a movie clip that stretches as gravity takes effect—the legs keep spinning but become elongated. Facial features like the mouth and eyes can be separate tweened objects on different layers, giving you the opportunity to create lots of different facial expressions.
In the Motion Editor, every property has its own graph line, as shown in Figure 8-13. Move from left to right along that graph line, and you're marking the passage of time. Like the main timeline, it's measured in frames on a scale at the top of the Motion Editor. The vertical axis of the graph tracks changes in value for that particular property. The units used differ according to the property. For example, if it's the Y coordinate in the "Basic motion" panel, the value relates to the vertical position of an object on the stage, and it's measured in pixels. If it's the alpha value in the Color Effect group, it's a percentage indicating the transparency (0%) or opacity (100%) of an object.
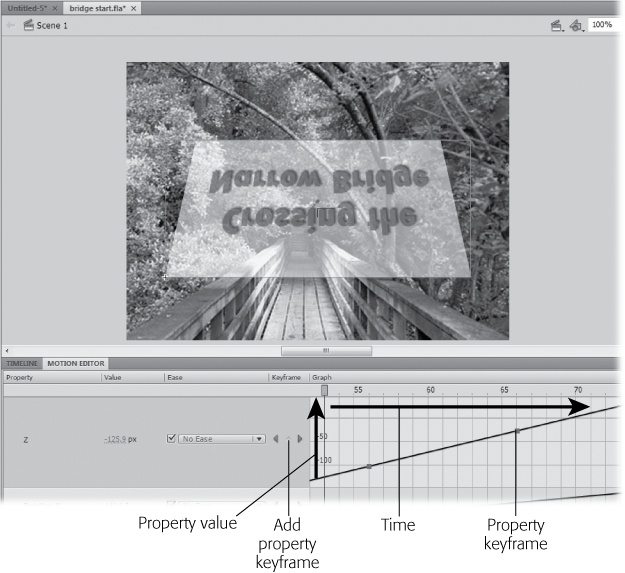
Figure 8-13. Each property has a graph where the horizontal axis marks time in frames and the vertical axis shows the change in property values.
You apply tweens to values by placing property keyframes along the timeline; Flash calculates the changes for all the values between two property keyframes (Figure 8-13). To add a property keyframe, move the playhead to the frame where you want to record a change in value, and then click the diamond-shaped button under Keyframe. This button is a toggle: If there aren't any keyframes at that position, Flash creates one. If there's a keyframe at that position, Flash removes it.
There are other ways to add property keyframes to a graph line. One of the quickest is simply to right-click at a point in the graph line and then choose Add Keyframe from the shortcut menu. Another way to add keyframes is to drag the playhead to a specific frame, and then make a change in a property's value. Flash automatically creates the property keyframe.
The Motion Editor uses a solid line in the graph to indicate values in between keyframes—values that are changing. A dashed line indicates that the values of the property aren't changing—static, in Flash-speak.
When you work with tweens, timing is everything. Whether you're controlling the movement of a jumping cheetah or changing the color of a building as it explodes, you control the timing by moving property keyframes up and down the timeline. You reposition property keyframes in the Motion Editor's graph by dragging them with the Selection or Subselection tools. By moving the property keyframe up and down, you increase or decrease the value of that property. If you drag a property keyframe left or right along the graph's timeline, you change the frame (time) at which the property change happens.
There's another way you can move property keyframes up and down the timeline—with roving keyframes. Using this method, Flash keeps track of the relationship of keyframes even as you make changes to the timeline. See the box on The Keyframe Rovers for the details.
In the Motion Editor, the basic motion properties X, Y, and Z go everywhere hand in hand. Whenever you change one of the properties, the Motion Editor registers the values for the other two. It's Flash's way of keeping tweened objects pinned down in time and space. The basic motion properties are also the only properties that you can't fine-tune using Bezier line tools.
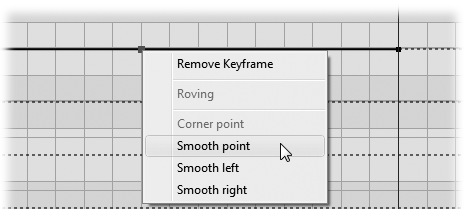
For any properties other than the basic motion properties, you can use Bezier controls in the Motion Editor graph to create smooth changes that increase or decrease over time. It's just like editing a line that you draw on the stage. The property keyframes can be either sharp-angled corner points where a value changes abruptly, or they can be gradual curves. Initially, property keyframes are corner points. Right-click a property keyframe to change a corner point to a curve, as shown in Figure 8-14. If there are property keyframes on both sides of the one you click, you can choose whether to add a single Bezier control handle ("Smooth left" or "Smooth right") or add two handles (Smooth point). If you right-click a property keyframe that's already a curve, you can turn it back into a corner point.
Your tween span has no color effects until you apply them (in the Properties panel or the Motion Editor). To add a color effect using the Motion Editor, position the playhead on the frame where you want to make a change, click the + button, and then choose the effect you want to add: Alpha, Brightness, Tint, or Advanced Color. Once you choose an effect, its subpanel appears under Color Effect. Click the Value setting to the right of the property name, and then type a new value.
Note
Alpha sets the transparency for an object. If you want to apply a combination of alpha, brightness, and tint, use the Advanced Color option.
To remove a color effect, click the – button, and then choose the name of the effect from the pop-up menu. Flash removes the property changes from the tweened object, and the effect's subpanel goes away.
Flash includes a handful of standard filters that you apply to movie clips and text fields, and when you apply filters using the Motion Editor, you can change the values of these filters over time. Want a drop shadow to change its angle as the sun moves across your animation? You can do it with the Motion Editor (Figure 8-15).

Figure 8-15. Filters sometimes have multiple properties. The Drop Shadow filter shown here has properties for the shadow's blurriness, strength, quality, and angle. Not shown, there are even more properties for the color and type of shadow created.
Don't be afraid to experiment with the filter effects. A single filter can create dramatically different effects, as shown in Figure 8-16.
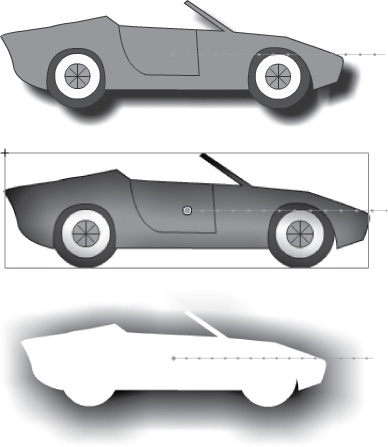
Figure 8-16. You don't have to settle for the first effect a filter gives you. The Drop Shadow filter, for example, gives some remarkably different effects. Top: When you first apply a drop shadow, it looks like this. Middle: Adjusting the inner shadow gives the car a more 3-D look. Bottom: The Knockout property makes the car look like a paper cutout.
Working with Flash, you fight a constant battle to get a good view of the stage, the timeline, and all the panels and windows. It's a balancing act where you're constantly expanding this and shrinking that. Adding the Motion Editor to the mix just makes the problem tougher. It's so packed with properties, graphs, and widgets that it requires tweaking to achieve a workspace that works for you. If you plan to do a lot of work in Flash and you don't have a two-monitor system, think seriously about upgrading to one. With two monitors, you can leave your Motion Editor open on one monitor and keep your stage and main timeline open on another. To move the Motion Editor, or remove it from a docked position, drag it by the tab with its name on it.
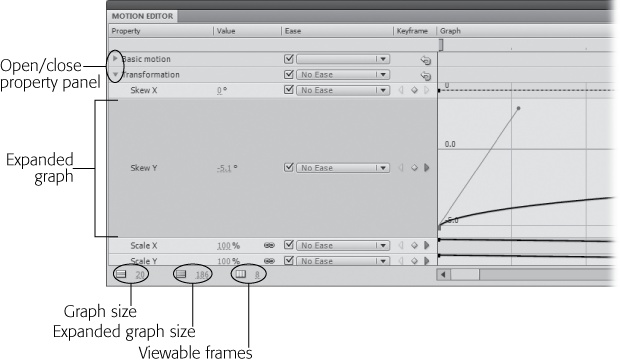
Initially, Flash gives you a fairly skimpy view of each property. Some of the panels are closed, depending on the kinds of changes in your tween. To open and close panels, click the triangle toggle buttons, as shown in Figure 8-17.
Unlike some windows, you can't change the amount of horizontal space occupied by labeled sections like Property, Value, and Ease, but you can change the vertical space in a number of ways. That vertical space is what's important when you're trying to get a good view of the property graphs while you perfect, for example, a custom ease (Creating a Custom Ease Preset). You can expand a single property graph by clicking anywhere in the panel to the left of the graph. That graph remains expanded until you click the panel again or click another property panel to expand a different graph. This feature means that only one graph can be expanded at a time. Two settings in the lower-left corner of the Motion Editor control the height of graphs. A third setting controls the number of frames displayed in the Motion Editor timeline:
Graph Size sets the height of all the graphs.
Expanded Graph Size sets the height of the one expanded graph.
Viewable Frames sets the number of frames showing in the graph timeline.