Once you have access to a video in the Flash video format (.flv or .f4v), you're ready to begin importing the video file into Flash. When you begin this process, your video can be on your computer or it can be on the web, where it's served up by a Flash Media Server. In this section, you see step-by-step examples for both scenarios.
When you have a video on your computer in one of Flash's two video formats (.flv or .f4v), it's easy to import it into your Flash project. By making a couple of choices along the way, you can give your Flash audience standard controls to play and pause your video and adjust its sound. To work on the following exercise, you can download the video 11-4_Building_Implode.flv from the Missing CD page at www.missingmanuals.com/cds.
Note
If you need to convert a video to one of the Flash video formats (.flv or .f4v), see Encoding: Making Flash Video Files.
When you add video to your Flash project using this method, Flash creates a link between the Flash file and your project. Even after you publish a Flash .swf file for final distribution, the Flash file and your video file remain separate. If the project is for a website, you need to place both the Flash .swf file and the video file (.flv or .f4v) on the website, ideally in the same folder. To make things easy for yourself, it's best to put your Flash video in same folder where you save your Flash work file (.fla) and publish your Flash animation (.swf).
Create a new Flash document, and then save it.
It's always good to name and save your Flash projects at the beginning. It's even more helpful when you work with external video files, as you do in this project. A name like building_bye_bye.fla might be appropriate for this one.
Place the Flash video 11-4_Building_Implode.flv in the same folder where you save your Flash file (.fla) and your published Flash file (.swf).
This step makes it easier for Flash to create a link to the video file. After publishing the .swf, as long as both files are located in the same folder, the link between the two will continue to work.
In Flash, select File→Import→Import Video.
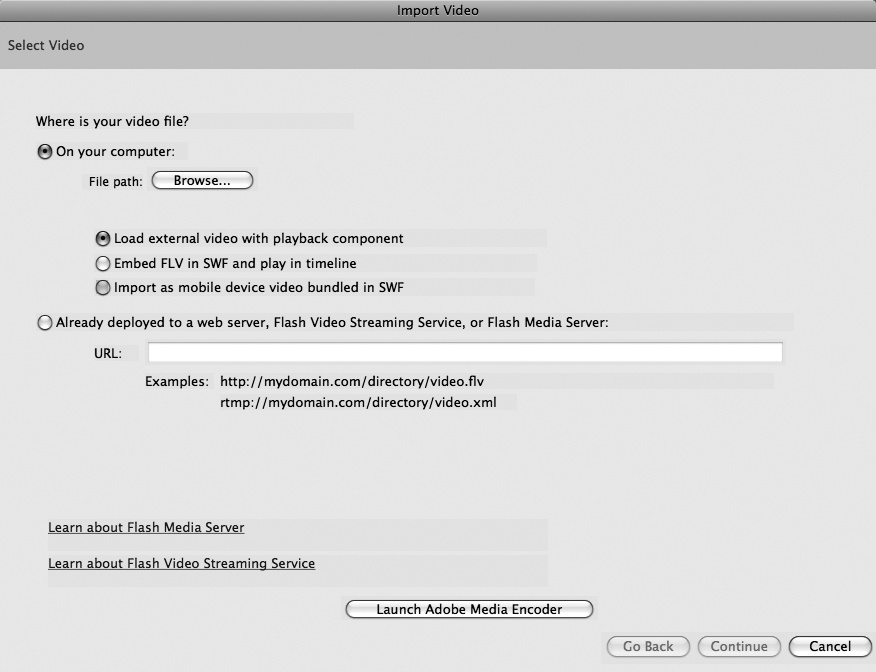
The Import Video dialog box appears, as shown in Figure 11-15, with several options you can choose using radio buttons. The question is: Where is your video file? Either it's on your computer, or it's stored on a web server with Flash Media Server software.
Click the radio button for "On your computer".
Flash wants to know where the file is right now, so it can load it into your project. At this step, don't jump ahead and start thinking about where the final project is going to be published.
Click the Browse button, and then locate and select your video file.
Flash displays a standard Open window similar to the one you use to open a Flash document. It should be easy to locate 11-4_Building_Implode.flv, because it's in the same folder as your Flash file. After you select the file, its name and path show up under the Browse button. Now that Flash knows where the file is located, it can work with the video.
Note
The video of the imploding building is copyrighted and was provided by www.freestockfootage.com.
Tell Flash how you want to work with the video by clicking the radio button labeled: "Load external video with playback component".
Load external video with playback component creates a link between your Flash file and an external video file. When Flash gets a command to play the video, it finds and plays the external file.
The other two options are used less frequently, but they're useful for special cases:
Embed FLV in SWF and play in timeline. This option embeds video into your animation. Each frame of video becomes a frame in the Flash timeline. The result is that the Flash file gets huge very fast, and your audience will be frustrated trying to download and play the video. Don't try this option with clips any longer than 5 or 10 seconds.
Import as mobile device video bundled in SWF. Use this option in combination with Flash's templates for consumer devices and handsets to create animations for handheld devices (a topic not covered in this book).
Click Continue to move to the next Import Video step.
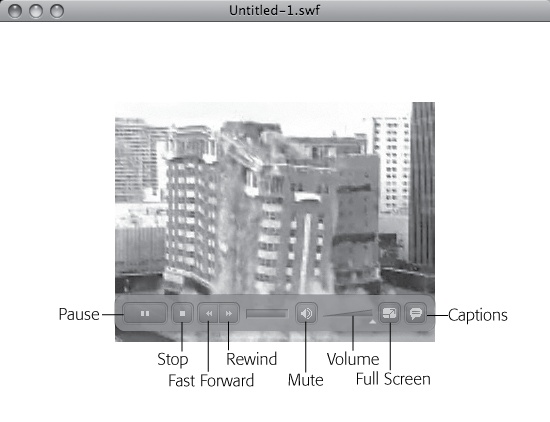
The Import Video box changes to show skinning options for your video. A skin is a sort of container that adds Play/Pause/Stop type controls to your video, as shown in Figure 11-16.
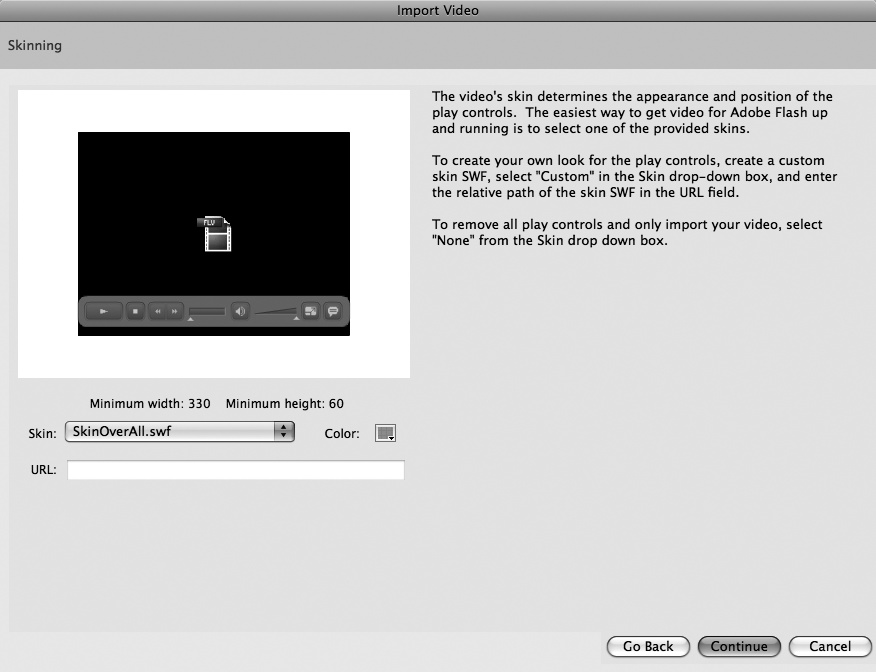
From the Skin drop-down box, choose SkinOverAll.swf.
Use the drop-down menu to choose an Adobe predesigned skin, as shown in Figure 11-17. Adobe supplies a whole slew of skins with different combinations of controls. SkinOverAll includes all the controls, so this exercise shows you what's available. When you tackle a real-world project, you may find you don't need quite so many gadgets on your videos.
Figure 11-16. There are two basic types of skins for Flash video. "Over" skins like the one shown here sit on top of the video image, hiding some parts of the picture. "Under" skins are completely outside the image.
Figure 11-17. Give your audience snazzy video controls by simply choosing from the Skin drop-down menu. Use the buttons in the lower-right corner of the Import Video dialog box to move forward (Continue) or backward (Go Back) in the Import Video process. Or you can give up entirely (Cancel).
There are also options to provide no controls at all (usually not the best option) or to use a custom-designed skin. For example, you might want to put your client's logo on the video skin as another way to establish his brand.
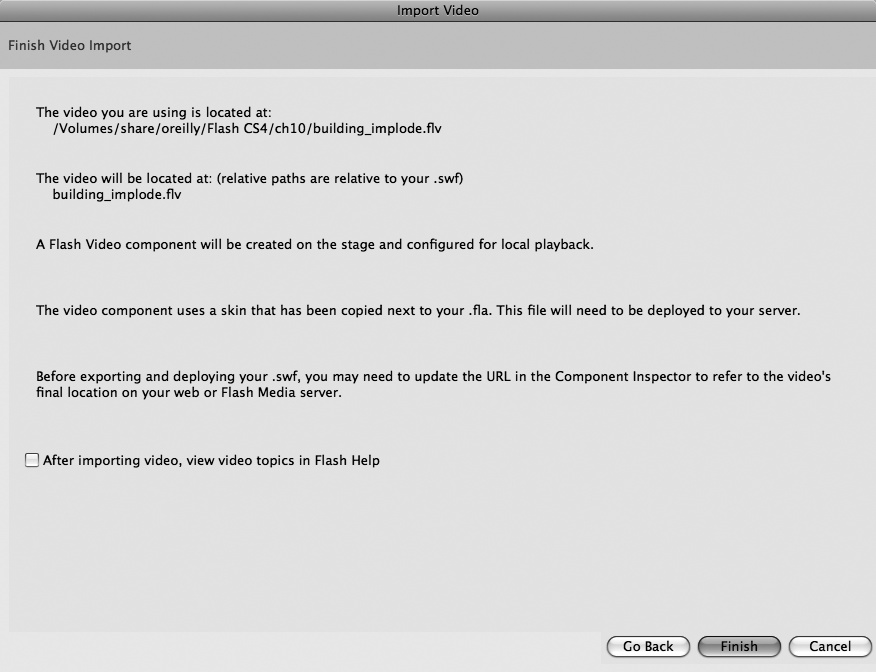
Flash displays the Import Video: Finish Video Import dialog box you see in Figure 11-18. The details shown may not seem that important until it's time to publish your Flash project on a web page. Here's a translation for each of the lines:
The video you are using is located at: This line lists the folder where the video file lives. If your final project is going on a web server, you have to give both 11-4_Building_Implode.flv and building_bye_bye.swf to your webmaster.
The video will be located at: (relative paths are relative to your .swf). This line explains the relationship of your files when you publish your Flash animation. It shows you the path that has to exist between the .swf and your video file (11-4_Building_Implode.flv). In this case, there is no path (just a filename) because you're planning on keeping both the .swf and the .flv in the same folder, whether it's on your computer or a web server.
A Flash video component will be created on the stage and configured for local playback. This line simply tells you that your video and whatever skin you selected will appear on the stage in your Flash document.
The video component uses a skin that has been copied next to your .fla. This file will need to be deployed to your server. These sentences are a roundabout way of saying that the skin for your video is stored in a separate .swf file. Flash places it in the same folder on your computer with building_bye_bye.fla. This skin has a name similar to the name you chose in step 8. In this case, it's named SkinOverAll.swf, and it has to be in the same folder with building_bye_bye.swf and 11-4_Building_Implode.flv when you publish your Flash animation.
Before exporting and deploying your .swf you may need to… If building_bye_bye.swf and 11-4_Building_Implode.flv aren't in the same folder when you put your animation on a web server, you need to change the path in the video component. For more on video components, see the next section, Deploying your Flash video on the web.
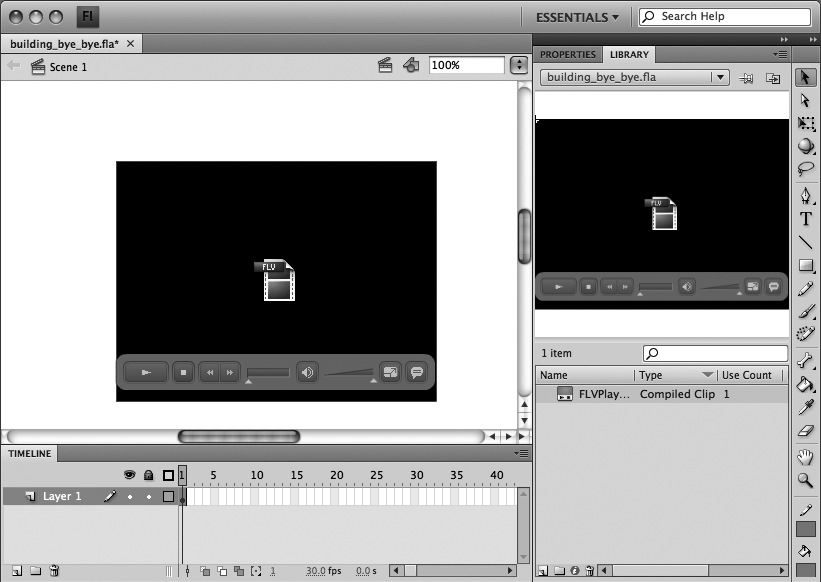
The Import Video: Finish Video Import dialog box disappears. As promised, you see the video player on your stage along with the skin (video controls). There's also copy of the video in the Library, as shown in Figure 11-19.
Press Ctrl+Enter (⌘-Return on a Mac) to test your Flash project and view the video.
In the Flash animation, you see your video running. Using the skin controls, you can start and stop the playback.
Note
One of Flash Professional CS5's new tricks is the ability to test video within the Flash workspace. If you want, you can press Enter (Return) to watch your video instead of Ctrl+Enter (⌘-Return).
Most of the time, Flash projects that incorporate videos end up on the web. Whether you're uploading the video to a web page or someone is doing it for you, make sure that three files make the journey: the Flash animation (.swf), the Flash video file (.flv or f4v), and the skin file (named something like SkinOverAll.swf).
Surprisingly, importing a video file that's stored on the Web isn't much different from importing one that's on your computer, as described on Importing Video Files. The Flash video file may be in a standard web server or one that has Flash Media Server software. (Don't worry if you don't have a video file stored on a web server; there's an example file you can practice with, as you'll see in the following steps.)
The only differences in the importing process happen at the very beginning.
Select File→Import→Import Video.
The Import Video: Select window appears.
Turn on the radio button next to "Already deployed to a web server, Flash Video Streaming Service, or Flash Media Server" (Figure 11-15). In the URL box, type the web address where the file lives, and then click Continue.
The URL for the practice file is http://examples.oreilly.com/flashcs4mm/11-4_Building_Implode.flv. When you click Continue, the Import Video: Skinning window you see in Figure 11-17 appears.
The rest of the steps are identical to those for importing a Flash video file on your own computer. You can pick up the process at step 8 on Importing a Flash Video File Stored on Your Computer.
In Flash-speak, once your video is added to your Flash file, it's called the FLVPlayback component. Components are prebuilt widgets that you drop into your animations. Someone else went to all the trouble of building (and hopefully testing) the component. All you have to do is drop a component into your Flash project and let it do its stuff. Components save you design and programming time, so it's worthwhile to learn about them. There's a whole chapter on components (Chapter 16), but since you're already using one in this example, it's worth covering some of the specific ways you can customize the FLVPlayback component.
Most components provide a few options that let you customize them for your nefarious purposes. For example, in the case of the FLVPlayback component, you can change the playback behavior of the video and the appearance of the video controls. You can even change the video source file if you have a newly edited and improved video. You change the settings for a component by changing its parameters. Here's how to view and edit the FLVPlayback parameters:
In Flash, click the FLVPlayback component on the stage.
As with other objects, you select the video playback component and then modify it using the settings in the Properties panel.
In the Properties Panel, open the Component Parameters subpanel.
The Component Inspector panel opens in Flash. The name of each parameter (setting) is listed on the left, and its value is shown on the right.
Make changes to the FLVPlayback parameters.
You can change multiple parameters. For example, to change the appearance of the skin (video playback controls), click skinAutoHide, and then set the value to "true". To change the color of the skin, click the skinBackgroundColor swatch, and then choose a new color from the color picker.
Here's a complete description of the parameters for the FLVPlayback component:
align. Determines the alignment of the video image when the video scaleMode (below) isn't set to exactFit.
autoPlay. If set to "true", the video automatically plays when the Flash animation frame that holds it is loaded.
cuePoints. You can add cue points to your video when it's encoded, as explained on Adding Cue Points to Your Video. Or you can add them using the FLVPlayback component. Click the magnifying glass to open a window where you can add manual cue points by typing in a name and a time.
islive. Used with a Flash Media Server, this value is set to "true" when streaming a live performance.
preview. Used for the live preview feature that helps you test the parameter settings. Click the magnifying glass to see your video with the current settings.
scaleMode. This setting determines how the video image sizes itself after it's loaded. There are three options: noScale, where the video uses the size of the Flash video source file; maintainAspectRatio, where the video retains its proportions when enlarged or shrunk; and exactFit, which forces the video to fit the dimension of the component as shown in the Properties panel.
skin. The name and path for the .swf file that adds playback controls to the video.
skinAutoHide. If set to "true", the playback controls disappear unless the mouse is hovering over the video image.
skinBackgroundAlpha. Playback controls can be transparent. A value of 1.0 = opaque and 0 = invisible. So, a value of .8 provides an 80 percent opacity effect.
skinBackgroundColor. Click the color swatch, and then choose a new color from the color picker.
source. The name and path for the Flash video file.
volume. Sets the audio volume for video playback. A value of 1.0 = full volume and 0 = no volume. So a value of .5 provides half the available volume for audio playback.