So far this chapter has covered two types of mouse events: MOUSE_OVER and MOUSE_OUT. The technique for using other events is nearly identical. The most frequently used mouse event is probably the CLICK event. If you understand the previous examples with MOUSE_OVER and MOUSE_OUT, you'll have no problem putting CLICK to work. Suppose you want to create a Flash project that's organized with tabs?. You've seen a similar system on websites and in programs including Flash. You click a tab, and it reveals different information or a panel of tools.

Figure 13-4. Using the mouse-event techniques described so far, you can create a photo gallery like this one. When the mouse is over a thumbnail, a large version of the picture is shown to the right.
Using the ActionScript programming tools introduced in this chapter and the preceding one, you can create a tabbed window like the one shown in Figure 13-5. Here are the tools you need in your Flash and ActionScript toolbox:
Three mouse events: MOUSE_OVER, MOUSE_OUT, and CLICK.
A few IF..ELSE conditional statements to control tab behavior.
Four movie clips to serve as tabs.
One movie clip that holds the "content" shown under each tab.
The tabbed bar in Figure 13-5 is made up of four movie clips, one for each tab subject: dog, cat, flower, and Porsche. You can make the graphic part of the tab any shape you want. In this example, the tabs are created with a rectangle primitive. The top corners are rounded to give it that old-fashioned, tabbed-folder look. The Classic static text was created with the text tool. The important thing is that each tab is a separate movie clip, and each movie clip has three frames: over, out, and selected. In the example, the tabs are 137.5 pixels wide so that four tabs fit snugly in a 550-pixel horizontal space.
Note
You can follow the instructions in this section to set up your tabbed folder document, or you can download 13-3_Tabbed_Folders.fla from the Missing CD page (www.missingmanuals.com/cds). If you want to see a finished and working copy of the project, download 13-4_Tabbed_Folders_done.fla.
As the mouse moves and clicks, you want to change the tabs' appearance to provide some interactive feedback for your audience. In this example, when the mouse is "out," the tab contrasts in color with the color of the content's folder. It looks as if the tab is behind another open folder. When the mouse moves over the tab, it changes size and color and the text is bold, providing a highlight effect.
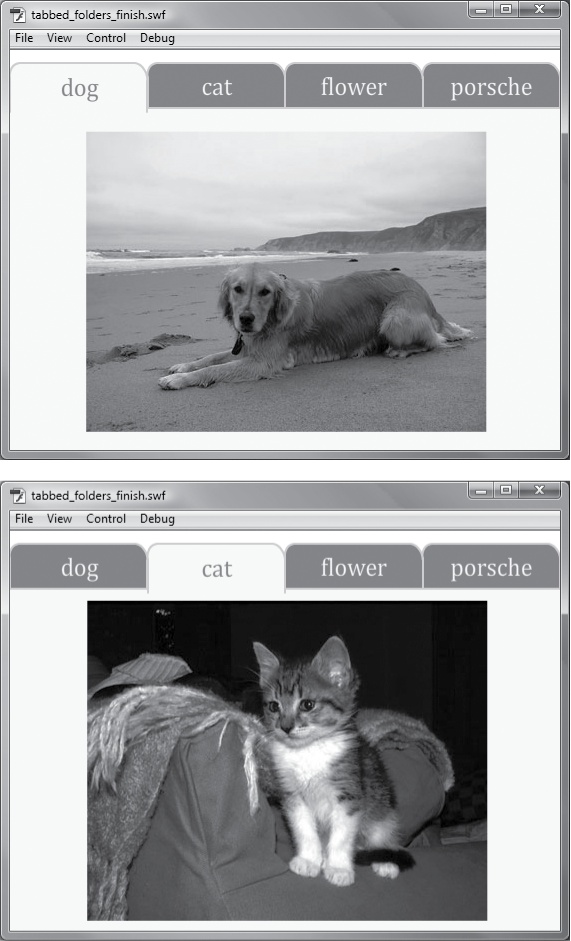
Figure 13-5. You can make a tabbed window interface using three simple mouse events. Top: The dog tab is selected, and the content area below shows a dog. Bottom: Clicking the cat tab changes the tab's appearance and the content below.
When the tab is selected and its content is showing, the color of the tab matches the background color of the folder, giving it the appearance of an open folder. The frames are labeled out, over, and selected as shown in Figure 13-6. The ActionScript code uses the labels to identify particular frames.

Figure 13-6. Each tab is a movie clip with three frames, one for each state of the tab. Shown here in the symbol editing view, the top picture shows the "out" state, the middle shows "over," and the bottom shows "selected."
The main movie clip has only one frame, but it organizes the actions, tabs, and content into three layers, as shown in Figure 13-7.
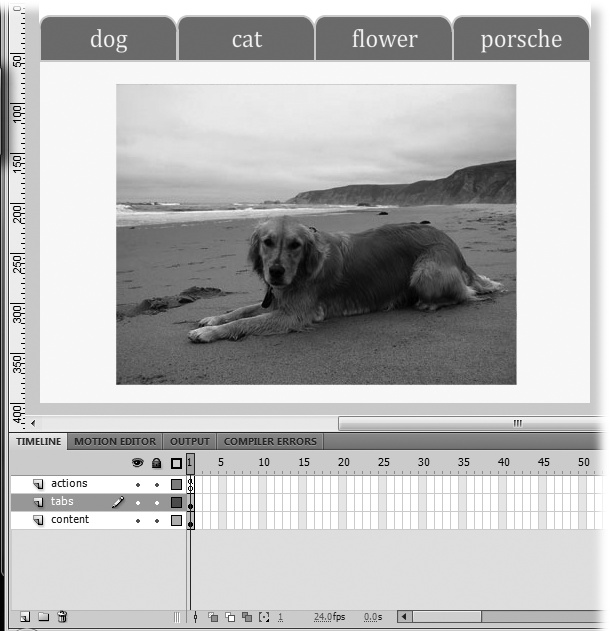
Figure 13-7. The timeline for the main movie clip in this project has three layers: actions, tabs, and content. It's not absolutely necessary to use three layers, but it's helpful to organize your project using layers.
Each tab is a separate movie clip symbol, and the instances arranged on the stage are named mcDogTab, mcCatTab, mcFlowerTab, and mcPorscheTab. There's one other movie clip in this project, called mcContent. You guessed it—that's a movie clip that covers most of the stage and shows the contents for each of the tabs. The mcContent movie clip has four frames with labels that match each tab: dog, cat, flower, and Porsche. So, when the "cat" tab is clicked, the playhead in mcContent moves to the "cat" frame. In the example file, there's a matching photo for each mcContent frame. If you don't have photos of your favorite dog, cat, flower, and Porsche, a static text word will do.
As projects become more complicated, you can save a lot of time by thinking things through before you start writing code. It's a lot like doing a rough pencil sketch or storyboard (Creating a Storyboard) before you draw. With programming, it helps to list the actions that need to take place for your program to work. You can put these down in the human language of your choice, but it certainly helps to keep in mind the ActionScript tools you'll be using to build your project. Here's an example of planning notes for the tabbed window project:
On startup, the dog tab should be selected, and dog content should be showing. The other tabs should show the "out" frame.
If the mouse rolls over or out of the dog tab, it shouldn't change its appearance, it should stay "selected."
If the mouse rolls over any of the non-selected tabs, they should highlight, showing the "over" image when the mouse is over, and they should change back to "out" when the mouse moves away.
When the mouse clicks any tab, the clicked tab should change to "selected" and all the other tabs should change to "out." The content should change to match the selected tab.
These points present a pretty good sketch of how the tabbed window should behave, and they give you some programming goals. To help grapple with the elements in your program, the words indicating movie clips are in italics, and the words indicating frames are in quotes. In your sketch, use any tools (typographic effects, colors, circles, and arrows) you want that help you understand the project.
The first bullet point in the sketch is easy to tackle, especially if you warmed up by completing the rollover project outlined earlier in this chapter (Mouse Events). Here's the code you need to start with the dog tab selected and the other tabs set to the "out" frame:
1  // Start with the Dog tab selected and Dog content showing
2  mcDogTab.gotoAndStop("selected");
3  mcContent.gotoAndStop("dog");
4  // Stop the other tab movie clips from playing on start up
5  mcCatTab.gotoAndStop("out");
6  mcFlowerTab.gotoAndStop("out");
7  mcPorscheTab.gotoAndStop("out");
Because this project involves more lines of code and is a bit more complicated, it's good programming practice to use line numbers and to add comments to the code. If you don't have line numbers in your Actions window, click the Options button in the upper-right corner of the Actions window, and then choose Line Numbers near the bottom of the menu. In the code shown, the lines that begin with two slashes (//) are comments. ActionScript ignores anything from the slashes to the end of the line, so you're free to put whatever words will help you and others understand the logic behind your program.
Looking over the "sketch" of your program, you can see that each tab needs to react to three different mouse events: MOUSE_OVER, MOUSE_OUT, and CLICK. So, each tab needs to register event listeners for those mouse events. (If you need a refresher on registering an event listener, the details are on How Events Work.) It may look like a lot of code, but each line uses the same form, or as programmers like to say, syntax, to register an event listener.
8
9   // Register mouse event listeners for mcDogTab
10  mcDogTab.addEventListener(MouseEvent.MOUSE_OVER, dogOverListener);
11  mcDogTab.addEventListener(MouseEvent.MOUSE_OUT, dogOutListener);
12  mcDogTab.addEventListener(MouseEvent.CLICK, dogClickListener);
13
14  // Register mouse event listeners for mcCatTab
15  mcCatTab.addEventListener(MouseEvent.MOUSE_OVER, catOverListener);
16  mcCatTab.addEventListener(MouseEvent.MOUSE_OUT, catOutListener);
17  mcCatTab.addEventListener(MouseEvent.CLICK, catClickListener);
18
19  // Register mouse event listeners for mcFlowerTab
20  mcFlowerTab.addEventListener(MouseEvent.MOUSE_OVER, flowerOverListener);
21  mcFlowerTab.addEventListener(MouseEvent.MOUSE_OUT, flowerOutListener);
22  mcFlowerTab.addEventListener(MouseEvent.CLICK, flowerClickListener);
23
24  // Register mouse event listeners for mcPorscheTab
25  mcPorscheTab.addEventListener(MouseEvent.MOUSE_OVER, porscheOverListener);
26  mcPorscheTab.addEventListener(MouseEvent.MOUSE_OUT, porscheOutListener);
27  mcPorscheTab.addEventListener(MouseEvent.CLICK, porscheClickListener);
Note
Some lines in this script are left empty on purpose. ActionScript doesn't mind, and a little white space makes the code easier to read and understand, especially when viewed in the Actions panel.
Now that the event listeners are registered, you have a roadmap for the action part of your code. The last word in each of those statements—like dogOverListener, catOutListener, and porscheClickListener—is a reference to an event listener, and it's up to you to write the code that defines the actions. For example, lines 10, 11, and 12 show that mcDogTab needs three listeners, so that's a good place to start.
Looking back at the sketch, you have a rough outline of how the dog tab is supposed to behave. Those two middle bullet points from Planning Before Coding describe what's supposed to happen:
If the mouse rolls over or out of the dog tab, it shouldn't change its appearance; it should stay selected.
If the mouse rolls over any of the non-selected tabs, they should be highlighted, showing the "over" image when the mouse is over, and they should change back to "out" when the mouse moves away.
The word "if" is a good clue that you've got an if…else situation here. At this point, it may help to refine your human language describing the actions; however, if you're feeling confident, you can jump in and start to code. Here's a refined version of what should happen when the mouse moves over the dog tab:
If the movie clip mcDogTab is selected, then the movie clip mcDogTab should remain on the frame labeled "selected."
Else if the movie clip mcDogTab isn't selected, movie clip mcDogTab should change to the frame labeled "over."
With the refined description, it's just a hop, skip, and a jump to the ActionScript code for the mouse-over event listener. Remember, the lines with double slashes (//) are just comments, not statements:
28
29  // Event listeners for mcDogTab
30  function dogOverListener(evt:MouseEvent):void
31  {
32    // if the tab is selected, leave it selected on mouse over
33    // else if the tab isn't selected show the out frame
34    if (mcDogTab.currentLabel == "selected")
35    {
36      mcDogTab.gotoAndStop("selected");
37    }
38    else
39    {
40      mcDogTab.gotoAndStop("over");
41    }
42  }
The if…else conditional statement for mcDogTab follows this form:
if (condition)
    {
    do these statements;
   }
   else
     {
     do these statements;
   }
The if…else structure works well for the tabs because it helps you manage the possibility that the tab may already be selected when the mouse moves over it. (There are more details on conditional statements like if…else on Constants.)
Note
When you write the (condition) part of the statement (line 33), you want to use ActionScript's equality operator, which is two equal signs (==). You use the equality operator to test whether a statement is true or false. A single equals symbol (=) is the assignment operator in ActionScript and is used to change values.
The next event listener for mcDogTab handles the MOUSE_OUT event. Similar to the MOUSE_OVER event, you want the tab to do nothing if the tab is selected. If it's not selected, then you want the tab to change back to the "out" state. Another job for if…else, and the form for the listener is very similar:
43
44  function dogOutListener(evt:MouseEvent):void
45  {
46    // if the tab is selected, leave the tab selected
47    // else if the tab isn't selected show the out frame
48    if (mcDogTab.currentLabel == "selected")
49    {
50      mcDogTab.gotoAndStop("selected");
51    }
52    else
53    {
54      mcDogTab.gotoAndStop("out");
55    }
56  }
The actions that need to be performed for the CLICK event were listed in the sketch as follows:
When the mouse clicks any tab, the clicked tab should change to "selected" and all the other tabs should change to "out." The content should change to match the selected tab.
There's no if…else situation here. There's simply a series of actions that need to take place when a tab is clicked. Those actions position the playhead on specific frames of the "tab" and "content" movie clips. Here's the dogClickListener code:
57
58  function dogClickListener(evt:MouseEvent):void
59  {
60    // when clicked change the tab to selected
61    mcDogTab.gotoAndStop("selected");
62    // when clicked change the mcContent to show related frame
63    mcContent.gotoAndStop("dog");
64    // Set all the other tabs to the "out" frame
65    mcCatTab.gotoAndStop("out");
66    mcFlowerTab.gotoAndStop("out");
67    mcPorscheTab.gotoAndStop("out");
68  }
69
When the dog tab is clicked, line 61 changes the dog tab to "selected," and line 63 displays dog stuff in the content movie clip. The other three lines of code, 65–67, change the other tabs to the "out" state.
You've finished writing the event listeners for the dog tab. You've got three more tabs to go; however, if you use the "copy and tweak" coding technique described in this section, the last three tabs will go quickly. Before you copy and reuse code, you want to make sure it's working properly. There's no benefit in copying mistakes, so this is a good time to test the code for the dog tab.
The first thing to do is to check for typos and obvious errors with the Check Syntax tool. At the top of the Actions window, click Check Syntax, as shown in Figure 13-8. A box appears, telling you whether or not there are errors in the code. If there are errors, you see them listed by line number in the Compiler Errors tab next to the timeline. Double-click an error, and Flash highlights the offending line of code. The explanations of errors may seem a little cryptic. If you don't understand what Flash is saying, then compare your code to the code in this book. Check spelling, capitalization, and punctuation carefully. Punctuation errors can include missing semicolons at the ends of statements or missing parentheses and brackets. Sometimes, bracket confusion includes using an opening bracket ({) when you should use a closing bracket (}).
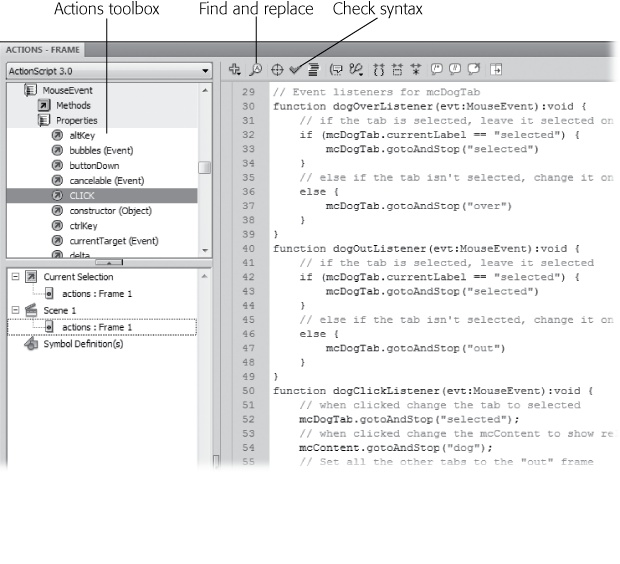
Figure 13-8. The Actions window has tools to help you find typos (Check Syntax), find and replace words, and insert prebuilt chunks of code (Actions toolbox).
It takes a little extra effort to test part of your code before your program is complete, but the process gives you a better understanding of how it works. If you're copying and reusing code, testing is worth the effort, and it's likely to save you time in the long run.
If you test your movie at this point, you just get a lot of flickering, and the Compiler Errors panel fills up with errors with descriptions like the ones in Figure 13-9: "Access of undefined property catOverListener" and so on. In the Compiler Errors panel, double-click the error, and Flash highlights line 15 in your code. The problem is this line (and others) register event listeners and point to functions that you haven't written yet. This confuses ActionScript. Often, if one part of your code doesn't work (or isn't complete), the rest of the code doesn't run properly. Hence the flickering when you test your program.
The solution is to temporarily remove these lines from your program while you test the dog tab. You don't want to delete lines you've already written—that would be a waste of time. Instead you can comment them out. In other words, when you place double slash lines in front of the code, ActionScript ignores the lines because they look like comments. After testing, you remove the comment marks and turn your code back into legitimate statements.
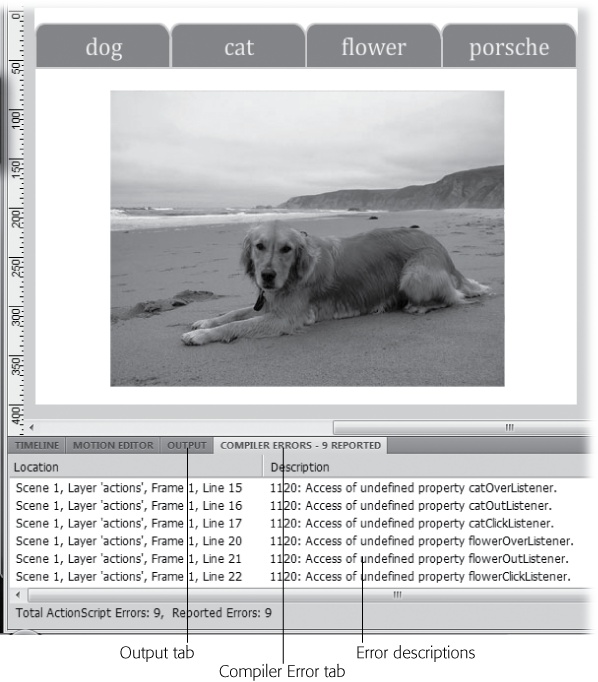
Figure 13-9. When testing your ActionScript programs, errors appear in the Compiler Errors window. Double-click an error, and ActionScript highlights the line of code that created the problem.
So, to comment out line 15, which registers the catOverListener, place two slash marks at the beginning so that it looks like this:
// mcCatTab.addEventListener(MouseEvent.MOUSE_OVER, catOverListener);
Problem solved. Place comment marks in front of the lines for the mcCatTab: 15, 16, and 17; for the mcFlowerTab: 20, 21, and 22; and for the mcPorscheTab: 25, 26, and 27.
Tip
When you want to comment out more than one line of code, you can use the block comment characters. Put /* at the front, and then put */ at the end. Everything between those markers is considered a comment, no matter how many characters, words, or lines there are. Two buttons on the Actions panel toolbar make it easy to add comment marks to your text. To use the "Add block comment" button, select the text you want to "comment out," and then click the button. The "Apply line comment" button places slash marks at the cursor.
Now you can test the dog tab part of your movie; press Ctrl+Enter (⌘-Return). If everything is working properly, there shouldn't be any flickering when the animation runs, because all the movie clips are told to gotoAndStop() at a specific frame. The dog tab should be selected, and the other tabs should be showing the "out" movie clip frame. When you mouse over any of the tabs, nothing should happen. The dog tab doesn't change when you mouse over and out of it, because that's what you programmed it to do. The other tabs don't change because you haven't programmed their actions yet.
It would be nice to test the MOUSE_OVER and MOUSE_OUT events on the dog tab before you copy the code and use it for the other tabs. To do that, you have to tweak your code so that mcDogTab isn't "selected" when you test the program. Change line 2 to read:
mcDogTab.gotoAndStop("out");And then change the mcCatTab so it's selected by changing line 5 to:
mcCatTab.gotoAndStop("selected");Now, when you test your movie, the dog tab should change when you mouse over it. If everything works as expected, great. If not, you need to search and destroy any typos that appear in your code. You can download the file 13-4_Tabbed_Folders_done.fla from the Missing CD page (www.missingmanuals.com/cds) to compare coding. Open the Actions window in the downloaded file, and you see the tabbed folders statements with the proper lines commented out and tweaked for testing. If you compare the code line by line to your project, you should be able to identify any errors.
Once your code has passed the testing phase, you need to undo the changes you made. So, change line 2 back to its original form:
mcDogTab.gotoAndStop('selected');And, likewise, change line 5 back to:
mcCatTab.gotoAndStop("out");Remove the comment marks from the lines that register event listeners: For the mcCatTab: 15, 16, and 17; for the mcFlowerTab: 20, 21, and 22; and for the mcPorscheTab: 25, 26, and 27.
With your code tested and working properly, you can copy and tweak with confidence, as described in the next section.
If you've typed all of the 60-plus lines of code shown so far in this example, you probably agree that writing and testing code can be a little tedious. The good news is, if you've gotten this far, you can use the copy-and-tweak technique to develop code for the other three tabs. When you have some code that works properly and you need to write nearly identical code for another part of your program, it makes sense to copy the code and then change a name or word here and there. In this example, all the tabs have very similar behavior. You can copy the event listeners for mcDogTab, and then paste that code to the bottom of your script. Then, all you need to do is swap a few names. For example, where it says mcDogTab, change it to mcCatTab.
First copy and paste the code you want to modify:
Select and copy the code between line 29 and line 68, inclusive.
Move to line 70, and then paste the code back into your script.
At this point, you need to rewrite the code for mcCatTab. You can do so in a couple of ways, but for learning purposes, this exercise will walk you through the changes one at a time. See Table 13-1.
Table 13-1. This table shows how to convert the code for the event listener dogOverListener to catOverListener. Elements in bold were changed.
Line # | Code as written for mcDogTab | Code revised for mcCatTab |
|---|---|---|
70 | // Event listeners for mcDogTab | // Event listeners for mcCatTab |
71 | function dogOverListener (evt:MouseEvent):void { | function catOverListener (evt:MouseEvent):void { |
75 | if (mcDogTab.currentLabel == "selected") { | if (mcCatTab.currentLabel == "selected") { |
77 | mcDogTab.gotoAndStop("selected") | mcCatTab.gotoAndStop("selected") |
67 | // else if the tab isn't selected, change it on mouse over | // else if the tab isn't selected, change it on mouse over |
81 | mcDogTab.gotoAndStop("over") | mcCatTab.gotoAndStop("over") |
Tip
Reading your code line by line, thinking through the actions that the code performs, and then making changes is the safest way to rewrite your code. You can also employ ActionScript's find-and-replace tool; however, it's awfully easy to get carried away and make bad changes. To use find and replace, click the magnifying glass at the top of the Actions window, as shown in Figure 13-8.
The event listener, catOverListener, is very similar to the previous example. You need to change "dog" to "cat" in the function name and everywhere the tab movie clip symbol appears. When you're finished, the code should look like this example:
function catOutListener(evt:MouseEvent):void
{
    // if the tab is selected, leave the tab selected
    // else if the tab isn't selected show the out frame
    if (mcCatTab.currentLabel == "selected")
    {
        mcCatTab.gotoAndStop("selected");
    }
    else
    {
        mcCatTab.gotoAndStop("out");
    }
}
To rewrite the code for the CLICK event, think back to the tasks the code has to perform. When any tab is clicked, it should change to "selected," and all the other tabs should change to "out." The content needs to be changed to match the selected tab. With those concepts clearly in mind, it's fairly easy to adapt the dogClickListener code to work for catClickListener. Below is the code as it should read after you've made changes. The bolded words have been changed.
function catClickListener(evt:MouseEvent):void { // when clicked change the tab to selectedmcCatTab.gotoAndStop("selected"); // when clicked change the mcContent to show related frame mcContent.gotoAndStop("cat"); // Set all the other tabs to the "out" framemcDogTab.gotoAndStop("out"); mcFlowerTab.gotoAndStop("out"); mcPorscheTab.gotoAndStop("out"); }
That finishes the changes that transform the dog tab code to work for the cat tab. Now you need to repeat the process for the remaining two tabs: flower and Porsche. When you've done that, the rest of your code should look like this:
 1   // Event listeners for mcFlowerTab
 2   function flowerOverListener(evt:MouseEvent):void
 3   {
 4       // if the tab is selected, leave it selected on mouse over
 5       // else if the tab isn't selected show the out frame
 6       if (mcFlowerTab.currentLabel == "selected")
 7       {
 8           mcFlowerTab.gotoAndStop("selected");
 9       }
10       else
11       {
12          mcFlowerTab.gotoAndStop("over");
13       }
14   }
15
16   function flowerOutListener(evt:MouseEvent):void
17   {
18       // if the tab is selected, leave the tab selected
19       // else if the tab isn't selected show the out frame
20       if (mcFlowerTab.currentLabel == "selected")
21       {
22           mcFlowerTab.gotoAndStop("selected");
23       }
24       else
25       {
26           mcFlowerTab.gotoAndStop("out");
27       }
28   }
29   function flowerClickListener(evt:MouseEvent):void
30   {
31       // when clicked change the tab to selected
32       mcFlowerTab.gotoAndStop("selected");
33       // when clicked change the mcContent to show related frame
34       mcContent.gotoAndStop("flower");
35       // Set all the other tabs to the "out" frame
36       mcCatTab.gotoAndStop("out");
37       mcDogTab.gotoAndStop("out");
38       mcPorscheTab.gotoAndStop("out");
39   }
40   // Event listeners for mcPorscheTab
41   function porscheOverListener(evt:MouseEvent):void
42   {
43       // if the tab is selected, leave it selected on mouse over
44       // else if the tab isn't selected show the out frame
45       if (mcPorscheTab.currentLabel == "selected")
46       {
47           mcPorscheTab.gotoAndStop("selected");
48       }
49       else
50       {
51           mcPorscheTab.gotoAndStop("over");
52       }
53   }
54
55   function porscheOutListener(evt:MouseEvent):void
56   {
57       // if the tab is selected, leave the tab selected
58       // else if the tab isn't selected show the out frame
59       if (mcPorscheTab.currentLabel == "selected")
60       {
61           mcPorscheTab.gotoAndStop("selected");
62       }
63       else
64       {
65           mcPorscheTab.gotoAndStop("out");
66       }
67   }
68
69   function porscheClickListener(evt:MouseEvent):void
70   {
71       // when clicked change the tab to selected
72       mcPorscheTab.gotoAndStop("selected");
73       // when clicked change the mcContent to show related frame
74       mcContent.gotoAndStop("porsche");
75       // Set all the other tabs to the "out" frame
76       mcCatTab.gotoAndStop("out");
77       mcFlowerTab.gotoAndStop("out");
78       mcDogTab.gotoAndStop("out");
79   }
When you test the code, using Ctrl+Enter on a PC or ⌘-Return on a Mac, it should work as advertised. On startup, the dog tab is selected. Mouse over any of the other tabs, and they should show a highlight. Click a tab, and it becomes the selected tab, showing related content in the main part of the window. If your project isn't working exactly as expected, compare your code with 13-4_Tabbed_Folders_done.fla from the Missing CD (www.missingmanuals.com/cds).
The tabbed window project creates a container. You can rename the tabs and put anything you want in the "content" movie clip. The example in this chapter holds a single picture, but each tab could hold an entire photo collection or a collection of widgets that work with a database. The tabs simply provide a way to organize elements of a project.
You can easily change the tabs themselves for a different look. Metallic high-tech tabs, perhaps? All you have to do is change the shape or the color of the graphics in the tab movie clips. For example, if you'd like a look that emulates colored file folders, you can coordinate the color of the tabs with the background of the content movie clip. If it works better for your project, you can use the same ActionScript code to manage tabs that run vertically along the edge of the content area.