Enough theory! It's time to back get to that empty stage and the task of displaying an object. The following exercises use a file called 14-1_Display_List.fla that's available on the Missing CD page at www.missingmanuals.com/cds. Several of the examples in this chapter gradually add ActionScript code to this Flash document.
Select File→Open, and then browse to 14-1_Display_List.fla.
When you open this document, there's nothing on the stage.
If the Library isn't visible, go to Window→Library to display it.
The Library holds seven movie clips. Five of the movie clips look like simple playing cards, and are named PlayingCard1 through PlayingCard5. No suits, just numbers. There are two simple rectangles that represent card tables: GreenCardTable and BlueCardTable.
Open the Actions window by pressing F9 (Option-F9) or Window→Actions.
The Actions window appears without any code. If the Line Number option is turned on, you see the number 1 in the left margin. If line numbering isn't turned on, click the Options button in the upper-right corner, and then choose Line Numbers from the menu.
In the ActionScript window, type in the following code:
1   var card1:PlayingCard1 = new PlayingCard1();
2   addChild(card1);
The first line is called a "variable declaration. It creates a new instance of the PlayingCard1 class and stores it in the variable card1. (If you want to learn more about how PlayingCard1 became a class, see Making Library Objects Available to ActionScript.) The second line adds card1 to the Display List.
Press Ctrl+Enter (⌘-Return) to test your ActionScript code.
When the Flash Player runs, a single card with the number 1 appears in the upper-left corner of the stage.
The second line of code shown in step 5 adds card1 to the Display List, making it visible on the stage, as shown in Figure 14-2. It's almost as if you dragged the card out of the Library. You may be wondering why the method for adding an object to the Display List is called "addChild." It has to do with the hierarchical relationship of displayed objects. (ActionScript just loves hierarchical relationships.) In the case of the Display List, an object contained in another object is considered a child of the container. The addChild() statement adds card1 as a child to the main timeline DisplayObjectContainer.
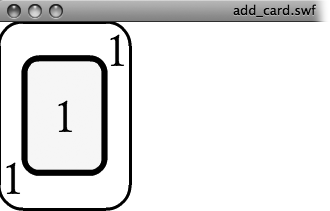
Figure 14-2. When you add this playing card to the Display List using ActionScript, you'll see it on the stage when you preview the Flash document (Ctrl+Enter or ⌘-Return).
You can add a second card using the same two steps in your code. First create an instance of PlayingCard2 using the variable name card2. Then add card2 to the Display List using the addChild() method. Here are the steps:
In the Actions panel, press Enter or Return to create a new empty line, and then type two more lines:
var card2:PlayingCard2 = new PlayingCard2();
addChild(card2);
The main timeline now has two children, as shown in Figure 14-4.
Press Ctrl+Enter (⌘-Return) to test your ActionScript code.
When Flash Player runs, you see the second playing card in the stage's upper-left corner. It looks as if only the card2 movie clip is on the stage. That's because the second card was placed directly over the first. So far, your ActionScript code adds cards to the Display List, making them visible. You haven't provided any instructions about where to place the cards. Without instructions, ActionScript places the registration point of an object at 0, 0 on the stage—that's the upper-left corner.
In the Action panel on the next available line, type the following code:
card2.x = 50;
card2.y = 50;
These lines reposition the card2 movie clip so it appears 50 pixels from the top and left margin.
Press Ctrl+Enter (⌘-Return) to test your ActionScript code.
This time when Flash Player shows your document, you see both cards (Figure 14-5). The first card movie clip you placed, card1, appears to be underneath card2.
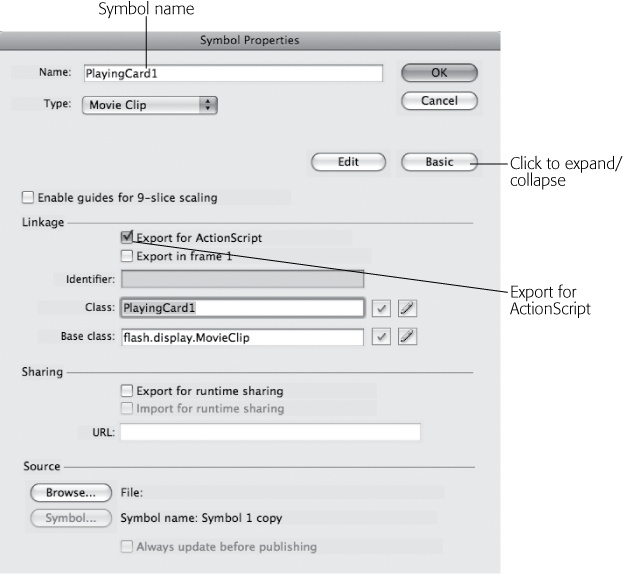
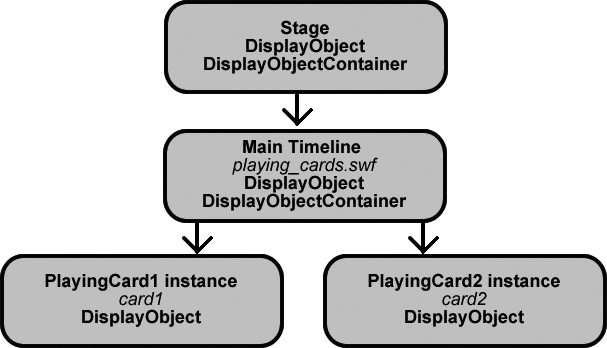

Figure 14-5. The card2 movie clip is positioned using x/y coordinates. Because card1 was added to the Display List first, it appears beneath card2.
At this point the complete code for your project may look like this:
1 var card1:PlayingCard1 = new PlayingCard1();
2 addChild(card1);
3
4 var card2:PlayingCard2 = new PlayingCard2();
5 addChild(card2);
6
7 card2.x = 50;
8 card2.y = 50;
The empty lines aren't necessary, they're there for housekeeping purposes only, making the code a little easier to read. As your projects get bigger, you may be inclined to keep the variable declarations together. So go ahead and rearrange you code so it looks like this:
1 var card1:PlayingCard1 = new PlayingCard1();
2 var card2:PlayingCard2 = new PlayingCard2();
3
4 card2.x = 50;
5 card2.y = 50;
6
7 addChild(card1);
8 addChild(card2);
Now, when you test the animation, you see card1 peeking out from behind card2.
You can make a couple of interesting conclusions from the code. Display List factoids so far include these:
Objects added to the Display List are placed on top of each other. Just like cards dealt onto a card table, the second object you add to the Display List covers the first.
You can apply properties to an object before you display it. In lines 4 and 5, you define the x/y coordinates for card2 before you display the card using the addChild() method in line 8.
You can use both points to your advantage when you develop projects using ActionScript. Every visible object has a position index number (sometimes called the Z-order) that tracks its position (or depth) in the stack. No two objects in a container share the same position index number. When the way objects overlap is important, you can control their appearance by adding them to the Display List in a specific sequence. If you're thinking that's not always possible, don't worry—this chapter shows plenty of other ways to shuffle cards. Also, you can change the properties of objects before they're displayed. For example, you can set the x/y coordinates prior to displaying the card2 movie clip on the stage. You can work with an object in code without showing the object to your audience. You can set its position, change its dimensions and colors, and add transformations and filters without adding it to the Display List. When you finally place that object on the Display List, it's essentially preformatted.
As mentioned on Using Event Properties, the trace() statement is a multipurpose tool that ActionScript programmers use to double-check their code and report on variables and objects. It never hurts to trace some of the objects in your code to understand how ActionScript sees them. A good first step is to place one of your cards inside the trace statement's parentheses and see what shows up in the Output panel, as shown in Figure 14-6. Trace shows the following text: [object PlayingCard1]. From this you can deduce that the variable card1 is an object of the PlayingCard1 class.
trace(card1);
Helpful, but what happens if you check the name property for card1?
trace(card1.name);
The message that appears in the Output panel is: instance1. Not so helpful. If you don't specifically give names to objects as you add them to your ActionScript code, Flash names them for you, and you end up with names of the instance1 variety. So, the next step for this project is to modify your code a little and add names for both card1 and card2. (If you find the differences between class names, variable names, and the name property of an object a little confusing, see the box on Naming Conventions and Your Sanity.) You can assign any string you want to the name property of card1 and card2, but there's no need to be too creative. Something like the following works just fine. Create new lines, and then add:
card1.name = "Card 1";
card2.name = "Card 2";
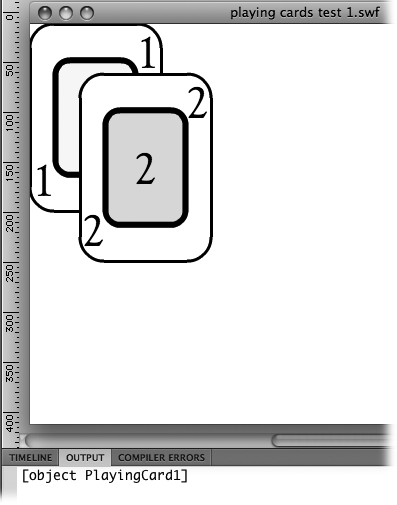
Figure 14-6. Using the trace() statement you can learn how ActionScript views the objects and variables in your code. Here trace() reports that the variable card1 is an object of the PlayingCard1 class.
Now the trace statements show the names of the objects in the Output panel. Instead of getting "instance1" and so forth, you get "Card 1" and "Card 2." Much better, but you can fashion your trace() statements into something even more helpful by adding some more explanatory text. Anything that appears in quotes in a trace() statement is displayed literally in the Output panel. If you write a statement like trace("dog") you see the word dog displayed in the Output panel. So you can modify your trace() statement a bit to make a descriptive sentence about your card variables:
trace(card1.name, " is ", card1);
This statement displays an "almost sentence" that's a little easier to understand: Card 1 is [object PlayingCard1]. Creating this statement might seem like a lot of unnecessary work at this point, but as your ActionScript becomes more complicated, statements like this are a big help in understanding what's going on inside your code. The next section uses trace() statements to report on the parent or display object containers that hold the cards.
So far, the code that adds the two cards to the Display List isn't specific about the container that holds the objects. When no specific container is identified, ActionScript places the object in the timeline that holds the code. As you might expect, if your card is referred to as a "child," the display object container holding the card is referred to as a "parent." You can use the trace statement to show the name of the parent (the display object container) that holds your cards.
Note
If you look up the class description for DisplayObject in the ActionScript 3.0 Reference, you find that it has a property called parent. Every display object is held in a display object container, so every display object has a parent.
Add these lines to the end of the code in the Actions panel:
trace(card1.name, " is ", card1);
trace("The parent of ", card1.name," is ", card1.parent);
trace(card2.name, " is ", card2);
trace("The parent of ", card2.name," is ", card2.parent);
Placing card1.parent inside the trace statement parentheses causes Flash to show the object class of the parent in the Output panel—in this case, MainTimeline. The Output panel displays the words in the quotation marks verbatim. You can include these words to make the output a little clearer for humans. As shown in Figure 14-7, both of the cards have the same parent, meaning they're both held in the same display object container.
Once your animations get more populated, you're likely to place display objects inside other display object containers. To show that point, the next example adds a card table to the Display List. The card table is a movie clip, so it has all the properties and methods of the DisplayObjectContainer class. Using the addChild() method, you can move one of the cards into the card table display object container. Finally, you'll add some additional trace statements at the end of the code to gain more understanding about how the code works.
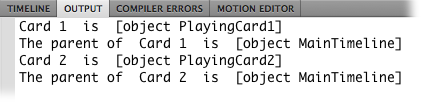
Figure 14-7. The trace() statement shows that the main timeline is the parent of both cards. Programmers often use trace() to make sure code is behaving as expected.
Follow these steps to update 14-1_Display_List.fla:
On new lines, type the following two lines of code. (You may want to keep that first line with the other variable declarations):
var greenTable:GreenCardTable = new GreenCardTable();
greenTable.name = "Green Table";
The first line creates a new variable, greenTable. It's an instance of the GreenCardTable symbol in the Library. (The drawing is a bit primitive, but think of it as one of those professional green felt card tables.) The second line changes the name property of this instance to "Green Table."
To position the table, type the following line of code:
greenTable.x = 250;
This code positions greenTable so that it's 250 pixels from the left margin. That way, it won't cover up the other items on the stage.
Next, add the following two lines of code.
addChild(greenTable);
greenTable.addChild(card2);
The addChild() method in the first line adds greenTable to the Display List. No parent is designated, so greenTable is in the main timeline. In the second line, you're using the addChild() method a little differently from the previous examples. Since you're running it specifically as a method of greenTable, addChild() adds card2 to the Display List as a child of greenTable. In other words, greenTable is a display object container that holds card2. Figure 14-8 shows a diagram of the relationships among the objects on the stage.
Beginning on line 18, update the trace statements to match the following code:
trace(card1.name, "is", card1); trace("The parent of", card1.name,"is", card1.parent); trace(card2.name, "is", card2); trace("The parent of", card2.name,"is", card2.parent.name); trace(greenTable.name, "is", greenTable); trace("The parent of", greenTable.name, "is", greenTable.parent);Press Ctrl+Enter (⌘-Return) to test your animation.
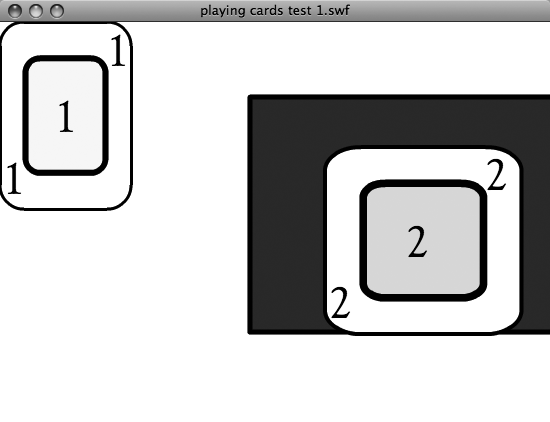
When you test the code, the display looks like Figure 14-9. In the Output tab, you see that now the parent of card2 is Green Table. The parent of Green Table is an object of the MainTimeline class.
The complete text in the Output panel reads:
Card 1 is [object PlayingCard1]
The parent of Card 1 is [object MainTimeline]
Card 2 is [object PlayingCard2]
The parent of Card 2 is Green Table
Green Table is [object GreenCardTable]
The parent of Green Table is [object MainTimeline]
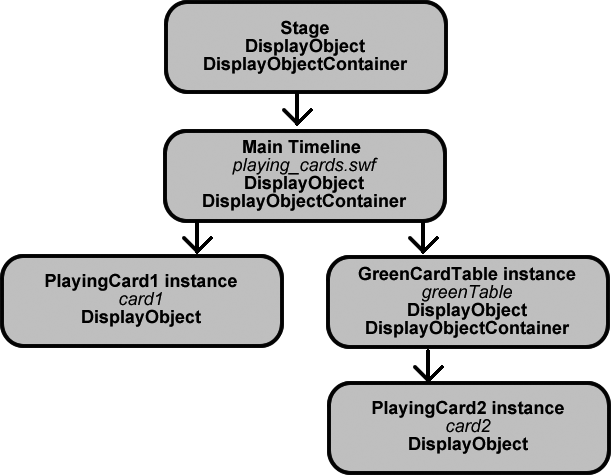
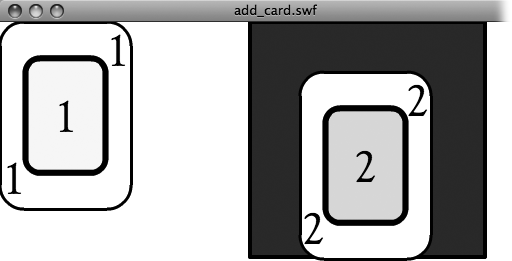
Figure 14-9. After you add card2 to the Display List as a child of greenTable, it appears in its container. Now that it's a container, card2's x/y coordinates use greenTable (not the stage) as a reference point. The card is placed 50 pixels from the left edge and 50 pixels from the top of greenTable's borders.
If you've been following the examples in this chapter, then at this point your code looks something like this:
1   var card1:PlayingCard1 = new PlayingCard1();
2   var card2:PlayingCard2 = new PlayingCard2();
3   var greenTable:GreenCardTable = new GreenCardTable();
4
5   card1.name = "Card 1";
6   card2.name = "Card 2";
7   greenTable.name = "Green Table";
8
9   card2.x = 50;
10  card2.y = 50;
11  greenTable.x = 250;
12
13  addChild(card1);
14  addChild(card2);
15  addChild(greengreenTable.addChild(card2);
16
17  trace(card1.name, " is ", card1);
18  trace("The parent of ", card1.name," is ", card1.parent);
19  trace(card2.name, " is ", card2);
20  trace("The parent of ", card2.name," is ", card2.parent);
21  trace(greenTable.name, "is", greenTable);
22  trace("The parent of", greenTable.name, "is", greenTable.parent);
The main thing the new code does is create and display a new display object container—the greenTable movie clip instance. A new addChild() statement places card2 inside greenTable. If you're keeping track of interesting Display List factoids, here are some more for you:
You can move display objects from one display object container to another with the addChild() statement. There are two addChild() statements related to card2. The first places card2 in the main timeline. The greenTable.addChild(card2) statement moves card2 from the stage into the greenTable DisplayObjectContainer. A single instance, like card2, can appear in only one place at a time, so the latter statement takes precedence.
A display object's position coordinates are relative to the display object container that holds it. Initially, card2 was positioned 50 pixels from the top and 50 pixels from the left border of the stage. After moving it to greenTable, the code displays card2 relative to greenTable's borders.
The objects inside a display object container are pretty much at the mercy of any transformations that happen to the container. For example, suppose you move or scale the width of greenTable while card2 is contained within it. Those changes and transformations affect card2, since it's a child of greenTable. You can test this process by inserting these lines into your code beginning on line 12.
greenTable.y = 75;
greenTable.scaleX = 1.5;
The first line moves greenTable down from the top margin 75 pixels. The second line scales the display object container, greenTable, making it one and one half times its original width. When you test the code after these changes, you see that both the move and the transformation affect card2 as well as greenTable (Figure 14-10). It's interesting to note that it doesn't matter whether the code places card2 in the greenTable container before or after transforming the table: card2 is transformed in either case.
It's not unusual for a Flash animation to have more than one container, and you'll often want to move display objects from one container to another, just as you'd move a document from one folder to another on your computer. The following updated ActionScript code expands on the cards and card table theme. It adds a second table to the stage (blue this time). It then places card1 on the new, blue table. Trace() statements at the end of the code report on Blue Table.
Note
If you're following along, add the bold lines to your project. If you'd like to start from here, you can use 14-2_Move_DisplayObjects.fla from the Missing CD (www.missingmanuals.com/cds).
1 var card1:PlayingCard1 = new PlayingCard1(); 2 var card2:PlayingCard2 = new PlayingCard2(); 3 var greenTable:GreenCardTable = new GreenCardTable();4 var blueTable:BlueCardTable = new BlueCardTable();5 6 card1.name = "Card 1"; 7 card2.name = "Card 2"; 8 greenTable.name = "Green Table";9 blueTable.name = "Blue Table";10 11 card2.x = 50; 12 card2.y = 50; 13 greenTable.x = 250; 14 greenTable.y = 75; 15 greenTable.scaleX = 1.5; 16 17 addChild(card1); 18 addChild(card2); 19 addChild(greenTable);20 addChild(blueTable);21 greenTable.addChild(card2);22 blueTable.addChild(card1);23 24 trace(card1.name, " is ", card1); 25 trace("The parent of ", card1.name," is ", card1.parent); 26 trace(card2.name, " is ", card2); 27 trace("The parent of ", card2.name," is ", card2.parent); 28 trace(greenTable.name, "is", greenTable); 29 trace("The parent of", greenTable.name, "is", greenTable.parent);30 trace(blueTable.name, "is", blueTable);31 trace("The parent of", blueTable.name, "is", blueTable.parent);
In this code, line 4 declares the blueTable variable, and line 9 gives it the name "Blue Table." Line 20 adds blueTable to the Display List, and then line 22 puts card1 in the blueTable DisplayObjectContainer. The code is nearly identical to the code used for greenTable (Placing Objects Inside Display Containers). When you test the code, Flash Player displays it, as shown in Figure 14-11.
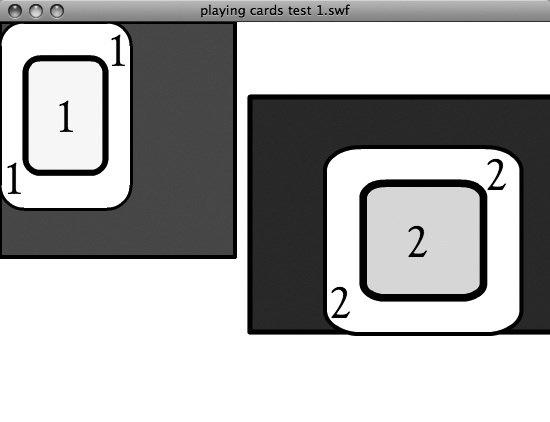
Figure 14-11. In the code it's currently on this page, there are two display object containers representing tables, with cards in them. A scaleX() method has transformed the green table (right). The transformation affects both the table and the card in the table.
So, at this point you have two tables and two cards. One of the tables is distorted a bit by scaling. Suppose you want to move a card from one table to another. That would be a good job for a mouse click. You can add an event listener to the blue table that waits for a mouse click, and then moves card2 from the green table to the blue table. Here's the code for the event listener and the function that runs on a mouse click. You can insert this code so it begins on line 24:
blueTable.addEventListener(MouseEvent.CLICK, clickTableListener);

function clickTableListener(evt:MouseEvent):void
{
    blueTable.addChild(card2);
}
Now when you test your animation, you first see the blue table with card1 and the green table with card2. If you click the blue table, card2 moves from the green table to the blue table. It works as planned, but it's kind of a one-shot deal and pretty dull. One click, and the fun is over. It would be more exciting if you could click either table to make card2 jump over to that table. It's not hard to modify the event listener to do the job. In fact, the MouseEvent class has a special property—called target—that identifies the object that's clicked.
As explained in Chapter 12, this process involves a listened-for event and an event object. Like any object, the event object has properties, one of which is target. This property stores the name of the object that initiates the event. In this case, blueTable initiated the event, so it's the target. To modify the code so card2 jumps to whichever table is clicked, you need to modify the clickTableListener() function so it identifies the clicked target object. Then you need to add an event listener to greenTable.
Here are the changes you need to make to the code (shown in bold):
blueTable.addEventListener(MouseEvent.CLICK, clickTableListener);greenTable.addEventListener(MouseEvent.CLICK, clickTableListener);function clickTableListener(evt:MouseEvent):void {evt.target.addChild(card2);}
Remember, evt is the variable name that identifies the MouseEvent in clickTableListener(). Like any variable, the actual name is up to you. It could be event or simply the letter e. The property target identifies the object that triggered the event. With the modified code, either of the tables can listen for the click event. There's nothing in the clickTableListener() function that's specific to either the blue or the green table, so it behaves relative to the container that's clicked. When you test the animation, card2 moves to the table you click. If it's already on the table you're clicking, nothing happens.
Now that a display object (card2) is shuffling around between display object containers (greenTable and blueTable) it makes the trace() statements that report on parent and child relationships a little more interesting. Unfortunately, the trace statements run only once, and they don't provide any updates when the clickTableListener() function runs. One solution would be to copy and paste all the trace() statements so they're inside the clickTableListener() function's brackets, but that adds a lot of extra lines to your code. For a more elegant solution, you can turn all the trace statements into a single function, and then simply call that function whenever you need it.
Turning the trace() statements into a single function is relatively easy. Create a line that defines the function with the keyword function, and a name you supply, like traceDisplayList. Place all the trace statements inside the curly brackets that hold the function's code. When you're done, it looks like the following. The bold line at the top and the bold curly bracket at the bottom are the only changes:
function traceDisplayList():void
{
    trace(card1.name, "is", card1);
    trace("The parent of", card1.name,"is", card1.parent);
    trace(card2.name, "is", card2);
    trace("The parent of", card2.name,vis", card2.parent.name);
    trace(greenTable.name, "is", greenTable);
    trace("The parent of", greenTable.name, "is", greenTable.parent);
    trace(blueTable.name, "is", blueTable);
    trace("The parent of", blueTable.name, "is", blueTable.parent);
}
Throughout this chapter, you've added trace() statements as the code developed and grew. If, as you're working, you want to add more trace() statements, just place the new lines inside the curly brackets. They'll run with the other statements whenever you code calls traceDisplayList().
Note
There are more details about creating functions and methods on Functions and Methods Put the Action in ActionScript.
Now, to show the results of the trace() statements in the Output window, you need only one line of code:
traceDisplayList();
For example, if you add this line to the clickTableListener() every time someone clicks one of the tables, the Output panel shows all the trace() statements. Here's the clickTableListener() code with the call to traceDisplayList() included:
function clickTableListener(evt:MouseEvent):void
{
    evt.target.addChild(card2);
 traceDisplayList();
}
Test your project now with Ctrl+Enter (⌘-Return), and card2 jumps to whichever table you click. Keep an eye on the Output panel, and you see that the card2's parent is updated with each click.
The statement that removes a display object from the Display List is pleasingly consistent with the statement that adds objects. It looks like this:
displayObjectContainer.removeChild(child);
So, if you want to remove card1 from the blue table, you write:
blueTable.removeChild(card1);
If you don't specifically define the display object container, Flash assumes that you're referring to the main timeline. That's the same assumption it makes with the addChild() statement. For example, if you want to remove the blue table, you write:
removeChild(blueTable);
That removes blueTable from the main timeline. If blueTable is a display object container holding other objects, those contained objects also get removed. Everything from the container on down disappears from view. If blueTable isn't contained in the main timeline—if it's contained in another display object container, for example—the code won't find it and won't remove it.
The previous section explained how to use a MouseEvent to move a card from one table to another. That code used the target property to identify the table that was clicked. To remove a card from the Display List when it's clicked, you need to identify both the target (card1) and the target's parent (blueTable). It may look a little convoluted, but the code that does the trick looks like this:
evt.target.parent.removeChild(evt.target);
Here's how that statement works, moving from left to right. As explained in the previous section, evt.target identifies the object that was clicked, initiating the event. By tacking the .parent onto that, you identify the container of the object that was clicked. That's all you need to invoke the removeChild() method. Remember, removeChild() is a method of the display object container. Because the child you want to remove is the object that was clicked, you can place evt.target inside the parentheses of the removeChild() statement.
Here's the event listener for card1, with a call to run traceDisplayList() at the end of the function:
card1.addEventListener(MouseEvent.CLICK, clickCardListener);

function clickCardListener(evt:MouseEvent): void
{
    evt.target.parent.removeChild(evt.target);
    traceDisplayList();
}
As you see, there's nothing in the function clickCardListener() that mentions card1. It simply identifies the target that was clicked and the container of that target. So, it's easy to add an event listener to card2 so that it works in exactly the same manner and removes card2 from the Display List.
Note
Removing display objects from the Display List removes them from the main timeline and the stage, but it doesn't remove them from memory. As your programs increase in both size and their demands on computer resources, it becomes important to remove them from memory when they're no longer needed.
It may not be the most entertaining card game in the world, but at this point when you test your animation and code, it performs two basic card tricks:
In the next section, you'll learn how to stack the deck the ActionScript way.