When programmers talk about object-oriented programming, they're referring to specific programming techniques—a way of looking at the parts of a program and the overall design. The idea is to create chunks of programming code that do a specific job. If you design them all, those chunks can fit together with other pieces of code. Think for a second about a typical home theater system that has an amplifier/receiver, a DVD player, a TV screen, and maybe a cable box. Each unit is an object. The folks who designed the DVD player don't have to know how to build a TV screen; they just have to make a DVD player that can plug into a TV. You can plug the same DVD player into another home theater system, and it'll work perfectly well. Programmers strive for that kind of modularity when they build objects.
The benefits are obvious. As long as the objects have an agreed-upon method for interacting, different programmers can work on different objects. When they all come together, they'll play well with one another. If the objects are truly useful and flexible, you can reuse them in future projects. Future programmers won't have to understand how the DVD player works; all they need to know is how to plug it in and how to send and receive signals from it.
In addition to reusability, there are a handful of other concepts that define object-oriented programming. Some of them don't make a lot of sense until you understand the basics of ActionScript, but here are a few of the basics for reference:
Classes. A class describes an object in the abstract, like the concept of DVD players. A class is like a generalized blueprint for building an object.
Instances. An instance is a specific object, like a Sony DVD Player Model N55.
Properties. Properties are characteristics that define an object. For example, color may be a property of the Sony DVD player; that property may be set to black or silver. Properties are part of an object's definition, so they're called members of the object.
Methods. Methods are actions that an object can perform. To continue the DVD player example, Play, Pause, and Fast Forward are methods of the DVD player class. These methods also belong to the Sony N55 instance of the DVD player class. Methods are part of an object's definition so, like properties, they're members of the object.
Events. Events act as triggers. Someone presses the Play button on the DVD player—the event—and the Play method runs. Events are also part of an object's definition.
Encapsulation. It's not necessary or wise to expose all the inner workings of an object. It's important for people to be able to play, pause, and eject discs in the DVD player, but they don't need to control the rotation speed or the intensity of the laser that reads the discs. In object-oriented programming, encapsulated features are those your audience can't mess with.
Flash itself gives you a good head start toward object-oriented thinking. Consider a lowly rectangle you draw on the Flash stage. That's an object. All rectangles share some of the same properties. For example, they have four sides defined by four points, and they have a surface or face between those sides. All the corners of a rectangle are right angles.
Once you understand the basics, you can describe a Flash rectangle using a few properties:
Width
Height
Stroke thickness
Stroke color
Fill color
Taking it a step further, you can place that rectangle anywhere on the stage by placing its upper-right corner on a particular point. That location is another property of a Flash rectangle.
If you're working in Flash, chances are you're going to use more than one rectangle, and you don't have to build every rectangle from the ground up. You can take certain rectangular characteristics for granted—four sides, right-angled corners. Other properties you need to define separately for each rectangle—width, height, color, location on the stage. So you need a class that defines rectangles in general, and you can then create specific instances of rectangles by defining their individual properties. And that's exactly how Flash works. Class, instance, and property are all fundamental terms for object-oriented programming and thinking.
In Flash, you change a rectangle's height or width using the Modify→Transform→Scale command. To change its location, you drag it to a new place. In ActionScript, by contrast, you change the height, width, and location by changing the properties in your ActionScript code:
myRectangle.width = 150;
myRectangle.height = 75;
myRectangle.x = 300;
myRectangle.y = 225;
Note
It's common practice to refer to locations on a computer screen as X/Y coordinates. The X refers to the horizontal position, and the Y refers to the vertical position. If you need something to help you remember which is which, remember that a lowercase y extends farther in a vertical direction.
Want to put some of these programming concepts to work? Try this:
In a new document, draw a rectangle of any size and shape.
You can think of this step as defining an object.
Select the rectangle, and then convert it to a symbol (Modify→Convert to Symbol), choosing Movie Clip as the type.
Movie clip is a great catch-all symbol for ActionScript programming. Movie clips can be as simple or complicated as you want.
Create a new layer, double-click the layer name, and then type "actions".
It's good programming practice to create a separate layer in the timeline for your ActionScript code. Naming it actions or scripts makes it clear that the layer is reserved for code.
For consistency, rename the rectangle layer drawings.
Your timeline now has two layers with descriptive names.
Make sure the instance on stage is selected, and then in the Properties panel, type myRectangle in the "Instance name" box, as shown in Figure 12-7.
This step is important. If you don't give objects on the stage a name, there's no way to tell ActionScript exactly which object you're talking about.
Figure 12-7. Before you can control objects on the Flash stage with ActionScript, you have to convert them to movie clip or button symbols, and then name them in the "Instance name" box on the Properties panel.
Tip
Uppercase and lowercase spelling make a difference to ActionScript. Objects named myRectangle, MyRectangle, and myrectangle are completely different things to ActionScript. ActionScript programmers use certain typographic conventions that make it easier to read and understand code. One of those conventions is to use camel case for instances of objects. Camel case uses an initial lowercase letter and then uppercase for the first letter of additional words. For example: thisIsCamelCase.
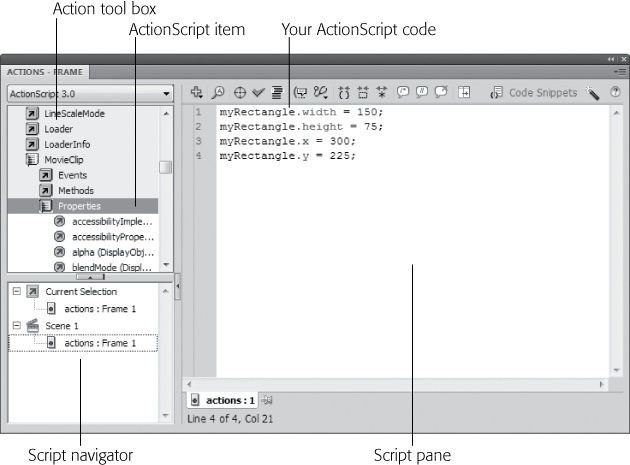
Open the Actions panel.
The Actions panel looks pretty busy when you first see it, as shown in Figure 12-3. All the details are described on Writing ActionScript Code in the Timeline. For now, focus on the big blank area in the middle, where you type ActionScript code.
Select the first frame of the actions layer in the timeline, and then type the following lines in the Actions panel:
myRectangle.width = 150;
myRectangle.height = 75;
myRectangle.x = 300;
myRectangle.y = 225;
When you're done, the Script pane should look like Figure 12-8.
Click the Check Syntax button (the checkmark) at the top of the Actions panel to check for typos in your code.
The check syntax feature in ActionScript 3 isn't as picky as it could be. Still, it helps you find major bloopers in your code, so it's worth using, especially when you're just starting out.
Test your movie.
After a little churning, the Flash Player or your browser appears on your screen. If everything's working right, your rectangle changes its shape and size. No matter what dimensions and location your rectangle had to begin with, it takes on the properties you defined in your ActionScript code. It's 150 pixels wide and 75 pixels high, and it's located 300 pixels from the left (X) of your screen and 225 pixels from the top (Y).

You can probably guess what you need to do to animate this baby. Just add new frames, including a keyframe, to your timeline, and then type some instructions similar to the ones in step 7 above. Here are the specific steps:
Click the 40th frame in both layers of your timeline, and then press F5 to insert frames.
You've just added 39 new blank frames to each layer of the timeline. Blank frames show whatever is on the stage in the previous keyframe without changing anything.
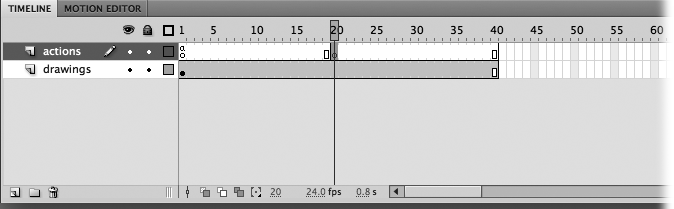
Click the 20th frame in the timeline's "actions" layer, and then press F6 to insert a keyframe.
Pressing F6 here places a second keyframe in the middle of the timeline, where you can change the look of myRectangle using another snippet of ActionScript. When you're done, the timeline should look similar to Figure 12-9.
In the Actions panel, type the following lines:
myRectangle.width = 200;
myRectangle.height = 200;
myRectangle.x = 100;
myRectangle.y = 225;
Or, to avoid duplicate effort, use the Copy (Ctrl+C for PCs; ⌘-C for Macs) and Paste (Ctrl+V for PCs; ⌘-V for Macs) commands to steal the code from Keyframe 1 to Keyframe 20. Just copy, paste, and then change the numbers. It's faster than typing in new code, and you're less likely to create a typo.
Click the Check Syntax button.
You never know!
Test your movie.
Halfway through your animation, the rectangle turns square and moves to the left. Exactly as you programmed it. Not terribly exciting, but you can use these same methods to dress it up a bit more, which you'll do in the next section.
Tip
When you're starting out in any programming language, the most common error is misspelling. Computers are worse than your second-grade teacher. They want everything spelled and punctuated perfectly. If something goes wrong, double-check your spelling and punctuation first. You can save yourself some grief by copying and pasting words, like myRectangle, to avoid typos.
As explained on Object-Oriented Thinking, properties define the characteristics of objects. Methods are the actions. Methods explain how a particular object can do something. If you, as a human being, are an object, then your height, hair color, and gender are your properties. Walking, talking, and keyboarding are your functions and methods.
Note
In ActionScript, methods are actions that are a defined part of an object, just like its properties. Functions are actions that are independent of any particular object.
In the exercise in the previous section, your code moved myRectangle to the left 200 pixels. What if you want to move to the left by 5 pixels at several different points along the timeline? The script writer's way to do that is to write a moveLeft() function, and then run that function whenever the object needs to be moved. Here's the code for a function that handles the move:
function moveLeft(anyMovieClip:MovieClip):void
{
 anyMovieClip.x = anyMovieClip.x -5;
}
Go ahead and type the function below the ActionScript code on the first frame of your document. Start on line 6, so that there's a little room between the different parts of your code. Click the Check Syntax button and double-check your spelling and punctuation. When you're done, it should look like Figure 12-10.
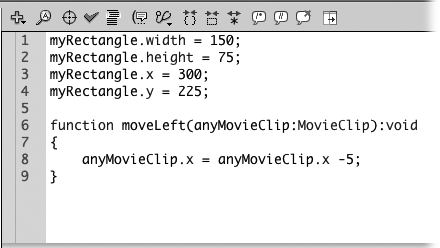
Figure 12-10. Compared to the object's properties, a function is just a tad more geeky and complicated. The first word, function, explains that the code that follows defines a function. The next word is the name of the function, moveLeft(). You'll use this name every time you want to run the function.
Your function moveLeft() is an action, and as such it needs an actor. Something's gotta move, and that something is named inside the parentheses. You're moving anyMovieClip. That's probably a clear enough explanation for you, but it's not for your computer. To your computer, "anyMovieClip" might as well be "joeJones." They're both names it's never heard of. Your computer needs to know exactly what kind of object it is that you're moving. So, on the other side of the colon (:) you explain that anyMovieClip is in fact a MovieClip object. With that explanation, ActionScript can look up the definition for MovieClips, and it knows exactly what anyMovieClip can and can't do. Your computer also knows how much memory it needs to devote to anyMovieClip—an issue that becomes more important as your programs grow bigger.
Following the parentheses is the mysterious :void—another bit of ActionScript housekeeping. This code tells ActionScript that moveLeft() doesn't perform a calculation and provide a value in return. Suppose you created a function to find the area of a rectangle; getArea() would do its calculation, and the result would be a number. Instead of expecting the ominous-sounding :void, you'd tell ActionScript to expect :Number.
The actual instructions for your moveLeft() function have to be between curly brackets {…}, like the ones you see on second and fourth lines. The brackets don't have to be on lines by themselves, but sometimes it's easier to read your code when it's written that way.
The action in your code is all on one line; everything else was just the necessary ActionScript overhead used to create every function.
anyMovieClip.x = anyMovieClip.x -5;
Remember how myRectangle.x was shorthand for "the horizontal position of myRectangle"? You're using the same shorthand here with anyMovieClip. ActionScript knows what you mean by x, because it's one of the built-in properties of the MovieClip class. What's more, if you change the value of x, the movie clip changes position. You saw that in the example on Customizing the Video Playback Component. Changing a value is also called assigning a new value. And while you may know the = symbol as equals, in ActionScript it's called the assignment operand, because it assigns the value on the right side to the property or variable on the left.
When you wrote:
myRectangle.x = 100;
you were assigning the value 100 to the x property of myRectangle. Your moveLeft() function's code is just a little bit more complicated. You're saying "take the value that's currently assigned to anyMovieClip.x, subtract 5, and then put the result back in the anyMovieClip.x property." This method of reassigning a value is very common in ActionScript and almost any programming language.
So you may be wondering why your function used the word anyMovieClip instead of using myRectangle as the object of this moveLeft() action. The function is literally for moving any movie clip, so it's not hard-coded for a single rectangle like myRectangle. The name in the parentheses is a parameter of the function, so when you run moveLeft(), you tell ActionScript specifically which movie clip you want to move. Here's how it's done:
moveLeft(myRectangle);
It's that simple to run a function, or as the fellow with the pocket protector and tape on his glasses would say, "to call a function and pass it a parameter." To put your function into action, go back to your timeline. Add keyframes (press F6) every fifth frame from Frame 5 to Frame 25. Delete all the code that's on Frame 20. In the keyframes from 5 onward, type your function:
moveLeft(myRectangle);
With the code inserted, your timeline looks like the one in Figure 12-11.
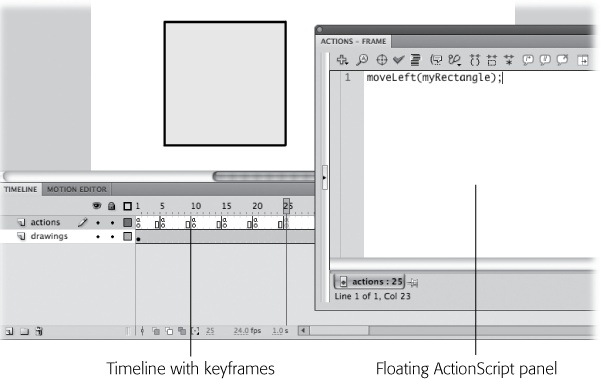
Figure 12-11. Drag the ActionScript panel by the top bar, and you create a floating window like this one. The single line calling the moveLeft() function appears in the Script pane.
Check syntax, spelling, punctuation, and then test your movie by pressing Ctrl+Enter (PC) or ⌘-Return (Mac). If the scripting deities smile upon you, myRectangle should move left in 5-pixel increments, and then pause for a bit.
Here's another great thing about using functions instead of hard-coding everything. Suppose you decide that 5-pixel steps isn't quite the grand, sweeping motion you had in mind. All you have to do is change one number in the original function. Change the code:
anyMovieClip.x = anyMovieClip.x -5;to the following:
anyMovieClip.x = anyMovieClip.x -25;and then test the results.
The complete geeky moniker for moveLeft() in this example is function closure. In ActionScript, functions that are part of an object definition are called methods. Functions that aren't part of an object definition are called function closures. (Often, in other languages, they're referred to simply as functions.) If moveLeft() was part of the definition for a rectangle object, it would be called a method of myRectangle.
Note
To see the completed file, download 12-1_Move_Rectangle.fla from the Missing CD page (www.missingmanuals.com/cds).
In the olden days of programming, programs simply ran through a series of statements. The experience was similar to watching an animation with no way to change it. All you could do was watch it run from beginning to end. The concept of events helped change all that. When a person clicks a button in a Flash animation, that's an event. The response to that event might be a number of things: perhaps a new shape appears on the stage, or maybe the animation jumps to a new scene or frame.
ActionScript programmers create routines that listen for a particular event, like that mouse click, and then handle it with a particular action, like jumping to a new scene. It's a great, tried-and-true method of interaction that lots of programming languages use.
When you write an ActionScript program, you decide what events your program will listen for. Those events can include any of the following:
Mouse events, like mouse clicks or mouse movements.
Keyboard events, like pressed keys.
Frame events, like the Flash playhead moving into or out of specific frames.
Load events, which report on the progress when loading external files.
Once you've identified the events you want your ActionScript program to respond to, you write event handlers to spring into action. Your event handlers will run through a series of ActionScript statements, which may be made up of functions like the moveLeft() function from the previous section. Your event handlers can also change an object's properties.
You can use events to hand the controls over to the folks watching your Flash animations, which makes events an important tool in your Flash/ActionScript toolbox. Events are so important they have their own chapter (Chapter 13).
Note
Previous versions of ActionScript handled events in a few different ways, including the well-known on statements. ActionScript 3 has only one method for handling events—event listeners, as introduced here and in covered in more detail on How Events Work.