Once you've got your AIR project squared away, you'll want to test it, debug it, and ultimately distribute it to your audience, just like a Flash animation. In Flash-speak, that means you need to publish your project. The process for publishing an AIR project is slightly different from publishing a Flash animation. For one thing, as explained on Create a Code Signing Certificate, you need a code signing certificate. Usually, Flash animations consist of one or more SWF files and sometimes some HTML code to create a web page. On the other hand, AIR applications are distributed as a single .air file, which holds all the project's stuff. Your audience uses that .air file to install the program and all the necessary files on their computers. As part of that process, the installation routine checks to make sure the AIR runtime is on the local computer. If it isn't, your user is prompted to install it. The following steps show you how to publish your AIR project. (You can use your own project or the example from Convert a Flash Animation to AIR.)
With your AIR project open in Flash, choose File→Adobe AIR 2 Settings.
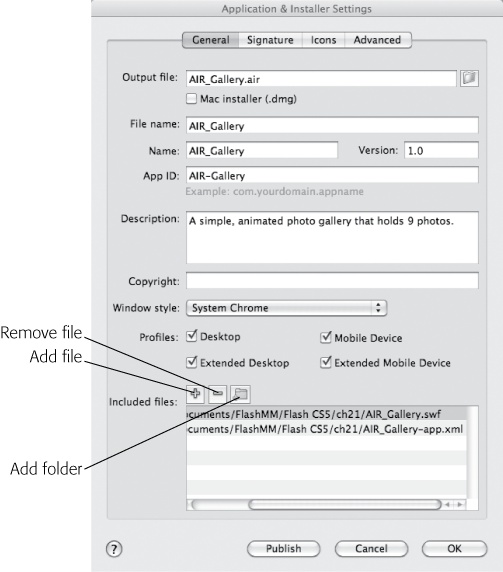
The Application & Installer Settings window opens, displaying the General tab. Parts of the form are probably already filled in, such as the Output filename. In any case, here's a rundown on all the text boxes and widgets:
Output file. The name of the file that you distribute to people who want to install and run your application. The filename ends in .air to indicate that it's an Adobe AIR application/installation file. Click the folder icon to choose a folder for the file that Flash creates during the publish process. Turn on the Windows or Mac installer box to create an .exe installer for Windows computers or a .dmg installer for Macs.
File name. The application's filename once it's installed on a computer.
App Name (Name on the Mac). The application name that appears on the window when the program is running.
Version. The version number for your application. You need to update this when you make improvements to your program.
App ID. The name AIR uses for this application. By convention, AIR developers use the reverse of their website address and the app name. For example, something like "com.MissingManuals.AIR_Gallery" would be appropriate.
Description. Your description of your program. What does it do? Who would find it helpful?
Copyright. Protect your work with a copyright notice and date.
Window style. This option determines the appearance of the window that holds your application, called chrome in webspeak. Choose System Chrome to have the window match the Windows, Mac, or Linux system it runs on. As an alternative, you can choose Custom Chrome (opaque) or Custom Chrome (transparent).
Profiles. Choose where your program is intended to run. Options are Desktop, Mobile Device, Extended Desktop, and Extended Mobile Device.
Included files. Flash automatically adds files needed for your AIR app. In the Photo Gallery project, it adds AIR_Gallery.swf and AIR_Gallery-app.xml (the descriptor file). If your project needs additional assets, like photos, videos, or sound files, you can add them by clicking the + button, as shown in Figure 21-9.
Click the Signature tab and add your certificate name and password.
If you created a self-signed certificate, as explained on Create a Code Signing Certificate, you can use that here. Use the password you assigned to the certificate. If you have a certificate from a third-party certificate authority, use the details it provided for the certificate name and password.
Click the Icons tab.
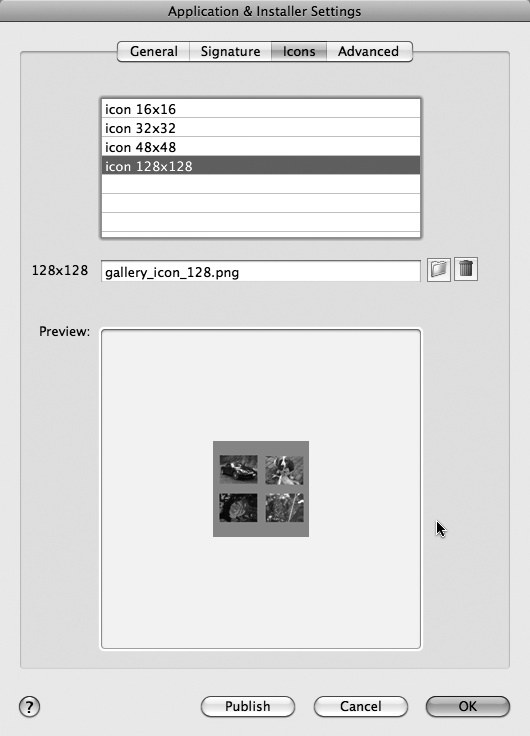
You use Icons tab, shown in Figure 21-10, to define program icons used by the various operating systems (Windows, OS X, Linux) to represent your application. In pixels, icons are expected to be the following sizes: 16 x 16, 32 x 32, and 128 x 128. Use a program like Fireworks or Photoshop to create and size your icons. For this exercise, you can create your own or use the icons found on the Missing CD (www.missingmanuals.com/cds) in the file 21-2_Gallery_Icon.zip. The examples are named gallery_icon_16.png, gallery_icon_32.png, gallery_icon_48.png, and gallery_icon_128.png.
In the icons tab, select "icon 128x128" then click the folder button to find and open the file gallery_icon_128.png.
After you click Open, the selected icon appears in the Preview pane at the bottom.
Repeat the process to add all four icon sizes to your project.
When you're finished, four icons of different sizes are associated with your project.
You use the advanced options to create file associations, to manage the program window size and behaviors, and to designate the folder for installation files and menus. This simple test program doesn't use any of the advanced features, so there's no need to make changes unless you're feeling adventurous.
Click Publish.
You can use the Publish button on the Application & Installer Settings panel, or you can use the standard File→Publish command. In either case, Flash creates an .air file that holds all the assets needed to run your application. If you selected the installer option, Flash creates either an .exe installer for Windows or a .dmg installer for Macs.
Once your project is published, you can distribute the .air file or one of the installer files (.exe or .dmg). When your fans double-click the file, your application installs itself. If the AIR runtime is not present on the local computer, the installer prompts the person to download and install it.

