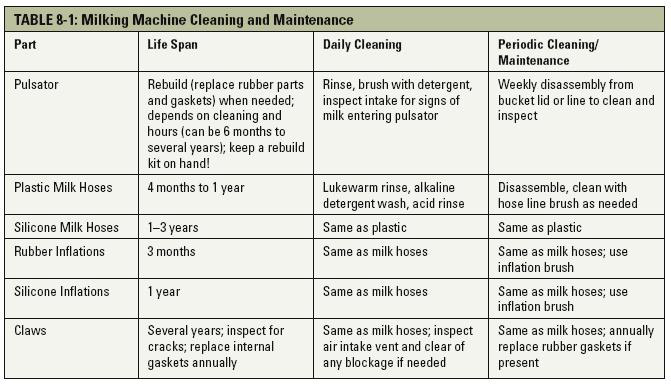
• 8 •
The Milking Parlor and Milkhouse
What transforms a farm into a dairy? Two rooms: the milking parlor and the milkhouse. Both of these specialized rooms must be constructed to meet regulatory standards as well as to suit the size of your herd and your own personal preferences.
For both rooms we will cover floor plan considerations, construction and maintenance standards, and equipment options. Appendix B contains sample floor plans from working farmstead creameries around the country—feel free to refer to them during your reading. Appendix A provides a list of resources where you can get much of the equipment mentioned here.
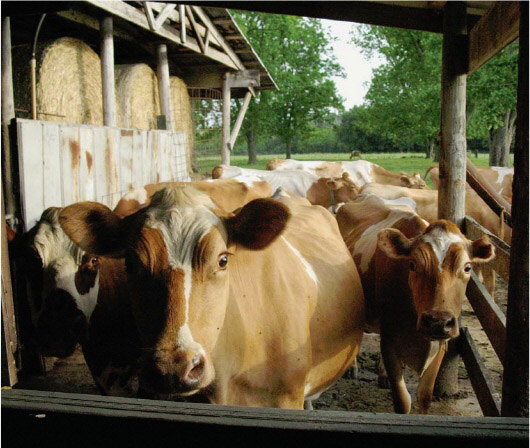
Eager to be milked, these pasture-fed cows wait for their turn at Sweet Home Farm, Alabama.
The Milking Parlor
While the term “parlor” may bring to mind fringed lamp shades and overstuffed furniture, the milking parlor is in reality a bustling, noisy, wet room that should be designed to withstand the abrasion of animal hooves and the harsh contact of cleaning chemicals and brooms.
Floor Plan Considerations
When designing the layout of your milking parlor, take into consideration access, location, and size.
Access
Milking takes a huge chunk of time out of the dairy farmer’s day. Getting animals in and out of the parlor in an efficient fashion will cut down on wasted time and effort. Think about animal traffic flow when designing the floor plan of your milking parlor, especially in relationship to the loafing area, holding pen, and barn. If you will be milking by hand or using a portable milking machine, then easy access to the milkhouse is a priority—lugging heavy pails of milk up steps and through doors will get old very quickly!
Location
Locating the parlor close to or adjoining the barn brings convenience, but also the added challenge of keeping barn material—such as manure, flies, hair, and dust—out. If milk will be transported to a bulk tank via a permanent pumping system, locating the parlor slightly above the bulk tank will allow for gravity-assisted pumping—and the milk will be treated more gently.
TRAFFIC FLOW
Paul Hamby, owner of Hamby Dairy Supply, one of the nation’s largest suppliers to home and commercial dairies, says: “Traffic flow is perhaps the single biggest mistake people make in planning a new facility. Poor flow adds more labor and slows the milking process and usually cannot be fixed after your facility is up and running.”
Size
As with most rooms in the dairy, it is hard to make them too large. A good parlor should accommodate the animals, the milkers, and the occasional additional person, such as a milk tester, visitor, apprentice, etc.
Construction and Maintenance Standards
These standards are defined in the Pasteurized Milk Ordinance (PMO), the FDA’s bible on Grade A milk production. Each state may also dictate additional and unique standards, so be sure to consult with your state’s regulatory agency prior to building. This book will refer to the standards in the PMO at the time of writing.
WILLOW HILL FARM
Willow Smart and David Phinney of Willow Hill Farm in Milton, Vermont, built their new creamery on a slope—with each room stepped down a level from the one preceding it in the cheesemaking process, thus allowing them to utilize gravity at each stage. Even the whey flows out of the creamery through a pipeline that runs directly to the hog pens. Willow Hill milks a herd of approximately 90 East Friesian and Friesian cross ewes and 7 Brown Swiss and Dutch Belted cows, which provides them with enough milk to produce 15,000 pounds of cheese per year. Their new creamery includes a handy self-serve “store” from which customers can also view the cheesemaking room.
Floors
• Sloped to drain
• Made of concrete or other impervious material
The parlor floor is not expected to be as smooth and free of blemishes as other rooms in your dairy, but it should not have areas that allow water to accumulate in puddles or cracks that are too deep to clean. You can have a slightly rough texture to your parlor floor to prevent animals or milkers from slipping. Parlor floors, especially those used by cows, will need to be resurfaced periodically over time (usually many years).
Walls and Ceilings
• Cleanable surface
• Sealed junctions at floor and ceiling
SWEET HOME FARM
One of the more clever ceiling materials I saw was at Doug Wolbert and Alyce Birchenough’s Sweet Home Farm in Alabama. Doug used painted metal roofing to cover the ceiling interior. He sealed screw heads and joints with 100 percent silicone caulking. The material has held up extremely well in the moist environment and looks clean and fresh with minimal maintenance. Doug and Alyce produce approximately 13,000 pounds of cheese annually from their herd of grass-fed Guernsey cross cows.
Walls and ceilings must have a surface finish that you can keep reasonably clean. Concrete and block will have to be filled and relatively smooth. Ceilings should be smooth and painted or finished in an approved manner. Ceiling-to-wall joints as well as light fixtures must be sealed to prevent dust from falling into milk (especially when feed or other things are stored above the parlor). You should expect to resurface concrete floors periodically, depending upon what kind of wear and tear they experience. (For example, concrete floors in a cow parlor will wear much more quickly than those in a goat parlor.)
GRADE B MILK
While the PMO covers the production of Grade A fluid milk, some states still license plants to produce Grade B milk, also known as “manufacturing milk” because of its use in the manufacture of other dairy products, including cheese. Regulations differ for Grade B in regard to dairy barn construction and bacterial counts allowed in milk. Inspections are not as frequent. Some farmers start out using Grade B to make cheese, with the thought of upgrading in the future. Before you start your construction, consult with your licensing agency to determine if Grade B is an option worth investigating in your state.
Lighting
Lighting must be sufficient for well-illuminated day or night milking. The PMO stipulates a light meter reading of 110 lux. (Think of a living room with enough light to read easily.) Light fixtures should be sealed to prevent any broken bulbs from introducing hazards into the milk. The most acceptable light fixture consists of a bulb inside a rugged glass jar encased by a metal grid. These fixtures are somewhat costly, but they’ll reduce the risk of hazards due to broken bulbs (which can occur easily when cleaning the ceiling and walls with a scrub broom).
Ventilation
Good ventilation is important to prevent condensation or excessive odors. Consider installing an exhaust fan with a timer if natural ventilation through windows is not an option year-round.
Openings
The PMO allows for three-sided parlors (ones that are open to a holding pen, breezeway, or other livestock access), but remember to check the rules for your specific state to see if this is acceptable where you are. Any opening to a feed room must have dust-tight doors that are closed except when they are in use, to prevent the contamination of feedstuffs into the milk. In addition, poultry, swine, and pets may not have access to the parlor. For large openings, using vinyl strip curtains or doors can help with climate and pest control.
Equipment and Accessories
Here is a list of some of the equipment and extra stuff you will need to consider for your milking parlor:
• Milk stand or platform
• Milking machine system, portable or in-place
• Hand-washing sink and wash-down hose
• Other stuff: shelf for teat dip, udder wipes, radio, white board, calendar, clock, etc.
Milk Stand or Platform Considerations
• Number of animals that need to be milked—both now and planned over the next five years
• Construction material, cost, and maintenance
• Parlor style: tie-stall; pit/recessed (with herringbone or parallel pattern); side exit; or rotary/carousel
Number of Animals
While it is often not possible to anticipate future growth, try to start out with a milking stand or platform that will anticipate your needs about five years down the road. This could save significant cost as well as time should your herd size grow. Also, remember that the more animals you can milk at one time, the faster your milking chores will be completed!
Construction Materials
If you are building a recessed (pit) parlor, then you will likely build your platform from concrete, most certainly if you are milking cows. If you are milking goats or sheep, you can have a recessed parlor with the elevated platform fabricated from steel—either painted, galvanized, or stainless steel. (If you are milking year-round, it is a good idea to spend the extra money on a hot-dipped galvanized surface or even stainless steel.) A handful of states allow the use of painted wood. Some have argued that painted wood is an impervious material and should be allowed, but in reality, a painted surface on which hooved animals will be walking will be in constant need of maintenance.
Parlor Style
In the Northeast and colder parts of the nation, you will find many tie-stall barns that both house the cows during the winter and serve as a milking parlor. These are rarely seen in more temperate parts of the nation, where animals can access an outdoor loafing shed or protected paddock year-round. In some parlors, animals are not given grain during milking and can be clip-tied to either a wall or a rail. While this does eliminate the cost of purchasing a headgate system, it also increases labor time, as each animal must be individually secured and released.
Recessed or pit parlors can be designed with either a herringbone or parallel formation:
• A herringbone parlor usually consists of a central pit flanked by two milking platforms. Animals enter on one side and line up diagonally. The milker prepares the first set of animals and begins their milking, then allows a second set into the other side and gets them started. After being milked, animals exit from each side at the same time.
• In a parallel parlor, animals line up side by side at a right angle to the milker. Some parallel systems allow for single exit of animals, while others allow group exit.
Three-cow tie-stall parlor, Sweet Home Farm, Alabama.
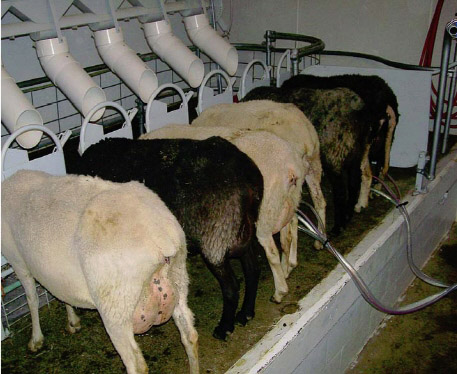
Six-sheep milking parlor with cascading headgate, Black Sheep Creamery, Washington.
HEADGATES
For the small goat or sheep producer, a parallel formation on an elevated platform is the most common parlor design in use. The does or ewes usually place their heads in a stanchion (headgate) and are secured during the milking process. Headgates can be gang-operated (a single mechanism locks all animals in at one time); cascading (the first animal can access only the first stanchion; as it places its head through the opening, the stanchion locks the animal in and triggers the next stanchion in sequence, to open, and so on); or individually activated (each station closes and releases independently of the rest). Cascading head-gates have, in my opinion, the advantage in that they prevent animals from stopping at the first open stanchion and blocking animals behind them from entering the parlor. The only catch is that in order for the cascading headgate to latch, the animal must lower her head to a grain tub, thus triggering the catch. So you must want to feed the animals grain while they’re on the milk stand for this type of headgate to be a good choice for your farm.
Side-exit parlors have individually loading and exiting stalls that place the cow sideways to the milker.
Rotary or carousel parlors are just what they sound like: animals step onto a slowly rotating platform and face toward the center, placing the udder to the outside.
As you can imagine, there are many things to consider when choosing a parlor style. There are advantages and disadvantages to each type. Some of the main points to consider when choosing a parlor style are:
• Ease of access to the animal for udder prep and milking. The easier the access, the more sanitary the process is likely to be.
• Individual attention. If animals must come and go in groups only, then slow-milking animals will either impede the process or will not be completely milked out when they exit.
• Visibility for the milker. The farther the milker is from animals during milking (such as in a larger side-exit parlor), the more likely teat cups will not be removed at the right time.
• Comfort of the milker. Parlors designed for one species (such as cows) but used for another (such as goats) are likely to be less efficient and comfortable. Platform height that is too low for the milker to easily prep and milk animals will decrease comfort and therefore efficiency.
If possible, try to visit dairies using several of these systems to get a better sense of your options. Consulting a specialist who sells parlor systems can also be helpful; however, many of these companies are focused on systems that are designed for the large dairy.
Milking System Considerations
While the PMO does allow for hand-milking, there are very few dairies that still employ this method as their primary milking system. Most small operations utilize either portable bucket milkers or a permanent pipeline system. Important factors to consider when choosing a milking machine system are:
• Number of animals to be milked, now and over the next five years
• Initial cost and setup
• Operator efficiency and comfort
TIP
A “Semi-Permanent” Bucket Milker
A bucket milker can be set up to be “semi-permanent” by locating the vacuum pump and motor a distance from the milking parlor and installing a PVC line that runs from the vacuum pump to the milking parlor and an electrical line and switch for turning the motor on and off in the parlor. This allows for a quieter milking situation, and easier cleanup in the parlor; it also keeps any greasy residue from an oil vacuum pump out of the milking area.
Rhonda Gothberg setting up her semi-permanent bucket milking system at Gothberg Farm, Washington.
Portable Bucket Systems
Portable bucket systems consist of a vacuum pump, a pulsator, a milk bucket, milking lines, and a milking cluster made up of claws and teat cups. The vacuum pump has a line that runs to the milk bucket, where it creates negative pressure. The milking lines run from the bucket to the animal. A pulsator is installed either on the lid of the bucket, in the vacuum line, or as an all-in-one claw and pulsator. The pulsator turns the vacuum suction to the milk bucket and teat cups on and off rhythmically, allowing the teat to refill with milk and ensuring that circulation of blood to and from the teat is not impaired. The vacuum pulls the teat into the teat cup, which consists of an inflation and shell. The inflation has a silicone or rubber liner inside a plastic or stainless steel shell. At the bottom of each inflation, or in-line just after the inflation, is a part referred to as the claw. If you are milking cows, the claw looks a bit like an animal claw, with many attachments coming off a central part, but for goats and sheep there is no resemblance. The whole setup is referred to as the cluster. The claw consists of a reservoir where milk pools before it enters the milk hose, a valve that prevents backflow of milk into the inflation, and a tiny air vent to draw air into the line—thus preventing “slugs” of milk in the lines (slugs are a problem because they cause the vacuum to fluctuate to an extreme that can allow for droplets of milk to spray upward and into an open teat orifice). If no claw is used, then venting must be provided through the shell. Both the milk line and a vacuum line from the pulsator attach to the claw.
After milking, the bucket is transported to the milkhouse, where the milk is poured through a filter (unless an inline filter is used) into a clean milk can or bulk tank; after this, the milk is either chilled and stored or pumped directly to the cheese make room for processing. Portable systems are cleaned using hose brushes and a sink and/or bucket washer (more on this in the section on the milkhouse).
Pipeline Systems
Pipeline systems deliver the milk directly to a milk storage (bulk) tank, eliminating the need to transport buckets by hand. The main components (milk pipeline and vacuum lines) are built in, while milk hoses and clusters can be either cleaned-in-place (CIP) or cleaned separately in the milkhouse. Most newer pipeline systems are CIP, but many smaller farms or dairies that milk in tie-stall barns remove milk hoses from the pipeline and clean them manually or with a bucket washer in the milkhouse. Pipeline systems use the same cluster set-up as described for portable bucket milkers, but instead of the milk hoses being attached to a bucket, they are attached to a milk pipeline and the vacuum lines are attached to a main vacuum line. These main lines run either above the level of the udder (high line) or below (low line). It is generally agreed that low-line systems are more efficient and move the milk more gently, as they can rely more on gravity to aid in the milk flow. In the small dairy, teat cups will most likely be removed by hand when the animal has been emptied of milk, but in large systems, automatic take-offs (ATOs) are common. The milk flows through the pipeline to a milk receiver jar, where it is pooled and then pumped or released to the bulk tank for storage. There are many variations, modifications, and maintenance issues that exist with a pipeline system. (These include such things as automatic backflushing of teat cups, in-line cooling and filtration, and more.) You would be well advised to consult with a reputable dairy supply dealer when considering the purchase of a pipeline milking system and then maintaining it.
BACKFLUSHING AND MASTITIS PREVENTION
In large dairies, pipeline systems are more complex and automated than you are likely to see in a small dairy. This includes automatic take-off (ATO) and automatic backflushing of the teat cups. Backflushing is the process in which a sanitizing solution is flushed through the teat cups to remove any milk residue from the animal just milked and sanitize the teat cups between animals. Since the solution flows in the opposite direction of the milk, it is called back-flushing. The removal of the milk residue can help prevent cross-contamination by mastitic agents. Manual backflushing can be done on any milking system by shutting off all vacuum to the cluster and immersing the teat cups in a sanitizing solution; however, exposure to the solution must be for the minimum time required (30 seconds for most properly diluted sanitizers), and great care must be taken to refresh the solution (as it will rapidly become ineffective as the milk residue is rinsed into it) and to ensure that no solution is pulled into the milk hoses. Most references to manual backflushing as a means of preventing the spread of mastitis suggest that other steps will be equally effective, including ensuring proper vacuum pressure; not allowing teat cups to slip on and off a teat during milking (causing milk in teat cups to possibly enter the teat orifice); proper removal of teat cups, with vacuum off; and proper teat sanitation.
Eight-doe pipeline CIP milking system, Fraga Farm, Oregon.
MILK QUALITY OPPORTUNITY
Your best defense against poor milk quality is aggressively enforced sanitation and proper procedure in the milking parlor. Not only will these good manufacturing procedures (GMPs) and Standard Sanitation Operating Procedures (SSOPs) ensure a clean milk supply, but they will help prevent cross-contamination between animals and the spread of a potentially herd-devastating disease. The correct operation of vacuum pumps and milking equipment will help maintain good udder health, without which quality milk cannot be produced! See appendix C for more on milk quality and chapter 12 for more on SSOPs and GMPs.
Choosing the Right System
The more animals you are milking, the greater your volume of milk—and possibly the longer it will take to relieve them of this milk. This brings into consideration two important factors: First, the greater the volume, the more difficult it becomes to transport the milk by hand. Second, the longer it takes to complete the milking, the less quickly milk will be chilled (if not automatically transported to a chilling tank). A portable bucket system is very inexpensive in comparison to a pipeline system, but there could be added labor costs if the volume of milk reduces operator efficiency.
The two system types are virtual mirror images in their advantages and disadvantages. Here is a little quiz that might help you choose:
1. How many animals will you be milking?
a. 1–20 goats/sheep or 1–3 cows? Portable okay.
b. 20–30 goats/sheep or 4–6 cows? Portable okay, but pipeline better.
c. 30 or more goats/sheep or more than 6 cows? Pipeline best.
2. Is your milking parlor already built?
a. Yes? Consider portable.
b. No? Consider pipeline if milking more than number of animals in (1a) above.
3. How much money can you invest?
a. Minimal? Choose a portable system.
b. A bit more than “not a lot”? Consider a pipeline for long-term benefits if milking more than 20 goats/sheep or 3 cows.
If you decide that a portable system is best, there are a few things to keep in mind when choosing a system: motor size, oil or oil-less vacuum pump, balance tank, and maintenance issues. Motor size, measured in horsepower (HP), will dictate the maximum number of animals (or clusters) that can be milked at one time. If the motor doesn’t have enough HP, then it cannot create sufficient vacuum without working too hard and shortening its life. With respect to oil lubrication of the vacuum pump, you will find equal support for either being “the best,” but remember that an oil pump will spew out an oily residue that will need to be factored in for placement of the unit. Balance tanks serve several purposes on a milking system. First, they provide a cushioning effect on the vacuum supply, preventing or limiting severe fluctuations in vacuum when lines are taken on and off of animals. Second, it provides a distribution chamber for line from the pump and to the milking clusters. Last, it serves as a trap (or leads to a trap) for any milk that might inadvertently get sucked into the vacuum lines. Some very small portable systems made today do not have a balance tank. If any milk enters the system, it can go directly into the vacuum pump and cause damage. With any portable, or, for that matter, pipeline system you will need to know the proper maintenance schedule. Be sure to consult with the dealer and know what is needed to keep your system operating at its peak.
As with parlor design, it is helpful to have some hands-on experience with milking equipment options before you choose and invest in a system of your own. Discuss the choices with people who have used both, as well as with vendors who sell both. While you can always upgrade from a portable to a CIP system, it may save you time and effort to install one in the beginning if need will eventually demand it.
Hand-Washing Sink and Wash Hose
A hand-washing sink is not required in the milking parlor, but consider installing one anyway, as it does come in handy. Parlor floors must be kept clean. While a washdown with water is the most common method, dry brushing followed by the application of hydrated lime (to sanitize the floor) is allowed by the PMO. Goat and sheep parlors can easily be swept first, to minimize the amount of solid waste entering the wastewater management system. The wash hose does not need to be supplied with hot water; however, you might want to consider having hot water accessible for more intense cleaning.
Other Stuff for Your Milking Parlor
You can outfit your milking parlor with other things that will increase your comfort and functionality. A nearby shelf or a rolling cart (get the plastic/ rubber type) for such items as teat dip, wipes, and udder treatments is very useful. A radio or music system is nice for both the milker and the animals. A calendar with important breeding and treatment dates, along with a whiteboard to leave messages for the next milker (or for yourself ), can also help optimize the time spent in the parlor by increasing the efficiency of your herd management.
The Milkhouse
The room that houses the bulk tank, and therefore the milk, is called the milk-house. While a small creamery may actually store its milk in the cheese make room, it will still be required to have a milkhouse for the cleaning and storing of milking equipment.
Floor Plan Considerations
When designing the layout of your milkhouse, take the following points into consideration:
• Access that makes it easy to bring milk and milking equipment in from the parlor; when allowed, have doors swing into the room for easier load transportation.
• Location that is convenient to the parlor and make room, but separated for reasons of cleanliness and sanitation.
• Size that allows for ease of work and cleaning, along with possible equipment upsizing over time.
Construction and Maintenance Standards
As with the milking parlor, the construction and maintenance standards in this book conform to the PMO at the time of writing. Remember that your state may enforce different requirements; therefore, be sure to consult with your regulatory agency prior to any construction.
Floors
Floors must be sloped to drain and made of concrete or other impervious material. They should be finished smooth and free of cracks or blemishes that inhibit proper cleaning. Floor drains must be accessible for cleaning and inspection. Don’t put a drain where equipment will sit!
WHAT KIND OF DOORS?
This question seems so simple to me now, but during our construction it was a tough one. For some reason I thought we had to buy heavy-duty, commercial-grade doors (very expensive). Fortunately, we figured out that it didn’t matter, as long as they were sturdy and easy to clean. We chose fiberglass-wrapped doors with reinforced interior panels. (Most fiberglass and steel doors have a foam insulation core.) We also had windows put in each one, allowing extra light as well as visibility when coming and going into the room.
Walls, Ceilings, and Doors
Wall finishes in the milkhouse will need to be more easily cleaned than those in the milking parlor; in other words, they will need to be smoother and in better repair than might be acceptable in the parlor. Painted plywood, fiberglass-reinforced panels, dairy board (also known as high-density polyethylene boards HDPE), and sealed and painted concrete (block or other) are all acceptable. Keep in mind that any paint going on a block or concrete wall will need to be formulated for wet environments. Many cheesemakers have had to completely strip and redo their walls after paint failure! Doors should be tight fitting and self-closing. If your regulators allow, try to design doors to swing inward to facilitate carrying loads into the room. Some state regulations will not allow for the parlor-to-milkhouse door to swing into the milkhouse, the concern being that an animal could push the door in and gain access to the milkhouse.
Lighting
The milkhouse should be more brightly lit than the parlor. A lux of 220 is required. (Think kitchen lighting brightness.) Light fixtures should be protected and covered to prevent any broken bulbs from introducing hazards into the milk.
Ventilation
As in the parlor, there must be enough air volume and circulation to prevent condensation and allow tools and equipment to dry—remember, moisture allows for bacterial growth! A dry environment is more likely to be a sanitary environment. A good-quality exhaust fan (suitable for damp environments) with a timer switch (so it can run for a period of time after cleaning is completed) is highly recommended. Be sure to include a screened opening for fresh air to enter when the exhaust fan is running. Windows are permitted by the PMO (as long as they do not open directly to animal housing) and can supply adequate ventilation during most seasons.
Remember, moisture allows for bacterial growth!
A dry environment is more likely to be a sanitary environment.
Water
Hot water must be supplied to the milkhouse at a minimum temperature of 140–160°F. This is to allow for the proper cleaning of milking equipment. The water must also be of a sufficient volume and have adequate pressure for cleaning. Insufficient hot water supply is one of the most common mistakes made when designing systems for the dairy. While hot water may arrive into the milkhouse at an adequate temperature, it cools rapidly during pumping through milking lines and equipment. If water is not hot enough, solids will be redeposited during the wash cycle—this can lead to buildups of fats, proteins, and other contaminants that will harbor and grow bacteria, which in turn lead to the contamination of milk.
Insufficient hot water supply is one of the most common
mistakes made when designing systems for the dairy.
In addition to water temperature, water for cleaning should be of a close to neutral pH and not be too high in minerals, such as iron. While your regulatory agency will most likely test the water for coliform contamination, I recommend a test for minerals (especially calcium and magnesium, the main components of hard water) and pH. You can test pH with pH strips or a pH meter (the same can be used for cheesemaking). If the mineral content of your water is high enough to negatively affect cleaning and sanitizing chemicals, it could also be affecting the absorption of and interaction with other minerals your livestock need. Consult the company that supplies and/or manufactures your cleaning and sanitizing chemicals for parameters and product suggestions. Water quality and its effect on cleaning quality will influence the life span of your milk hoses and equipment, so it should not be ignored!
Equipment and Accessories
Here is a list of some of the equipment you will need for the milkhouse, followed by details on each item. The bulk tank can be located in the cheese make room, but we will cover it under this section.
TIP
Shelving
Wall shelving in the dairy, especially the milkhouse and creamery, can be challenging. Plastic-coated wire holds up for several years, but the brackets and mounts designed to hold it are made of painted steel. Any painted metal in the dairy will begin to flake and rust in a very short period of time. These flakes of rust and paint can become a contaminant in your milk and product. Chrome-coated shelves will also rust. Stainless steel won’t rust in normal circumstances, but it will in the presence of high concentrations of chlorine. Epoxy-coated shelving is, in my opinion, the best choice. Even then, watch out for the mounting hardware (screws, etc.), as they will often rust out, leaving your shelves in a precarious position. Choose stainless steel screws and bolts whenever possible.
• Double-compartment sink
• Hand-washing sink and wash hose
• Milk cooling/bulk tank
• Milk line washing equipment
• Milk strainer and receiving pails (when using portable milking system)
Double-Compartment Sink
A two-compartment sink is needed for the washing and rinsing of milking equipment and tools. For the very small producer, the second compartment can be a stainless steel pail or a small, side-hanging sink as used with a bucket washer (more on that in a bit). You can hang your clean buckets and pails above the sink on stainless steel “S” hooks hanging from mesh shelving.
Hand-Washing Sink and Wash Hose
A hand-washing sink should be equipped with single-use towels (either disposable paper towels or cloth towels that are laundered between use). Be sure the sink stays clear of items that would block usage; in other words, don’t leave baby bottles, pails, or anything sitting in it. Part of the routine dairy inspection will verify the access (and appropriate use) of hand-washing sinks. A wash hose with hot and cold water will be very useful, especially when cleaning tanks and hard-to-reach corners in the milkhouse. Don’t forget to use a floor squeegee to reduce water waste (instead of using the water sprayer as a broom).
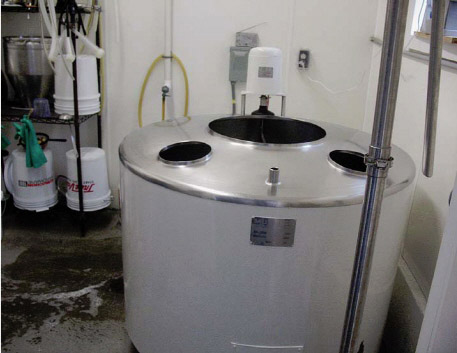
Milk Cooling (Bulk) Tank
There are cheesemakers who do not use any milk storage system; rather, they make cheese daily. While this is the best choice for producing high-quality cheese, it is not realistic for most farms that rely on only a few people to do all of the labor. If you make cheese daily, other important things, such as animal care and maintenance (not to mention your own personal life), could take a backseat. I will assume that most people reading this book will need to hold their milk for 24 to 72 hours on a regular basis.
For the larger producer, there are many bulk tanks available, both new and used. For the small dairy, however, the choices are very limited. New tanks currently manufactured in the U.S. start at 600 gallons. But at least one small U.S. company is working on plans for small bulk tanks. There are some small, very nice tanks available from Europe, but depending upon the strength (or weakness) of the U.S. dollar, these imported tanks can fluctuate greatly in cost. Small used tanks can still be found through used dairy equipment suppliers. These older tanks are often in varying states of disrepair and will probably require new refrigeration equipment and valves. (See appendix A for a list of suppliers of both new and used bulk tanks.) If you have a very small operation, there are some creative milk storage methods that many small creameries around the country are using successfully—with their inspector’s approval. More on that coming up.
Small, rebuilt bulk tank, Twig Farm, Vermont.
A bulk tank consists of a stainless steel reservoir (sized to hold several days worth of milk) surrounded by an insulated double wall with compressor coils (to chill) built into the wall. Some older tanks utilize an ice bank (coils immersed in a water bath that create a layer of ice around the lines, providing chilled water that can circulate around the tank). In large dairies, milk is often pre-chilled in-line before entering the tank. This is more energy efficient and better for the milk, but it’s usually not cost effective, equipment-wise, for the small dairy. Agitator paddles operated by a motor gently stir the milk to ensure even cooling as well as to prevent cream separation (important for cow’s milk).
Important Bulk Tank Considerations
• Volume of first milking. When choosing a tank, it is important to determine the minimum volume required to attain a level in the tank that will ensure that the milk makes contact with the agitators (usually about 10%). You will need to know what your average production for one milking will be in order to determine if the tank size will work for you.
• Storage volume. Determine your milk production volume at peak month and maximum days stored. Try not to choose a tank that you will outgrow quickly.
• Power supply. Even most small bulk tanks will require a 220-volt outlet (think electric dryer or range outlet). Older tanks, and some that are specially made overseas, are often rated for 110 volts.
Creative Alternatives to a Traditional Bulk Tank
• Combination chiller/vat. Possibly the most practical solution for the small creamery is a vat and/or pasteurizer that is also supplied by a chilled water source for cooling the milk. Several companies are now outfitting units for this multipurpose use. A regular cheesemaking vat is outfitted to pipe in cold water from a remote chilling unit. This water is drained prior to cheesemaking, and hot water is then circulated in the vat. Using one piece of equipment instead of two or three can be the most economical and practical choice; however, be sure you deal with someone who knows the special needs of each function and isn’t just putting together something that may compromise each process. Some considerations when purchasing a combination vat/chiller:
• Gentle agitation during chilling and cheesemaking—variable-speed motor.
• Energy efficiency—fully insulated exterior to maximize both the chilling and the heating efficiency of the unit.
• Immersion cooling. Pails or other acceptable containers are filled with filtered milk and then immersed in a cold-water bath. Milk is hand-agitated and temperature drop is documented either through a digital temperature logger or through manual logging. Some examples of ice-bath chillers include using a traditional bulk tank filled with cold water into which food-grade bags of milk or milk cans are immersed and chest freezers filled with water, salt water, or a food-grade propylene glycol bath (both salt water and propylene glycol will attain very low temperatures without freezing) to cool cans of milk. Depending upon the temperature of the water bath, cans are either moved to a storage refrigerator or left in the cooling bath. This goes back to the old days when all dairies used milk cans and can coolers. Keep in mind that a 7-gallon milk can is very heavy when full, making lifting them in and out of a chiller physically difficult!
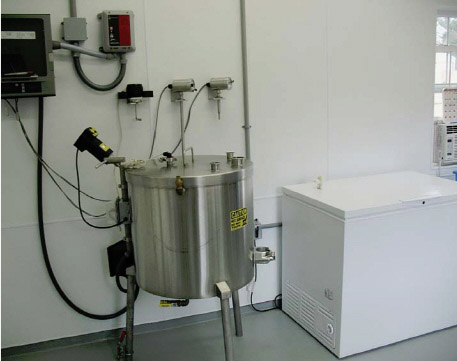
Pasteurizer/bulk tank combination chilled by homemade remote chilling system, Mama Terra Micro Creamery, Oregon.

Bucket washer setup, Pholia Farm, Oregon.
Milk Line Washing Equipment
Whether you are installing a pipeline milking system or using a bucket milker, you may want to add a system that is specifically designed to aid in the proper and practical cleaning of your equipment. Lines can be effectively cleaned manually after each milking by using brushes, but this will erode the interior surfaces much more quickly than a vacuum washing system, as well as being very time consuming for you. The bucket washer (so called not because it washes your buckets—it doesn’t—but because it is meant for use with bucket milker systems) consists of a suction unit that mounts to the wall onto which you attach your milking lines. A small sink or pail is filled with the washing solutions and the inflations are immersed in this pail. A line runs from the wall unit to your vacuum source. When the vacuum is turned on, the suction unit pulls and pushes the washing fluids through the lines. Between each cycle (rinse, wash, acid, or sanitizer) you will turn off the suction and change the solution in the small sink or pail. You hand-scrub the actual buckets and lids. A CIP system does basically the same thing but forces the solutions through the built-in-place milk lines. As you might expect, a CIP system is more complicated and requires monitoring to ensure proper function. Consult with a qualified sales representative to make sure that your system is performing adequately and that you are using the correct detergents and sanitizers, water temperature, “slug” (air bubble) flow rate, volume, and time.
TIP
A Bucket Washer System with Faster Draining
If purchasing a bucket washer system (look for one that has stainless steel components) that comes with a small side sink that hangs off one end of the wash sink, consider having a larger drain hole cut. Side sinks typically come with a very small hole in the center that drains rather slowly. Have your new hole positioned in the corner that is the lowest and closest to you (so the plug is easy to reach). Have it cut to the same size as the drain hole in your wash sink so you can use the same size plugs. Have a short section of stainless tubing welded to the bottom to direct the drainage downward (otherwise it will fan out and soak your legs!). This new, larger hole will greatly speed your cleanup time.
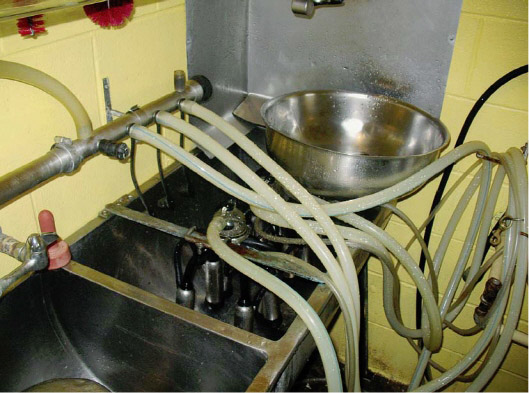
Pipeline milk hoses and clusters being washed, Sweet Home Farm, Alabama.
Milk Strainer and Receiving Pails
Whether milking by hand or by machine, the milk must be filtered. If you’re using a pipeline system, an in-line filter will likely be used. If you’re using a bucket milker, then you will pour the milk through a strainer/filter and into a receiving pail, or directly to a pail or tank if an in-line filter designed for a portable bucket system is used. Alternatively, a large filter can be placed in an opening on top of the bulk tank and the milk pipeline can drain into the filter reservoir. (Note: This works only if the bulk tank has an opening designed to hold a filter.)
TIP
Keeping Stainless Spotless
Be sure to inspect stainless steel equipment for cleanliness when dry-wetness will disguise residues and bio-films making dirty equipment look clean.
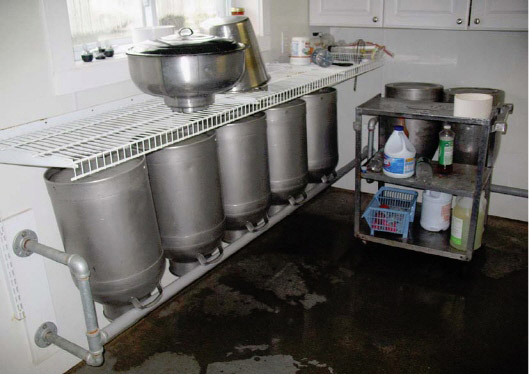
Milk-can storage rack, Lazy Lady Farm, Vermont.
When filtering into milk cans or directly into a bulk tank, choose a large, stainless steel strainer with disposable filters. These large strainers often come with a stainless steel screen filter—this filter is not PMO approved. You can order a second “punched” stainless filter that you can use along with a disposable filter. You will need to store disposable filters in a container that can be kept closed between uses. Special dispensers for filters can be used, or you can use any type of plastic or stainless container. We hung a small plastic trash can with a self-closing lid just above the sink.
Milk cans and receiving pails must meet sanitary standards. Rolled edges, rivets, rough welds, and glass lids are not acceptable. There are several inexpensive milk cans on the market for home dairy use—avoid these! Purchase cans that are listed as meeting “Grade A standards.” When they arrive, inspect them for defects. Sometimes a rough weld can be fixed by fine sanding and polishing. Lids should be “umbrella” style, meaning they come up and over the outside edge of the pail (as opposed to nesting down into the neck of the can). Avoid rolled edges, as these will not be acceptable to most inspectors.
Other Stuff for Your Milkhouse
Milk testing equipment, such as scales, dippers, and milk measuring meters, can be stored in the milkhouse when not in use. This equipment is subject to inspection, so don’t neglect to periodically take apart any milk meters for cleaning. Other items, such as kid/calf/lamb feeding equipment, might be allowed in the milkhouse, but check with your inspector. The philosophy should be: If it isn’t used regularly, it shouldn’t be in the room.
With thought and planning you can create a milking parlor and milkhouse that are efficient to work in and easy to maintain. Proper procedures in the parlor and milkhouse will help ensure a high-quality, safe milk supply—without which you negate any efforts to make good cheese! There is an old saying, “Milk was never meant to see the light of day.” When you remove the milk from its source and send it through multiple processes, you put it at risk for becoming a dangerous or simply unappetizing food. Plan for and build spaces that help, not hinder, your goal of creating great farmstead cheese.