10
Defining Class Members
MEMBER DEFINITIONS
Within a class definition, you provide definitions for all members of the class, including fields, methods, and properties. All members have their own accessibility levels, defined in all cases by one of the following keywords:
-
public—Members are accessible from any code. -
private—Members are accessible only from code that is part of the class (the default if no keyword is used). -
internal—Members are accessible only from code within the assembly (project) where they are defined. -
protected—Members are accessible only from code that is part of either the class or a derived class.
The last two of these can be combined, so protected internal
members are also possible. These are only accessible from code‐derived classes within the project (more accurately, the assembly).
Fields, methods, and properties can also be declared using the keyword static
, which means that they are static members owned by the class, rather than by object instances, as discussed in Chapter 8
.
Defining Fields
Fields are defined using standard variable declaration format (with optional initialization), along with the modifiers discussed previously:
class MyClass{public int MyInt;}
Fields can also use the keyword readonly
, meaning the field can be assigned a value only during constructor execution or by initial assignment:
class MyClass{publicreadonlyint MyInt = 17;}
As noted in the chapter introduction, fields can be declared as static using the static
keyword:
class MyClass{public static int MyInt;}
Static fields are accessed via the class that defines them (MyClass.MyInt
in the preceding example), not through object instances of that class. You can use the keyword const
to create a constant value. const
members are static by definition, so you don’t need to use the static
modifier (in fact, it is an error to do so).
Defining Methods
Methods use standard function format, along with accessibility and optional static
modifiers, as shown in this example:
class MyClass{public string GetString() => "Here is a string .";}
Remember that if you use the static
keyword, then this method is accessible only through the class, not the object instance. You can also use the following keywords with method definitions:
-
virtual—The method can be overridden. -
abstract—The method must be overridden in non‐abstract derived classes (only permitted in abstract classes). -
override—The method overrides a base class method (it must be used if a method is being overridden). -
extern—The method definition is found elsewhere.
Here’s an example of a method override:
public class MyBaseClass{public virtual void DoSomething(){// Base implementation.}}public class MyDerivedClass : MyBaseClass{publicoverridevoid DoSomething(){// Derived class implementation, overrides base implementation.}}
If override
is used, then sealed
can also be used to specify that no further modifications can be made to this method in derived classes—that is, the method can’t be overridden by derived classes. Here is an example:
public class MyDerivedClass : MyBaseClass{public overridesealedvoid DoSomething(){// Derived class implementation, overrides base implementation.}}
Using extern
enables you to provide the implementation of a method externally to the project, but this is an advanced topic not covered here.
Defining Properties
Properties are defined in a similar way to fields, but there’s more to them. Properties, as already discussed, are more involved than fields in that they can perform additional processing before modifying state—and, indeed, might not modify state at all. They achieve this by possessing two function‐like blocks: one for getting the value of the property and one for setting the value of the property.
These blocks, also known as accessors
, are defined using get
and set
keywords respectively, and can be used to control the access level of the property. You can omit one or the other of these blocks to create read‐only or write‐only properties (where omitting the get
block gives you write‐only access, and omitting the set
block gives you read‐only access). Of course, that only applies to external code because code elsewhere within the class will have access to the same data that these code blocks have. You can also include accessibility modifiers on accessors—making a get
block public while the set
block is protected, for example. You must include at least one of these blocks to obtain a valid property (and, let’s face it, a property you can’t read or change wouldn’t be very useful).
The basic structure of a property consists of the standard access modifying keyword (public
, private
, and so on), followed by a type name, the property name, and one or both of the get
and set
blocks that contain the property processing:
public int MyIntProp{get{// Property get code.}set{// Property set code.}}
The first line of the definition is the bit that is very similar to a field definition. The difference is that there is no semicolon at the end of the line; instead, you have a code block containing nested get
and set
blocks.
get
blocks must have a return value of the type of the property. Simple properties are often associated with a single private field controlling access to that field, in which case the get
block can return the field’s value directly:
// Field used by property.private int myInt;// Property.public int MyIntProp{get {return myInt;}set { // Property set code. }}
Code external to the class cannot access this myInt
field directly due to its accessibility level (it is private). Instead, external code must use the property to access the field. The set
function assigns a value to the field similarly. Here, you can use the keyword value
to refer to the value received from the user of the property:
// Field used by property.private int myInt;// Property.public int MyIntProp{get { return myInt; }set {myInt = value;}}
value
equates to a value of the same type as the property, so if the property uses the same type as the field, then you never have to worry about casting in situations like this. To provide a default value in case the integer allows null
, this expression‐bodied member function pattern works well:
private int? myInt;public int? MyIntProp{get { return myInt; }set {myInt = value ?? 0;}}
This simple property does little more than shield direct access to the myInt
field. The real power of properties is apparent when you exert a little more control over the proceedings. For example, you might implement your set
block as follows:
set{if (value >= 0 && value <= 10)myInt = value;}
Here, you modify myInt
only if the value assigned to the property is between 0 and 10. In situations like this, you have an important design choice to make. What should you do if an invalid value is used? You have four options:
- Do nothing (as in the preceding code).
- Assign a default value to the field.
- Continue as if nothing went wrong but log the event for future analysis.
- Throw an exception.
In general, the last two options are preferable. Deciding between them depends on how the class will be used and how much control should be assigned to the users of the class. Exception throwing gives users a fair amount of control and lets them know what is going on so that they can respond appropriately. You can use one of the standard exceptions in the System
namespace for this:
set{if (value >= 0 && value <= 10)myInt = value;elsethrow (new ArgumentOutOfRangeException("MyIntProp", value,"MyIntProp must be assigned a value between 0 and 10."));}
The exception created using throw
can be handled using try…catch…finally
logic in the implementing code that uses the property, as you saw in Chapter 7
.
Logging data, perhaps to a text file or the Event Log, can be useful, such as in production code where problems really shouldn’t occur. It enables developers to check on performance and perhaps debug existing code if necessary.
Properties can use the virtual
, override
, and abstract
keywords just like methods, something that isn’t possible with fields. Finally, as mentioned earlier, accessors can have their own accessibilities, as shown here:
// Field used by property.private int myInt;// Property.public int MyIntProp{get { return myInt; }protected set { myInt = value; }}
Here, only code within the class or derived classes can use the set
accessor.
The accessibilities that are permitted for accessors depend on the accessibility of the property, and it is forbidden to make an accessor more accessible than the property to which it belongs. This means that a private property cannot contain any accessibility modifiers for its accessors, whereas public properties can use all modifiers on their accessors.
C# 6 introduced a feature called expression based properties. Similar to the expression based method discussed previously in Chapter 6 , this feature reduces the extent of the property to a single line of code. For example, properties that return a one‐line mathematical computation on a value can use the lambda arrow followed by the equation.
// Field used by property.private int myDoubledInt = 5;// Property.public int MyDoubledIntProp => (myDoubledInt * 2);
The following Try It Out enables you to experiment with defining and using fields, methods, and properties.
Tuple Deconstruction
In Chapter 6
you learned about tuples, which are useful for returning multiple results from a function. When using more complex objects like a class, structure, or array is unnecessary, using a tuple
is a valid approach for handling this situation. Here is a simple example of a tuple
:
var numbers = (1, 2, 3, 4, 5);
Defining a function that return multiple results:
private static (int max, int min, double average)GetMaxMin(IEnumerable<int> numbers) {… }
When your code consumes the GetMaxMin()
function, the result must be parsed by the code to display the results. (Review Chapter 6
again if you need a refresh on that specific approach.) Writing code to parse out the result is not required, however, if you implement tuple deconstruction. Tuple
deconstruction is achieved by adding a function named Deconstruct()
to any class which you want to support this feature. Examine, for example, the following class:
public class Location{public Location(double latitude, double longitude)=> (Latitude, Longitude) = (latitude, longitude);public double Latitude { get; }public double Longitude { get; }public voidDeconstruct(out double latitude, out double longitude)=> (latitude, longitude) = (Latitude, Longitude);}
The Location
class implements an expression‐bodied constructer that accepts two variables of type double
(latitude
and longitude)
that are used to set the values of the properties Latitude
and Longitude
. The Deconstruct()
function has two out
parameters: out double latitude
and out double longitude
. The expression then sets the two out
parameters equal to the Latitude
and Longitude
properties populated when the Location
class is initialized. You can then access the fields by assigning a tuple to Location
:
var location = new Location(48.137154, 11.576124);(double latitude, double longitude) = location;
It is then possible to reference the results directly without having the parse through the result.
Refactoring Members
One technique that comes in handy when adding properties is the capability to generate a property from a field. This is an example of refactoring , which simply means modifying your code using a tool, rather than by hand. This can be accomplished by right‐clicking a member in a class diagram or in code view.
For example, if the MyClass
class contained this field:
public string myString;
you could right‐click on the field and select Quick Actions and Refactorings…. (Ctrl+.) That would bring up the dialog box shown in Figure 10‐2 .
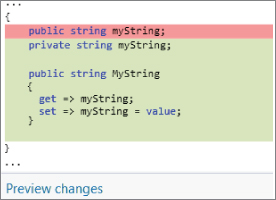
Accepting the default options modifies the code for MyClass
as follows:
public string myString;public string MyString{get => myString;set => myString = value;}private string myString;
Here, the accessibility of the myString
field has been changed to private
, and a public property called MyString
has been created and automatically linked to myString
. Clearly, reducing the time required to monotonously create properties for fields is a big plus!
Automatic Properties
Properties are the preferred way to access the state of an object because they shield external code from the implementation of data storage within the object. They also give you greater control over how internal data is accessed, as you have seen several times in this chapter’s code. However, you’ll typically define properties in a very standard way—that is, you will have a private member that is accessed directly through a public property. The code for this is almost invariably similar to the code in the previous section, which was autogenerated by the Visual Studio refactoring tool.
Refactoring certainly speeds things up when it comes to typing, but C# has another trick up its sleeve: automatic properties. With an automatic property
, you declare a property with a simplified syntax and the C# compiler fills in the blanks for you. Specifically, the compiler declares a private field that is used for storage, and uses that field in the get
and set
blocks of your property—without you having to worry about the details.
Use the following code structure to define an automatic property:
public int MyIntProp{get;set;}
You can even define an automatic property on a single line of code to save space, without making the property much less readable:
public int MyIntProp


{


   get;


   set;


}
You define the accessibility, type, and name of the property in the usual way, but you don’t provide any implementation for the get
or set
block. Instead, the compiler provides the implementations of these blocks (and the underlying field).
When you use an automatic property, you only have access to its data through the property, not through its underlying private field. This is because you can’t access the private field without knowing its name, which is defined during compilation. However, that’s not really a limitation because using the property name directly is fine. The only limitation of automatic properties is that they must include both a get
and a set
accessor—you cannot define read‐ or write‐only properties
in this way. However, you can change the accessibility of these accessors. For example, this means you can create an externally read‐only property as follows:
public int MyIntProp { get; private set; }
Here you can access the value of MyIntProp
only from code in the class definition.
C# 6 introduced two new concepts pertaining to automatic properties referred to as getter‐only auto‐properties and initializers for auto‐properties. Prior to C# 6, automatic properties required setters, which limited the utilization of immutable data types. The simple definition of an immutable data type is that it does not change state once it is created, the most famous immutable type being System.String
. There are many benefits for using immutable data types, such as the simplification of concurrent programming and the synchronization of threads.
Concurrent programming and synchronization of threads are advanced topics and not discussed further in this book; however, it is important to know about the getter‐only auto‐properties. They are created by using the following syntax, notice that a setter is no longer required:
public int MyIntProp { get; }
The initialization feature for auto‐properties is implemented by the following which is similar to the way fields are declared:
public int MyIntProp { get; } = 9;
ADDITIONAL CLASS MEMBER TOPICS
Now you’re ready to look at some more advanced member topics. This section tackles the following:
- Hiding base class methods
- Calling overridden or hidden base class methods
- Using nested type definitions
Hiding Base Class Methods
When you inherit a (non‐abstract) member from a base class, you also inherit an implementation. If the inherited member is virtual, then you can override this implementation with the override
keyword. Regardless of whether the inherited member is virtual, you can, if you want, hide
the implementation. This is useful when, for example, a public inherited member doesn’t work quite as you want it to.
You can do this simply by using code such as the following:
public class MyBaseClass{public void DoSomething(){// Base implementation.}}public class MyDerivedClass : MyBaseClass{public void DoSomething(){// Derived class implementation, hides base implementation.}}
Although this code works fine, it generates a warning that you are hiding a base class member. That warning gives you the chance to correct it if you have accidentally hidden a member that you want to use. If you really do want to hide the member, you can use the new
keyword to explicitly indicate that this is what you want to do:
public class MyDerivedClass : MyBaseClass{new public void DoSomething(){// Derived class implementation, hides base implementation.}}
This works in exactly the same way but won’t show a warning. At this point, it’s worthwhile to note the difference between hiding and overriding base class members. Consider the following code:
public class MyBaseClass{public virtual void DoSomething() => WriteLine("Base imp");}public class MyDerivedClass : MyBaseClass{public override void DoSomething() => WriteLine("Derived imp");}
Here, the overriding method replaces the implementation in the base class, such that the following code uses the new version even though it does so through the base class type (using polymorphism):
MyDerivedClass myObj = new MyDerivedClass();MyBaseClass myBaseObj;myBaseObj = myObj;myBaseObj.DoSomething();
This results in the following output:
Derived imp
Alternatively, you could hide the base class method:
public class MyBaseClass{public virtual void DoSomething() => WriteLine("Base imp");}public class MyDerivedClass : MyBaseClass{new public void DoSomething() => WriteLine("Derived imp");}
The base class method needn’t be virtual for this to work, but the effect is exactly the same and the preceding code only requires changes to one line. The result for a virtual or nonvirtual base class method is as follows:
Base imp
Although the base implementation is hidden, you still have access to it through the base class.
Calling Overridden or Hidden Base Class Methods
Whether you override or hide a member, you still have access to the base class member from the derived class. There are many situations in which this can be useful, such as the following:
- When you want to hide an inherited public member from users of a derived class but still want access to its functionality from within the class
- When you want to add to the implementation of an inherited virtual member rather than simply replace it with a new overridden implementation
To achieve this, you use the base
keyword, which refers to the implementation of the base class contained within a derived class (in a similar way to its use in controlling constructors, as shown in the last chapter):
public class MyBaseClass{public virtual void DoSomething(){// Base implementation.}}public class MyDerivedClass : MyBaseClass{public override void DoSomething(){// Derived class implementation, extends base class implementation.base.DoSomething();// More derived class implementation.}}
This code executes the version of DoSomething()
contained in MyBaseClass
, the base class of MyDerivedClass
, from within the version of DoSomething()
contained in MyDerivedClass
. As base
works using object instances, it is an error to use it from within a static member.
The this Keyword
As well as using base
in the last chapter, you also used the this
keyword. As with base
, this
can be used from within class members, and, like base
, this
refers to an object instance, although it is the current object instance (which means you can’t use this keyword in static members because static members are not part of an object instance).
The most useful function of the this
keyword is the capability to pass a reference to the current object instance to a method, as shown in this example:
public void doSomething(){MyTargetClass myObj = new MyTargetClass();myObj.DoSomethingWith(this);}
Here, the MyTargetClass
instance that is instantiated (myObj
) has a method called DoSomethingWith()
, which takes a single parameter of a type compatible with the class containing the preceding method. This parameter type might be of this class type, a class type from which this class derives, an interface implemented by the class, or (of course) System.Object
.
Another common use of the this
keyword is to use it to qualify local type members, for example:
public class MyClass{private int someData;public int SomeData => this.someData;}
Many developers like this syntax, which can be used with any member type, as it is clear at a glance that you are referring to a member rather than a local variable.
Using Nested Type Definitions
You can define types such as classes in namespaces, and you can also define them inside other classes. Then you can use the full range of accessibility modifiers for the definition, rather than just public
and internal
, and you can use the new
keyword to hide a type definition inherited from a base class. For example, the following code defining MyClass
also defines a nested class called MyNestedClass
:
public class MyClass{public class MyNestedClass{public int NestedClassField;}}
To instantiate MyNestedClass
from outside MyClass
, you must qualify the name, as shown here:
MyClass.MyNestedClass myObj = new MyClass.MyNestedClass();
However, you might not be able to do this, for example if the nested class is declared as private
. One reason for the existence of this feature is to define classes that are private to the containing class so that no other code in the namespace has access to them. Another reason is that nested classes have access to private and protected members of their containing class. The next Try it Out examines this feature.
INTERFACE IMPLEMENTATION
This section takes a closer look at how you go about defining and implementing interfaces. In the last chapter, you learned that interfaces are defined in a similar way as classes, using code such as the following:
interface IMyInterface{// Interface members.}
Interface members are defined like class members except for a few important differences:
- No access modifiers (
public,private,protected, orinternal) are allowed—all interface members are implicitly public. - Interface members can’t contain code bodies.
- Interfaces can’t define field members.
- Interface members can’t be defined using the keywords
static,virtual,abstract, orsealed. - Type definition members are forbidden.
You can, however, define members using the new
keyword if you want to hide members inherited from base interfaces:
interface IMyBaseInterface{void DoSomething();}interface IMyDerivedInterface : IMyBaseInterface{new void DoSomething();}
This works exactly the same way as hiding inherited class members.
Properties defined in interfaces define either or both of the access blocks—get
and set
—which are permitted for the property, as shown here:
interface IMyInterface{int MyInt { get; set; }}
Here the int
property MyInt
has both get
and set
accessors. Either of these can be omitted for a property with more restricted access.
Interfaces do not specify how the property data should be stored. Interfaces cannot specify fields, for example, that might be used to store property data. Finally, interfaces, like classes, can be defined as members of classes (but not as members of other interfaces because interfaces cannot contain type definitions).
Implementing Interfaces in Classes
A class that implements an interface must contain implementations for all members of that interface, which must match the signatures specified (including matching the specified get
and set
blocks), and must be public, as shown here:
public interface IMyInterface{void DoSomething();void DoSomethingElse();}public class MyClass : IMyInterface{public void DoSomething() {}public void DoSomethingElse() {}}
It is possible to implement interface members using the keyword virtual
or abstract
, but not static
or const
. Interface members can also be implemented on base classes:
public interface IMyInterface{void DoSomething();void DoSomethingElse();}public class MyBaseClass{public void DoSomething() {}}public class MyDerivedClass : MyBaseClass, IMyInterface{public void DoSomethingElse() {}}
Inheriting from a base class that implements a given interface means that the interface is implicitly supported by the derived class. Here’s an example:
public interface IMyInterface{void DoSomething();void DoSomethingElse();}public class MyBaseClass : IMyInterface{public virtual void DoSomething() {}public virtual void DoSomethingElse() {}}public class MyDerivedClass : MyBaseClass{public override void DoSomething() {}}
Clearly, it is useful to define implementations in base classes as virtual so that derived classes can replace the implementation, rather than hide it. If you were to hide a base class member using the new
keyword, rather than override it in this way, the method IMyInterface.DoSomething()
would always refer to the base class version even if the derived class were being accessed via the interface.
Explicit Interface Member Implementation
Interface members can also be implemented explicitly by a class. If you do that, the member can only be accessed through the interface, not the class. Implicit members, which you used in the code in the last section, can be accessed either way.
For example, if the class MyClass
implemented the DoSomething()
method of IMyInterface
implicitly, as in the preceding example, then the following code would be valid:
MyClass myObj = new MyClass();myObj.DoSomething();
This would also be valid:
MyClass myObj = new MyClass();IMyInterface myInt = myObj;myInt.DoSomething();
Alternatively, if MyDerivedClass
implements DoSomething()
explicitly, then only the latter technique is permitted. The code for doing that is as follows:
public class MyClass : IMyInterface{void IMyInterface.DoSomething() {}public void DoSomethingElse() {}}
Here, DoSomething()
is implemented explicitly, and DoSomethingElse()
implicitly. Only the latter is accessible directly through an object instance of MyClass
.
Additional Property Accessors
Earlier you learned that if you implement an interface with a property, you must implement matching get/set
accessors. That isn’t strictly true—it is possible to add a get
block to a property in a class in which the interface defining that property only contains a set
block, and vice versa. However, this is possible only if you implement the interface implicitly. Also, in most cases you will want to add the accessor with an accessibility modifier that is more restrictive than the accessibility modifier on the accessor defined in the interface. Because the accessor defined by the interface is, by definition, public, this means that you would add nonpublic accessors. Here’s an example:
public interface IMyInterface{int MyIntProperty { get ; }}public class MyBaseClass : IMyInterface{public int MyIntProperty { get; protected set ; }}
If you define the additional accessor as public, then code with access to the class implementing the interface can access it. However, code that has access only to the interface won’t be able to access it.
PARTIAL CLASS DEFINITIONS
When you create classes with a lot of members of one type or another, the code can get quite confusing, and code files can get very long. One technique that can help is to use code outlining. By defining regions in code, you can collapse and expand sections to make the code easier to read. For example, you might have a class defined as follows:
public class MyClass{#region Fieldsprivate int myInt;#endregion#region Constructorpublic MyClass() { myInt = 99; }#endregion#region Propertiespublic int MyInt{get { return myInt; }set { myInt = value; }}#endregion#region Methodspublic void DoSomething(){// Do something..}#endregion}
Here, you can expand and contract fields, properties, the constructor, and methods for the class, enabling you to focus only on what you are interested in. It is even possible to nest regions this way, so some regions are visible only when the region that contains them is expanded.
An alternative to using regions is to use partial class definitions
. Put simply, you use partial class definitions to split the definition of a class across multiple files. You can, for example, put the fields, properties, and constructor in one file, and the methods in another. To do that, you just use the partial
keyword with the class in each file that contains part of the definition, as follows:
public partial

 class MyClass {  …}
If you use partial class definitions, the partial
keyword must appear in this position in every file containing part of the definition.
For example, a WPF window in a class called MainWindow
has code stored in both MainWindow.xaml.cs
and MainWindow.g.i.cs
(visible if Show All Files is selected in the Solution Explorer window if you drill down into obj\Debug
folder). This enables you to concentrate on the functionality of your forms, without worrying about your code being cluttered with information that doesn’t really interest you.
One final note about partial classes: Interfaces applied to one partial class part apply to the whole class, meaning that the definition,
public partial class MyClass : IMyInterface1 { … }public partial class MyClass : IMyInterface2 { … }
is equivalent to:
public class MyClass : IMyInterface1, IMyInterface2 { … }
Partial class definitions can include a base class in a single partial class definition, or more than one partial class definition. If a base class is specified in more than one definition, though, it must be the same base class; recall that classes in C# can inherit only from a single base class.
PARTIAL METHOD DEFINITIONS
Partial classes can also define partial methods. Partial methods are defined in one partial class definition without a method body, and implemented in another partial class definition. In both places, the partial
keyword is used:
public partial class MyClass{partial void MyPartialMethod() ;}public partial class MyClass{partial void MyPartialMethod(){// Method implementation}}
Partial methods can also be static, but they are always private and can’t have a return value. Any parameters they use can’t be out
parameters, although they can be ref
parameters. They also can’t use the virtual
, abstract
, override
, new
, sealed
, or extern
modifiers.
Given these limitations, it is not immediately obvious what purpose partial methods fulfill. In fact, they are important when it comes to code compilation, rather than usage. Consider the following code:
public partial class MyClass{partial void DoSomethingElse();public void DoSomething(){WriteLine("DoSomething() execution started.");DoSomethingElse();WriteLine("DoSomething() execution finished.");}}public partial class MyClass{partial void DoSomethingElse() =>WriteLine("DoSomethingElse() called.") ;}
Here, the partial method DoSomethingElse()
is defined and called in the first partial class definition, and implemented in the second. The output, when DoSomething()
is called from a console application, is what you might expect:
DoSomething() execution started.DoSomethingElse() called.DoSomething() execution finished.
If you were to remove the second partial class definition or partial method implementation entirely (or comment out the code), the output would be as follows:
DoSomething() execution started.DoSomething() execution finished.
You might assume that what is happening here is that when the call to DoSomethingElse()
is made, the runtime discovers that the method has no implementation and therefore continues executing the next line of code. What actually happens is a little subtler. When you compile code that contains a partial method definition without an implementation, the compiler actually removes the method entirely. It also removes any calls to the method. When you execute the code, no check is made for an implementation because there is no call to check. This results in a slight—but nevertheless significant—improvement in performance.
As with partial classes, partial methods are useful when it comes to customizing autogenerated or designer‐created code. The designer may declare partial methods that you can choose to implement or not depending on the situation. If you don’t implement them, you incur no performance hit because effectively the method does not exist in the compiled code.
Consider at this point why partial methods can’t have a return type. If you can answer that to your own satisfaction, you can be sure that you fully understand this topic—so that is left as an exercise for you.
EXAMPLE APPLICATION
To illustrate some of the techniques you’ve been using so far, in this section you’ll develop a class module that you can build on and make use of in subsequent chapters. The class module contains two classes:
-
Card—Representing a standard playing card, with a suit of club, diamond, heart, or spade, and a rank that lies between ace and king -
Deck—Representing a full deck of 52 cards, with access to cards by position in the deck and the capability to shuffle the deck
You’ll also develop a simple client to ensure that things are working, but you won’t use the deck in a full card game application—yet.
Planning the Application
The class library for this application, Ch10CardLib
, will contain your classes. Before you get down to any code, though, you should plan the required structure and functionality of your classes.
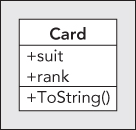
The Card Class
The Card
class is basically a container for two read‐only fields: suit
and rank
. The reason for making the fields read‐only is that it doesn’t make sense to have a “blank” card, and cards shouldn’t be able to change once they have been created. To facilitate this, you’ll make the default constructor private, and provide an alternative constructor that builds a card from a supplied suit and rank.
Other than that, the Card
class will override the ToString()
method of System
.Object
, so that you can easily obtain a human‐readable string representing the card. To make things a little simpler, you’ll provide enumerations for the two fields suit
and rank
.
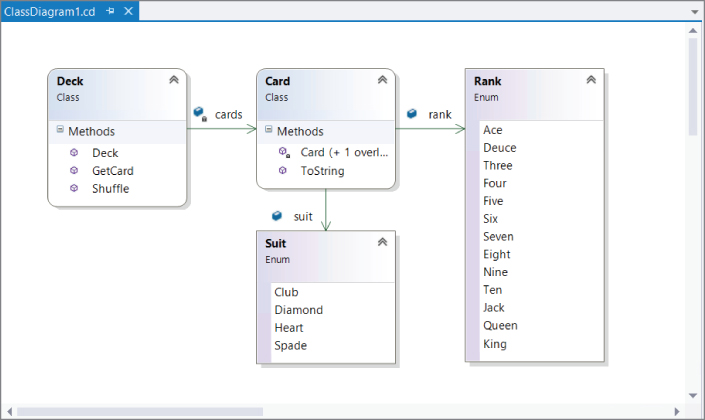
The Card
class is shown in Figure 10‐4
.
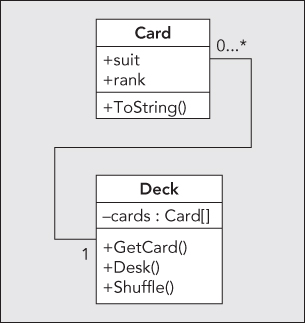
The Deck Class
The Deck
class will maintain 52 Card
objects. You can use a simple array type for this. The array won’t be directly accessible because access to the Card
object is achieved through a GetCard()
method, which returns the
Card
object with the given index. This class should also expose a Shuffle()
method to rearrange the cards in the array. The Deck
class is shown in Figure 10‐5
.
Writing the Class Library
For the purposes of this example, it is assumed that you are familiar enough with the IDE to bypass the standard Try It Out format, so the steps aren’t listed explicitly, as they are the same steps you’ve used many times. The important thing here is a detailed look at the code. Nonetheless, several pointers are included to ensure that you don’t run into any problems along the way.
Both your classes and your enumerations will be contained in a class library project called Ch10CardLib
. This project will contain four .cs
files: Card
.cs
, which contains the Card
class definition, Deck
.cs
, which contains the Deck
class definition, and the Suit
.cs
and Rank
.cs
files containing enumerations.
You can put together a lot of this code using the Visual Studio class diagram tool.
To get started, you need to do the following:
- Create a new class library project called
Ch10CardLiband save it in the directoryC:\BeginningCSharp7\Chapter10. - Remove
Class1.csfrom the project. -
Open the class diagram for the project using the Solution Explorer window (right‐click the project and then click View
 View Class Diagram). The class diagram should be blank to start with because the project contains no classes. This creates a file named
 ClassDiagram1.cdin the project for later use.
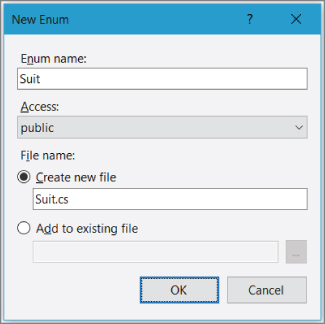
Adding the Suit and Rank Enumerations
With the ClassDiagram1.cd
file opened, add an enumeration to the class diagram by dragging an Enum from the Toolbox into the diagram, and then filling in the New Enum dialog box that appears. For example, for the Suit
enumeration, fill out the dialog box as shown in Figure 10‐6
.
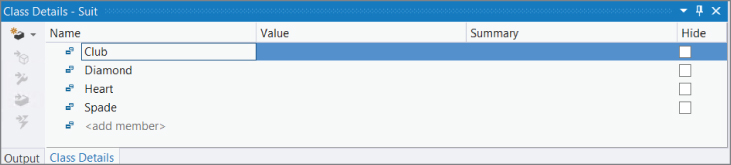
Next, add the members of the enumeration using the Class Details window (right‐click on the just added Suit
Enum
Class Details within the ClassDiagram1.cd
file). Figure 10‐7
shows the values that are required.
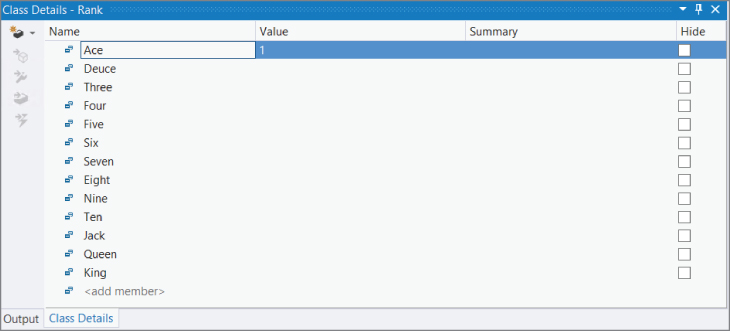
Add the Rank
enumeration from the Toolbox in the same way. The values required are shown in Figure 10‐8
.
You can find the code generated for these two enumerations in the code files, Suit.cs
and Rank.cs
. First, you can find the full code for this example in Ch10CardLib Suit.cs
:
using System;using System.Collections.Generic;using System.Linq;using System.Text;namespace Ch10CardLib{public enum Suit{Club,Diamond,Heart,Spade,}}
And you can find the full code for this example in Ch10CardLib Rank.cs
:
using System;using System.Collections.Generic;using System.Linq;using System.Text;namespace Ch10CardLib{public enum Rank{Ace = 1,Deuce,Three,Four,Five,Six,Seven,Eight,Nine,Ten,Jack,Queen,King,}}
Alternatively, you can add this code manually by adding Suit.cs
and Rank.cs
code files and then entering the code. Note that the extra commas added by the code generator after the last enumeration member do not prevent compilation and do not result in an additional “empty” member being created—although they are a little messy.
Adding the Card Class
To add the Card
class, you’ll use a mix of the class designer and code editor. Adding a class in the class designer is much like adding an enumeration—you drag the appropriate entry from the Toolbox into the diagram. In this case, you drag a Class
into the diagram and name the new class Card
.
Use the Class Details window to add the fields rank
and suit
, and then use the Properties window to set the Constant Kind of the field to readonly
. You also need to add two constructors—a private default constructor, and a public constructor that takes two parameters, newSuit
and newRank
, of types Suit
and Rank
, respectively. Finally, you override ToString()
, which requires you to change the Inheritance Modifier
in the Properties window to override
.
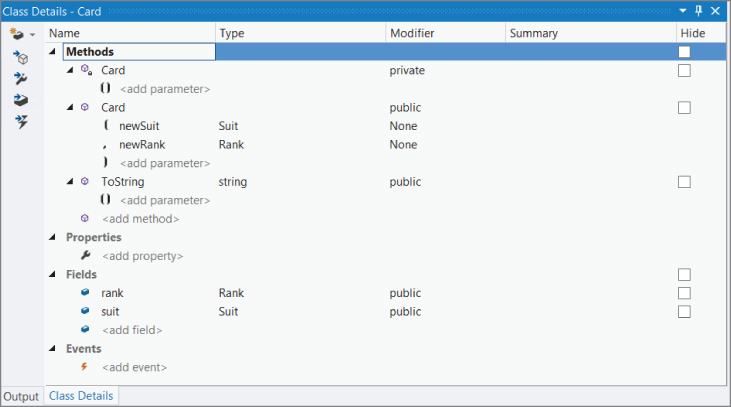
Figure 10‐9
shows the Class Details window and the Card
class with all the information entered. (You can find this code in Ch10CardLib\Card.cs
.)
Next, modify the code for the class in Card.cs
as follows (or add the code shown to a new class called Card
in the Ch10CardLib
namespace):
public class Card{public readonly Suit suit;public readonly Rank rank;public Card(Suit newSuit, Rank newRank){suit = newSuit;rank = newRank;}private Card() {}public override string ToString() => "The " + rank + " of " + suit + "s";}
The overridden ToString()
method writes the string representation of the enumeration value stored to the returned string, and the nondefault constructor initializes the values of the suit
and rank
fields.
Adding the Deck Class
The Deck
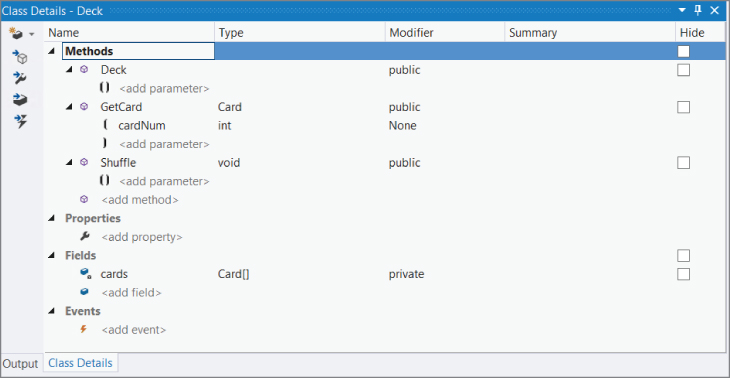
class needs the following members defined using the class diagram:
- A private field called
cards, of typeCard[] - A public default constructor
- A public method called
GetCard(), which takes oneintparameter calledcardNumand returns an object of typeCard - A public method called
Shuffle(), which takes no parameters and returnsvoid
When these are added, the Class Details window for the Deck
class will appear as shown in Figure 10‐10
.
To make things clearer in the diagram, you can show the relationships among the members and types you have added. In the class diagram, right‐click on each of the following in turn and select Show as Association from the menu:
-
cardsinDeck -
suitinCard -
rankinCard
When you have finished, the diagram should look like Figure 10‐11 .
Next, modify the code in Deck.cs
(if you aren’t using the class designer, you must add this class first with the code shown here). You can find this code in Ch10CardLib\Deck.cs
. First you implement the constructor, which simply creates and assigns 52 cards in the cards
field. You iterate through all combinations of the two enumerations, using each to create a card. This results in cards
initially containing an ordered list of cards:
using System;using System.Collections.Generic;using System.Linq;using System.Text;using System.Threading.Tasks;namespace Ch10CardLib{public class Deck{private Card[] cards;public Deck(){cards = new Card[52];for (int suitVal = 0; suitVal < 4; suitVal++){for (int rankVal = 1; rankVal < 14; rankVal++){cards[suitVal * 13 + rankVal ‐1] = new Card((Suit)suitVal,(Rank)rankVal);}}}}}
Next, implement the GetCard()
method, which either returns the Card
object with the requested index or throws an exception as shown earlier:
public Card GetCard(int cardNum){if (cardNum >= 0 && cardNum <= 51)return cards[cardNum];elsethrow(new System.ArgumentOutOfRangeException("cardNum", cardNum,"Value must be between 0 and 51."));}
Finally, you implement the Shuffle()
method. This method works by creating a temporary card array and copying cards from the existing cards
array into this array at random. The main body of this function is a loop that counts from 0 to 51. On each cycle, you generate a random number between 0 and 51, using an instance of the System.Random
class from the .NET Framework. Once instantiated, an object of this class generates a random number between 0
and X
, using the method Next(X)
. When you have a random number, you simply use that as the index of the Card
object in your temporary array in which to copy a card from the cards
array.
To keep a record of assigned cards, you also have an array of bool
variables, and assign these to true
as each card is copied. As you are generating random numbers, you check against this array to see whether you have already copied a card to the location in the temporary array specified by the random number. If so, you simply generate another.
This isn’t the most efficient way of doing things because many random numbers will be generated before finding a vacant slot into which a card can be copied. However, it works, it’s very simple, and C# code executes so quickly you will hardly notice a delay. The code is as follows:
public void Shuffle(){Card[] newDeck = new Card[52];bool[] assigned = new bool[52];Random sourceGen = new Random();for (int i = 0; i < 52; i++){int destCard = 0;bool foundCard = false;while (foundCard == false){destCard = sourceGen.Next(52);if (assigned[destCard] == false)foundCard = true;}assigned[destCard] = true;newDeck[destCard] = cards[i];}newDeck.CopyTo(cards, 0);}}}
The last line of this method uses the CopyTo()
method of the System.Array
class (used whenever you create an array) to copy each of the cards in newDeck
back into cards
. This means you are using the same set of Card
objects in the same cards
object, rather than creating any new instances. If you had instead used cards = newDeck
, then you would be replacing the object instance referred to by cards
with another. This could cause problems if code elsewhere were retaining a reference to the original cards
instance—which wouldn’t be shuffled!
That completes the class library code.
A Client Application for the Class Library
To keep things simple, you can add a client console application to the solution containing the class library. To do so, simply right‐click on the solution in Solution Explorer and select Add
New Project. The new Console App (.NET Framework) project is called Ch10CardClient
.
To use the class library you have created from this new console application project, add a reference to your Ch10CardLib
class library project. You can do that through the Projects tab of the Reference Manager dialog box (right‐click the Ch10CardClient
project then Add
Reference
Projects), as shown in Figure 10‐12
.

Select the project and click OK to add the reference.
Because this new project is the second one you’ve created, you also need to specify that it is the startup project for the solution, meaning the one that is executed when you click Run. To do so, simply right‐click on the project name in the Solution Explorer window and select the Set as StartUp Project menu option.
Next, add the code that uses your new classes. That doesn’t require anything particularly special, so the following code will do (you can find this code in Ch10CardClient\Program.cs
):
using System;using System.Collections.Generic;using System.Linq;using System.Text;using System.Threading.Tasks;using static System.Console;using Ch10CardLib;namespace Ch10CardClient{class Program{static void Main(string[] args){Deck myDeck = new Deck();myDeck.Shuffle();for (int i = 0; i < 52; i++){Card tempCard = myDeck.GetCard(i);Write(tempCard.ToString());if (i != 51)Write(", ");elseWriteLine();}ReadKey();}}}
Figure 10‐13 shows the result you’ll get if you run this application.

This is a random arrangement of the 52 playing cards in the deck. You’ll continue to develop and use this class library in later chapters.
THE CALL HIERARCHY WINDOW
Now is a good time to take a quick look at another feature of Visual Studio: the Call Hierarchy window. This window enables you to interrogate code to find out where your methods are called from and how they relate to other methods. The best way to illustrate this is with an example.
Open the example application from the previous section, and open the Deck.cs
code file. Find the Shuffle()
method, right‐click on it, and select the View Call Hierarchy menu item. The window that appears is shown in Figure 10‐14
(which has some regions expanded).
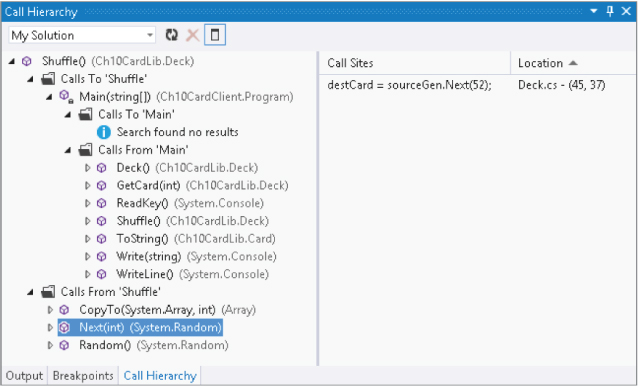
Starting from the Shuffle()
method, you can drill into the tree view in the window to find all the code that calls the method, and all the calls that the method makes. For example, the highlighted method, Next(int)
, is called from Shuffle()
, so it appears in the Calls From ‘Shuffle’ section. When you click on a call you can see the line of code that makes the call on the right, along with its location. You can double‐click on the location to navigate instantly to the line of code that is referred to.
This window is very useful when you are debugging or refactoring code, as it enables you to see at a glance how different pieces of code are related.
EXERCISES
- 10.1 Write code that defines a base class,
MyClass, with the virtual methodGetString(). This method should return the string stored in the protected fieldmyString, accessible through the write‐only public propertyContainedString. - 10.2 Derive a class,
MyDerivedClass, fromMyClass. Override theGetString()method to return the string from the base class, using the base implementation of the method, but add the text “(output from derived class)” to the returned string. - 10.3 Partial method definitions must use the
voidreturn type. Provide a reason why this is so. - 10.4 Write a class called
MyCopyableClassthat is capable of returning a copy of itself using the methodGetCopy(). This method should use theMemberwiseClone()method inherited fromSystem.Object. Add a simple property to the class, and write client code that uses the class to confirm that everything is working. - 10.5 Write a console client for the
Ch10CardLiblibrary that draws five cards at one time from a shuffled Deck object. If all five cards are the same suit, then the client should display the card names onscreen along with the textFlush!; otherwise, it should quit after 50 cards with the textNo flush.
Answers to the exercises can be found in Appendix.
 WHAT YOU LEARNED IN THIS CHAPTER
| TOPIC | KEY CONCEPTS |
| Member definitions | You can define field, method, and property members in a class. Fields are defined with an accessibility, name, and type. Methods are defined with an accessibility, return type, name, and parameters. Properties are defined with an accessibility, name, and a get
and/or set
accessor. Individual property accessors can have their own accessibility, which must be less accessible than the property as a whole. |
| Member hiding and overrides | Properties and methods can be defined as abstract
or virtual
in base classes to define inheritance. Derived classes must implement abstract members, and can override virtual members, with the override
keyword. They can also provide new implementations with the new
keyword, and prevent further overrides of virtual
members with the sealed
keyword. Base implementations can be called with the base
keyword. |
| Interface implementation | A class that implements an interface must implement all of the members defined by that interface as public. You can implement interfaces implicitly or explicitly, where explicit implementations are only available through an interface reference. |
| Partial definitions | You can split class definitions across multiple code files with the partial
keyword. You can also create partial methods with the partial
keyword. Partial methods have certain restrictions, including no return value or out
parameters, and are not compiled if no implementation is provided. |