11
Collections, Comparisons, and Conversions
COLLECTIONS
In Chapter 5 , you learned how to use arrays to create variable types that contain a number of objects or values. Arrays, however, have their limitations. The biggest limitation is that once arrays have been created, they have a fixed size, so you can't add new items to the end of an existing array without creating a new one. This often means that the syntax used to manipulate arrays can become overly complicated. OOP techniques enable you to create classes that perform much of this manipulation internally, simplifying the code that uses lists of items or arrays.
Arrays in C# are implemented as instances of the System.Array
class and are just one type of what are known as collection classes
. Collection classes in general are used for maintaining lists of objects, and they may expose more functionality than simple arrays. Much of this functionality comes through implementing interfaces from the System.Collections
namespace, thus standardizing collection syntax. This namespace also contains some other interesting things, such as classes that implement these interfaces in ways other than System.Array
.
Because the collection's functionality (including basic functions such as accessing collection items by using [index]
syntax) is available through interfaces, you aren't limited to using basic collection classes such as System.Array
. Instead, you can create your own customized collection classes. These can be made more specific to the objects you want to enumerate (that is, the objects you want to maintain collections of). One advantage of doing this, as you will see, is that custom collection classes can be strongly typed
. That is, when you extract items from the collection, you don't need to cast them into the correct type. Another advantage is the capability to expose specialized methods. For example, you can provide a quick way to obtain subsets of items. In the deck of cards example, you could add a method to obtain all Card
items of a particular suit.
Several interfaces in the System.Collections
namespace provide basic collection functionality:
-
IEnumerable—Provides the capability to loop through items in a collection -
ICollection—Provides the capability to obtain the number of items in a collection and copy items into a simple array type (inherits fromIEnumerable) -
IList—Provides a list of items for a collection along with the capabilities for accessing these items, and some other basic capabilities related to lists of items (inherits fromIEnumerableandICollection) -
IDictionary—Similar toIList, but provides a list of items accessible via a key value, rather than an index (inherits fromIEnumerableandICollection)
The System.Array
class implements IList
, ICollection
, and IEnumerable
. However, it doesn't support some of the more advanced features of IList
,
and it represents a list of items by using a fixed size.
Using Collections
One of the classes in the Systems.Collections
namespace, System.Collections.ArrayList
, also implements IList
, ICollection
, and IEnumerable
, but does so in a more sophisticated way than System.Array
. Whereas arrays are fixed in size (you can't add or remove elements), this class can be used to represent a variable‐length list of items. To give you more of a feel for what is possible with such a highly advanced collection, the following Try It Out uses this class, as well as a simple array.
Defining Collections
Now that you know what is possible using more advanced collection classes, it's time to learn how to create your own strongly typed collection. One way of doing this is to implement the required methods manually, but this can be a time‐consuming and complex process. Alternatively, you can derive your collection from a class, such as System.Collections.CollectionBase
, an abstract class that supplies much of the implementation of a collection for you. This option is strongly recommended.
The CollectionBase
class exposes the interfaces IEnumerable
, ICollection
, and IList
but provides only some of the required implementation—notably, the Clear()
and RemoveAt()
methods of IList
and the Count
property of ICollection
. You need to implement everything else yourself if you want the functionality provided.
To facilitate this, CollectionBase
provides two protected properties that enable access to the stored objects themselves. You can use List
, which gives you access to the items through an IList
interface, and InnerList
, which is the ArrayList
object used to store items.
For example, the basics of a collection class to store Animal
objects could be defined as follows (you'll see a fuller implementation shortly):
public class Animals : CollectionBase{public void Add(Animal newAnimal) => List.Add(newAnimal);public void Remove(Animal oldAnimal) => List.Remove(oldAnimal);public Animals() {}}
Here, Add()
and Remove()
have been implemented as strongly typed methods that use the standard Add()
method of the IList
interface used to access the items. The methods exposed will now only work with Animal
classes or classes derived from Animal
, unlike the ArrayList
implementations shown earlier, which work with any object.
The CollectionBase
class enables you to use the foreach
syntax with your derived collections. For example, you can use code such as this:
WriteLine("Using custom collection class Animals:");Animals animalCollection = new Animals();animalCollection.Add(new Cow("Lea"));foreach (Animal myAnimal in animalCollection){WriteLine($"New { myAnimal.ToString()} object added to custom " +$"collection, Name = {myAnimal.Name}");}
You can't, however, do the following:
animalCollection[0].Feed();
To access items via their indices in this way, you need to use an indexer.
Indexers
An indexer is a special kind of property that you can add to a class to provide array‐like access. In fact, you can provide more complex access via an indexer, because you can define and use complex parameter types with the square bracket syntax as you want. Implementing a simple numeric index for items, however, is the most common usage.
You can add an indexer to the Animals
collection of Animal
objects as follows:
public class Animals : CollectionBase{…public Animal this[int animalIndex]{get { return (Animal)List[animalIndex]; }Set { List[animalIndex] = value; }}}
The this
keyword is used along with parameters in square brackets, but otherwise the indexer looks much like any other property. This syntax is logical because you access the indexer by using the name of the object followed by the index parameter(s) in square brackets (for example, MyAnimals[0]
).
The indexer code uses an indexer on the List
property (that is, on the IList
interface that provides access to the ArrayList
in CollectionBase
that stores your items):
return (Animal)List[animalIndex];
Explicit casting is necessary here, as the IList.List
property returns a System.Object
object. The important point to note here is that you define a type for this indexer. This is the type that will be obtained when you access an item by using this indexer. This strong typing means that you can write code such as
animalCollection[0].Feed();
rather than:
((Animal)animalCollection[0]).Feed();
This is another handy feature of strongly typed custom collections. In the following Try It Out, you expand the previous Try It Out to put this into action.
Adding a Cards Collection to CardLib
In the last chapter, you created a class library project called Ch10CardLib
that contained a Card
class representing a playing card, and a Deck
class representing a deck of cards—that is, a collection of Card
classes. This collection was implemented as a simple array.
In this chapter, you'll add a new class to this library, renamed Ch11CardLib
. This new class, Cards
, will be a custom collection of Card
objects, giving you all the benefits described earlier in this chapter. Create a new class library called Ch11CardLib
in the C:\BeginningCSharp7\Chapter11
directory. Next, delete the autogenerated Class1.cs
file; select Project  Add Existing Item; select the
 Card.cs
, Deck.cs
, Suit.cs
, and Rank.cs
files from the C:\BeginningCSharp7\Chapter10\Ch10CardLib
directory; and add the files to your project. As with the previous version of this
project, introduced in Chapter 10
, these changes are presented without using the standard Try It Out format. Should you want to jump straight to the code, feel free to open the version of this project included in the downloadable code for this chapter.
The downloadable code for this chapter includes a Ch11CardLib
folder that contains all the code you need for the various expansions to the Ch11CardLib
project. Because of this, you may notice some extra code that isn't included in this example, but this won't affect how it works at this stage. Often you will find that code is commented out; however, when you reach the relevant example, you can uncomment the section you want to experiment with.
If you decide to create this project yourself, add a new class called Cards
and modify the code in Cards.cs
as follows:
using System;using System.Collections;using System.Collections.Generic;using System.Linq;using System.Text;using System.Threading.Tasks;namespace Ch11CardLib{public class Cards : CollectionBase{public void Add(Card newCard) => List.Add(newCard);public void Remove(Card oldCard) => List.Remove(oldCard);public Card this[int cardIndex]{get { return (Card)List[cardIndex]; }set { List[cardIndex] = value; }}/// <summary>/// Utility method for copying card instances into another Cards/// instance—used in Deck.Shuffle(). This implementation assumes that/// source and target collections are the same size./// </summary>public void CopyTo(Cards targetCards){for (int index = 0; index < this.Count; index++){targetCards[index] = this[index];}}/// <summary>/// Check to see if the Cards collection contains a particular card./// This calls the Contains() method of the ArrayList for the collection,/// which you access through the InnerList property./// </summary>public bool Contains(Card card) => InnerList.Contains(card);}}
Next, modify Deck.cs
to use this new collection, rather than an array:
using System;using System.Collections.Generic;using System.Linq;using System.Text;namespace Ch11CardLib{public class Deck{private Cards cards = new Cards();public Deck(){// Line of code removed herefor (int suitVal = 0; suitVal < 4; suitVal++){for (int rankVal = 1; rankVal < 14; rankVal++){cards.Add(new Card((Suit)suitVal, (Rank)rankVal));}}}public Card GetCard(int cardNum){if (cardNum >= 0 && cardNum <= 51)return cards[cardNum];elsethrow (new System.ArgumentOutOfRangeException("cardNum", cardNum,"Value must be between 0 and 51."));}public void Shuffle(){Cards newDeck = new Cards();bool[] assigned = new bool[52];Random sourceGen = new Random();for (int i = 0; i < 52; i++){int sourceCard = 0;bool foundCard = false;while (foundCard == false){sourceCard = sourceGen.Next(52);if (assigned[sourceCard] == false)foundCard = true;}assigned[sourceCard] = true;newDeck.Add(cards[sourceCard]);}newDeck.CopyTo(cards);}}}
span epub:type="pagebreak" title="281" id="Page_281" />
Not many changes are necessary here. Most of them involve changing the shuffling logic to allow for the fact that cards are added to the beginning of the new Cards
collection newDeck
from a random index in cards
, rather than to a random index in newDeck
from a sequential position in cards
.
The client console application for the Ch10CardLib
solution, Ch10CardClient
, can be used with this new library with the same result as before, as the method signatures of Deck
are unchanged. Clients of this class library can now make use of the Cards
collection class, however, rather than rely on arrays of Card
objects—for example, to define hands of cards in a card game application.
Keyed Collections and IDictionary
Instead of implementing the IList
interface, it is also possible for collections to implement the similar IDictionary
interface, which allows items to be indexed via a key value (such as a string name), rather than an index. This is also achieved using an indexer, although here the indexer parameter used is a key associated with a stored item, rather than an int
index, which can make the collection a lot more user‐friendly.
As with indexed collections, there is a base class you can use to simplify implementation of the IDictionary
interface: DictionaryBase
. This class also implements IEnumerable
and ICollection
, providing the basic collection‐manipulation capabilities that are the same for any collection.
DictionaryBase
, like CollectionBase
, implements some (but not all) of the members obtained through its supported interfaces. Like CollectionBase
, the Clear
and Count
members are implemented, although RemoveAt()
isn't because it's a method on the IList
interface and doesn't appear on the IDictionary
interface. IDictionary
does, however, have a Remove()
method, which is one of the methods you should implement in a custom collection class based on DictionaryBase
.
The following code shows an alternative version of the Animals
class, this time derived from DictionaryBase
. Implementations are included for Add()
, Remove()
, and a key‐accessed indexer:
public class Animals : DictionaryBase{public void Add(string newID, Animal newAnimal) =>Dictionary.Add(newID, newAnimal);public void Remove(string animalID) =>Dictionary.Remove(animalID);public Animals() {}public Animal this[string animalID]{get { return (Animal)Dictionary[animalID]; }set { Dictionary[animalID] = value; }}}
The differences in these members are as follows:
-
Add()—Takes two parameters, a key and a value, to store together. The dictionary collection has a member calledDictionaryinherited fromDictionaryBase, which is anIDictionaryinterface. This interface has its ownAdd()method, which takes two object parameters. Your implementation takes a string value as a key and anAnimalobject as the data to store alongside this key. -
Remove()—Takes a key parameter, rather than an object reference. The item with the key value specified is removed. -
Indexer—Uses a string key value, rather than an index, which is used to access the stored item via theDictionaryinherited member. Again, casting is necessary here.
One other difference between collections based on DictionaryBase
and collections based on CollectionBase
is that foreach
works slightly differently. The collection from the last section allowed you to extract Animal
objects directly from the collection. Using foreach
with the DictionaryBase
derived class gives you DictionaryEntry
structs, another type defined in the System.Collections
namespace. To get to the Animal
objects themselves, you must use the Value
member of this struct, or you can use the Key
member of the struct to get the associated key. To get code equivalent to the earlier
foreach (Animal myAnimal in animalCollection){WriteLine($"New {myAnimal.ToString()} object added to custom " +$"collection, Name = {myAnimal.Name}");}
you need the following:
foreach (DictionaryEntry myEntry in animalCollection){WriteLine($"New {myEntry.Value.ToString()} object added to " +$"custom collection, Name = {((Animal)myEntry.Value).Name}");}
It is possible to override this behavior so that you can access Animal
objects directly through foreach
. There are several ways to do this, the simplest being to implement an iterator.
Iterators
Earlier in this chapter, you saw that the IEnumerable
interface enables you to use foreach
loops. It's often beneficial to use your classes in foreach
loops, not just collection classes such as those shown in previous sections.
However, overriding this behavior, or providing your own custom implementation of it, is not always simple. To illustrate this, it's necessary to take a detailed look at foreach
loops. The following steps show you what actually happens in a foreach
loop iterating through a collection called collectionObject
:
-
collectionObject.GetEnumerator()is called, which returns anIEnumeratorreference. This method is available through implementation of theIEnumerableinterface, although this is optional. - The
MoveNext()method of the returnedIEnumeratorinterface is called. - If
MoveNext()returnstrue, then theCurrentproperty of theIEnumeratorinterface is used to get a reference to an object, which is used in theforeachloop. - The preceding
twosteps repeat untilMoveNext()returnsfalse, at which point the loop terminates.
To enable this behavior in your classes, you must override several methods, keep track of indices, maintain the Current
property, and so on. This can be a lot of work to achieve very little.
A simpler alternative is to use an iterator. Effectively, using iterators generates a lot of the code for you behind the scenes and hooks it all up correctly. Moreover, the syntax for using iterators is much easier to get a grip on.
A good definition of an iterator is a block of code that supplies all the values to be used in a foreach
block in sequence. Typically, this block of code is a method, although you can also use property accessors and other blocks of code as iterators. To keep things simple, you'll just look at methods here.
Whatever the block of code is, its return type is restricted. Perhaps contrary to expectations, this return type isn't the same as the type of object being enumerated. For example, in a class that represents a collection of Animal
objects, the return type of the iterator block can't be Animal
. Two possible return types are the interface types mentioned earlier, IEnumerable
or IEnumerator
. You use these types as follows:
- To iterate over a class, use a method called
GetEnumerator()with a return type ofIEnumerator. - To iterate over a class member, such as a method, use
IEnumerable.
Within an iterator block, you select the values to be used in the foreach
loop by using the yield
keyword. The syntax for doing this is as follows:
yield return value

>;
That information is all you need to build a very simple example, as follows (you can find this code in SimpleIterators\Program.cs
):
public static IEnumerable SimpleList(){yield return "string 1";yield return "string 2";yield return "string 3";}static void Main(string[] args){foreach (string item in SimpleList())WriteLine(item);ReadKey();}
Here, the static method SimpleList()
is the iterator block. Because it is a method, you use a return type of IEnumerable
. SimpleList()
uses the yield
keyword to supply three values to the foreach
block that uses it, each of which is written to the screen. The result is shown in Figure 11‐3
.

Obviously, this iterator isn't a particularly useful one, but it does show how this works in action and how simple the implementation can be. Looking at the code, you might wonder how the code knows to return string
type items. In fact, it doesn't; it returns object
type values. As you know, object
is the base class for all types, so you can return anything from the yield
statements.
However, the compiler is intelligent enough that you can interpret the returned values as whatever type you want in the context of the foreach
loop. Here, the code asks for string
type values, so those are the values you get to work. Should you change one of the yield
lines so that it returns, say, an integer, you would get a bad cast exception in the foreach
loop.
One more thing about iterators. It is possible to interrupt the return of information to the foreach
loop by using the following statement:
yield break;
When this statement is encountered in an iterator, the iterator processing terminates immediately, as does the foreach
loop using it.
Now it's time for a more complicated—and useful!—example. In this Try It Out, you'll implement an iterator that obtains prime numbers.
Iterators and Collections
Earlier you were promised an explanation of how iterators can be used to iterate over the objects stored in a dictionary‐type collection without having to deal with DictionaryItem
objects. In the downloadable code for this chapter, you will find the code for the next project in the DictionaryAnimals
folder. Recall the collection class Animals
:
public class Animals : DictionaryBase{public void Add(string newID, Animal newAnimal) =>Dictionary.Add(newID, newAnimal);public void Remove(string animalID) =>Dictionary.Remove(animalID);public Animal this[string animalID]{get { return (Animal)Dictionary[animalID]; }set { Dictionary[animalID] = value; }}}
You can add this simple iterator to the code to get the desired behavior:
public new IEnumerator GetEnumerator(){foreach (object animal in Dictionary.Values)yield return (Animal)animal;}
Now you can use the following code to iterate through the Animal
objects in the collection:
foreach (Animal myAnimal in animalCollection){WriteLine($"New {myAnimal.ToString()} object added to " +$" custom collection, Name = {myAnimal.Name}");}
Deep Copying
Chapter 9
described how you can perform shallow copying with the System.Object.MemberwiseClone()
protected method, by using a method like the GetCopy()
one shown here:
public class Cloner{public int Val;public Cloner(int newVal) => Val = newVal;public object GetCopy() => MemberwiseClone();}
Suppose you have fields that are reference types, rather than value types (for example, objects):
public class Content{public int Val;}public class Cloner{public Content MyContent = new Content();public Cloner(int newVal) => MyContent.Val = newVal;public object GetCopy() => MemberwiseClone();}
In this case, the shallow copy obtained though GetCopy()
has a field that refers to the same object as the original object. The following code, which uses this Cloner
class, illustrates the consequences of shallow copying reference types:
Cloner mySource = new Cloner(5);Cloner myTarget = (Cloner)mySource.GetCopy();WriteLine($"myTarget.MyContent.Val = {myTarget.MyContent.Val}");mySource.MyContent.Val = 2;WriteLine($"myTarget.MyContent.Val = {myTarget.MyContent.Val}");
The fourth line, which assigns a value to mySource.MyContent.Val
, the Val
public field of the MyContent
public field of the original object, also changes the value of myTarget.MyContent.Val
. That's because mySource.MyContent
refers to the same object instance as myTarget.MyContent
. The output of the preceding code is as follows:
myTarget.MyContent.Val = 5myTarget.MyContent.Val = 2
To get around this, you need to perform a deep copy. You could just modify the GetCopy()
method used previously to do this, but it is preferable to use the standard .NET Framework way of doing things: implement the ICloneable
interface, which has the single method Clone()
. This method takes no parameters and returns an object
type result, giving it a signature identical to the GetCopy()
method used earlier.
To modify the preceding classes, try using the following deep copy code:
public class Content{public int Val;}public class Cloner : ICloneable{public Content MyContent = new Content();public Cloner(int newVal) => MyContent.Val = newVal;public object Clone(){Cloner clonedCloner = new Cloner(MyContent.Val);return clonedCloner;}}
This created a new Cloner
object by using the Val
field of the Content
object contained in the original Cloner
object (MyContent
). This field is a value type, so no deeper copying is necessary.
Using code similar to that just shown to test the shallow copy—but using Clone()
instead of GetCopy()
—gives you the following result:
myTarget.MyContent.Val = 5myTarget.MyContent.Val = 5
This time, the contained objects are independent. Note that sometimes calls to Clone()
are made recursively, in more complex object systems. For example, if the MyContent
field of the Cloner
class also required deep copying, then you might need the following:
public class Cloner : ICloneable{public Content MyContent = new Content();…public object Clone(){Cloner clonedCloner = new Cloner();clonedCloner.MyContent = MyContent.Clone();return clonedCloner;}}
You're calling the default constructor here to simplify the syntax of creating a new Cloner
object. For this code to work, you would also need to implement ICloneable
on the Content
class.
Adding Deep Copying to CardLib
You can put this into practice by implementing the capability to copy Card
, Cards
, and Deck
objects by using the ICloneable
interface. This might be useful in some card games, where you might not necessarily want two decks with references to the same set of Card
objects, although you might conceivably want to set up one deck to have the same card order as another.
Implementing cloning functionality for the Card
class in Ch11CardLib
is simple because shallow copying is sufficient (Card
contains only value‐type data, in the form of fields). Begin by making the following changes to the class
definition:
public class Card : ICloneable{public object Clone() => MemberwiseClone();
This implementation of ICloneable
is just a shallow copy. There is no rule determining what should happen in the Clone()
method, and this is sufficient for your purposes.
Next, implement ICloneable
on the Cards
collection class. This is slightly more complicated because it involves cloning every Card
object in the original collection—so you need to make a deep copy:
public class Cards : CollectionBase, ICloneable{public object Clone(){Cards newCards = new Cards();foreach (Card sourceCard in List){newCards.Add((Card)sourceCard.Clone());}return newCards;}
Finally, implement ICloneable
on the Deck
class. Note a slight problem here: The Deck
class in Ch11CardLib
has no way to modify the cards it contains, short of shuffling them. There is no way, for example, to modify a Deck
instance to have a given card order. To get around this, define a new private constructor for the Deck
class that allows a specific Cards
collection to be passed in when the Deck
object is instantiated. Here's the code to implement cloning in this class:
public class Deck : ICloneable{public object Clone(){Deck newDeck = new Deck(cards.Clone() as Cards);return newDeck;}private Deck(Cards newCards) => cards = newCards;
Again, you can test this with some simple client code. As before, place this code within the Main()
method of a client project for testing (you can find this code in Ch11CardClient\Program.cs
in the chapter's online download):
Deck deck1 = new Deck();Deck deck2 = (Deck)deck1.Clone();WriteLine($"The first card in the original deck is: {deck1.GetCard(0)}");WriteLine($"The first card in the cloned deck is: {deck2.GetCard(0)}");deck1.Shuffle();WriteLine("Original deck shuffled.");WriteLine($"The first card in the original deck is: {deck1.GetCard(0)}");WriteLine($"The first card in the cloned deck is: {deck2.GetCard(0)}");ReadKey();
The output will be similar to what is shown in Figure 11‐5 .

COMPARISONS
This section covers two types of comparisons between objects:
- Type comparisons
- Value comparisons
Type comparisons—that is, determining what an object is, or what it inherits from—are important in all areas of C# programming. Often when you pass an object—to a method, for example—what happens next depends on the type of the object. You've seen this in passing in this and earlier chapters, but here you will see some more useful techniques.
Value comparisons are also something you've seen a lot of, at least with simple types. When it comes to comparing values of objects, things get a little more complicated. You have to define what is meant by a comparison for a start, and what operators such as >
mean in the context of your classes. This is especially important in collections, for which you might want to sort objects according to some condition, perhaps alphabetically or according to a more complicated algorithm.
Type Comparisons
When comparing objects, you often need to know their type, which enables you to determine whether a value comparison is possible. In Chapter 9
you saw the GetType()
method, which all classes inherit from System.Object
, and how this method can be used in combination with the typeof()
operator to determine (and take action depending on) object types:
if (myObj.GetType() == typeof(MyComplexClass)){// myObj is an instance of the class MyComplexClass.}
You've also seen how the default implementation of ToString()
, also inherited from System.Object
, will get you a string representation of an object's type. You can compare these strings too, although that's a rather messy way to accomplish this.
This section demonstrates a handy shorthand way of doing things: the is
operator. This operator allows for much more readable code and, as you will see, has the advantage of examining base classes. Before looking at the is
operator, though, you need to be aware of what often happens behind the scenes when dealing with value types (as opposed to reference types): boxing
and unboxing
.
Boxing and Unboxing
In Chapter 8
, you learned the difference between reference types and value types, which was illustrated in Chapter 9
by comparing structs (which are value types) with classes (which are reference types). Boxing is the act of converting a value type into the System.Object
type or to an interface type that is implemented by the value type. Unboxing is the opposite conversion.
For example, suppose you have the following struct type:
struct MyStruct{public int Val;}
You can box a struct of this type by placing it into an object
‐type variable:
MyStruct valType1 = new MyStruct();valType1.Val = 5;object refType = valType1;
Here, you create a new variable (valType1
) of type MyStruct
, assign a value to the Val
member of this struct
, and then box it into an object
‐type variable (refType
).
The object created by boxing a variable in this way contains a reference to a copy of the value‐type variable, not a reference to the original value‐type variable. You can verify this by modifying the original struct's contents and then unboxing the struct contained in the object into a new variable and examining its contents:
valType1.Val = 6;MyStruct valType2 = (MyStruct)refType;WriteLine($"valType2.Val = {valType2.Val}");
This code gives you the following output:
valType2.Val = 5
When you assign a reference type to an object, however, you get a different behavior. You can see this by changing MyStruct
into a class (ignoring the fact that the name of this class isn't appropriate now):
class MyStruct{public int Val;}
With no changes to the client code shown previously (again ignoring the misnamed variables), you get the following output:
valType2.Val = 6
You can also box value types into interface types, so long as they implement that interface. For example, suppose the MyStruct
type implements the IMyInterface
interface as follows:
interface IMyInterface {}struct MyStruct : IMyInterface{public int Val;}
You can then box the struct into an IMyInterface
type as follows:
MyStruct valType1 = new MyStruct();IMyInterface refType = valType1;
You can unbox it by using the normal casting syntax:
MyStruct ValType2 = (MyStruct)refType;
As shown in these examples, boxing is performed without your intervention—that is, you don't have to write any code to make it possible. Unboxing a value requires an explicit conversion, however, and requires you to make a cast (boxing is implicit and doesn't have this requirement).
You might be wondering why you would actually want to do this. There are two very good reasons why boxing is extremely useful. First, it enables you to use value types in collections (such as ArrayList
) where the items are of type object
. Second, it's the internal mechanism that enables you to call object
methods on value types, such as int
s and structs.
It is worth noting that unboxing is necessary before access to the value type contents is possible.
The is Operator
Despite its name, the is
operator isn't a way to determine whether an object is a certain type. Instead, the is
operator enables you to check whether an object either is or can be converted into
a given type. If this is the case, then the operator evaluates to true
.
Earlier examples showed a Cow
and a Chicken
class, both of which inherit from Animal
. Using the is
operator to compare objects with the Animal
type will return true
for objects of all three of these types, not just Animal
. This is something you'd have a hard time achieving with the GetType()
method and typeof()
operator shown previously.
The is
operator has the following syntax:
operand

> is type

>
The possible results of this expression are as follows:
- If
<type>is a class type, then the result istrueif<operand>is of that type, if it inherits from that type, or if it can be boxed into that type. - If
<type>is an interface type, then the result istrueif<operand>is of that type or it is a type that implements the interface. - If
<type>is a value type, then the result istrueif<operand>is of that type or it is a type that can be unboxed into that type.
The following Try It Out shows how this works in practice.
Pattern Matching with the is Operator Pattern Expression
Recall from Chapter 4
where the switch
statement was introduced and in Chapter 5
where it was expanded to include cases that support matching based on variable type (
string
,
int
, and so on). Once the type is known you can access its properties and methods to further reduce the matches.
The switch case
approach is the more elegant way of pattern matching because the is
operator commonly implements many if…else if…
statements. As the scenarios in which you want to pattern match expand, the statements can get deep and long, making the code less legible. If that ever becomes the case, know that the alternative is the switch case
pattern matching feature. However, for smaller code snippets, the is
operator is a very valid and powerful tactic for matching patterns and filtering your data set. Take the following code for example:
object[] data ={ 1.6180, null, new Cow("Rual"), new Chicken("Lea"), "none" };foreach (var item in data){if (item is 1.6180) WriteLine("The Golden Ratio");else if (item is null) WriteLine("The value is null");else if (item is Cow co) WriteLine($"The cow is named {co.Name}.");else if (item is Chicken ch) WriteLine("The chicken is named" +$" {ch.Name} and {ch.RunInCircles()}");else if (item is var catcher) WriteLine("Catch all for" +$" {catcher.GetType().Name});}
The objects stored in the data
variable consist of several different types. Looping through the object[]
array using a foreach
statement, you can check the type of the variable using the is
operator and take an appropriate action when there is a match. The first pattern match is on 1.6180 which is a constant value and is an example of the const pattern
, as is the null
in the second pattern match. It is possible to use the ==
operator to achieve the same outcome when matching constants; however, the is
operator is much easier to understand and is friendlier.
The last two objects in the data
variable are of type Cow
and Chicken
. The type pattern
assigns a new variable of the specified type when there is a pattern match. For example, when Chicken
is matched, a new ch
variable is created that contains the Chicken
object, allowing the programmer to access properties and methods contained within the Chicken
class (e.g., the property name
and the method RunInCircles())
.
Finally, you can use the var pattern
to catch all the scenarios that did not match any of the if…else if…
statements higher up in the code path. Then use the catcher
variable to get variable type via the GetType().Name
property.
Value Comparisons
Consider two Person
objects representing people, each with an integer Age
property. You might want to compare them to see which person is older. You can simply use the following code:
if (person1.Age > person2.Age){…}
This works fine, but there are alternatives. You might prefer to use syntax such as the following:
if (person1 > person2){…}
This is possible using operator overloading , which you'll look at in this section. This is a powerful technique, but it should be used judiciously. In the preceding code, it is not immediately obvious that ages are being compared—it could be height, weight, IQ, or just general “greatness.”
Another option is to use the IComparable
and IComparer
interfaces, which enable you to define how objects will be compared to each other in a standard way. This technique is supported by the various collection classes in the .NET Framework, making it an excellent way to sort objects in a collection.
Operator Overloading
Operator overloading
enables you to use standard operators, such as +
, >
, and so on, with classes that you design. This is called “overloading” because you are supplying your own implementations for these operators when used with specific parameter types, in much the same way that you overload methods by supplying different parameters for methods with the same name.
Operator overloading is useful because you can perform whatever processing you want in the implementation of the operator overload, which might not be as simple as, for example, +
, meaning “add these two operands together.” Later, you'll see a good example of this in a further upgrade of the CardLib
library, whereby you'll provide implementations for comparison operators that compare two cards to see which would beat the other in a trick (one round of card game play).
Because a trick in many card games depends on the suits of the cards involved, this isn't as straightforward as comparing the numbers on the cards. If the second card laid down is a different suit from the first, then the first card wins regardless of its rank. You can implement this by considering the order of the two operands. You can also take a trump suit into account, whereby trumps beat other suits even if that isn't the first suit laid down. This means that calculating that card1
>
card2
is true
(that is, card1
will beat card2
if card1
is laid down first), doesn't necessarily imply that card2
>
card1
is false
. If neither card1
nor card2
are trumps and they belong to different suits, then both comparisons will be true
.
To start with, though, here's a look at the basic syntax for operator overloading. Operators can be overloaded by adding operator type members (which must be static) to a class. Some operators have
multiple uses (such as ‐
, which has unary and binary capabilities); therefore, you also specify how many operands you are dealing with and the types of these operands. In general, you will have operands that are the same type as the class in which the operator is defined, although it's possible to define operators that work on mixed types, as you'll see shortly.
As an example, consider the simple type AddClass1
, defined as follows:
public class AddClass1{public int val;}
This is just a wrapper around an int
value, but it illustrates the principles. With this class, code such as the following will fail to compile:
AddClass1 op1 = new AddClass1();op1.val = 5;AddClass1 op2 = new AddClass1();op2.val = 5;AddClass1 op3 = op1 + op2;
The error you get informs you that the +
operator cannot be applied to operands of the AddClass1
type. This is because you haven't defined an operation to perform yet. Code such as the following works, but it won't give you the result you might want:
AddClass1 op1 = new AddClass1();op1.val = 5;AddClass1 op2 = new AddClass1();op2.val = 5;bool op3 = op1 == op2;
Here, op1
and op2
are compared by using the ==
binary operator to determine whether they refer to the same object, not to verify whether their values are equal. op3
will be false
in the preceding code, even though op1.val
and op2.val
are identical.
To overload the +
operator, use the following code:
public class AddClass1{public int val;public static AddClass1 operator +(AddClass1 op1, AddClass1 op2){AddClass1 returnVal = new AddClass1();returnVal.val = op1.val + op2.val;return returnVal;}}
As you can see, operator overloads look much like standard static
method declarations, except that they use the keyword operator
and the operator itself, rather than a method name. You can now successfully use the +
operator with this class, as in the previous example:
AddClass1 op3 = op1 + op2;
Overloading all binary operators fits the same pattern. Unary operators look similar but have only one parameter:
public class AddClass1{public int val;public static AddClass1 operator +(AddClass1 op1, AddClass1 op2){AddClass1 returnVal = new AddClass1();returnVal.val = op1.val + op2.val;return returnVal;}public static AddClass1 operator ‐(AddClass1 op1){AddClass1 returnVal = new AddClass1();returnVal.val = ‐op1.val;return returnVal;}}
Both these operators work on operands of the same type as the class and have return values that are also of that type. Consider, however, the following class definitions:
public class AddClass1{public int val;public static AddClass3 operator +(AddClass1 op1, AddClass2 op2){AddClass3 returnVal = new AddClass3();returnVal.val = op1.val + op2.val;return returnVal;}}public class AddClass2{public int val;}public class AddClass3{public int val;}
This will allow the following code:
AddClass1 op1 = new AddClass1();op1.val = 5;AddClass2 op2 = new AddClass2();op2.val = 5;AddClass3 op3 = op1 + op2;
When appropriate, you can mix types in this way. Note, however, that if you added the same operator to AddClass2
, then the preceding code would fail because it would be ambiguous as to which operator to use. You should, therefore, take care not to add operators with the same signature to more than one class.
In addition, if you mix types, then the operands must be supplied in the same order as the parameters to the operator overload. If you attempt to use your overloaded operator with the operands in the wrong order, the operation will fail. For example, you can't use the operator like,
AddClass3 op3 = op2 + op1;
unless, of course, you supply another overload with the parameters reversed:
public static AddClass3 operator +(AddClass2 op1, AddClass1 op2){AddClass3 returnVal = new AddClass3();returnVal.val = op1.val + op2.val;return returnVal;}
The following operators can be overloaded:
-
Unary operators
—
+,‐,!,~,++,‐‐,true,false -
Binary operators
—
+,‐,*,/,%,&,|,^,<<,>> -
Comparison operators
—
==,!=,<,>,<=,>=
You can't overload assignment operators, such as +=
, but these operators use their simple counterparts, such as +
, so you don't have to worry about that. Overloading +
means that +=
will function as expected. The ==
assignment operator can't be overloaded because it has such a fundamental usage, but this operator is related to the user‐defined conversion operators, which you'll look at in the next section.
You also can't overload &&
and ||
, but these operators use the &
and |
operators to perform their calculations, so overloading these is enough.
Some operators, such as <
and >
, must be overloaded in pairs. That is, you can't overload <
unless you also overload >
. In many cases, you can simply call other operators from these to reduce the code required (and the errors that might occur), as shown in this example:
public class AddClass1{public int val;public static bool operator >=(AddClass1 op1, AddClass1 op2)=> (op1.val >= op2.val);public static bool operator <(AddClass1 op1, AddClass1 op2)=> !(op1 >= op2);// Also need implementations for <= and > operators.}
In more complex operator definitions, this can reduce the lines of code. It also means that you have less code to change if you later decide to modify the implementation of these operators.
The same applies to == and !=, but with these operators it is often worth overriding Object.Equals()
and Object.GetHashCode()
, because both of these functions can also be used to compare objects. By overriding these methods, you ensure that whatever technique users of the class use, they get the same result. This isn't essential, but it's worth adding for completeness. It requires the following nonstatic override methods:
public class AddClass1{public int val;public static bool operator ==(AddClass1 op1, AddClass1 op2)=> (op1.val == op2.val);public static bool operator !=(AddClass1 op1, AddClass1 op2)=> !(op1 == op2);public override bool Equals(object op1) => val == ((AddClass1)op1).val;public override int GetHashCode() => val;}
GetHashCode()
is used to obtain a unique int
value for an object instance based on its state. Here, using val
is fine, because it is also an int
value.
Note that Equals()
uses an object
type parameter. You need to use this signature, or you will be overloading this method, rather than overriding it, and the default implementation will still be accessible to users of the class. Instead, you must use casting to get the required result. It is often worth checking the object type using the is
operator discussed earlier, in code such as this:
public override bool Equals(object op1){if (op1 is AddClass1){return val == ((AddClass1)op1).val;}else{throw new ArgumentException("Cannot compare AddClass1 objects with objects of type "+ op1.GetType().ToString());}}
In this code, an exception is thrown if the operand passed to Equals
is of the wrong type or cannot be converted into the correct type. Of course, this behavior might not be what you want. You might want to be able to compare objects of one type with objects of another type, in which case more branching would be necessary. Alternatively, you might want to restrict comparisons to those in which both objects are of the same type, which would require the following change to the first if
statement:
if (op1.GetType() == typeof(AddClass1))
Adding Operator Overloads to CardLib
Now you'll upgrade your Ch11CardLib
project again, adding operator overloading to the Card
class. Again, you can find the code for the classes that follow in the Ch11CardLib
folder of this chapter's code download. First, though, you'll add the extra fields to the Card
class that allow for trump suits
and an option to place aces high. You make these static, because when they are set, they apply to all Card
objects:
public class Card{/// <summary>/// Flag for trump usage. If true, trumps are valued higher/// than cards of other suits./// </summary>public static bool useTrumps = false;/// <summary>/// Trump suit to use if useTrumps is true./// </summary>public static Suit trump = Suit.Club;/// <summary>/// Flag that determines whether aces are higher than kings or lower/// than deuces./// </summary>public static bool isAceHigh = true;
These rules apply to all Card
objects in every Deck
in an application. It's not possible to have two decks of cards with cards contained in each that obey different rules. That's fine for this class library, however, as you can safely assume that if a single application wants to use separate rules, then it could maintain these itself, perhaps setting the static members of Card
whenever decks are switched.
Because you have done this, it is worth adding a few more constructors to the Deck
class to initialize decks with distinctive characteristics:
/// <summary>/// Nondefault constructor. Allows aces to be set high./// </summary>public Deck(bool isAceHigh) : this(){Card.isAceHigh = isAceHigh;}/// <summary>/// Nondefault constructor. Allows a trump suit to be used./// </summary>public Deck(bool useTrumps, Suit trump) : this(){Card.useTrumps = useTrumps;Card.trump = trump;}/// <summary>/// Nondefault constructor. Allows aces to be set high and a trump suit/// to be used./// </summary>public Deck(bool isAceHigh, bool useTrumps, Suit trump) : this(){Card.isAceHigh = isAceHigh;Card.useTrumps = useTrumps;Card.trump = trump;}
Each of these constructors is defined by using the :
this()
syntax shown in Chapter 9
, so in all cases the default constructor is called before the nondefault one, initializing the deck.
Now add your operator overloads (and suggested overrides) to the Card
class:
public static bool operator ==(Card card1, Card card2)=> (card1?.suit == card2?.suit) && (card1?.rank == card2?.rank);public static bool operator !=(Card card1, Card card2)=> !(card1 == card2);public override bool Equals(object card) => this == (Card)card;public override int GetHashCode()=> 13 * (int)suit + (int)rank;public static bool operator >(Card card1, Card card2){if (card1.suit == card2.suit){if (isAceHigh){if (card1.rank == Rank.Ace){if (card2.rank == Rank.Ace)return false;elsereturn true;}else{if (card2.rank == Rank.Ace)return false;elsereturn (card1.rank > card2?.rank);}}else{return (card1.rank > card2.rank);}}else{if (useTrumps && (card2.suit == Card.trump))return false;elsereturn true;}}public static bool operator <(Card card1, Card card2)=> !(card1 >= card2);public static bool operator >=(Card card1, Card card2){if (card1.suit == card2.suit){if (isAceHigh){if (card1.rank == Rank.Ace){return true;}else{if (card2.rank == Rank.Ace)return false;elsereturn (card1.rank >= card2.rank);}}else{return (card1.rank >= card2.rank);}}else{if (useTrumps && (card2.suit == Card.trump))return false;elsereturn true;}}public static bool operator <=(Card card1, Card card2)=> !(card1 > card2);
There's not much to note here, except perhaps the slightly lengthy code for the >
and >=
overloaded operators. If you step through the code for >
, you can see how it works and why these steps are necessary.
You are comparing two cards, card1
and card2
, where card1
is assumed to be the first one laid down on the table. As discussed earlier, this becomes important when you are using trump cards, because a trump will beat a non‐trump even if the non‐trump has a higher rank. Of course, if the suits of the two cards are identical, then whether the suit is the trump suit or not is irrelevant, so this is the first comparison you make:
public static bool operator >(Card card1, Card card2){if (card1.suit == card2.suit){
If the static isAceHigh
flag is true
, then you can't compare the cards' ranks directly via their value in the Rank
enumeration, because the rank of ace has a value of 1
in this enumeration, which is less than that of all other ranks. Instead, use the following steps:
- If the first card is an ace, then check whether the second card is also an ace. If it is, then the first card won't beat the second. If the second card isn't an ace, then the first card wins:
if (isAceHigh){if (card1.rank == Rank.Ace){if (card2.rank == Rank.Ace)return false;elsereturn true;} - If the first card isn't an ace, then you also need to check whether the second one is. If it is, then the second card wins; otherwise, you can compare the rank values because you know that aces aren't an issue:
else{if (card2.rank == Rank.Ace)return false;elsereturn (card1.rank > card2?.rank);}} - If aces aren't high, then you just compare the rank values:
else{return (card1.rank > card2.rank);}
The remainder of the code concerns the case where the suits of card1
and card2
are different. Here, the static useTrumps
flag is important. If this flag is true
and card2
is of the trump suit, then you can say definitively that card1
isn't a trump (because the two cards have different suits); and trumps always win, so card2
is the higher card:
else{if (useTrumps && (card2.suit == Card.trump))return false;
If card2
isn't a trump (or useTrumps
is false
), then card1
wins, because it was the first card laid down:
elsereturn true;}}
Only one other operator (>=
) uses code similar to this, and the other operators are very simple, so there's no need to go into more detail about them.
The following simple client code tests these operators. Simply place it in the Main()
method of a client project to test it, like the client code shown earlier in the CardLib
examples (you can find this code in Ch11CardClient\Program.cs
):
Card.isAceHigh = true;WriteLine("Aces are high.");Card.useTrumps = true;Card.trump = Suit.Club;WriteLine("Clubs are trumps.");Card card1, card2, card3, card4, card5;card1 = new Card(Suit.Club, Rank.Five);card2 = new Card(Suit.Club, Rank.Five);card3 = new Card(Suit.Club, Rank.Ace);card4 = new Card(Suit.Heart, Rank.Ten);card5 = new Card(Suit.Diamond, Rank.Ace);WriteLine($"{card1.ToString()} == {card2.ToString()} ? {card1 == card2}");WriteLine($"{card1.ToString()} != {card3.ToString()} ? {card1 != card3}");WriteLine($"{card1.ToString()}.Equals({card4.ToString()}) ? " +$" { card1.Equals(card4)}");WriteLine($"Card.Equals({card3.ToString()}, {card4.ToString()}) ? " +$" { Card.Equals(card3, card4)}");WriteLine($"{card1.ToString()} > {card2.ToString()} ? {card1 > card2}");WriteLine($"{card1.ToString()} <= {card3.ToString()} ? {card1 <= card3}");WriteLine($"{card1.ToString()} > {card4.ToString()} ? {card1 > card4}");WriteLine($"{card4.ToString()} > {card1.ToString()} ? {card4 > card1}");WriteLine($"{card5.ToString()} > {card4.ToString()} ? {card5 > card4}");WriteLine($"{card4.ToString()} > {card5.ToString()} ? {card4 > card5}");ReadKey();
The results are as shown in Figure 11‐7 .
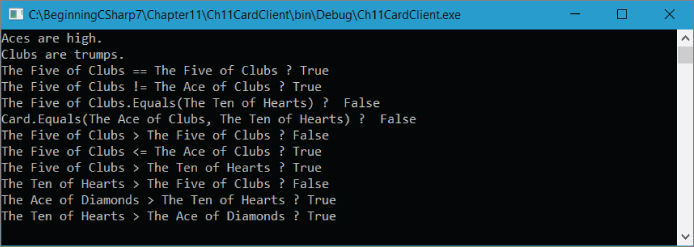
In each case, the operators are applied taking the specified rules into account. This is particularly apparent in the last four lines of output, demonstrating how trump cards always beat non‐trumps.
The IComparable and IComparer Interfaces
The IComparable
and IComparer
interfaces are the
standard way to compare objects in the .NET Framework. The difference between the interfaces is as follows:
-
IComparableis implemented in the class of the object to be compared and allows comparisons between that object and another object. -
ICompareris implemented in a separate class, which allows comparisons between any two objects.
Typically, you give a class default comparison code by using IComparable
, and nondefault comparisons using other classes.
IComparable
exposes the single method CompareTo()
, which accepts an object. You could, for example, implement it in a way that enables you to pass a Person
object to it and determine whether that person is older or younger than the current person. In fact, this method returns an int
, so you could also determine how much older or younger the second person is:
if (person1.CompareTo(person2) == 0){WriteLine("Same age");}else if (person1.CompareTo(person2) > 0){WriteLine("person 1 is Older");}else{WriteLine("person1 is Younger");}
IComparer
exposes the single method Compare()
, which accepts two objects and returns an integer result just like CompareTo()
. With an object supporting IComparer
, you could use code like the following:
if (personComparer.Compare(person1, person2) == 0){WriteLine("Same age");}else if (personComparer.Compare(person1, person2) > 0){WriteLine("person 1 is Older");}else{WriteLine("person1 is Younger");}
In both cases, the parameters supplied to the methods are of the type System.Object
. This means that you can compare one object to another object of any other type, so you usually have to perform some type comparison before returning a result, and maybe even throw exceptions if the wrong types are used.
The .NET Framework includes a default implementation of the IComparer
interface on a class called Comparer
, found in the System.Collections
namespace. This class is capable of performing culture‐specific comparisons between simple types, as well as any type that supports the IComparable
interface. You can use it, for example, with the following code:
string firstString = "First String";string secondString = "Second String";WriteLine($"Comparing '{firstString}' and '{secondString}', " +$"result: {Comparer.Default.Compare(firstString, secondString)}");int firstNumber = 35;int secondNumber = 23;WriteLine($"Comparing '{firstNumber}' and '{ secondNumber }', " +$"result: {Comparer.Default.Compare(firstNumber, secondNumber)}");
This uses the Comparer.Default
static member to obtain an instance of the Comparer
class, and then uses the Compare()
method to compare first two strings, and then two integers.
The result is as follows:
Comparing 'First String' and 'Second String', result: -1Comparing '35' and '23', result: 1
Because F comes before S in the alphabet, it is deemed “less than” S, so the result of the first comparison is −1. Similarly, 35 is greater than 23, hence the result of 1. Note that the results do not indicate the magnitude of the difference.
When using Comparer
, you must use types that can be compared. Attempting to compare firstString
with firstNumber
, for instance, will generate an exception.
Here are a few more points about the behavior of this class:
- Objects passed to
Comparer.Compare()are checked to determine whether they supportIComparable. If they do, then that implementation is used. - Null values are allowed, and are interpreted as being “less than” any other object.
- Strings are processed according to the current culture. To process strings according to a different culture (or language), the
Comparerclass must be instantiated using its constructor, which enables you to pass aSystem.Globalization.CultureInfoobject specifying the culture to use. - Strings are processed in a case‐sensitive way. To process them in a non‐case‐sensitive way, you need to use the
CaseInsensitiveComparerclass, which otherwise works exactly the same.
Sorting Collections
Many collection classes allow sorting, either by default comparisons between objects or by custom methods. ArrayList
is one example. It contains the method Sort()
, which can be used without parameters, in which case default comparisons are used, or it can be passed an IComparer
interface to use to compare pairs of objects.
When you have an ArrayList
filled with simple types, such as integers or strings, the default comparer is fine. For your own classes, you must either implement IComparable
in your class definition or create a separate class supporting IComparer
to use for comparisons.
Note that some classes in the System.Collections
namespace, including CollectionBase
, don't expose a method for sorting. If you want to sort a collection you have derived from this class, then you have to do a bit more work and sort the internal List
collection yourself.
The following Try It Out shows how to use a default and nondefault comparer to sort a list.
CONVERSIONS
Thus far, you have used casting whenever you have needed to convert one type into another, but this isn't the only way to do things. Just as an int
can be converted into a long
or a double
implicitly as part of a calculation, you can define how classes you have created can be converted into other classes (either implicitly or explicitly). To do this, you overload conversion operators, much like other operators were overloaded earlier in this chapter. You'll see how in the first part of this section. You'll also see another useful operator, the as
operator, which in general is preferable to casting when using reference types.
Overloading Conversion Operators
As well as overloading mathematical and logical operators, as shown earlier, you can define both implicit and explicit conversions between types. This is necessary if you want to convert between types that aren't related—if there is no inheritance relationship between them and no shared interfaces, for example.
Suppose you define an implicit conversion between ConvClass1
and ConvClass2
. This means that you can write code such as the following:
ConvClass1 op1 = new ConvClass1();ConvClass2 op2 = op1;
Alternatively, you can define an explicit conversion:
ConvClass1 op1 = new ConvClass1();ConvClass2 op2 = (ConvClass2)op1;
As an example, consider the following code:
public class ConvClass1{public int val;public static implicit operator ConvClass2(ConvClass1 op1){ConvClass2 returnVal = new ConvClass2();returnVal.val = op1.val;return returnVal;}}public class ConvClass2{public double val;public static explicit operator ConvClass1(ConvClass2 op1){ConvClass1 returnVal = new ConvClass1();checked {returnVal.val = (int)op1.val;};return returnVal;}}
Here, ConvClass1
contains an int
value and ConvClass2
contains a double
value. Because int
values can be converted into double
values implicitly, you can define an implicit conversion between ConvClass1
and ConvClass2
. The reverse is not true, however, and you should define the conversion operator between ConvClass2
and ConvClass1
as explicit.
You specify this using the implicit
and explicit
keywords as shown. With these classes, the following code is fine:
ConvClass1 op1 = new ConvClass1();op1.val = 3;ConvClass2 op2 = op1;
A conversion in the other direction, however, requires the following explicit casting conversion:
ConvClass2 op1 = new ConvClass2();op1.val = 3e15;ConvClass1 op2 = (ConvClass1)op1;
Because you have used the checked
keyword in your explicit conversion, you will get an exception in the preceding code, as the val
property of op1
is too large to fit into the val
property of op2
.
The as Operator
The as
operator converts a type into a specified reference type, using the following syntax:
operand

> as type

>
This is possible only in certain circumstances:
- If
<operand>is of type<type> - If
<operand>can be implicitly converted to type<type> - If
<operand>can be boxed into type<type>
If no conversion from <
operand
>
to <
type
>
is possible, then the result of the expression will be null
.
Conversion from a base class to a derived class is possible by using an explicit conversion, but it won't always work. Consider the two classes ClassA
and ClassD
from an earlier example, where ClassD
inherits from ClassA
:
class ClassA : IMyInterface {}class ClassD : ClassA {}
The following code uses the as
operator to convert from a ClassA
instance stored in obj1
into the ClassD
type:
ClassA obj1 = new ClassA();ClassD obj2 = obj1 as ClassD;
This will result in obj2
being null
.
However, it is possible to store ClassD
instances in ClassA
‐type variables by using polymorphism. The following code illustrates this, using the as
operator to convert from a ClassA
‐type variable containing a ClassD
‐type instance into the ClassD
type:
ClassD obj1 = new ClassD();ClassA obj2 = obj1;ClassD obj3 = obj2 as ClassD;
This time the result is that obj3
ends up containing a reference to the same object as obj1
, not null
.
This functionality makes the as
operator very useful, because the following code (which uses simple casting) results in an exception being thrown:
ClassA obj1 = new ClassA();ClassD obj2 = (ClassD)obj1;
The as
equivalent of this code results in a null
value being assigned to obj2
—no exception is thrown. This means that code such as the following (using two of the classes developed earlier in this chapter, Animal
and a class derived from Animal
called Cow
) is very common in C# applications:
public void MilkCow(Animal myAnimal){Cow myCow = myAnimal as Cow;if (myCow != null){myCow.Milk();}else{WriteLine($"{myAnimal.Name} isn't a cow, and so can't be milked.");}}
This is much simpler than checking for exceptions!
EXERCISES
-
11.1 Create a collection class called
Peoplethat is a collection of the followingPersonclass. The items in the collection should be accessible via a string indexer that is the name of the person, identical to thePerson.Nameproperty.public class Person{private string name;private int age;public string Name{get { return name; }set { name = value; }}public int Age{get { return age; }set { age = value; }}} - 11.2 Extend the
Personclass from the preceding exercise so that the>,<,>=, and<=operators are overloaded, and compare theAgeproperties ofPersoninstances. - 11.3 Add a
GetOldest()method to thePeopleclass that returns an array ofPersonobjects with the greatestAgeproperty (one or more objects, as multiple items can have the same value for this property), using the overloaded operators defined in Exercise 11.2. - 11.4 Implement the
ICloneableinterface on thePeopleclass to provide deep copying capability. - 11.5 Add an iterator to the
Peopleclass that enables you to get the ages of all members in aforeachloop as follows:foreach (int age in myPeople.Ages){// Display ages.}Answers to the exercises can be found in Appendix.
 WHAT YOU LEARNED IN THIS CHAPTER
| KEY CONCEPT | DESCRIPTION |
| Defining collections | Collections are classes that can contain instances of other classes. You can define a collection by deriving from CollectionBase
, or implement collection interfaces such as IEnumerable
, ICollection
, and IList
yourself. Typically, you will define an indexer for your collection in order to use collection[index]
syntax to access members. |
| Dictionaries | You can also define keyed collections, or dictionaries, whereby each item has an associated key. In this case, the key can be used to identify an item, rather than using the item's index. You can define a dictionary by implementing IDictionary
or by deriving a class from DictionaryBase
. |
| Iterators | You can implement an iterator to control how looping code obtains values in its loop cycles. To iterate over a class, implement a method called GetEnumerator()
with a return type of IEnumerator
. To iterate over a class member, such as a method, use a return type of IEnumerable
. In iterator code blocks, return values with the yield
keyword. |
| Type comparisons | You can use the GetType()
method to obtain the type of an object, or the typeof()
operator to get the type of a class. You can then compare these type values. You can also use the is
operator to determine whether an object is compatible with a certain class type. |
| Value comparisons | If you want to make classes whose instances can be compared using standard C# operators, you must overload those operators in the class definition. For other types of value comparison, you can use classes that implement the IComparable
or IComparer
interfaces. These interfaces are particularly useful for sorting collections. |
The as
operator |
You can use the as
operator to convert a value to a reference type. If no conversion is possible, the as
operator returns a null
value. |