17
Advanced Cloud Programming and Deployment
CREATING AN ASP.NET WEB API
The Application Programming Interface (API) computer programming concept has been around for many decades and is generally described as a module that contains a set of functions useful for building software programs.
Originally, from a Windows client application perspective, these modules were dynamic linked libraries (
) which revealed programmatically accessible interfaces that exposed internal functions to other programs. In such a system, when a consuming program uses an API, it becomes dependent on the pattern of the interface. Changes to the interface cause exceptions and failures within the consuming program because the current procedure to access and execute the functions within the module is no longer valid. Once programs become dependent on an interface, it shouldn't be changed. When it is changed, that event is commonly referred to as DLL Hell. For more information about DLL Hell, read this article: .dll
http://www.desaware.com/tech/dllhell.aspx
.
As time moved on and the implementation of Internet and intranet solutions became mainstream, dependencies on technologies such as web services and Windows Communication Foundation (WCF) were made. Both web services and WCF exposed formal contractual interfaces that exposed the functions contained within them to other programs. As opposed to the previously mentioned DLL API where the module exists on the same computer as the one consuming it, the web service and WCF are hosted on a web server. As a result of being hosted on an Internet or intranet web server, access to the web interface is no longer confined to a single computer and is possible from any device, from any place with an Internet or networked intranet connection.
Recall from the previous chapter where the analysis of the cloud optimized stack took place. From that discussion, you learned that in order to be considered cloud optimized , a program must have a small footprint, be able to handle high throughput, and be cross‐platform enabled. An ASP.NET Web API is based on the ASP.NET MVC (Model, View, Controller) concept, which aligns directly with the new cloud optimized stack definition. If you have created and/or used web services or WCF in the past, you will see how much simpler and compact an ASP.NET Web API is in comparison. If you have never used either, take my word for it: It is.
In the following Try It Out, you will create an ASP.NET Web API that deals a hand of cards.
TRY IT OUT Create an ASP.NET Web API
You will use Visual Studio 2017 to create an ASP.NET Web API that accepts a player's name and returns a hand of cards for that player.
-
Create a new ASP.NET Web API by selecting File
 New
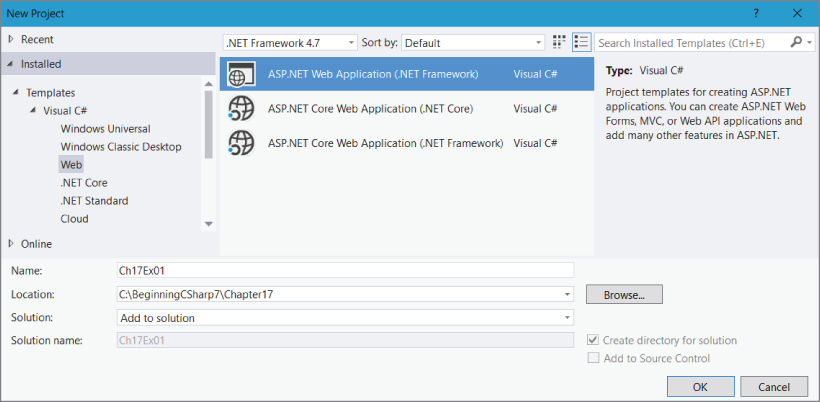
New  Project… within Visual Studio. In the New Project dialog box (see Figure 17‐1
), select the category Visual C#
  Web and then select the ASP.NET Web Application template. Change the path to
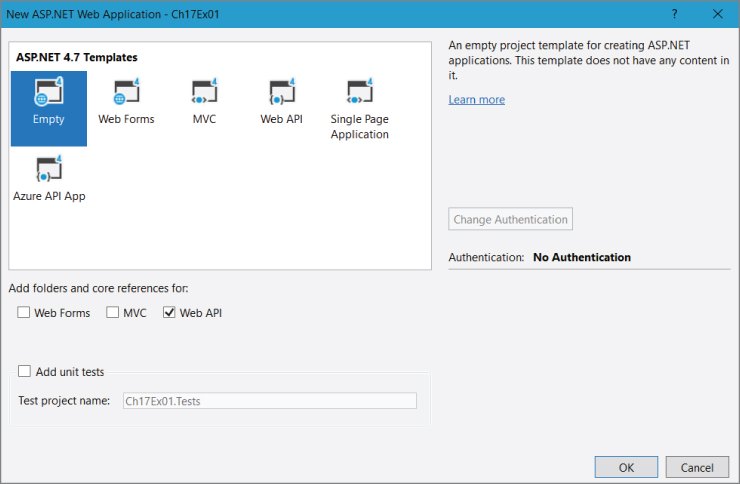
 C:\BeginningCSharp7\Chapter17 - Next click on the Empty ASP.NET 4.7 Template and check the Web API checkbox so required folders and core references are added to the project. See Figure 17‐2 . Click the OK button.
-
Right‐click on the Ch17Ex01 project, and then select Add
 New Folder and rename the folder
 CardLib - Download the sample code from the download site and place the following class files into the
CardLibCardLib Existing Item… and select the seven classes from the downloaded example.
-
Card.cs -
Cards.cs -
Deck.cs -
Game.cs -
Player.cs -
Rank.cs -
Suit.cs
NOTE
The seven classes are the same as used in Ch16Ex02. If you have already downloaded the source code for that exercise, then you can reuse them here as well.
-
- Next add a controller by right‐clicking on the Controllers folder, selecting
 Add
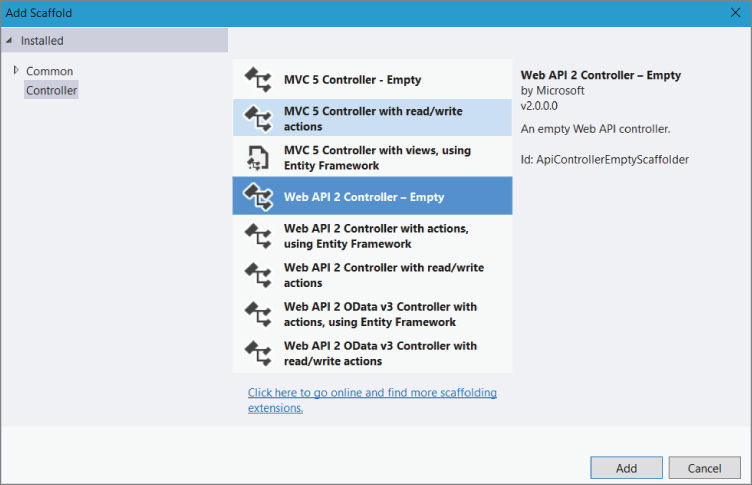
Add  Controller…, and selecting Web API 2 Controller ‐ Empty…
  Add (Figure 17‐3
).
 -
Name the controller
HandOfCardsController. - Add this code into the
HandOfCardsControllerclass:[Route("api/HandOfCards/{playerName}")]public IEnumerable<Card> GetHandOfCards(string playerName){Player[] players = new Player[1];players[0] = new Player(playerName);Game newGame = new Game();newGame.SetPlayers(players);newGame.DealHands();var handOfCards = players[0].PlayHand;return handOfCards;} - The ASP.NET Web API is now created and ready to be published to the cloud.
Congratulations! You have completed the creation of an ASP.NET Web API that returns a hand of cards.
How It Works
When you want to create a new ASP.NET Web API, there are two options. The first is the method that this Try It Out described. The fact that you selected Empty from the Template selection window meant that the project would contain nothing other than the bare necessities required to create an ASP.NET Web API. This resulted in very few configuration files and binaries being added to the solution; the footprint for this Web API is therefore very small and is just what is needed to run optimally in the cloud.
The other possible approach is to select the Web API template (see Figure 17‐2 ) instead of the Empty one. This includes additional configuration files, many additional references, and a basic example of an ASP.NET MVC application. As this Try It Out is relatively small and did not require most of the MVC features, the Empty template was chosen. If additional functionalities and examples are needed in a future project of your own, consider selecting the Web API template because it constructs data pipelines and provides many proven coding patterns to build your solution on top of.
You add the same seven card classes used in the Chapter 16
example to a directory called CardLib
. The contents of the GetHandOfCards()
method are identical to those of the one in Chapter 16
. The method accepts one parameter, the playerName
, creates a new Game
, sets the Players
, deals the hand of cards, and returns the Cards
class to the ASP.NET Web API consumer. The one additional line of code is this:
[Route("api/HandOfCards/{playerName}")]
The Route
annotation is how ASP.NET decides which Web API method responds to which request. As you will come to realize, after publishing there is no specific file requested when you interface with an ASP.NET Web API. Unlike an ASP.NET Web Forms application where a request is sent to a file with an .aspx
extension, the same is not true when calling a Web API (or an ASP.NET MVC application for that matter). A Web API request is sent to a web server, where the parameters are in the requested URL, separated by forward slashes. For example: “
http://contoso.com/api/{controllerName}/Parameter1/Parameter2/etc
 …
”.
NOTE
Instead of using annotations for creating Route Maps, you can create them in a file called
WebApiConfig.cs
located in the
App_Start
directory.
Now that the ASP.NET Web API is created, move on to the next section to learn about deployment and then consumption of the Web API.
DEPLOYING AND CONSUMING AN ASP.NET WEB API ON MICROSOFT AZURE
There are numerous options for deploying your Web App to the Microsoft Azure platform. One of the most popular methods is via a local Git repository or a public Git repository hosted on GitHub. Both the local and public Git repositories provide capabilities for version control, which is a very useful feature. Having version control lets the developer and release manager know what specific changes have been made, when they were made, and by whom. In the event that there are problems or unexpected exceptions when the binaries are compiled, or the changes are deployed to the live environment, it is easy to find who to contact about it. Other deployment platforms that can be integrated into Microsoft Azure include Visual Studio Team Services, OneDrive, and Bitbucket, for example.
NOTE
There are numerous methods for making deployments of your code to the Microsoft Azure platform. Projects stored in a source code repository versus specific standalone code scenarios each have numerous and individual deployment options.
As the code in the previous Try It Out is a standalone project that is not contained in a version control repository, the deployment is performed directly from within the IDE, in this case Visual Studio 2017. Additional methods for deploying a solution not contained in a source code repository include, for example, Web Deploy (msdeploy.exe
) and FTP.
Complete the following Try It Out to deploy an ASP.NET Web API to a Microsoft Azure Web App.
TRY IT OUT Deploy an ASP.NET Web API to the Cloud
- Right‐click Ch17Ex01 project
 Publish…. then select the Create New radio button and click the Publish button
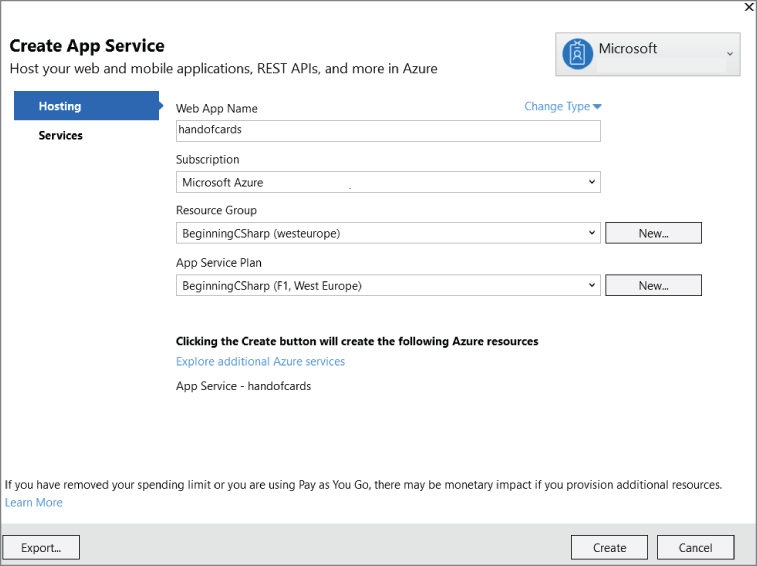
 - Select Web App from the Change Type drop‐down list, select the subscription to create the Web App into, import your Microsoft Azure subscription (if required), select or create a new
Resource Group, select an App Service Plan or create a new one, and finally click the Create button (Figure 17‐4
).
- Web App Name: Must be a unique name.
- Subscription: If you have multiple Microsoft Azure Subscriptions, select the one that you want this Web App to be created in.
- Resource Group: a logical grouping of Azure resources. This is a way to keep all the resources for a specific project or application grouped together, helping you manage the resources better.
- App Service Plan: the type of virtual machine you want to run the Web App on. For example, when running in FREE mode you share resources with other tenants, while in STANDARD mode your application runs on its own virtual machine.
- Once created, you can validate the connection by clicking the Settings…
 Validate Connection button (Figure 17‐5
) to make sure the configuration and credentials are set up correctly.
 - After the ASP.NET Web API is successfully published, a browser will open notifying that the web app has been successfully created. You can also view the details of the Output window in Visual Studio to find more information about the publishing steps.
- Check the response of the ASP.NET Web API. It is now globally accessible via, for example,
http://handofcards.azurewebsites.net/api/HandOfCards/Benjamin, wherehandofcardsis the name you provided when creating the Microsoft Azure Web App andBenjaminis the name of the player.

NOTE
By default, different browsers render the results in different ways. For example, Internet Explorer prompts you to download a JSON file, while Chrome, Firefox, and Edge display some XML data. The important aspect is that you get a response. Consuming the API is covered in the next section.
How It Works
When you publish a Web App from within Visual Studio, it uses Web Deploy in the background to perform the actual deployment. Knowing this, if you have special requirements for the deployment, they can be set within the publish profile located in the Properties\PublishProfiles
directory. The contents within *.pubxml
contain the configuration items and dependencies for the given deployment.
Once the deployment completes, a browser is rendered to the main page of the Web App (illustrated by Figure 17‐6 ), and not the ASP.NET Web API.

Unlike legacy APIs contained in a .dll
, web service, or WCF service, it is uncommon in practice to access an ASP.NET Web API directly. Rather, in all cases, the call to the API comes from code contained in another (API consuming) project or solution.
Now that the ASP.NET Web API is deployed, it is consumable from any client with capabilities to make an HTTP request and parse a JSON file. The following Try It Out provides all the instructions you need to learn how to consume the just published ASP.NET Web API from an ASP.NET Web Page.
NOTE
The following Try It Out modifies the Ch16Ex02 ASP.NET Web Site. The primary difference is that instead of retrieving the
Cards
from classes contained in the Web Site itself, the
Cards
are retrieved from the ASP.NET Web API created and deployed in this chapter.
TRY IT OUT Consume the Web API from a Web Site
You will use Visual Studio 2017 to modify the CH16Ex02 example so that it consumes an ASP.NET Web API. The Web API accepts a player's name and returns a hand of cards for that player.
- Open Visual Studio 2017, select File
 New
New  Web Site, and select ASP.NET Empty Web Site from the Visual C# list of installed Templates.
 - Change the Web Location to
C:\BeginningCSharp7\Chapter17\Ch17Ex02and then press the OK button to continue.
NOTE
The output of an ASP.NET Web API is a JSON file, the format of which follows a standard format making it easily parsed. The most common means for parsing a JSON file is using the
Newtonsoft.Jsonlibraries.
-
To install the
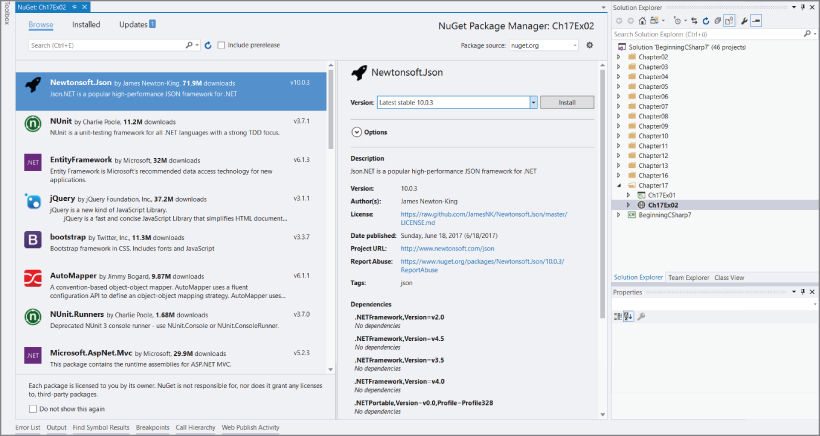
Newtonsoft.Jsonlibraries used for parsing the JSON file, right‐click on theCh17Ex02project and select Manage NuGet Packages…, which opens a tab in Visual Studio similar to that shown in Figure 17‐7 . - Browse for and select
Newtonsoft.Jsonfrom the Package list and press the Install button. ABindirectory is added to the ASP.NET Web Site that contains theNewtonsoft.Json.dllbinary. - Add a
cshtmlfile to the solution by right‐clicking on the Ch17Ex02 and selecting Add Add New Item…
  Empty Page (Razor v3), name it
 default.cshtml, and press the Add button.
NOTE
The contents of the
default.cshtmlfile here and the one previously created in CH16Ex02 are very similar, but some modifications are required. Consider copying the contents ofdefault.cshtmlfrom Chapter 16 instead of retyping the entire page.
- Next, include the
Newtonsoft.Jsonlibraries into the Razor file by adding this statement at the very top of the page:@using Newtonsoft.Json; - Add this code snippet directly below the line added in step 6:
@{List<string> cards = new List<string>();var playerName = Request["PlayerName"];if (IsPost){string GetURL = "http://handofcards.azurewebsites.net/api/" +"HandOfCards/" + playerName;WebClient client = new WebClient();Stream dataStream = client.OpenRead(GetURL);StreamReader reader = new StreamReader(dataStream);var results =JsonConvert.DeserializeObject<dynamic>(reader.ReadLine());reader.Close();foreach (var item in results){cards.Add((string)item.imageLink);}}} - Lastly, add the markup and Razor code to trigger the consumption of the ASP.NET Web API directly under the code added in step 7:
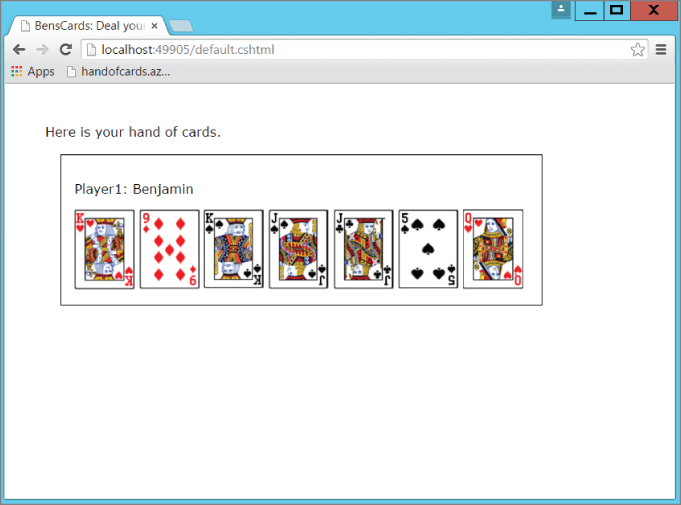
<html><head><title>BensCards: Deal yourself a hand.</title></head><body>@if (IsPost){<label id="labelGoal">Here is your hand of cards.</label><br/><div><p><label id="labelPlayer1">Player1:@playerName</label> </p>@foreach (string card in cards){<img width="75"height="100"alt="cardImage"src="https://deckofcards.blob.core.windows.net/carddeck/@card"/>}</div><label id="errorMessageLabel"/>}else{<label id="labelGoal">Enter the players name and deal the cards.</label><br/><br/><form method="post"><div><p>Player 1: @Html.TextBox("PlayerName")</p><p><input type="submit" value="Deal Hand"class="submit"></p></div></form>}</body></html> - Run the ASP.NET Web Site by pressing F5. Once rendered, enter a name and click the Deal Hand button. The ASP.NET Web Site consumes the ASP.NET Web API and renders a hand of cards, similar to that shown in Figure 17‐8 .
How It Works
When the default.cshtml
page is initially rendered, IsPost
is false
and therefore the calling of the ASP.NET Web API from the C# code contained in the Razor code block does not execute. Instead, only the portion of HTML code within the else
code block gets displayed. The rendered portion contains a TextBox
to capture the player name and a Button
to trigger the posting of the page back to itself.
Once a player name is entered, and the Deal Hand button is pressed, the IsPost
property becomes true
and the C# code within the Razor tag at the top of page is executed.
string GetURL = "http://handofcards.azurewebsites.net/api/HandOfCards/" +playerName;WebClient client = new WebClient();Stream dataStream = client.OpenRead(GetURL);
The web address stored in the GetURL
string is the Internet or intranet location of the ASP.NET Web API and is used as a parameter for the OpenRead()
method of the WebClient
class. The WebClient
contains the methods required to perform an HTTP request. The result of the OpenRead()
method is stored in a Stream
object.
StreamReader reader = new StreamReader(dataStream);var results = JsonConvert.DeserializeObject<dynamic>(reader.ReadLine());
The Stream
object is then passed as a parameter to the StreamReader
constructor. Using the ReadLine()
method of the StreamReader
class as a parameter to deserialize the JSON file using the Newtonsoft.Json
libraries, the results
can then be enumerated through a foreach
statement and added to a List<string>
container named cards
. The cards
list can then be accessed for usage later in the page rendering process.
foreach (var item in results){cards.Add((string)item.imageLink);}
NOTE
Review the
dynamic
type discussed previously in Chapter 13
. It is common practice to use the
dynamic
type with JSON files as the structure contained within it is not always castable to a strongly typed class.
Once the parsed results of the JSON file are loaded into the cards
container, the markup code within the IsPost
code block gets executed. The foreach
loop within the Razor tags reads through the cards
container and concatenates the image name with the link to the Microsoft Azure Blob Container created in Chapter 16
.
@foreach (string card in cards){<img width="75"height="100"alt="cardImage"src="https://deckofcards.blob.core.windows.net/carddeck/@card"/>}
You might consider deploying this ASP.NET Web Site to the Microsoft Azure platform using the acquired knowledge from the previous Try It Out. For example, simply right‐click the Ch17Ex02 solution, select Publish Web App, and follow the publish wizard. Creating a Web App called “handofcards‐consumer
” would then be accessible from http://handofcards‐consumer.azurewebsites.net
/. As both the ASP.NET Web API and the Microsoft Azure Blob Container are accessible on the Internet from any place in the world, placing the ASP.NET Web Site on Azure would result in the same outcome (getting a hand of cards).
Over time, if either the consumer or the API become popular and begin receiving many requests, running the Web Apps in FREE mode would likely result in a resource threshold breach that then suspends the resource availability. This would not be ideal. In the next section, you learn how to scale an ASP.NET Web API running as a Web App on the Microsoft Azure platform so that users and customers can access your responsive web resource when required.
SCALING AN ASP.NET WEB API ON MICROSOFT AZURE
Scaling to meet the requirements of your users used to be a very tedious, time‐consuming, and expensive activity. Historically, when a company wanted to increase server capacity to support more traffic, it required the acquisition, assembly, and configuration of physical hardware into a data center. Then, once the hardware was on the network, it was handed over to the application owners to install and configure the operating system, the required components, and the application source code. The time required to perform such tasks resulted in companies installing a lot of physical capacity to manage peak time usage; however, during times of non‐peak usage, the extra capacity simply went unused and sat idle, which is a very expensive and non‐optimal way to allocate resources.
A better approach is to use cloud platforms, like Microsoft Azure, that provide the ability to optimally utilize physical resources to scale up, down, and out during the times when the resources are required. When you need physical resources like CPU, disk space or memory, you scale up or out to meet the demands, and when the demand for your cloud‐hosted services reduce, you can scale back down and save your financial resources for use with other projects and services.
NOTE
To successfully complete the exercises in this chapter, you need a Microsoft Azure subscription. If you do not have one, you can sign up for a 30 day free trial here:
http://azure.microsoft.com
. It is quick and easy to do.
The remainder of this chapter illustrates how to scale an ASP.NET Web API based on CPU demand and during a specific time frame.
TRY IT OUT Scale an ASP.NET Web API Based on CPU Usage
- Access the Microsoft Azure portal at
https://portal.azure.com. - Select the ASP.NET Web API you created earlier in this chapter, for example “
handofcards.” As shown in Figure 17‐9 , notice that the Web App is in the FREE pricing tier. Auto Scaling is only available when the Web App is in STANDARD mode. - Scale your Web App up to STANDARD (this will incur a charge) by clicking on the Scale up (App Service Plan) link, choose S1, S2, or S3, then the Select button at the bottom of the page.
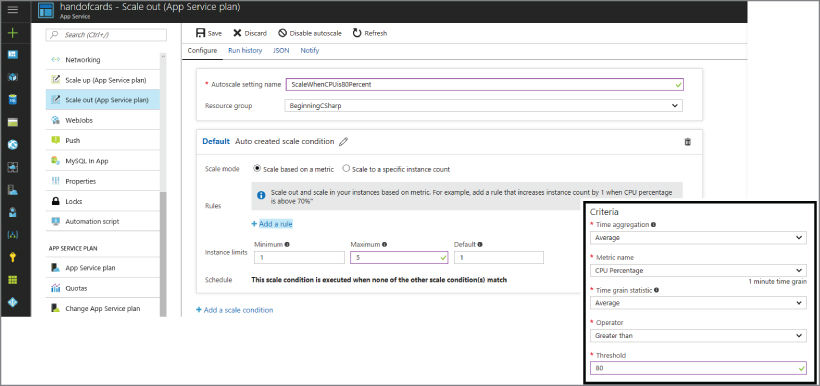
- Once the scale up is completed, click Scale out (App Service Plan) then click the Enable autoscale button + Add a rule (see Figure 17‐10 ). Select CPU Percentage from the Metric Name drop-down box.
- Change the Instance limits maximum to 5 and the Threshold to 80.
- Save the rule by clicking the Add button then Save.

How It Works
Running a Web App in FREE mode does not get you a whole lot. It is really for testing and learning how the Microsoft Azure platform works. Auto Scaling is only available in STANDARD or higher modes and therefore you must scale to this tier to have access to this feature. Other modes like SHARED and BASIC have the capacity to scale but require a manual configuration to do so.
By default, the Auto Scale settings are to scale up to a maximum of 1 instance of this App Service Plan when the CPU utilization averages over 70% within a 10‐minute time period examined every 1 minute. This was changed to a maximum of 5 instances with an average CPU threshold of 80% (see Figure 17‐10 ). This means that when the average CPU consumption on one instance is greater than 80% for 10 minutes, the Azure platform will add another instance. If the average combined CPU consumption on those two instances is again greater than 80%, another instance is added. This happens up to a maximum of five instances. The absolute maximum number of instances in a STANDARD App Service Plan is 10 instances.
Consider the S1 App Service Plan (ASP), which equates to 1 x 2.6 GHZ CPU and 1.75GB of memory. This means that when you scale to the maximum of five instances, there are five different virtual machines, each one with 1 x 2.6GHZ CPU and 1.75GB of memory all running the same Web App in the form of a Web Farm. Had an S3 ASP been selected instead, a maximum of five virtual machines with 4 x 2.6GHZ CPUs and 7GB of memory each could be available from this rule.
Finally, when the utilization of the CPU or CPUs on the virtual machines running your Web App breaches the configured CPU threshold percentage downwards, i.e., less than 80% (refer to Figure 17‐10 ), an instance or virtual machine is removed from the Web Farm until the number of instances set in the Minimum text box is reached.
The auto scaling feature is very useful for managing unexpected peaks of usage and requests to your Web App. However, if you already know when your customers or users interact with your Web App, you can plan ahead and have the additional instances available slightly before they are actually needed. The benefit is that instead of a gradual increase or decrease of instances based on CPU usage, you can scale immediately to the number of CPUs and amount of memory required during only that specific timeframe. For example, if you know that your marketing department is running a campaign during the month of October, you can schedule additional resources to be available during that month. By having the required resources available and warmed up, you can avoid any delay in getting them allocated for use by your users or customers. Perform the steps described in the following Try It Out to see how.
TRY IT OUT Scale an ASP.NET Web API at a Specific Time
- Access the Microsoft Azure portal at
https://portal.azure.com. - Select the ASP.NET Web API you created earlier in this chapter, for example “
handofcards.” Remember that if the Web App is in the FREE pricing tier Auto Scaling is not available; it is only available when the Web App is in STANDARD or higher mode. - Scale your Web App up to STANDARD by clicking on the Scale up (App Service Plan), choose either S1, S2, or S3, and then press the Select button at the bottom of the page.
- Once the configuration is saved, select Scale out (App Service Plan), + Add a scale condition, and the options for scaling based on dates and time are rendered, as illustrated by Figure 17‐11 . Click the “Specify start/end dates” radio button.
- Enter for example the Timezone, dates, and times similar to those shown in Figure 17‐12 .
- Click the SAVE button at the top of the page, and when the configured time frame becomes current, the scale setting will take effect.
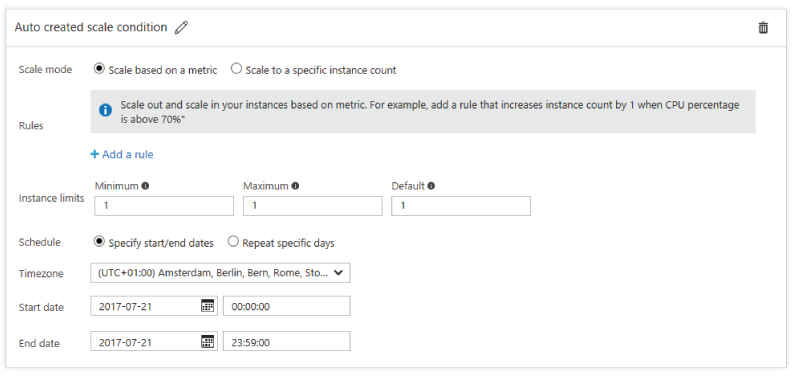
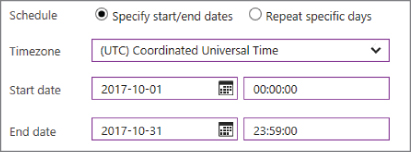
When you create a schedule for scaling your Web App, a name, start date, start time, end date, and end time are required. With this information, the Microsoft Azure platform manages the number of available instances, which are virtual machines that serve requests to your Web App during the configured time frame. It is possible to create numerous schedules, each having its own number of instances and scale settings. Simply create the schedule, save it, and when it's needed select it from the schedule drop down, and the resources will become available as expected.
EXERCISES
- 17.1 Instead of consuming the ASP.NET Web API from an ASP.NET Web Site application, try consuming it from another program type like a console application or a Windows Universal App.
- 17.2 What is the maximum size and number of instances you can have for a Web App on the Microsoft Azure platform? Answers to the exercises can be found in Appendix.
 WHAT YOU LEARNED IN THIS CHAPTER
| TOPIC | KEY CONCEPTS |
| ASP.NET Web API | An ASP.NET Web API is an Internet or intranet interface that exposes methods for consumption from external programs. |
| Deploying to the cloud | Use tools like Visual Studio, WebDeploy, Git, or FTP to deploy your program to the cloud. |
| Consuming a Web API | An ASP.NET Web API returns the output of the method in a JSON file. Use the Newtonsoft.Json
class library to parse and use its content. |
| Scaling in the cloud | Microsoft Azure Web Apps let you auto scale based on a defined schedule or CPU usage. Being able to scale up when you need more of a resource and down when it is no longer needed is one of the most valuable benefits of the cloud. |