Think you need fancy skills to sew stylish clothes? I’m here to tell you that that’s simply not true! You can sew a wide array of basic pieces using—you guessed it—straight lines only.
The secret is in the fabric you choose. Look for fabrics that drape well (such as knits or sheers), which will give even the simplest garments a flattering shape. Or choose bold, eye-catching prints, which allow the fabric to be the star in an otherwise basic piece.
The projects in this chapter are guaranteed to look great andteach you tons of skills. If you’re a beginner, start with the One-Hour Skirt or the Shirred to the Max dress (they’re both simple tubes with a little elastic in the right places), or the 60-Second Belt—it’s the epitome of instant DIY gratification!
Check out the Easy, Breezy Blouse to work with a delicate sheer fabric, or the First Time’s a Charm Cardi, a comfy knit garment that’s easy even if you’ve never sewn with knits. Try your hand at the City Girl Tote to learn the basics of bag construction, or stitch Quilty Zigs and Zags, a striking quilted belt that’s super easy to personalize.
For a challenge, don’t miss the Origami Dress, a sweet, swingy number that features an intricate pleated trim. Work with a demanding material in the Heavy Metal Bag—a studded, faux-leather purse that no one will believe you made yourself. The Sewing School Skirt is a tailoring tutorial that will show you the ins and outs of making a fitted waistband, pleats, and buttonholes.
You can customize each of the garments to your own body size for a fit that’s sure to flatter. Before you begin, take your body measurements (or better, have a friend take them) and write them down. If you have doubts about any project, sew a muslin sample first to gain a firm understanding of the construction process and work out any kinks related to size, fit, and sewing techniques.
Sound like fun? It is! And I promise that sewing your own clothes isn’t as tricky as you might think. Let’s get started!
When you see how easy it is to sew your own quick and comfy skirt you won’t ever want to purchase this wardrobe basic off the rack again. With just one yard of fabric and a mere sixty minutes, you can whip up a fantastic little number that looks like a million bucks. You can easily adapt this pattern to make a variety of different looks—try a narrower elastic waist, a longer length, or even less gathering to suit your own personal style.
finished dimensions
WIDTH: Sized to fit your body
LENGTH: 18" (45.5cm)
supplies
* Approximately 1 yard (91cm) medium weight fabric (see Note)
* 1¾"- (4.5cm-) wide elastic (the length of your waist circumference)
* One large safety pin
fabric suggestions
I made this skirt in a cotton-linen blend, which is soft and has great drape. Almost any light or medium weight fabric will work for this project; just keep in mind that the texture of the fabric you choose will determine whether your skirt is flowy or more structured.
 note
note
This garment is sized to fit your measurements so the exact amount of fabric needed will vary. Read the entire pattern and take your body measurements (Step 1) to determine the exact amount you’ll need. Buy extra when in doubt.
1. measure + cut
FABRIC: Measure your hip circumference (7"–8" [18cm–20.5cm] below your natural waist, or at your widest point) for measurement A. Cut 2 rectangles with a width equal to A and a length of 22½" (57cm). (FIGURE 1)

ELASTIC: Measure your waist circumference and cut a piece of elastic to that measurement minus 1" (2.5cm).
2. sew the side seams
Pin then sew the 2 front/back pieces together along both 22½" (57cm) edges with ¼" (6mm) French seams. (FIGURE 2)

3. sew the waistband casing
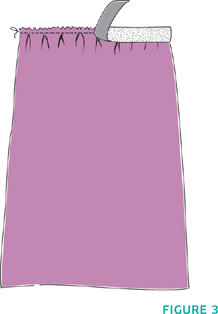
Turn under the top edge ½" (13mm); press. Turn under this folded top edge 2" (5cm); press then pin. Topstitch the folded edge in place, leaving a 4" (10cm) opening near one of the side seams. (FIGURE 3)

4. sew the hem
Turn under the hem ½" (13mm); press. Turn it under again 1½" (3.8cm); press then pin. Topstitch the hem in place.
5. finish the waistband
Attach a safety pin to one end of the elastic and thread that end through the entire waistband casing, being careful not to twist the elastic. When the safety pin gets back to the opening, overlap the 2 raw edges of the elastic ½" (13mm) and sew them together with a straight stitch, backstitching to reinforce at the beginning and end of the seam. Insert the joined elastic ends back into the casing. Topstitch the opening of the casing closed.
Distribute the gathers evenly around the skirt. Once the gathers are arranged, stitch in the ditch along each side seam at the waistband to secure the elastic in place.
 go custom
You can change this pattern up in lots of ways to make whatever kind of skirt your heart desires. Here are a few options.
* If you prefer the look of a skinny waistband, just use thinner elastic and adjust the waistband casing accordingly. (Make the casing ¼" [6mm] wider than the elastic.)
* This skirt measures 18" (45.5cm) from waist to hem. To make it longer or shorter (if you dare!), just adjust the length of the rectangle you cut in Step 1. (You may need to buy more fabric for a longer skirt.)
* The fabric you choose has a huge impact on the look of this garment. A very light fabric with a lot of drape will give you a flowy skirt; choose something stiff like taffeta for a poufy ball-gown effect.
Add a little crafty flair to your look with this graphic belt. The layers of free-form quilting are easy and fun to do, but if you prefer a different look, you can make this belt with a patterned fabric and keep the quilting more minimal. I love that this belt makes a big statement, yet it’s made from soft materials that are comfortable enough to wear all day, even if you sit at a desk. Anything that’s cute and comfortable is a winner in my book!
finished dimensions
WIDTH: 2¼" (5.5cm)
LENGTH: Sized to fit your body
supplies
* ¼ yard (23cm) solid medium-weight cotton
* ¼ yard (23cm) medium-loft cotton quilt batting
* All-purpose thread to match fabric
* All-purpose threads (in 2 colors) to contrast with fabric
* Belt buckle with 2" (5cm) opening and center bar
fabric suggestions
Quilting cottons are perfect for this belt; almost any medium-weight woven would work too.
Getting ClosureWhere to find the perfect buckle? I chose this one from the legendary M&J Trimming in New York City (mjtrim.com). Try checking your local trimming shops, but better yet, keep your eyes peeled at thrift stores and flea markets; you may find an old belt with a cool buckle that’s worth recycling. Etsy.com has a great selection of crafty buckles, too.
1. measure + cut
Measure your body at your true waist. Add 10" (25.5cm) to this number for measurement A.
FABRIC: Cut 2 strips of fabric 2¾" (7cm) wide and as long as A (if your fabric isn’t long enough to accommodate A, piece 2 strips of fabric together).
BATTING: Cut one strip of batting the same size as the fabric, minus 4" (10cm) in length.
2. sew the layers together
Layer both pieces of fabric right sides together, aligning all raw edges. Place the batting on top of the layered fabric, aligned at one 2¾" (7cm) end. Cut this end (through the batting and both fabric layers) at an angle to form the slanted end of the belt. (Aim for a 45-degree angle, but it doesn’t have to be perfect.) Pin all 3 layers together.
Using thread to match your fabric, sew around 3 sides with a ¼" (6mm) seam allowance. Leave the unslanted end open. (FIGURE 1)

Carefully trim the seam allowance to approximately ⅛" (3mm). Trim the excess fabric and batting from the points of the corners. Turn the piece right side out so that both pieces of fabric are outside and the batting is inside. Use a pointy tool to gently poke out the corners.
Press the belt thoroughly, using your fingers to spread the seams flat and open as you go.
Turn under the remaining raw edges ¼" (6mm) to the inside. Press. Topstitch near the fold to close the end.
3. quilt the belt
Adjust your machine’s stitch length to a quilting length; I recommend 8 stitches per inch (3mm-long stitches). Using contrasting thread and a straight stitch, and beginning at one end of the belt, simply sew a random, zigzagging line all the way to the other end of the belt. Make 4 passes in the first color of thread, alternating between sharp and wide angles. Change to a different color thread and make one more pass. (FIGURE 2)

4. attach the buckle
Wrap the straight end of belt around the center post of the buckle. By hand, whipstitch the end to the body of the belt 1" (2.5cm) from the post of the buckle.

perfectly randomSometimes it’s tricky to get that perfectly unplanned look in a project. I got my uneven zigzag effect here by layering several free-form passes of quilting stitches. I varied the width of each zig and zag without premeditation, and I also varied the point at which each zig and zag turned. If you look closely you can see that some points reach almost to the edge of the belt, while others don’t extend quite so far. That’s all there is to it—so let go of all planning and just wing it on this one, for an end result that’s all you!
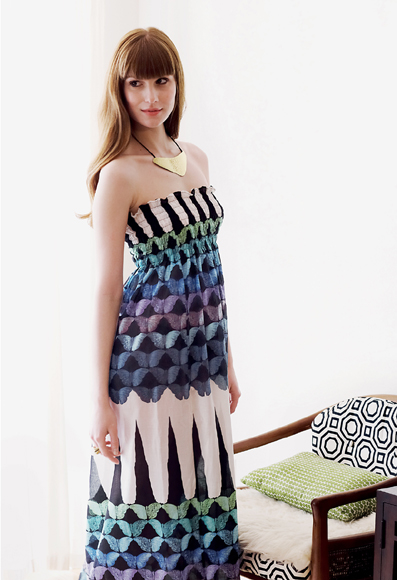
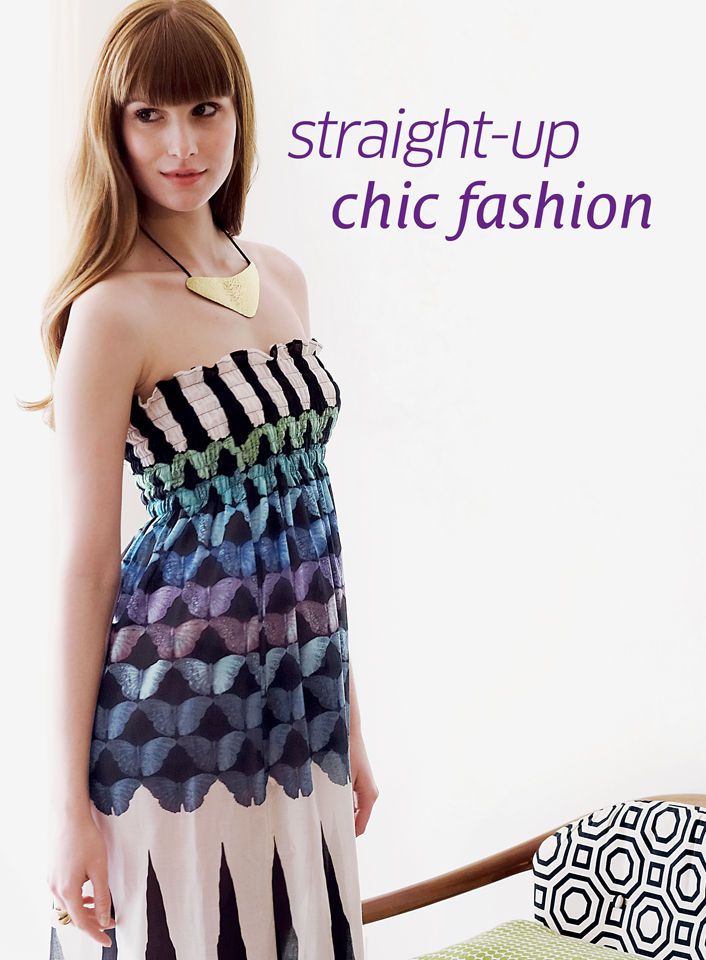
Would you believe me if I said this maxi dress is a snap to make? A super easy technique called shirring creates the fitted bodice, transforming a plain rectangle into a fitted, flattering garment—like magic! Add a bold print, and you’ve got a major statement dress that you can stitch up in just a couple hours. And if strapless isn’t your thing, no worries—you can add straps in a snap.
finished dimensions
Sized to fit your body
supplies
* Approximately 3 yards (2.7m) lightweight cotton fabric (see Note)
* Elastic thread
fabric suggestions
Very light cottons, such as voile, are ideal to achieve a soft, floaty silhouette.
1. measure + cut
BUST: Measure your bust circumference and add 1" (2.5cm) for measurement A.
DRESS LENGTH: Measure your desired dress length and add 2" (5cm) for measurement B.
Cut 2 rectangles that are as wide as A and as long as B. (FIGURE 1)

note
This garment is sized to fit your measurements so the exact amount of fabric needed will vary. Read the entire pattern and take your body measurements (Step 1) to determine the exact amount you’ll need. Buy extra when in doubt.
2. sew the front and back
Pin then sew the front and back pieces together along one of the long sides with a ¼" (6mm) French seam to form one large rectangle. (FIGURE 2)
3. hem and mark the top
Turn under the top edge ½" (13mm); press. Turn the folded edge under ½" (13mm) again; press. Topstitch the hem in place.
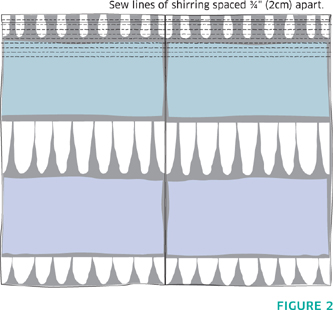
Lay the dress so the right side is facing up. Beginning ¾" (2cm) from the top edge, use chalk or a disappearing ink pen to draw lines parallel to the top edge spaced ¾" (2cm) apart. Draw as many lines as you would like rows of gathering; more lines will create a more fitted bodice. For the dress shown here, 8 rows were drawn. (FIGURE 2)
4. shirr the bodice
Hand-wind the elastic thread onto an empty bobbin. Add a little bit of tension as you wind. Don’t worry too much about getting it perfect; just make sure there are no knots and the thread is somewhat evenly wound on the bobbin. Load the bobbin into your machine as you normally would. Use all-purpose thread in the needle. With the fabric right side up, sew along the marked lines on your dress, starting with the line nearest the top edge. Backstitch at the beginning and end of each shirred row. The elastic thread will automatically create the gathers as you sew; at first the fabric may not gather very much, but as you sew more rows the gathering will increase. Stretch out the fabric as you work to keep it flat as you stitch each line. After sewing the lines of shirring, steam the fabric by holding a steam iron just above the shirring, which will cause the shirring to bunch up. Do not press the iron on the shirring, or you will flatten it.
 tip
tipIf strapless isn’t your style, add straps by stitching ribbon to the inside top edge, or make narrow straps from your fabric.
5. sew the remaining side seam
Pin then sew the dress’s remaining long edges together with a ¼" (6mm) French seam. Make sure the top and bottom edges and shirred rows are all aligned. (FIGURE 3)
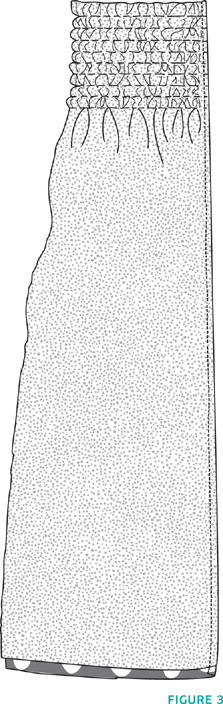
6. hem the skirt
Turn under the hem ½" (13mm) and press. Turn it under again 1" (2.5cm) and press. Topstitch the hem in place close. (FIGURE 3)
shirr geniusSimply by replacing your normal bobbin thread with elastic thread, you can create a gathered effect that is comfy and flattering to boot.
On this dress, you can work the shirring to just below the bustline, extend it a little lower to flatter the midriff, or work it all the way to the waistline.
Practice on some scrap fabric just to get the hang of it. Here are some pointers to get you started.
* Hand wind the elastic thread around your bobbin; it won’t work on the machine. Wind with a little tension, but not too much.
* Mark the shirr lines before sewing, or use your presser foot to space them.
* Backstitch securely at the beginning and end of each line.
* You won’t see much gathering at first, but don’t fret. The more lines you sew, the more your fabric will pucker.
* After shirring, blast your fabric with a steam iron (held 1 inch [2.5cm] above the shirring) to see it pucker up even more.
* Try this technique on sleeve cuffs and necklines.
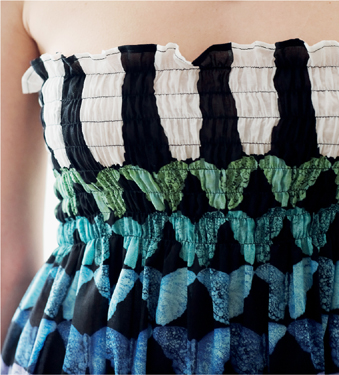
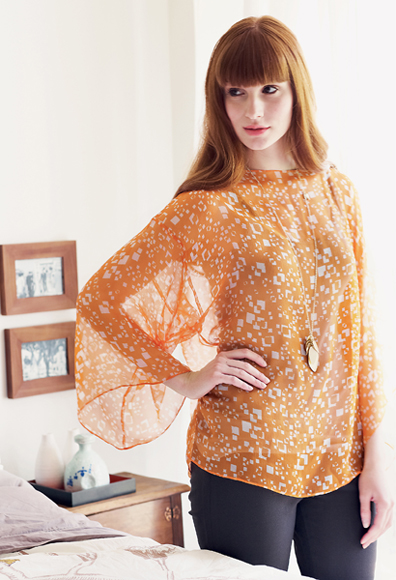
When designing this top, I wanted to show that even the most basic garment could look sophisticated if stitched in the right fabric. I used a high-end silk chiffon to transform a simple boxy shape into a dreamy, fluid silhouette that’s light as air—and the end result is truly greater than the sum of its parts. Sewing chiffon can be a challenge, so this basic top is the perfect starting project if you’re new to sheer materials.
finished dimensions
WIDTH: Sized to fit your body
LENGTH: 25" (63.5cm)
supplies
* Approximately 1½ yards (1.4m) silk or polyester chiffon (see Note)
1. measure + cut
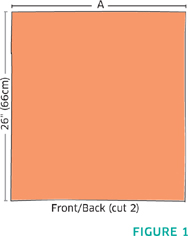
FRONT AND BACK: Measure the width of your body from shoulder to shoulder and add 6" (15cm) for measurement A. Cut 2 rectangles with the width of A and 26" (66cm) long. (If you prefer a different length than the one shown here, measure from your shoulder to the length you want and add 1" [2.5cm] for seam allowances, and cut your rectangle to this length.) (FIGURE 1)
Working with ChiffonIf this is your first time working with chiffon, I suggest buying a little more fabric than you need. Use the extra to practice cutting, sewing seams, and hemming—you’ll be a pro in no time!
Sheer fabrics like chiffon can be difficult to cut straight, but they often tear easily in a straight line. Test on your fabric first to make sure you get the results you want, and then cut out your rectangles by snipping the fabric and gently pulling the fabric at the snip to tear it. Don’t worry, it’s not as scary as it sounds.
note
This garment is sized to fit your measurements so the exact amount of fabric needed will vary. Read the entire pattern and take your body measurements (Step 1) to determine the exact amount you’ll need. Buy extra when in doubt.
SLEEVES: Cut 2 rectangles 26" (66cm) long and 24" (61cm) wide for the sleeves. (This creates a very wide sleeve; if you prefer, you can customize the sleeve to a different width. Loop a tape measure loosely around your upper arm to determine the width you prefer, and cut to this measurement plus 1" [2.5cm] for seam allowances.) (FIGURE 2)

2. sew shoulder seams
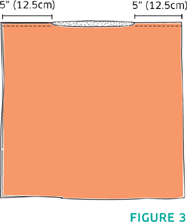
With wrong sides together, pin the front to the back with the top raw edges aligned. Sew the shoulder seams with a ¼" (6mm) French seam. Start stitching at each side edge and continue for 5" (12.5cm), leaving the center of the top edge open for the neck. Press the seam allowances to the back. (FIGURE 3)
3. attach the sleeves
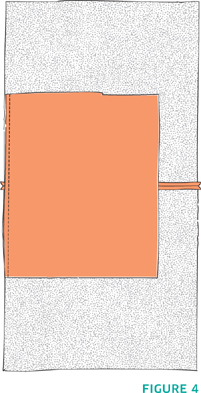
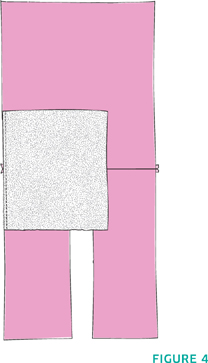
Lay the joined front/back piece wrong side up on a flat surface. With wrong sides together, pin one sleeve to the front/back, centering a 24" (61cm) edge over the shoulder seam, aligning raw edges (FIGURE 4). Sew the sleeve to the top with a ¼" (6mm) French seam. Press the seam allowance toward the sleeve. Repeat for the remaining sleeve.
4. sew side seams
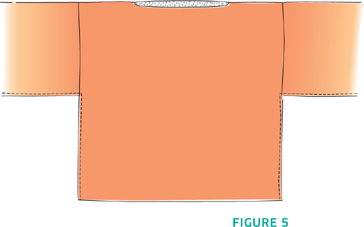
Fold the top at the shoulder seams, wrong sides together, aligning the underarm and side edges. Sew from the bottom up the side seams and along the arms with ¼" (6mm) French seams. (FIGURE 5)
5. hem the neck, sleeves, and bottom edge
To create a narrow hem on sheer fabric, work as follows: First Topstitch ¼" (6mm) from the fabric’s raw edge, then turn under the hem along the stitching and press (FIGURE 6).

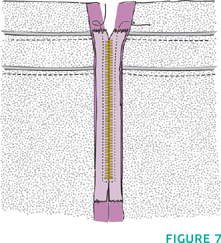
Stitch again about ⅛" (3mm) from the fold, stitching through both layers. Carefully trim the hem allowance as close to the second stitching line as you can. (FIGURE 7)

Turn up the hem once more along the second stitching line and press. Topstitch close to the upper folded edge (a scant ⅛" [3mm] from the outer edge) and press. (FIGURE 8)

Using ½" (13mm) hem allowances and the method described above, make a narrow hem along the neckline and the bottom edge. Try on the top and mark how long you want the sleeves. Make sure they are equal. If necessary, trim each sleeve ½" (13mm) below your marked length and make a narrow hem around each sleeve opening.

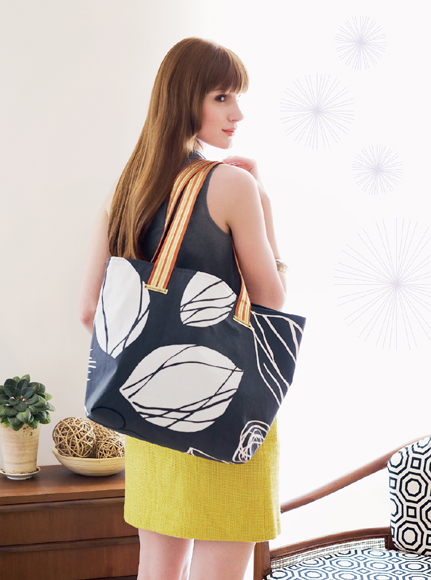
Here in New York, tote bags are an essential for city ladies. I never leave my apartment without one, and every day my bag is stuffed with everything from my lunch, makeup, and a change of shoes to a craft project, a water bottle, and who knows what else. Whew—I get tired just thinking about everything we carry around, but an adorable bag makes it much more bearable. If you’re a basic dresser, there’s no better way to add some pizzazz to your look than with a cute tote. If you love fabric, totes are the perfect use for snazzy textiles.
finished dimensions
WIDTH: 19" (48.5cm)
HEIGHT (excluding strap): 15" (38cm)
supplies
* 1 yard (91cm) heavyweight fabric (for exterior)
* 1 yard (91cm) medium-heavy fabric (for lining and straps)
* 1 yard (91cm) heavyweight fusible interfacing
* 5 yards (4.6m) ½"- (13mm-) wide metallic trim
* All-purpose thread to match your fabrics
* All-purpose thread to contrast with your fabrics
fabric suggestions
Heavy fabrics such as canvas or cotton duck will make a nice, sturdy tote. I suggest a medium-heavy fabric for the lining, such as cotton twill.
1. measure + cut
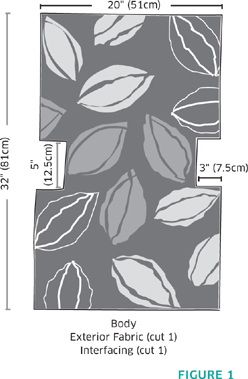
BODY EXTERIOR AND INTERFACING: Cut one 32" × 20" (81cm × 51cm) rectangle from the exterior fabric. Find the center point of each long edge, and cut a centered 3" × 5" (7.5cm × 12.5cm) rectangle from each side. Cut one piece the same size and shape from the interfacing. (FIGURE 1)
LINING: Cut one 26" × 20" (66cm × 51cm) rectangle from the lining fabric. Find the center point of the long edge and cut a 3" × 5" (7.5cm × 12.5cm) rectangle from each side, just as you did for the exterior.
FACING: Cut two 4" × 20" (10cm × 51cm) pieces from the exterior fabric and 2 from the interfacing.
STRAPS: Cut two 6" × 30" (15 cm × 76cm) pieces from the lining fabric and 2 from the interfacing. (FIGURE 2)

2. attach interfacing
Using a steam iron, fuse the interfacing pieces to the wrong sides of the corresponding exterior and facing pieces.
3. sew the tote exterior
Fold the tote exterior in half with right sides together and short edges aligned; pin. Sew side seams with a ½" (13mm) seam allowance. (FIGURE 3) Press the seam allowances open. Fold the corners flat, centering the side seams; pin. Stitch closed with a ½" (13mm) seam allowance. (FIGURE 3 INSET) Trim the corners, turn the tote right side out, and use a pointy tool to carefully poke out the corners. Press the seams.

4. sew the facing and lining
With right sides together and aligning all edges, pin then sew a facing piece to each short edge of the lining with a ½" (13mm) seam allowance. Press the seam allowance toward the facing.
Fold the entire piece in half with right sides together and the raw edges of the facing aligned; pin. Sew the side seams with a ½" (13mm) seam allowance, leaving a 6" (15cm) opening in the center of one side seam. (FIGURE 4) Sew the corners closed; trim, turn, and press them as you did for the exterior in Step 3.

5. attach the lining to the bag
With the lining inside out, the tote exterior right side out, and with right sides together, place the tote exterior inside the lining, aligning the side seams and top raw edges; pin. Sew the exterior and facing together at the top raw edges with a ½" (13mm) seam allowance. Turn right side out, carefully turning the tote through the opening in the side seam of the lining.
Extend the lining above the bag and press the seam allowance toward the facing. Turn the lining inside the bag and press the folded top edge where the facing meets the exterior. Topstitch the upper edge of the tote, sewing close to the edge.
Whipstitch the opening in the lining closed.
6. make straps
Using the strap pieces cut in Step 1, make 2 straps following these directions.
Cut four 30" (76cm) lengths of metallic trim. Position a length of trim approximately ¼" (6mm) in from each long edge on the right side of the straps. Stitch in place with a zigzag stitch.
7. attach the straps
Pin the straps, right side facing out, 4" (10cm) in from the side seams and with the raw ends of the straps 2" (5cm) down from the upper edge of the bag. Topstitch each end in place, stitching over the existing topstitching along the strap’s edges. Topstitch another line about 2" (5cm) long down the center of the strap. (FIGURE 5)
COVER THE RAW ENDS OF THE STRAPS: Cut four 2" (5cm) lengths of trim. Place one length over each strap end, covering the raw edge. Zigzag stitch the trim in place. (FIGURE 5, INSET)


Confession time: Until I designed this cardigan, I had never sewn with knits. I was afraid of them. I thought I needed something special, like a special sewing machine or special thread or some magical special ability to sew stretchy things. Turns out, I was completely wrong! Sewing knits is very similar to sewing woven fabrics, and you use all the same techniques and tools. So even if you’ve never sewn with knits, give this cardi a try—you’ll be glad you did.
finished dimensions
WIDTH: Sized to fit your body
LENGTH: 28" (71cm)
supplies
* Approximately 2 yards (1.8m) stretch knit fabric (see Note)
note
This garment is sized to fit your measurements so the exact amount of fabric needed will vary. Read the entire pattern and take your body measurements (Step 1) to determine the exact amount you’ll need. Buy extra when in doubt.
1. measure + cut
BACK: Measure your bust circumference and divide that number in half. Add 3" (7.5cm) for measurement A. Cut a rectangle with a width of measurement A and a length of 29" (74cm).
FRONTS: Cut 2 rectangles with a width equal to half of measurement A minus 4" (10cm) and a length of 29" (74cm). (FIGURE 1)

SLEEVES: Cut 2 rectangles 24" (61cm) wide and 11" (28cm) long. (This creates a very wide, kimono-style elbow-length sleeve. If you prefer a different-sized sleeve, adjust the length and width accordingly here. Wrap a tape measure loosely around your upper arm to help determine the sleeve width you prefer.)
FRONT FACING: You will also need to cut two 7" (18cm) strips for the front facing, but you must first construct the cardigan fronts and back to determine the necessary measurement. Be sure to allow for these extra pieces when cutting. (See Step 7 for more details.) (FIGURE 2)

2. sew the shoulder seams
With right sides together, pin the fronts to the back at the top edges (there will be a gap between the front pieces, as shown). Sew each front to the back across the top edge with a ½" (13mm) seam allowance. (FIGURE 3)

3. attach the sleeves
Open the front and back piece and lay it flat, right side up. With right sides together, pin one sleeve to the cardigan front and back, centering the wide end of the sleeve over the shoulder seam, with the edges aligned. Sew with a ½" (13mm) seam allowance. (FIGURE 4) Press the seam allowance toward the sleeve (this is important for creating a nice underarm seam in Step 5). Repeat for the remaining sleeve.
4. shape the neck back
With wrong sides together, fold the cardigan back in half vertically and mark the center point (on the right side) at the top edge with a pin; unfold and lay flat, right side up. Using a small plate or other round object, trace a curve onto the back, centered between the 2 front pieces, about 1" (2.5cm) deep. Cut the marked curve out of the neckline. (FIGURE 5)

5. sew the side and underarm seams
With right sides together, fold the cardigan at the shoulder seams and align the underarm and side edges; pin. Beginning at the bottom (hem edge), sew along the side and underarm seams with a ½" (13mm) seam allowance. (FIGURE 6)

6. hem the bottom edge
NOTE: It may seem counterintuitive to hem the bottom edge before the front facing has been added, but the facing will be finished separately in Step 7.
Turn the bottom hem under ½" (13mm) and press. Turn the hem under again 1" (2.5cm); press, then pin. Topstitch the hem in place. If your fabric is very lightweight, add a strip of lightweight interfacing to the hem allowance before you sew it in place to stabilize the stitching.

7. make the front facing
With a tape measure, measure from the bottom hem along the front edge and around the neckline to the center back. (FIGURE 7) Cut 2 strips of fabric this length plus 1" (2.5cm), and 7" (18cm) wide. With right sides together and the 7" (18cm) ends aligned, sew the 2 strips together with a ½" (13mm) seam allowance. Press the seam allowance open. With right sides together and long edges aligned, fold the strip in half lengthwise; pin then sew the 2 short ends closed with a ½" (13mm) seam allowance. (FIGURE 8) Trim the corners and turn the strip right side out. Press.


8. attach the facing
With right sides together and raw edges aligned, pin the facing in place along the cardigan’s fronts and (back) neck. Align the facing’s center seam with the cardigan’s center back. Sew in place, using a ½" (13mm) seam allowance and sewing through both layers of the facing and the cardigan body. Begin sewing at the bottom and work up one front side to the center back, then stop, backstitch, and clip the thread. Start sewing again at the bottom of the other side of the front, sewing up the front to the center back. (Working up from each bottom edge ensures that the finished bottom edges of the facing will be perfectly aligned with the hem.) (FIGURE 9)

Press the seam allowance toward the cardigan body and, on the right side, Topstitch in place.
9. hem the sleeves
Turn the raw edge of the sleeve under ½" (13mm) and press. Turn under another 1" (2.5cm); press, then pin. Topstitch the hem in place.
get knitty with itI admit, I was a knit newbie before making this cardigan. But sewing with knits is easier than you’d think! Here are a few pointers I learned along the way.
* Because knits stretch, they tend to shift as you’re cutting them, which makes the cutting slow going. But just take your time and you’ll get through it. I find it easier to use a rotary cutter, straightedge, and cutting mat.
* Pin your pieces well before sewing to discourage the fabric from shifting mid-seam.
* Stretch the fabric slightly as you sew it. If you stretch it too much, it will distort the seam.
* Knits don’t unravel, so if you want to keep things really simple, you don’t have to bother finishing your raw edges on hems, sleeves, etc.
* Steam-press each seam after you sew it. Other-wise you’ll get discouraged and think you’ve sewn an ugly, distorted seam. Stitching tends to bunch up on knits, but a quick press with the iron smoothes it right out. All better.

I love to sew things that look like they couldn’t possibly be handmade—and this bag fits that bill to a T. Faux ostrich is a luxe departure from a traditional fabric choice, and metal hardware lends a professional touch. These materials are a fun challenge to work with, but if you prefer, you can also use this pattern to sew a bag from a woven fabric. For a softer look, choose round studs rather than the pointed ones I used.
finished dimensions
WIDTH: 15" (38cm)
LENGTH: (excluding strap): 15" (38cm)
supplies
* 1 yard (91cm) lightweight vinyl faux leather
* ½ yard (46cm) medium-weight cotton (for lining)
* ¼ yard (23cm) medium-weight muslin (for stabilizer)
* Four ¾" (2cm) nailheads/studs
* Four ¼" (6mm) nailheads/studs
* Four 1⅛" (4.8cm) metal rings
* Low-tack masking tape
* Tissue paper
* Clapper or hardcover book
* Heavy-duty sewing machine needle
fabric suggestions
I used lightweight faux leather vinyl for this project. If you prefer, you can make this bag with a traditional woven fabric; medium- to heavyweight cottons and blends would work great here.
note
1. Be sure to read the Working with Vinyl sidebar before beginning this project.
2. If you use a woven fabric instead of vinyl, simply use standard ironing and sewing methods.
1. measure + cut
BAG BODY AND LINING: Cut two 23" × 12" (58.5cm × 30.5cm) pieces from the exterior fabric and 2 the same size from the lining fabric. Cut a 2" (5cm) square from each bottom corner.
FACING: Cut two 15" × 4" (38cm × 10cm) pieces from the exterior fabric, and 2 the same size from the muslin (the stabilizer).
SIDE STRAPS: Cut two 8" × 4" (20.5cm × 10cm) pieces from the exterior fabric.
SHOULDER STRAP: Cut one 20" × 4" (51cm × 10cm) piece from the exterior fabric. (FIGURE 1)
2. make the pleats
Mark pleat placement on the top edge of each bag body piece as follows: Starting at the left edge, measure a point 5" (12.5cm) from the edge. Mark this as point A. Measure over 2" (5cm) from point A, and mark point B. Mark point C 2" (5cm) from point B. Mark point D 5" (12.5cm) from point C. Mark point E 2" (5cm) from point D. Mark point F 2" (5cm) from point E. (FIGURE 1)

Fold points A and C to meet at point B. Fold points D and F to meet at point E. Pin in place. (If using vinyl, be sure to place pins only in the seam allowance.) Press as described in the Working with Vinyl sidebar.
3. add stabilizer to the facing
NOTE: For added strength, a stabilizing layer of muslin is sewn to the wrong side of the facing.
With wrong sides together, sew one piece of muslin facing to each bag facing, sewing around all 4 sides with a ¼" (6mm) seam allowance.
4. attach the facing to the bag sides
With right sides together, pin then sew one facing piece to each bag body piece along the pleated edge, with a ½" (13mm) seam allowance. Press the seam allowance toward the facing.
Topstitch on the facing close to the folded edge (see Working with Vinyl sidebar for tips on topstitching vinyl), placing a piece of tissue paper on top of the facing before sewing. Tear the tissue away after completing the topstitching. (You may need to carefully remove any small pieces of tissue with tweezers.) (FIGURE 2)

5. assemble the bag body
With right sides together, sew the bag body pieces together along the side seams with a ½" (13mm) seam allowance. Press the seam allowances open. Sew the bottom seam with a ½" (13mm) seam allowance. (It will be hard to press this seam with an iron, so it’s not necessary to do so.) (FIGURE 3)
Fold the bag so that the right sides of the bottom and side seams meet at the bottom corners. Sew each corner opening closed with a ½" (13mm) seam allowance. (FIGURE 3 INSETS)

Turn the bag right side out. Press the corner seams on the fold.
6. make the side straps
Using the strap pieces cut in Step 1, make 2 side straps following these directions.
Sandwich the folded strap between two 1"- (2.5cm-) wide strips of tissue paper. Topstitch the strap through the tissue paper close to the folded edge along both long edges. Tear the tissue paper away after completing the stitching.
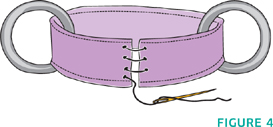
Insert the strap through 2 of the metal rings as shown in FIGURE 4. Bring the short ends of the strap to meet so that strap forms a ring. With ends butted together (not overlapping), whipstitch the ends together. (If you’re making your bag from fabric rather than vinyl, zigzag stitch the ends of the strap to prevent the raw edges from fraying.) Flatten the strap so that the whipstitched seam is at the center back of the strap, and a ring is on each end. Repeat for the remaining strap.
7. attach the side straps
Position an assembled side strap over each side seam of the bag body, with the folded top end of each strap ¾" (2cm) down from the raw edge of the bag facing. Hold the straps in place temporarily by taping the rings and the ends of the straps down with low-tack masking tape.
Place a 1"- (2.5cm-) wide strip of tissue paper over each side strap, and topstitch them in place as follows: Stitching close to the strap edge and pivoting at the corners, sew down one side of the strap, across the strap, up the other edge, and back across to form a rectangle of stitching that is approximately 1" (2.5cm) long and centered on the strap, as shown in FIGURE 5.

8. install the studs
Refer to FIGURE 6 for placement. Mark placement for a ¼" (16mm) stud near each end of each side strap, centered between the ring and the topstitching. With an awl or seam ripper, carefully pierce the side strap through all layers at each mark. Following the manufacturer’s directions for installing studs, insert a stud through each hole.

9. sew the lining
Mark and sew pleats on the lining pieces exactly as you did for the bag body in Step 2.
Place both lining pieces right sides together; pin. Sew the side seams with a ½" (13mm) seam allowance, leaving a 6" (15cm) opening at the center of one side seam. (It’s important to sew the top and bottom of the side seam and leave the opening in the center; otherwise finishing will be tricky.) Press the seam allowances open.
Sew the bottom seam with a ½" (13mm) seam allowance and press the seam allowance open. Sew the corners as you did for the bag exterior in Step 5. (FIGURE 3, INSET)
10. attach the lining to the bag
Turn the lining inside out and place the bag exterior inside the lining with right sides together, aligning the top raw edges and side seams. (Be sure to fold the side straps out of the way.) Sew the facing and lining together at the top raw edge with a ½" (13mm) seam allowance. To turn the bag right side out, pull the lining up over bag, gently working the bag exterior body through the opening on the side seam of the lining. From the right side of the fabric, press the seam allowance toward the lining. Whipstitch the opening in the lining closed, and turn the lining to the interior of bag. (NOTE: When the lining is folded to the inside, the facing will also fold to the inside of the bag, for a slouchy look. You do not need to press or stitch the facing at the fold, but rather let it slouch in naturally.)
11. make the shoulder strap
Using the piece cut in Step 1, make the shoulder strap following these directions.
12. attach the shoulder strap
Feed 2" (5cm) of the shoulder strap through each of the upper rings on the 2 side straps. Fold the strap back on itself around the ring and topstitch this 2" (5cm) overlap in place with a rectangle as you did for the side straps in Step 7, sandwiching the strap between 2 layers of tissue paper before stitching.
13. install the studs
Referring to the photographs (below), mark placement for two ¾" (2cm) studs above the rings on each overlapped end of the shoulder strap. Install studs as you did for the side straps in Step 8.

working with vinylI won’t sugar coat it—sewing vinyl can be a bit tricky. But the payoff is totally worth it: a cool finished piece that no one will believe you made yourself. And once you get the hang of vinyl’s special characteristics, it’s really not hard to work with at all.
HERE ARE SOME TIPS TO GET GREAT RESULTS:
TEST FIRST
Before beginning on your actual project, practice cutting, pinning, stitching, and pressing on the vinyl you’ll be working with.
PINS AND NEEDLES
Place a new heavy-duty needle in your machine. (It’s easy to forget that your needle might be dull, and a sharp needle will do wonders here.)
Pins make permanent marks in vinyl, so place pins only inside the seam allowances. Or, use low-tack masking tape or clips, such as quilt binding clips or small office binder clips, to hold pieces together instead of pinning.
SEWING NON-STICK
Sewing on the wrong side of vinyl is easy; it sews just like regular fabric. Sewing on the right side of vinyl is tricky, as it sticks and doesn’t feed through the machine easily. But there’s an easy fix. Change your stitch length to a longer setting (around 7 stitches per inch [3.5mm-long stitches]). Sandwich the vinyl between strips of tissue paper, and sew over the paper, removing it after stitching.
TOPSTITCHING TIPS
When topstitching over the tissue paper, it can be hard to see where you’re sewing, making it hard to achieve precise topstitching. To compensate, I cut my tissue to the exact size of the area I’m stitching and align the edges of the tissue with the edges of the fabric. I then know exactly where to sew. (For example, when topstitching a 1"- [2.5cm-] wide strap, I cut a 1"- [2.5cm-] wide strip of tissue paper and align it directly over the strap.)
PRESSING WITHOUT MELTING
You must press vinyl carefully to avoid melting it. Here’s how: Use a dry iron (no steam), set to medium. Cover the vinyl with a press cloth. Iron it for a few seconds, then remove the iron and quickly place a clapper or hardcover book over the area you just ironed. Hold the clapper or book in place for several seconds, applying pressure. This will allow the heat to continue to permeate the vinyl, without overheating and melting it.
Got a minute? Make an adorable belt! Wide elastic and a cool belt buckle join forces to create an accessory that’s simply irresistible.

supplies
* 1 yard (91cm) belt elastic in a width to fit buckle opening
* Interlocking belt buckle
* Thread to match elastic
1. Turn under one raw end of the elastic ½" (13mm) and Topstitch in place. Loop this end of the elastic through one side of the buckle, folding 2" (5cm) of elastic to the wrong side (wrong sides together). Stitch in place close to the folded edge.
2. Repeat to attach the remaining end of the elastic to the remaining side of the buckle. (Before sewing the second end, try on the belt and trim the length of the elastic for the fit you prefer.)
note
Belt elastic is wide, decorative elastic that can be found in the trim section of the fabric store. Look for it in fun colors, patterned prints, or with embellishments such as ruffled edges.
I like to think of this skirt as a little sewing school all wrapped up in a single project. You’ll learn to make pleats, a fitted waistband, button plackets, and buttonholes—all while sewing straight lines only. And even better, at the end of this lesson, you’ll have an adorably preppy-chic skirt to show off. (I love it with flats or boots!)
finished dimensions
WIDTH: Sized to fit your body
LENGTH: 20¾" (51cm)
supplies
* Approximately 2 yards (1.8m) fabric (see Note)
* ½ yard (46cm) lightweight fusible interfacing
* Five 1⅛"- (2.8cm-) diameter buttons
* All-purpose thread to match your fabric
* All-purpose thread to contrast with your fabric
fabric suggestions
A medium to heavyweight woven is ideal for this skirt. I used a cotton twill, but light denim, corduroy, or wool would all work great, too.
note
This garment is sized to fit your measurements so the exact amount of fabric needed will vary. Read the entire pattern and take your body measurements (Step 1) to determine the exact amount you’ll need. Buy extra when in doubt.
1. measure + cut
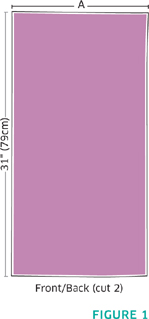
SKIRT FRONTS: Measure your waist circumference and add 1½" (3.8cm) ease for measurement A. Divide A by 4 and add 13¼" (33.5cm) for measurement B. Cut 2 rectangles with a width of B and a length of 22¾" (58cm).
SKIRT BACK: Divide A by 2 and add 10" (25.5cm) for measurement C. Cut one rectangle with a width of C and a length of 22¾" (58cm). (FIGURE 1)

INTERFACING: Cut two 10" × 22¾" (25.5cm × 58cm) pieces of fusible interfacing for the skirt front. You will also need to cut interfacing for the waistband; measurements to be determined in Step 9.
WAISTBAND: You will need to cut fabric for a waistband, but you can’t do this until you’ve determined the size you’ll need in Step 9. Be sure to reserve enough fabric to cut two pieces which are 2¾" (7cm) wide by at least your waist measurement plus 1" (2.5cm). (FIGURE 2)

2. fuse interfacing to skirt fronts
Fuse one piece of interfacing to the wrong side of each skirt front, along one 22¾" (58cm) edge. The interfaced edges will be the center front and the noninterfaced edges will be the side seams, so make sure you fuse opposite edges on each skirt front piece. (FIGURE 3)

3. mark the pleats
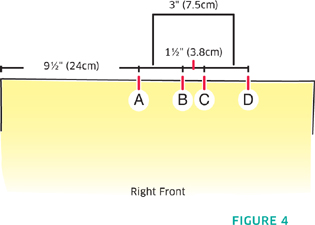
This skirt has 1½"- (3.8cm-) deep knife pleats that face away from the skirt center. Be sure to refer to the illustrations for clarification in marking the skirt front and back pieces for pleat placement.
MARK FRONT PLEATS: Lay each skirt front piece with the right side facing up. Work at the top edge of each skirt front: Mark point A 9½" (24cm) from the interfaced edge. Mark point B 3" (7.5cm) from point A. Mark point C 1½" (3.8cm) from point B. Mark point D 3" (7.5cm) from point C. (FIGURE 4)
MARK BACK PLEATS: Fold the skirt back in half to find the center back; mark. Open the back and lay it flat, right side facing up. Referring to the measurements in FIGURE 5, mark the top edge of the skirt back for pleat placement (A–F) as you did for the fronts. Be sure to mark points A–F on both the left and the right sides of the center back.

4. make the pleats
FOLD FRONT PLEATS: Fold the fabric away from the interfaced edge so that point A meets B and point C meets D; pin. (FIGURE 6) This will result in two 1½"- (3.8cm-) deep pleats, each folded in a Z shape, facing away from the skirt center. (The pleats on the right skirt front will be folded to the right, and the pleats on the left skirt front will be folded to the left.)

FOLD BACK PLEATS: Fold the pleats on each side of the back toward the side seams so that point A meets B, point C meets D, and point E meets F. This will result in three 1½"- (3.8cm-) deep pleats on each side of the back, for 6 pleats total. (FIGURE 7)

FRONT AND BACK: Press the pleats and baste along their top edges with a ¼" (6mm) seam allowance.
5. sew skirt fronts to back
With right sides together, pin the skirt back to each skirt front piece along the noninterfaced 22¾" (58cm) edges (side seams), aligning raw edges. Sew with a ¼" (6mm) French seam.
6. press facing and hem guide lines
NOTE: In this step, you will fold and press the skirt’s facing and hem to create guidelines that will be used in Steps 7 and 8.
On both skirt fronts, turn the interfaced edge under 2½" (6.5cm) and press. Turn it under another 2½" (6.5cm) and press. Turn under the hem ½" (13mm) along the bottom of the front and back pieces and press. Turn under the hem another 2" (5cm) and press.
Unfold to proceed, using the pressed lines as guidelines for Steps 7 and 8.
7. fold and sew the facing
On one skirt front, with right sides together, fold the facing edge to the front 5" (12.5cm) along the pressed guideline you made in Step 6. Keeping this fold in place, fold the raw edge back to meet the fold line (the fabric will be folded in a 2½"- [6.5cm-] wide Z); pin. Sew across the facing along the hemline (the pressed guideline 2½" [6.5cm] above the bottom raw edge). (FIGURE 8) Repeat for the remaining skirt front.

Trim the outside corners as shown and turn the facings to the wrong side. Sew 2 lines of Topstitching on both facings along both long folded edges. These are your button plackets.
8. hem the skirt
Repress the hem allowance along the folds made in Step 6 and topstitch it in place close to the hem allowance’s top edge.
tipShow off your favorite big buttons on this garment—but don’t go larger than 1⅛" (2.8cm), or the button will be too large to fit on the waistband.

9. make the waistband
Measure the skirt’s entire top edge and add 1" (2.5cm). Cut 2 waistband fabric pieces and one interfacing piece this length by 2¾" (7cm) wide. Fuse the interfacing to the wrong side of one waistband piece.
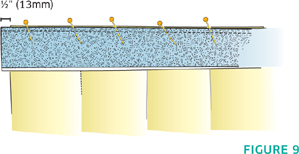
SEW THE FIRST WAISTBAND PIECE: With right sides together, pin the interfaced rectangle to the skirt with the long edges aligned and short ends extending ½" (13mm) past the skirt facing edges. Sew in place with a ½" (13mm) seam allowance. (FIGURE 9) Press the seam open, with the seam allowance pressed toward the waistband.
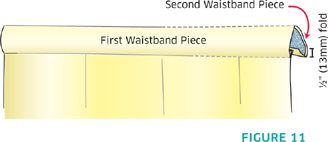
SEW THE SECOND WAISTBAND PIECE: Fold under one long edge of the remaining waistband piece ½" (13mm) and press. With right sides together and raw edges aligned, pin this piece to the waistband piece already sewn to the skirt, aligning the long folded edge with the waistband seam. Sew around the ends and top edge with a ½" (13mm) seam allowance. (FIGURE 10)

Trim the corners and turn the facing right side out. Use a pointy tool to gently poke out the corners. (FIGURE 11) The waistband will now be finished on 3 sides, with the folded edge on the interior. Pin the folded edge to the inside and whipstitch to secure.
10. add buttonholes and buttons
(Refer to your sewing machine’s manual for instructions on making buttonholes.) On the right skirt front, make a 1¼"- (3cm-) long horizontal buttonhole centered on the waistband and starting 1" (2.5cm) from the edge. Add 4 vertical buttonholes down the length of the right skirt front button placket 1⅛" (2.8cm) from the edge and spaced 2½" (6.5cm) apart. (FIGURE 12)

Use a seam ripper to open all buttonholes. Close the skirt front with the buttonhole placket laying over the left skirt front. Make a button placement mark through each buttonhole onto the left skirt front. Sew a button on each mark.
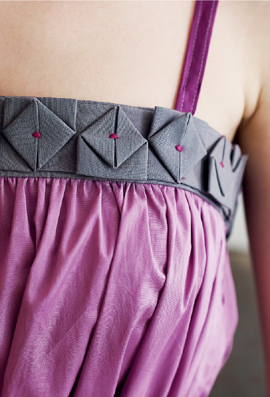
Now that you’re getting comfortable sewing straight lines, are you ready for a little challenge? Take it up a notch with this swingy dress, featuring a fancy folded trim that looks like it’s straight out of a designer boutique. This pattern will also show you how to install a zipper, using my favorite easy method. What’s more, multiple colors of fabric trick the eye into thinking this design is even more complex than it is. All in all, this dress packs major punch, using only basic skills. Go for it!
finished dimensions
WIDTH: Sized to fit your body
LENGTH: 31" (79cm)
supplies
* Approximately 2 yards (1.8m) main color fabric (light purple) (see Note)
* ¼ yard (23cm) accent-color fabric (gray)
* ½ yard (46cm) contrasting-color fabric (dark purple)
* 11" (28cm) standard zipper
* Hook and eye
* All-purpose thread to contrast with fabric
fabric suggestions
For the body of this dress I recommend a lightweight cotton or cotton blend. Medium-weight cottons don’t drape as well.
noteThis garment is sized to fit your measurements so the exact amount of fabric needed will vary. Read the entire pattern and take your body measurements (Step 1) to determine the exact amount you’ll need. Buy extra when in doubt.
1. measure + cut
DRESS FRONT AND BACK: Measure your body’s circumference just above the bust for measurement A. From your main fabric (light purple), cut 2 rectangles with a width equal to A and a length of 31" (79cm). (FIGURE 1)
CHEST BANDS: Divide measurement A in half and add 1" (2.5cm) for measurement B. From the accent (gray) fabric, cut 4 rectangles with a length of B and a width of 2½" (6.5cm).
ORIGAMI TRIM: From the accent (gray) fabric, cut 3 rectangles that are 3½" (9cm) wide and as long as measurement A plus 12" (30cm).
STRAPS: From the contrasting fabric (dark purple), cut 2 rectangles 2" (5cm) wide by 18" (45.5cm) long. (FIGURE 2)

2. gather the front and back
Gather the top edge of the dress body pieces as follows: Baste the top edge of the dress body front and back ¼" (6mm) from raw edge. Pull the bobbin thread to gather each piece of fabric down to a width of measurement B. Distribute the gathers evenly. (FIGURE 3)
3. attach the chest bands
With right sides together, pin then sew a chest band piece along the gathered edge of the front and back pieces with a ½" (13mm) seam allowance (FIGURE 3). Trim the seam allowance from the dress body piece (not the band) and press the seam allowance toward the chest band.
4. mark the center point
With wrong sides together, fold each front and back piece in half vertically to find the center points. Mark these points on the chest band with a pin or marking tool. (These points will be needed in Step 7 to position the straps.)
5. sew the right-hand side seam
With right sides together, pin then sew the front and back together along the right-hand side edge with a ½" (13mm) seam allowance. (You will sew the left-hand side seam in Step 10.) Press the seam allowance open.
6. make the straps
Using the pieces you cut in Step 1, make 2 straps following these directions.
7. attach the straps
With right sides together, pin one end of each strap to the chest band 4½" (11.5cm) from the center point of the dress front. (There will be a total of 9" [23cm] between straps.) Pin the other ends of the straps to the back chest band, as you did on the front. (FIGURE 4)

Try on the dress to check the strap placement and length, adjusting as needed. With right sides together and raw edges aligned, sew each strap to the front and back chest band, using a ¼" (6mm) seam allowance.
8. assemble the facing
With wrong sides together, and with a ½" (13mm) seam allowance, pin then sew the 2 remaining chest band pieces together along one short end to make the facing. Press the seam allowance open. Fold one long edge under ½" (13mm) and press.
9. attach the facing
With right sides together and side seams aligned, pin the facing’s unpressed long edge along the top edge of chest band. Sew along the top edge with a ½" (13mm) seam allowance. Press the seam allowance toward the facing.
10. sew the left-hand side seam
With right sides together and raw edges aligned, pin the remaining side seam together. Beginning at the (top) facing seam (not at the top raw edge), baste the seam for 11" (28cm) with a ½" (13mm) seam allowance. After basting for 11" (28cm), change your machine’s stitch length to a regular stitch, backstitch to reinforce, and sew the remainder of the side seam with a regular stitch. Press the seam allowance open. (FIGURE 5)

11. install the zipper
(Refer to the Don’t Fear the Zipper sidebar.) With the dress wrong side out and with the right side of the zipper facing the fabric, pin the zipper over the basted section of the left side seam, centering the teeth over the basted seam. (FIGURE 6)

Attach a zipper foot to your machine. Starting at the top of the zipper, sew down one side of the zipper. When you reach the bottom, pivot and sew across the zipper, then pivot to sew up the other side of the zipper, stopping when you reach the top. (FIGURE 7)
Working on the right side of the dress, use a seam ripper to gently remove the basting stitches from the seam and expose the zipper.
12. make the origami strip
With right sides together and short ends aligned, sew the 3 trim strips together with a ¼" (6mm) seam allowance to make one long strip. Press the seam allowances open.
SEW THE STRIP: Fold the strip in half lengthwise with right sides together and long edges aligned; pin. Sew the long edge with a ¼" (6mm) seam allowance. Turn the strip right side out, center the seam on the strip, and press. (The side with the seam is the wrong side of the strip.) (FIGURE 8)

Beginning 2" (6cm) from the edge mark the strip every 1½" (3.8cm) on the right side of the strip. (FIGURE 9)

Fold the strip with wrong sides together so that every third mark meets; pin. Sew the strip at each meeting point, creating a series of loops on the strip. Press each loop flat. (FIGURE 10)

FOLD EACH LOOP INTO A DIAMOND SHAPE, ORIGAMI STYLE: Refer to FIGURE 11. NOTE: You can view a video of this technique on my website: www.brettbara.com.

A. On one flattened loop, pull the top front edge of the folded loop open.
B. Bring the two side edges of the loop together to meet in the center, forming a diamond shape.
C. Press flat.
D. With contrasting thread, secure each diamond in place in its center, either by hand or machine. To secure by machine, set your stitch for a wide, short zigzag. Make several zigzag stiches in the center of the diamond, backstitching a few times to reinforce.
Fold the next diamond in the same manner, except open the loop from the bottom edge. Fold and stitch all the diamond shapes on the strip, alternating folding from the top and the bottom edges.
ATTACH THE ORIGAMI STRIP TO THE DRESS: Fold under the raw edges of the strip and pin the wrong side of the finished origami strip over the right side of the chest band; trim the length of the strip if necessary. Whipstitch the strip to the band along both long edges.
tipYou can turn this dress into a special-occasion affair just by upgrading the details. Use a slinky black fabric for the body, and consider stitching a bead or rhinestone onto the center of each diamond in the trim. Ooh la la!
13. finish the facing
Fold the facing to the inside. Turn under the facing’s raw side edges and whipstitch them in place. Whipstitch the long folded edge of the facing in place.
14. hem
Turn under the hem ½" (13mm) and press. Turn it under again 1" (2.5cm) and press. Topstitch the hem in place.
15. attach the hook and eye
Hand-sew the hook and eye to the wrong side of the band, above the zipper, following the directions on the package.