

In June, as many as a dozen species may burst their buds on a single day. No man can heed all of these anniversaries; no man can ignore all of them.
—ALDO LEOPOLD
Melted-Crayon Stained Glass Bunting
Mixed-Berry Scones with Lemon Icing
Coconut Chicken Satay with Mango Sauce
IN SUMMER BOTH NATURE and children are bustling with energy. The birds belt out the songs, the insects buzz, the gardens burst (with a dizzying riot of color and scent), and the kids have never been so busy. We respond both by slowing down (all the better to enjoy it) and speeding up. The long, light-filled hours and warm weather inspire us to be active and do more.
Vegetable gardens; farmers’ markets; fresh salads with crunchy cucumbers, just-picked tomatoes, and flavorful basil capture the essence of summer for me—accented by the chatter of exuberant children.
And it isn’t summer without water to cool us off. We run through the sprinkler, take trips to the beach, frequent swimming holes, and dance in warm afternoon rainstorms.
I think I speak for more than just myself when I say we all feel a bit healthier in the summer than at other times of the year. Being active, getting fresh air and sunlight, taking more time to relax and play, and eating fresh from the garden and orchard can’t help but make us our best selves.
In summer the greater emphasis on outdoor living and exploring means that the crafts of the season are often created outside or created with the intention of being used outside. We make artful pinwheels to twirl in the wind and beaded bubble wands for that old favorite, bubble blowing. And we try our hands at sand-casting, both at the beach and in the sandbox.
OUR FAVORITE BOOKS ABOUT SUMMER
Come On, Rain! by Karen Hesse
Take Me Out to the Yakyu by Aaron Meshon
A Rumpus in the Garden by Sven Nordqvist
The Relatives Came by Cynthia Rylant
The Gardener by Sarah Stewart
ARTFUL PINWHEELS
Create colorful pinwheels from watercolor-resist paintings.
MATERIALS
Poster board, watercolor paper, or card stock
Crayons
Paintbrush
Watercolor paint (we used liquid watercolors)
Scissors
Ruler
Pencil
Artwork remnants or colored construction paper
Pushpin
Small wooden dowels (from the craft store) or pencils
Straight pins (the kind with a little ball head)
Small round beads with holes through the center
Hot glue gun
1. Draw on the poster board with crayons, pressing hard. White and light colors work especially well for this technique, called watercolor resist. Paint over the entire paper with watercolors. Let the paint dry.
2. Turn the poster board over and paint the reverse side with a contrasting color of watercolor paint. Let it dry again.
3. Cut the watercolor-resist artwork into 6" squares (smaller or larger work as well, but this is a good size to start with). Turn a square over and use a ruler and a pencil to draw straight lines from corner to corner, crossing in the center. Use scissors to cut along the drawn lines, stopping 1"–2" from the center.
4. Cut 1"–2" circles out of artwork remnants or colored construction paper.
5. Create holes in preparation for assembly: Poke a pushpin into the side of the dowel, near the top. Remove the pin, leaving a hole. Use the same pin to poke holes in the center of the penciled X as well as in the pointed end of each spoke. Also poke a hole in the center of the circles.
6. To assemble, insert a straight pin through the hole in the center of one of the circles, then through each of the four spokes, one at a time, and then finally through the center of the penciled X. Slip a bead onto the end of the pin (so there will be a bead between the dowel and the pinwheel), then add a dab from the hot glue gun to the sharp end of the pin. Poke the glue-covered pin end into the hole in the dowel. The hot glue dries quickly.
7. Blow your pinwheel to make it spin, or hold it up to the wind.

Double-sided napkins in summery fabrics are perfect to take along on a picnic. This is an easy sewing project for adults or kids and an especially good one for those just beginning to use a sewing machine. In the latter case, don’t fret about mistakes or seams that are not straight—my daughter went off the bias tape a few times, and I just helped her back up a bit and get on track again.
MATERIALS
1 yard each of 2 lightweight printed cotton fabrics
Bias tape, extra-wide double-fold, in a coordinating color
Pins
Sewing machine
Thread to match the bias tape
INSTRUCTIONS
1. Line up the two fabrics, wrong sides together, and cut squares through both layers in the size desired. Ours are about 12" square.
2. With the squares of fabric still layered together, attach the bias tape with pins, starting at one corner and sandwiching the edges of the napkin between the two sides of the bias tape.
3. Sew along the inner edge of the narrow side of the bias tape, removing pins as you go.
4. Repeat with the rest of the napkins.
Make stunning flower crowns to celebrate the floral bounty of summer. These are great for pretend-play accessories or as a unique party activity.
MATERIALS
Crown template (see page 328)
Pencil
Poster board or card stock
Scissors
X-Acto knife
Cutting mat or cardboard
Transparent contact paper (also called sticky-back plastic)
Flowers
Tape
INSTRUCTIONS
1. Using the crown template, trace the crown shape on the poster board, including the large inset sections where the flower jewels will go.
2. Cut out the crown. Scissors work best for the outside of the crown, and an X-Acto knife will work best for cutting out the insets. X-Acto knives are for adults only. Make sure to protect your work surface with a cutting mat or cardboard if using an X-Acto knife.
3. Pull the paper backing off a piece of contact paper and lay it on the table, sticky side up. Press the crown to the contact paper, then cut away the excess contact paper from the outer edges, leaving the contact paper exposed in the inset sections.
4. Press flower petals to the contact paper, creating a bejeweled, stained glass effect.
5. Cut small pieces of contact paper slightly larger than the inset sections of the crown and press these over the flower-petal stained glass.
6. Wrap the crown around your head and tape it in place.
The same technique used for the flower stained glass crowns can also be used to create necklaces.
MATERIALS
Card stock
Scissors
X-Acto knife
Cutting mat or cardboard
Transparent contact paper (also called sticky back-plastic)
Flowers
Hole punch
Yarn
INSTRUCTIONS
1. Cut “doughnuts” out of card stock about 3"–4" in diameter. Scissors work best for the outside of the circle, and an X-Acto knife will work best for cutting out the inset circle. X-Acto knives are for adults only. Make sure to protect your work surface with a cutting mat or cardboard if using an X-Acto knife.
2. Cut circles out of the contact paper, slightly larger than the hole. Pull off the paper backing and stick it over the hole, so that it overlaps the edges by a bit.
3. Press flower petals to the sticky contact paper. Cover the flower design with a second circle of contact paper.
4. Punch a hole at the top of the circle. Thread a length of yarn through the hole and tie the ends together to create the necklace.
MELTED-CRAYON STAINED GLASS BUNTING
Hang this melted-crayon stained glass bunting where the summer sun can shine through it.
MATERIALS
Cheese grater
Crayons
Bowls or muffin tin
Iron
Wax paper
Ironing board
Newsprint or scrap paper
Scissors
Sewing machine or hot glue gun (see note below)
INSTRUCTIONS
1. Follow steps 1–6 of the Melted-Crayon Suncatchers on page 23.
2. Cut the melted-crayon stained glass into triangles, either freehand or with a paper template if you prefer a uniform size.
3. Use a sewing machine to sew the triangles together along the tops.
Note: For a no-sew variation, use a hot glue gun to glue the stained glass triangles along a ribbon.
Melted-bead suncatchers are surprisingly easy to create yet very durable. Unlike the melted-crayon suncatchers, these suncatchers will withstand the elements for extended outdoor use.
MATERIALS
Translucent plastic pony beads
Old metal baking dishes such as muffin tins and cake pans
Grill or toaster oven
Power drill or metal grommets (see note below)
String
INSTRUCTIONS
1. Arrange the pony beads in a single layer in old metal baking dishes. You can also use old metal cookie cutters on a metal dish to create specific shapes.
2. Place the baking dishes on a hot grill for 5–15 minutes or until the beads are melted (start checking after 5 minutes). This is best done outdoors because of the plastic fumes; if you don’t have a grill, consider using a toaster oven outside.
3. Let the melted beads cool completely, then pop the suncatchers out of the pans.
4. Drill a small hole in each suncatcher, tie some string through the hole, and use the loop to hang up your new suncatcher. You can create individual suncatchers or try connecting several together.
Note: If you don’t have a power drill, include a metal grommet among the beads before melting them. The plastic beads will melt around the grommet, leaving the grommet hole open. (Thanks to one of my blog readers for the suggestion.)
A mobile made out of colorful suncatchers is perfect for a child’s room or a sunny window.
MATERIALS
Power drill or metal grommets (see note on page 128)
Small melted-bead suncatcher shapes made with muffin tins or cookie cutters (see page 128)
Large melted-bead suncatcher, made with a cake pan or similar (see page 128)
String
INSTRUCTIONS
1. Drill a hole near the top of each small melted-bead suncatcher shape. Drill four to six holes equidistant around the circumference of the large melted-bead suncatcher and one in its center.
2. To hang the suncatcher, loop and tie a length of string 1'–2' long through each of the holes along the edge of the large disk. Pull the strings together at the top and tie them into a knot. Hang the suncatcher up for the next step.
3. String two or three of the smaller shapes together and tie the end of the string to the large disk through the same hole as the hanging strips at the top and knot them, letting the shapes hang down. Repeat with the rest of the suncatcher shapes.
String melted-bead suncatchers together to create a unique and lovely garland that works as well outside (it’s waterproof) as in.
MATERIALS
Translucent pony beads (although any bead will do)
String, such as embroidery floss or kite string
Large needles, such as embroidery needles
Melted-bead suncatchers (page 128)
INSTRUCTIONS
1. Thread the needle with embroidery floss, then string pony beads on, tying a knot around the first to hold the rest on as you work.
2. Tie melted-bead suncatchers to the beaded string at regular intervals using embroidery floss. (For long garlands, you can make shorter sections and then tie several together, as we did.)
3. Hang the garland on a porch, in a window, or between poles in the garden. To enjoy the suncatchers at night, hang them alongside a string of white lights.
An indoor hopscotch can keep kids active on rainy days or when it’s just too hot for outdoor play.
MATERIALS
Masking tape, rainbow colors optional (Test first to make sure the tape pulls up off your floor easily—it will in most cases.)
Melted-Crayon Rocks (see page 42) or other hopscotch marker
INSTRUCTIONS
1. Use masking tape to form hopscotch squares, numbering them with tape as you go. You can stick with the traditional 10, or you can go as high as you like. Ours reaches 27 and curves through three rooms.
2. Teach your kids how to play with a marker (see instructions below) or let them just jump along the course. Younger kids might not be quite ready for the official game, but the course itself is wonderful for balancing, coordination, and number recognition.
How to Play Hopscotch
1. Standing just in front of the hopscotch course, throw a hopscotch marker (melted-crayon rock, beanbag, or other small object) into the first square. If it lands on or outside the line, the player skips her turn.
2. If the marker lands inside the square, the player hops along the entire course, skipping the square with the stone. The player hops on one foot when there is a single square and hops onto both feet when there are two squares side by side, with one foot inside each square. If the player hops on the wrong square, touches the lines, or hops outside of a square, the player loses her turn and has to repeat that square on her next turn.
3. When the last square is reached, the player turns around and hops back through the course, pausing to pick up the marker on the way back.
4. Player hands the marker to the next player for his turn.
5. When it’s the first player’s turn again, she throws the marker to the second square and hops the course as before. The game continues until one player makes it through the entire course with the marker on each square.

Kids can make their own simple flags for Independence Day or pretend play.
MATERIALS
Scissors
White cotton fabric
Elmer’s blue gel glue
Splat mat or wax paper
Paintbrushes
Acrylic paint
Scrub brush
Iron
Ironing board
Sewing machine (optional)
Wood dowel or bamboo pole
Stick-on Velcro tabs
INSTRUCTIONS
1. Cut the white fabric into the desired size and shape.
2. Squeeze the glue onto the fabric in the stars and stripes of the American flag (or any design). Let the glue dry.
3. Set your flag on a waterproof splat mat or a piece of wax paper. Paint with watered-down acrylic paints (about half and half works well). Let the paint dry.
4. Soak the flag in warm water for 30–60 minutes. Scrub the glue off with the brush. Let the flag dry, then iron it flat.
5. If desired, hem the edges or use a zigzag stitch around the edge to keep the flag from fraying.
6. Attach the flag to a dowel using sticky-back Velcro, and fly it. Have a backyard parade with your new flags or use them to decorate a sandbox, playhouse, or patio.

In the summer we eat fruit like there’s no tomorrow. We always try to eat seasonally for the most part (and the food tastes much better that way), so we take advantage of the fruit season to the hilt.
I have fond memories of picking blackberries as a child along our neighbor Wanda’s long dirt driveway in the Oregon countryside. Many berries went straight into the mouth, but there were always enough for cobbler afterward. Now we take our own children berry picking at local farms, later enjoying the bounty in a variety of fresh and baked goods, and freezing the excess for the rest of the year.
OUR FAVORITE BOOKS ABOUT SUMMER FOOD
Blueberries for Sal by Robert McCloskey
Apple Pie 4th of July by Janet S. Wong

This fruit gelatin is fresh, tasty, and perfectly refreshing as a dessert or snack on the hottest of summer days. This recipe is my attempt to re-create a favorite summer treat from my childhood.
INGREDIENTS
3-plus cups fresh fruit, such as grapes, peaches, kiwi, strawberries, blackberries (reserve some for garnish)
4 packets gelatin
6 cups cold cranberry juice
Mint (optional)
INSTRUCTIONS
1. Arrange the fresh fruit around the circumference of a Bundt pan. Set the pan aside.
2. Sprinkle the gelatin powder over 1 cup of the cold cranberry juice in a large bowl. Let it sit for 5 minutes.
3. Meanwhile, bring the remaining 5 cups of cranberry juice to a boil in a medium saucepan. Whisk the hot juice into the gelatin mixture. Let the gelatin cool to room temperature (I put the bowl in the fridge for 30–40 minutes), then pour the gelatin over the fruit in the Bundt pan. Cover the pan with plastic wrap and refrigerate overnight or until the gelatin is firm.
4. To release the mold from the pan, set the Bundt pan in a sink of warm water for 10–20 seconds or so. Then hold a large plate firmly over the top of the pan and invert them quickly.
5. Slice the gelatin and serve. Garnish it with fresh fruit and mint as desired.
Blueberry pie goodness in a portable, little-person size.
Makes 14–16 hand pies
INGREDIENTS
1 batch Piecrust dough (see page 142)
1½ cups blueberries, fresh or frozen
¼ cup sugar, plus extra for sprinkling
2 tablespoons cornstarch
1 teaspoon lemon zest
1 tablespoon lemon juice
½ teaspoon vanilla
Pinch nutmeg
Egg wash (1 egg beaten with 1 tablespoon water)
INSTRUCTIONS
1. Preheat the oven to 375°F and line one or two cookie sheets with baking parchment. Bring the piecrust dough out of the fridge to soften slightly (about 15 minutes).
2. Mix together the blueberries, sugar, cornstarch, lemon zest, lemon juice, vanilla, and nutmeg.
3. Roll out half of the crust at a time on a floured surface. Use a 3" round biscuit or cookie cutter to cut rounds out of the dough. Transfer half of the dough rounds to the baking parchment–lined cookie sheets.
4. Add a spoonful of blueberry filling to the center of each round.
5. Cover each pie with a second round of dough. (You may want to roll out the top rounds a second time after you cut them out, to make them a bit bigger for better coverage.) Press the edges closed with fork tines.
6. Use a sharp knife to cut three or four little air vents in the top crusts. Brush each with egg wash, then sprinkle them with sugar.
7. Bake for 25 minutes or until the crust is golden brown at the edges. Eat warm or at room temperature.
A good piecrust is key when making pies and hand pies.
INGREDIENTS
3 cups flour (I use half white whole wheat flour and half all-purpose flour.)
½ teaspoon salt
2 tablespoons sugar
1 cup (2 sticks) butter, sliced into tablespoons
12 tablespoons ice water
INSTRUCTIONS
1. Mix the dry ingredients in a food processor. Add half of the butter slices, pulse a couple times, then add the other half. Pulse several times. Alternatively, cut the butter into pea-size pieces with a pastry cutter or knife and fork.
2. Place the flour mixture in a large bowl. Add ice water 3 tablespoons at a time, using a sturdy rubber spatula to alternately mix and press down on the dough between water additions. Use the spatula or your hands to bring the dough into a loose ball.
3. Divide the dough in two and wrap each section in plastic wrap. Knead slightly through the wrap to create a more cohesive ball. Chill the dough in the fridge for at least 30 minutes. Follow individual recipes for uses and baking times.
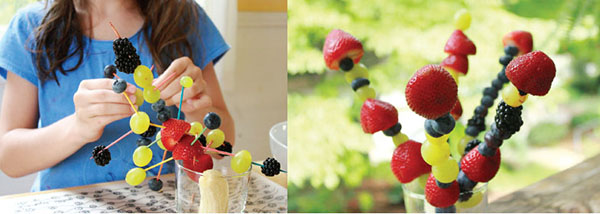
Make a summer snack sculpture inspired by fireworks and sparklers. Perfect for the Fourth of July or anytime.
INGREDIENTS
Banana
Fresh fruit, such as strawberries, grapes, blueberries, and blackberries
Wood skewers or toothpicks
INSTRUCTIONS
1. Place half of a peeled banana upright in a glass (to support the sparkler). Poke the end of a wood skewer or toothpick into the banana and then thread the skewer with a variety of berries and small fruits. Continue adding more skewers and fruit.
2. When the fruit sparkler is finished, admire it and then eat it.
Filled with delicious and healthy ingredients, this granola makes for a quick breakfast when you’d rather head outside than cook. I’ve adapted it from my friend Bobbi’s recipe.
INGREDIENTS
4 cups old-fashioned rolled oats
1 cup unsweetened, shredded coconut
2–3 cups mixed, chopped nuts and seeds
1 teaspoon salt
1 teaspoon cinnamon
¾ teaspoon ground nutmeg
½ cup maple syrup
½ cup coconut oil
2 tablespoons honey
1 tablespoon vanilla
1–2 cups mixed dried berries and fruit
¼ cup ground flaxseed (optional)
Fresh fruit and yogurt or milk, for serving
INSTRUCTIONS
1. Preheat the oven to 325°F.
2. Mix the oats, dried coconut, nuts, salt, cinnamon, and nutmeg in a large bowl.
3. Whisk the syrup with the coconut oil (melt it first if it’s solid). Stir in the honey and vanilla.
4. Pour the oil mixture into the oat mixture and stir until it’s combined. Spread the mixture evenly in a large baking dish.
5. Bake the mixture, stirring it every 20 minutes or so, until it is toasted. It may take an hour or more, depending on how toasty you like it.
6. Let the granola cool, then stir in the dried fruit and the flaxseed, if desired. Store the granola covered in the fridge.
7. Serve the granola with fresh fruit and yogurt or milk.
Nothing says summer quite as well as fresh-squeezed lemonade (and lemonade stands). Pairing sweet and sour, lemonade is refreshing on hot summer days. If you’re feeling adventurous, you can even flavor it with the addition of fruits or herbs (our favorite variation is raspberry lemonade) or make frozen Popsicles with any extra.
INGREDIENTS
1 bag lemons
Simple syrup (see note below)
Ice cubes
Water
INSTRUCTIONS
1. Squeeze the lemons, straining out any seeds from the juice. Measure the lemon juice and pour it into a pitcher.
2. Add an equal amount of simple syrup to the lemon juice.
3. Fill the rest of the pitcher with ice and water. Stir and serve.
Note: To make simple syrup, mix 1 cup sugar with 1 cup water in a small saucepan and bring it to a boil. Stir the mixture until the sugar dissolves completely. Let the syrup cool, then store it covered in the fridge.
VARIATION
To add a fruity kick and color (such as for raspberry lemonade), puree fresh or frozen fruit in a blender, strain it through a fine sieve, then stir the fruit puree into the lemonade.
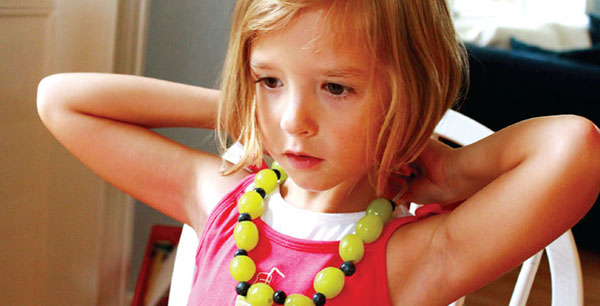
String fruit into an edible (and healthy) necklace for a fun activity and snack.
INGREDIENTS
Elastic thread or string
Yarn needle
Fruit, such as strawberries, blueberries, and grapes
INSTRUCTIONS
1. Thread elastic thread or regular string through an embroidery or yarn needle. Tie a knot near the other end to hold all the fruit beads on the necklace.
2. Poke the needle through a grape (or other piece of fruit) and push it to the knotted end.
3. Continue stringing the fruit beads onto the necklace in patterns or as desired. Tie the two ends of the elastic thread together when the necklace is complete.
4. Wear, admire, and snack on your edible jewelry.
Puree fruit and juice in a variety of tasty combinations for healthy, DIY frozen treats that kids love. Try these flavor combinations or make up your own: strawberries with orange juice and a spoonful of honey, blueberries with coconut milk, mango with yogurt, pineapple and banana with coconut milk.
INGREDIENTS
2 cups fresh or frozen fruit
1 cup juice, yogurt, or coconut milk
Popsicle molds
INSTRUCTIONS
1. Place the fruit and juice in a blender. Blend until smooth.
2. Pour the mixture into Popsicle molds.
3. Freeze the Popsicles until they’re frozen solid.
4. To remove the Popsicles, run the mold under warm water briefly, then pull each Popsicle out.
5. Enjoy these refreshing Popsicles on a hot day.
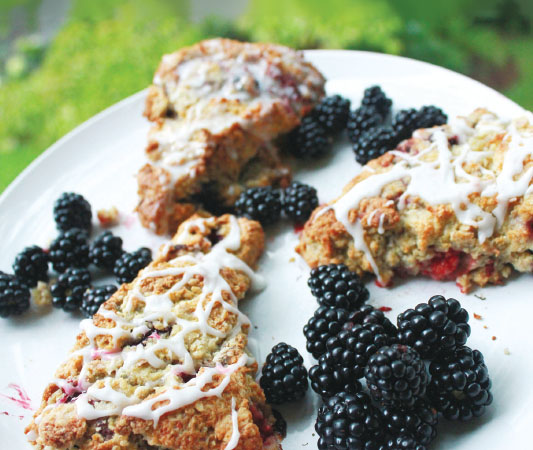
MIXED-BERRY SCONES WITH LEMON ICING
Bursting with flavor from the berries and lemon, these scones are a tasty weekend treat.
INGREDIENTS
For the Scones
1 cup white whole wheat flour
1 cup all-purpose flour
¼ cup sugar
1 tablespoon baking powder
½ teaspoon salt
Zest from 1 lemon
6 tablespoons butter, sliced
1 egg
½ cup plain or vanilla yogurt (I use whole-milk yogurt)
1–2 cups fresh or frozen berries, such as blackberries, raspberries, strawberries, and blueberries
For the Lemon Icing
1 tablespoon lemon juice
1 cup powdered sugar
INSTRUCTIONS
1. Preheat the oven to 425°F. Line a cookie sheet with baking parchment.
2. Measure all the dry ingredients, including the lemon zest, into a food processor. Run for a minute to mix.
3. Add the butter pieces to the flour mixture. Pulse several times until the butter is pea size or smaller. (Or you can just mix the dry ingredients and then cut the butter into them using a pastry blender or knife and fork.) Transfer the mixture to a large bowl.
4. Whisk together the egg and yogurt. Make a well in the center of the flour and pour in the egg mixture. Stir the batter until it’s combined and the dough starts to come together.
5. Fold in the berries.
6. Turn the dough out onto the counter and shape it into a disk about 1" thick. Cut it, like a pie, into eight wedges.
7. Bake the scones for 20 minutes or until they’re cooked through and toasty brown on the edges. Let them cool slightly.
8. Make the lemon icing by whisking the ingredients together. Drizzle the icing over the scones. Serve warm or at room temperature.
COCONUT CHICKEN SATAY WITH MANGO SAUCE
This is a tasty summer staple that can be cooked on the grill, over an open fire, or in the oven. A side of steamed rice is a nice accompaniment. Note: The chicken will need to marinate for 2–3 hours before grilling.
Serves 6–8
INGREDIENTS
1 can coconut milk (about 14 oz.)
Zest and juice from two limes
¼ cup light brown sugar
1 tablespoon sea salt
2 garlic cloves, minced
2 teaspoons fresh ginger, grated
1½ pounds boneless, skinless chicken breasts, cut into strips
½ teaspoon turmeric
1 mango
To Serve
1 head lettuce with large leaves (butter lettuce works well)
Mango coconut sauce
½ cup cilantro, chopped
½ cup roasted and salted peanuts, chopped
½ cup chopped scallions (optional)
INSTRUCTIONS
1. Whisk together the coconut milk, lime zest and juice, brown sugar, sea salt, garlic, and ginger in a medium bowl. Remove ½ cup of the coconut mixture and set it aside. Add the chicken strips and turmeric to the remaining coconut mixture in the bowl and toss until the chicken is fully coated in the marinade. Cover and refrigerate for 2–3 hours.
2. Score the outside of the mango with a knife, then bend the skin back so the cubed flesh sticks up. Slice off the skin from the cubes.
3. Puree the mango cubes with the ½ cup reserved coconut mixture in a blender or food processor. Cover the mango coconut sauce and refrigerate it until ready to serve.
4. When the chicken has finished marinating, thread it onto wood skewers that have been soaked in water for half an hour, or use metal skewers.
5. Grill the chicken over medium-high heat, about 4–5 minutes on each side, until the chicken is cooked through. If you’re using an oven, broil the chicken for 4–5 minutes on each side. Check for doneness by piercing the thickest piece of chicken. It should be opaque in the center.
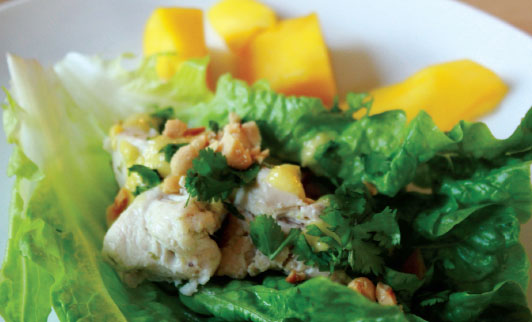
6. To serve, place a large lettuce leaf on each plate. Slide some chicken off a skewer and onto the lettuce. Top the chicken with a spoonful or two of mango coconut sauce, cilantro, and a sprinkle of roasted peanuts. Add scallions if desired. Fold the lettuce over the fillings, like a burrito, and enjoy.
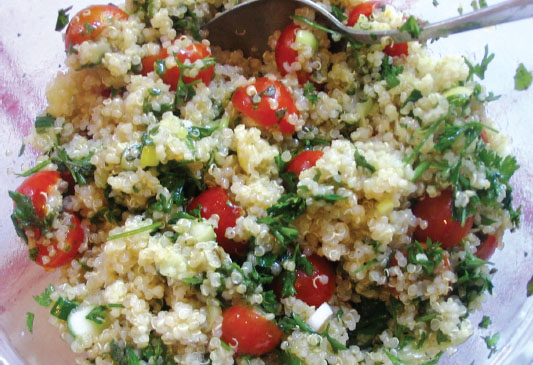
QUINOA TABBOULEH WITH ADDITIONAL MIX-INS
This summer favorite combines the refreshing flavors of traditional tabbouleh, replacing the bulgur wheat with protein-rich quinoa. We like to make a large batch and keep it in the fridge as an easy, chilled snack or meal for when it’s just too hot to cook. While tabbouleh is great as it is, we often add extras or make substitutions as our garden, fridge, and whims decree.
Serves 8–10
BASIC INGREDIENTS
1 cup quinoa
1½ cups water
1 tablespoon sea salt
¼ cup olive oil
Juice from 2 lemons
Freshly ground black pepper, to taste
1 large cucumber, peeled and chopped
2 cups cherry tomatoes, halved
1 bunch scallions, sliced
1 cup fresh mint, chopped
1 cup fresh flat-leaf parsley, chopped
Ideas for Additional Mix-Ins
1–2 cups cubed, grilled chicken
1 cup cubed or crumbled feta cheese
1–2 cups canned chickpeas
1–2 cups grapes, halved
1–2 cups slivered almonds
1 cup roasted beets, cubed
1 cup boiled or roasted potatoes, cubed
1. Place the quinoa in a medium pot with a lid. Cover the quinoa with water and soak it for half an hour. Carefully pour off the soaking water and rinse the quinoa two or three times or until the water is relatively clear. Drain well and return the quinoa to the pot.
2. Add the water and ½ teaspoon of the salt. Bring the water to a boil. Turn the heat down to low. Simmer, covered, for 20 minutes.
3. Place the cooked quinoa in a large bowl and toss it with the olive oil, lemon juice, the remaining salt, and pepper. Set the quinoa aside while you chop the vegetables and herbs.
4. Add the vegetables, herbs, and any extra mix-ins and toss them to combine. Cover the tabbouleh and refrigerate it for a few hours or overnight to let the flavors combine. Serve the tabbouleh at room temperature or chilled.
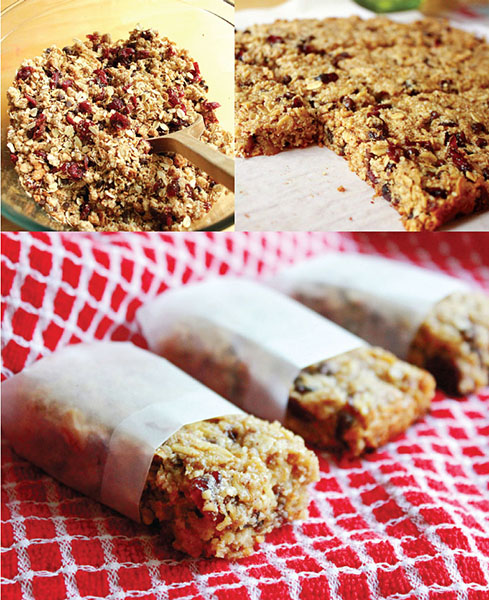
These granola bars are healthy, yummy, and great for breakfast on the go or a quick snack. My children love them in their school lunches, too.
Makes about 30 bars
INGREDIENTS
2 cups old-fashioned rolled oats
1 cup almond meal
½ cup whole wheat flour
1 teaspoon cinnamon
1 teaspoon salt
1 cup dried cranberries
⅓ cup mini chocolate chips
½ cup (1 stick) butter
½ cup honey
1 egg
2 teaspoons vanilla
INSTRUCTIONS
1. Preheat the oven to 350°F. Line a 9" x 13" baking pan with baking parchment.
2. Mix the oats, almond meal, flour, cinnamon, salt, cranberries, and chocolate chips in a large bowl.
3. Melt the butter in a small saucepan. Whisk in the honey, then the egg and vanilla. Pour the butter mixture into the oat mixture and combine thoroughly.
4. Press the dough into the pan and bake for 20–25 minutes.
5. Cool the baked dough partially, then cut it into bars. Store the bars, wrapped, in the fridge or freezer.
Longer summer days and inviting warm weather create an emphasis on outdoor living and connecting with nature. At my house, we go outside to play, garden, dine, and entertain. We cook our dinners on the grill or over the fire pit, eat on the patio, hike through the woods, have picnics (everywhere), splash in the pool, and run through the sprinkler. Our children practice cartwheels and handstands by the dozen, spend hours on the swing, decorate our walkways and stones with chalk, and create miniature worlds in the sandbox.
OUR FAVORITE BOOKS ABOUT SUMMER ADVENTURES
Weslandia by Paul Fleischman
Grandma Summer by Harley Jessup
Roxaboxen by Alice McLerran
How I Spent My Summer Vacation by Mark Teague
A Camping Spree with Mr. Magee by Chris Van Dusen
You Can’t Take a Balloon into the Metropolitan Museum by Jacqueline Preiss Weitzman
FLOWER NECKLACES
Children love to string their own flower necklaces, bracelets, and crowns out of marigolds and other flowers.
MATERIALS
Flowers such as marigolds or zinnias
Embroidery needle
Embroidery floss
1. Pick flower heads, such as marigolds or zinnias.
2. Thread a large embroidery needle with embroidery floss and tie a knot at the end.
3. String the flowers by poking the needle through the fleshy flower base (on marigolds) or through the center of the flower (on zinnias). Continue until the flower necklace is the desired length, then tie the ends together. Wear and show off your flower necklace.

OUR FAVORITE BOOKS ABOUT WATER AND THE BEACH
Wave by Suzy Lee
Ladybug Girl at the Beach by David Soman and Jacky Davis
Down to the Sea with Mr. Magee by Chris Van Dusen
Flotsam by David Wiesner
What Lives in a Shell? by Kathleen Weidner Zoehfeld
SANDBOX CAKES
A bit cleaner than mud pies, sandbox cakes are just as popular with kids and are readily decorated with items found around the garden.
MATERIALS
Small shovel or large spoon
Old cake pans, muffin tins, and jelly molds
Sandbox
Nature items, such as flowers, pebbles, twigs, and pinecones
Melted-crayon rocks (see page 42, optional)
INSTRUCTIONS
1. Use the shovel or spoon to fill the cake pans and other molds with sand from the sandbox. Decorate the sand cakes with nature items and melted-crayon rocks, if desired.
2. Have a sand-cake tea party.
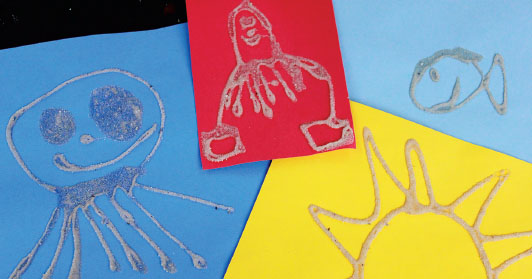
This is a fun and simple art project for the beach or sandbox.
MATERIALS
Bottle of glue
Card stock or heavy paper, white or colored
Sand (from sandbox or beach)
Paint (tempera, watercolor, BioColor, or acrylic) and paintbrush (optional)
INSTRUCTIONS
1. Squeeze some glue onto the card stock to create pictures or designs.
2. Sprinkle a light layer of sand over the glue picture, then shake off the excess. Repeat if necessary until you’ve coated the glue completely with sand. Let the glue dry.
3. If desired, paint over the dried sand picture. You can also paint just on the paper or just on the sand lines.
Sand-casting is a fun activity for the beach or the sandbox and creates a special memento filled with treasures.
MATERIALS
Shovel
Sand (beach or sandbox)
Small nature items, such as shells, pebbles, flowers, sticks
Small treasures, such as glass beads, marbles, little figurines (optional)
Melted-crayon rocks, optional (see page 42)
Plaster of Paris
Old bucket and spoon for mixing the plaster
Water
INSTRUCTIONS
1. Dig a hole in the sand.
2. Line the hole with your treasures (shells, rocks, glass beads, marbles, melted crayon rocks, and so on).
3. Mix the plaster of Paris in the old bucket, using 2 parts plaster to 1 part water.
4. Pour the wet plaster into the holes, covering the treasures and filling the holes.
5. Optional step: decorate the tops by poking in more treasures.
6. Let the plaster sit for 30 minutes or so, to set it.
7. Lift the sand cast out of the sand, turn it over, and carefully dust off the extra sand. Place it in a protected place overnight to continue the drying process.
8. Display your sand-casted plaster on the summer nature table or mantel.
Bring beach magic to everyday life with sand-casted candleholders.
MATERIALS
Shovel
Sand (beach or sandbox)
Glass votive holders
Shells, pebbles, glass beads, and other treasures
Plaster of Paris
Water
Old bucket and spoon for mixing the plaster
Votive candles or tealights
INSTRUCTIONS
1. Dig a hole in the sand at least as deep as your votive holder.
2. Set the glass votive holder upside down at the bottom of the hole.
3. Arrange shells, pebbles, glass beads, and other treasures around the rim of the votive holder and around the edge of the hole.
4. Mix and pour the plaster of Paris, following steps 3–7 for sand-casting (see page 163).
5. Add a votive candle or tealight and enjoy the candlelight and treasurescape together.
These temporary tattoos are unique and a fun DIY project for summer.
MATERIALS
Bottle of glue
Sand
INSTRUCTIONS
Squeeze glue into a picture or design on your skin. Sprinkle sand over the glue and shake off the excess. The tattoo washes off with soap and water.

Mix up a quick batch of chalk paint and let the kids paint rocks, the patio, and the sidewalk.
MATERIALS
Large spoon
Cornstarch
Water
Medium bowl
Cups
Tempera paint or food coloring
Paintbrush
INSTRUCTIONS
1. Mix equal parts of cornstarch and water in the bowl. (It will be hard to stir. Just do your best.)
2. Divide the cornstarch mixture between individual cups, then stir in enough tempera paint or food coloring to reach the color intensity desired.
3. Paint the world! The chalk paint washes away with rain or the spray of a hose.

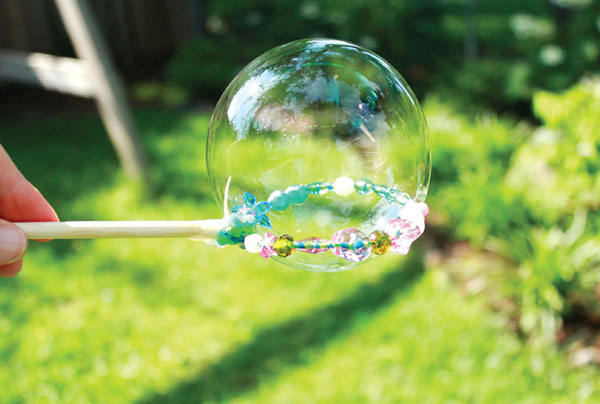
Kids will love making their own (beautiful) beaded bubble wands. This makes a great party or play-date activity.
MATERIALS
Pipe cleaners
Small wooden dowels (or cut a long one into sections)
Assorted beads
Hot glue gun
Bubble solution (see page 169)
INSTRUCTIONS
1. Twist one end of a pipe cleaner around the tip of a dowel.
2. Thread beads along the pipe cleaner, leaving an inch or so clear.
3. Bend the beaded pipe cleaner into a loop and twist the end around the dowel. Add a dab of glue from the hot glue gun to help hold the pipe cleaner in place.
4. Dip the beaded bubble wand in the bubble solution and blow through it or wave it through the air to make magical bubbles.

No need to fear running out of bubbles when you can make your own so easily.
MATERIALS
½ cup sugar
4 cups warm water
½ cup dish soap (Dawn original dish soap works best.)
INSTRUCTIONS
Whisk the sugar in the warm water until it’s dissolved. Stir in the dish soap. Blow bubbles!
Quick to put up, this teepee becomes a shady backyard spot for playing, reading, and eating.
MATERIALS
2" x 2" wood poles or boards, 8'–10' long
Large tree (optional)
Rope
Old sheets or tablecloths
Large safety pins
Rugs or blankets (optional)
INSTRUCTIONS
1. Prop poles against and around the tree trunk at a 45-degree angle, creating a teepee shape. Lash the poles to the tree with rope. (Alternatively, create a freestanding teepee by tying the tops of the poles together.)
2. Drape tablecloths or sheets over the teepee structure, holding the fabric in place by wrapping it around the poles and fastening it with safety pins.
3. Cover the floor of the teepee with old rugs or blankets if desired.