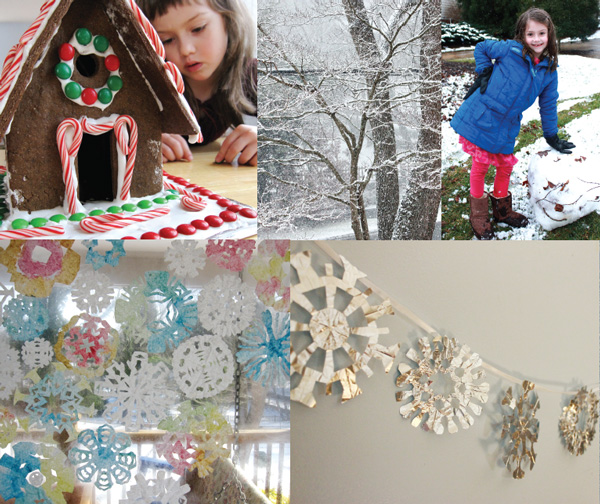

Winter is the time for comfort, for good food and warmth, for the touch of a friendly hand and for a talk beside the fire: it is the time for home.
—EDITH SITWELL
Stained Glass Salt-Dough Ornaments
Salt-Dough Gingerbread House Lantern
A Christmas Tree for the Dolls
Tissue-Paper Stained Glass Bunting
Tissue-Paper Stained Glass Paper Chain
Coffee Filter Christmas Bunting
Styrofoam-Printed Holiday Cards
Healing Crock-Pot Chicken Soup
Chocolate-Covered Peanut Butter Balls
Sponge-Printed Perpetual Calendar
Words and Wishes for the New Year
Colored-Ice Snowman Decorations
WINTER HOLIDAYS, crafts, and decorations are my favorites, and they help me get through what is admittedly the bleakest part of the year for me. The dark, cold days of winter are made fun and bright with candlelight, fires in the hearth, holiday baking and decorating, extra family time, and a succession of festive holidays.
Winter and the holiday season officially start for us each year when we drive to the Christmas tree farm after Thanksgiving to choose our tree. We strap the year’s perfect tree on top of the car, drive home, and take the box of ornaments and decorations out of storage. From then on, it’s a month of holiday decorating, baking, crafting, shopping, and parties.
As much as we love the holidays, afterward, of course, we are ready to slow down and simplify, focusing more on building snowmen (when we have snow, which is less frequent in North Carolina than my kids would like), reading, playing games, and doing quiet arts and crafts activities. And then around comes Valentine’s Day, just when we are ready for another fun holiday to celebrate.
Christmas is my favorite holiday, the one with twinkling lights, a little extra baking and crafting, and perhaps best of all, the excitement and wonder of children. We drape the house with strings of lights and candles to brighten dark mornings and evenings, and we love to drive around town to admire the glowing windows and outdoor holiday displays of other homes.
We decorate our house using a combination of the old and the new: old ornaments stored away in our Christmas box complemented by whatever we create that year. Our decor is always added to, bit by bit, over the season. We make paper chains, snowflakes, salt-dough ornaments, garlands, and stained glass. We draw and paint and collage.
OUR FAVORITE BOOKS ABOUT CHRISTMAS
The Little Drummer Boy by Ezra Jack Keats
The Night before Christmas by Clement C. Moore
Room for a Little One: A Christmas Tale by Martin Waddell
A Wish to Be a Christmas Tree by Colleen Monroe
The Polar Express by Chris Van Allsburg
The Spirit of Christmas by Nancy Tillman
AN ADVENT CALENDAR CHAIN
This activity-based Advent calendar is relatively easy to make and use. Get the kids involved or make it on your own and surprise them.
MATERIALS
Paper cut into 24 different-size circles
Sewing machine
Scissors
Potato-printed stars or other shapes (see page 31)
White glue, such as Elmer’s
List of 24 Advent activity ideas (see below)
INSTRUCTIONS
1. Sew the paper circles into one long chain with a continuous, simple basting stitch down the center of the chain, with little to no space between each circle.
2. Cut out your potato-print shapes and glue one to the center of each paper circle. Write or stamp the numbers 1 through 24, one on each shape. Let them dry.
3. Hang your chain vertically on the first day of Advent, with number 24 at the top and number 1 at the bottom.
4. Each day you can either snip off that day’s circle or pull off the star or other shape from the circle. Refer to the corresponding Advent activity list (keep it handy—perhaps taped inside a cupboard door) to find the activity for the day. Or simply write the activity on the back of the circle.

Make snowflake Christmas cards.
Decorate salt-dough ornaments.
Head to the library to pick out some Christmas books.
Drive to a Christmas tree farm to choose a tree.
String cranberries and popcorn to decorate the tree.
Make paper chains.
Invite a friend over to paint finger- or toenails red and green.
Make an ice wreath.
Make a gingerbread house.
Decorate gingerbread men.
Make pinecone ornaments for the birds and hang them outside.
Make candied and spiced nuts.
Have a family art night and make a holiday mural together.
Wrap gifts.
Create snowflake window decorations.
Make a batch of candy cane playdough.
Go for a winter nature hike.
Play games and drink hot chocolate.
Bake Christmas cookies.
Invite a friend over to decorate cookies.
Make popcorn and watch a Christmas movie together.
Go for a drive to look at Christmas lights.
Sing carols.
Build a snowman.
Salt dough is easily and inexpensively made with basic kitchen ingredients. When mixing the dough, you can even add cinnamon for lovely scented ornaments or food coloring for dyed dough.
INGREDIENTS
4 cups all-purpose flour
1 cup salt
1½ cups cold water
INSTRUCTIONS
1. Mix the flour and salt together in a large bowl. Add the water and stir. If necessary, add up to another ½ cup of water, a little at a time, until the dough pulls together.
2. Store the dough in a plastic freezer bag in the fridge until ready to use.
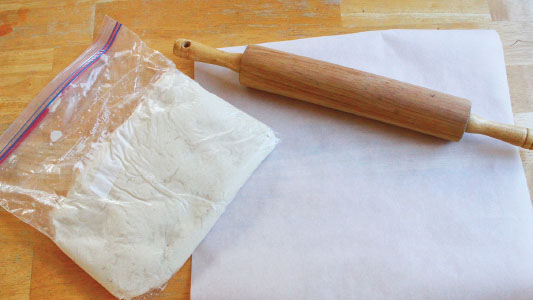
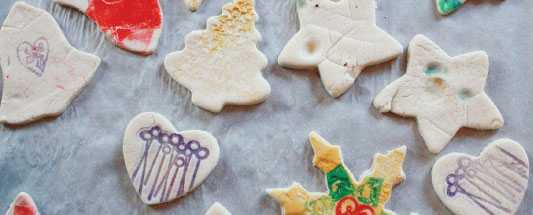
Salt dough can be shaped with cookie cutters and baked hard, making it popular for holiday ornaments.
MATERIALS
1 batch Salt Dough (see page 245)
Rolling pin
Baking parchment
Cookie cutters
Plastic drinking straws
Cookie sheet
Paint, such as BioColor, activity paint, or tempera paint (optional)
Paintbrush (optional)
Glitter (optional)
Thin jewelry wire or ribbon, for hanging (or use ornament hooks)
INSTRUCTIONS
1. Tear off a fist-size section of salt dough and roll it out on a sheet of baking parchment to about a ¼" thick.
2. Use cookie cutters to cut out shapes. Pull away the extra dough from around the cookie cutter shapes.
3. Use a plastic drinking straw to punch a hanging hole at the top of each ornament.
4. Transfer the baking paper with the salt-dough ornaments to a cookie sheet. Bake the ornaments at 250°F for 2–3 hours or until they’re hard. Let them cool.
5. Paint the ornaments with BioColor or other paints, adding glitter to the wet paint if desired (optional).
6. Thread the jewelry wire through the hole and twist the ends to form a loop. Hang the ornaments on the tree or elsewhere.
Small glass beads can be pressed into and baked in the salt-dough ornaments to create a beautiful stained glass effect.
MATERIALS
Basic Salt-Dough Ornaments (see page 246), uncooked
Small glass beads
INSTRUCTIONS
1. Press small glass beads into the un-cooked salt-dough ornaments. You can use the beads to create specific designs, or you can place them in an all-over random pattern.
2. Follow steps 3–6 for Basic Salt-Dough Ornaments to finish.

Salt dough readily accepts rubber stamps, which create attractive designs on the surface of the ornament.
MATERIALS
Basic Salt-Dough Ornaments (see page 246), uncooked
Rubber stamps
Ink pads
Paint, such as BioColor (optional)
INSTRUCTIONS
1. Use the rubber stamps and stamp pad ink to stamp designs into the uncooked salt-dough ornaments. Press firmly but not too deeply.
2. Follow steps 3–4 for Basic Salt-Dough Ornaments.
3. If desired, paint the cooked ornaments, as in step 5 for Basic Salt-Dough Ornaments. The stamped design should remain, if it was pressed in firmly, although the stamp ink will be covered up.
4. Follow step 6 to finish.
STAINED GLASS SALT-DOUGH ORNAMENTS
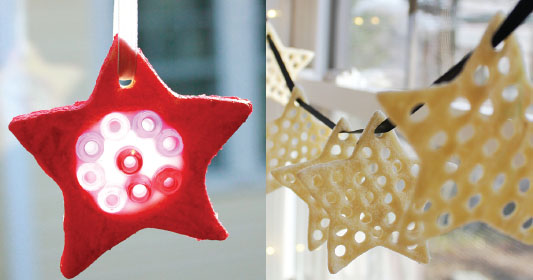
In these ornaments, the salt dough forms the frame, and the center is filled with glue (which dries somewhat transparent) and colorful, translucent beads.
MATERIALS
Basic Salt-Dough Ornaments (see page 246), uncooked
Small cookie cutters (or a sharp knife) to cut designs out of the center of the ornaments
Cookie sheet
Plastic wrap
White glue, such as Elmer’s
Tempera paint (optional)
Translucent pony beads or glass beads
Glitter, sequins, colored tissue paper (optional)
INSTRUCTIONS
1. Use the small cookie cutters or sharp knife to cut the centers out of the salt-dough ornaments.
2. Follow steps 3–5 for the Basic Salt-Dough Ornaments.
3. Place the cooked salt-dough ornaments on a cookie sheet covered with plastic wrap. Fill the center of each ornament with the white glue. If you like, color the glue first with some tempera paint.
4. Set the beads in the wet glue. Alternatively, sprinkle the glue with glitter or sequins, or add colored tissue paper. Let the glue dry completely (about 2–3 days).
5. Follow step 6 for the Basic Salt-Dough Ornaments to finish.
6. Hang the ornaments on the Christmas tree or in the window and admire them with the light shining through.
Punch holes in your salt dough to create these elegant, lacelike ornaments.
MATERIALS
Basic Salt-Dough Ornaments (see page 246), uncooked
Scissors
Plastic drinking straws
INSTRUCTIONS
1. Cut the drinking straws into thirds (they get gunked up with the salt dough and you’ll want a bunch).
2. Punch the end of the straw into the salt-dough ornament and pull it back out, creating a hole in the ornament. Continue to punch as many holes as desired. You can create specific designs or an all-over pattern.
3. Follow steps 4–6 for the Basic Salt-Dough Ornaments to finish.
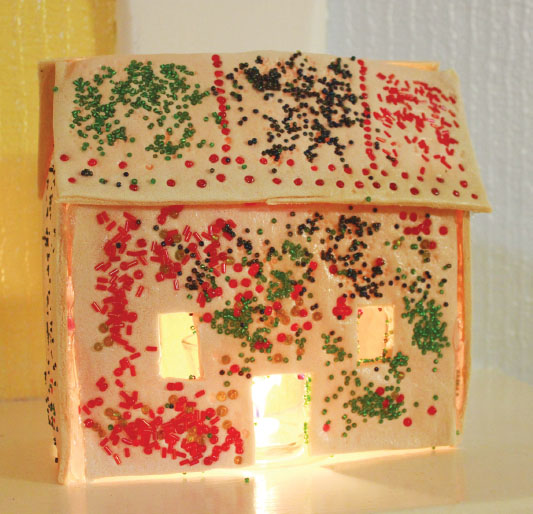
SALT-DOUGH GINGERBREAD HOUSE LANTERN
This lantern is magical, much loved in our house, and definitely worth the extra effort to make.
MATERIALS
1 batch of Salt Dough (see page 245)
Rolling pin
Baking parchment
Tiny gingerbread house template (see page 331)
Table knife (for kids), or sharp knife (for adults)
Glass beads
Straw (optional)
Cookie sheet
Scissors (optional)
Foam brush or regular paintbrush
Mod Podge
Hot glue gun
Candle in a glass votive holder
INSTRUCTIONS
1. Divide the salt dough into four or five sections and roll each one out separately on a sheet of parchment to about a ¼" thick.
2. Set the gingerbread house template pieces on top of each rolled-out salt-dough section. Use a knife to cut out the salt dough in the shape of the template. Pull the extra dough away from the house sections.
3. Decorate the house pieces by pressing glass beads into the salt dough. You can also use a straw to punch a lacy design if desired.
4. Transfer each sheet of baking parchment with its house section to a cookie sheet. You can trim the parchment paper around the salt dough in order to fit more pieces on a cookie sheet at one time.
5. Bake the gingerbread house pieces at 250°F for 2–4 hours, until hard. Let the pieces cool.
6. Brush the salt dough with Mod Podge for shine and protection (this also helps tiny glass beads to stick to the salt dough). Let the pieces dry.
7. Assemble the salt-dough gingerbread house, using a hot glue gun to hold the sections together.
8. Light a candle in a glass votive holder under the gingerbread house and admire it in the dark.
Children love to watch their drawings shrink before their eyes, becoming miniature ornaments, perfect for a doll tree (page 255).
MATERIALS
Permanent markers, such as Sharpies
Shrinky Dink plastic
Scissors
Hole punch
Cookie sheet
Thread or embroidery floss
INSTRUCTIONS
1. With a permanent marker, draw and color in images for your ornaments directly on the Shrinky Dink plastic, making them about twice as large as you want the finished ornament to be.
2. Cut out the ornaments. Punch a hole in the top for hanging them.
3. Spread the ornaments out on a cookie sheet. Bake at 325°F until the ornaments shrink and flatten out, which can take up to 10 minutes. (Note: First they curl up as part of the shrinking process, but then they flatten out.) Children will enjoy watching this through the oven door window.
4. Let the ornaments cool.
5. Hang the ornaments on a tabletop or other small Christmas tree (see next activity) using thread or embroidery floss.
A CHRISTMAS TREE FOR THE DOLLS
If your kids are like mine, they love anything miniature, and decorating a tree for their doll and animal friends creates another layer of enchantment for a holiday filled with magic.
MATERIALS
Tabletop-size Christmas tree, such as a small potted tree, the top off a larger Christmas tree, or simply some pine boughs in a vase
A small string of miniature Christmas lights
Miniature ornaments, such as Shrinky Dinks Ornaments (see page 254), small salt-dough ornaments (see page 246), jingle bells, large buttons, a string of beads
Gifts for dolls and animals (optional)
INSTRUCTIONS
1. Trim the miniature tree with the minilights and ornaments.
2. Place small boxes or little handmade gifts for the dolls and stuffed animals under the tree if desired.

TISSUE-PAPER STAINED GLASS BUNTING
Decorate for the season with a bunting that will shine in both sunlight and holiday lights.
MATERIALS
Scissors
Colored tissue paper in Christmas colors
Transparent contact paper (also called sticky-back plastic)
Clear tape, such as Scotch tape
Hot glue gun (optional)
¼" wide ribbon (optional)
INSTRUCTIONS
1. Cut the colored tissue paper into stars, triangles, squares, or random shapes.
2. Cut off a section of contact paper about 6" wide. Tape it to the table, paper side up. Pull off the paper backing.
3. Press the colored-tissue-paper shapes to the contact paper, covering most of it. Cover the tissue-paper design with another sheet of contact paper.
4. Cut the tissue-paper stained glass into triangles.
5. To create the bunting, either run clear tape along the top of the triangles to connect them (folding it over itself and the triangles) or use the hot glue gun and the ribbon.
6. Hang the bunting in the window where the sun will shine through it.
TISSUE-PAPER STAINED GLASS PAPER CHAIN
As with the Tissue-Paper Stained Glass Bunting, this paper chain glows both in sunlight and at night with Christmas lights.
MATERIALS
Scissors
Colored tissue paper
Transparent contact paper (also called sticky-back plastic)
Clear tape
INSTRUCTIONS
1. Follow steps 1–3 for the Tissue-Paper Stained Glass Bunting (see page 256).
2. Cut the tissue-paper stained glass into 1" wide strips.
3. Tape one of the strips end to end (overlapping by about ½"–1") to form a loop. Insert another strip into the first and tape it end to end to form another loop. Continue to form loop after loop to create a paper chain as long as desired.
4. Hang the stained glass paper chain on the Christmas tree or in the window.

This colorful paper chain is quickly and easily assembled from a simple pack of index dividers.
MATERIALS
Scissors
Index dividers (file-folder size) made out of translucent colored film
Stapler
INSTRUCTIONS
1. Cut the index dividers into 1" wide strips.
2. Staple one of the strips end to end (overlapping by about ½"–1") to form a loop. Insert another strip into the first and staple it end to end to form another loop. Continue to form loop after loop, to create a paper chain as long as desired.
3. Hang the colored-film paper chain on the Christmas tree or in the window.

Candy cane playdough makes a great gift to give all the young kids in your life.
Makes about 1 dozen mason jar gifts
MATERIALS
1 batch candy cane playdough (see page 18)
Knife
Twelve 1-pint mason jars with lids
Scissors
Yarn
Hole punch
Labels (see template on page 332)
Christmasy fabric, cut into squares or circles about 5" in diameter
INSTRUCTIONS
1. Cut each of the playdough colors into about twelve sections.
2. Roll each section out into a snake. Twist a white snake and a red snake together to make a candy cane.
3. Fit the candy cane into a mason jar. Add the circle part of the lid.
4. Cut the yarn into 4" pieces and loop the yarn through a hole punched in each label. To make a more decorative gift, set the yarn ends of the label over the lid and then place the fabric square on top. Screw on the rim of the lid to hold everything in place.
COFFEE FILTER CHRISTMAS BUNTING
Coffee filters are fun to paint with liquid watercolors and look quite festive when strung together as a bunting.
MATERIALS
White coffee filters (the bowl-shaped kind rather than the cone shape)
Liquid watercolors in Christmas colors
Paintbrushes and/or droppers
¼" wide ribbon
Glue stick
INSTRUCTIONS
1. Paint the coffee filters with liquid watercolors using paintbrushes or droppers. Let the filters dry.
2. To make the bunting, fold a painted coffee filter in half over the ribbon and glue the two ends together.
3. Continue adding the rest of the painted coffee filters, spacing them as desired.
4. Hang the bunting on the wall, over the mantel, or on the Christmas tree.

STYROFOAM-PRINTED HOLIDAY CARDS
Styrofoam printing is a childhood classic for a reason. Kids can easily draw holiday images into the Styrofoam, then transfer them to cards in any colors they desire.
MATERIALS
Scissors
Flat Styrofoam, perhaps from a grocery store
Styrofoam tray
Thin copy paper
Pen
Newspaper or splat mat to protect workspace
Water-based printing ink
Acrylic box frame or a flat-bottomed baking dish
Brayer (hard rubber roller)
Spoon
A set of plain (blank) note cards and envelopes
INSTRUCTIONS
1. Cut the Styrofoam to the size of the card print you would like to make. Cut the copy paper to the same size.
2. Draw an image on the thin copy paper with the pen.
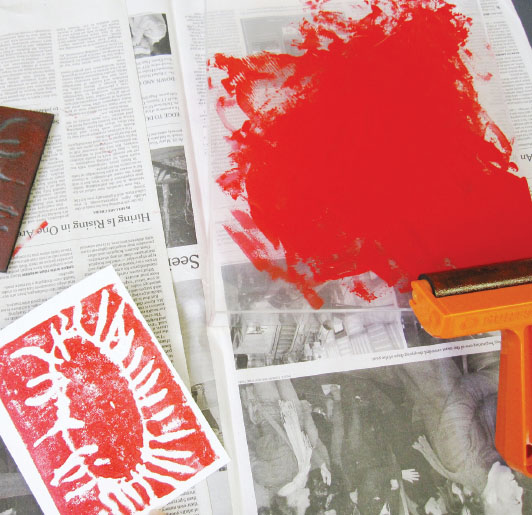
3. Place the drawing over the Styrofoam and draw over the image again, pressing down evenly but firmly to create an incised drawing on the Styrofoam (the pointy end of a thin paintbrush works well, too, and is less likely to break through the paper). Remove the paper.
4. Protect your workspace with newspaper or a splat mat and assemble all of your printmaking materials.
5. Squirt a bit of the printing ink on the acrylic frame and roll your brayer over it to coat it thinly and evenly.
6. Roll the ink-covered brayer over the Styrofoam that now has an impression of your drawing.
7. Place a blank note card over the Styrofoam. Rub all over the note card evenly and firmly with the back of the spoon to transfer the inked image to the paper.
8. Repeat the inking and printing process with any number of note cards.
9. Let the cards dry overnight, then add your message to the interior of the cards. If desired, add a note on the back of the card about the name of the artist and the date of the artwork. Slip the cards into envelopes to mail to friends and family.
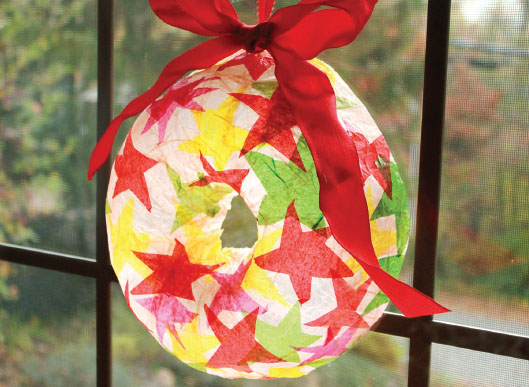
If you have a Bundt pan, it’s probably in need of an extra job now and again. Let it be the mold for this colorful stained glass wreath in between baking Bundt cakes.
MATERIALS
Bundt pan
Plastic wrap
Cookie sheet
White glue, such as Elmer’s
Water
Foam brush or paintbrush
Tissue paper, both light and bright colors
Scissors
Hole punch
Narrow ribbon
Wide ribbon (optional)
Christmas lights (optional)
INSTRUCTIONS
1. Wrap the outside of a Bundt pan tightly and completely with plastic wrap. Cover the cookie sheet (or other work surface) with plastic wrap as well.
2. Set the Bundt pan on the cookie sheet, rounded side up.
3. Thin the glue with water (about 1 part water to 2 parts glue). Brush the plastic-covered Bundt pan all over with the glue mixture. Lay light-colored tissue paper over the pan pressing it against the Bundt form. Brush more glue over the tissue paper. Repeat with another layer of light-colored tissue paper and another layer of glue.
4. Cut the bright-colored tissue paper into stars or other shapes. Press the stars to the light-colored tissue paper and brush more glue over the stars. Let everything dry.
5. Turn the Bundt pan over, cut the plastic, and gently pull the wreath (with plastic) off the pan. The wreath will hold its shape now, like papier-mâché.
6. Trim the edges of the wreath to remove excess plastic wrap and to make the edge even. Trim the inside to create a hole in the center of the wreath.
7. Punch a hole through the tissue paper near the edge of the wreath. Loop a thin ribbon through the hole and tie the ends together for hanging the wreath. You can also decorate the wreath with a larger ribbon tied in a bow if desired.
8. Hang the wreath in the window to admire in the sunlight, or loop a small string of white Christmas lights around the inside of the wreath form (I held mine in oh-so-professionally with a paper plate and tape), for a lighted nighttime wreath.
Winter is our excuse to bake, bake, bake. We keep our kitchen and home cozy and fragrant with a combination of holiday treats, warming soups, and nourishing whole-grain bread. We indulge our sweet tooth with cookies, cakes, and candies—some for ourselves, some as gifts for family and friends.
CRANBERRY-ORANGE CAKES
Jewel-like mini cranberry cakes are made in a muffin tin and will add a festive splash of color to the end of any holiday meal.
INGREDIENTS
¾ cup butter, softened, plus a little extra to melt for greasing the muffin tin
1 cup sugar
1 teaspoon orange zest
2 cups fresh cranberries
1 egg
1 teaspoon vanilla
½ cup orange juice
½ cup plain or vanilla yogurt
1 cup all-purpose flour
1 teaspoon baking powder
½ teaspoon salt
Whipped cream or vanilla ice cream, for serving (optional)
INSTRUCTIONS
1. Preheat the oven to 375°F. Grease a large 12-section muffin tin (I let my daughter use a pastry brush and melted butter for this step—her favorite).
2. Melt ¼ cup of the butter in a cast iron pan on the stove top over medium heat. Mix in ½ cup of the sugar, the orange zest, and the cranberries. Divide the mixture evenly among the 12 muffin cups, making sure to include all of the butter-sugar mixture along with the cranberries.
3. Cream the remaining ½ cup butter and ½ cup sugar in a medium bowl with an electric mixer. Add the egg, vanilla, orange juice, and yogurt and beat until well combined. Finally, mix in the flour, baking powder, and salt. Spoon the cake batter over the cranberries, again dividing it equally among the cups.
4. Bake the cakes for 25 minutes or until the very edges look golden brown and a little crispy. Remove the muffin tin from the oven and let it cool for 5 minutes. Holding a large cooling rack securely over the top of the muffin tin, turn them both over, inverting the cranberry cakes onto the rack.
5. Eat the cakes warm or at room temperature. They’re especially good with a dollop of whipped cream or a scoop of vanilla ice cream.

This is my all-time favorite scone. I usually freeze a batch of uncooked scones, then bake just a few at a time. They can go straight from the freezer to a preheated oven. (I add 1–2 minutes to the cooking time.)
Makes 12 scones
INGREDIENTS
1 cup white whole wheat flour
1 cup all-purpose flour
¼ cup sugar, plus extra for sprinkling on top
2 teaspoons baking powder
½ teaspoon baking soda
½ teaspoon salt
2 teaspoons lemon zest
6 tablespoons cold butter, sliced
¾ cup dried sour cherries, roughly chopped
¾ cup sliced almonds
½ cup cream, plus extra for brushing on top (I sometimes use buttermilk.)
1 egg, beaten
¼ teaspoon almond extract
INSTRUCTIONS
1. Preheat the oven to 425°F. Line a cookie sheet with baking parchment.
2. Measure all the dry ingredients (including the lemon zest) into a food processor. Run it for a minute to mix them.
3. Add the butter pieces to the flour mixture. Pulse the food processor several times until the butter is pea size or smaller. (Or you can just mix the dry ingredients and then cut in the butter using a pastry blender or knife and fork.)
4. Transfer the flour mixture to a large bowl and mix in the dried cherries and sliced almonds.
5. Make a well in the center of the flour mixture and pour in the ½ cup cream, egg, and almond extract. Mix the ingredients until they are combined and the dough starts to come together.
6. Turn the dough out onto the counter and shape it into two rounds. Cut each round, like a pie, into six wedges.
7. Brush the tops of the scones with cream and sprinkle sugar on top.
8. Bake for 15 minutes. Let the scones cool slightly. Yum!

Enjoy these festive cookies with a glass of milk, give them as gifts, or leave a plate out for Santa on Christmas Eve. This recipe has been passed down to me by my grandma and is well remembered by my mom from her childhood. Children love to roll out the cookie-dough snakes and twist them into candy cane shapes.
INGREDIENTS
1 cup butter, softened
1 cup powdered sugar
1 egg
1½ teaspoons almond extract
1 teaspoon vanilla
2½ cups all-purpose flour, plus extra for rolling the dough
1 teaspoon salt
½ teaspoon red food coloring (If you want a natural alternative, try the India Tree brand.)
INSTRUCTIONS
1. Preheat the oven to 375°F. Mix together the butter, sugar, egg, almond extract, and vanilla with an electric mixer. Sift in the flour and salt.
2. Divide the dough evenly, removing half and wrapping it in plastic wrap (shape it into a flattened ball as you do so). Blend red food coloring into the remaining half, then wrap this dough in plastic as well. Place both dough balls in the fridge for an hour, or until firm.
3. Working on a floured surface, roll the dough into thin snakes about 4" long, then twist the two colors together. (Note: Younger children may have difficulty twisting the two colors together. My three-year-old enjoyed making a candy cane shape out of one color and pressing bits of the other color along it for the stripes.) Place the twisted dough on a parchment-lined cookie sheet and curve the top down to make a candy cane shape. Repeat with the remaining dough. Sprinkle the candy canes with sugar for a little extra sparkle.
4. Bake the cookies for 9 minutes. Remove them from the oven and let them cool on the cookie sheet for 5 minutes. Transfer the cookies to a cooling rack and let them cool completely. The cookies are somewhat fragile, so handle them carefully.

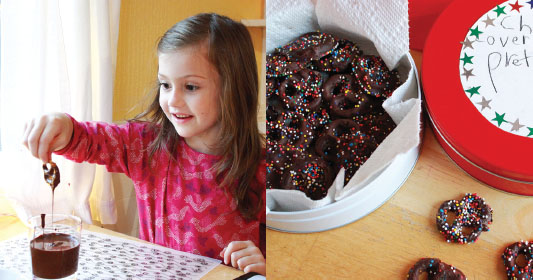
Pretzels dipped in melted chocolate are a supereasy and fun holiday treat that even the youngest kids can make.
INGREDIENTS
Chocolate chips
Pretzels
Colored sprinkles
INSTRUCTIONS
1. Melt the chocolate chips in a double boiler or in the microwave.
2. Dip the pretzels in the melted chocolate, then set them on a parchment-lined cookie sheet. Decorate them with colored sprinkles, then let the chocolate cool and harden.
3. Eat the pretzels or give them as a gift.
Have a hot, healthy breakfast ready when you wake up. This tropical version of oatmeal will help you escape to paradise for a few minutes when it’s still snowy outside.
INGREDIENTS
1 cup steel cut oats (you can use old-fashioned rolled oats, too, but double the amount of oats if you do)
2½ cups water
1 15 oz. can coconut milk
½ teaspoon vanilla
1 teaspoon cinnamon
¼ teaspoon cardamom (optional)
½–1 cup dried tropical fruit, such as mango, chopped (optional)
Toppings such as fresh tropical fruit (banana, mango, pineapple, papaya), honey, shredded coconut, and/or nuts
Milk
INSTRUCTIONS
1. Mix all the ingredients except the toppings and milk in your Crock-Pot or slow cooker. Cook on low for 6–8 hours.
2. Serve with the desired toppings and milk.
STOVE-TOP VERSION
This works too: Bring the water to a boil and add the oats. Stir in the remaining ingredients, except the toppings and milk, and simmer uncovered for approximately 40 minutes, until the oats are soft and the liquid has been absorbed.
Every child wants to make a gingerbread house at Christmas. This miniature version is easily decorated by a child (parents may want to assemble it for younger children) and is small enough to eat. These houses are great for a family creation or as a children’s holiday party activity.
INGREDIENTS
Gingerbread cookie dough (use your favorite recipe)
Flour for rolling the dough
Tiny gingerbread house template (see page 331), or make your own
Simple icing (1 cup powdered sugar whisked with 1 tablespoon milk)
Tiny candies for decorating, such as mini M&M’s, mini chocolate chips, white chocolate chips, chocolate and colored sprinkles, coconut flakes, and miniature or crushed candy canes
INSTRUCTIONS
1. Roll out the gingerbread cookie dough on a floured surface. Use the template or your own design to cut out the four sides and two roof pieces for each teeny tiny house you plan to make. Bake the pieces according to the recipe instructions, then let them cool.
2. Assemble the gingerbread house walls using the icing to glue the sections together. Let them dry (for stability), then add the roof pieces. Let them dry again.
3. Decorate the gingerbread houses with icing and small candies. Admire and then eat them.
HEALING CROCK-POT CHICKEN SOUP
Chicken soup is known for its curative powers. Plus it’s delicious and comforting and the perfect hot meal on a chilly day, whether you are sick or healthy. This one is made in the slow cooker but can be adapted easily for the stove top.
INGREDIENTS
1–2 boneless, skinless chicken breasts
1 large yellow onion, diced
1–2 leeks, sliced
3–4 carrots, peeled and cut into thirds
3 celery stalks, cut into thirds
1 bay leaf
1 teaspoon dried thyme
3 cloves garlic, minced
2 quart-size boxes chicken stock (or use homemade)
3 cups egg noodles
¼ cup fresh parsley
Salt and pepper to taste
Grandma’s Honey-Wheat Bread, to serve (see page 278)
INSTRUCTIONS
1. Place the chicken breasts in the bottom of the Crock-Pot. Top them with the onion, leeks, carrots, celery, bay leaf, thyme, and garlic.
2. Pour the chicken stock over the other ingredients.
3. Put the lid on the pot and cook on low for 6–8 hours.
4. Remove and slice the carrots and celery. Remove the chicken and use two forks to pull it apart. Remove and discard the bay leaf. Add the chicken and the vegetables back to the soup.
5. Add the egg noodles to the soup and stir them in. Put the lid back on and cook on low for another 15 minutes, or until the noodles are soft.
6. Stir in the fresh parsley and salt and pepper to taste. Enjoy a bowl with a slice of Grandma’s honey-wheat bread.
This recipe is adapted slightly from one passed down to me from my grandma, who clipped the original Granary Bread recipe from the Cleveland Plain Dealer newspaper decades ago.
Makes 2 loaves
INGREDIENTS
2 cups all-purpose flour, plus a little extra for kneading
2 packets dry yeast (about 5 teaspoons)
1 tablespoon salt
⅓ cup honey
3 tablespoons butter
2½ cups hot tap water
4 cups white whole wheat flour
½ cup toasted wheat germ (optional)
Butter to grease the pan
Olive or vegetable oil to brush on the loaves
INSTRUCTIONS
1. Combine the all-purpose flour, undissolved yeast, and salt in a large bowl. Add the honey and butter, then the hot water. Mix with a whisk.
2. Add the white whole wheat flour a cup at a time, as well as the optional toasted wheat germ, stirring between each addition.
3. Once you have a soft dough that pulls away from the sides of the bowl, place it on the counter and knead it lightly. (The dough is quite sticky at this point, but resist the urge to add too much additional flour.) Turn the bowl facedown and place it over the bread dough and let it rest for 20 minutes.
4. Punch the dough down and knead it for another couple of minutes. Shape it into two loaves and place them in greased bread pans. Brush the tops with oil. Cover the loaves loosely with plastic wrap or a damp cloth and refrigerate for 2–4 hours.
5. Let the loaves stand at room temperature while heating the oven to 400°F. Slash the top of the loaves with a sharp knife. Bake 35–40 minutes.

Crushed candy canes make a tasty and attractive topping to sprinkle over hot chocolate or freshly iced holiday cookies. You can crush the candy canes with a heavy rolling pin, but children really enjoy using a hammer to smash them. A plastic bag helps to keep the candy pieces from flying across the room.
INSTRUCTIONS
1. Unwrap the desired number of candy canes and place them in a resealable, heavy gallon-size plastic bag and seal it.
2. Place the bag of candy canes over a padded surface such as a thick layer of newspapers and let your kids smash the candy canes with a hammer. (Note: Do not put the bag of candy canes directly on the tabletop, as in the photo shown opposite, unless you want a few dents in your table.)
3. Removed the crushed candy from the plastic bag and store in an airtight container, such as a jelly jar.
4. Sprinkle the crushed candy over hot chocolate, cookies, and cakes throughout the holiday season for flavor and decoration.
Hot cocoa is a regularly requested beverage in our house during the winter, especially on snow days. Adding a bit of the candy cane peppermint flavor makes it extraspecial.
INGREDIENTS
¼ cup water
5 tablespoons unsweetened cocoa powder
2 cups milk
1 teaspoon vanilla
3 tablespoons honey
1–2 drops peppermint essential oil or ¼ teaspoon peppermint extract
Whipped cream, optional
Crushed Candy Cane Topping (see page 280), optional
INSTRUCTIONS
1. Boil the water in a small heavy-bottom saucepan. Add the cocoa and whisk it to mix it thoroughly. Stir in the remaining ingredients and heat them slowly over medium-low heat (do not boil).
2. Divide the cocoa among cups and add whipped cream and a sprinkle of crushed candy cane if desired.
This festive candy is one my children love to make to give as gifts or bring to a holiday party. Almost every step is fun for kids, from arranging the candy canes to adding the sticks and decorating the lollipops with sprinkles and chocolate chips.
INGREDIENTS
Miniature candy canes
Semisweet, milk chocolate, and/or white chocolate chips
Colored sprinkles
INSTRUCTIONS
1. On a parchment-lined baking sheet, assemble two mini candy canes facing each other to form a heart. Slip the end of a lollipop stick between the base of the two candy canes. Repeat to make as many lollipops as desired.
2. Melt the chocolate chips in a double boiler (or in a glass bowl over a pan of simmering water).
3. Spoon the melted chocolate into the heart-shaped space between the candy canes.
4. Add sprinkles and/or contrasting chocolate chips while the chocolate is still soft. Let the lollipops cool and harden.
5. Wrap the candy cane lollipops individually by slipping a small plastic candy bag over the top of each and tying it on with a festive ribbon.
CHOCOLATE-COVERED PEANUT BUTTER BALLS
Every Christmas my aunt Dorothy would send her delicious homemade chocolate bonbons, carefully packaged in an egg carton. This is her recipe.
INGREDIENTS
1 cup chopped nuts
1 cup chopped dates
1 cup creamy peanut butter
1 cup powdered sugar
1 tablespoon butter
1 12-oz. package chocolate chips
6 oz. butterscotch chips
INSTRUCTIONS
1. Mix the nuts and dates together in a food processor until finely processed. Add the peanut butter, powdered sugar, and butter and blend thoroughly.
2. Roll the mixture into 1" balls. Kids love this step, and as you can see from the photos, their peanut butter balls may range in size and shape a bit, which is okay.
3. Melt the chocolate chips and butterscotch chips together in a double boiler.
4. Dip the balls into the melted chocolate and roll them around until they’re evenly coated, then place them on a parchment-lined cookie sheet to cool. It will take a few hours for the peanut butter balls to firm up.
5. If desired, you can package these as Aunt Dorothy did, in the sections of a (thoroughly cleaned) plastic or Styrofoam egg carton.
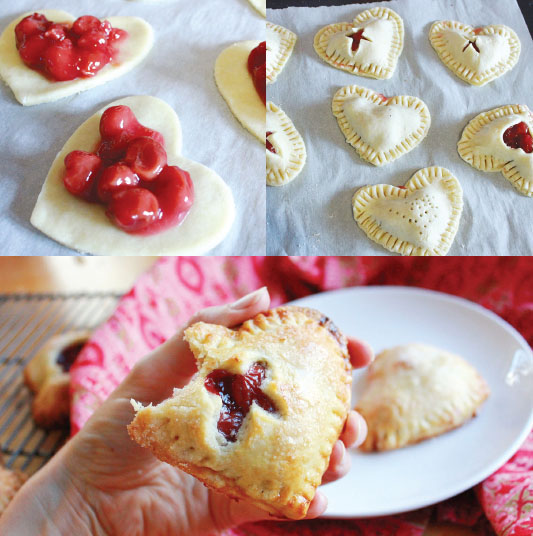
Cherry hand pies are delicious anytime, but they’re especially perfect for Valentine’s Day when you shape them into hearts.
Makes approximately 1 dozen (recipe doubles easily)
INGREDIENTS
1 can (14½ oz.) tart cherries in water; reserve half of the liquid (I buy Oregon Fruit Products found in the canned fruit section of the grocery store, not the baking section; you can also buy them on Amazon.com.)
⅓ cup sugar, plus extra for sprinkling
2 tablespoons cornstarch
⅛ teaspoon almond extract
1 batch Piecrust (see page 142)
Flour for rolling dough
Egg wash (1 egg whisked with 1 tablespoon water)
INSTRUCTIONS
1. Mix the cherries, half of the liquid from the can, the ⅓ cup sugar, cornstarch, and almond extract in a heavy-bottom pan. Cook the mixture over medium heat, stirring regularly, for 8–10 minutes or until the liquid turns thick, gels, and bubbles. Remove the filling from the heat and let it cool.
2. Preheat the oven to 425°F and line two cookie sheets with baking parchment. Also, bring the piecrust dough out of the fridge to soften slightly (about 15 minutes).
4. Divide the piecrust dough into two equal parts and roll out each half separately on a floured surface. Use a 3" heart-shaped cookie cutter to cut hearts out of both pieces of dough. Transfer half of the hearts to the lined cookie sheets.
5. Spoon a couple tablespoons of cherry filling onto the center of each heart.
6. Cover each one with a second dough heart. Press the edges closed with fork tines.
7. Use a sharp knife to cut an X (for a kiss) in the top crust. (Alternatively, use a tiny heart cookie cutter to punch a heart out of the center of the top crusts before placing them over the filling.) Brush each hand pie with egg wash, then sprinkle them with sugar.
8. Bake for 20 minutes, or until the crust is golden brown at the edges.
9. Enjoy the pies warm or at room temperature.
This, my favorite cookie, is modified slightly from my great-aunt Polly’s Oatmeal Jumbos. You can bake these with cranberries, dried cherries, or raisins, as in the original recipe. Make these if you like your oatmeal cookies soft and chewy.
INGREDIENTS
1 generous cup dried cranberries
2¼ cups white whole wheat flour or all-purpose flour, plus a little extra for rolling the dough
1 teaspoon salt
½ teaspoon baking soda
1 teaspoon cinnamon
½ teaspoon nutmeg
⅛ teaspoon cloves
1 cup (2 sticks) butter, softened
1½ cups brown sugar, packed
1 egg
2 tablespoons water
2 cups old-fashioned rolled oats
White sugar, for sprinkling
INSTRUCTIONS
1. Pour boiling water over the cranberries to cover. Let them stand for 10 minutes, then drain.
2. Mix the flour, salt, baking soda, and spices. Add the butter, brown sugar, egg, and water. Work the dough with a wooden spoon until smooth. Stir in the cranberries and oats. Chill the dough for at least 1 hour.
3. Roll the dough out on a floured surface to ¼" thickness. Cut out the cookies with a floured cookie cutter, either heart-shaped, as pictured here, or round. Sprinkle the cookies with sugar.
4. Bake the cookies on ungreased cookie sheets at 375°F for 10–12 minutes. Eat them warm or at room temperature. These are just as good the next day.

After the holiday frenzy there’s a whole new year to welcome and plan, combined with some time for reflecting on the year just past. Generally we clean the house from top to bottom, making space for a fresh start, then inaugurate a new calendar and think carefully about our goals and desires. We ring in the New Year as a family with a living room dance party, sparklers, and toasts to each other, letting the kids stay up late (if they can manage it).
OUR FAVORITE BOOKS ABOUT THE NEW YEAR AND CHINESE NEW YEAR
Squirrel’s New Year’s Resolution by Pat Miller
Shanté Keys and the New Year’s Peas by Gail Piernas-Davenport
The Night before New Year’s by Natasha Wing
Dragon Dance: A Chinese New Year by Joan Holub
Bringing in the New Year by Grace Lin
SPONGE-PRINTED PERPETUAL CALENDAR
This idea was inspired by and adapted from a calendar by Design Mom. We took her sponge-printing idea and turned her small, monthly watercolor calendar into a larger perpetual calendar that we’ve used and enjoyed every day since.
MATERIALS
Scissors
Sponge
Paint such as tempera or BioColor in a shallow dish
White poster board
Markers or other drawing materials to decorate the calendar
Transparent contact paper (also called sticky-back plastic), or skip this and just have your poster board laminated, as we did
Wet-erase marker (not dry-erase, unless you opt for the more expensive dry-erase lamination)
INSTRUCTIONS
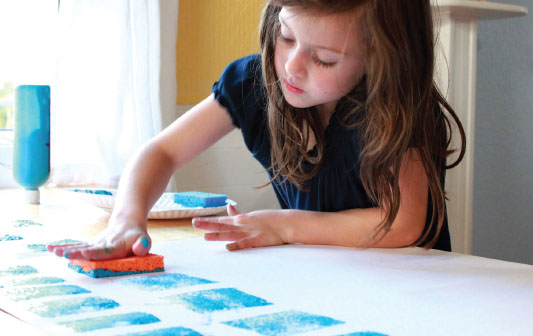
1. Cut the end off the sponge to make it a square.
2. Press the sponge flat into the paint and then onto the sheet of poster board. Continue making even sponge prints until you have seven squares across and five down. Let the paint dry.
3. Write your child’s name or simply “Calendar” at the top. Add the days of the week along the top of the first layer of squares. Decorate the calendar if desired with words, borders, or pictures around the edges. (Don’t add dates or months yet.)
4. Cover the surface of the calendar with transparent contact paper or laminate it at a full-service copy shop.
5. Once the calendar is laminated, you can use a wet-erase marker to write the month at the top and fill in the numbers for the days of that month (refer to an online calendar if necessary).
6. Add holidays, events, classes, and appointments for the month, also with the wet-erase marker.
7. Just wipe the calendar clean with a wet sponge or cloth at the end of the month and start again.
WORDS AND WISHES FOR THE NEW YEAR
This fun activity gets the whole family creating together and also thinking about dreams and goals.
MATERIALS
Drawing tools, such as colored pencils or markers
Colored construction paper, cut into triangles
Glue
Collage materials, such as sequins, feathers, decorative papers, and washi tape
Sewing machine
Ribbon (optional)
Hot glue gun (optional)
INSTRUCTIONS
1. Discuss your wishes and goals for the coming year as well as “words for the year,” such as Peace or Fun. Each person can write one or more words on a construction-paper triangle that represent something she or he would like to do, be, or have in the coming year. (Prewriters can dictate their wishes to you.)
2. Each person can decorate his or her triangle as desired, giving life and pizzazz to his or her New Year’s wish.
3. Sew the wish triangles together into a bunting using a simple basting stitch (you can add extra scrap-paper triangles in between each as we did, if desired) or glue them to a ribbon with a hot glue gun.
4. Hang the bunting and let your New Year’s words and wishes work their magic.
Foil letters make this bunting shimmer and shine both in daylight and by candlelight or holiday lights.
MATERIALS
Sharpie or other permanent marker
Aluminum foil
Scissors
6 sheets of 8½" x 11" white paper
White glue, such as Elmer’s
Hot glue gun
Ribbon
INSTRUCTIONS
1. Write “Happy New Year” on the foil in large bubble letters. Cut out each letter.
2. Cut each of the 6 sheets of paper crosswise in half. Glue a foil letter to each half sheet of paper.
3. Use a hot glue gun to glue each bunting section to the ribbon. (Run a thin line of hot glue along the top front of the paper, then press the ribbon faceup over the glue). Leave approximately ½" of space between each paper. I like to make two buntings, one that said HAPPY and a separate one for NEW YEAR, but of course you can create one long bunting instead.
4. Hang the bunting as part of your New Year’s decorations and celebrations.
The color of springtime is in the flowers; the color of winter is in the imagination.
—TERRI GUILLEMETS
Winter means snow, of course, at least occasionally in our part of the world, and that is the most anticipated and cherished part of the season for our children. A snow day is a joyous one of stomping and tasting, sledding and frolicking, and making snowmen and snow angels. A snow day also means warming up, back inside the house. It means teddy bear pancakes, hot chocolate, and soup in the Crock-Pot.
In addition to snowmen (and snow women, bunnies, bears . . .), our postholiday winter crafts seem to revolve around the weather: ice sculptures, ice wreaths, and paper snowflakes.
OUR FAVORITE BOOKS ABOUT WINTER
Extra Yarn by Mac Barnett
Annie and the Wild Animals by Jan Brett
Happy Winter by Karen Gundersheimer
The Snowy Day by Ezra Jack Keats
Winter Waits by Lynn Plourde
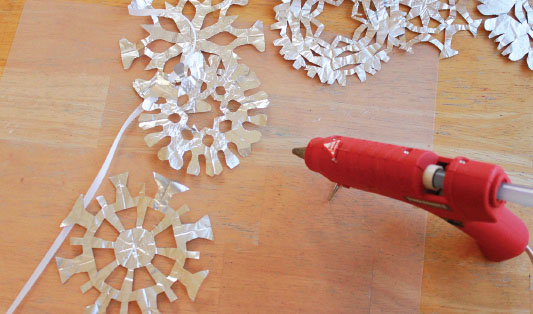
Snowflakes don’t have to be made out of paper. Try them with foil instead and then see how they add a cool sparkle to the room.
MATERIALS
Aluminum foil
Scissors
Hot glue gun (optional)
¼" wide ribbon (optional)
INSTRUCTIONS
1. Tear off a square piece of aluminum foil. Fold it in half, then in half again and again (as you would when making a paper snowflake). Round the bottom (opposite the point) with your scissors.
2. Cut out triangles, circles, and snippets along the sides and bottom.
3. Carefully open the snowflake.
4. Repeat to make as many snowflakes as desired, perhaps in different patterns and sizes.
5. To make a garland, use the hot glue gun to attach the foil snowflakes along the ribbon.
6. Use the garland or individual snowflakes as decorations. They are especially beautiful reflecting candlelight or Christmas lights.
Coffee filters make the best snowflakes. The paper is thin yet tough and (bonus!) already round. They also accept watercolor paint beautifully.
MATERIALS
White bowl-shaped coffee filters
Scissors
Paintbrush (optional)
Watercolor paints (optional)
Newspapers or a mat to protect your work surface (optional)
Glue stick
INSTRUCTIONS
1. Fold your coffee filter in half, then in half again two more times.
2. Make little scissor snips along all of the edges to make your snowflake.
3. If desired, paint the snowflake with watercolors over a protected work surface. Let the snowflakes dry.
4. Hang your coffee filter snowflakes in the window with a dab of glue from a glue stick. (It washes off easily with soap and water when you’re ready to remove the snowflakes.)
COLORED-ICE SNOWMAN DECORATIONS
Think beyond the traditional carrot-stick nose and try colored ice shapes to spiff up your snowman this year.
MATERIALS
Ice cube trays, bowls, cake pans, muffin tins
Water
Food coloring or liquid watercolors
Latex or vinyl gloves
String
A snowman or other snow creation
INSTRUCTIONS
1. Fill the bowls, muffin tins, and the like with water. Mix in the food coloring or liquid watercolors. Put the containers in the freezer overnight or leave them outside to freeze if the temperature is low enough.
2. Fill the gloves with water at the tap, add a squirt or two of food coloring, and knot the gloves tight. Freeze the gloves. (Note: To make arms for the gloves, insert a stick in the glove of colored water and tie a string tightly around the wrist before freezing.)
3. When you are ready to use your colored ice decorations, set the pans in a sink of warm water just until the ice is loosened enough to come out. Invert the container over a bowl or basin. To remove the gloves from the ice hands, carefully snip and peel them off.
4. Use the colored ice shapes to create eyes, nose, hat, hands, buttons, and other decorations for your snowman.
SNOWMAN PLAYDOUGH SNOW-GLOBE GIFTS
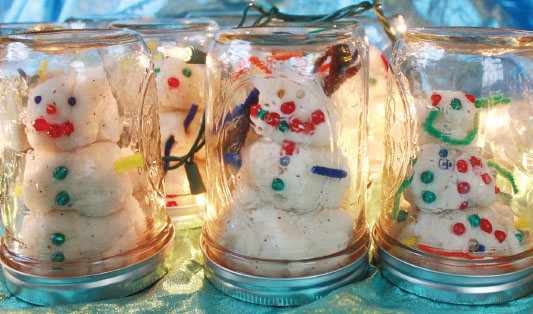
Present playdough molded into a snowman and placed into a “snow globe”—a fun gift for kids to make and to receive!
MATERIALS
1 batch white playdough with silver glitter (see page 16)
Beads
Pipe cleaners cut into 2" and 3" sections
Pint-size mason jars with lids
Labels (see template on page 332)
Glue stick
INSTRUCTIONS
1. Roll the playdough into various-size balls, then stack them to create a snowman approximately 5" tall.
2. Use the beads and pipe cleaner sections to create the snowman’s face, arms, buttons, and decorations.
3. Set the snowman on the upside-down lid. Set the mason jar upside down over the snowman and screw it onto the lid.
4. Fill out the gift label and then glue it to the lid.
5. Repeat with as many snowman snow-globe gifts as desired.
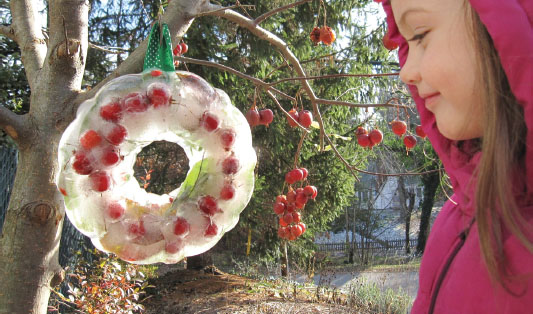
Colored ice makes a fun outdoor wreath for cold winter days (and an interesting one to watch melt on warmer ones).
MATERIALS
Muffin tin, ice cube tray, or cups
Water
Food coloring or liquid watercolors
Bundt pan (or a round cake pan and a plastic cup for the center)
Sturdy ribbon
INSTRUCTIONS
1. Fill the muffin tin or other container with water. Drop food coloring into the sections to dye the water as desired. Put the container in the freezer.
2. Remove the colored ice from the muffin tin by setting it in a sink of warm water briefly to loosen, then invert and arrange it in the bottom of the Bundt pan. (If you’re using a cake pan, set the cup in the center first and weigh it down with water.)
3. Pour ice water over the colored ice pieces, just covering them (because you want it to freeze fast). Freeze the wreath. (Note: The water needs to be really cold or it will melt the colored ice pieces prematurely. I chill the water first by putting it in a bowl with plain ice cubes.)
4. Unmold the stained glass ice wreath from the Bundt pan by setting it in a sink of warm water for a minute, then turning it upside down over a plate. Tie the ribbon around the ice wreath to hang it or freeze a ribbon loop into the wreath (see step 3 for the Nature Ice Wreath, page 303).
5. Hang your ice wreath outside in the sunlight.
Freeze nature items in wreath form for a lovely outdoor wreath. If you live in a warm climate, you can still make an ice wreath. It’ll melt, of course, but that can be interesting to watch.
MATERIALS
Bundt pan (or a round cake pan with a plastic cup for the center)
Nature items such as berries, crab apples, leaves, and flowers
Water
Sturdy ribbon, 8" long
INSTRUCTIONS
1. Fill the base of the Bundt pan with your nature items.
2. Add a layer of water to just cover the nature items. Place the pan in the freezer (or leave outside if it’s cold enough) until the water is frozen solid.
3. Make a loop with the ribbon, with the ends inside the Bundt pan and the loop hanging outside the pan, and hold it in place over the edge of the ice wreath while pouring another inch or so of water over the wreath. Place the pan in the freezer again until the water is frozen through.
4. Hang the wreath outside on a tree, fence, or porch and enjoy the sunlight shining through the ice.
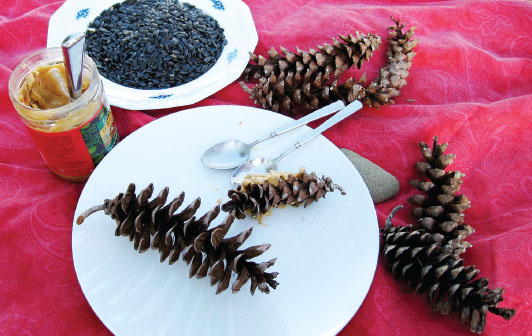
We love to watch the birds in the winter, whether at our window feeder or at our pinecone bird treats hanging in the trees.
MATERIALS
Spoon or butter knife
Peanut butter
Pinecones
Birdseed (such as sunflower seeds) in a shallow bowl
Scissors
Yarn or string
INSTRUCTIONS
1. Use a spoon or butter knife to spread the peanut butter over the pinecone and into the crevasses.
2. Roll the peanut-butter-covered pinecone in the birdseed to coat it with seeds.
3. Cut 8" lengths of yarn and tie them securely to the stem of the pinecone or around the entire cone, creating a hanging loop.
4. Hang your birdseed treats in the trees for the birds (and the squirrels) to enjoy. Choose a location you can watch from your window if possible.
Use colorful tissue paper to make these artful candleholders.
MATERIALS
Scissors (optional)
Colored tissue paper (the nonbleeding kind)
Foam brush or regular paintbrush
Mod Podge
Small drinking glasses or votive candleholders
Newspaper or mat to protect your work surface
Tealights
INSTRUCTIONS
1. Tear or cut the colored tissue paper into small pieces. Try hearts, stars, or other shapes if desired.
2. Protect your work surface, then brush Mod Podge over the outside surface of the glass.
3. Press the tissue-paper pieces to the Mod Podge while it is wet, covering the outside of the glass. Brush another layer of Mod Podge over the top of the tissue pieces to make them more translucent and to help them lay flat against the glass. Let the candleholders dry.
4. Place the tealights in your new candleholders and use them to decorate and light the table at your next dinner.
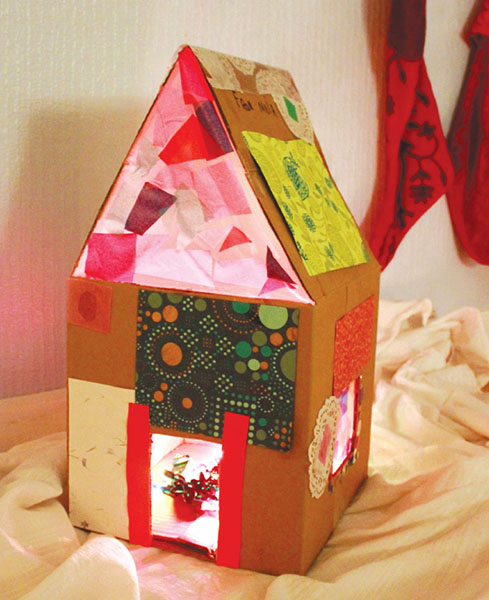
Children love to fashion little houses out of cardboard, decorating them with fanciful papers and drawings and adding a string of lights for an extra dose of magic on winter evenings.
MATERIALS
Sturdy cardboard box
Utility knife
Tape
Decorative papers
Markers, for decorating
Glue
Scissors
Transparent contact paper (also called sticky-back plastic)
Colored tissue paper
String of colored holiday lights
INSTRUCTIONS
1. Cut the flaps off two opposing sides of the cardboard box with the utility knife. Tape them to the remaining flaps, then tape the two long flaps together to create a roof.
2. Cut out windows and doors with the utility knife. (My daughter usually draws them on where she wants them, and then I cut them out.)
3. Design your house as desired with decorative papers, markers, drawings, and so forth.
4. Cut pieces of contact paper slightly larger than the windows and larger than one or both of the triangular roof openings. Pull off the paper backing and adhere the contact paper to the inside of the windows with the sticky side facing out. Press small pieces of colored tissue paper against the contact paper to create stained glass windows.
5. Coil a string of colored Christmas lights inside the house and plug them in. Admire the beautiful, lighted dollhouse!
With just the right amount of January downtime behind us, for sledding, snow angels, and snuggling up with books, February arrives and then Valentine’s Day, a time to celebrate love and friendship in bright reds and pinks. We festoon the house with hearts and bake cookies for ourselves and our friends. We make valentine cards to take to school and mail off to friends and family.
OUR FAVORITE BOOKS ABOUT VALENTINE’S DAY
The Day It Rained Hearts by Felicia Bond
Franklin’s Valentines by Paulette Bourgeois
Roses Are Pink, Your Feet Really Stink by Diane deGroat How Do I Love You? by P. K. Hallinan
If Kisses Were Colors by Janet Lawler
VALENTINE’S DAY SUNCATCHERS
Colorful hearts catching the light in the window—what could be better at Valentine’s Day?
MATERIALS
Scissors
Small paper plates
Paintbrush
Watercolor paints
Transparent contact paper (also called sticky-back plastic)
Index dividers made out of translucent colored film, or colored tissue paper
Hole punch
Ribbon or string
1. Cut a heart out of the center of the paper plate. Paint the plate with watercolors.
2. Press a square of contact paper to the back of the paper plate so the heart is covered and the sticky side faces the front.
3. Cut the translucent colored index dividers into small pieces. Press them to the sticky contact paper.
4. Use the hole punch to add a hole to the top of the paper plate and string a ribbon through. Hang the suncatcher in a sunny window.

Kids love to try their hand at melted-crayon drawings on aluminum foil. Combine the foil hearts with a message such as “You shine, Valentine.”
MATERIALS
Aluminum foil
Cookie sheet (or warming tray)
Towel
Oven mitt or winter mitten
Crayons
Scissors
White glue, such as Elmer’s
Blank cards (or paper folded over)
Markers
INSTRUCTIONS
1. Place a sheet of foil on the cookie sheet and heat both in a 350°F oven.
2. Place the hot cookie sheet on a doubled-over towel (to protect the table) and protect the nondominant hand with an oven mitt. Draw and decorate hearts with a crayon on the hot foil. The crayon will melt as you draw, creating vibrant, thick lines (juicy lines, as my daughter calls them). When the cookie sheet cools, just reheat it in the oven and continue.
3. Cut out the hearts from the foil. Glue them to the front of the blank cards.
4. Use markers to decorate the card and write your Valentine’s Day greetings and sentiments inside and out.
5. Present a heart to your valentine.
Wear your heart on your chest with these pretty shirts.
MATERIALS
Spoon(s)
Red, white, or pink fabric paint (I like Jacquard brand; don’t use metallic fabric paint) or BioColor paints mixed with BioColor fabric medium
Acrylic box frame or a flat-bottom baking dish, for rolling out the ink
Mini paint roller (from the hardware store, used for corners and trim in house painting)
Heart doilies (The stiffer, shinier ones work the best with the fabric paint; the uncoated kind works best with the BioColors.)
Newspaper and scrap paper
T-shirt
Brayer (hard rubber roller used for printmaking) or rolling pin
Iron
Ironing board
INSTRUCTIONS
1. Place a spoonful or two of fabric paint on an acrylic box frame or on the bottom of an upside-down baking dish. Roll the paint around with the mini paint roller to coat the roller evenly with paint.
2. Lay a heart doily on a sheet of newspaper. Roll the paint-covered roller over the doily to coat the doily evenly with paint.
3. Place the doily, paint side down, on the T-shirt where you want the print. Place a clean sheet of scrap paper or copy paper over the doily and roll over it evenly and firmly with a rubber brayer to transfer the paint to the shirt.
4. Lift the paper and the doily to reveal your heart-doily print. Let the shirt dry overnight.
5. Follow the instructions on the bottle to set the fabric paint (usually this means ironing it) so that it is colorfast and can be washed and dried normally.
6. Present the T-shirt to a loved one.
VARIATION
If you sew, you can make the doily print on a piece of fabric, trim around the edges, then sew it on a contrasting colored T-shirt as you would an appliqué.

Heart doilies are easily printed onto bags as well as T-shirts, making them perfect for gift giving on Valentine’s Day.
MATERIALS
Brown paper grocery bag with handles
Scissors
Sewing machine
Thread in color desired
Spoon(s)
Red, white, or pink tempera paint, BioColor paint, or printer’s ink
Acrylic box frame or a flat-bottom baking dish, for rolling out the ink
Mini paint roller (from the hardware store, used for corners and trim in house painting)
Heart doilies
Newspaper and scrap paper
Brayer (hard rubber roller used for printmaking) or rolling pin
INSTRUCTIONS
1. With the brown paper grocery bag folded closed and flat, cut the sides and bottom off, keeping the sections with the handles.
2. You now have two matching grocery bag pieces. Turn them so that the printed sides face each other and the handles line up.
3. Use a sewing machine to sew along the sides and bottom. Use a straight stitch or a decorative stitch with a colorful thread.
4. Following steps 1–4 for the Heart-Doily-Printed T-Shirt (page 312)—but substituting one of the paints listed here for the fabric paint—add a heart-doily print to the bag and let it dry.
5. Slip your gift inside the gift bag (it’s the perfect size for a heart-printed T-shirt or a boo-boo heart), and then sew the top of the bag closed if desired.
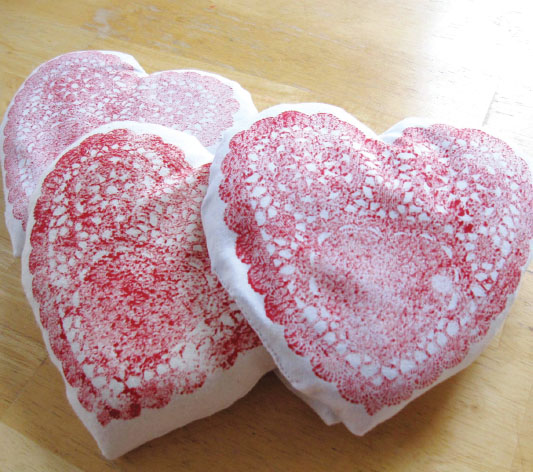
For boo-boos, headaches, a sleep aid, and TLC.
MATERIALS
Spoon(s)
Red, white, or pink fabric paint (I like Jacquard brand; don’t use metallic fabric paint) or BioColor paint mixed with BioColor fabric medium
Acrylic box frame or a flat-bottom baking dish
Mini paint roller (from the hardware store, used for corners and trim in house painting)
Heart doilies (The stiffer, shinier ones work the best with the fabric paint; the uncoated kind works best with BioColors.)
Newspaper and scrap paper
Muslin or other light cotton fabric in white or natural
Brayer (hard rubber roller used for printmaking) or rolling pin
Iron
Ironing board
Scissors
Pins
White thread
Sewing machine or needle and thread
Millet or rice
Dried lavender (3 tablespoons per cup of millet)
Funnel
INSTRUCTIONS
1. Following steps 1–5 for the Heart-Doily-Printed T-Shirt on page 312, print and set hearts on your white fabric.
2. Once the paint has dried and has been set with an iron, cut out the hearts, leaving a 1" margin around each one.
3. Place two hearts together, face to face, and insert pins to hold them together. Sew them together leaving a ¼" margin around the perimeter of the hearts. Leave a 2" space open along one edge.
4. Turn the heart pillow right side out through the 2" space. Press with an iron.
5. Mix the millet with the dried lavender and, using a funnel, fill the booboo heart.
6. Sew the hole up by hand.
7. To use the boo-boo heart, heat it in the microwave or oven for a warming heart or place it in the freezer if you need a cool heart.
These heartstrings combine the symbol of the season with one of our favorite craft projects and look beautiful in a sunny window.
MATERIALS
Cheese grater
Crayons in valentine colors
Bowls or muffin tin
Iron
Wax paper
Ironing board
Newsprint or scrap paper
Scissors
Sewing machine (or see nonsewing option below)
INSTRUCTIONS
1. Follow steps 1–6 of the Melted-Crayon Suncatchers on page 23.
2. Cut the melted-crayon sheets into heart shapes.
3. Sew the hearts together with a basting stitch through the center of the hearts horizontally, leaving an inch or two between hearts. Hang the hearts in a sunny window.
VARIATION
If you prefer not to sew, you can use a hot glue gun to create your heartstrings. Place a dab of hot glue in the center of two hearts and gently run a thread or fine string between the two. Continue by adding more glue dots and hearts.
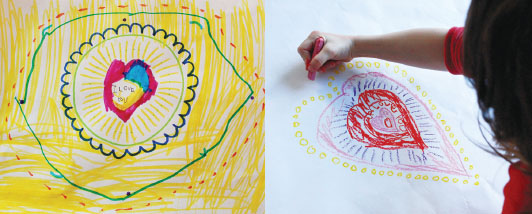
This back-and-forth game for two or more friends or family members can be a fun Valentine’s Day activity (your heart within my heart around your heart . . .) or just a simple drawing game to play while waiting at the doctor’s office or restaurant.
MATERIALS
Drawing tools, such as markers or crayons, in a variety of colors
Paper
INSTRUCTIONS
1. The first person starts the heart mandala by drawing a small heart or other symbol in the center of the paper. The second person draws another heart or a different design around the first.
2. The creation of the heart mandala continues as each person adds an additional radiating layer to the design. This can be done either with two people working side by side and taking turns or by circulating the paper around the table in a larger group.
3. Each person can sign the heart mandala when it is deemed finished.
This is a great process-oriented valentine activity for younger children. They work on eye-hand coordination and get to use a hole punch (a favorite), all while creating a card for a loved one.
MATERIALS
Scissors
Card stock or watercolor paper
Drawing tools, such as crayons or oil pastels
Paints and paintbrush (optional)
Hole punch (Target sells an inexpensive Up and Up brand paper punch that is especially easy for young kids to use)
Yarn or narrow ribbon
Yarn needle
INSTRUCTIONS
1. Cut the watercolor paper into heart shapes. Punch holes around the perimeter of the heart. (Kids love this step.)
2. Decorate the hearts with drawings, paintings, or words.
3. Thread the needle with yarn or ribbon and let your child use it to sew through the holes in the card. (You may want to tie one end of the yarn through one of the holes first to hold it in place while your child works.)
4. Present to a loved one.
You can make your own heart doilies in much the same way that you make paper snowflakes.
MATERIALS
White bowl-shaped coffee filters
Scissors
Paintbrush
Watercolor paints
Wax paper or a mat to protect your work surface
Glue stick
INSTRUCTIONS
1. Fold your coffee filter in half and cut out a heart along the folded edge.
2. Now fold the heart in half, then in half again two more times, as you would to cut a snowflake.
3. Make little snips along the edges as you would when cutting a paper snowflake.
4. Paint your coffee filter heart doily with watercolor paints over a protected work surface. Let the heart dry. (Or paint and dry before cutting.)
5. Hang your heart doilies in the window with a dab of glue from a glue stick. The glue washes off easily with soap and water when you’re ready to remove the doilies.
TISSUE-PAPER HEART-DOILY SUNCATCHERS
Tissue paper suncatchers are given a Valentine’s Day twist with these heart doilies.
MATERIALS
Scissors
Tissue paper in valentine colors
Transparent contact paper (also called sticky-back plastic)
String or tape (optional)
INSTRUCTIONS
1. First, cut a symmetrical heart from a sheet of colored tissue paper by folding it in half and cutting a half heart along the folded edge.
2. Fold the heart in half, then in half again (and even again if desired) and make small cuts along the edges as you would to make a snowflake.
3. Cut another heart, somewhat larger than the first, in a contrasting color.
4. Pull the backing off a piece of transparent contact paper. Press the doily heart to the contact paper, then center and press the larger heart over the doily heart. Cut around the heart, leaving a 1" margin of sticky contact paper to use to adhere the suncatcher to the window. (Or if preferred, sandwich the tissue-paper hearts between two sheets of contact paper and hang them in the window with string or tape.)