Windows & Doors
In this chapter:
• Solving Common Door Problems
• Fixing Storm Windows & Doors
• Installing Replacement Windows
• Installing Prehung Interior Doors
• Hanging a New Door in an Old Jamb
 Solving Common Door Problems
The most common door problems are caused by loose hinges. When hinges are loose, the door won’t hang right, causing it to rub and stick and throw off the latch mechanism. The first thing to do is check the hinge screws. If the holes for the hinge screws are worn and won’t hold the screws, try the repair on the next page.
If the hinges are tight but the door still rubs against the frame, sand or plane down the door’s edge. If a door doesn’t close easily, it may be warped; use a long straightedge to check for warpage. You may be able to straighten a slightly warped door using weights, but severe warpage can’t be corrected. Instead of buying a new door, remove the doorstop and reinstall it following the curve of the door.
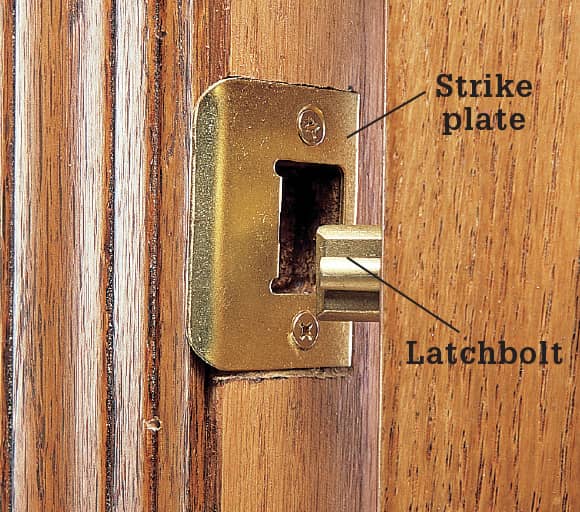
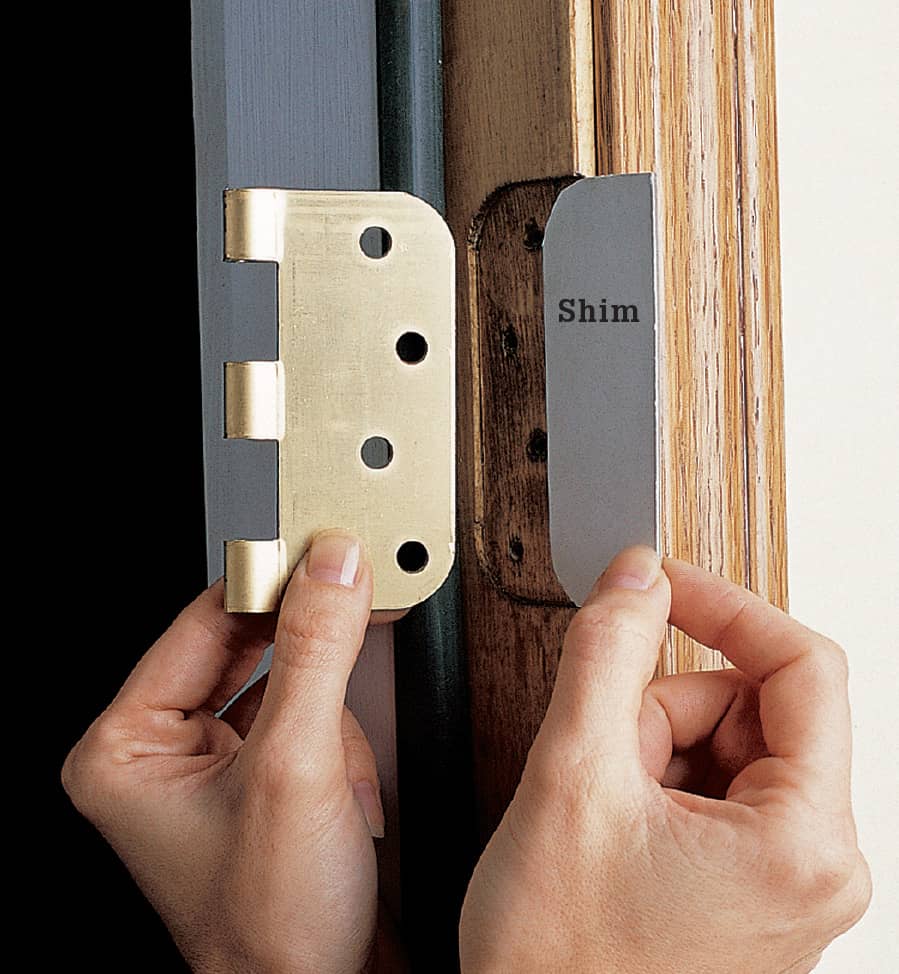
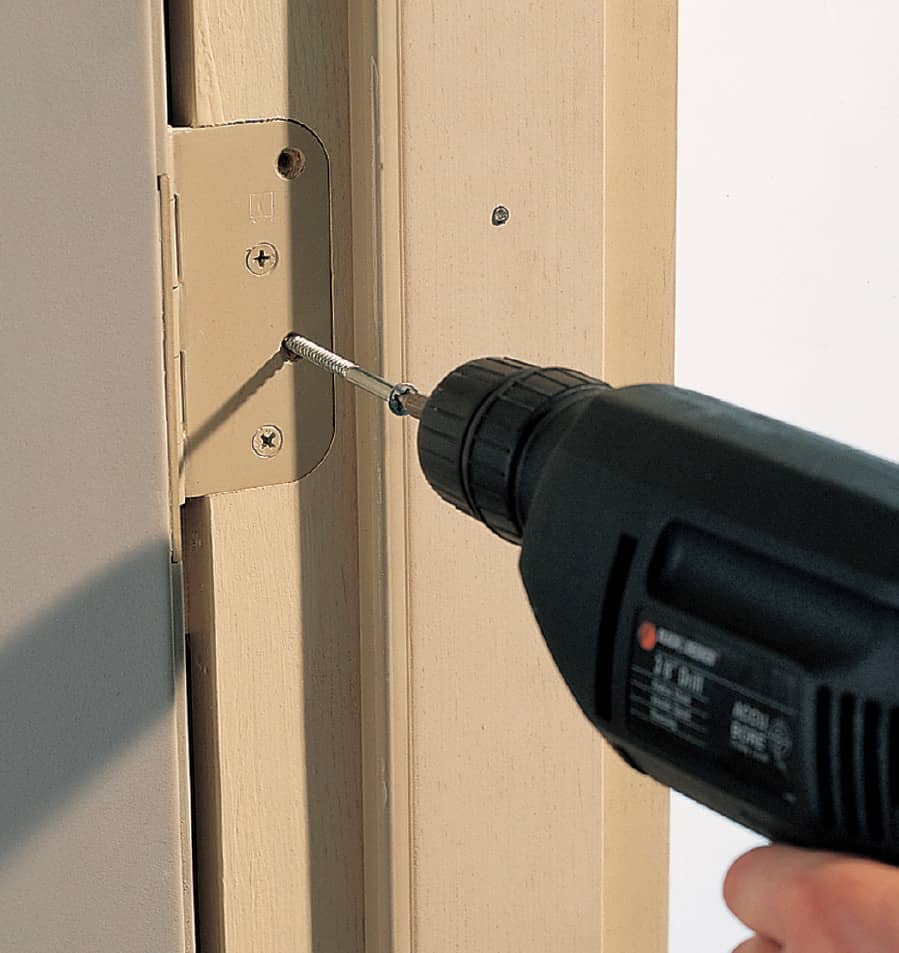
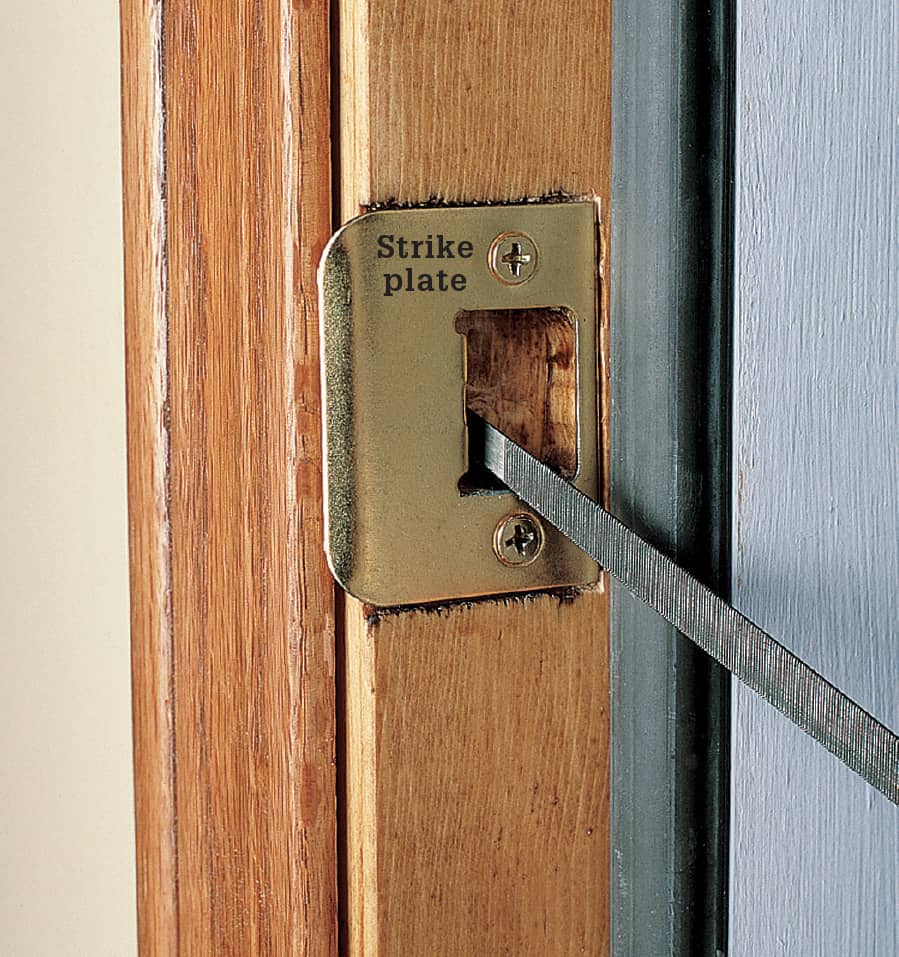
Door latch problems occur for a number of reasons: loose hinges, swollen wood, sticking latchbolts, and paint buildup. If you’ve addressed those issues and the door still won’t stay shut, it’s probably because the door frame is out of square. This happens as a house settles with age; you can make minor adjustments by filing the strike plate on the door frame. If there’s some room between the frame and the door, you can align the latchbolt and strike plate by shimming the hinges. Or, drive a couple of extra-long screws to adjust the frame slightly.
Common closet doors, such as sliding and bifold types, usually need only some minor adjustments and lubrication to stay in working order.
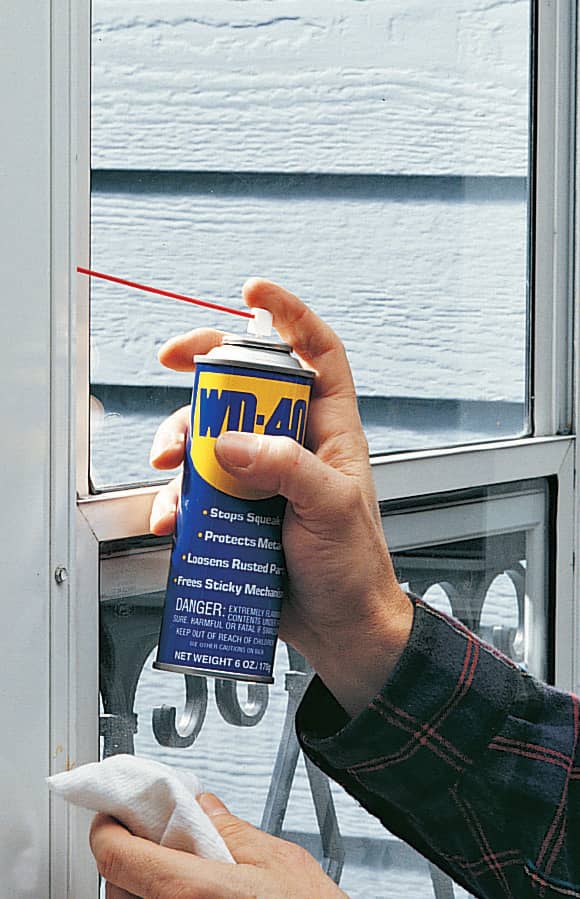
Door locksets are very reliable, but they do need to be cleaned and lubricated occasionally. One simple way to keep an entry door lockset working smoothly is to spray a light lubricant into the keyhole, then move the key in and out a few times. Don’t use graphite in locksets, as it can abrade some metals with repeated use.
How to Remove a Door
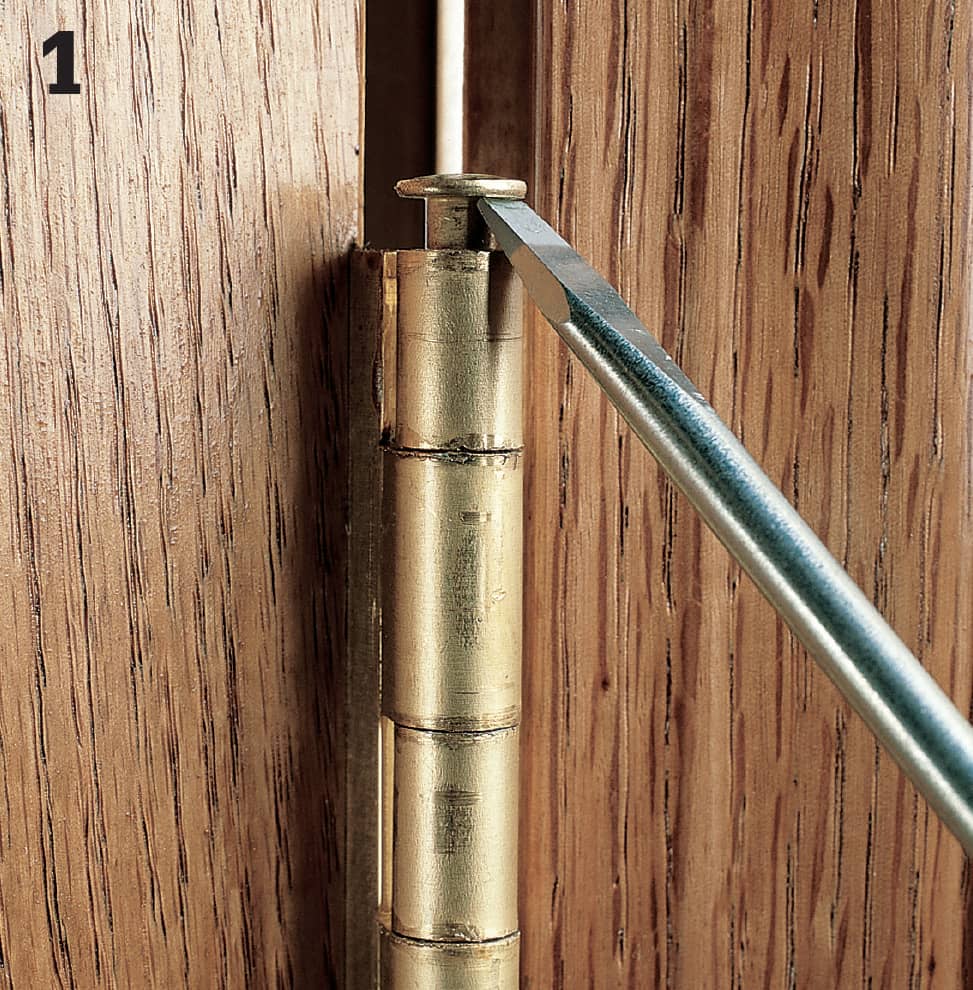
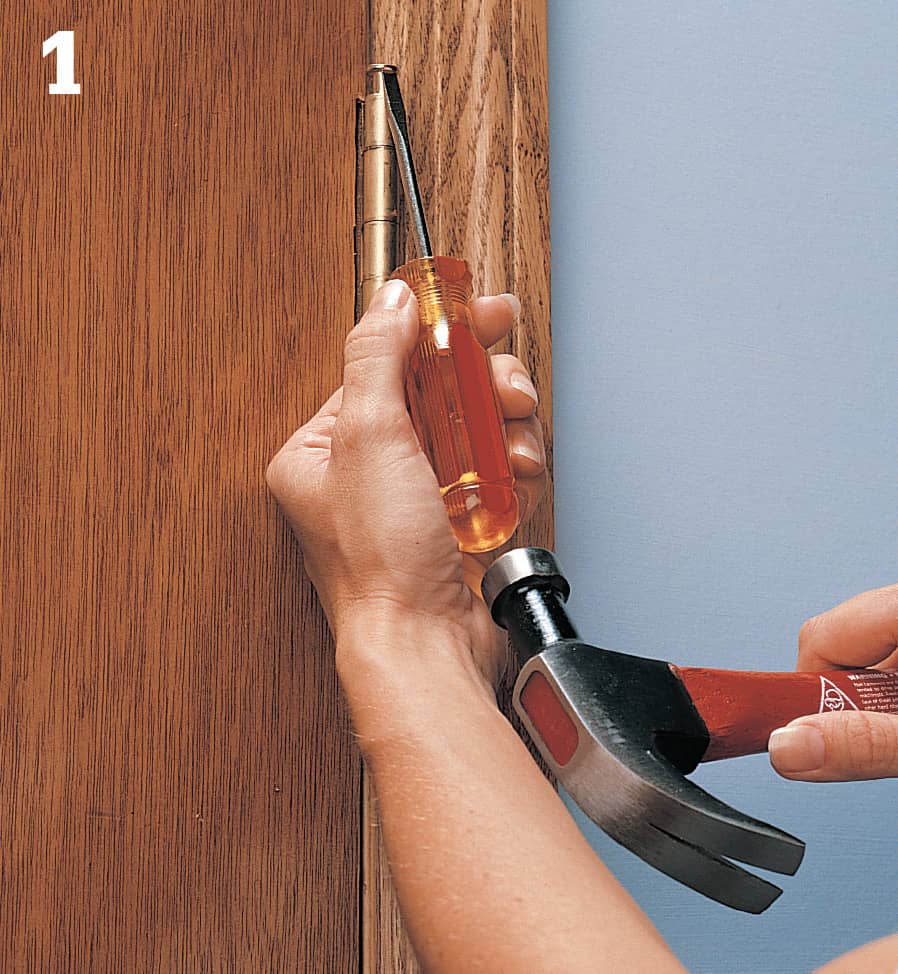
Drive the lower hinge pin out using a screwdriver and hammer. Have a helper hold the door in place, then drive out the upper (and center, if applicable) hinge pins. To help get the screwdriver tip under the pin head, use a nail set or small punch to tap the pin up from underneath.
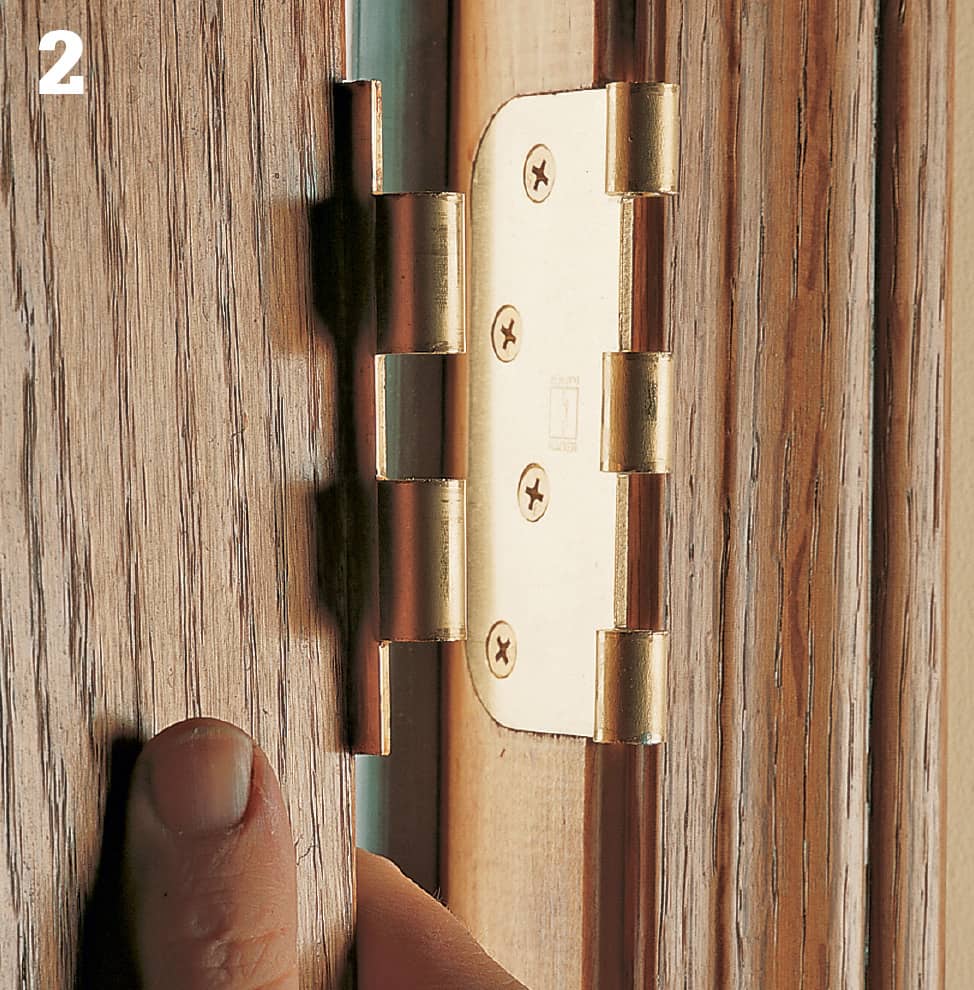
Remove the door and set it aside. Clean and lubricate the hinge pins before reinstalling the door.
How to Tighten a Loose Hinge Plate
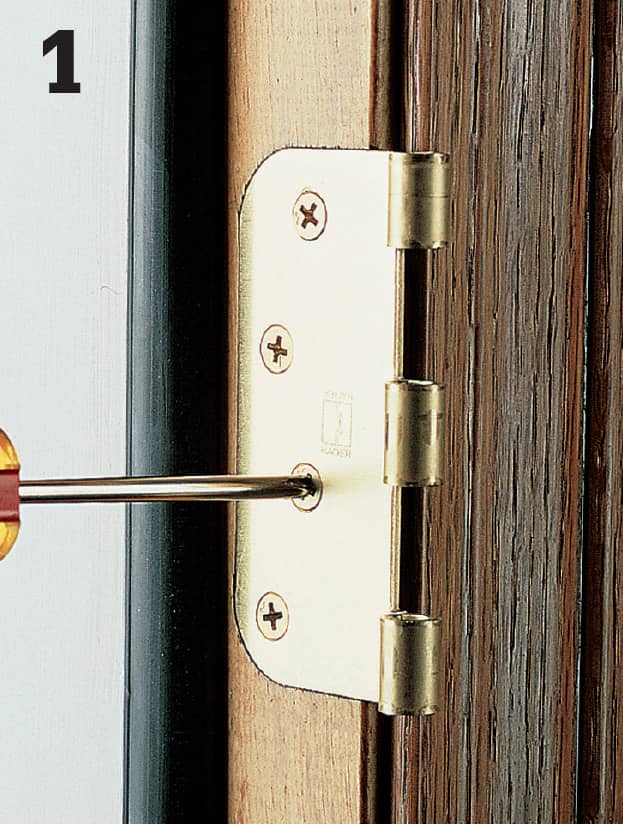
Remove the door from the hinges. Tighten any loose screws. If the wood won’t hold the screws tightly, remove the hinges.
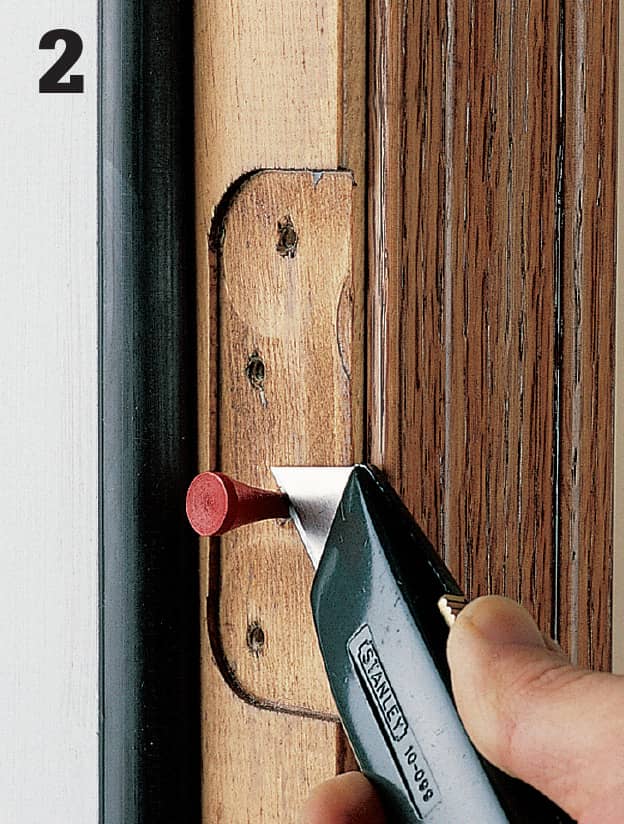
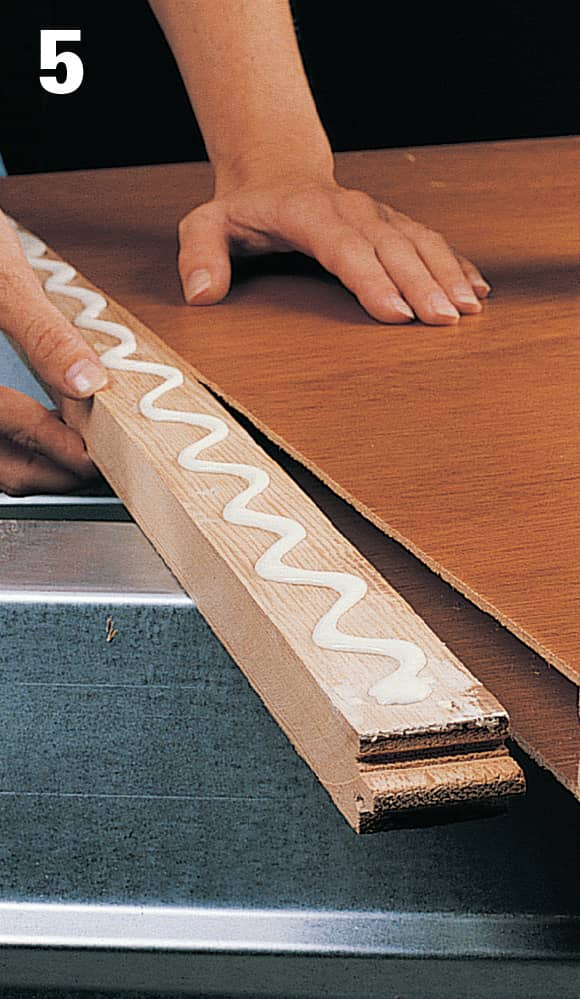
Coat wooden golf tees or dowels with wood glue, and drive them into the worn screw holes. If necessary, drill out the holes to accept dowels. Let the glue dry, then cut off excess wood.
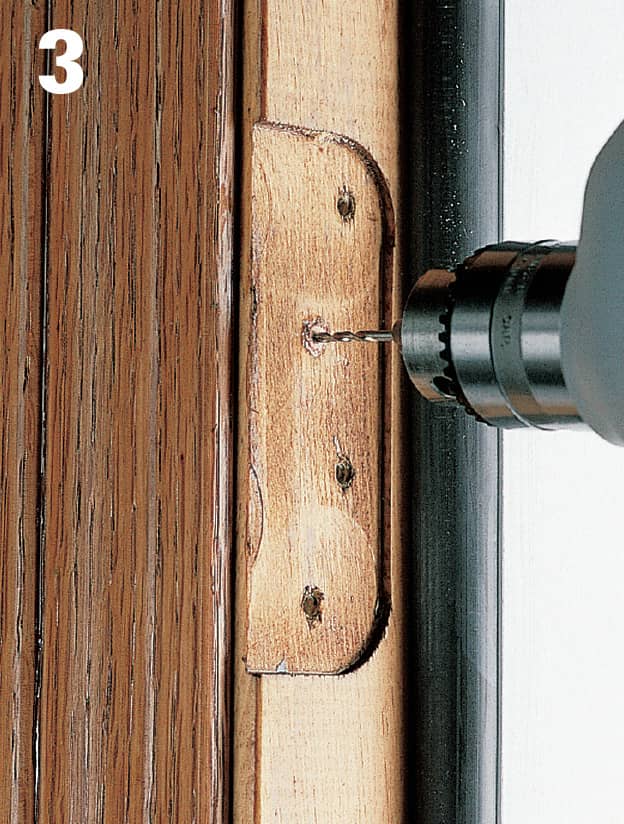
Drill pilot holes in the new wood, and reinstall the hinge.
How to Straighten a Warped Door
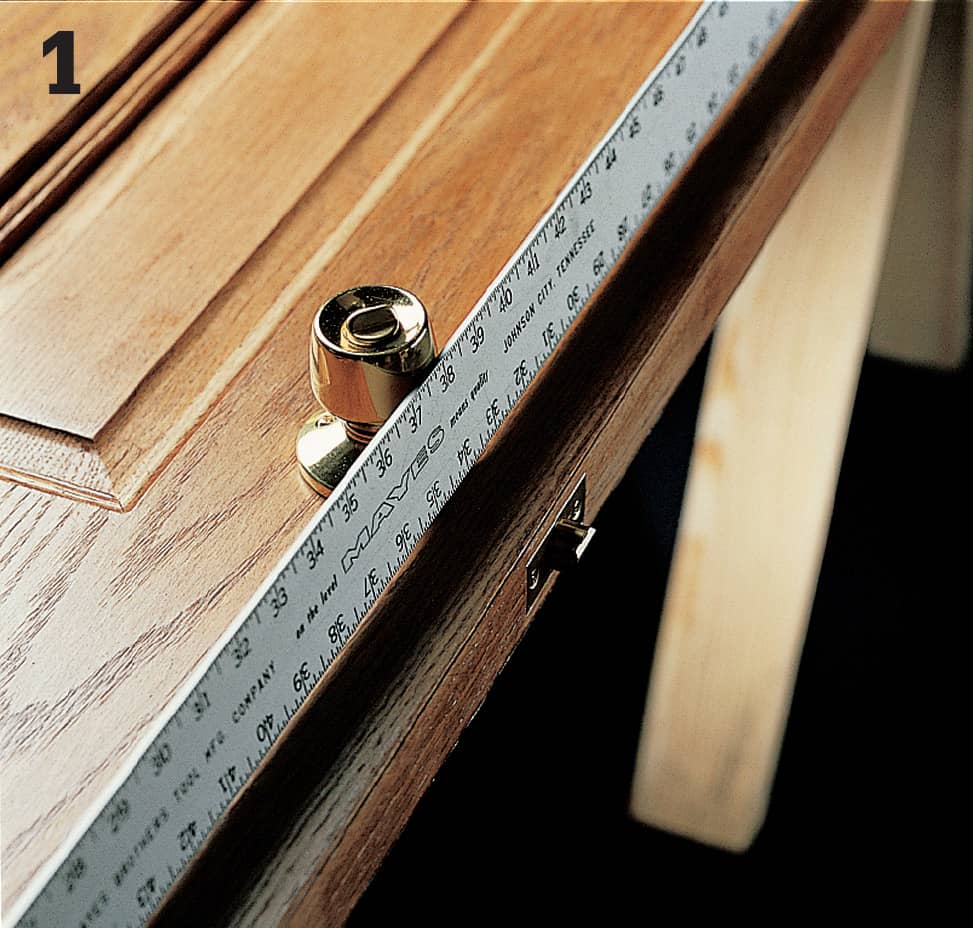
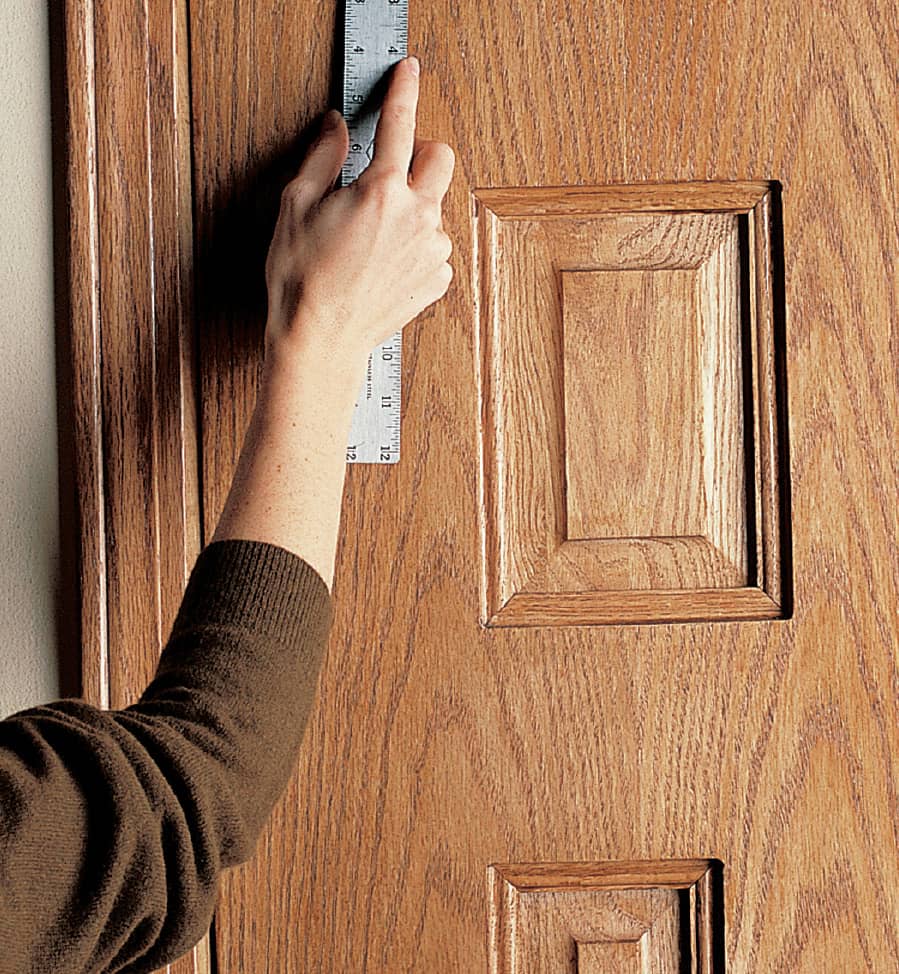
Check the door for warpage using a straightedge. Or, close the door until it hits the stop and look for a gap (see below). The amount of gap between the door and the stop reveals the extent of the warpage. The stop must be straight for this test, so check it with a straightedge.
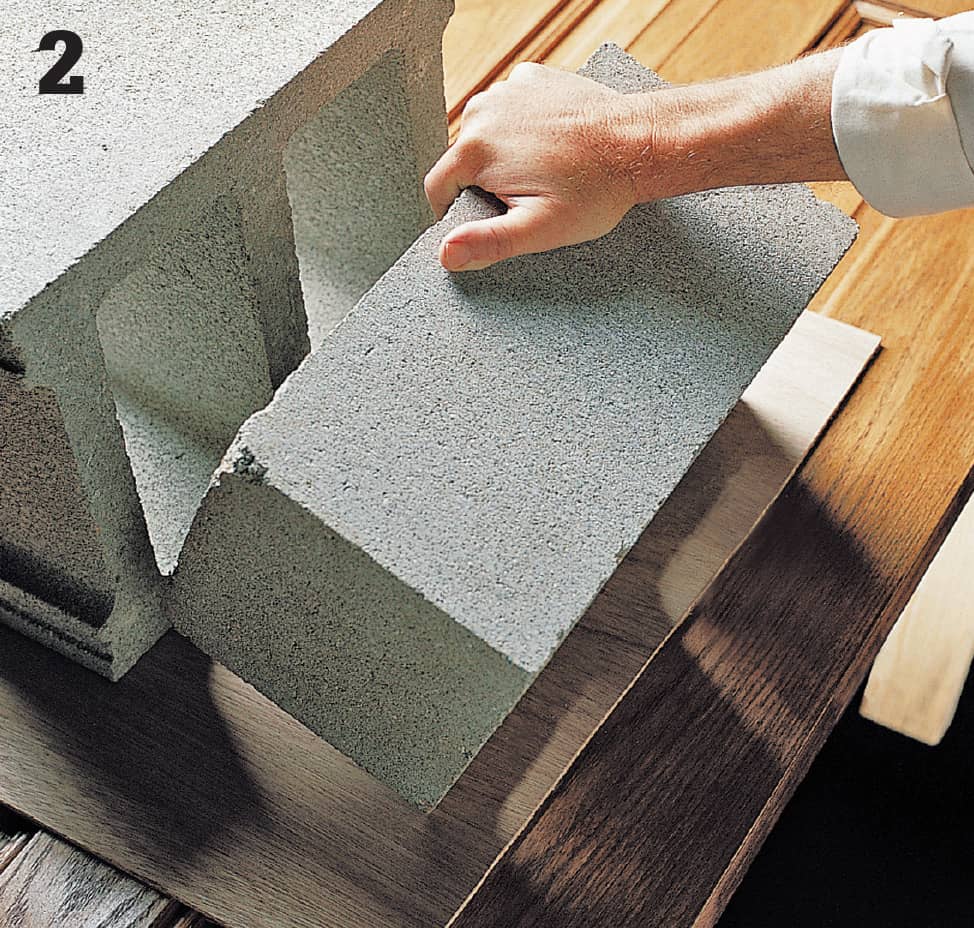
If the warpage is slight, you can straighten the door using weights. Remove the door, and rest the ends of the door on sawhorses. Place heavy weights on the bowed center of the door, using cardboard to protect the finish. Leave the weights on the door for several days, and check it periodically with a straightedge.
How to Adjust for a Severely Warped Door
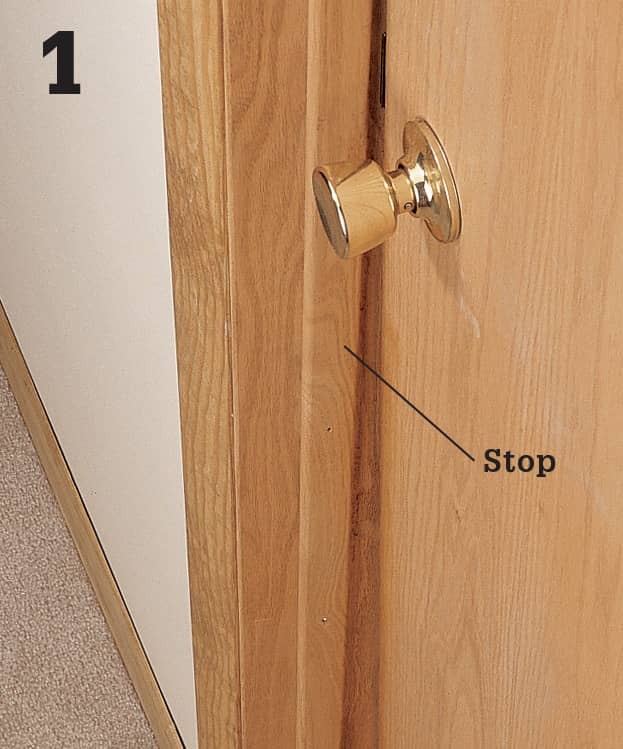
A severe warp cannot be corrected. Instead, you can adjust the doorstop to follow the shape of the door. If you touch up the door jamb with paint or stain after you’ve finished, no one will notice the repair.
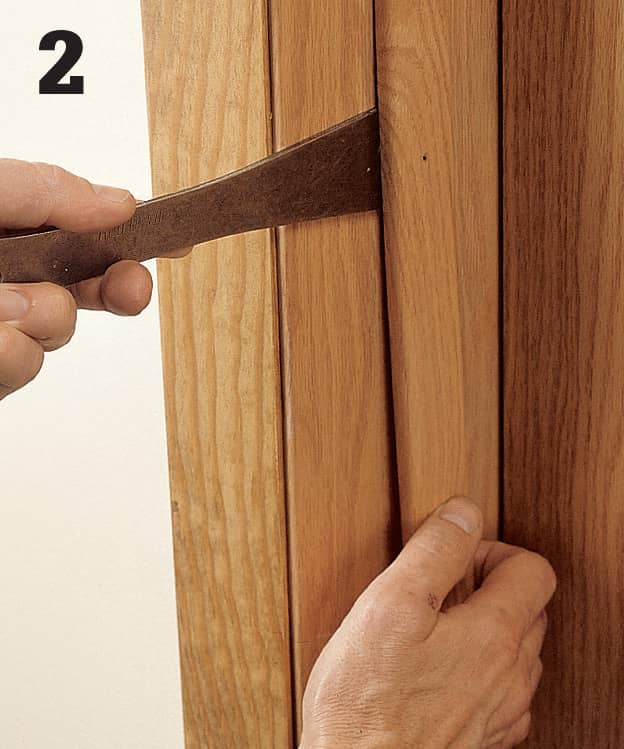
Remove the doorstop using a small pry bar. If it’s painted, cut the paint film first with a utility knife to prevent chipping. Avoid splintering by removing nails from the stop by pulling them through the back side of the piece. Pull all nails from the door jamb.
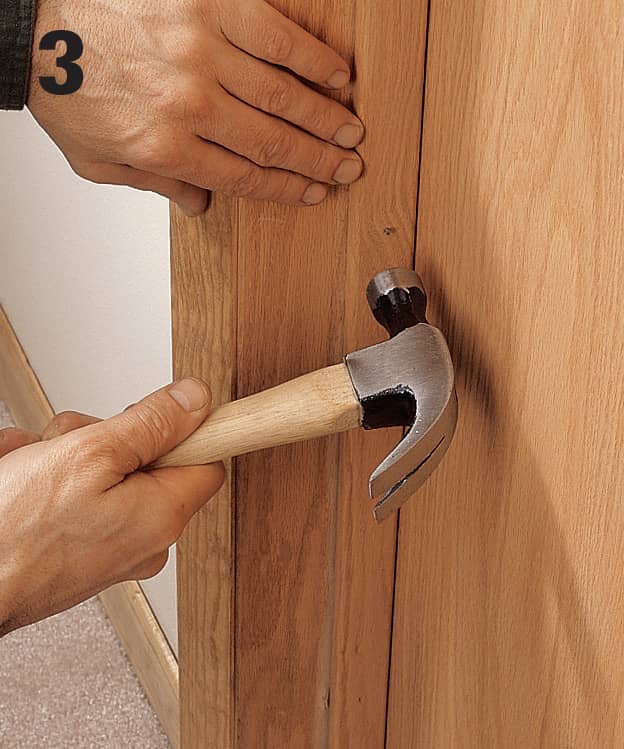
Close the door and latch it. Starting at the top, refasten the stop, keeping the inside edge flush against the door. Drive finish nails through the old holes, or drill new pilot holes through the stop. Set the nails with a nail set after you’ve checked the door’s operation.
How to Free a Sticking Door
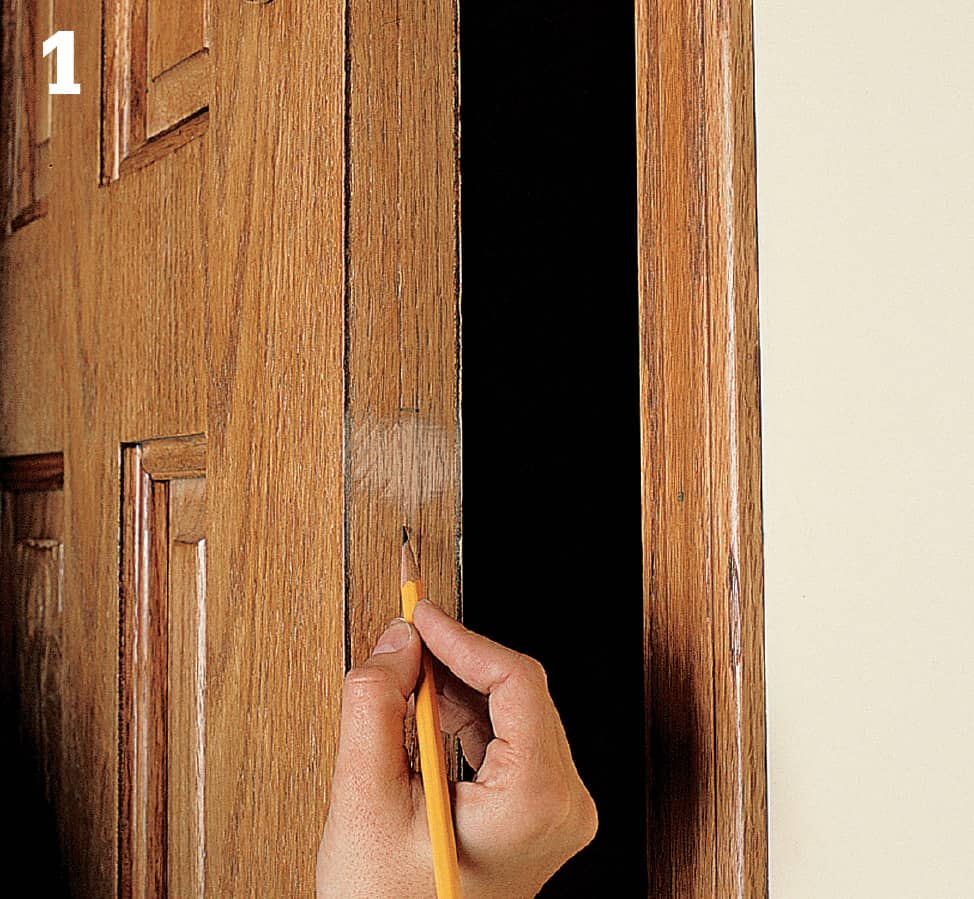
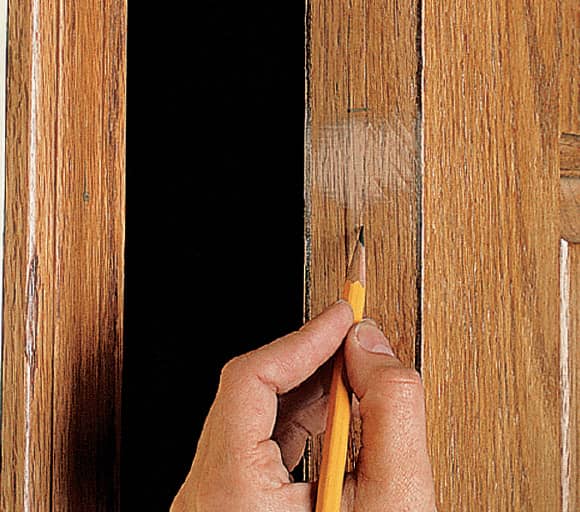
Tighten all of the hinge screws. If the door still sticks, use light pencil lines to mark the areas where the door rubs against the door jamb.
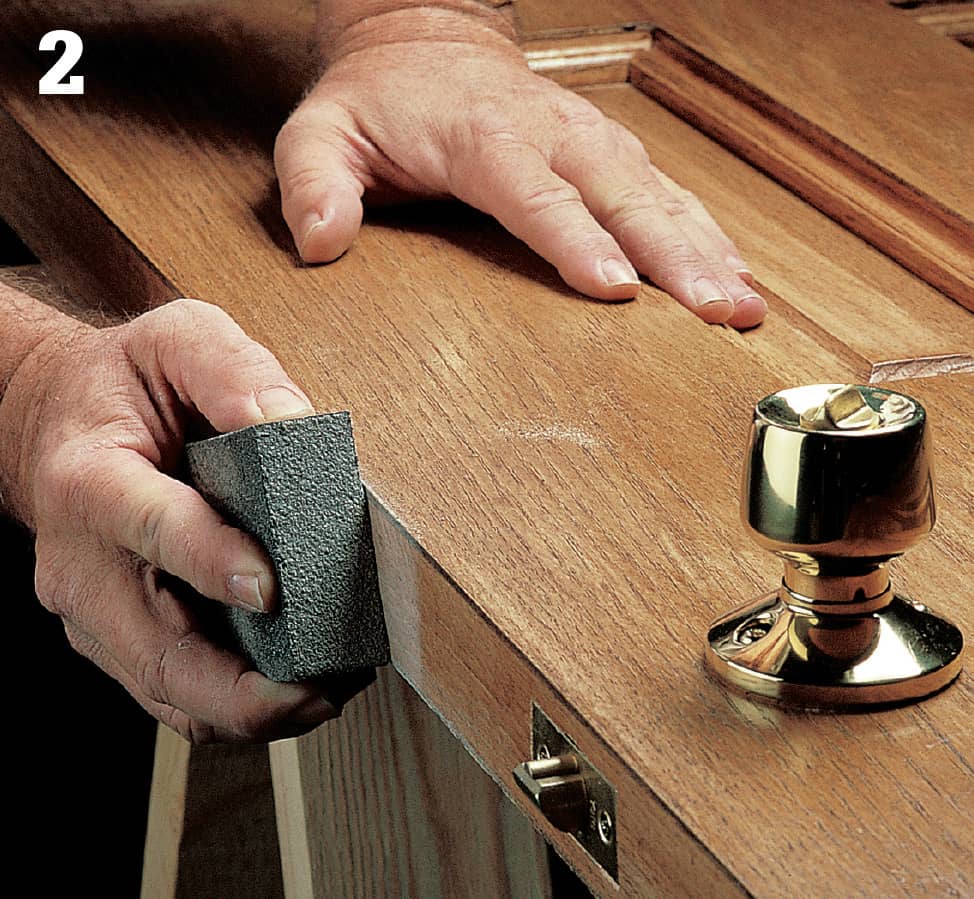
During dry weather, remove the door. If you have to remove a lot of material, you can save time by planing the door (step 3). Otherwise, sand the marked areas with medium-grit sandpaper. Make sure the door closes without sticking, then smooth the sanded areas with fine-grit sandpaper.
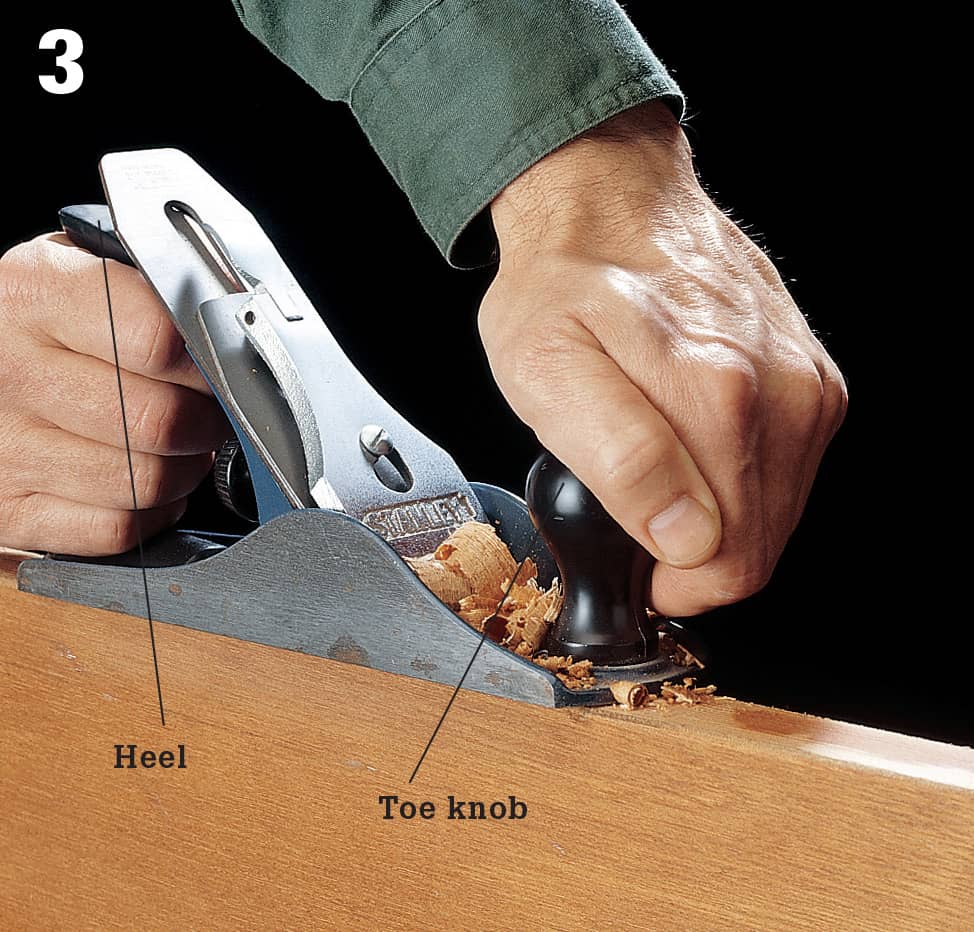
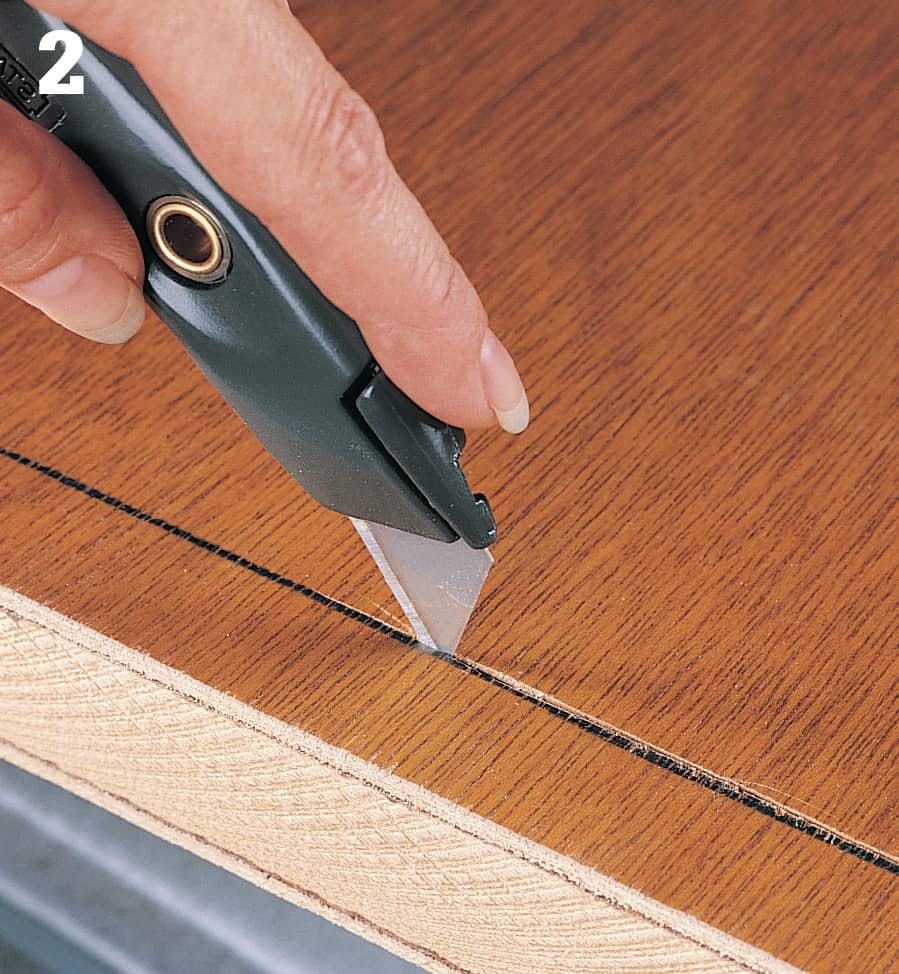
Secure the door on-edge. If the door has veneered surfaces, cut through the veneers with a utility knife to prevent splintering. Operate the plane so the wood grain runs “uphill” ahead of the plane. Grip the toe knob and handle firmly, and plane with long, smooth strokes. To prevent dipping, press down on the toe at the start of the stroke, and bear down on the heel at the end of the stroke. Check the door’s fit, then sand the planed area smooth.
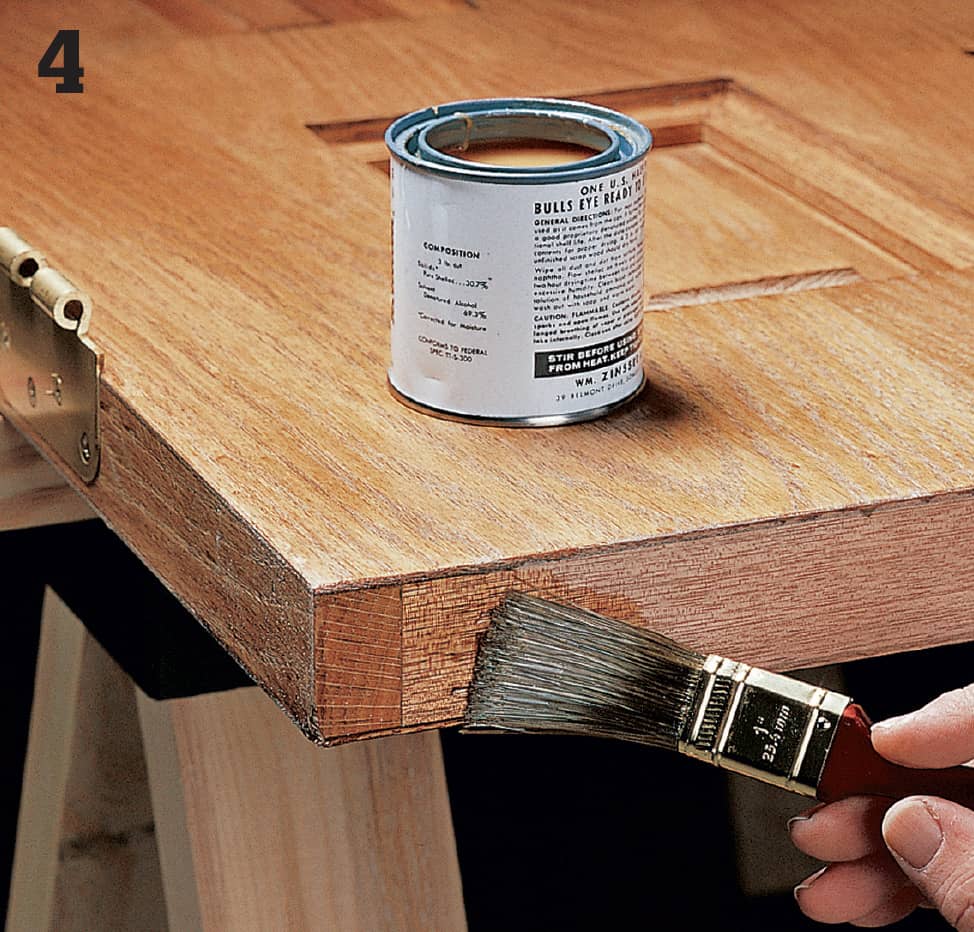
Apply clear sealer or paint to the sanded or planed area and any other exposed surfaces of the door. This will prevent moisture from entering the wood and is especially important for entry doors.
How to Maintain a Sliding Door
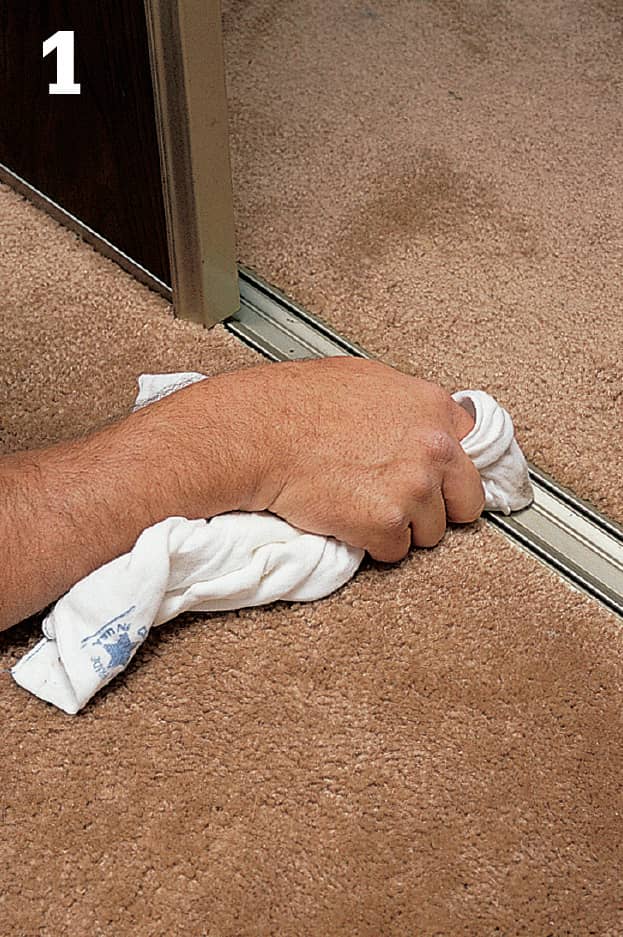
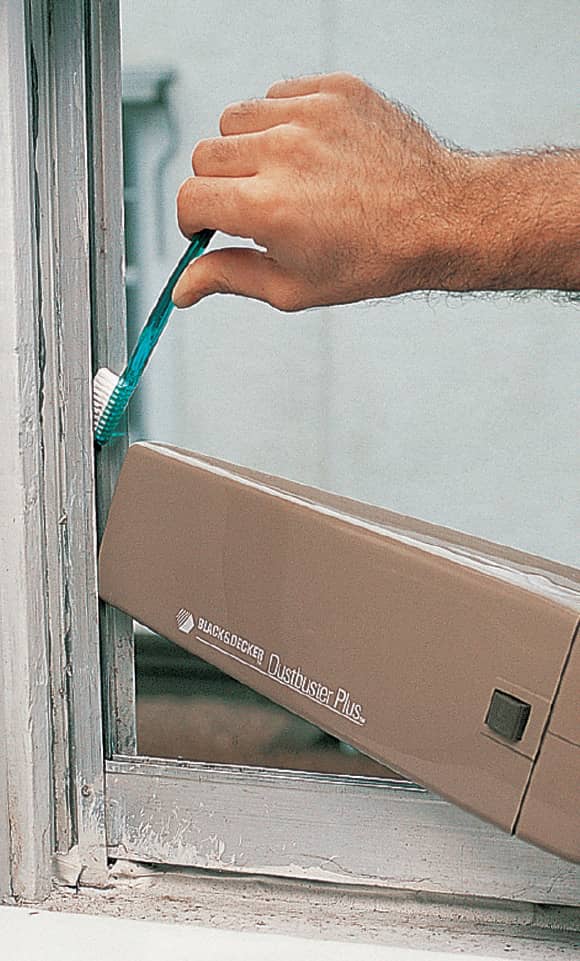
Clean the tracks above and below the doors with a toothbrush and a damp cloth or a hand vacuum.
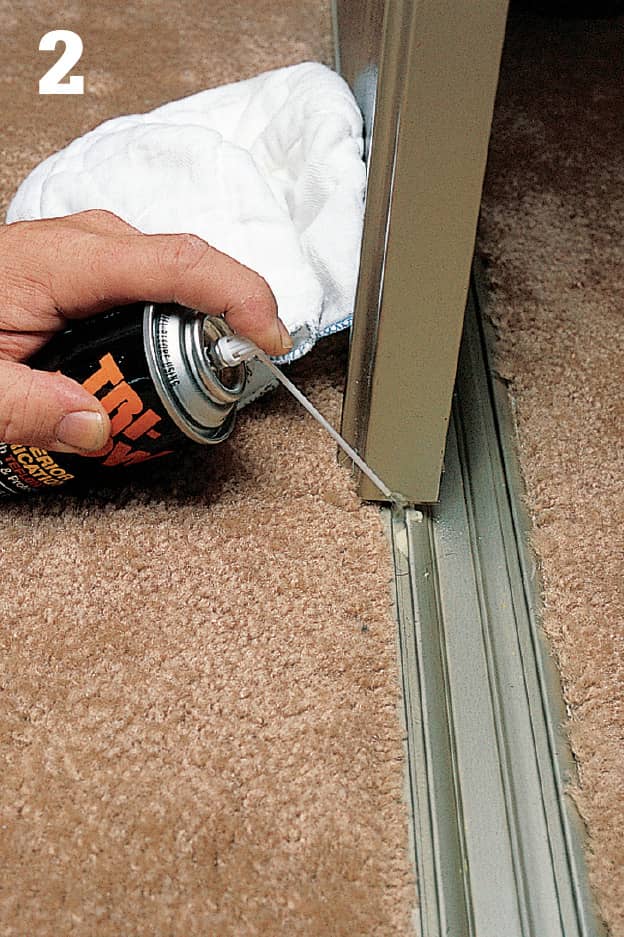
Spray a greaseless lubricant on all the rollers, but do not spray the tracks. Replace any bent or worn parts.
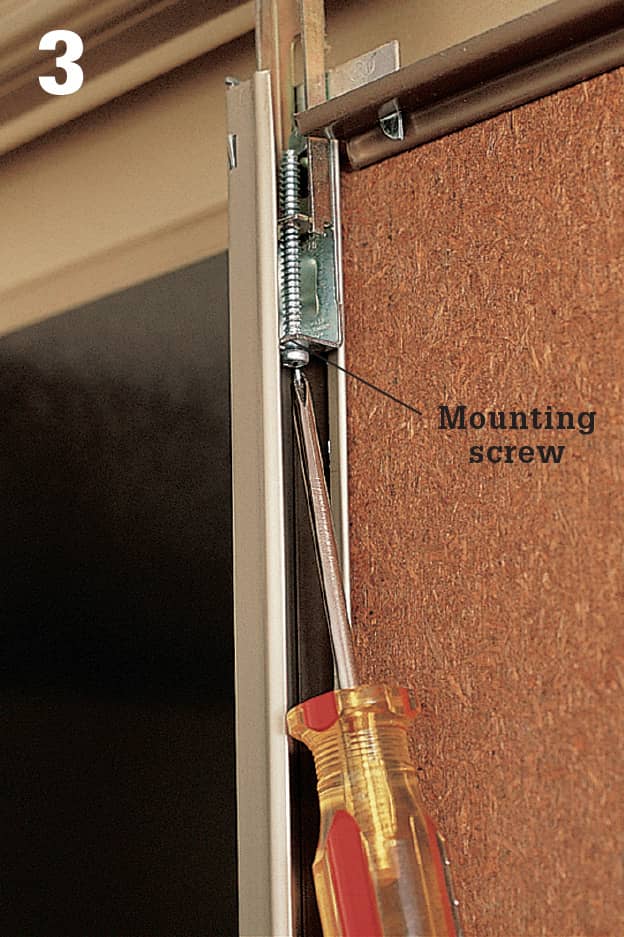
Check the gap along the bottom edge of the door to make sure it is even. To adjust the gap, rotate the mounting screw to raise or lower the door edge.
How to Maintain a Bifold Door
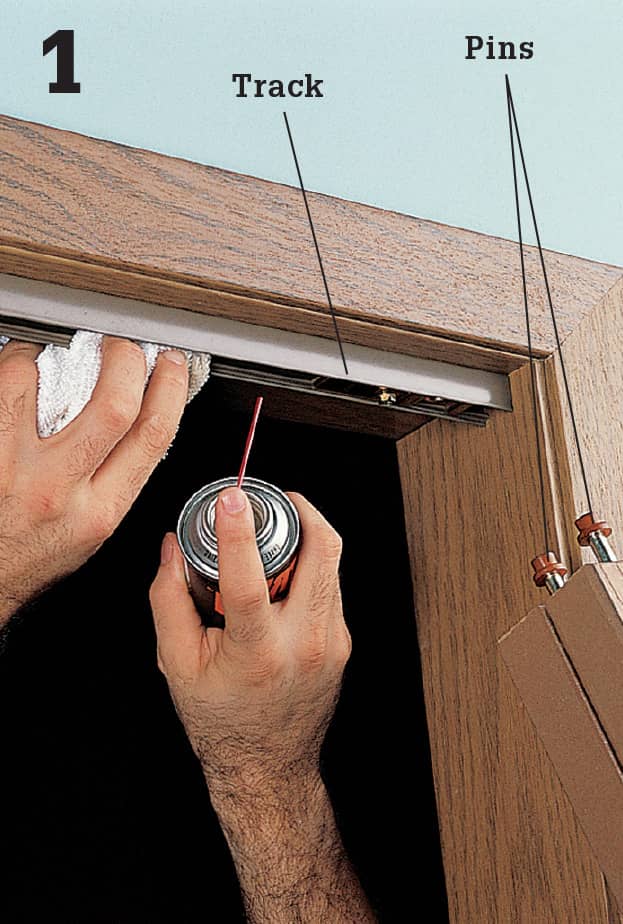
Open or remove the doors and wipe the tracks with a clean rag. Spray the tracks and rollers or pins with greaseless lubricant.
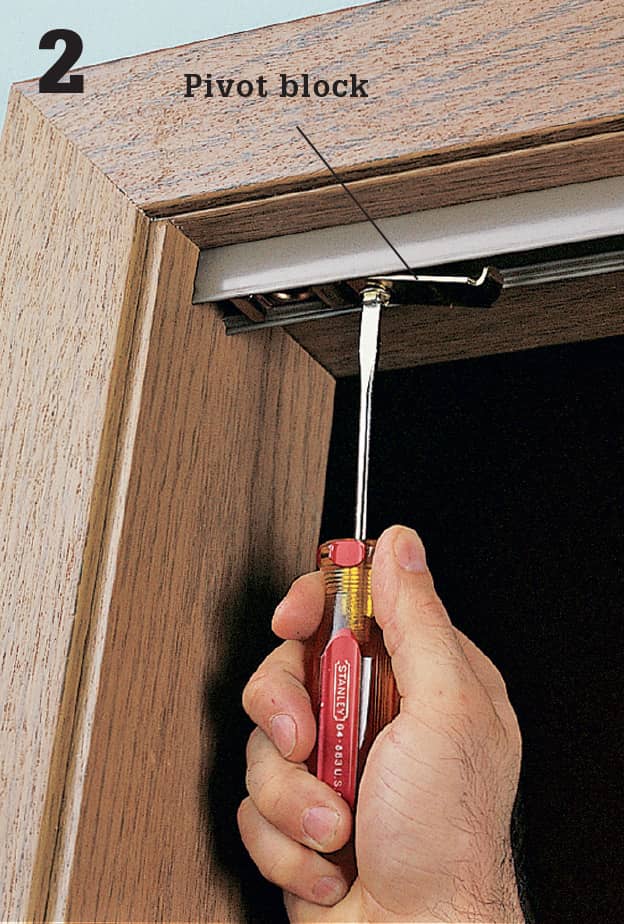
Check closed doors for alignment within the door frame. If the gap between the closed doors is uneven, adjust the top pivot blocks with a screwdriver or wrench.
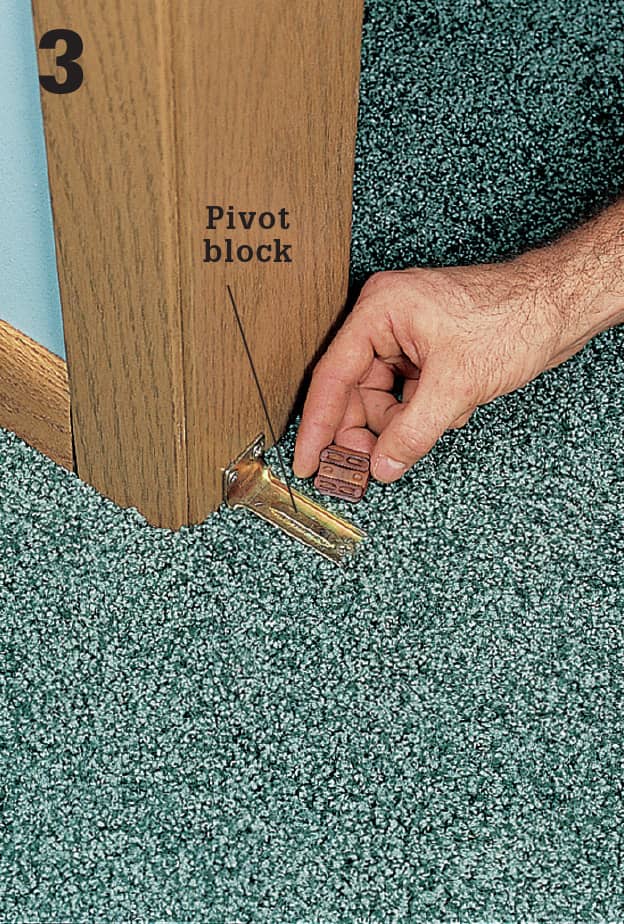
Adjustable pivot blocks are also found at the bottom of some door models. Adjust the pivot blocks until the gap between the door and the frame is even.
 Weatherizing Basics
No matter whether you live in a hot or a cold climate, weatherizing your home’s windows and doors can pay off handsomely. Heating and cooling costs may account for over half of the total household energy bill.
Since most weatherizing projects are relatively inexpensive, you can recover your investment quickly. In fact, in some climates, you can pay back the cost of a weatherproofing project in one season.
If you live in a cold climate, you probably already understand the importance of weatherizing. The value of keeping warm air inside the house during a cold winter is obvious. From the standpoint of energy efficiency, it’s equally important to prevent warm air from entering the house during summer.
Weatherizing your home is an ideal do-it-yourself project, because it can be done a little at a time, according to your schedule. In cold climates, the best time of the year to weatherize is the fall, before it turns too cold to work outdoors.
Whether you’re concerned about the environment or want to spend less on your utility bills, some simple adjustments around your home can help you accomplish your goal.
Most weatherizing projects deal with windows and doors, because these are the primary areas of heat loss in most homes. Here are a few simple suggestions you might consider for the exterior of your home:
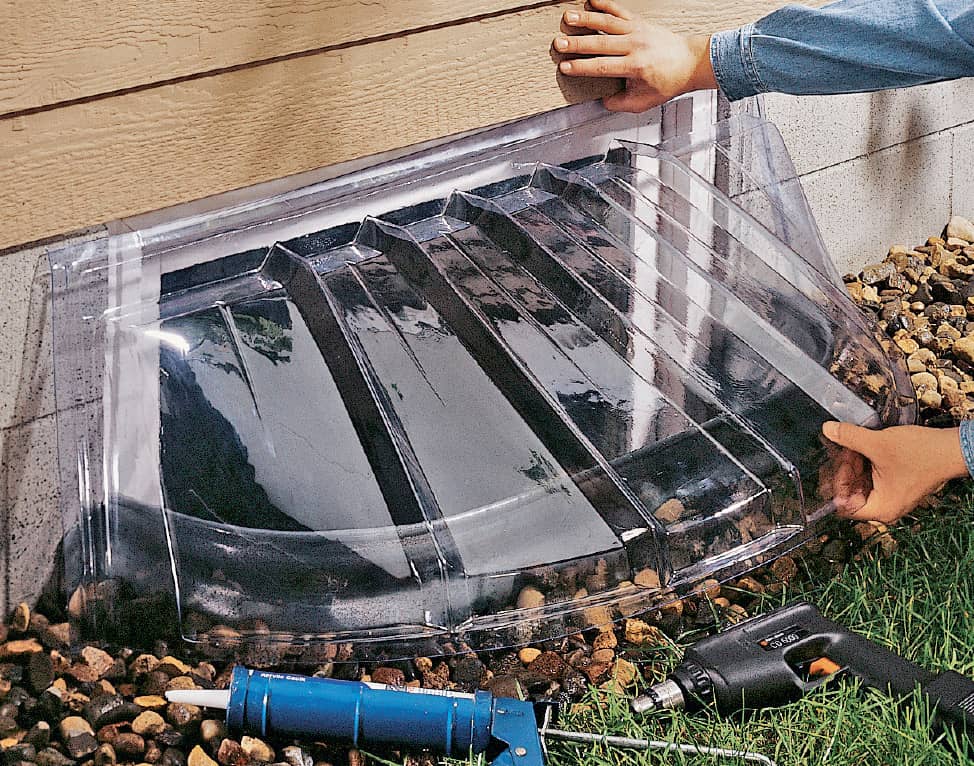
Before buying a basement window well cover, measure the widest point of the window well and note its shape.
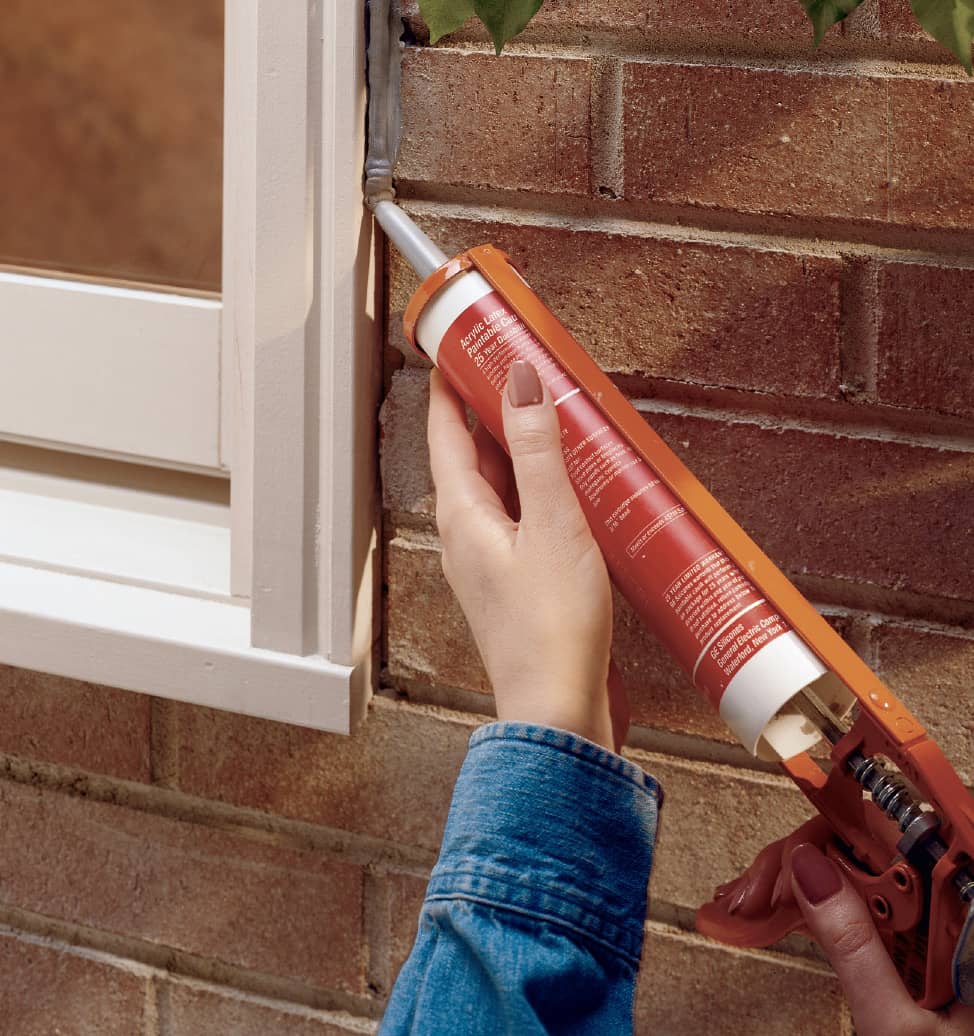
Use a caulk that matches your home exterior to seal the window and door frames.
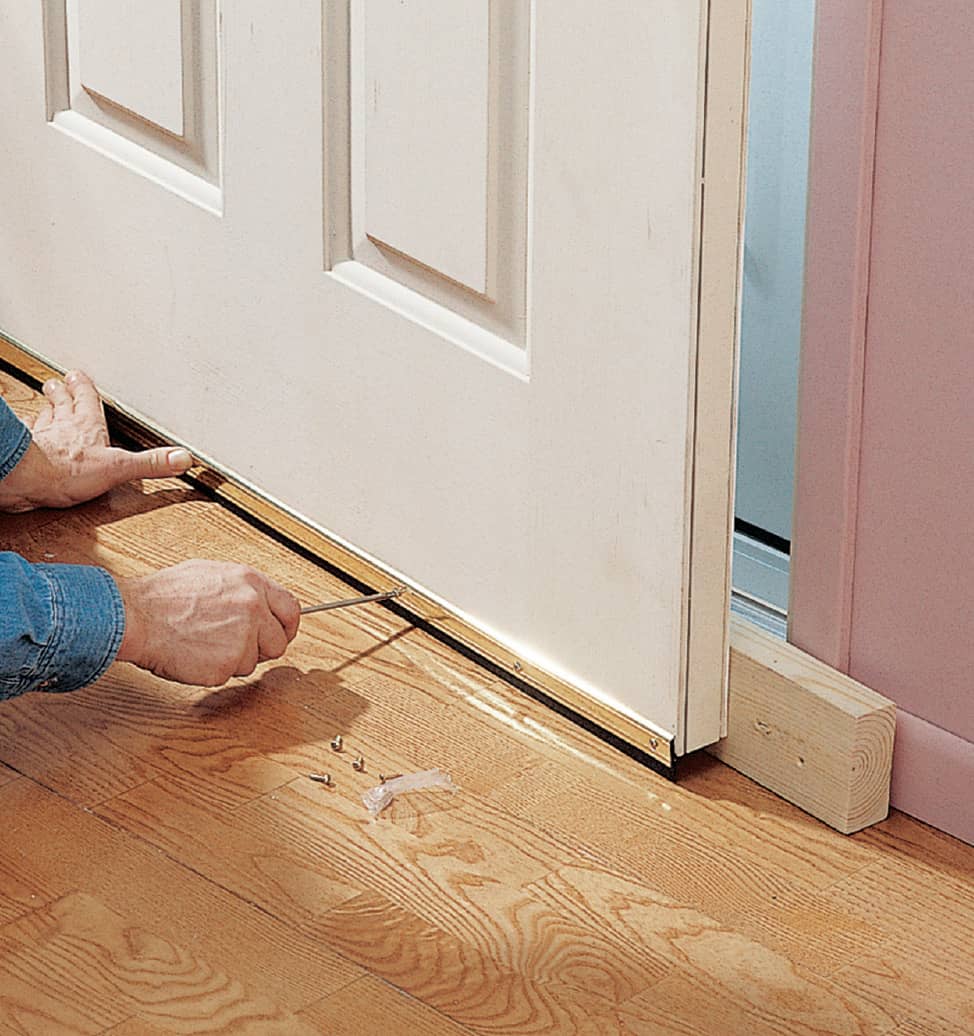
A felt door sweep can seal out drafts, even if you have an uneven floor or a low threshold.
Minimize heat loss from basement window wells by covering them with plastic window well covers (opposite page, top). Most window well covers have an upper flange designed to slip under the siding. Slip this in place, then fasten the cover to the foundation with masonry anchors and weigh down the bottom flange with stones. For extra weatherizing, seal the edges with caulk.
Adding caulk is a simple way to fill narrow gaps in interior or exterior surfaces. It’s also available in a peelable form that can be easily removed at the end of the season.
When buying caulk, estimate half a cartridge per window or door, four for an average-sized foundation sill, and at least one more to close gaps around vents, pipes, and other openings.
Caulk around the outside of the window and door frames to seal any gaps. For best results, use a caulk that matches or blends with the color of your siding.
There are many different types of caulk and weather stripping materials. All are inexpensive and easy to use, but it’s important to get the right materials for the job, as most are designed for specific applications.
Generally, metal and metal-reinforced weather stripping is more durable than products made of plastic, rubber, or foam. However, even plastic, rubber, and foam weather stripping products have a wide range of quality. The best rubber products are those made from neoprene rubber—use this whenever it’s available.
A door sweep (previous page, bottom) attaches to the inside bottom of the door to seal out drafts. A felt or bristle sweep is best if you have an uneven floor or a low threshold. Vinyl and rubber models are also available.
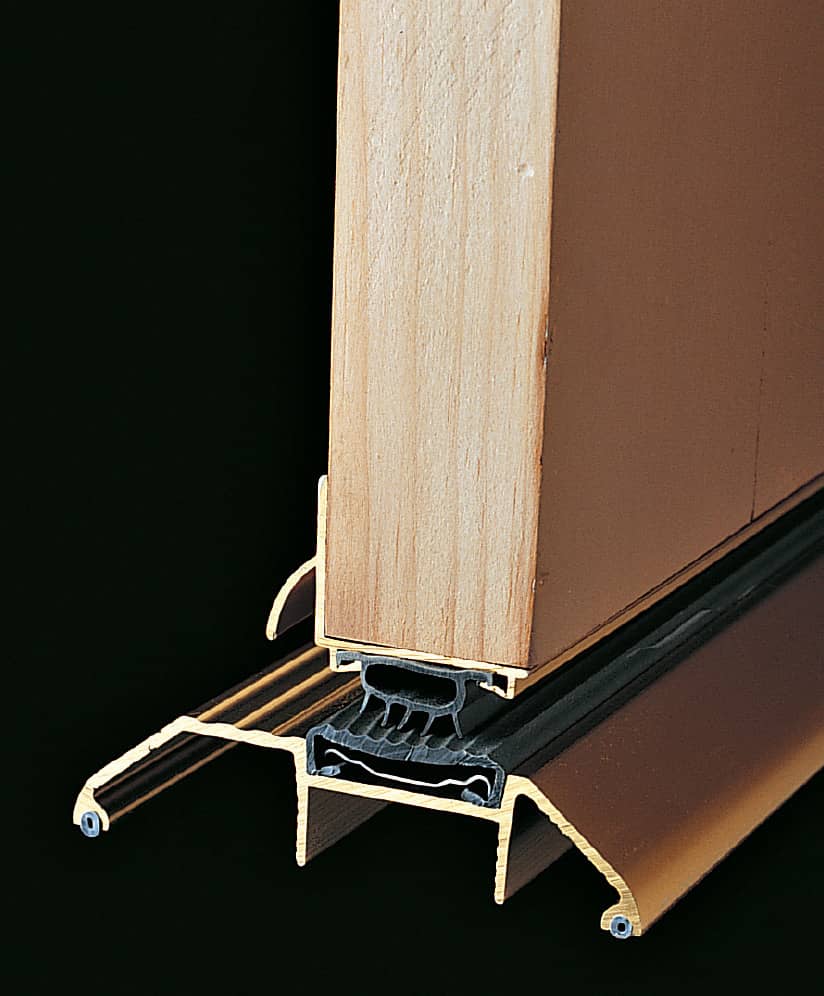
A threshold insert fits around the base of the door. Most have a sweep on the interior side and a drip edge on the exterior side to direct water away from the threshold.
A threshold insert seals the gap between the door and the threshold. These are made from vinyl or rubber and can be easily replaced.
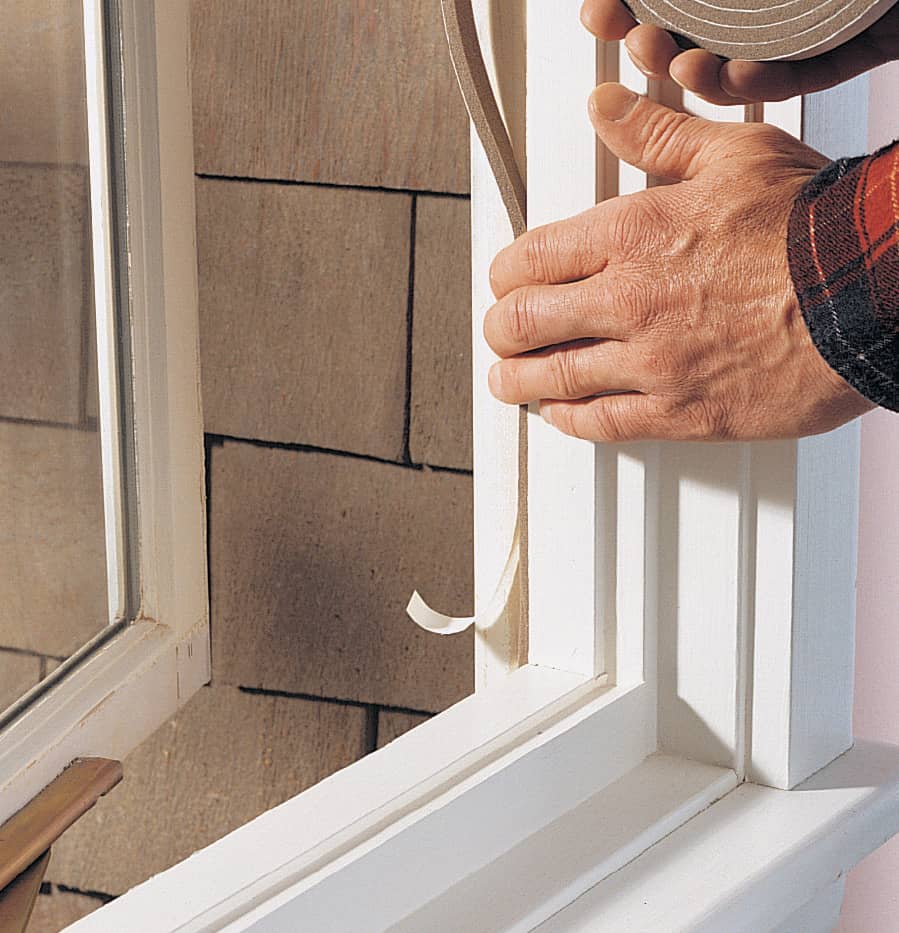
Self-adhesive foam strips (below) attach to sashes and frames to seal the air gaps at windows and doors. Reinforced felt strips have a metal spine that adds rigidity in high-impact areas, such as doorstops.
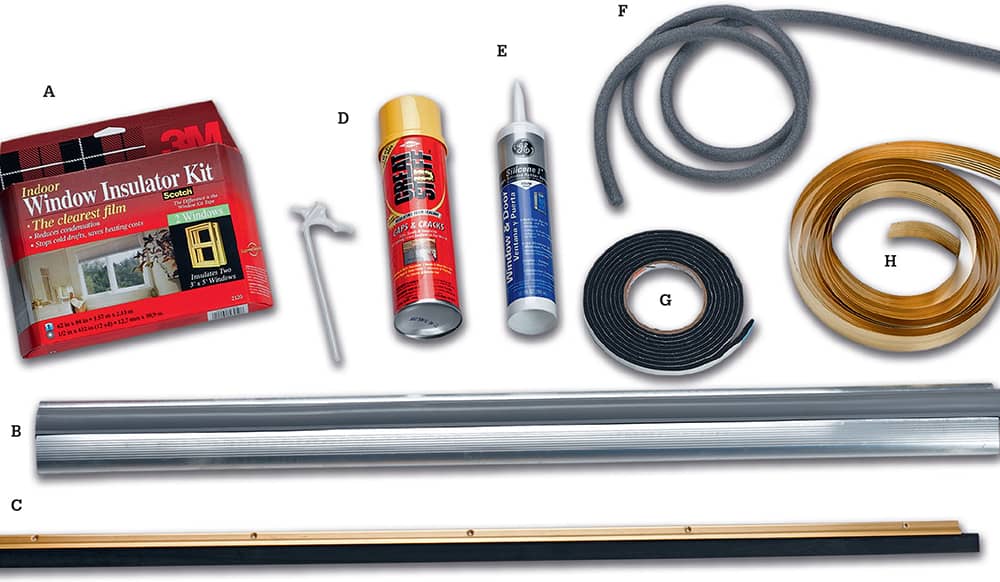
Weatherizing products commonly found in home centers include: A clear film, heat-shrink window insulator kit (A); an aluminum door threshold with vinyl weatherstripping insert (B); a nail-on, rubber door sweep (C); minimal expanding spray foam (D); silicone window and door caulk (E); open-cell foam caulk-backer rod (F); self-adhesive, closed-cell foam weatherstripping coil (G); flexible brass weatherstripping coil, also called V-channel, (H).
How to Weatherize an Exterior Door
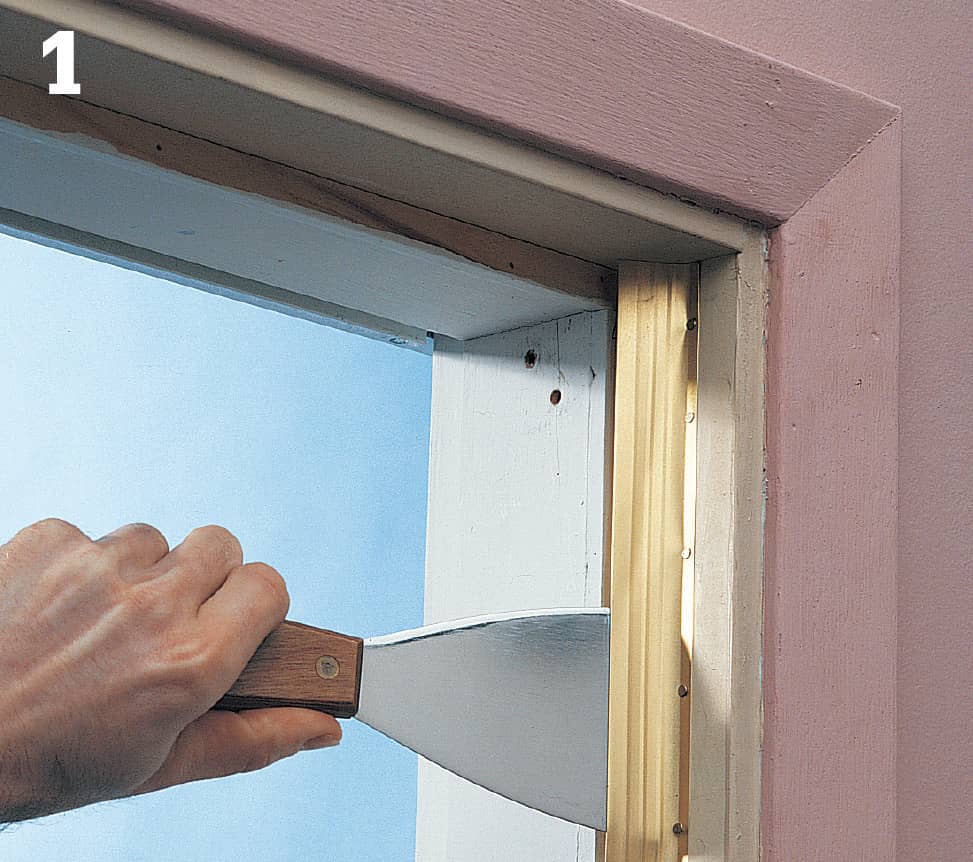
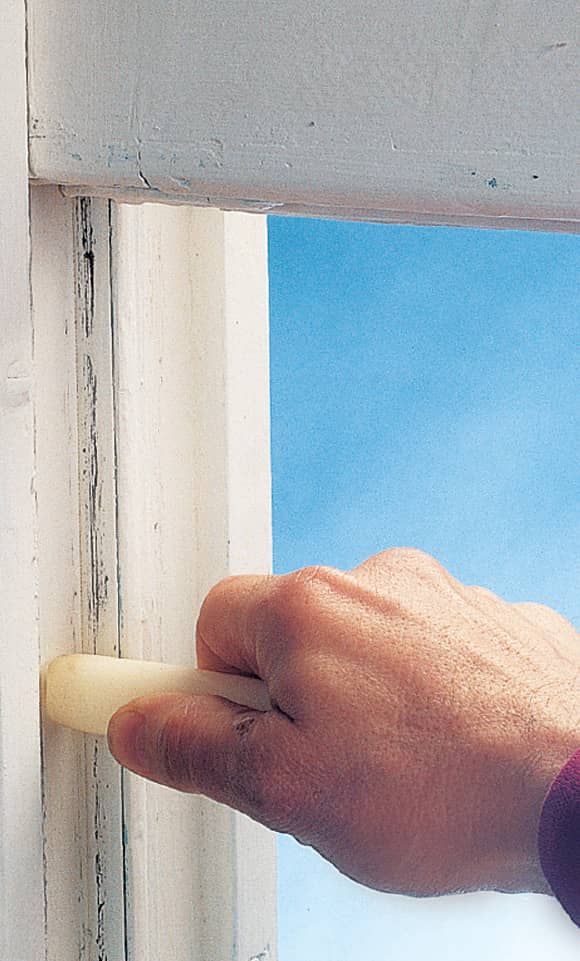
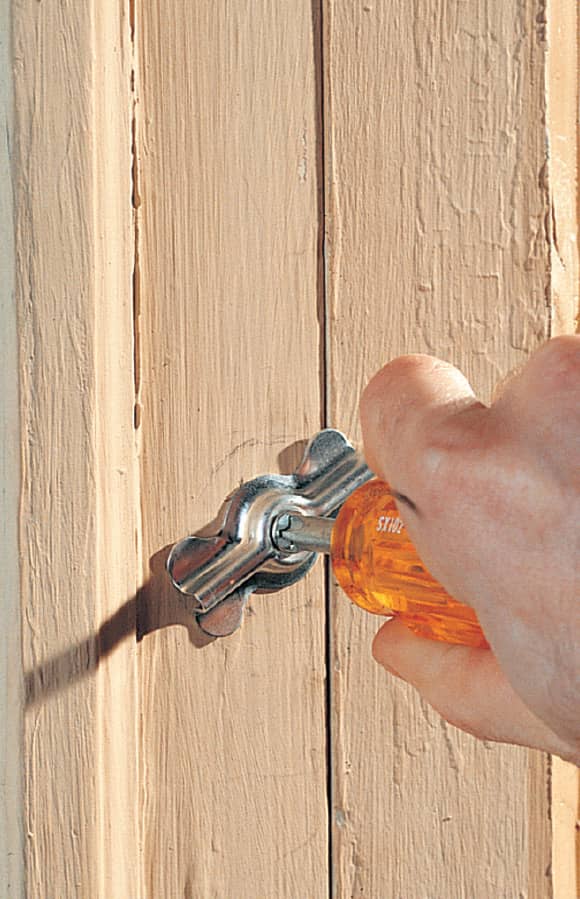
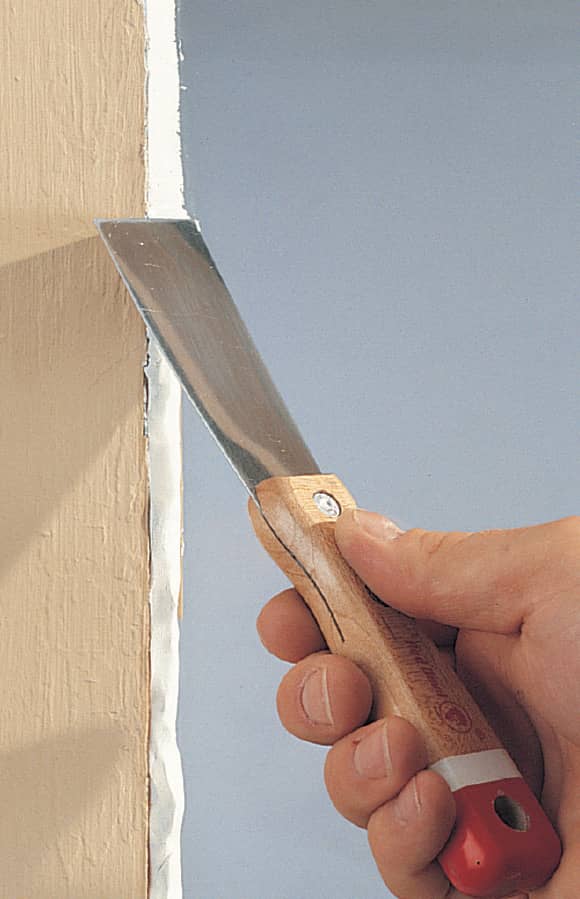
Cut two pieces of metal tension strip or V-channel the full height of the door opening, and cut another to full width. Use wire brads to tack the strips to the door jambs and door header on the interior side of the doorstops. Tip: Attach metal weather stripping from the top down to help prevent buckling. Flare out the tension strips with a putty knife to fill the gaps between the jambs and the door when the door is in the closed position (do not pry too far at a time).
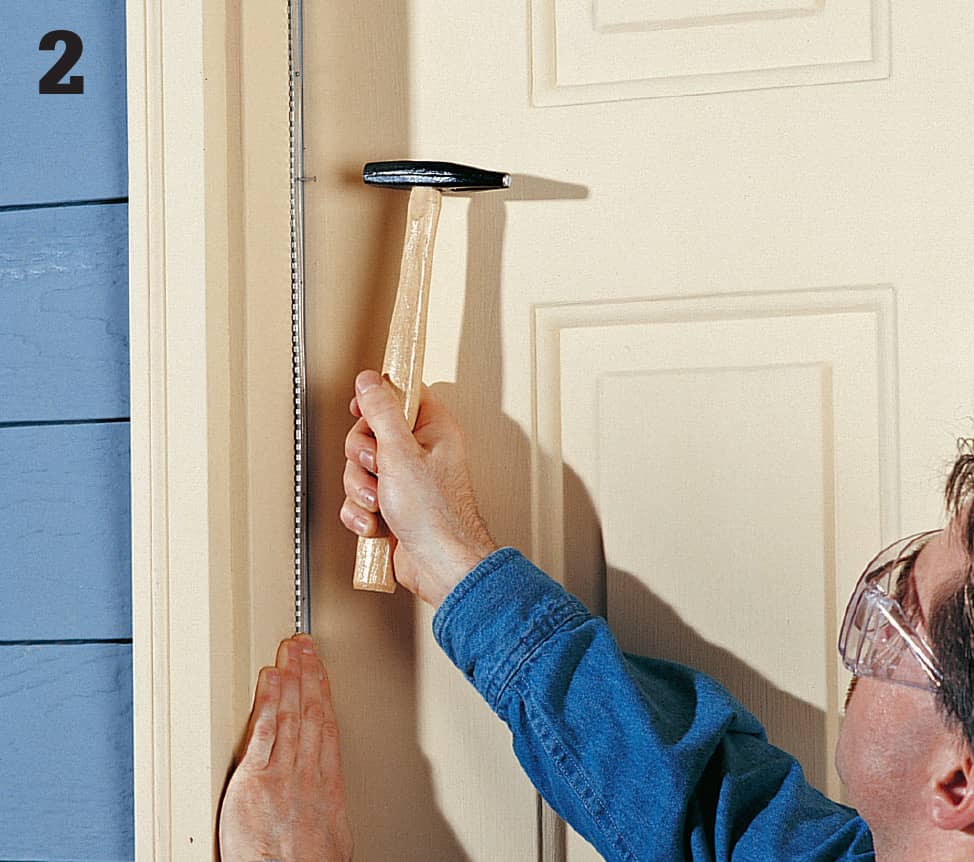
Add reinforced felt strips to the edge of the doorstop on the exterior side. The felt edge should form a close seal with the door when closed. Tip: Drive fasteners only until they are flush with the surface of the reinforcing spine—overdriving will cause damage and buckling.
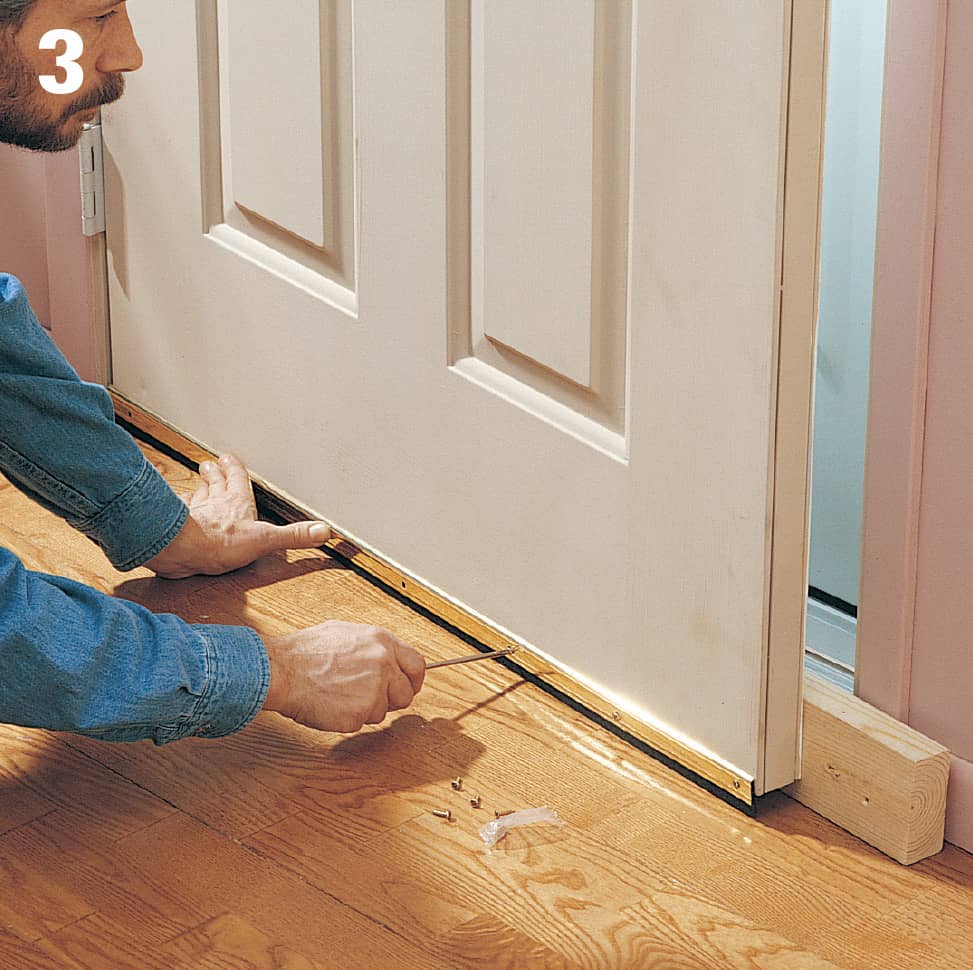
Attach a new door sweep to the bottom of the door on the interior side (felt or bristle types are better choices if the floor is uneven). Before fastening it permanently, tack the sweep in place and test the door swing to make sure there is enough clearance.
How to Weatherstrip a Window
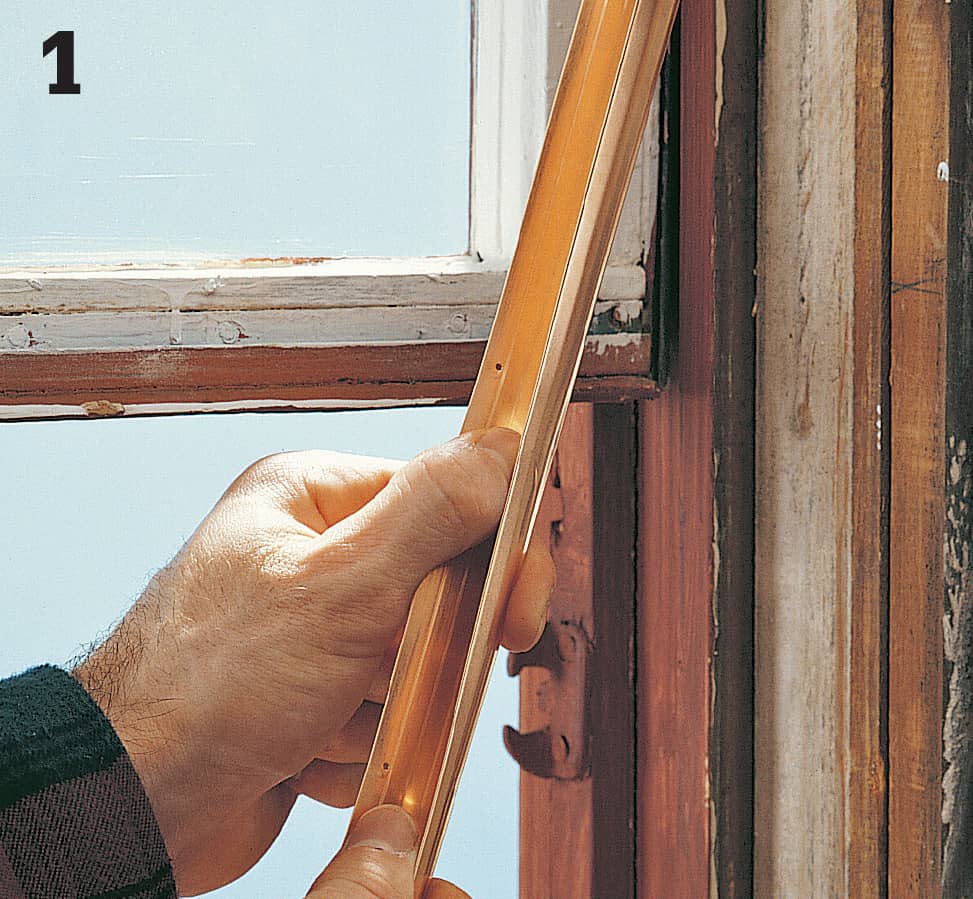
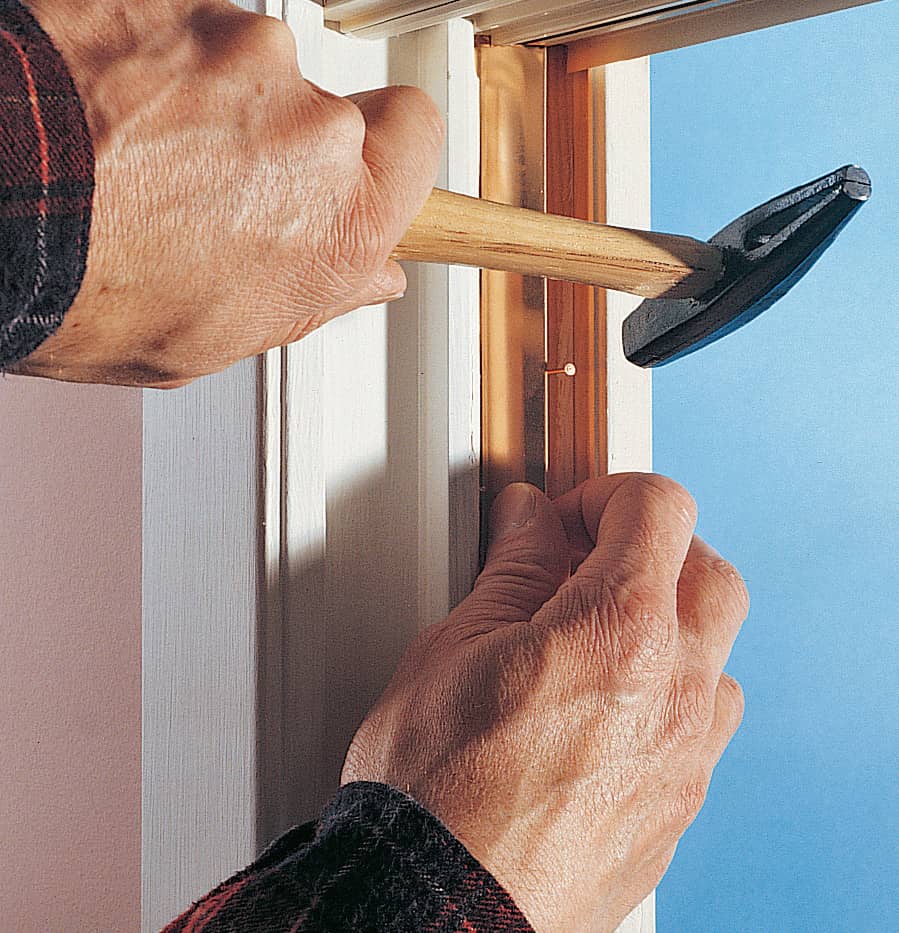
Cut metal V-channel to fit in the channels for the sliding sash, extending at least 2" past the closed position for each sash (do not cover sash-closing mechanisms). Attach the V-channel by driving wire brads (usually provided by the manufacturer) with a tack hammer. Drive the fasteners flush with the surface so the sliding sash will not catch on them.
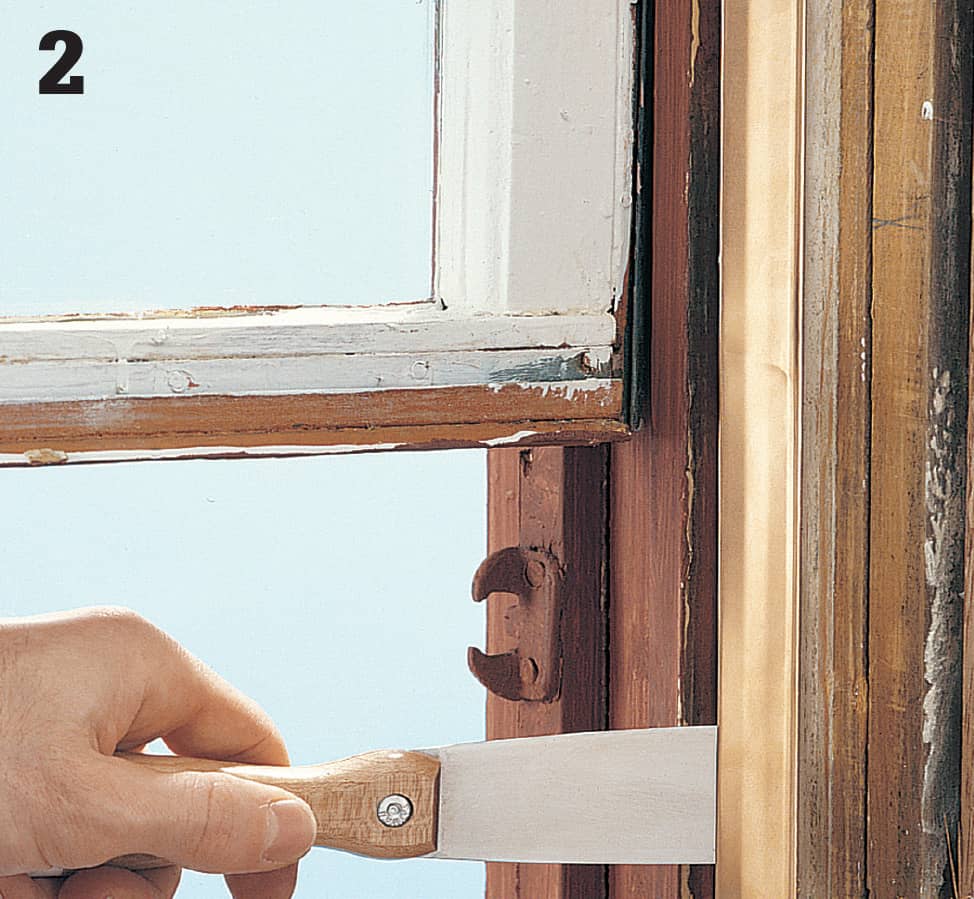
Flare out the open ends of the V-channels with a putty knife so the channel is slightly wider than the gap between the sash and the track it fits into. Avoid flaring out too much at one time—it is difficult to press V-channel back together without causing some buckling.
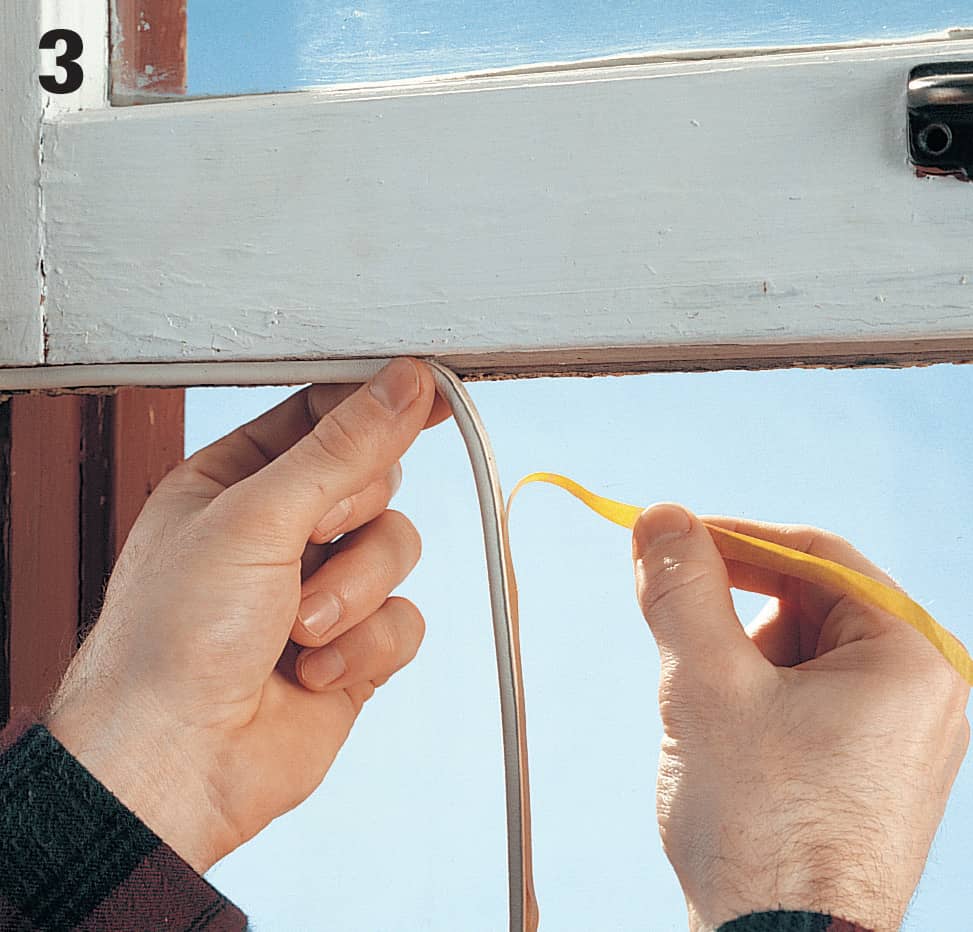
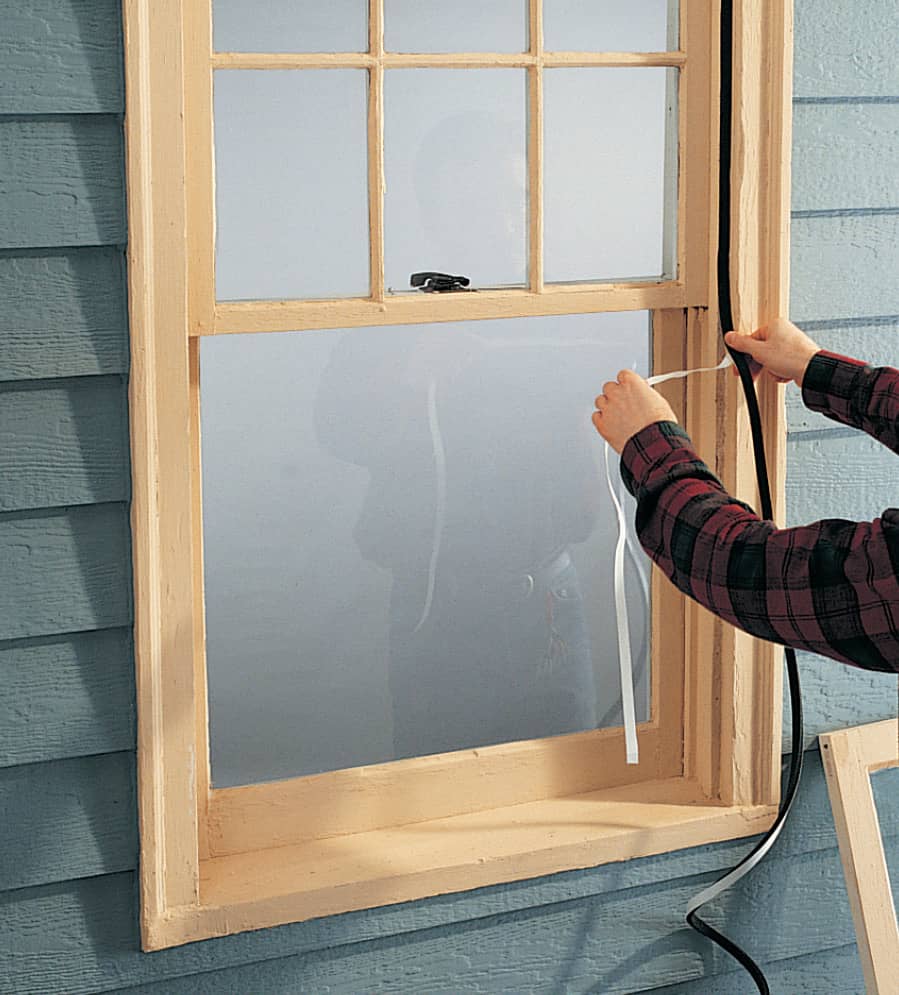
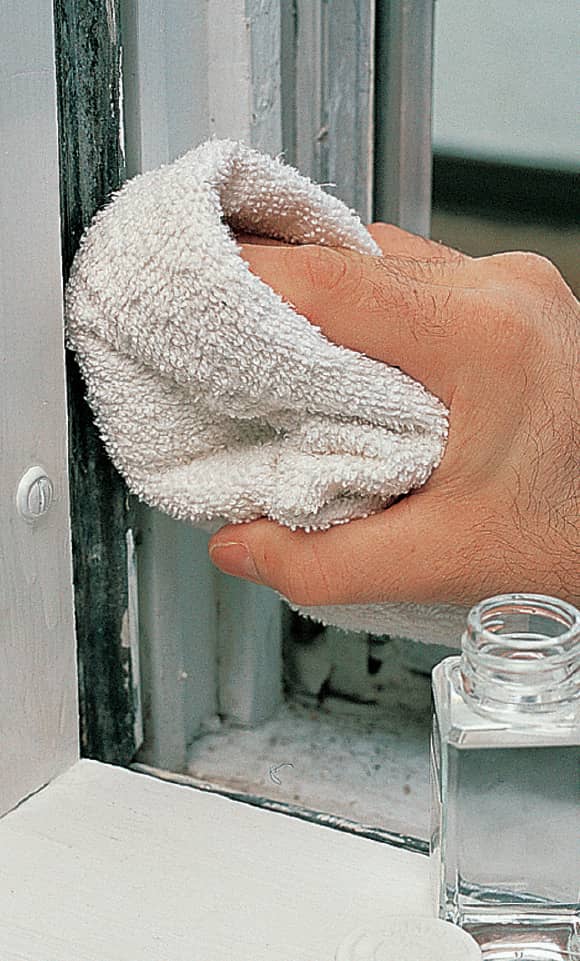
Wipe down the underside of the bottom window sash with a damp rag, and let it dry; then attach self-adhesive compressible foam or rubber to the underside of the sash. Use high-quality hollow neoprene strips, if available. This will create an airtight seal when the window is locked in position.
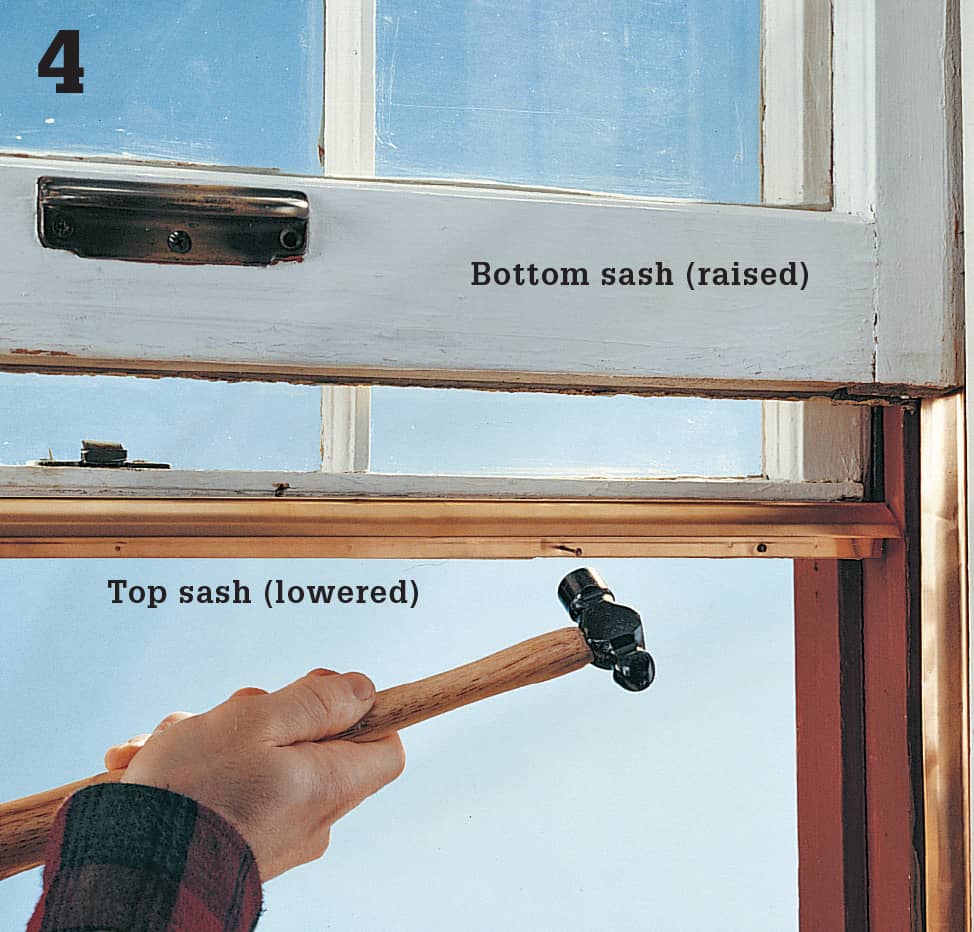
Seal the gap between the top sash and the bottom sash on double-hung windows. Lift the bottom sash and lower the top sash to improve access, and tack metal V-channel to the bottom rail of the top sash using wire brads. Tip: The open end of the “V” should be pointed downward so moisture cannot collect in the channel. Flare out the V-channel with a putty knife to fit the gap between the sash.
 Shortening Interior Doors
There should be a 3/8 to 3/4" gap between the bottom of interior doors and the finished floor. This lets the door swing without binding on new carpet or other floor coverings. But eventually, you may decide to recarpet or add new tile or wood flooring beneath an existing door, and you’ll need to shorten the door to create the proper gap again. If you own a circular saw with a fine-tooth blade, it’s a simple project for a do-it-yourselfer.
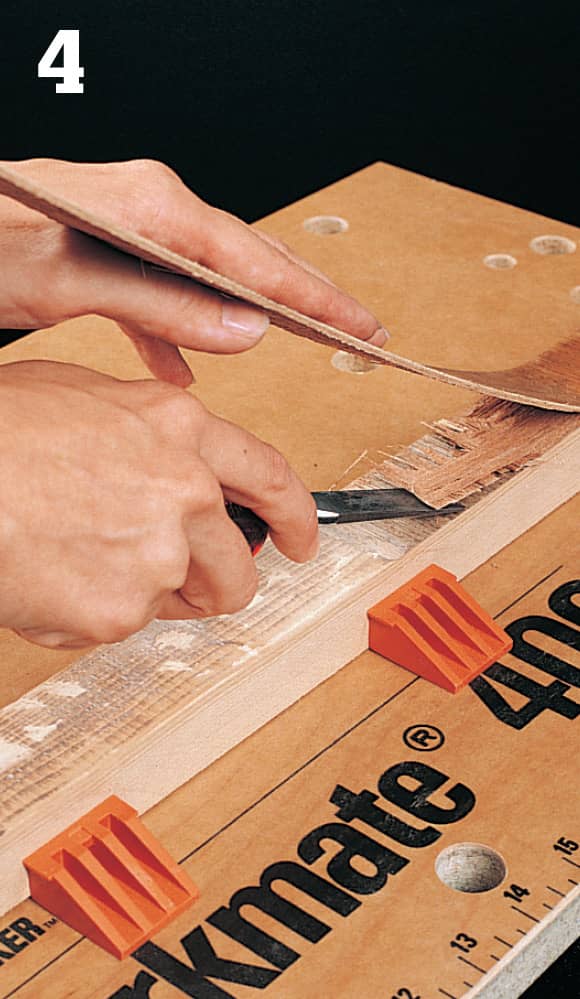
Most newer homes have solid-wood interior doors these days, but hollow-core doors are still fairly common, and they’re typical on older homes. Shortening either door type is a similar task, but hollow-core doors will require a few more steps because the door consists of multiple pieces (see page 129).
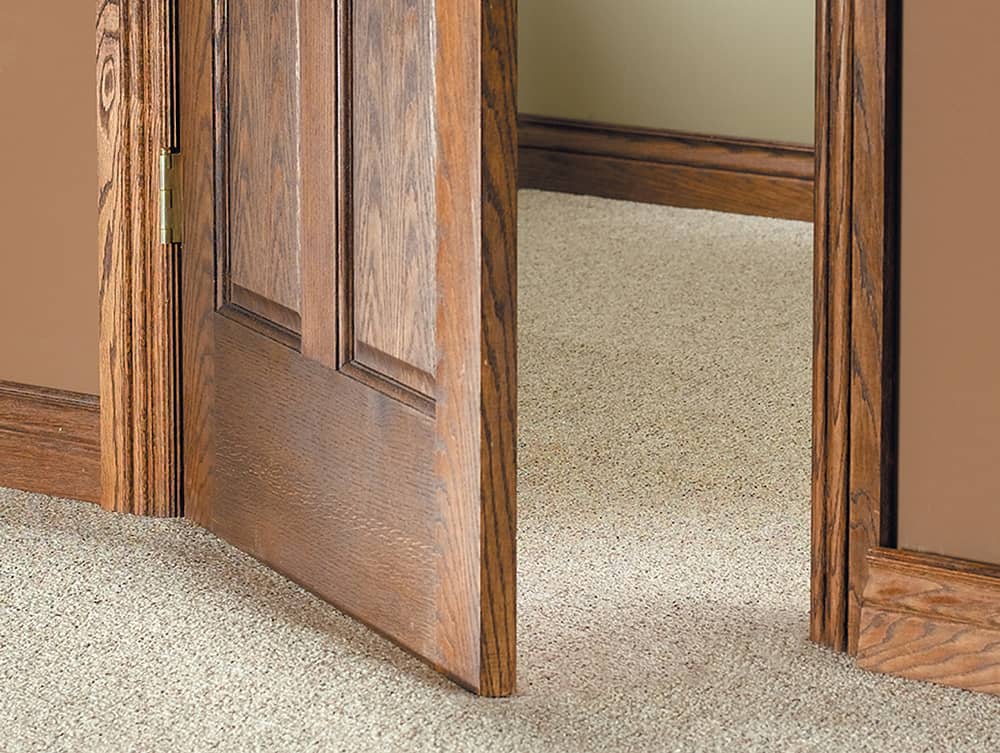
Changing a floor covering is a great way to update the look of a room, but if the new floor covering is thicker than the old one, you can impede door swing. The solution is to shorten the door.
How to Shorten a Solid Wood Door
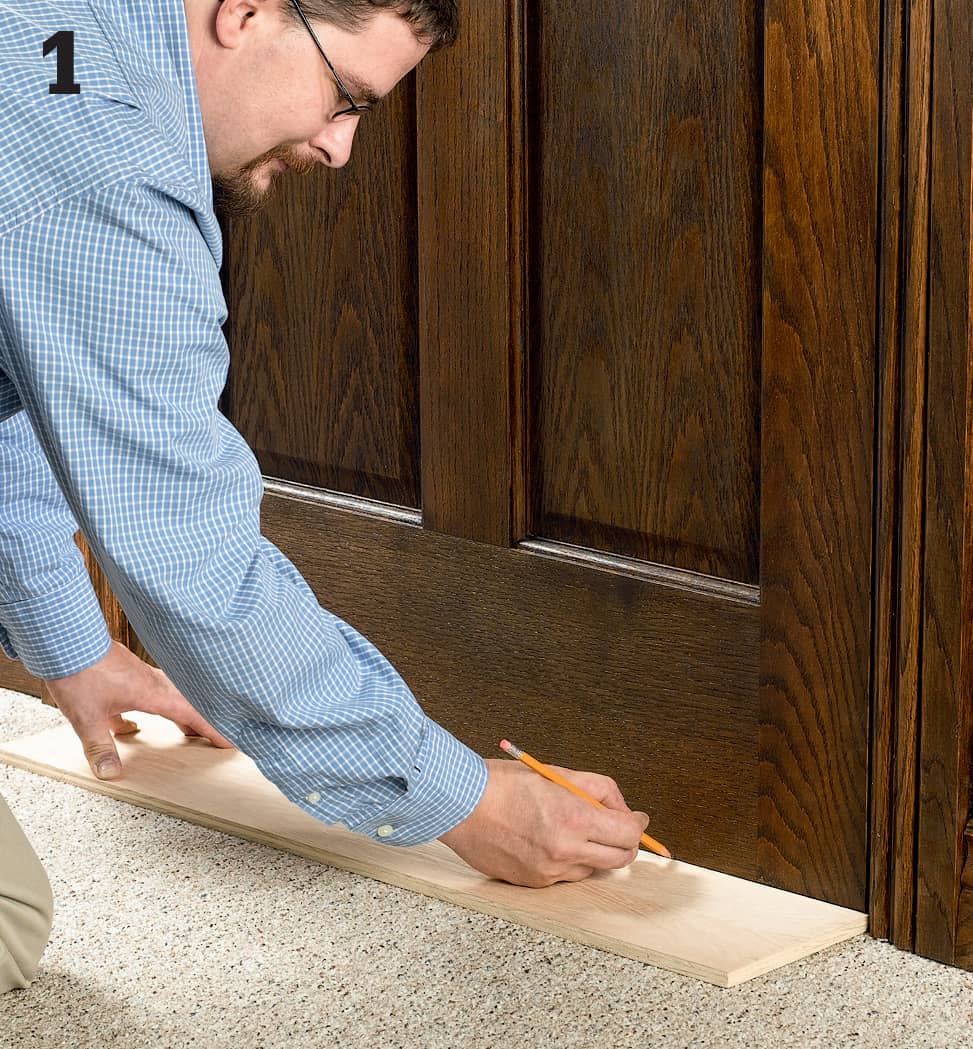
Set a strip of scrap plywood on the floor against the door, and trace along the plywood to create a reference line for cutting. The thickness of the plywood will set the amount of door gap, and it will help establish an even gap line. Do not press the plywood down into the carpet when drawing the line. If the flooring is uneven, open the door to where it rubs the most and use this spot to mark the gap.
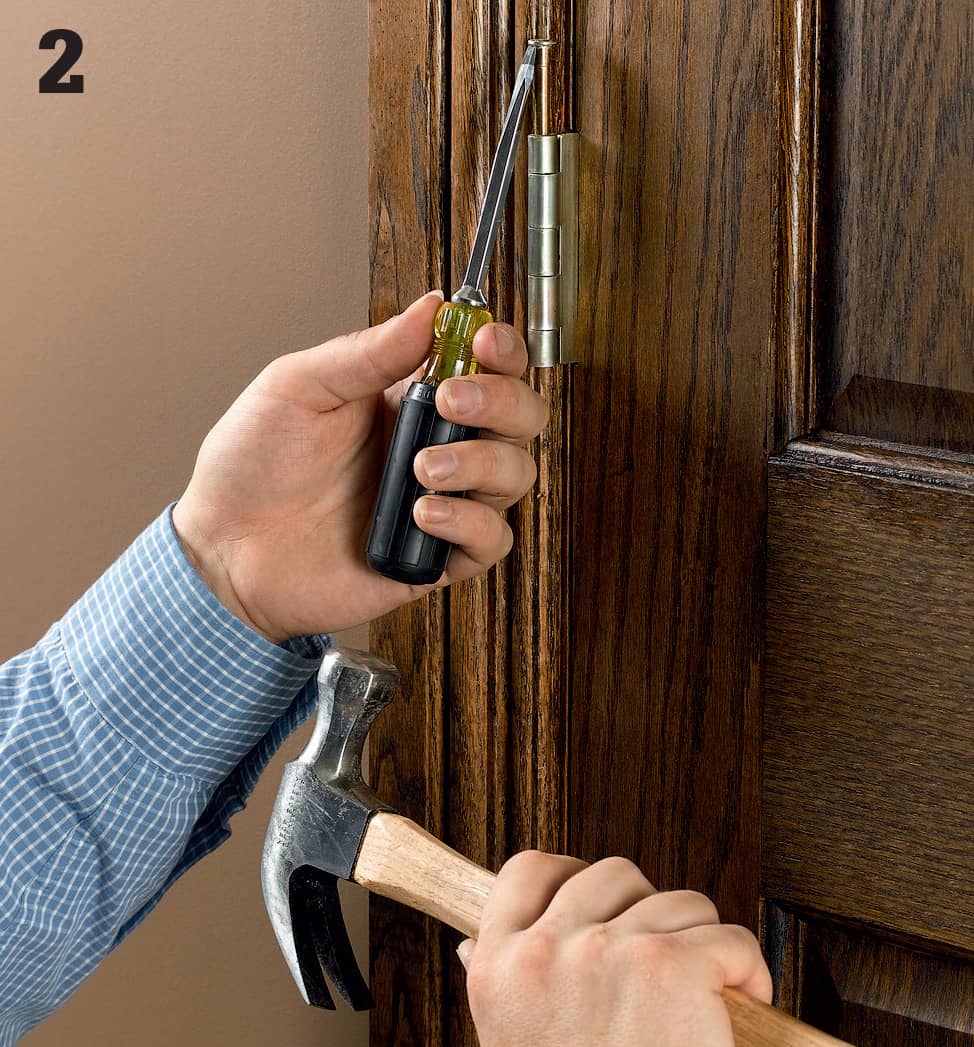
Remove the door from the jamb by tapping out the hinge pins with a hammer and flat-blade screwdriver. If the hinge pins are fixed, you’ll need to unscrew the hinge leaves from the jamb instead.
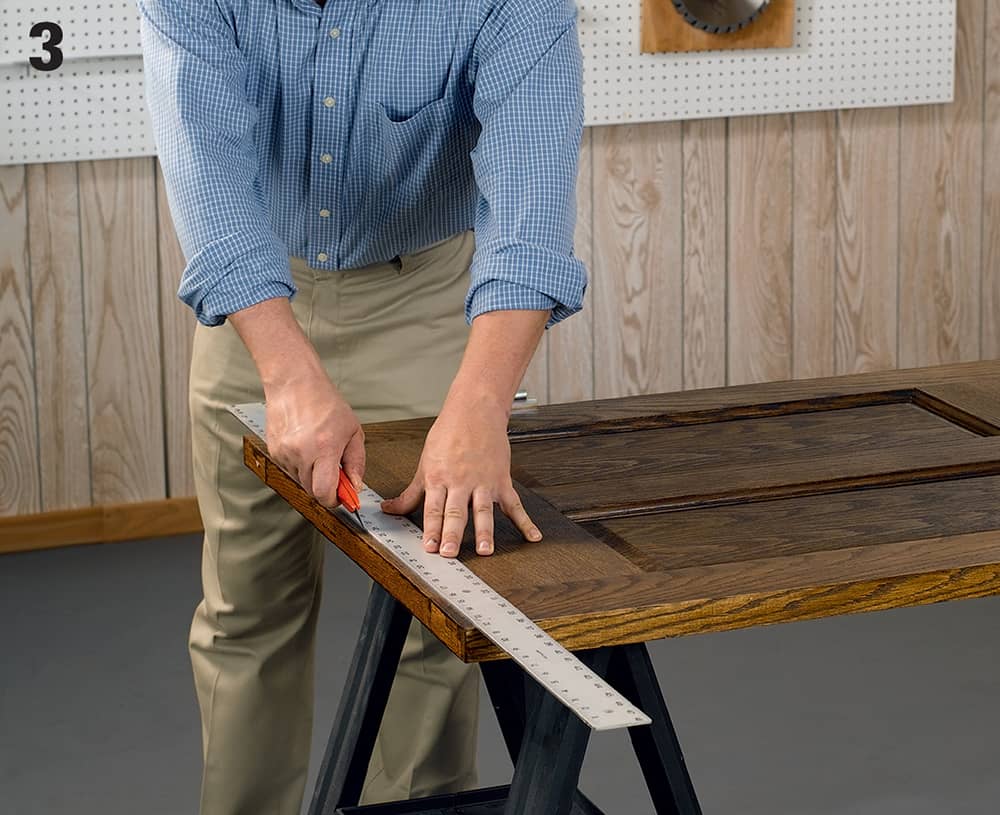
To prevent the saw from chipping the wood as it cuts, use a sharp utility knife to score along the cutting line. Guide the knife against a metal straightedge. Score both door faces and the edges.
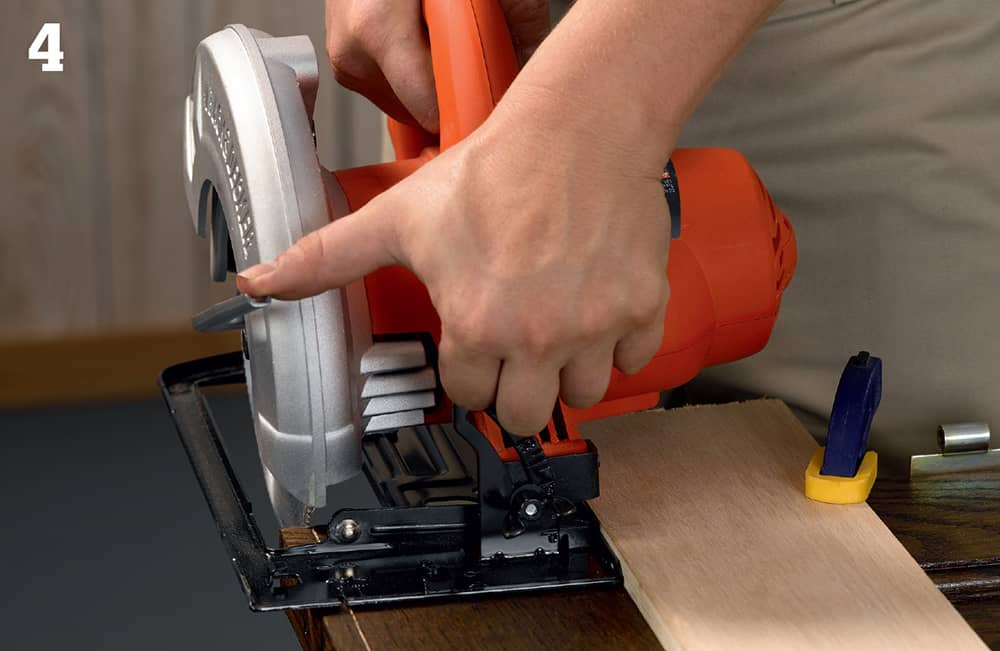
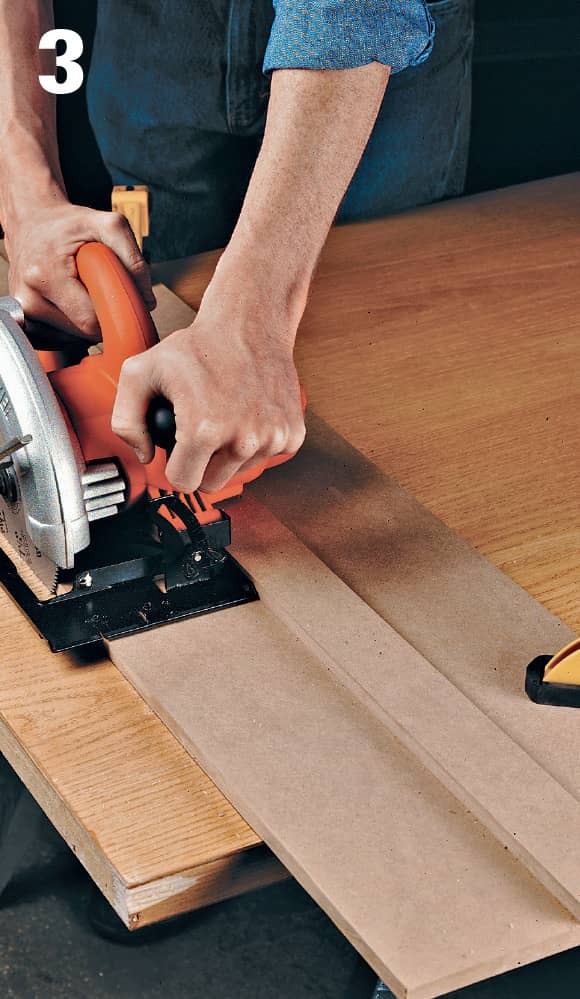
Clamp a straightedge to the door so the saw blade will cut about 1/16" on the waste side of your score line. The straightedge provides a guide for the edge of the saw base. Use the saw with a fine-tooth blade installed to check your setup.
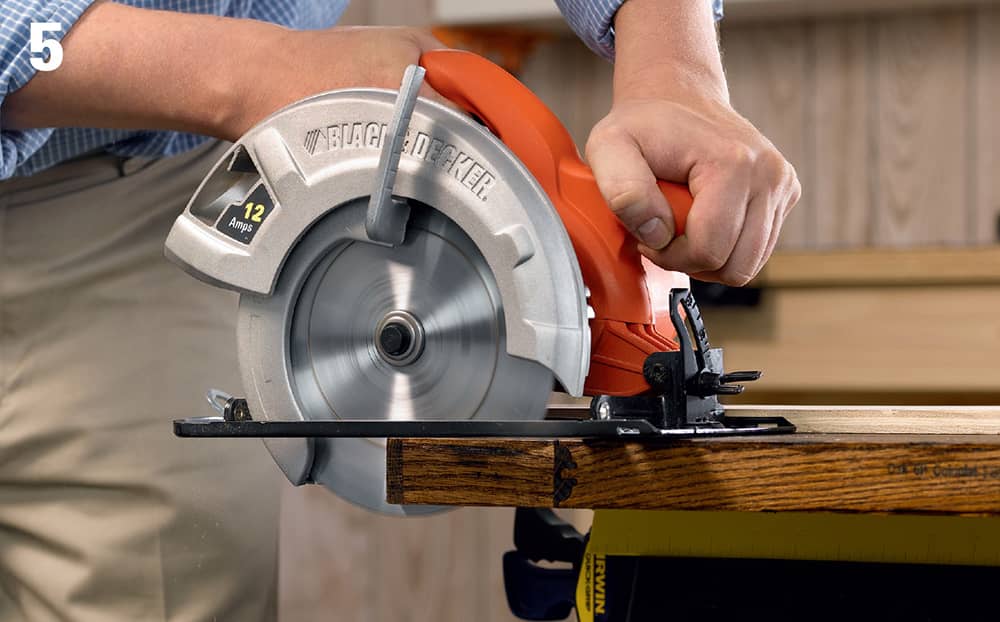
Set the blade so the teeth project about 1/4" below the door, and guide the saw along the straightedge to saw off the door bottom. Use steady feed pressure, and slow down your cutting rate at the end to prevent splintering the door edge.
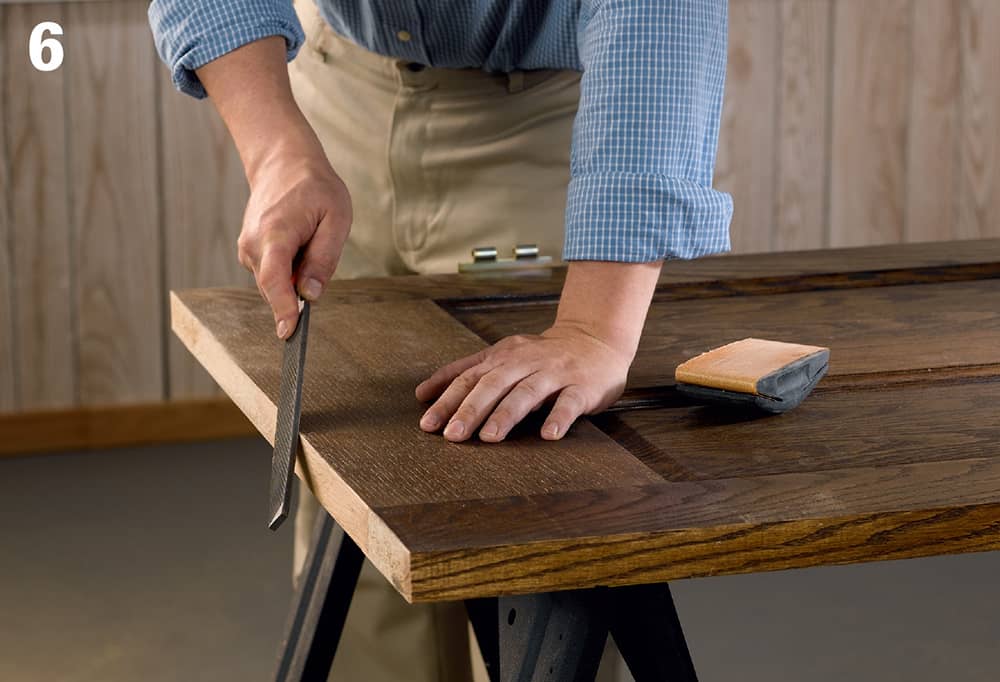
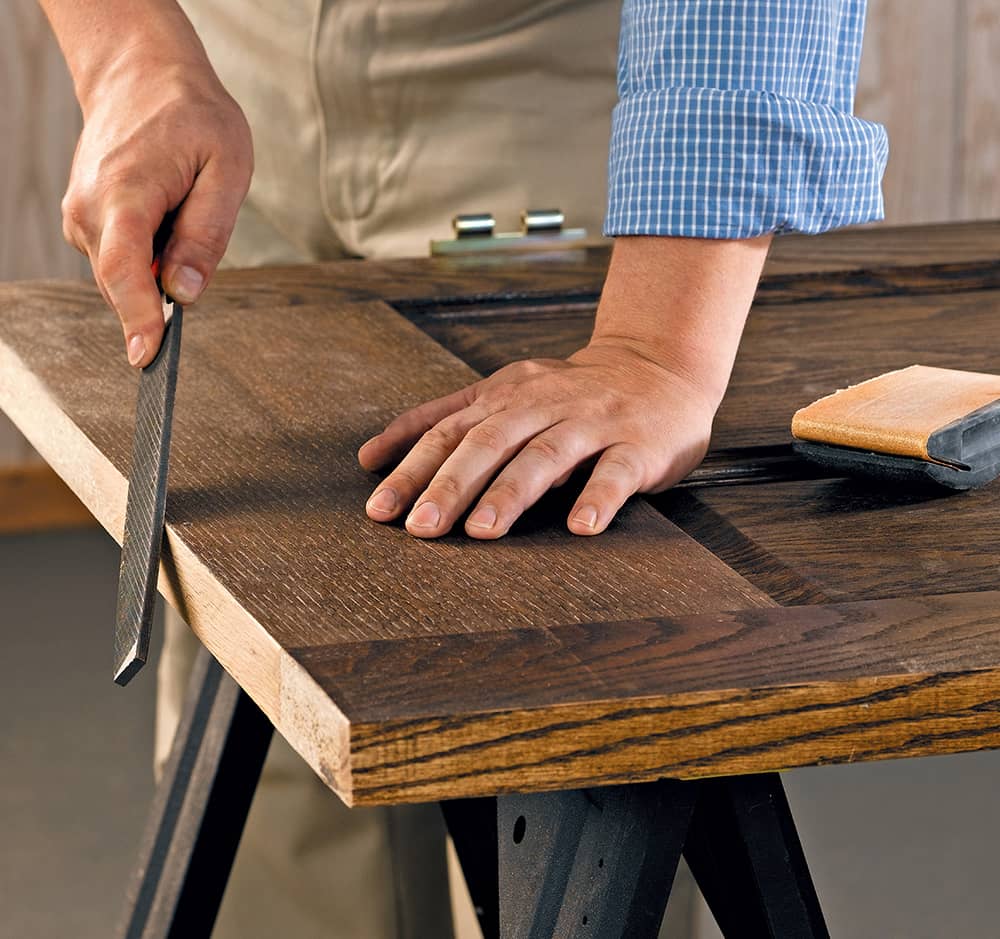
Use a file to soften the sharp edges of the cut and to form a very slight chamfer all around the door bottom. Switch to a sanding block and medium-grit sandpaper to smooth away any blade marks and roughness.
 Replacing Thresholds
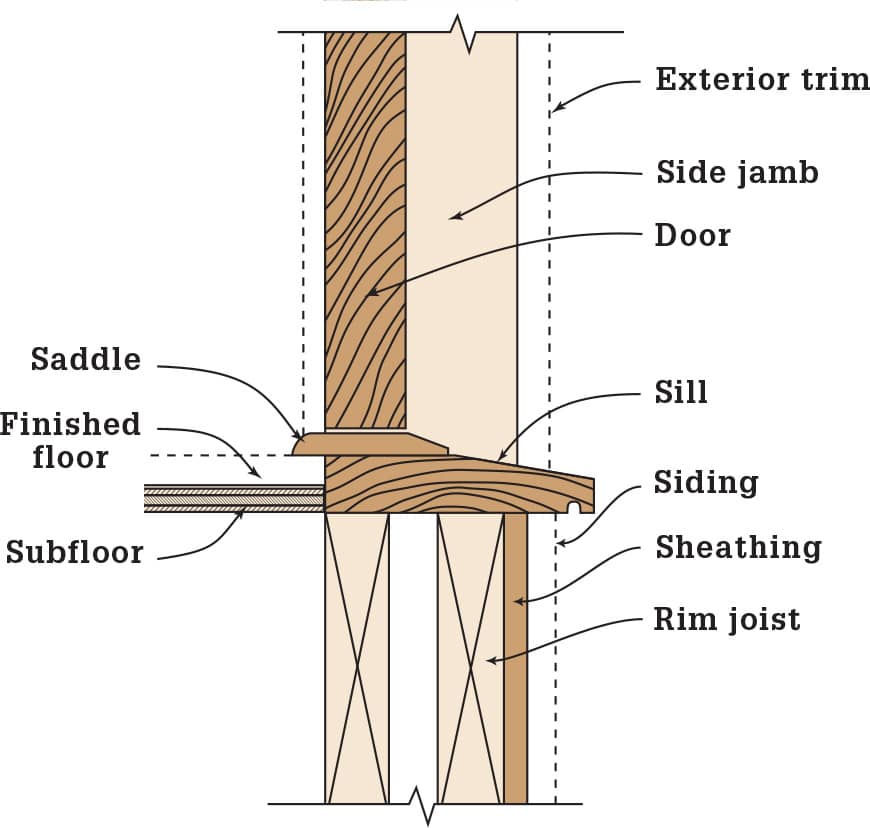
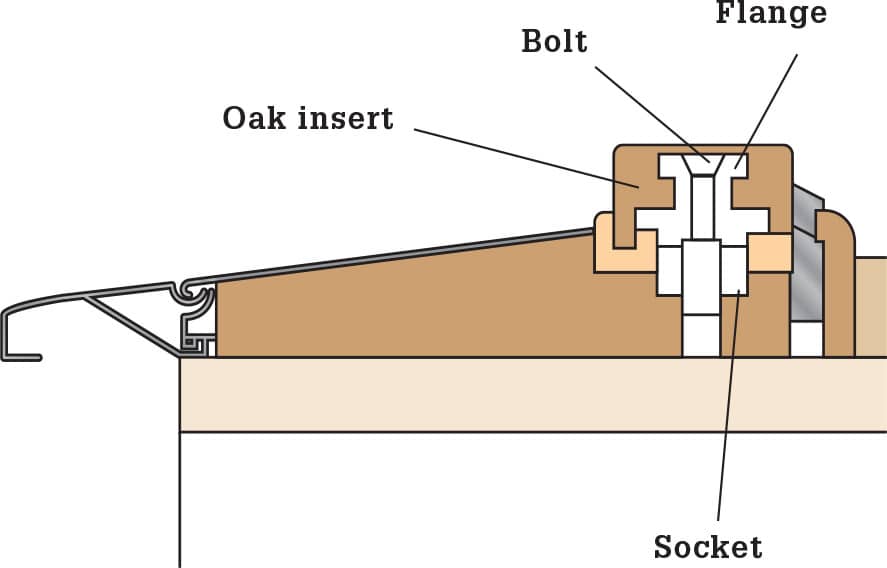
While construction varies from home to home, the part of a door that is generally referred to as the “threshold” is actually made up of two separate components: a sill, which serves as the bottom of the door frame and diverts water and dirt away from the home, and the threshold or saddle, which is attached to the sill and helps to seal the air space under a door. Due to constant traffic and exposure to the elements, sills and saddles may eventually require replacing.
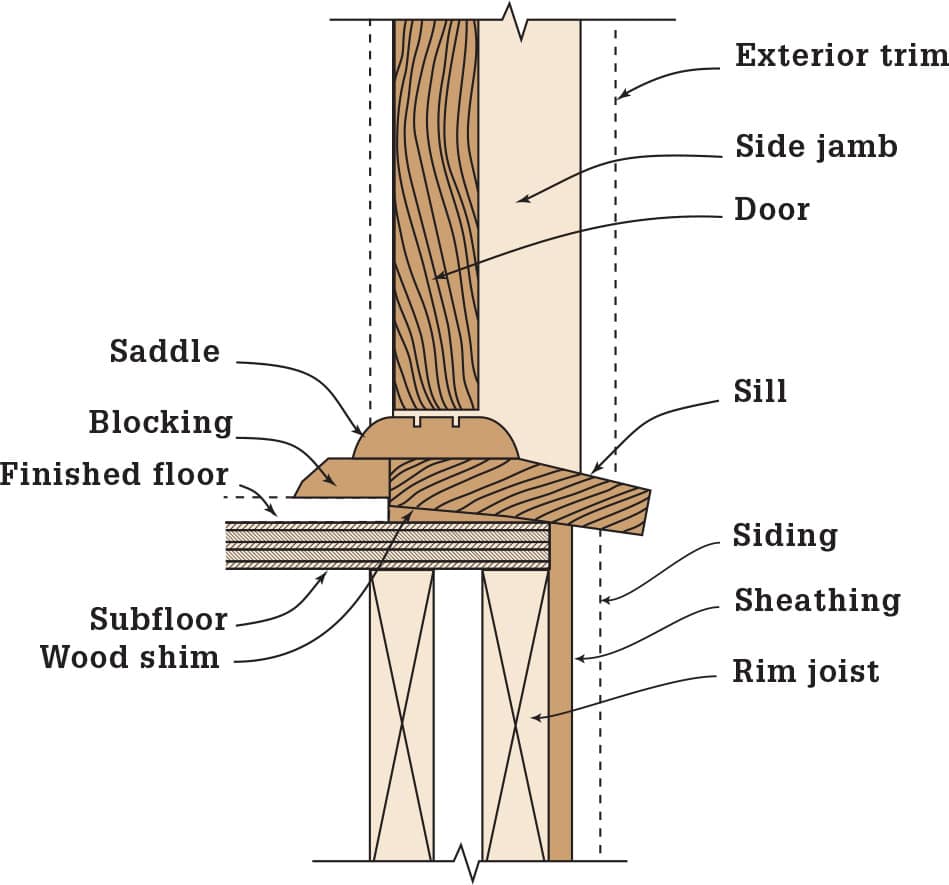
Modern prehung doors often have a cast metal sill with an integrated saddle and are installed directly on top of the subfloor. Older homes often have thick wooden sills that are installed lower than metal sills, flush with the floor framing, with a separate saddle bridging the gap between the sill and the finished floor. Saddles are available in several styles and materials, such as wood, metal, and vinyl. Because the design of entry thresholds can vary, it is important to examine the construction of your door threshold to determine your needs. In this project, we replaced a deteriorating wooden sill and saddle with a new oak sill and a wooden weatherstripped saddle.
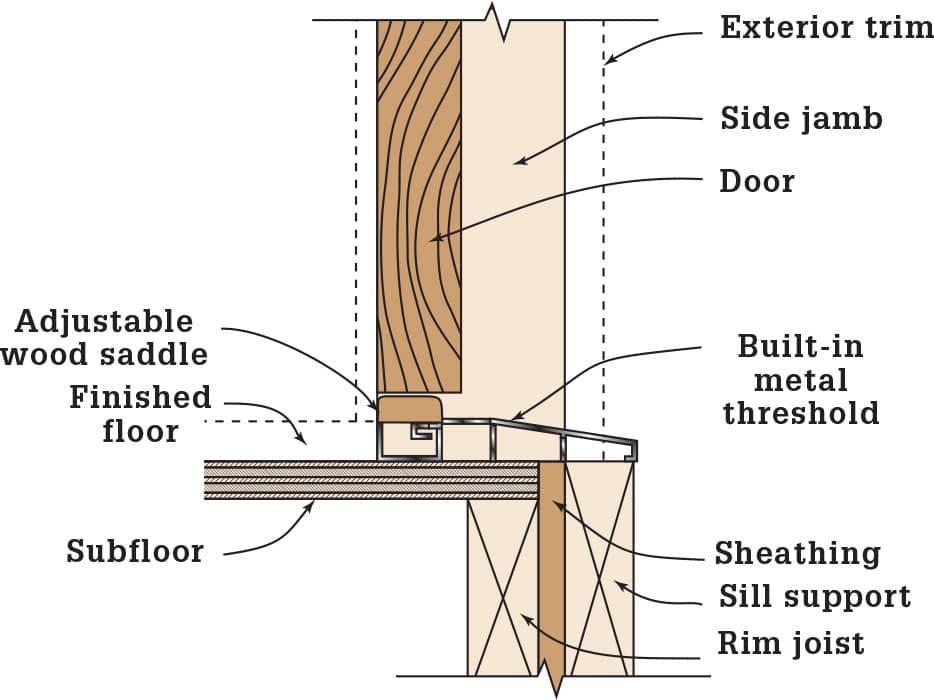
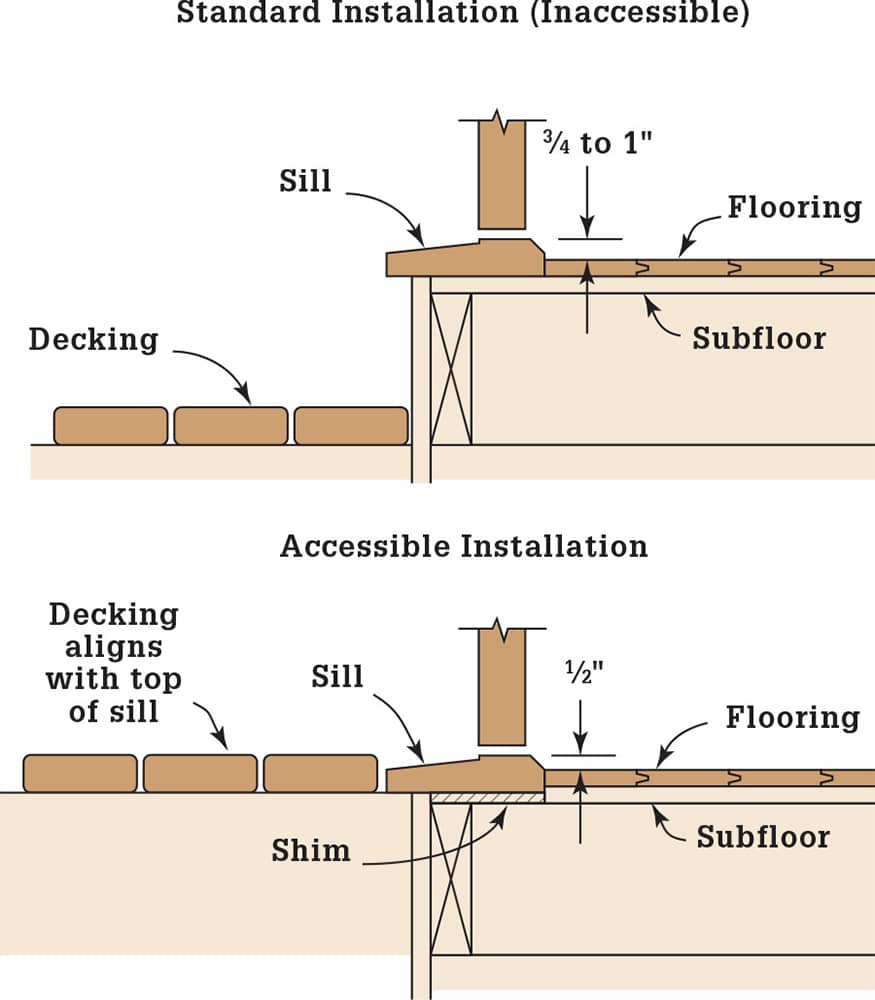
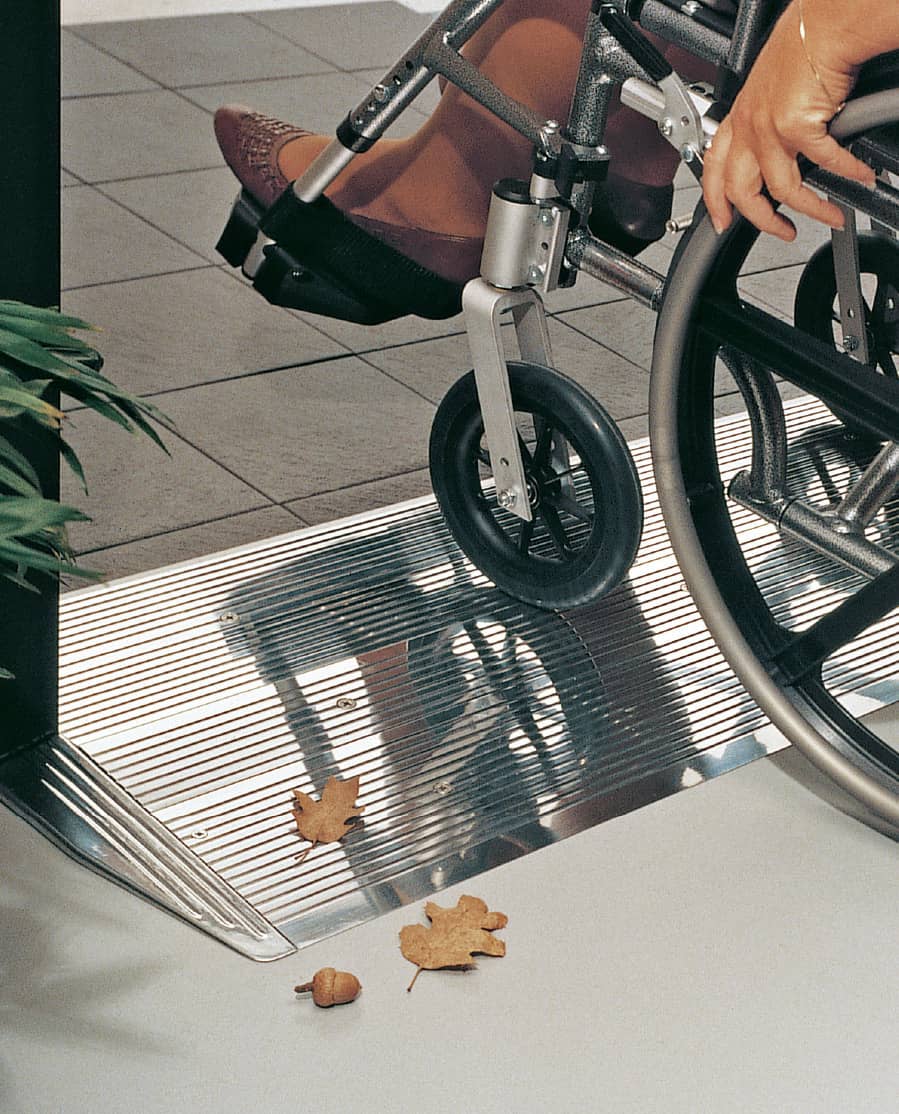
Besides replacing a deteriorating threshold, you might also choose to replace an existing threshold for increased accessibility. While standard thresholds are designed to keep mud and dirt out of a home, they deny access to people in wheelchairs and can cause people to trip if they are unsteady on their feet. See page 133 for tips on making thresholds accessible.
How to Replace an Exterior Door Threshold
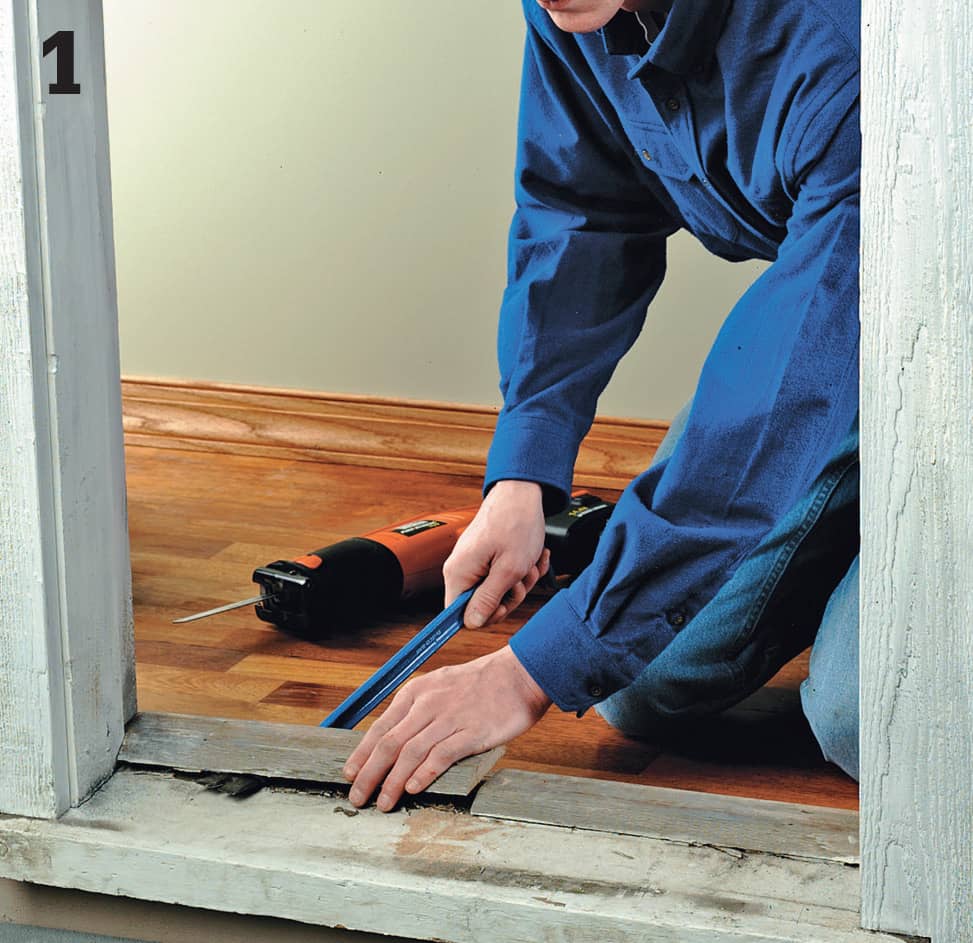
Remove the old saddle. This may be as easy as unscrewing the saddle and prying it out. If necessary, cut the old saddle in two using a reciprocating saw, then pry out the saddle. Be careful not to damage the flooring or door frame. Note which edge of the saddle is more steeply beveled; the new saddle should be installed the same way.
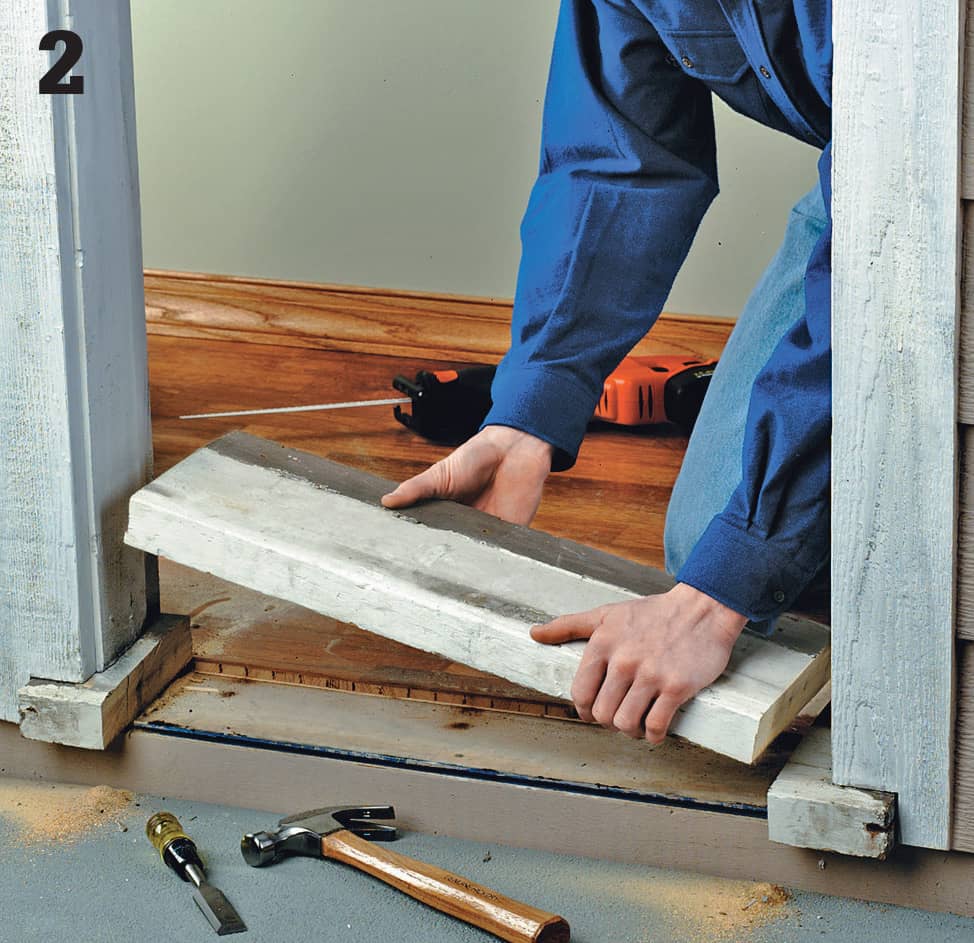
Examine the sill for damage or deterioration. If it needs replacing, use a reciprocating saw to cut the sill into three pieces, cutting as close to the jambs as possible. Pry out the center piece, then use a hammer and chisel to split out the pieces directly beneath the jambs. Remove any remaining nails from beneath the jambs using a reciprocating saw with a metal cutting blade.
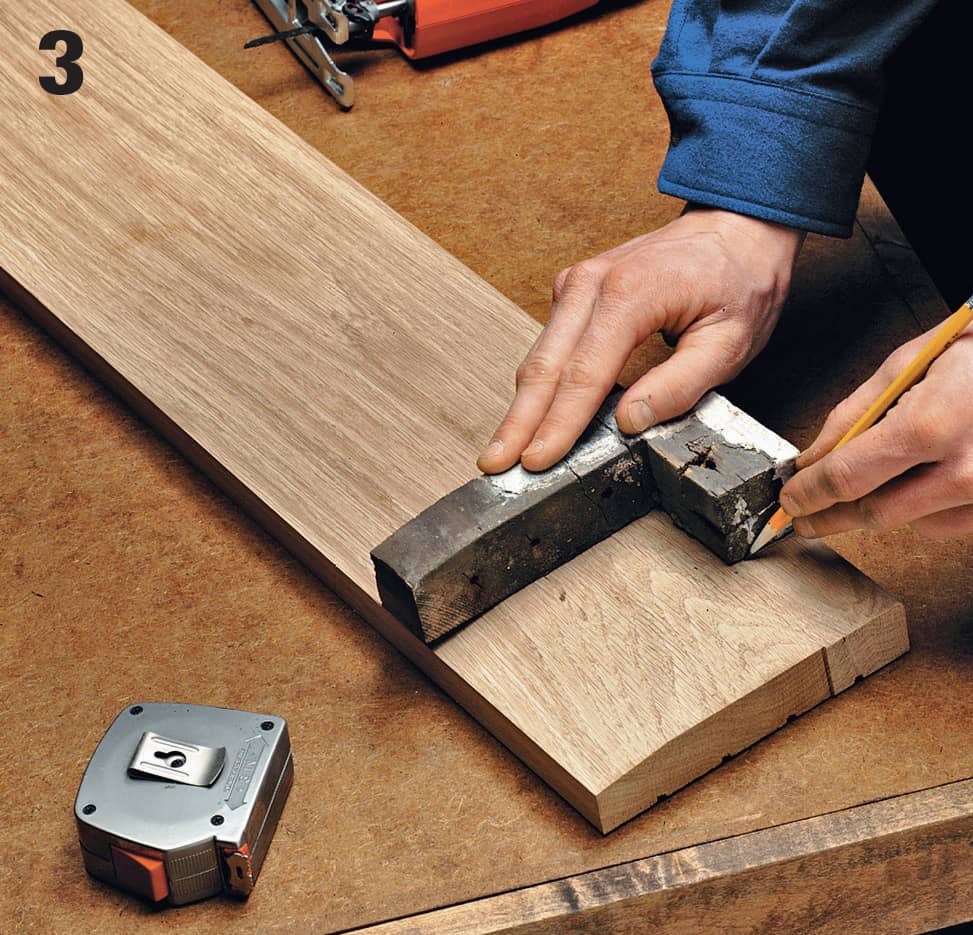
Measure and cut the new sill to size. If possible, use the salvaged end pieces from the old sill as a template to mark the notches on the new sill. Cut the notches using a jigsaw.
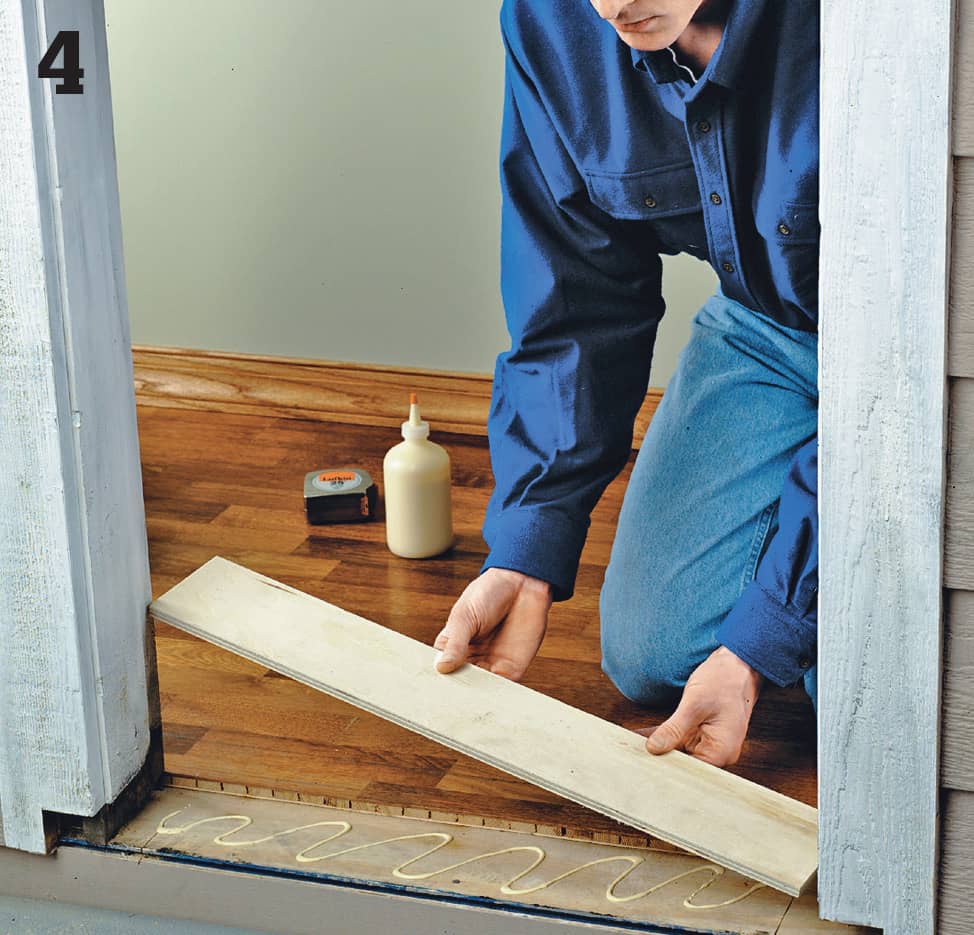
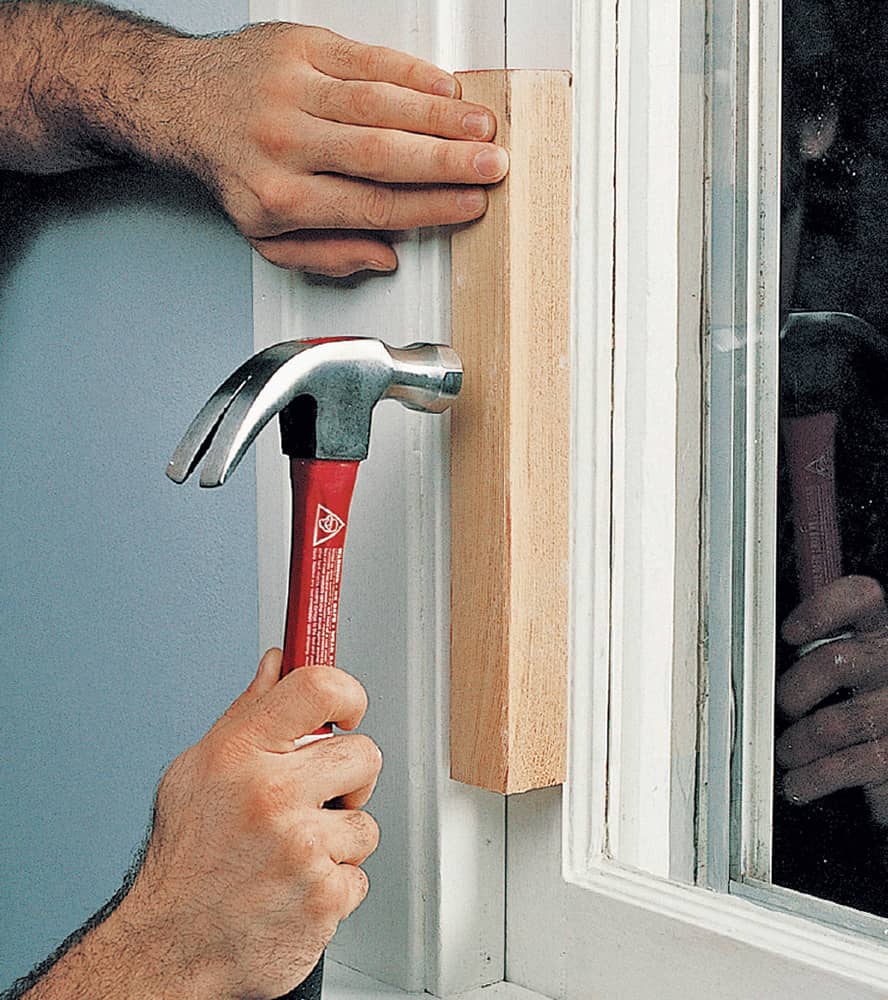
Test-fit the new sill, tapping it into place beneath the jambs using a hammer and wood block to protect the sill. Remove the sill and, if necessary, install long wood strips (or tapered shims) beneath the sill so it fits snugly beneath the jambs with a gentle slope away from the home.
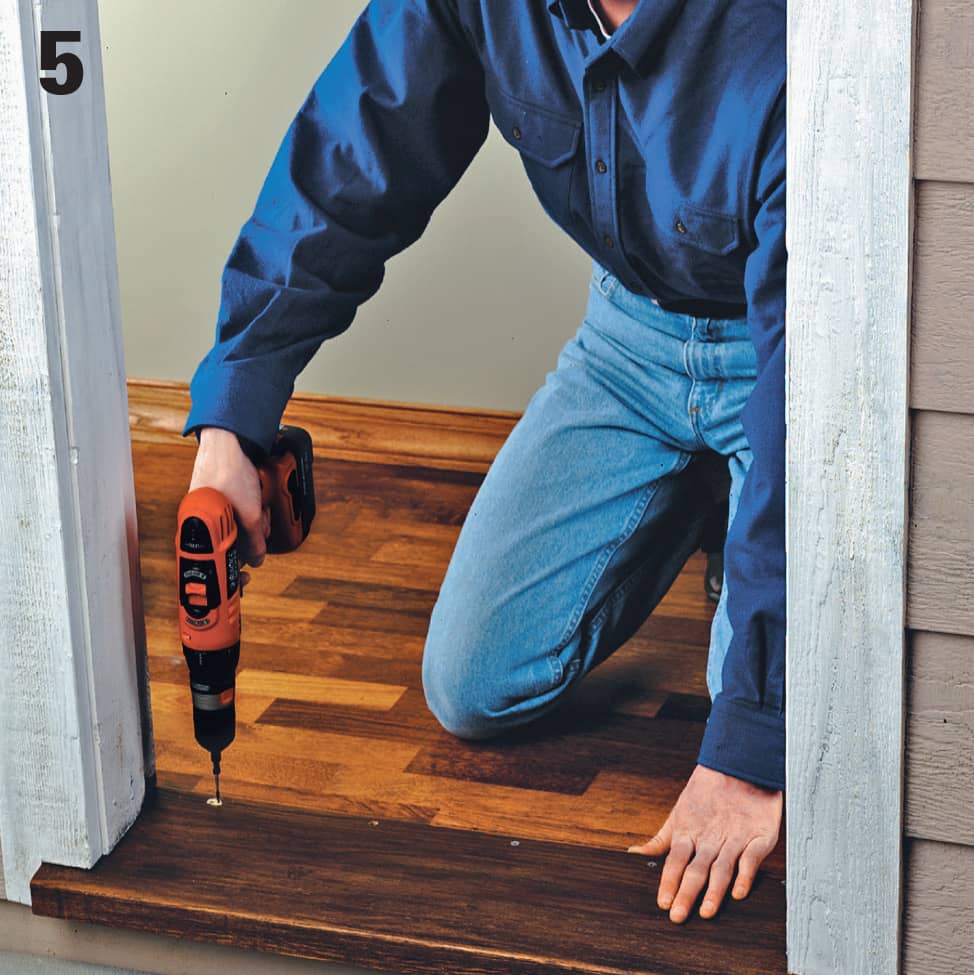
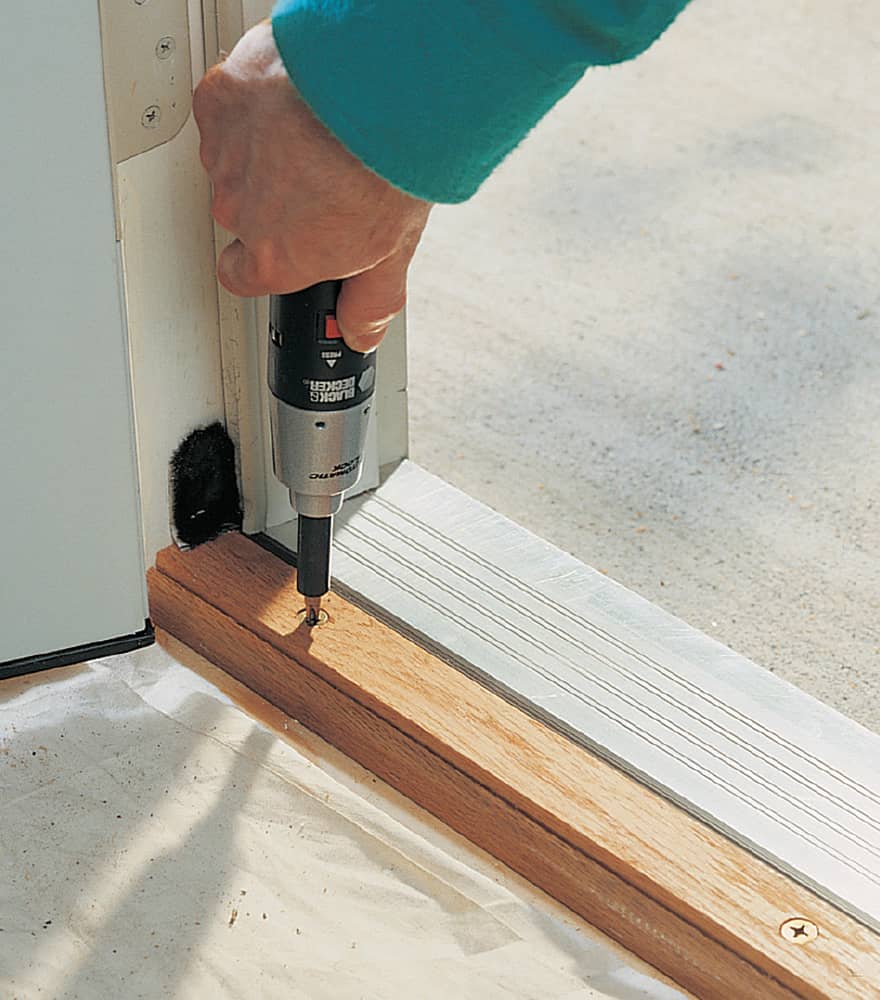
Apply several beads of caulk to the area beneath the sill. Tap the sill back in place. Drill countersunk pilot holes every 4 to 5" and fasten the sill with 10d galvanized casing nails or 3" screws.
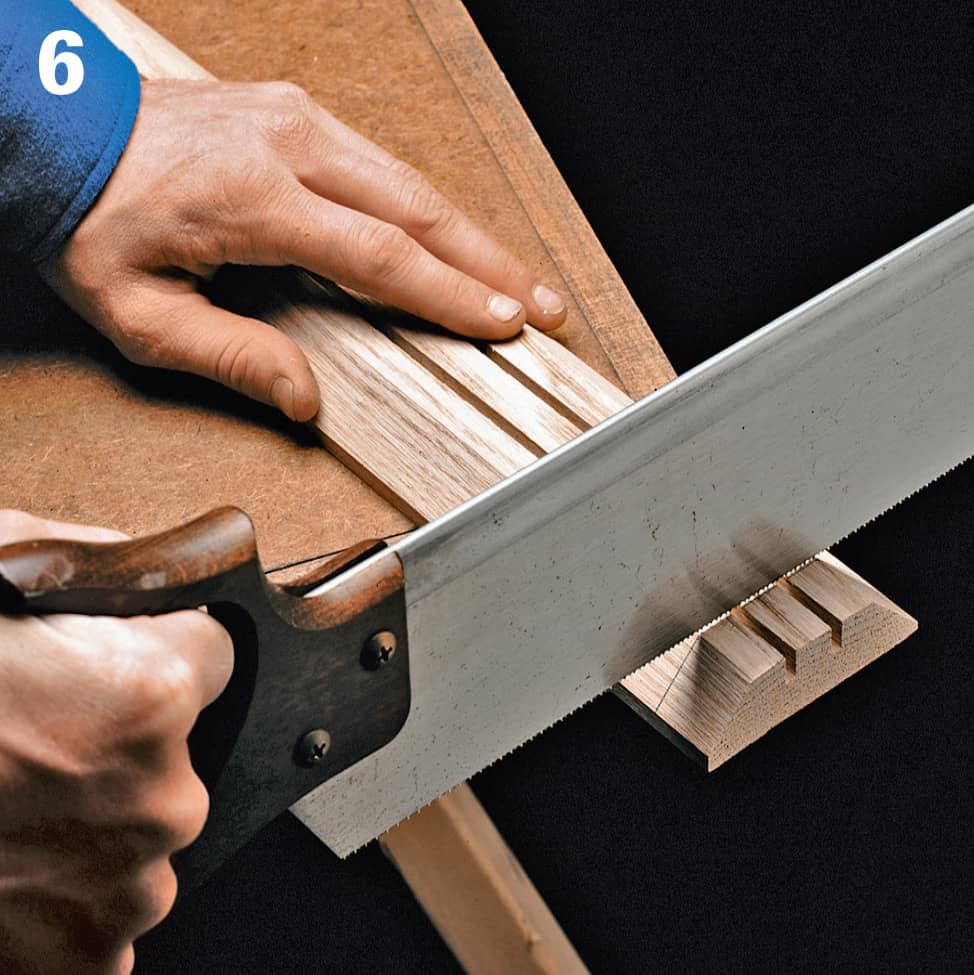
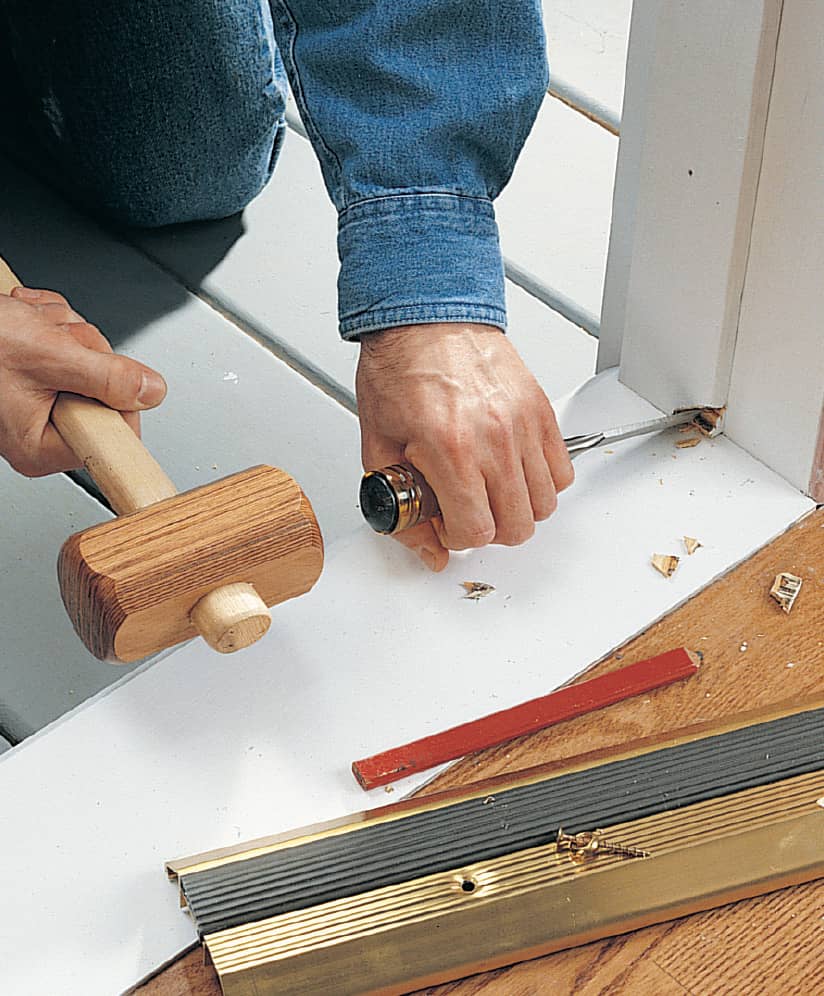
Measure the distance between the jambs and cut the new saddle to length. Test-fit the saddle. Mark the ends and cut notches to fit around the door jamb stops using a jigsaw. Apply caulk to the bottom of the saddle and position it so it covers the gap between the sill and the finished floor. Fasten the saddle using 1 1/2" galvanized screws.
 Improving Window Operation
Many of us have experienced difficulty with opening windows due to swelled wood or painted channels. Almost as frequent, windows won’t stay open because of a broken sash cord or chain. To avoid difficulties with windows, regular maintenance is crucial. Double-hung windows with spring-loaded sash tracks require cleaning and an occasional adjustment of the springs in (or behind) the tracks. Casement windows are often faulty at the crank mechanisms. If cleaning doesn’t fix the problem, the crank mechanism must be replaced. For storm windows, the window track must be clean, and greaseless lubricant must be applied each time the windows and screens are removed.
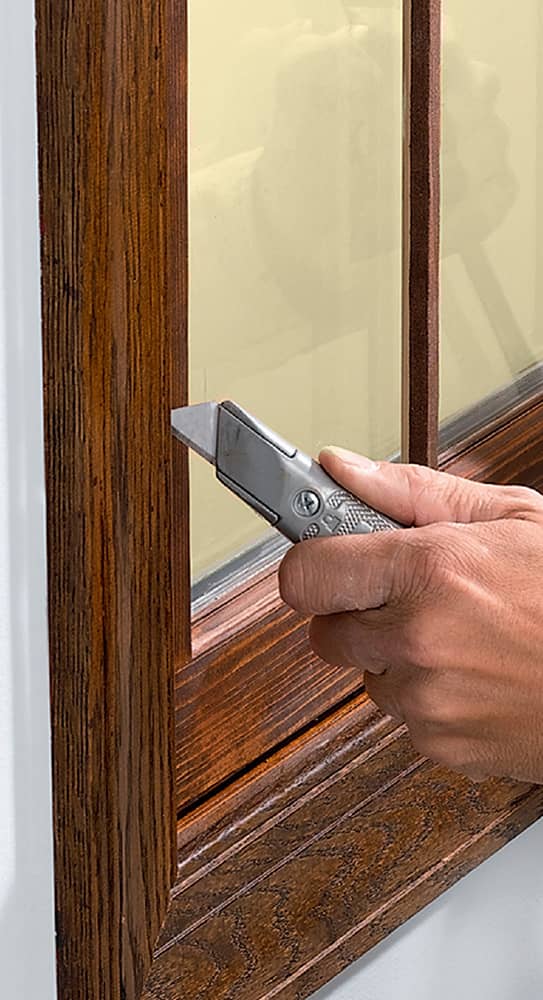
Windows endure temperature extremes, house setting, and all sorts of wear and tear. Sooner or later you’ll need to perform a bit of maintenance to keep them working properly.
How to Adjust Windows
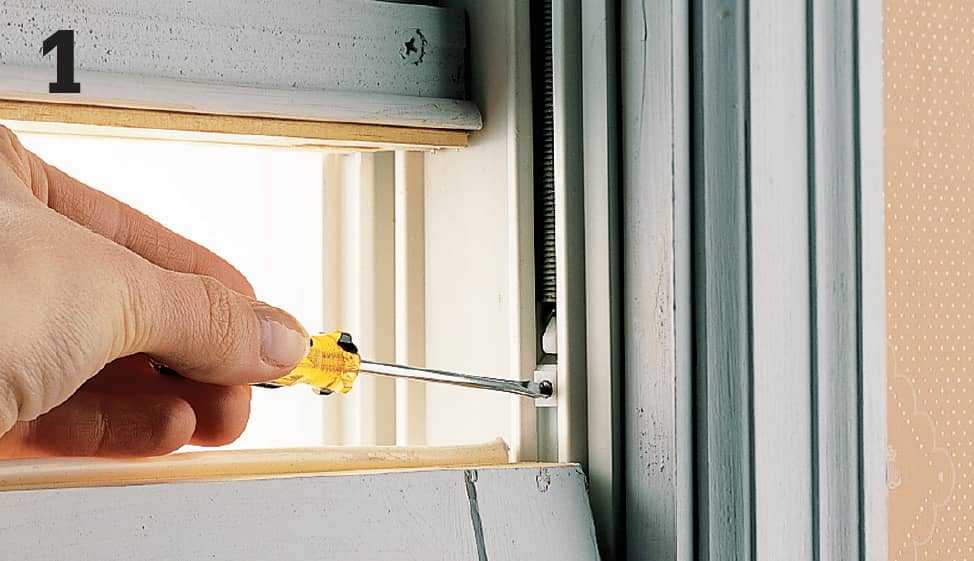
Spring-loaded windows have an adjustment screw on the track insert. Adjust both sides until the window is balanced and opens and closes smoothly.
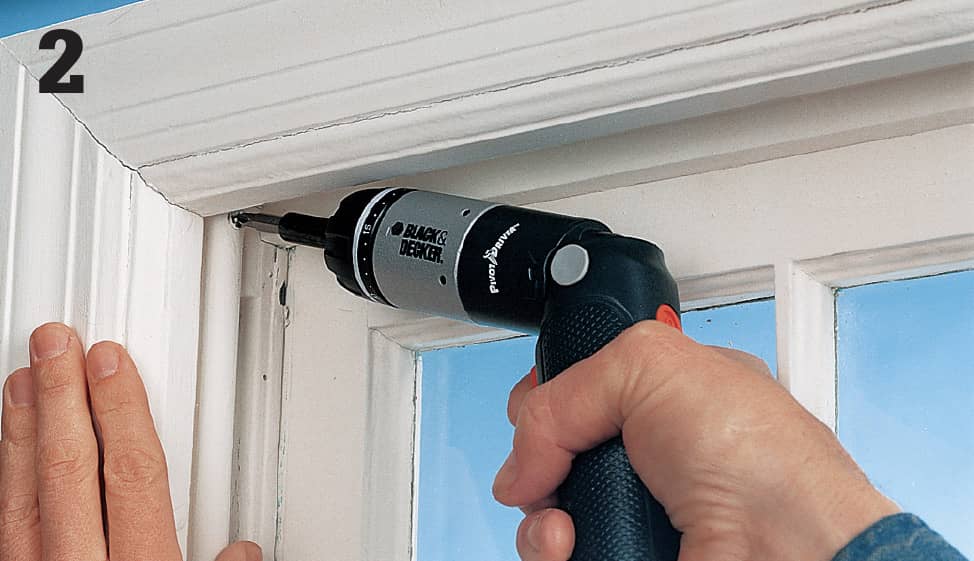
Spring-lift windows operate with the help of a spring-loaded lift rod inside a metal tube. Adjust them by unscrewing the top end of the tube from the jamb, then twisting the tube to change the spring tension: clockwise for more lifting power; counterclockwise for less. Maintain a tight grip on the tube at all times to keep it from unwinding.
How to Replace Broken Sash Cords
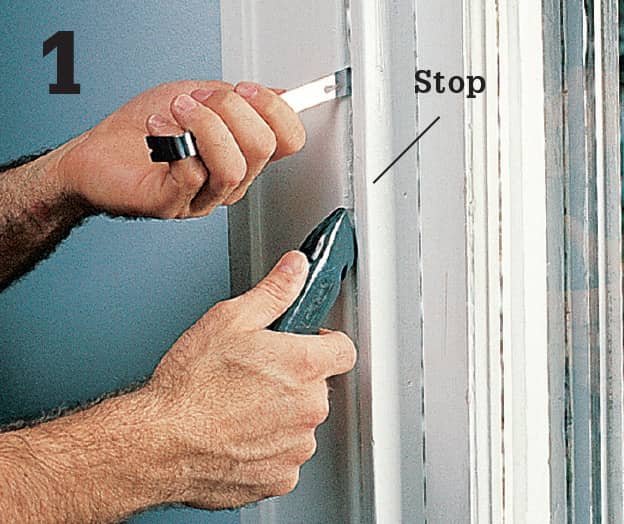
Cut any paint seal between the window frame and stops with a utility knife or paint zipper. Pry the stops away from the frame, or remove the molding screws.
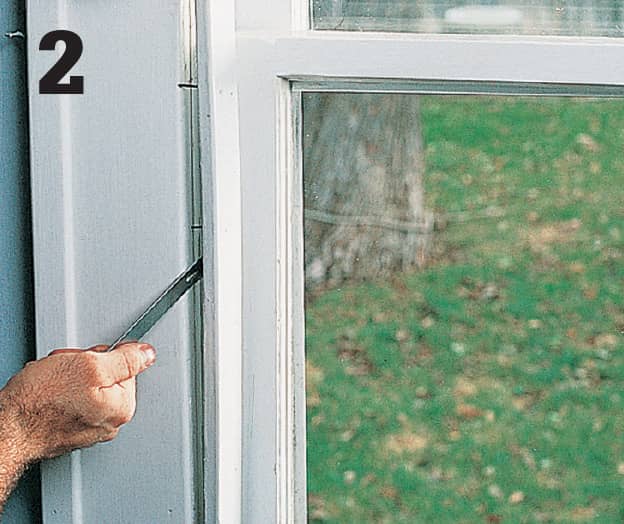
Bend the stops out from the center to remove them from the frame. Remove any weatherstripping that’s in the way.
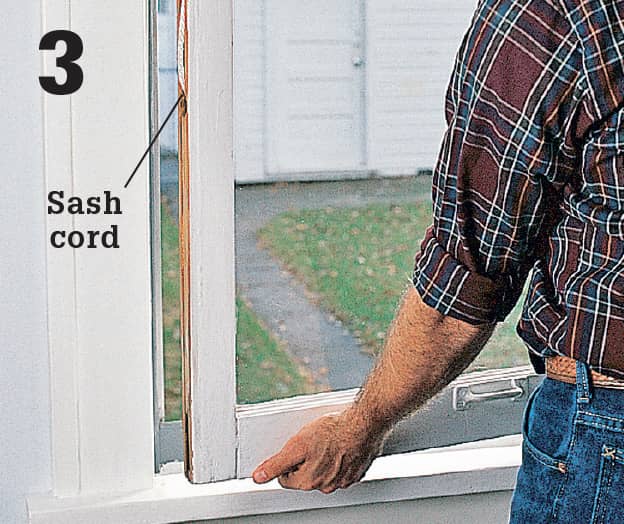
Slide out the lower window sash. Pull knotted or nailed cords from holes in the sides of the sash (see step 9).
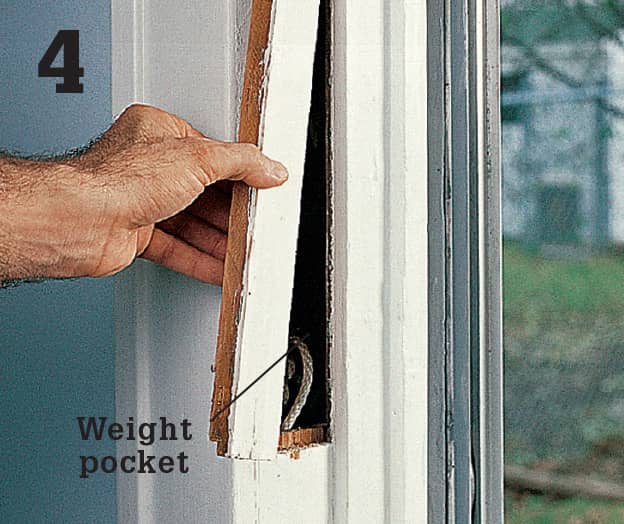
Pry out or unscrew the weight pocket cover in the lower end of the window channel. Pull the weight from the pocket, and cut the old sash cord from the weight.
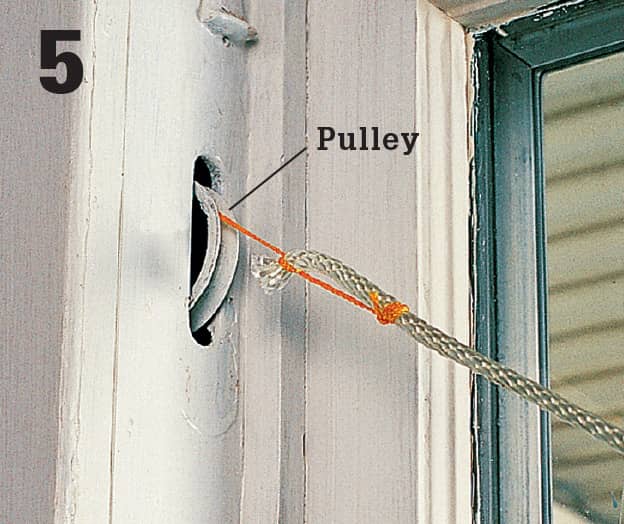
Tie one end of a piece of string to a nail and the other end to the new sash cord. Run the nail over the pulley and let it drop into the weight pocket. Retrieve the nail and string through the pocket.
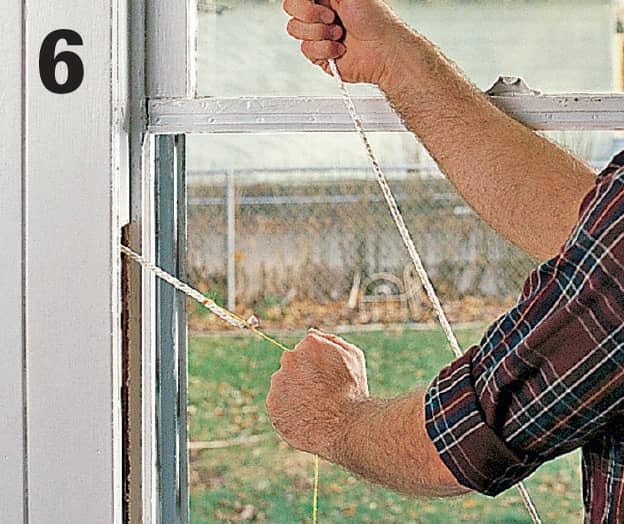
Pull on the string to run the new sash cord over the pulley and through the weight pocket. Make sure the new cord runs smoothly over the pulley.
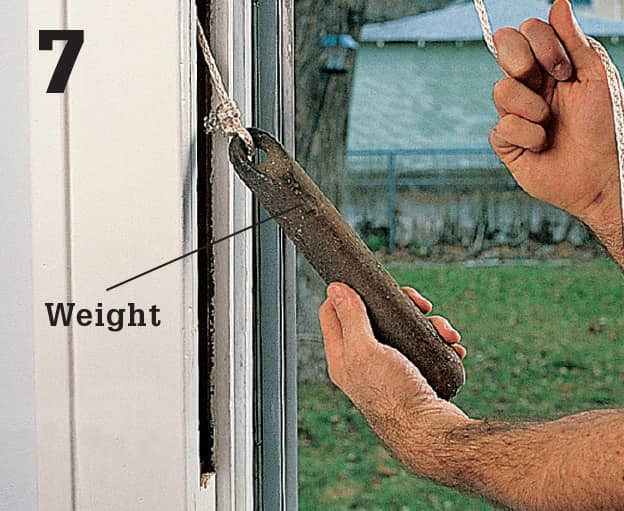
Attach the end of the sash cord to the weight using a tight double knot. Set the weight in the pocket. Pull on the cord until the weight touches the pulley.
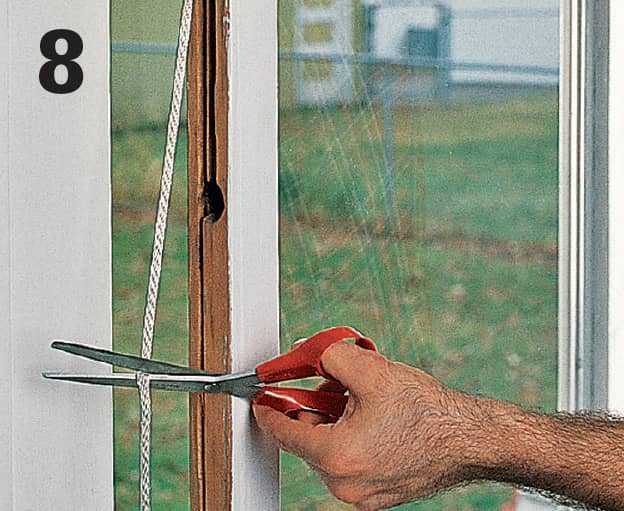
Rest the bottom sash on the sill. Hold the sash cord against the side of the sash, and cut enough cord to reach 3" past the hole in the side of the sash.
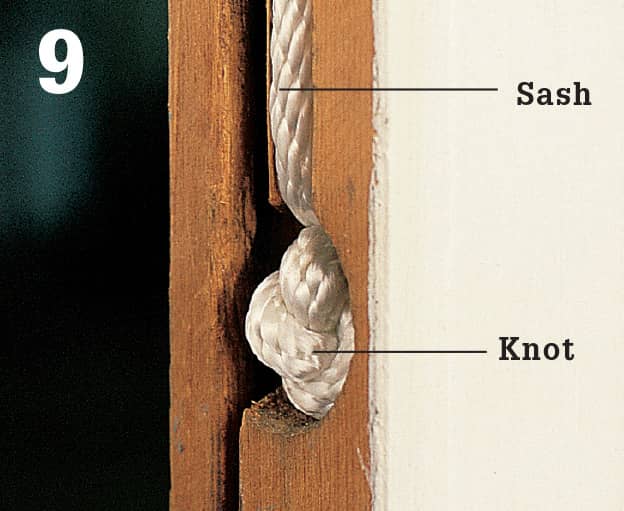
Knot the sash cord and wedge the knot into the hole in the sash. Replace the pocket cover. Slide the window and any weatherstripping into the frame, then attach the stops in the original positions.
How to Clean & Lubricate a Casement Window Crank
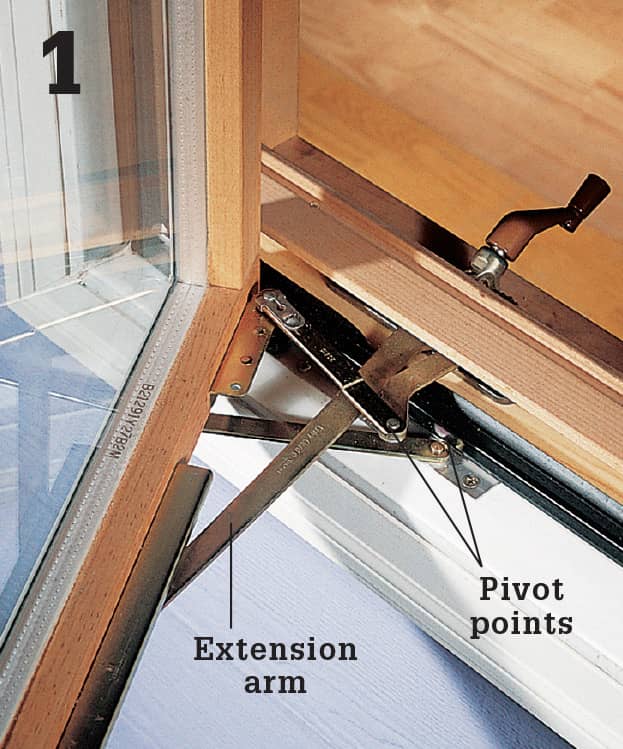
If a casement window is hard to crank, clean the accessible parts. Open the window until the roller at the end of the extension arm is aligned with the access slot in the window track.
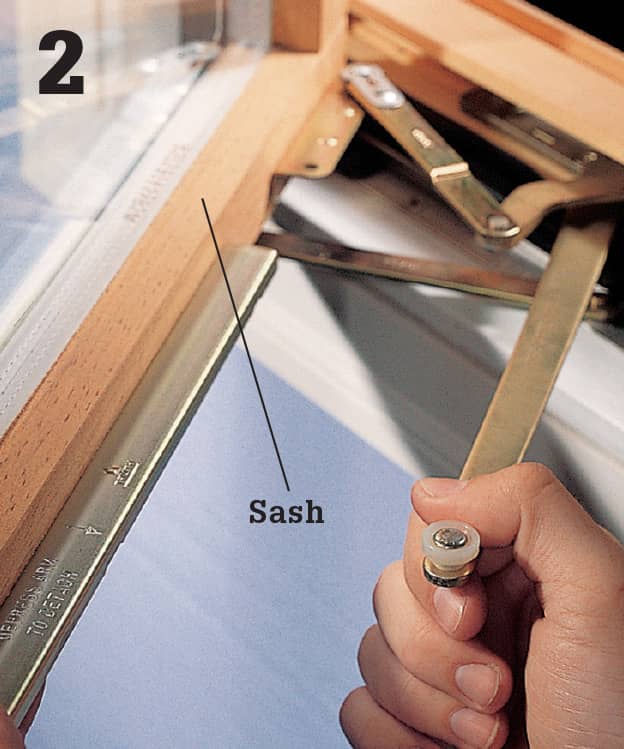
Disengage the extension arm by pulling it down and out of the track. Clean the track with a stiff brush, and wipe the pivoting arms and hinges with a rag.
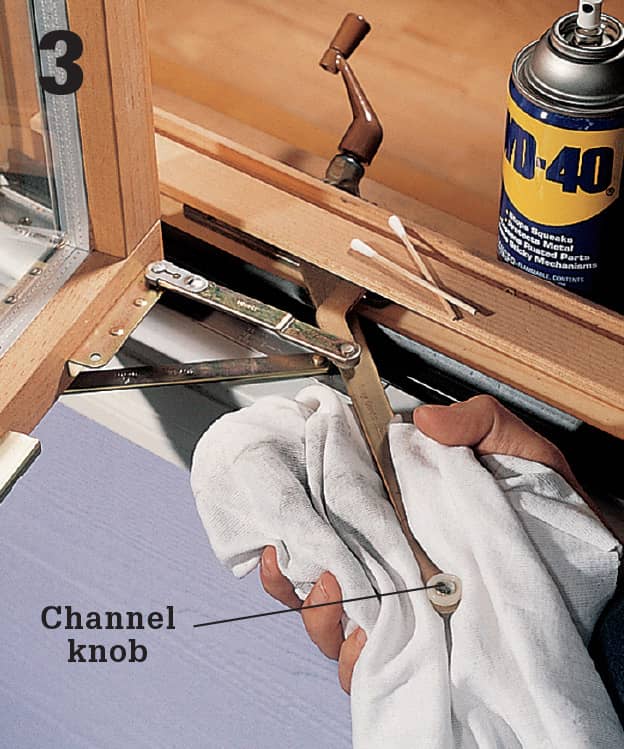
Lubricate the track and hinges with spray lubricant or household oil. Wipe off excess lubricant with a cloth, then reattach the extension arm. If that doesn’t solve the problem, repair or replace the crank assembly (below).
How to Repair a Casement Window Crank Assembly
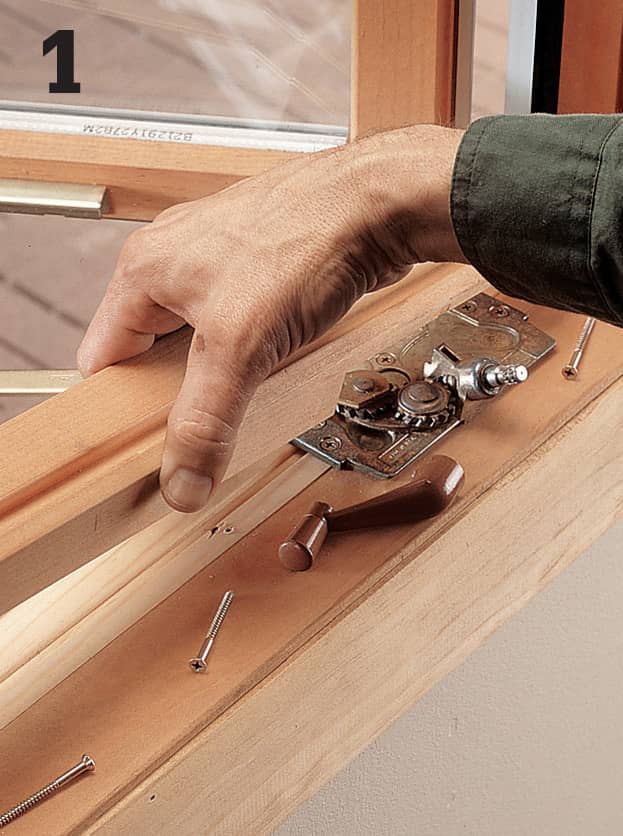
Disengage the extension arm from the window track, then remove the molding or cap concealing the crank mechanism. Unhinge any pivot arms connected to the window.
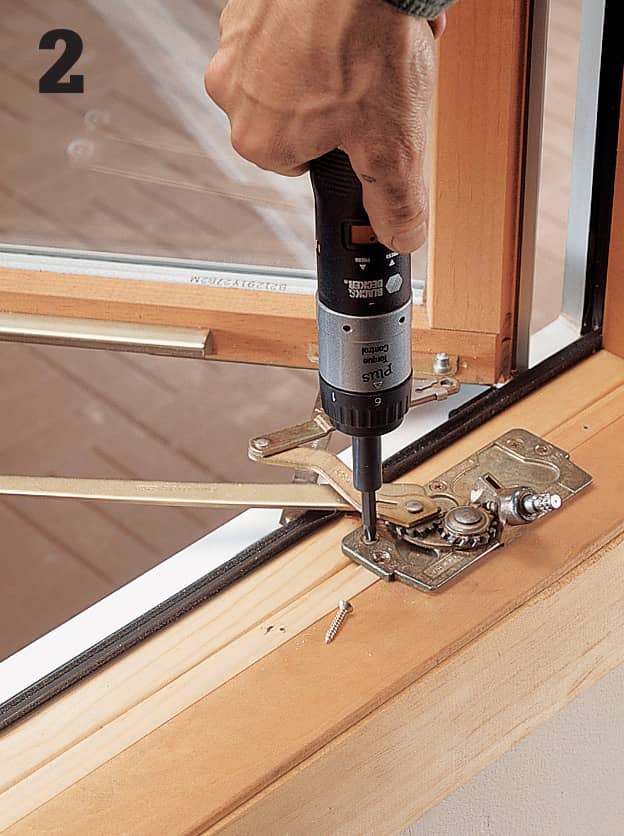
Remove the screws securing the crank assembly, then remove the assembly and clean it thoroughly. If the gears are badly worn, replace the assembly. Check a home center or call the manufacturer for new parts. Note which way the window opens—to the right or left—when ordering replacement parts.
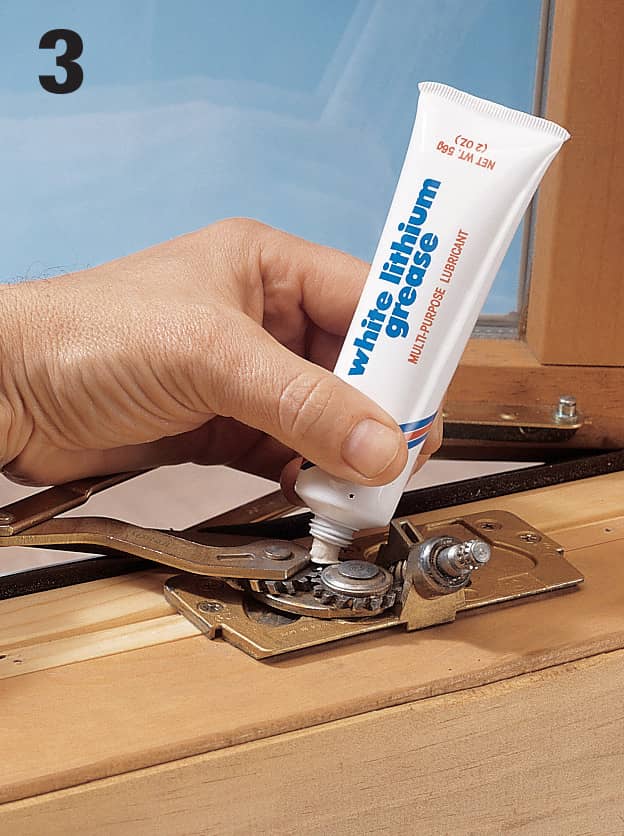
Apply an all-purpose grease to the gears, and reinstall the assembly. Connect the pivot arms, and attach the extension arm to the window. Test the window operation before installing the cap and molding.
How to Fix a Broken Windowpane
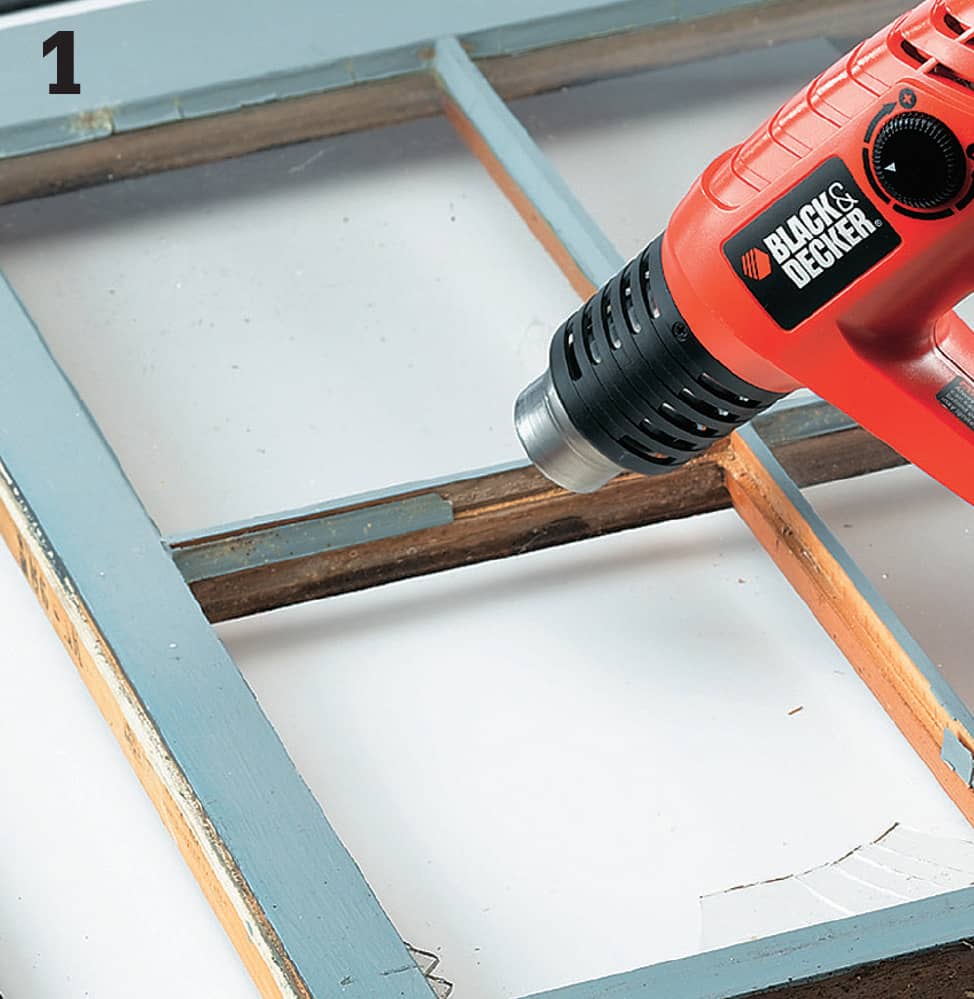
Wearing heavy leather gloves, remove the broken pieces of glass. Then, soften the old glazing compound using a heat gun or a hair dryer. Don’t hold the heat gun too long in one place because it can be hot enough to scorch the wood or crack adjacent panes of glass.
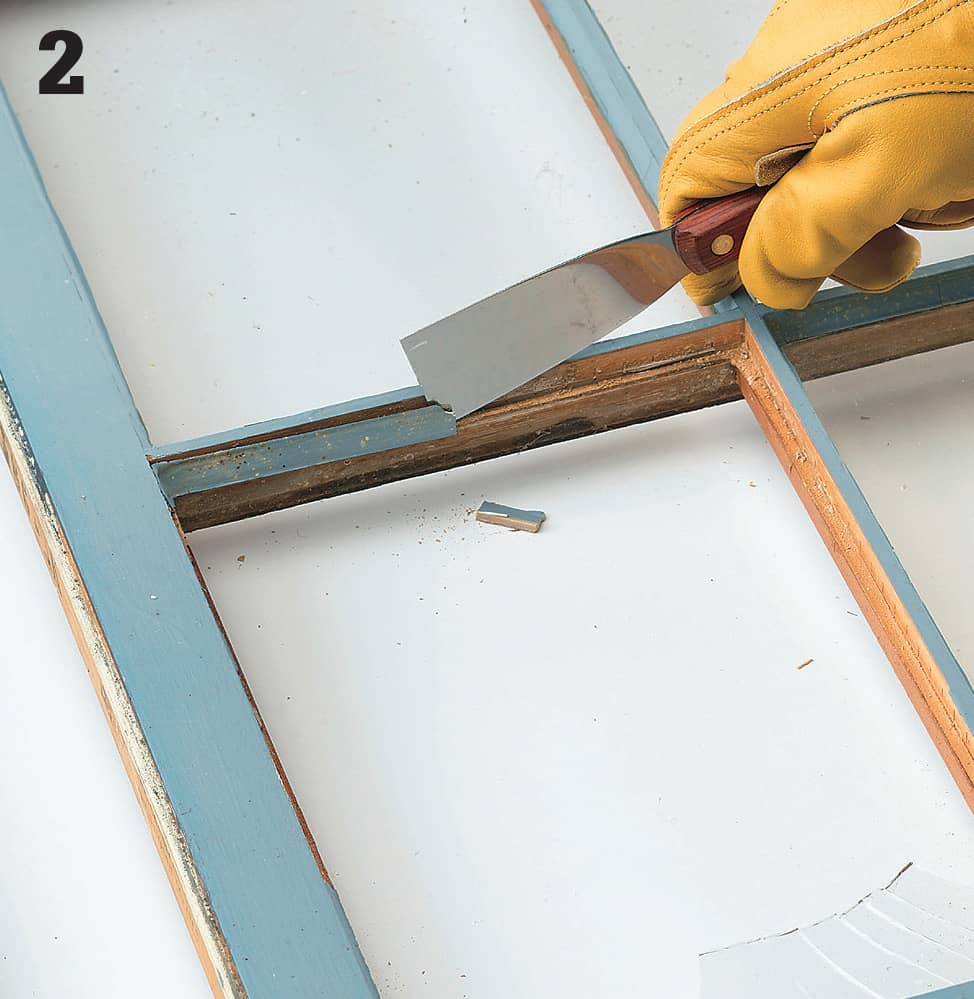
Once a section of compound is soft, remove it using a putty knife. Work carefully to avoid gouging the wood frame. If a section is difficult to scrape clean, reheat it with the heat gun. Soft compound is always easy to remove.
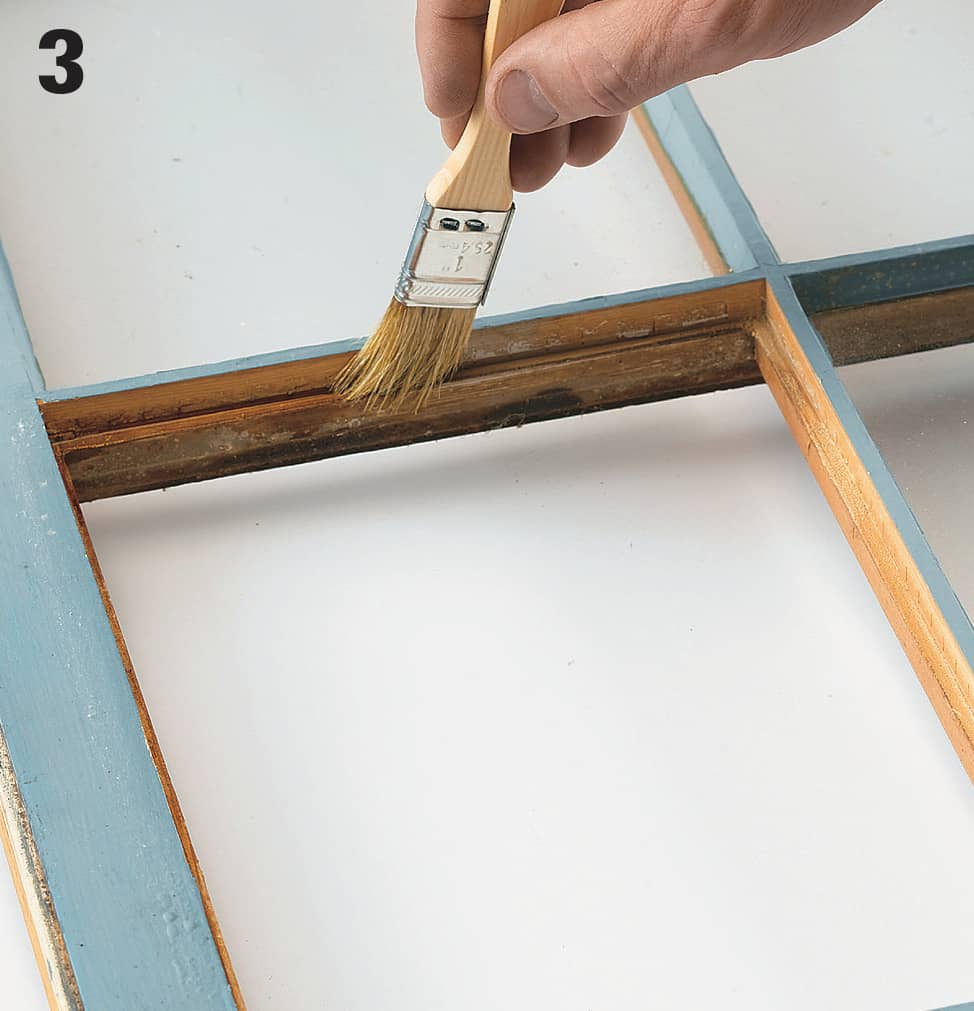
Once the wood opening is scraped clean, seal the wood with a coat of linseed oil or primer. If the wood isn’t sealed, the dry surface will draw too much moisture from the glazing compound and reduce its effectiveness.
Apply a thin bed of glazing compound to the wood frame opening and smooth it in place with your thumb.
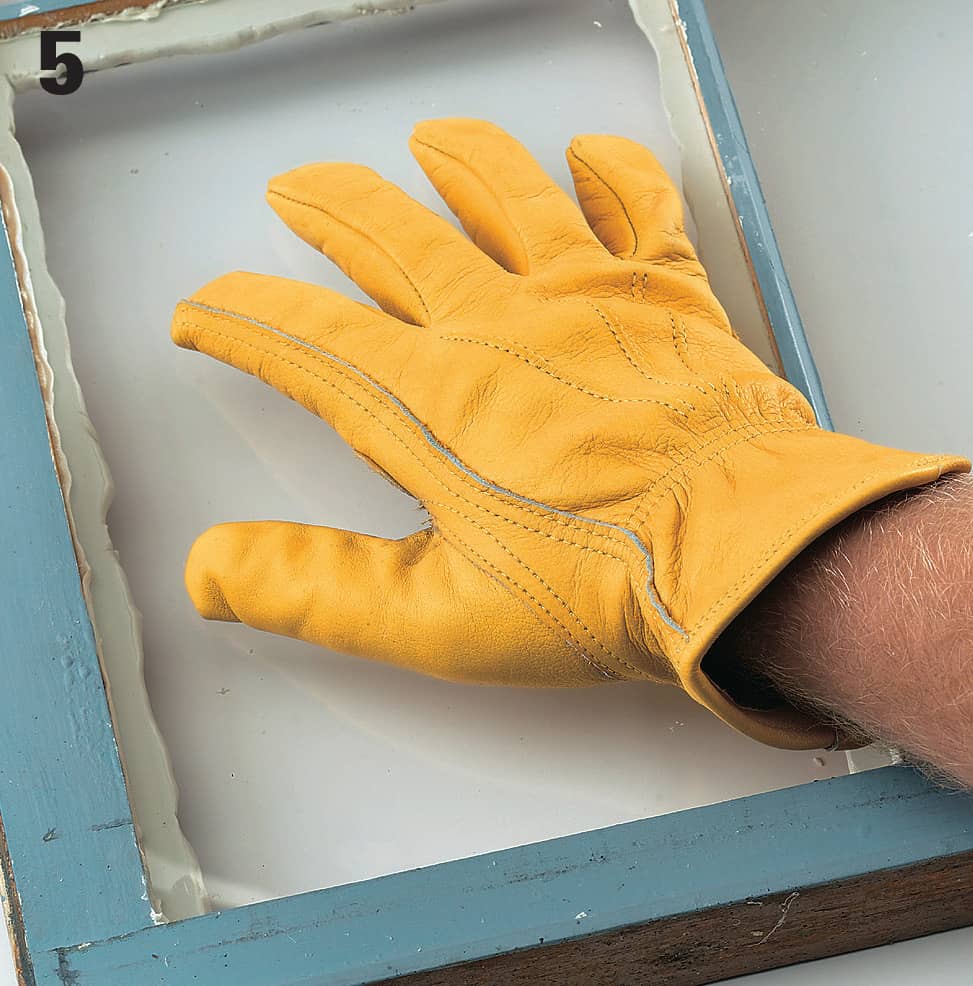
Press the new pane into the opening, making sure to achieve a tight seal with the compound on all sides. Wiggle the pane from side to side and up and down until the pane is seated. There will be some squeeze-out, but do not press all the compound out.
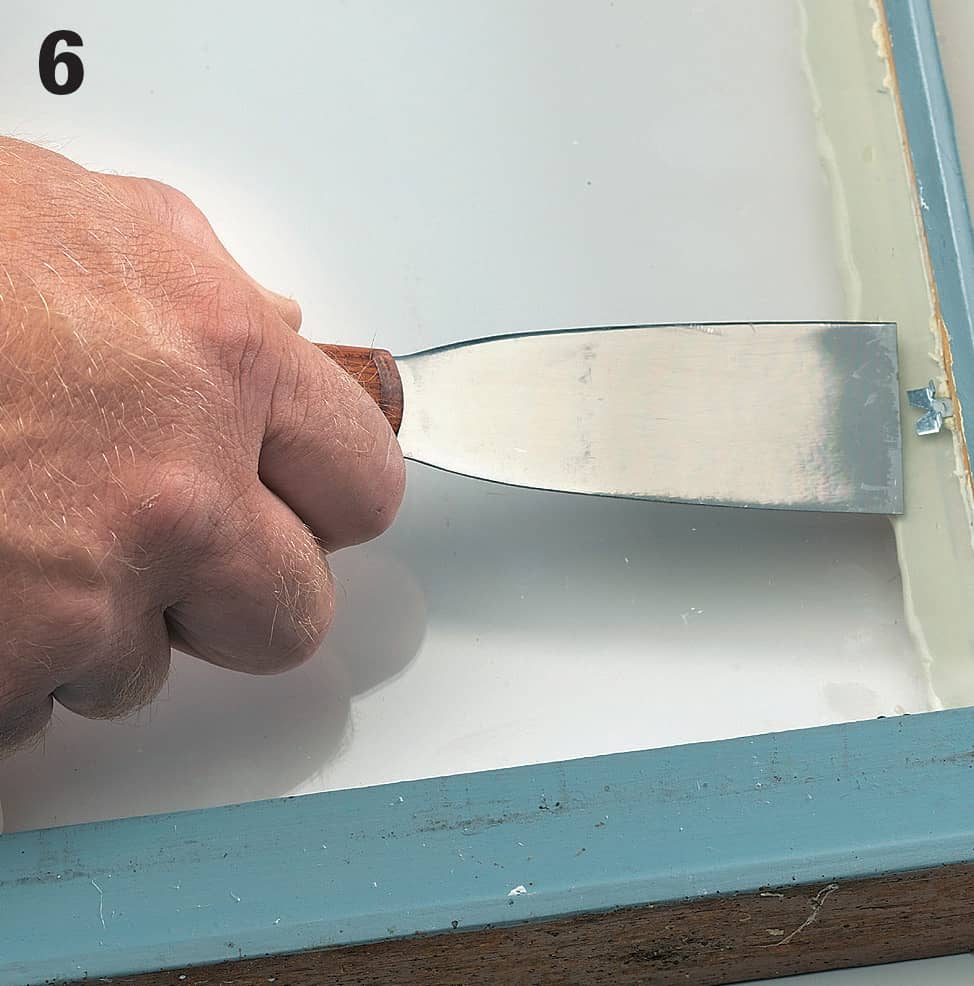
Drive glazier’s points into the wood frame to hold the pane in place. Use the tip of a putty knife to slide the point against the surface of the glass. Install at least 2 points on each side of the pane.
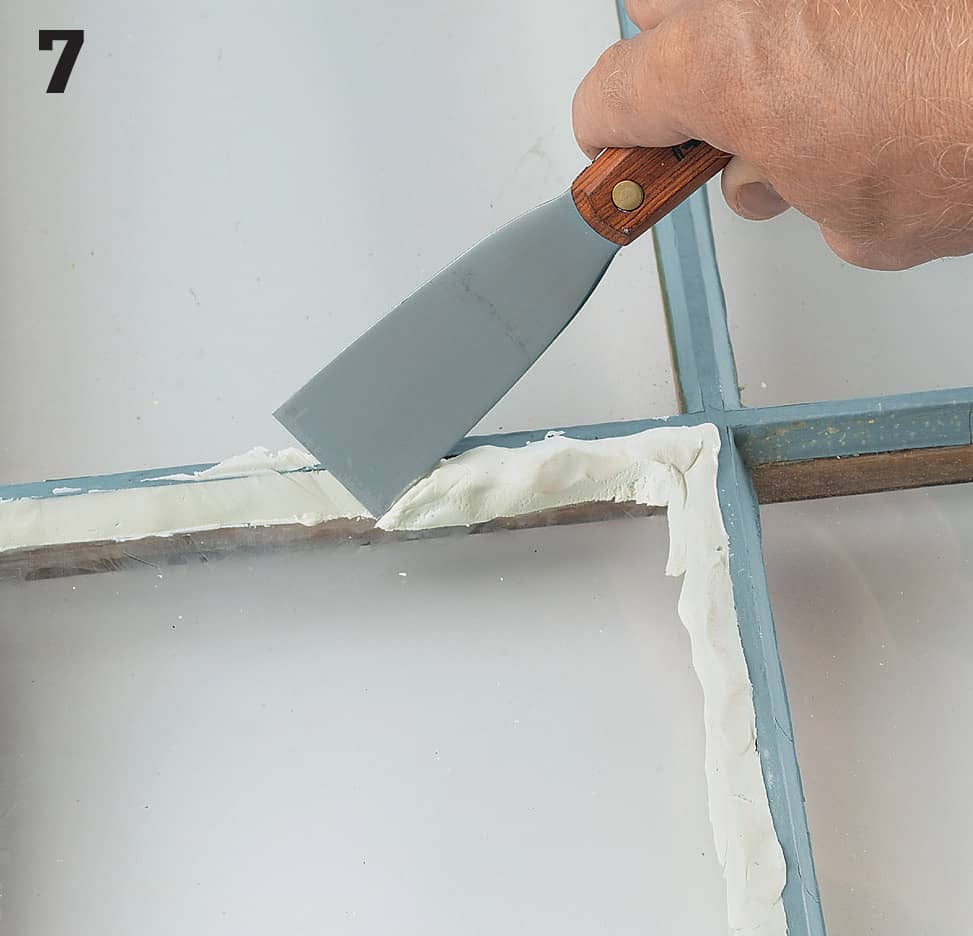
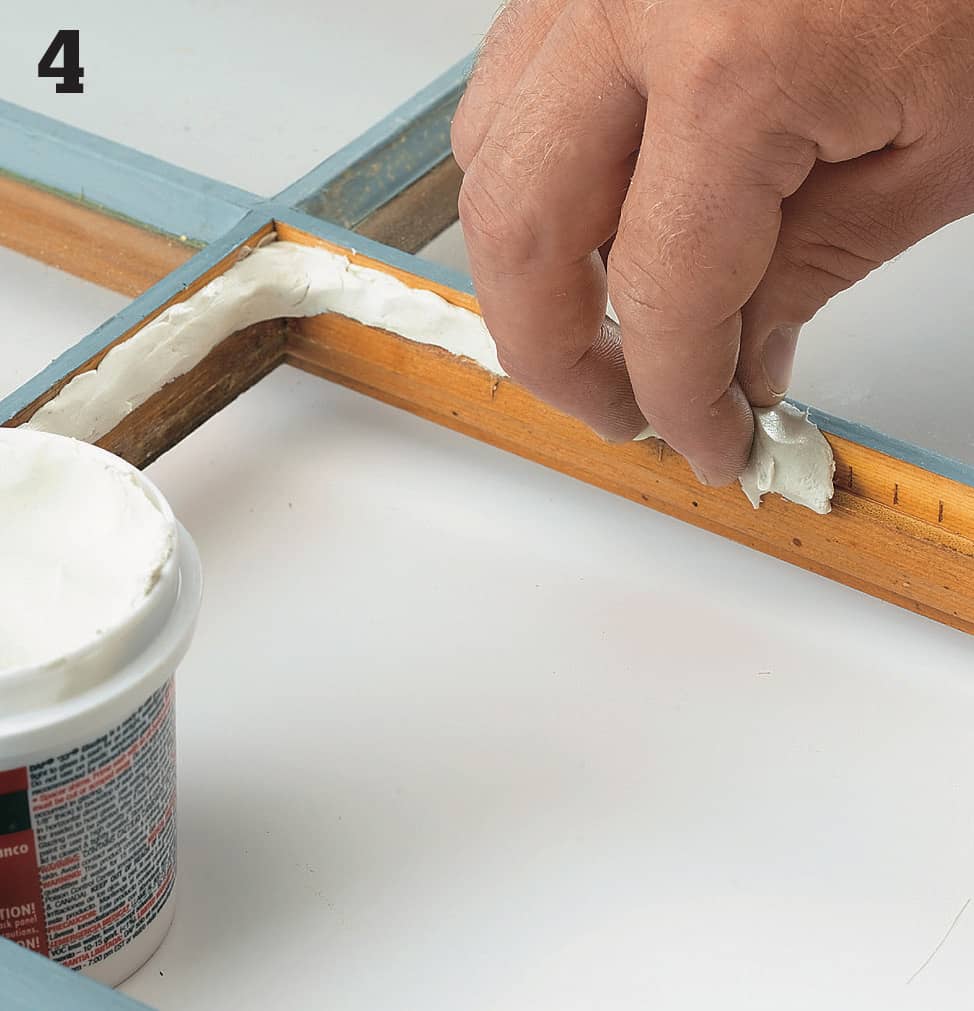
Make a rope of compound (about 1/2" dia.) by rolling it between your hands. Then press it against the pane and the wood frame. Smooth it in place by drawing a putty knife, held at a 45° angle, across its surface. Scrape off excess.
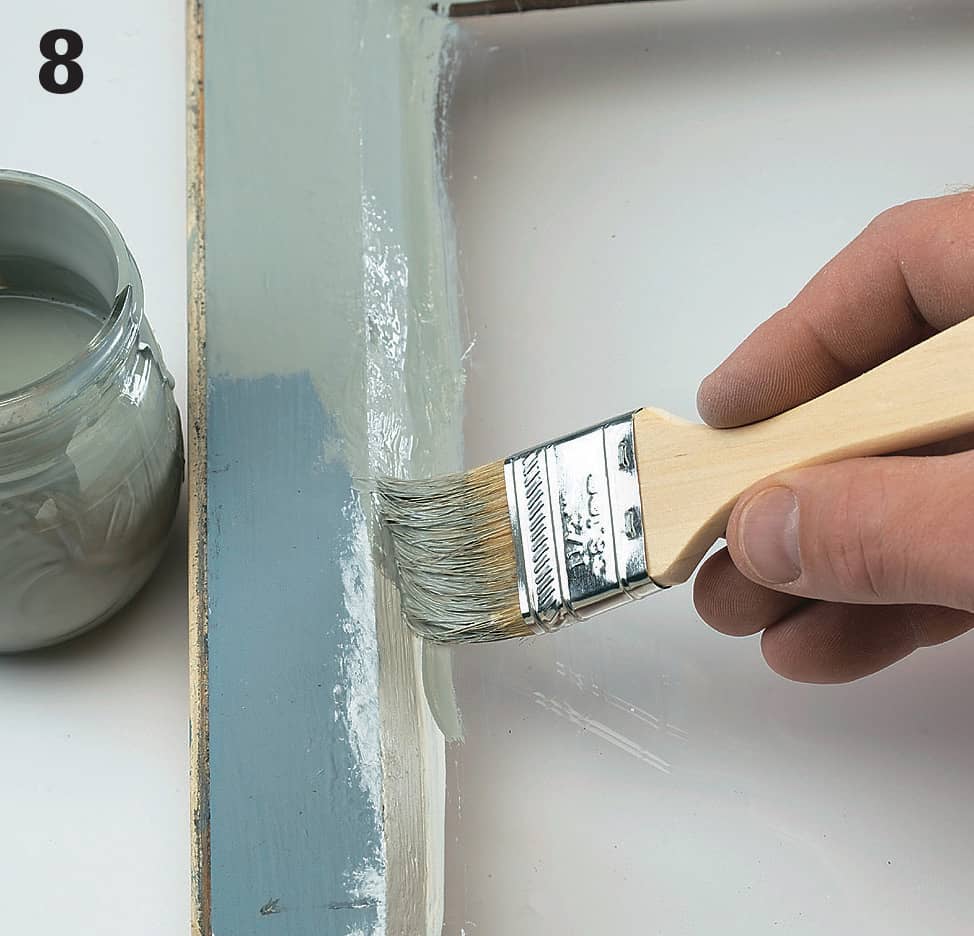
Allow the glazing compound at least one week to dry completely. Then prime and paint it to match the rest of the sash. Be sure to spread the paint over the joint between the compound and the glass. This will seal the joint completely. When the paint is dry, scrape off the extra with a razor blade paint scraper.
 Fixing Storm Windows & Doors
Compared to removable wood storm windows and screens, repairing combination storm windows is a little more complex. But there are several repairs you can make without too much difficulty, as long as you find the right parts. Take the old corner keys, gaskets, or other original parts to a hardware store that repairs storm windows so the clerk can help you find the correct replacement parts. If you cannot find the right parts, have a new sash built.
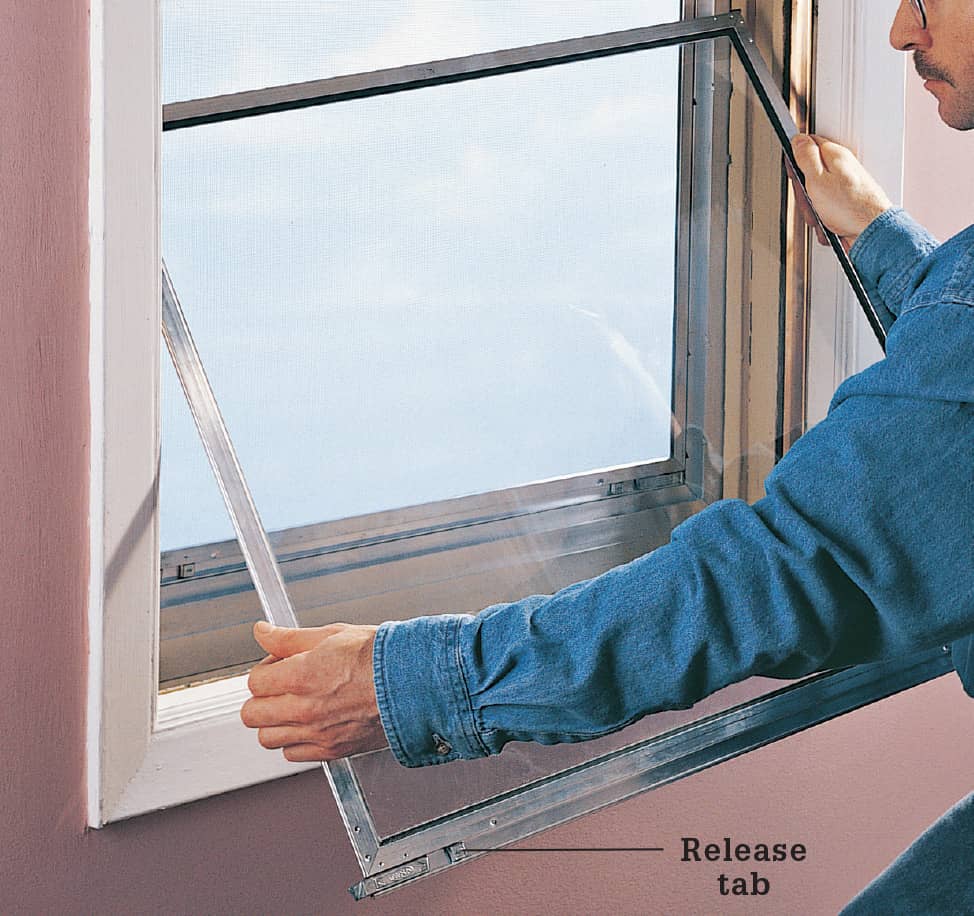
Remove the metal storm window sash by pressing in the release hardware in the lower rail then lifting the sash out. Sash hangers on the corners of the top rail should be aligned with the notches in the side channels before removal.
How to Replace Screening in a Metal Storm Window
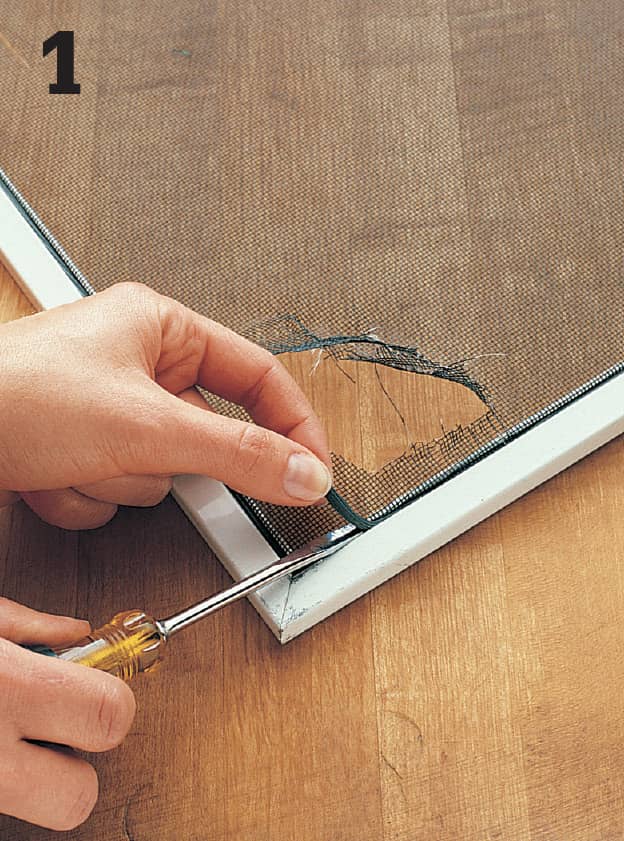
Pry the vinyl spline from the groove around the edge of the frame with a screwdriver. Retain the old spline if it is still flexible, or replace it with a new spline.
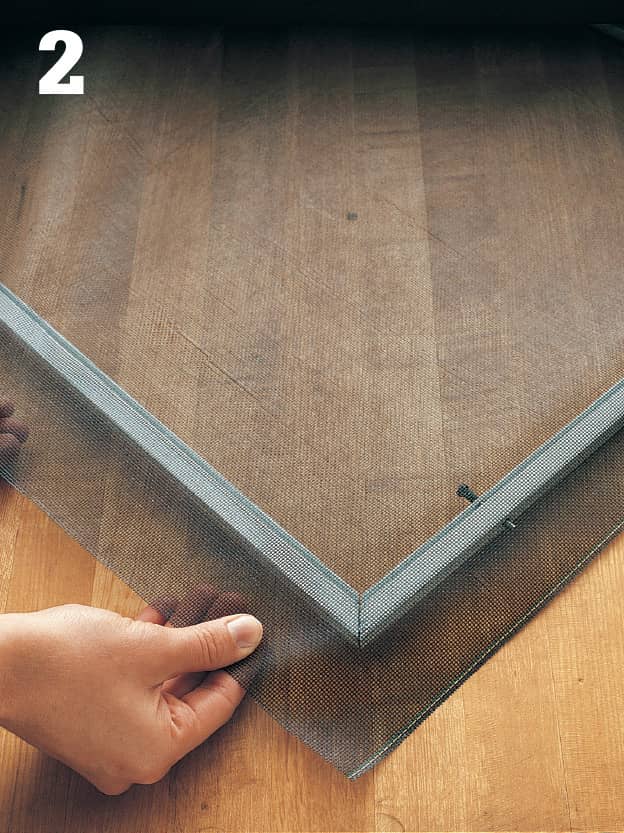
Stretch the new screen tightly over the frame so that it overlaps the edges of the frame. Keeping the screen taut, use the convex side of a spline roller to press the screen into the retaining grooves.
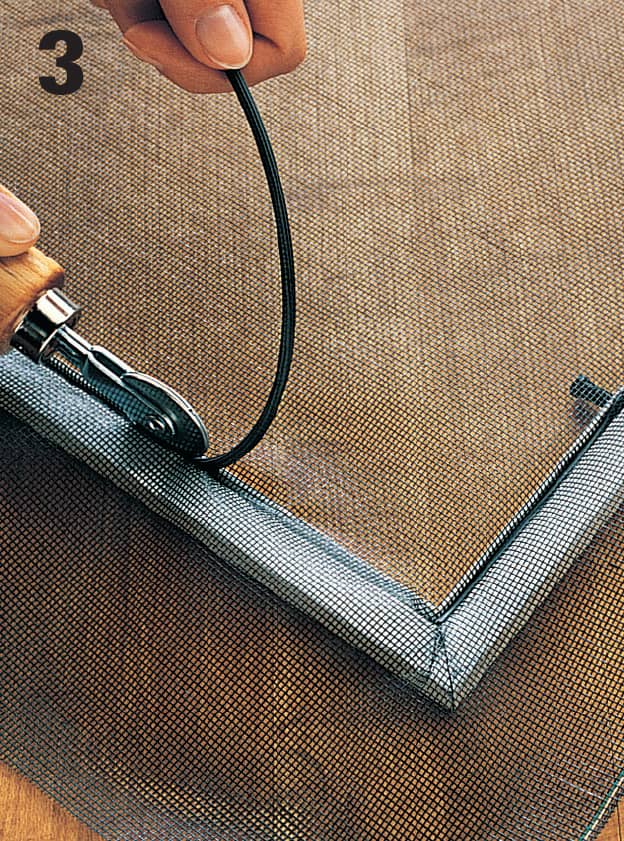
Use the concave side of the spline roller to press the spline into the groove (it helps to have a partner for this). Cut away excess screen using a utility knife.
How to Replace Glass in a Metal Storm Window
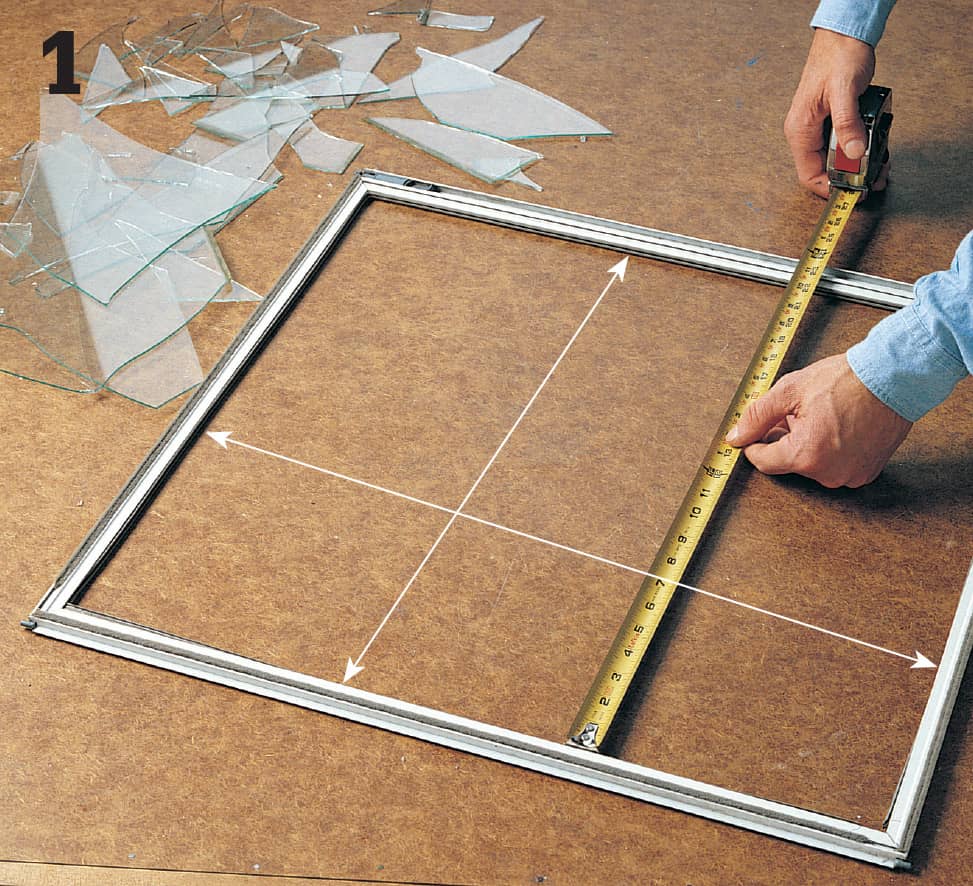
Remove the sash frame from the window, then completely remove the broken glass from the sash. Remove the rubber gasket that framed the old glass pane and remove any glass remnants. Find the dimensions for the replacement glass by measuring between the inside edges of the frame opening, then adding twice the thickness of the rubber gasket to each measurement.
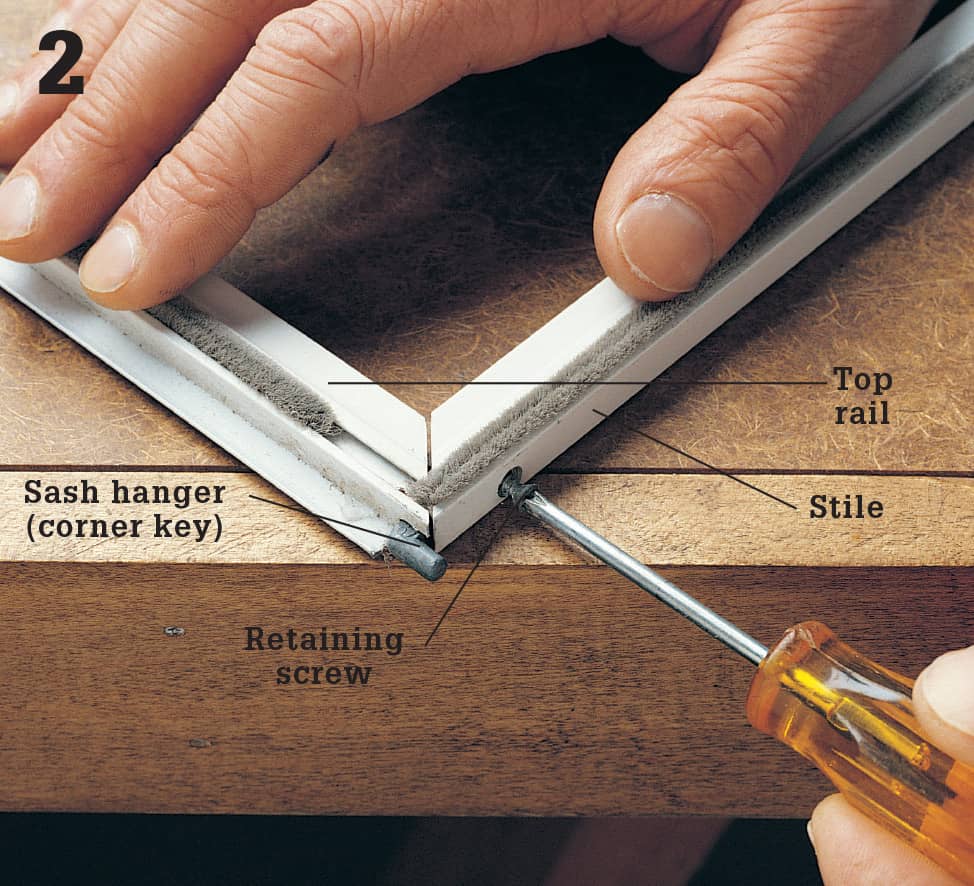
Set the frame on a flat surface, and disconnect the top rail. Remove the retaining screws in the sides of the frame stiles where they join the top rail. After unscrewing the retaining screws, pull the top rail loose, pulling gently in a downward motion to avoid damaging the L-shaped corner keys that join the rail and the stiles. For glass replacement, you need only disconnect the top rail.
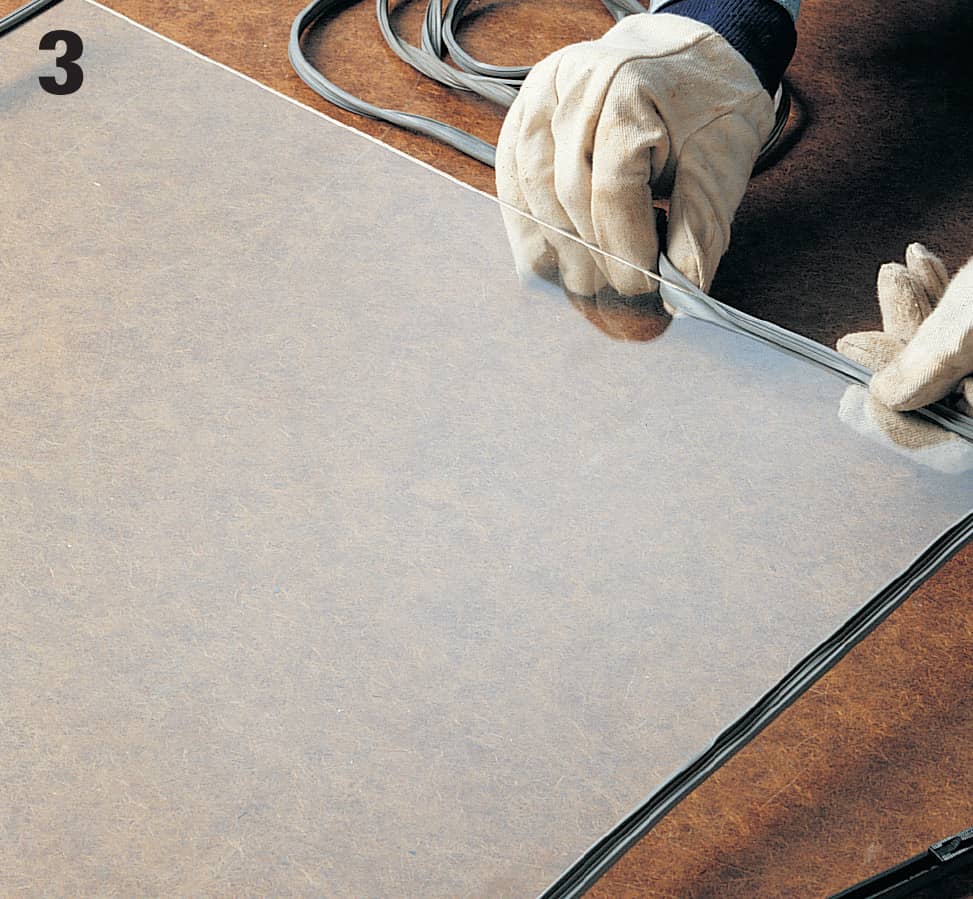
Fit the rubber gasket (buy a replacement if the original is in poor condition) around one edge of the replacement glass pane. At the corners, cut the spine of the gasket partway so it will bend around the corner. Continue fitting the gasket around the pane, cutting at the corners, until all four edges are covered. Trim off any excess gasket material.
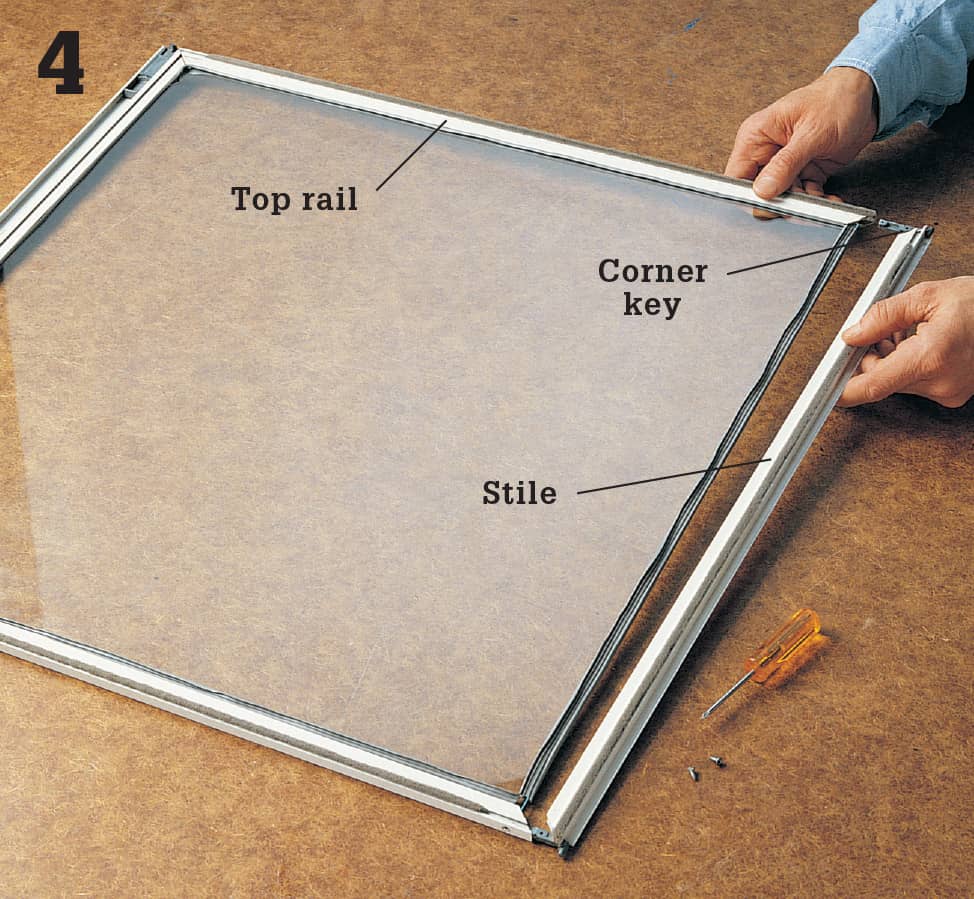
Slide the glass pane into the channels in the stiles and bottom rail of the sash frame. Insert corner keys into the top rail, then slip the other ends of the keys into the frame stiles. Press down on the top rail until the mitered corners are flush with the stiles. Drive the retaining screws back through the stiles and into the top rail to join the frame together. Reinsert the frame into the window.
How to Disassemble & Repair a Metal Sash Frame
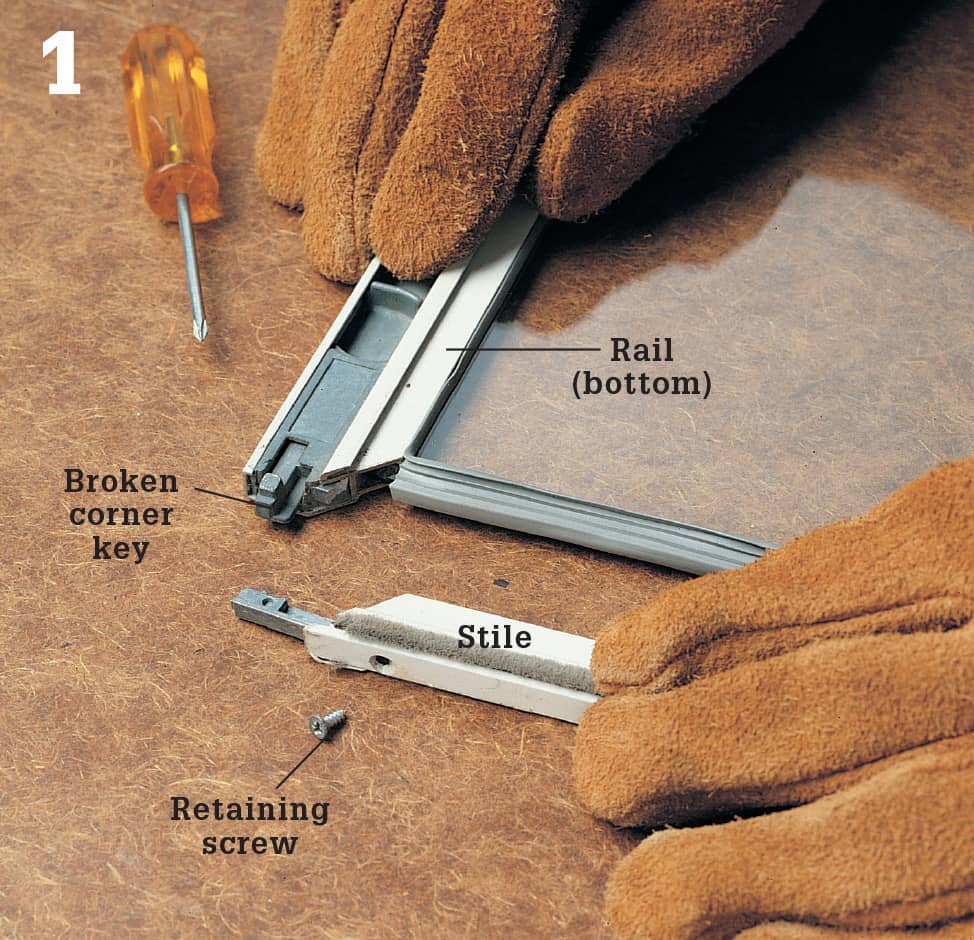
Metal window sash are held together at the corner joints by L-shaped pieces of hardware that fit into grooves in the sash frame pieces. To disassemble a broken joint, start by disconnecting the stile and rail at the broken joint—there is usually a retaining screw driven through the stile that must be removed.
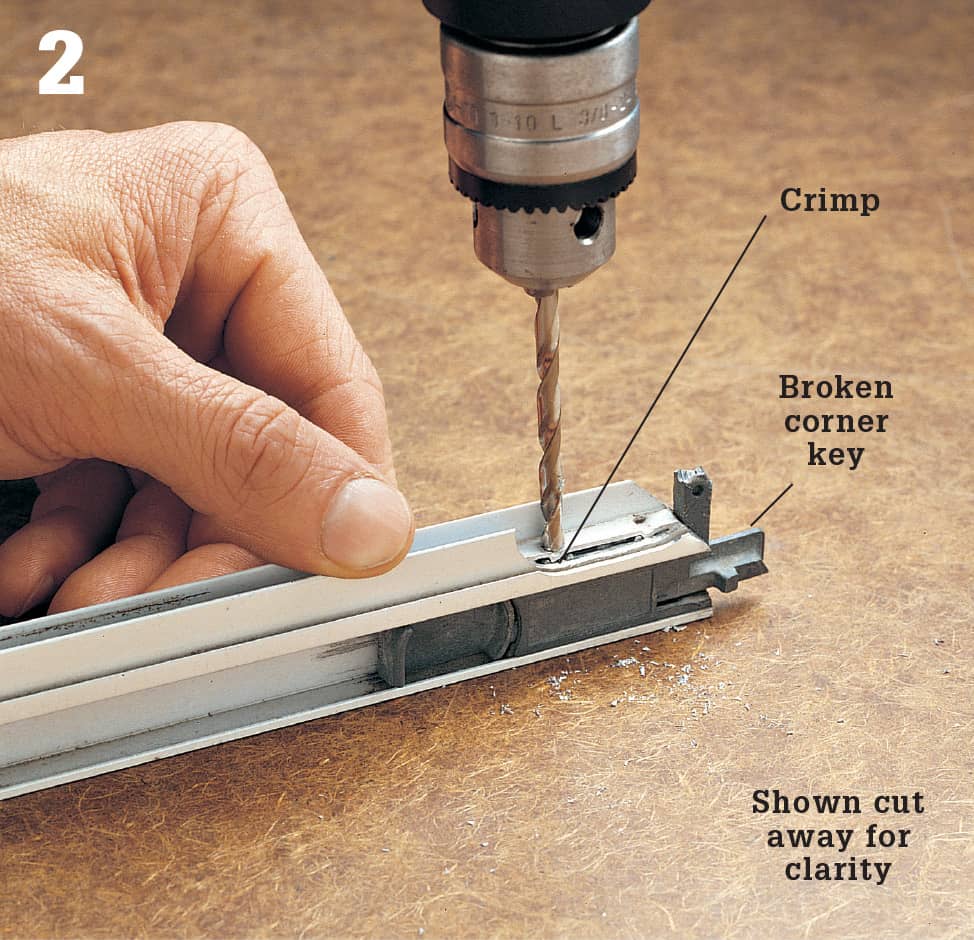
Corner keys are secured in the rail slots with crimps that are punched into the metal over the key. To remove keys, drill through the metal in the crimped area using a drill bit the same diameter as the crimp. Carefully knock the broken key pieces from the frame slots with a screwdriver and hammer.
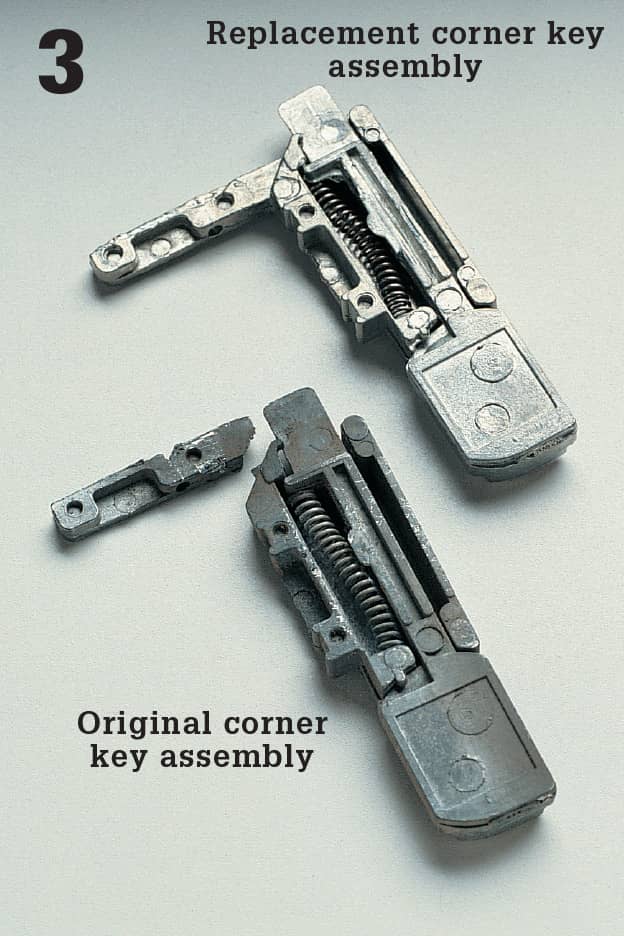
Locate matching replacement parts for the broken corner key, which is usually an assembly of two or three pieces. There are dozens of different types, so it is important that you save the old parts for reference.
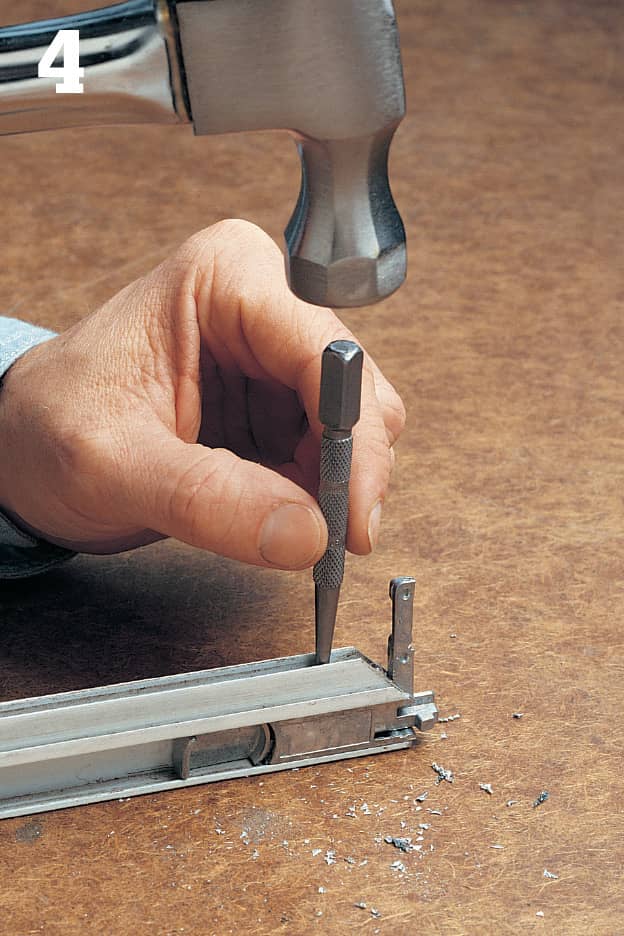
Insert the replacement corner key assembly into the slot in the rail. Use a nail set as a punch, and rap it into the metal over the corner key, creating a new crimp to hold the key in place.
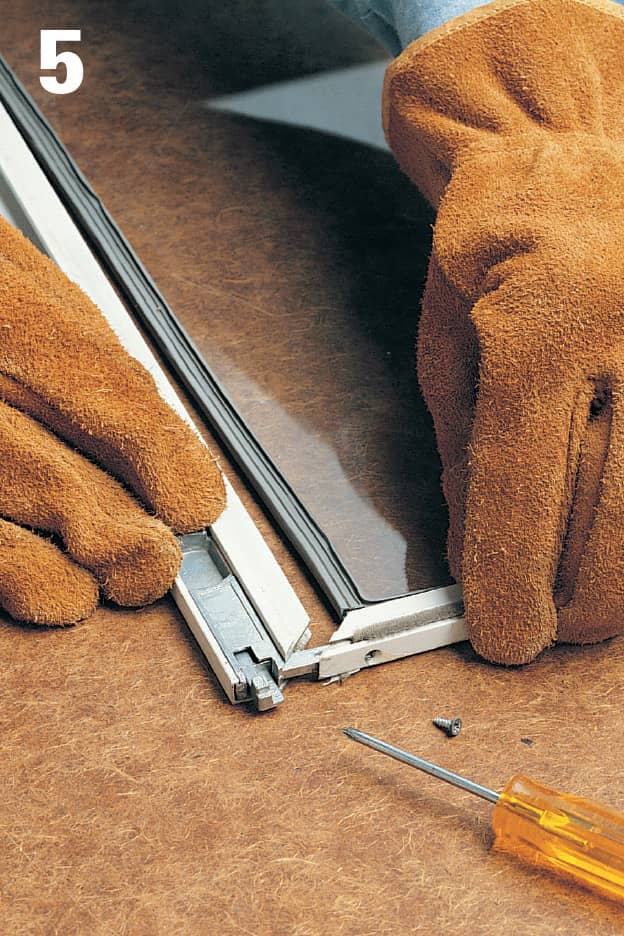
Insert the glass and gasket into the frame slots, then reassemble the frame and drive in retainer screws (for screen windows, replace the screening).
 Installing Replacement Windows
If you’re looking to replace or improve old single- or double-hung windows, consider using sash-replacement kits. They can give you energy-efficient, maintenance-free windows without changing the outward appearance of your home or breaking your budget.
Unlike prime window replacement, which changes the entire window and frame, or pocket window replacement, in which a complete window unit is set into the existing frame, sash replacement uses the original window jambs, eliminating the need to alter exterior or interior walls or trim. Installing a sash-replacement kit involves little more than removing the old window stops and sashes and installing new vinyl jamb liners and wood or vinyl sash. And all of the work can be done from inside your home.
Most sash-replacement kits offer tilt features and other contemporary conveniences. Kits are available in vinyl, aluminum, or wood construction with various options for color and glazing, energy efficiency, security features, and noise reduction.
Nearly all major window manufacturers offer sash-replacement kits designed to fit their own windows. You can also order custom kits that are sized to your specific window dimensions. A good fit is essential to the performance of your new windows. Review the tips shown on the next page for measuring your existing windows, and follow the manufacturer’s instructions for the best fit.
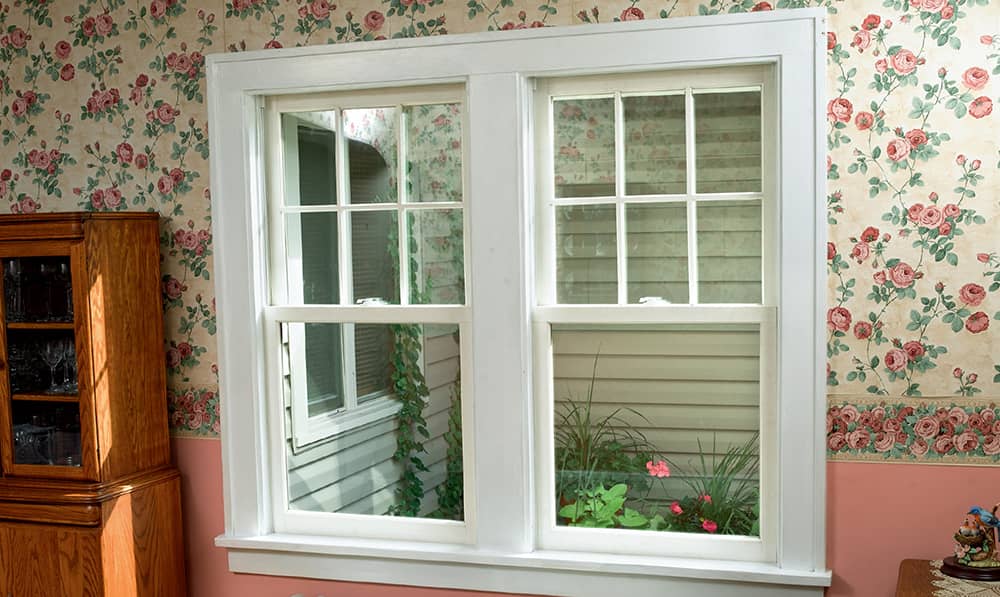
Upgrade old, leaky windows with new, energy-efficient sash-replacement kits. Kits are available in a variety of styles to match your existing windows or to add a new decorative accent to your home. Most kits offer natural or painted interior surfaces and a choice of outdoor surface finishes.
How to Install a New Window Sash
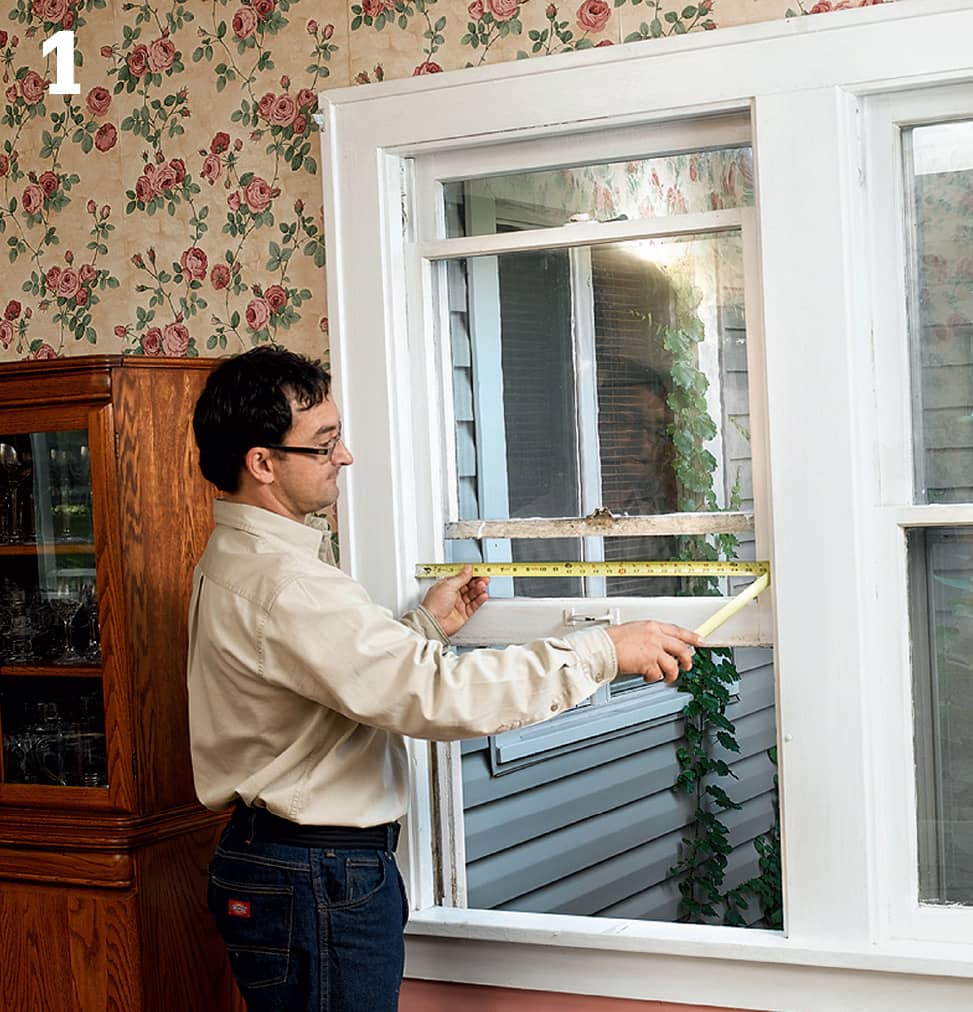
Measure the width of the existing window at the top, middle, and bottom of the frame. Use the smallest measurement, then reduce the figure by 3/8". Measure the height of the existing window from the head jamb to the point where the outside edge of the bottom sash meets the sill. Reduce the figure by 3/8". Note: Manufacturers’ specifications for window sizing may vary.
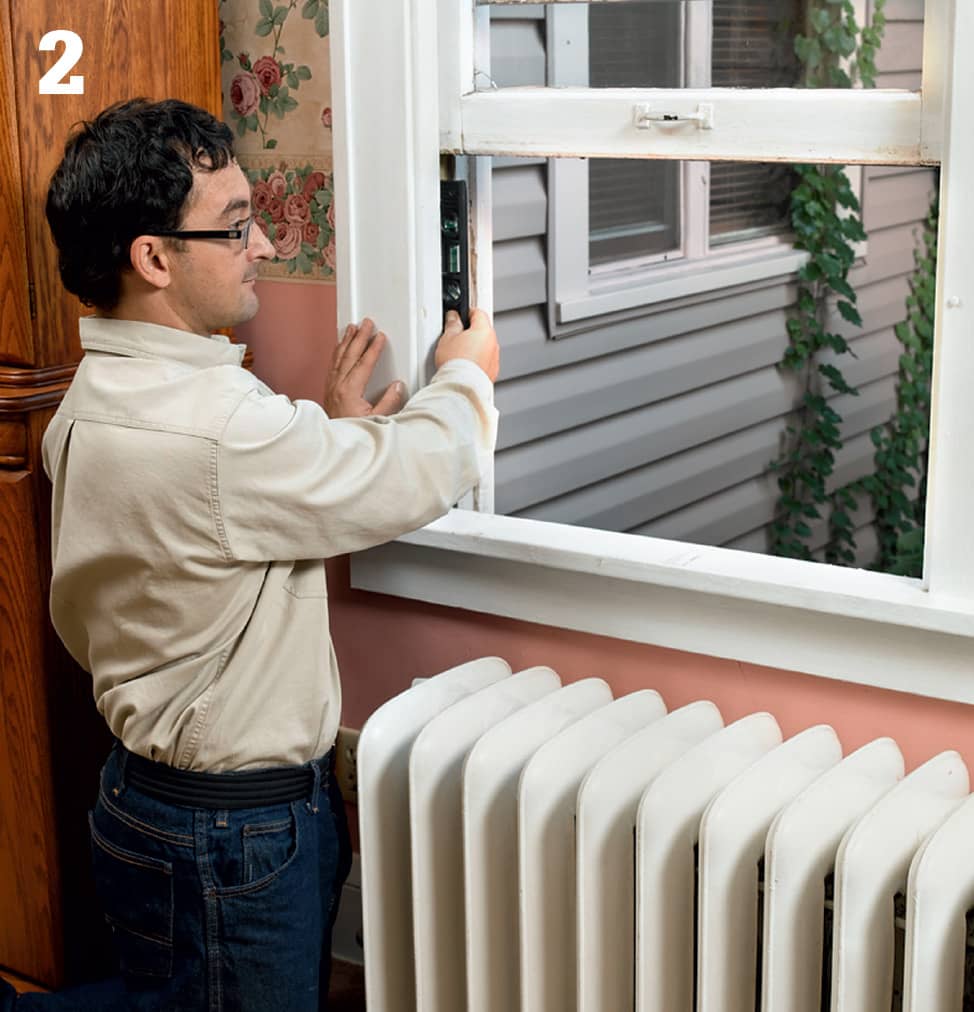
Check for a straight, level, and plumb sill, side, and head jambs using a torpedo level. Measure the frame diagonally to check for square (if the diagonal measurements are equal, the frame is square). If the frame is not square, check with the sash-kit manufacturer: Most window kits can accommodate some deviation in frame dimensions.
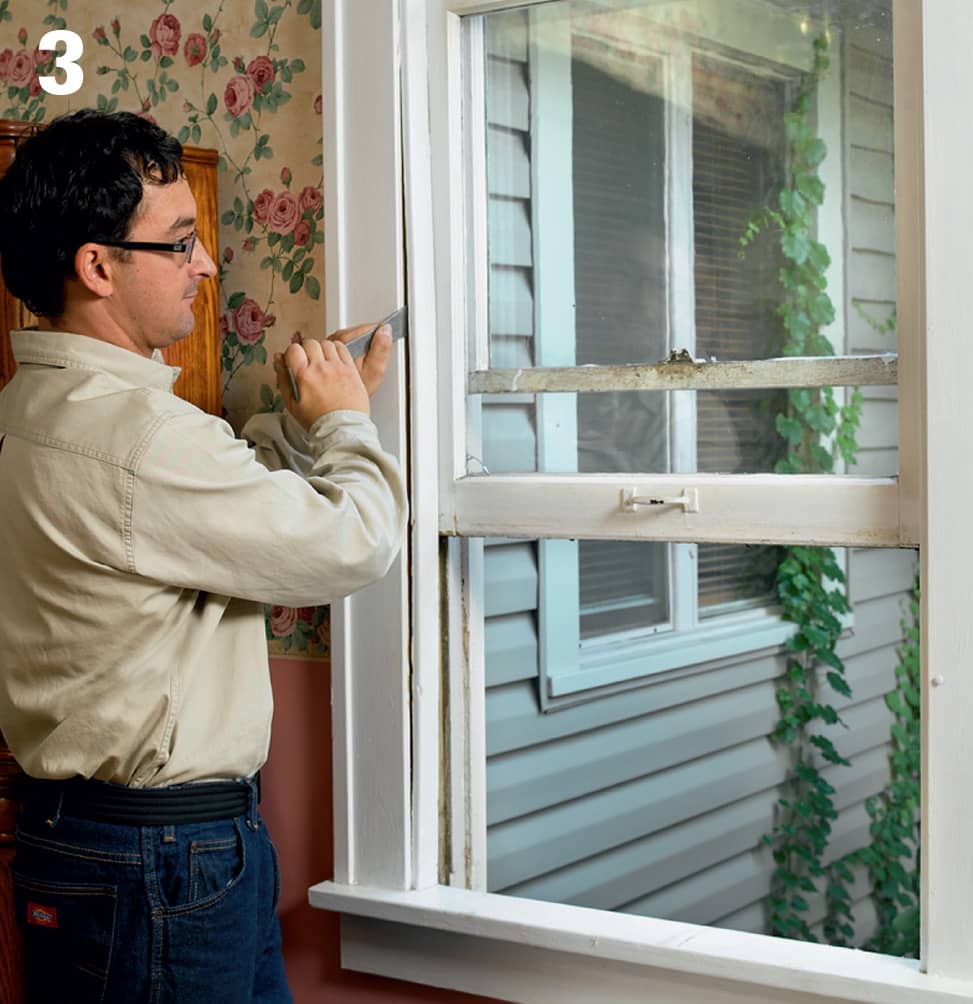
Carefully remove the interior stops from the side jambs, using a putty knife or pry bar. Save the stops for reinstallation.
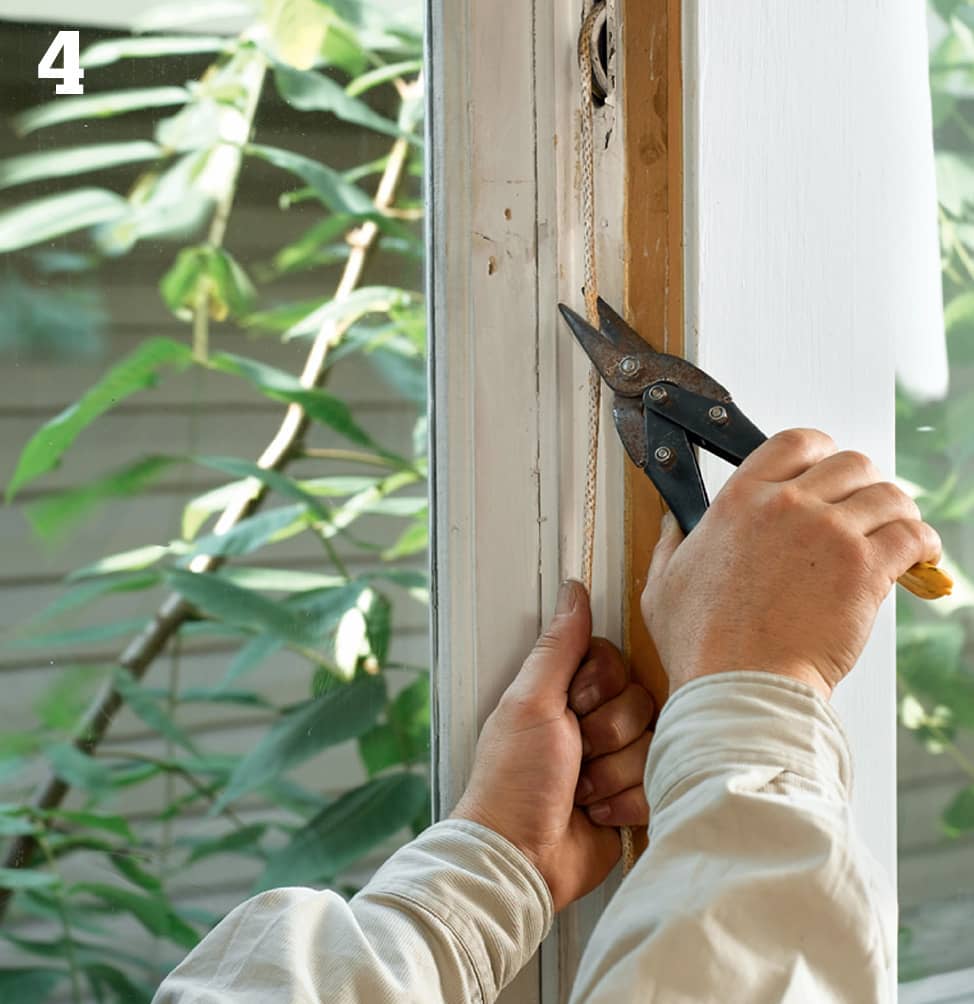
With the bottom sash down, cut the cord holding the sash, balancing weight on each side of the sash. Let the weights and cords fall into the weight pockets.
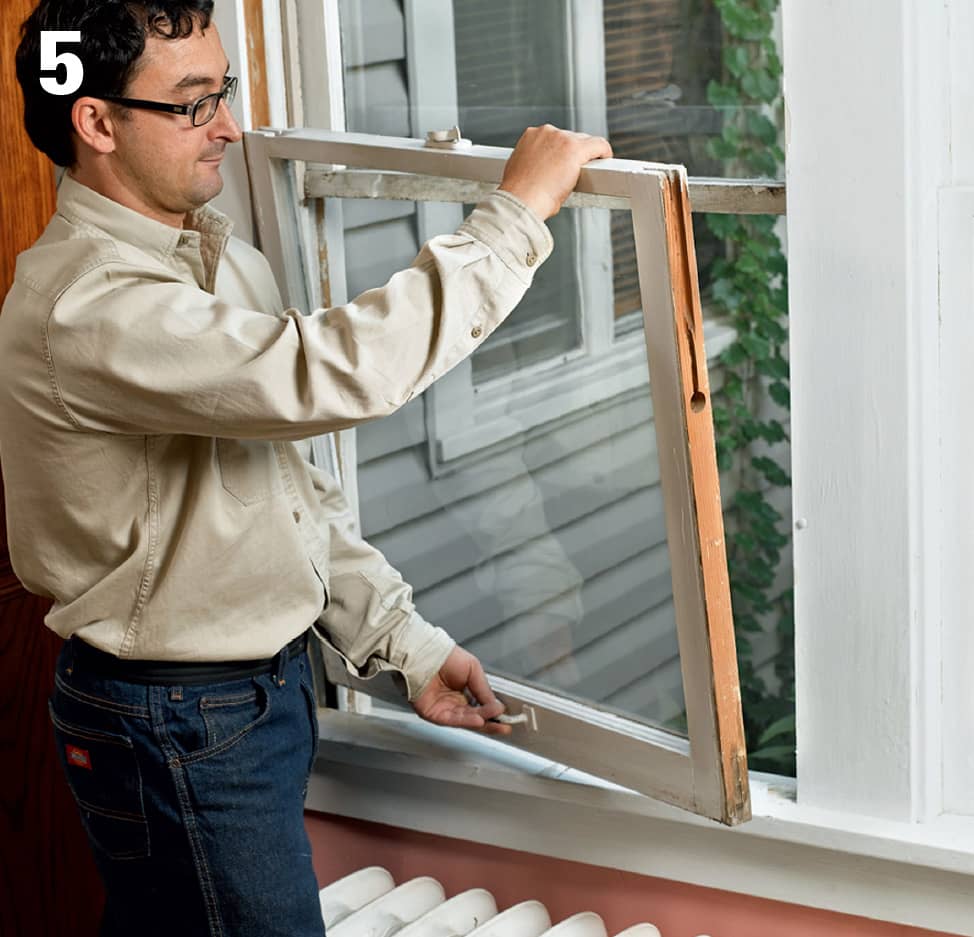
Lift out the bottom sash. Remove the parting stops from the head and side jambs. (The parting stops are the strips of wood that separate the top and bottom sash.) Cut the sash cords for the top sash, then lift out the top sash. Remove the sash-cord pulleys. If possible, pull the weights from the weight pockets at the bottom of the side jambs, then fill the weight pockets with fiberglass insulation. Repair any parts of the jambs that are rotted or damaged.
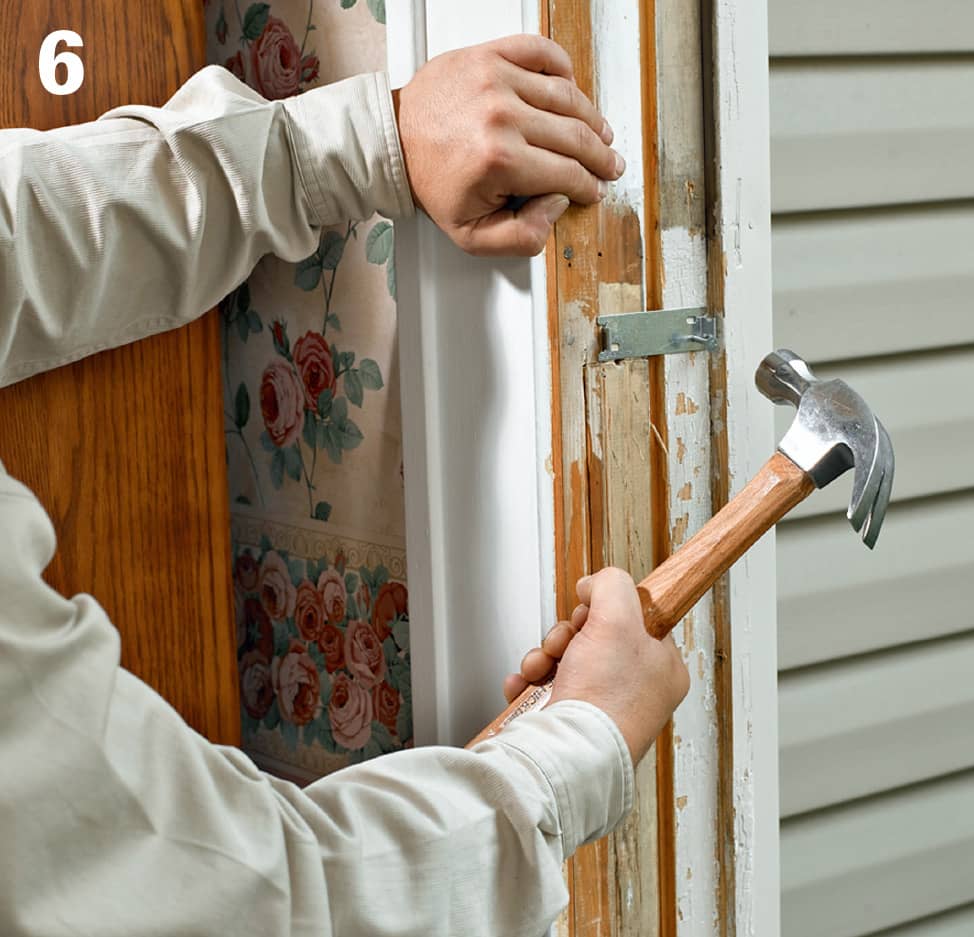
Position the jamb-liner brackets, and fasten them to the jambs with 1" galvanized roofing nails. Place one bracket approximately 4" from the head jamb and one 4" from the sill. Leave 1/16" clearance between the blind stop and the jamb-liner bracket. Install any remaining brackets, spacing them evenly along the jambs.
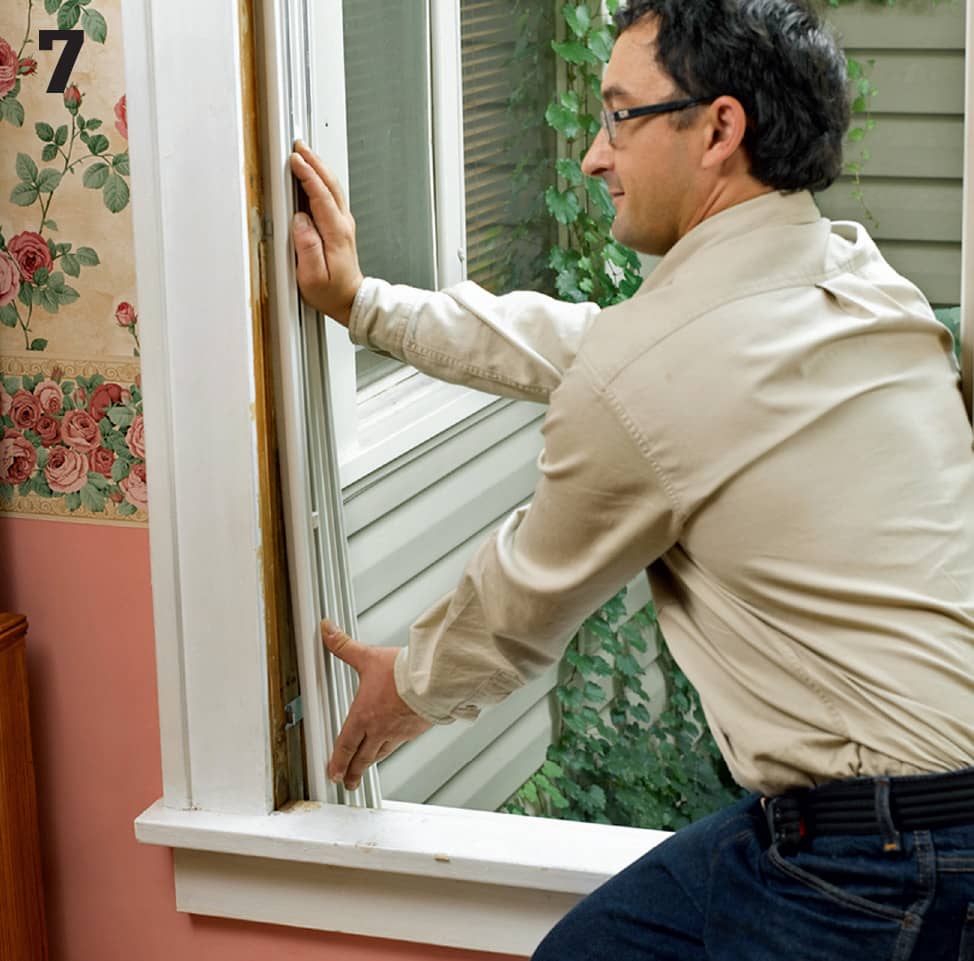
Position any gaskets or weatherstripping provided for the jamb liners. Carefully position each liner against its brackets and snap it into place. When both liners are installed, set the new parting stop into the groove of the existing head jamb, and fasten it with small finish nails. Install a vinyl sash stop in the interior track at the top of each liner to prevent the bottom sash from being opened too far.
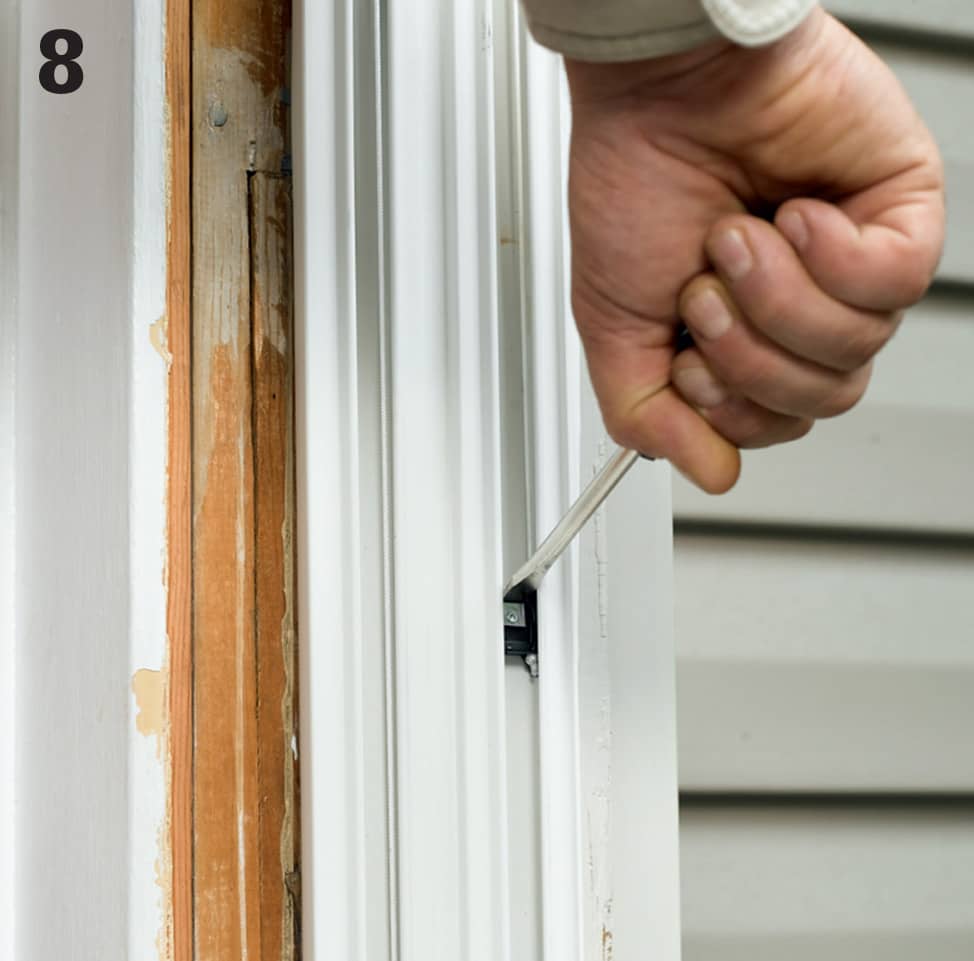
Set the sash control mechanism, using a slotted screwdriver. Gripping the screwdriver firmly, slide down the mechanism until it is about 9" above the sill, then turn the screwdriver to lock the mechanism and prevent it from springing upward. The control mechanisms are spring-loaded—do not let them go until they are locked in place. Set the mechanism in each of the four sash channels.
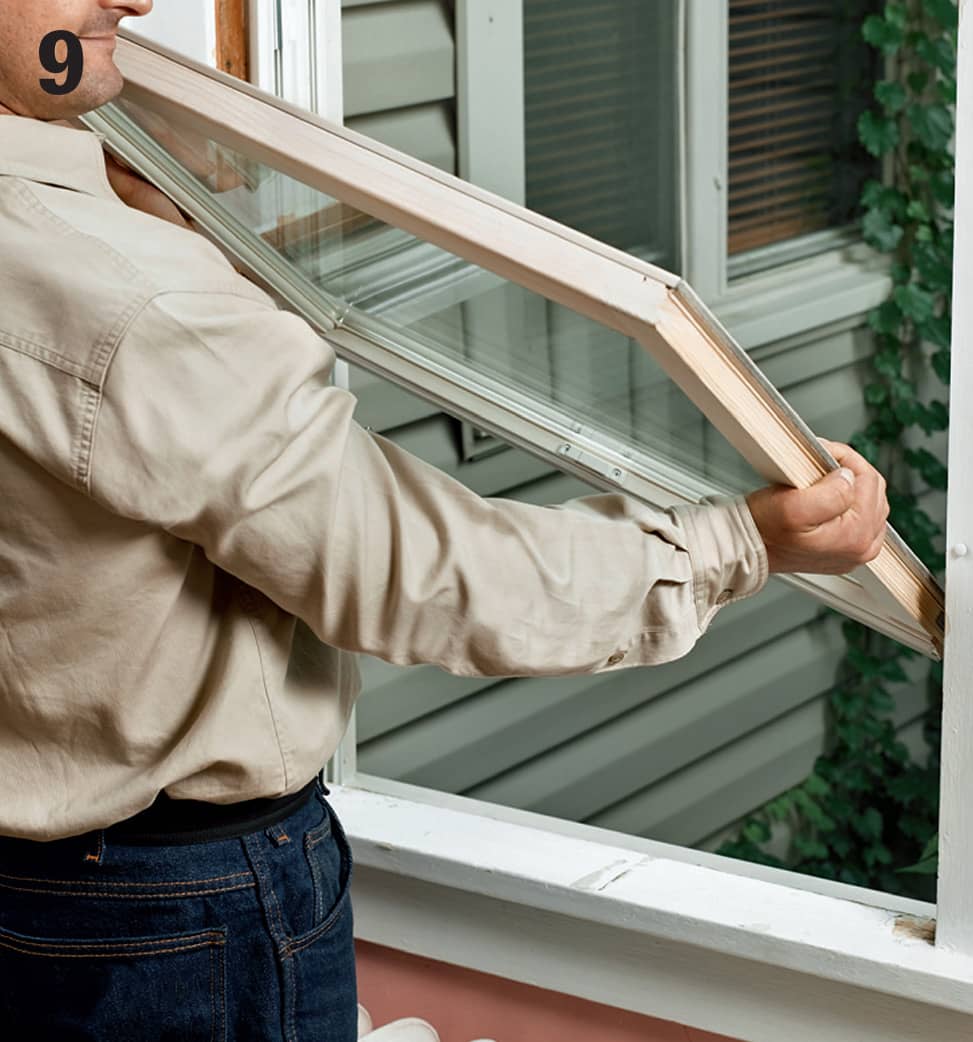
Install the top sash into the jamb liners. Set the cam pivot on one side of the sash into the outside channel. Tilt the sash, and set the cam pivot on the other side of the sash. Make sure both pivots are set above the sash control mechanisms. Holding the sash level, tilt it up, depress the jamb liners on both sides, and set the sash in the vertical position in the jamb liners. Once the sash is in position, slide it down until the cam pivots contact the locking terminal assemblies.
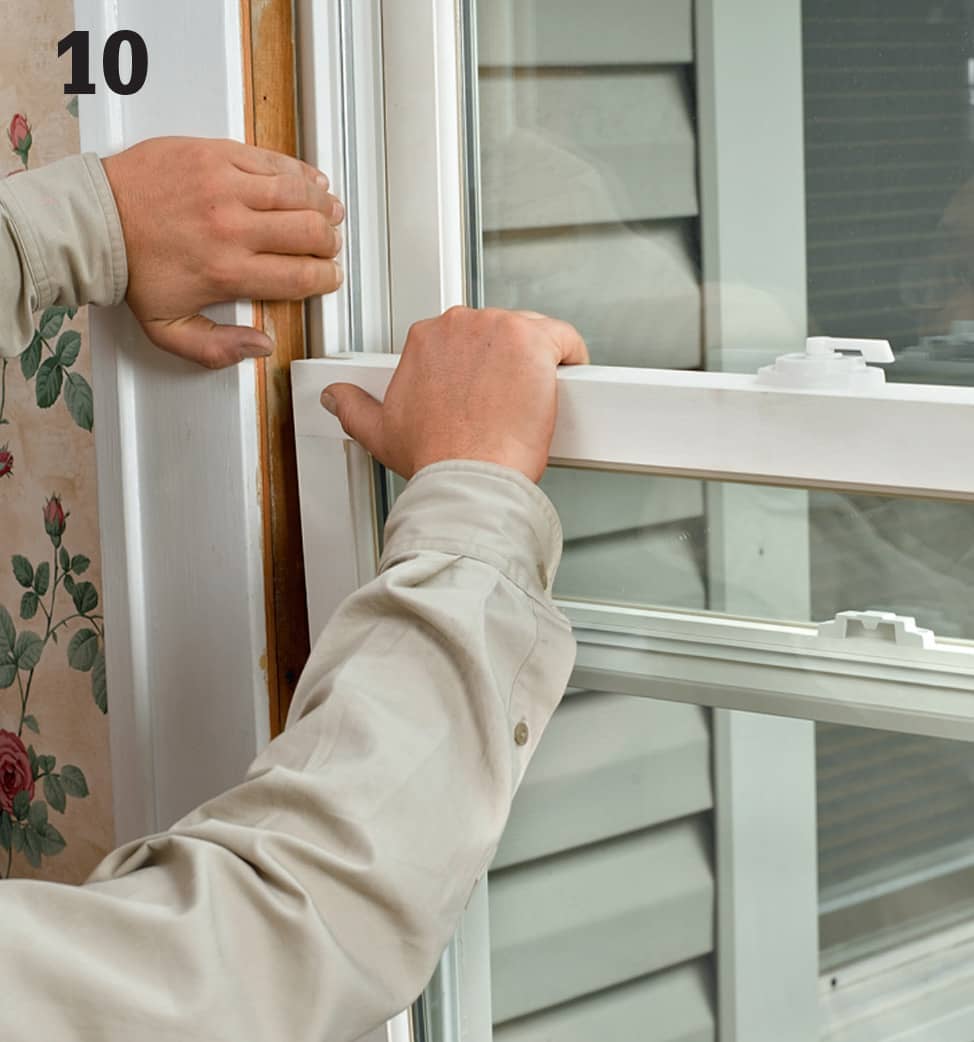
Install the bottom sash into the jamb liners, setting it into the inside sash channels. When the bottom sash is set in the vertical position, slide it down until it engages the control mechanisms. Open and close both sashes to make sure they operate properly.
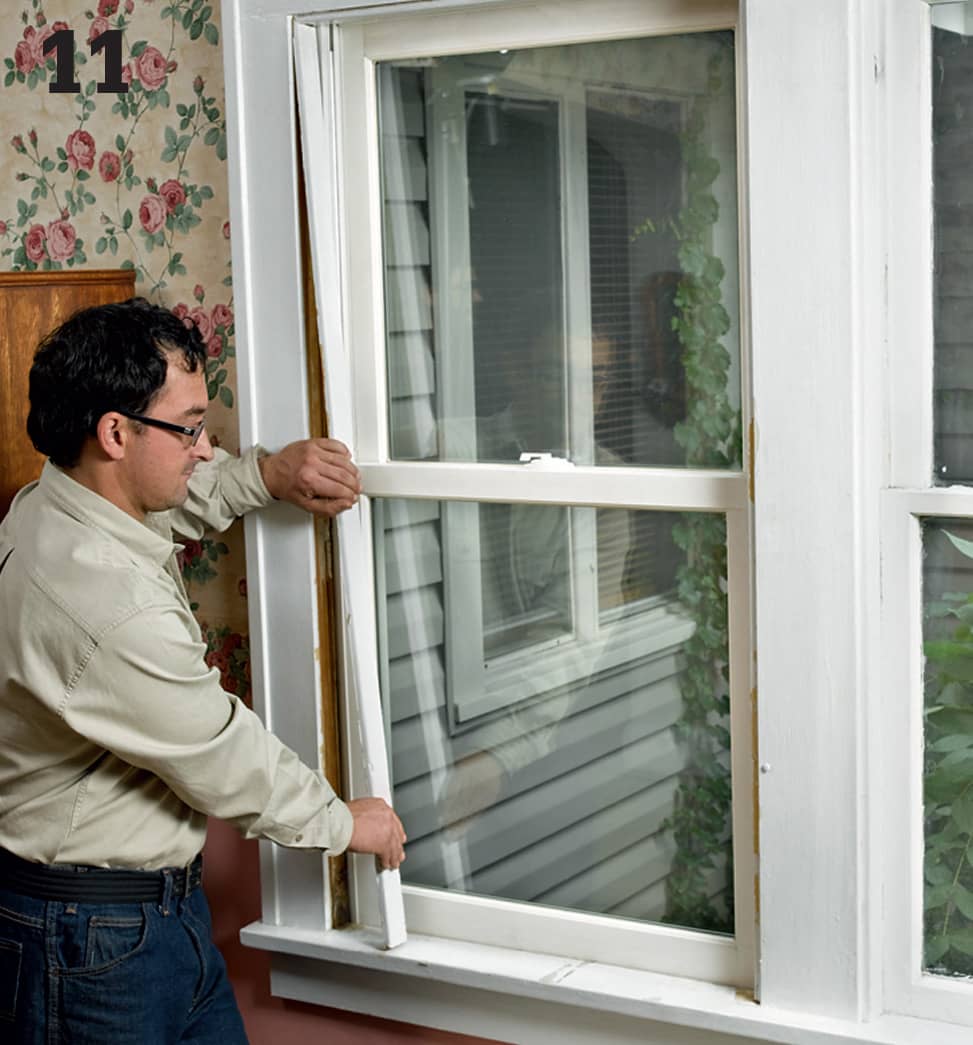
Reinstall the stops that you removed in step 3. Fasten them with finish nails, using the old nail holes, or drill new pilot holes for the nails.
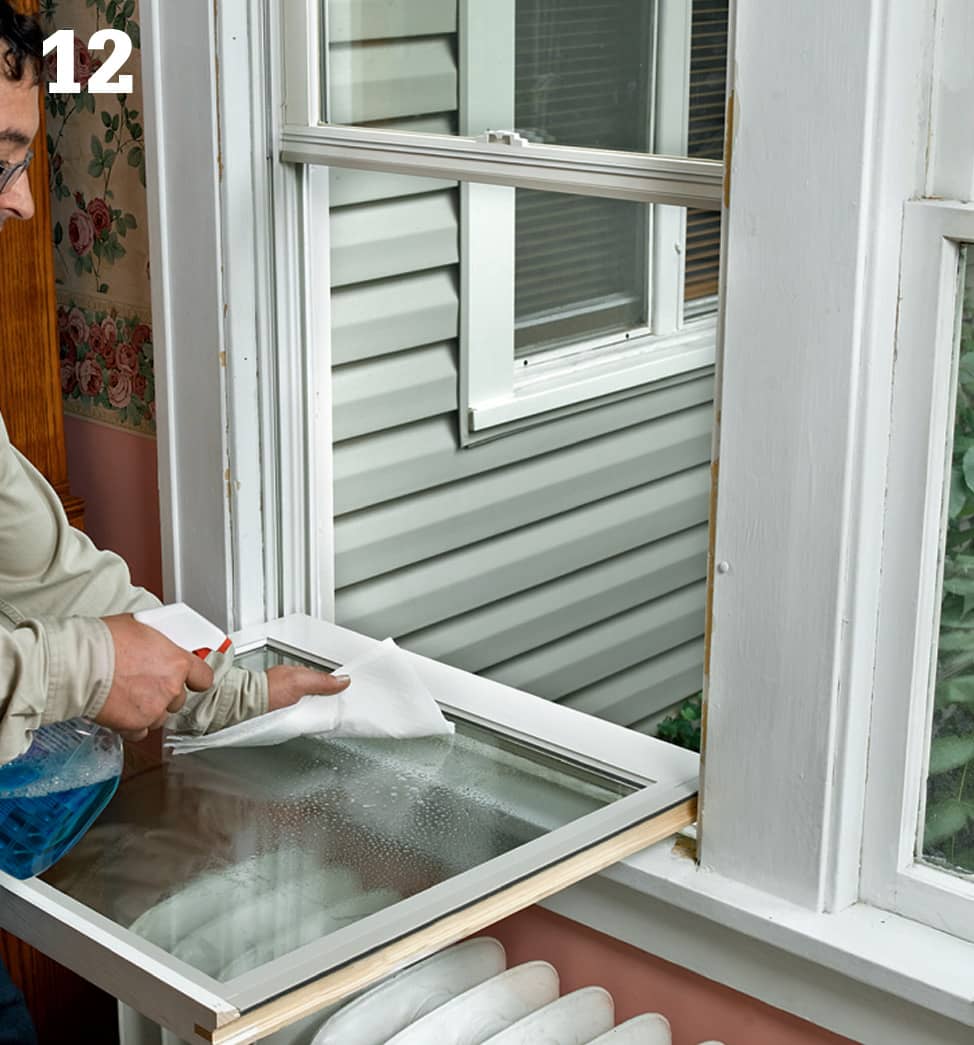
Check the tilt operation of the bottom sash to make sure the stops do not interfere. Remove the labels, and clean the windows. Paint or varnish the new sash as desired.
 Securing Windows & Doors
Securing windows and doors is often simply a matter of having the right hardware pieces. But skimping on strength or quality with any of them will undermine the security of the whole system.
Glass is both the strength and weakness of windows, in terms of security. An intruder can easily break the glass, but may not, since the noise it would make is likely to draw attention. Aside from installing metal bars, there’s no way to secure the glass, so make sure your windows can’t be opened from the outside.
Entry doors should be metal or solid wood—at least 1 3/4" thick—and each one in the home should have a deadbolt lock, as doorknob locks provide little security. Lock quality varies widely; just make sure to choose one that has a bolt (or bolt core) of hardened steel and a minimum 1" throw—the distance the bolt protrudes from the door when engaged.
Door hinges are easy to secure. Manufacturers offer a variety of inexpensive devices that hold a door in place even when the hinge pins are removed.
Garage doors are structurally secure, but their locking devices can make them easy targets. When you’re away from home, place a padlock in the roller track. If you have an automatic door opener, make sure the remote transmitter uses a rolling code system, which prevents thieves from copying your signal. An electronic keypad can make your garage door as secure and easy to use as your front door.
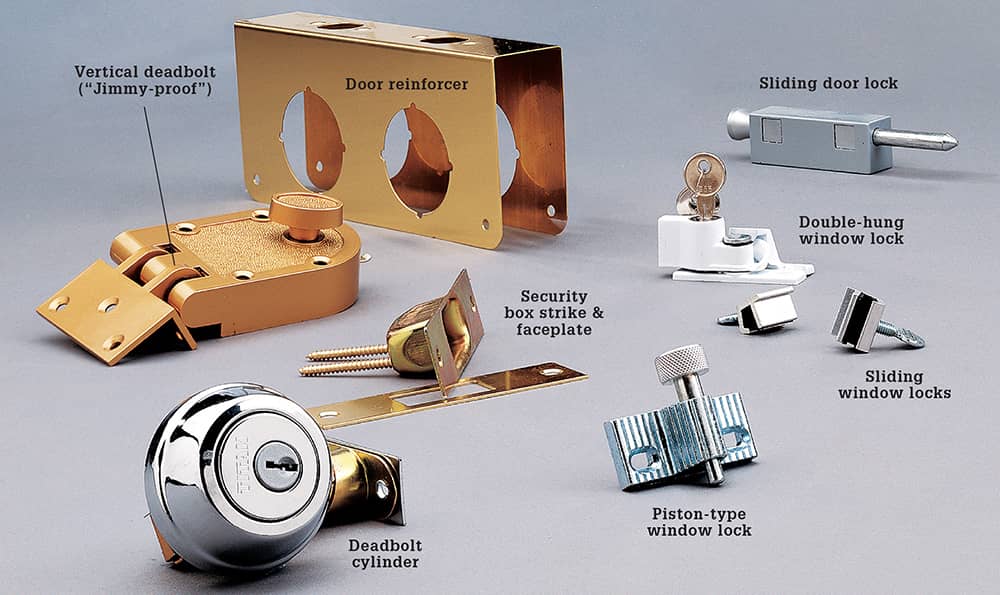
Tips for Securing Windows
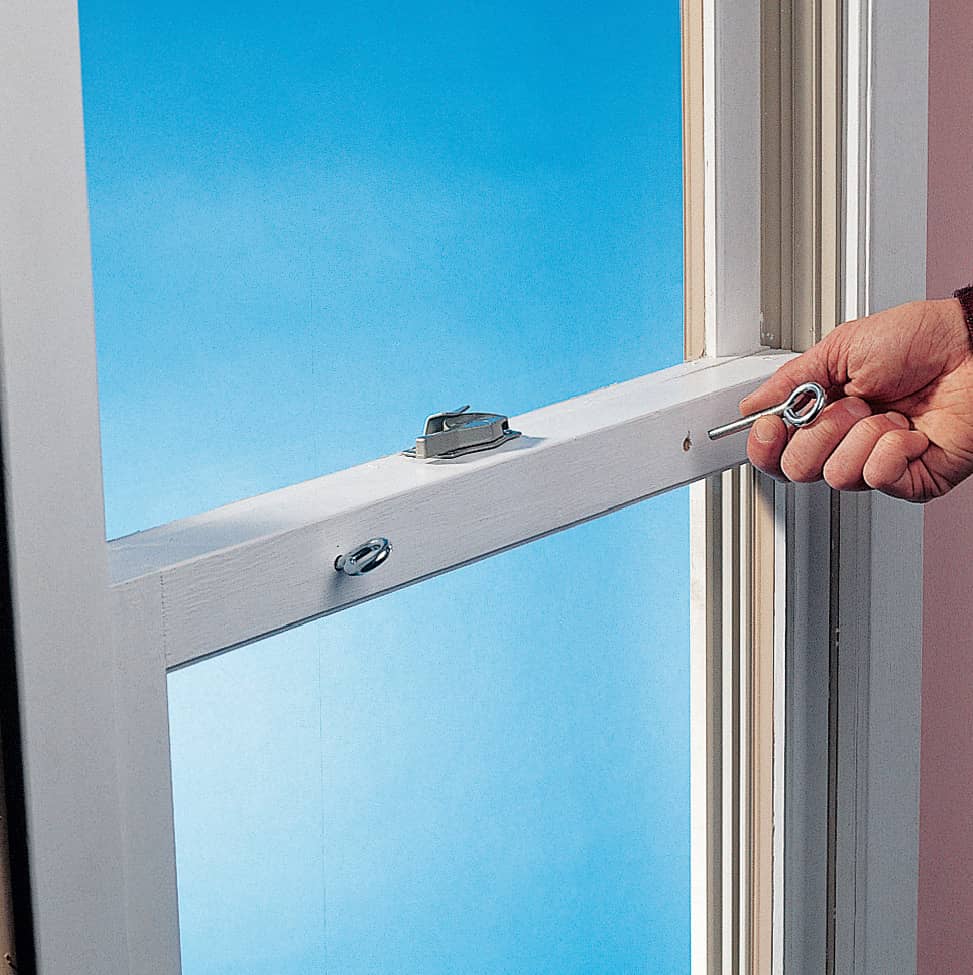
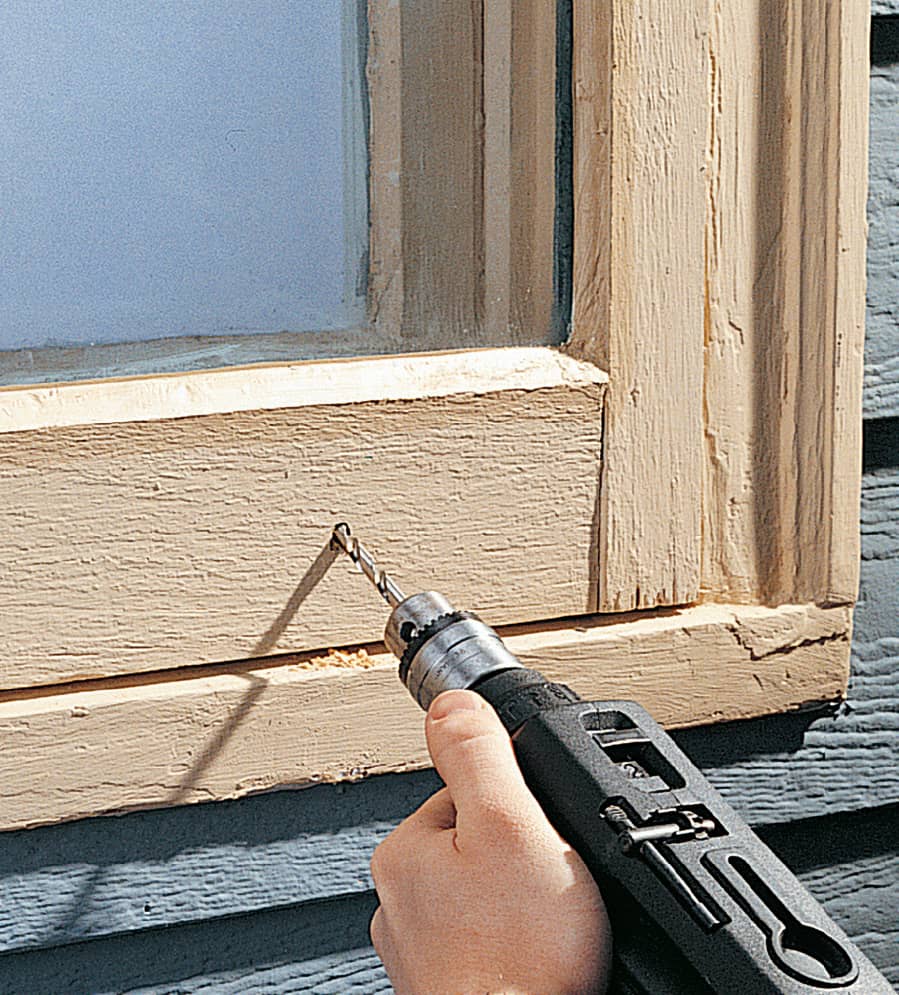
Pin together sashes of single- and double-hung windows with 1/4 × 3" eye bolts. With the window closed, drill a 1/4"-dia. hole, at a slight downward angle, through the top rail of the bottom sash and into the bottom rail of the top sash. Avoid hitting the glass, and stop the hole about 3/4 of the way through the top sash. To lock the window in open positions, drill holes along the sash stiles (vertical pieces) instead.
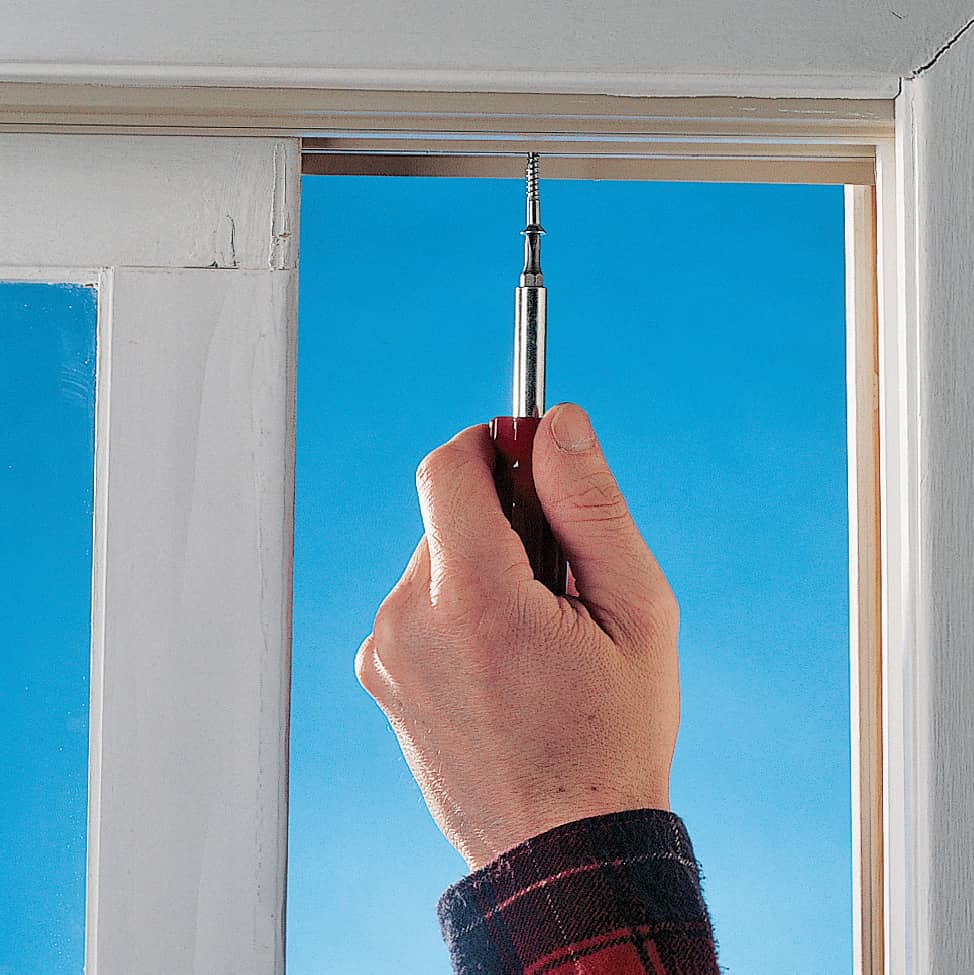
Drive screws into the top channel of sliding windows to prevent intruders from lifting the window sash out of the lower channel. The screws should just clear the top of the window and not interfere with its operation. Use sturdy screws, and space them about 6" apart.
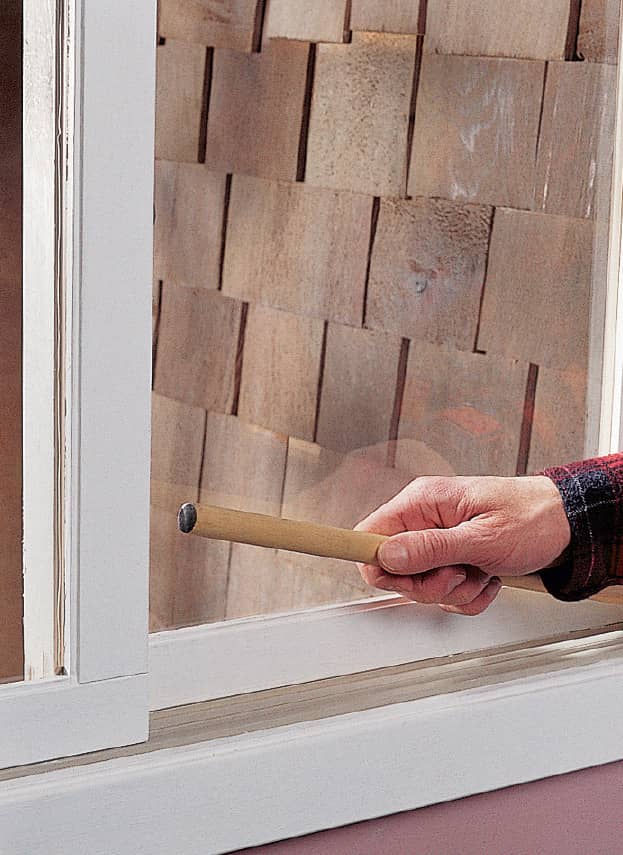
Block sash channels on sliding windows with a narrow board or a thick dowel.
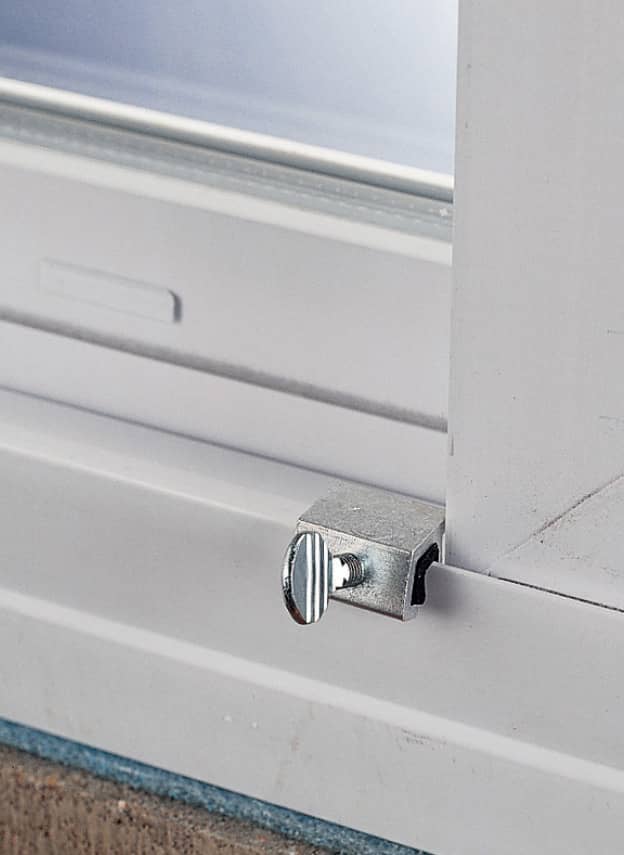
Use auxiliary locks on sliding windows when a dowel or board won’t work. Most types can be installed on the upper or lower window track.
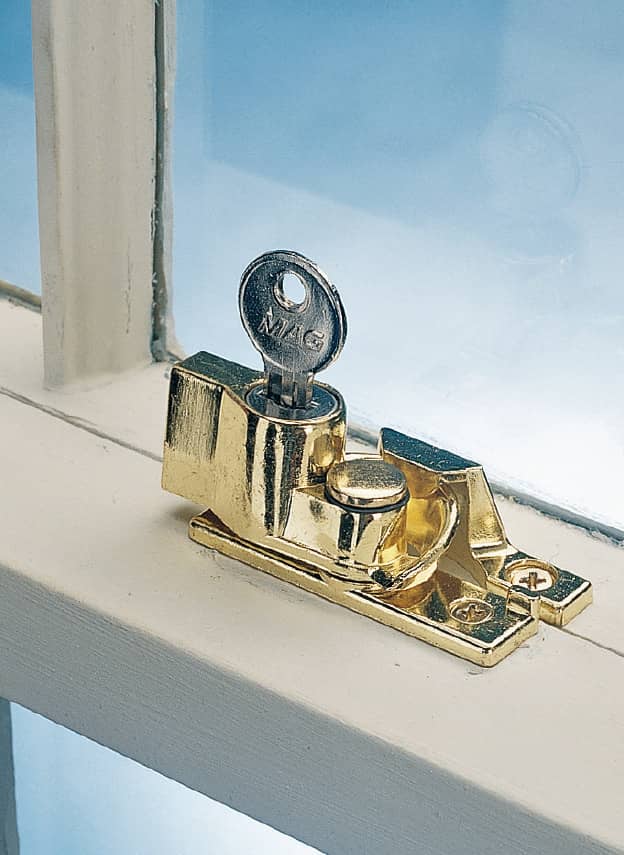
Replace old sash locks on double-hung windows with keyed devices. Traditional sash locks can be highly vulnerable—especially on old windows. Be sure to store a key nearby, for emergency exits.
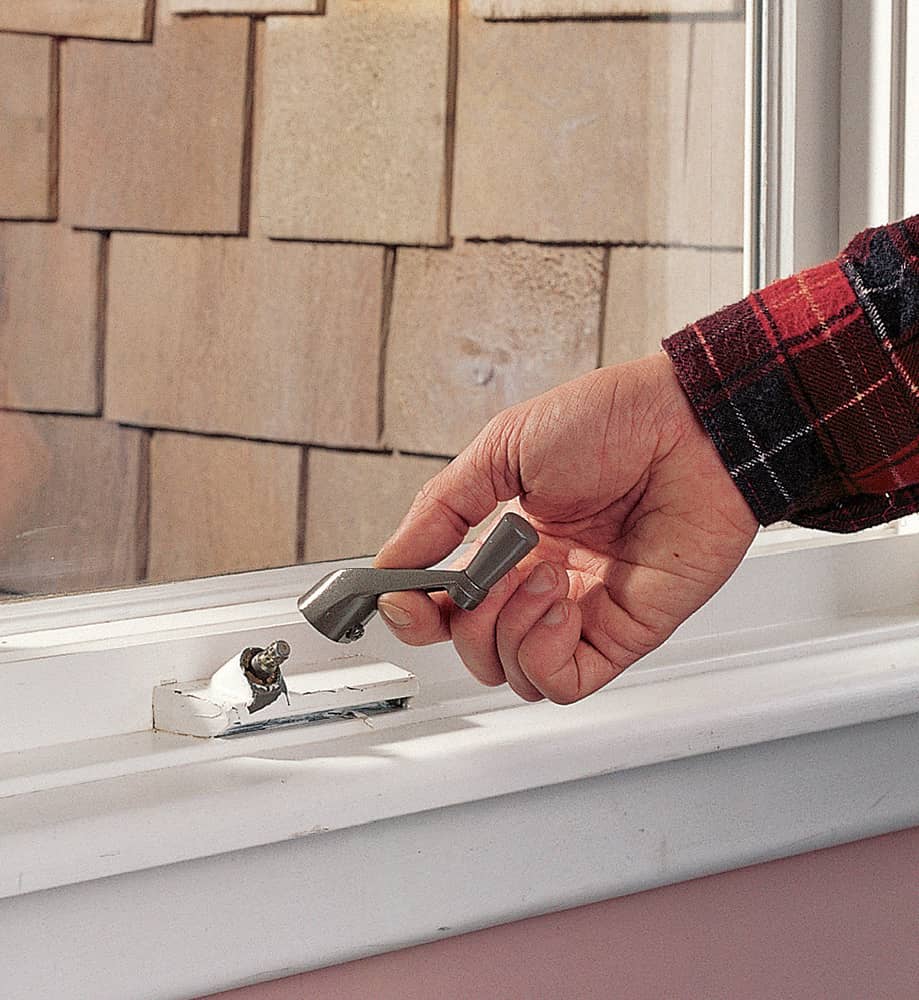
Removing the handles from casement and awning windows keeps intruders from cranking the window open after breaking the glass.
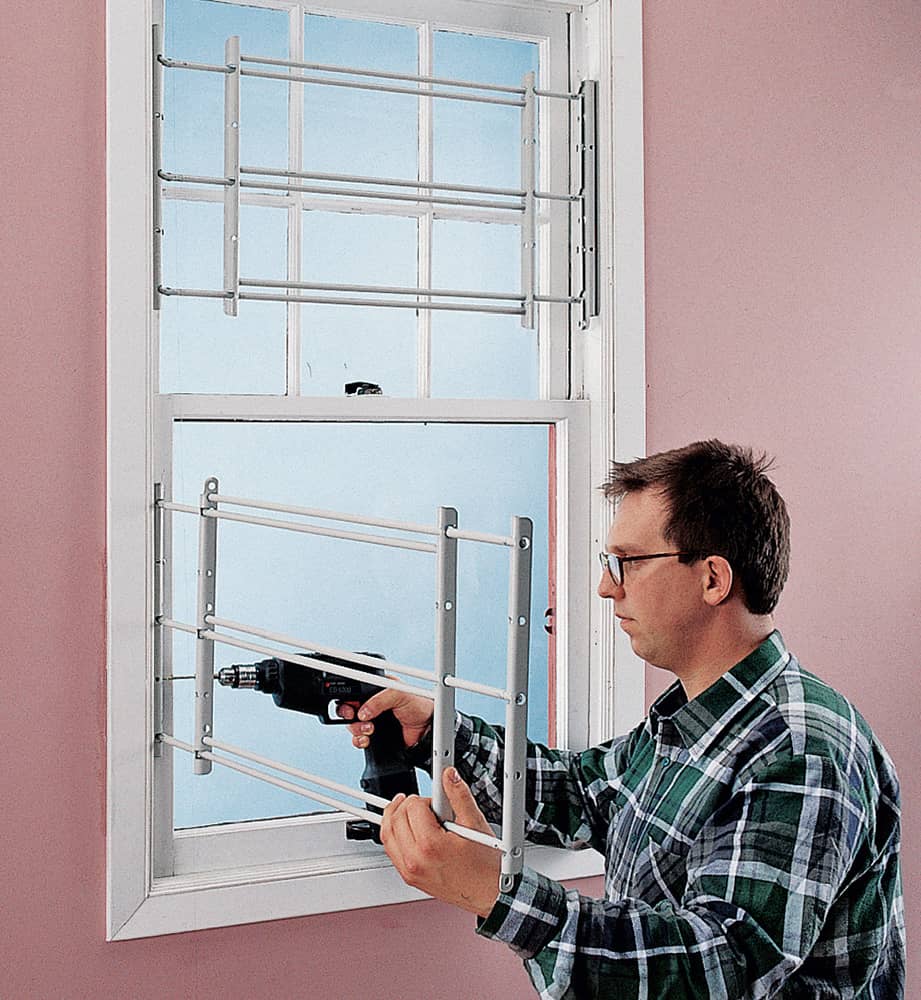
Security bars or gates can be installed in ground-floor windows to prevent intruders from gaining entry to your home.
Tips for Securing Sliding Glass Doors
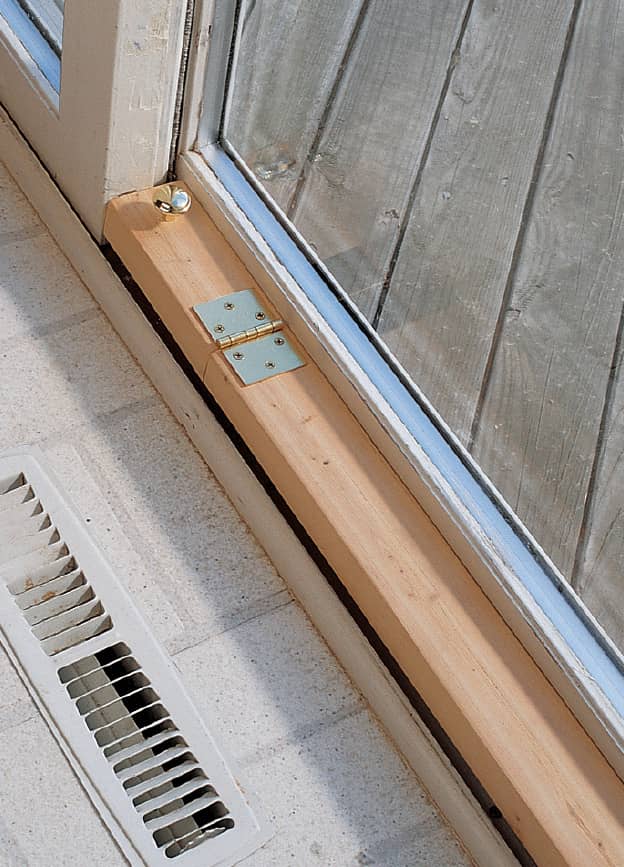
Make a custom lock for your door track, using a thick board and a hinge. Cut the board to fit behind the closed door, then cut it again a few inches from one end. Install a hinge so you can flip up the end and keep the door secure while it’s ajar. Attach knobs to facilitate use.
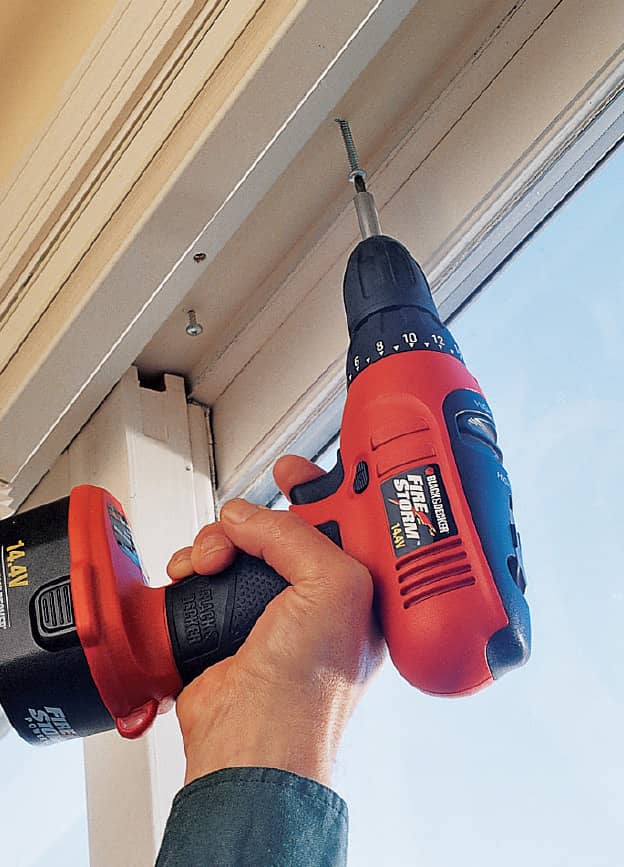
Drive screws into the upper track to keep the sliding panel from being pried up and out of the lower track. Use sturdy pan-head screws, spaced about every 8", and drive them so their heads just clear the top of the door. For metal door frames, use self-tapping screws and a low drill speed.
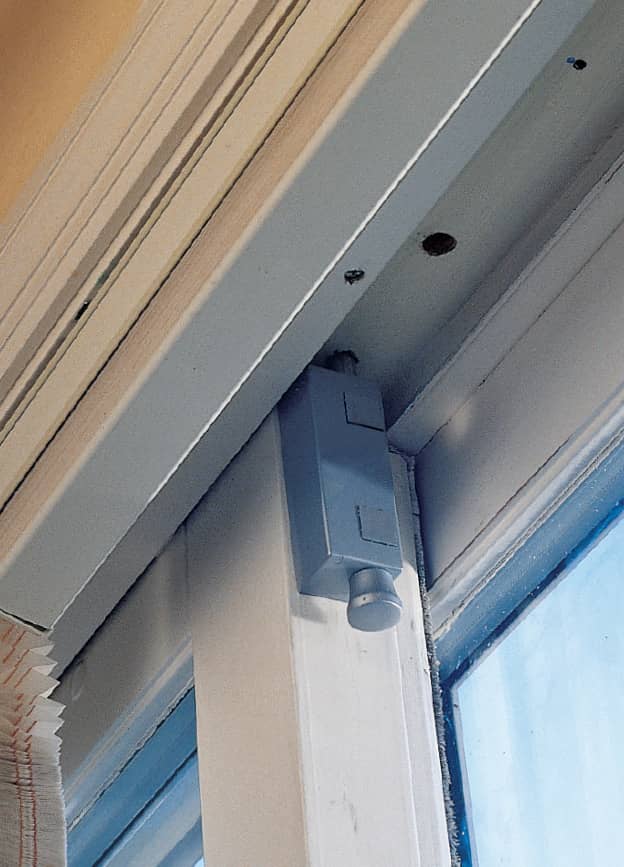
Attach a sliding-door lock to the frame of the sliding panel. Drill a hole for the deadbolt into the upper track. Then drill an additional hole a few inches away so you can lock the door in an open position.
Tips for Securing Doors
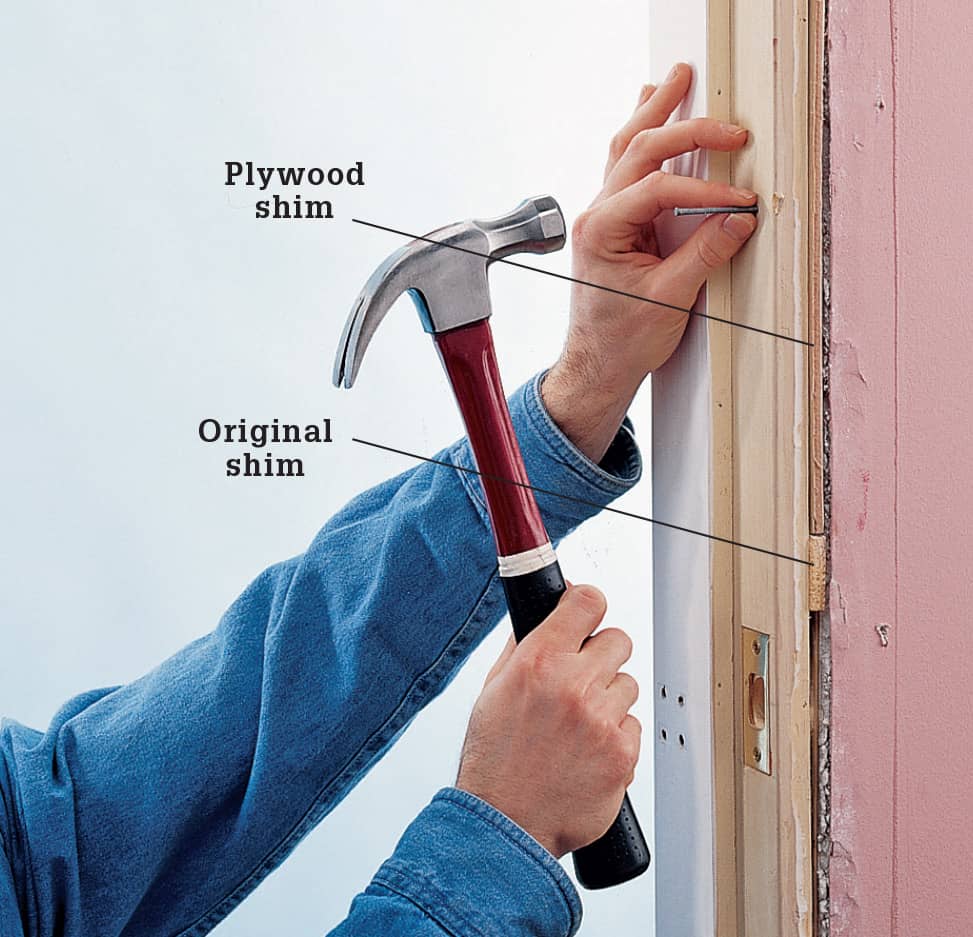
Install plywood shims in the gaps between the door frame and wall studs, to prevent pry-bar attacks. Remove the casing molding on the inside of the frame and inspect the gap; if it’s wider than 1/4", install new plywood shims in the spaces between the original shims. Be sure to shim directly above, below, and behind the strike plate. Drill pilot holes, and secure the shims with 10d casing nails.
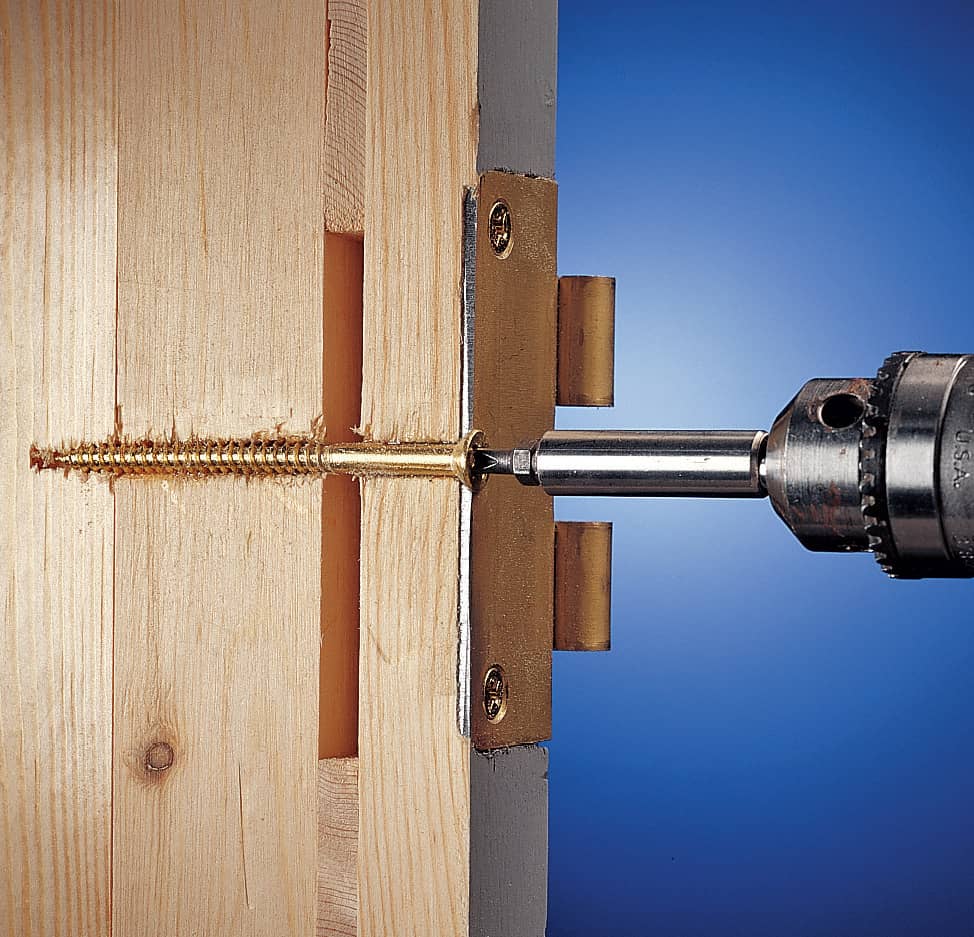
Replace short hinge screws with longer screws (3" or 4") that extend through the door jamb and into the wall studs. This helps resist door kick-ins. Tighten the screws snug, but avoid overtightening them, which can pull the frame out of square.
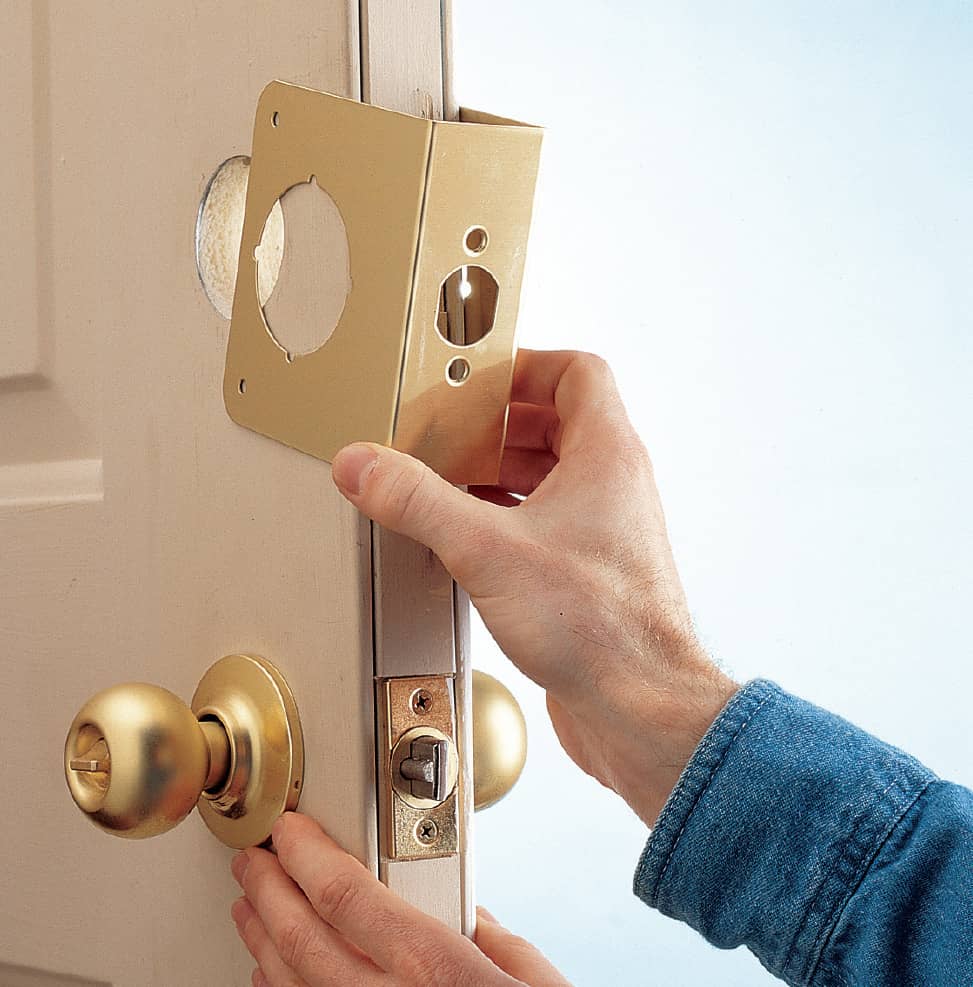
Add metal door reinforcers to strengthen the areas around locks and prevent kick-ins. Remove the lockset and slip the reinforcer over the door’s edge. Be sure to get a reinforcer that is the correct thickness for your door.
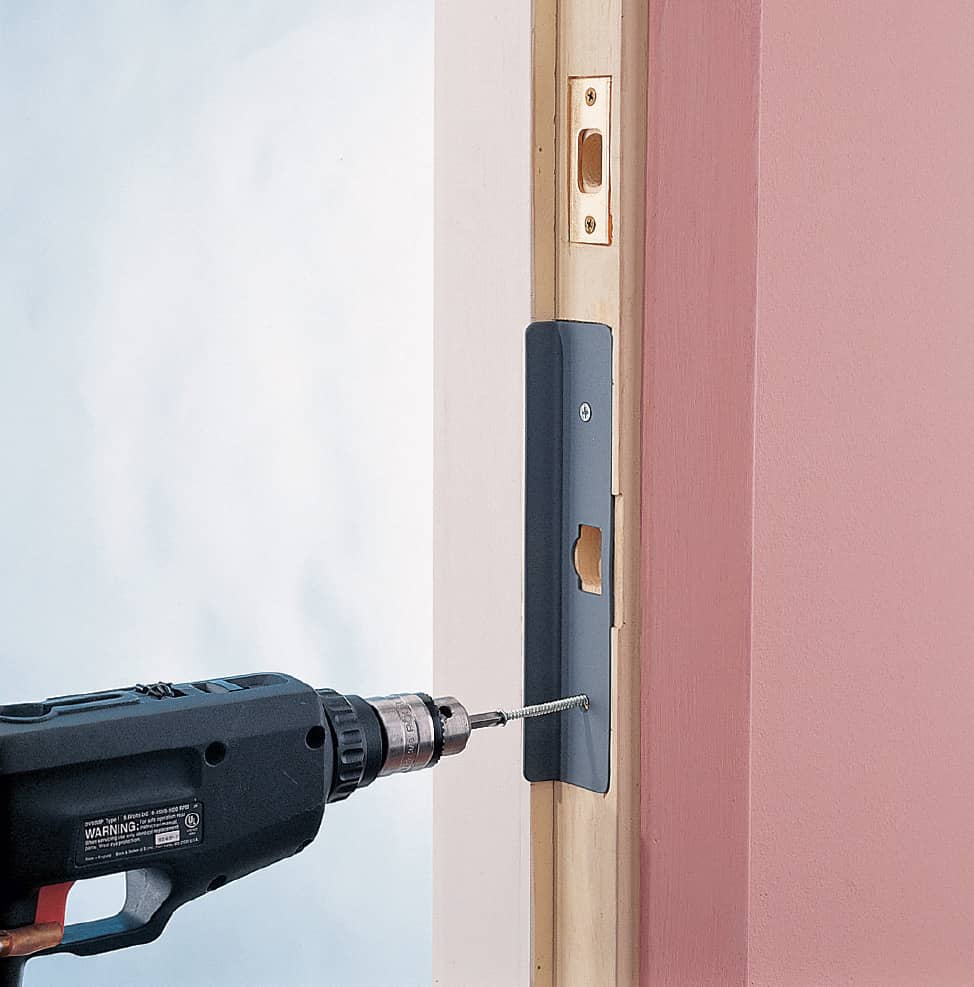
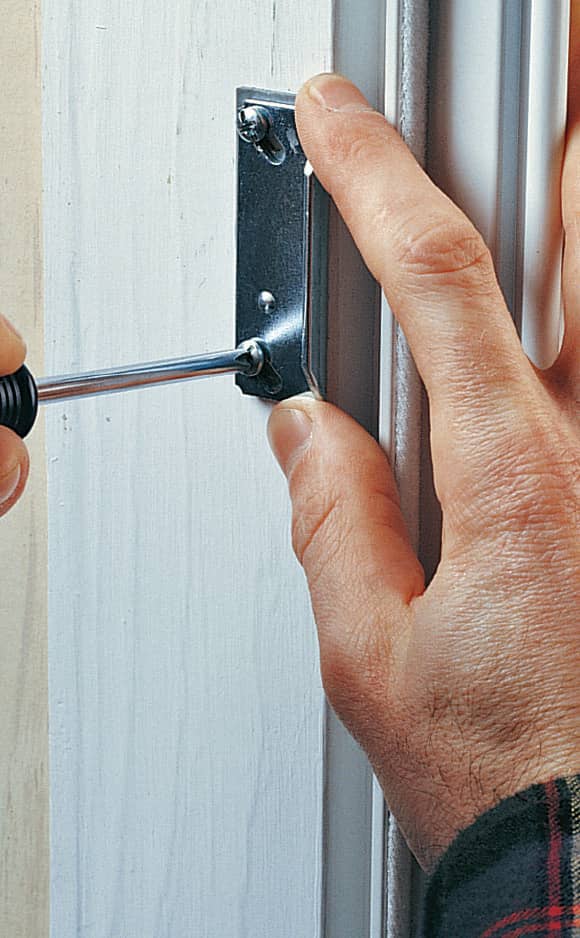
Add a heavy-duty latch guard to reinforce the door jamb around the strike plate. For added protection, choose a guard with a flange that resists pry-bar attacks. Install the guard with long screws that reach the wall studs.
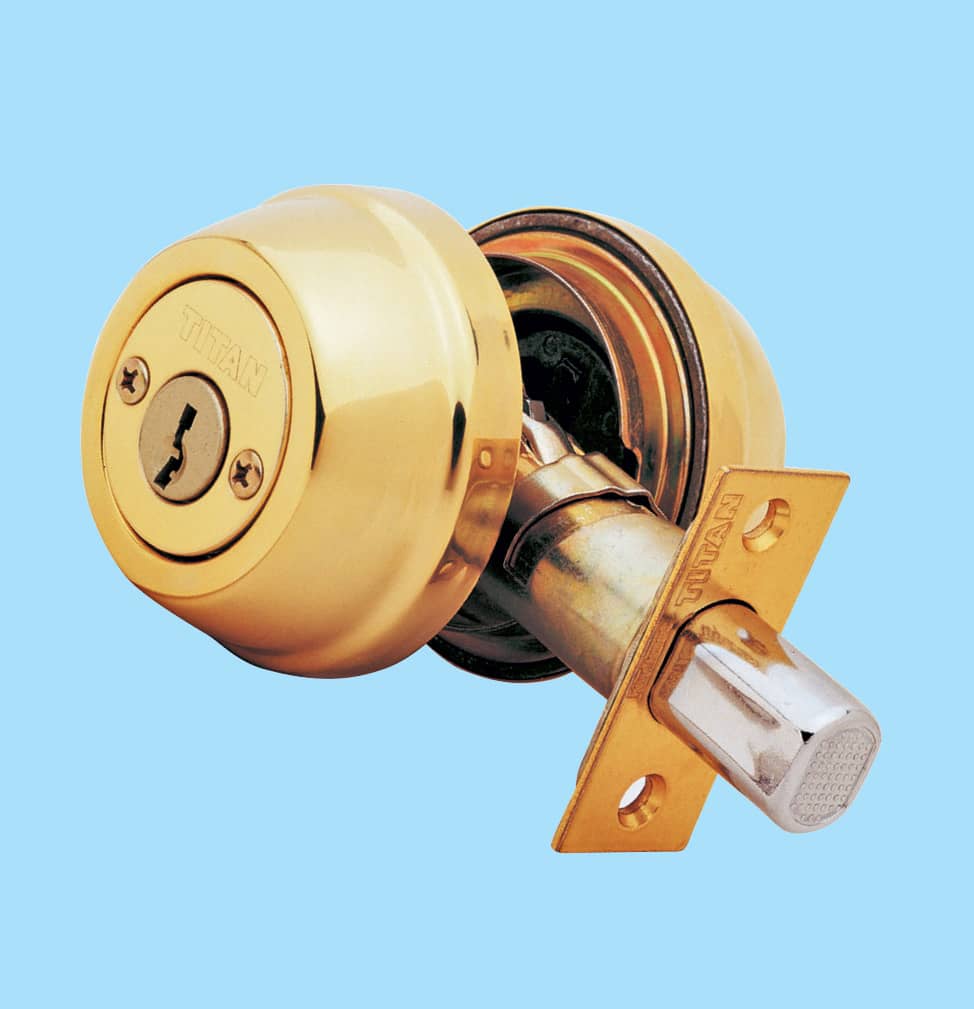
Have lock cylinders re-keyed to ensure that lost or stolen keys can’t be used by unwanted visitors. Remove cylinder, leaving bolt mechanism in door, and take it to a locksmith.
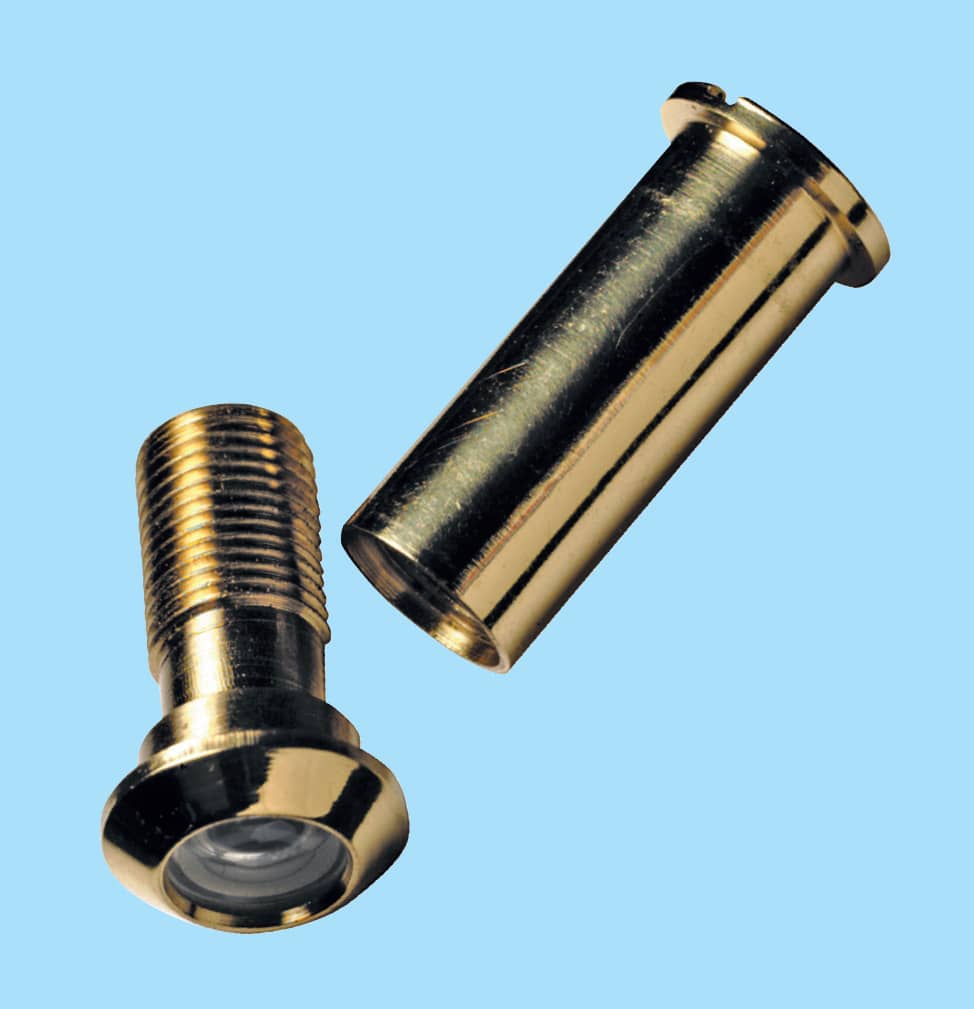
Putting a peephole into an exterior door is a quick and easy security measure. Simply drill a hole at the appropriate height, then screw the two halves of the peephole together.
How to Install a Security Box Strike
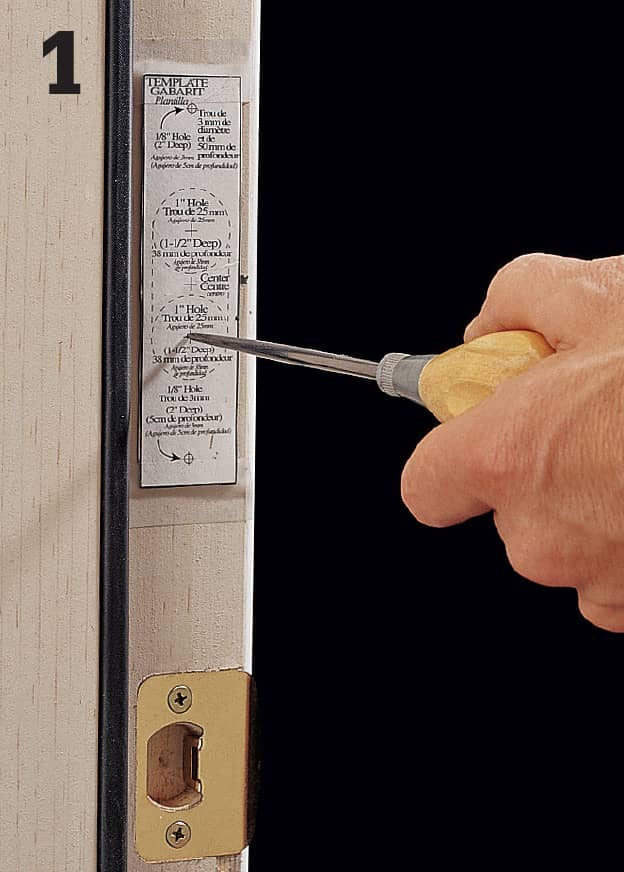
Mark the horizontal center of the deadbolt on the door jamb and tape the box strike template to the jamb, aligning the center marks. Use an awl to mark the drilling points, then use a utility knife to score a 1/8"-deep line around the outside of the template.
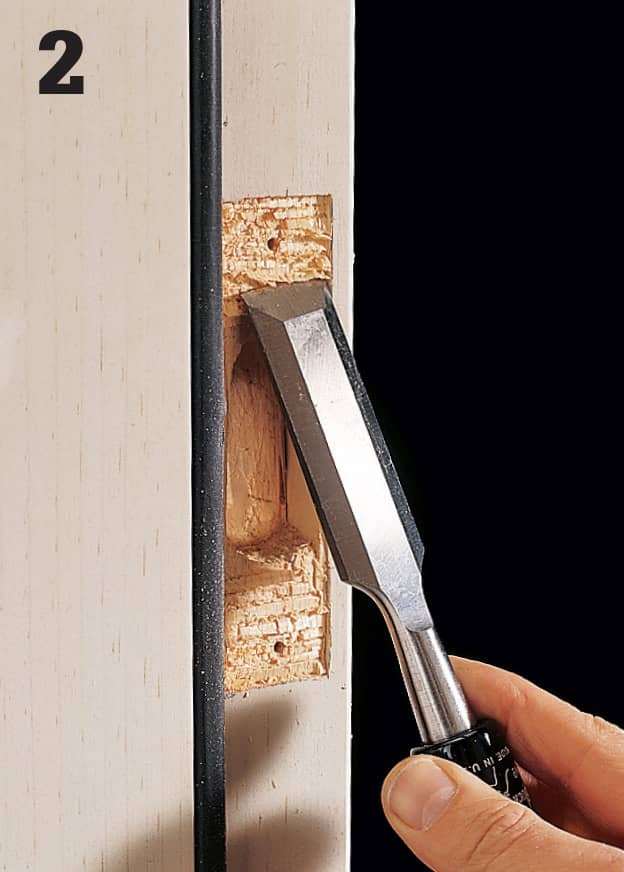
Drill pilot holes for the faceplate screws, and bore holes for the box mortise, using the recommended spade bit. To chisel the faceplate mortise, make parallel cuts 1/8" deep, holding the chisel at a 45° angle with the bevel side in. Flip the chisel over, and drive it downward to remove the material.
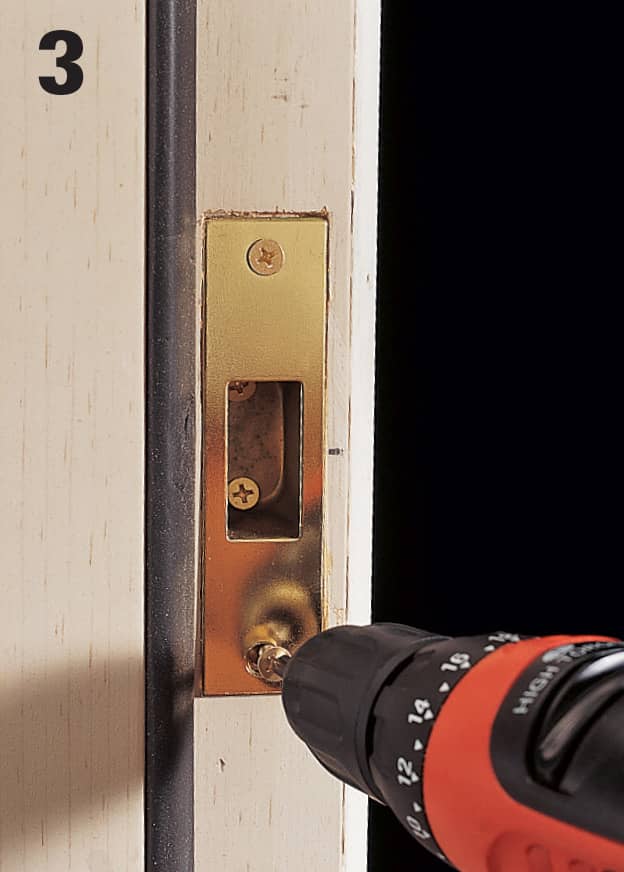
Insert the box strike into the mortise and install the screws inside the box. Angle the screws slightly toward the center of the wall stud, to increase their holding power. Position the faceplate and install the screws.
How to Install a Deadbolt Lock
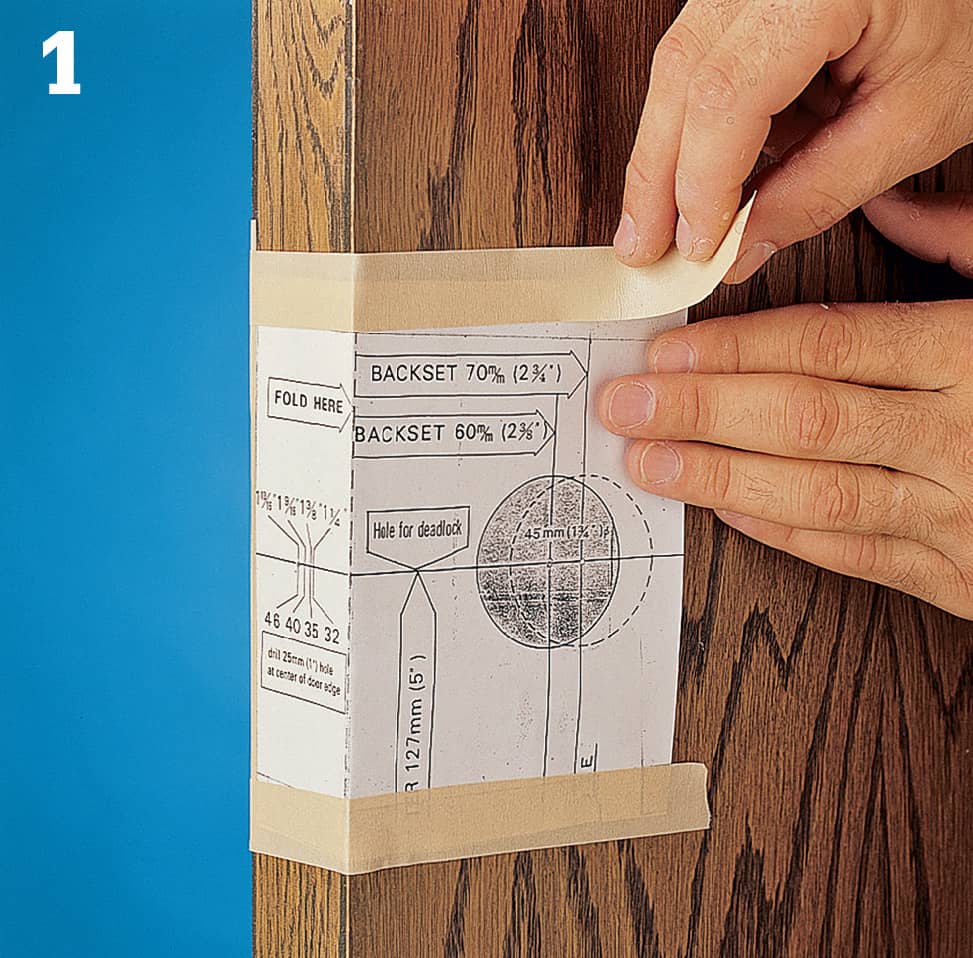
Measure up from the floor or existing lockset to locate the lock. Its center should be at least 3 1/2" from the lockset center. Tape the template (supplied with lock) to the door. Use an awl to mark the center- points of the cylinder and deadbolt holes on the door. Close the door and use the template to mark the centerline for the deadbolt hole in the door jamb.
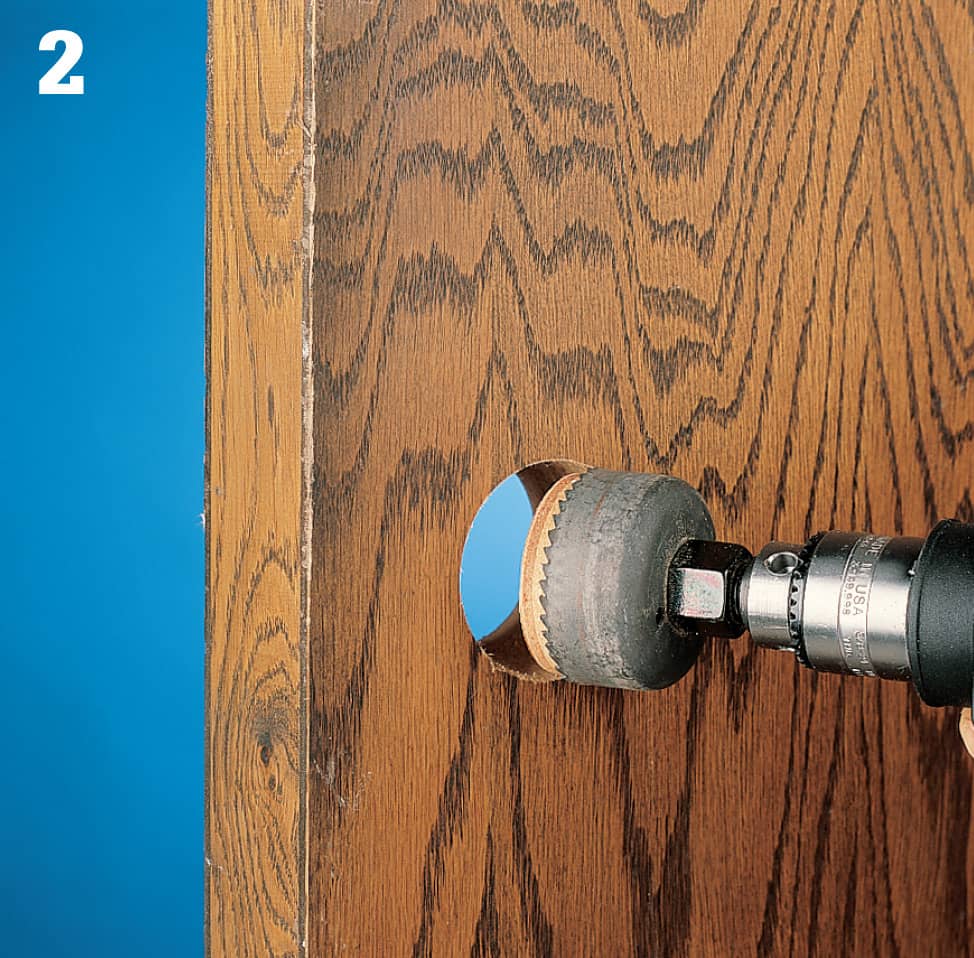
Bore the cylinder hole with a hole saw and drill. To avoid splintering the door, drill through one side until the hole saw pilot (mandrel) just comes out the other side. Remove the hole saw, then complete the hole from the opposite side of the door.
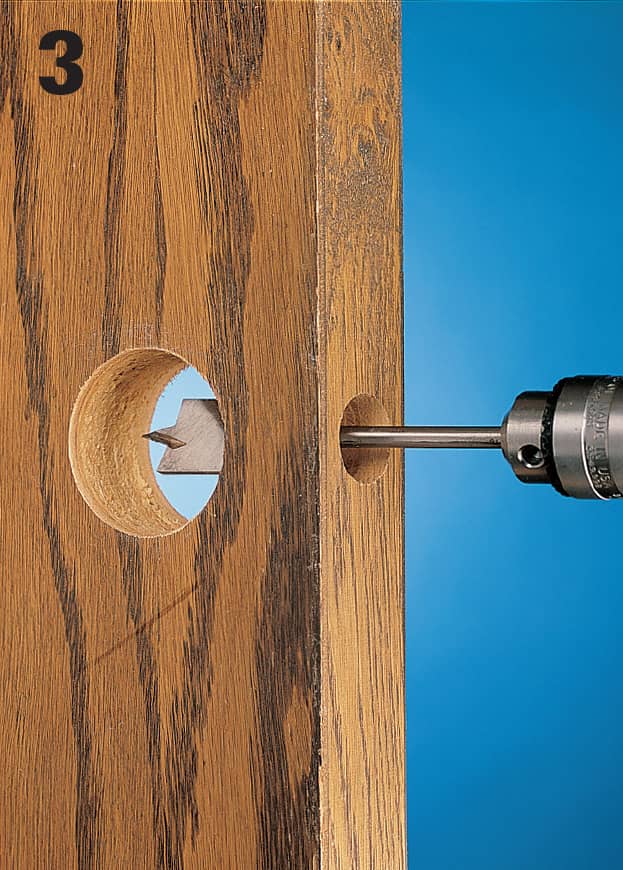
Use a spade bit to bore the deadbolt hole from the edge of the door into the cylinder hole. Be sure to keep the drill perpendicular to the door edge while drilling.
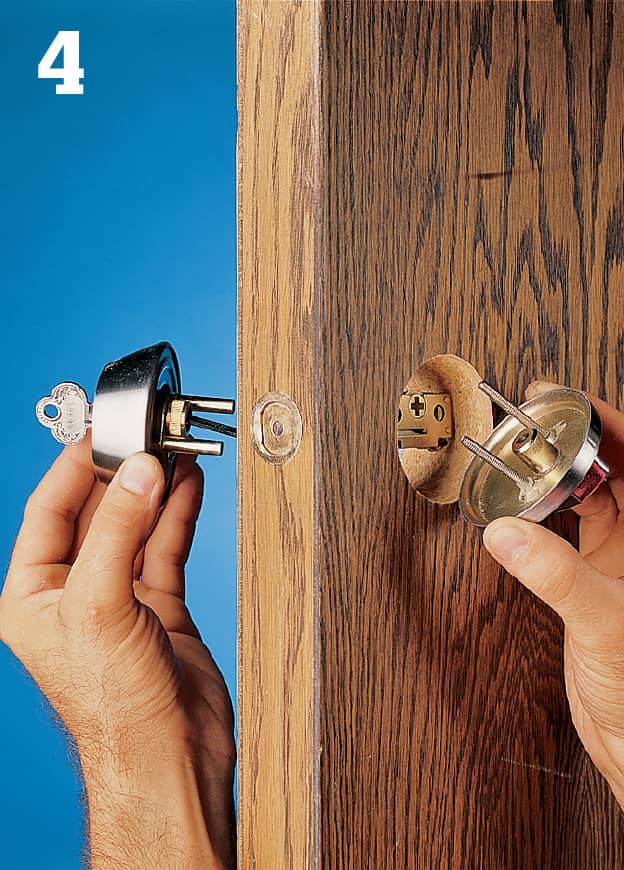
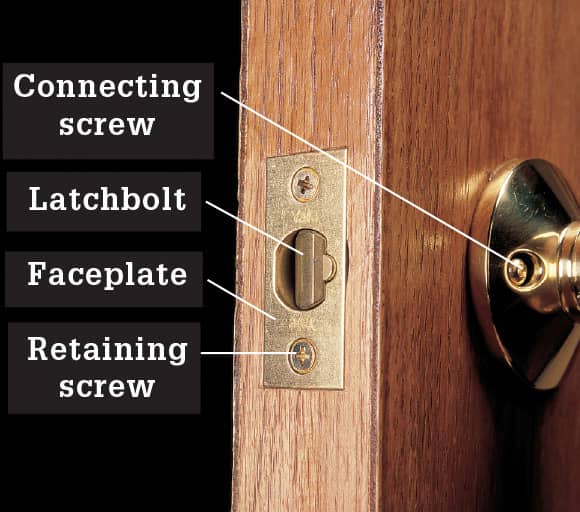
Insert the deadbolt into the edge hole. Fit the two halves of the lock into the door, aligning the cylinder tailpiece and connecting screw fittings with the proper holes in the deadbolt. Secure the two halves together with the connecting screws.
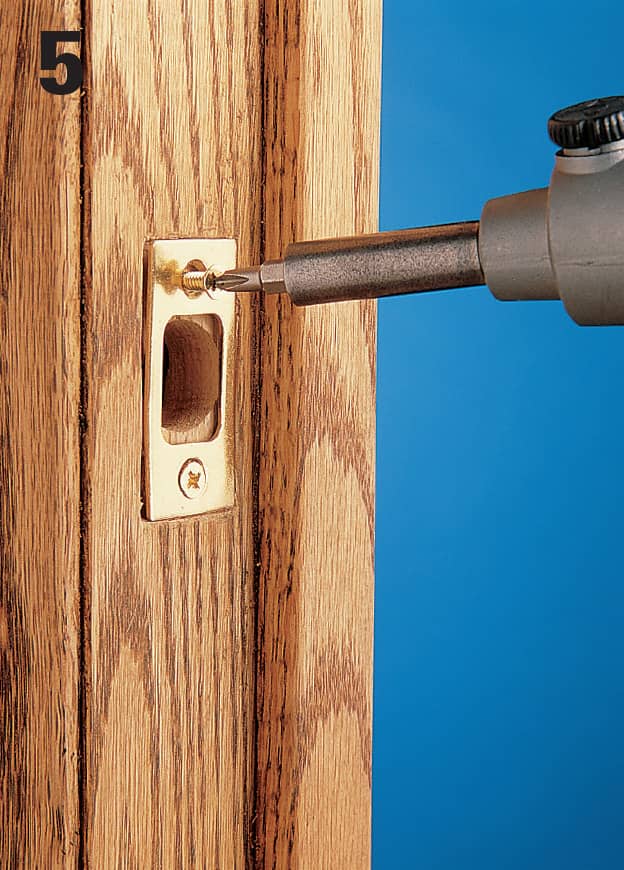
Use the centerline mark on the jamb to locate the hole for the deadbolt. Bore the hole, then chisel a mortise for the strike plate. Install the strike plate. Or, for greater security, install a security box strike, instead of the standard strike plate.
 Tuning Up Garage Doors
Imagine this: You’re driving home late at night, it’s pouring outside, and you’re shivering because you’ve got the flu. Then, you turn into your driveway, punch a little button, and your garage door opens, a light comes on, you pull in, and you’re HOME. You didn’t have to get drenched, or lift a door that felt like heavy metal, or scream at the heavens for making you so miserable. Thanks to a well-maintained garage door and opener, you escaped all of this, and that is a good thing.
Unfortunately, over time, many good things become bad things, especially if they aren’t well-maintained. An overhead garage door is no exception. To keep everything running smoothly requires effort on three fronts: the door, the opener, and the opener’s electronic safety sensors. Here’s what you need to know to keep all three in tiptop shape.
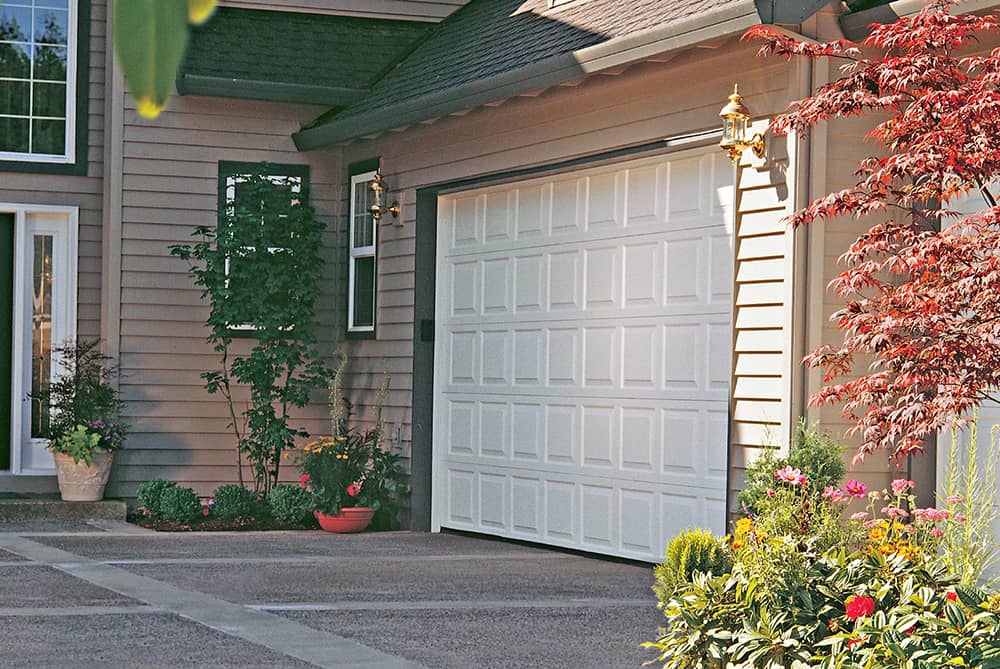
A bit of routine maintenance now and again will help keep your garage door working exactly as it should, rain or shine.
How to Tune-Up a Garage Door
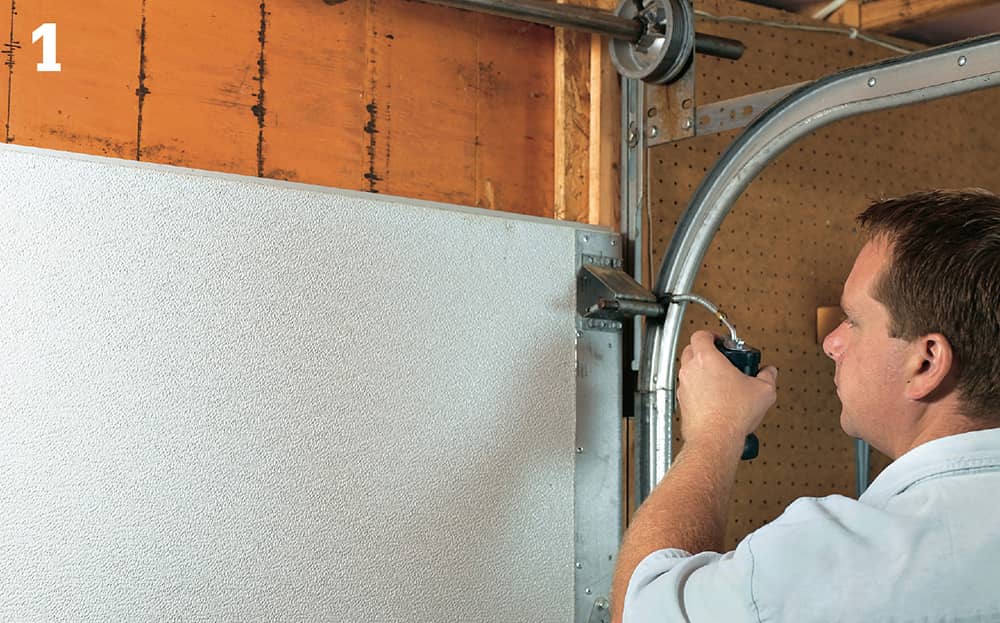
Begin the tune-up by lubricating the door tracks, pulleys, and rollers. Use a lightweight oil, not grease, for this job. The grease catches too much dust and dirt.
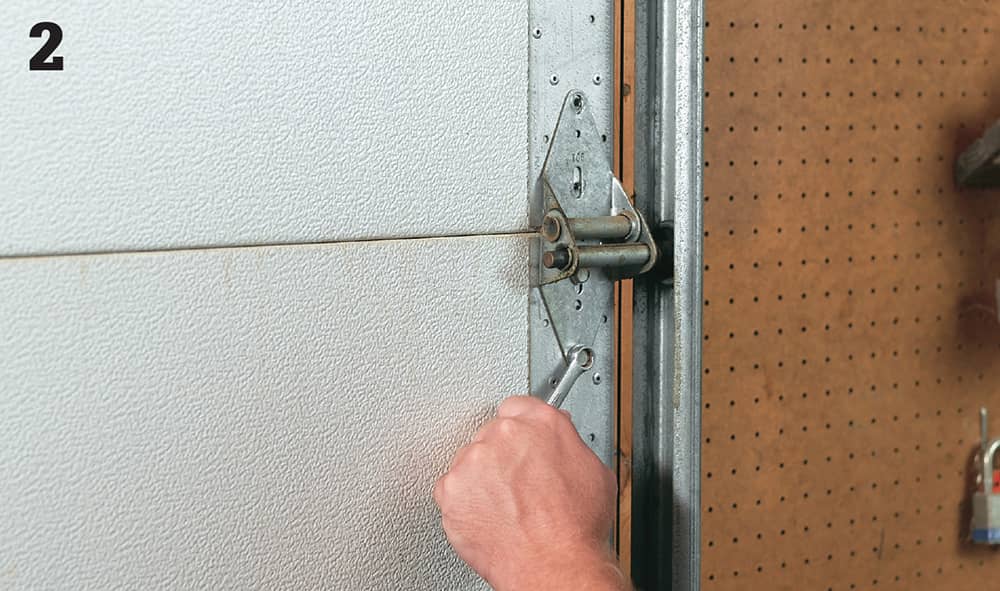
Remove clogged or damaged rollers from the door by loosening the nuts that hold the roller brackets. The roller will come with the bracket when the bracket is pulled free.
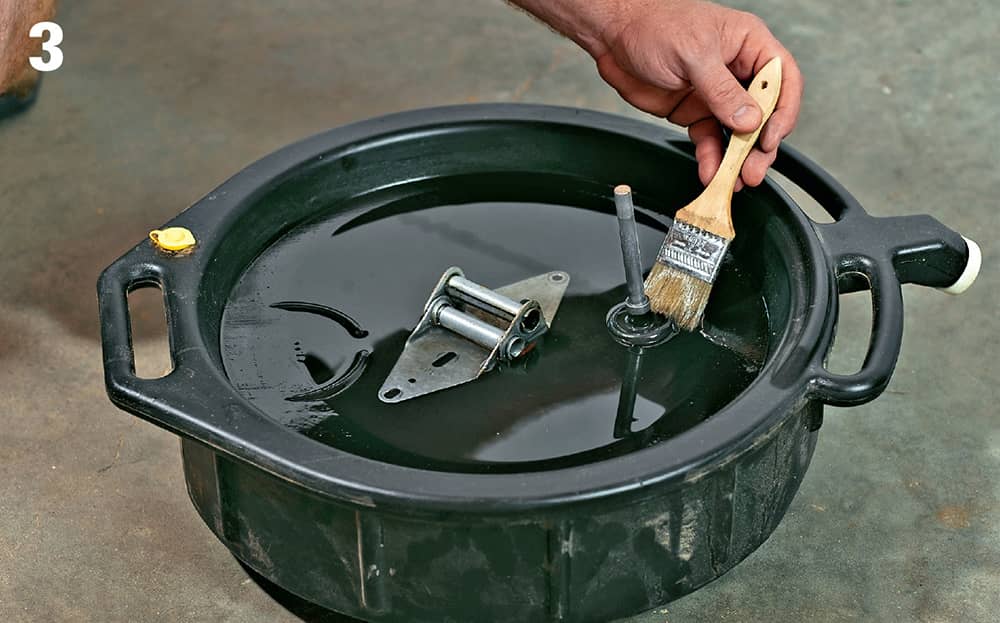
Mineral spirits and kerosene are good solvents for cleaning roller bearings. Let the bearing sit for a half hour in the solvent. Then brush away the grime build-up with an old paintbrush or toothbrush.
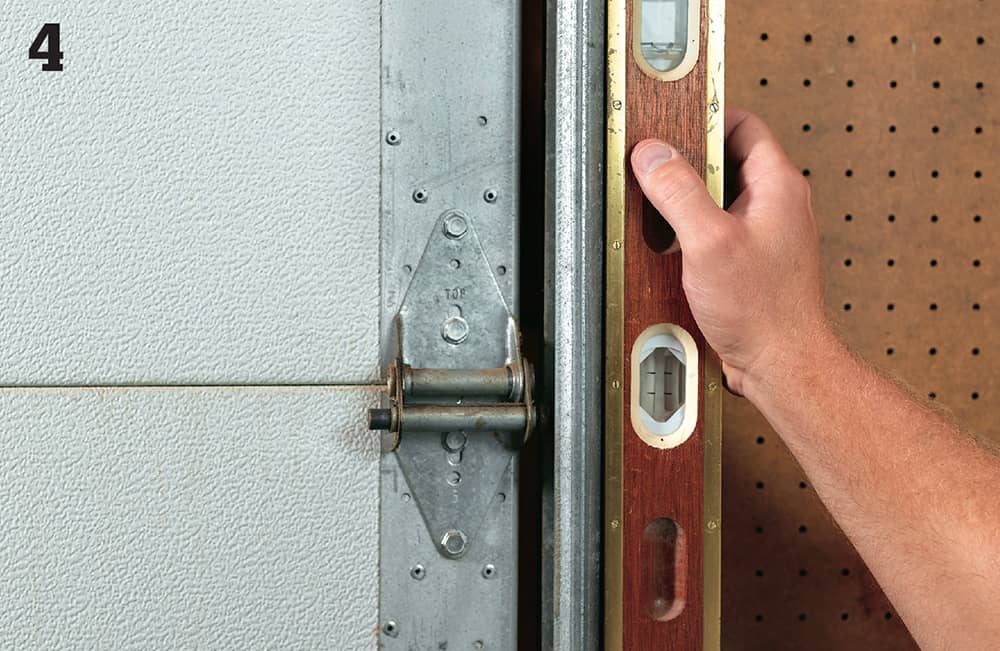
If the rollers are making a lot of noise as they move over the tracks, the tracks are probably out of alignment. To fix this, check the tracks for plumb. If they are out of plumb, the track mounting brackets must be adjusted.
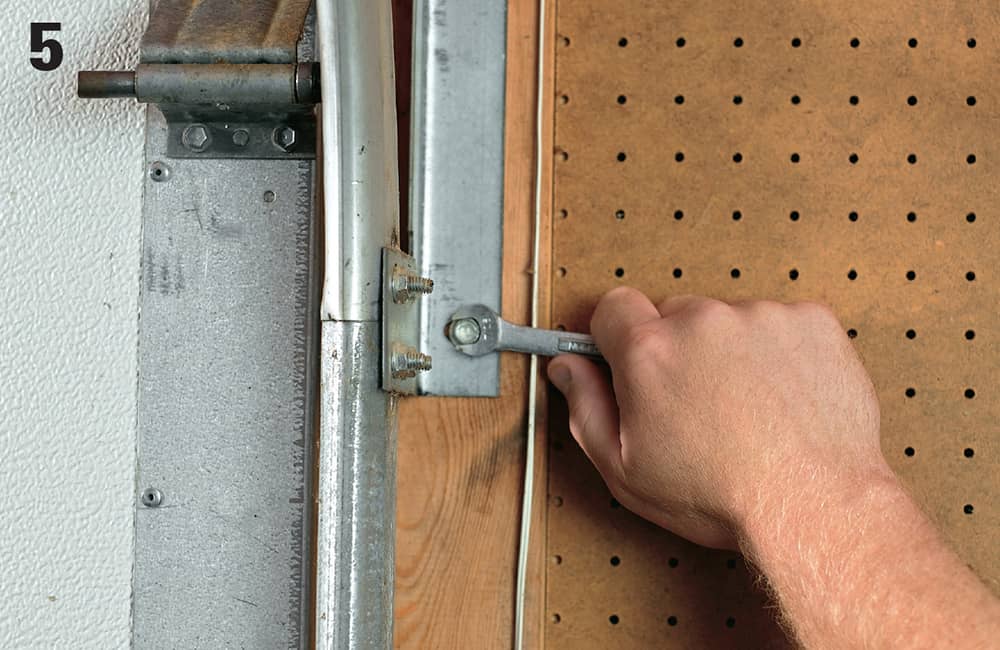
To adjust out-of-plumb tracks, loosen all the track mounting brackets (usually 3 or 4 per track) and push the brackets into alignment.
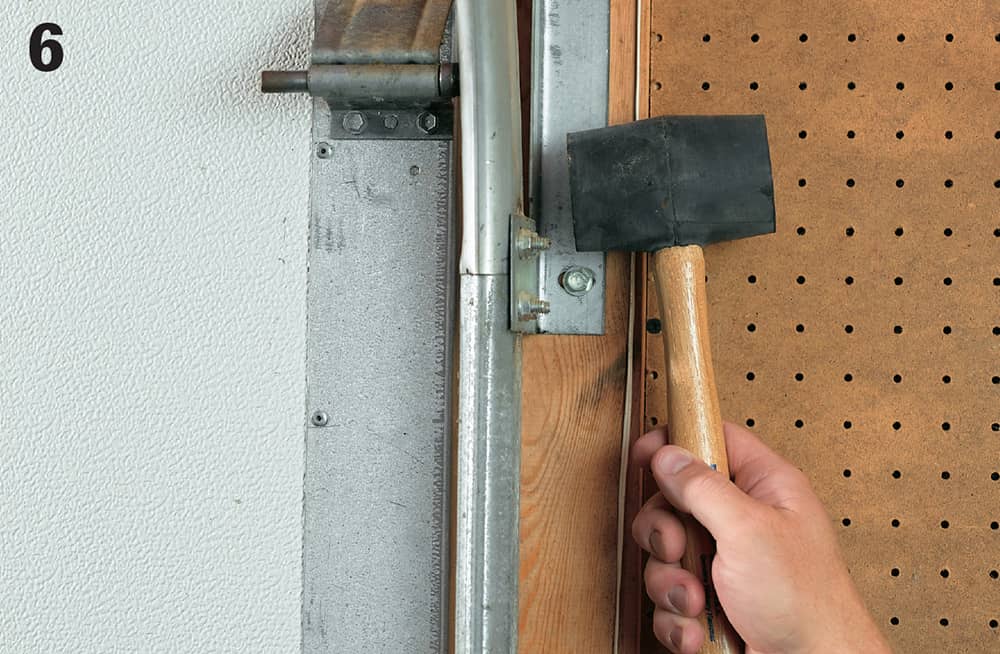
It’s often easier to adjust the brackets by partially loosening the bolts and tapping the track with a soft-faced mallet. Once the track is plumb, tighten all the bolts.
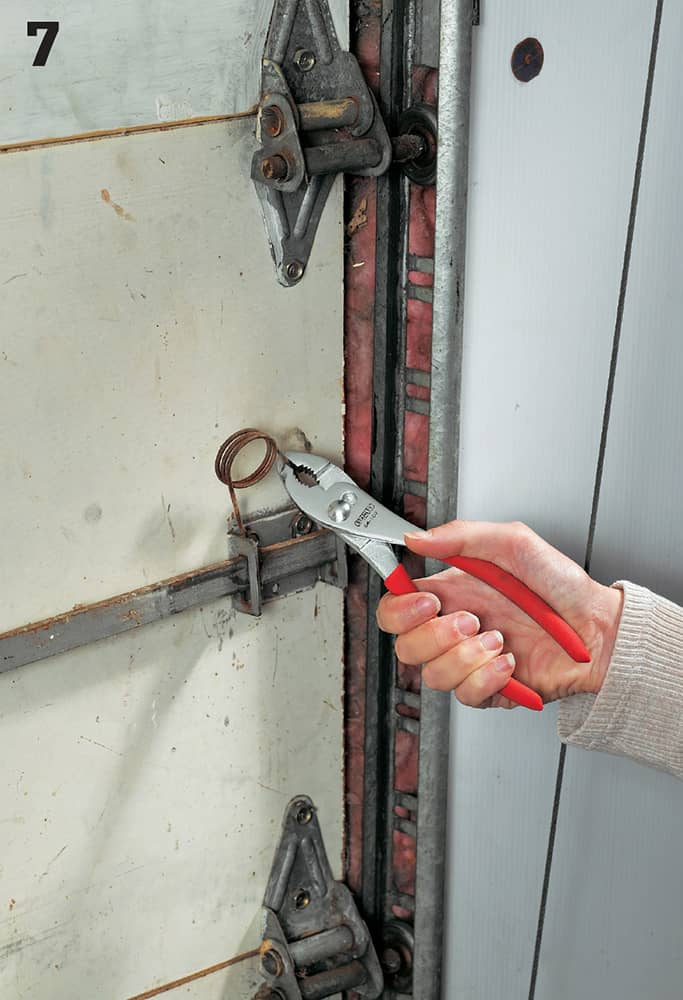
Sometimes the door lock bar opens sluggishly because the return spring has lost its tension. The only way to fix this is to replace the spring. One end is attached to the body of the lock; the other end hooks onto the lock bar.
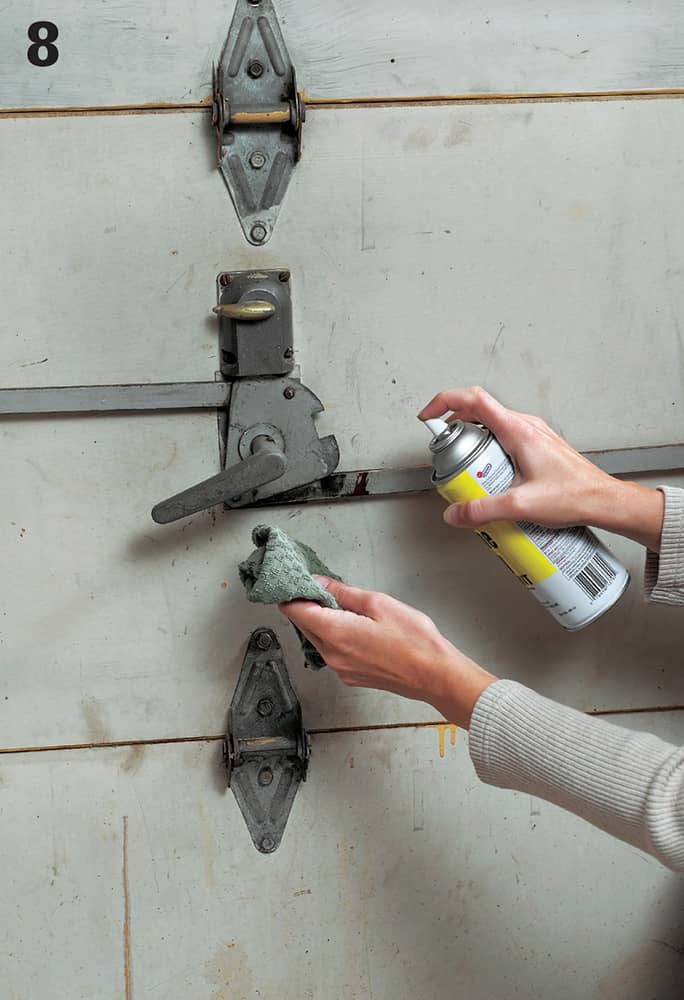
If a latch needs lubrication, use graphite in powder or liquid form. Don’t use oil because it attracts dust that will clog the lock even more.
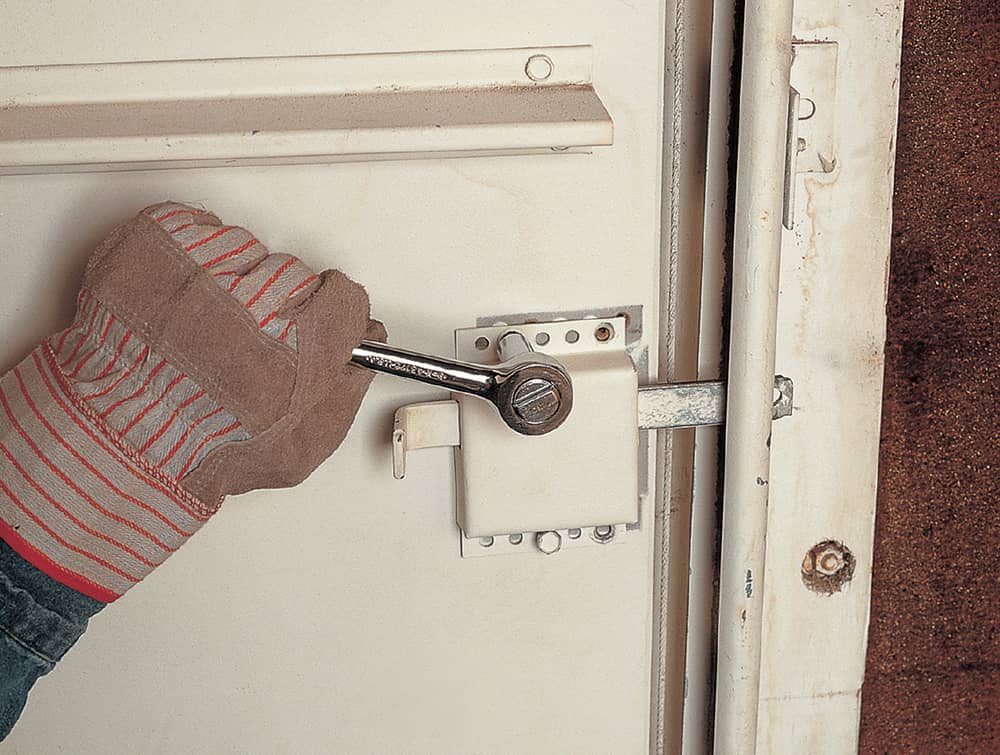
ALTERNATIVE: Sometimes the lock bar won’t lock the door because it won’t slide into its opening on the door track. To fix this, loosen the guide bracket that holds the lock bar and move it up or down until the bar hits the opening.
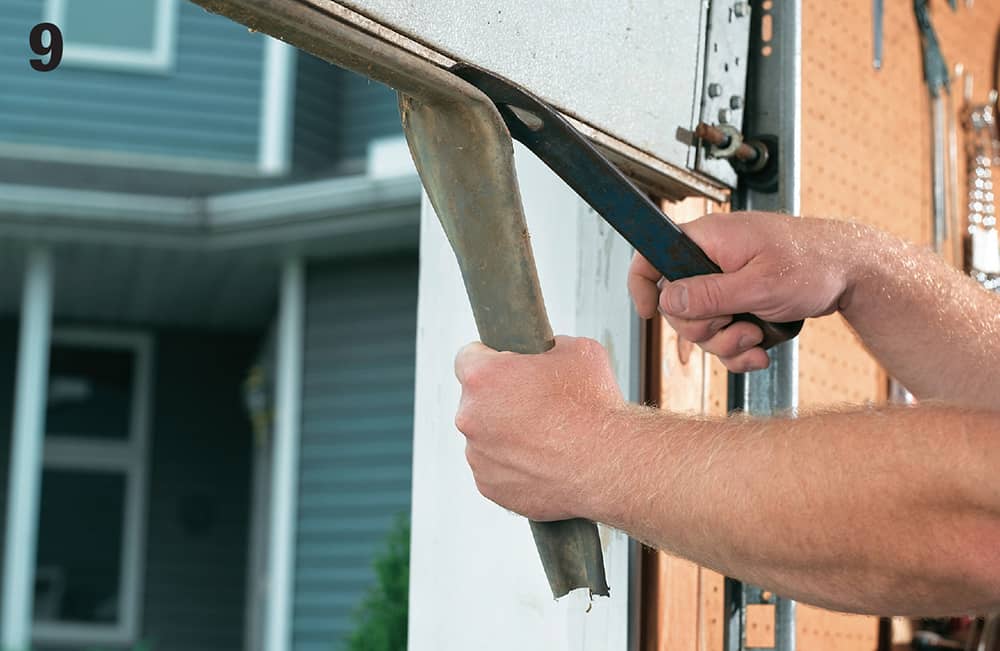
Worn or broken weather stripping on the bottom edge of the door can let in a lot of cold air and stiff breezes. Check to see if this strip is cracked, broken, or has holes along its edges. If so, remove the old strip and pull any nails left behind.
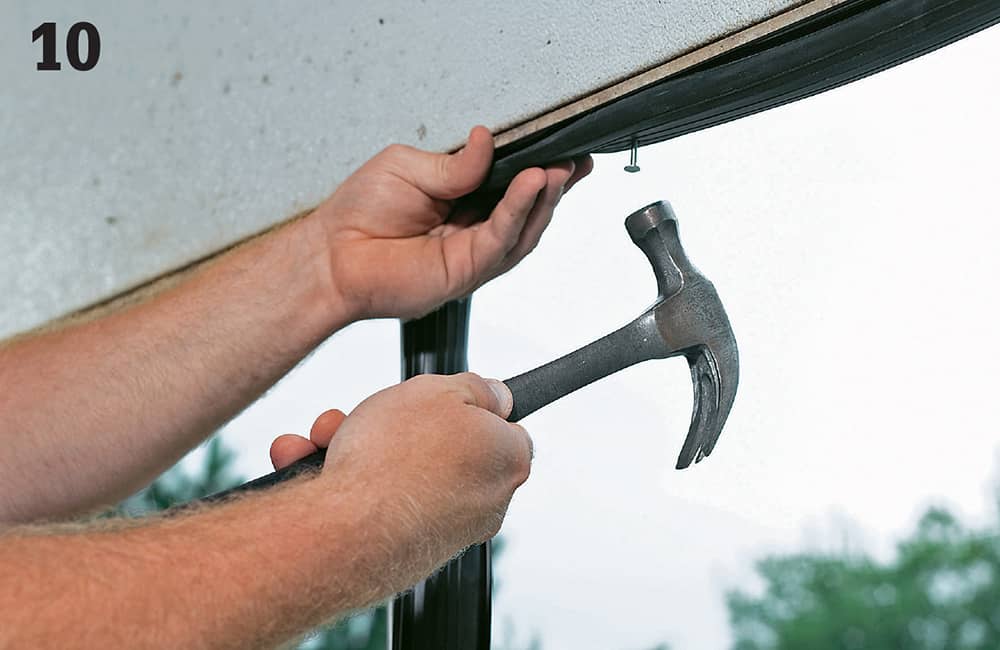
Measure the width of your garage door, then buy a piece of weather stripping to match. These strips are standard lumber-yard and home center items. Sometimes they are sold in kit form, with fasteners included. If not, just nail the stripping in place with galvanized roofing nails.
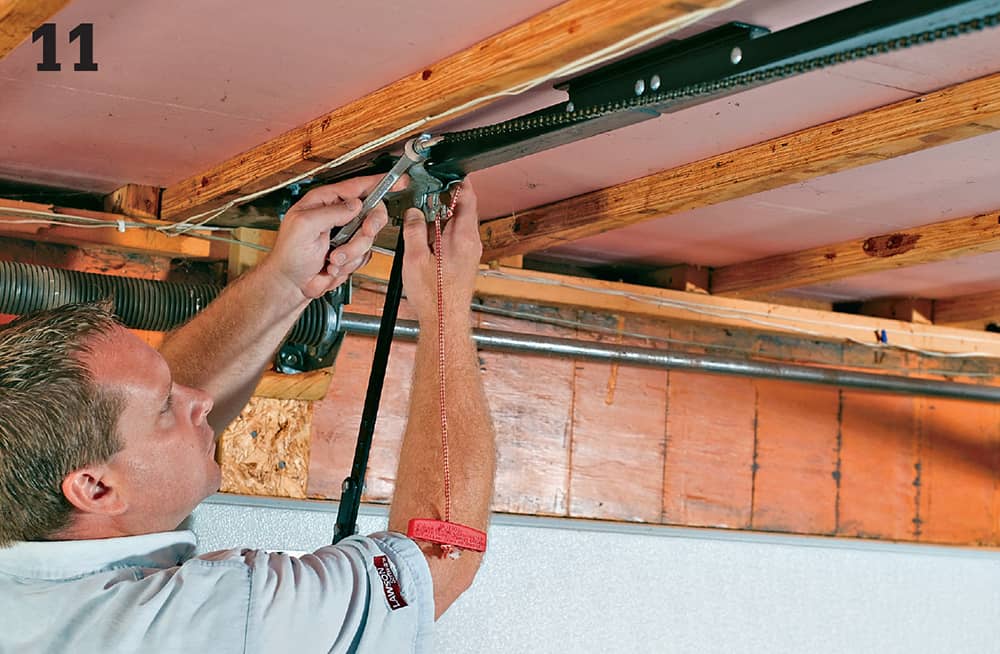
If the chain on your garage door opener is sagging more than 1/2" below the bottom rail, it can make a lot of noise and cause drive sprocket wear. Tighten the chain according to the directions in the owner’s manual.
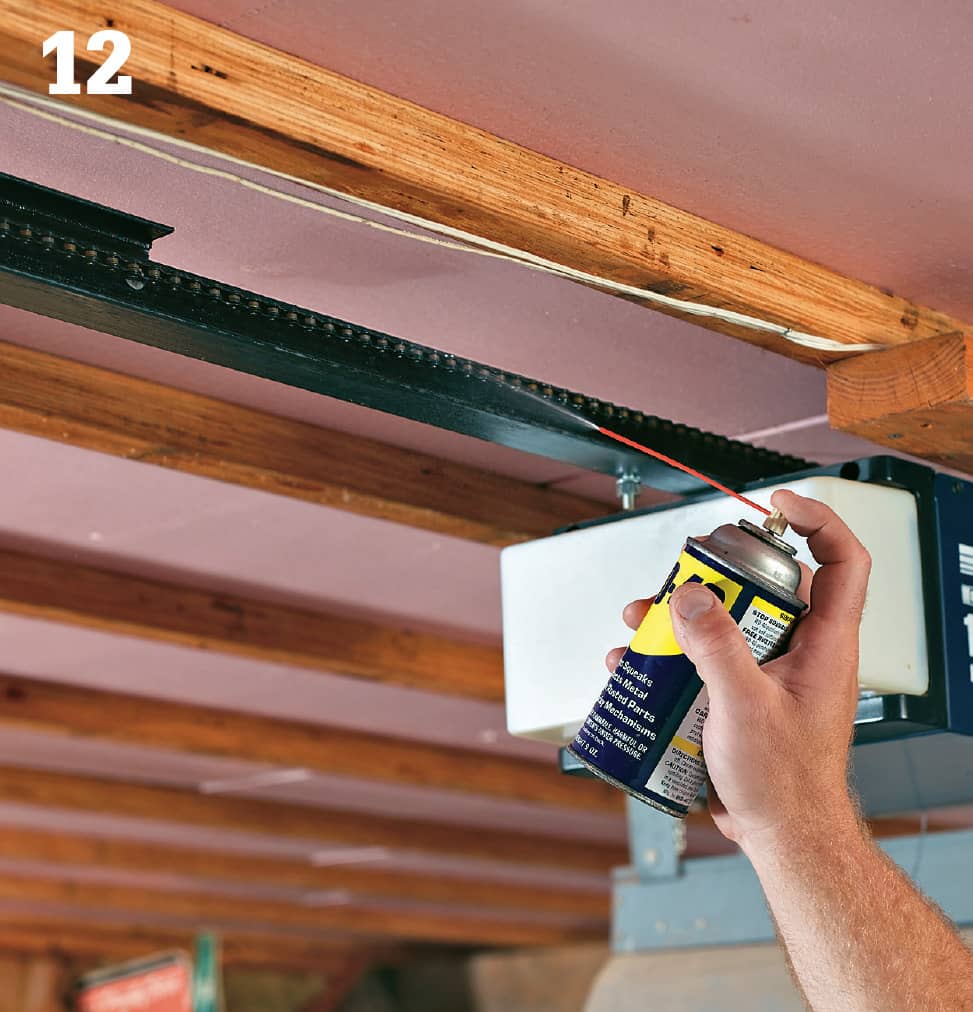
On openers with a chain, lubricate the entire length of the chain with lightweight oil. Do not use grease. Use the same lubricant if your opener has a drive screw instead.
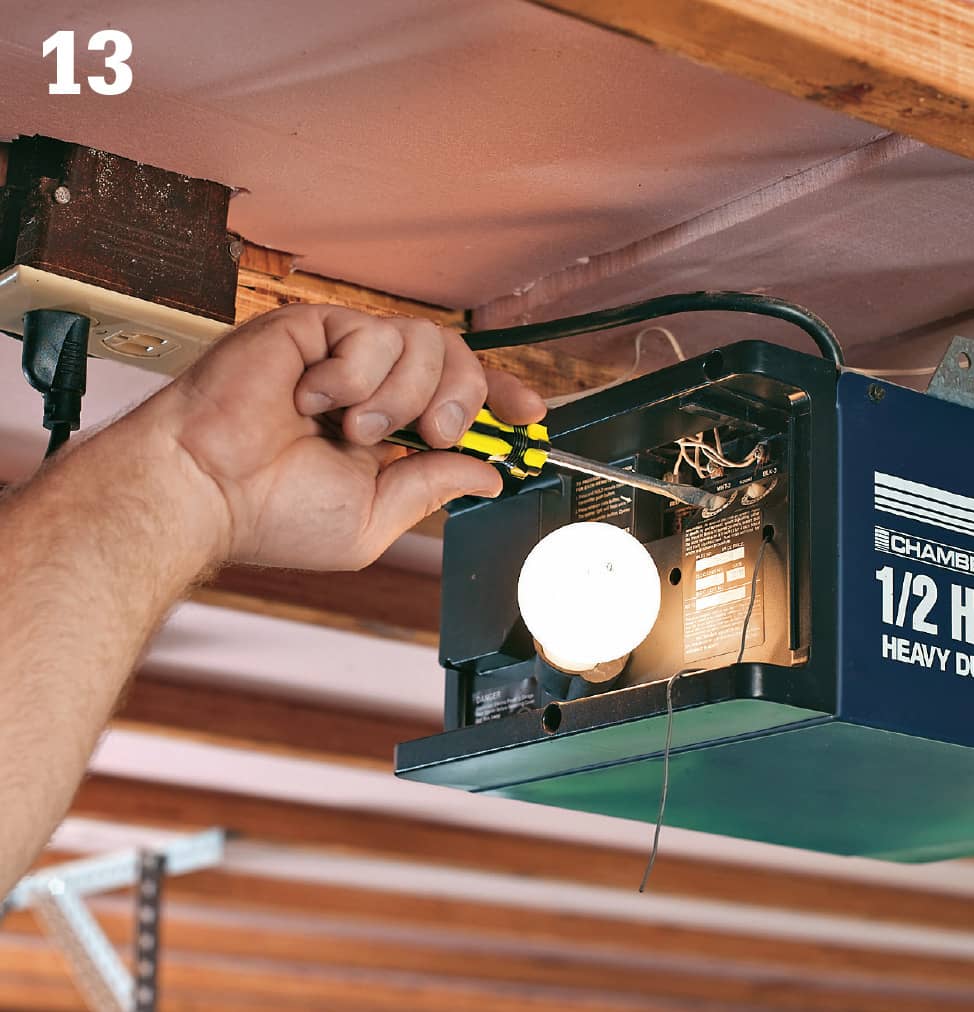
Test the door’s closing force sensitivity and make adjustments at the opener’s motor case if needed. Because both the sensitivity and the adjustment mechanism vary greatly between opener models, you’ll have to rely on your owner’s manual for guidance. If you don’t have the owner’s manual, you can usually download one from the manufacturer’s website.
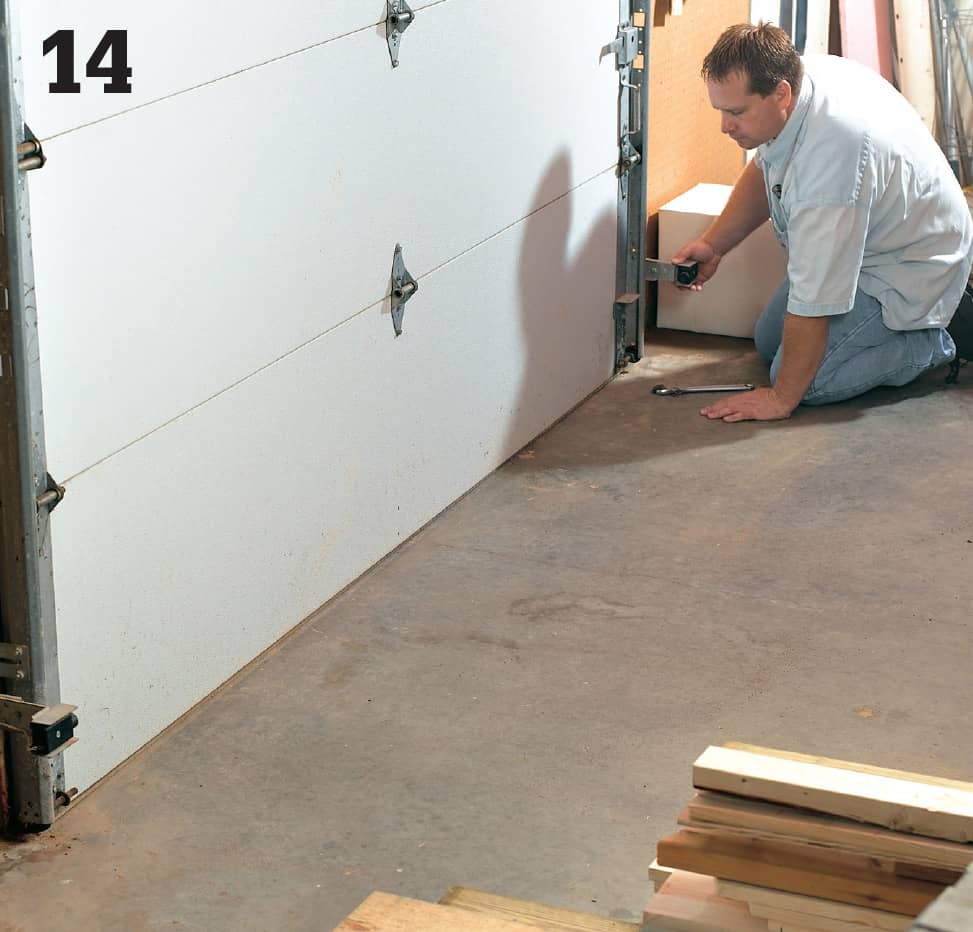
Check for proper alignment on the safety sensors near the floor. They should be pointing directly at one another and their lenses should be clean of any dirt and grease.
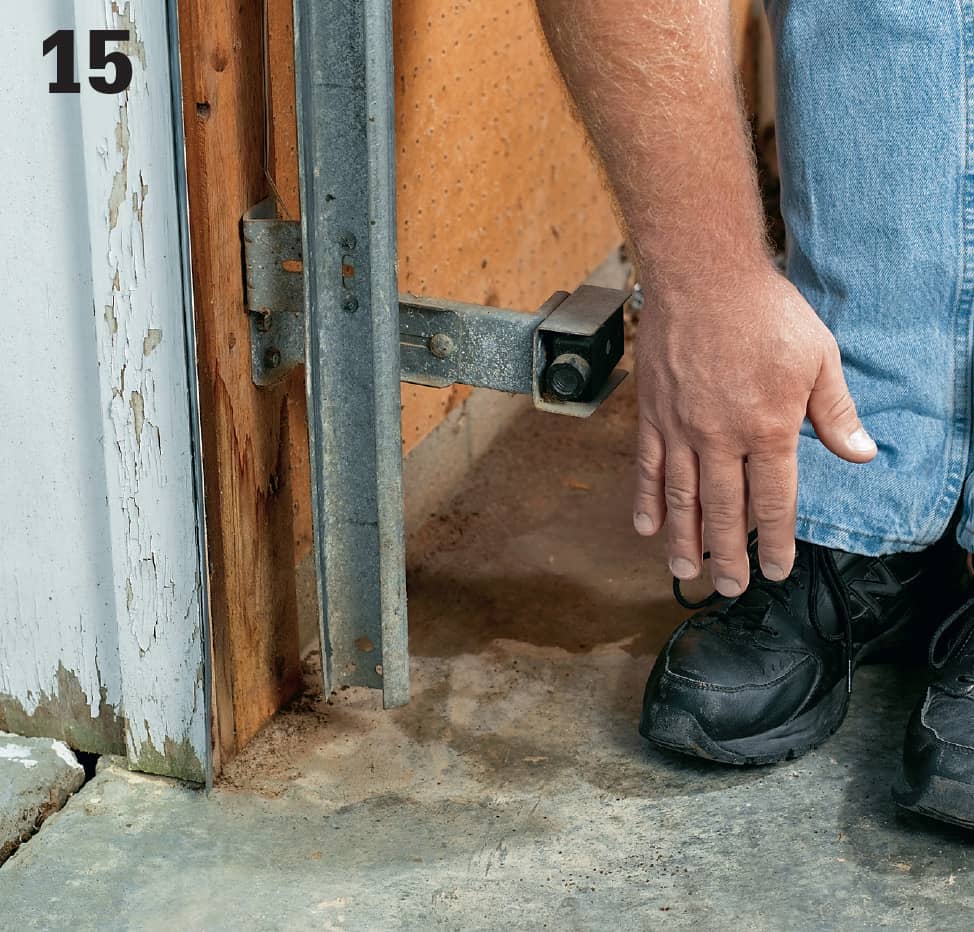
Make sure that the sensors are “talking” to the opener properly. Start to close the door, then put your hand down between the two sensors. If the door stops immediately and reverses direction, it’s working properly. If it’s not, make the adjustment recommended in the owner’s manual. If that doesn’t do the trick, call a professional door installer and don’t use the door until it passes this test.
 Installing Garage Doors
Your sectional garage door will bear the brunt of everything Mother Nature and an active household throws at it—seasonal temperature swings, moisture, blistering sunlight, and the occasional misfired half-court jump shot. If that isn’t enough, the average sectional garage door cycles up and down at least four times per day, which totals up to around 1,300 or more uses every year. For all of these reasons, it pays to install a high-quality door on your new garage so you can enjoy a long service life from it.
These days, you don’t have to settle for a drab, flat-panel door. Door manufacturers provide many options for cladding colors, panel texture and layout, exterior hardware, and window styles. Today’s state-of-the-art garage doors also benefit from improved material construction, more sophisticated safety features, and enhanced energy efficiency. When you order your new door, double-check your garage’s rough opening and minimum ceiling height to be sure the new door will fit the space properly.
Installing a sectional garage door is easier than you might think, and manufacturers make the process quite accessible for average do-it-yourselfers. With a helper or two, you should have little difficulty installing a new garage door in a single day. The job is really no more complex than other window and door replacements if you work carefully and exercise good judgment. Garage door kits come with all the necessary hardware and detailed step-by-step instructions. Since garage door styles vary, the installation process for your new door may differ from the photo sequence you see here, so always defer to the manufacturer’s instructions. This will ensure the door is installed correctly and the manufacturer will honor the product warranty.
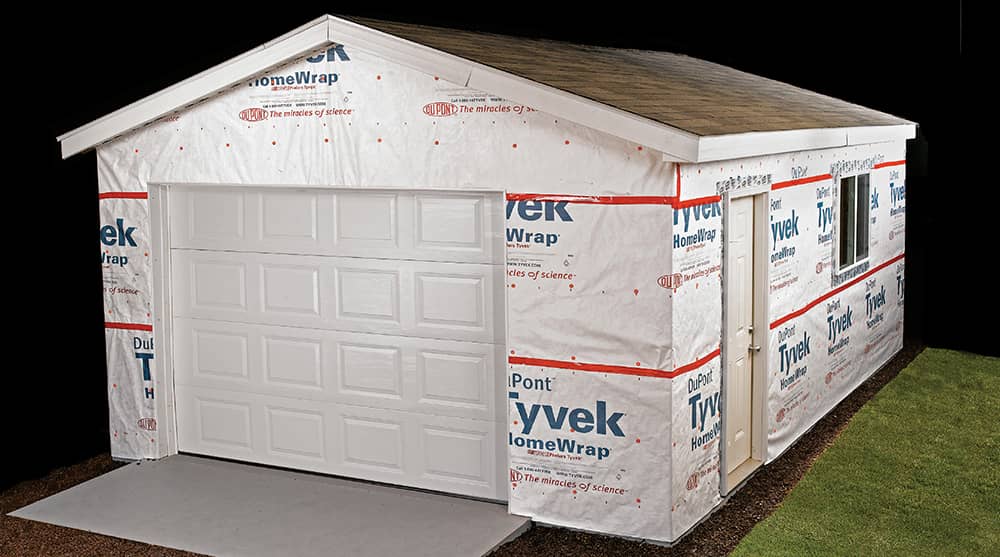
The sectional garage door you choose for your garage will go a long way toward defining the building’s appearance and giving you trouble-free performance day in and day out.
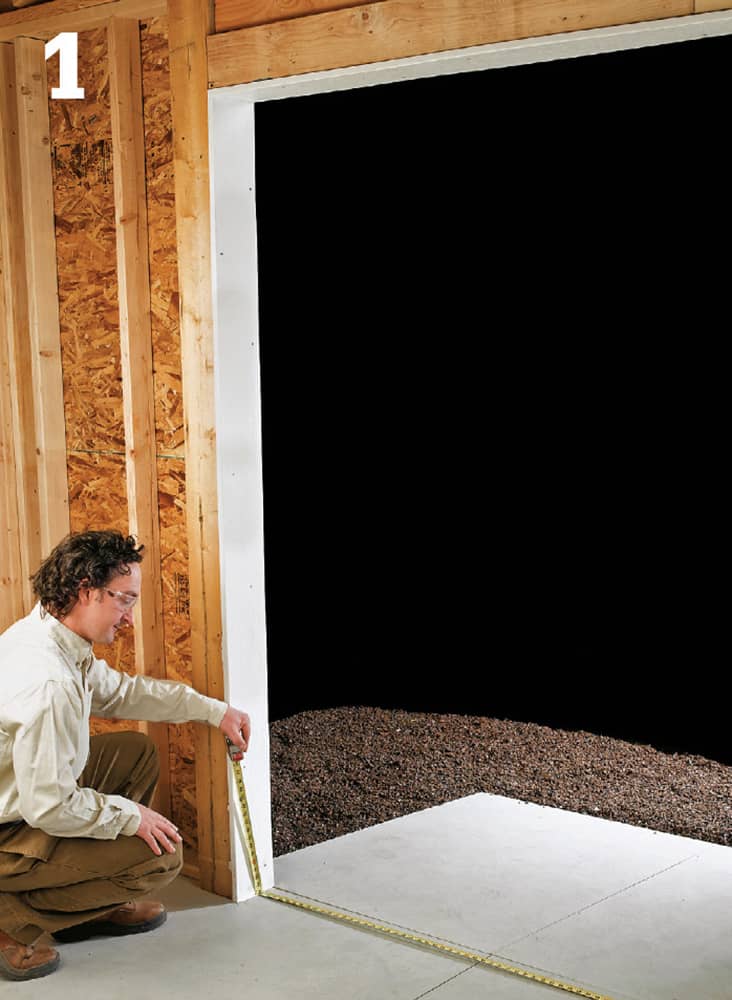
Measure for the door. Measure the width of the header, the headroom clearance to the rafter collar ties (or bottom truss chords), and the inside opening of the doorway. Check these measurements against the minimum requirements outlined in the instruction manual that comes with your sectional garage door.
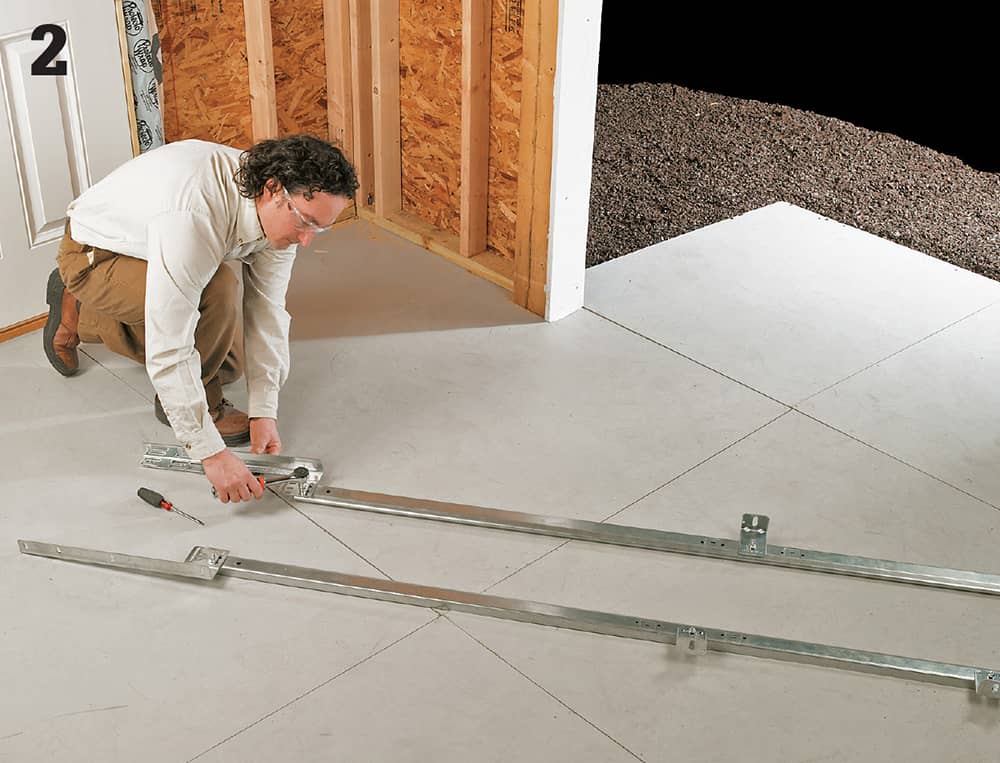
Assemble door tracks. Working on the floor, lay out and assemble the vertical tracks, jamb brackets, and flag angle hardware. Install the door bottom seal and the roller and hinge hardware on the bottom door section.
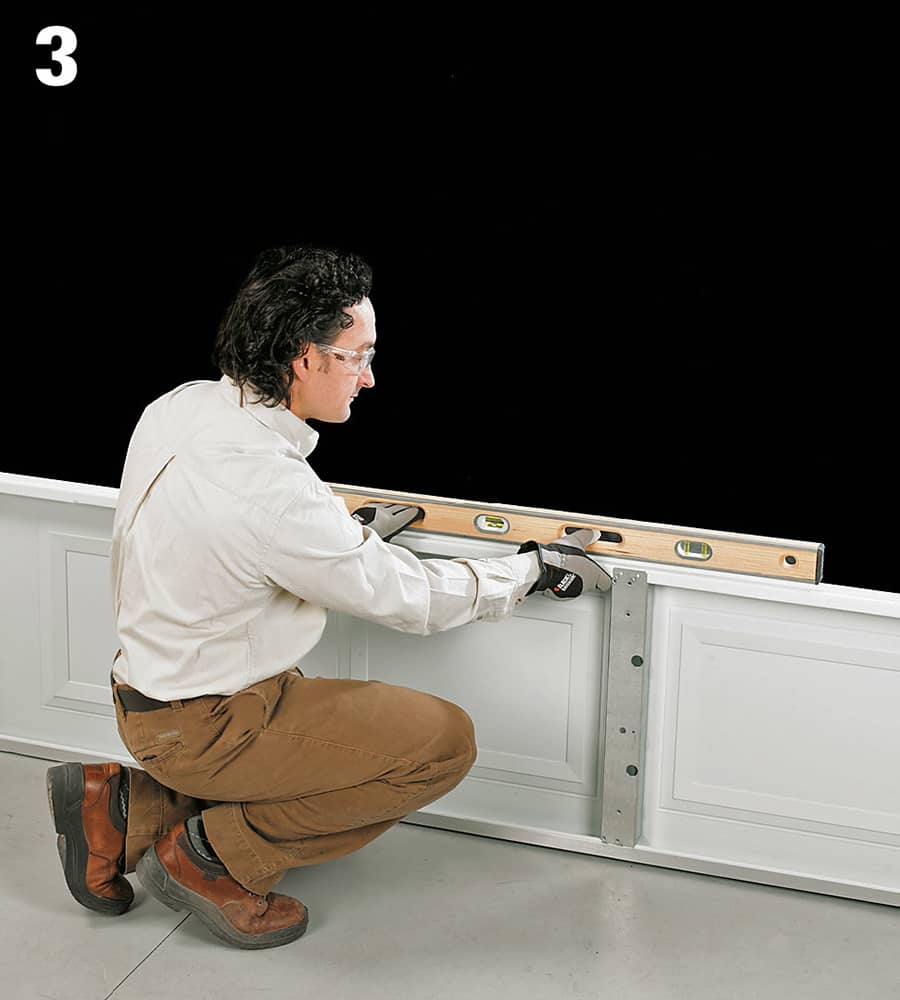
Install the first section. Set the bottom door section into position against the side jambs, and adjust it left or right until the side jambs overlap it evenly. Check the top of the door section for level. Place shims beneath the door to level it, if necessary. Have a helper hold the door section in place against the jambs until it is secured in the tracks.
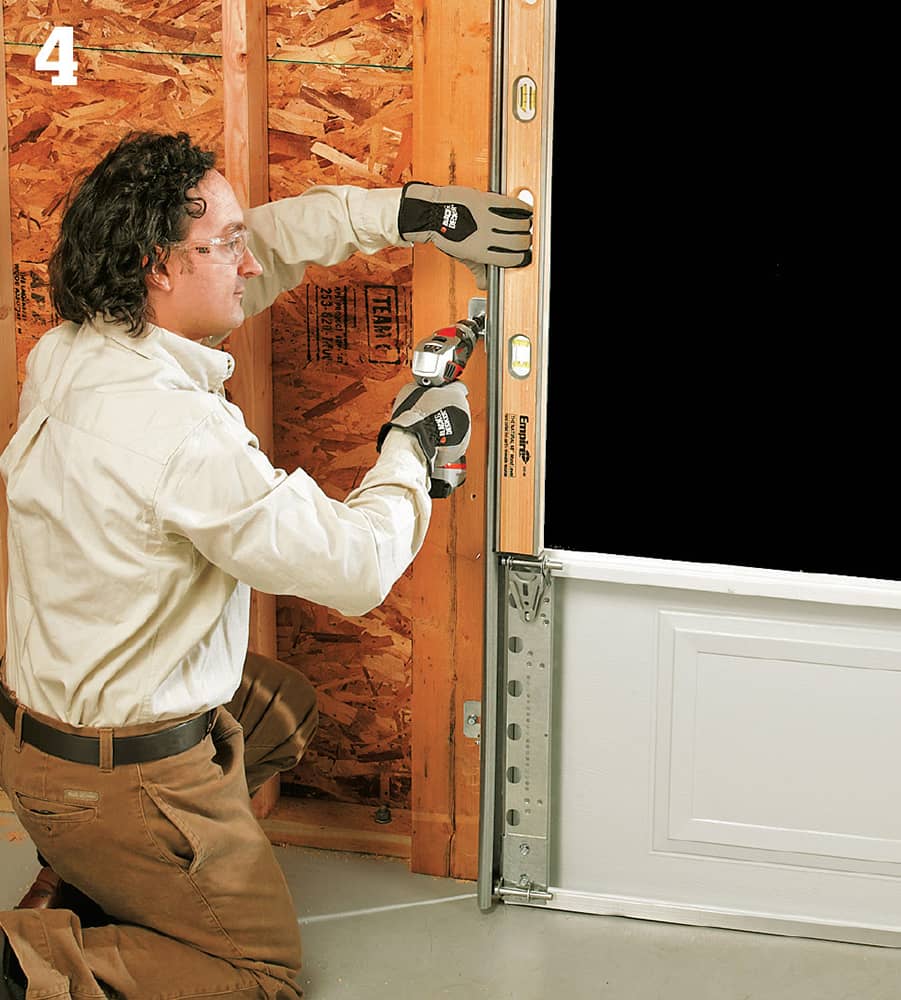
Attach the tracks. Slip a vertical track over the door section rollers and against the side jamb. Adjust it for plumb, then fasten the jamb brackets to the side jamb blocking with lag screws. Carefully measure, mark, and install the other vertical track as well.
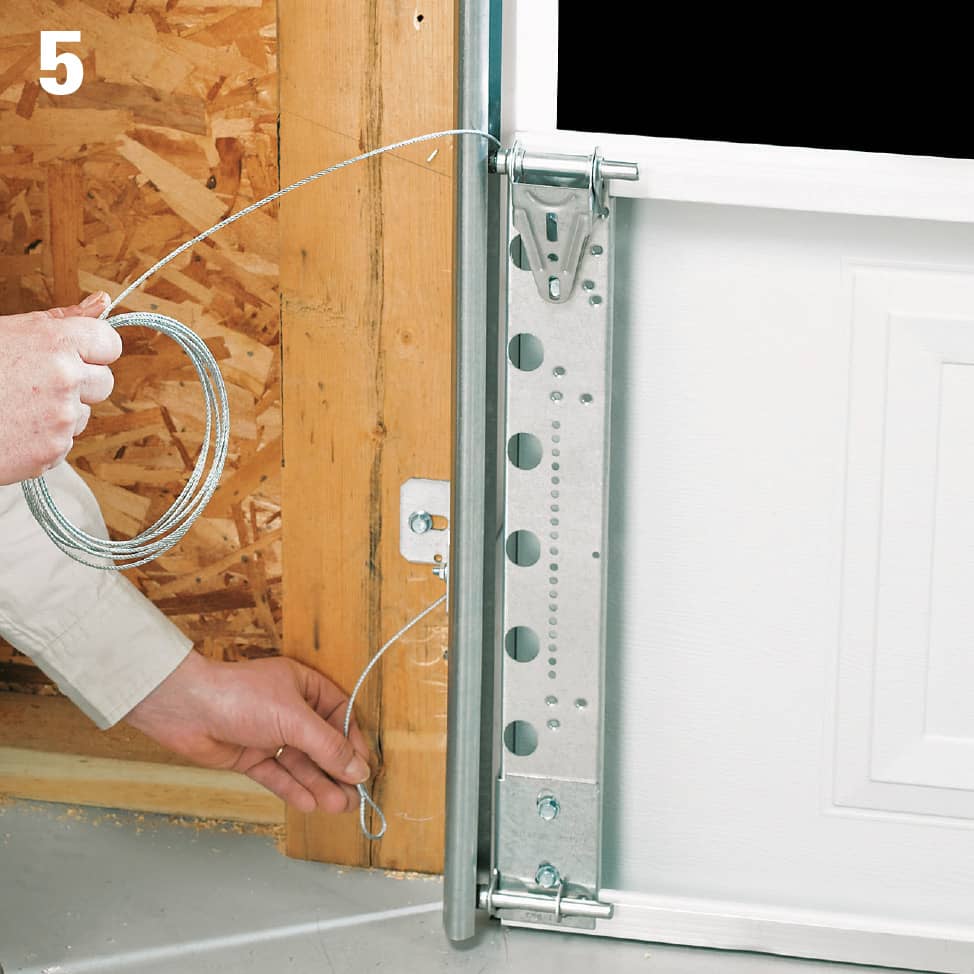
Attach the lift cables. Depending on your door design, you may need to attach lift cables to the bottom door section at this time. Follow the instructions that come with your door to connect these cables correctly.
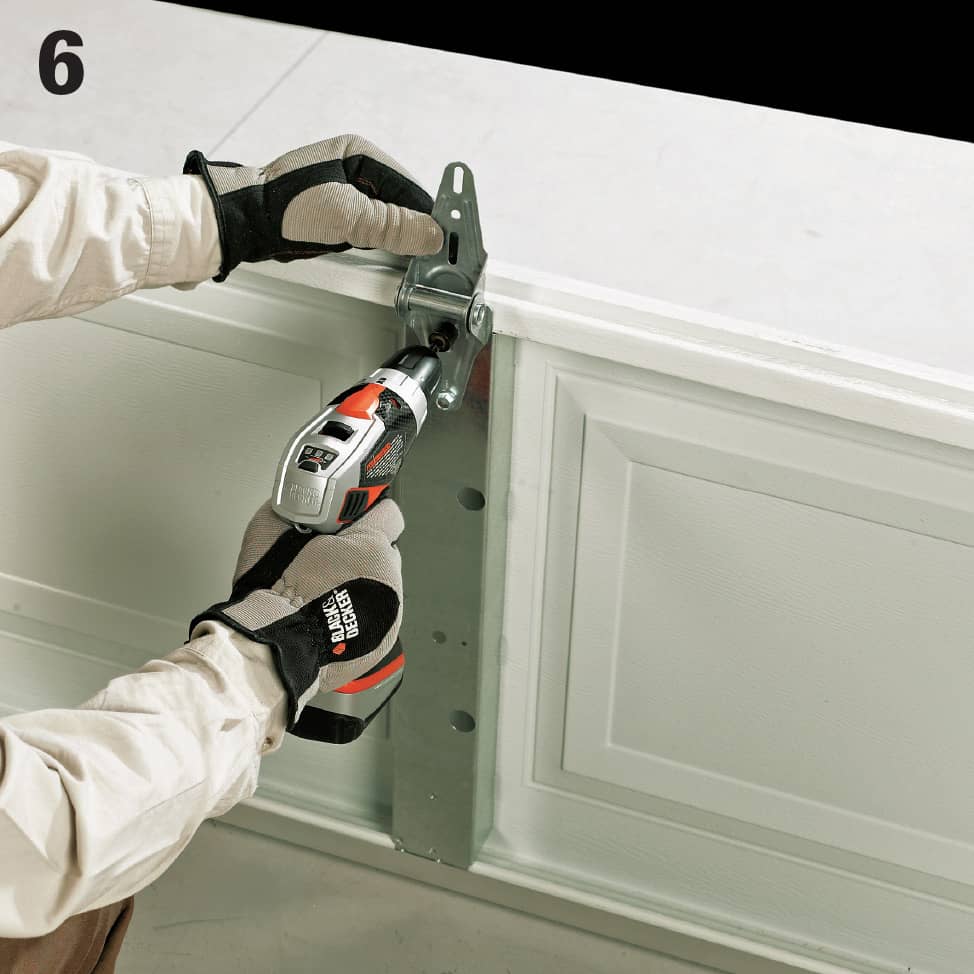
Install the door hinges. Fasten the end and intermediate hinges to the bottom door section, and then install roller brackets and hinges on the other door sections. Attach hinges to the top edges of each door section only. This way you’ll be able to stack one section on top of the next during assembly.
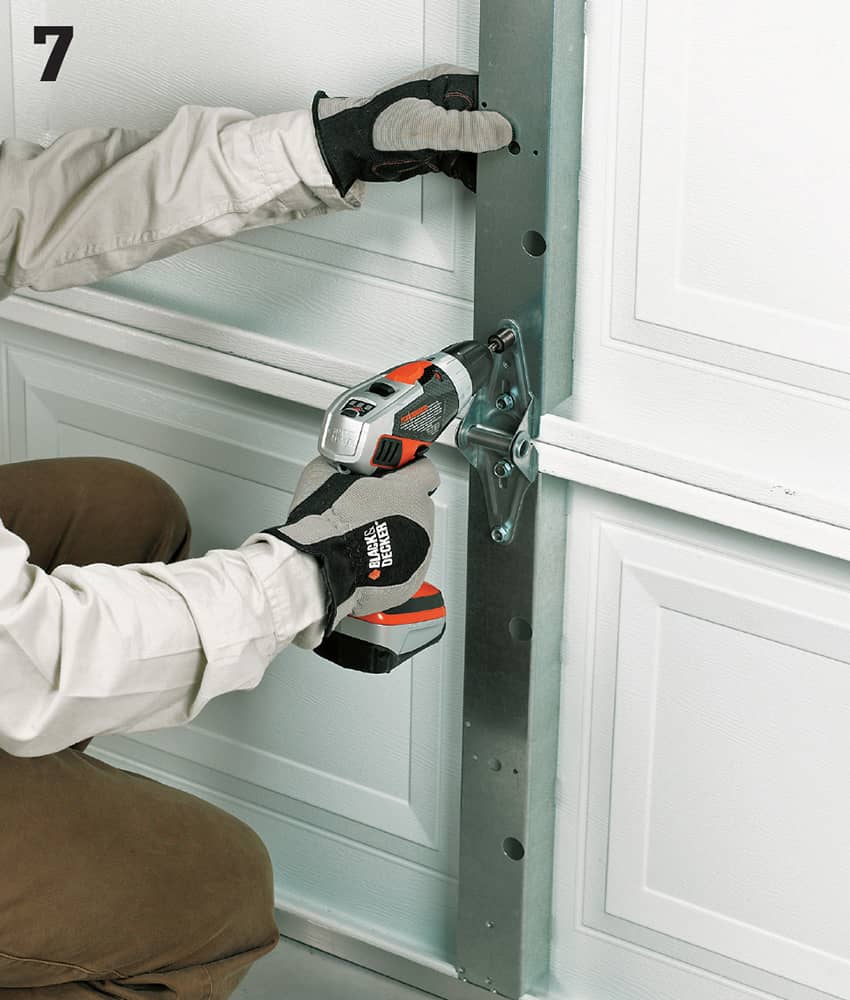
Add next sections. Slip the next door section into place in the door tracks and on top of the first section. Connect the bottom hinges (already attached to the first section) to the second door section. Repeat the process until you have stacked and installed all but the top door section.
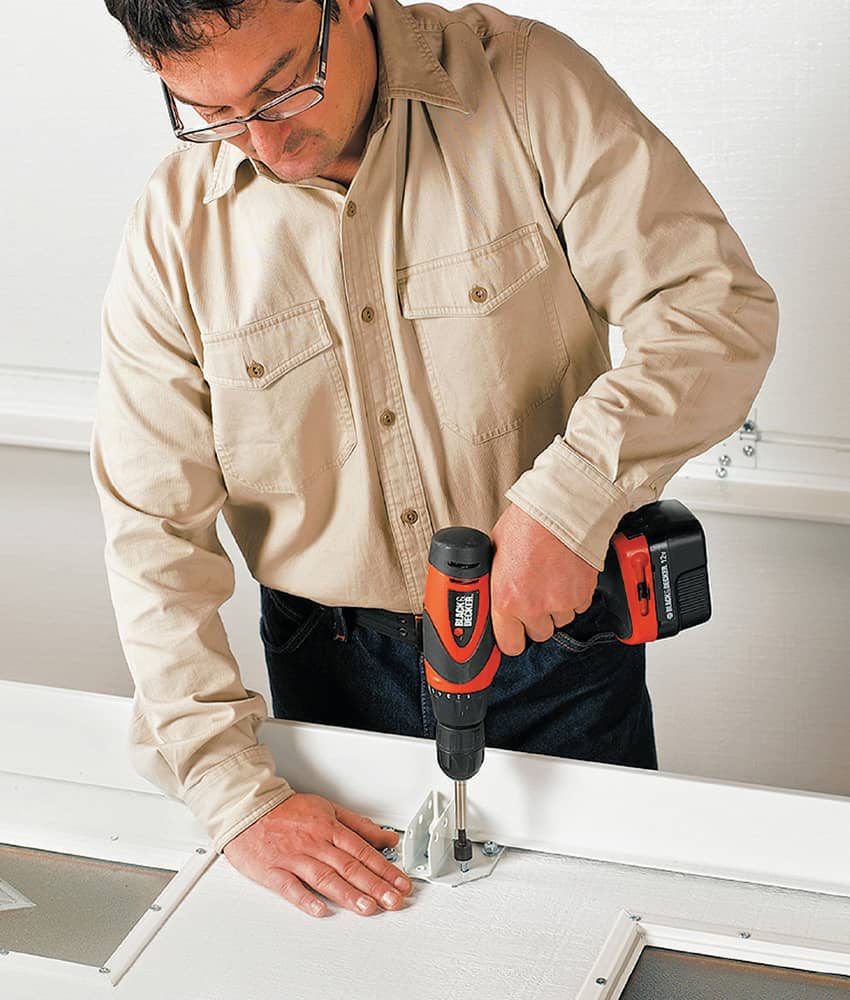
OPTION: The top door section may require additional bracing, special top roller brackets, and a bracket for securing a garage door opener. Install these parts now following the door manufacturer’s instructions.
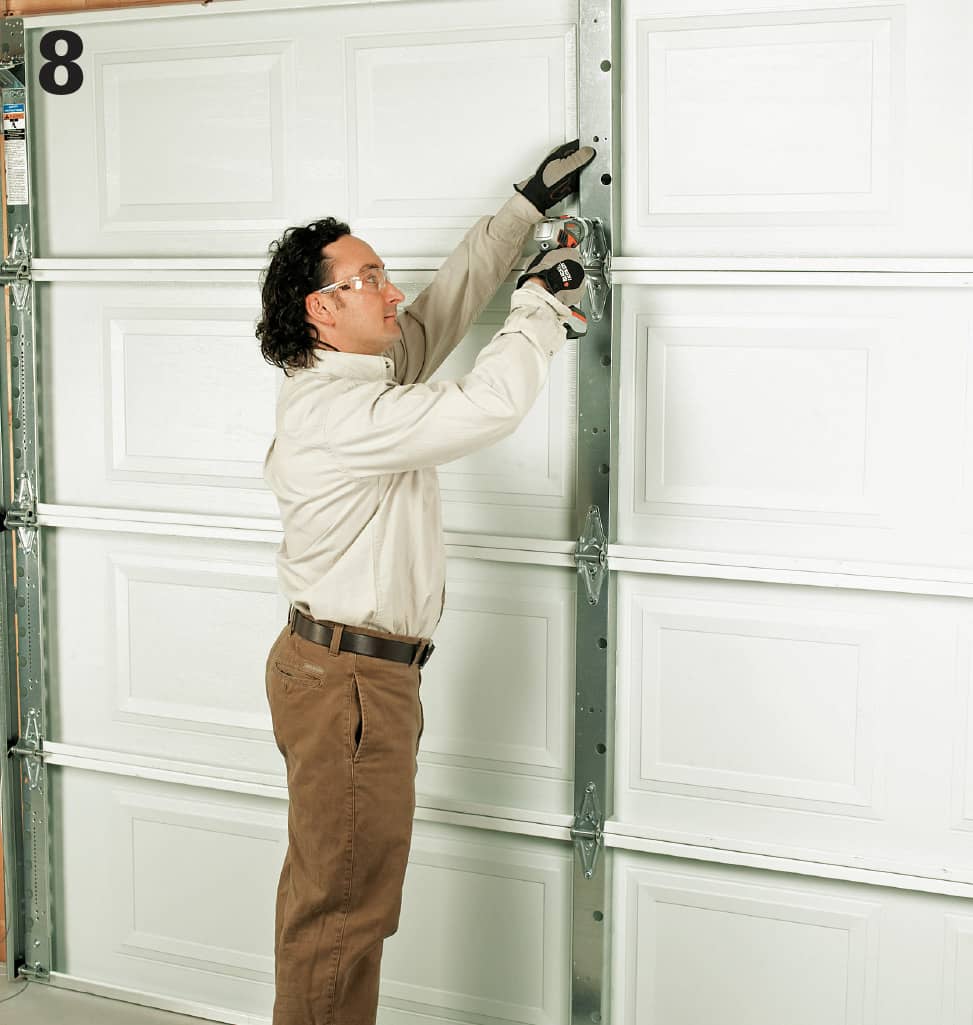
Install the top section. Set the top door section in place and fasten it to the hinges on the section below it. Support the door section temporarily with a few 16d nails driven into the door header blocking and bent down at an angle.
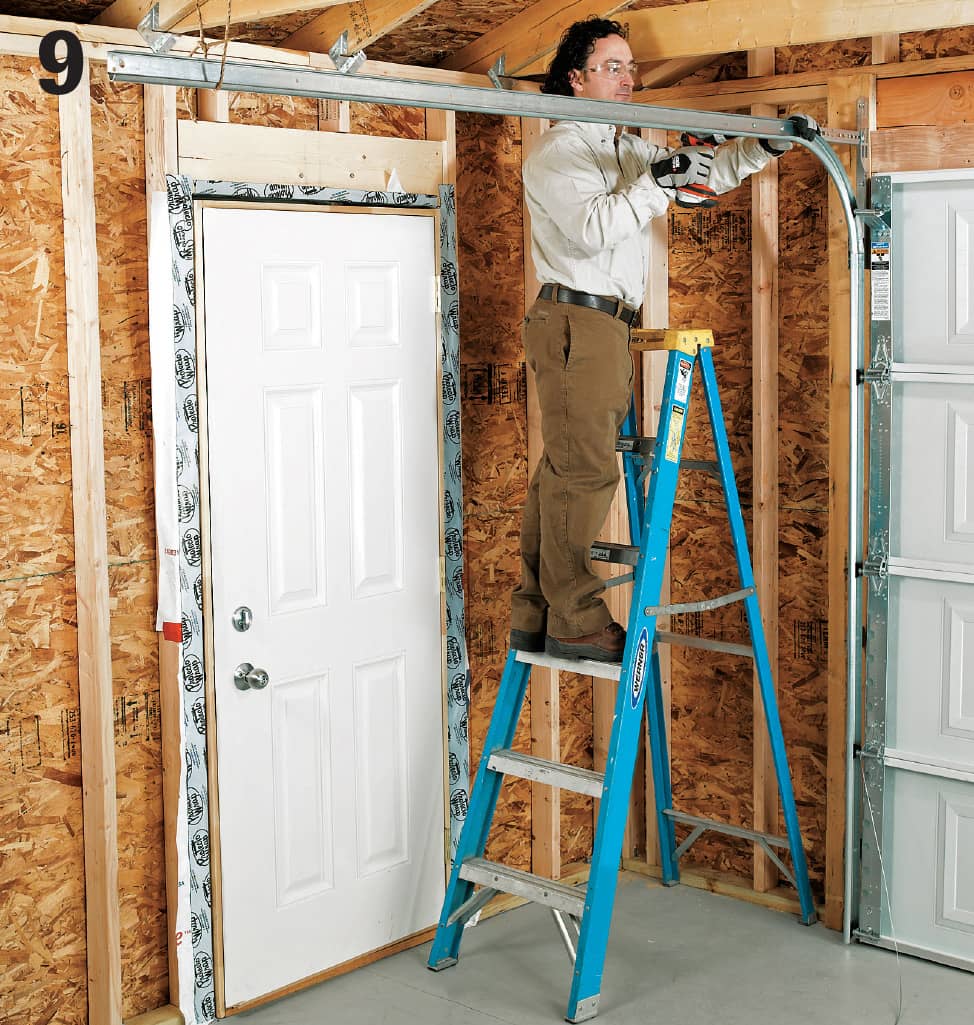
Complete track installation. Fasten the horizontal door tracks to the flag angle brackets on top of the vertical track sections. Temporarily suspend the back ends of the tracks with rope so they are level.
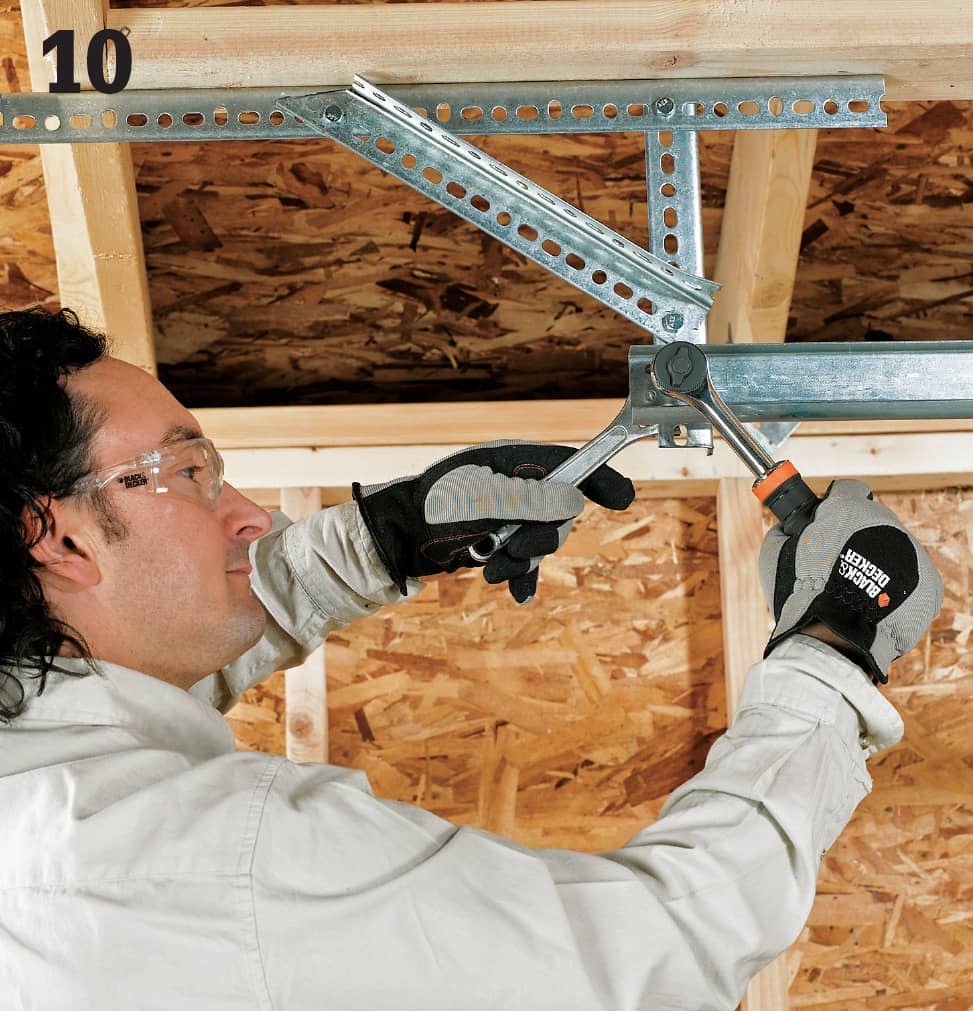
Install rear hanger brackets. This step will vary among door opener brands. Check your door instruction manual for the correct location of rear hanger brackets that will hold the horizontal door tracks in position. Measure, cut, and fasten sections of perforated angle iron together with bolts, washers, and nuts to form two Y-shaped door track brackets. Fasten the brackets to the collar tie or bottom truss chord with lag screws and washers following the door manufacturer’s recommendations.

Attach the extension springs. The door opener here features a pair of smaller springs that run parallel to the horizontal door tracks, not parallel to the door header as larger torsion springs are installed. The springs are attached to cables that attach to the rear door hanger brackets.
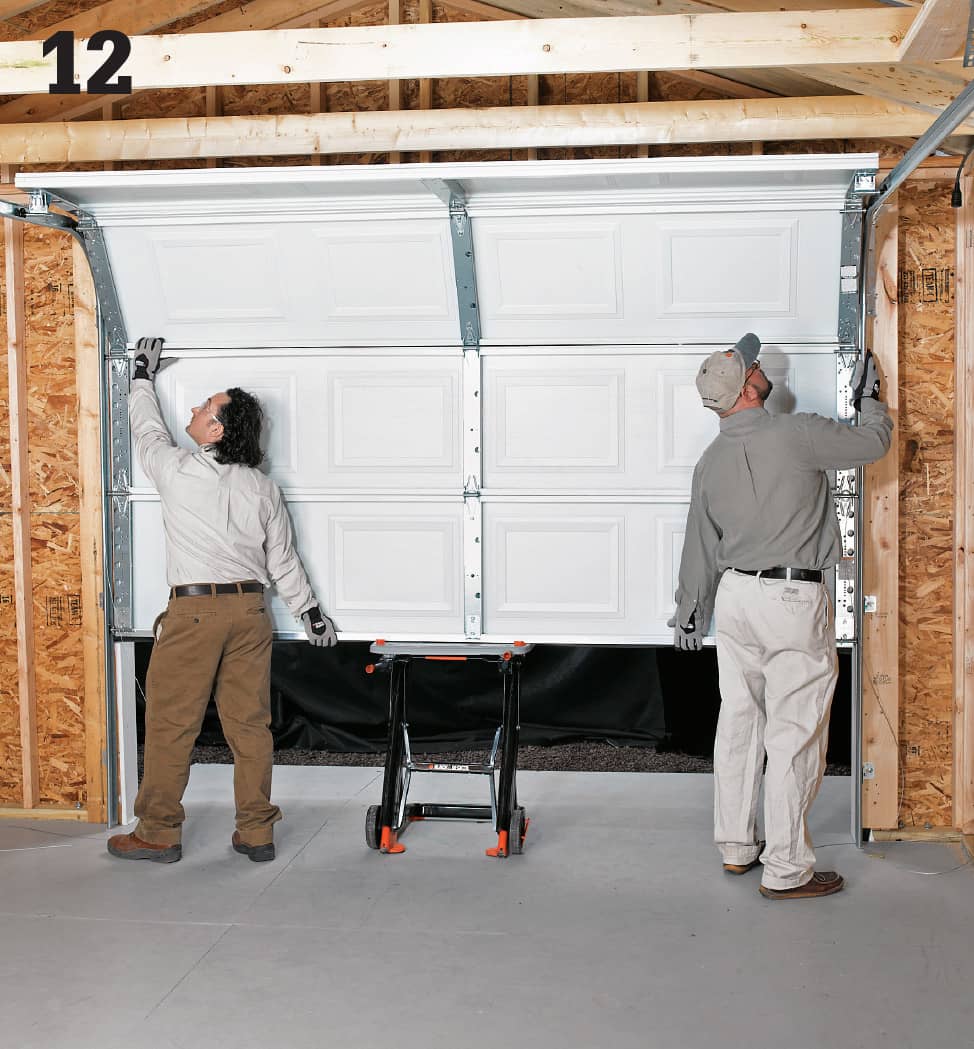
Test to make sure the door tracks properly. Raise it about halfway first. You’ll need at least one helper here. Slide a sturdy support underneath the door bottom to hold the door and then inspect to make sure the rollers are tracking and the tracks are parallel.
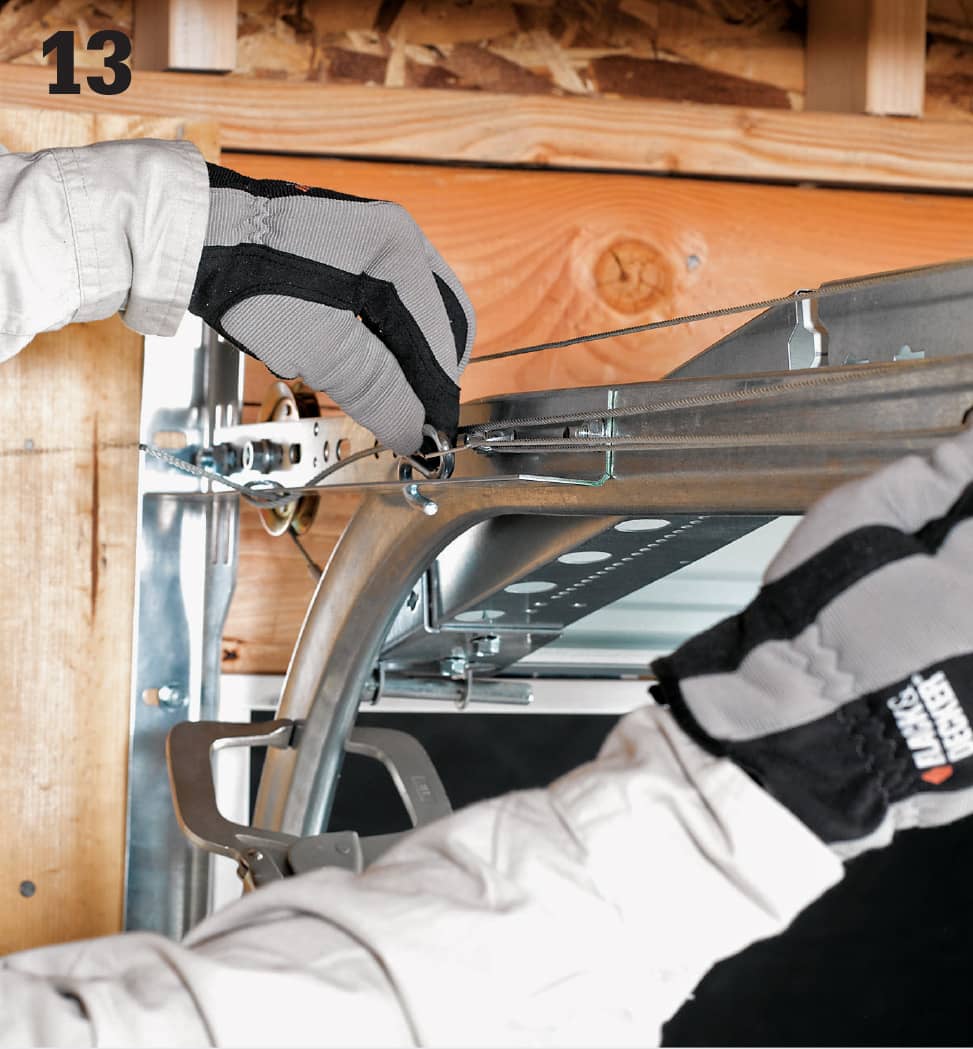
Attach the spring cables. The door should be fully raised and held in place with C-clamps tightened onto the tracks to prevent it from slipping down. The tension in the springs should be relieved. The cables in this case are tied off onto a 3-hole clip that is then hooked onto the horizontal angle bracket near the front of the tracks.
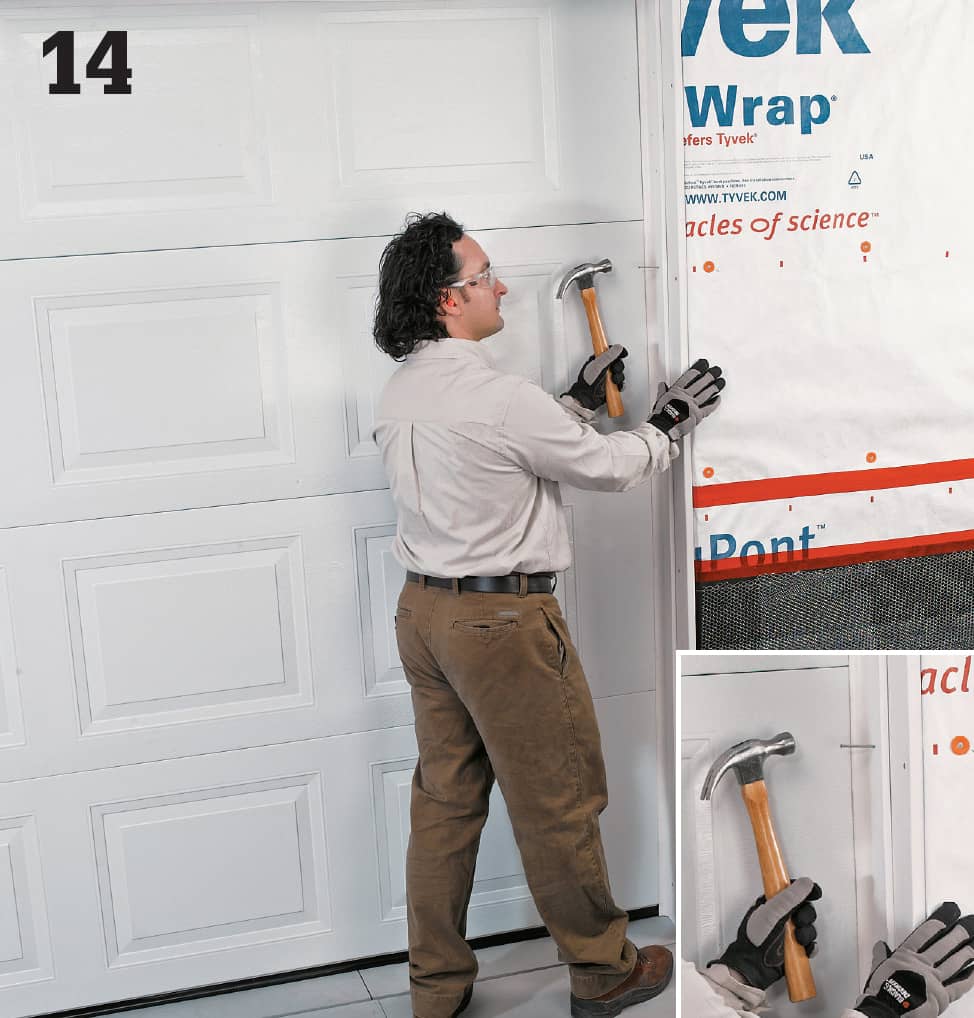
Attach the doorstop molding. Measure, cut, and nail sections of doorstop molding to the door jambs on the outside of the door to seal out weather. A rolled vinyl doorstop may come with your door kit. If not, use strips of 1 × 2 treated wood or cedar for this purpose.
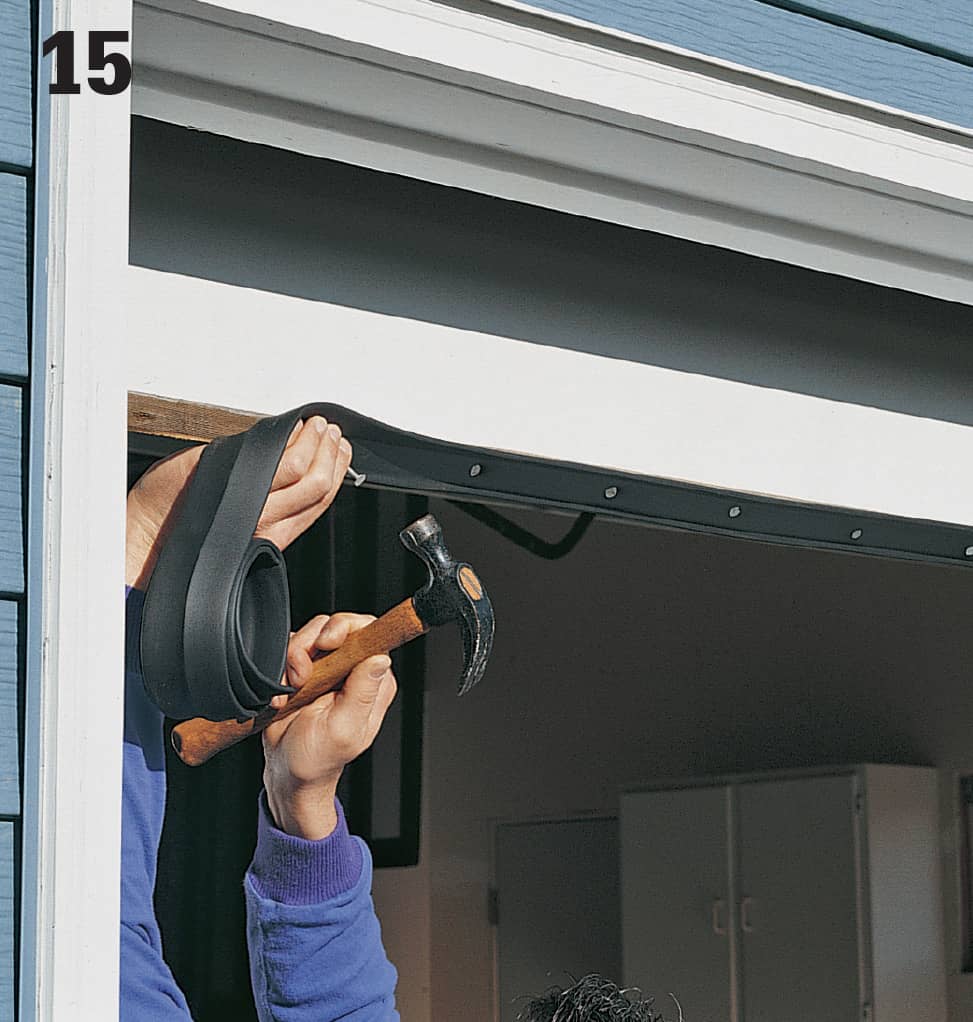
Attach a new rubber sweep to the bottom outside edge of the garage door. Also check the door jambs for drafts, and add weather stripping, if needed.
 Garage Door Openers
Those cold dashes from your car to the garage door and back can be a thing of the past with the convenience of a garage door opener. Add to this the benefit of secured access and you have all the reasons you need to install an automatic garage door opener. Garage door openers come in three basic models, each with its own benefits and drawbacks, but this project shows the basic steps for installing a chain-drive system—the most common and least expensive type—on a sectional door in a garage with exposed joists. If you have a one-piece door, a lightweight metal or glass-paneled door, or a garage with a finished ceiling, consult the manufacturer’s directions for alternative installation procedures.
Before you begin, read all of the manufacturer’s instructions. Then make sure your garage door is properly balanced and moves smoothly. Open and close the door to see if it sticks or binds at any point. Release the door in the half-open position. It should stay in place supported by its own springs. If your door is not balanced or sticks at any point, call a garage door service professional before installing the opener.
Most garage door openers plug into a standard grounded receptacle located near the unit. Some local codes may require openers to be hard-wired into circuits. Consult the manufacturer’s directions for hard-wiring procedures.
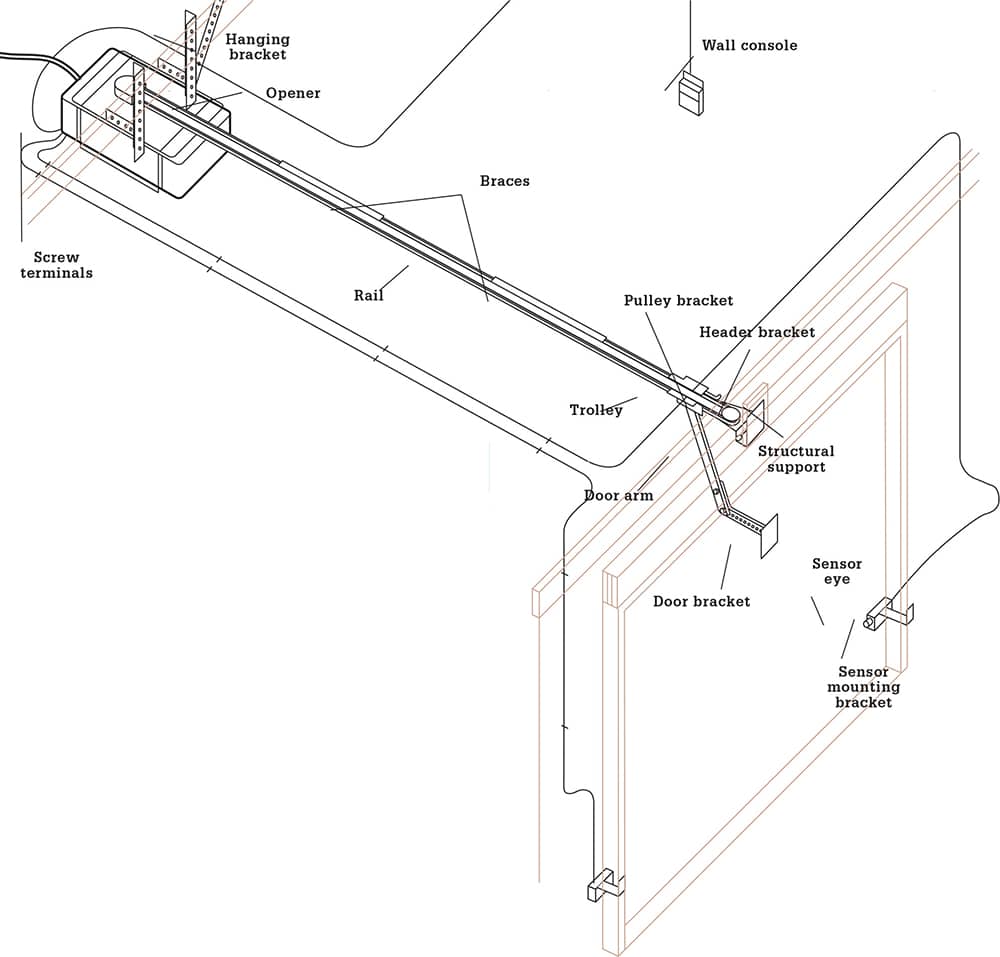
This illustration indicates all the components of a garage door opener. If your opener style differs, refer to your owner’s manual for clarification.
How to Install a Garage Door Opener
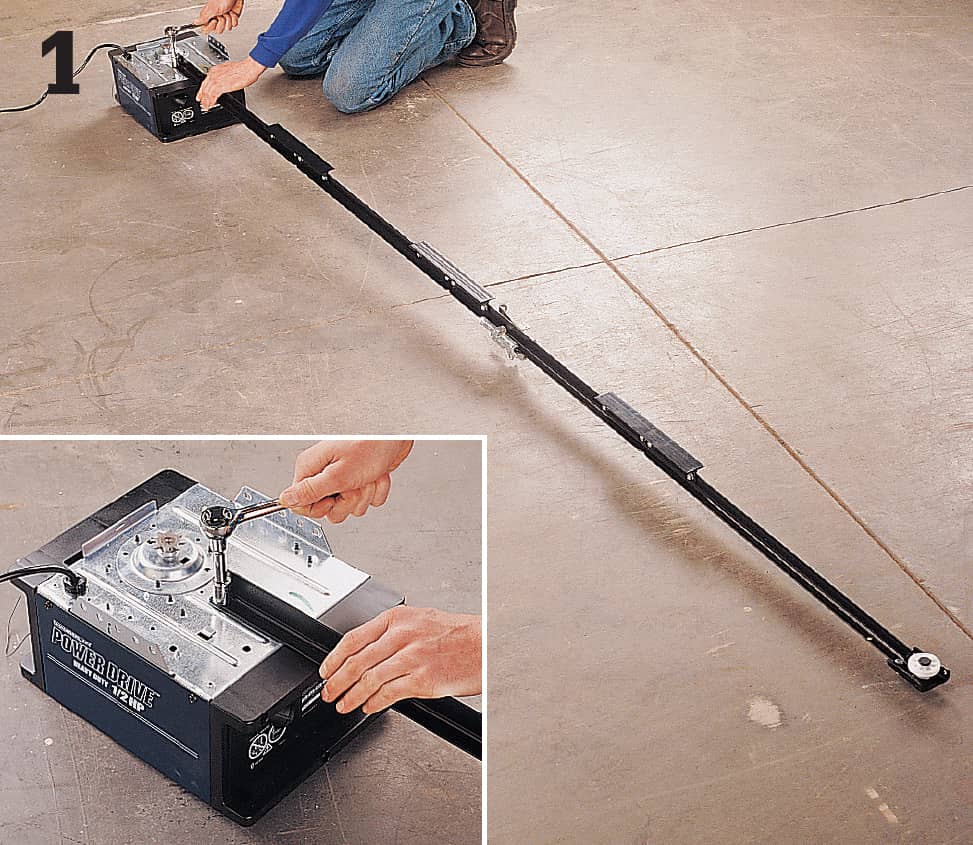
Start by aligning the rail pieces in proper order and securing them with the included braces and bolts. Screw the pulley bracket to the door end of the rail and slide the trolley onto the rail. Make sure the pulley and all rail pieces are properly aligned and that the trolley runs smoothly without hitting any hardware along the rail. Remove the two screws from the top of the opener, then attach the rail to the opener using these screws (inset).
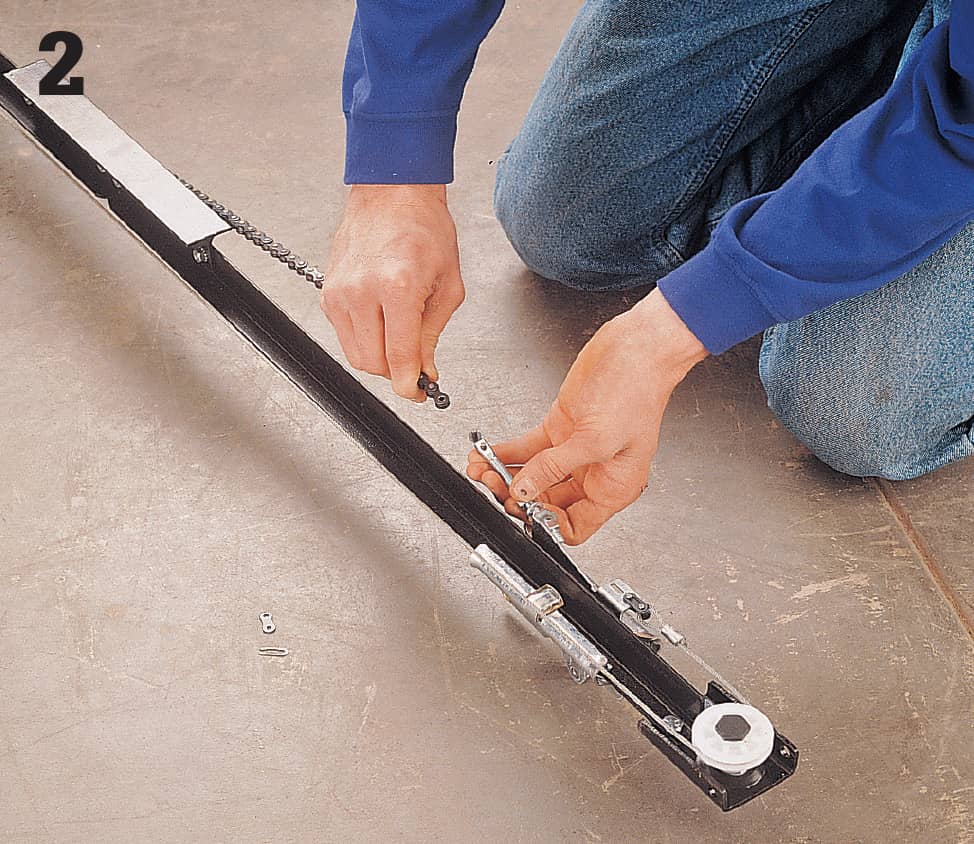
The drive chain/cable should be packaged in its own dispensing carton. Attach the cable loop to the front of the trolley using the included linking hardware. Wrap the cable around the pulley, then wrap the remaining chain around the drive sprocket on the opener. Finally, attach it to the other side of the trolley with linking hardware. Make sure the chain is not twisted, then attach the cover over the drive sprocket. Tighten the chain by adjusting the nuts on the trolley until the chain is 1/2" above the base of the rail.
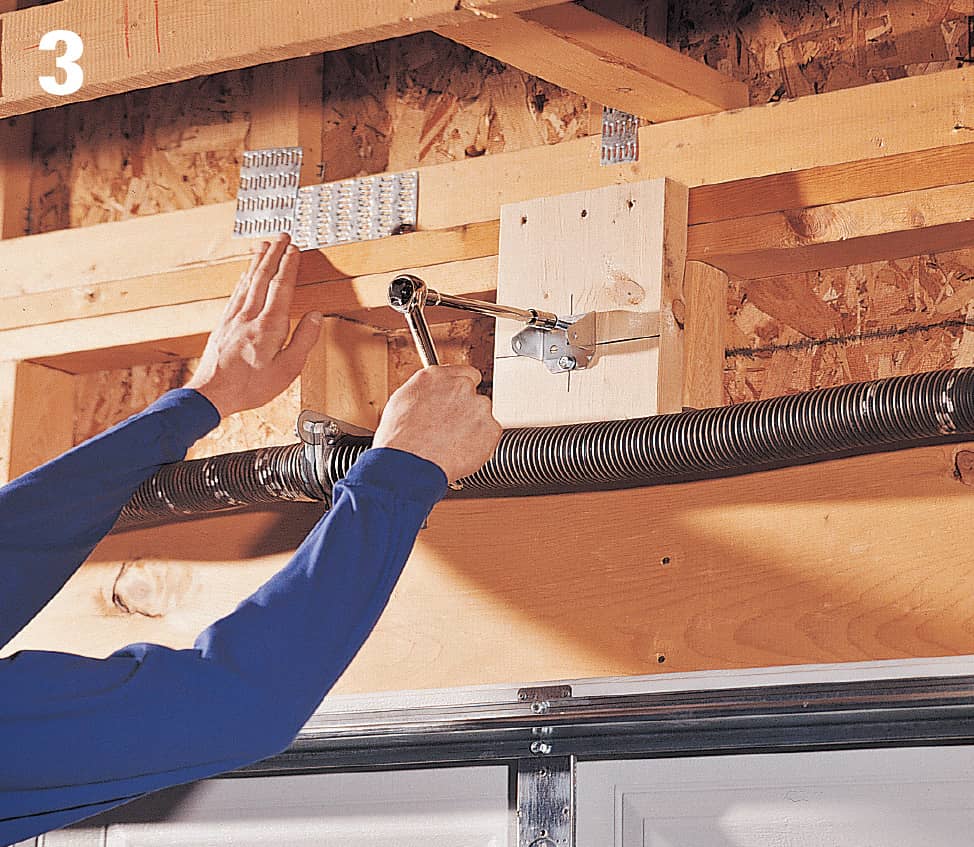
To locate the header bracket, first extend a vertical line from the center of the door onto the wall above. Raise the door and note the highest point the door reaches. Measure from the floor to this point. Add 2" to this distance and mark a horizontal line on the front wall where it intersects the centerline. If there is no structural support behind the cross point, fasten 2× lumber across the framing. Then fasten the header bracket to the structural support with the included screws.
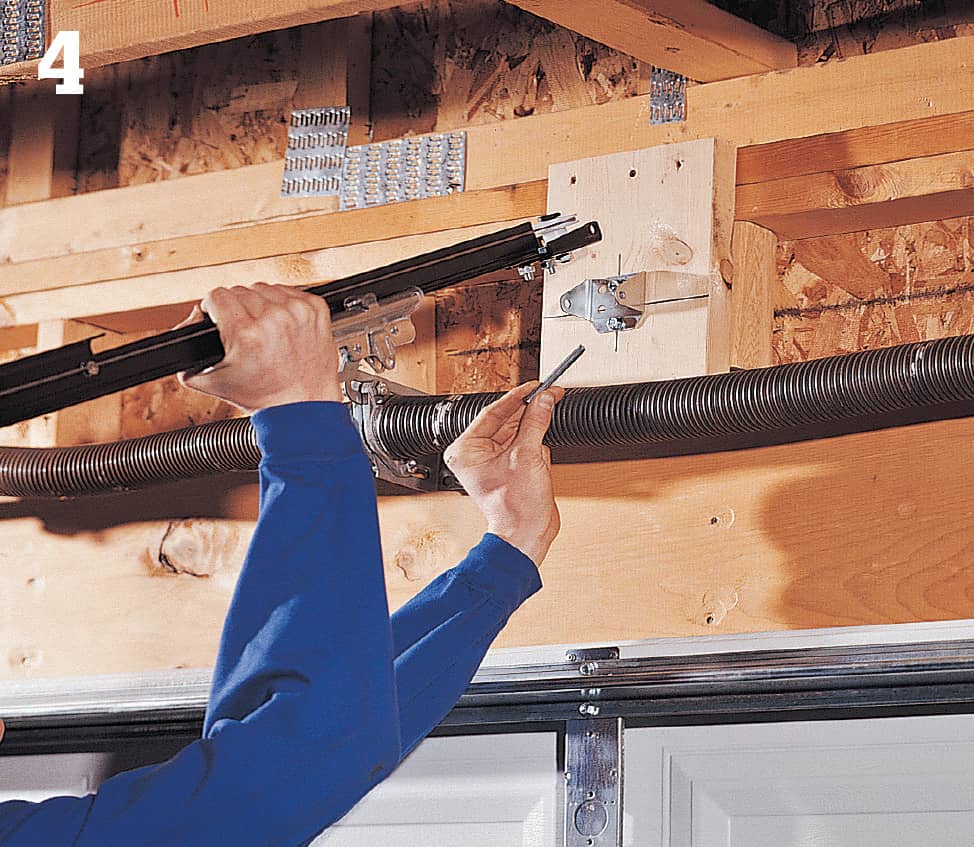
Support the opener on the floor with a board or box to prevent stress and twisting to the rail. Attach the rail pulley bracket to the header bracket above the door with the included clevis pin. Then place the opener on a stepladder so it is above the door tracks. Open the door and shim beneath the opener until the rail is 2" above the door.
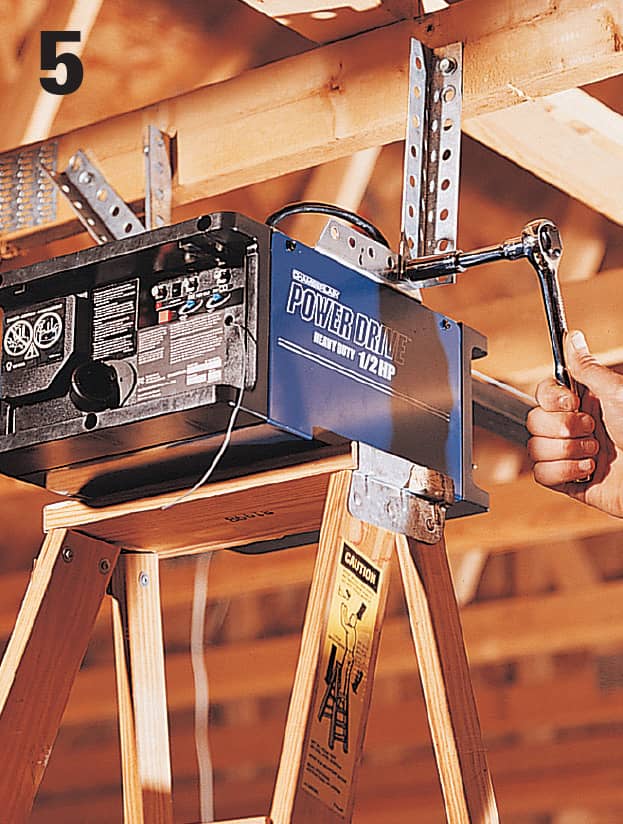
Hang the opener from the ceiling joists with the included hanging brackets and screws. Angle at least one of the hanging brackets to increase the stability of the unit while in operation. Attach the manual release cord and handle to the release arm of the trolley.
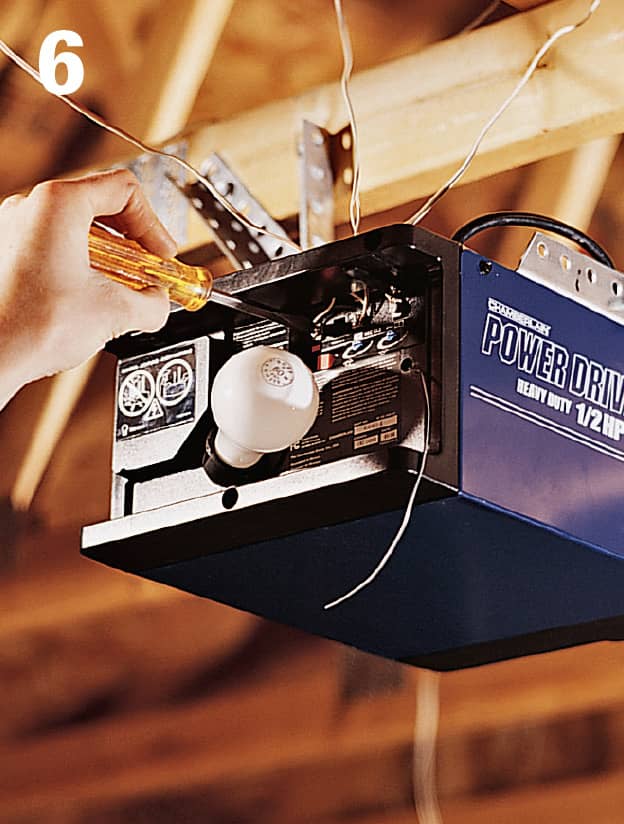
Strip 1/4" of sheathing from the wall-console bell wire. Connect the wire to the screw terminals on the console, then attach it to the inside wall of the garage with the included screws. Run the wires up the wall and connect them to the proper terminals on the opener. Secure the wire to the wall with insulated staples, being careful not to pierce the wire. Install the light bulbs and lenses.
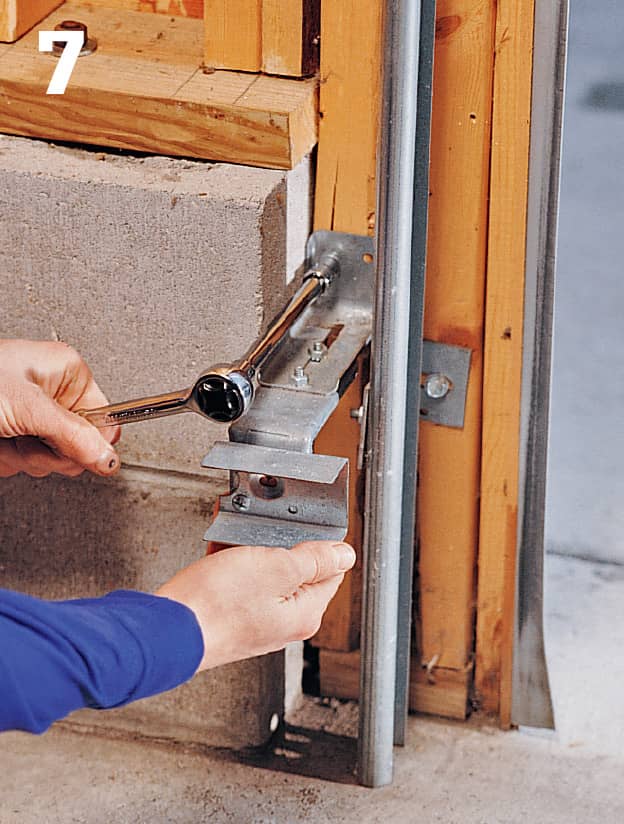
Install the sensor-eye mounting brackets at each side of the garage door, parallel to each other, about 4 to 6" from the floor. The sensor brackets can be attached to the door track, the wall, or the floor, depending upon your garage layout. See the manufacturer’s directions for the best configuration for your garage.
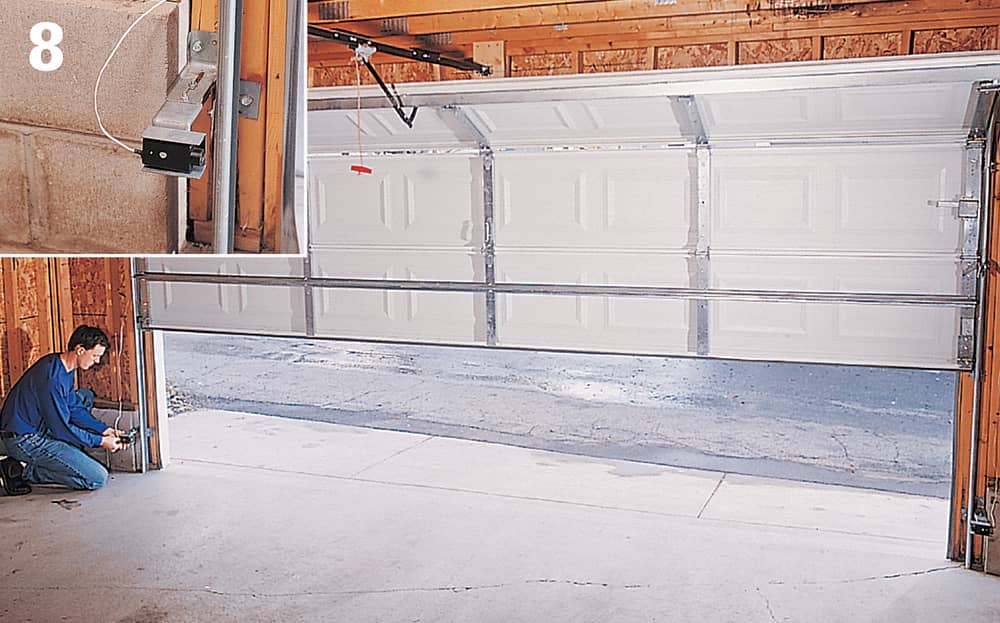
Attach the sensor eyes to the brackets with the included wing nuts, but do not tighten the nuts completely. Make sure the path of the eyes is unobstructed by the door tracks. Run wires from both sensors to the opener unit and connect the wires to the proper terminals. Plug the opener into a grounded receptacle and adjust the sensors until the indicator light shows the correct eye alignment (inset), then tighten the wing nuts. Unplug the unit and attach the sensor wires to the walls with insulated staples.
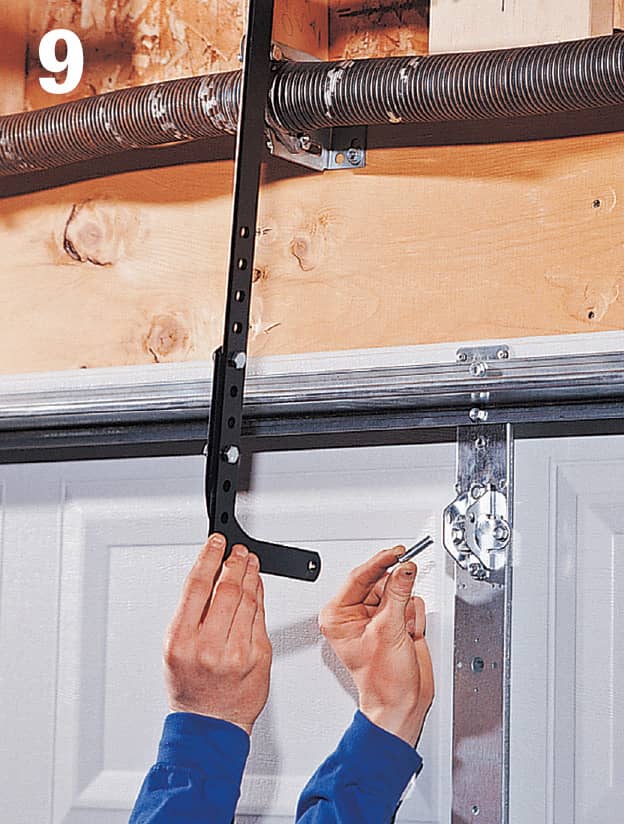
Center the door bracket 2 to 4" below the top of the door. Drill holes and attach the bracket with the included carriage bolts. Connect the straight and curved arm sections with the included bolts. Attach the arm to the trolley and door bracket with the included latch pins. Plug the opener into a grounded receptacle and test the unit. See the manufacturer’s directions for adjustment procedures.
 Removing Windows & Doors
If your remodeling project requires removing old windows and doors, do not start this work until all preparation work is finished and the interior wall surfaces and trim have been removed. You will need to close up the wall openings as soon as possible, so make sure you have all the necessary tools, framing lumber, and new window or door units before starting the final stages of demolition. Be prepared to finish the work as quickly as possible.
Windows and doors are removed using the same basic procedures. In many cases, old units can be salvaged for resale or later use, so use care when removing them.

Removing windows or doors is a similar process and often easier with a helper. Use care when removing large windows or patio doors, which can be very heavy.
How to Remove Doors
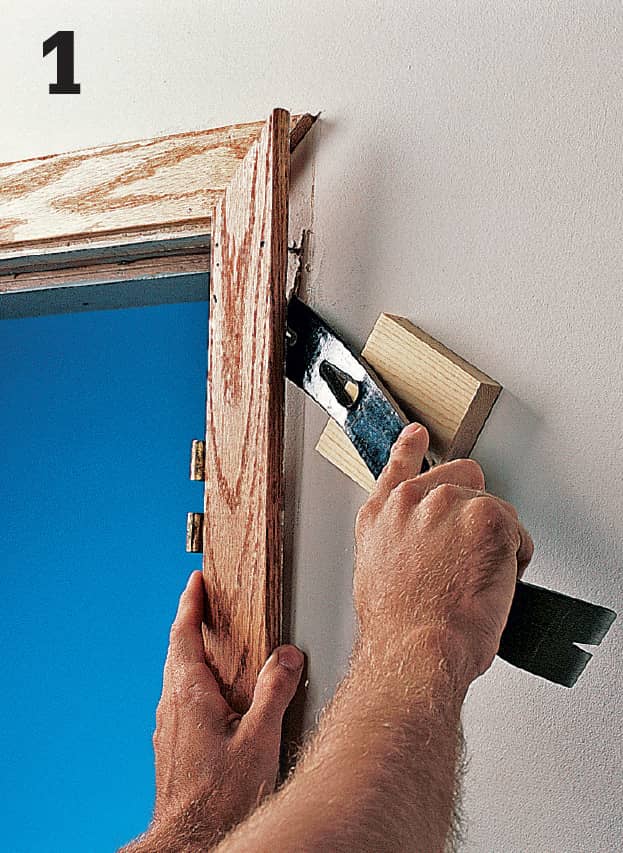
Using a pry bar and hammer, gently remove the interior door trim. Save the trim to use after the new door is installed.
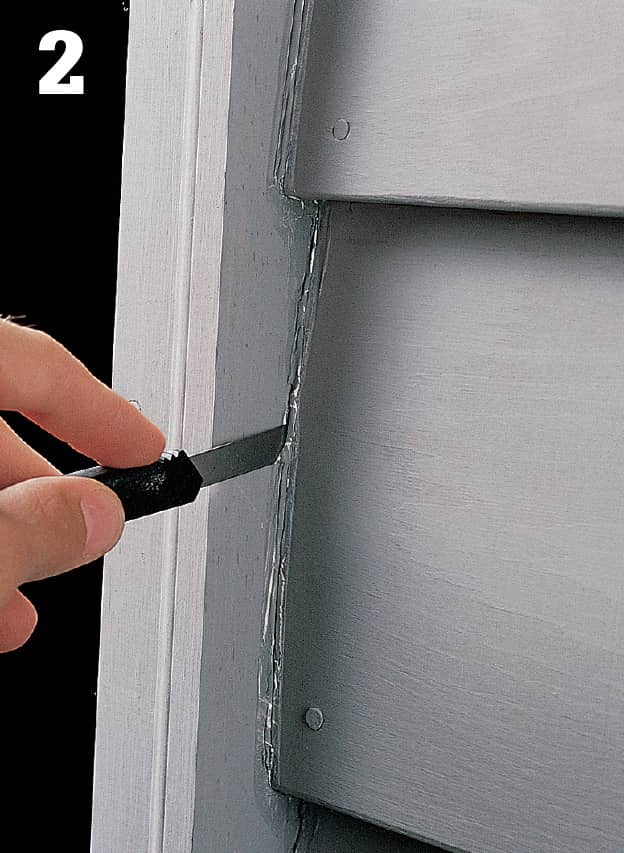
Cut away the old caulk between the exterior siding and the brick molding on the door frame using a utility knife.
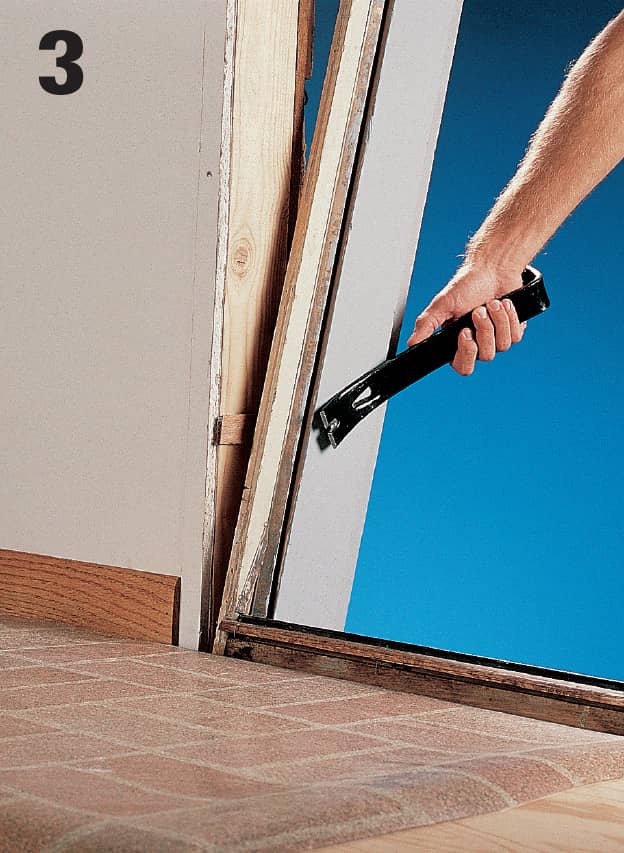
Use a flat pry bar or a cat’s paw to remove the casing nails securing the door jambs to the framing. Cut stubborn nails with a reciprocating saw (see step 2, below). Remove the door from the opening.
How to Remove Windows
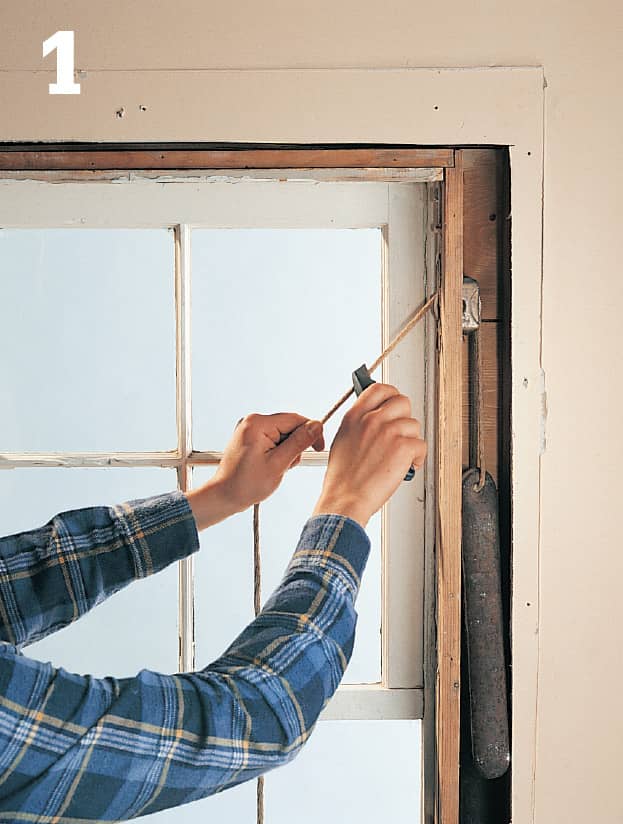
Carefully pry off the interior trim around the window frame. For double-hung windows with sash weights, remove the weights by cutting the cords and pulling the weights from the weight pockets near the bottom of the side jambs.
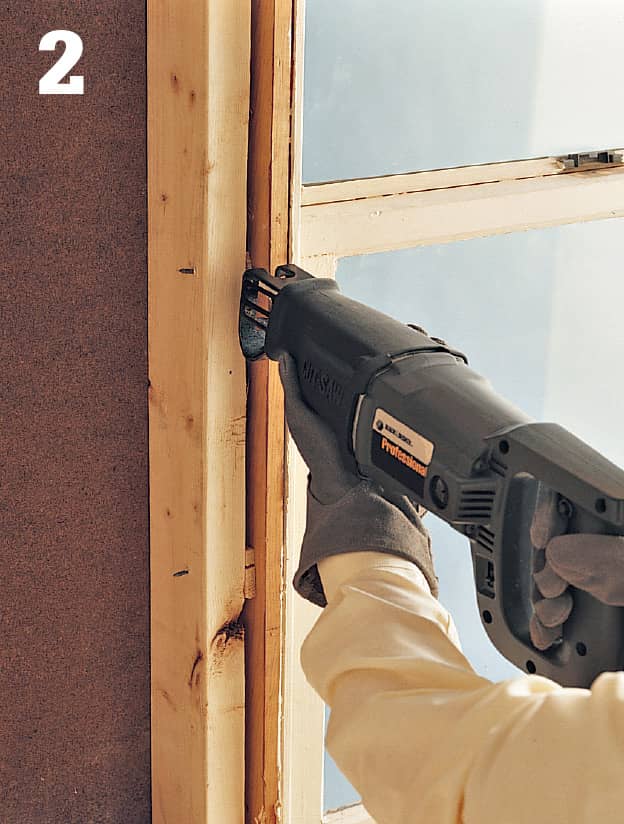
Cut through the nails holding the window jambs to the framing members using a reciprocating saw. Place tape over the windowpanes to prevent shattering, then remove the window unit from the opening.
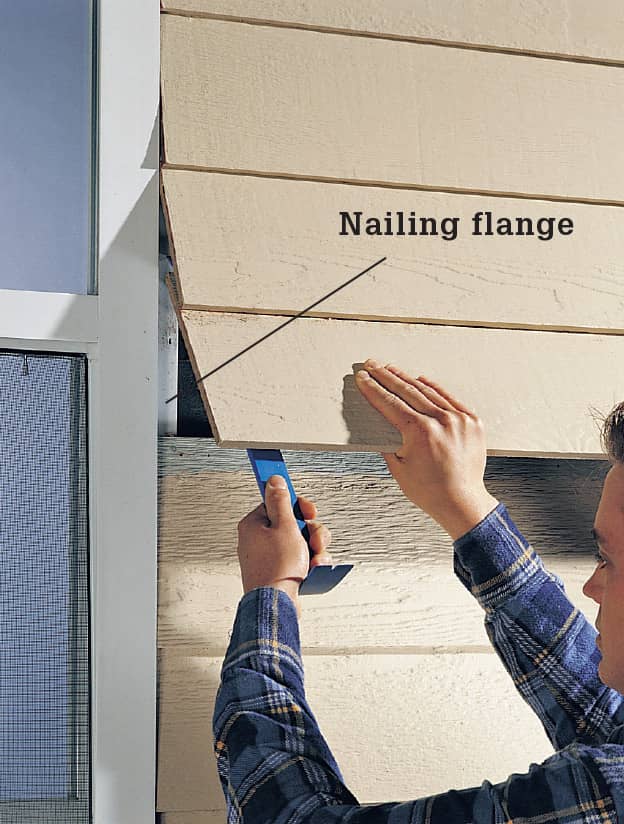
Variation: For windows and doors attached with nailing flanges, cut or pry loose the siding material, then remove the nails holding the unit to the sheathing. See pages 202 to 203 for more information on removing siding.
Installing Prehung Interior Doors
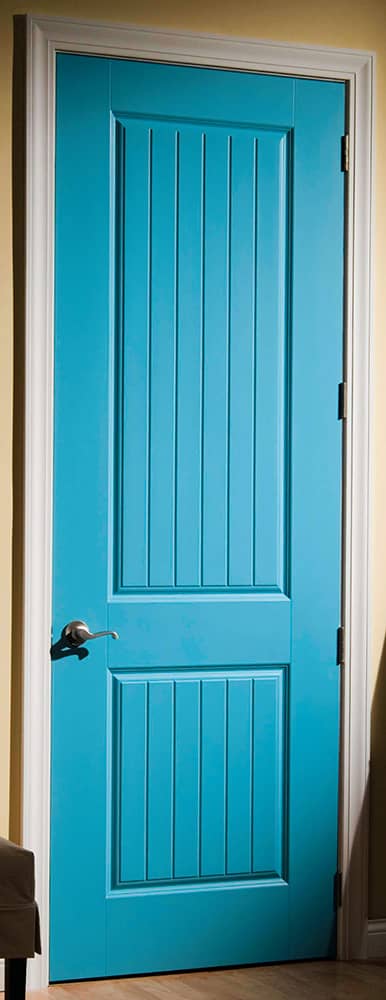
Install prehung interior doors after the framing work is complete and the drywall has been installed. If the rough opening for the door has been framed accurately, installing the door takes about an hour.
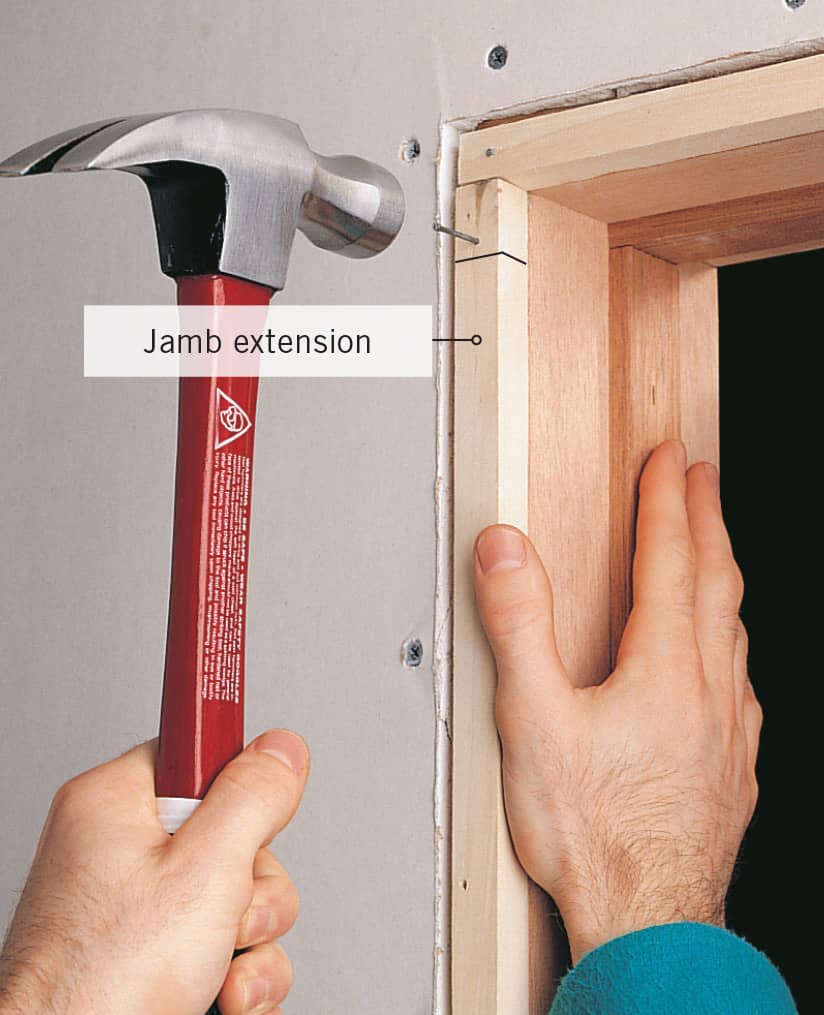
Standard prehung doors have 4 1/2-inch-wide jambs and are sized to fit walls with 2 × 4 construction and 1/2-inch wallboard. If you have 2 × 6 construction or thicker wall surface material, you can special-order a door to match, or you can add jamb extensions to a standard-sized door (photo, below).
How to Install a Prehung Interior Door
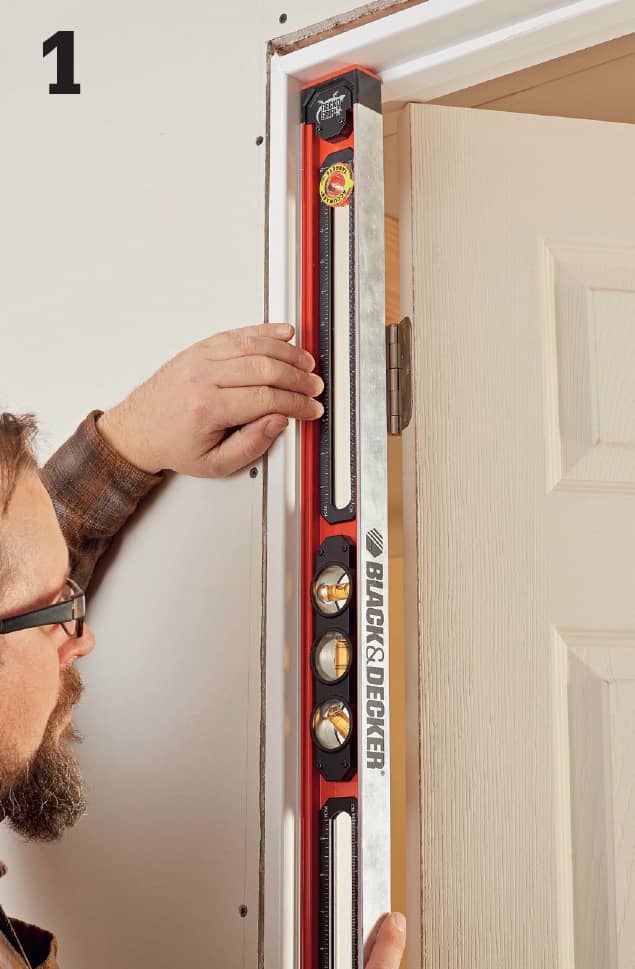
Slide the door unit into the framed opening so the edges of the jambs are flush with the wall surface and the hinge-side jamb is plumb.
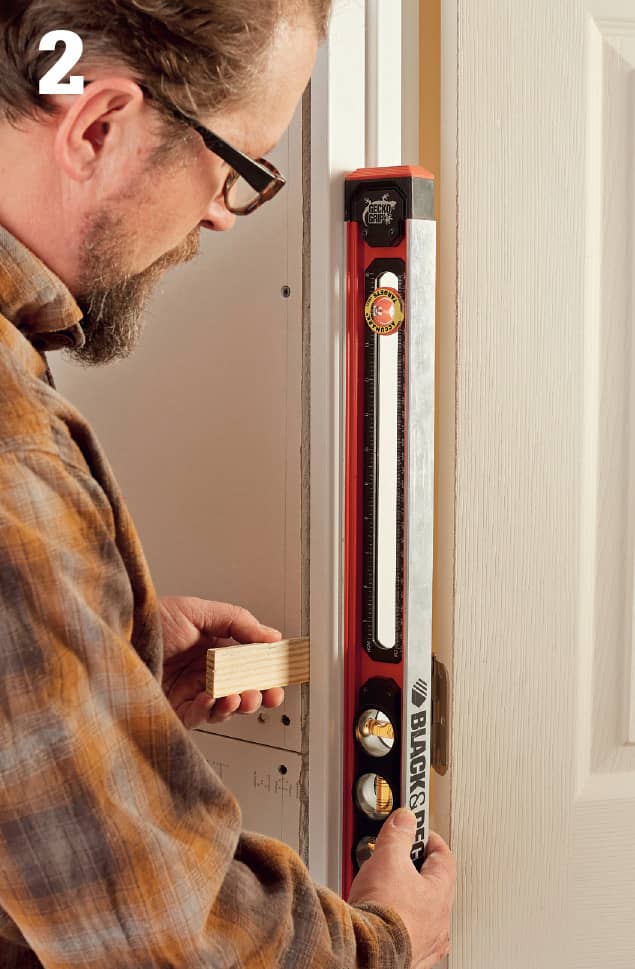
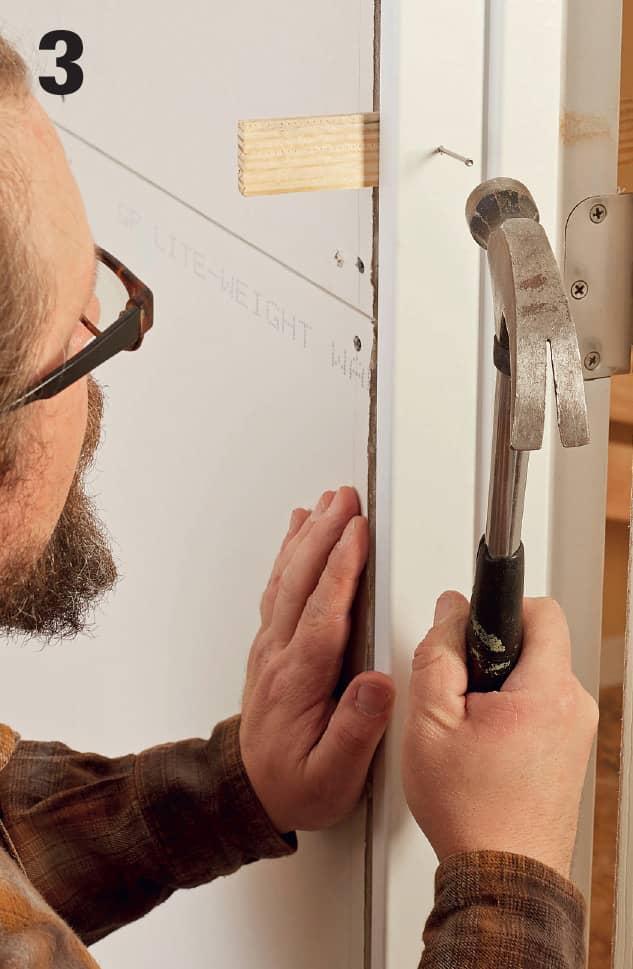
Insert pairs of wood shims driven from opposite directions into the gap between the framing members and the hinge-side jamb, spaced every 12". Check the hinge-side jamb to make sure it is still plumb and does not bow.
Anchor the hinge-side jamb with 8d casing nails driven through the jamb and shims and into the jack stud.
Insert pairs of shims in the gap between the framing members and the latch-side jamb and top jamb, spaced every 12". With the door closed, adjust the shims so the gap between door edge and jamb is 1/8" wide. Drive 8d casing nails through the jambs and shims, into the framing members.

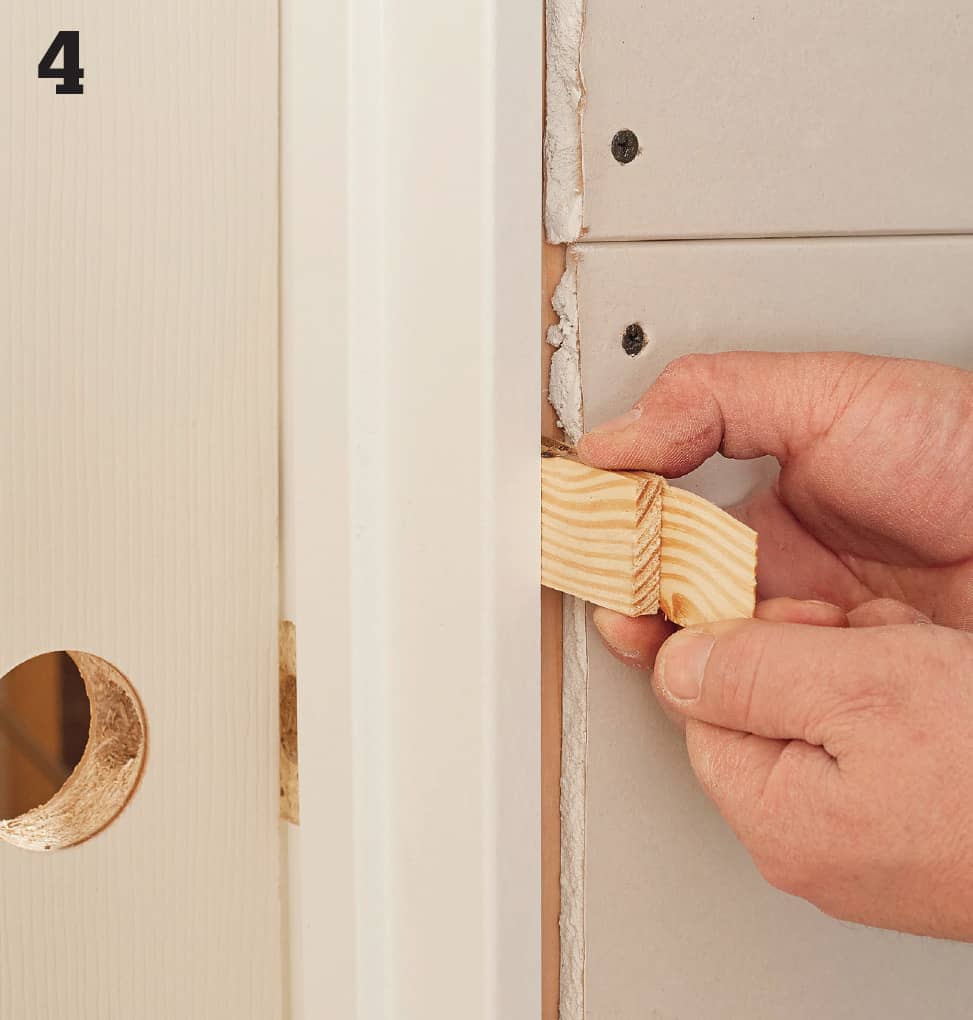
Cut the shims flush with the wall surface, using a handsaw. Hold the saw vertically to prevent damage to the door jamb or wall. Finish the door and install the lockset as directed by the manufacturer. Install trim around the door.
How to Install a Replacement Window with a Nailing Flange
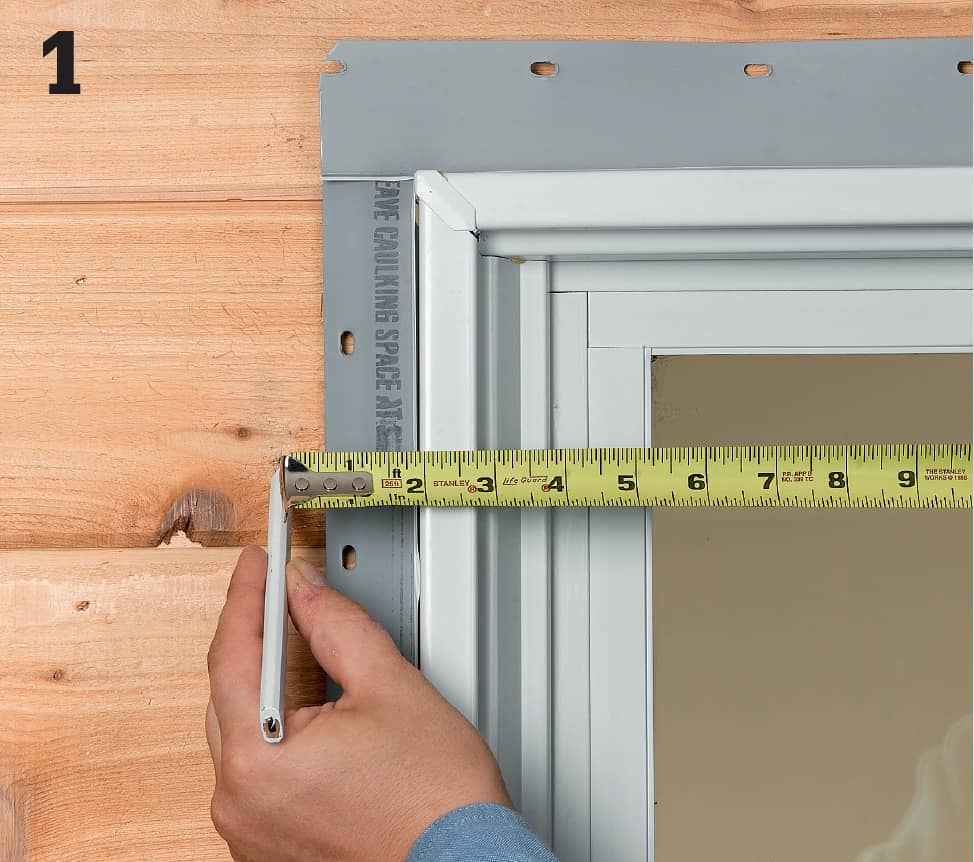
Remove the existing window (see pages 145 to 146), and set the new window into the rough opening. Center it left to right, and shim beneath the sill to level it. On the exterior side, measure out from the window on all sides, and mark the siding for the width of the brick molding you’ll install around the new window. Extend layout lines to mark where you’ll cut the siding.
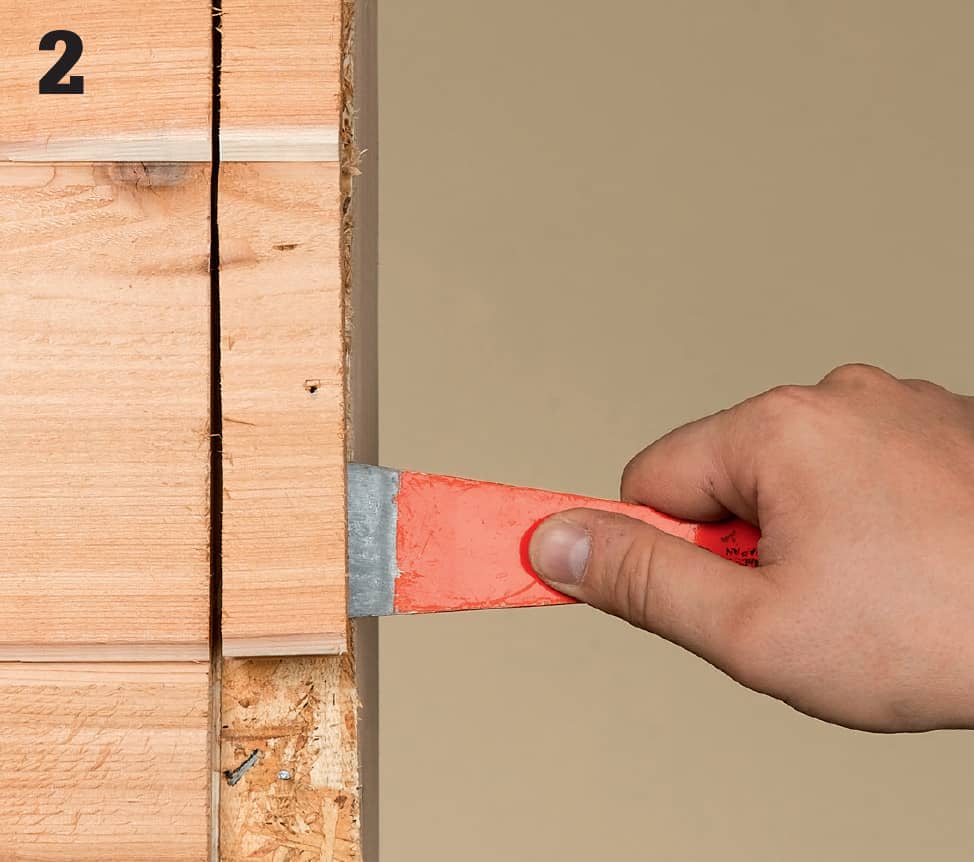
Remove exterior siding around the window area to expose the wall sheathing. Use a zip tool to separate vinyl siding for removal or use a pry bar and hammer to remove wood clapboard. For more on removing exterior surfaces, see pages 181 and 203.
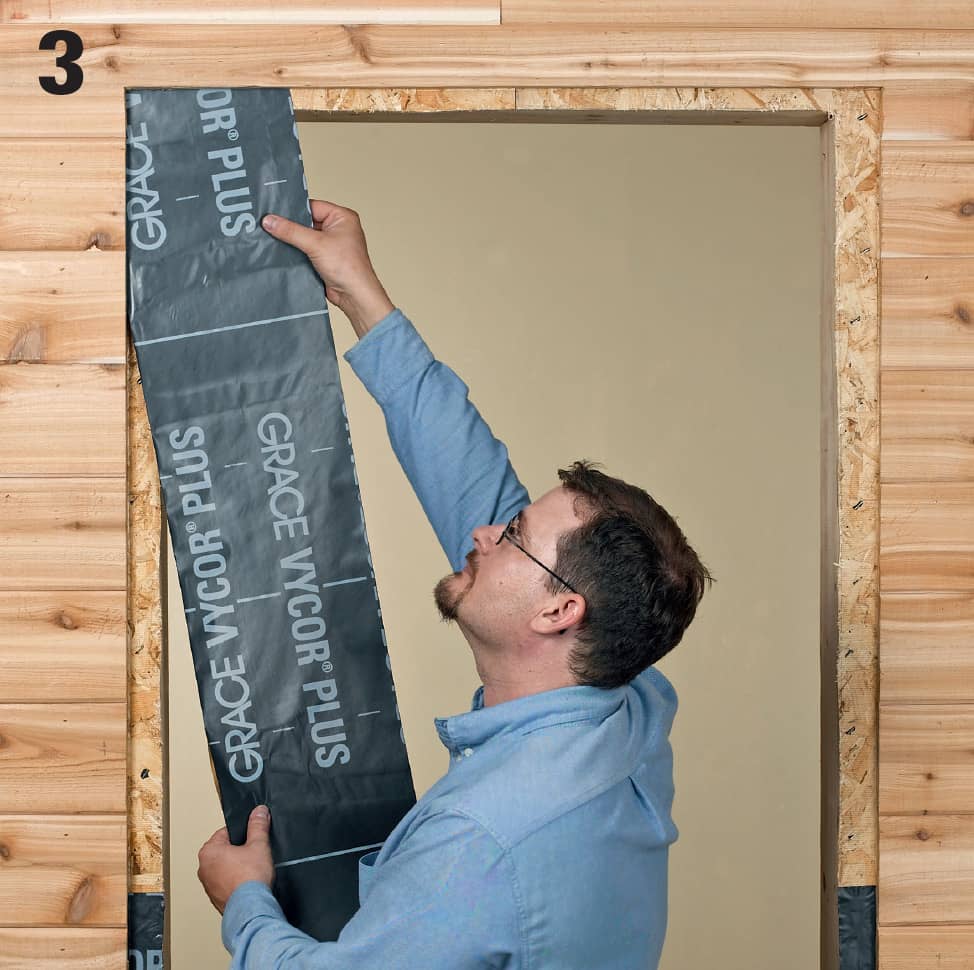
Cover the sill and rough opening framing members with self-adhesive, rolled flashing. Apply additional strips of flashing behind the siding and up the sill flashing. Finish flashing with a strip along the header. The flashing should cover the front edges and sides of the opening members.
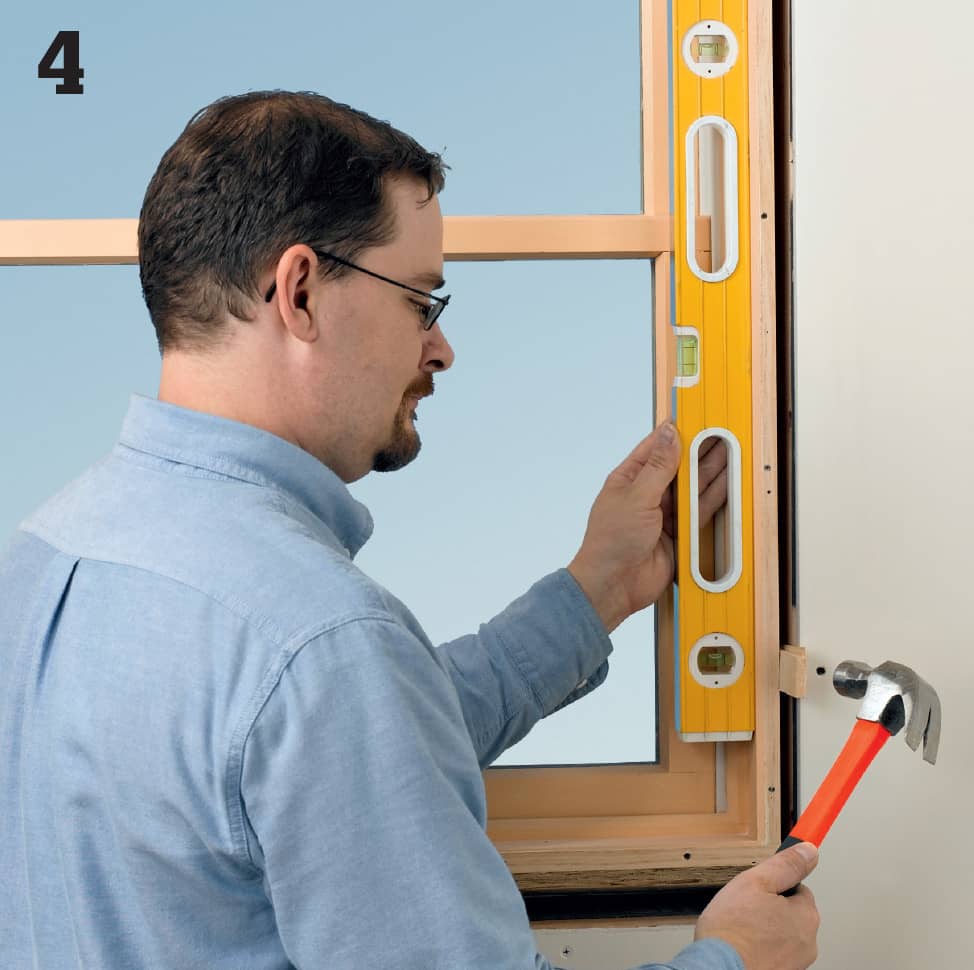
Apply a bead of silicone caulk around the back face of the window flange, then set it into the rough opening, centering it side-to-side in the opening. Tack the window in place by driving one roofing nail partway through the top flange. On the interior side, level and plumb the window, using shims to make any necessary adjustments.
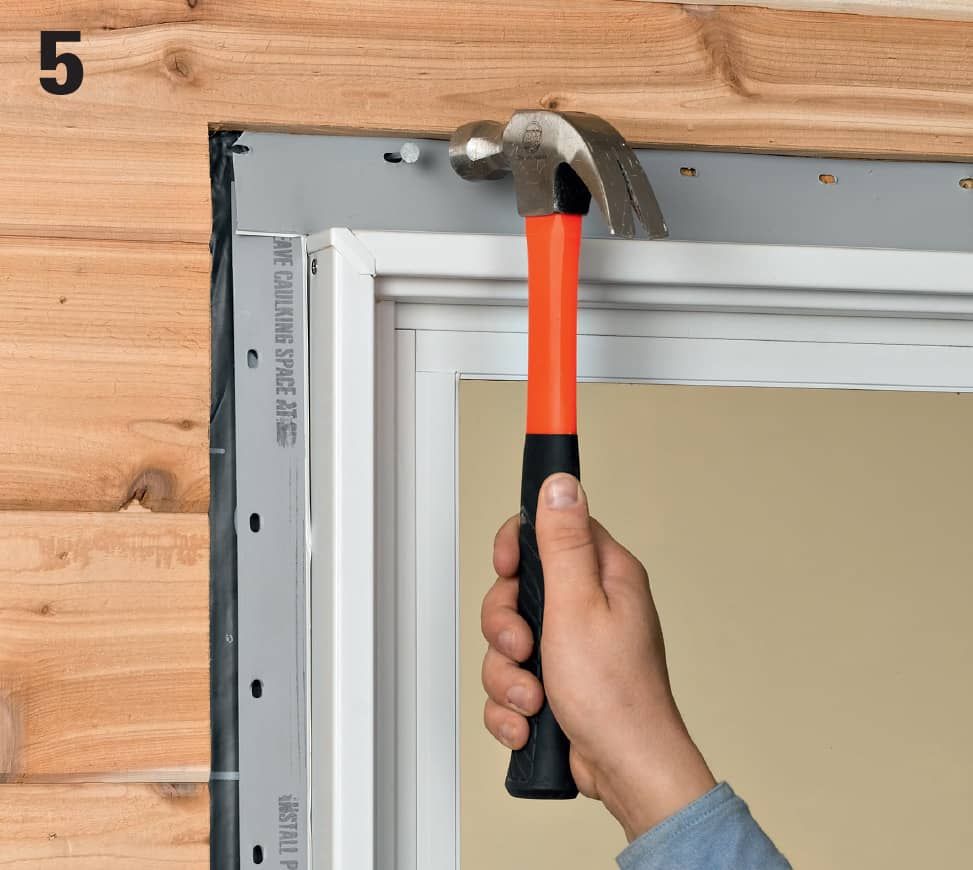
Tack the window to the header at one end of the nailing flange, using a 1" galvanized roofing nail. Drive a roofing nail through the other top corner of the flange to hold the window in place, then secure the flange all around the window with more roofing nails. Apply strips of rolled, self-adhesive flashing to cover the window flanges. Start with a strip that covers the bottom flange, then cover the side flanges, overlapping the bottom flashing and extending 8 to 10" above the window. Complete the flashing with a strip along the top, overlapping the side flashing.
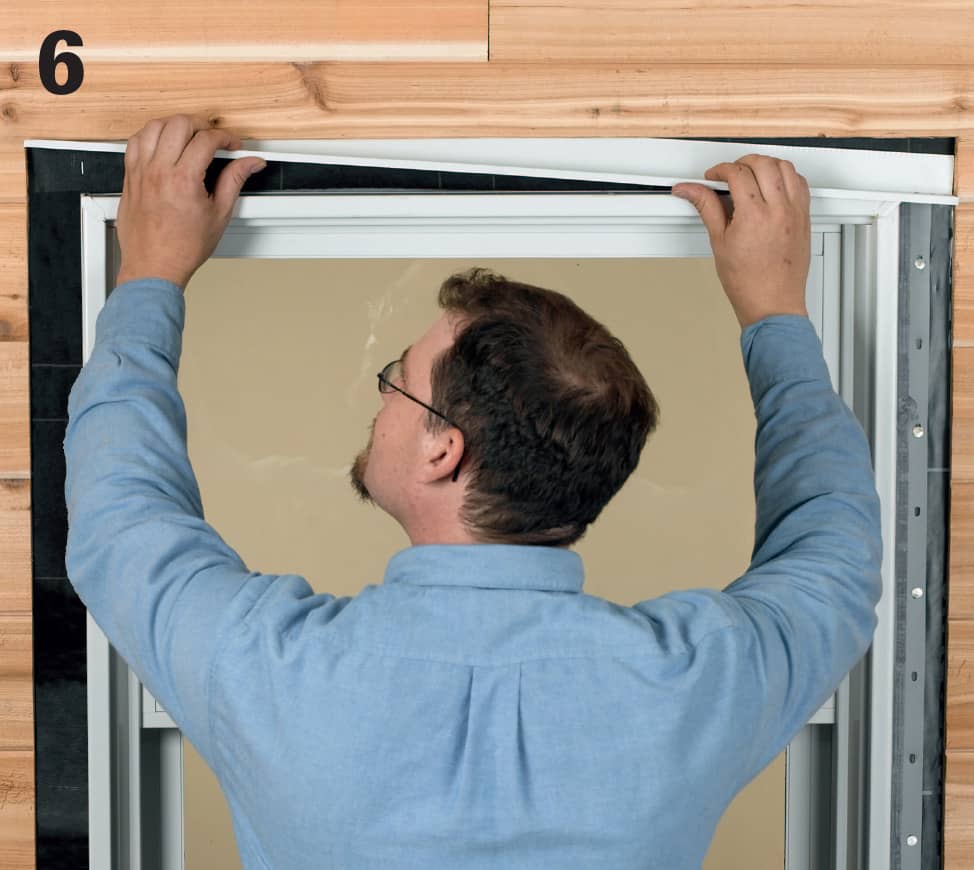
Install a piece of metal drip edge behind the siding and above the window. Secure it with silicone caulk only.
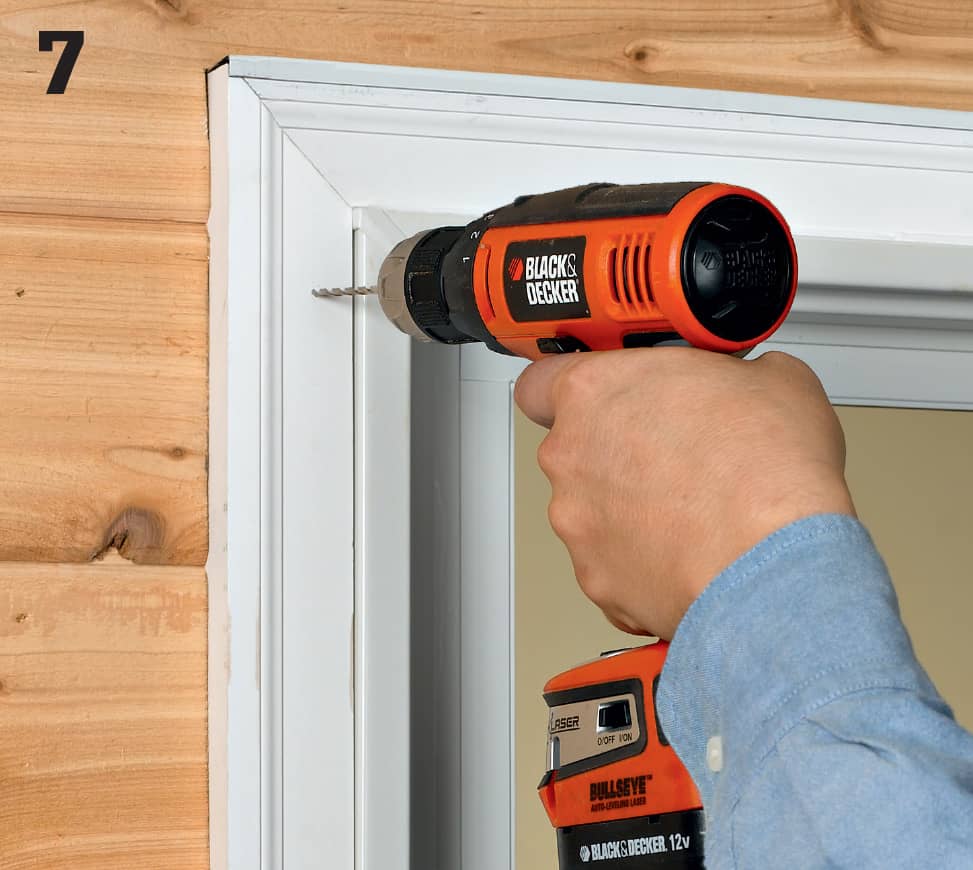
Cut and attach brick molding around the window, leaving a slight gap between the brick molding and the window frame. Use 8d galvanized casing nails driven into pilot holes to secure the brick molding to the rough framing. Miter the corner joints. Reinstall the siding in the window installation area, trimming as needed.
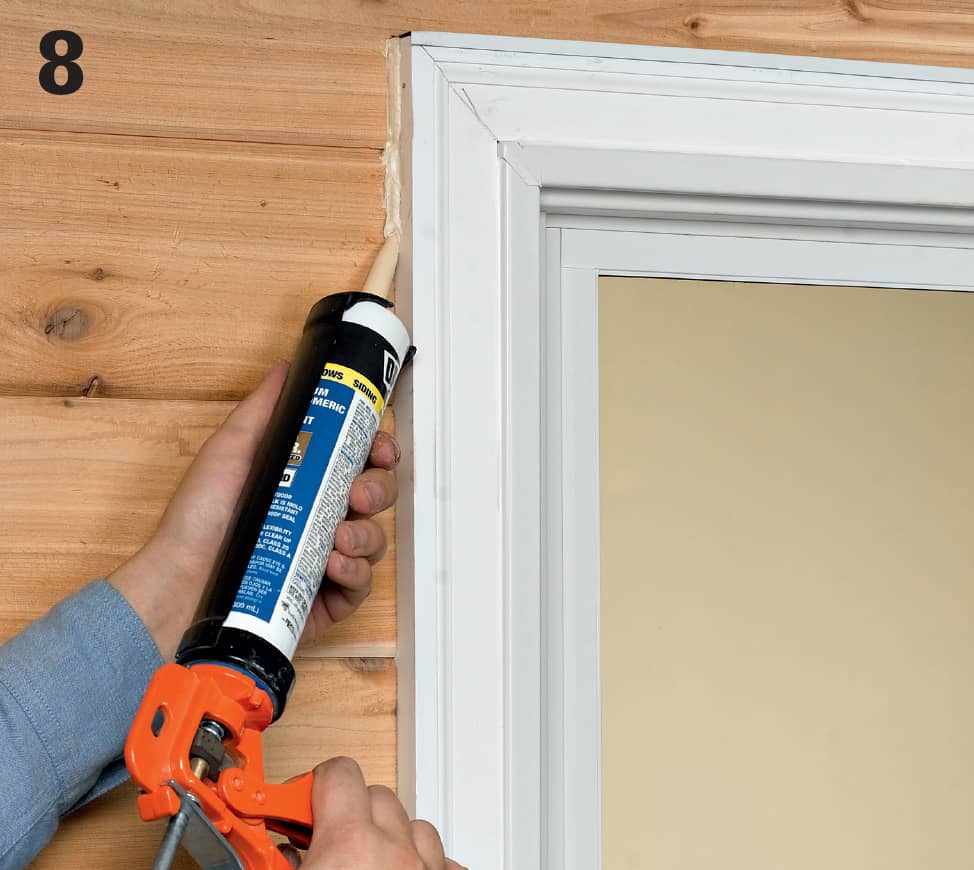
Use high-quality caulk to fill the gap between the brick molding and the siding. On the interior side, fill gaps between the window frame and surrounding framing with foam backer rod, low-expansion foam, or fiberglass insulation. Install the interior casing.
 Installing Storm Doors
Storm doors are important features for energy efficiency as well as for protecting your entry door. In harsh climates, storm doors protect the entry door from driving rain or snow. They create a dead air buffer between the two doors that acts like insulation. When the screen panels are in place, the door provides great ventilation on a hot day. And, they deliver added security, especially when outfitted with a lockset and a deadbolt lock.
If you want to install a new storm door or replace an old one that’s seen better days, your first job is to go shopping. Storm doors come in many different styles to suit just about anyone’s design needs. And they come in different materials, including aluminum, vinyl, and even fiberglass. (Wood storm doors are still available but they must be trimmed and fit by hand, as they’re not sold in prehung kits.) Most units feature a prehung door in a frame that is mounted on the entry door casing boards. Depending on the model you buy, installation instructions can vary. Be sure to check the directions that come with your door before starting the job.
Once purely utilitarian, today’s storm doors can be an important design element of your home. Do your research carefully, and choose a door that complements both the entry door and other trim on your home.
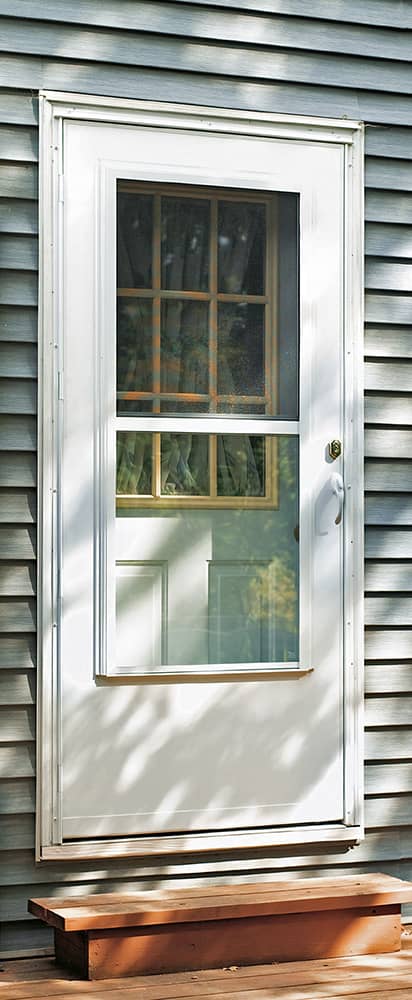
A quality storm door helps seal out cold drafts, keeps rain and snow off your entry door, and lets a bug-free breeze into your home when you want one.
How to Install a Storm Door
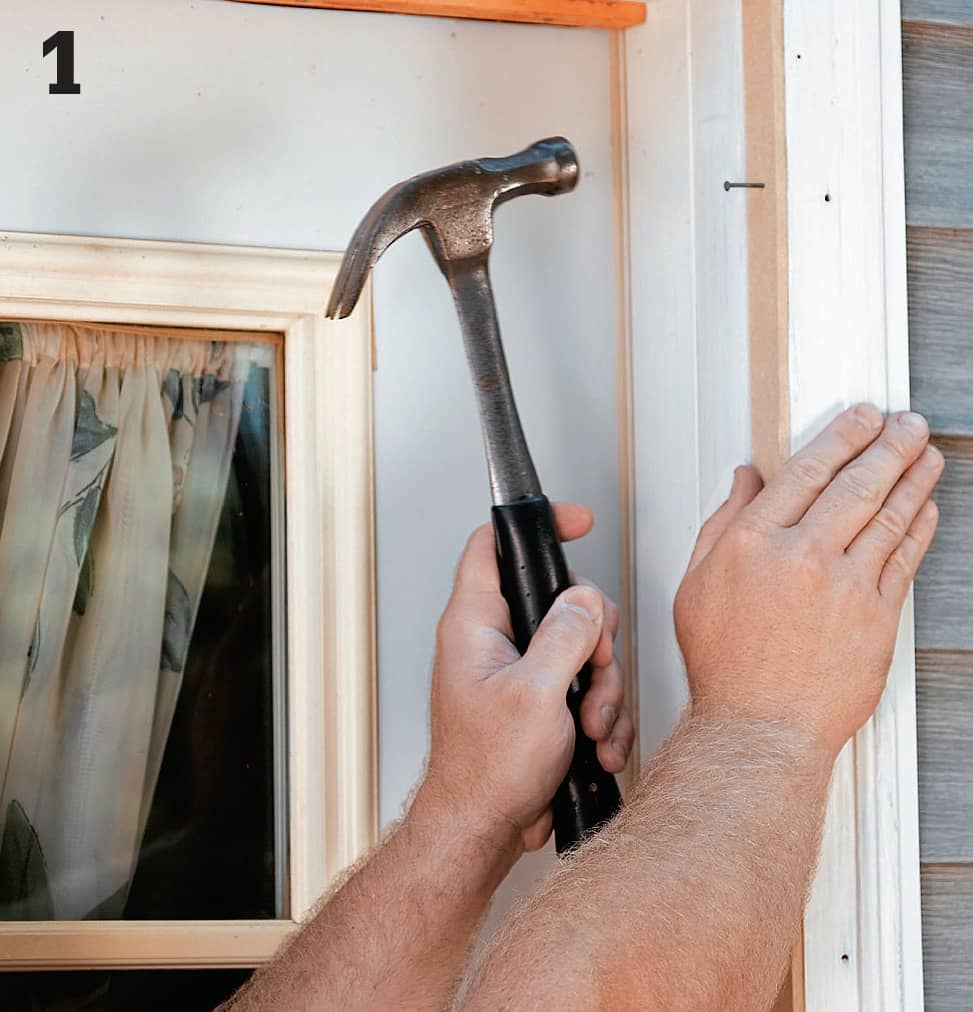
Test-fit the door in the opening. If it is loose, add a shim to the hinge side of the door. Cut the piece with a circular saw and nail it to the side of the jamb, flush with the front of the casing.
Install the drip edge molding at the top of the door opening. The directions for the door you have will explain exactly how to do this. Sometimes it’s the first step, like we show here; otherwise it’s installed after the door is in place.
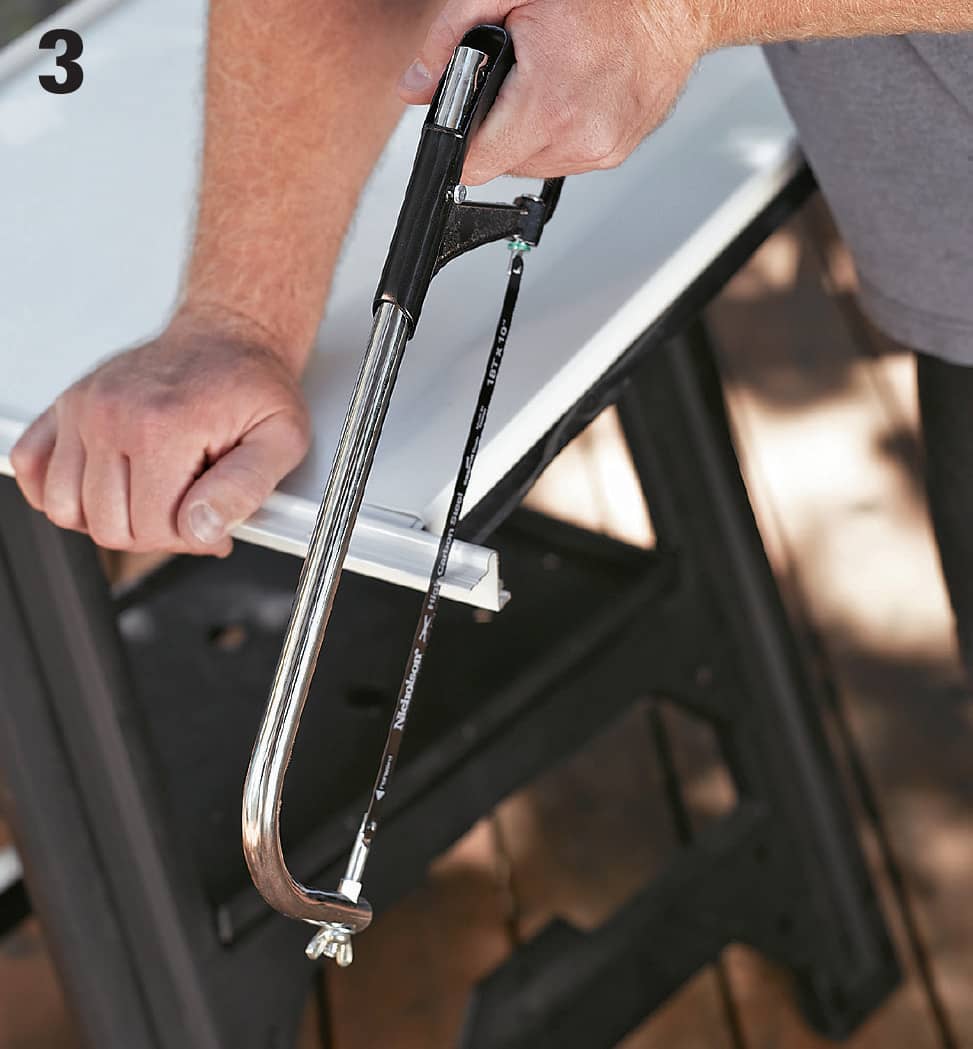
Measure the height of the opening and cut the hinge flange to match this measurement. Use a hacksaw and work slowly so the saw won’t hop out of the cut and scratch a visible area of the hinge.
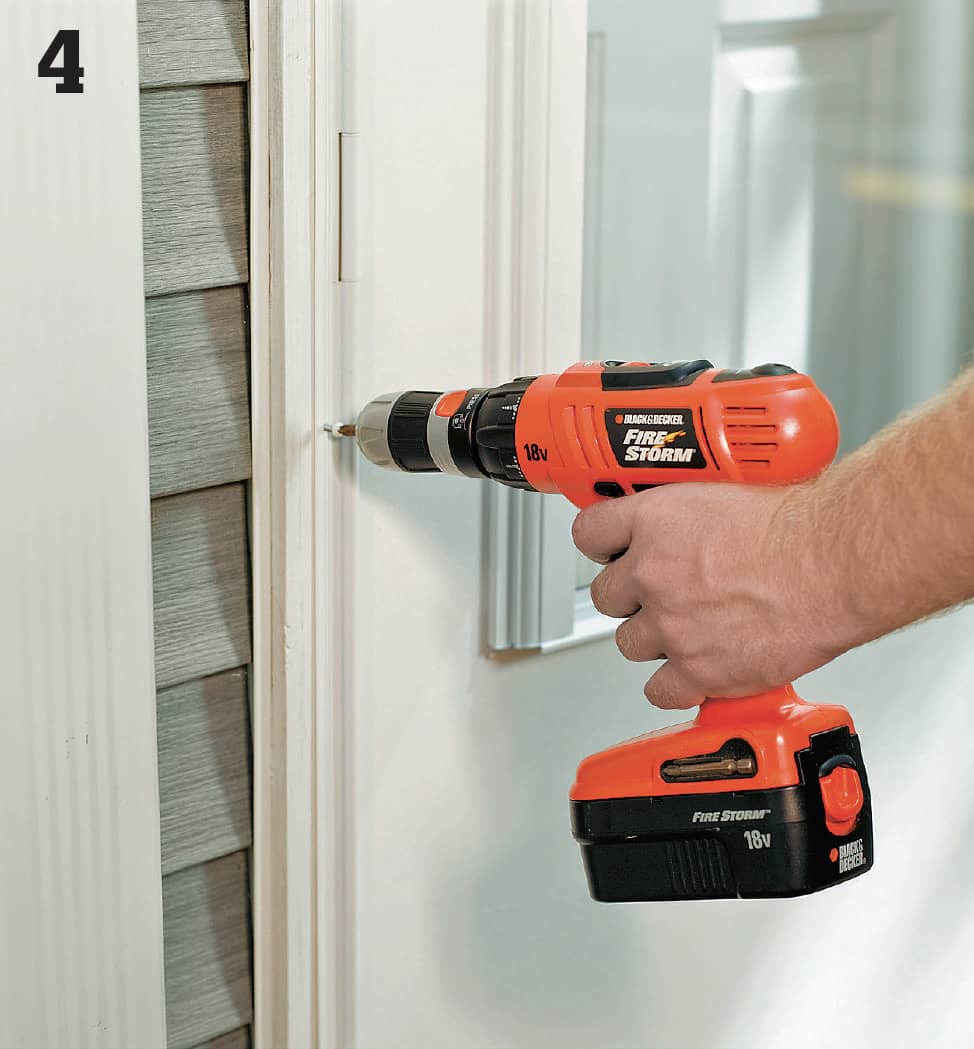
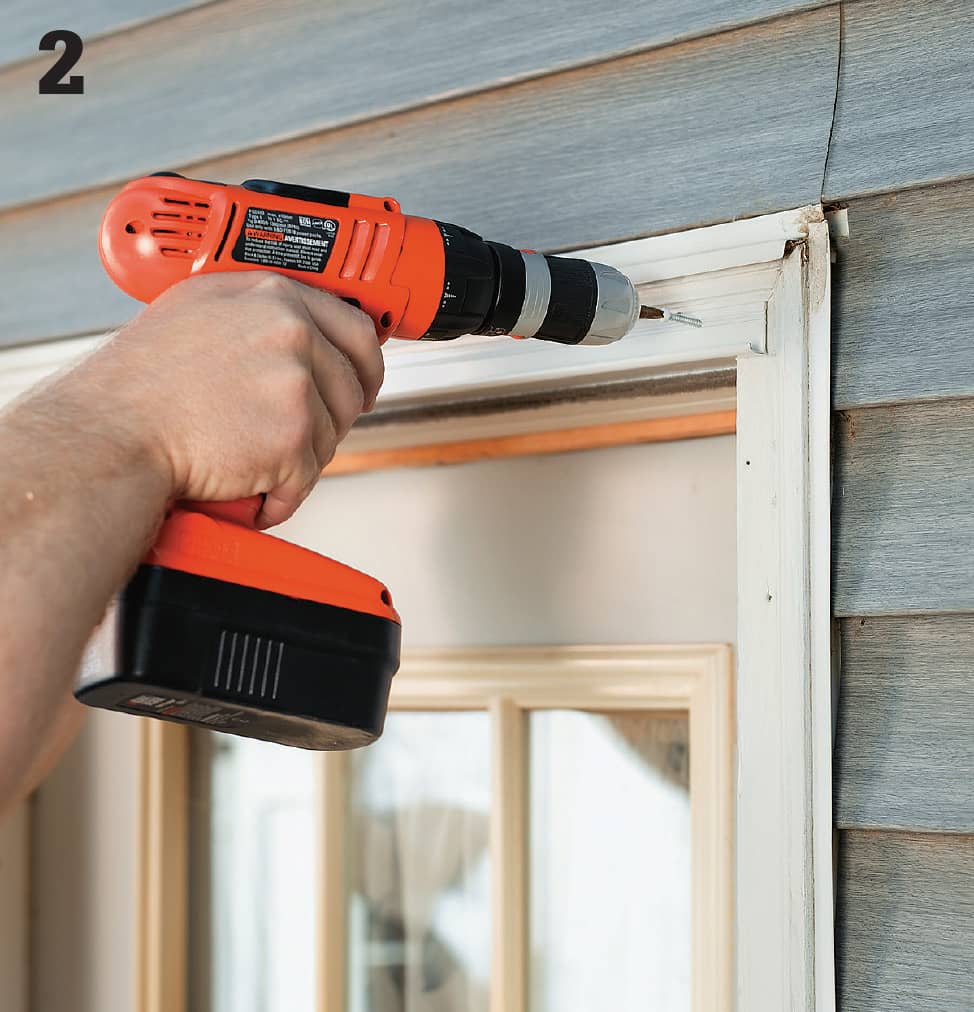
Lift the door and push it tightly into the opening. Partially drive one mounting screw near the bottom and another near the top. Check the door for plumb, and when satisfied, drive all the mounting screws tight to the flange.
 Hanging a New Door in an Old Jamb
If you’ve got an unsightly or damaged door to replace but the jamb and trimwork are in good condition, there’s no need to remove the jambs. Instead, buy a slab door and hang it in the existing jamb. It’s an excellent way to preserve existing moldings and trim, especially if you live in an old home, and you won’t have to color-match a new jamb to its surroundings.
If the hinges are also in good condition, you can reuse them as well. This may be particularly desirable in a historic home with ornate hinges. Most home centers stock six-panel slab doors, or you can order them in a variety of styles and wood types. For aesthetic and practical reasons, choose a door size as close to the original door as possible.
The process for hanging the door involves shimming the door into position in the jamb, scribing the ends and edges, and trimming or planing it to fit the opening. You’ll also need to chisel hinge mortises in the door edge to accommodate the jamb hinge positions.
This is a project where patience and careful scribing will pay dividends in the end. Have a helper on hand to hold the door in position as you scribe and fit the door in place.
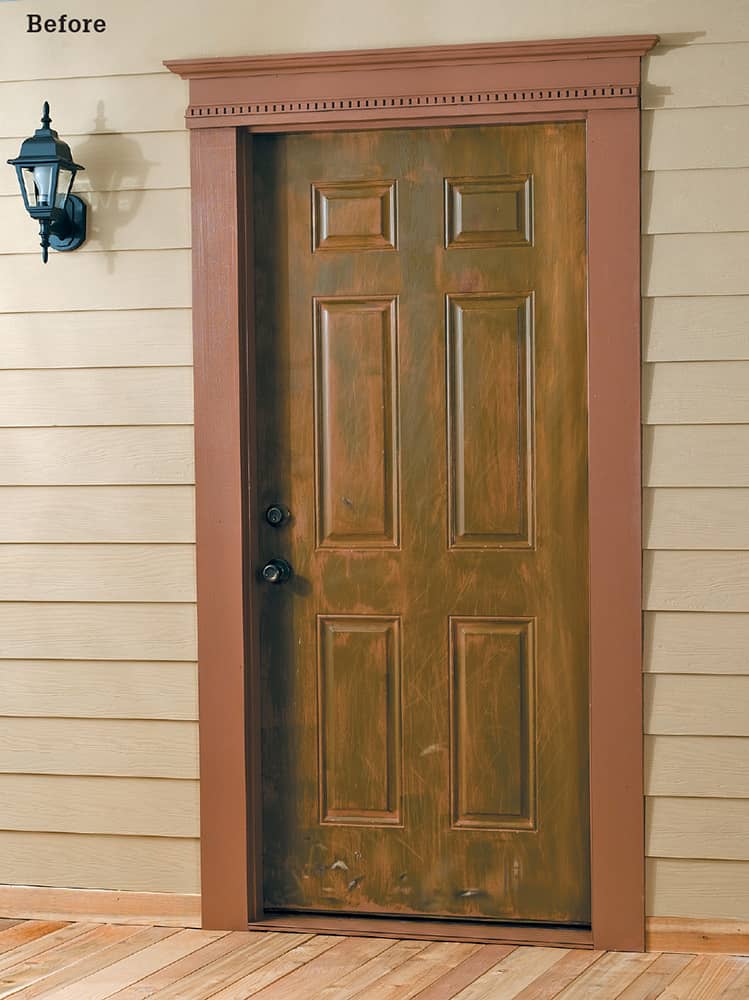
Installing a new door in an old jamb dramatically updates the curb appeal of your home.
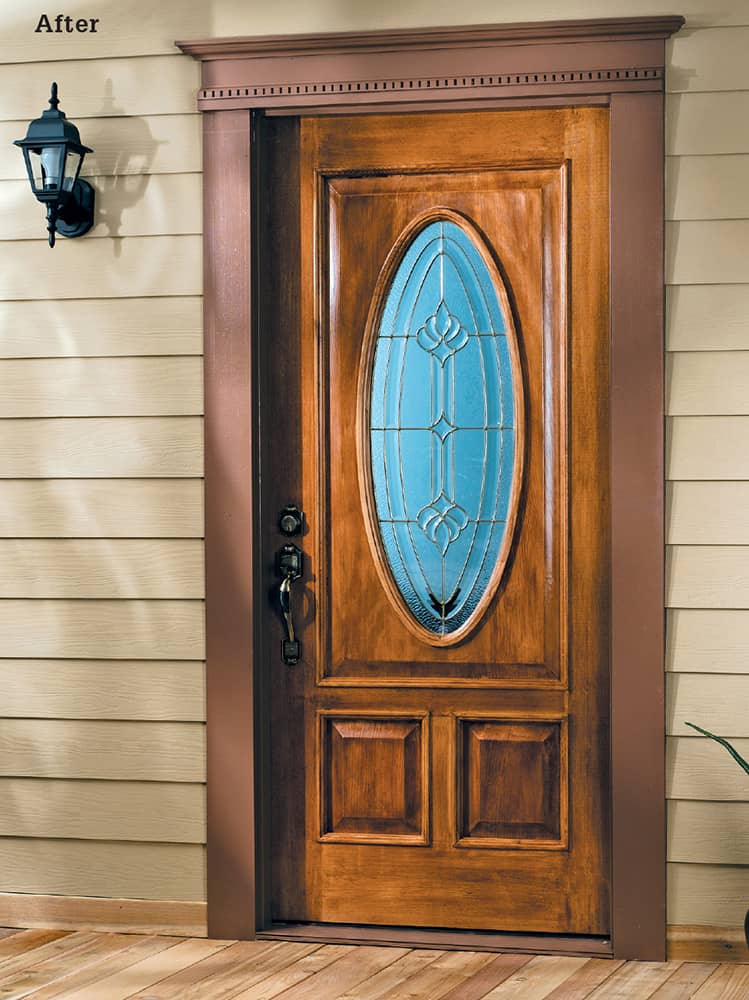
How to Hang a New Door in an Old Jamb
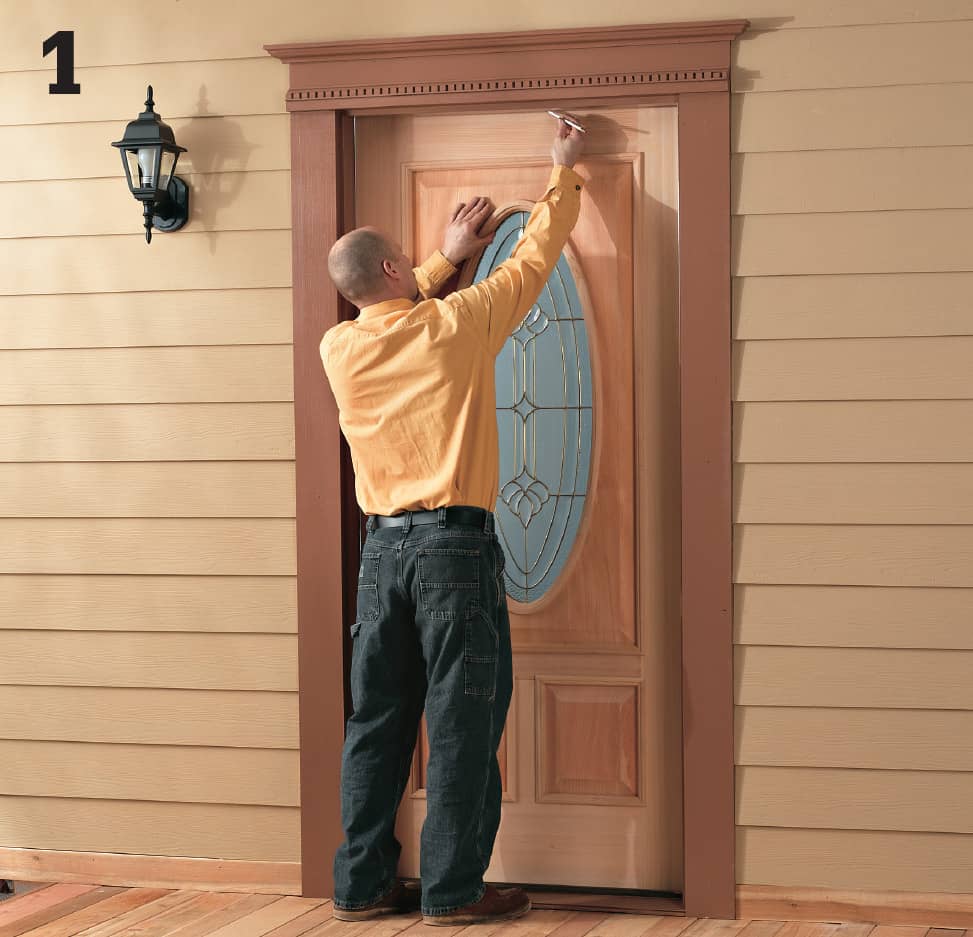
Have a helper hold the new door in place against the jamb from inside the room. Slide a pair of thick shims under the door to raise it up slightly off the floor or threshold. Move the shims in or out until the door’s top and side rails are roughly even with the jamb so it looks balanced in the opening, then make a mark along the top edge of the door.
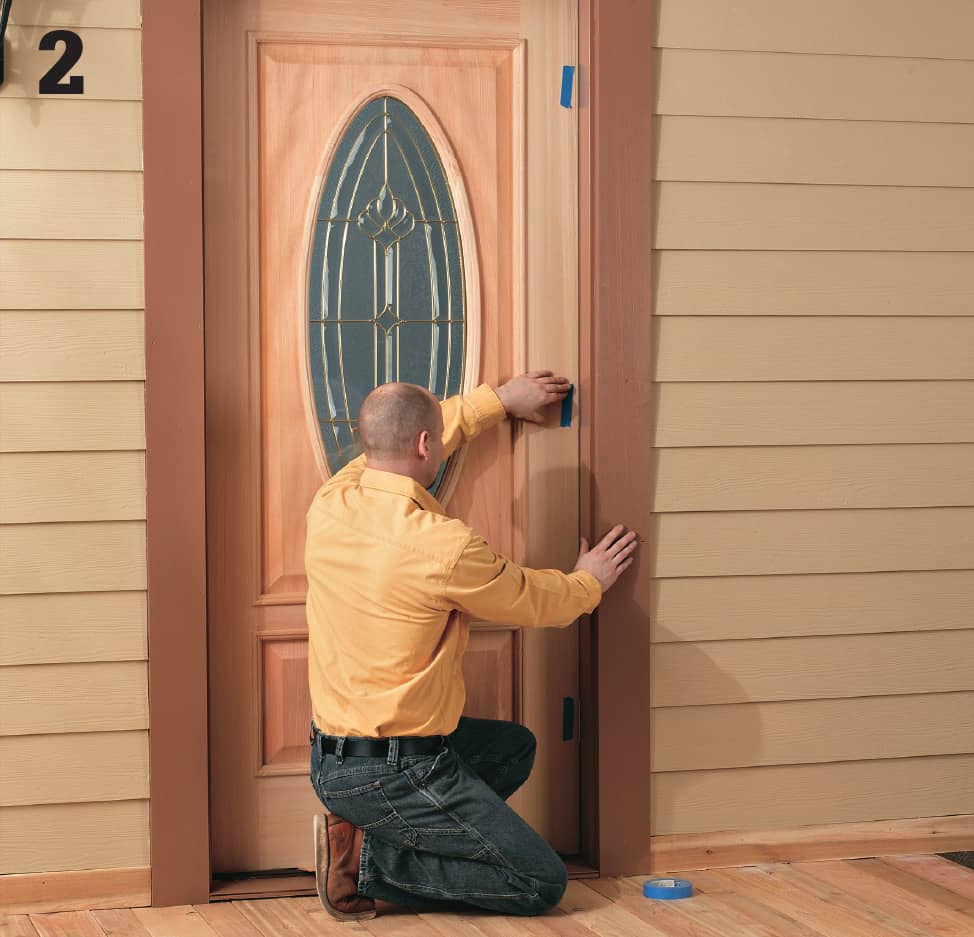
Use pieces of colored masking tape to mark the outside of the door along the hinge edge. This will help keep the door’s orientation clear throughout the installation process.
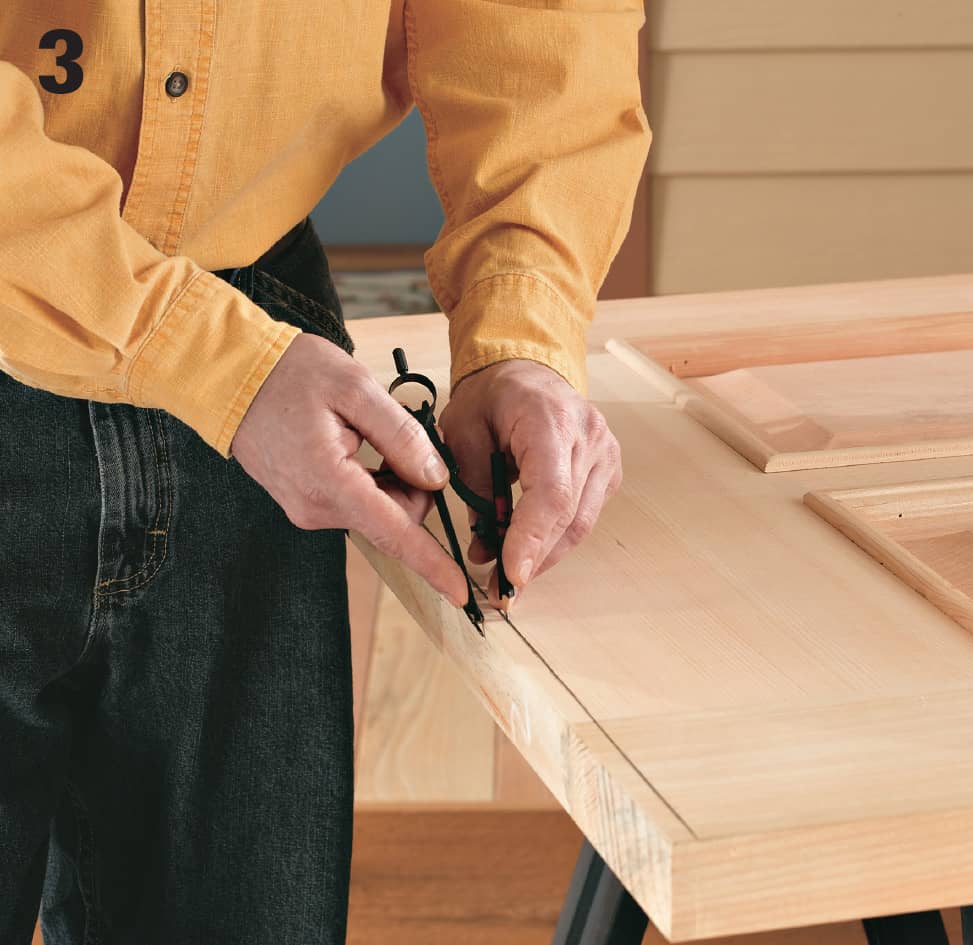
Use a pencil compass, set to an opening of 3/16", to scribe layout lines along both long edges of the door and across the top. These lines will create a clear space for the hinges and door swing. If the bottom of the door will close over carpet, set the dividers for 1/2" and scribe the bottom edge. Remove the door and transfer these scribe lines to the other door face.
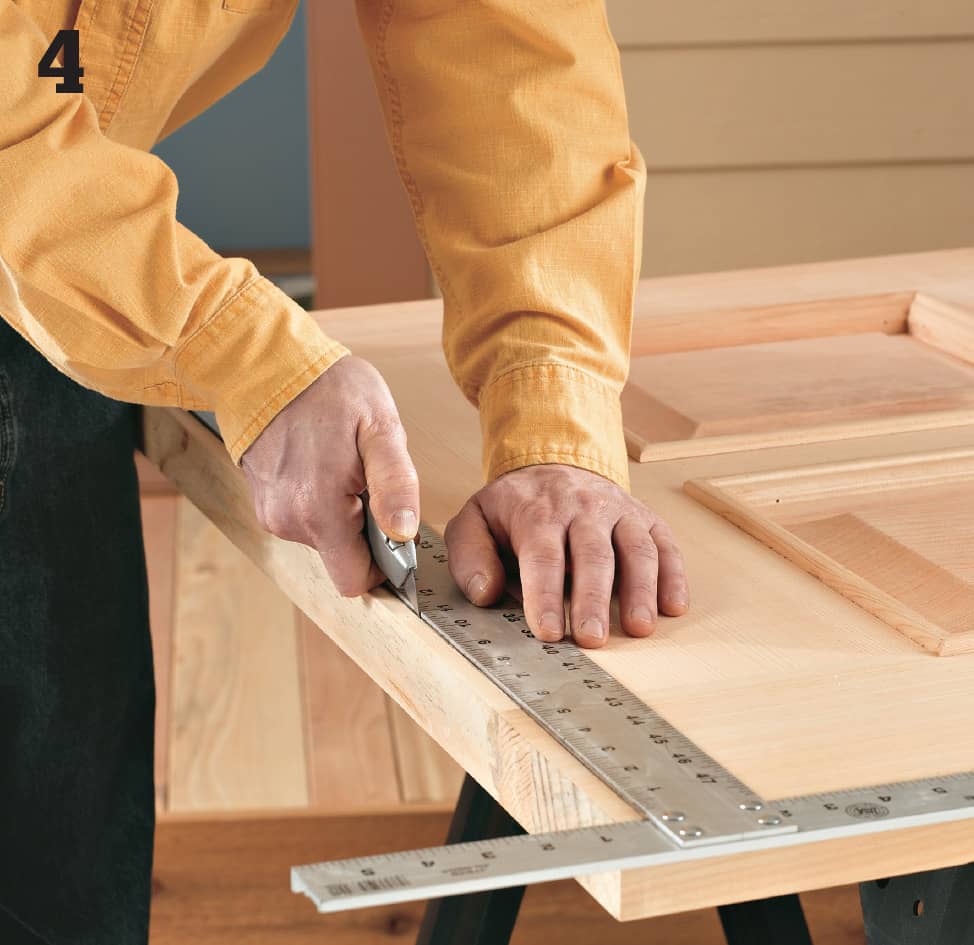
Lay the door on a sturdy bench or across a pair of sawhorses with the tape side facing up. Score the top and bottom scribe lines with a utility knife to keep the wood fibers from splintering when you cut across the ends.
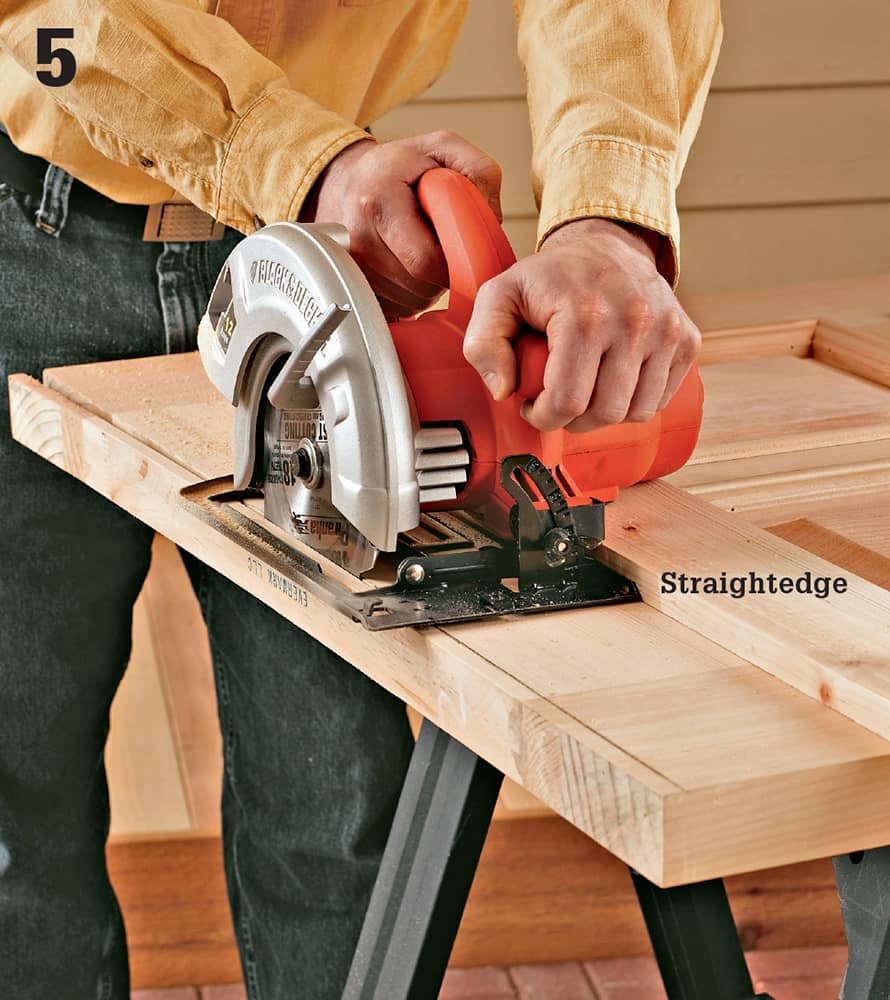
Trim the door ends with a circular saw equipped with a fine-cutting blade. Run the saw base along a clamped straightedge with the blade cutting 1/16" on the waste side of the layout lines. Check to make sure the blade is set square to the saw base before cutting. Use a power planer or hand plane to plane the door ends to the layout lines.
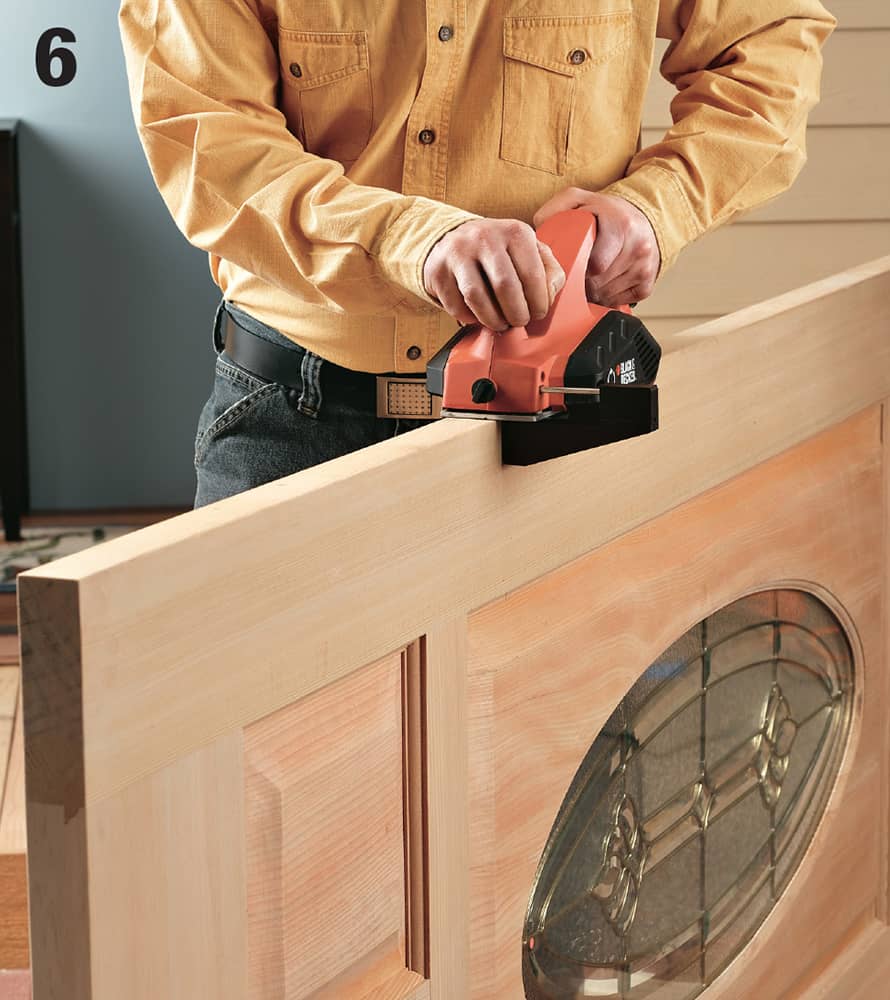
Stand the door on edge and use a power plane or hand plane to plane down to the edge of the scribe lines. Set the tool for a fine cut; use a 1/16" cutting depth for power planing and a shallower cutting depth for a hand plane. Try to make each planing pass in long strokes from one end of the door to the other.
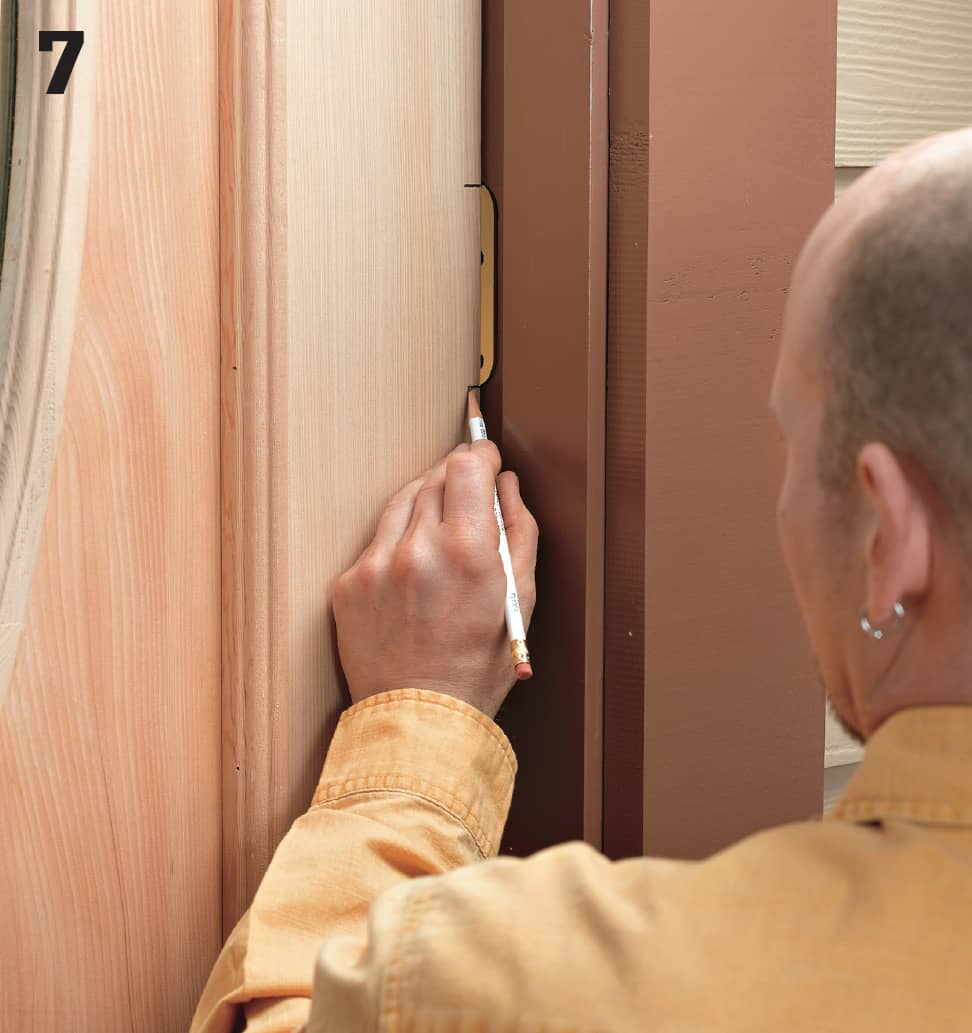
Shim the door back into position in the jamb with a helper supporting it from behind. Set the door slightly out from the doorstop moldings so you can mark the hinge locations on the door face.
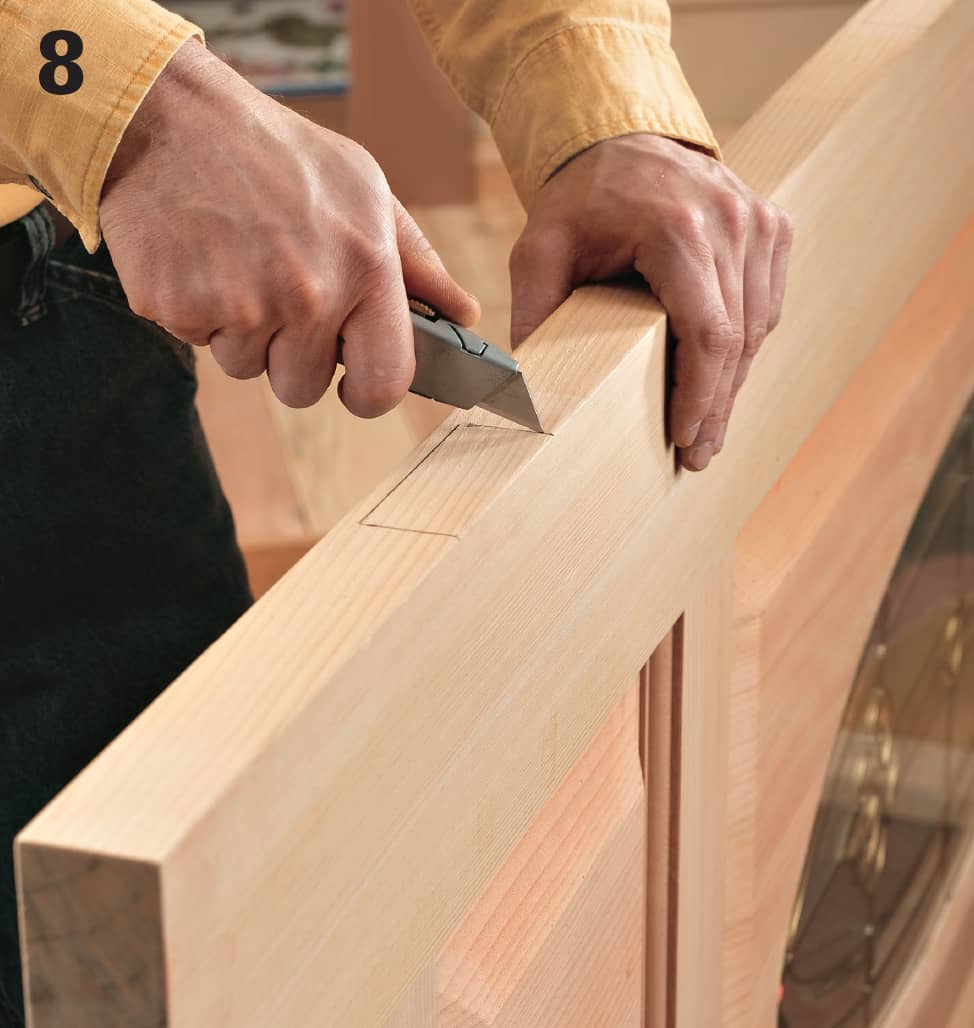
Use a combination square or one of the hinge leaves to draw hinge mortise layout lines on the door edge. Score the layout lines with a utility knife.
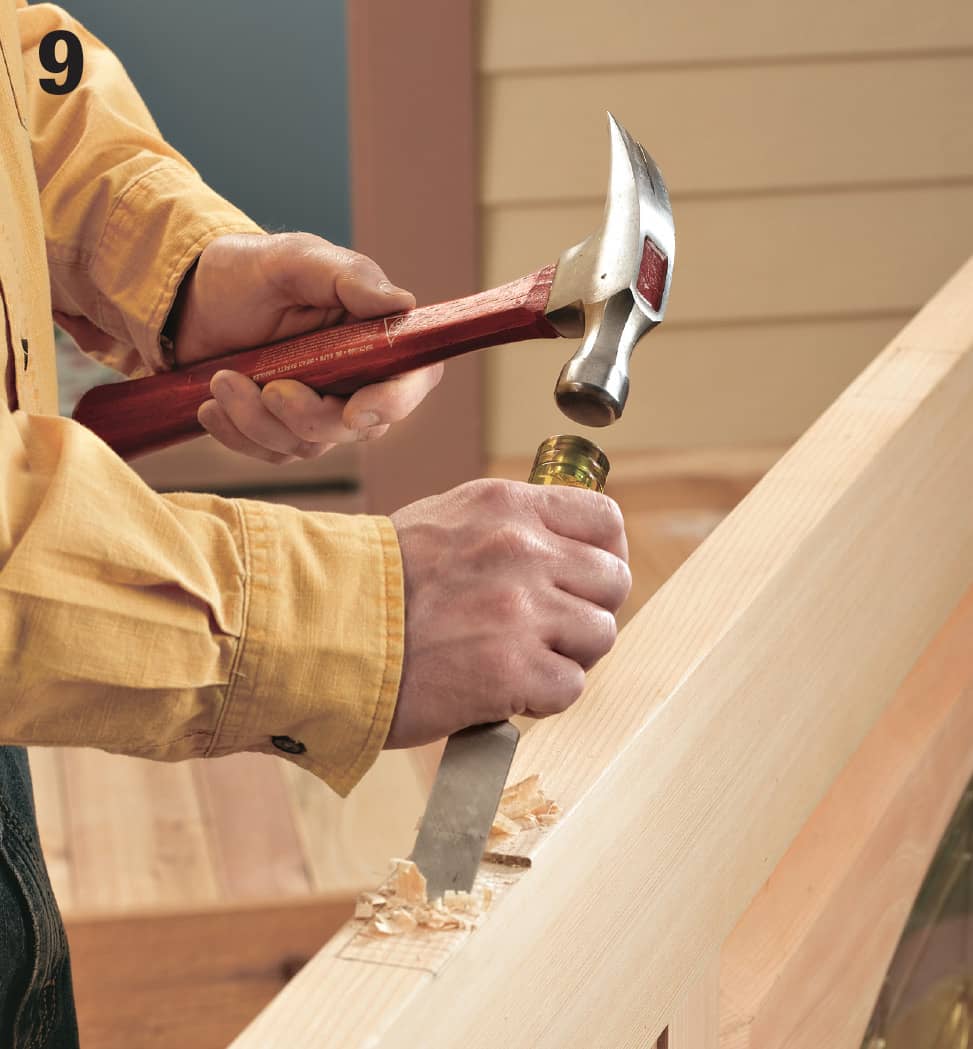
Cut shallow hinge leaf mortises in the door edge with a sharp chisel and hammer. First score the mortise shape with a straightedge and utility knife or a chisel, then make a series of shallow chisel cuts inside the hinge leaf area. Pare away this waste so the mortise depth is slightly deeper than the hinge leaf thickness.
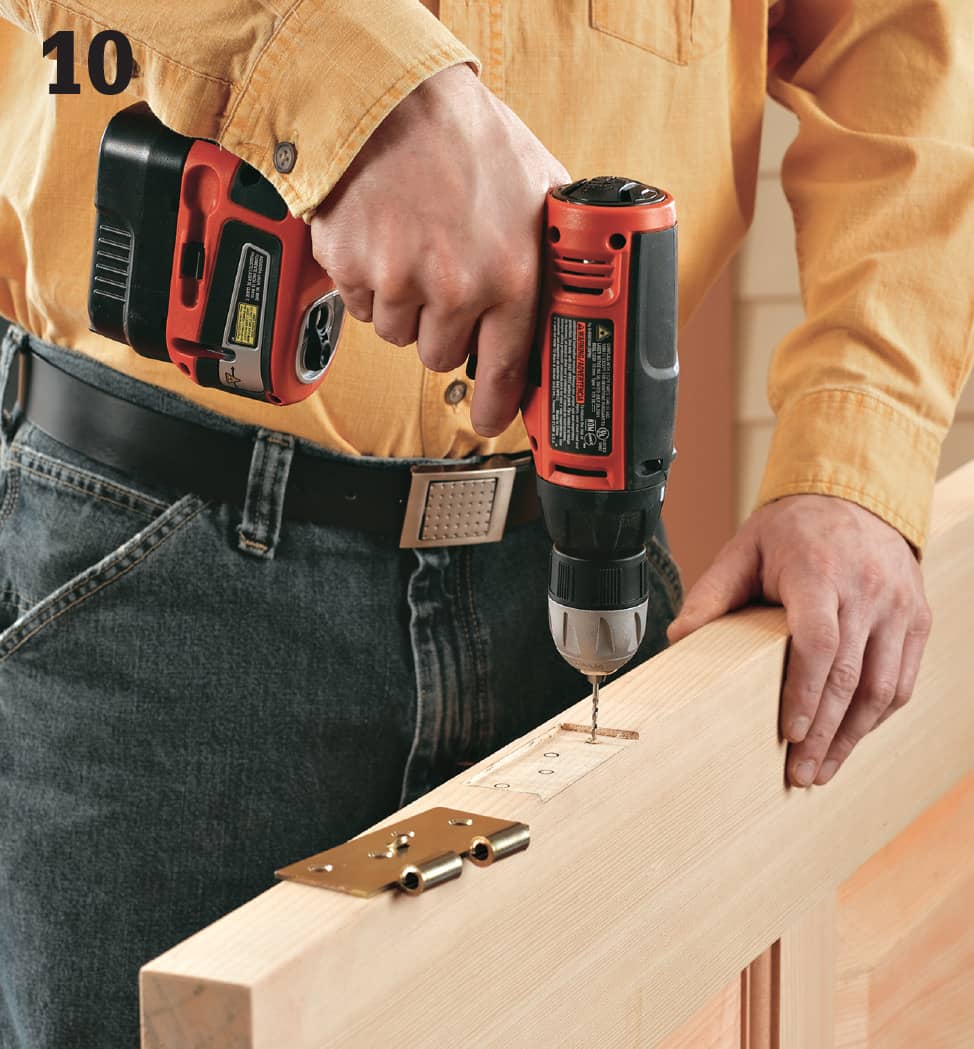
Set the hinges in the door mortises, and drill pilot holes for the hinge screws. Attach the hinges to the door.
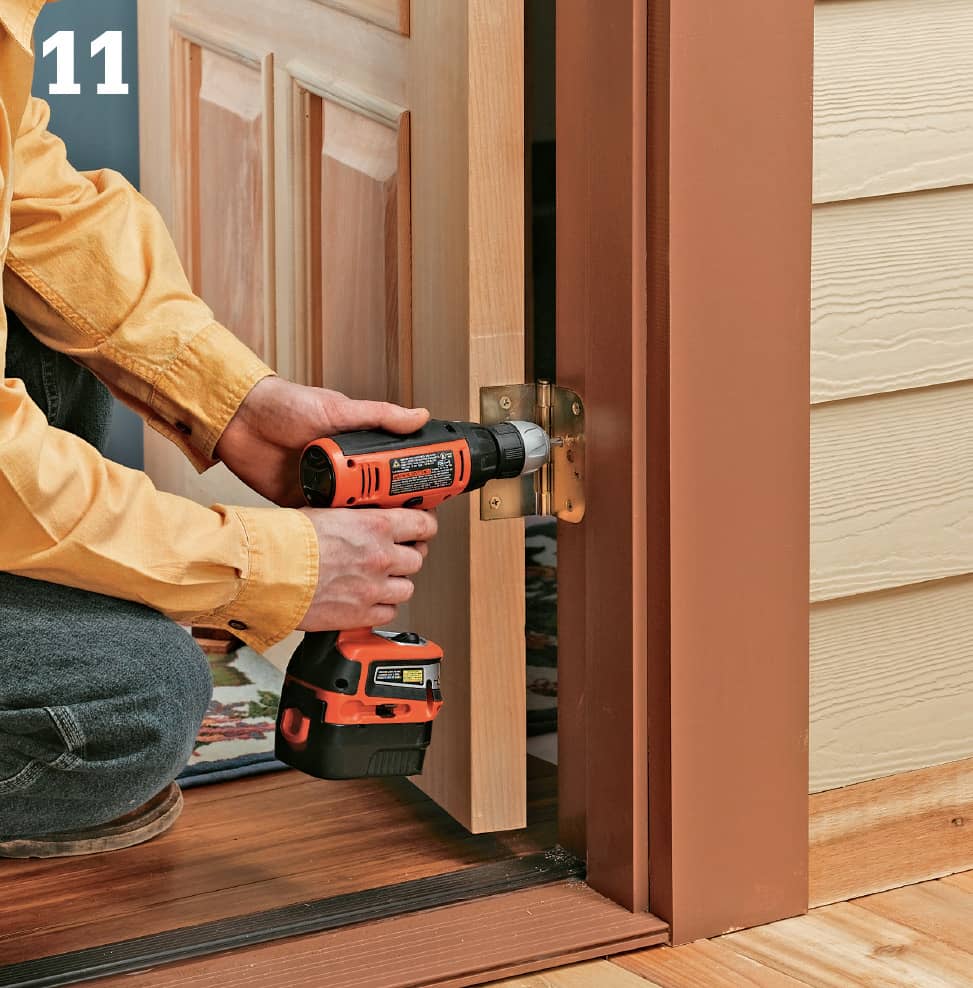
Hang the door in the jamb by tipping it into place so the top hinge leaf rests in the top mortise of the jamb. Drive one screw into this mortise. Then set the other leaves into their mortises and install the remaining hinge screws.
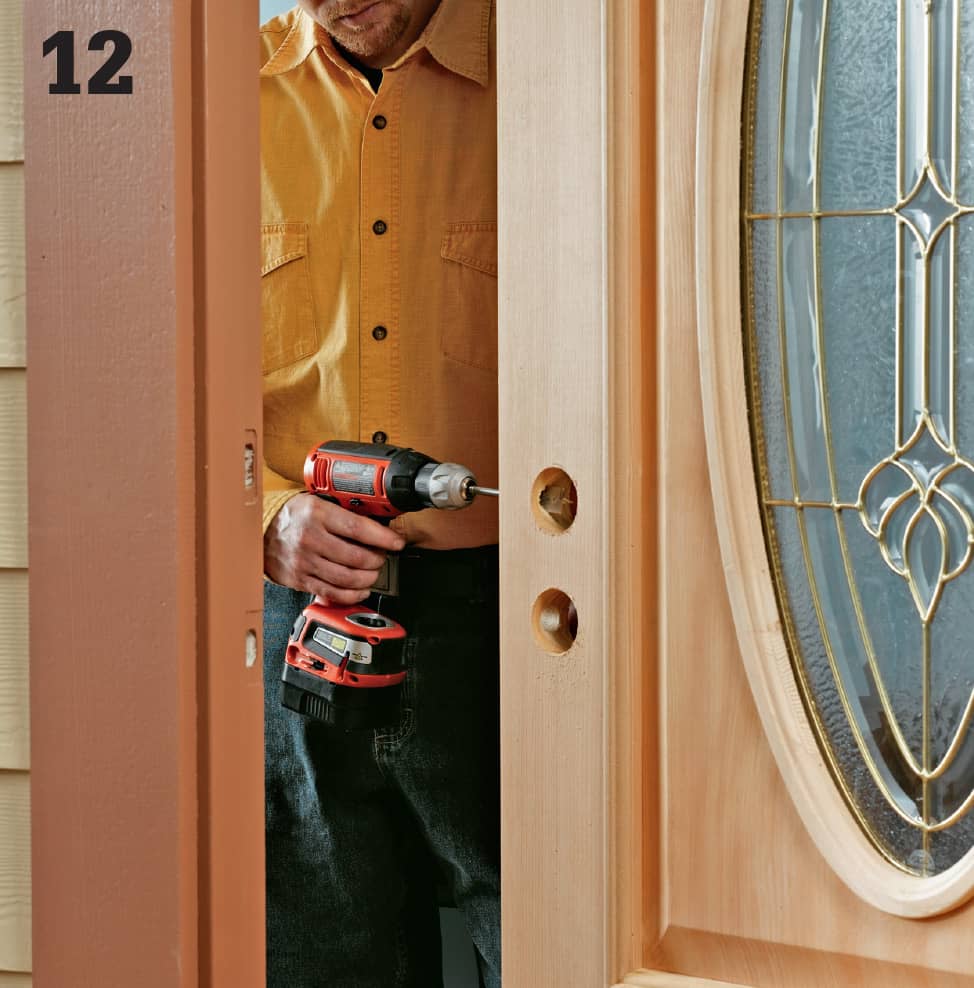
Bore holes for the lockset and bolt using a hole saw and spade bit. If you’re reusing the original hardware, measure the old door hole sizes and cut matching holes in the new door, starting with the large lockset hole. For new locksets, use the manufacturer’s template and hole sizing recommendations to bore the holes. Install the hardware.
 Installing Entry Doors
Few parts of a house have a more dramatic effect on the way your home is perceived than the main entry door. A lovely, well-maintained entryway that is tastefully matched architecturally to the house can utterly transform a home’s appearance. In fact, industry studies have suggested that upgrading a plain entry door to a higher-end entry door system can pay back multiple times in the resale of your house. But perhaps more importantly, depending on your priorities, it makes a great improvement in how you feel about your home. Plus, it usually pays benefits in home security and energy efficiency as well.
If you are replacing a single entry door with a double door or a door with a sidelight or sidelights, you will need to enlarge the door opening. Be sure to file your plans with your local building department and obtain a permit. You’ll need to provide temporary support from the time you remove the wall studs in the new opening until you’ve installed and secured a new door header that’s approved for the new span distance.
The American Craftsman style door with sidelights installed in this project has the look and texture of a classic wood door, but it is actually created from fiberglass. Today’s fiberglass doors are quite convincing in their ability to replicate wood grain, while still offering the durability and low maintenance of fiberglass.
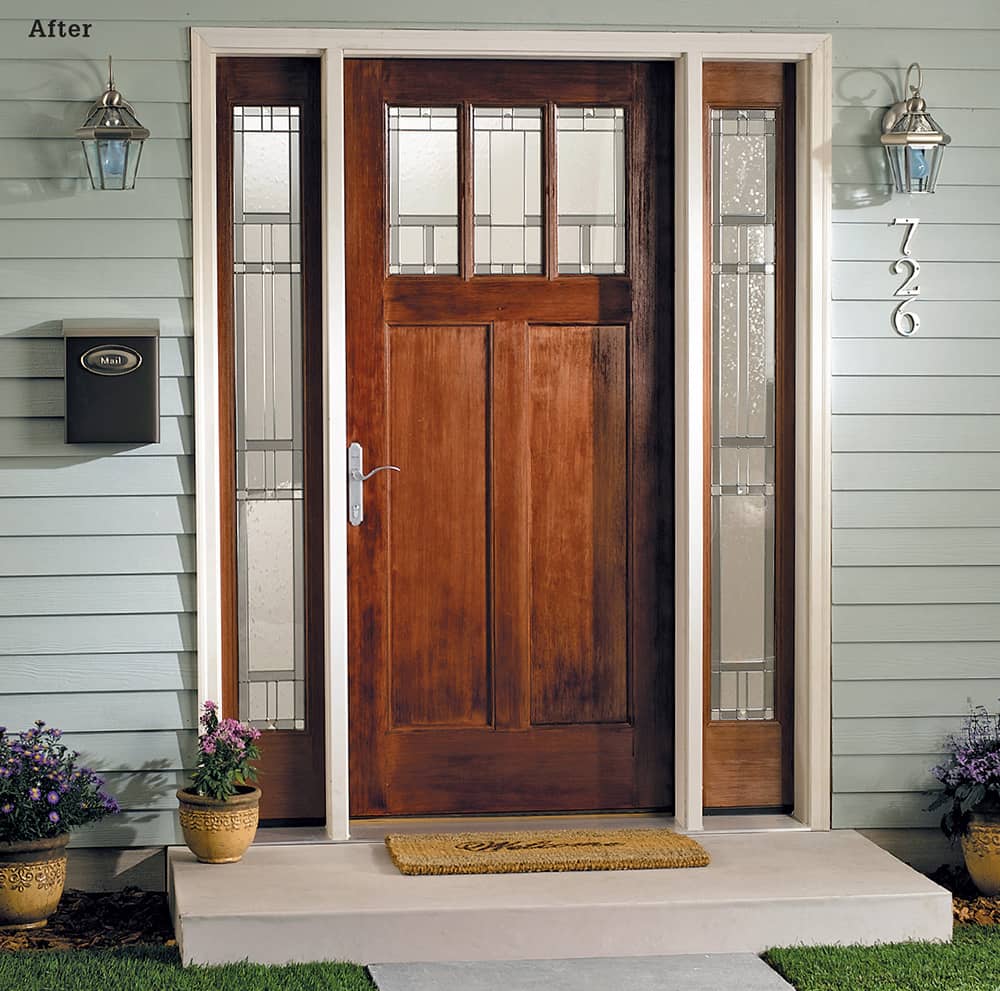
Replacing an ordinary entry door with a beautiful new upgrade has an exceptionally high payback in increased curb appeal and in perceived home value, according to industry studies.
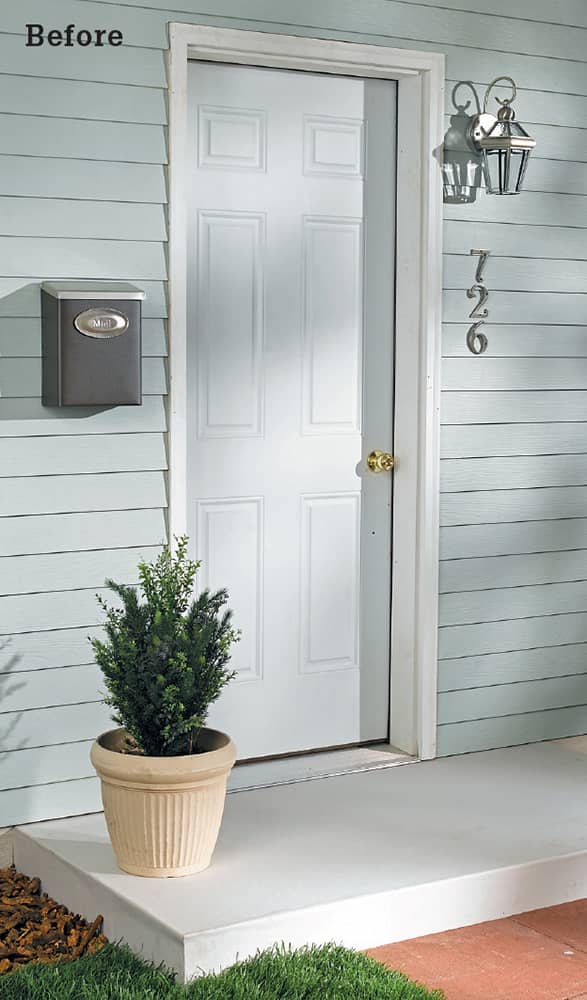
How to Replace an Entry Door
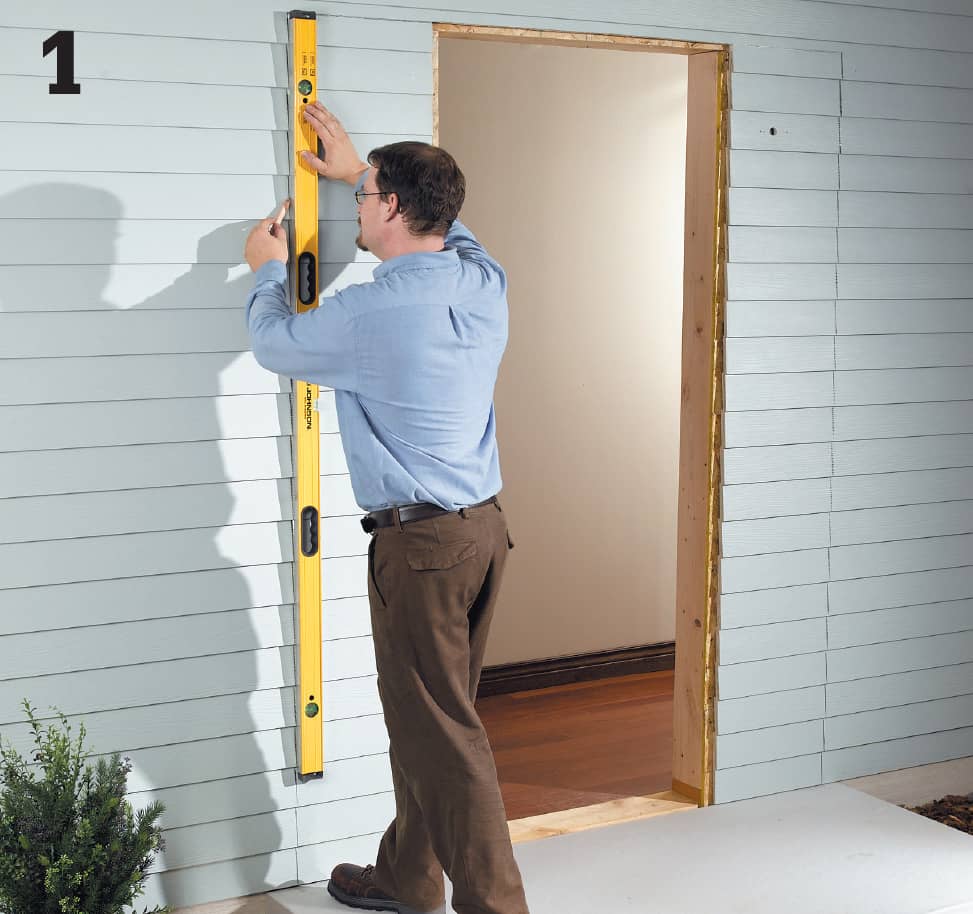
Remove the old entry door by cutting through the fasteners driven into the jamb with a reciprocating saw. If the new door or door system is wider, mark the edges of the larger rough opening onto the wall surface. If possible, try to locate the new opening so one edge will be against an existing wall stud. Be sure to include the thickness of the new framing you’ll need to add when removing the wall coverings.
Frame in the new rough opening for the replacement door. The instructions that come with the door will recommend a rough opening size, which is usually sized to create a 1/2" gap between the door and the studs and header. Patch the wall surfaces.
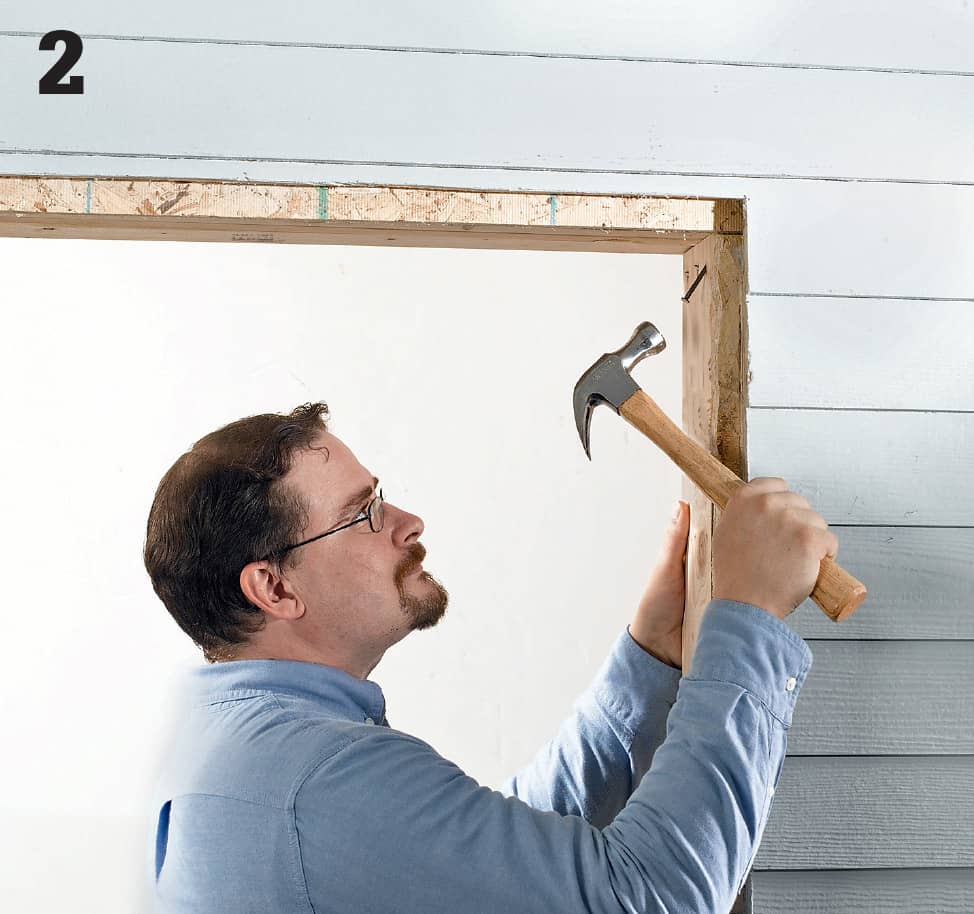
Cut metal door drip cap molding to fit the width of the opening and tuck the back edge up behind the wallcovering at the top of the door opening. Attach the drip cap with caulk only–do not use nails or screws.
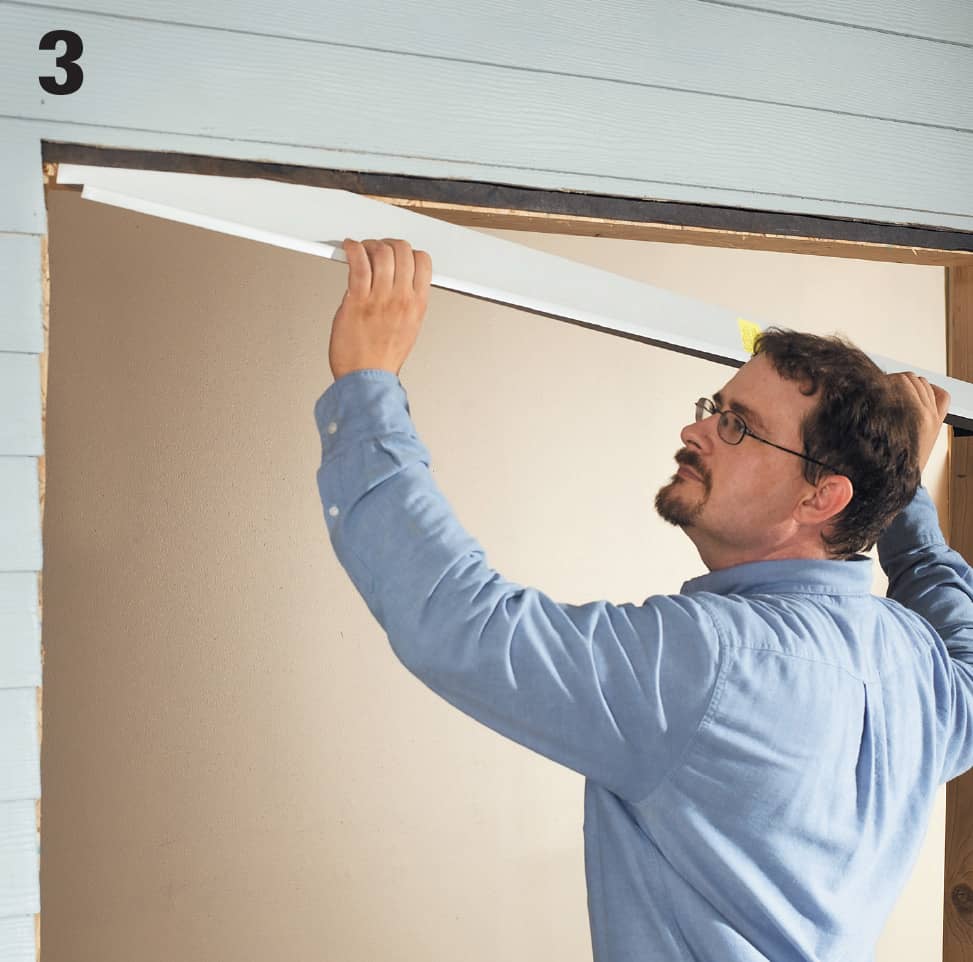
Unpack the door unit and set it in the rough opening to make sure it fits correctly. Remove it. Make sure the subfloor is clean and in good repair, and then apply heavy beads of caulk to the underside of the door sill and to the subfloor in the sill installation area. Use plenty of caulk.
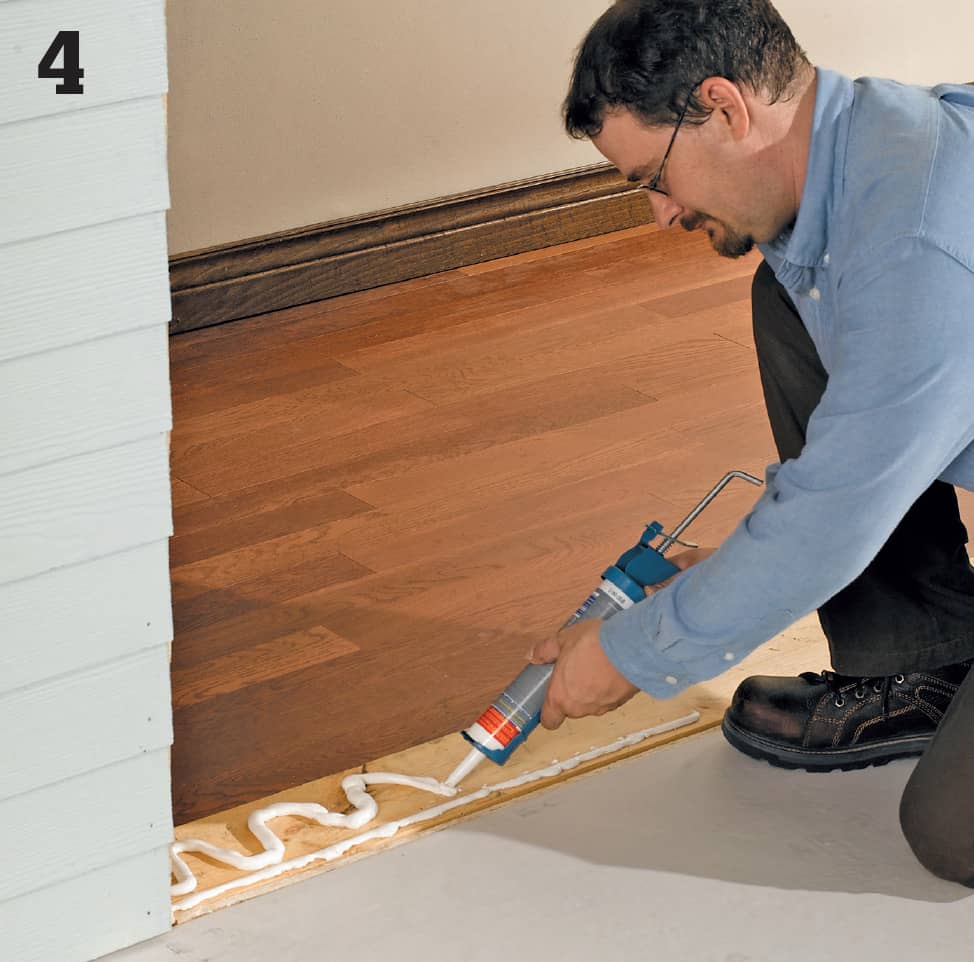
Set the door sill in the threshold and raise the unit up so it fits cleanly in the opening, with the exterior trim flush against the wall sheathing. Press down on the sill to seat it in the caulk and wipe up any squeeze-out with a damp rag
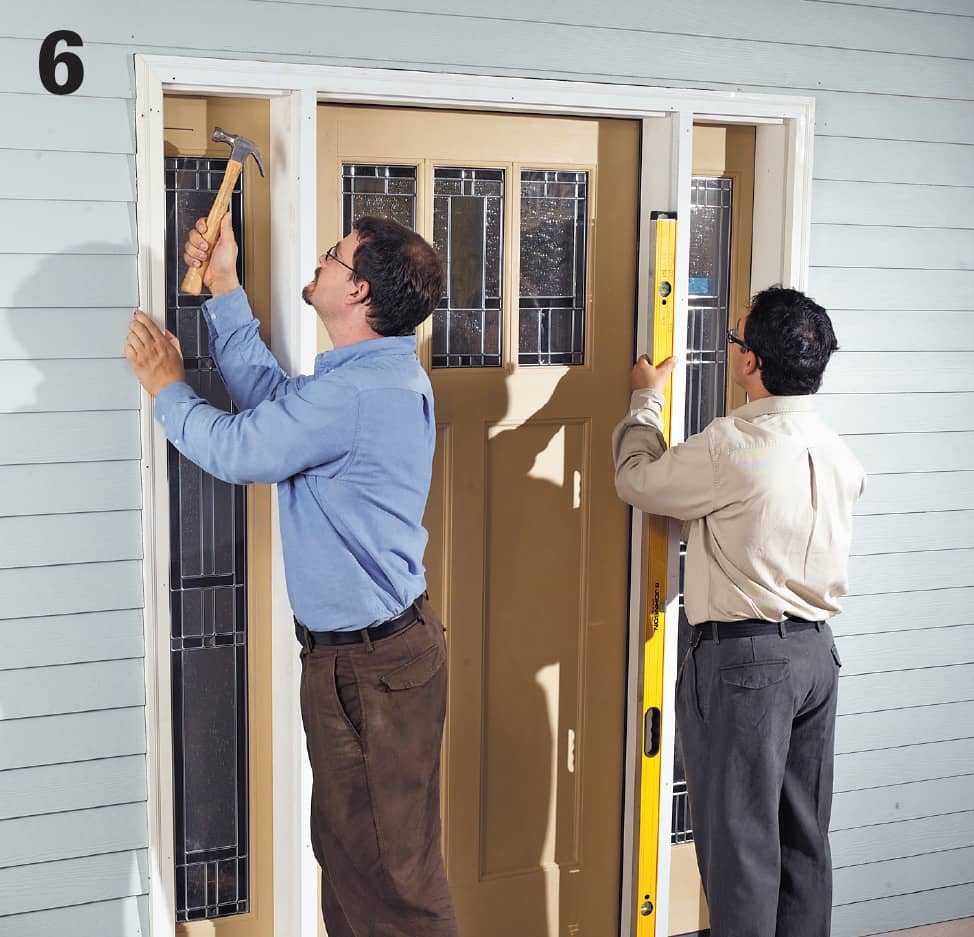
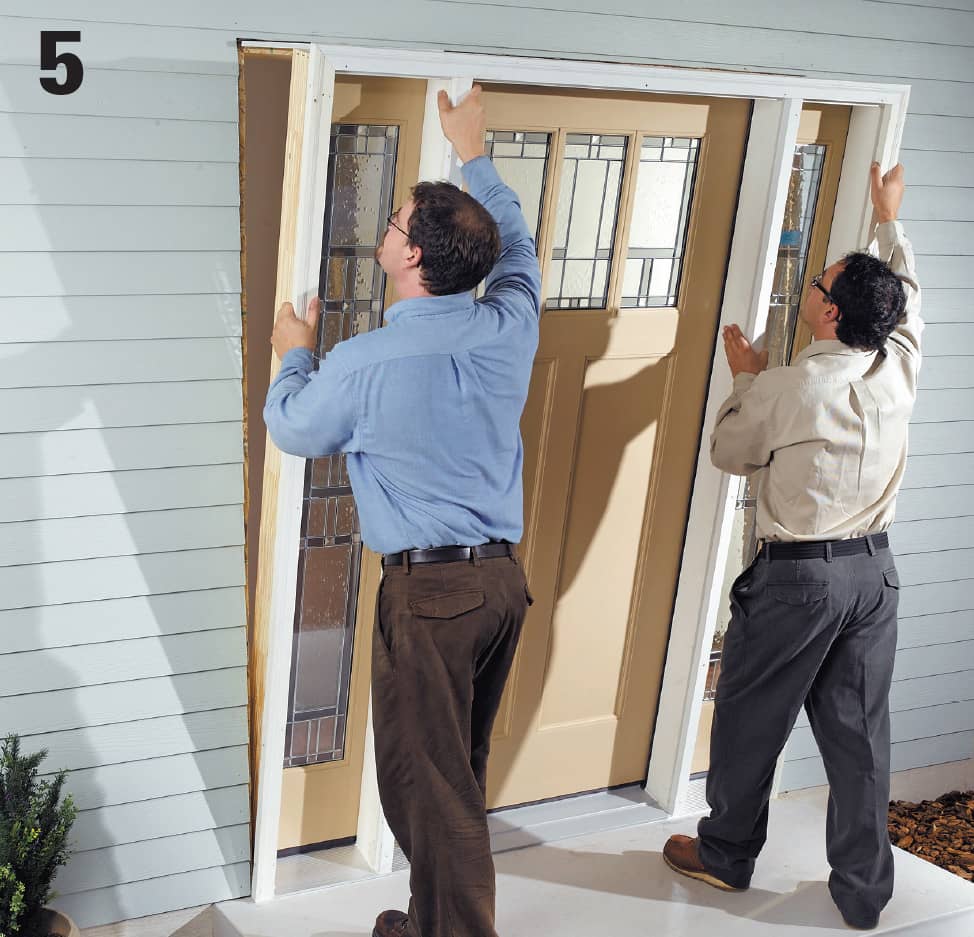
Use a 6-ft. level to make sure the unit is plumb and then tack it to the rough opening stud on the hinge side, using pairs of 10d nails driven partway through the casing on the weatherstripped side of the door (or the sidelight). On single, hinged doors, drive the nails just above the hinge locations. Note: Many door installers prefer deck screws over nails when attaching the jambs. Screws offer more gripping strength and are easier to adjust, but covering the screw heads is more difficult than filling nail holes.
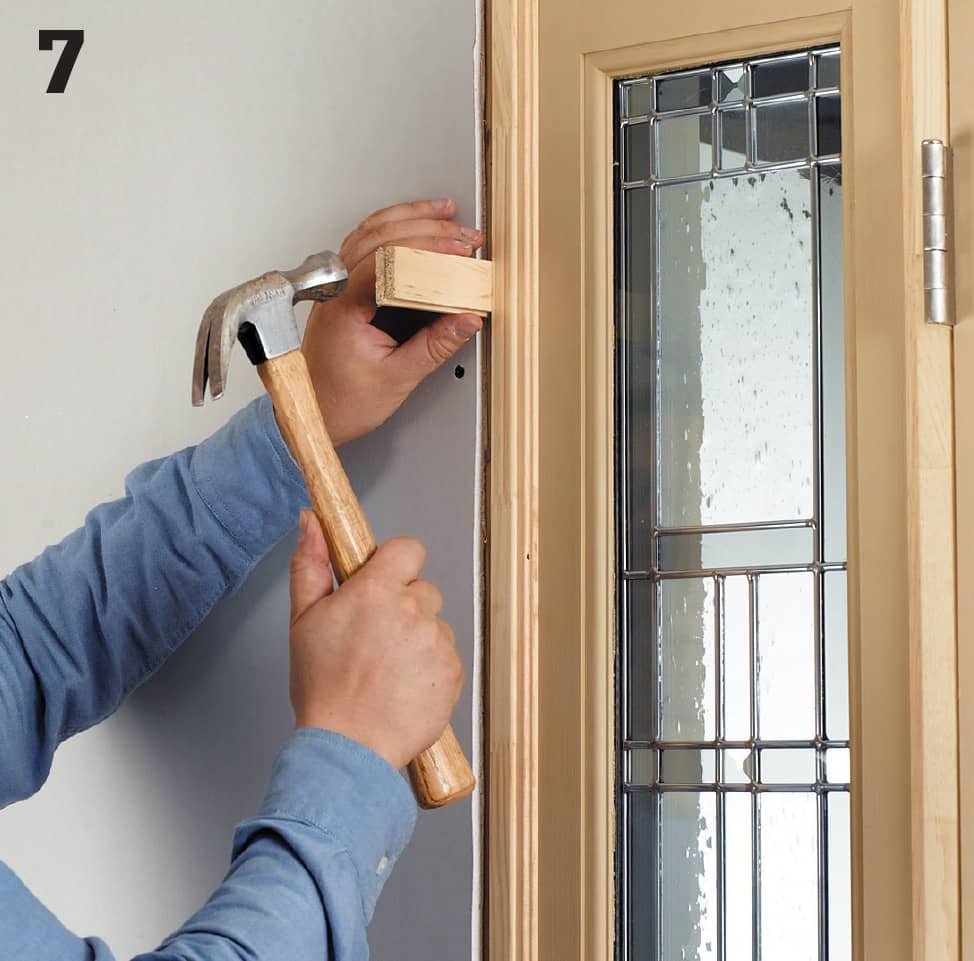
Drive wood shims between the jamb and the wall studs to create an even gap. Locate the shims directly above the pairs of nails you drove. Doublecheck the door with the level to make sure it is still plumb.
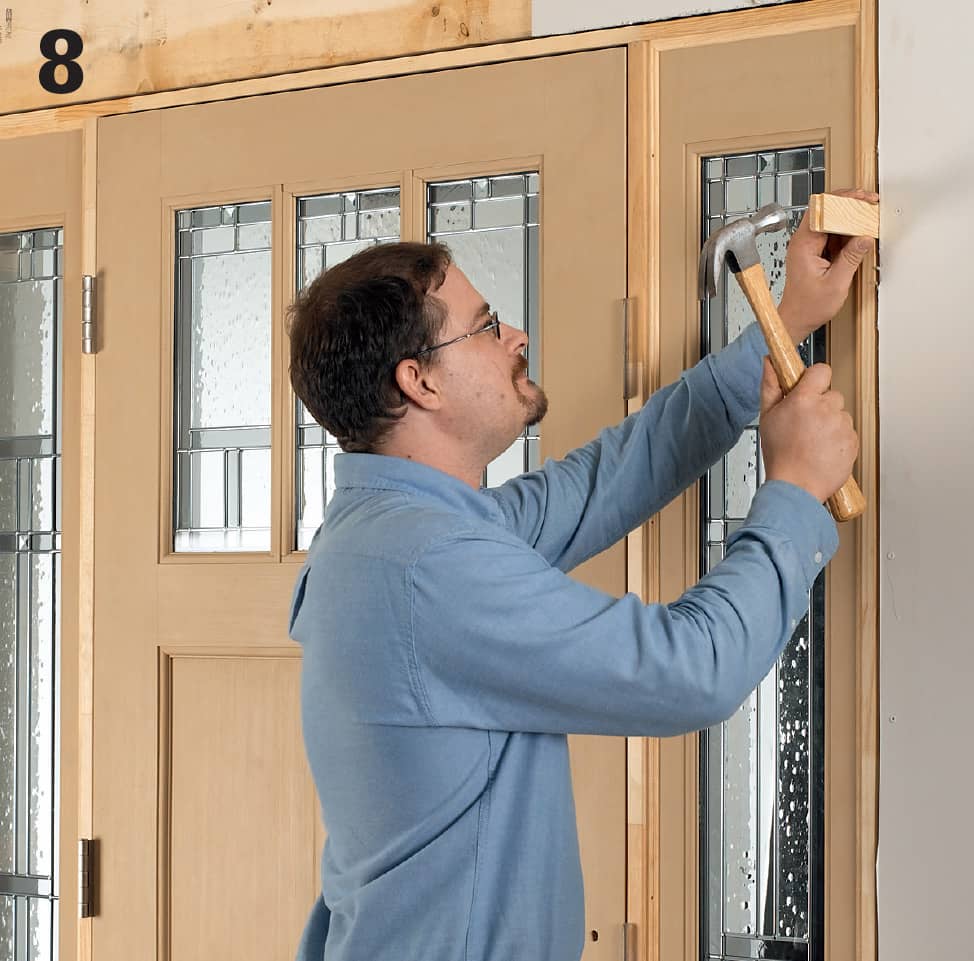
Drive shims between the jamb on the latch side of the unit and into the wall stud. Only drive the nails part way. Test for plumb again and then add shims at nail locations (you may need to double-up the shims, as this gap is often wider than the one on the hinge side). Check to make sure the door jamb is not bowed.
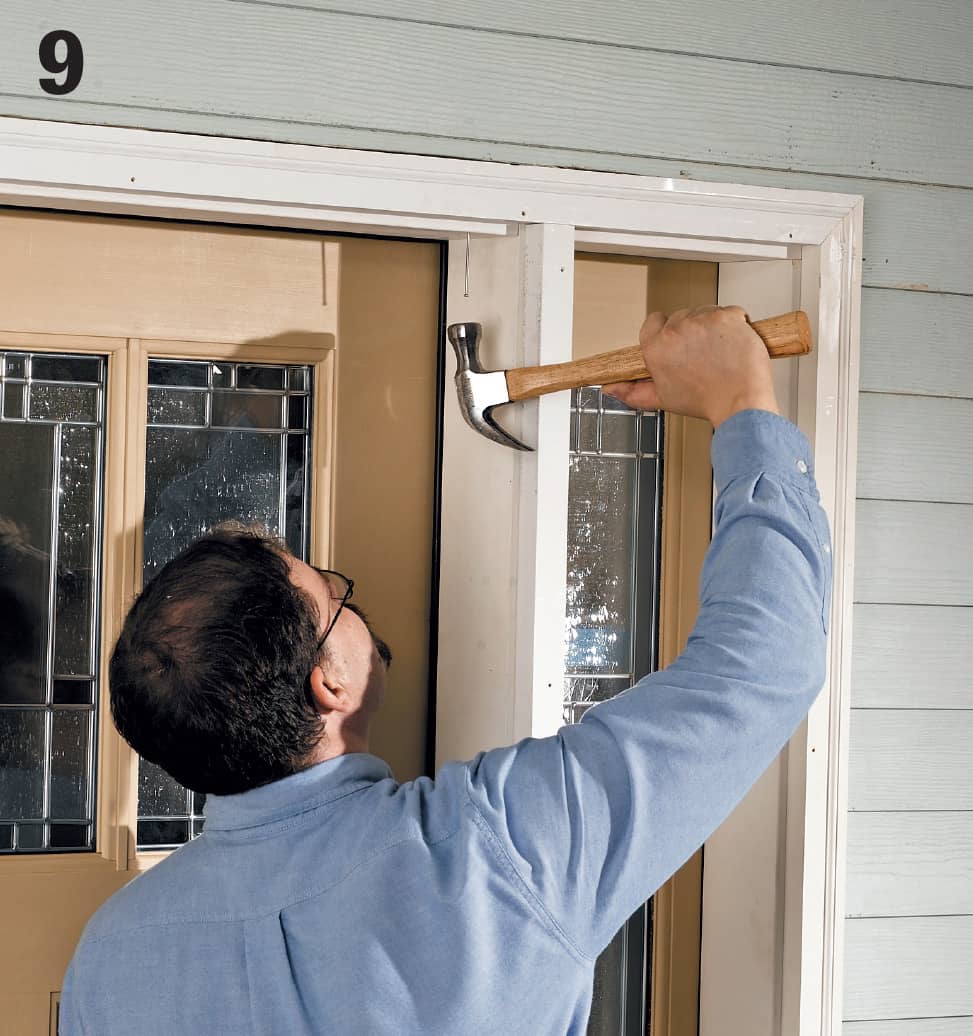
Drive finish nails at all remaining locations, following the nailing schedule in the manufacturer’s installation instructions.
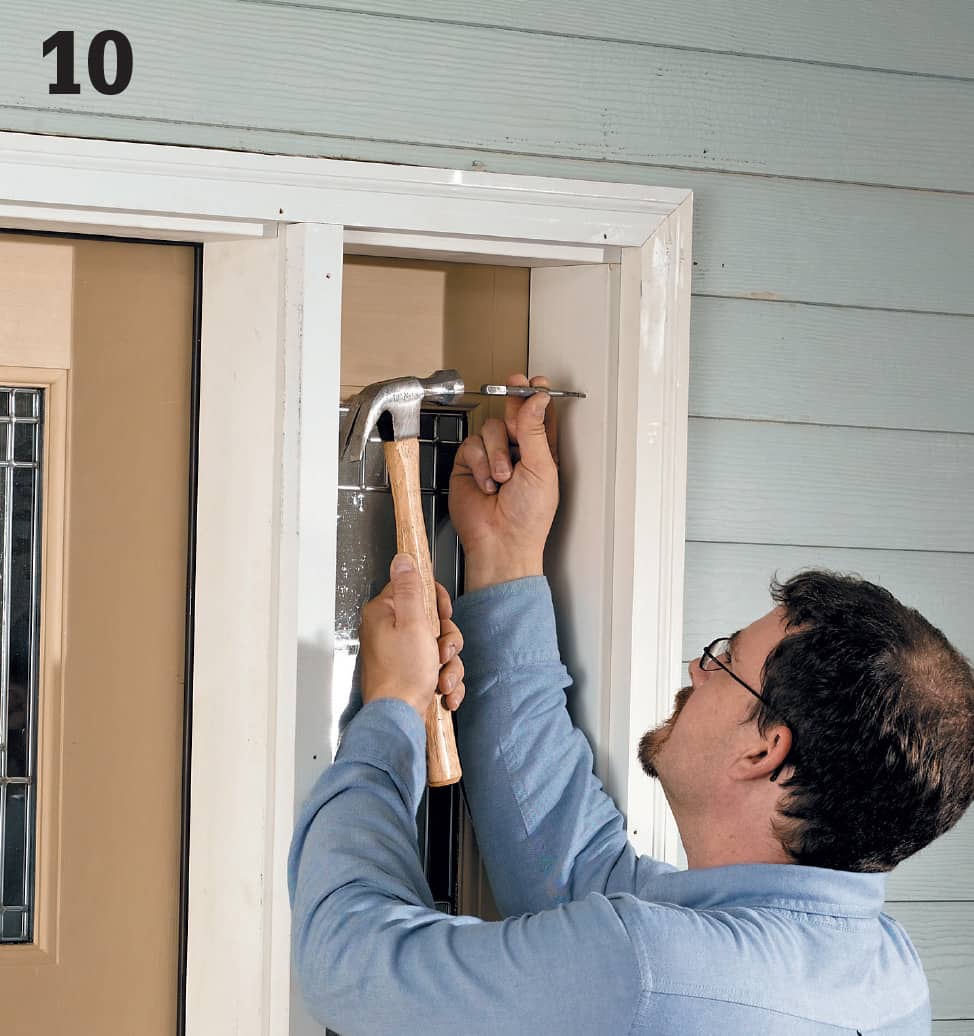
Use a nail set to drive the nail heads below the wood surface. Fill the nail holes with wood putty (you’ll get the best match if you apply putty that’s tinted to match the stained wood after the finish is applied). The presence of the wood shims at the nail locations should prevent the jamb from bowing as you nail.
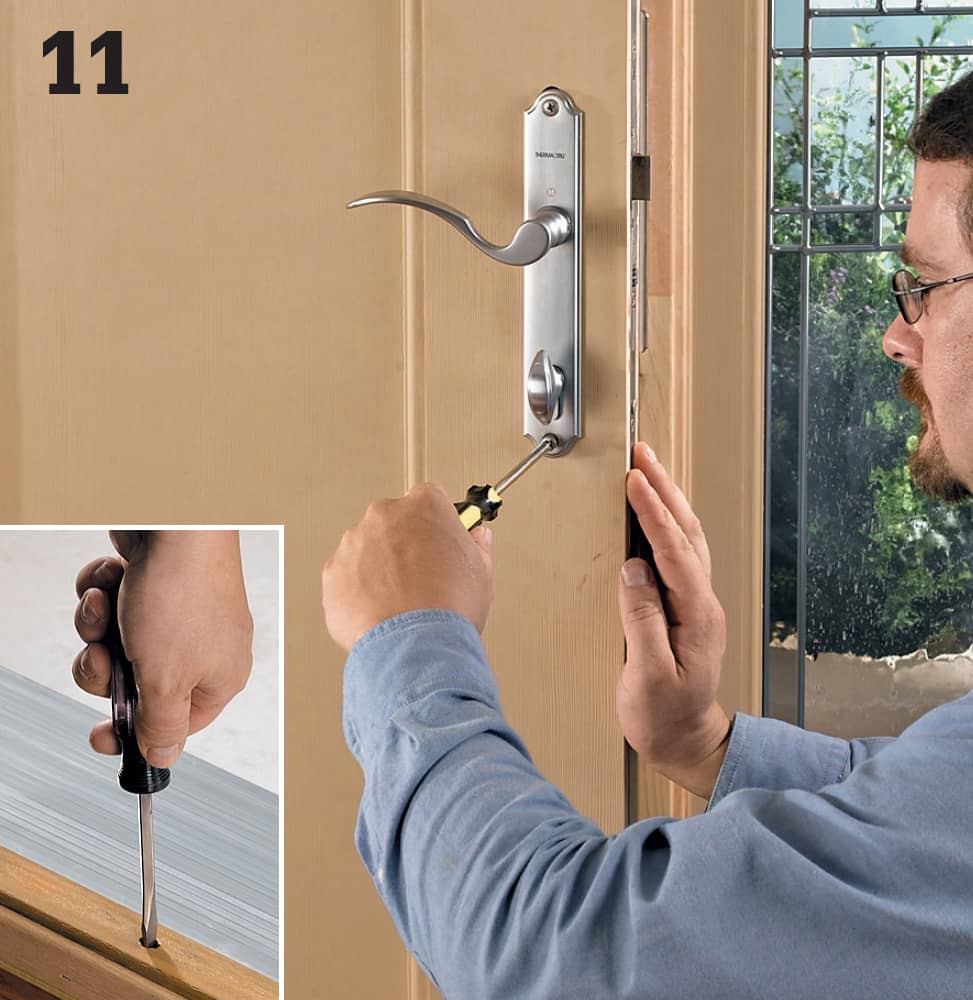
Install the lockset, strikeplates, deadbolts or multipoint locks, and any other door hardware. If the door finish has not been applied, you may want to do so first, but generally it makes more sense to install the hardware right away so the door can be operated and locked. Attach the door sill to the threshold and adjust it as needed, normally using the adjustment screws (inset).
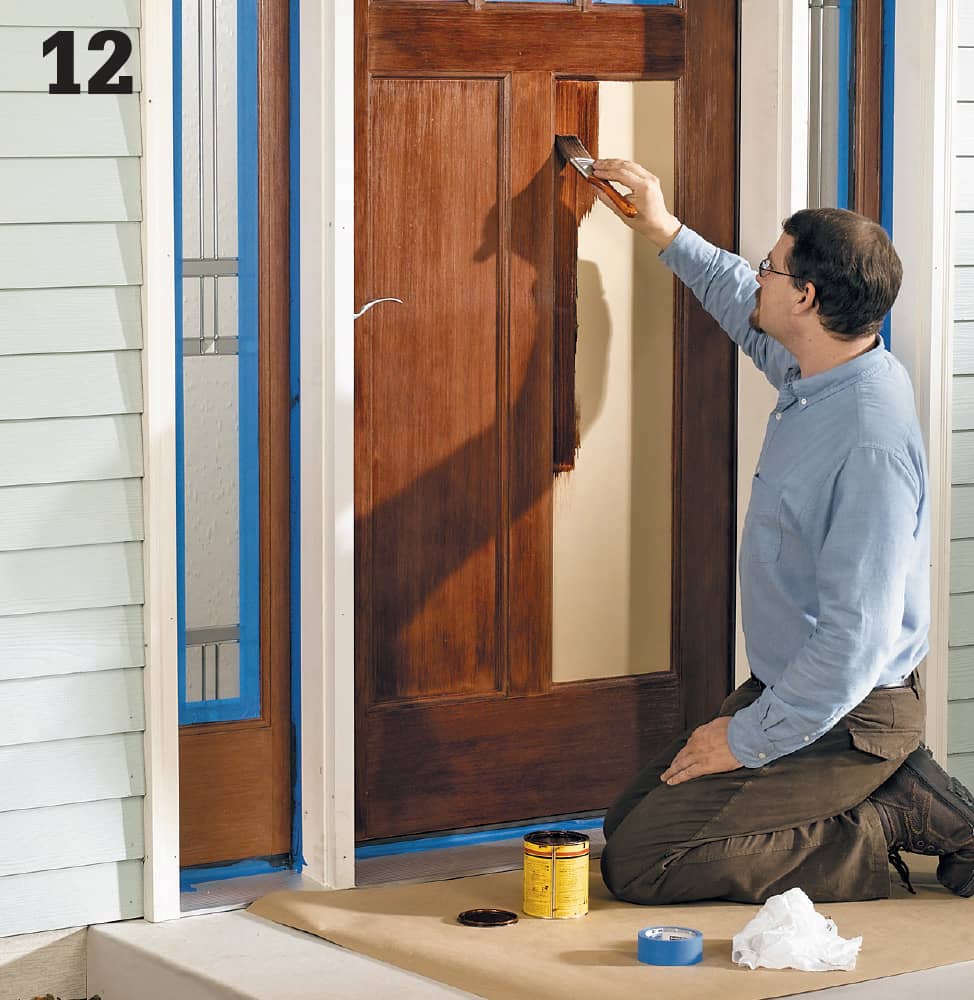
Apply your door finish if it has not yet been applied. Read the manufacturer’s suggestions for finishing very closely and follow the suggested sequences. Some manufacturers offer finish kits that are designed to be perfectly compatible with their doors. Install interior case molding and caulk all the exterior gaps after the finish dries.
 Installing Bifold Doors
Bifold doors provide easy access to a closet without requiring much clearance for opening. Most home centers stock kits that include two pairs of prehinged doors, a head track, and all the necessary hardware and fasteners. Typically, the doors in these kits have predrilled holes for the pivot and guide posts. Hardware kits are also sold separately for custom projects. There are many types of bifold door styles, so be sure to read and follow the manufacturer’s instructions for the product you use.
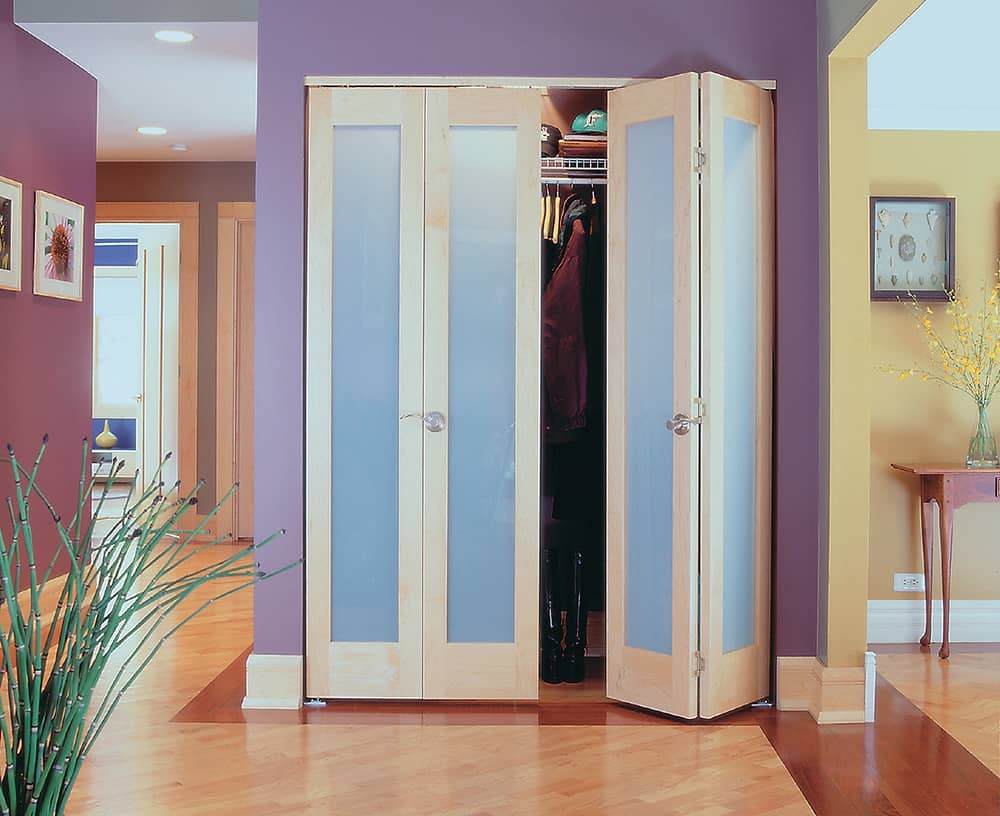
A variety of designer bifold doors are available for installation between rooms and closets. They provide the same attractive appearance as French doors but require much less floor space.
How to Install Bifold Doors
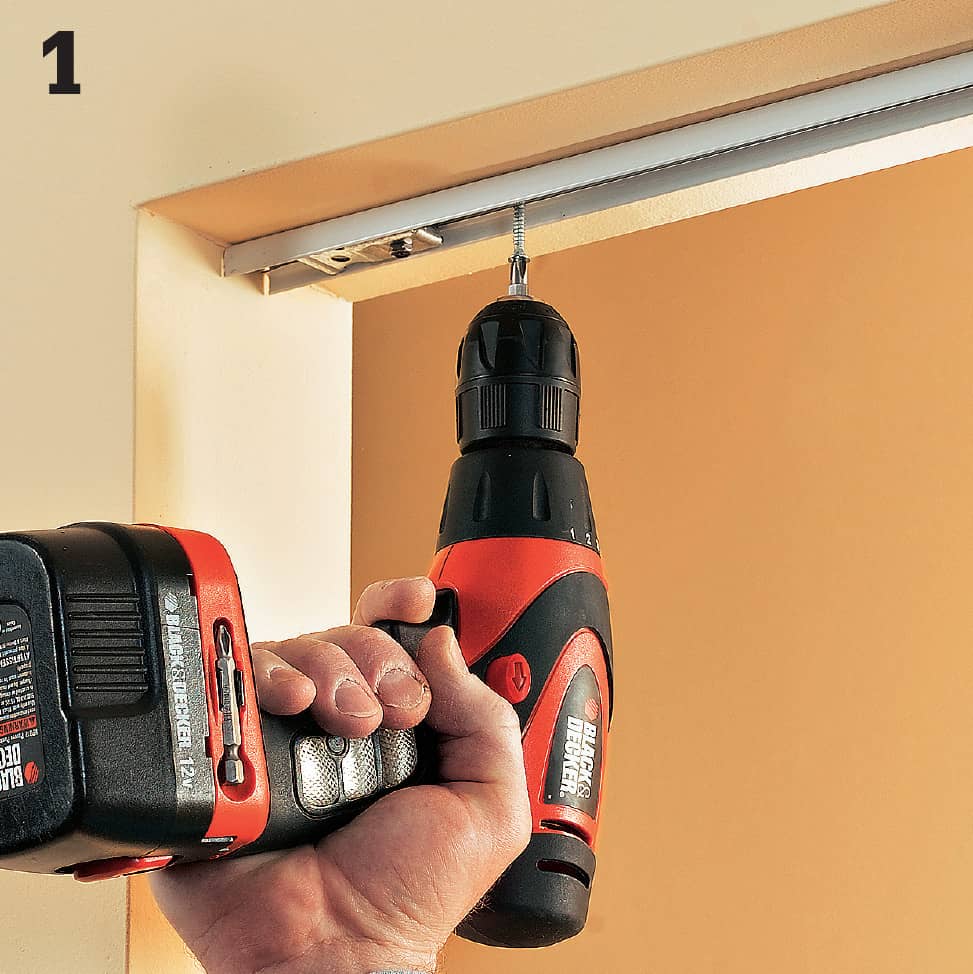
Cut the head track to the width of the opening using a hacksaw. Insert the roller mounts into the track, then position the track in the opening. Fasten it to the header using panhead screws.
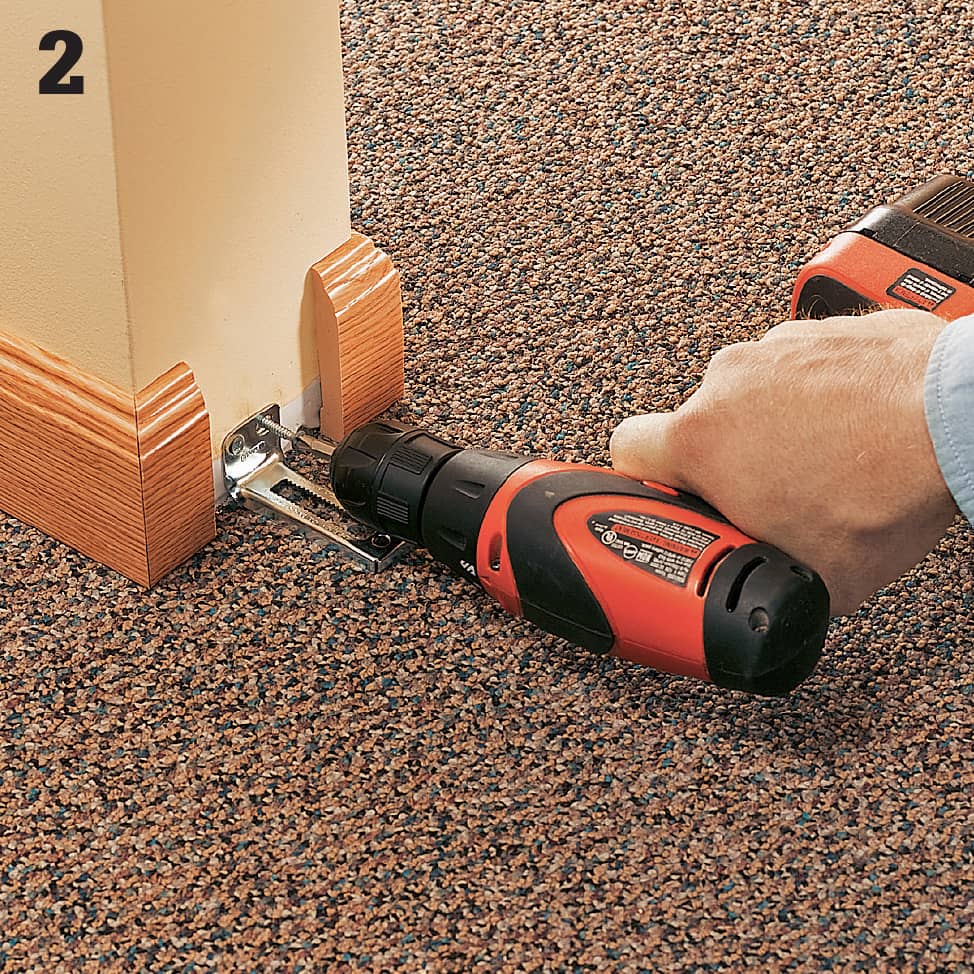
Measure and mark each side jamb at the floor for the anchor bracket so the center of the bracket aligns exactly with the center of the head track. Fasten the brackets in place with flathead screws.
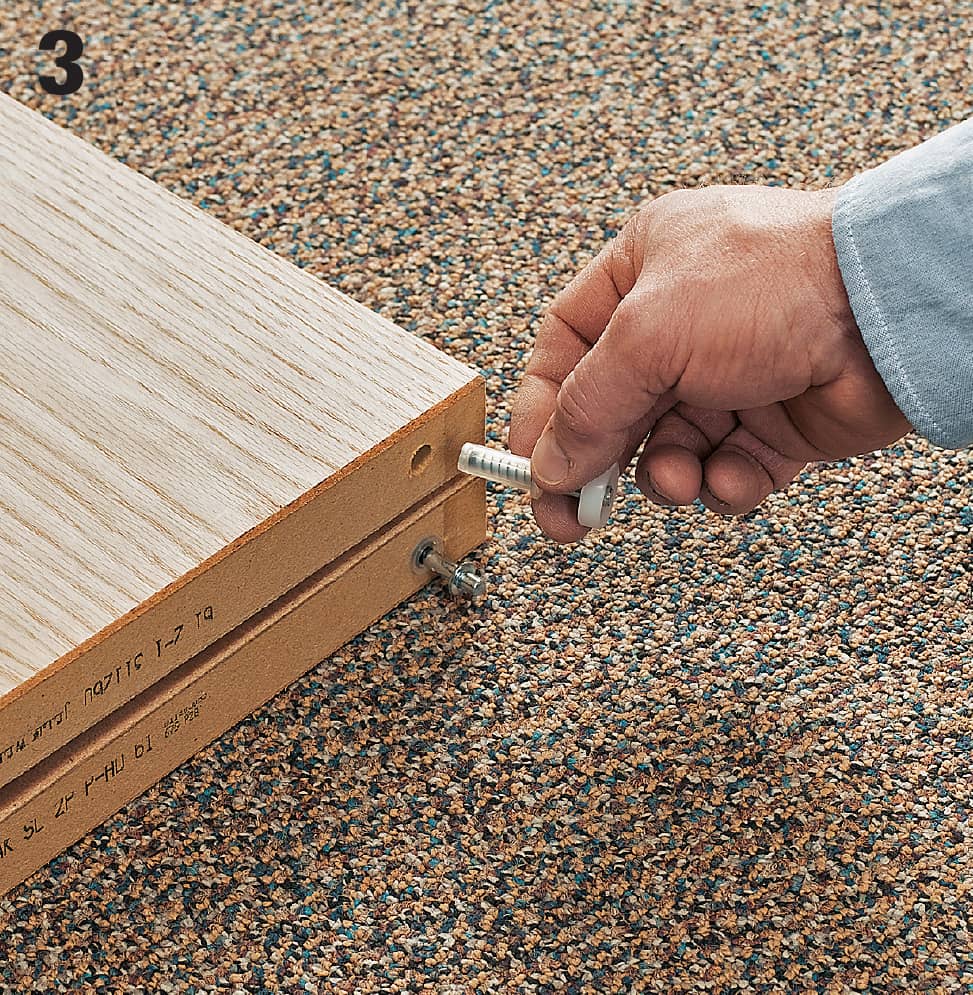
Check the height of the doors in the opening, and trim if necessary. Insert pivot posts into predrilled holes at the bottoms and tops of the doors. Insert guide posts at the tops of the leading doors. Make sure all posts fit snugly.
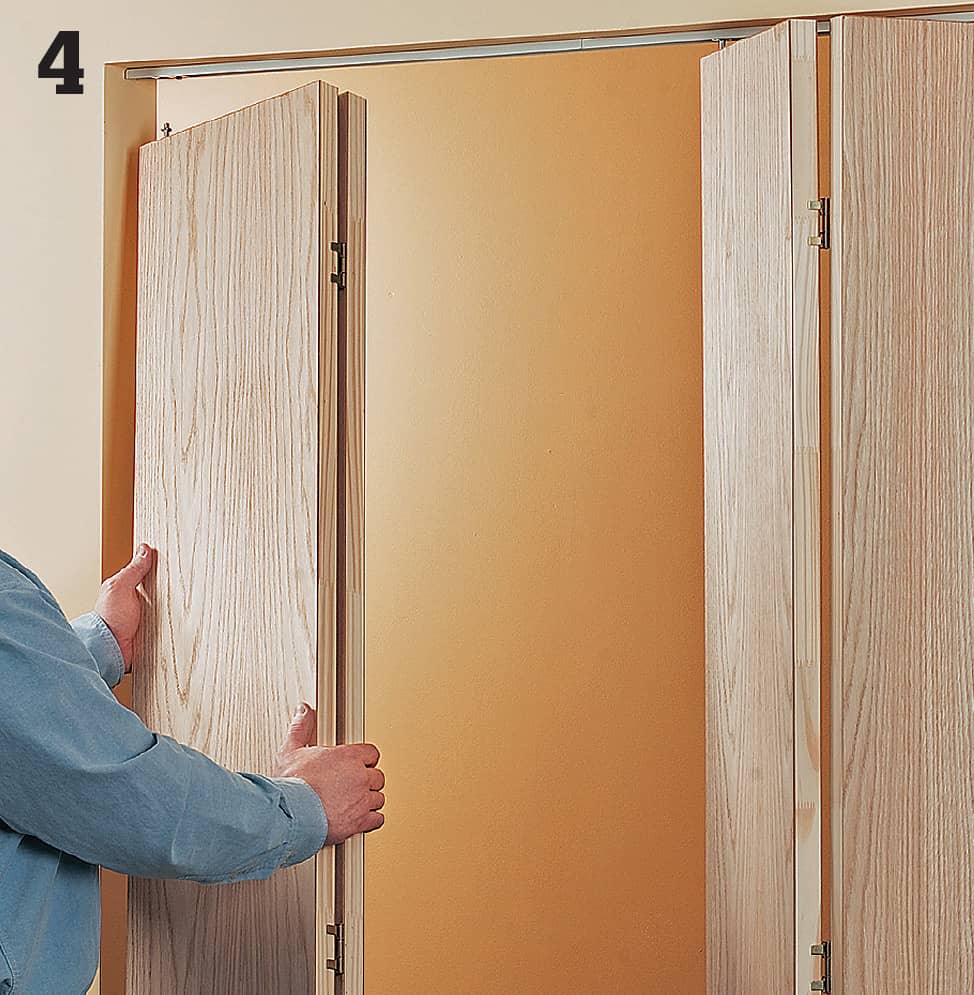
Fold one pair of doors closed and lift into position, inserting the pivot and guide posts into the head track. Slip the bottom pivot post into the anchor bracket. Repeat for the other pair of doors. Close the doors and check alignment along the side jambs and down the center. If necessary, adjust the top and bottom pivots following the manufacturer’s instructions.


