CHAPTER ONE
Getting Ready to Play
Even as an adult, I continue to purchase “back to school” supplies. Who can resist the penny pencils, fifty-cent composition books and bargain-basement loose-leaf paper? I love to look through the folders and notebooks to see what the “cool kids” will be buying. I always come across some item I can't walk away from, knowing it will make my life easier or at least more fun.
This chapter is all about collecting and organizing your supplies. The items mentioned here are the essential raw materials Collage Toy Box. Each you'll need for your collage or mixed-media time support, you create a of art, you'll need an adhesive, a piece surface-enriching media and collage resources. In Chapter Two, I'll show you how to take some of these raw materials and turn them into Collage Elements — fun items to have on hand to help preserve the images you love the most so you can use them in multiple ways.
So let's jump in to the sandbox, dig around and see what we come up with!
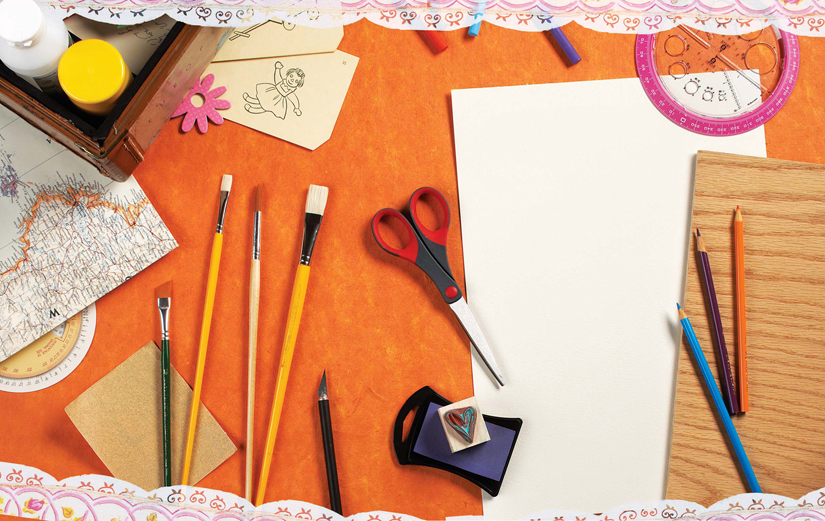
The Collage Toy Box
You will find there are certain supplies you reach for over and over again. To help ease the time spent searching and gathering these supplies for every project, I have organized a one-stop spot: the Collage Toy Box.
The Collage Toy Box contains all the supplies necessary to create a piece of collage art. Having everything in a container helps keep your supplies in one easy location and convenient to transport.
Take the time to create your Collage Toy Box to be ready for every project. Be creative when selecting your container; look for something that is sturdy and portable. Think about using a small vintage suitcase, cigar box or a photo storage box. Take it a step further and personalize the outside of your Collage Toy Box and then add your favorite toys!
Tip
To ensure safety, always follow the manufacturer's instructions and safety guidelines for products used in this book.
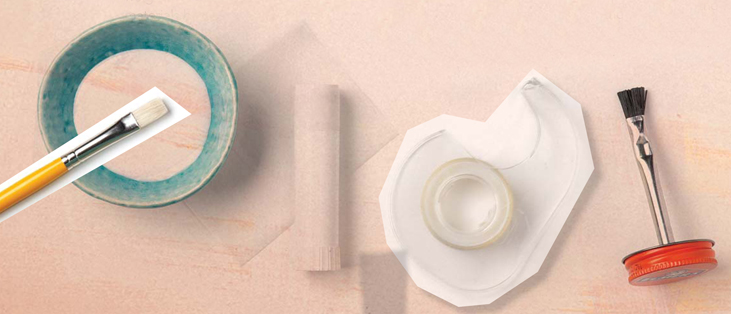
Adhesives
Selecting an adhesive is primarily based on the type of materials involved in the collage. Each manufacturer will list the materials that work well with their product; I recommend taking the time to understand the qualities of each product you use. Tinker around with your adhesives to see how they work for you!
What make things stick together? Let's take a look at different adhesives.
Matte Medium
This acrylic emulsion dries clear and is water based, which means it can be diluted with water. It is a good adhesive for paper, lightweight materials and small embellishments.
Rubber Cement
This adhesive works well with papers, especially Color-aid paper, because it resists bubbling and buckling. You may substitute Double Tack Mounting Film in place of rubber cement.
Double Tack Mounting Film
This double-sided adhesive film made by Grafix can turn anything into a sticker. It is a strong, heat-resistant, acid-free, permanent adhesive that cuts easily and bonds instantly.
Fusible Webbing
This is a paper-backed adhesive web that bonds two materials together. It is recommended for fabric, but I also use it on paper. This product will fuse fabric to fabric or other porous surfaces. It comes in different weights, to be used according to the weight of the materials being bonded. I used the light or medium weight for the projects in this book.
Two-Sided Tape
Use two-sided tape in small coverage areas or for interactive purposes. I use two-sided tape to hold strips of paper when weaving.
Glue Stick
Glue sticks are clean and easy to use. I like to use glue sticks when creating Collage Elements, especially Collage Sheets. This adhesive is quick and easy to dispense and is great for paper and lightweight materials.
Self-Adhesive Foam Pop-Ups
These thick, double-sided adhesives can help add dimension to your art work. You can find these in different sizes and shapes along with the scrap-booking supplies.
Supports
Supports are the surfaces on which collages are built. Selecting a support is a vital decision when creating a collage. Things to consider are the weights of the items being added, the types of adhesive used to apply the collage items and which surface-enriching media will be used in the collage. It is important to know how your support material will react to each one of these factors. For example, let's say you select to collage with paper and enrich the surface with paint. You must choose a support that will accept a wet medium. The support also needs to be strong and sturdy enough not to bow under the weight of the materials.
Self-Adhesive Mounting Board
These boards make quick work of adding light-weight backgrounds to your art: Simply lay the paper, fabric or other lightweight (preferably flat and smooth) material over the surface and smooth it out with your hand. You can then use other mediums and adhesives to build your collage. You should cover the entire surface of the board, or you might get something you didn't intend stuck onto your artwork!
Chipboard
This inexpensive support material is available in different thicknesses and sizes. It is very porous, which means it is highly absorbent. I have found that it works great if you use fusible webbing to iron paper directly on the chipboard. If you are using matte medium, it is best to prime the chipboard with acrylic paint, allow the paint to dry and then apply the matte medium. To prevent the board from buckling, place the board on a flat surface, add a weight on top and allow to dry.
Foamcore Board
An inexpensive support material, foamcore board is lightweight and easy to cut. This support is highly compatible with Double Tack Mounting Film, lightweight materials and minimal layering.
Stretched Canvas
Coated with gesso, stretched canvas works well with matte medium, light- to medium-weight materials and medium to heavy layering. Canvas is also good for the decollage technique (see pages 100–101).
Bristol Board, Illustration Board and Watercolor Paper
Bristol board and other similar boards such as watercolor paper and illustration board are inexpensive support materials. These boards work well with the majority of adhesives and can handle a lot of layering. To prevent the board from buckling, place it on a flat surface, add a weight on top and allow to dry.
Wood
Wood provides a very strong surface for all materials and weights. Raw wood is porous; therefore matte medium is an excellent choice as an adhesive.
Surface-Enriching Media
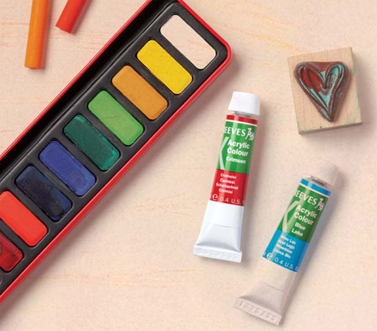
Surface-enriching media are products used to enhance your collage. They can be used on materials before you adhere them to your collage or after the materials have been affixed to the art. You may also use these materials directly on the support — for example, painting a canvas before applying collage material.
Acrylic Paints
These water-based paints become transparent when mixed with matte medium. They may be purchased in an array of colors, or you may mix your own. I recommend getting a set of twelve colors, including black and white, for a great set of choices.
Watercolors
Available in tubes, liquids, pencils or cakes, water-colors are easy to use and clean up. Pencils offer the most control, with liquids being the most saturated (full of color).
Spray Paints
Fun to experiment with when developing Collage Elements, spray paints are available in many colors and for many types of surfaces. I like to use transparent spray paint, which is made for glass. I spray a light coat on vintage book pages. The paint dries to a clear finish, letting the text of the book page show through. Spend some time with different spray-paint finishes. Remember to read all manufacturer instructions and warnings.
Oil Pastels
The rich colors of oil pastels blend and mix well on most surfaces and provide beautiful textural quality. I recommend a box of twenty-four colors to give you lots of options to play with.
Permanent Markers
Permanent markers come in different colors and tip sizes. They are perfect to emphasize an image in a collage, write with or outline shapes. Black permanent markers with tips ranging from extra-fine to medium can be extremely useful in collage work. An assortment of colors lets you punch up the color of any piece of art or add color where you feel it's needed.
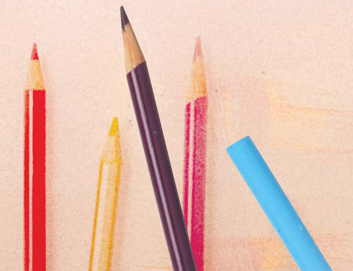
Colored Pencils
You may purchase colored pencils individually or in different sets. I recommend a set of twelve, including black and white. If you find you need more colors, you may add to your set. Colored pencils are applied to dry, porous surfaces.
Rubber Stamps and Ink Pads
Artistically designed stamps are readily available for purchase in art and craft stores. You also have the option to make your own rubber stamps. Look for rubber-stamp kits, composed of self-adhesive rubber sheets and wood blocks. To make a stamp, draw on the paper backing of the sheet, cut out the design with scissors and adhere it to a wood block. Then ink up the rubber stamp and stamp away!
Gesso
This pigment is perfect for priming canvas and other porous materials. Brush on gesso with a flat brush, allow to dry and begin your artistic creation.
Rub-On Transfers
Traditionally a scrapbooking and cardmaking supply, rub-on transfers can add another layer of detail to your art without any bulk. I'll teach you how to make your own by using a product called “Rub-onz” by Grafix. This material may be purchased at most art and craft stores or online.
Stickers
Stickers can instantly change the appearance of a collage. You will have the opportunity to create a sheet of your own art on sticker paper.
Transparency Adhesive Sheets
These sheets are perfect for layering. In the project Bandana you will see the full value of having art printed on a transparency sheet.
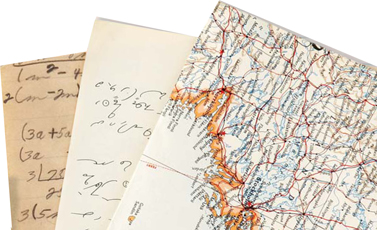
Collage Resources
I loved show-and-tell day at school; I felt it was the time I got to know myself as well as others. I take this same view of the materials people select for their Collage Resources — the papers, maps, stamps, pamphlets, brochures and photos. What is it that appeals to you? Is there a common thread, or is it just a random selection?
Collage sources are abundant and found everywhere. Unsure of what to look for? Get started by looking over the list below and then select what appeals to you — just like show-and-tell.
-
Vintage books, pages and book jackets
-
Maps, graphs and charts
-
Postage stamps and collectible handbills
-
Postcards, letters, cards and mail labels 13
-
Advertisements, brochures and pamphlets
-
Newspapers
-
Kraft paper, gift bags and retail bags
-
Vellum, decorative and scrapbook papers
-
Food product packaging, cereal boxes, bags and food labels
-
Old prints, paintings, sketches and unfinished art
-
Signs, posters and catalog pages
-
Purchased papers, tissue paper and wrapping paper
-
Stencil templates
-
Vintage textiles, handkerchiefs, doilies and tablecloths
Hide-and-Seek
Collage Resources are Everywhere You Look!
If you do not already have a box full of collage resources, cast your eye to some of the everyday items you don't normally give a second look — you'll be amazed at how much is hiding in plain sight!
There is no need to leave your house. I am sure you have plenty of collage resources at your fingertips. Do you get junk mail? Do you have wrapping paper? What about an old book?
If you want to venture out of your home, visit a flea market, antiques store, thrift store or, better yet, a friend's house. Try this little challenge: Take a walk, pick up ten items and make a piece of art.
I am fortunate in that my friends know my attraction to collage resources, and they are always donating to my cause. Put the word out; I bet you will be pleased at what your friends give you.
Tools
Collage art requires only the basic tools, and you probably already own many of them. Certain tools will enable you to create with ease — like a metal ruler versus a plastic one (which is not sturdy enough). Look around your house or studio and gather up your tools.
Bristle Brushes
Use these flat- or round-tip brushes to apply matte medium. Select the size of the brush based on the size of the material you need to adhere. You'll want to use a small round-tip brush when applying adhesive to small materials. Use a flat brush when applying adhesive to a larger or broader area.
Synthetic Brushes
I like to use these with acrylic and watercolor paints. They clean easily and are very affordable. It's best to have a variety of tips and sizes, preferably in a range from 0 to 6, with the following tips: round, flat, sashed or angled, and pointer. Take a look at what brushes you already own and see if it is necessary to update.

Scissors
Different types of scissors can achieve different tasks. You will want to have a small pair of scissors, like embroidery scissors, for detailed pieces, and a pair of 6″ (15cm) scissors for cutting out shapes. I also have a pair of scissors designated for fabric only. Cuticle scissors are nice to have to cut small detailed circles. Remember, no running with sharp objects!
Craft Knife with No. 11 Blades
A craft knife is perfect for trimming edges and cutting details. I also use my craft knife to help peel backing from different specialty papers.
Cutting Mat
While not essential, a cutting mat saves the wear and tear on any cutting instruments and work surface. The grid on the cutting mat is handy for measuring as well.
Plastic Putty Knives
I use these to flatten and smooth materials once they are affixed to the support. Holding the putty knife at an angle, gently press down while pulling the edge of the putty knife across the material. Excess adhesive will be pushed out by the putty knife, eliminating bubbles and wrinkles. Have a variety of sizes on hand to accommodate your artwork.
2B Pencil
A 2B pencil is my pencil of choice when I am sketching or writing ideas and concepts. Like all artist supplies, pencils are available in an array of choices. The important thing to remember about drawing pencils is the hardness of the lead. The letter “B” represents a pencil with a softer lead, such as 2B, 4B, 6B and so on. The higher the number value, the softer the lead. On the opposite side of the spectrum is the “H” pencil, representing a “hard” lead. In between the “B” and the “H” pencil is the “HB,” the middle ground for pencil sets, which is not too hard and not too soft.
Erasers
Rubber-cement pick-up erasers help clean up the excess when using rubber cement. A Pink Pearl or white nylon eraser is a universal eraser for pencil sketch lines and other unwanted marks.
Circle Template
This is a handy dandy-tool for drawing perfect circles.
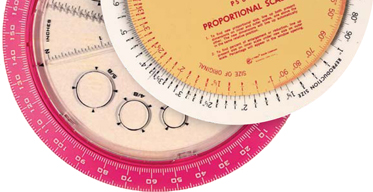
Proportion Wheel
A proportion wheel is a useful guide to help calculate how to manipulate the size of an original when using a copier. For example, it would help you determine to what percentage you would need to set your copier to enlarge a 4″ (10cm) drawing to a 7″ (18cm) copy.
Metal Tweezers
Tweezers are great for picking up small items and helping remove the backing from specialty papers.
Sandpaper
Sheets of sandpaper cut into small squares (about 3″ × 3″ [7.5cm × 7.5cm]) are used to “decollage” art, sand down wood boxes and smooth collage paper's ragged edges. Believe it or not, an emery board can also do a good job of sanding small detailed areas.
Burnisher
A burnisher is used to apply pressure in small areas, smoothing down corners or troubled sections within a collage. This tool resembles a ball-tip pen with an opposing end that has a small, flat edge. You would use a burnisher in areas where a putty knife is too large or cumbersome.
Metal Ruler
Metal rulers are much sturdier than plastic rulers. The hard edge of a metal ruler is recommended when cutting with a craft knife. You may also use a metal ruler as a guide when scoring or tearing paper.
Heavy Machinery
On your playground, you will need a few pieces of heavy equipment. Keep in mind that it is not necessary to purchase these items to complete the projects in this book. We can always find an alternative solution. For example, use a tack hammer and tacks to secure a stretched canvas versus a staple gun or use a press cloth with your iron to keep it clean enough to use on clothes later. No ink jet printer? It's OK; find a copy center and become friends with them. Not into the sewing machine? No sweat; hand stitching works just fine. See, even on a rainy day the playground is in full operation.
-
Sewing machine
-
Color copy machine or ink jet printer
-
Iron, dedicated to art
-
Staple gun for stretching canvas
Keeping the Playground Clean
We all know that littering is unacceptable, so think about your work space in the same way. It is OK to have a work in progress. However, even with collage, you will want to keep the area relatively clean and most definitely wash your hands when needed. There's nothing worse than finishing a masterpiece and damaging it by picking it up with dirty hands.
-
Water container
-
Clean rags
-
Palette
-
File system to store collage materials