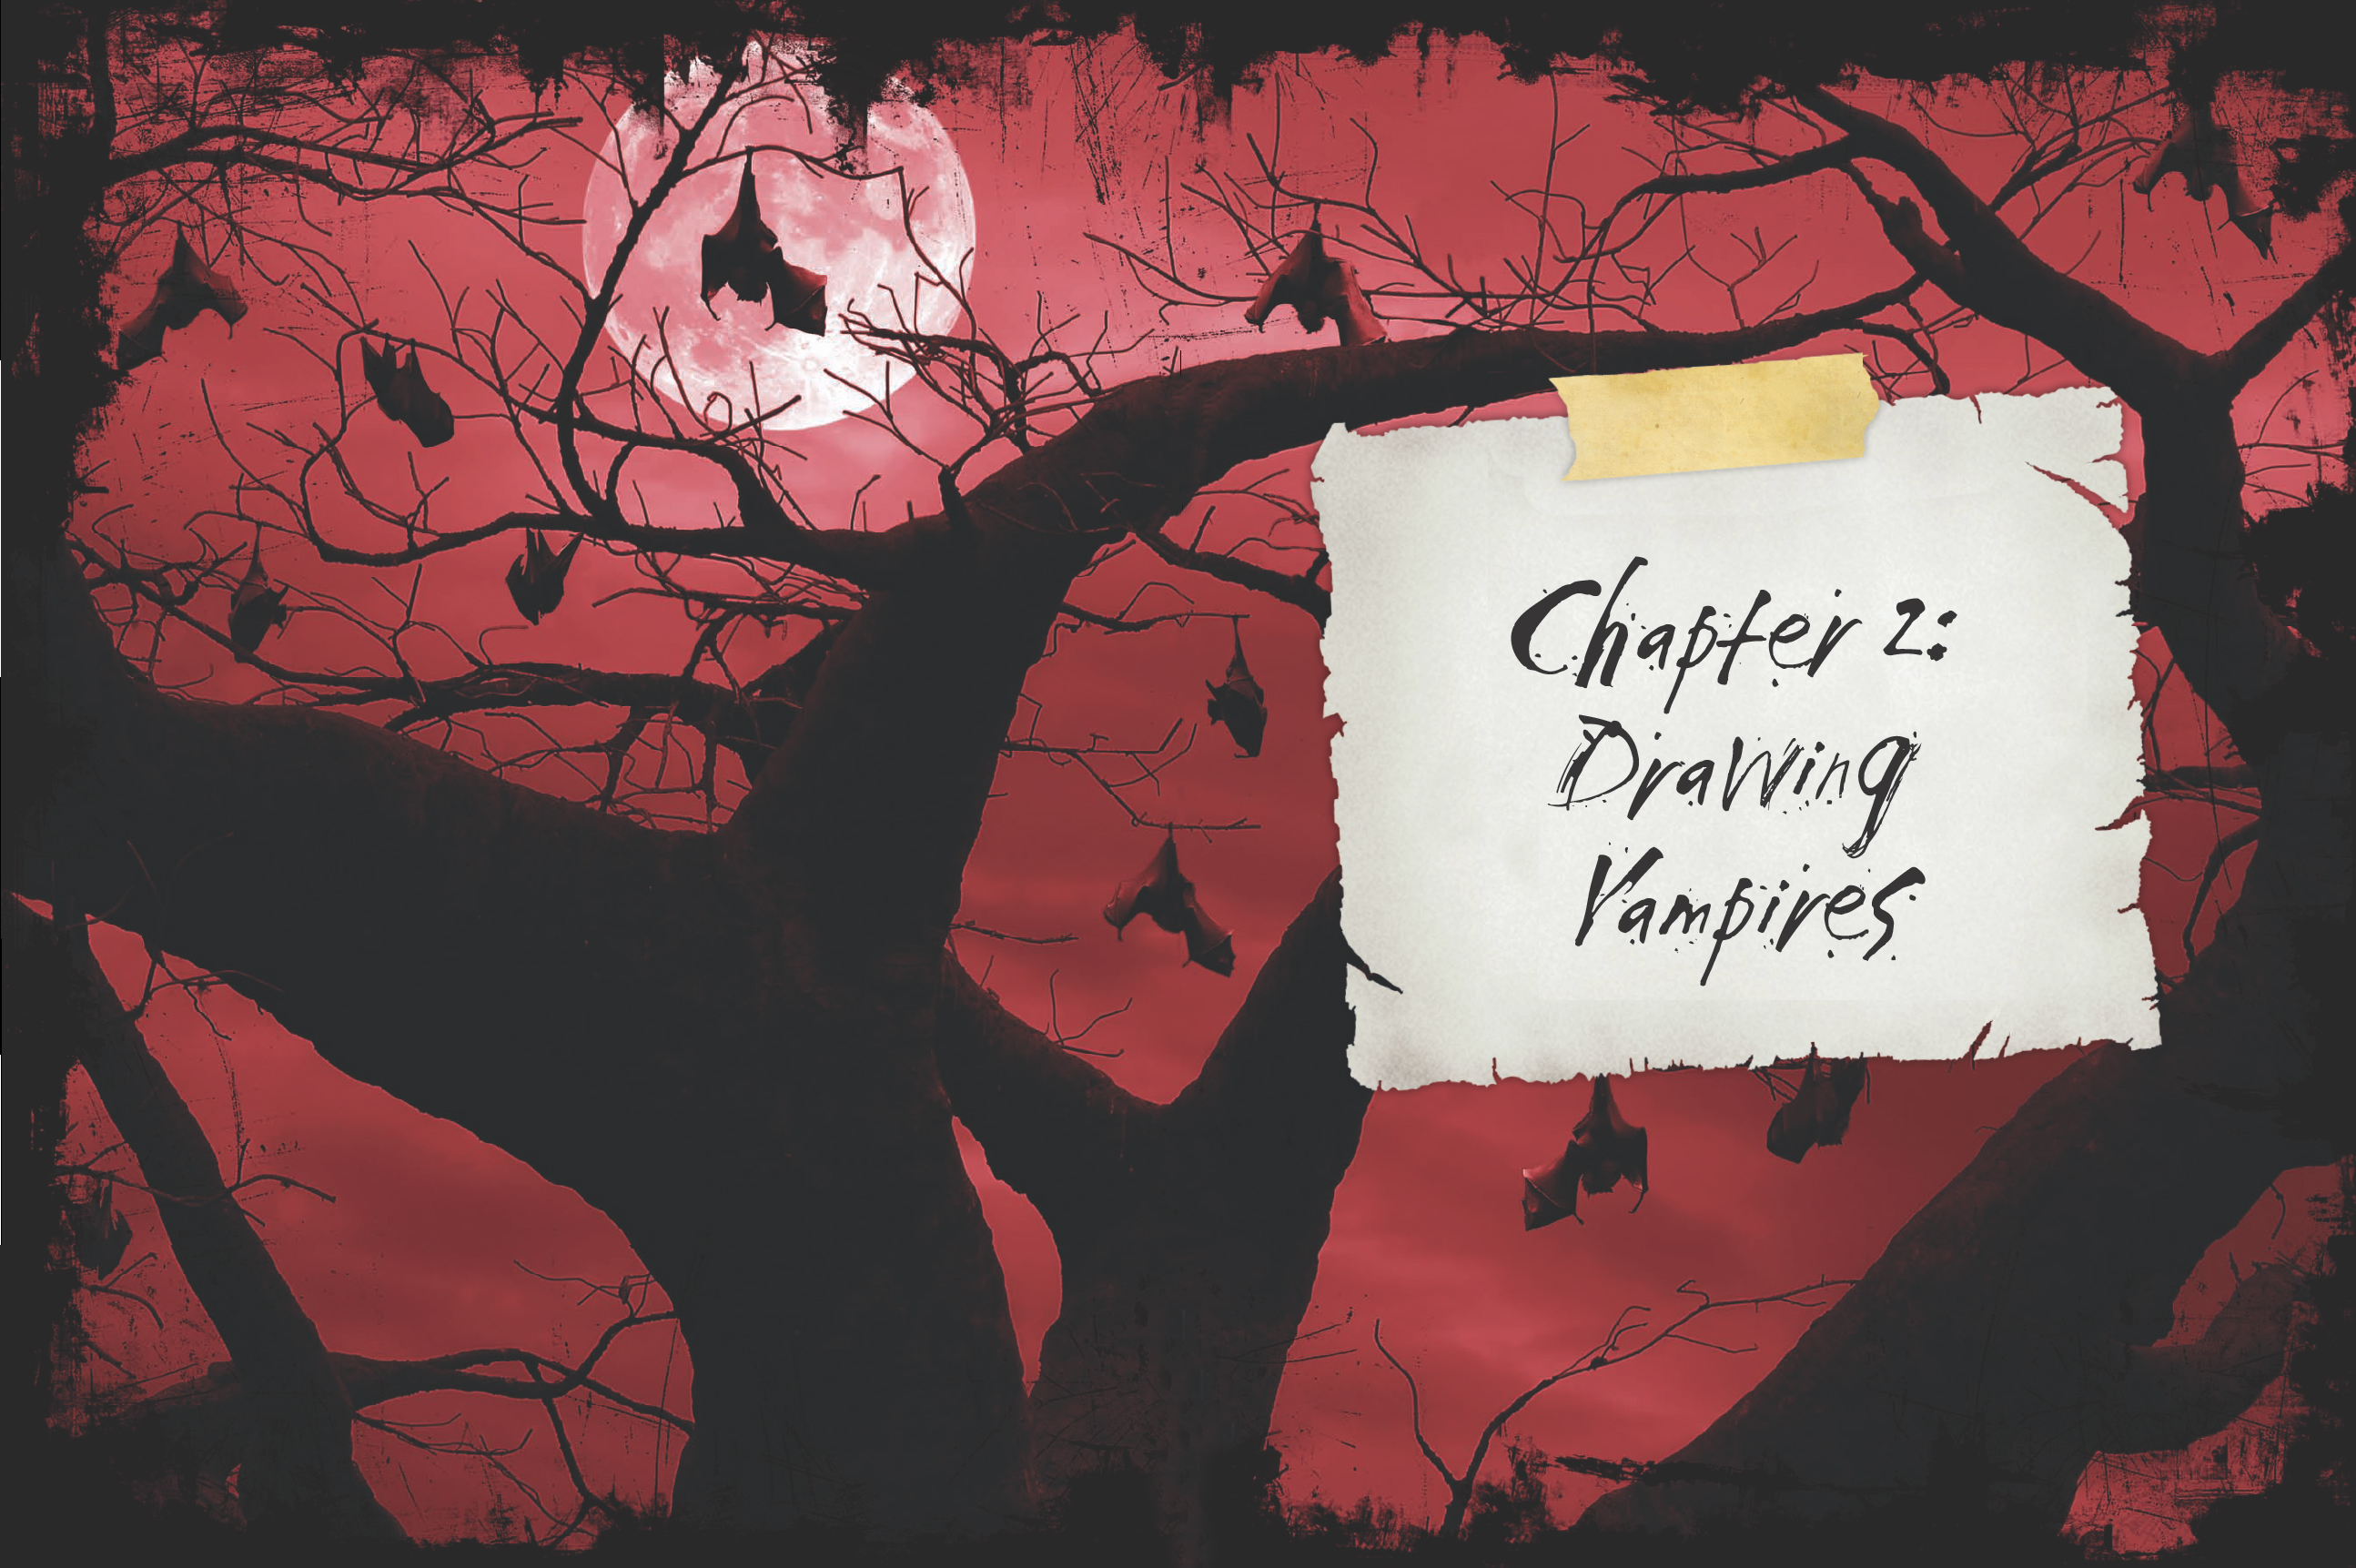
Drawing vampires is a bit simpler than painting or rendering them on the computer, so let’s start here. Basically, drawing consists of indicating shapes and defining values (the lightness or darkness of a color or of black). Because one relies so heavily on value to represent the subject, it’s important to include a range of values for variety and contrast. Keep this in mind throughout your drawing process—from the beginning stages to the final details.
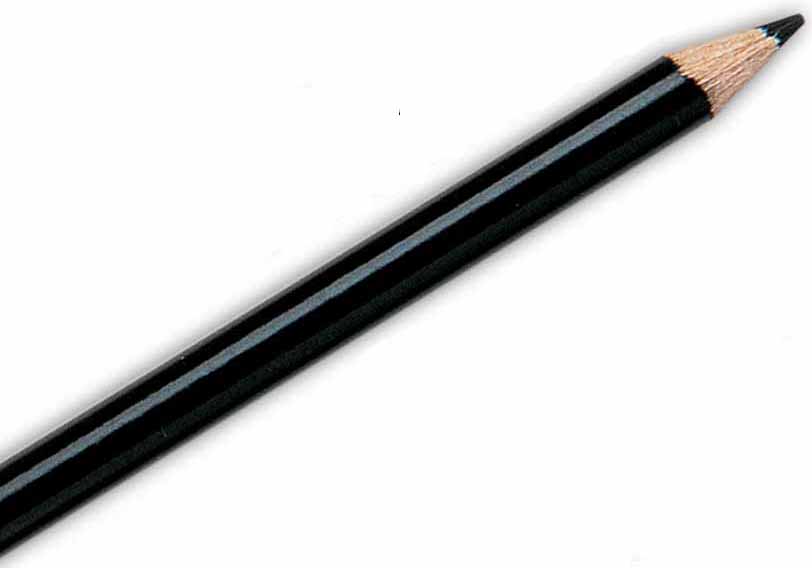
Black colored pencil
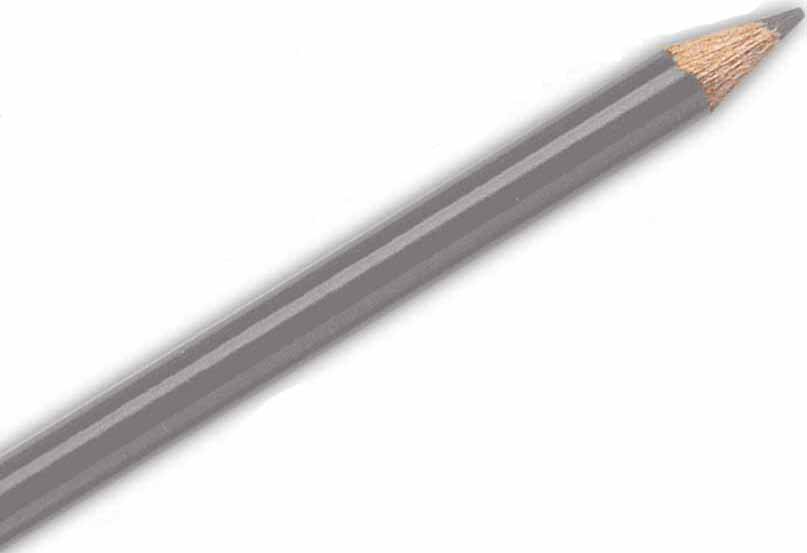
Warm gray colored pencil
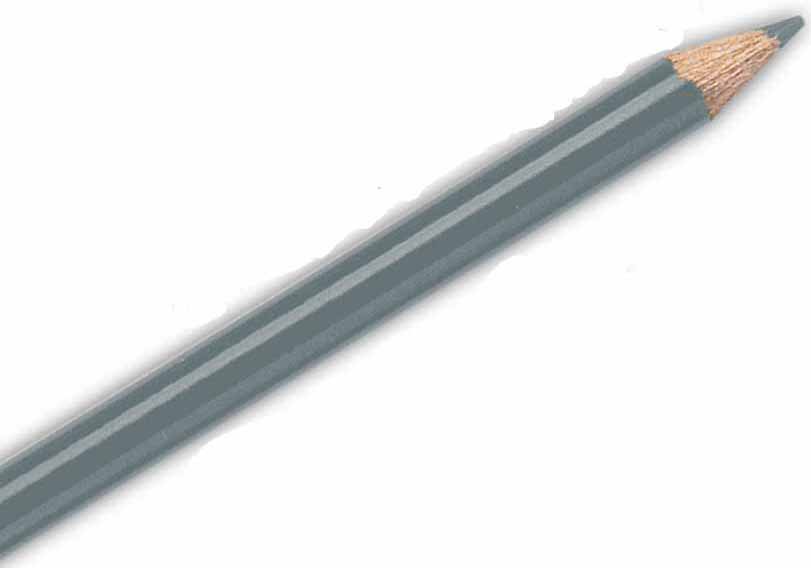
Cool gray colored pencil
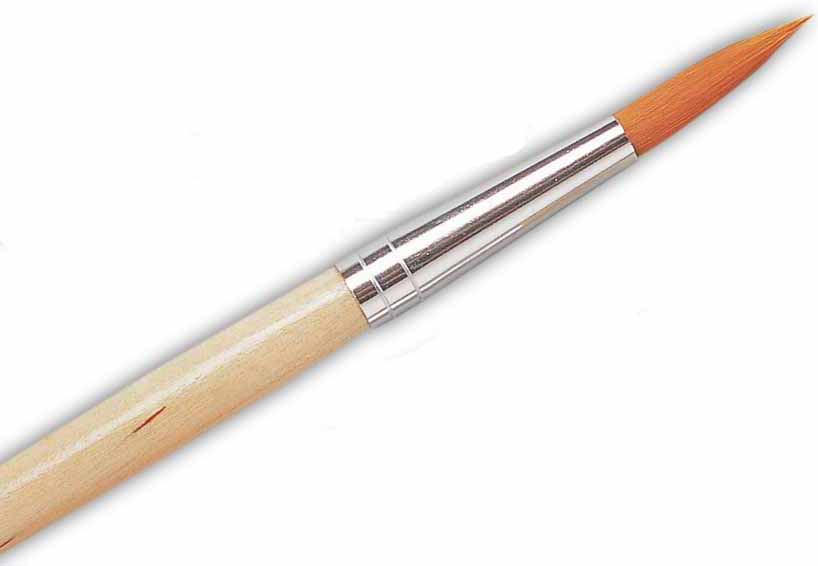
Small paintbrush
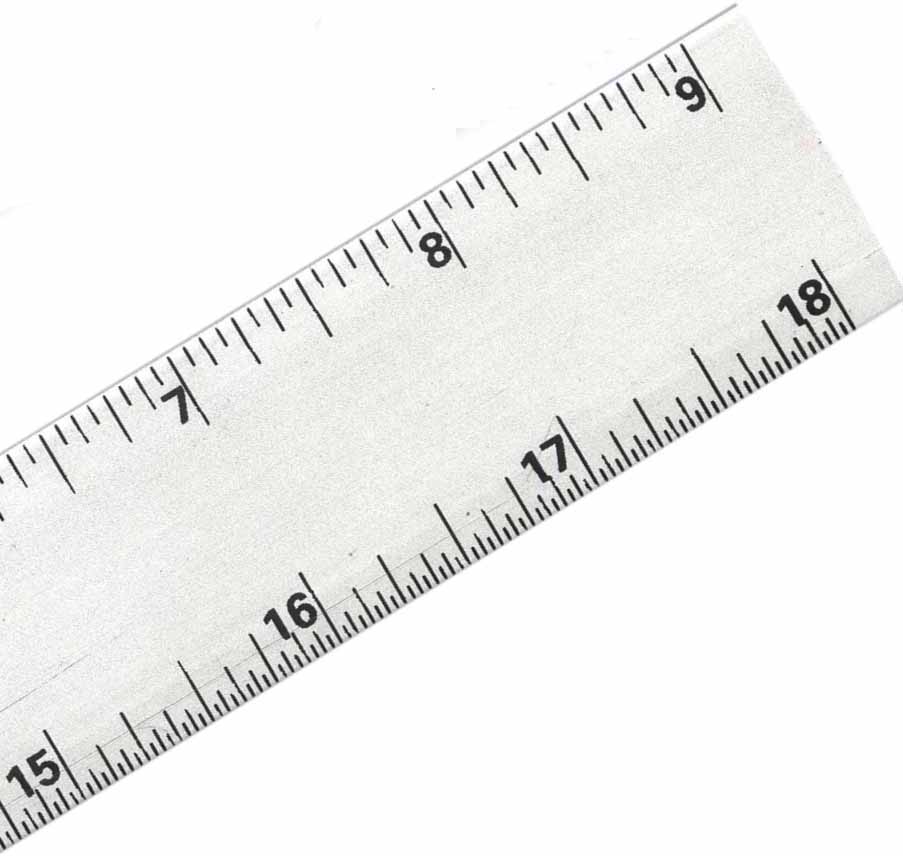
Ruler
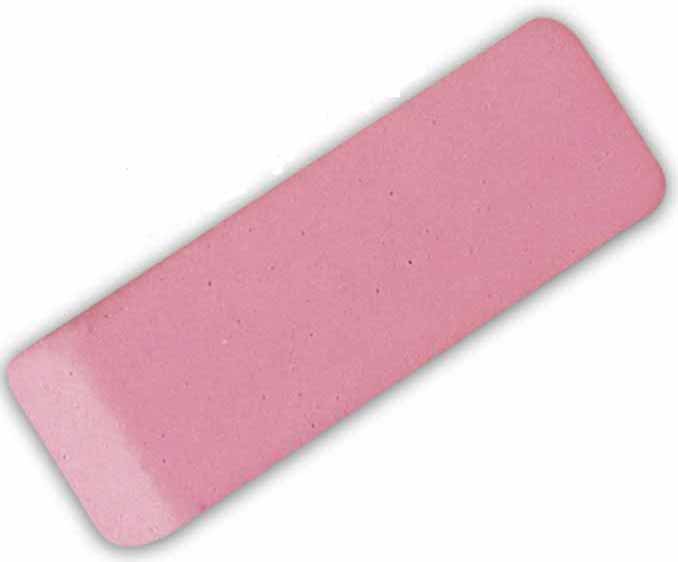
Eraser
Tracing paper
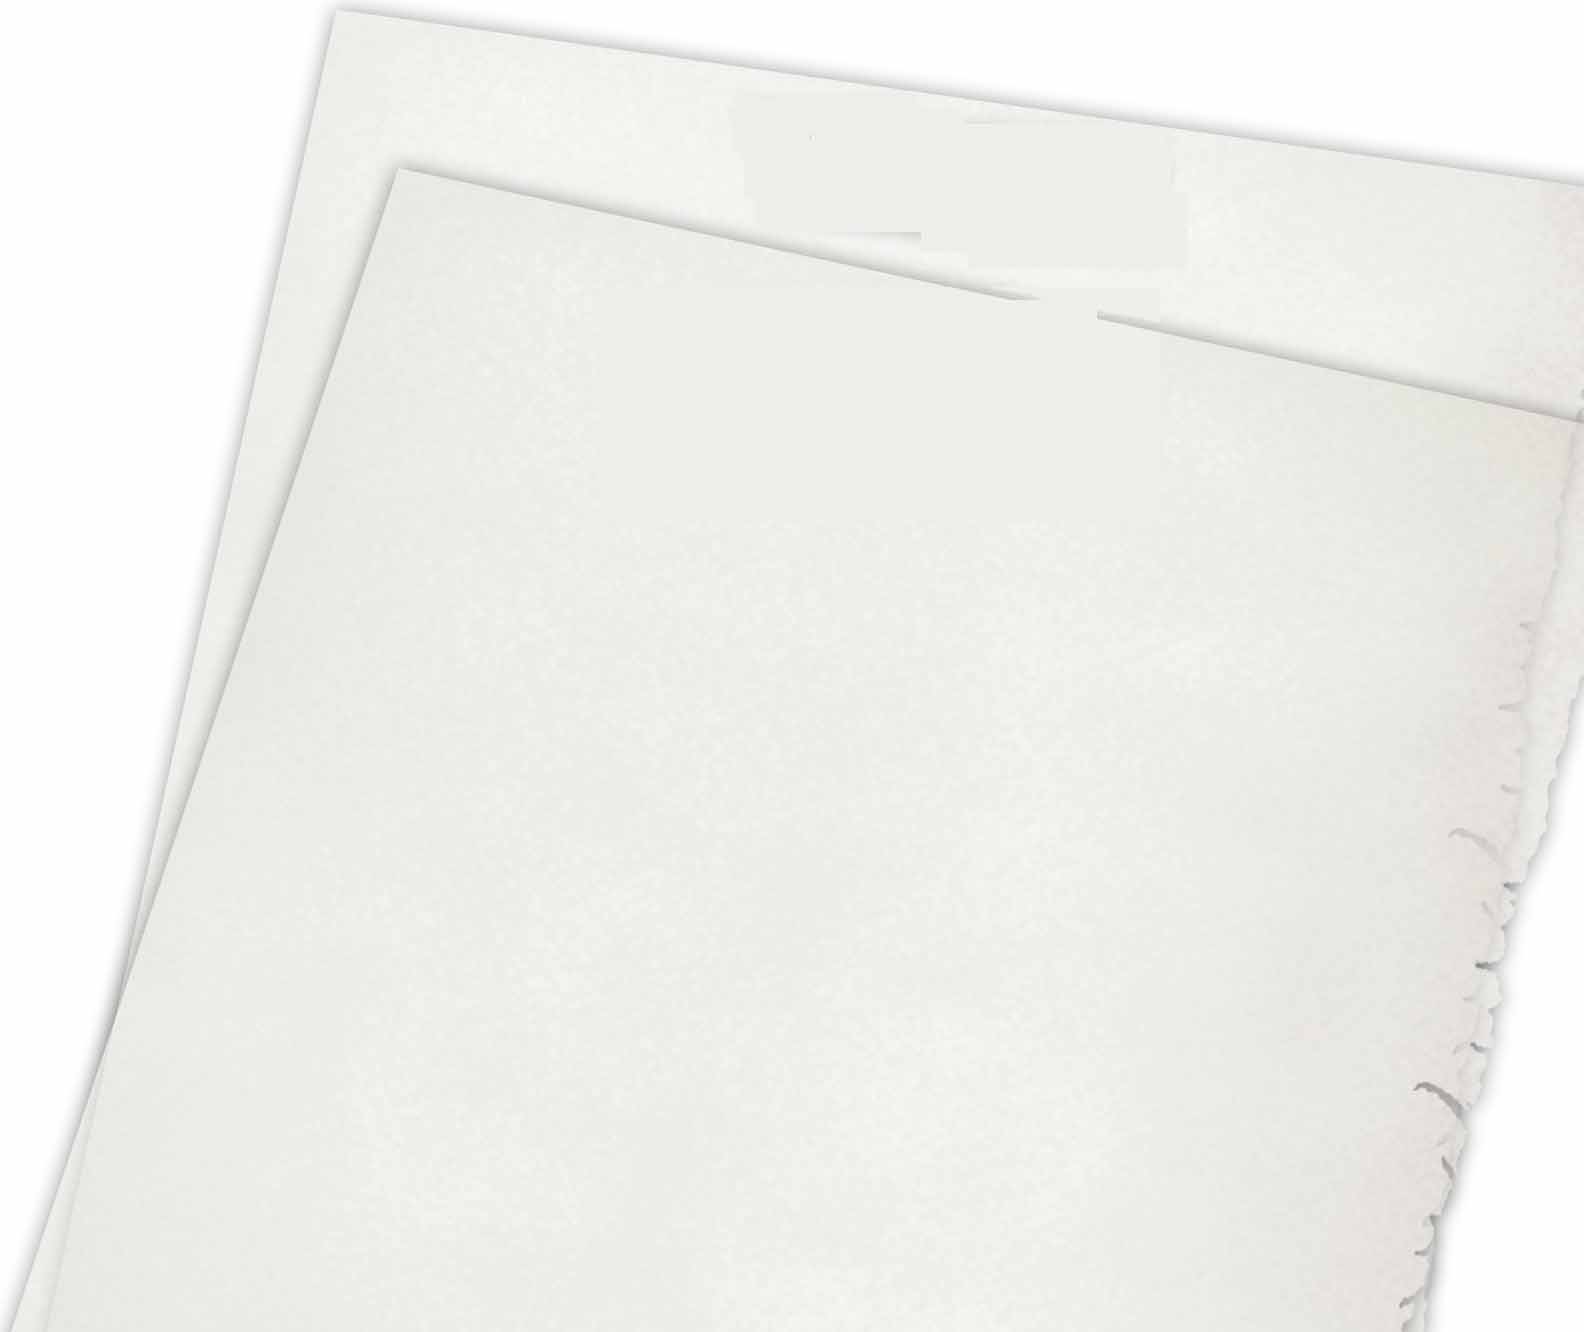
Vellum paper
The projects in this book will be easier if you have access to a light table, such as the one shown on the right. This illuminated surface makes it possible to create a clean outline from a sketch, simply by placing a sheet of paper over your sketch and tracing. If you don’t have a light table, you’ll want to keep your initial sketch lines very light so they can be erased at a later stage.

Pencils
Graphite drawing pencils are generally graphite “leads” encased in wood. The lead comes in grades and is usually accompanied by a letter (“H” for “hard,” or “B” for “soft”) and a number (ranging from 2 to 9). The higher the number accompanying the letter, the harder or softer the graphite. (For example, a 9B pencil is extremely soft.) Hard pencils produce a light value and can score the surface of the paper, whereas softer pencils produce darker values and smudge easily. For this reason, stick to an HB (aka #2) pencil, which is right in between hard and soft pencils.
In addition to graphite pencils, you will also use a few colored pencils. Colored pencils are less likely to smear and come in a wide range of colors. (See also “Colored Pencils” on page 71.)
Kneaded Eraser
A kneaded eraser is a helpful tool that can serve as both an eraser and a drawing tool. It can be molded into any shape, making it easy to remove graphite from your drawing surface. To erase, simply press the kneaded eraser onto your paper and lift. Unlike kneaded erasers, rubber or vinyl erasers can damage delicate drawing surfaces, and it’s not as easy to be precise.
Paints
The project in this chapter involve mostly drawing, but they do suggest paint to accent areas here and there. The gouache (an opaque type of watercolor) and acrylic paints listed are all water-soluble, so you’ll need a jar of water and some paper towels when using them. You can use either natural or synthetic hair bristles with gouache paint, but you’ll want to stick with synthetic bristles when using acrylic.
Workable Spray Fixative
Coating your drawings with a layer of spray fixative can help prevent smudging as you develop your drawings. It’s easy to accidentally smear your strokes. Workable spray fixative allows you to spray occasionally throughout your drawing process, so you can prevent accidents along the way.
Drawing Surfaces
Traditional drawing paper comes in three types: hot-press (smooth), cold-press (textured), and rough. Choose your texture according to your desired look. In general, rough paper produces broken strokes; it’s not conducive to creating detail, but it’s ideal for a sketchy style. Smooth paper allows for smooth, controlled strokes. In this chapter, the projects call for vellum paper, which offer suitable surfaces for a multimedia drawing approach.

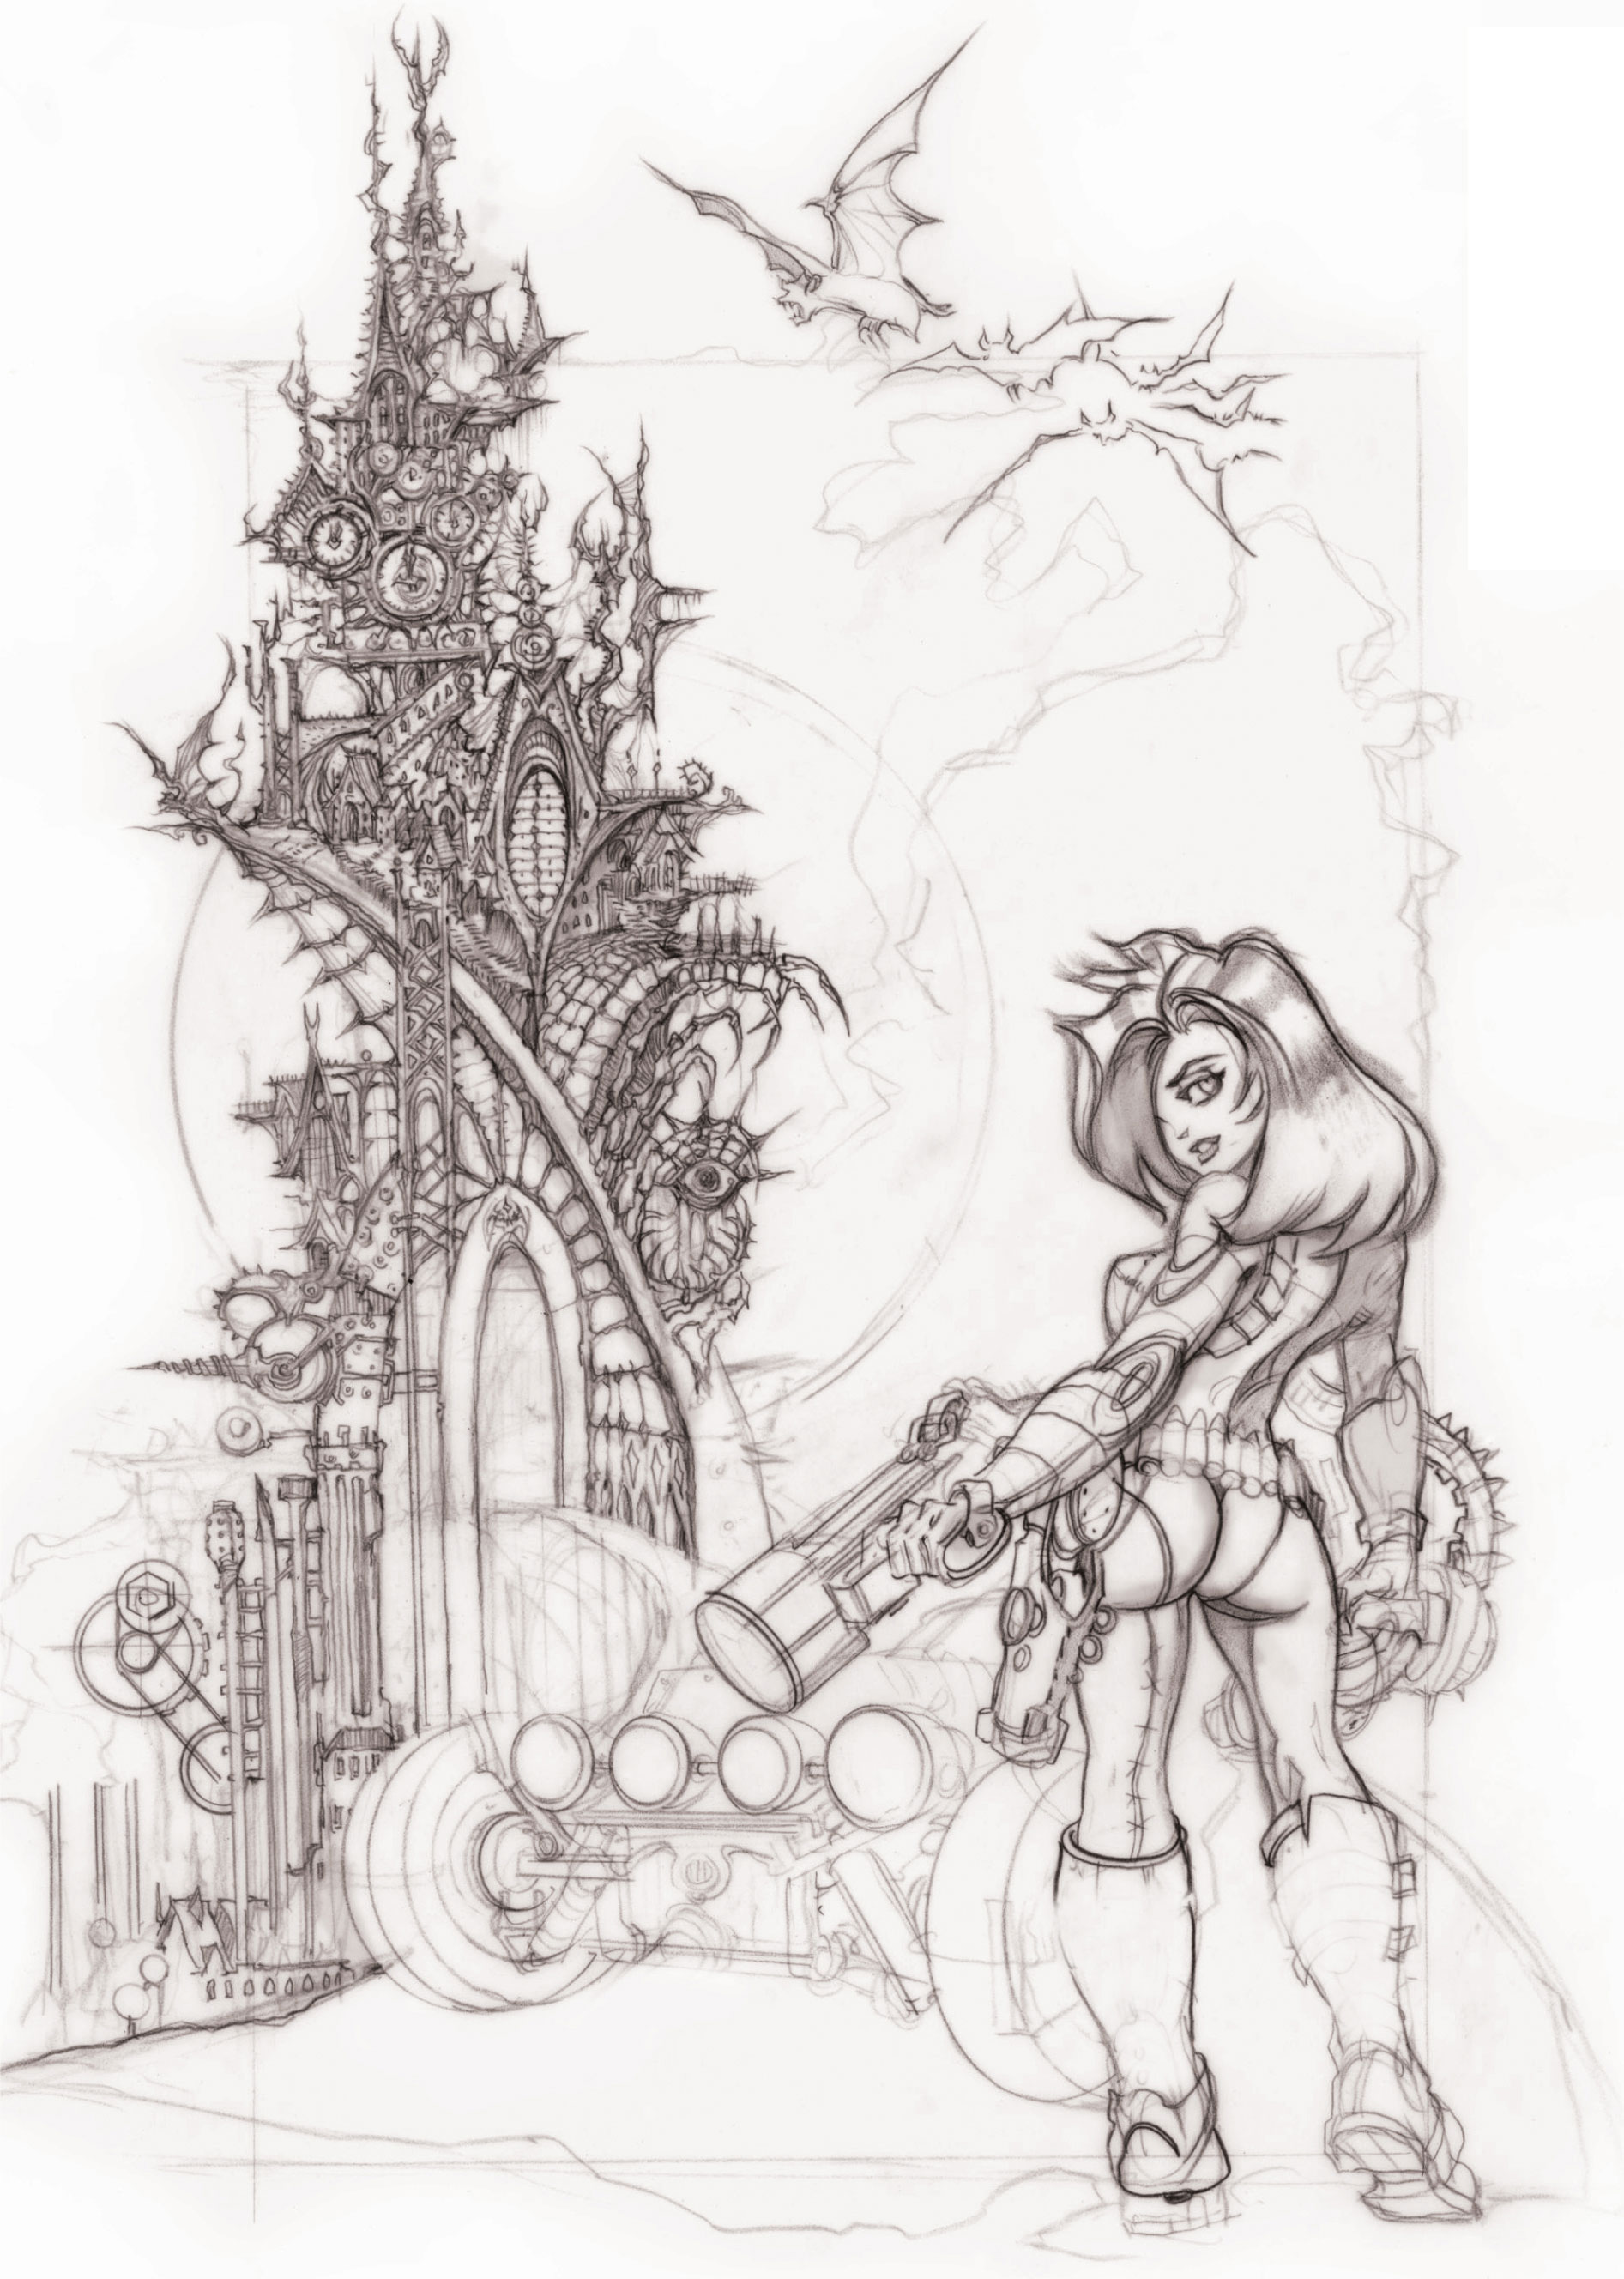
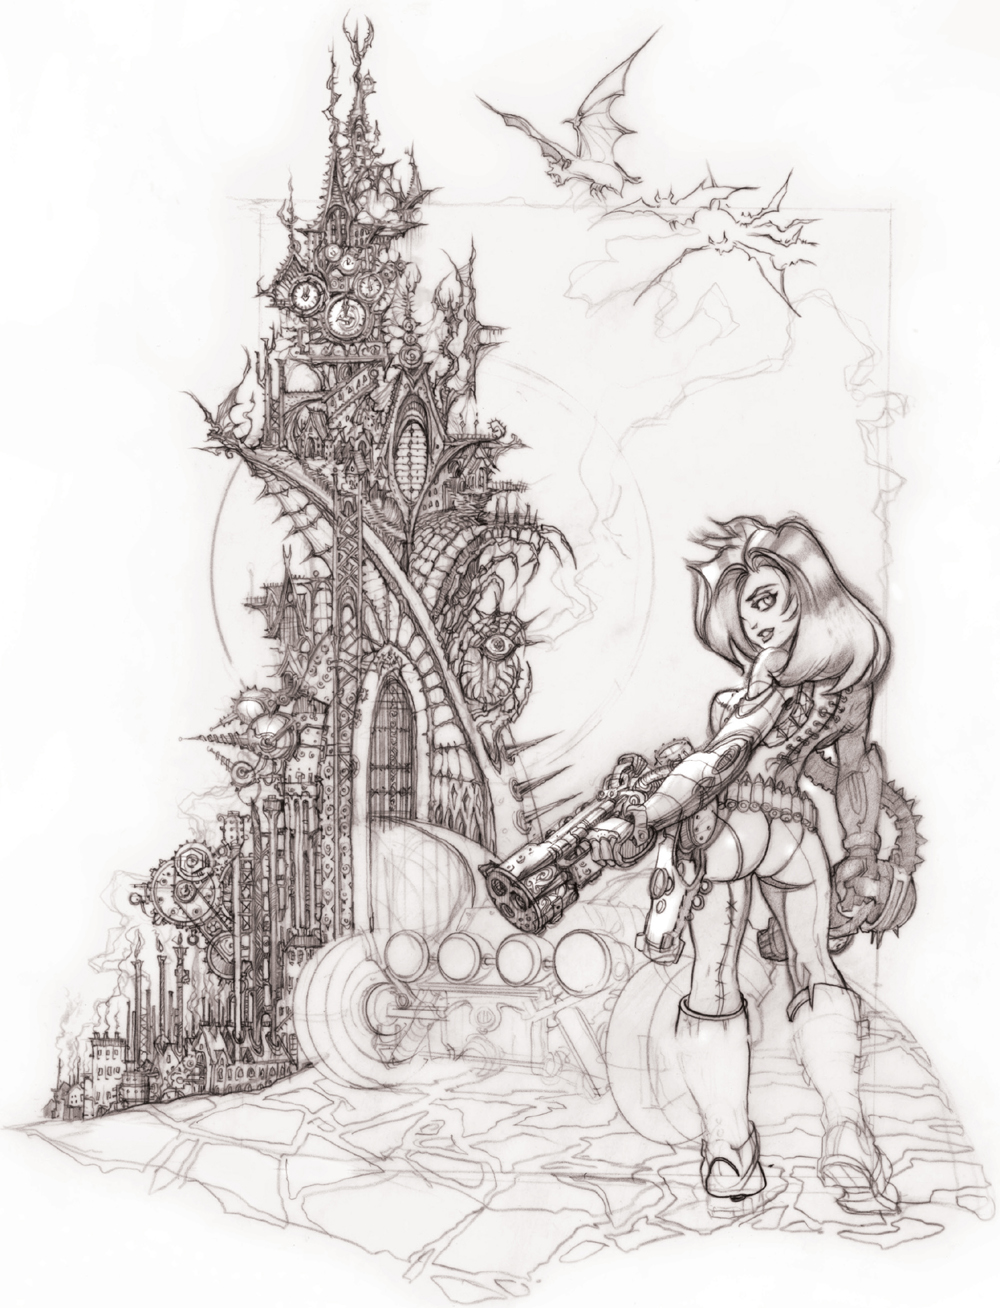
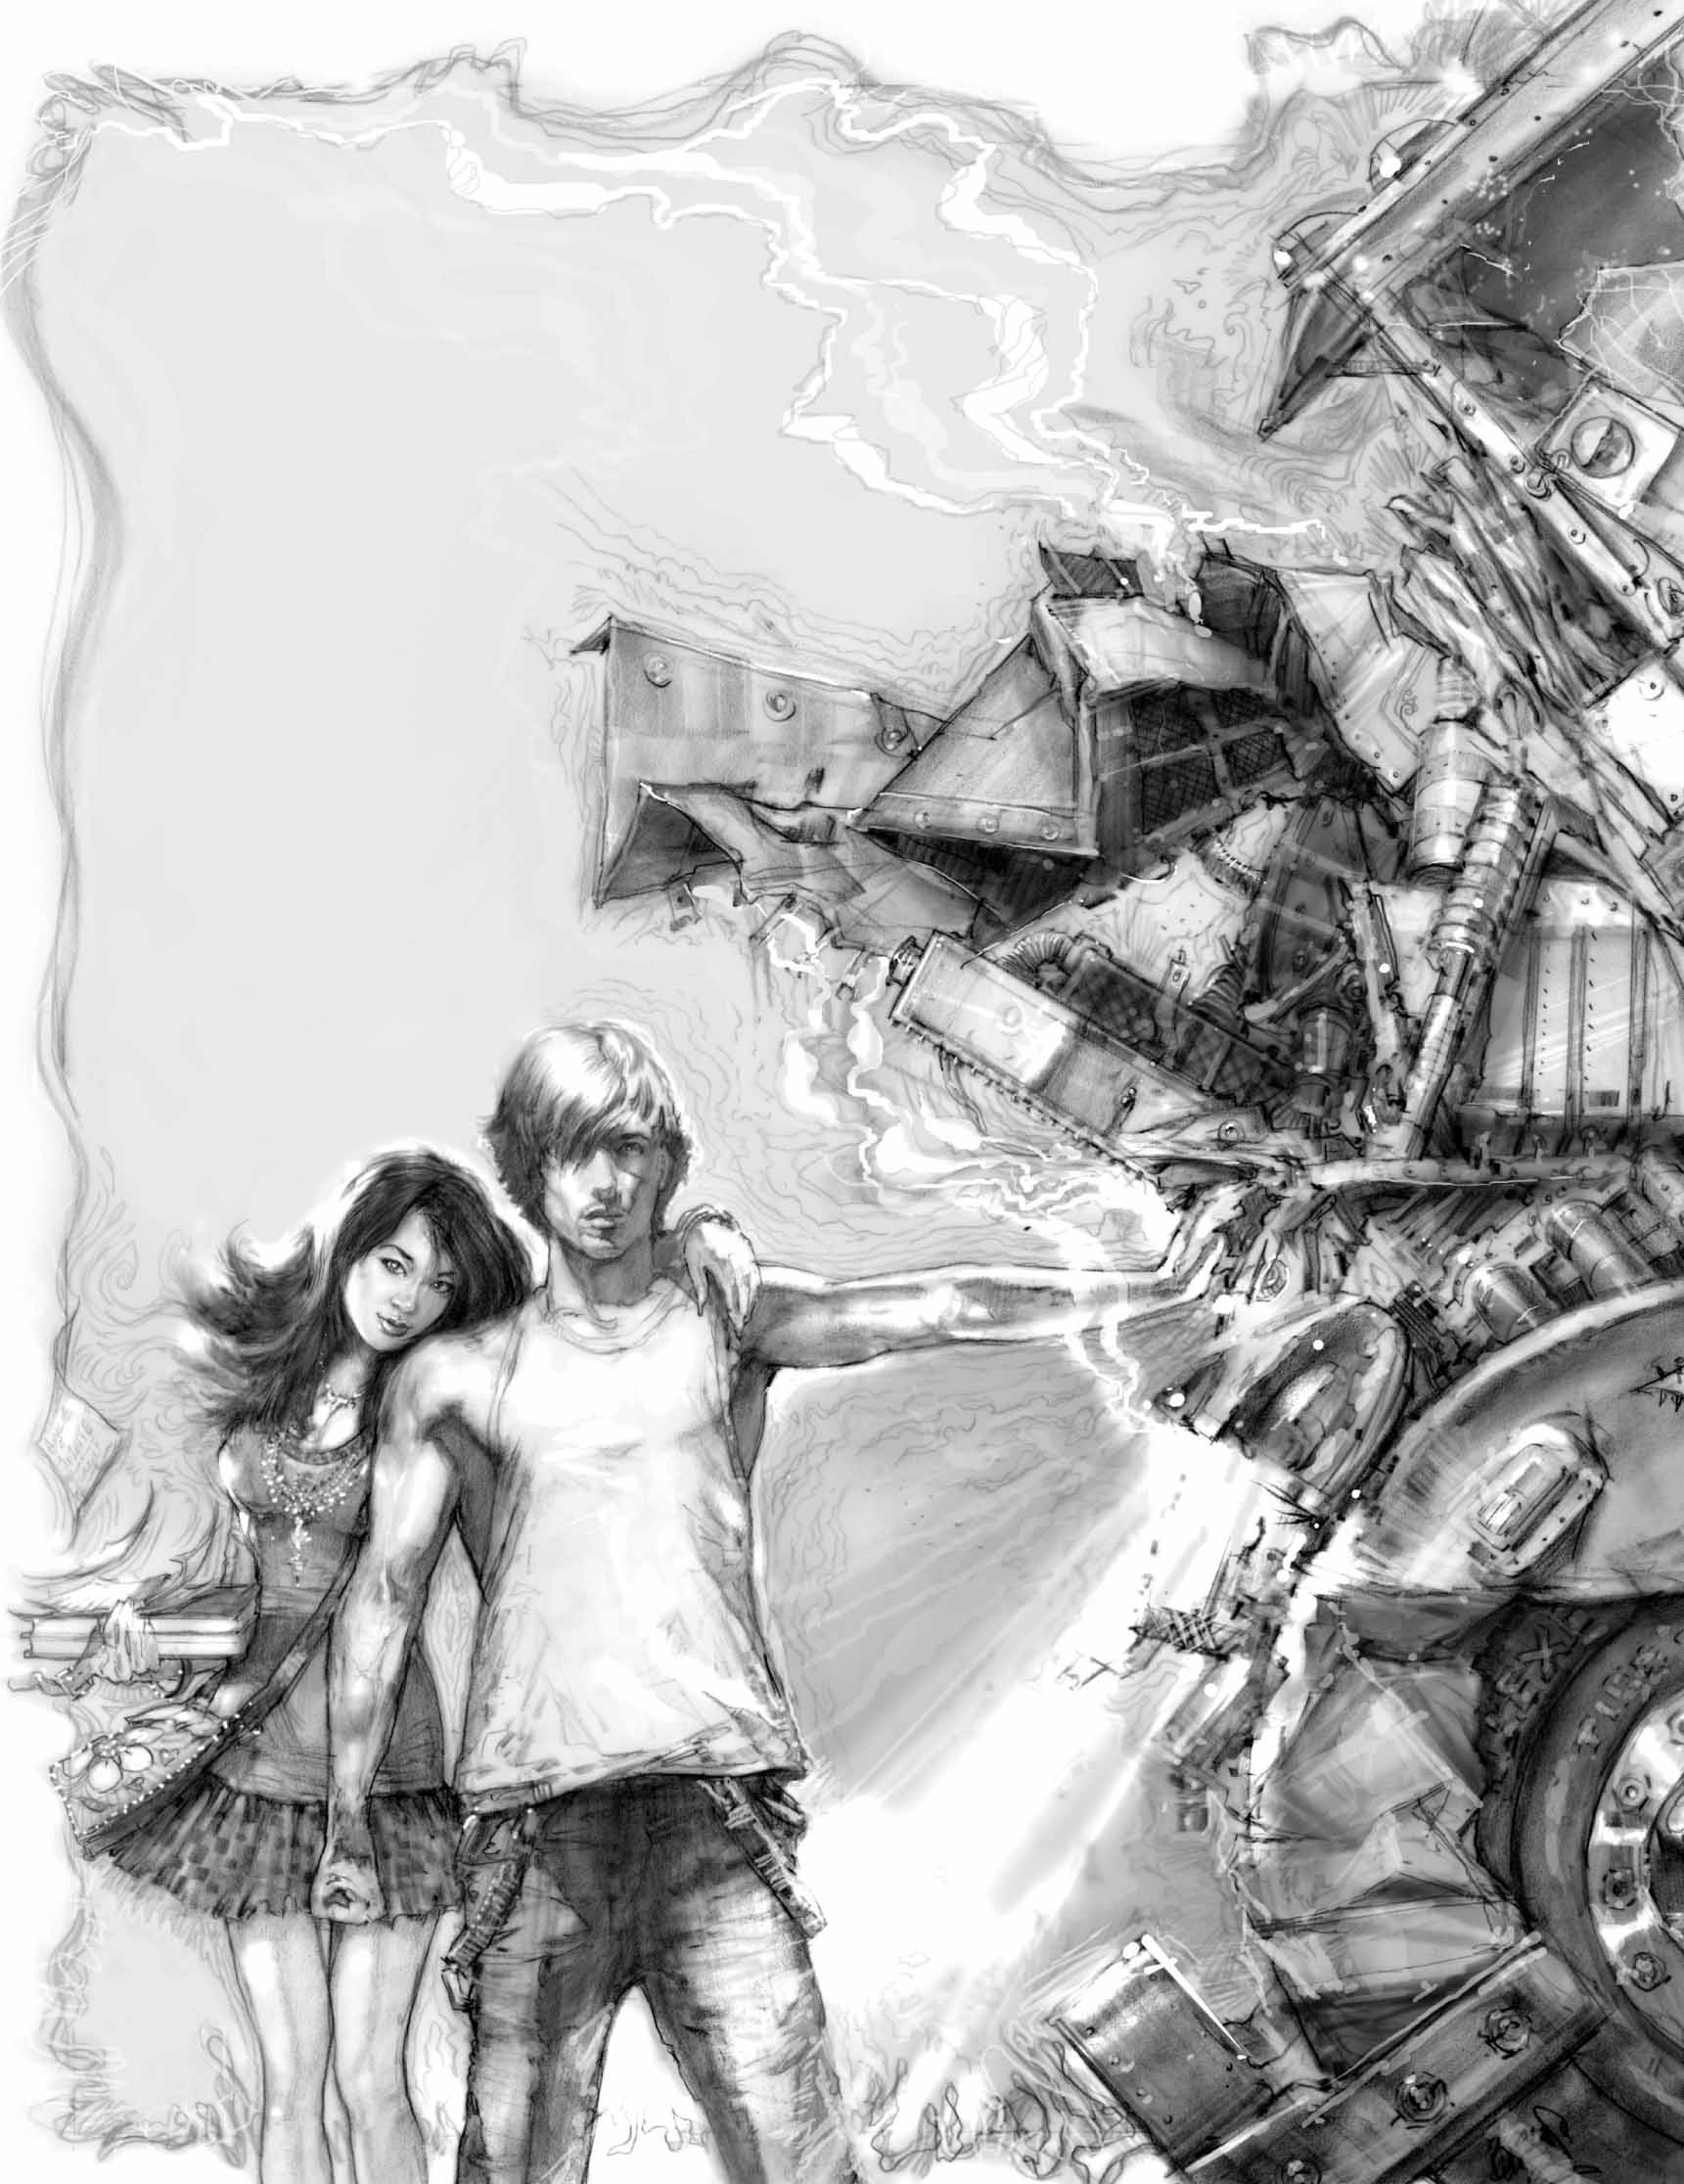
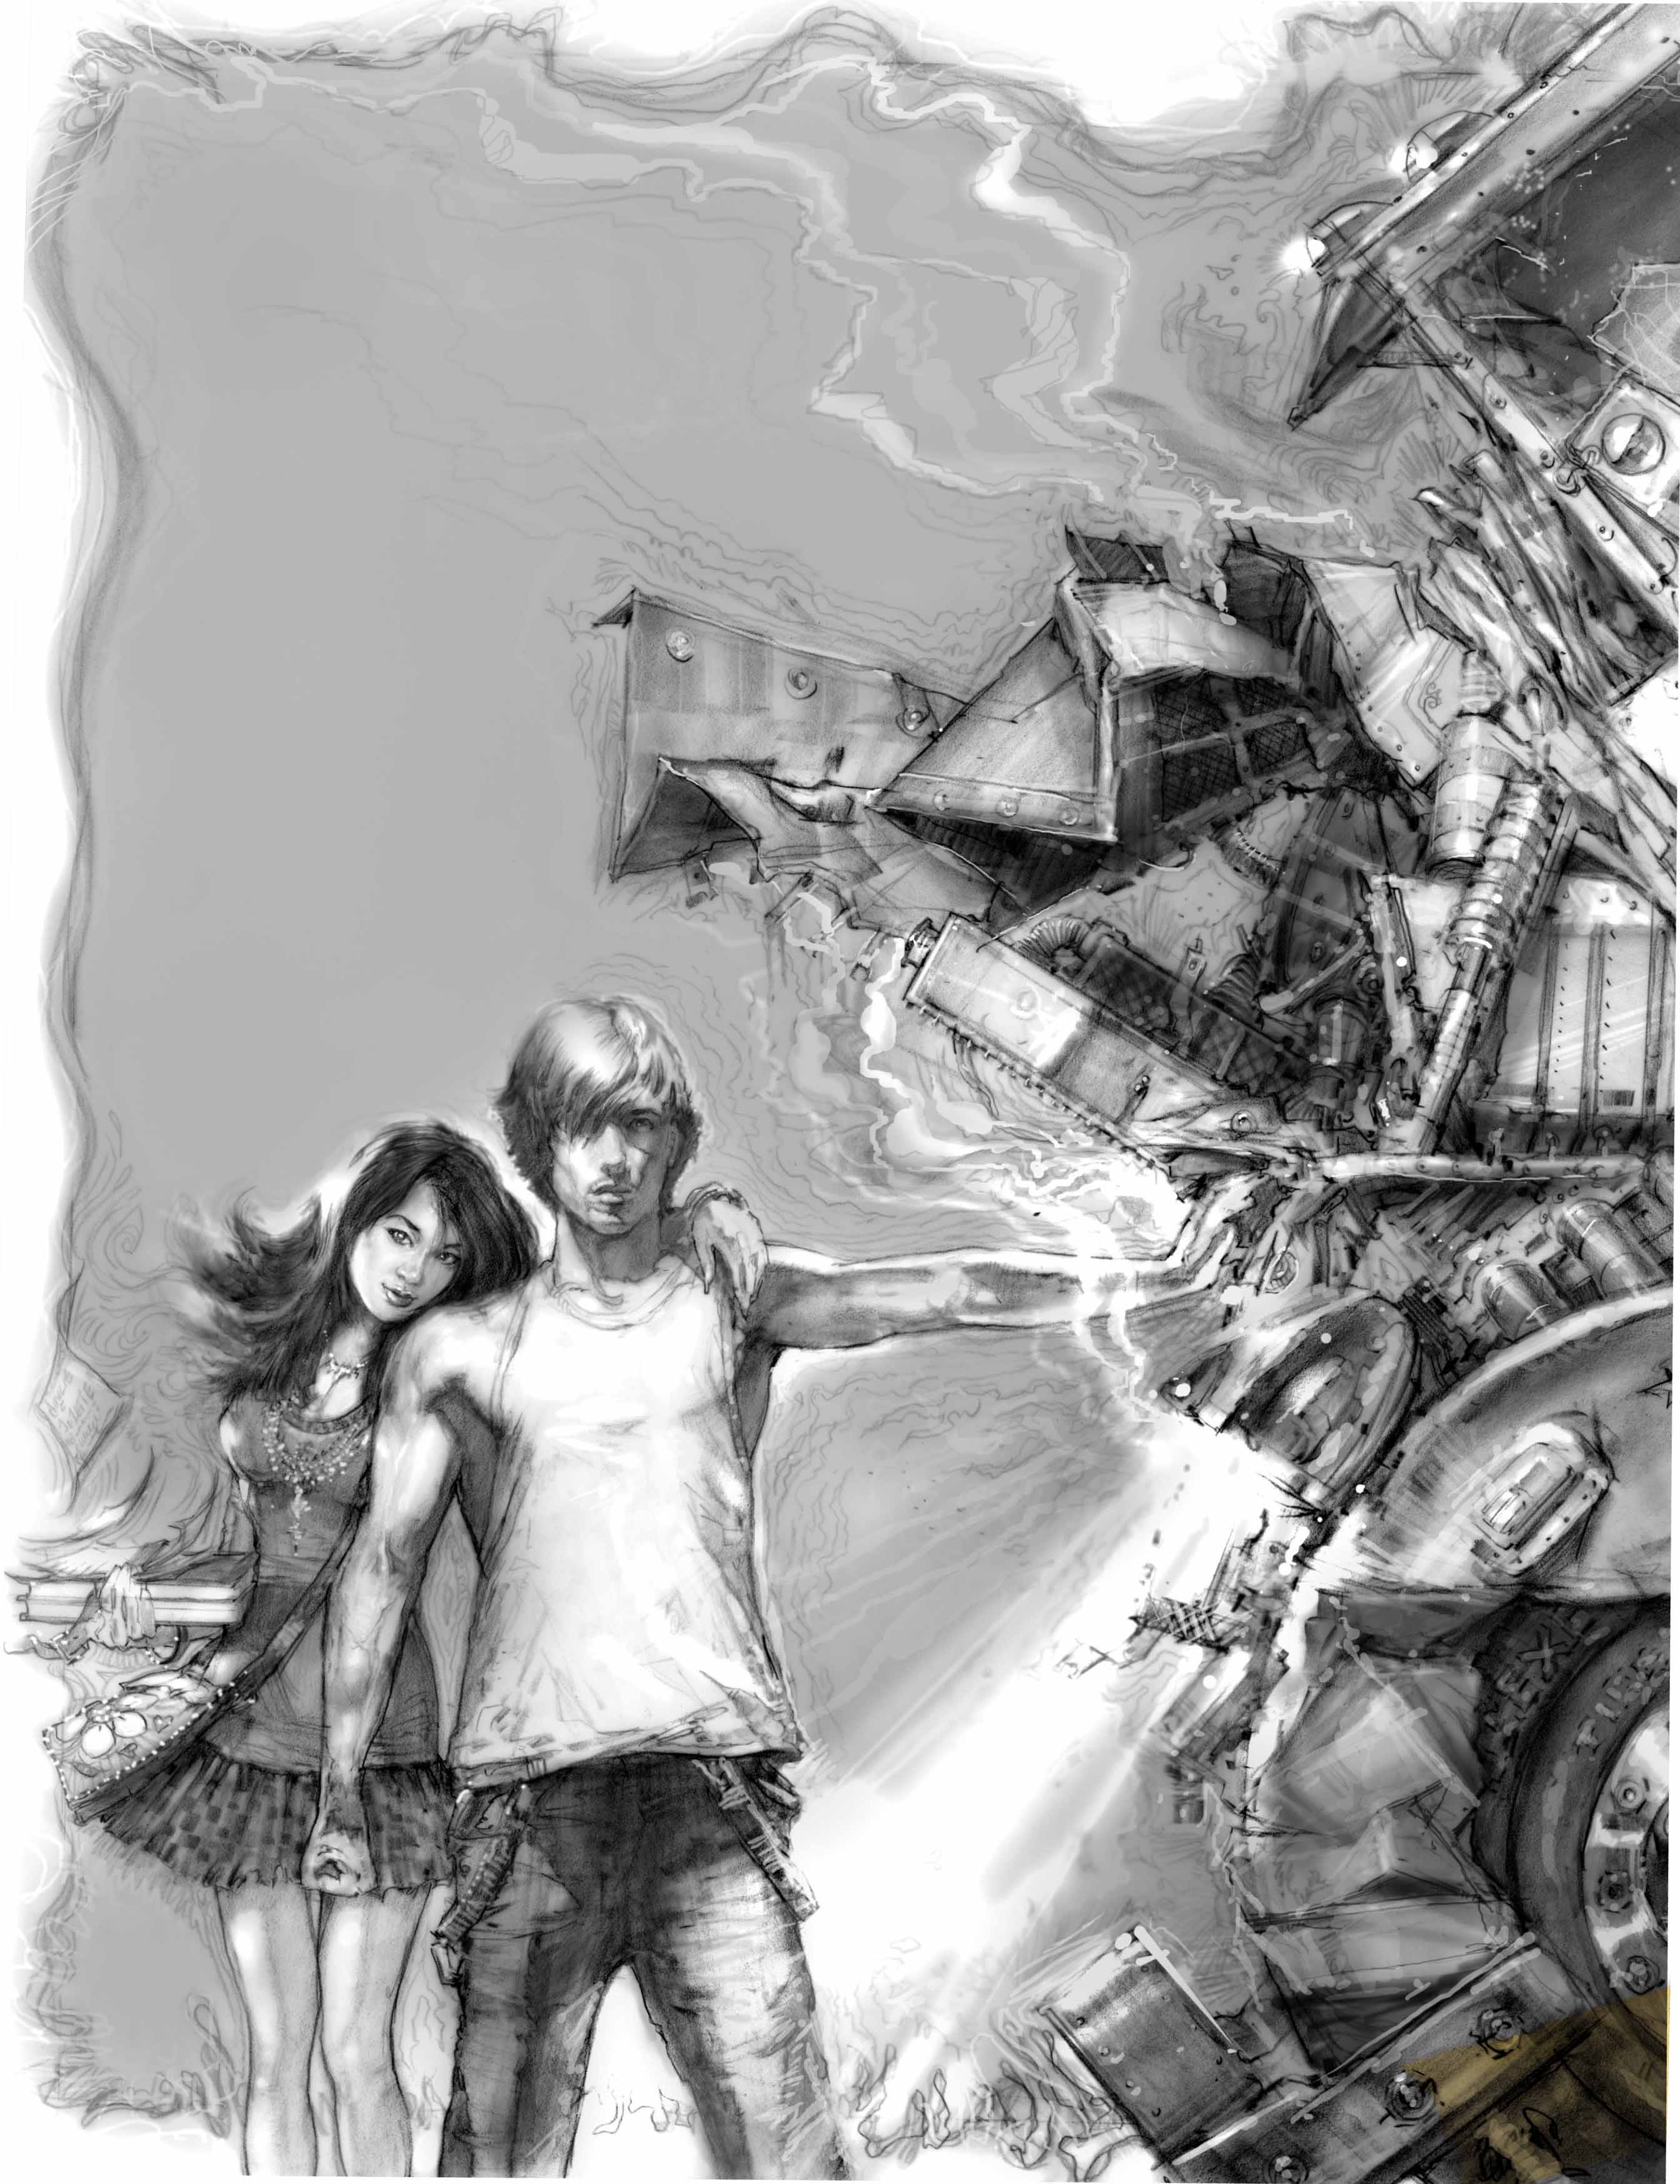
This provocative vampire slayer found inspiration in a variety of popular subcultures, from steampunk to Goth to anime. All aspects of these genres are intriguing, but by blending them together you will create something new and fresh and original. Our slayer stands at the base of a castle, ready to do battle with the hungry vampire queen who lurks inside.
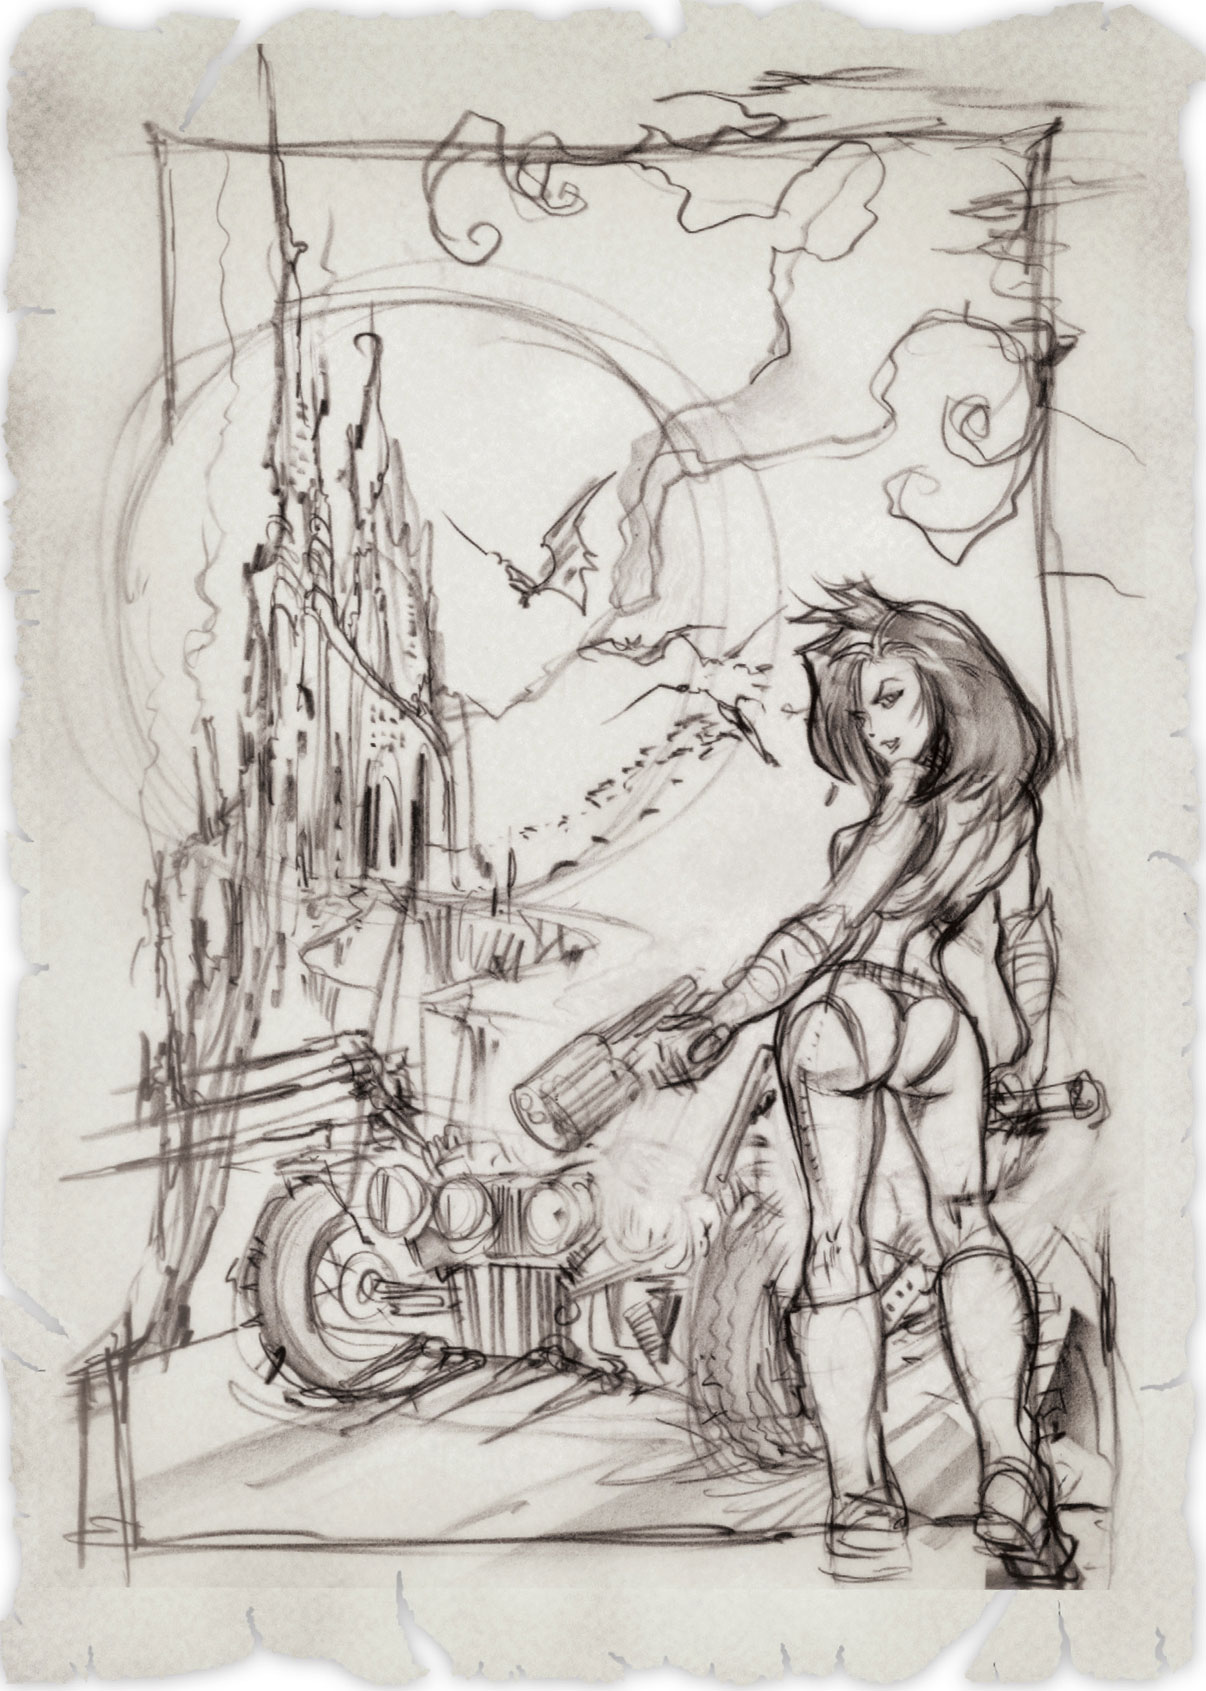
Step One We start this illustration with a block-in using a black colored pencil over tracing paper. Breaking the frame keeps the composition dynamic. The slayer stands in the foreground, while everything else forms a peak that points toward the lair of the deadly vampire queen. (You can transfer this sketch; see “Transferring a Drawing” below.)
To begin the projects in this book, you might find it helpful to trace a basic outline of the final piece of art (or one of the early steps). Transferring the outlines of an image to your drawing or painting surface is easier than you may think. The easiest method for this involves transfer paper, which you can buy at your local arts and crafts store. Transfer paper is a thin sheet of paper that is coated on one side with graphite. (You can also create your own version of transfer paper by covering one side of a piece of paper with graphite from a pencil.) Simply follow the steps below.
Step 1 Make a photocopy of the image you would like to transfer and enlarge it to the size of your drawing paper or canvas. Place the transfer paper graphite-side-down over your paper or canvas. Then place your photocopy over the transfer paper and secure them in place with tape.

Step 2 Lightly trace the lines that you would like to transfer onto your drawing or painting surface. When transferring a guide for a drawing project, keep the lines minimal and just indicate the position of each element; you don’t want to have to erase too much once you remove the transfer paper.
Step 3 While tracing, occasionally lift the corner of the photocopy to make sure the lines are transferring properly. Continue tracing over the photocopy until all of your lines have been transferred.
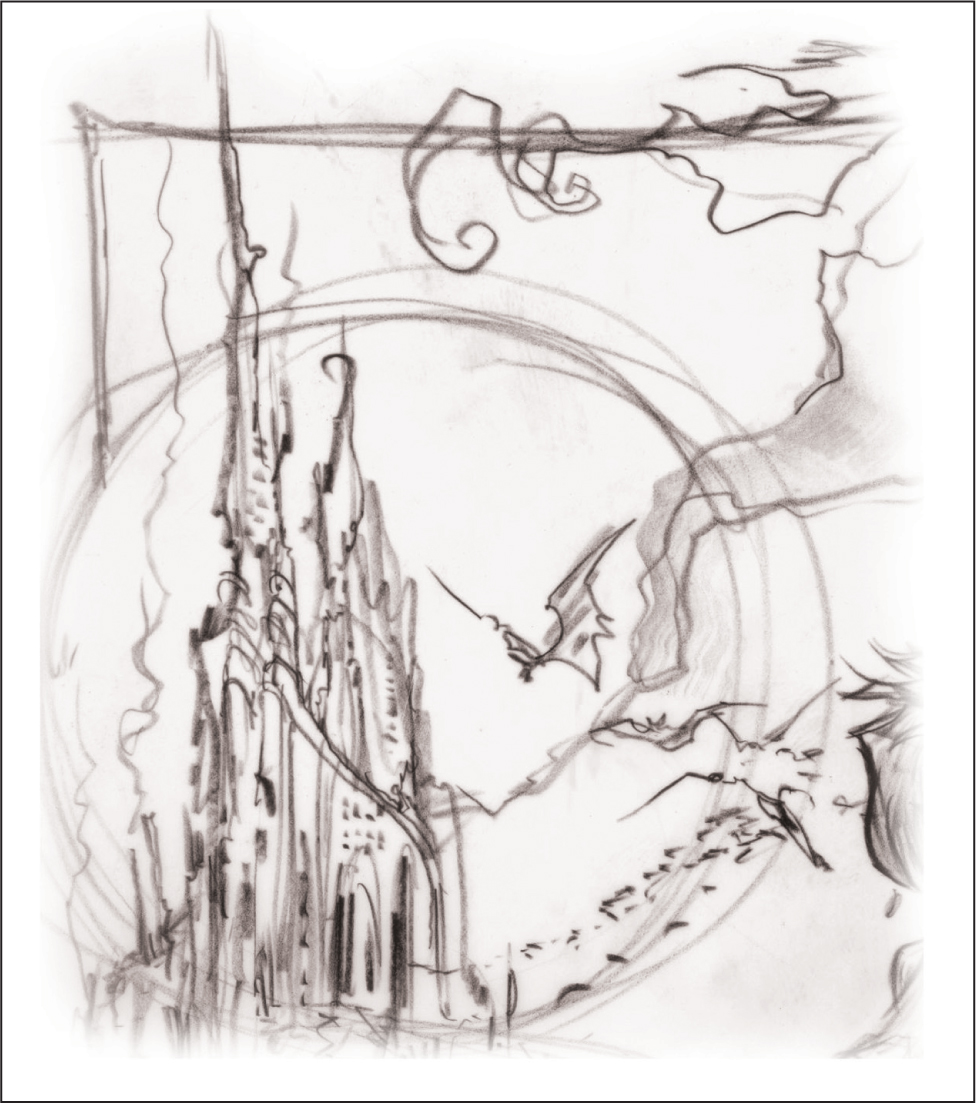
Step Two The curling smoke and the full moon behind the castle serve two purposes in this illustration. First, they help set the dark, eerie mood we want to project. Second, they help soften the jagged edges of the castle.
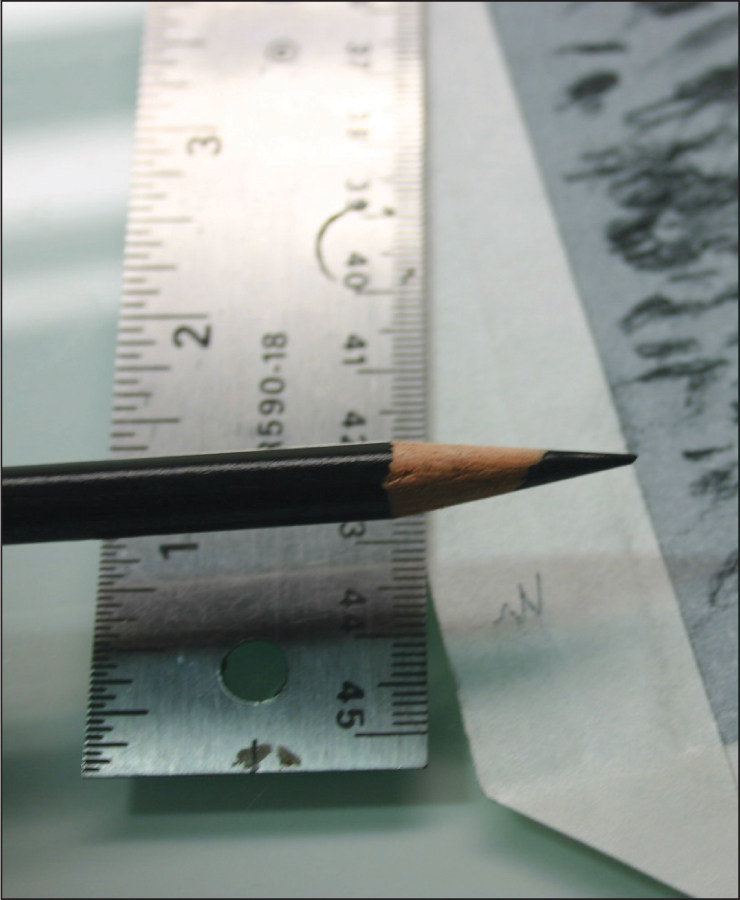
Note: It’s extremely important to keep your pencils sharp, especially when drawing at this size and when using vellum paper. It’s best to use an electric sharpener that produces very sharp tips (preferably to a 16-degree point). Next, you can use 600-grit sandpaper to further sharpen the pencil. This also creates a chiseled edge which makes it easier to vary the width of your line as you draw.
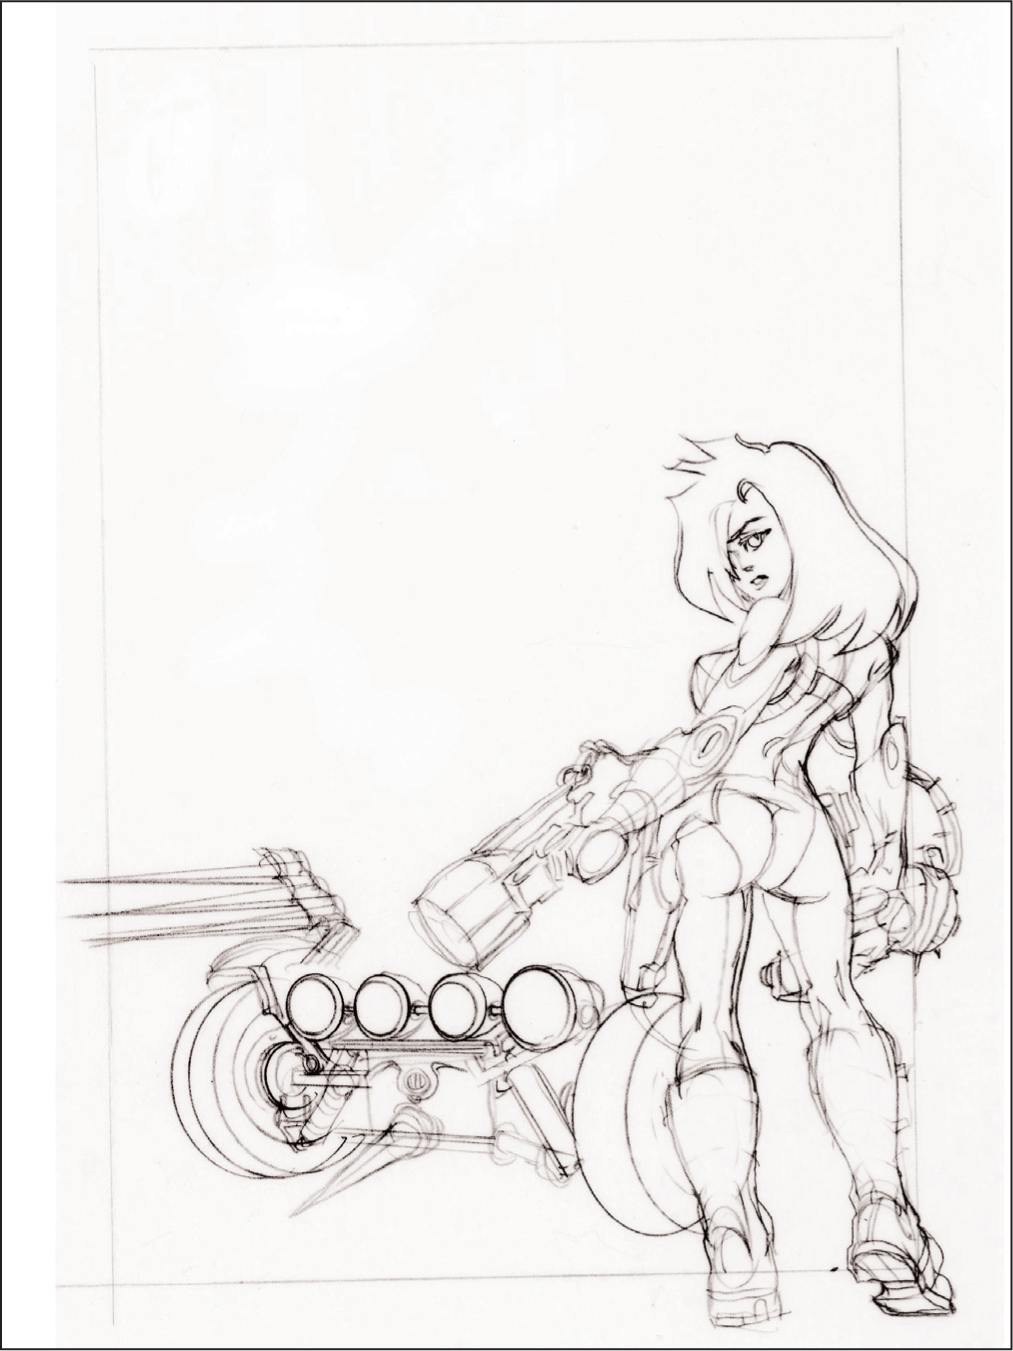
Step Three Next, take a sheet of vellum paper and lay it over your rough sketch. Then, trace over your sketch with the aid of a light table, if possible. Try to keep your lines as clean as possible. You may need to change things around a little as you see fit. I enlarged her gun and added even a few more weapons to her collection. Remember to keep both your line quality and shapes varied so the drawing doesn’t become stagnant.
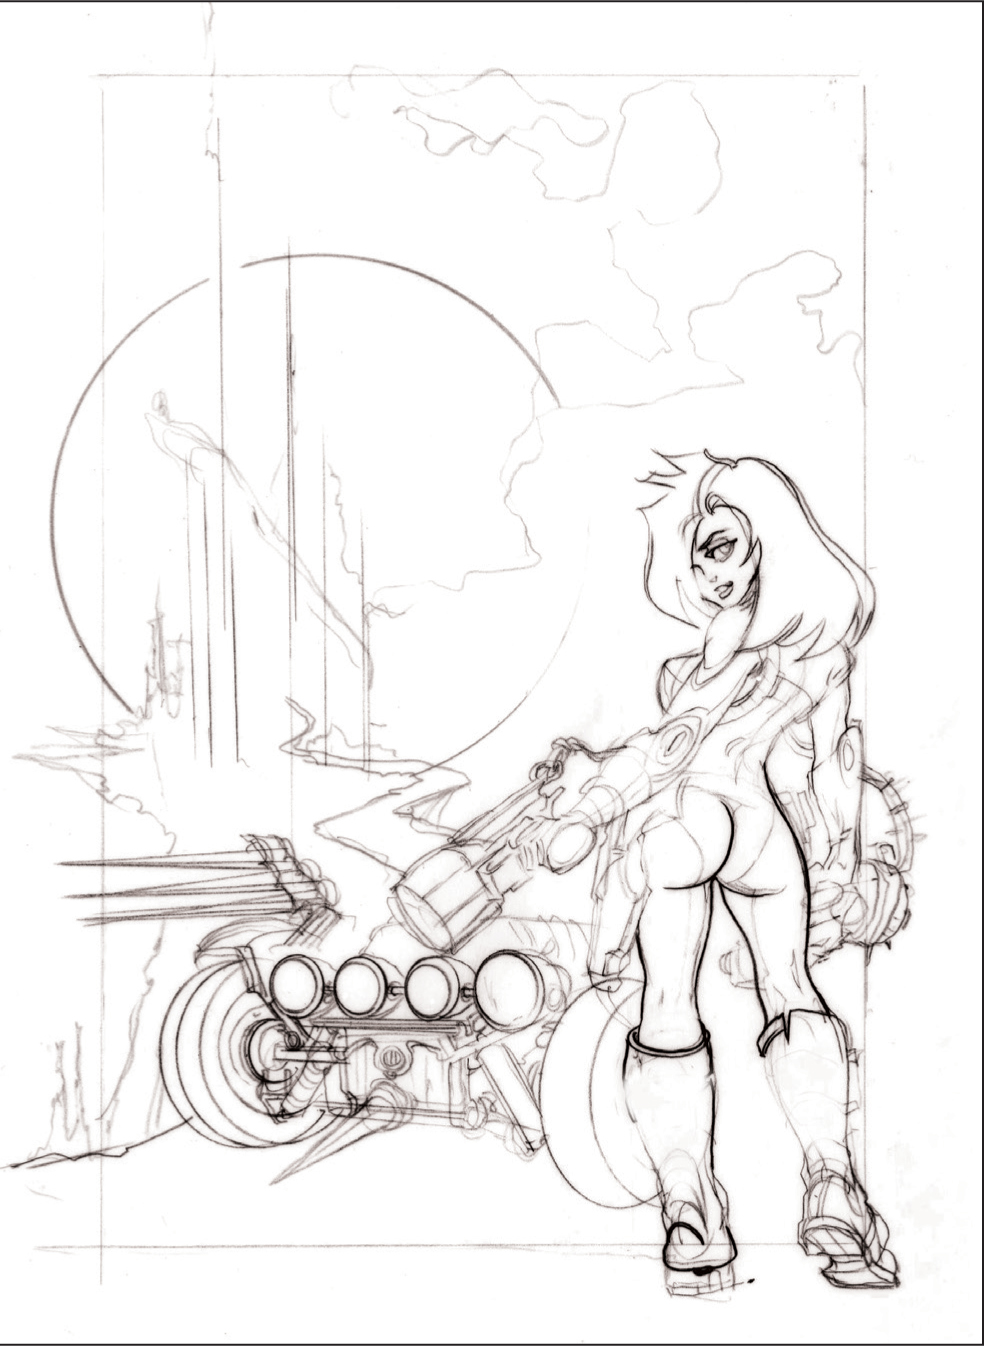
Step Four In this step, you’ll begin tracing in the environment. Considering how much detail will go into this drawing, you’ll want to keep it extremely clean. So, use a circle template for the moon and the headlights on the vehicle. Once you do this, you can go back and re-draw them freehand, so they don’t look too stiff. Now that the big pieces of the drawing have been laid in, go back and darken your lines, varying them from thick to thin. By doing this, you can indicate depth and perspective while maintaining a dynamic energy.
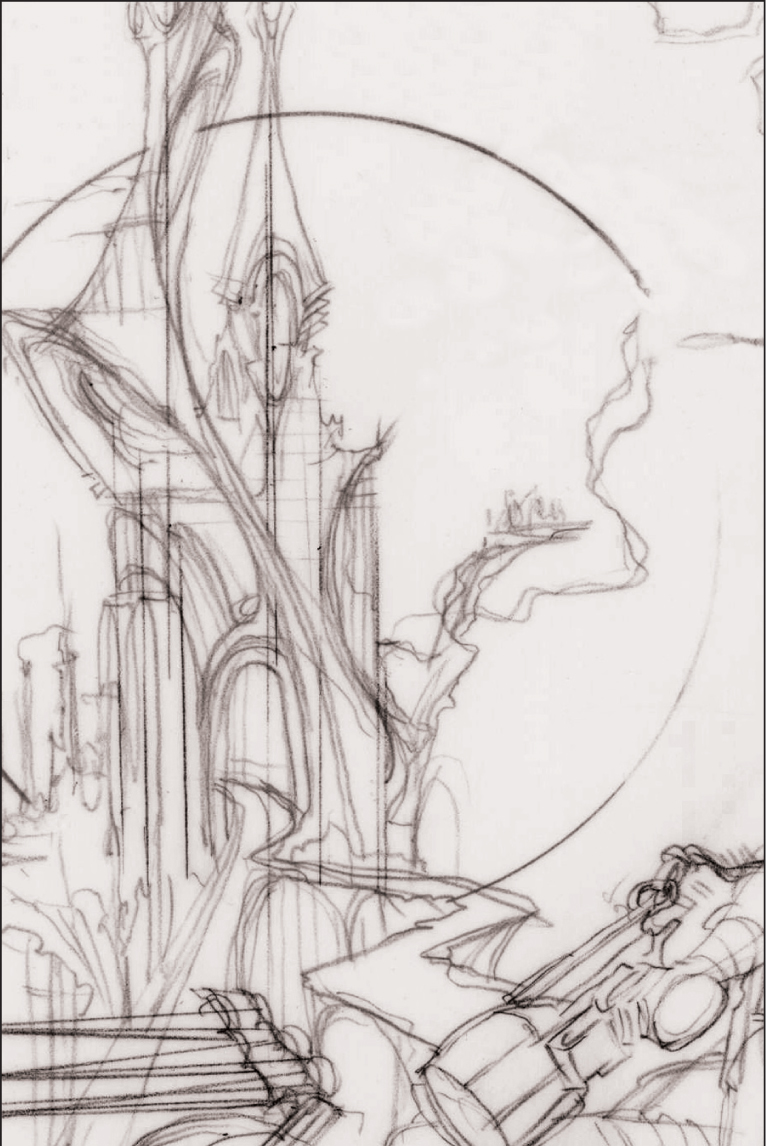
Step Five Now we’ll begin to lay out a whimsical yet Gothic design for the castle, with lines swooping in and out of the architecture. Try to carve interesting positive and negative shapes into the sides of the structure as well. Remember, the shapes that you don’t draw are just as important to the overall aesthetics as the ones that you do.
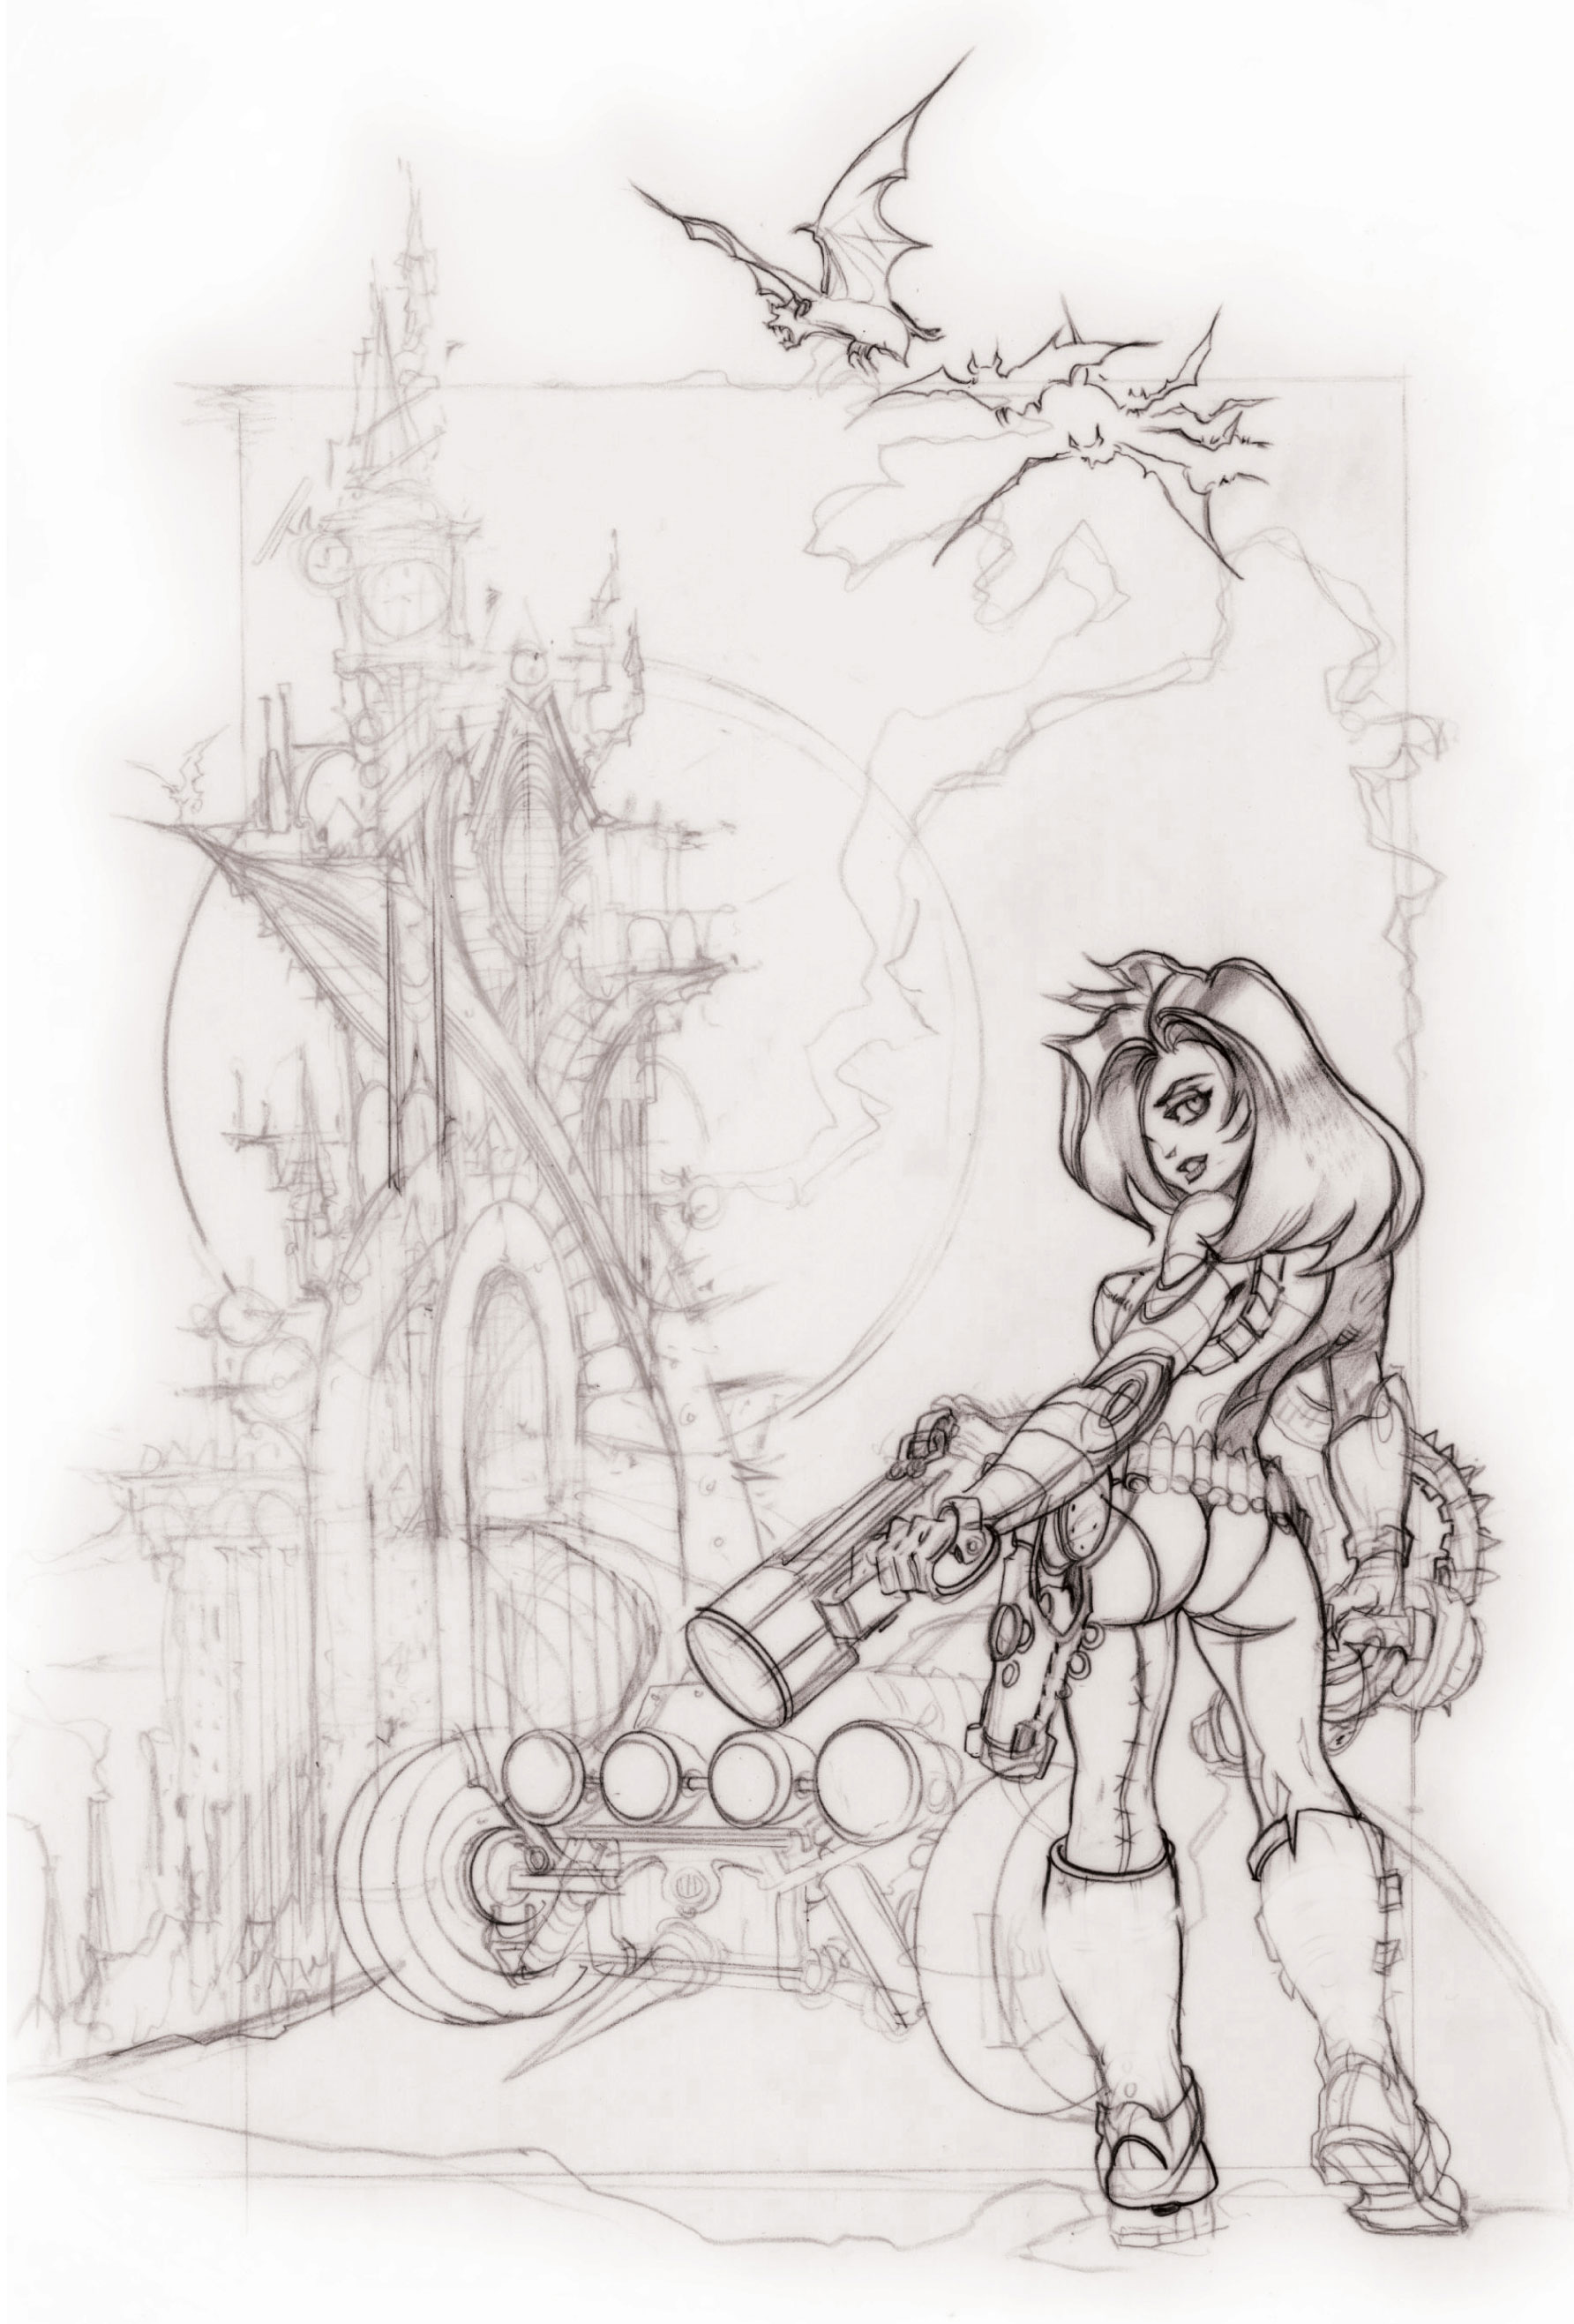
Step Six Notice that the bats are flying away from the slayer, leading your eye back to the castle where the dreaded vampire queen waits. Now that the big shapes have been laid in, we can begin adding the smaller details into the castle. With a sharp black colored pencil, draw in lines and shapes that accentuate the curves of the spires and the different castle tiers. Also, expand the base well beyond the frame to add more strength to the structure.
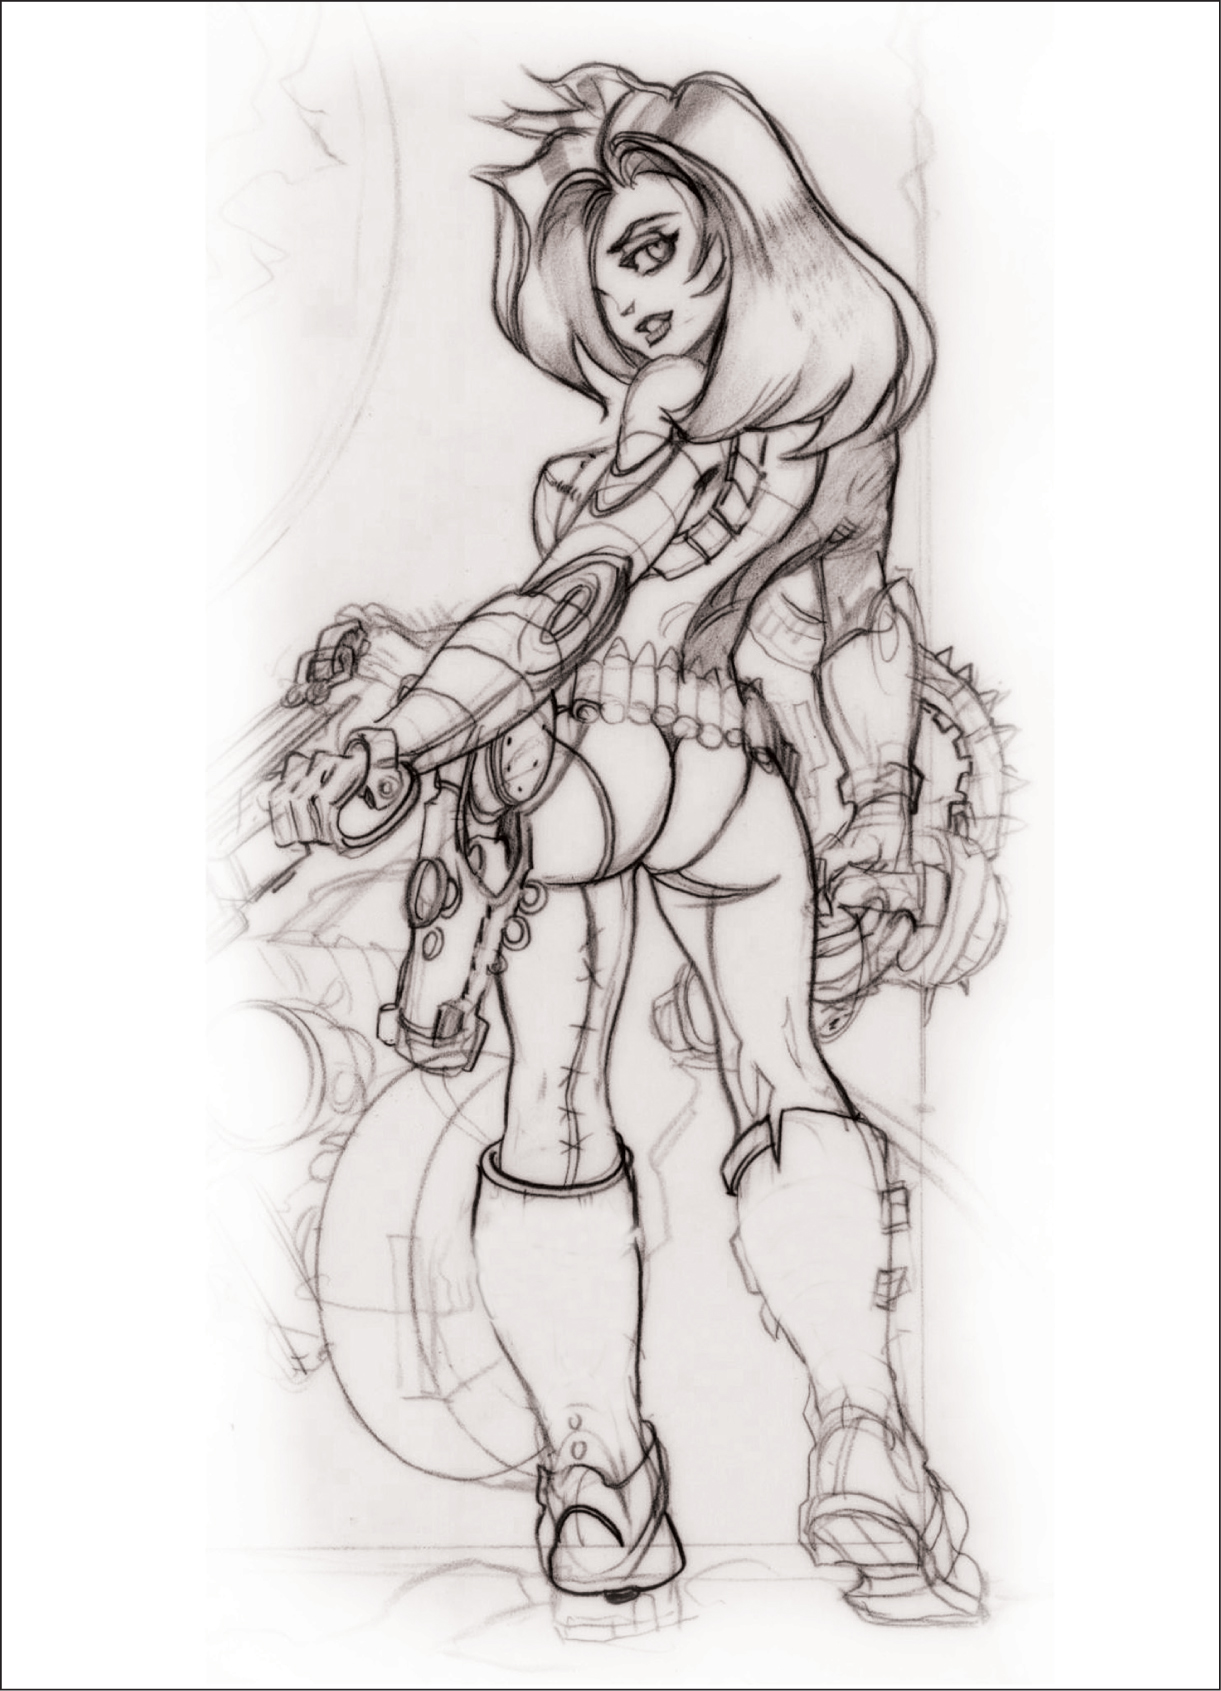
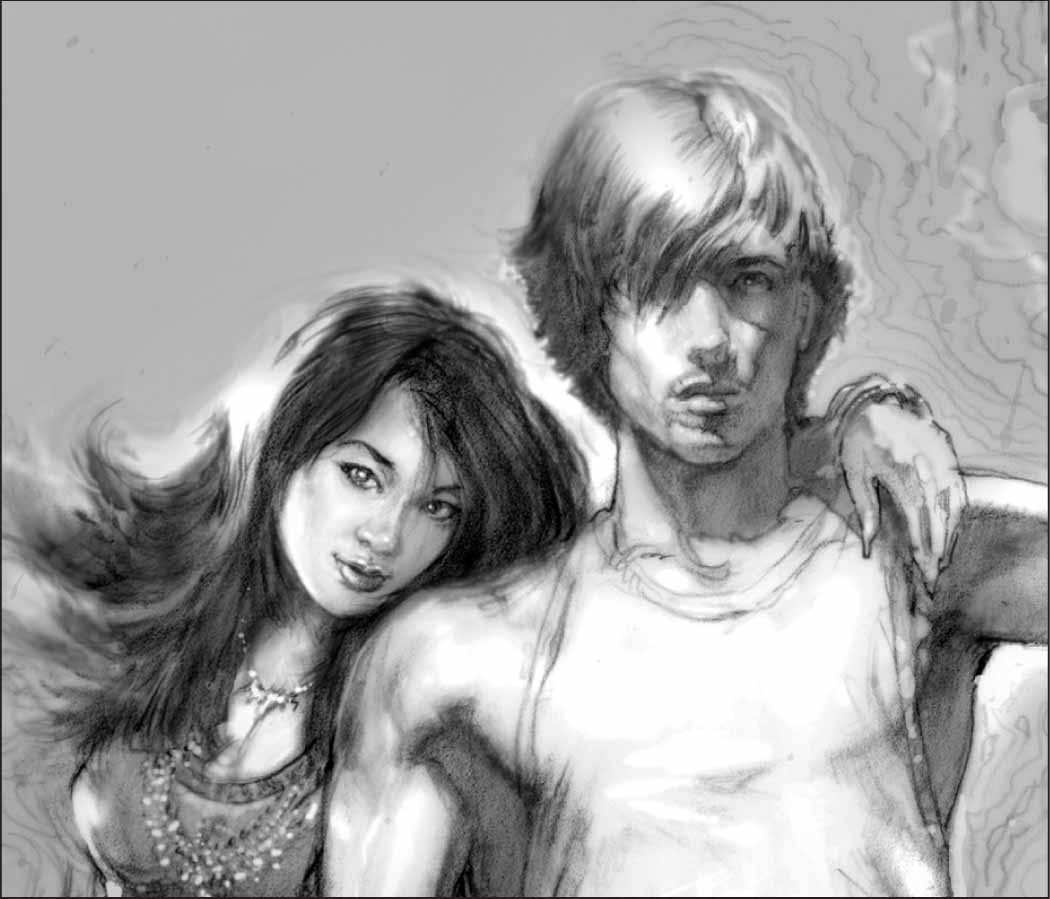
Step Seven Finish outlining the vampire slayer and begin to add some values to her hair and back. Like popular urban fantasy characters, the slayer is sexy but tough. Exaggerate her pose and feminine attributes without making her look ridiculous. Hint at her taut muscles and make her loaded with armaments that only a slayer with superior strength could carry.
Step Eight Here, you’ll begin to add all the quirky details to the castle. This is all from imagination but draw your inspiration from both the steampunk and gothic cultures, thus creating ornate gizmos and designs that could run on steam but have a modern flair.
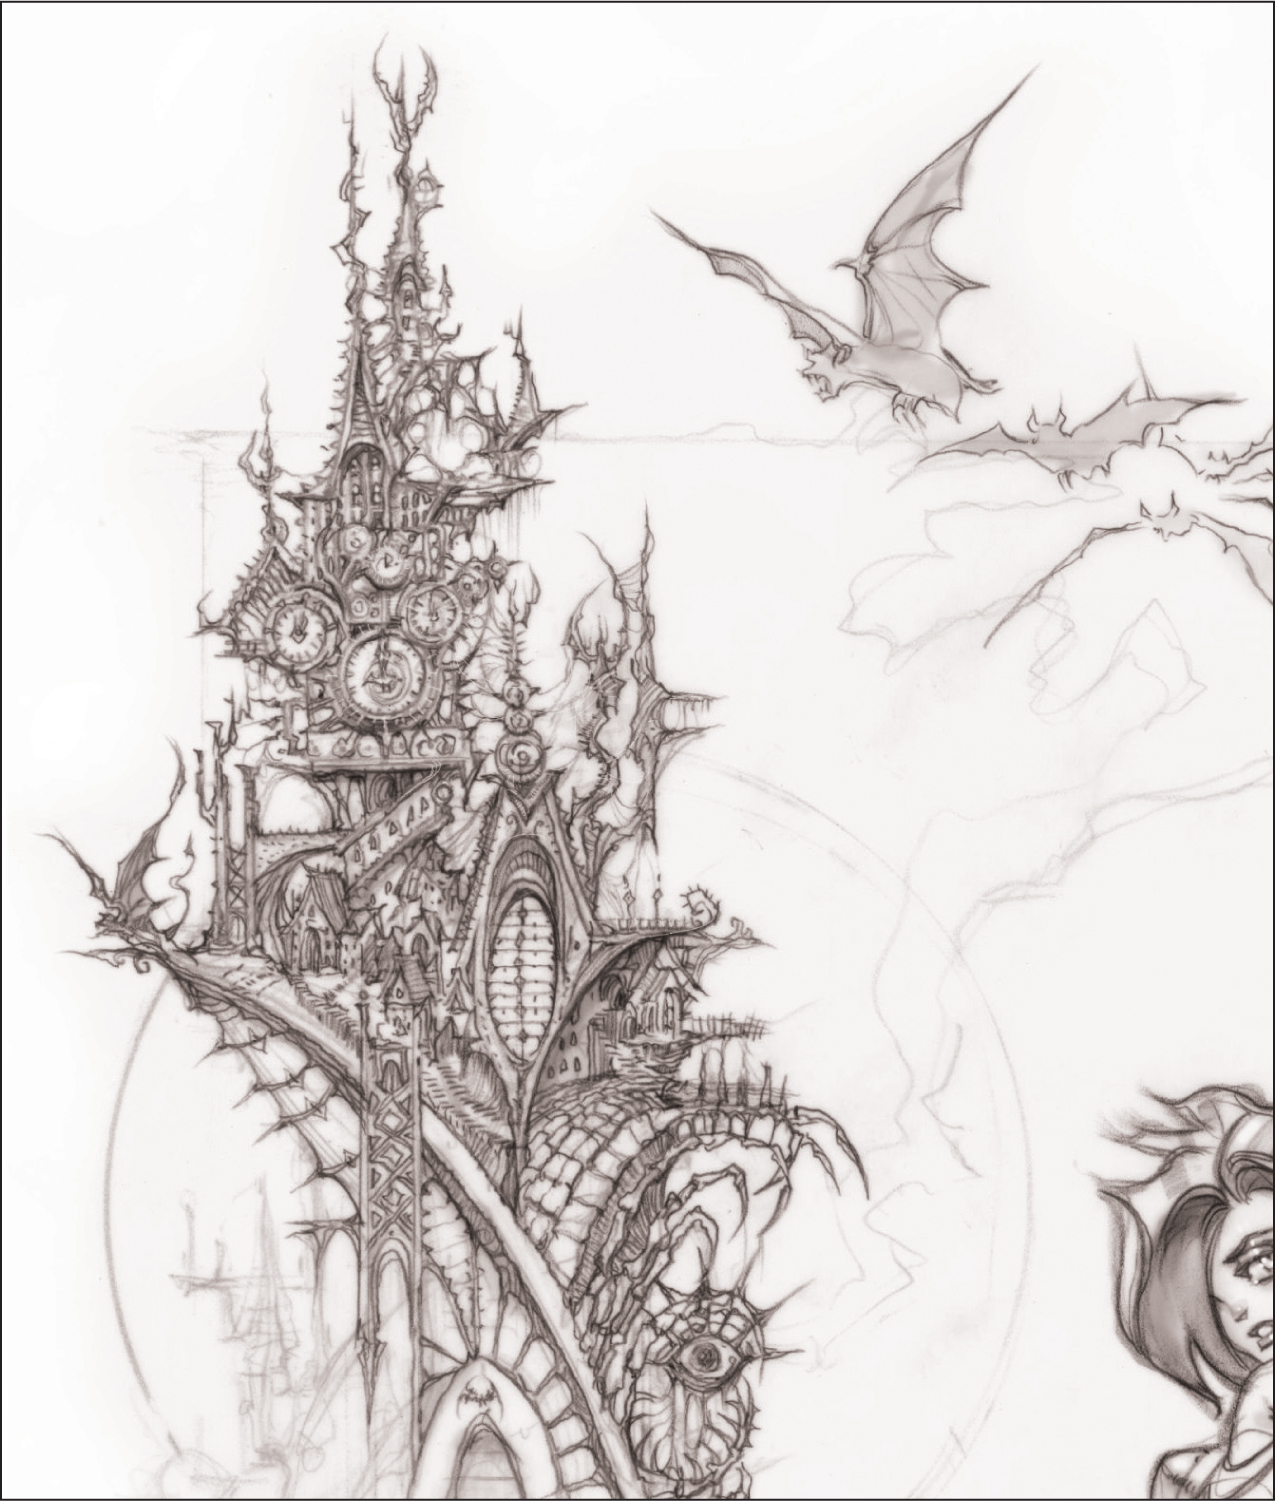
Step Nine It will look like you spent days on the castle but the architecture is actually made from the simple shapes of circles, triangles, squares and so forth. To add more dimension to tiny details, use a warm 50% gray colored pencil and quickly outline the smaller shapes. When creating architecture out of your imagination, keep several things in mind: vary the shapes and lines, maintain a consistent perspective and pick a light source. And have fun!
Step Ten In this step, we are going to continue working on the slayer. Focus on her values and make her look a little more 3-dimensional. In contrast to the castle, keep the shapes on the girl round and soft, making her attractive and flirtatious.
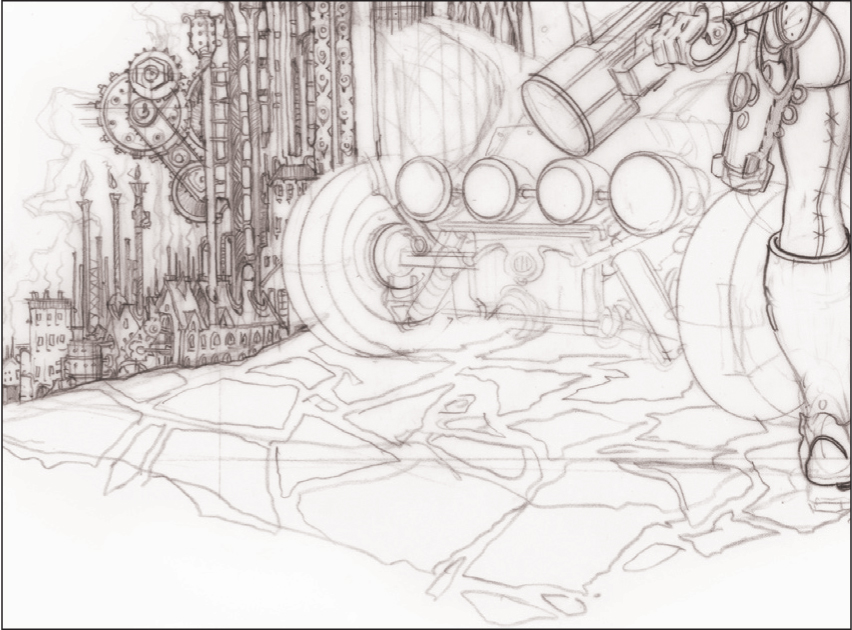
Step Eleven Next, follow the same technique with the bottom of the castle, varying the lines and shapes. Then, create a small town at the base of the castle, one that lives under the oppressive reign of the vampire queen. At this point, we’ll transform the road into one made of cobblestone. This will emphasize the fact that the past, present, and future coexist in this forsaken world.
Step Twelve Now, we’re going to slowly build up more tone over the slayer. Exaggerate the twist of her back by giving her right side an overall shadow value. Don’t put too much detail into this area since the castle is full of minutia and the drawing needs some clean, big shapes to create balance. Also, at this point, we’re going to take another approach with her boots. Since this drawing is inspired by steampunk, make her boots a bit more feminine and incorporate some Victorian touches.

Step Thirteen For the vampire slayer’s vehicle, use your knowledge of cars as a reference point, but add a few fantastic embellishments. Keep it low, tough, and utilitarian. Now make her boots a bit frillier and add some more lacing to match the stitching on her back and pant leg.
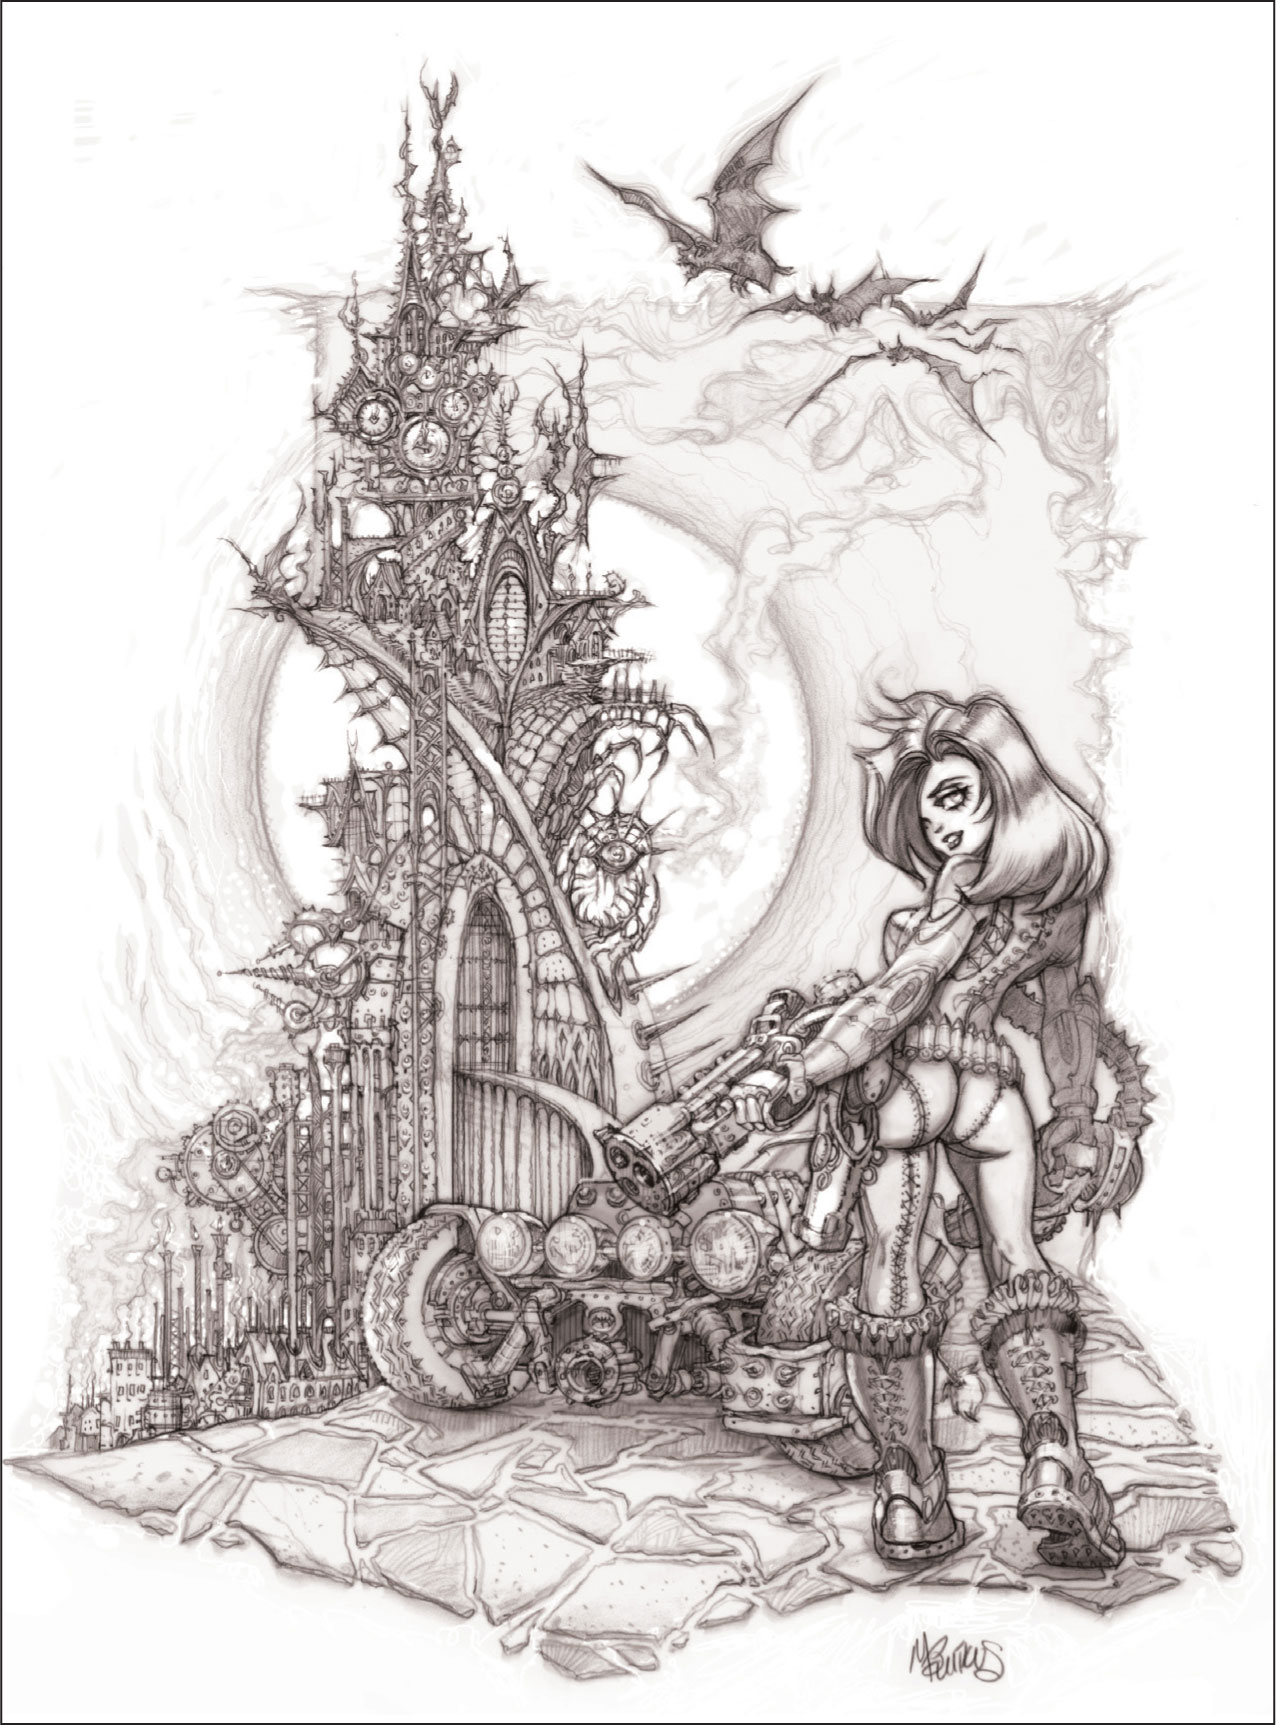
Step Fourteen We’ve stepped into a creepy and mysterious world. To convey that atmosphere, make the moon extremely large and use the side of your pencil to shade rings of smoke and clouds around it. Also, add steam to the top edges of the frame and above the small town to create more movement.
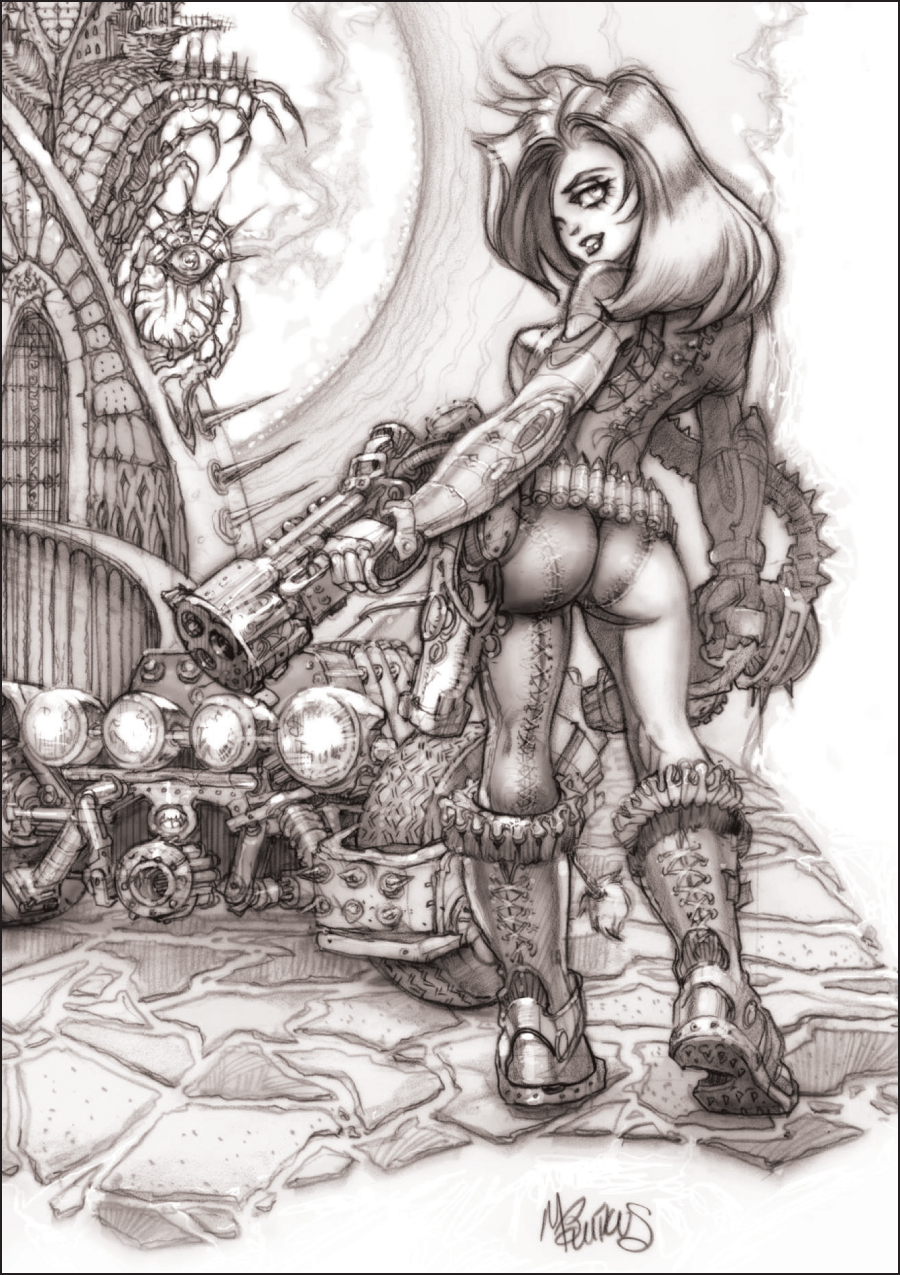
Step Fifteen Next, give the slayer’s unusual one-sided pants a value of their own. Without the tone, it looks like her skin is stitched up instead of the fabric. To emphasize her voluptuous assets, use a kneaded eraser to pick out the highlights.
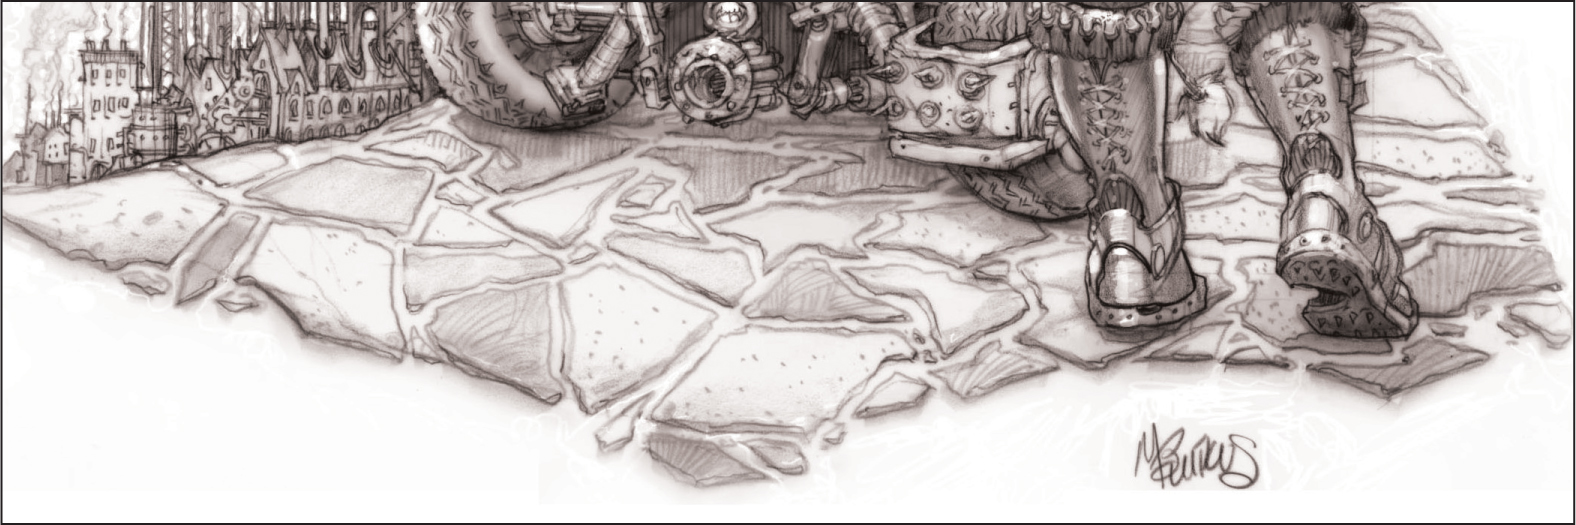
Step Sixteen We don’t want to bring too much attention to the cobblestones, but they need some texture of their own. Alternate the textures from flat values to dots and strokes, making none of them darker than a medium value. Don’t finish the road beyond the frame. This way the edges of the stones frame the drawing. Remember that your border treatment is just as important to your composition as anything else in the image.
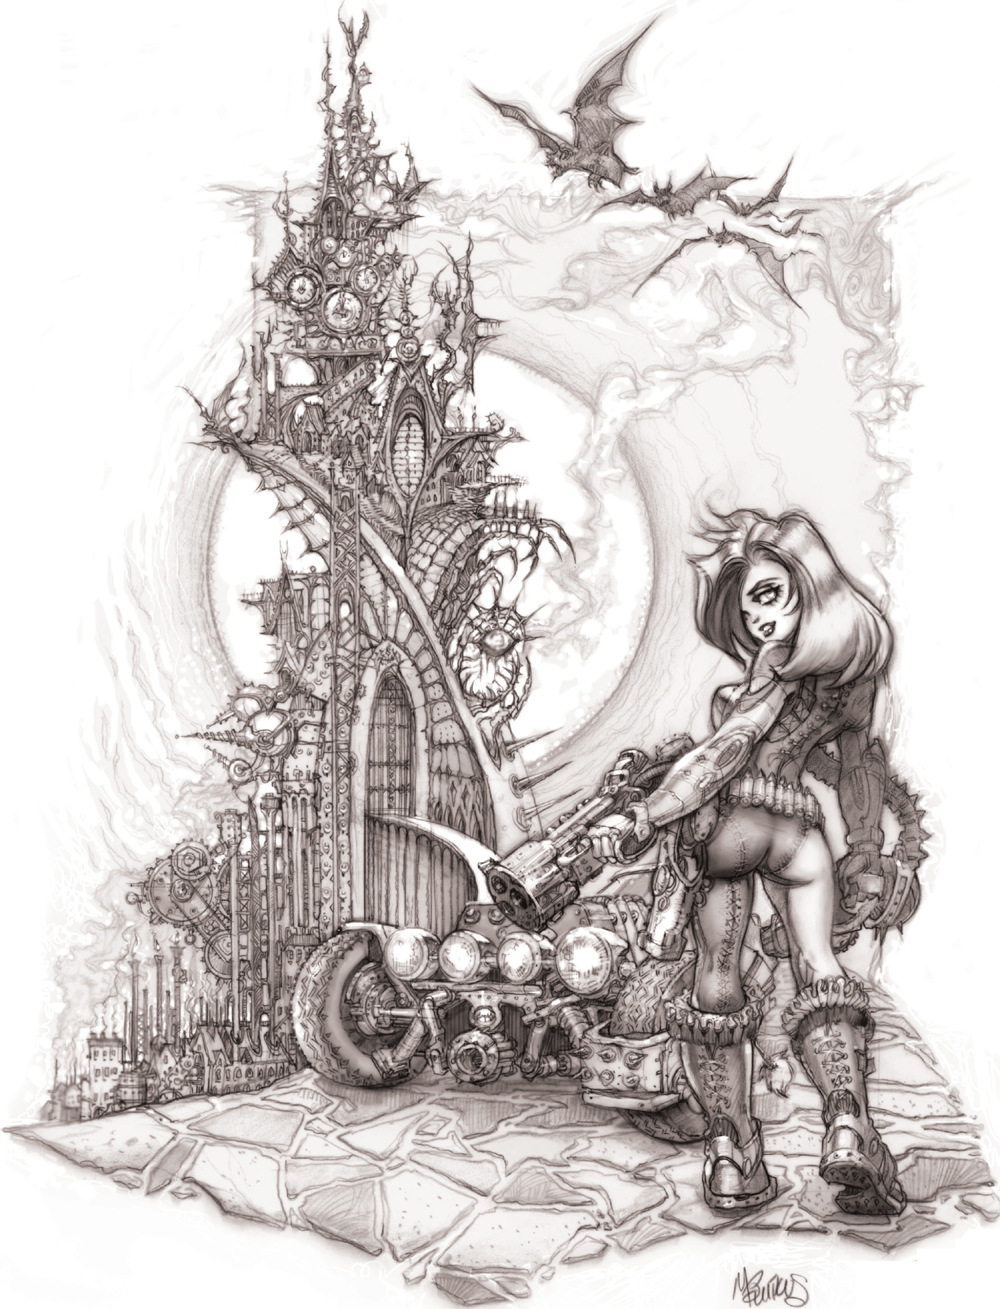
Step Seventeen The vampire slayer drawing is now complete.
International House of Vampires: Part 1
Most of our current vampire legends have descended from Eastern European folklore. Throughout the centuries, however, many other cultures around the world have believed in mythical creatures with similar characteristics. From an unfulfilled spirit to a dark goddess to a jumbie shape shifter, these ghoulish bogeymen are almost enough to make you want to postpone that holiday abroad.
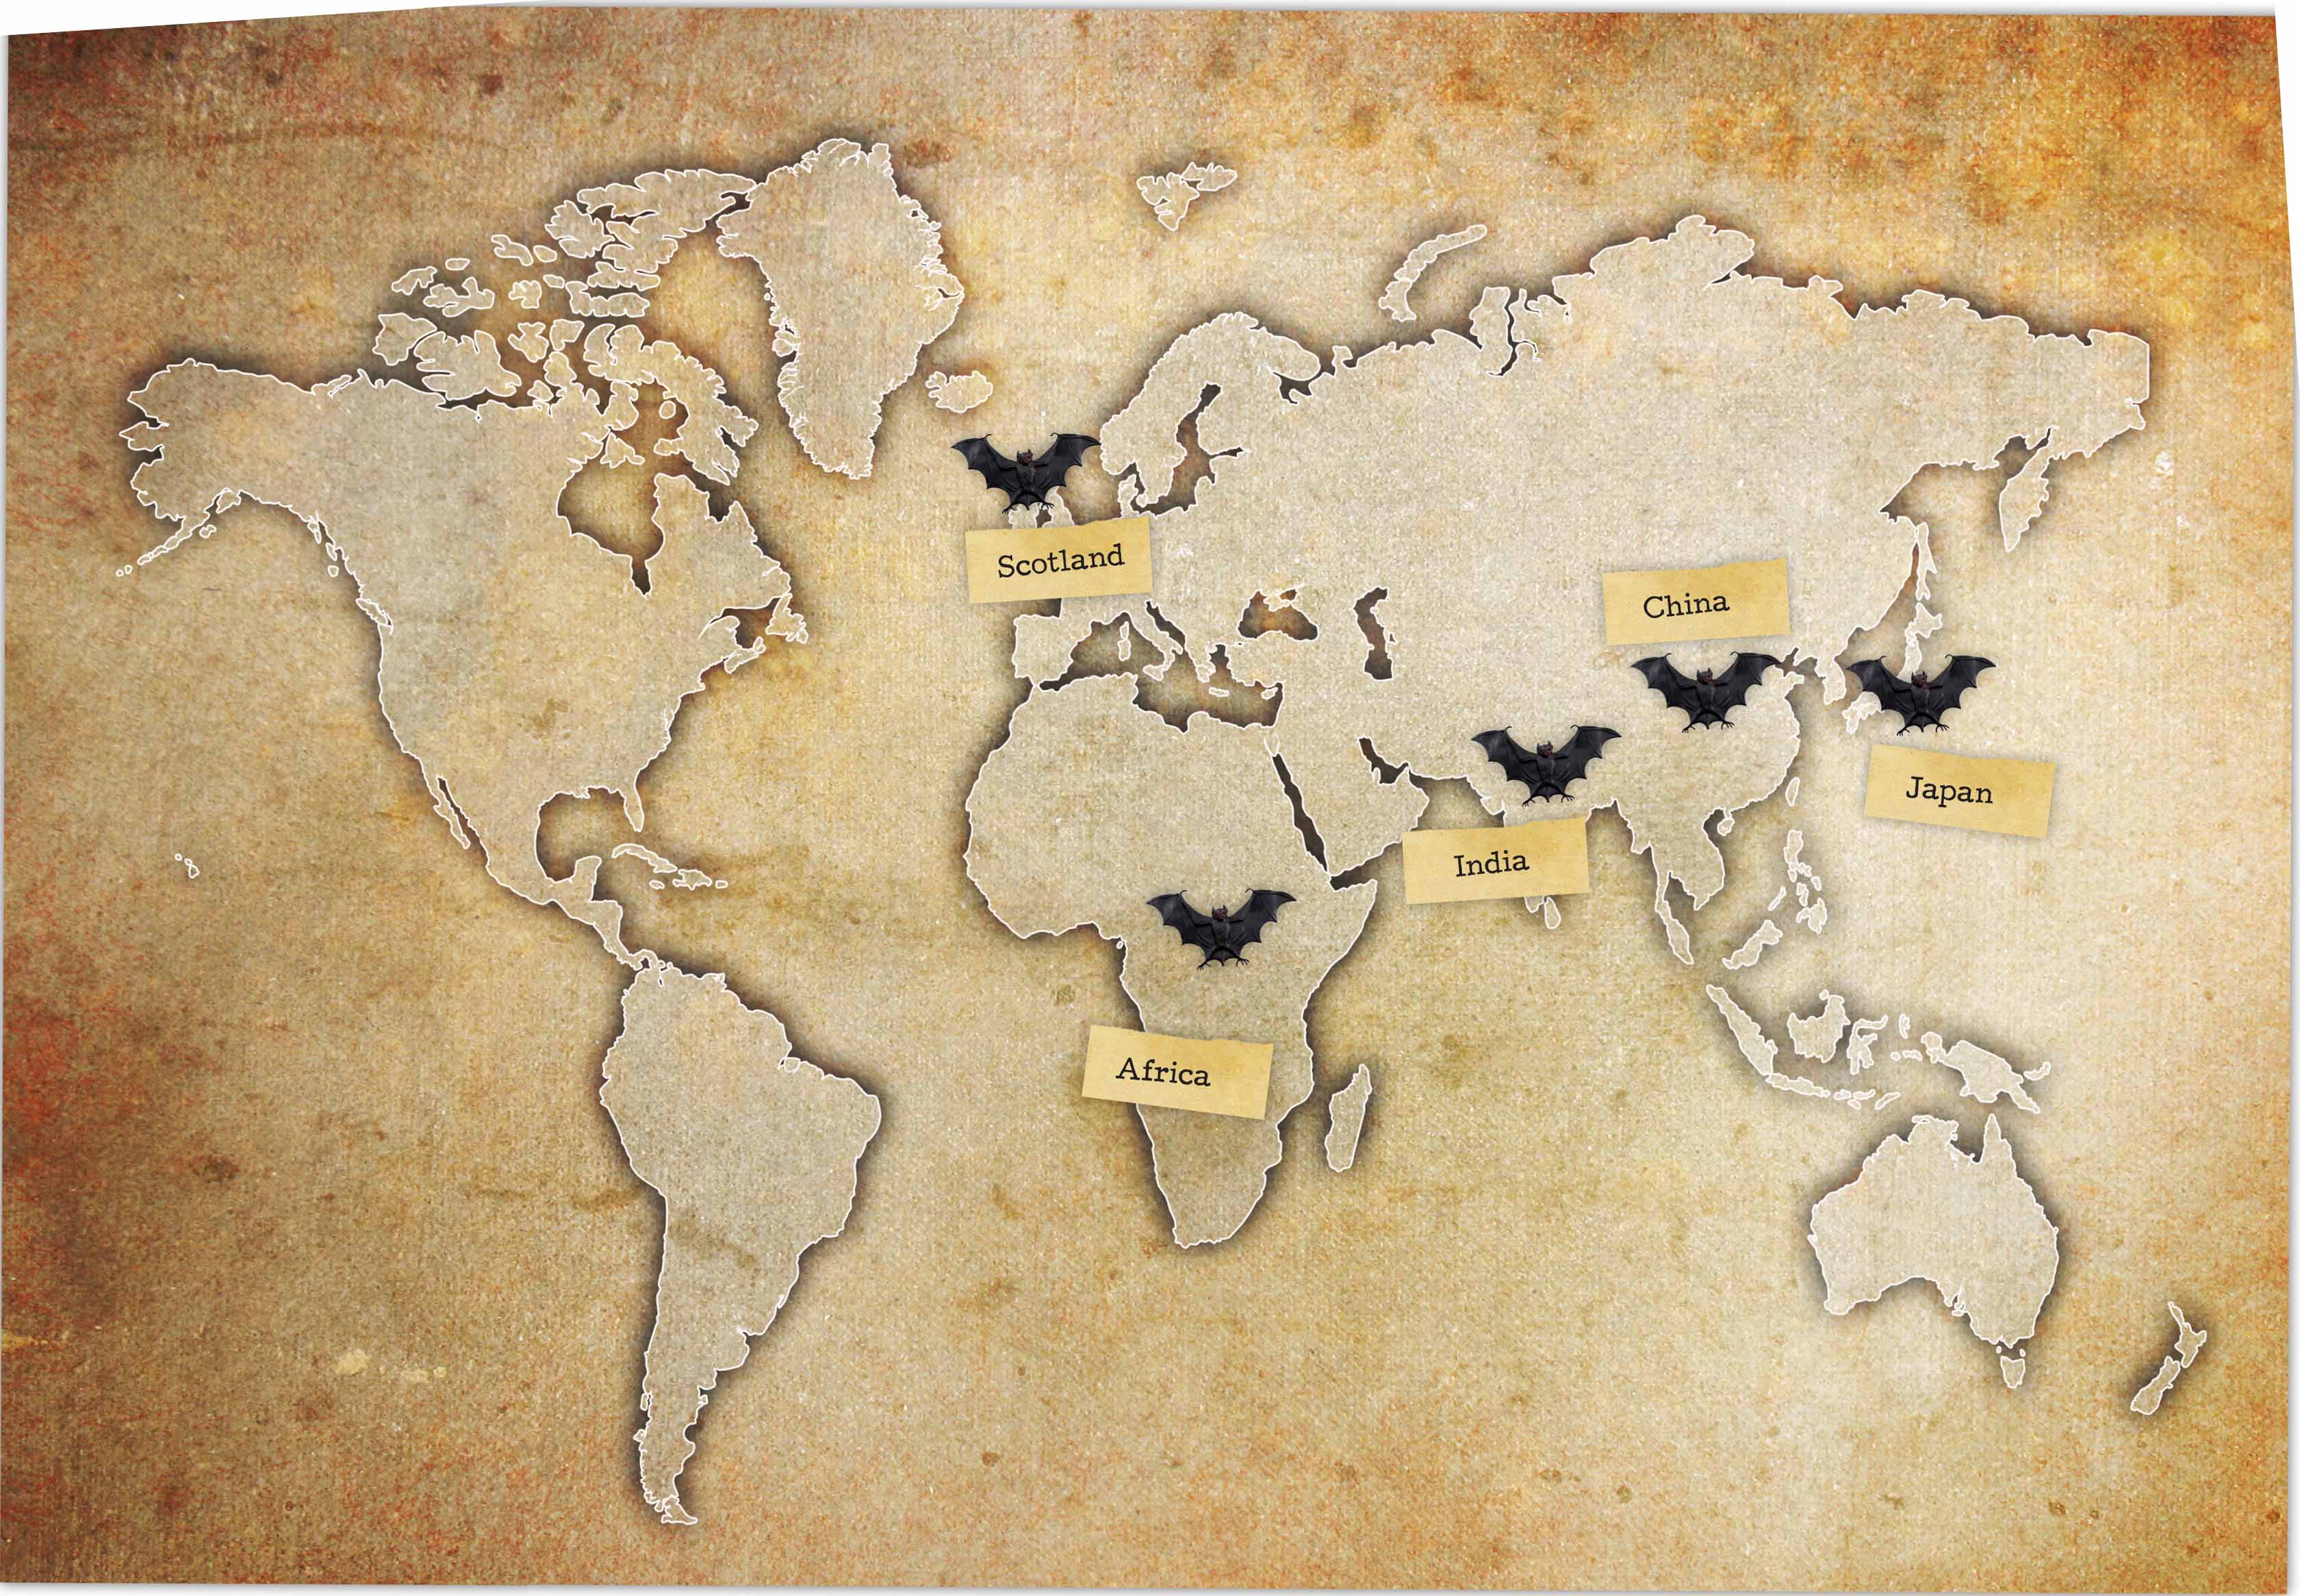
India
The Bhūta or Prét:
The Bhūta is the spirit of a person who died with his/her wishes unfulfilled; it longs for a human body again. The Hindus believe that these spirits can possess humans and cause sickness, unhappiness, and strange behavior.
The Goddess Kali:
A four-armed Indian goddess, Kali has fangs and wears a necklace made of skulls. She supposedly won a battle against the demon, Raktabija, who was able to regenerate himself from a single drop of his own blood. To prevent this, Kali drained and drank all of his blood without shedding any on the ground.
Scotland
The Baobhan Sith:
This fairy vampire appears as a beautiful woman and often preys on Highland travelers. She has a special penchant for hunters, for they often carry the scent of blood on their clothes. She may also entice a young man to dance with her, and then drain his blood when her prey becomes exhausted from the dance.
Japan
The Nukekubi:
This creatures appears to be human, but has the ability to separate its head and neck from its body. At night, the Nukekubi’s head detaches, then flies through the air, screaming and biting human victims.
China
The Chiang-Shih:
A fearful combination of both vampire and zombie, this monstrous beast begins its reign of terror after being raised from the dead. Sporting black fingernails, the Chiang-Shih often has white skin with fuzzy green mold on its flesh. With arms outstretched, this nocturnal being hops about, seeking to drain the life force, or qì, from its prey.
Africa
The Asanbosam or Sasanbosam:
This monster dwells in trees and devours its prey with iron teeth. With an appearance similar to humans, the Asanbosam will attack anyone who crosses its path.
The Obayifo:
An Ashanti witch by day, at night this vampiric creature flies about, preying on children. With a strong hunger, this monster is also able to drink the sap from entire crop fields, if desired.
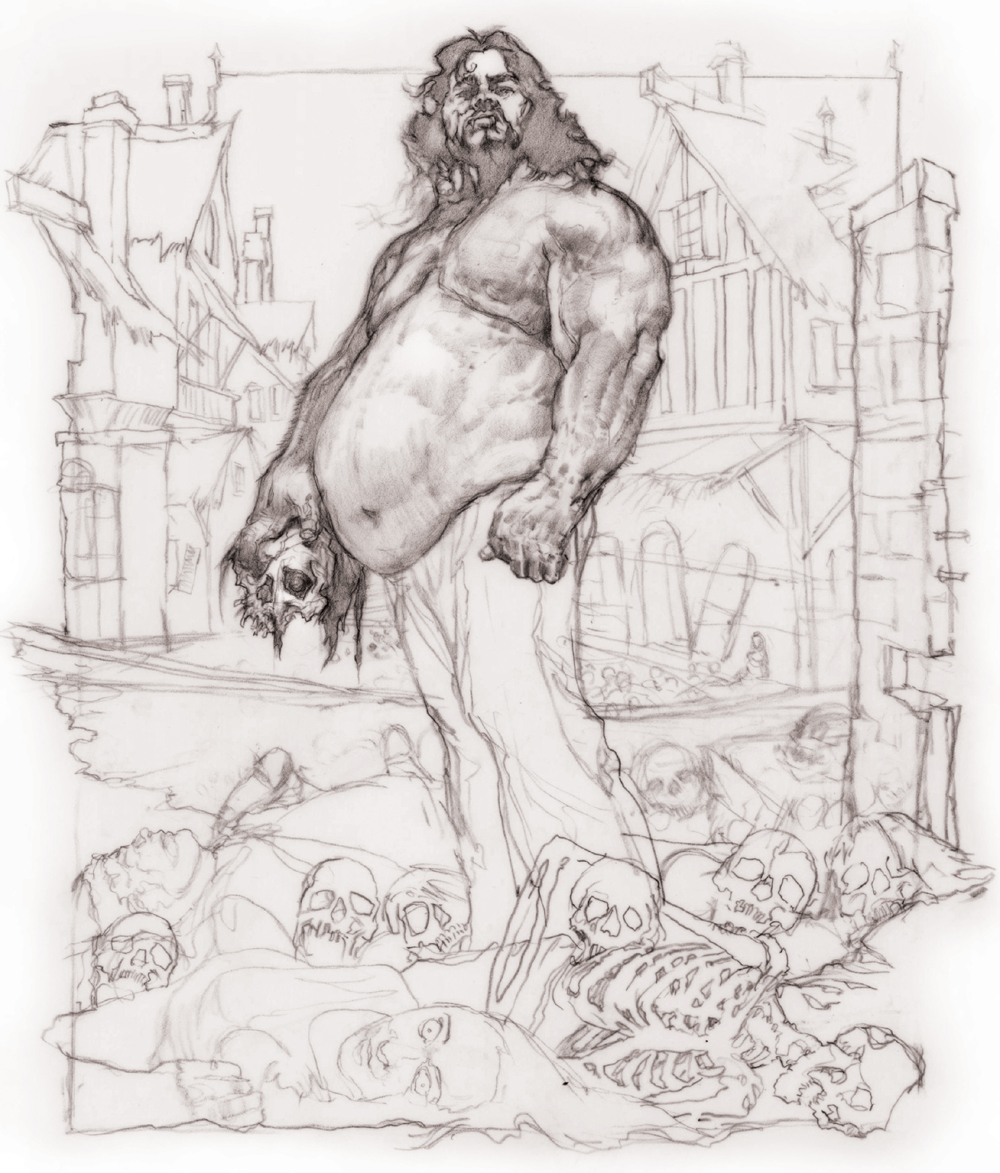
Surrounded by carnage, this vampiric brute has just gorged himself. His feeding frenzy temporarily abated, he stands with a challenging glare and posture as if to say he could easily take on a second village. This project focuses on multiple perspectives and juxtaposing angles, as well as positive and negative shapes.
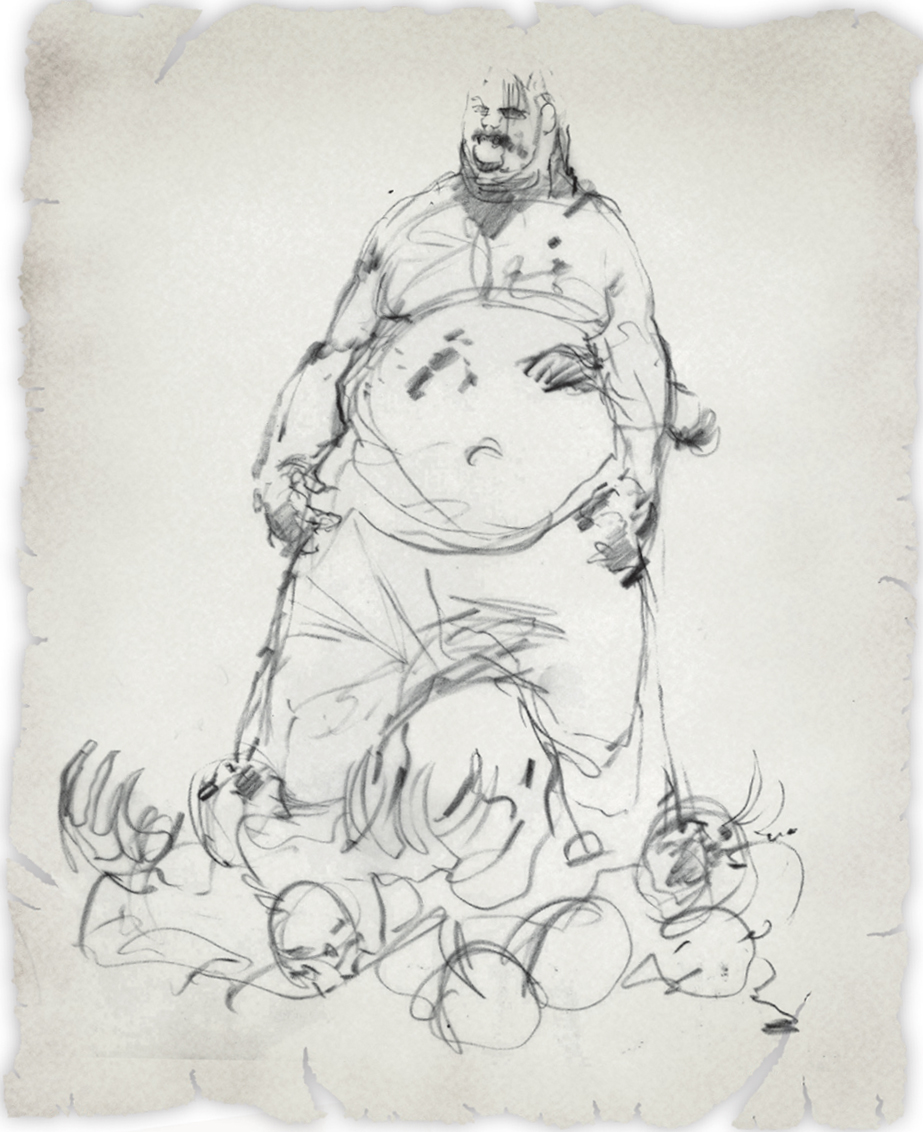
Step One We’ll begin this project by mapping out a gruesome scene using a black colored pencil on tracing paper. This is the point where you’ll figure out how far you want to take this terrifying and gluttonous character. The goal in this illustration is to make it as unsettling as possible. (You can transfer this sketch; see “Transferring a Drawing” on page 25.)
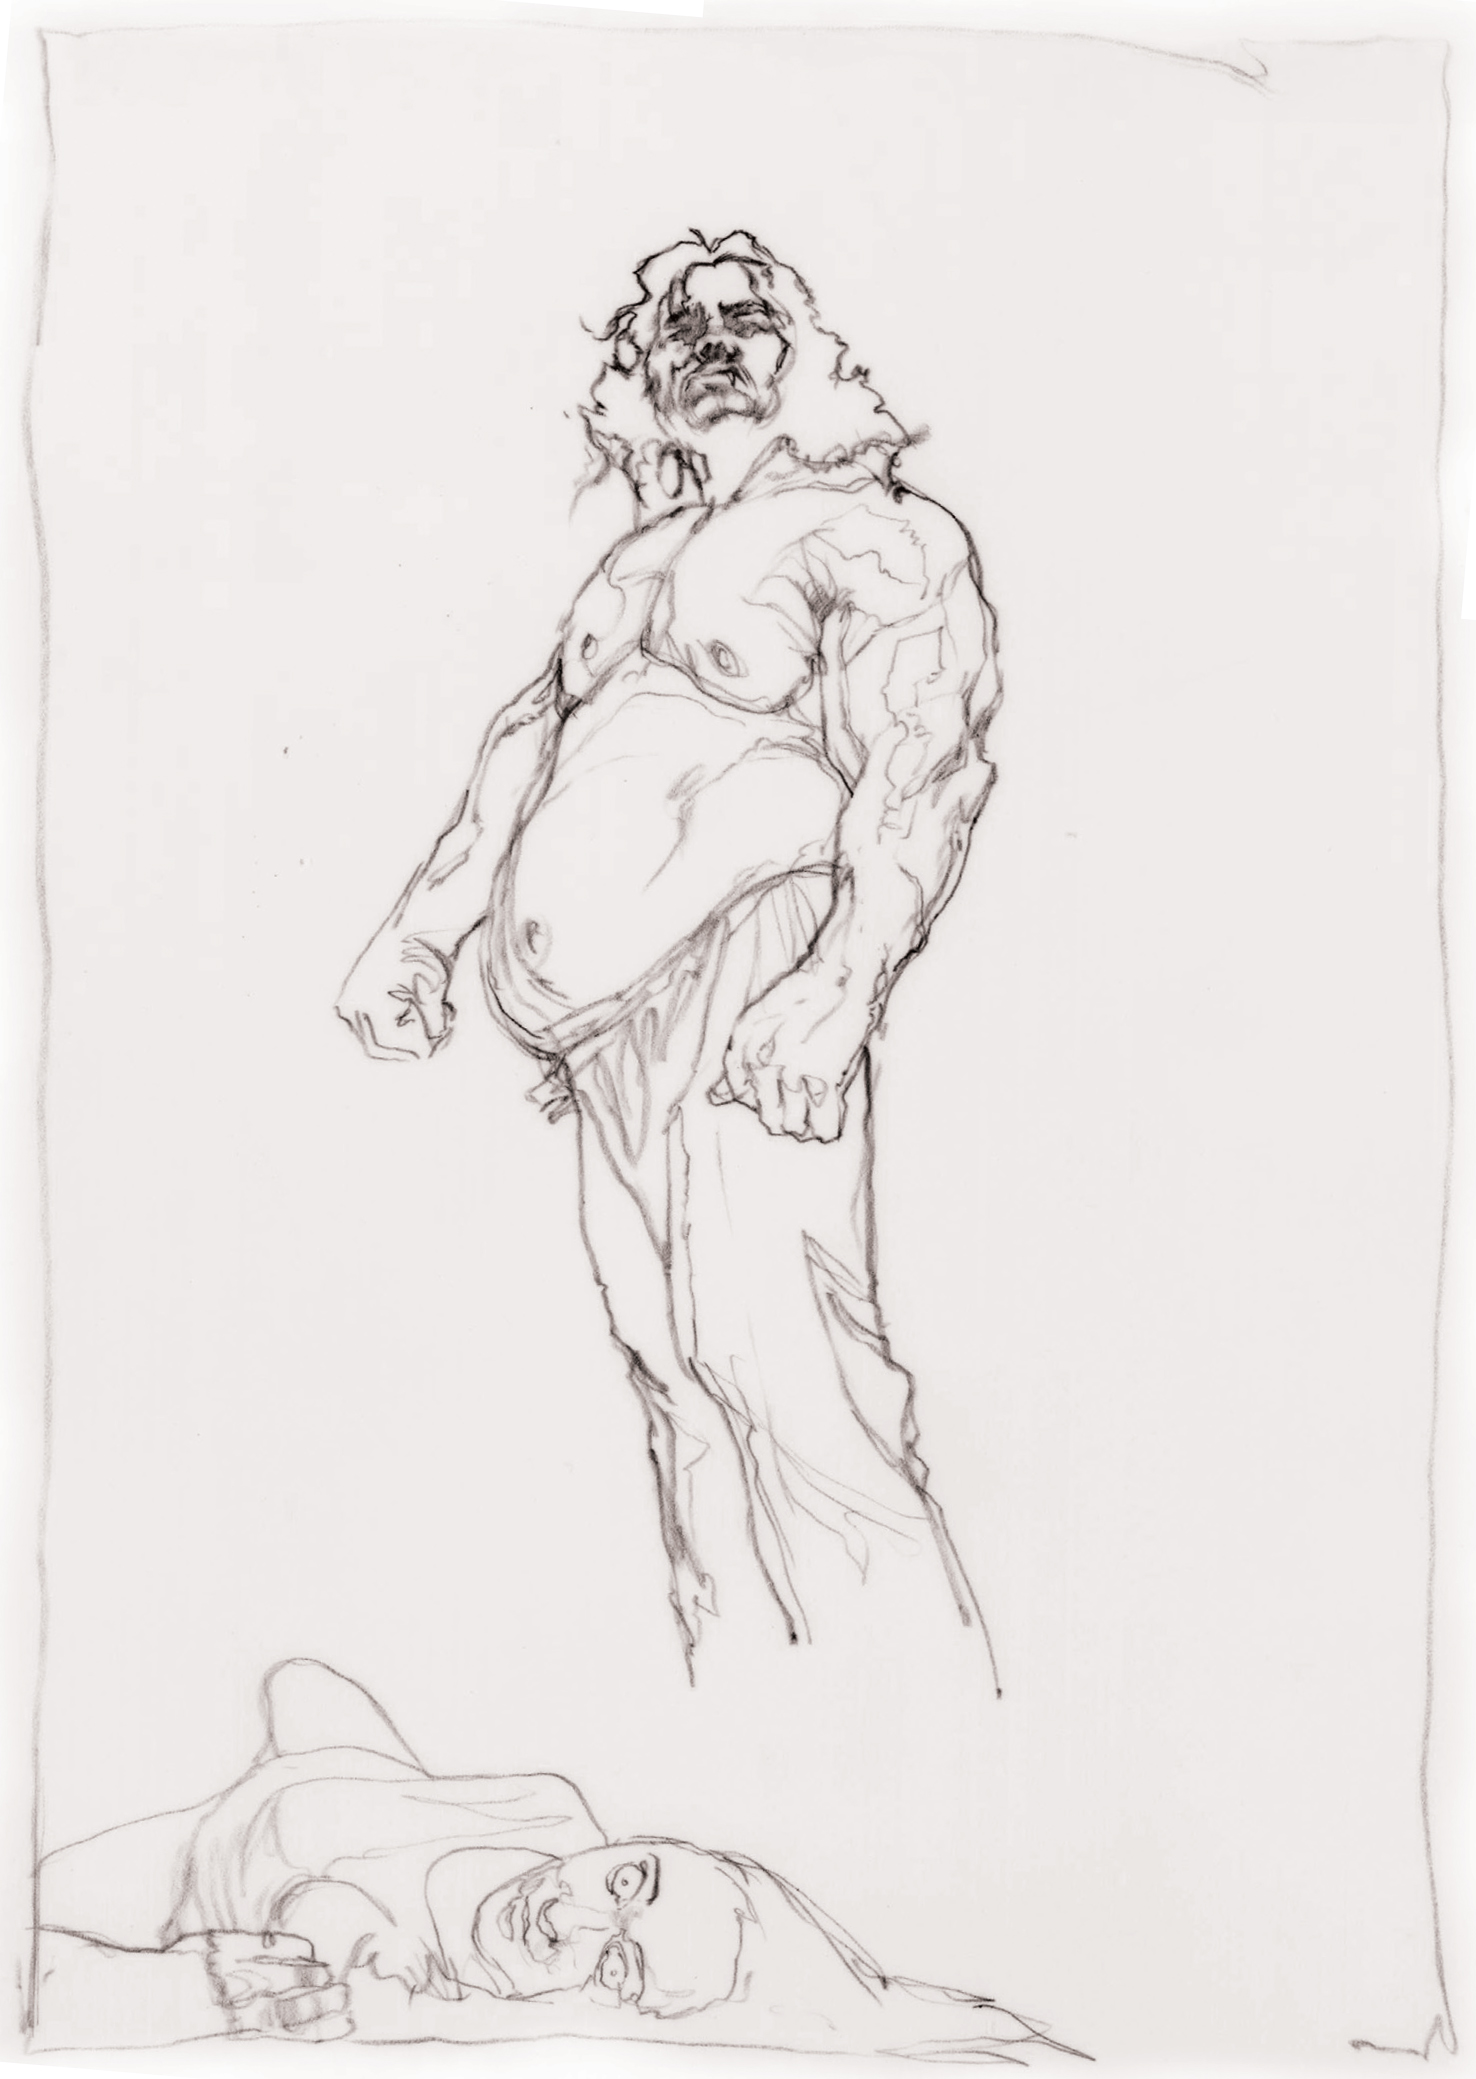
Step Two Based on your thumbnail, create a linear drawing on vellum paper. This illustration is going to be tightly rendered, so the approach for the beginning stages will be quite different than those used in the Vampire Slayer on page 24. Map out the dark patterns in the main character’s face, leaving his eyes in shadow. Also, lightly draw in the shapes of the light and dark patterns along his body and pants.
Step Three Next, begin to draw the background, incorporating a quaint rural village as the setting. Since we are looking up at the main character, his head reaches above the rooftops, making him look larger than life. Another way to make your character more imposing is to make his head much smaller in comparison to his body.

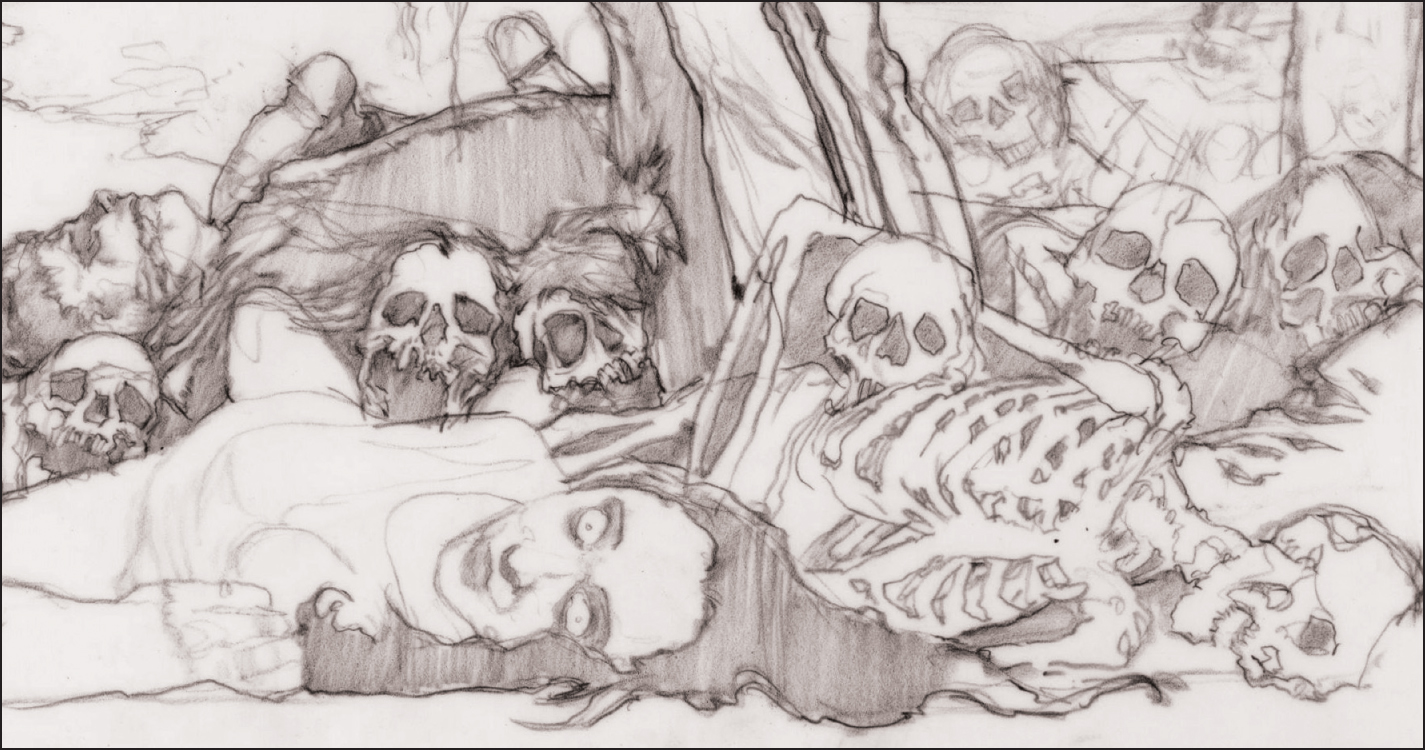
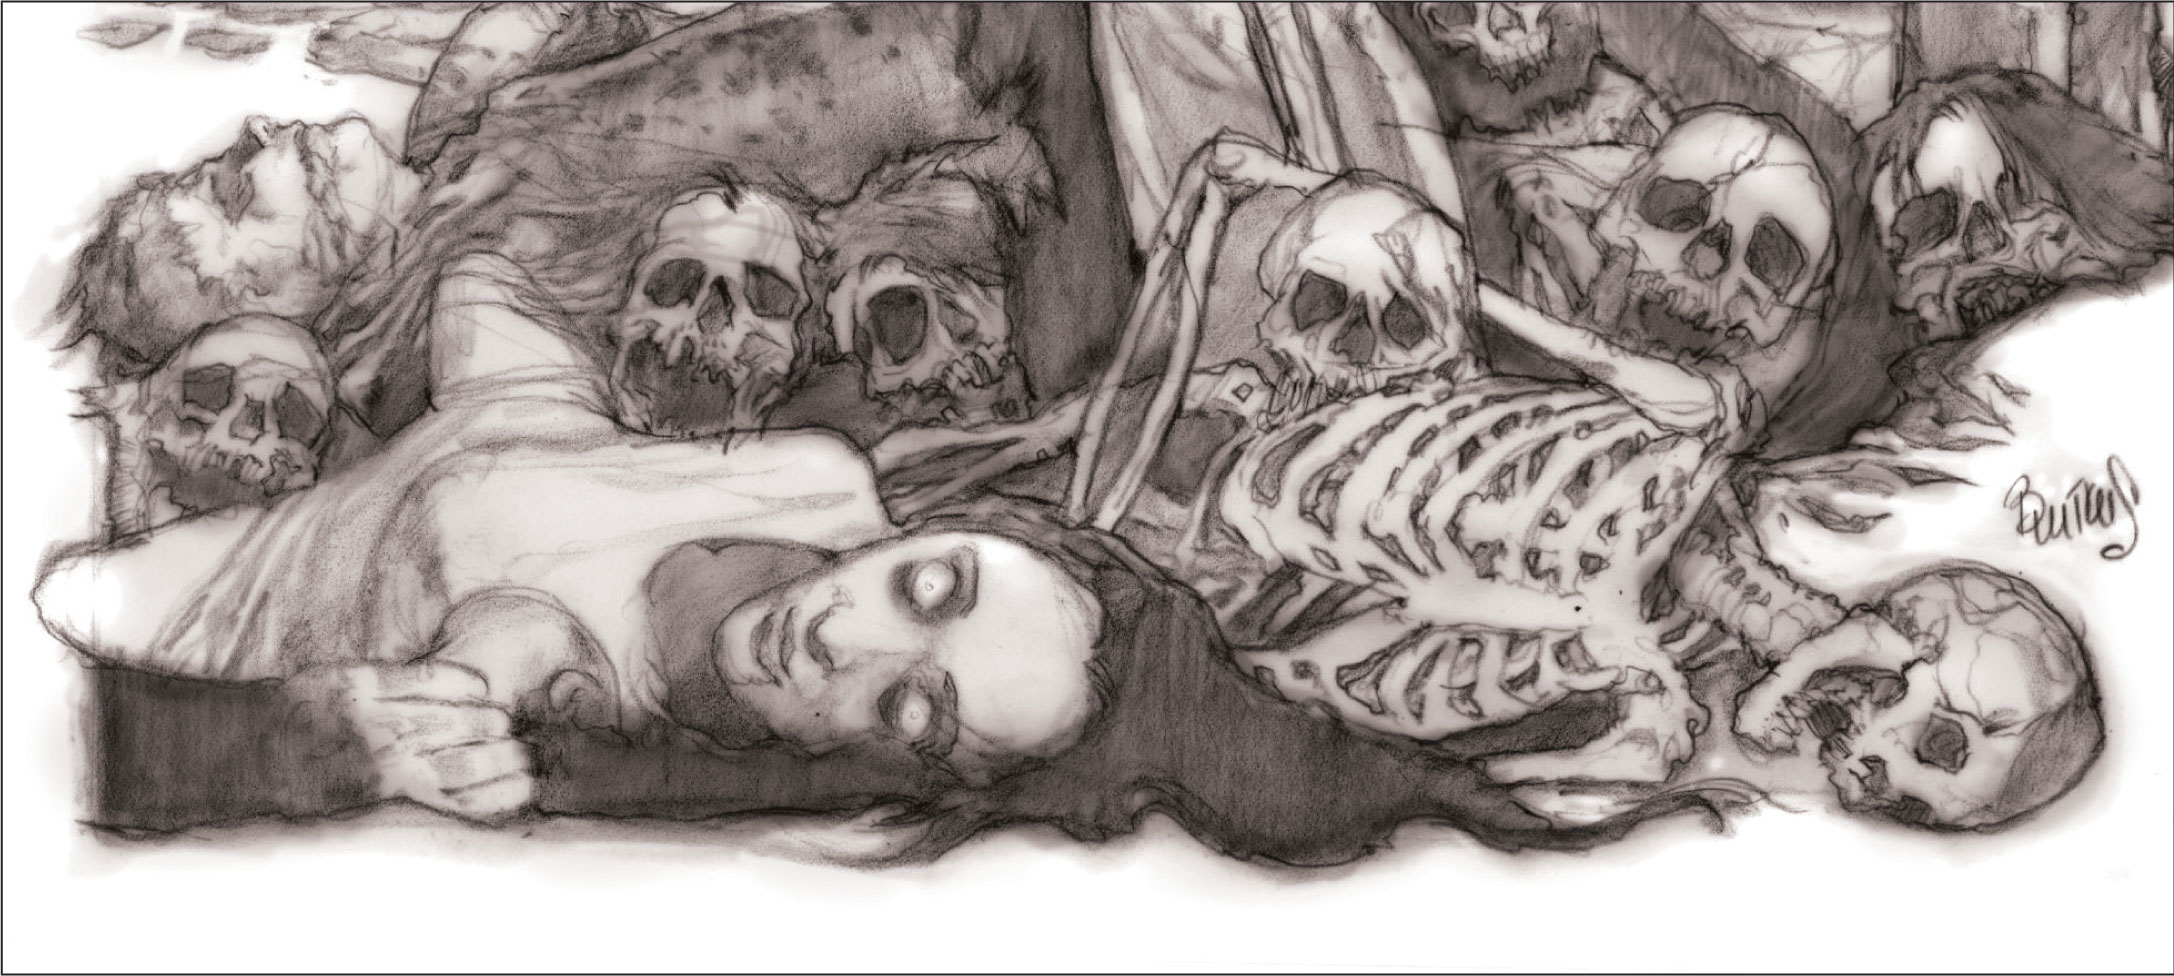
Step Four Now, start indicating the hundreds of skulls and dead bodies that resulted from this vampire’s insatiable appetite. Make sure they diminish in size as they go back in perspective.
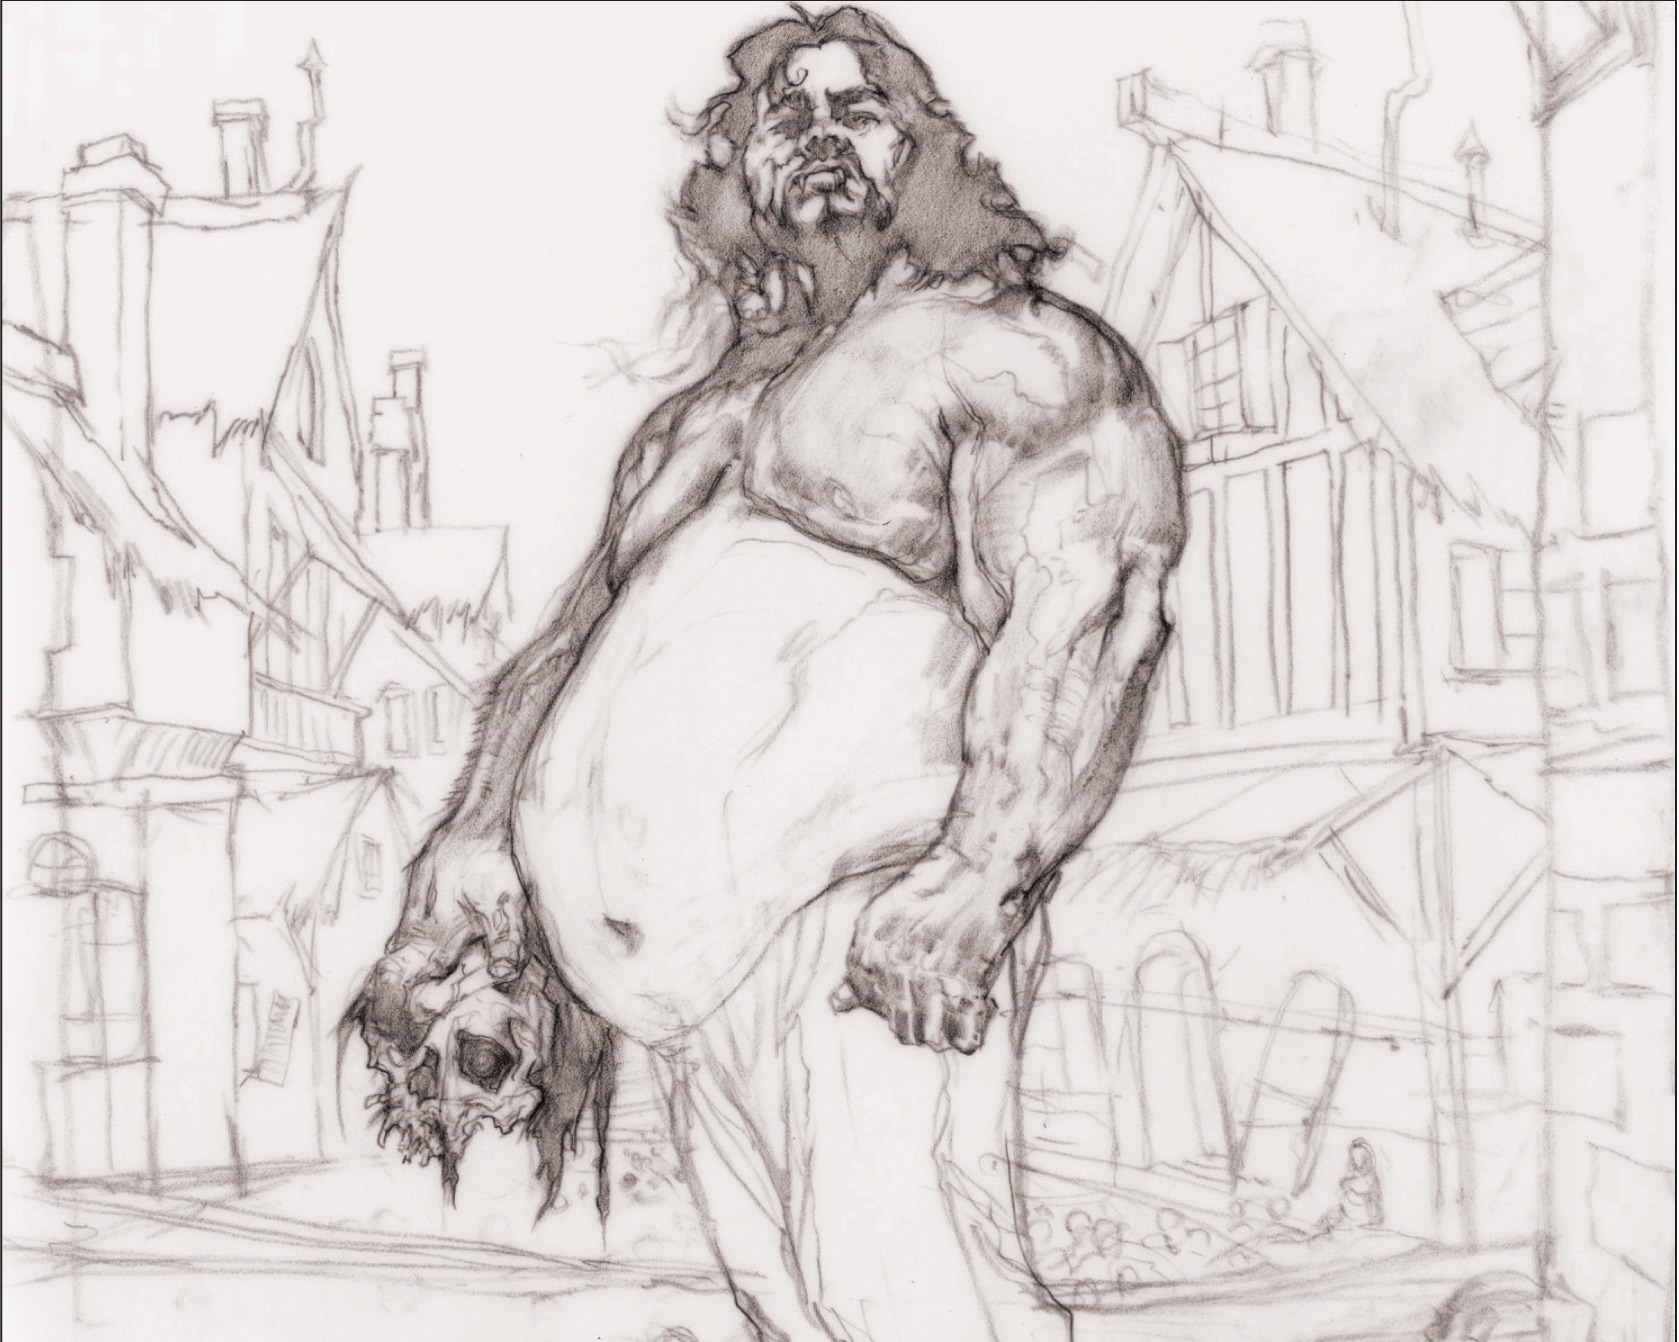
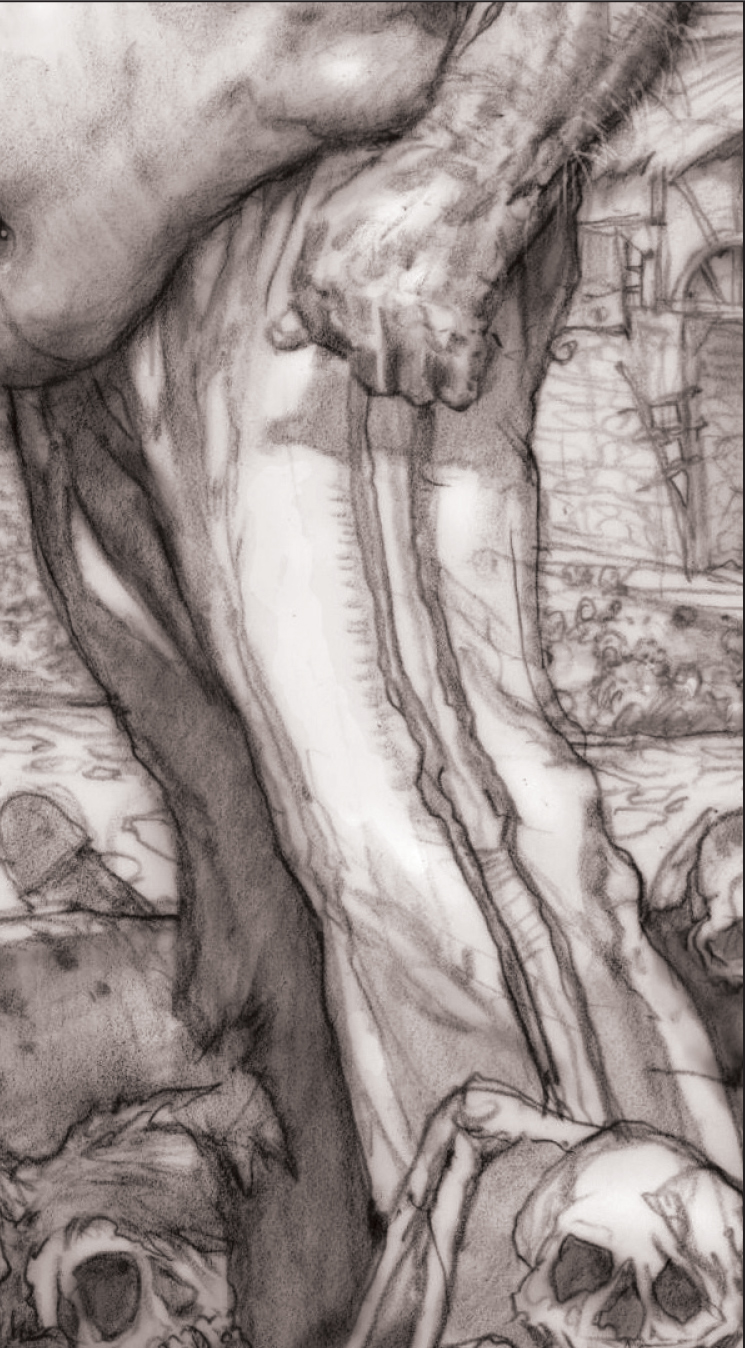
Step Five Begin to shade in the values for the vampire’s hair and upper body. Be careful to keep your pencil strokes consistent; this will keep your values clean. Add a half-eaten head in one hand the bodies on the street behind him—they looked a bit excessive.
Step Six Even though he’s got a bit of a gut, you still want him to look strong and fierce. Chisel out his musculature by alternating the direction of your pencil strokes, making him look like he could be made out of granite.
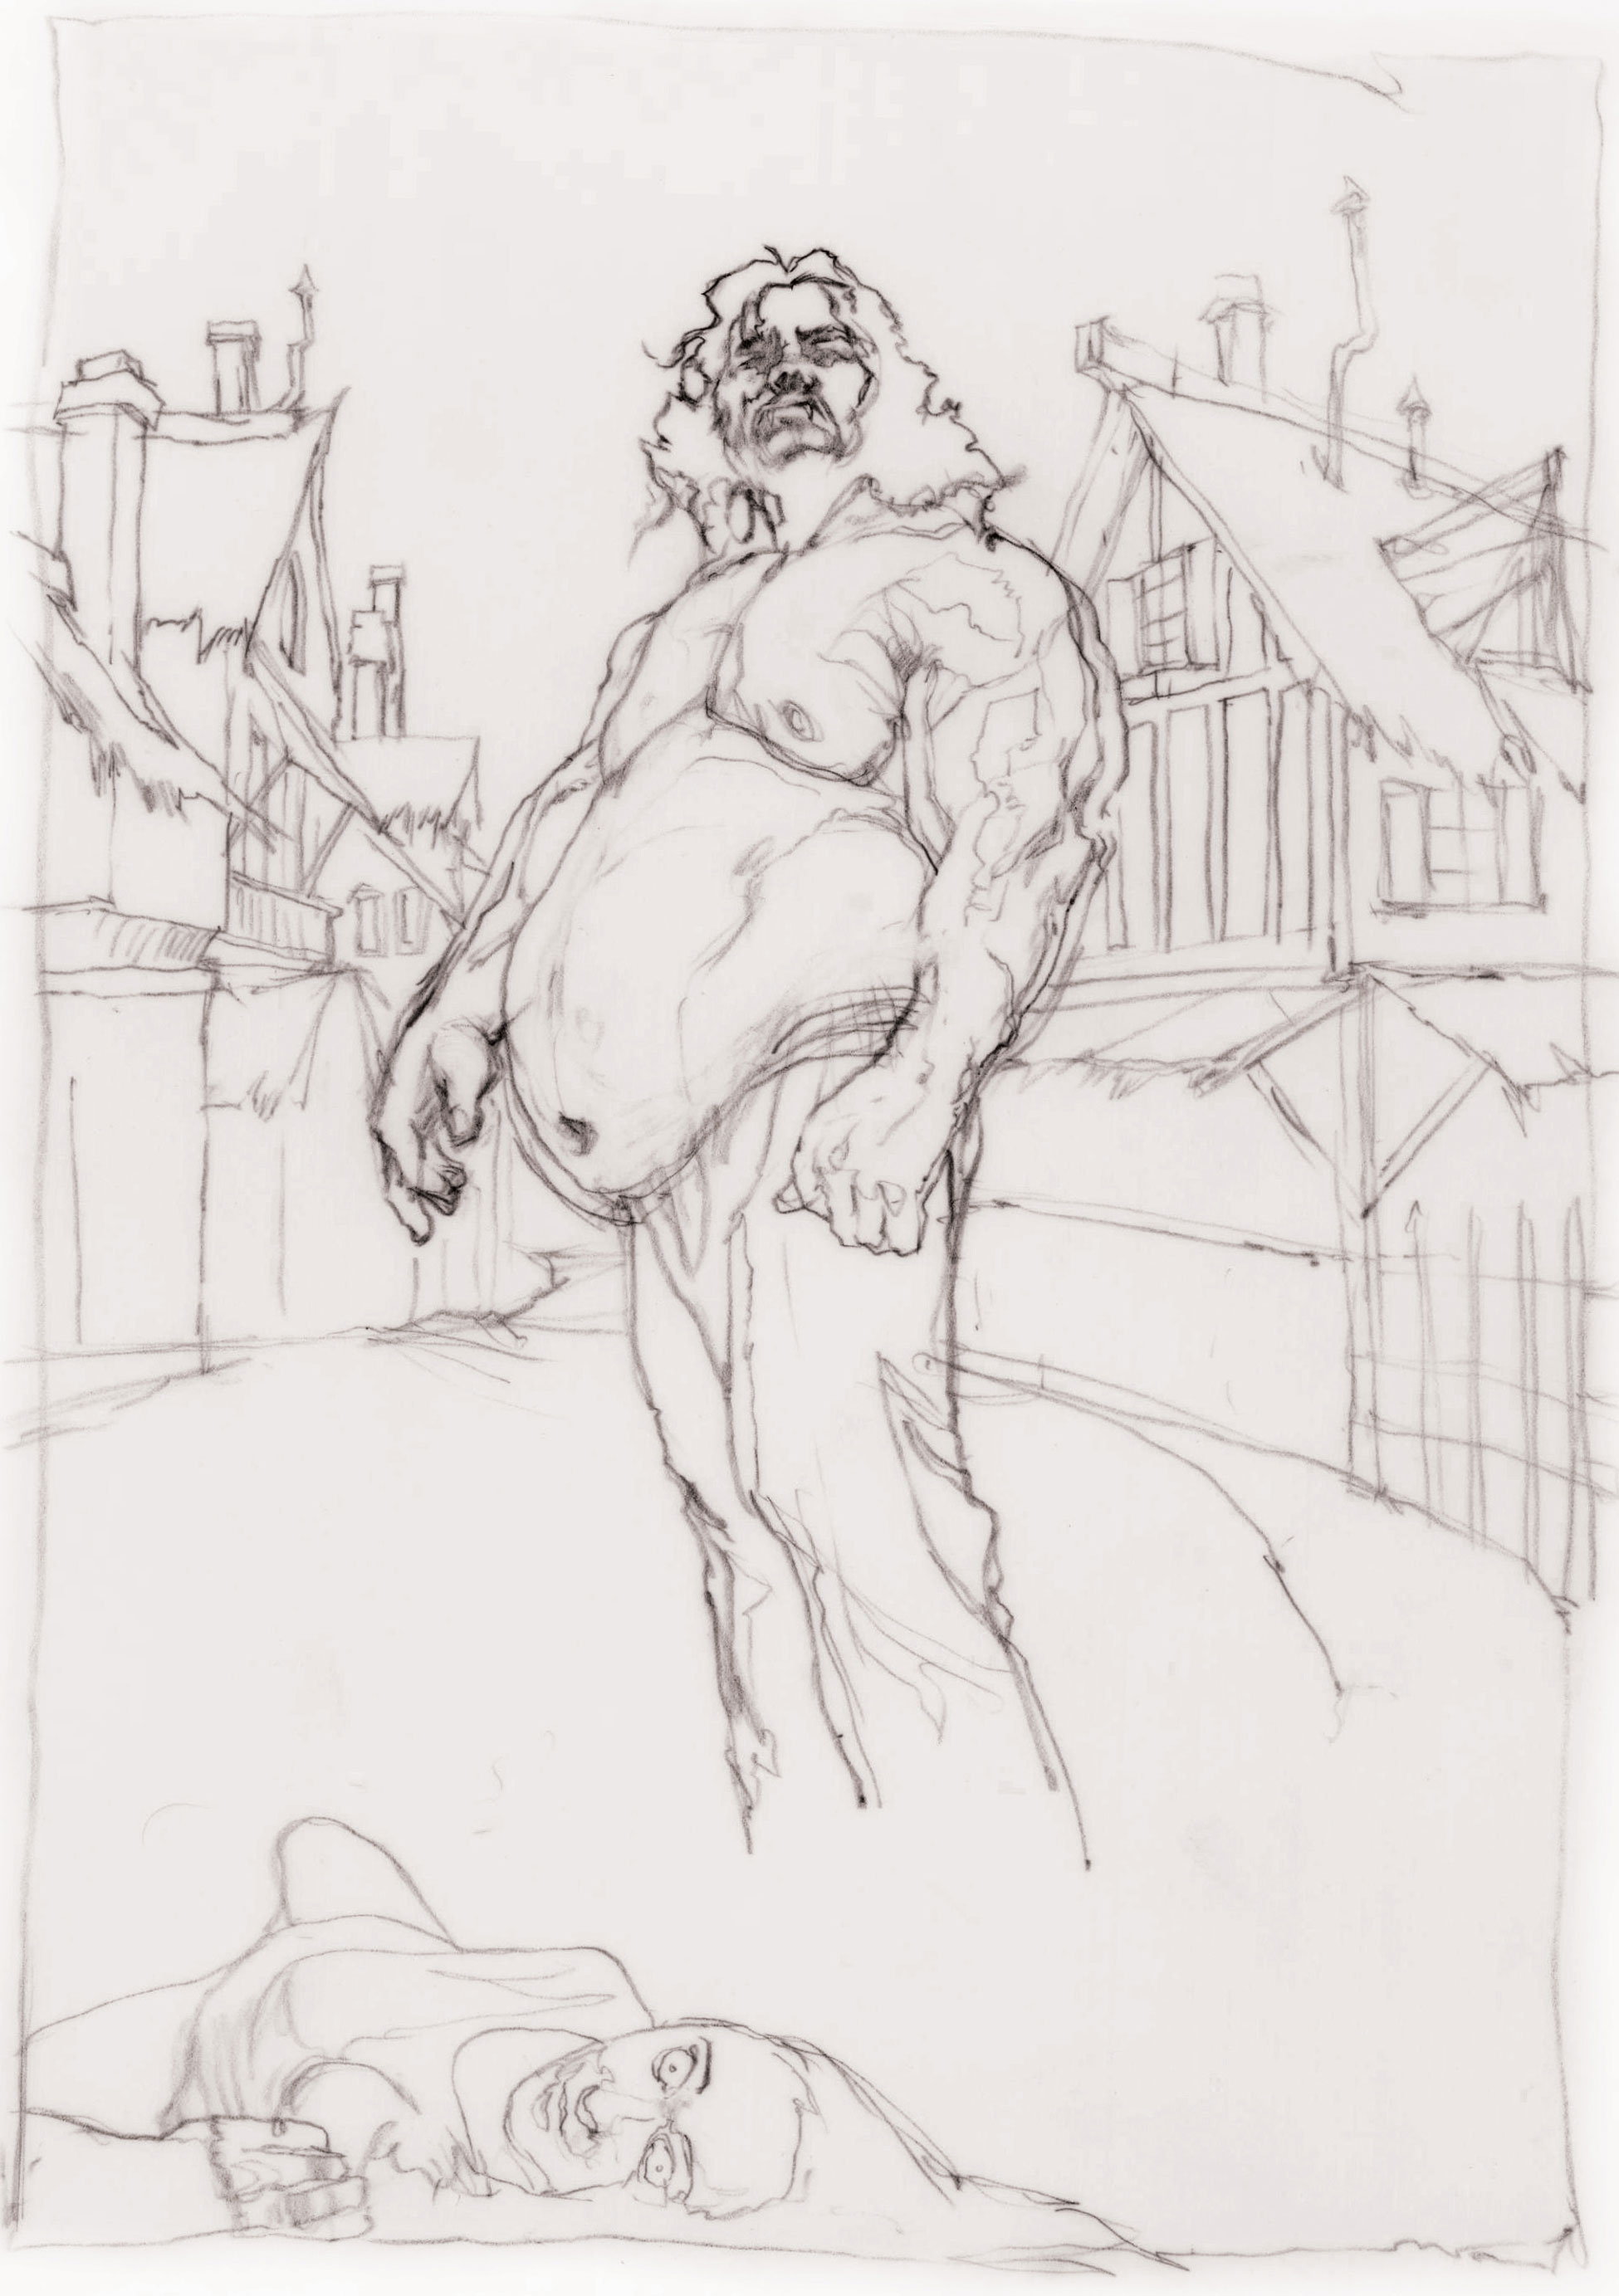
Step Seven Begin to block in large dark patterns at the bottom, keeping the values about 15% lighter than their holding line. This grounds the composition, creates a sense of mystery, and reveals attractive shapes at the same time.
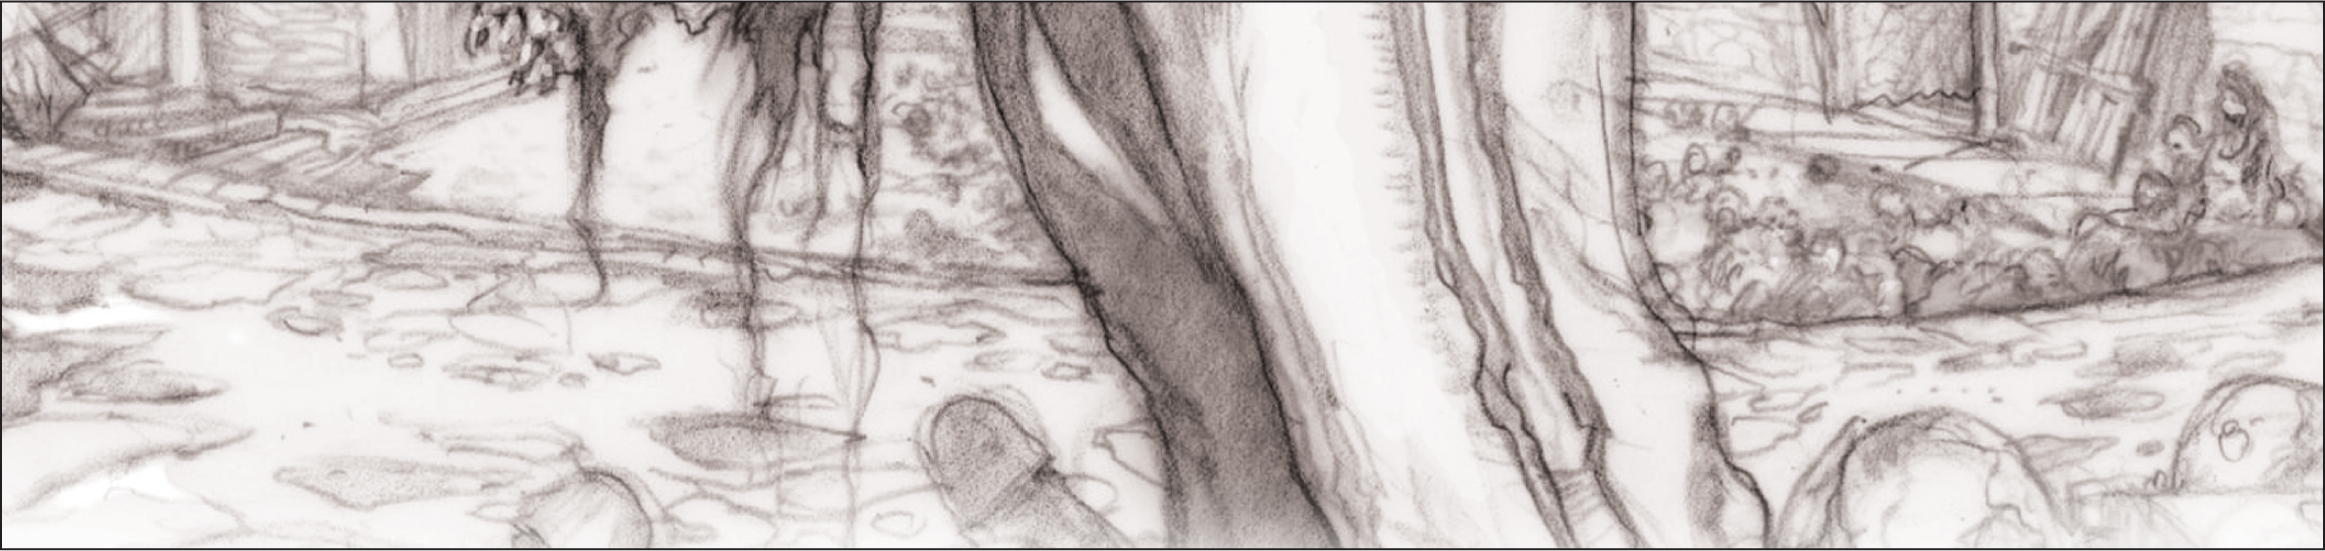
Step Eight Bow the ground slightly. Make it appear as if it’s giving way to the tremendous weight of our hungry vampire and all the carnage he’s left behind from his recent meal.
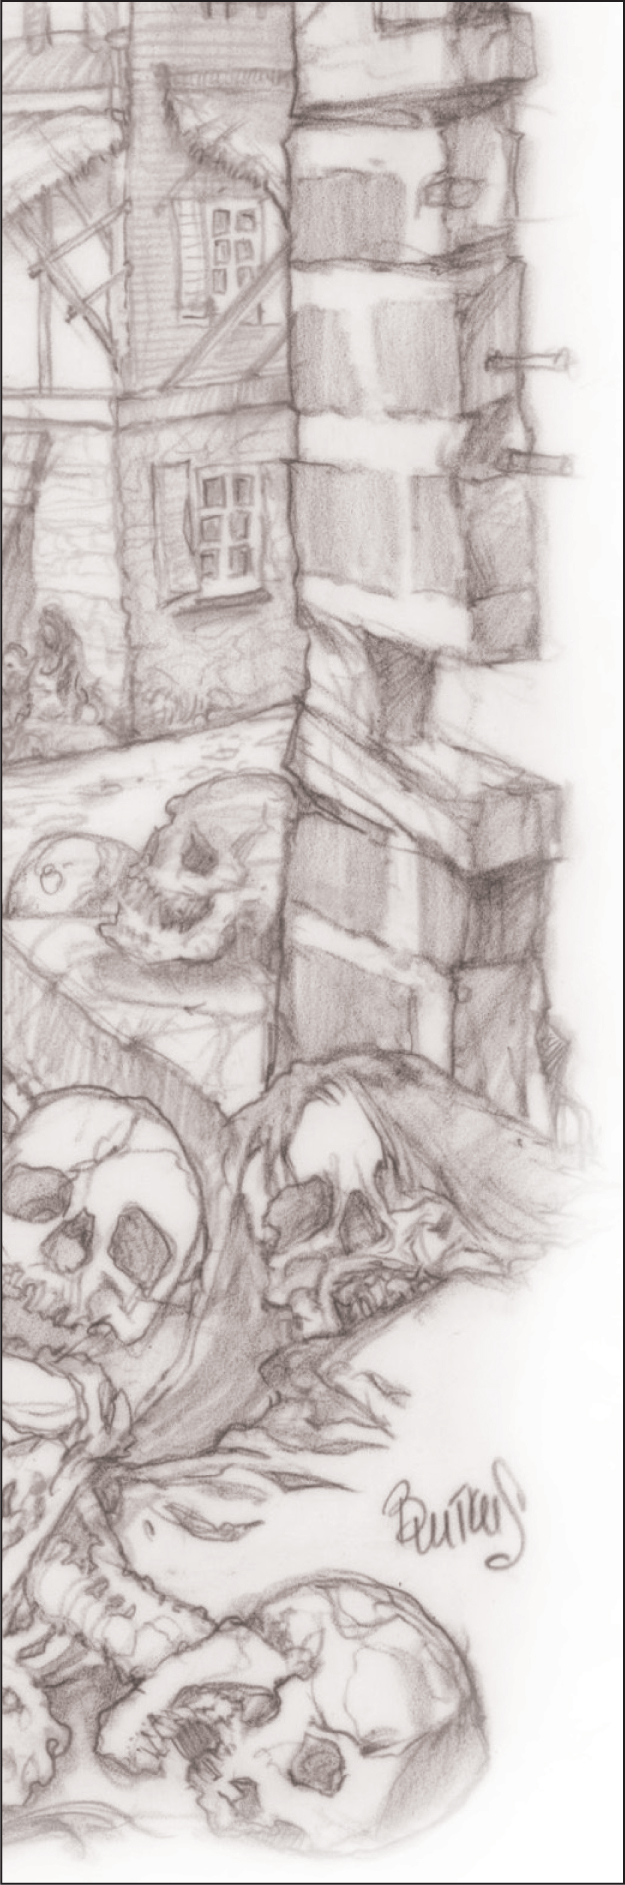
Step Nine The bricks and skeletons are used to break the frame, creating a much more dynamic border treatment.
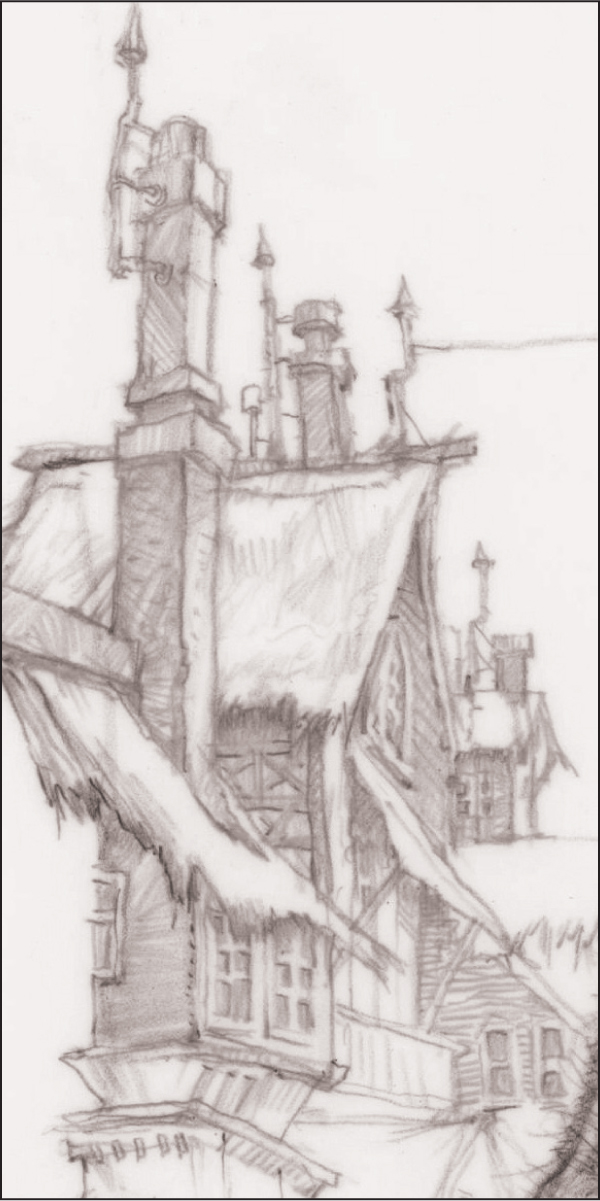
Step Ten Start to lay in a mid value for the village. Vary your strokes according to the changing planes of each structure. To keep the feeling of Old World charm, draw all the buildings free-hand, without the aid of a ruler.
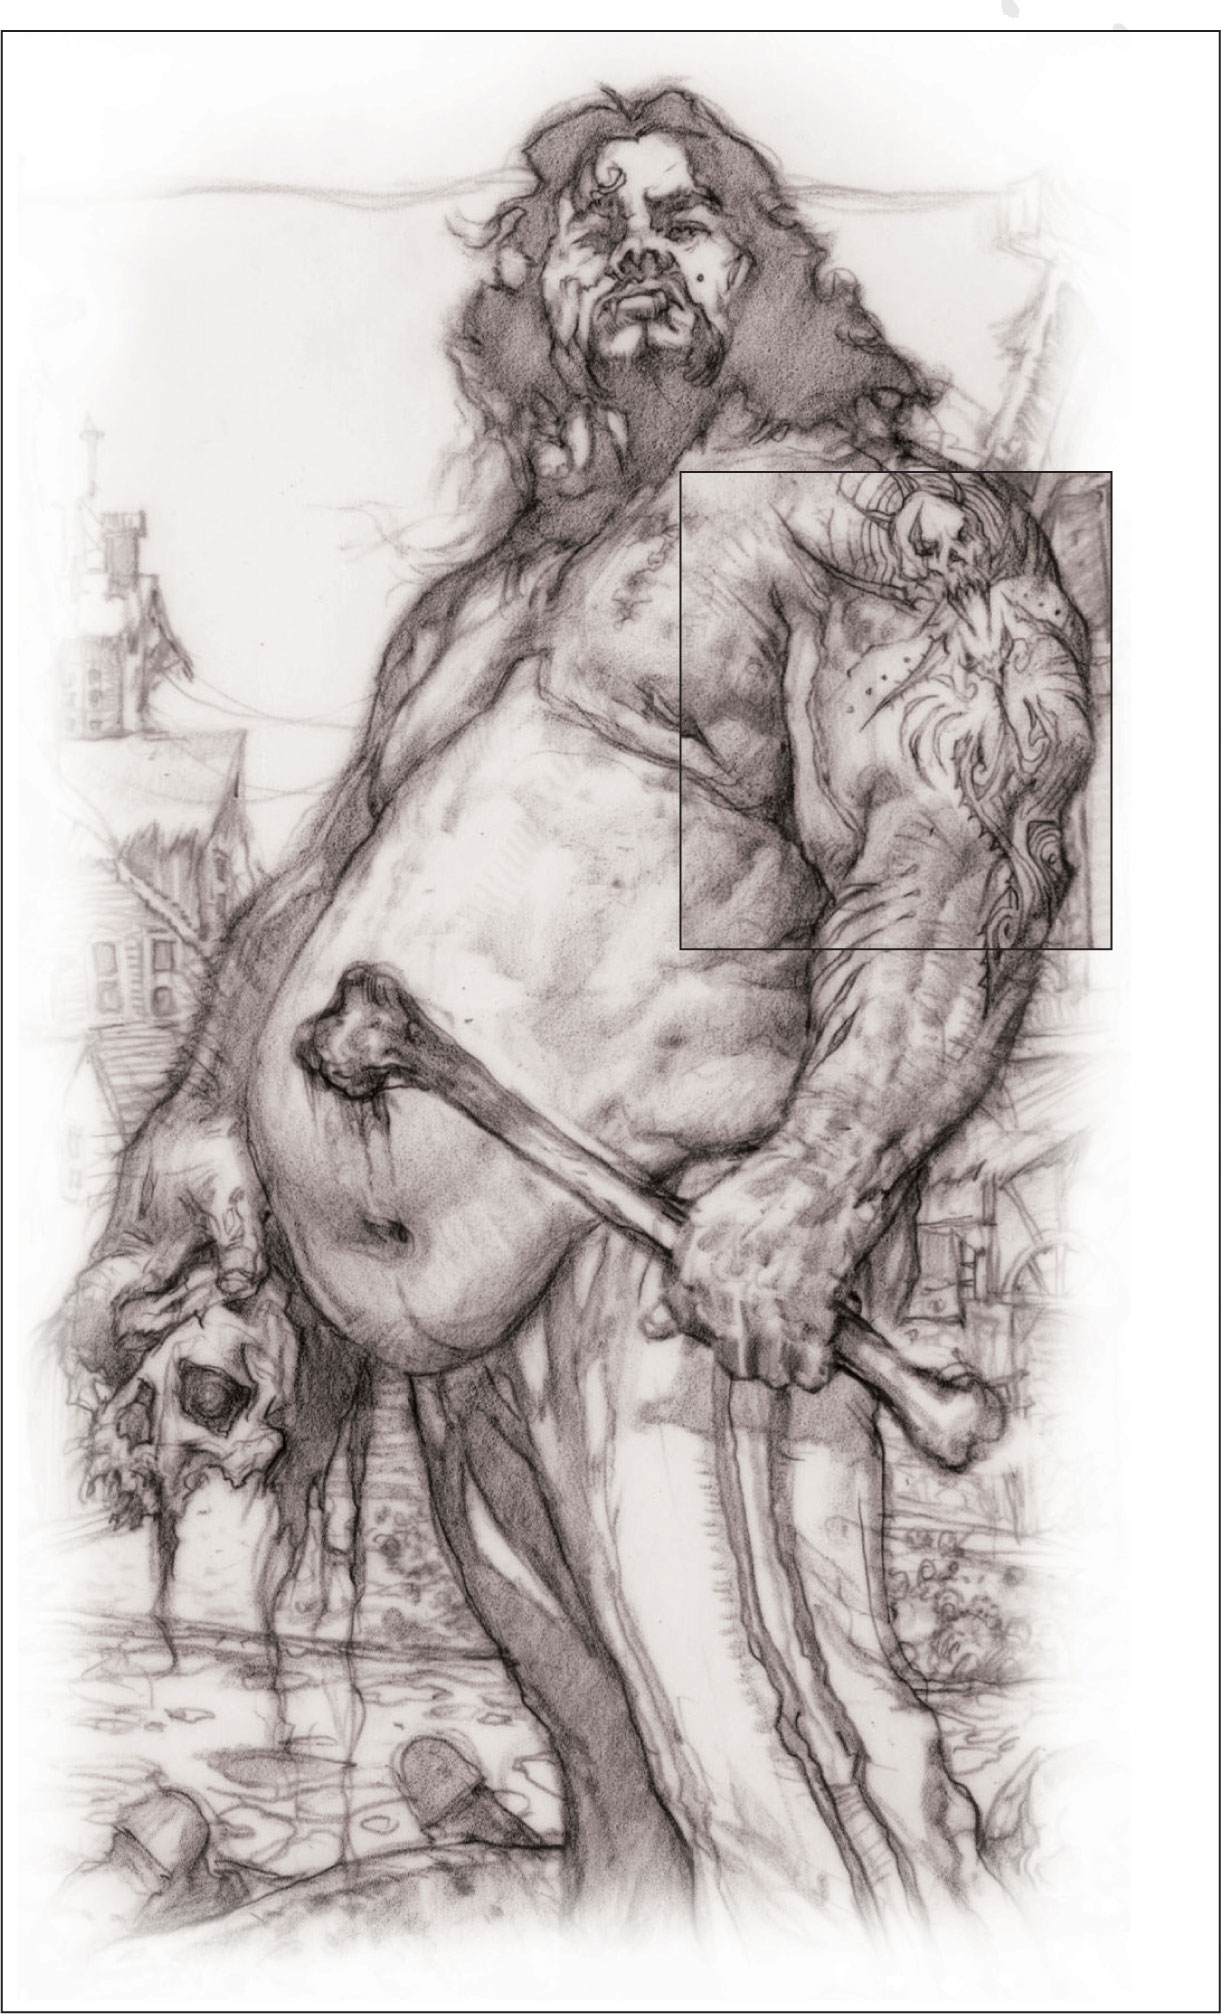
Step Eleven To make him look even more intimidating, design a demonic tattoo for his arm and add a bit of grizzle to his forearm. Push his stomach out by darkening the value along its perimeter. Also, add a shadow pattern on his pants just below his gut, further exaggerating his girth.
Step Twelve Darken your values and holding line a bit more. Since the values in this area are heavily contrasted, make sure your positive and negative shapes are defined and attractive.
Step Thirteen Yes, this vampire is wearing track pants. This small detail throws the viewer off as to which century this atrocity actually took place. Note how his back leg is enveloped in shadow. In a tightly detailed drawing like this, you’ll need to create balance using large, solid shapes. Using graphic shadow patterns will also help add more masculinity to the image.
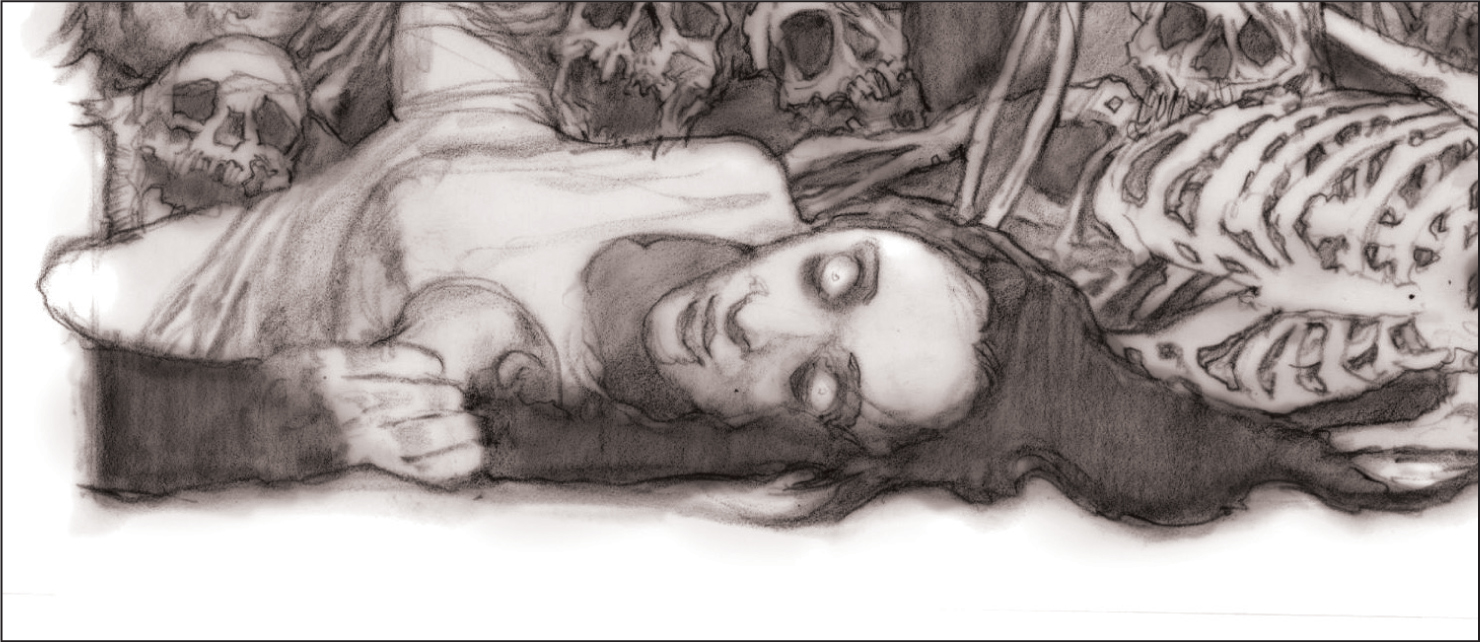
Step Fourteen Is that a pool of blood she’s laying in or is that her hair? Leaving certain elements in your drawing unexplained is another great way to rattle your viewer. This dark mass in the bottom corner also helps anchor the composition.
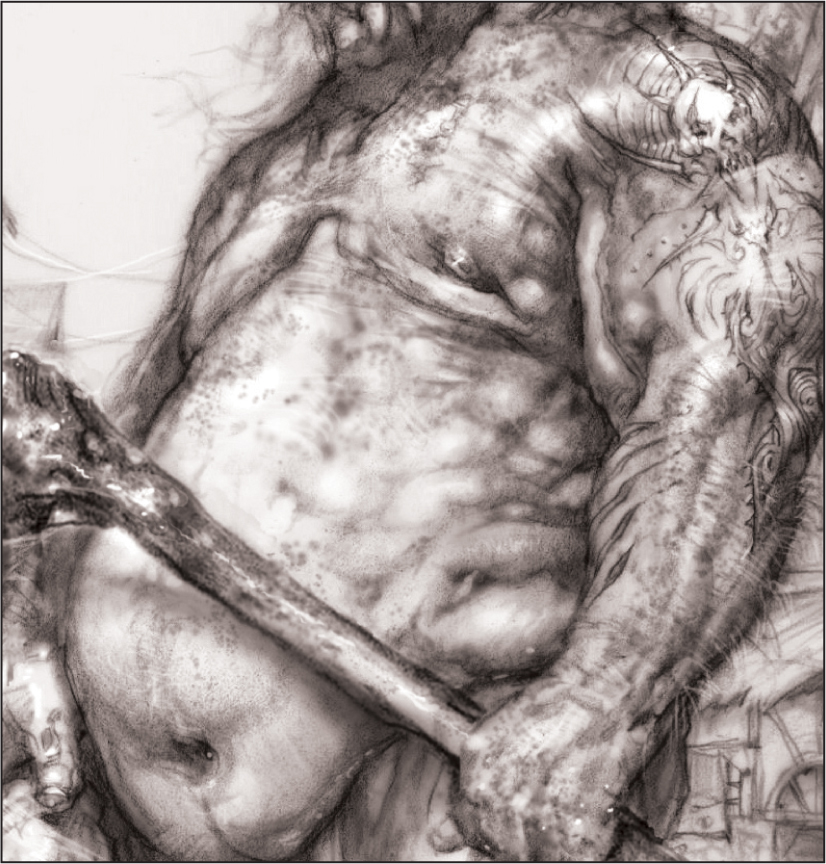
Step Fifteen Now, let’s take this grisly image a step further. Add a human femur to the clenched fist of his other hand. Make the bone quite long, thus insinuating that the victim it belonged to was no weakling. Add some boils up and down the side of his stomach by lightly shading soft circles.
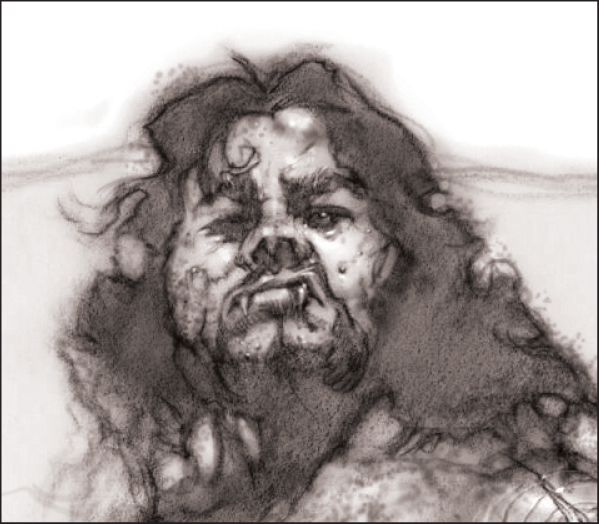
Step Sixteen This ghoul’s head is made up of dark and light shapes. By outlining all the shapes with a slightly darker line, you can create graphic forms while still leaving much to mystery.
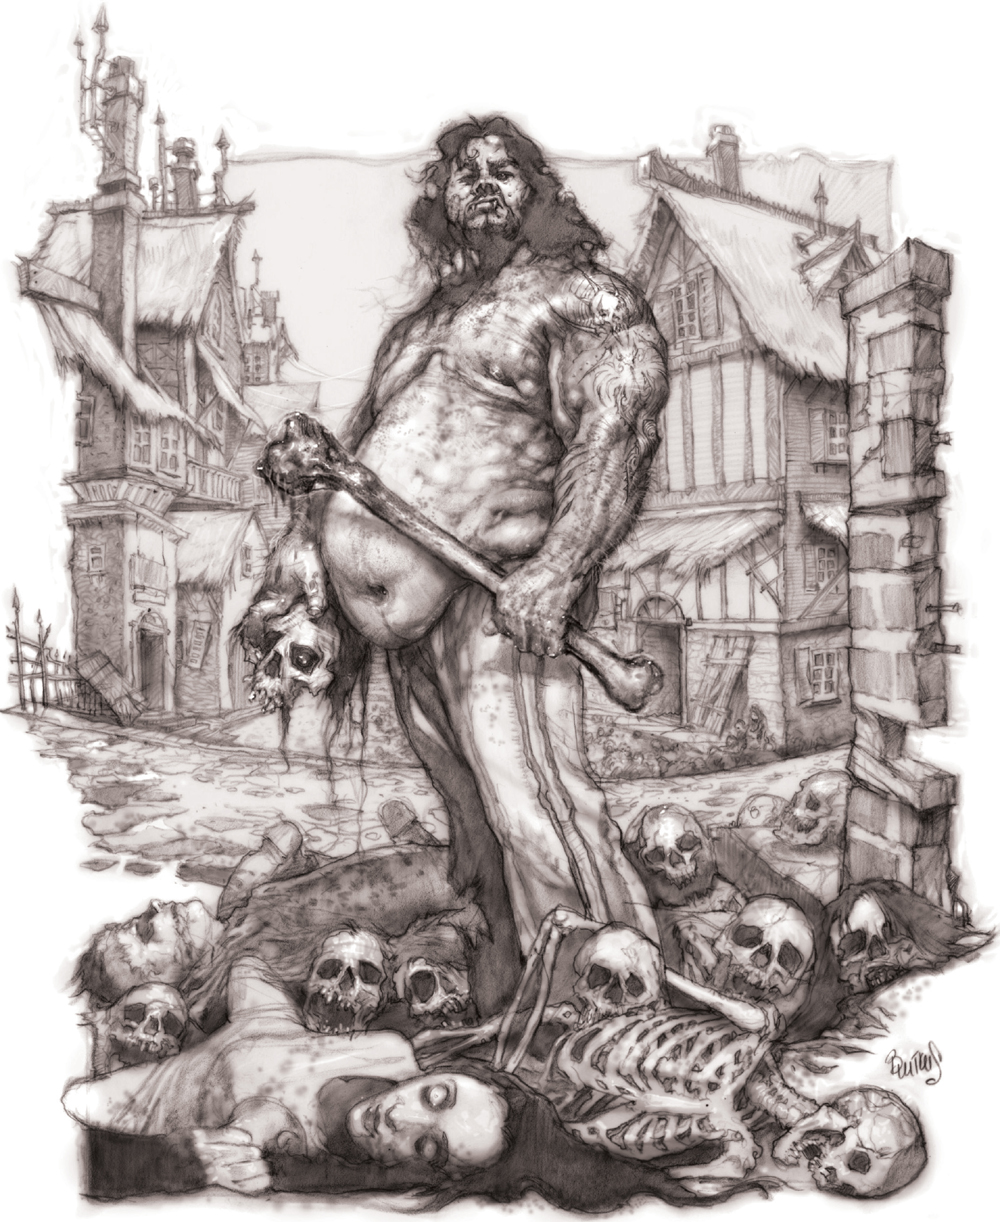
Step Seventeen Aside from the uncomfortable subject matter, this illustration is an example of many things. In the environment, we’re showing multiple perspectives and juxtaposing angles. The dead bodies have very little detail but still read well because they’re made out of designed positive and negative shapes. The background is a second read; if you look closely, you can see all the bedlam and mayhem this vampire has caused in his recent rampage on the village.
With a hint of youthful innocence, this vampire craves the smokin’ hot blood of demons. Spunky, offbeat, and quirky, the character in this illustration has definitely not been following in anyone else’s footsteps. The position of her body, her clothes, and even the tilt of her head all help to express how unique this vampire is.
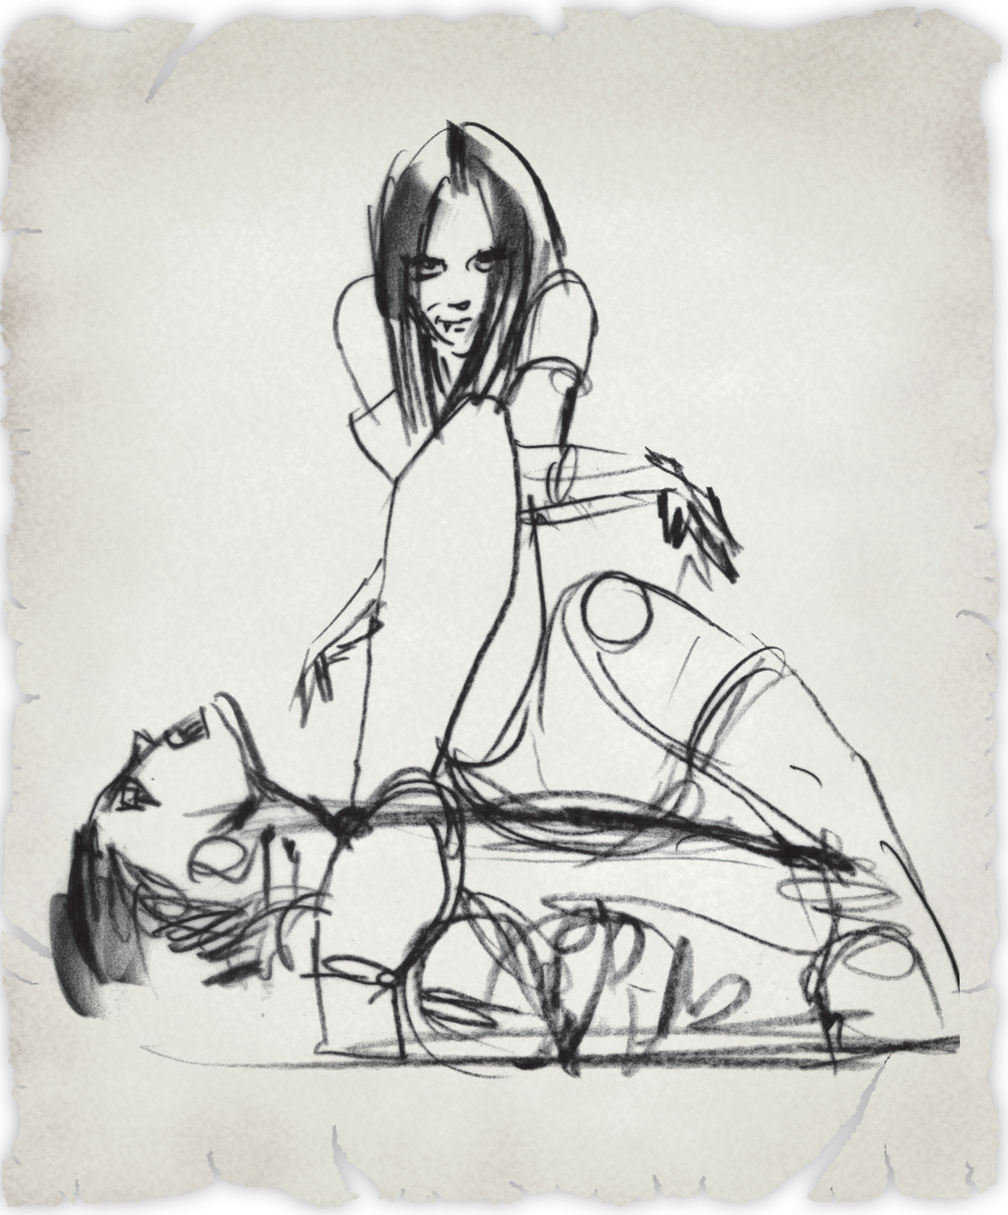
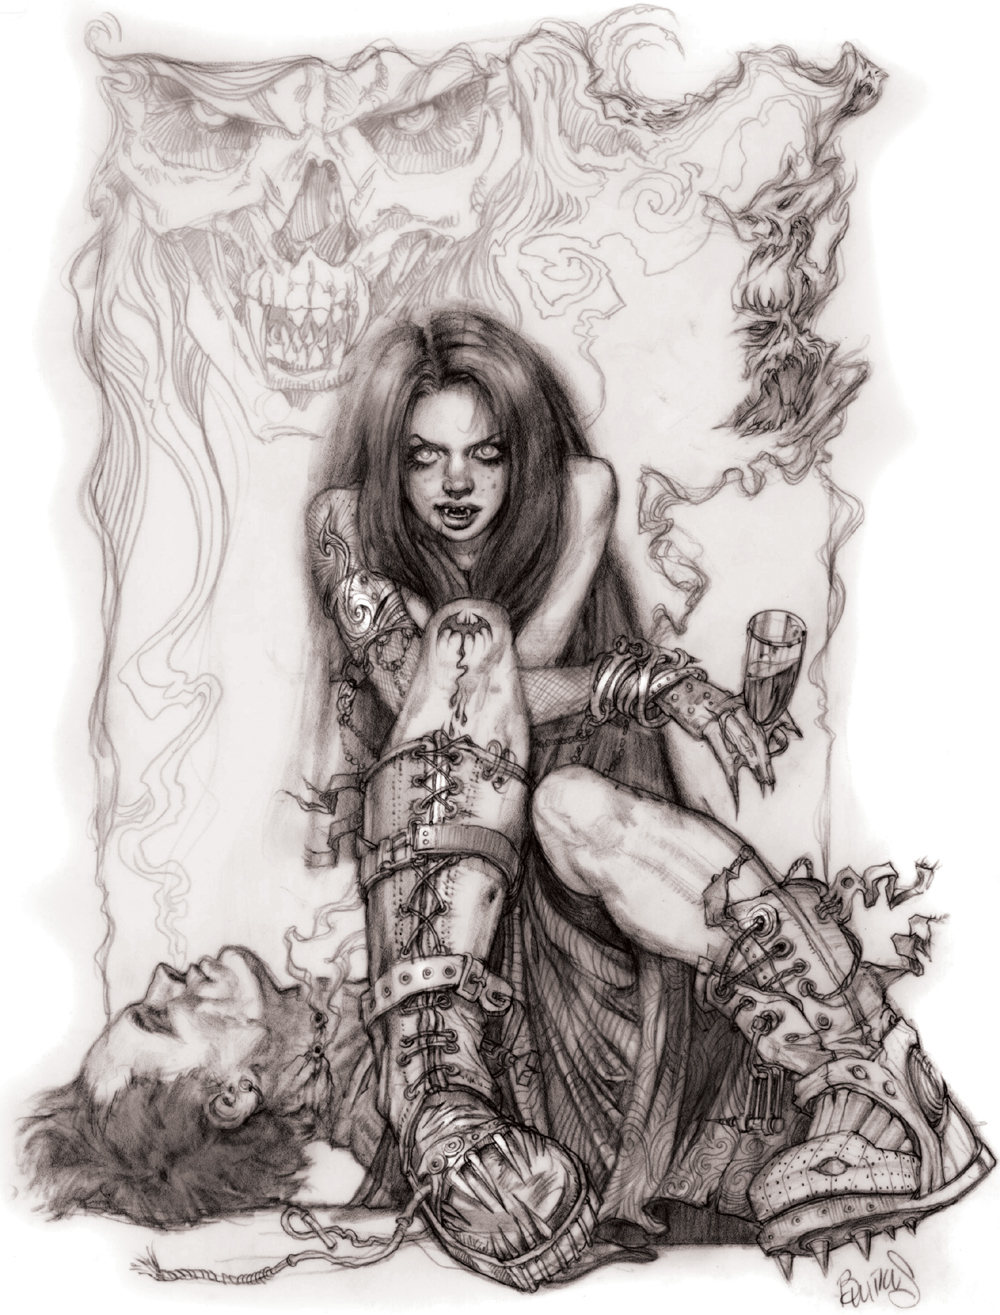
Step One To create a spunky vampire character, we’ll need to give her a quirky yet unsettling pose. In this preliminary sketch, you’ll see that she’s sitting on her victim’s lifeless body. At this point, sketch a rough layin using a black colored pencil over a sheet of tracing paper. Her facial expression, plus the positioning of her arms and legs, reveal her eccentric personality. (You can transfer this sketch; see “Transferring a Drawing” on page 25.)
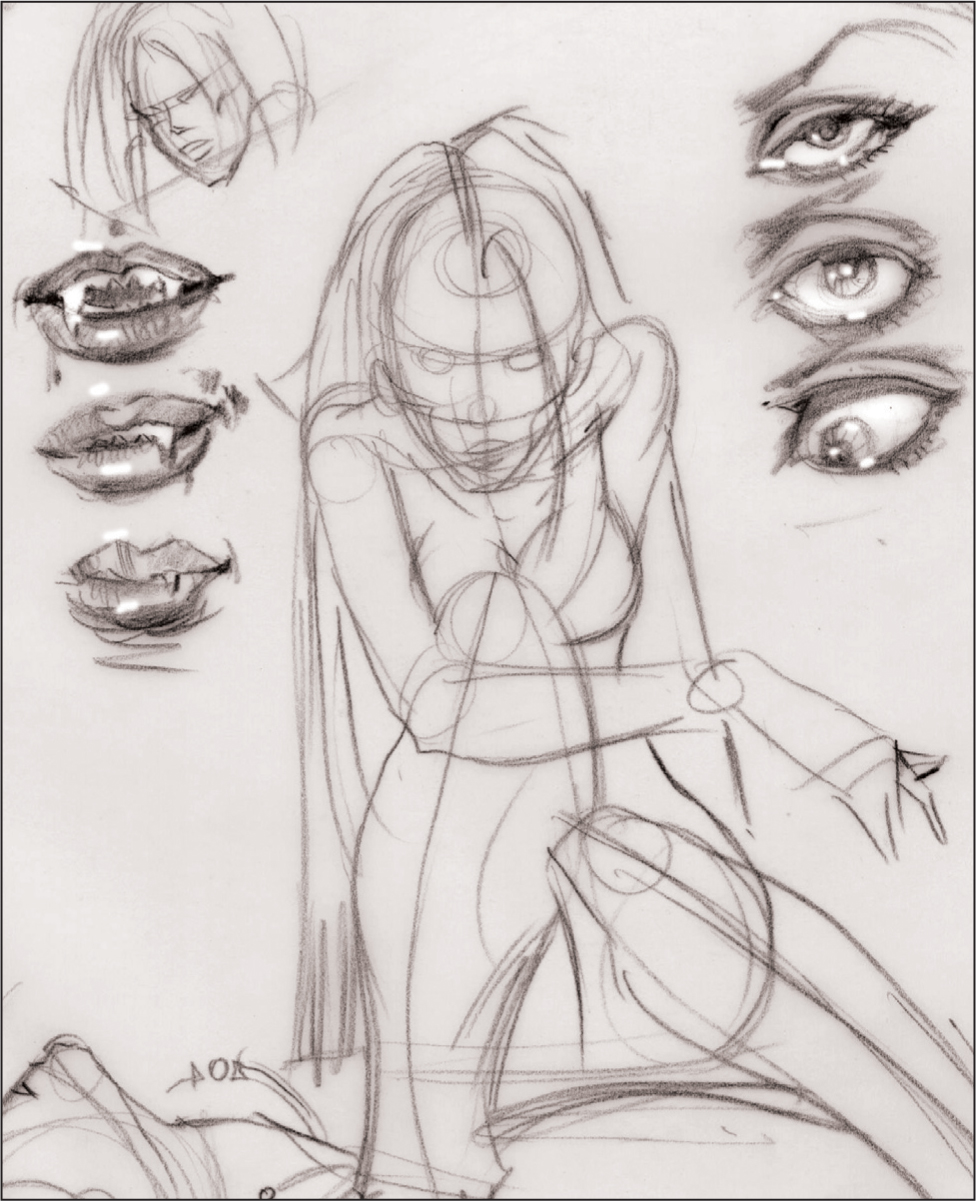
Step Two In this step, we’ll continue to experiment with the position of the vampire’s body. This character’s body language tells a lot of the story, so we want to it to be perfect. It’s also important to block in your drawing to make sure the anatomy is correct. Her facial expression is extremely important, so you may want to try a variety of looks for the eyes and mouth.

Step Three Now, start the final drawing, using a sharp black colored pencil over a sheet of vellum paper. For a quirkier, less aggressive stance, push her arm behind her knee, as in the thumbnail. Then bring her legs forward and exaggerate the foreshortening even more. Give her eyes dark, heavy eyelashes for added mystique.
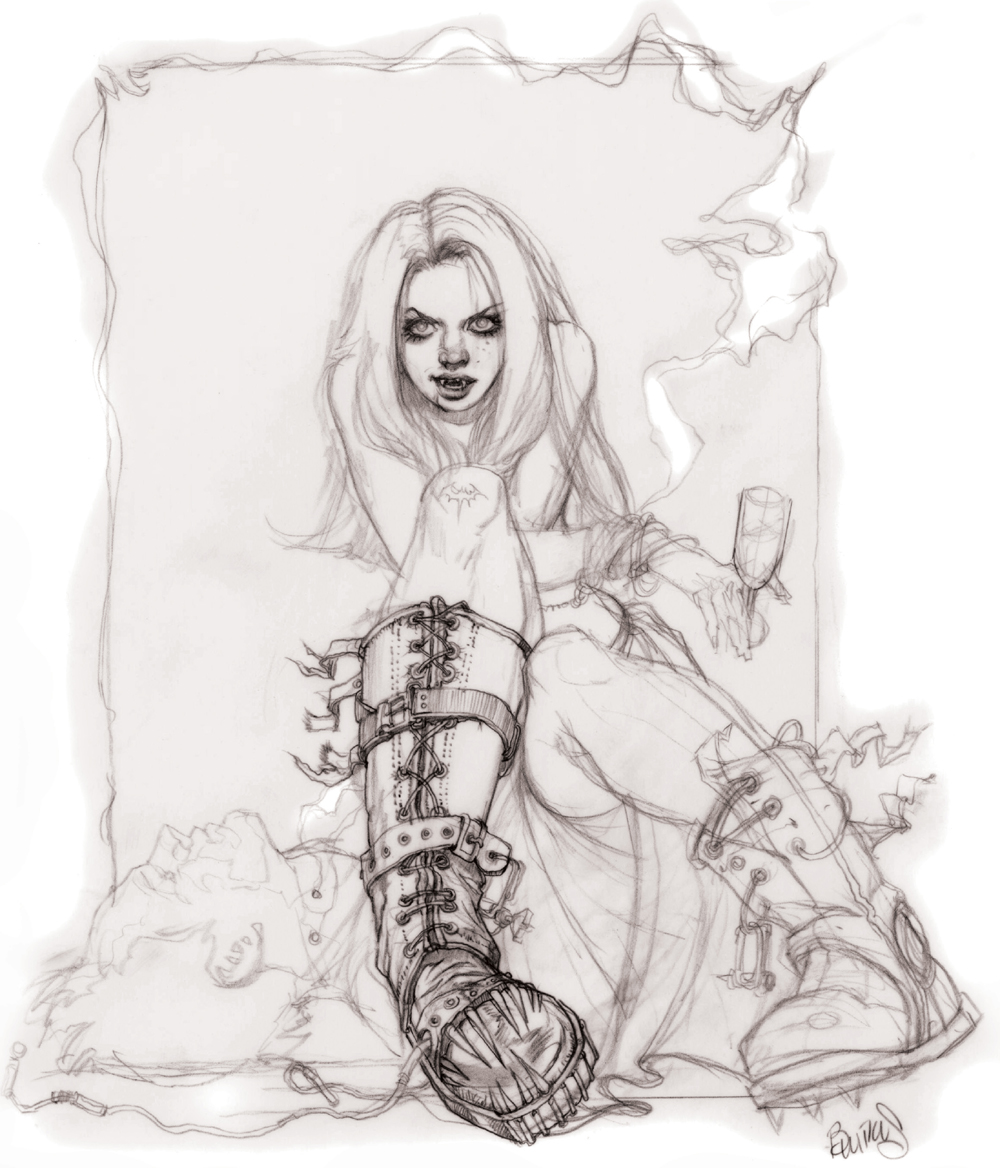
Step Four We’ll begin with the boots since they are in the foreground. The style of the boots will dictate how to approach the rest of her ensemble. By giving them thick buckles, laces, and “fangs” of their own, they look tough and almost alive. The fact that she has two mismatched boots only adds to her eccentricities.
Step Five On to the dead guy. At first glance, he may look like an average Joe, but he’s actually a demon—just the kind of meal this kooky vampire goes after. Although hard to obtain, to the discerning vampire, this demon’s blood tastes like fine wine. But we don’t want too much attention paid to him, so keep his values to a minimum and the edges soft. He should be a second read in this picture, like a piece of furniture in a room.
Step Six The framing of an illustration is almost as important as the drawing itself and can add a whole new dimension. The smoke wafting from the bite wounds on the demon is actually his soul escaping. Design monstrous faces within the smoke to represent how abhorrent this soul once was. Make sure to keep the edges soft and the shapes slightly twisted and warped. Note: If you’re having trouble drawing believable smoke, try lighting a wad of wet tissue and then observe the smoke coming off of it. The shapes are quite beautiful and graphic.
Step Seven Add tone to the vampire’s hair, stroking in the direction of hair growth. Pull out highlights using an eraser. Now we start to add more accoutrements to define this vampire’s unique sense of style. While in Europe, I wandered through a wonderful shop that catered to Gothic subculture. I found beautifully crafted ornate jewelry with long chains attached. I tried to design this vampire’s jewelry based on those memories, exaggerating them even further.
Step Eight Now, we’ll finish laying in the rest our drawing. Keep the folds of material between her legs graphic and strong. Make sure that the lines curve around her thigh to add more dimension. Folds can really weaken a drawing if they don’t look realistic. You might want to drape some fabric over a form similar to your subject matter for reference.
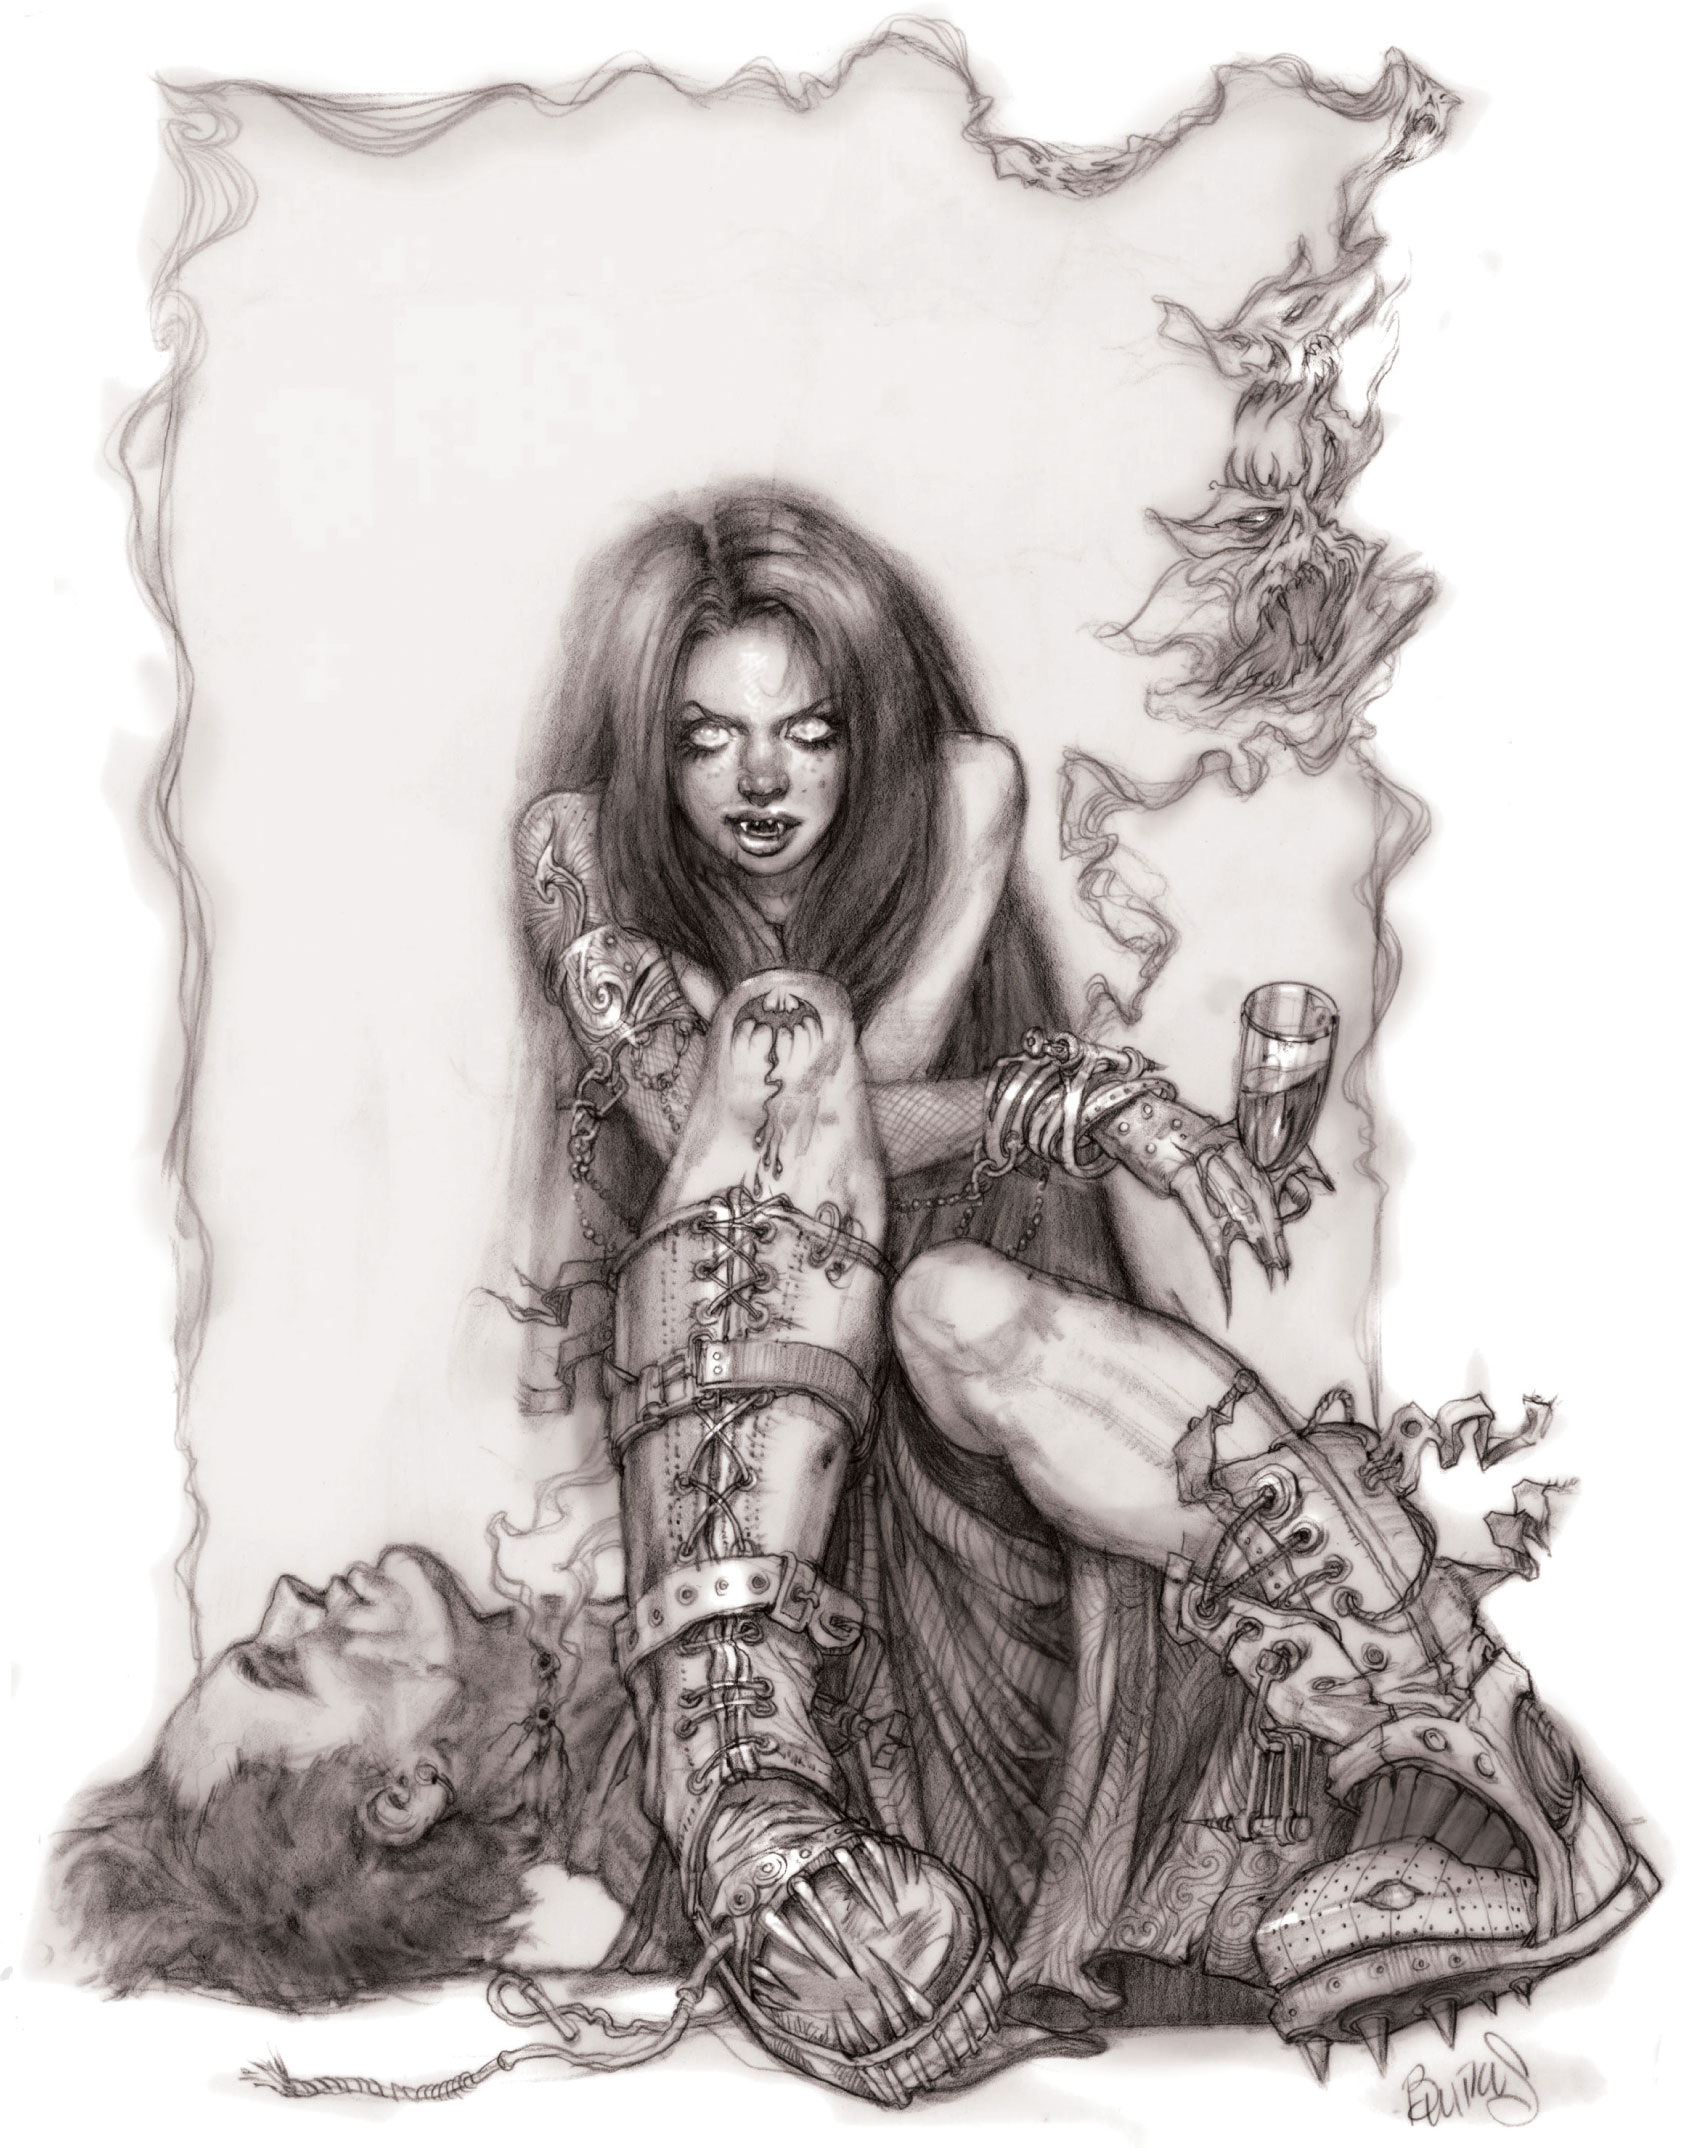
Step Nine Finish laying in the rest of the drawing, then begin to add your darker values. Lighten up her eyes and darken her skin tone a bit. Also, lengthen her hair, making sure you keep the edges extremely soft.
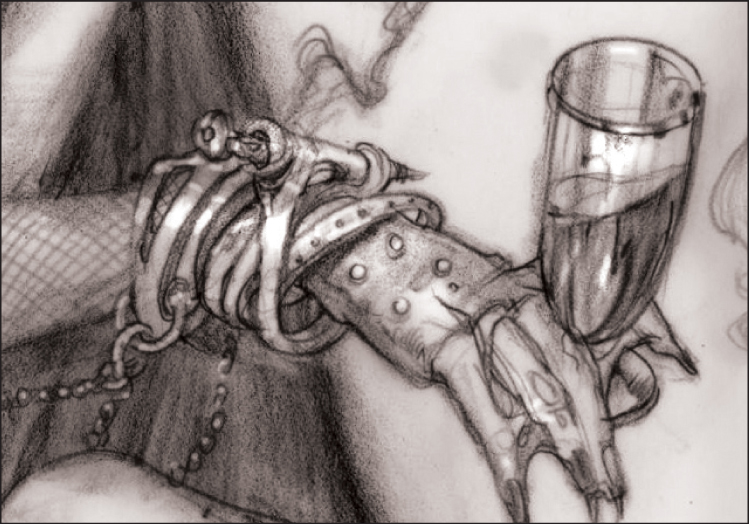
Step Ten Her jewelry is made up of an eclectic mix of metals, so using your eraser (any kind will do), put in some bright highlights down the middle. As for the glass of demon’s blood precariously hanging from her fingers, keep the shapes defined and the reflection off the glass bright.
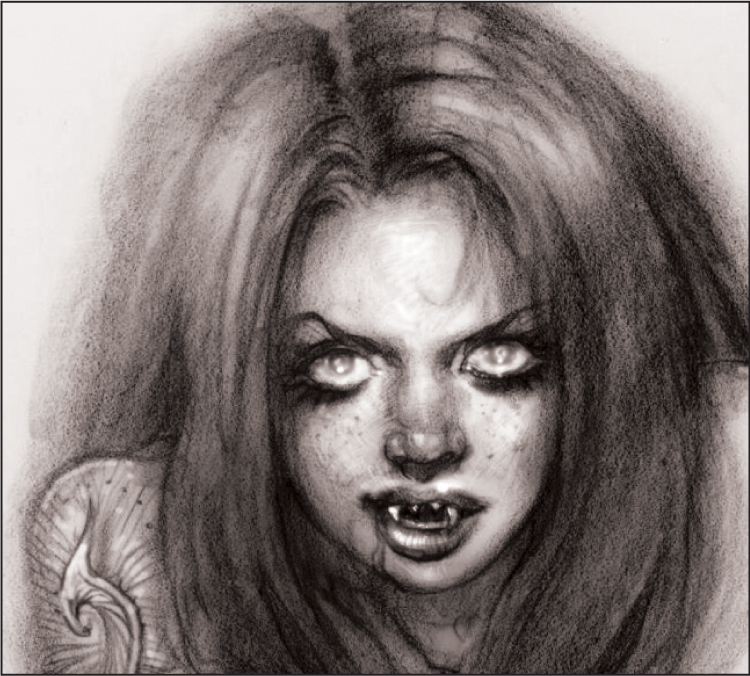
Step Eleven Although this vampire is a terrifying predator to the demons, she has a youthful face—once she retracts her fangs. To achieve this look, keep her features soft and round and even add a few freckles. Give her large doe eyes and a button nose.
Step Twelve In this step, we’re going to expand on the idea of the demon’s ugly soul. For the background, use a 30% warm gray colored pencil and design a menacing smoky apparition of a skull. Vary the thickness of the line quality and keep the edges firm.
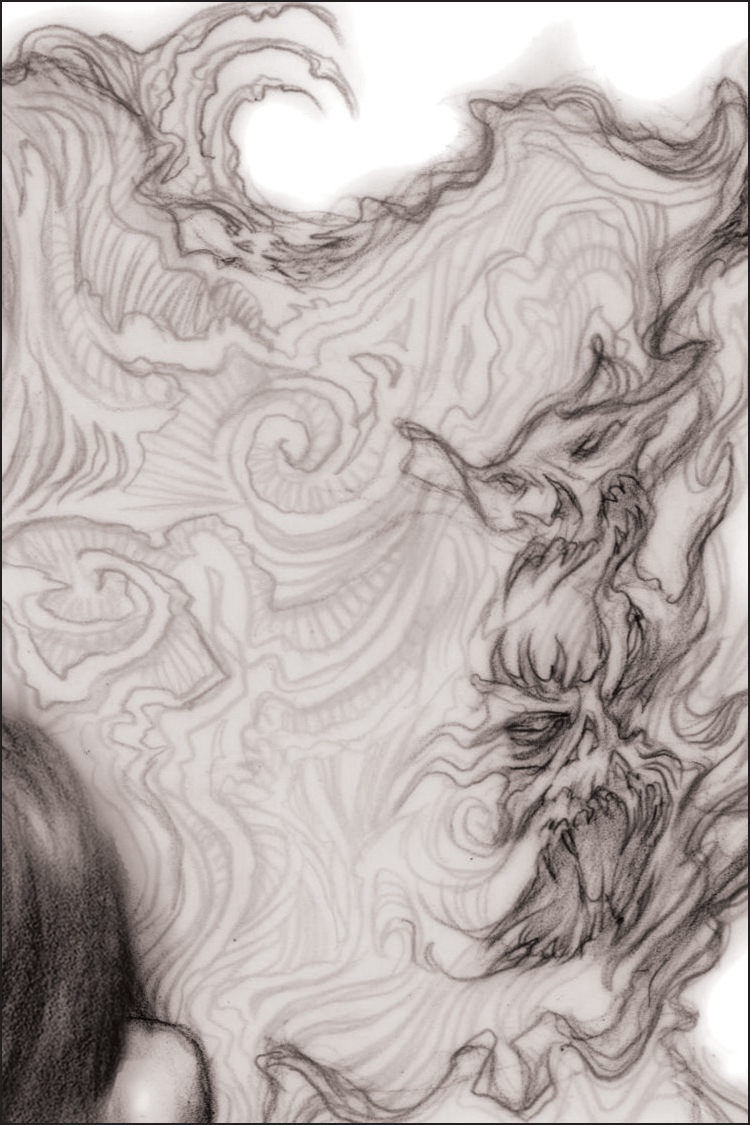
Step Thirteen By allowing the shapes in the smoke to closely interact with one another, we’ve created a background woven with intricate details like an elaborate tapestry. In reality, you’ll spend very little time on it.
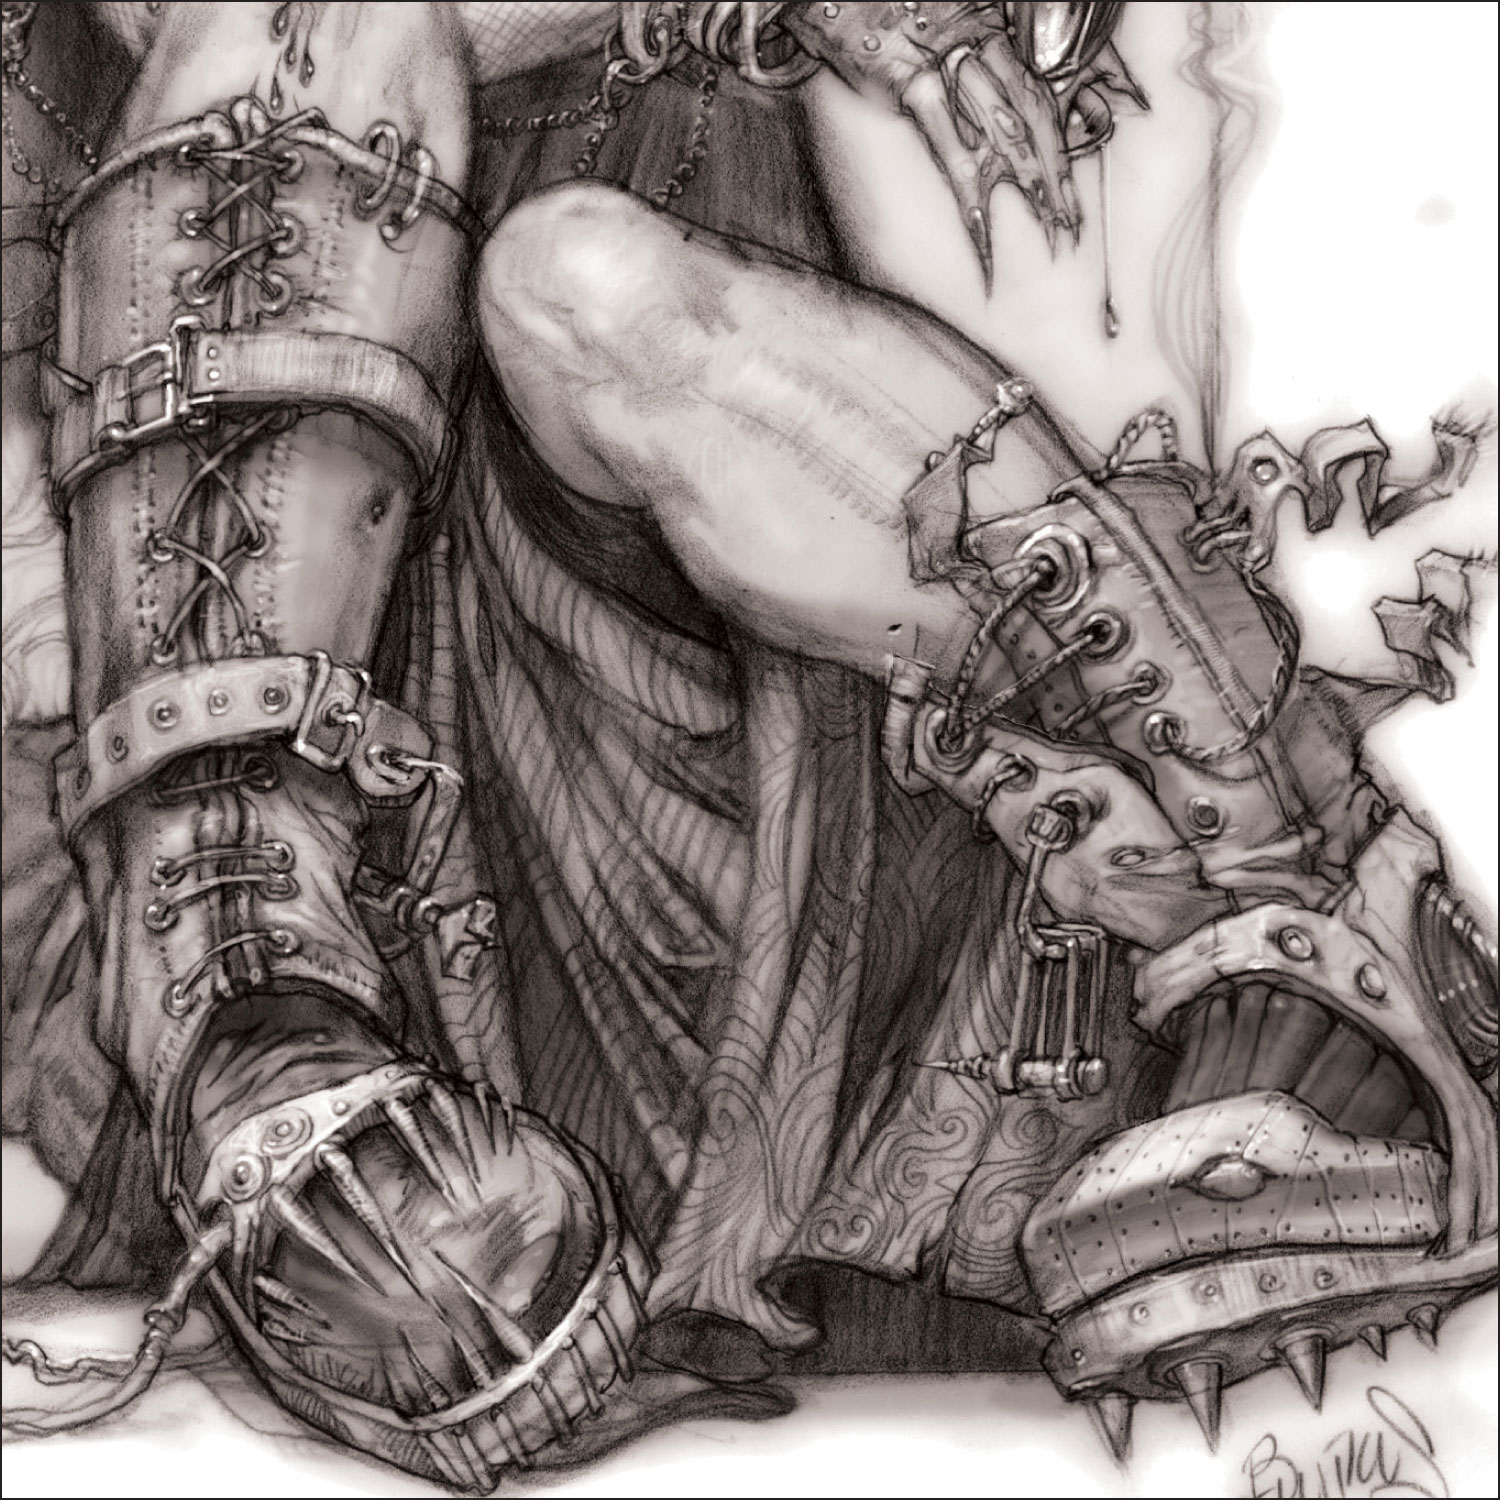
Step Fourteen Here, we’ll finish putting in all the dark accents and highlights on the boots. To add more character to the shoes, incorporate a variety of textures to the different parts. Also, remember to vary the direction of your pencil strokes, thus adding dimension and weight.
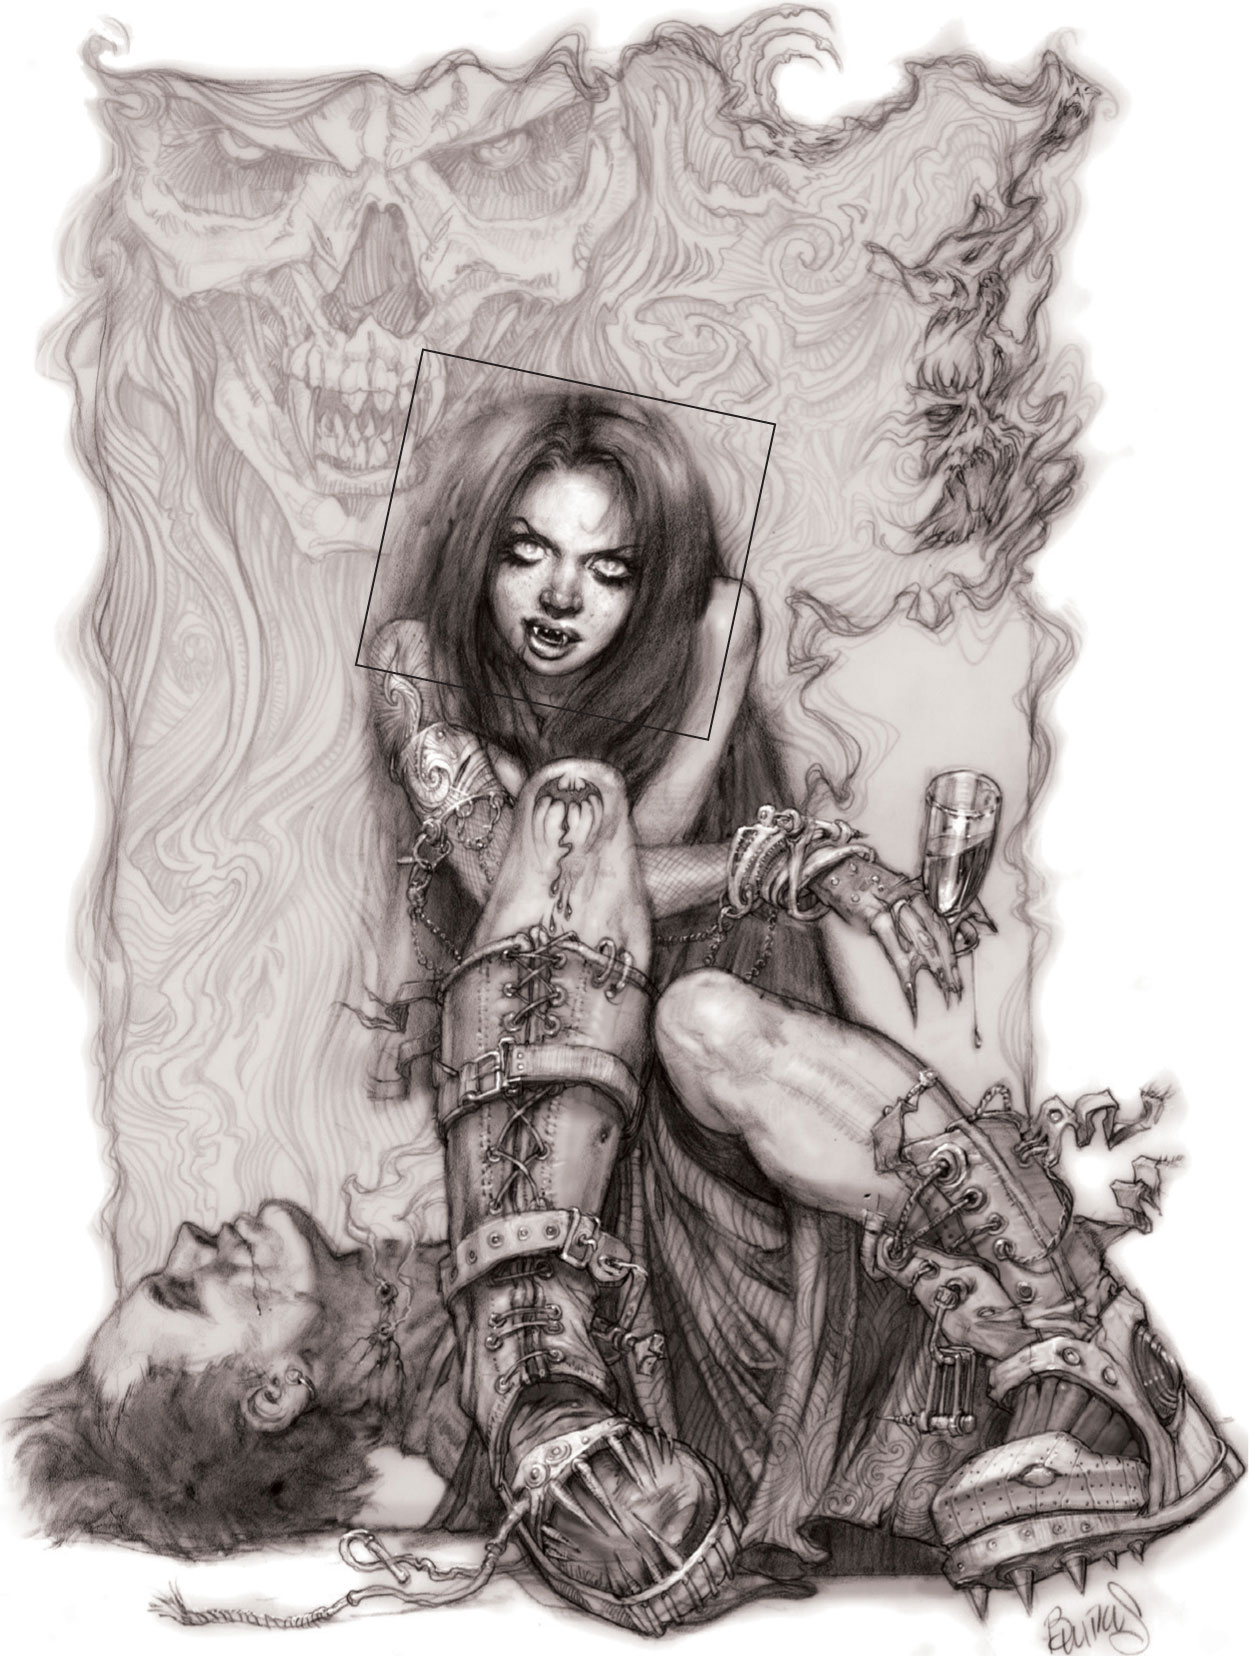
Step Fifteen If you want to enhance your drawing digitally, scan the drawing into Photoshop®. Here, we’ll darken the overall illustration by about 15% using the “levels” tool (see page 107). You can use the dodge tool or the eraser tool to bring out highlights. Notice that I’ve isolated her head and tilted it about 15 degrees to her left, adding much more to her offbeat personality. Remember that you have plenty of freedom to experiment once you bring the drawing into Photoshop®.
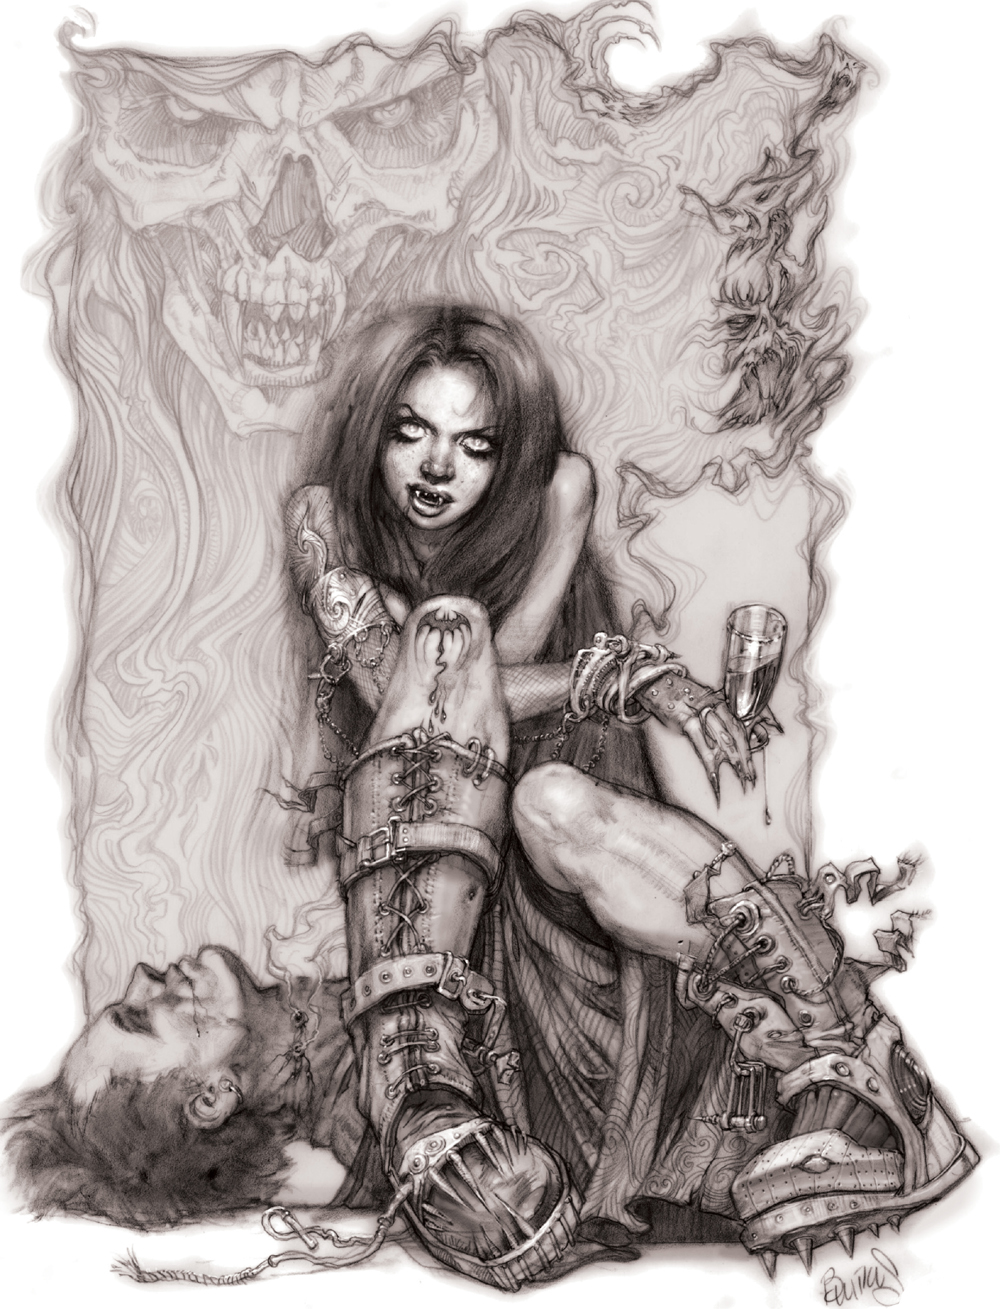
Step Sixteen Here we see the final drawing.
International House of Vampires: Part 2
From the sweltering islands in the Caribbean to the fog-shrouded jungles of South Africa, the vampire continues to make its mark around the world. Sometimes wearing the skin of a human temptress, sometimes pretending to be an abandoned infant, sometimes flying through the night as a demonic snake, its agenda is always the same. It longs to drink your blood.
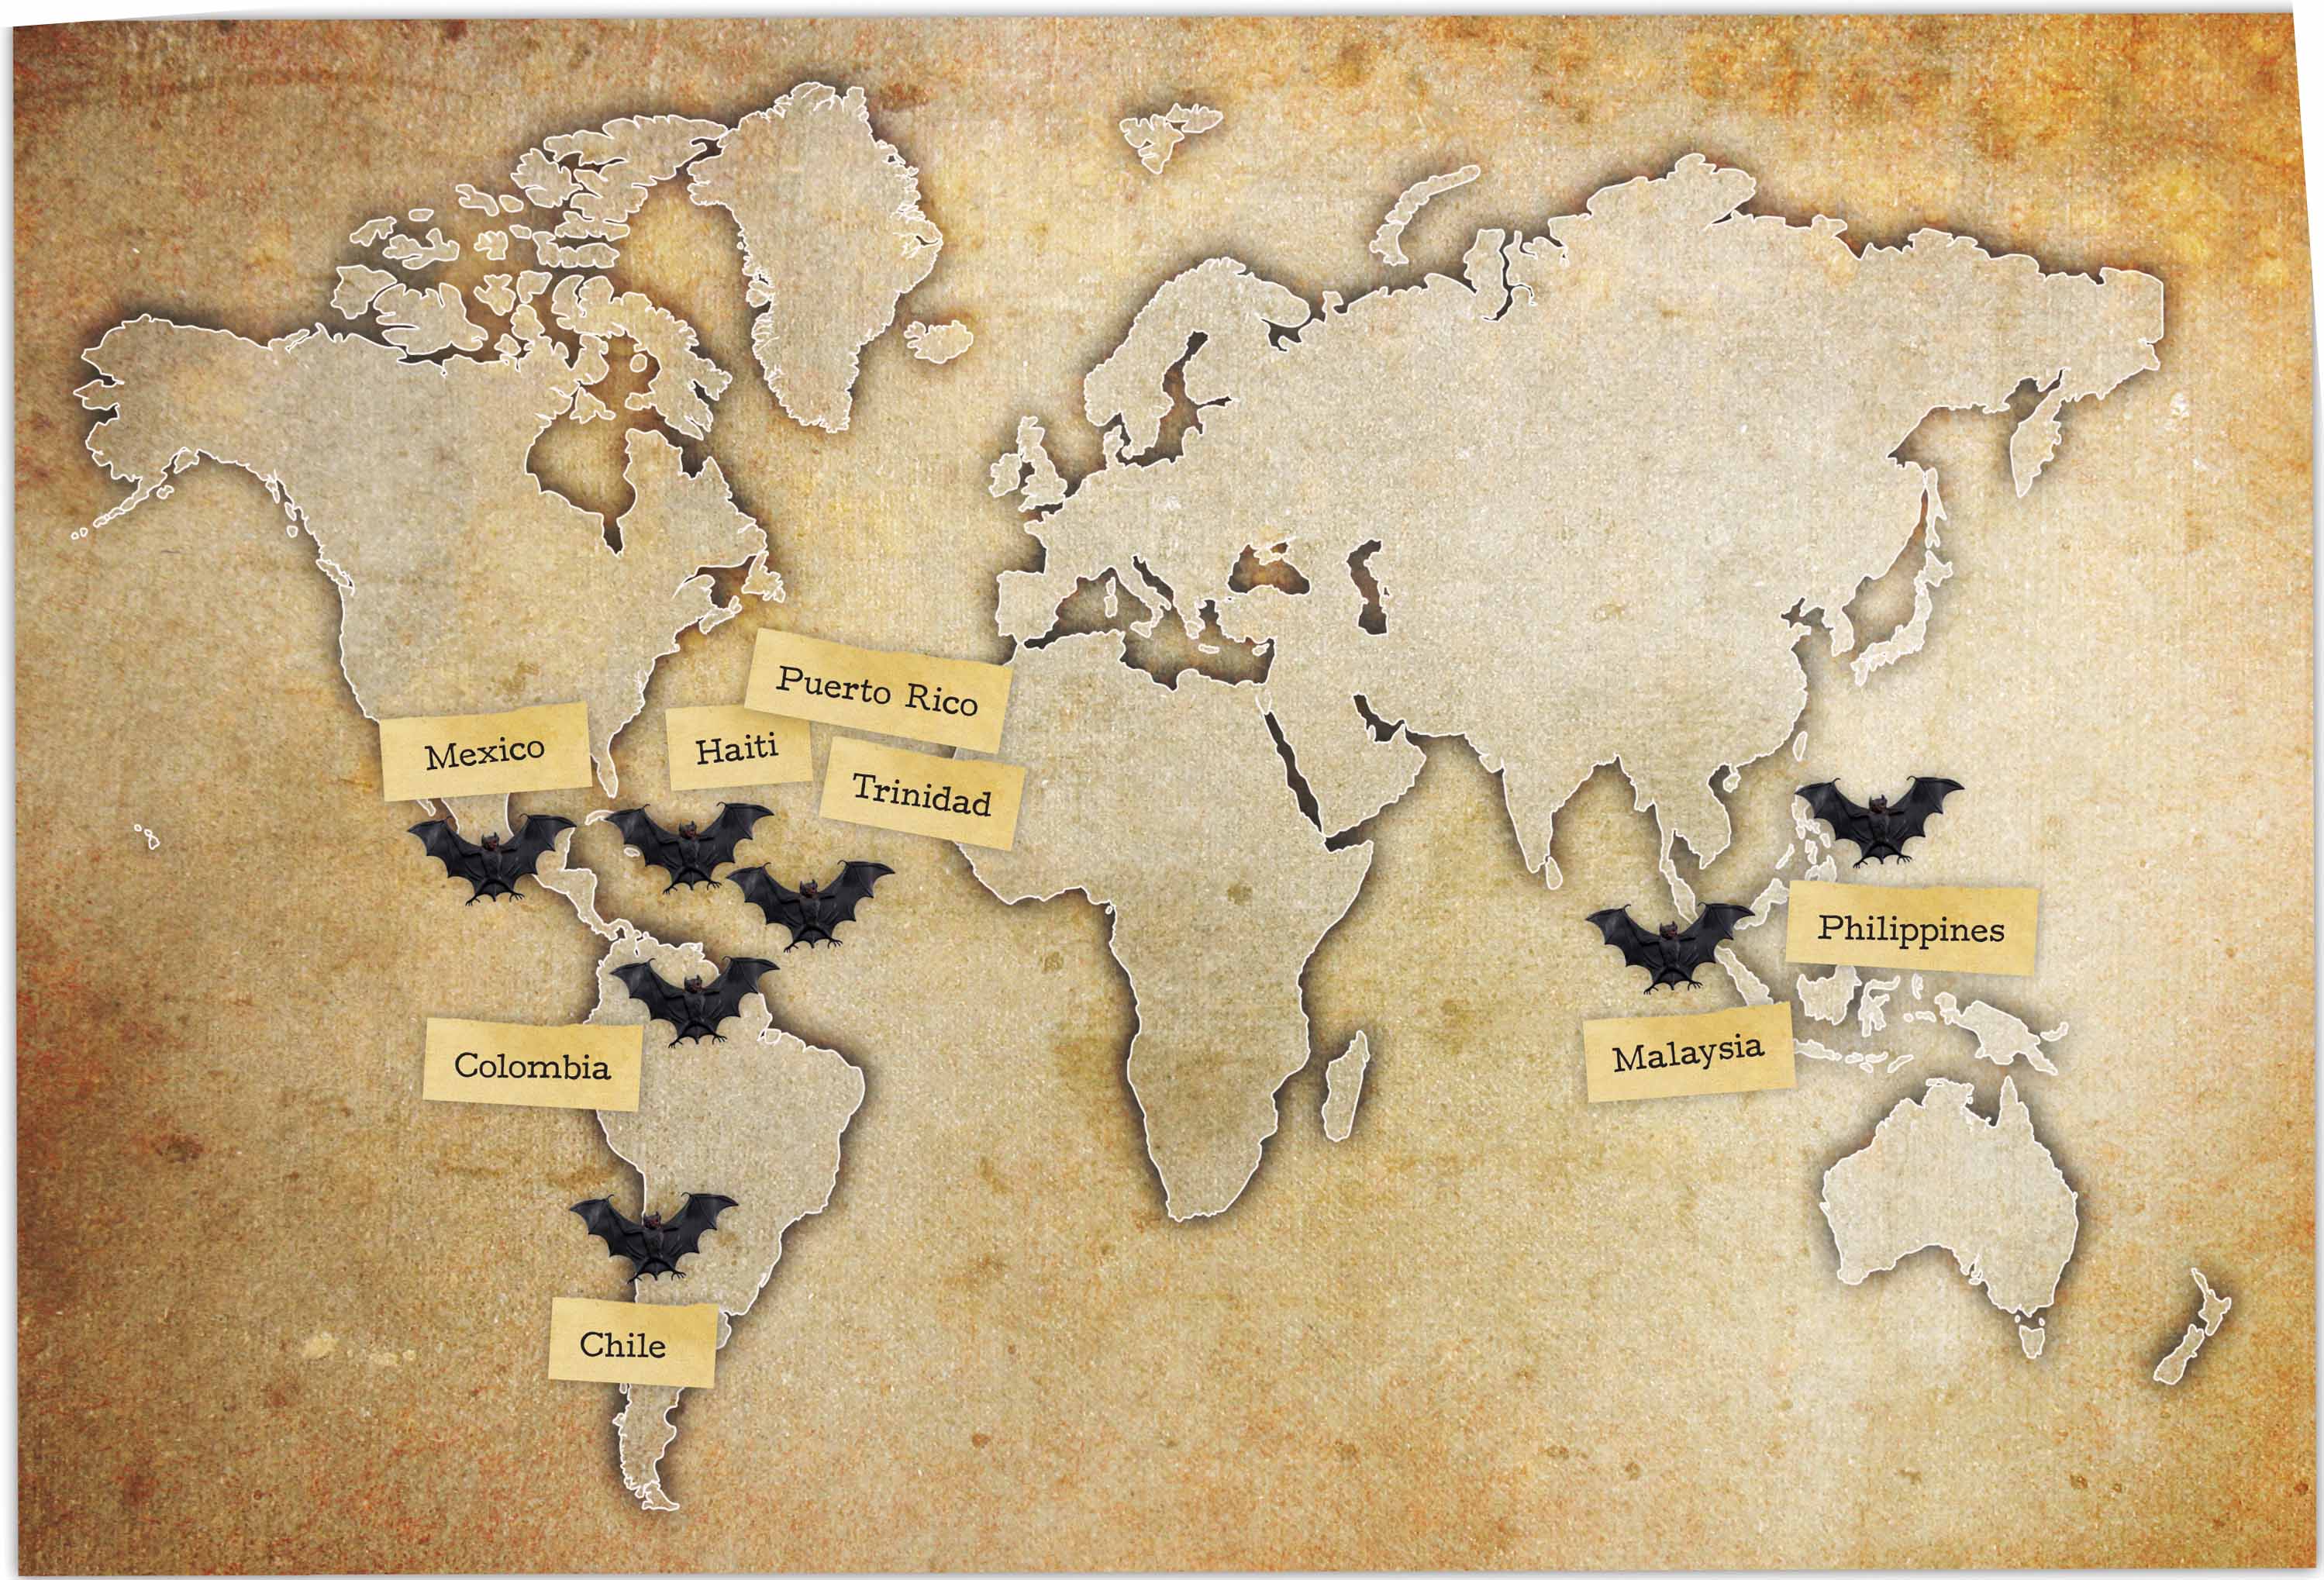
Haiti
The Loogaroo:
Believed to be a witch who has made an arrangement with the devil, this creature hunts by night, hiding its human skin beneath a silk-cotton tree. Using magical powers, the Loogaroo has been charged with the task of providing the devil with warm blood.
Trinidad
The Soucouyant:
Very similar to the Loogaroo, this jumbie shape shifter is also in league with the devil. She sheds her skin in the evening, hiding it beneath a stone mortar, then flies about, sucking blood. The Soucouyant often appears as a ball of fire and must return, a la Cinderella, before dawn.
Philippines
The Manananggal:
During the day, the Manananggal appears to be a lovely older woman, but at night all hell breaks loose. Her head and entrails detach themselves from her body and she flies through the air with wings like a bat. She dines on the fetuses and blood of pregnant women, feeding with a long hollow tongue.
The Tiyanak:
This babe in the woods is more trouble than it’s worth. Believed to have been a human infant that died, this vampire looks like a crying abandoned baby and tricks humans into taking it home. It then attacks when everyone is asleep. The Tiyanak has also been attributed with kidnapping children and getting people lost in the woods.
Malaysia
Langsuir:
Her hunger borne from pain, legends say that this vampire was once a woman whose child died during birth, and then she died soon afterward. Now a demon-like creature bearing long black hair and long fingernails, the Langsuir has the ability to shape shift into an owl. She feeds on the blood of infants.
Colombia
Patasola:
This shape shifter often appears as a beautiful woman and seeks to lure men off into the wilderness. There, she reveals her true desire for human blood and flesh. In its true shape, however, the Patasola is deformed and has only one leg.
Chile
Peuchen:
Just like the run-of-the-mill vampire, this flying snake with shape shifter abilities has a craving for blood. Often attributed with the death of sheep, the Peuchen supposedly has the ability to enchant its victims with just a glance.
Puerto Rico, Mexico
Chupacabra:
The newest monster on the block, the Chupacabra was first sighted in the 1990s in Puerto Rico. Accused of attacking livestock and draining its blood through one or two small holes, this creature has allegedly been seen in areas from Chile to the Carolinas. Descriptions vary from a dog-like beast to a lizard-like creature.
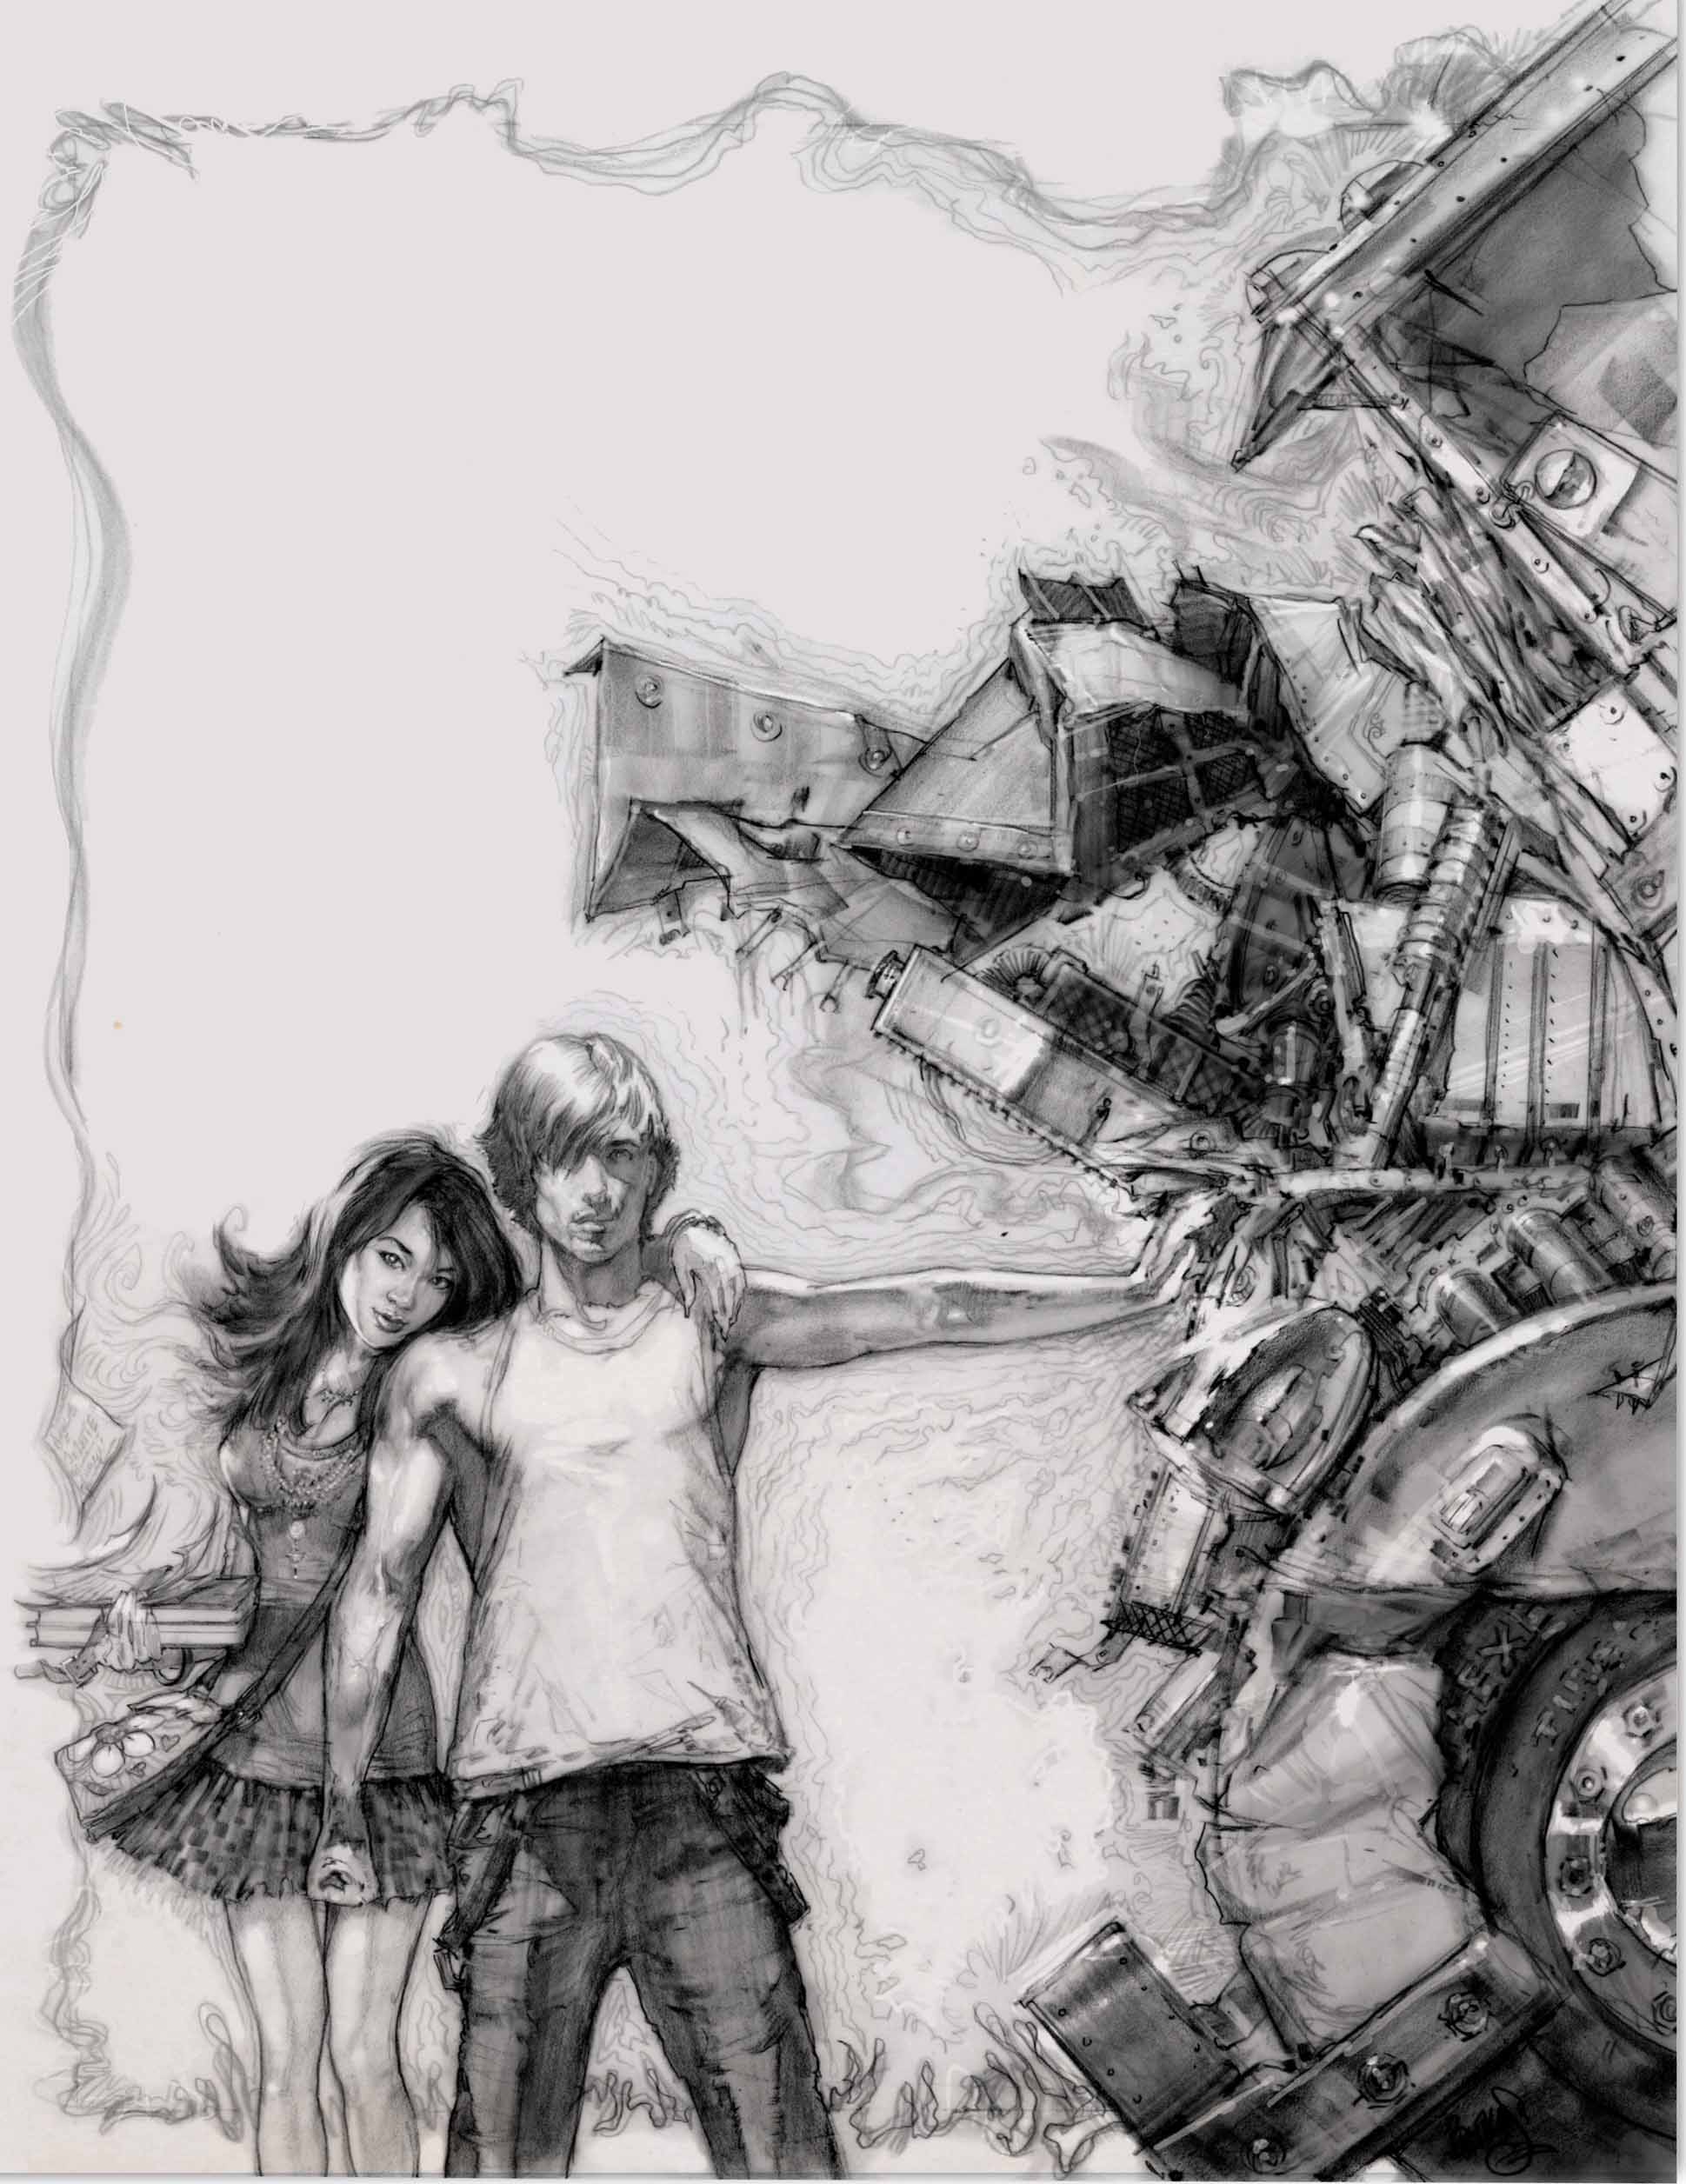
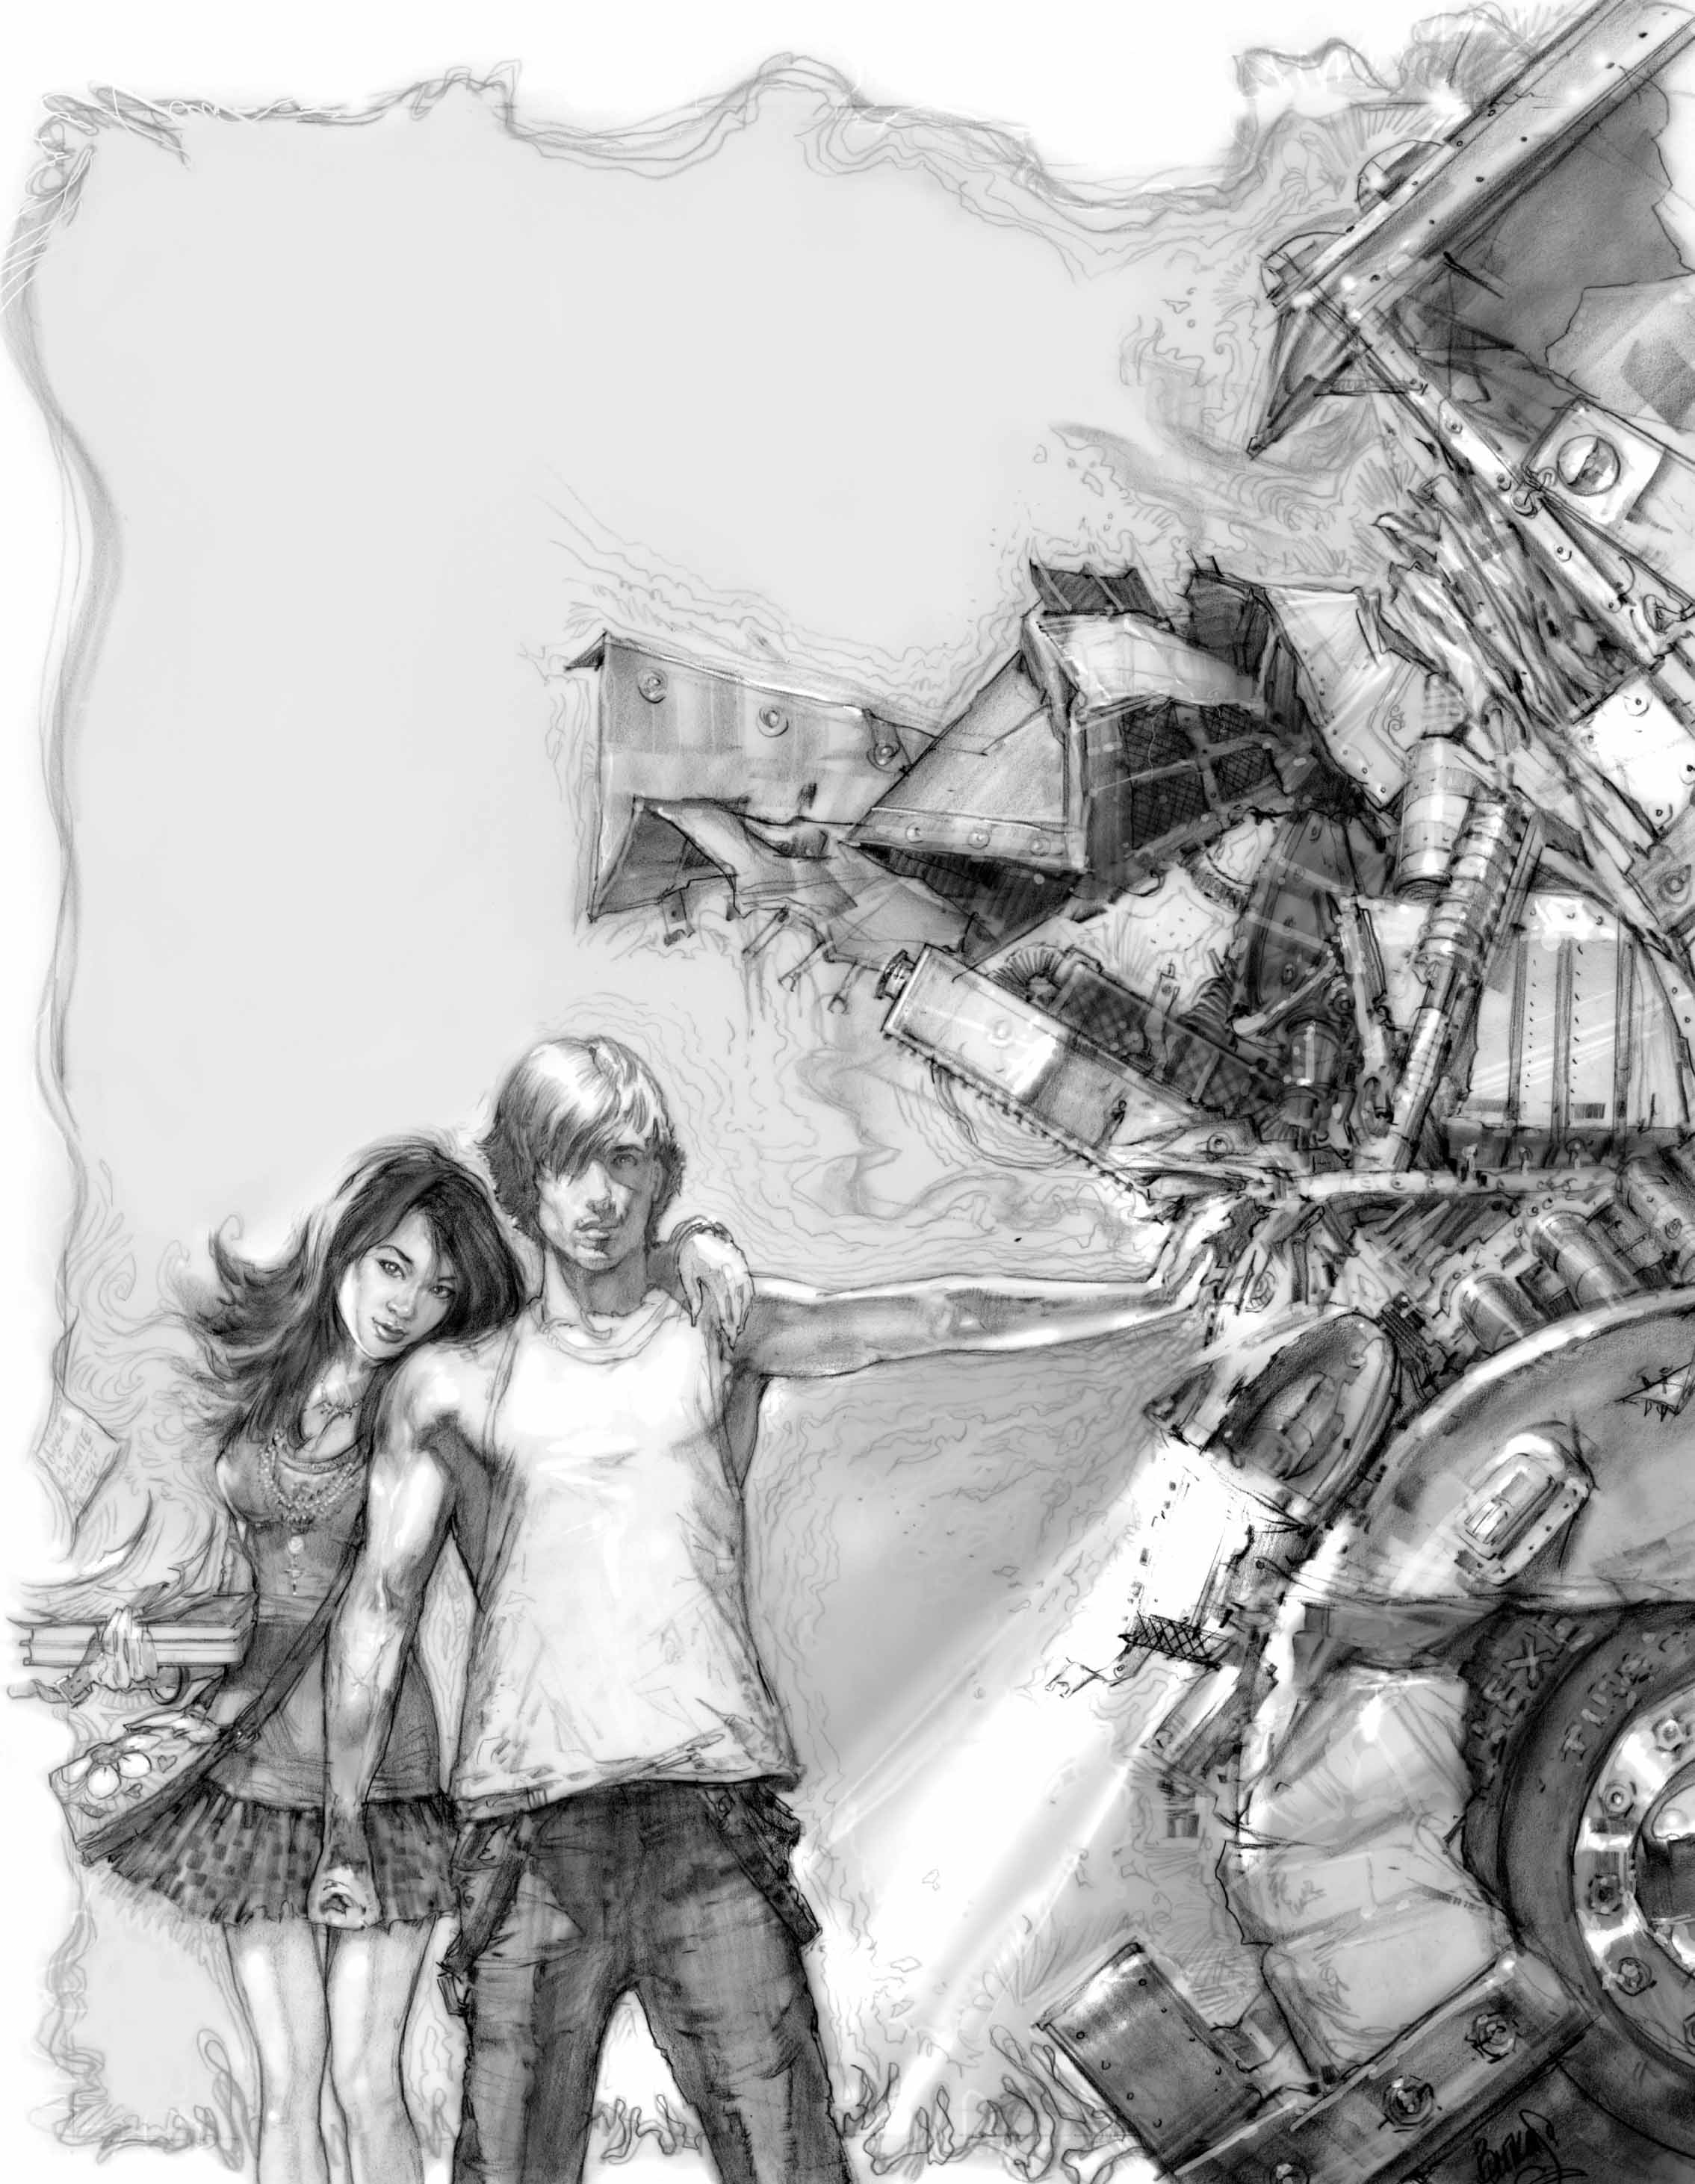
Falling in love with a teenage vampire presents all sorts of problems. Even walking home from school can be life-threatening. Our modern day romantic hero may seem calm and complacent in the midst of saving his human girlfriend from death, but that’s only because he’s thinking about bigger things. Like how he’s going to explain his latest supernatural feat when all those cell phone photos of the event go viral.
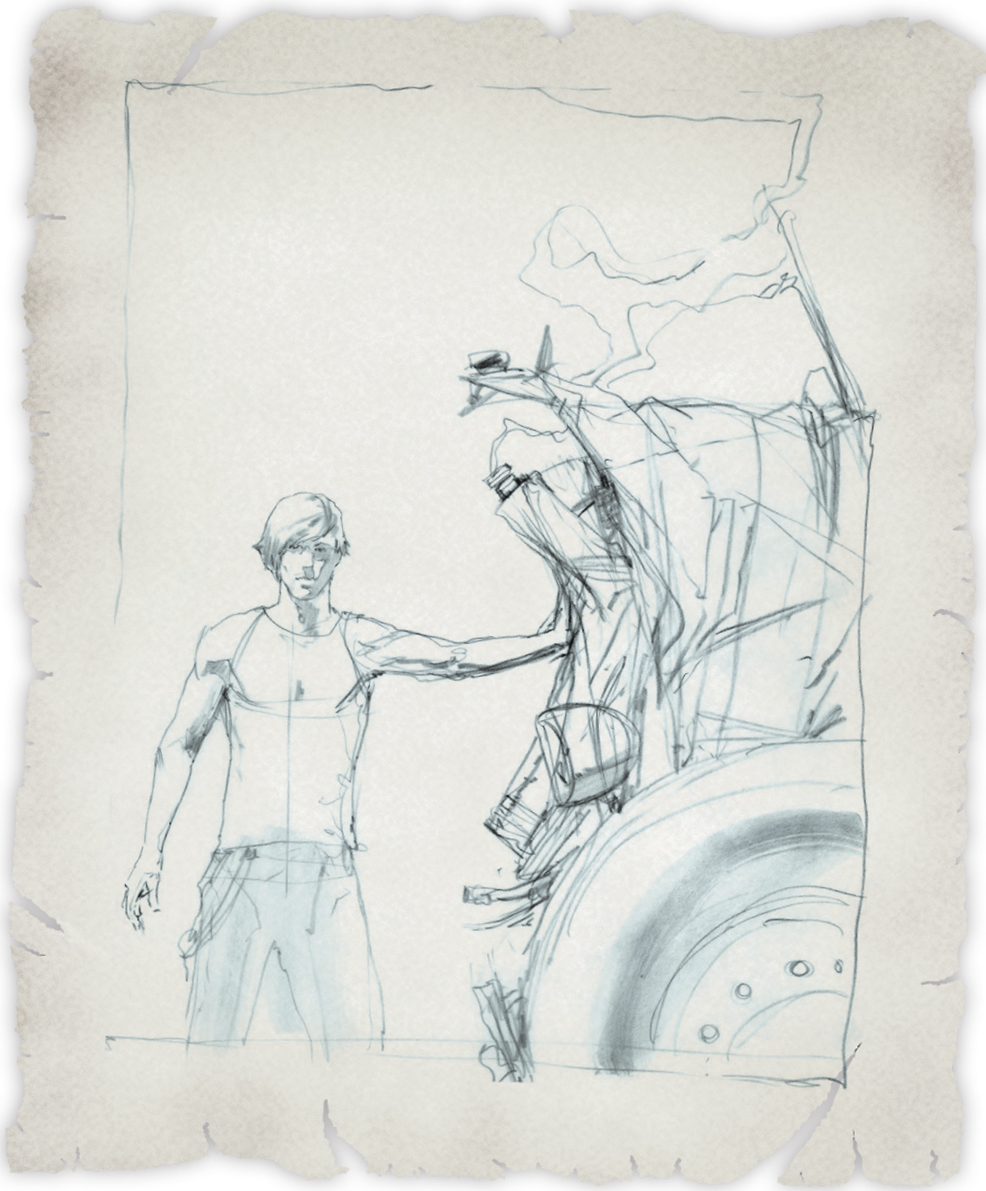
Step One This black-and-white illustration begins with a thumbnail sketch on tracing paper, using a black colored pencil. We want our teen character to be ultra cool, capable of stopping a big rig with one bare hand. In the thumbnail, work out the body language and the size relationship of the vampire to the smashed truck before starting the final drawing. (You can transfer this sketch; see “Transferring a Drawing” on page 25.)
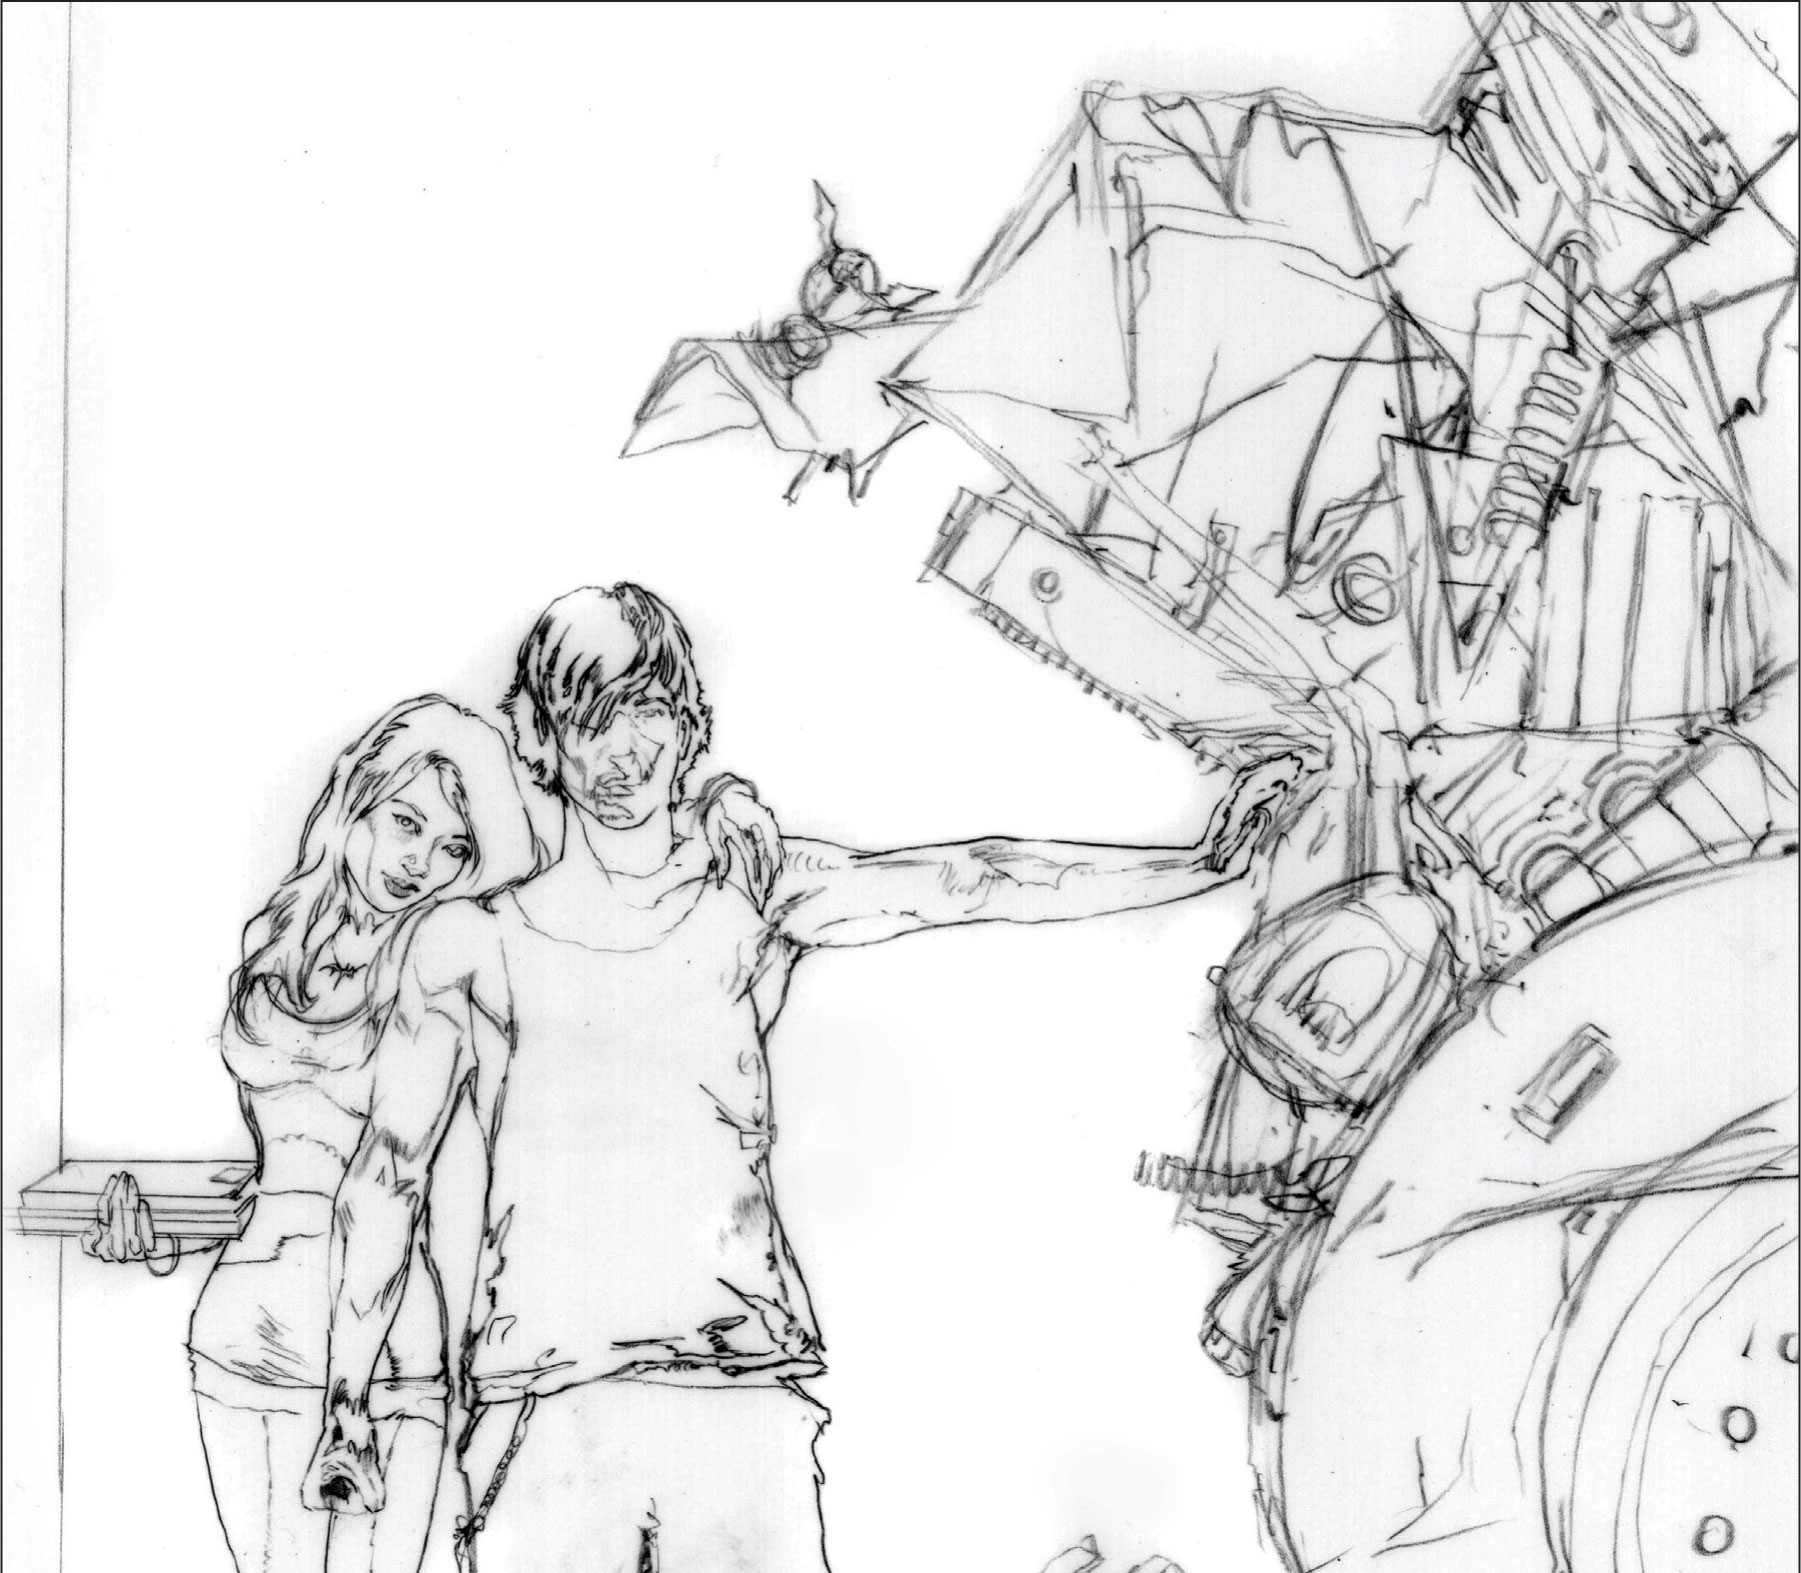
Step Two Now we transfer our illustration to vellum paper. At this point, I decided to bring in a cute love interest—a great idea because it adds to the composition and story. However, we still want our teen vampire to be the main character, so keep his girlfriend behind him. Judging from the textbooks in her arms, they were just innocently coming out of school when suddenly a vamp-killing semi attempted to squash the two lovebirds.
Step Three Since this will be a full-valued drawing, you might want to shoot a photo reference. It makes it easier to capture the subtleties of body language when you can get your friends or family to model for you. Map out the character’s shadow pattern linearly with a lighter value, referring to your photograph.
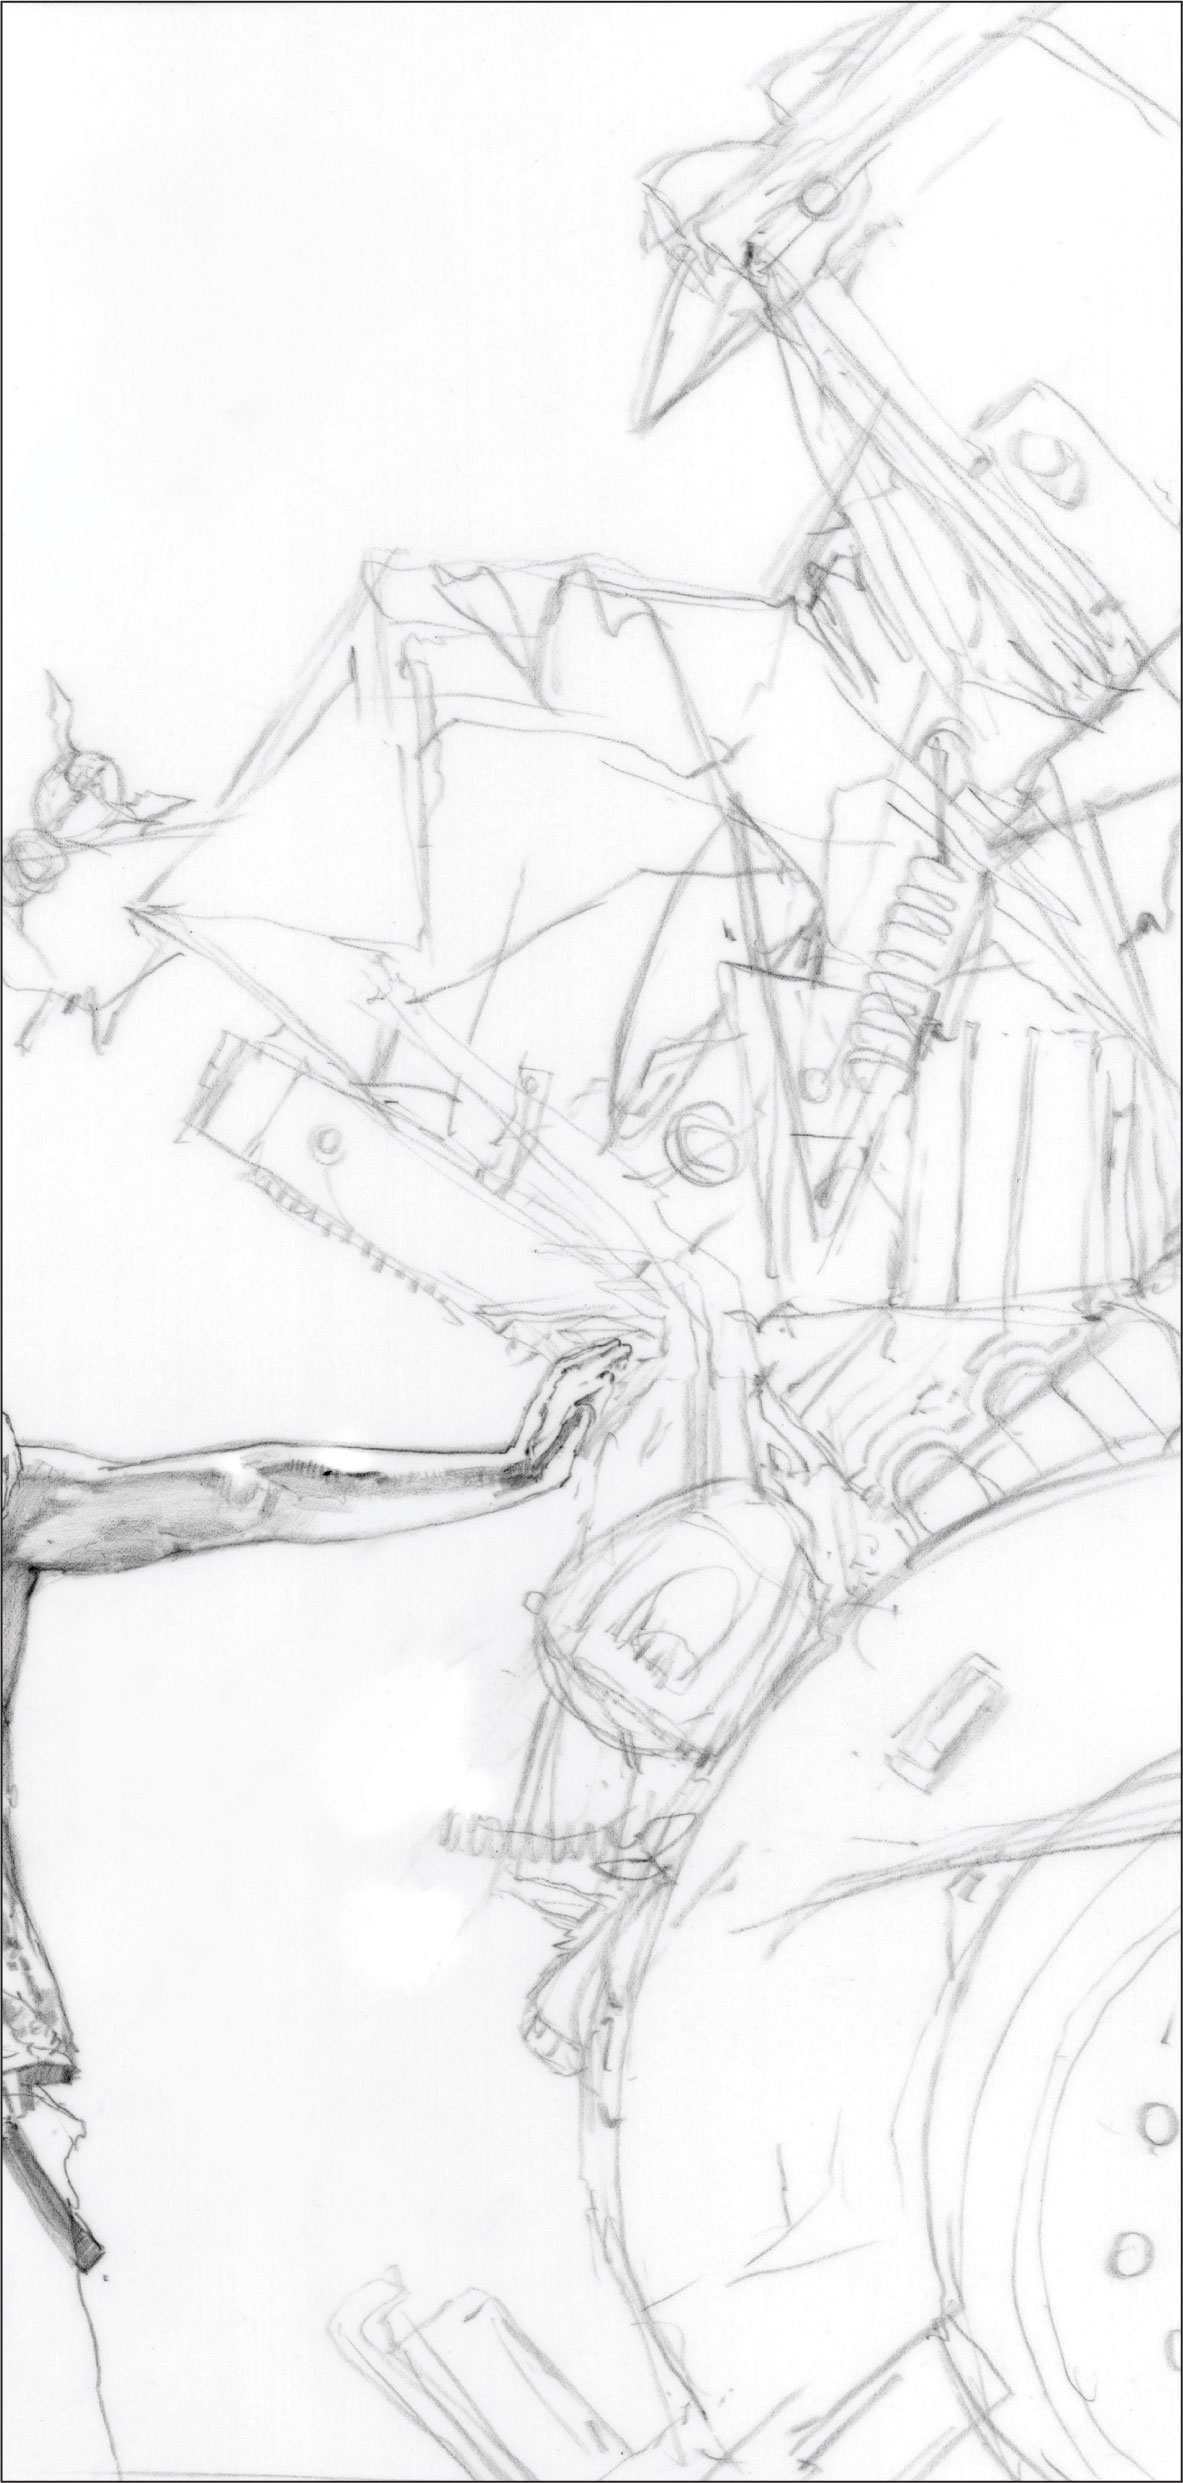
Step Four Although we don’t know what a truck would look like if a vampire brought it to a “dead” stop, picture it like an accordion folding in upon itself. Have fun with the shapes and include the familiar elements of the truck’s front end. Also, make it look like a gaping mouth about to devour the teen lovebirds.
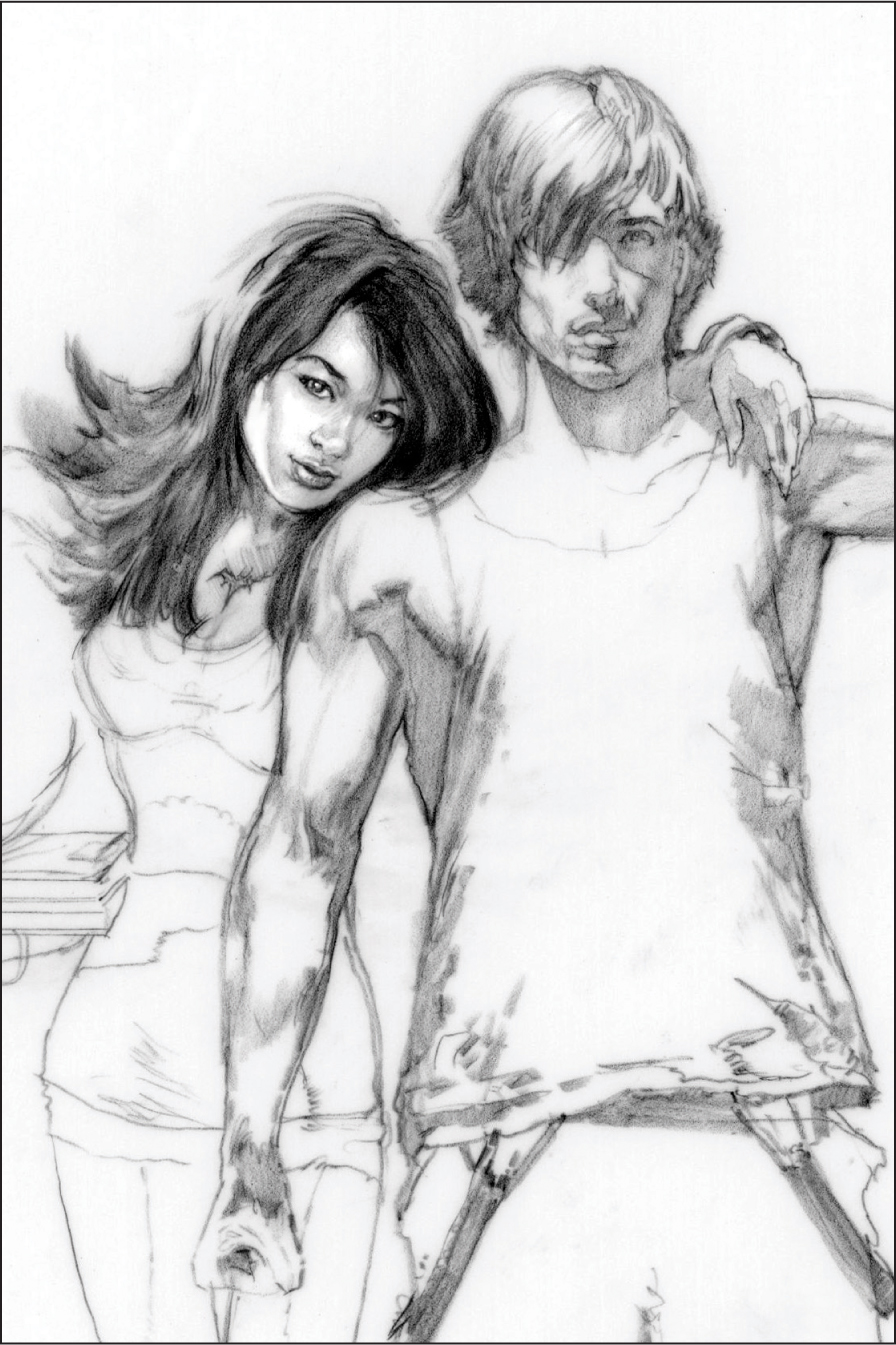
Step Five Next, we’ll begin to work on their faces. His is deadpan and unreadable, while hers is demure, confident that her boyfriend will save them yet again.
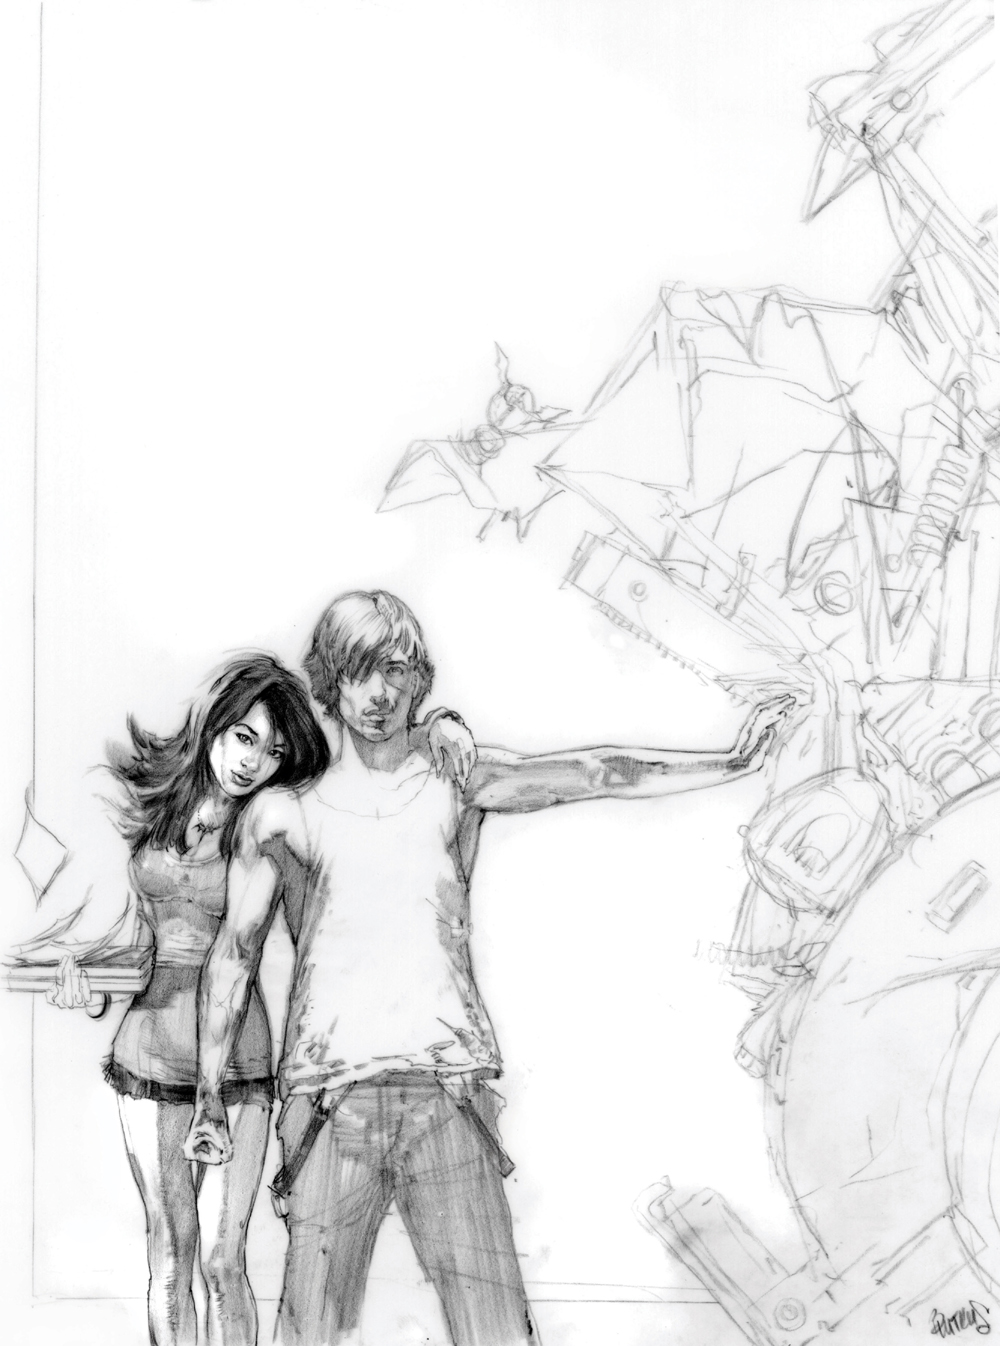
Step Six Because we mapped out the shadow patterns earlier, it takes almost no time to fill in their values. Keep the edges of the core shadows firm and graphic on the vampire to define his muscles.
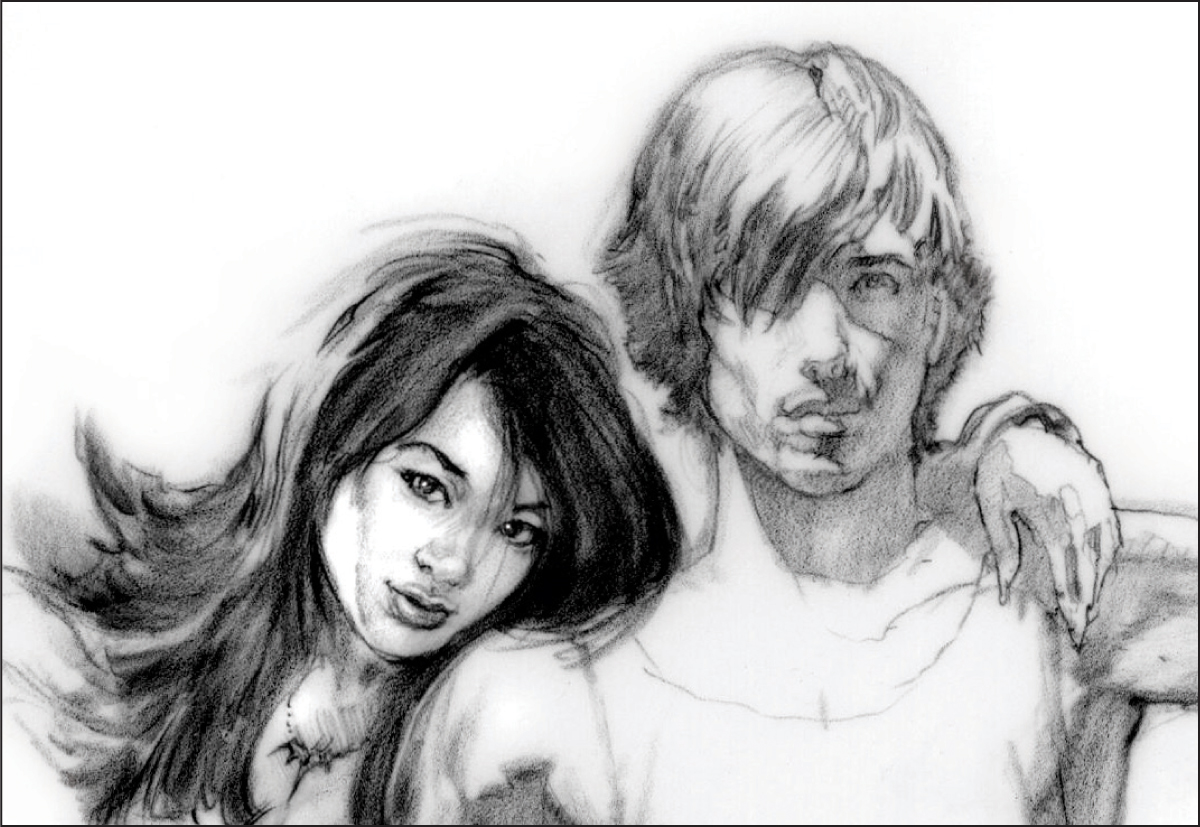
Step Seven Keep the edges on their hair soft and slightly windswept due to the oncoming truck. Make sure that you design the shapes in the hair as well.
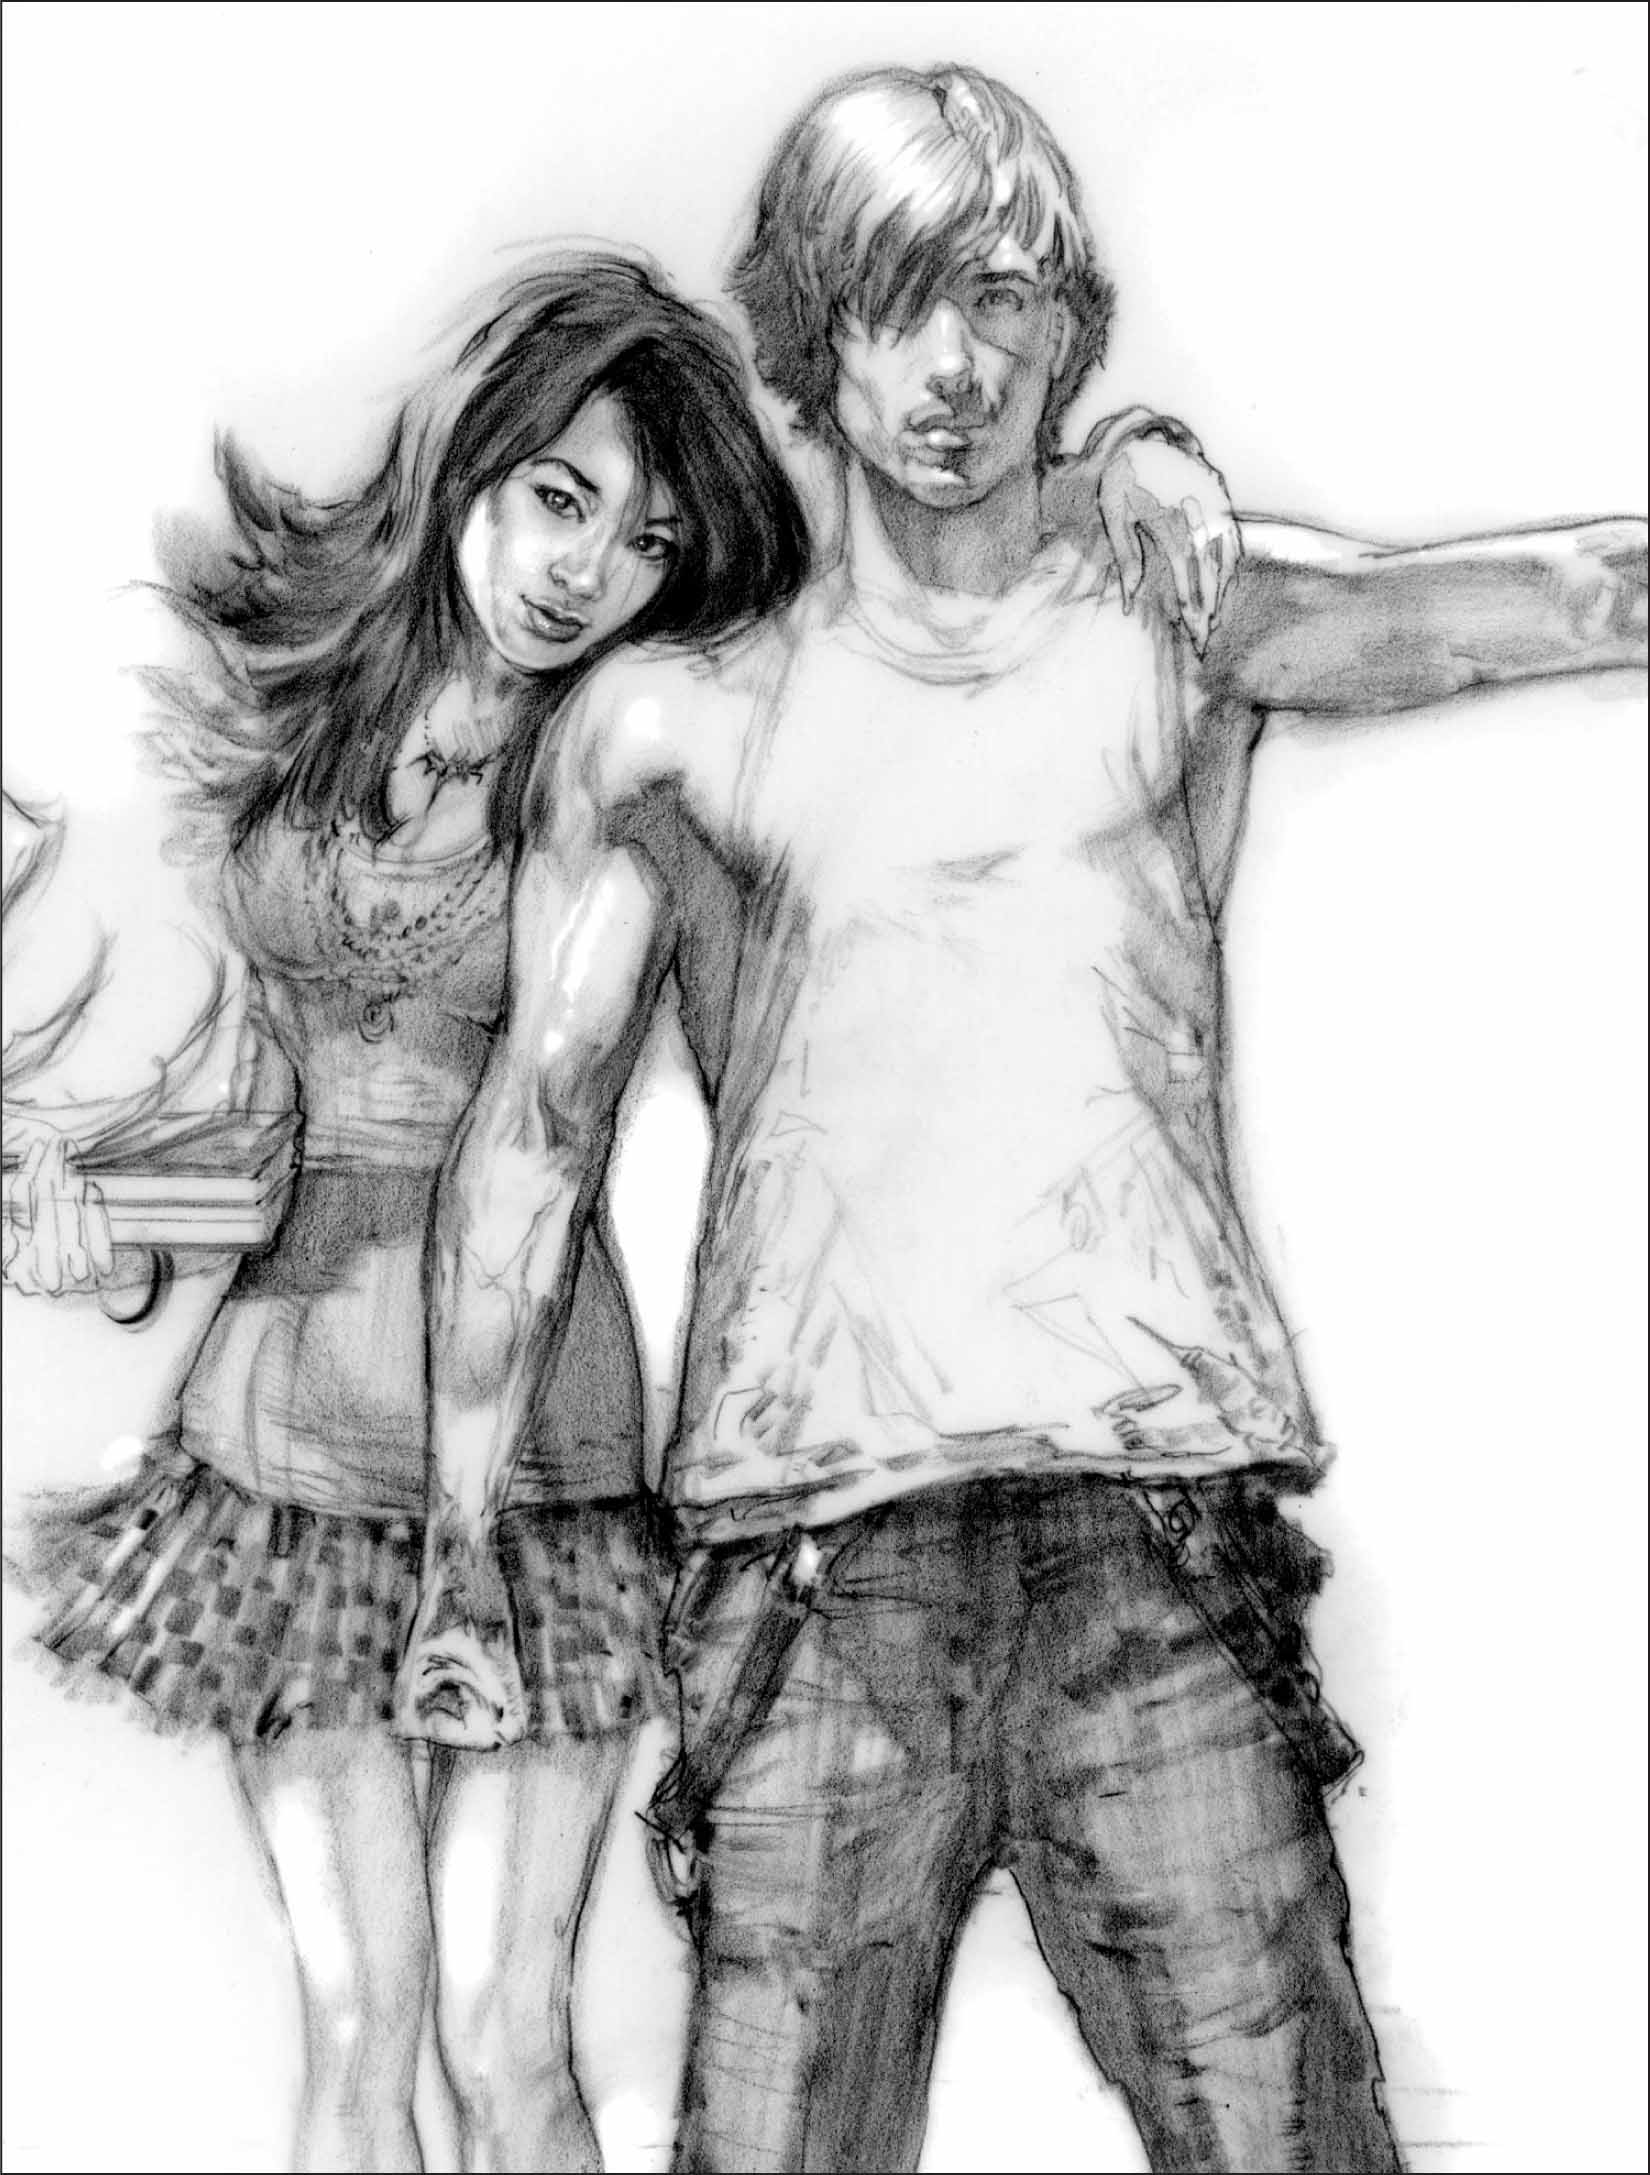
Step Eight Next, begin to add details to their clothing. At this point we’ll give her a pleated skirt with fun patterns to make her a little cuter. Give his jeans crisp edges to reflect the texture of the material. Also add some dark accents in their clothes to balance out the dark value in her hair.
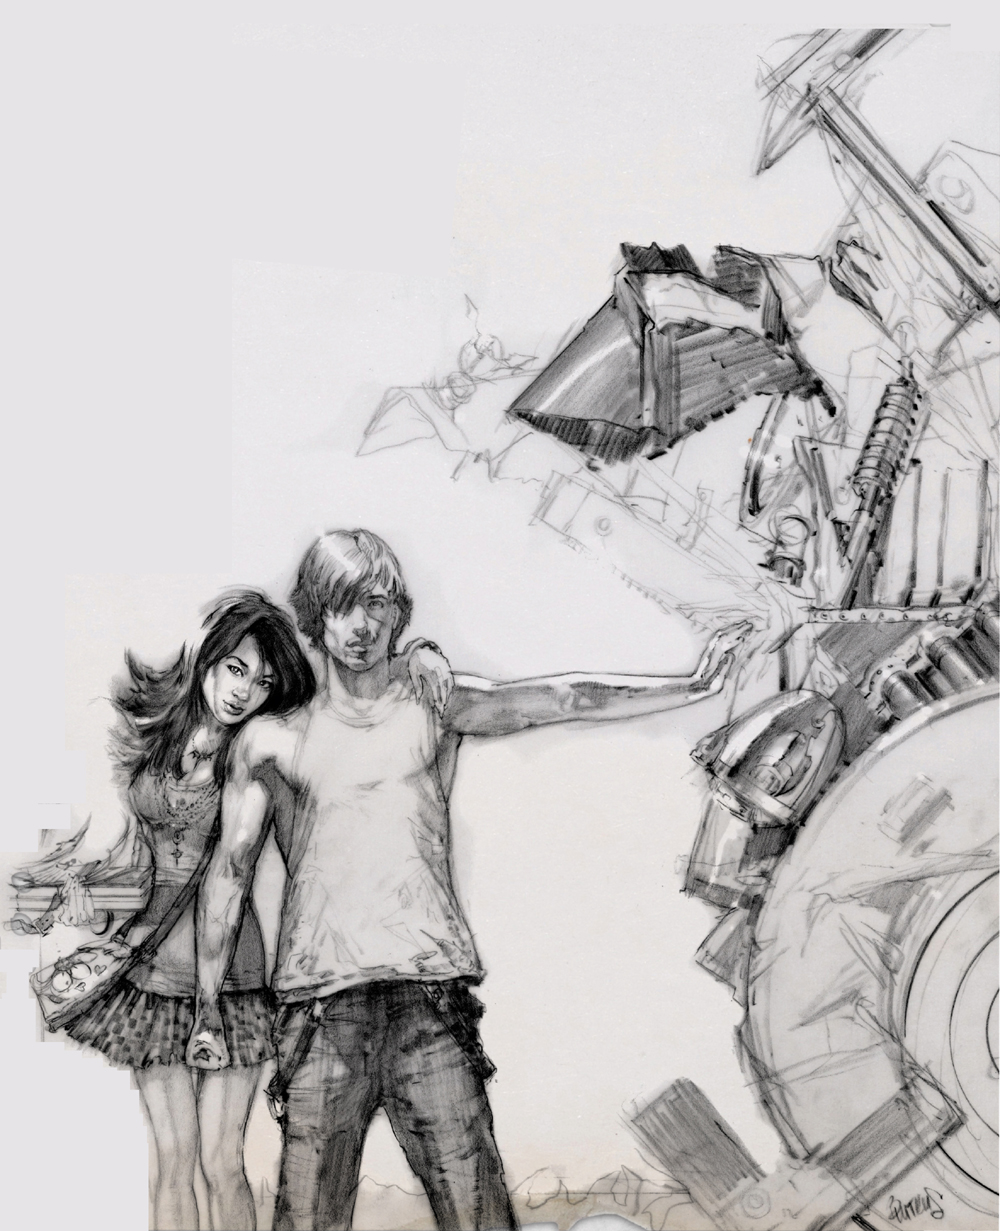
Step Nine Begin shading in some of the big shapes in the truck. Vary the strokes to add energy to the drawing. Since a lot of this is from your imagination, make sure the dark and light shapes are interesting and are angling in different directions. When making up mechanical objects, be sure to keep the lines crisp and clean and the shapes graphic.
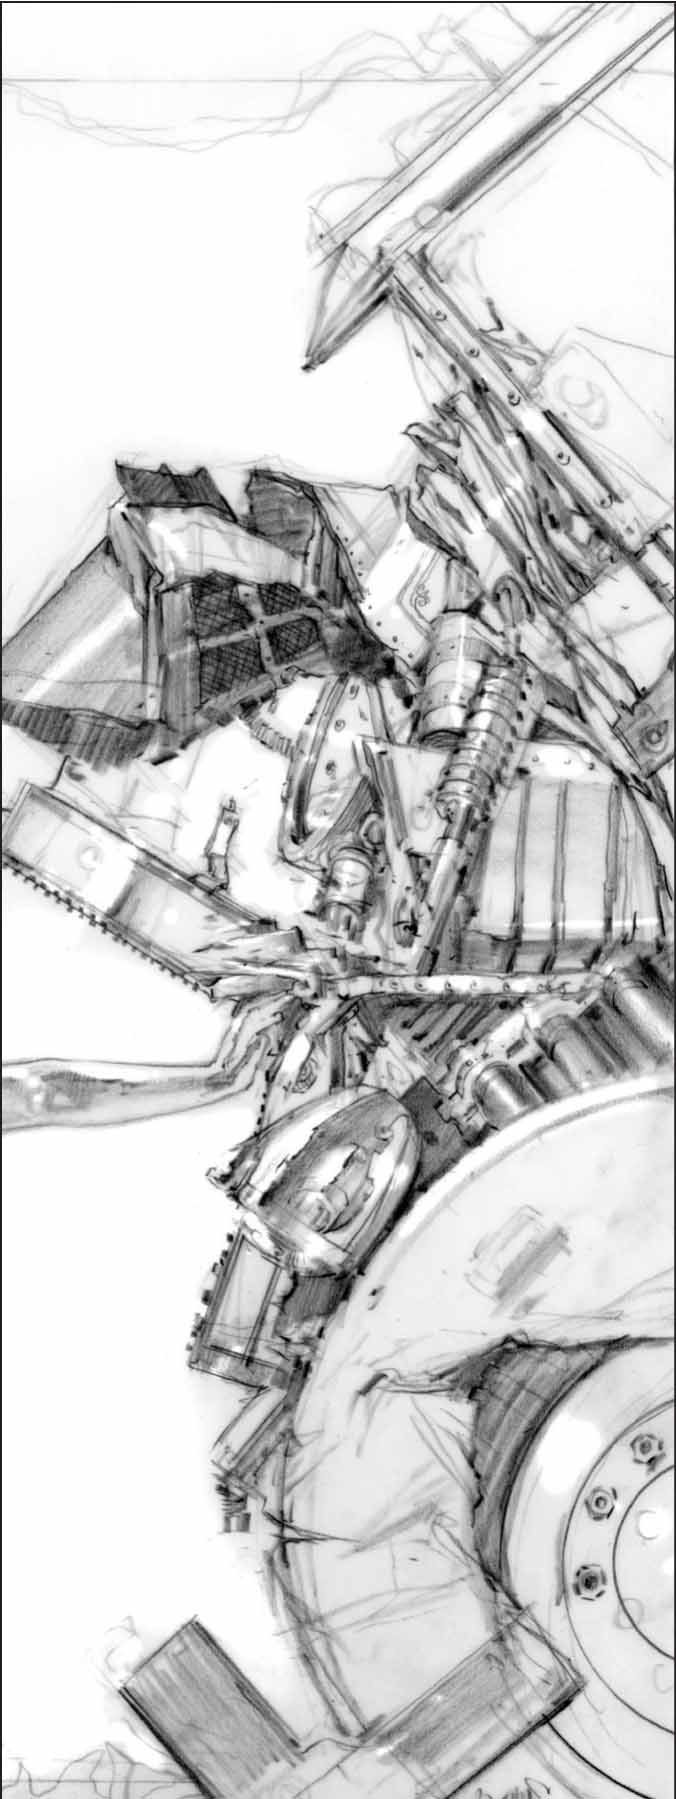
Step Ten Add more details to the crumpled truck. Indicate all the nuts and bolts with circular dot patterns. Then add sharp highlights down the middle of all the shapes since they are mostly metal.
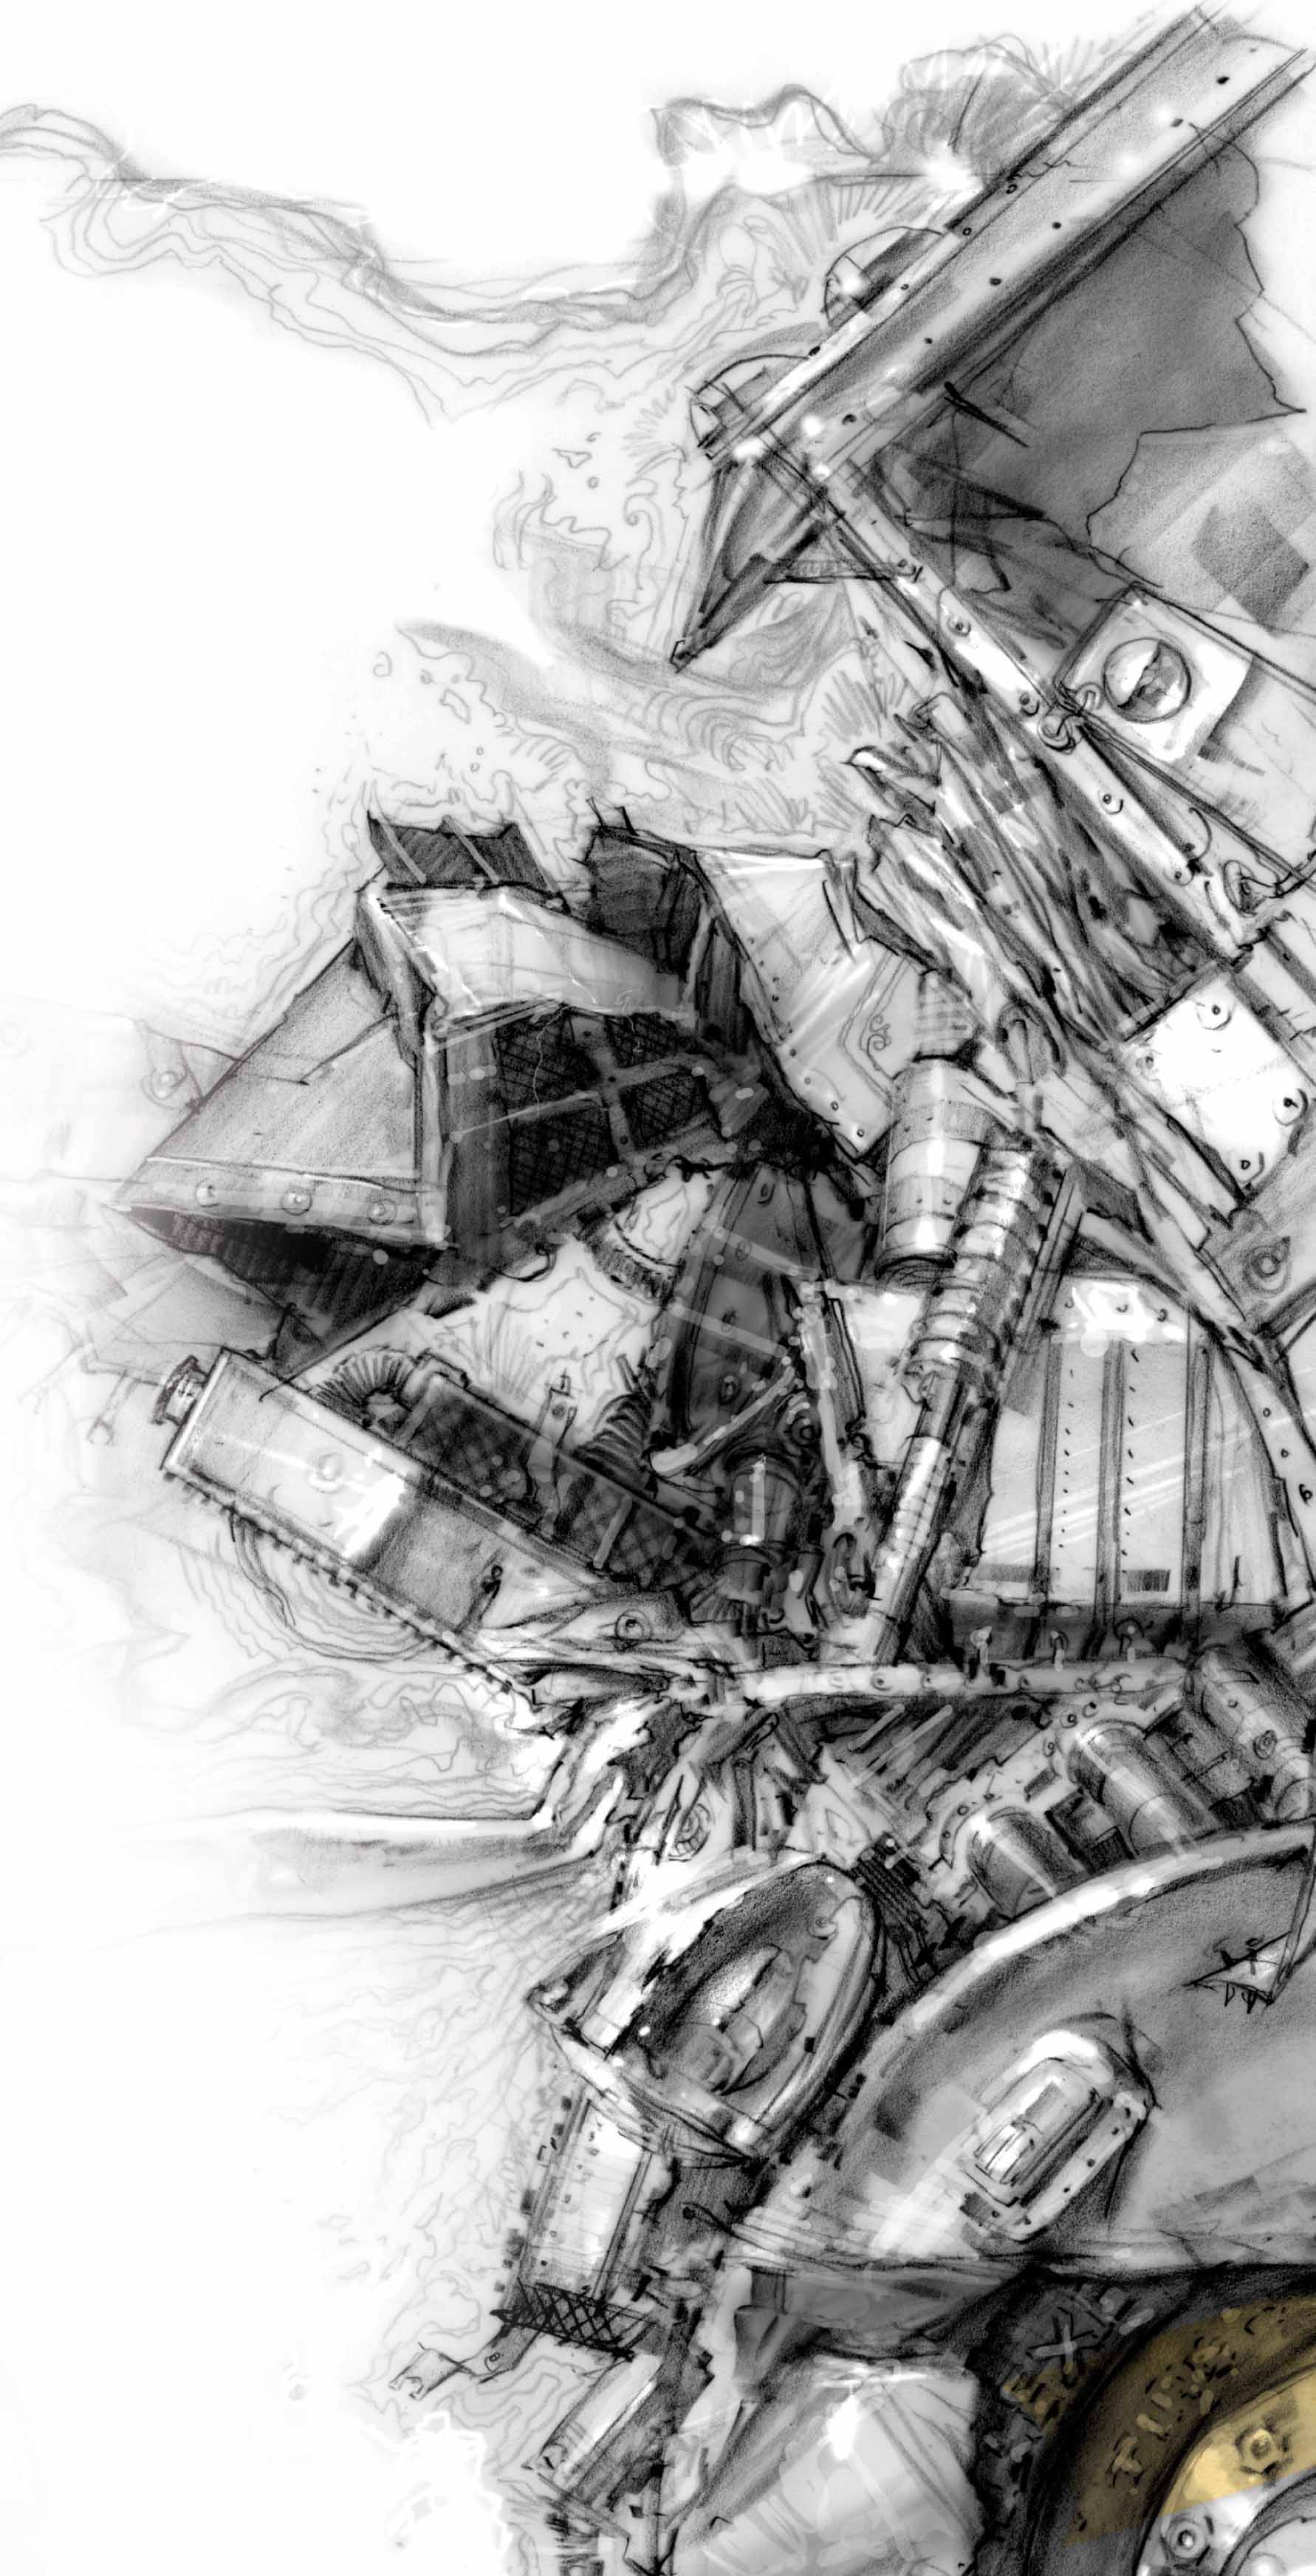
Step Eleven Lay in a mid value for the rest of the shapes and return to add dark accents. Add more textures to describe the different auto parts. For example, notice the crosshatching on the grills. Using a 30% cool gray colored pencil, draw squiggly lines all around the truck to express the energy and vibration that occur from the impact.
Step Twelve When making up reflective chrome, you first need to lay in a mid tone. Then, give it a hard, graphic core shadow that conforms to the shape of the object. After that, put a bright highlight right next to it. If it reflects a busy scene like this, try to design attractive shapes within the shadow areas.
Step Thirteen Use the smoke coming off the truck to create a soft border treatment around the image. Also, incorporate the blowing school papers into the frame. Try to make the borders a part of the story as much as possible.
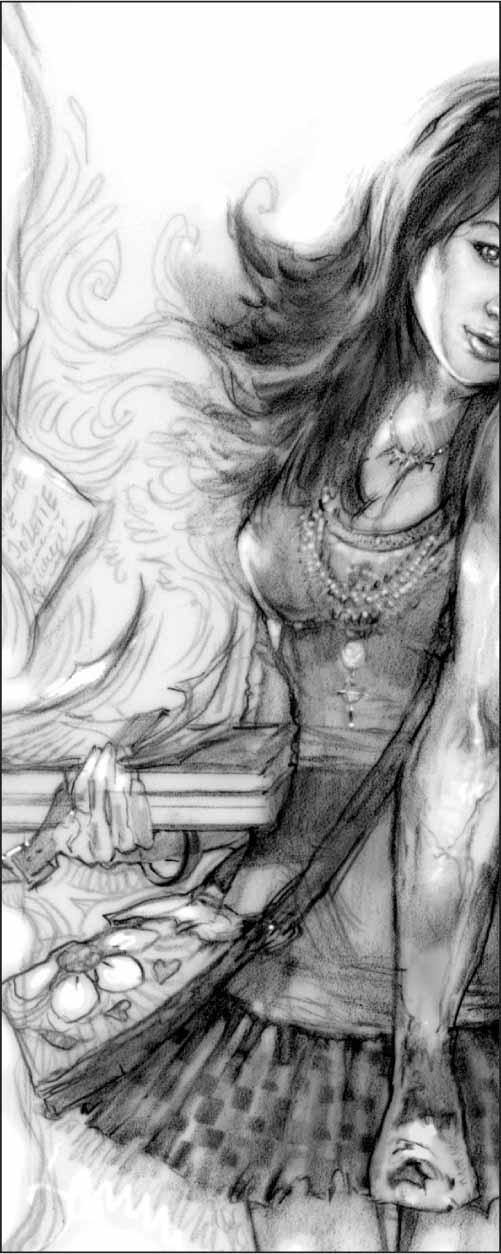
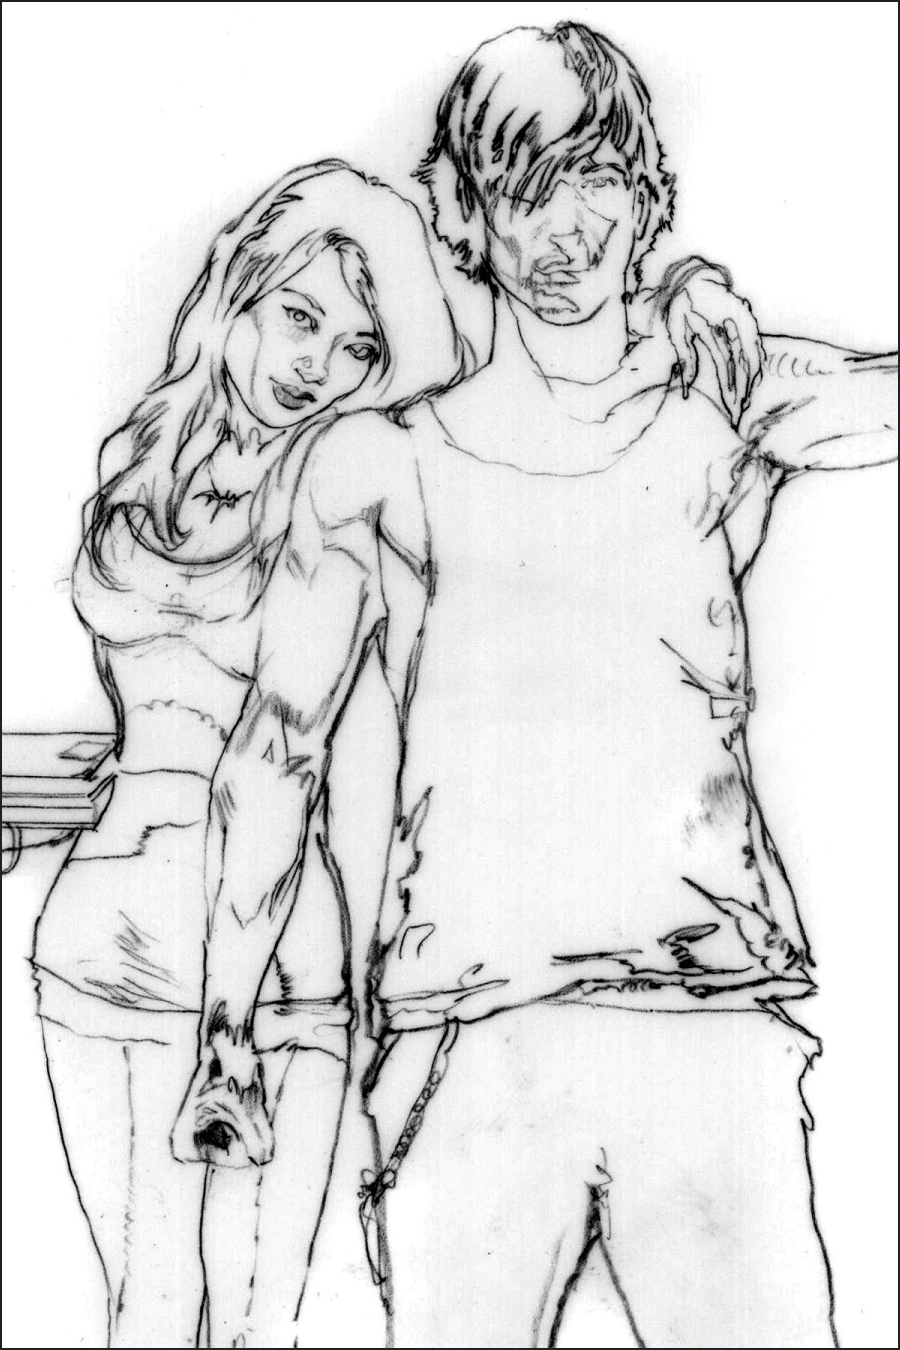
Step Fourteen This girl might be in love with a blood-sucking killer, but she’s still just an average teenager. Accessorize her with sparkling jewelry, a floral print shoulder bag, and a bat necklace that declares her love for the vampire. You might want to take note of any teenagers in your family for insight.
Step Fifteen Then, scan your illustration into Photoshop® (see page 107). Here you will create the finishing touches and bright highlights that will make this illustration pop even more. Select the eraser tool, then adjust the diameter to size, decreasing the hardness to about 8% and lowering the opacity. Then darken the background until you have a gray mid tone. This allows you to create bright highlights.
Step Sixteen You will finish the illustration using the eraser tool in Photoshop®. Adjust the brush size and opacity accordingly, then bring the headlights to a glaring white. Also add spots of highlights within the truck and design more wisps of smoke.
Step Seventeen Even in the midst of all this turmoil, we still want to infuse some softness and romance to the image. One of the ways to accomplish this is to blow out their hair with soft edges and highlights, still using the eraser tool. Very little time will actually be spent in Photoshop®, since 99% of the drawing has been done traditionally. However, you do not need Photoshop® to complete this illustration.
Step Eighteen Here we see the final image.
This illustration depicts the nocturnal activity of a vampire in the 1920s. Here we see him lurking about a boardwalk, just before sunrise. Maybe he’s heading to a dark hotel room to sleep off a recent kill. Or maybe he’s waiting to dine on one of the gangsters delivering an illegal shipment of gin in the background.
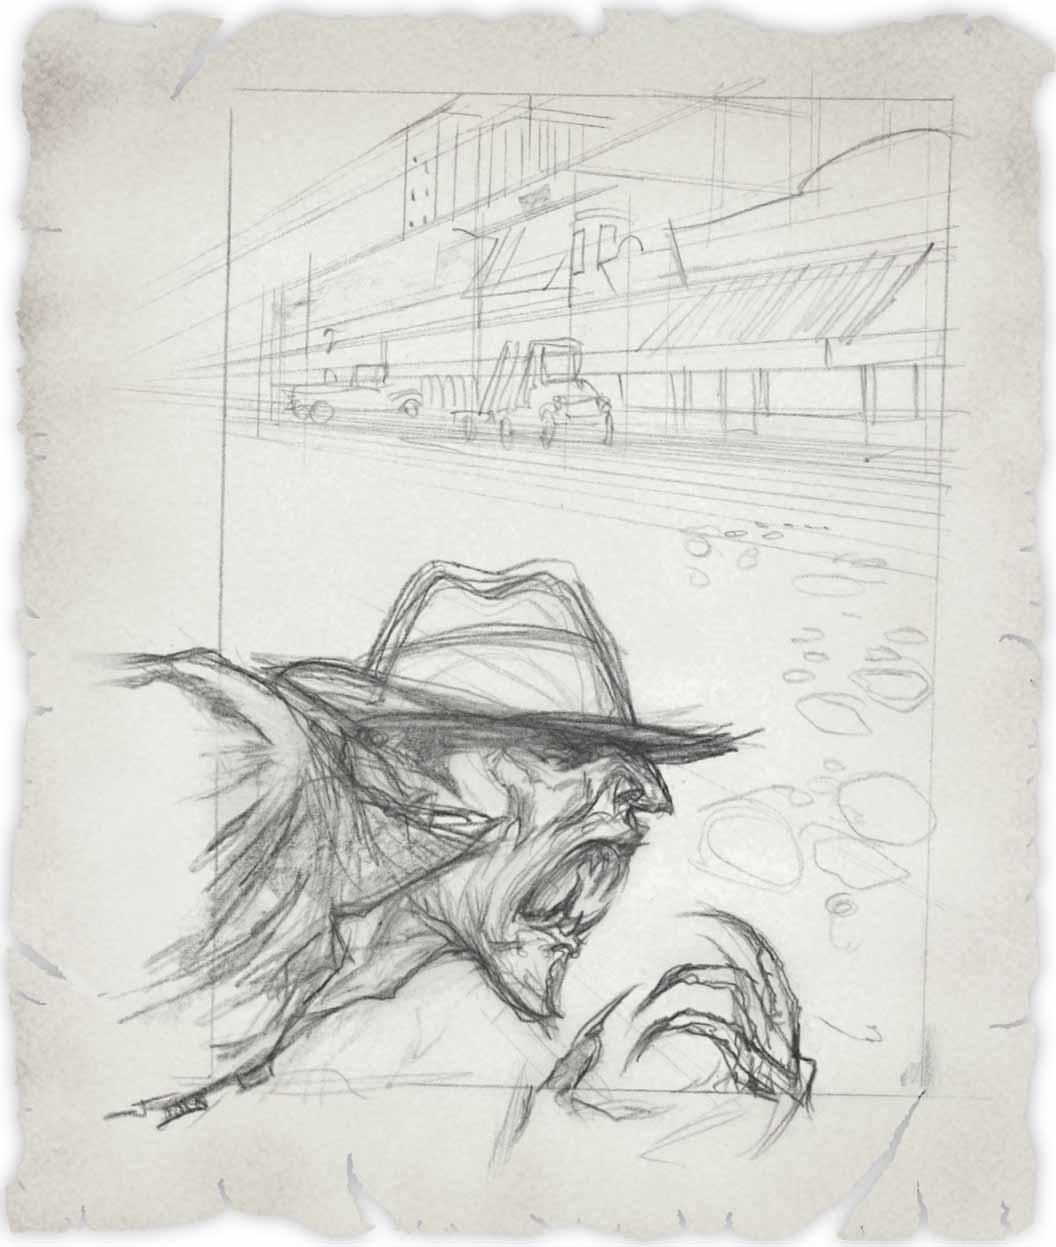
Step One This vampire with a hunger for gangster blood lurks around a festive and brightly lit boardwalk. There might have been a prohibition on alcohol in the ’20s, but there wasn’t any on draining human blood. Our first step begins by creating a light pencil block-in, using a black colored pencil over tracing paper.
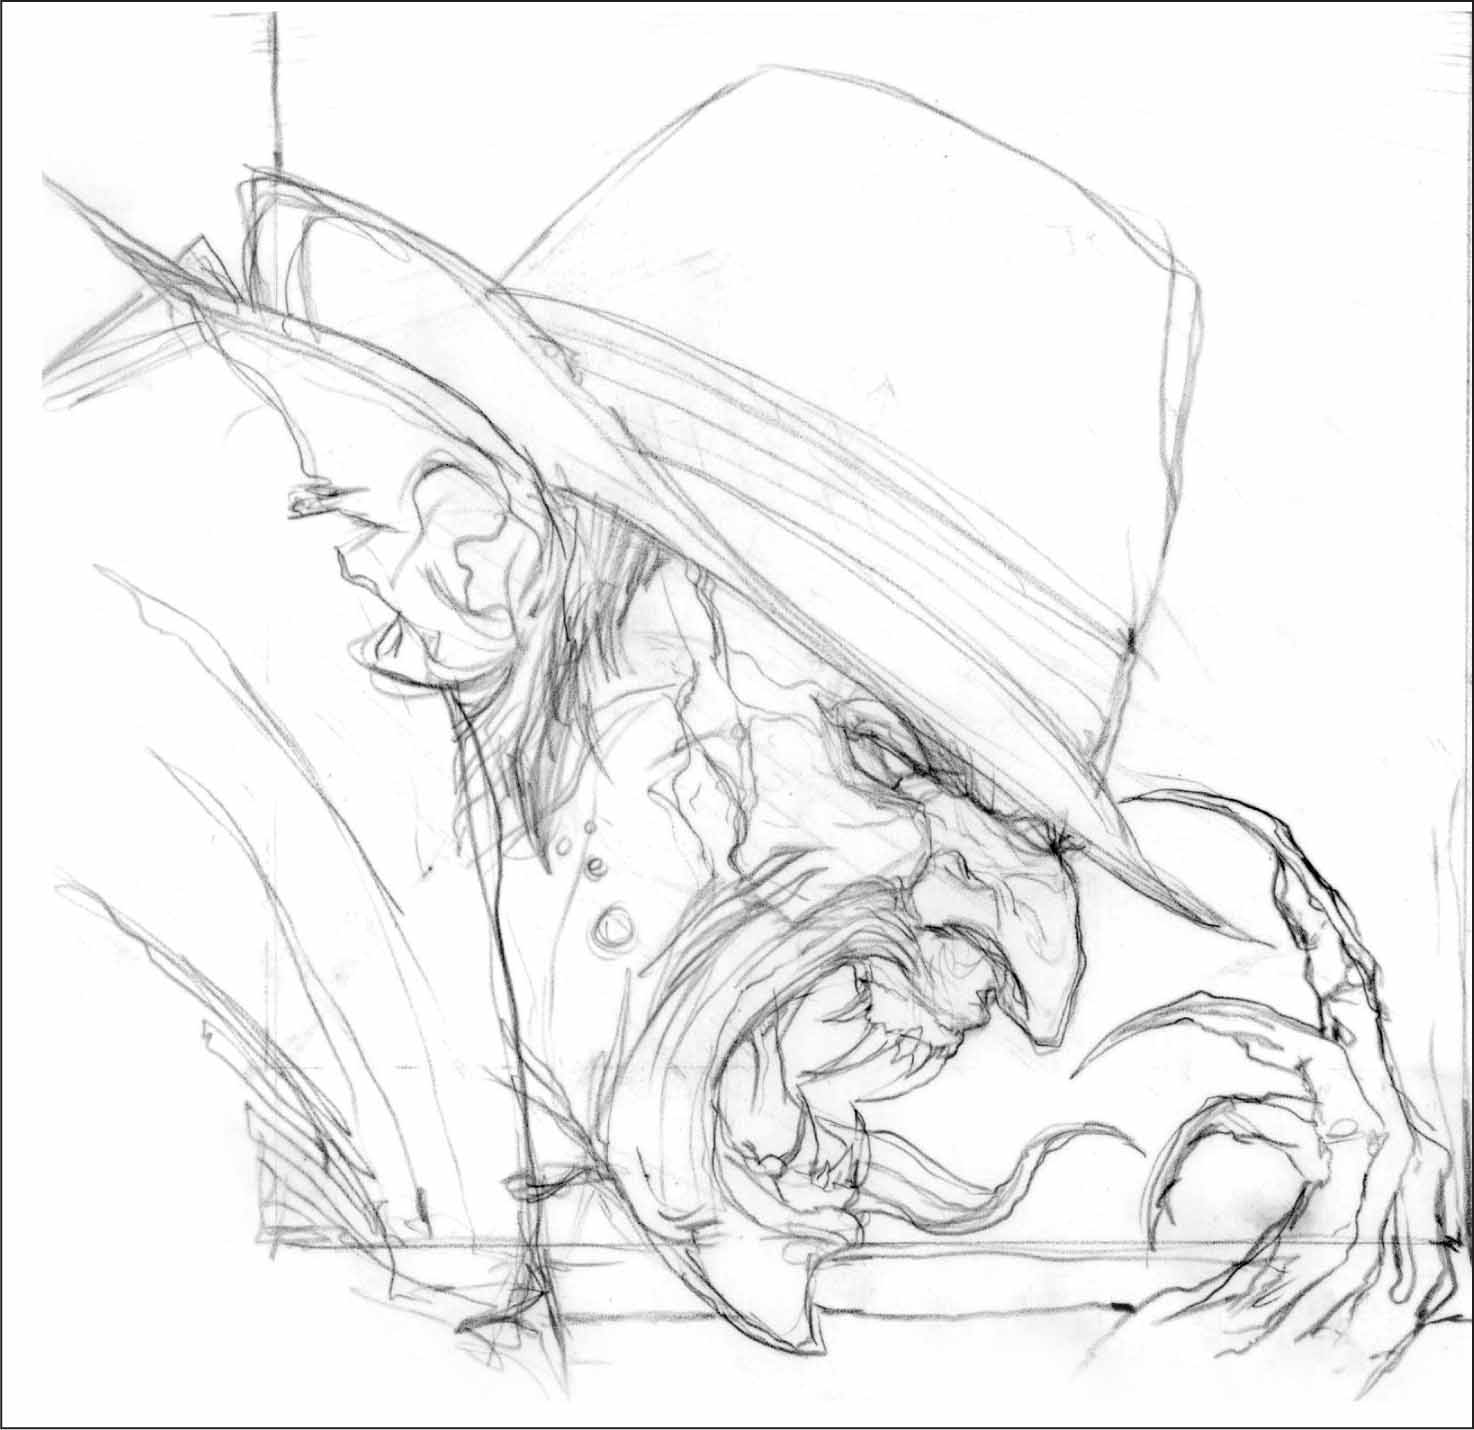
Step Two Now, we’ll begin the final drawing. Transfer your sketch onto a sheet of vellum paper and begin drawing with a sharp black colored pencil. In this step, you can see that I have changed the vampire’s look, giving him more personality. The size of his head was increased and now his abnormally long tongue curls out of his mouth. Always remember that you’re free to make changes between your thumbnail sketches and your final drawing. (You may choose to transfer the sketch; see page 25.)
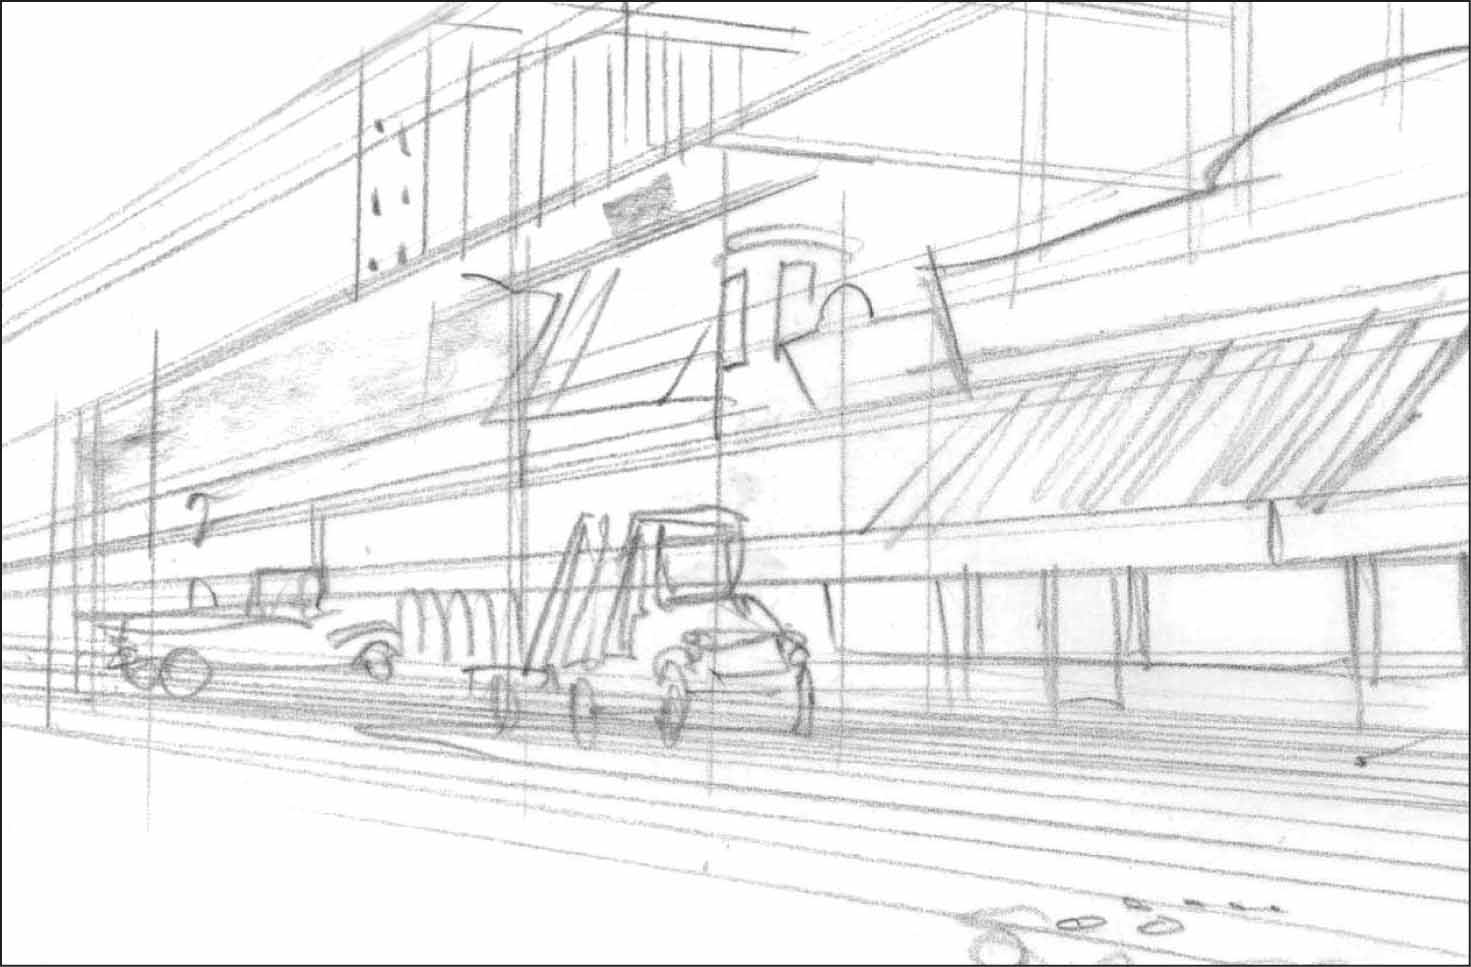
Step Three It’s a good idea to use a ruler when first blocking in a one-point perspective background like this. Once that is done, however, you can do the rest of the background freehand. By leaving the ruler behind at this point, you’ll add more energy to your illustration.
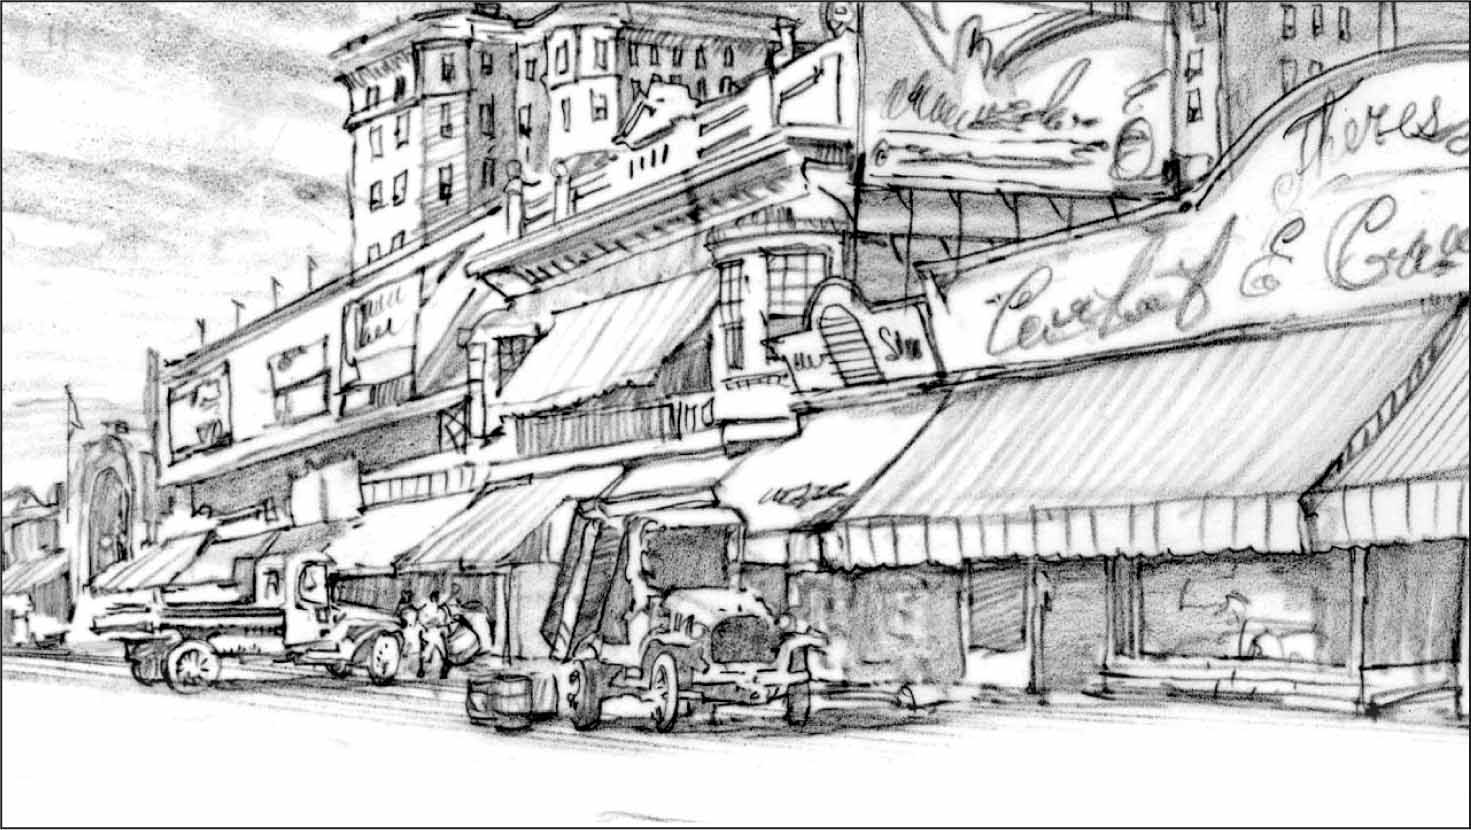
Step Four The background scene shows a charming, nostalgic boardwalk. Create different-sized shapes for the windows and signage. This adds detail and character to the architecture. Then, fill in the large recessed shapes with a mid value. By designing attractive positive and negative shapes in this small area, you’ll achieve a lot of detail work in a short period of time.
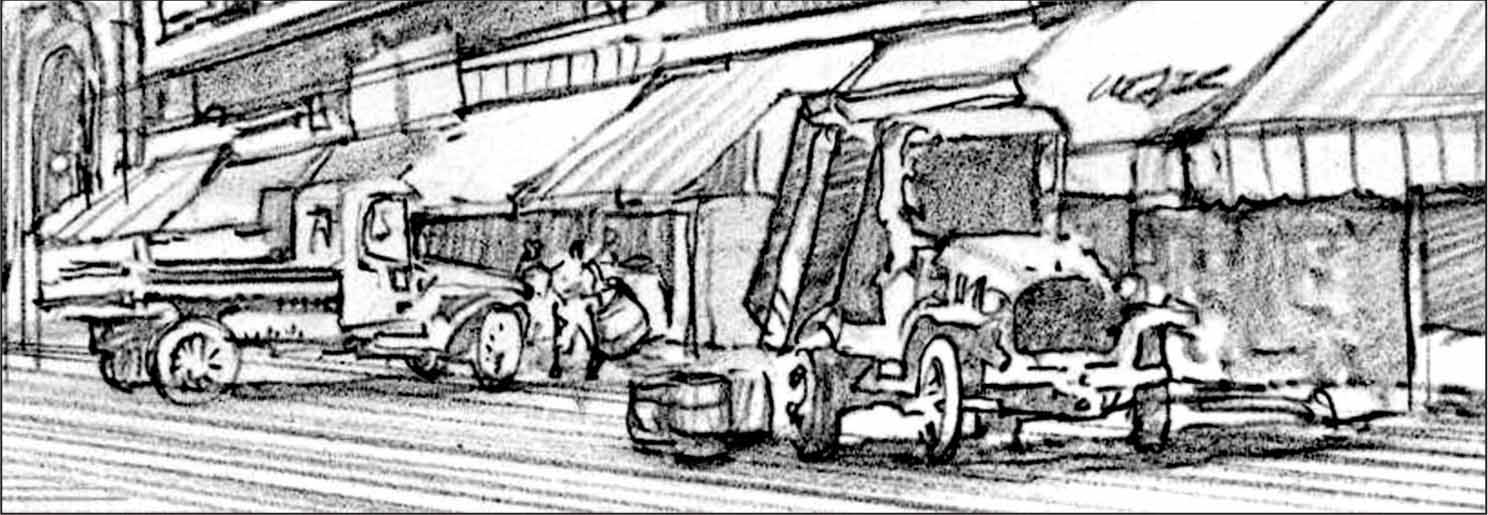
Step Five You might want to have some reference material on hand when drawing your 1920s delivery trucks. You don’t have to be familiar with drawing vehicles, however, to make them look believable. Since they are set at a distance, all you have to do is concentrate on the light and dark shapes, and keep their placement accurate.
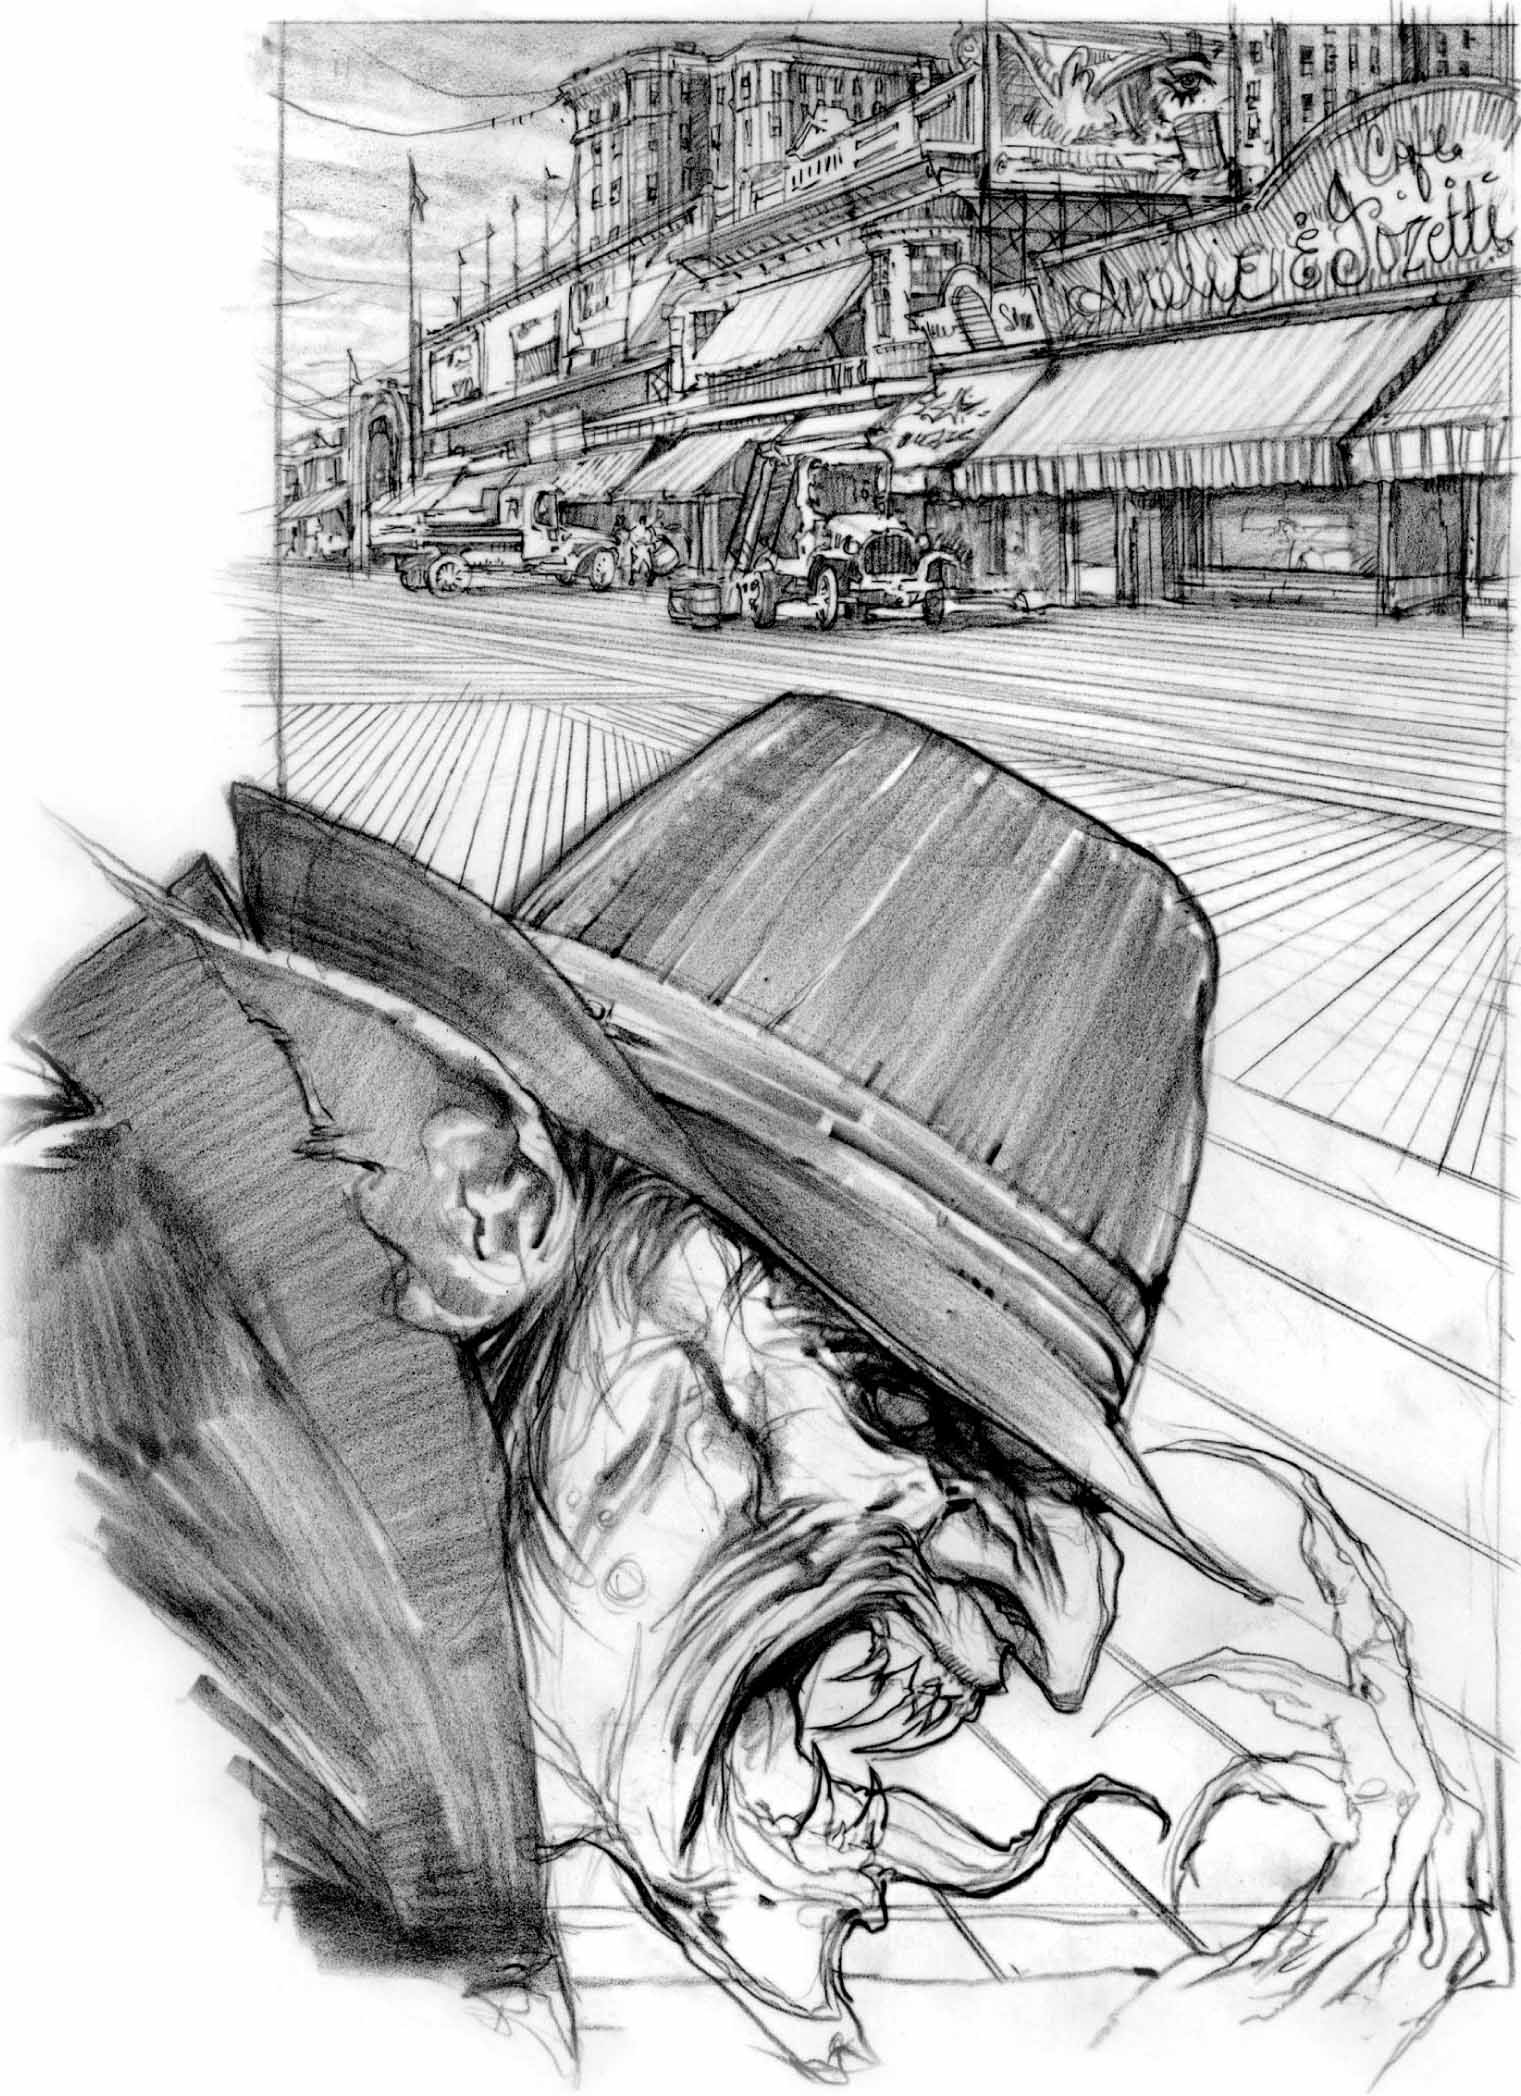
Step Six Next, we’re going to start adding values to our prohibition-era vampire. Make sure to keep your pencil strokes consistent, but vary the direction to describe the form. Also begin to add the dark accents to his face.
Step Seven To exaggerate the distance between the vampire and the shops, use a ruler to create crisscrossing patterns for the boardwalk. This also adds more interest to the composition.
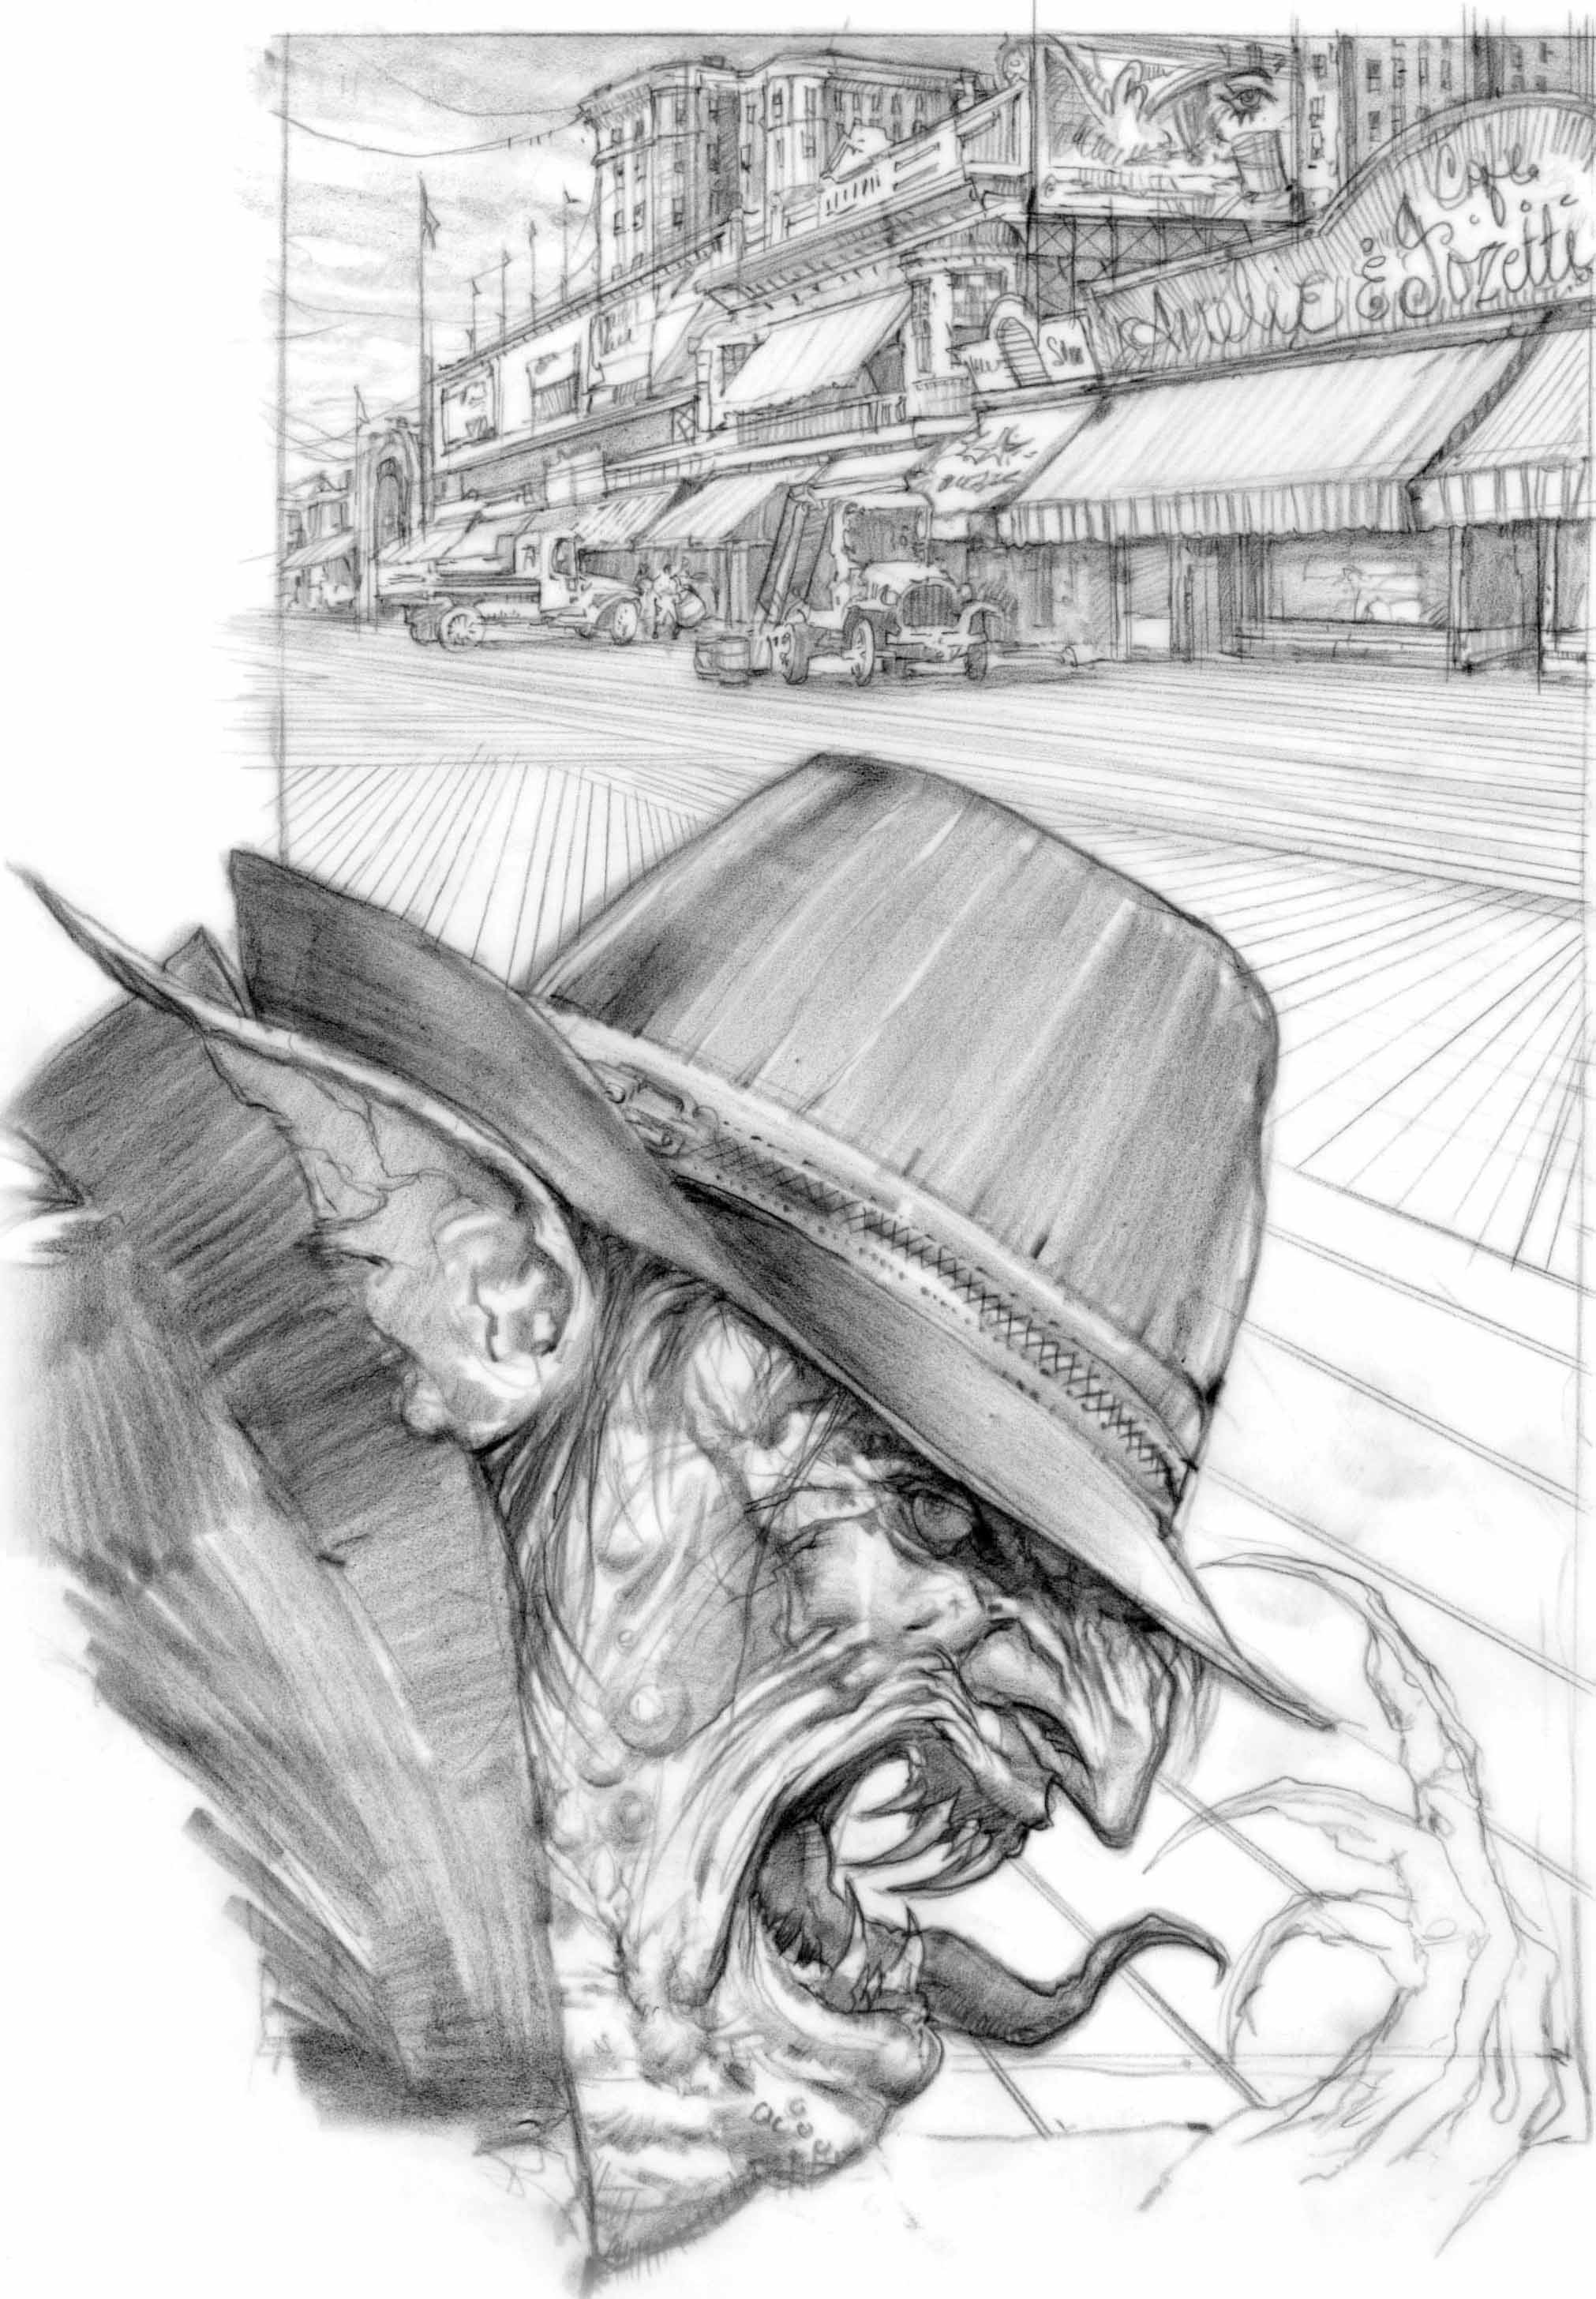
Step Eight Now we’re going to make our vampire even more hideous. Add more warts, darken his gums, and bring down his jowls, making him look extremely well fed.
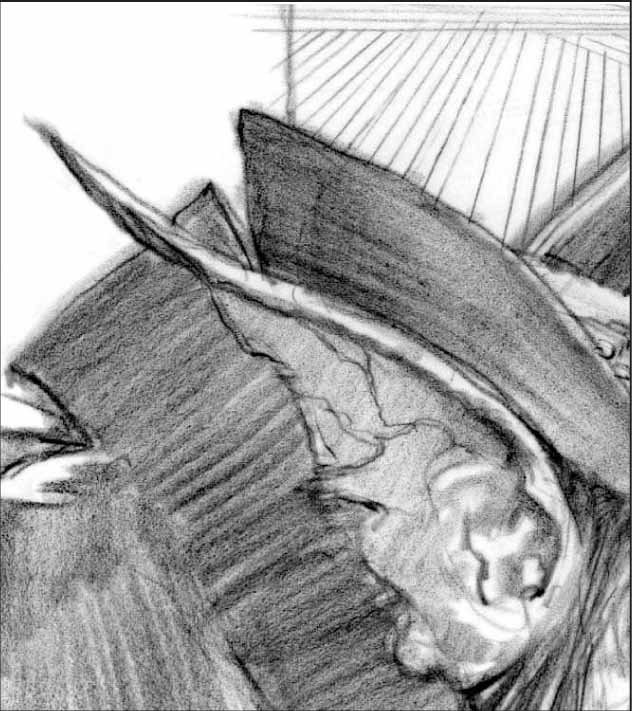
Step Nine This vampire has been through quite a metamorphosis. Once human, he has now evolved into a bat-like creature. Elongate his ears, making them look like bat wings. Add some veins in his ears, as well.
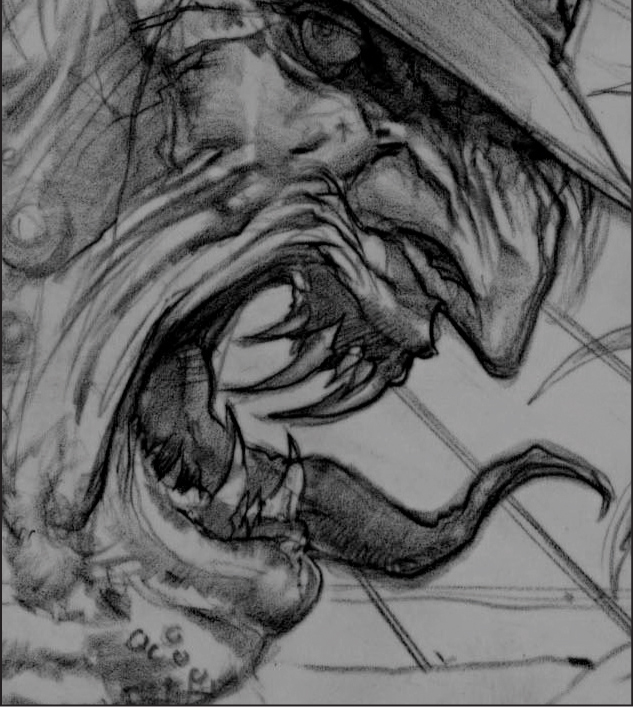
Step Ten Pull the skin back from his teeth and give him some gnarly wrinkles along the side of his mouth and nose. By doing this you’ll emphasize his grimace.
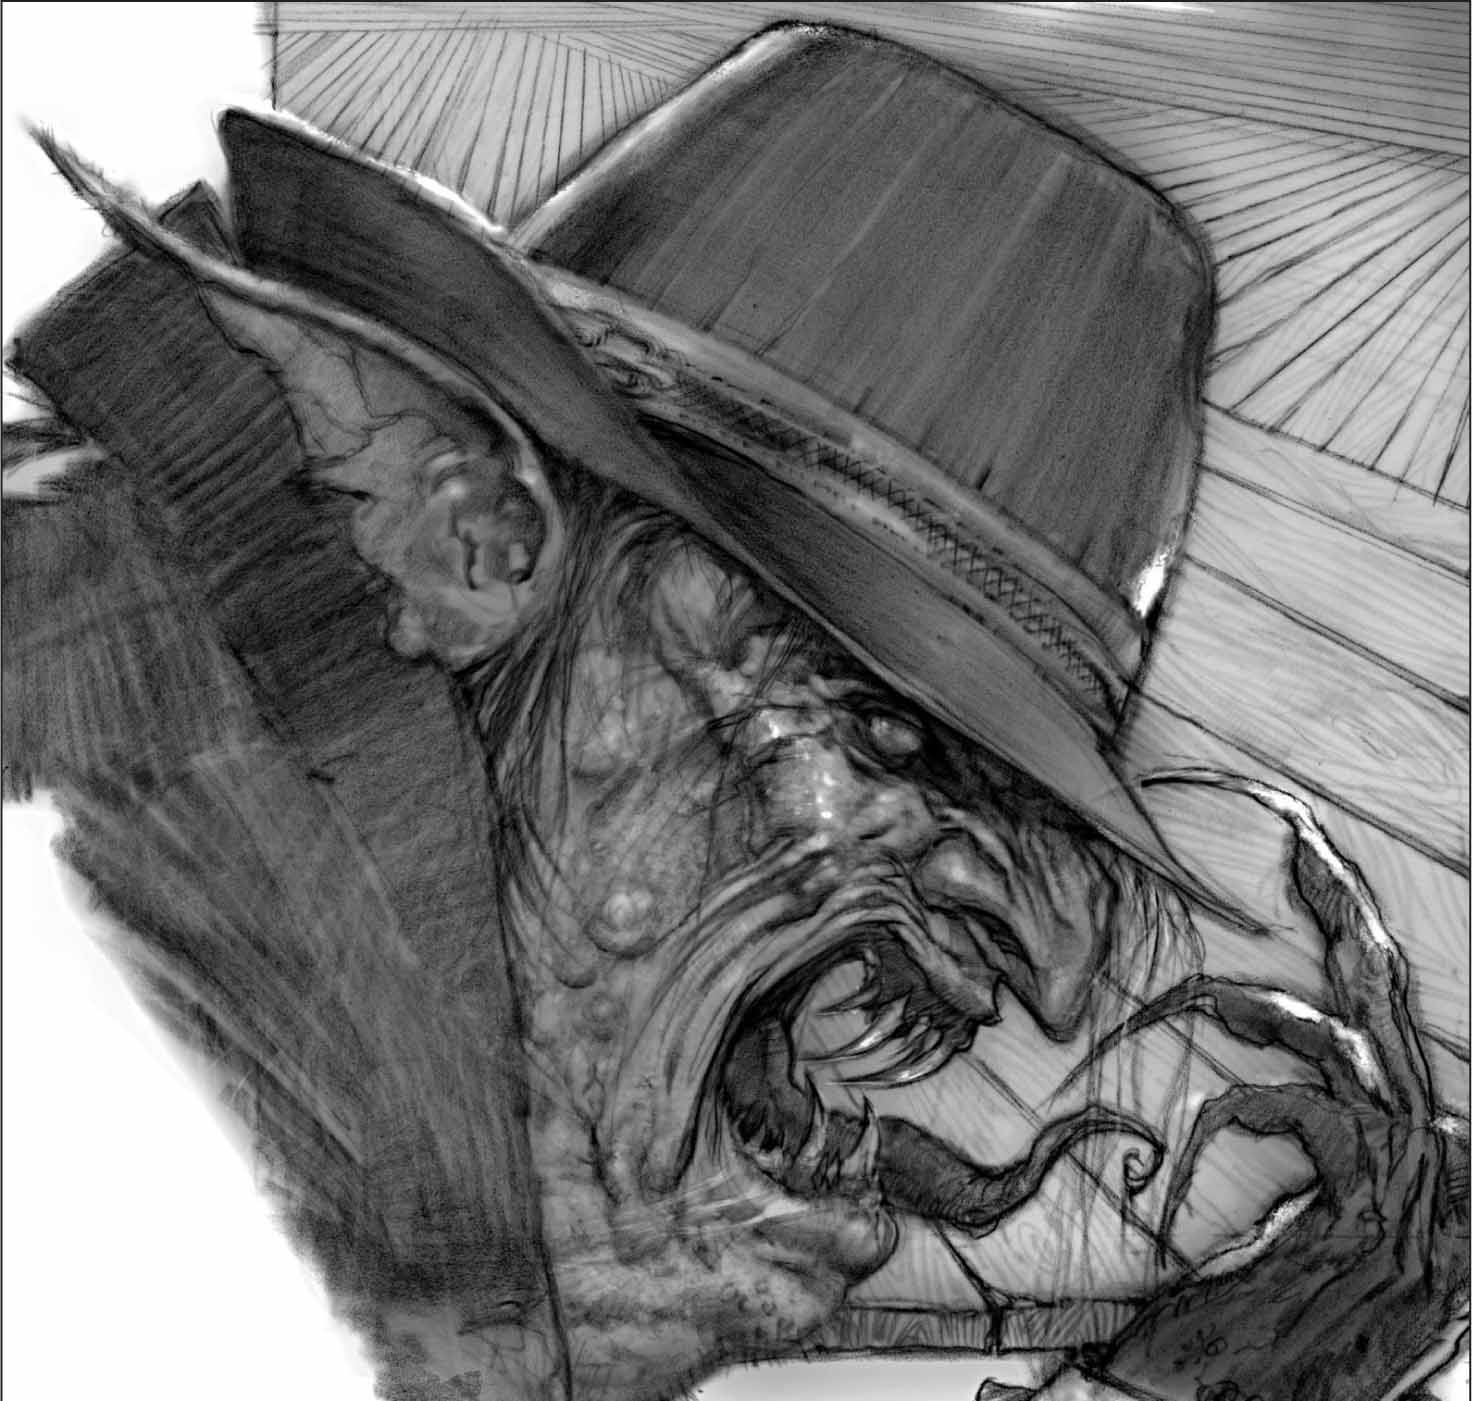
Step Eleven Once all your values are in place, scan your drawing into Photoshop® and add the final details digitally. Darken the drawing by adjusting the levels (see page 107). Since the majority of the light source is coming from the shops, give the vampire some rim lighting along his hat and his claws using the eraser tool.
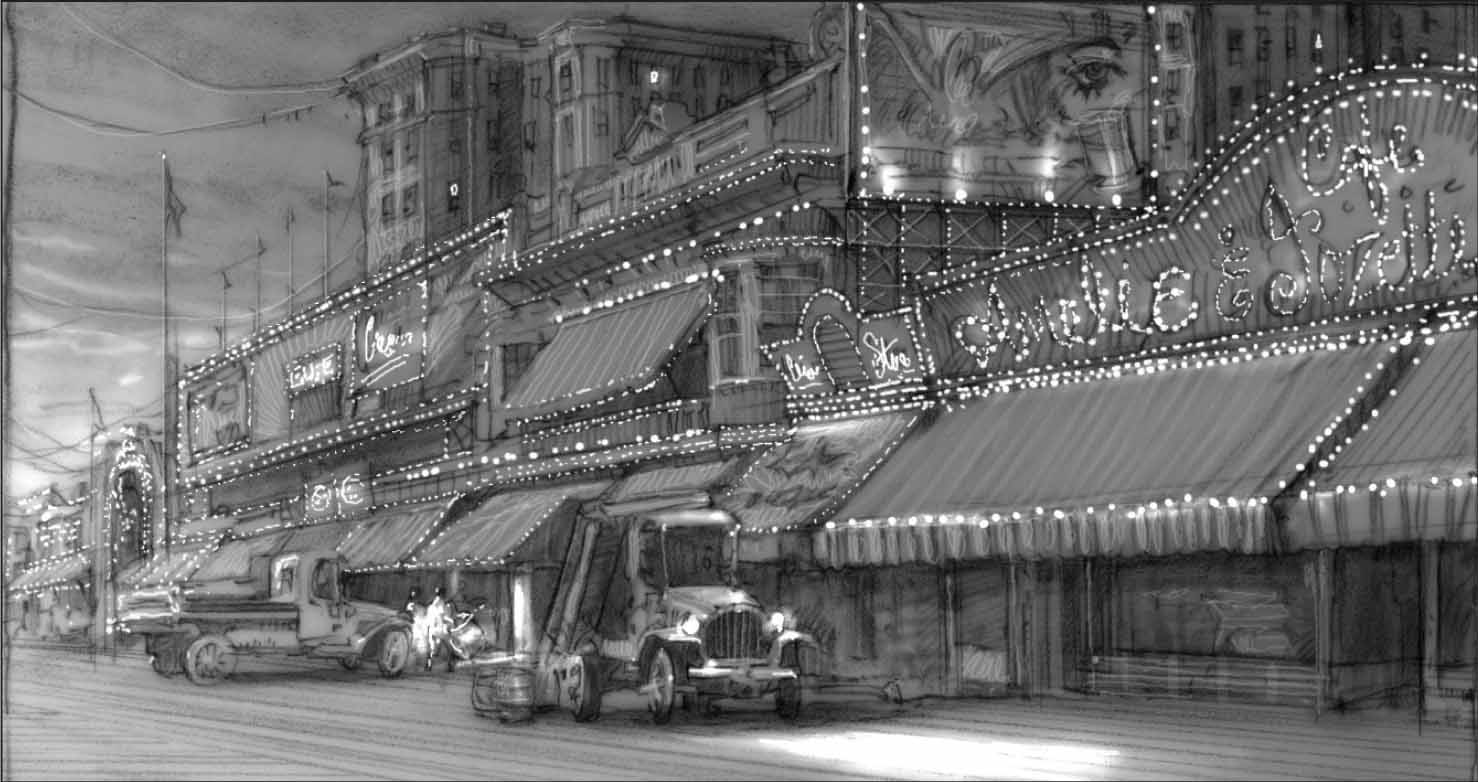
Step Twelve Still using the eraser tool, decrease the brush size and increase the opacity. Zoom in on the shops; then quickly add bright twinkle lights along all the signage and the headlights on the trucks. In the background of this illustration, you’ll see gangsters unloading illegal spirits. Who knows, these could be our vampire’s next victims. It always helps to embed a story in your illustration.
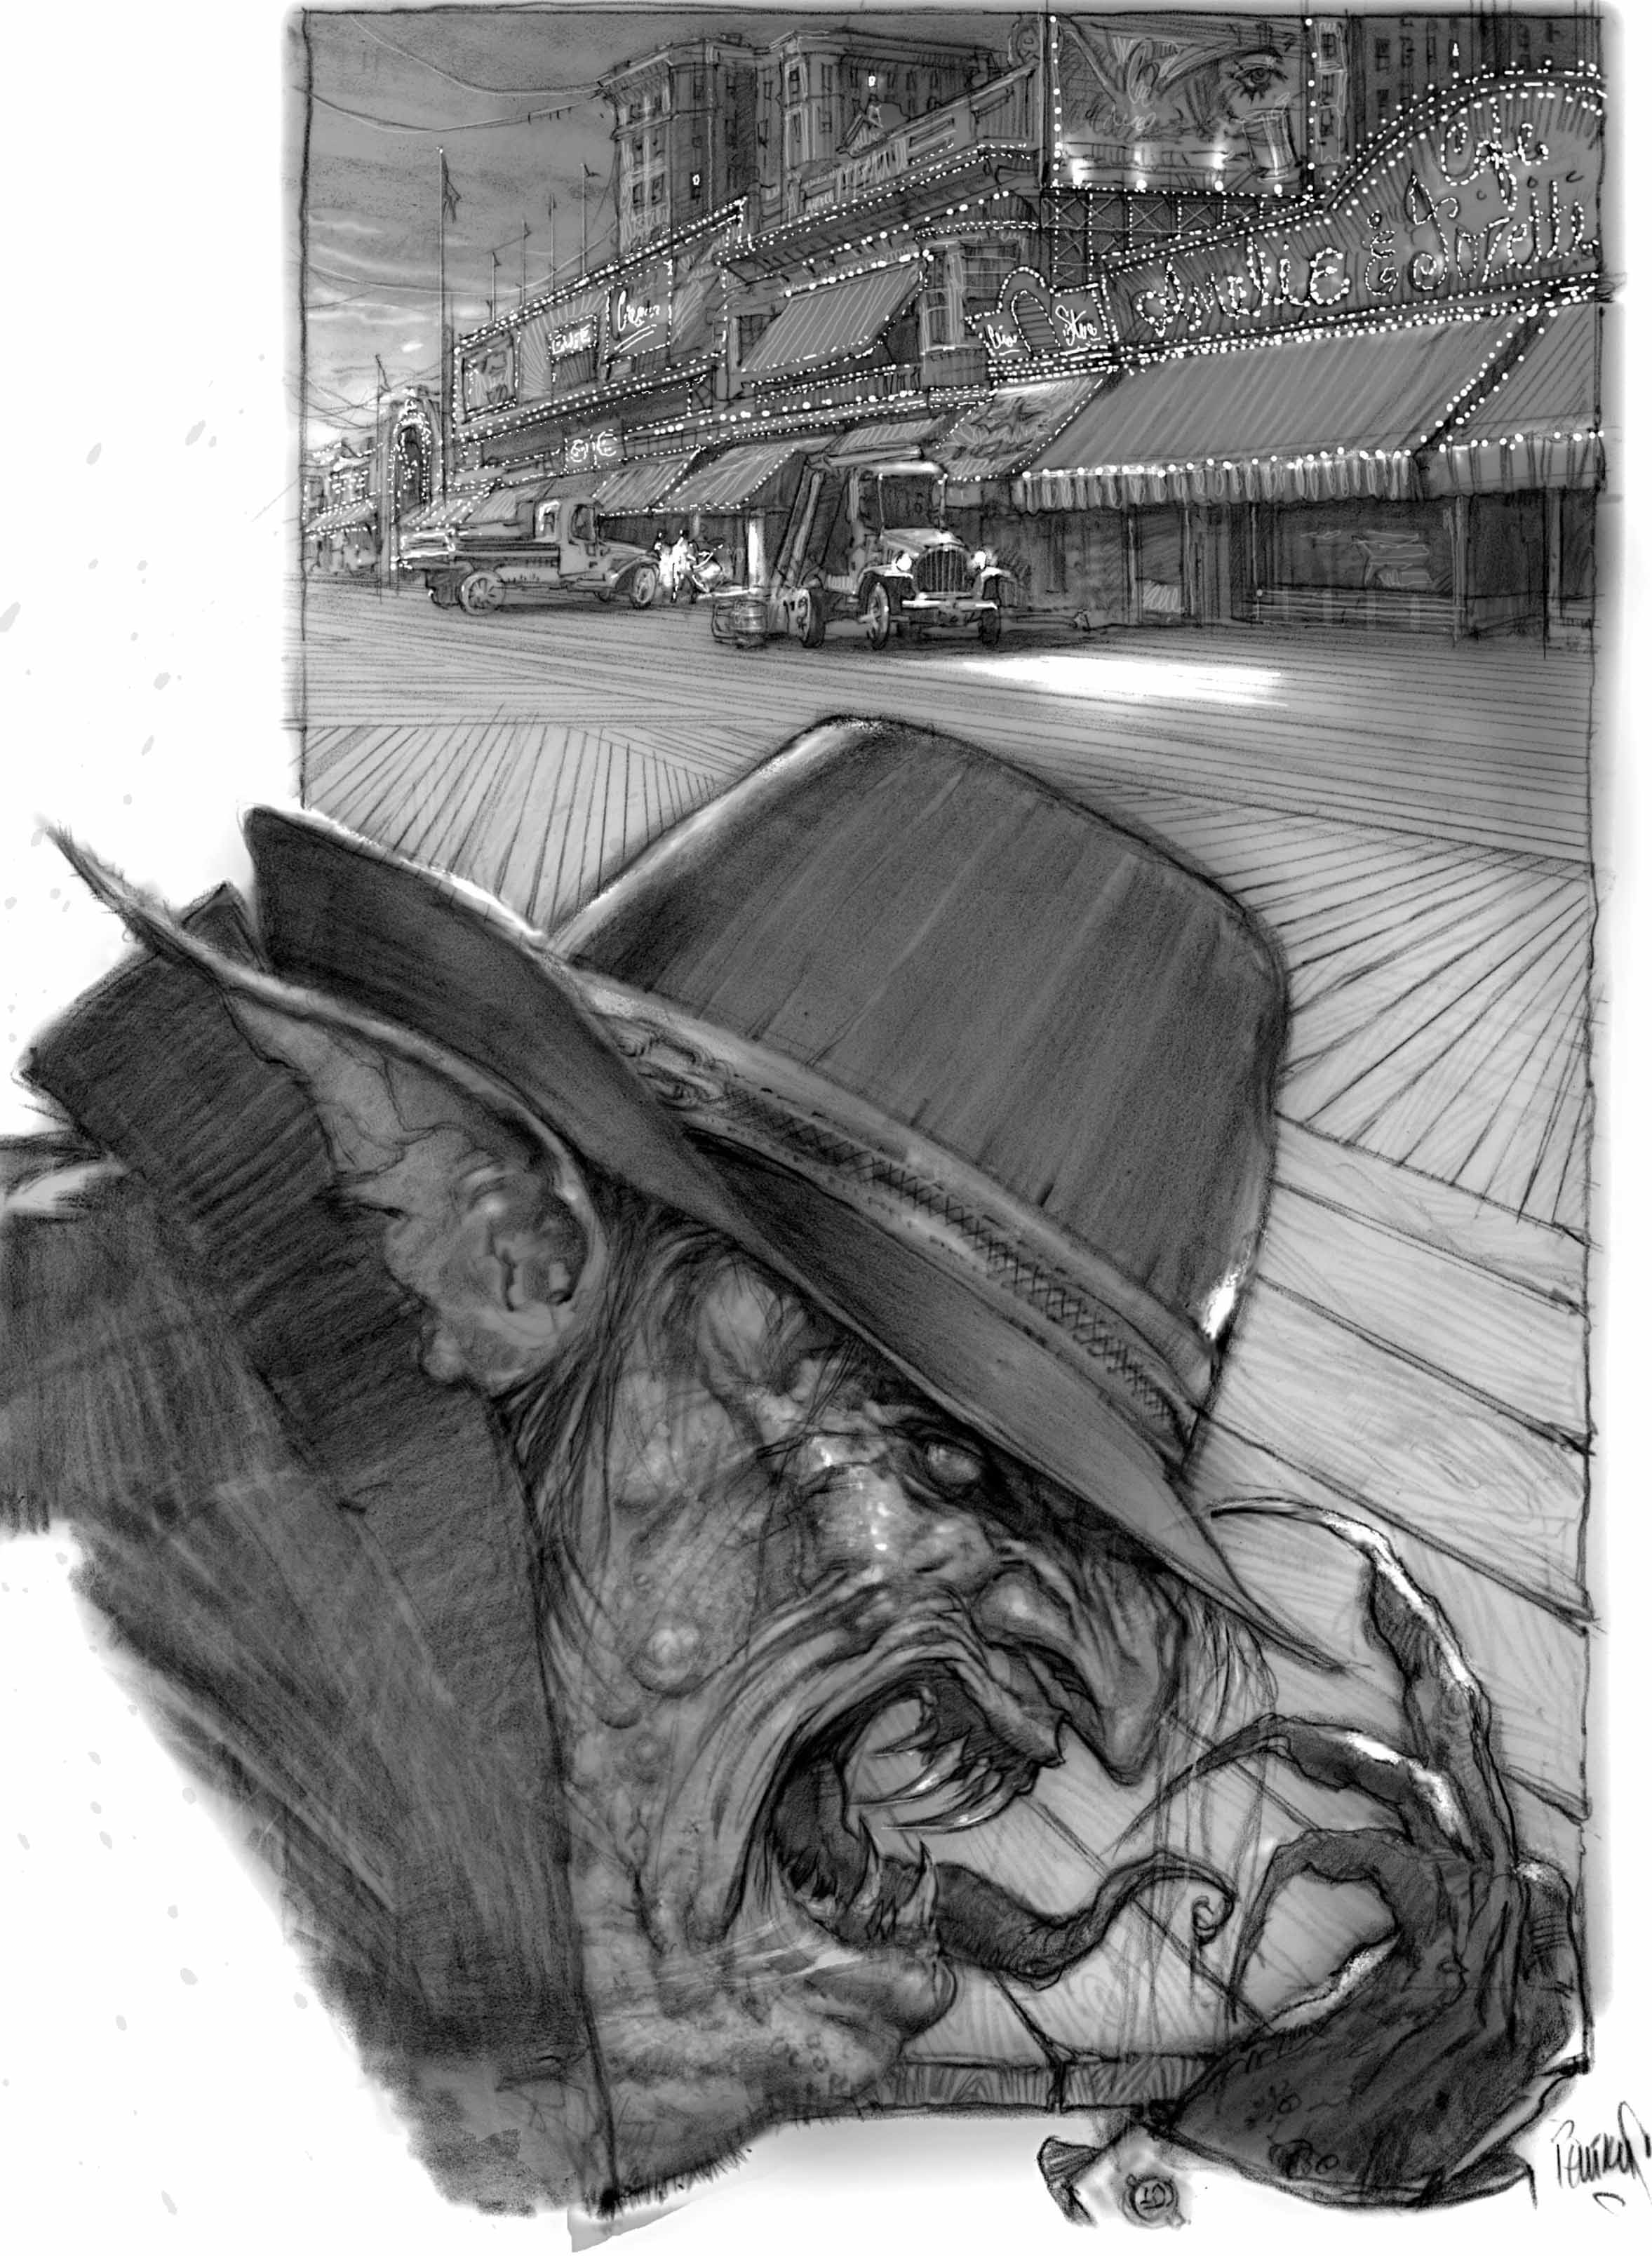
Step Thirteen The last adjustment involves lightening up the sky a bit to show that the sun is starting to rise. Select the eraser tool again and increase the brush size; then dramatically lower the opacity. Next, lighten the sky by about 10%. This digital stage of the drawing (steps eleven, twelve, and thirteen) takes very little time since the majority of the work is already done. If you do not want to use Photoshop®, you can also take a little bit of white gouache (very opaque watercolor) and a small brush to paint the highlights. This will give you the same effect.