Chapter 1
Getting Started

Are you interested in working with digital images? Do you want to improve or transform your photos? This chapter introduces Adobe Photoshop Elements 13, a popular photo editor and organizer.
Introducing Photoshop Elements
Switch between the Organizer and the Editor
Introducing the Photoshop Elements Tools
Introducing Photoshop Elements 13
You can use Photoshop Elements to edit, improve, and organize digital images. The product is split into two parts: the Organizer and the Editor. Use the Organizer to collect photos into albums; tag them; search them by place, tag, or date; and create slideshows. Use the Editor to improve the color and exposure of your photos, apply corrections, crop them, and transform them with creative effects. For example, you can add a virtual frame, make a photo look like a painting, add captions and other text, and decorate your photo with clip-art shapes and objects. The Editor supports layers, which make it easy to combine multiple images into a collage and experiment with changes without having to alter your original image. When you are finished with your images, you can use Photoshop Elements to print them or share them on the web or on photo-sharing and social-media sites such as Flickr and Facebook.
Fix Photos

The Editor is packed with features you can use to make simple and quick improvements to your photos. You can apply one-click fixes for color and contrast, correct color and exposure manually, and stretch and shrink your photos in many different ways to correct perspective and composition. You can crop photos to remove unwanted features and eliminate clutter. As you gain more experience, you can begin to select objects in your photos — including people — and move them within the photo or even delete them completely. You can also combine photos to create group shots and panoramas, and you can blend multiple photos of the same scene to remove unwanted moving objects.

You can use Photoshop Elements to edit new photos to make them look their best as well as retouch and repair older photos that suffer from aging problems. For example, you can restore a faded photo by using saturation controls to make it more vibrant, or you can use the Clone Stamp tool to repair a tear or stain. You can also use the program’s exposure commands to fix lighting problems as well as edit out unwanted objects with the Healing Brush.
Add Decoration
The painting and drawing tools in Photoshop Elements make the program a formidable illustration tool as well as a photo editor. You can apply colors or patterns to your images with a variety of brush styles. And you can also add text, captions, and speech or thought bubbles.
Create a Digital Collage

You can combine parts of different images in Photoshop Elements to create a collage. Your compositions can include photos, scanned art, text, and anything else you can save on your computer as a digital image. By placing elements on separate layers, you can move, place, and edit them independently.
Organize and Catalog
As you bring photos into Photoshop Elements, the Organizer keeps track of them. You can preview photos from one convenient window, group photos into theme-specific albums, tag photos with keywords, and search for photos based on time and date, location, and any tags you added. You can even find photos that are visually similar, and put names to faces in your photos.

After you edit your photographs, you can print them out or share them, individually, in groups, or even in animated video slide show. You can share your photos online on Facebook or Twitter directly from the Organizer. You can also print photos on your own printer, or create photo books, calendars, and other projects.
Understanding Digital Images
Digital images are made of millions of tiny squares called pixels. When you take a photo with a digital camera or scan a photo with a scanner, the hardware converts the scene or the source image into a grid of pixels. This section introduces you to some important basics about how computers store images in digital form.
Acquire Photos

You can acquire photographic images to use in Photoshop Elements from a number of sources. You can download photos to Photoshop Elements from a digital camera, memory card, or photo CD. You can scan photographs, slides, or artwork and then import the images directly into the program. You can also bring in photos that you have downloaded from the web or received via e-mail.
Understanding Pixels

Each pixel is a single color. If you zoom in to your photo, you can see the pixels as a colored grid. If you have too few pixels, your image looks small on the screen and is soft if you try to print it. If you have too many pixels, your photos takes up lots of disk space when you save them and lots of computer memory as you edit them. Photoshop Elements works its magic by rearranging and recoloring these pixels. You can edit specific pixels or groups of pixels by selecting the area of the photo you want to edit.

Images composed of pixels are known as bitmap images or raster images. The pixels are arranged in a rectangular grid, and each pixel includes information about its color and position. Most of the time when you are working in Photoshop Elements, you are working with bitmap content.
Vector Graphics

Text and shapes in Photoshop use a different format called vector graphics, which are mathematical recipes that draw shapes and letters. You can stretch or shrink vector graphics as much as you want without losing sharpness. You do not need to know math to work with vector graphics. You can add text by typing, and you can resize text and shapes by dragging your mouse. Photoshop Elements hides all the math that makes this possible.
Supported File Formats

Photoshop Elements supports a variety of files, including BMP, TIFF, JPEG, GIF, PDF, PNG, and PSD, which stands for Photoshop Document. The PSD, TIFF, and PDF formats can include layers. Other formats cannot. The most common formats for images published on the Internet are JPEG and PNG.

Different formats differ from one another in the amount of storage they take up on your computer. Formats such as PSD and TIFF take more space because they save a perfect copy of a photo. They can also include multiple layers. PNG files are perfect copies of a photo, but do not include separate layers. JPEG and GIF files sacrifice some quality for a smaller file size. Typically you save your work as PSD files while you are editing or printing at home, and you save a separate copy as a JPG or a PNG when you want to share the file on the Internet.
Start Photoshop Elements
You can install Photoshop Elements from a DVD or from a download. After installation, you can launch Photoshop Elements in the usual ways.
On a PC, you can click the Photoshop Elements icon in the Start Screen. On a Mac, you can access it through the Finder in the Applications folder or through Launchpad.
Start Photoshop Elements
 Open the Windows Start screen.
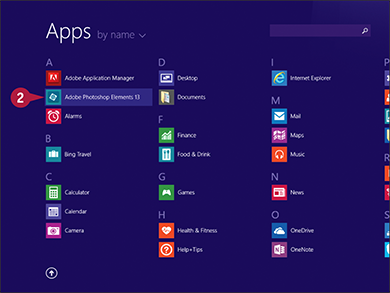
 Click the Adobe Photoshop Elements 13 button.
Note: Your location of the Photoshop Elements button may be different depending on how the Start screen is configured.
The Photoshop Elements welcome screen opens.
You can open the Organizer or the Editor from the welcome screen.
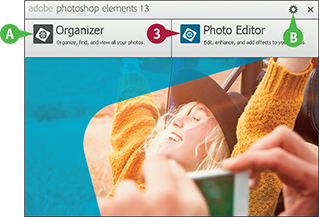
 Click Photo Editor.
The Photoshop Elements Editor opens.
A You can click Organizer to open the Organizer.
B You can click  to choose the screen that appears when you launch Photoshop Elements.
Explore the Editor Workspace
To open the Editor, click Photo Editor on the welcome screen. You can then use its tools, menu commands, and panel-based features to edit your digital photos. You can select Quick, Guided, and Expert editing modes to reveal different editing options. The main Editor pane displays the photos you are editing.

This displays the photo you are editing.
B Image Tabs
These tabs switch between images in the Editor.
C Organizer Button
This button closes the Editor and loads the Organizer, where you can catalog your photos.
D Mode Buttons
These buttons switch among the three Editor modes. (Expert mode is shown.)
E Panel Bin
This is an area for panels, which display information about layers, effects, graphics, and editing options.
F Photo Bin
This lists the loaded photos you can edit.
G Task Bar
These buttons select panels and various options. They also include important editing commands, including undo.
H Tools
These icons are the main editing tools in Photoshop Elements.
I Open Button
Click this button to select and load a photo for editing.
J Create Button
Click this button to create various photo-based projects such as calendars, CD/DVD jackets, and Facebook profile photos.
K Share Button
Click this button to share photographs by e-mail, on social networks, and on websites.
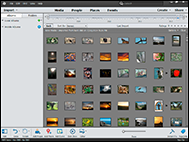
Tour the Organizer Workspace
In the Photoshop Elements Organizer, you can catalog, view, and sort your growing library of digital photos. The main Organizer pane, called the Media Browser, shows miniature versions of the photos in your catalog. To open the Organizer, click Organizer on the welcome screen.

This displays miniature versions, or thumbnails, of the photos and other media in your catalog.
B Photo Details
This shows ratings information and the categories associated with each photo.
C Editor Button
This button loads the Editor workspace, where you can edit your photos.
D View Buttons
These buttons switch between views in the Organizer.
E Panel Bin
This is an area for panels, which display quick fix, tagging, or photo information.
F Import Button
Click this button to import photos from a camera, scanner, or folder.
G Task Bar
These buttons select panels and various options. They also include important editing commands, including undo.
H Time Line
Use this area to scroll through photos in date order.
I Share Button
Click this button to share your photo by e-mail, on a social network, sharing via social networks, or through a private web page or slide show.
Switch between the Organizer and the Editor
Photoshop Elements has two main workspaces: the Organizer and the Editor. The Organizer lets you browse, sort, share, and categorize photos in your collection, and the Editor enables you to modify, combine, and optimize your photos. You can easily switch between the two environments.
You can use the Organizer to review your photos to find images for your projects. After you select your photos in the Organizer, you can open the Editor to adjust the colors, lighting, and other aspects of the photos, and then switch back to the Organizer to choose more photos to edit.
Switch between the Organizer and the Editor
Start Photoshop Elements in the Organizer view.
Note: See the section “Start Photoshop Elements” for more on starting the program.
You can browse and sort your photos in the Organizer.
Note: For more about adding photos to the Organizer, see Chapter 2.

Click a photo to select it.
The photo opens in the Editor. If the Editor is not already running, it may take a few moments to launch.

A The Editor opens in whatever mode you last used.
B You can click Organizer to return to the Organizer.
Introducing the Photoshop Elements Tools
In the Editor, Photoshop Elements offers a variety of specialized tools that enable you to manipulate your image. You can select tools by clicking icons on the left side of the workspace or by typing a keyboard shortcut key. Keyboard shortcut keys are shown in parentheses. Many tools create selections — areas you can edit. Each Editor mode displays different tools. Expert mode displays all the tools, as shown here.
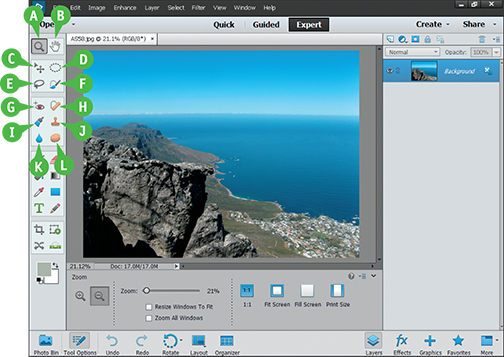
Expand/shrink the image in the preview area.
B Hand (H)
Drag the image when it is too big to fit into the preview area.
C Move (V)
Move a selection.
D Marquee (M)
Create a rectangular or round selection.
E Lasso (L)
Draw a free-form selection shape with your mouse.
F Quick Selection (A)
Create a selection by looking for similar colors or contrasting edges.
G Red-Eye Removal (Y)
Correct red-eye problems.
H Spot-Healing Brush (J)
Repair imperfections by copying nearby pixels.
I Smart Brush (F)
Select and apply a “quick fix” collection of effects.
J Clone Stamp (S)
Paint pixels from one area to another.
K Blur (R)
Blur a selection.
L Sponge (O)
Increase or decrease color saturation (intensity).

A Brush (B)
Paint on the image.
B Eraser (E)
Erase pixels by replacing them with the background color or making them transparent.
C Paint Bucket (K)
Fill a selection with a single color.
D Gradient (G)
Fill a selection with a blend of colors.
E Eyedropper (I)
Copy a color from the image.
F Custom Shape (U)
Draw various shapes.
G Type (T)
Add text to an image.
H Pencil (N)
Draw hard-edged lines.
I Crop (C)
Chop off unwanted parts of an image to improve it.
J Recompose (W)
Intelligently change the size of a photo while keeping elements intact.
K Content-Aware Move Tool (Q)
Move a selection and fill its old location with textures from the surrounding area.
L Straighten (P)
Straighten a crooked image or rotate it for special effects.
M Foreground and Background Color
Set the foreground and background colors used by the paint, draw, text, shape, and fill tools.
N Tool Options Panel
Display settings and options for the current tool.
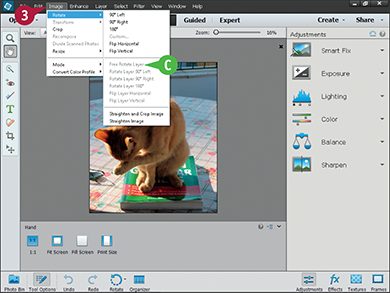
Switch Editor Modes
The Photoshop Elements Editor has three modes: Quick, Guided, and Expert. Use Quick mode for simple, easy edits. This mode is perfect for beginners who are new to photo editing.
Guided mode offers step-by-step instructions for more complex edits and effects. Use it to experiment with what Photoshop Elements can do. Expert mode gives you full access to all the features in Photoshop Elements. Use it when you have more experience with the tools and feel more confident about working with them.
Switch Editor Modes
Open a photo in the Editor.
Note: See Chapter 2 for information about opening photos.

Click Quick.
Quick mode appears.
A Click the tool bar to select a tool.
Note: For more about tools, see the next section, “Work with Tools.”
B Click here to select and apply one of the built-in quick adjustments and fixes.
Click a menu.
Photoshop Elements displays the menu commands.
C In Quick and Guided modes, some commands are grayed out and you cannot use them.

 Click Guided.
Guided mode appears.
D Click here to select a tool.
E Click the headings in the panel bin to see step-by-step instructions for editing photos.
Note: Very few tools are available in Guided mode, but the step-by-step editing suggestions include tools and settings of their own.

 Click Expert.
Expert mode appears.
F Click a tool in the toolbar to select it.
G Click an option to open its panel.
Note: See the section “Work with Panels” for more information.
Work with Tools
You can use the tools in Photoshop Elements to make changes to an image. After you select a tool, the Tool Options panel displays controls and settings for the tool. For example, if you select the Rectangular Marquee tool, you can set the width and height of the selected area.
Some tools display a tiny mark in the upper-right corner when you position the cursor over them. This tells you can select related tools by clicking the tool icon again. For example, you can click the Lasso tool icon to select two further tools: Polygonal Lasso and Magnetic Lasso.
Work with Tools
Select a Tool

Click an Editor mode.
Position the mouse pointer over a tool.
A A screen tip displays the tool name and shortcut key. You can click the tool name to access help information about the tool.
Click the tool to select it.
B The Tool Options panel shows settings and options for the current tool.

Click a tool that has a  in the top-right corner.
Photoshop Elements displays the clicked tool and one or more related tools in the Tool Options panel.
Click one of the related tools.
You can also press a tool’s shortcut key more than once to cycle through the related tools.
Close the Tool Options Panel
You can close the Tool Options panel to give you more space to view and edit your photos.

Click Tool Options.
The Tool Options panel closes.
C You can click Tool Options again to reopen the Tool Options panel.
TIPS
How can I keep the Tool Options panel hidden?
In the Tool Options panel, click the panel menu ( ). By default, Auto Show Tool Options is selected and the panel is shown when a tool is clicked. Click Auto Show Tool Options to deselect the option and keep the panel hidden.
How can I reset a tool to its default settings?
With a tool selected, click the panel menu () in the Tool Options panel and then click Reset Tool. You can click Reset All Tools to reset all the Photoshop Elements tools to their default settings.
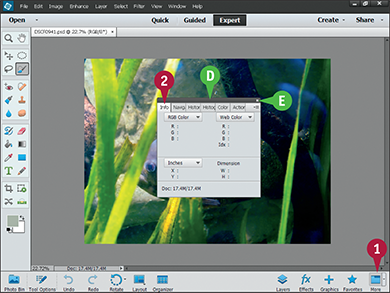
Work with Panels
In the Photoshop Elements Editor, you can open panels to access different Photoshop Elements features. In Expert mode, shown in this example, most panels open in the Panel Bin at the right side of the workspace. Other panels open in a tabbed window. You can click this window to drag, click the tabs to select different features, and resize the window.
For example, the Layers panel shows the layers in your image, including the standard background layer available in all images. The Graphics panel displays clip-art and graphics you can add to your photos.
Work with Panels
Using the Main Panels
Open the Photoshop Elements Editor.
Note: For more on opening the Editor, see the section “Start Photoshop Elements.”

Click one of the panel buttons.
Note: You can also access panels in the Window menu.
A The clicked panel opens in the Panel Bin.
B Many panels have buttons and sub-menus with further sub-options.

Click the panel button again.
The panel closes.
C Closing the panels increases the size of the photo in the preview window.
Open More Panels
Click More.
A window opens with tabbed panels.
Click any tab to display a panel.
D You can click and drag the panel header to move the window.
E You can click  to close the panel window.

To resize the panel window, click and drag the corner or edges. Not all panels in the panel window are resizable.
The panels resize.
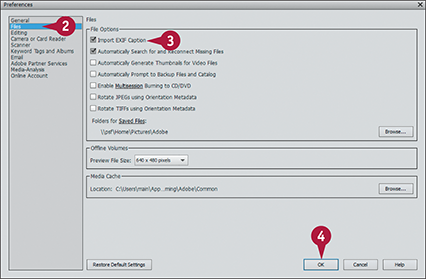
Set Program Preferences
You can use the Photoshop Elements Preferences dialog box to change various settings. For example, you can change image measurements from inches to centimeters or pixels, set how much memory is being used, control how many steps of Undo are remembered, and so on. You can make these changes from both the Editor and the Organizer.
Preferences are always saved to disk. Changes remain even if you quit and restart Photoshop Elements. In the Organizer, you can restore all preferences to their original state by clicking Restore Default Settings in the General preferences.
Set Program Preferences
In the Editor
In the Editor, click Edit. (On a Mac, click Photoshop Elements Editor.
Note: For more on opening the Editor, see the section “Explore the Editor Workspace.”

Click Preferences ⇒ General.
As an alternative, you can press  +
+ (
( + on a Mac).
The Preferences dialog box opens and displays General options.

Select any settings you want to change.
A For example, you can click the  to specify the shortcut keys for stepping backward and forward through your commands.
B You can click this option ( changes to
  ) to open images in floating windows instead of tabbed windows.
Click any of the items in this list to select a different preference category.
C You can also click Prev and Next to move back and forth between categories.
This example shows the Units & Rulers preferences.

Select any settings you want to change.
 Click OK.
Photoshop Elements sets the preferences.
In the Organizer, repeat steps 1 to 3 in the subsection “In the Editor,” or press + (+ on a Mac).
Note: For more on opening the Organizer, see the section “Tour the Organizer Workspace.”
The Preferences dialog box opens.
Select any of the preference groups.
Note: The groups and the settings are not the same as the Editor preferences.
Click and change any of the settings.
Click OK.
Photoshop Elements sets the preferences.
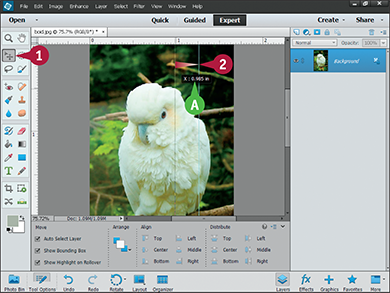
View Rulers and Guides
In Expert mode, you can turn on rulers and guides. Use rulers to measure widths and heights in your image. To change the units of measurement, see the previous section, “Set Program Preferences.”
Guides are horizontal or vertical lines. You can add them in the Editor preview area to help you line up elements in your image. You can only see guides as you edit. They do not appear in printed images or in images saved for sharing.
View Rulers and Guides
Show Rulers
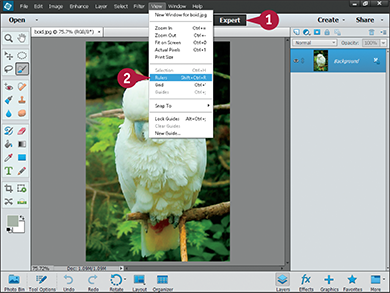
Click Expert
Click View ⇒ Rulers.
You can also press  ++
++ (++ on a Mac).
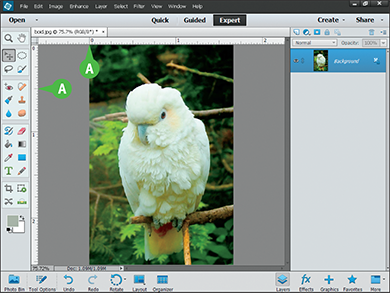
A Photoshop Elements adds rulers to the top and left edges of the image window.
Note: The left and top of the image always line up with 0 on the rulers.
Create a Guide
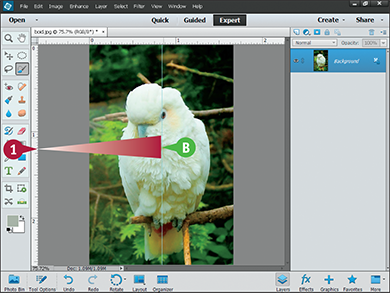
Click one of the rulers, and drag the cursor into the window ( changes to
  ).
).
Drag the top ruler down to create a horizontal guide.
Drag the left ruler to the right to create a vertical guide.
B A thin, colored line appears.
You can also click View and then New Guide to add a guide.
Move a Guide
Click the Move tool ( ).
).
Position the mouse pointer over a guide ( changes to ), and then click and drag.
A Photoshop Elements shows the guide position from the top or left of the image as you drag.
You can also press + (+ on a Mac) to display a grid on your image. The lines of the grid can help you align objects in your image.