Chapter 2
Importing and Opening Digital Images
Before you can start working with photos, you must import them. This chapter shows you how to import photos into the Organizer and open them in the Editor.
Import Photos from a Digital Camera or Card Reader
Import or Search for Photos from a Folder
Get Photos for Your Projects
Photoshop Elements can accept images from various sources, including digital cameras, scanners, and photo-sharing sites. Before you can organize and edit your images, you must import them. Photoshop Elements imports different sources in different ways.
Digital Cameras
Photoshop Elements is compatible with the budget cameras built into mobile phones, with mid-range point-and-click enthusiast cameras, and with full-featured digital SLR (Single Lens Reflex) cameras at various price points. Some cameras support a direct USB connection, while others save their files to a memory card and need a card reader device, which also works over USB. Photoshop Elements supports both options and reads all the standard digital photo file types, including the RAW format used by better cameras to give the best possible image quality.
Scanned Photos and Art
You can use the Windows version of Photoshop Elements to scan photos and hand-drawn or painted art into your computer using an external scanner. Some scanners support transparency (slide) scanning, and you can use Photoshop Elements to crop, tidy up, and repair images from old slides. Note that scanning is not available on the Mac version, but you can use external scanning software to scan images and then import them manually as files.
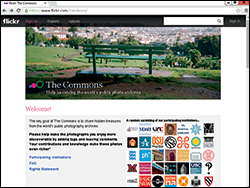
If you have photos or art stored on the web, you can save those image files to your computer and then open them in Photoshop Elements. In Internet Explorer on the PC, you can save a web image by right-clicking it and choosing Save picture as (Save Image As in Firefox or in Safari on a Mac). Inexpensive stock photo websites, such as iStockphoto, offer professional-grade images for download. On photo-sharing sites such as Flickr, users often allow noncommercial use of their photos.
Start from Scratch

You can also create your Photoshop Elements image from scratch by opening a blank canvas in the image window. You can then apply colors and patterns with the painting tools in Photoshop Elements, or you can cut and paste parts of other images to create a composite. See the section “Create a Blank Image” for more on opening a blank canvas.
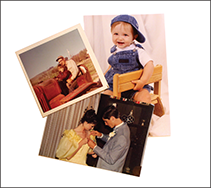
Film Photos
Although most photography is now digital, cheap waterproof film cameras are still popular for vacation and sports photography. Some serious photographers continue to prefer the look of film. If you use a commercial film developing service, you can usually ask to receive your images pre-scanned to files on a CD or DVD. To import these images into Photoshop Elements, see the section “Import Photos from a Folder.”
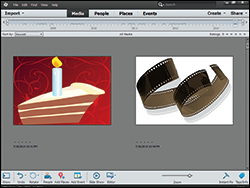
When you import images into Photoshop Elements, they appear in the Organizer. You can browse miniature versions of your photos, called thumbnails, sort them, group them into albums, and assign keyword tags to them. You can edit your photos by opening them in the Photoshop Elements Editor. You can open them in the Editor from the Organizer or open them directly from folders on your computer. See Chapter 1 for more on the Editor and the Organizer workspaces.
Import Photos from a Digital Camera or Card Reader
You can import photos into Photoshop Elements from a digital camera or from a memory card. To read from a camera, connect it to a USB port. To read from a card, connect a card reader — a small device with slots for different memory cards — and plug the card into a compatible slot. Some computers have a built-in card reader.
Every camera and card reader works differently. For example, you may need to set a special USB mode on your camera before you can read photos from it. Check your camera’s manual for instructions.
Import Photos from a Digital Camera or Card Reader
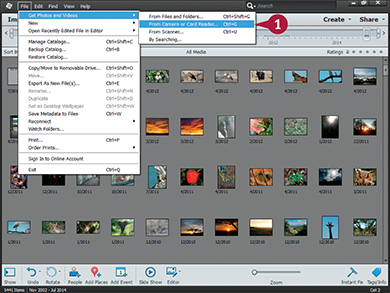
 In the Organizer, click File ⇒ Get Photos and Videos ⇒ From Camera or Card Reader.
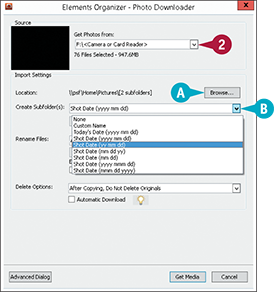
The Photo Downloader dialog box opens.
Photo Downloader may automatically open when you connect your device to your computer, depending on the settings in Photoshop Elements.
 Click
Click  to choose your camera or memory card from the Get Photos From menu.
A You can click Browse (Choose on a Mac) to set the import destination.
By default, Photoshop Elements downloads your photos into subfolders inside your Pictures folder. Each folder name includes the date of the photos.
B You can click to select a different naming scheme for subfolders.
Note: You can name subfolders with the shoot date in a variety of formats, the import date, and a custom name.
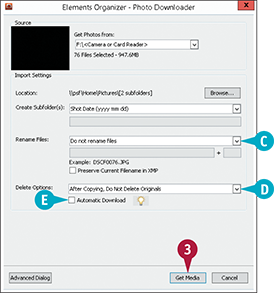
C You can click to set a naming scheme for your files.
D Click to choose whether to keep your photos on the device or delete them after downloading.
E On Windows only, you can click this option to set up Photoshop Elements to download your photos automatically using the current settings whenever a photo device is connected to your computer ( changes to
  ).
).
 Click Get Media.
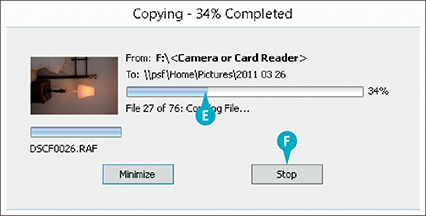
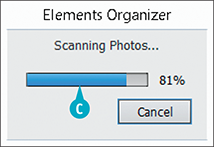
E Photoshop Elements downloads the photos from the device.
F You can click Stop to abort the download.
After downloading the photos, Photoshop Elements adds them to the current Organizer catalog.
Import Photos from a Scanner
You can import a photo into Photoshop Elements through a scanner attached to your computer in Windows. In Windows, the photo appears in the Organizer Media Browser after importing. On a Mac, you can use the Image Capture application to scan photos and send them to the Organizer. Some scanners include slide or film attachments that enable you to digitize slides or film.
Every scanner works differently. Consult the documentation that came with your scanner for more information. After scanning, you can rotate or crop the photo to fix any alignment issues. See Chapter 5 for details.
Import Photos from a Scanner

In the Organizer, click File ⇒ Get Photos and Videos ⇒ From Scanner.
The Get Photos from Scanner dialog box opens.
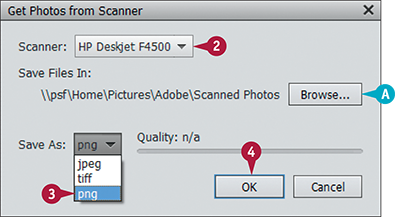
If your scanner does not appear here, click to select it.
By default, Photoshop Elements saves scanned photos in the Adobe folder inside your Pictures folder.
A You can click Browse to choose another location.
Click to choose a file format.
Note: PNG is a good choice because it does not reduce image quality.
The software associated with your scanner opens. Different scanners have different software, so you may not see the options shown here.
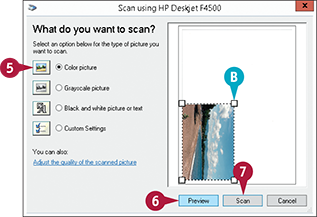
 Change your scanning settings as needed. You may need to specify whether the photo is black and white or color. You may also get to preview the scan.
 If your software includes a Preview button, click it to see a preview.
B The preview may include a box that snaps around a photo, as shown here. If it does not, you can usually drag the corners of the preview box to the edges of the photo.
 Click your scanner software’s Scan button to scan your photo.
C Photoshop Elements scans the photo.
After scanning, the photo appears in the Organizer.
Note: Scanned photos often need to be cropped and/or rotated. For details, see Chapter 5.
Import or Search for Photos from a Folder
You can use the Organizer workspace in Photoshop Elements to import images from a folder. Select this option if you already have a collection of digital photos on your hard disk or if you want to import photos from shop-made CDs.
The Organizer also includes a search feature. You can use it to search your hard drives and find folders with photos. You can then choose which folders to import from.
Import or Search for Photos from a Folder
Import Photos by Selecting a Folder

In the Organizer, click File ⇒ Get Photos and Videos ⇒ From Files and Folders.
The Get Photos and Videos from Files and Folders dialog box opens.
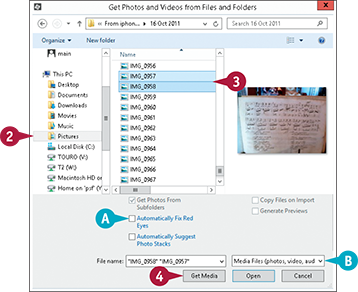
Click a folder to list the photos inside it.
 +click (
 +click on a Mac) to select the photos you want to import.
A You can click this option if you want Photoshop Elements to fix photos with red eye ( changes to ).
B You can select different file types, such as PDF documents or Photoshop Elements projects, by clicking and selecting a type.
 Click Get Media.
Photoshop Elements downloads the selected photos from the folder.
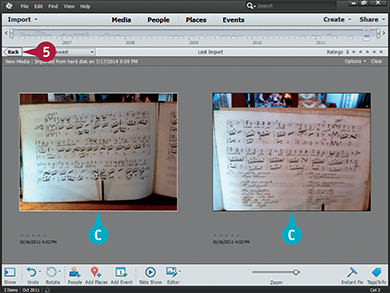
C Photoshop Elements displays the imported photos by themselves in the Organizer.
Click Back to return to the previous Organizer view.
Click File ⇒ Get Photos and Videos ⇒ By Searching.
The Get Photos and Videos By Searching dialog box opens.
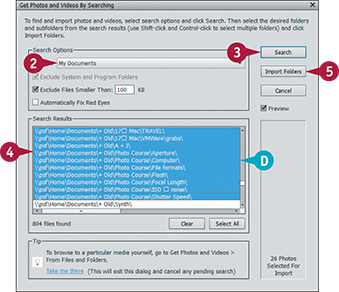
In the Search Options section, click the menu to choose all hard drives, a single hard drive, or to select a folder.
Click Search.
D Your search results appear.
Select one or more folders. +click (+click on a Mac) to select multiple folders.
Click Import Folders to get the photos.
Open a Photo
You can open a photo in the Editor to modify it or to use it in a project. After you open the photo, you can adjust its color and lighting, add special effects, and move objects in the photo to separate layers. You can also open photos from the Organizer for editing in the Editor.
You can open more than one photo at a time in the Editor. You can switch between photos using the window tabs. Open images also appear in the Photo Bin. For information about managing photos after you open them, see Chapter 5.
Open a Photo
Open a Photo in the Editor
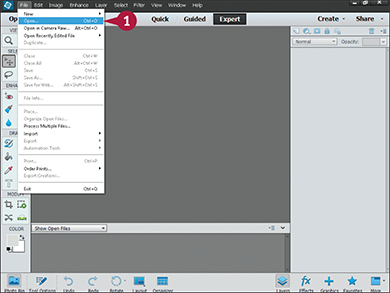
In the Editor, click Open.
You can also press +click (+click on a Mac).
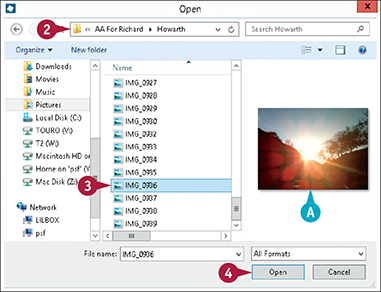
Click the file selector menu to navigate to the folder containing the file you want to open.
Click the photo you want to open.
A If your file browser is set up for image previews, a preview appears.
Click Open.
Photoshop Elements opens the image.
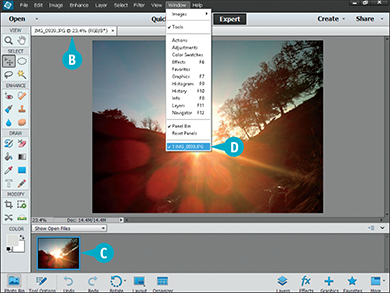
B The filename and zoom (preview magnification) setting appear in the tab.
Note: Depending on your preferences, the image may appear in a floating window instead of a tab.
C If the Photo Bin is open in the Editor, the image also appears in the Bin.
D You can click Window to view a list of open photos at the end of the menu.
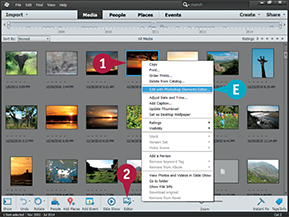
In the Organizer, click the photo you want to edit.
Click Editor.
E You can also right-click the image and select Edit with Photoshop Elements Editor.
Photoshop Elements opens the photo in the Editor.
Create a Blank Image
You can start a Photoshop Elements project by creating a blank image and then adding a photo, text, or graphics. When you create a blank image, you specify the dimensions and the resolution. Photoshop Elements offers a number of useful preset sizes, including common paper sizes and web browser dimensions.
You can add content from other images to your blank image as separate layers. For more on layers, see Chapter 13. You can also use the Brush tool to add streaks of color. See Chapter 11 for information about using and customizing the Brush tool.
Create a Blank Image

In the Editor, click File ⇒ New ⇒ Blank File.
You can also press + (+ on a Mac).
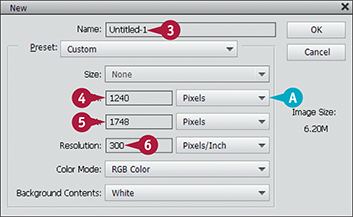
Type a name for the new image.
Note: Changing the units for one dimensions also changes the units for the other dimension.
A Click this menu to change the size units of the image.
Type the width of your image.
Type the height of your image.
Set the resolution of the image.
Note: Use the default RGB color mode for color images.
Note: If you copy an image or selection before creating a new image, Photoshop Elements automatically copies its dimensions, unless you select a different size.
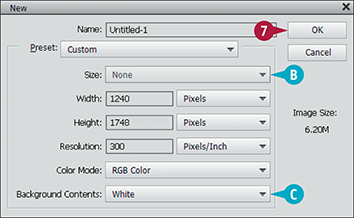
B You can click the Size menu to select one of the preset sizes.
C You can click the Background Contents menu to select a background color.
Note: By default, Photoshop Elements makes the background white.
Click OK.
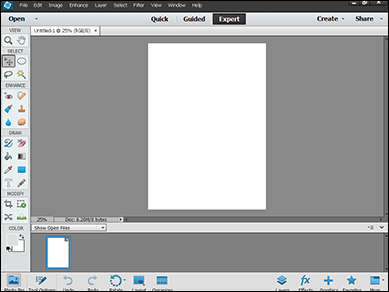
Photoshop Elements creates a new blank image with the dimensions you selected.
Note: See Chapter 11 for information about adding text and Chapter 14 for information about adding frames and other graphics.
Save a Photo
You can fix the changes you make to a photo by saving it. Photoshop Elements can save files in a number of formats. The default format is PSD. This includes useful project information, but it can be read only by a limited collection of Adobe-compatible products.
Use PNG for most applications and JPEG if you need very small files — example, to make a web page load quickly — and if you can afford to lose some image quality. You can save multiple versions of the same image as a version set in the Organizer.
Save a Photo
Save a New Photo
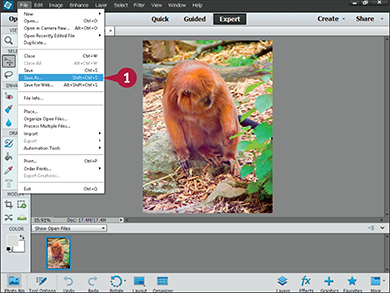
In the Editor, click File ⇒ Save As.
Note: For photos that you have previously saved, you can click File and then Save.
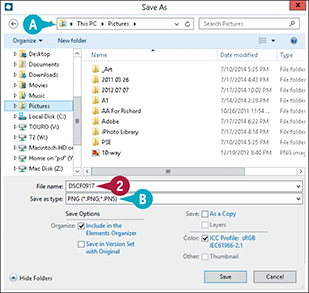
If you need to change the name, type it here.
A You can click the folder selector to choose another folder or drive for the file.
B You can click the Save as type menu (format menu on a Mac) to choose a different file format.
Note: Photoshop Elements adds the correct file extension automatically. You do not need to add it to the filename.
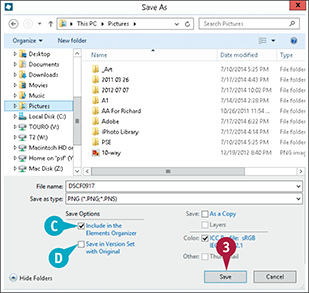
C Click this option to add the file to the current Organizer catalog ( changes to ).
D Click this option to save the file as part of a version set with other versions ( changes to ).
You can use this option only if a version set for the photo already exists.
Click Save.
Photoshop Elements saves the image file.
View a Version Set in the Organizer
In the Organizer, find a version set ( ).
).
A You can use the scroll bar to browse your photos.
Click  to expand the version set so you can view all the photos in that set.
Photoshop Elements expands the version set.
TIPS
How can I save my open photos as an album in the Organizer?
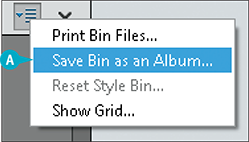
In the Photo Bin, click the bin menu ( ). Click Save Bin as an Album (A). In the Save Photo Bin dialog box, type a name for the album and click OK. The photos are saved as a new album in the Organizer.
Duplicate a Photo
In the Editor, you can duplicate a photo to keep an unedited “safe” version before you begin changing it. When you make a duplicate, Photoshop Elements creates a new window for it. You can then save the duplicate to disk to create your backup. See the previous section, “Save a Photo,” for more details. Note that creating a duplicate automatically creates a version set.
The Photoshop Elements editor includes a special side-by-side view for comparing original and edited versions of a photo. For more about working with different views and layouts, see Chapter 5.
Duplicate a Photo
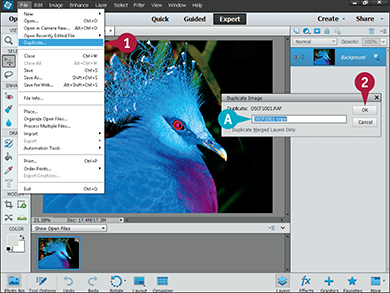
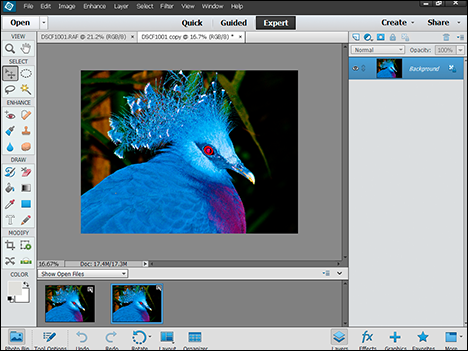
In the Editor, click File ⇒ Duplicate.
The Duplicate Image dialog box opens.
A You can type here to change the name of the duplicate.
Note: The default adds “copy” to the original name.
Click OK.
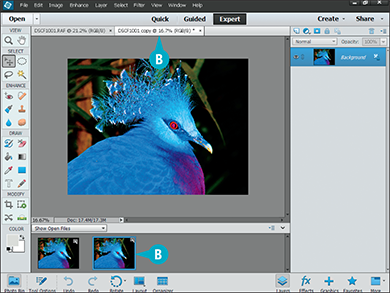
B Photoshop Elements opens a duplicate of the photo as another tabbed window.
Close a Photo
You can close a photo after you finish editing it. Although you can have more than one photo open at a time, closing photos can free up memory and make your computer work faster. It also reduces workspace clutter.
If you try to close an edited photo without saving it first, Photoshop Elements asks if you want to save it so you do not lose the changes. When you exit Photoshop Elements, it closes all open images and also warns you about unsaved changes.
Close a Photo

In the Editor, click File ⇒ Close.
You can also press + (+ on a Mac).
A You can also click  to close a photo.

B If you have edited but not saved your photo, Photoshop Elements asks if you want to save it before closing.
C Click Yes to save your work or No to lose your changes.
Photoshop Elements closes the photo.
Note: If you open the Editor by selecting a photo in the Organizer and clicking the Editor button, closing the file also hides the Editor.