Chapter 13
Using Layers
You can use layers to work independently with different parts of an image. You can cut items out of an image onto different layers, move the layers independently, filter them separately, and transform them without changing anything else in your image. You can change the order in which layers appear, to control how layers hide other layers. You can combine them visually in different ways without losing their independence. And you can merge layers back into a single image. You can also use special adjustment layers to apply color and lighting effects without making a permanent edit.
Introducing Layers
A Photoshop Elements image can include multiple layers. Each layer can include different objects, adjustments, or color fills. You can use layers to split an image into separate parts. You can then work with the parts independently, so you can try out different edits and ideas without changing the image. You can even save a file with separate layers so you can continue making changes later.
When you open an image in Photoshop Elements, the content appears in a single layer called the Background Layer. You can copy or cut items out of the background layer onto new layers as you work, and you can add adjustment layers to modify the image without changing it permanently.
Layer Independence
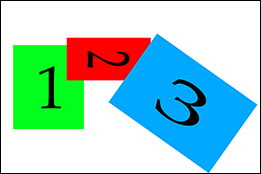
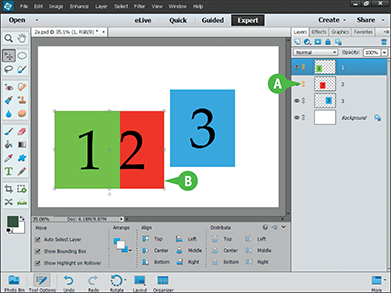
Layers are like images glued to pieces of transparent plastic. Each layer has its own pixels. You can move and edit it independently. A layer can include a small object, or it can be bigger than the canvas. Complex images can have tens or even hundreds of separate layers. The illustration shows three very simple layers on a plain white background.

Apply Commands to Layers
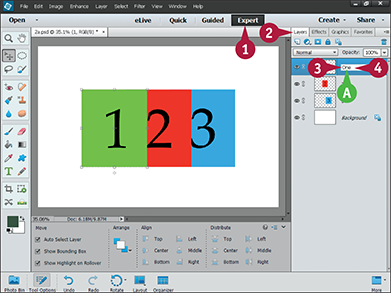
Most Photoshop Elements commands affect only the layers that you select in the Layers panel. You can move them, rotate them, and transform them independently. Layers are a good way to isolate effects. For example, if you copy a person into a layer in a portrait image, you can improve skin tone without changing the rest of the image. You can also keep different versions of the person in different layers and try them out against the same background to see which works best.
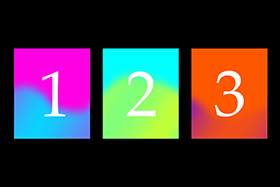
You can combine, duplicate, filter, and hide layers in an image and also shuffle their order. You can also link particular layers so they move in unison, or you can blend content from different layers in creative ways. You manage all of this in the Layers panel. The illustration shows all the layers from the first panel transformed in different ways.

Transparency
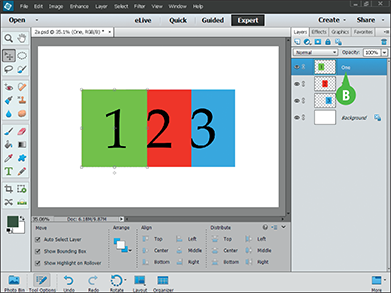
Layers can have transparent areas, where the elements in the layers below show through. When you perform a cut or erase command on a layer, the affected pixels become transparent. You can also make a layer partially transparent by decreasing its opacity. Here, layer 1 is partially transparent, and layer 3 has had an area removed so layer 2 shows through.

Adjustment Layers
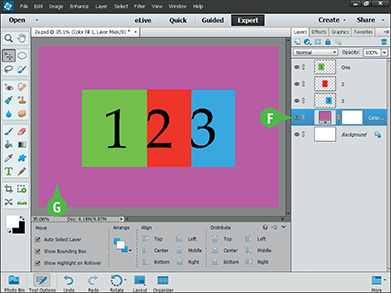
Adjustment layers are special layers that contain information about color or tonal adjustments. An adjustment layer affects the appearance of the pixels in all the layers below it. You can increase or decrease an adjustment layer’s intensity to get precisely the effect you want. Adjustment layers can have any shape you want. Here, an adjustment layer with soft edges and varying intensity shifts colors in parts of the image, and a second adjustment layer inverts the entire image.
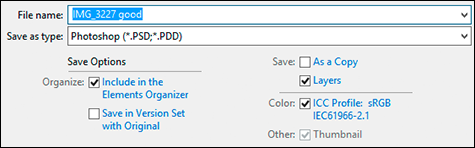
You can save files with layers using the PSD, PDF, and TIFF file formats. Other formats flatten layers back into the background; the layers disappear and you cannot keep working with them. You can also flatten layers in the Editor to save memory and disk space.
Create and Add to a Layer
To keep elements in your image independent of one another, you can create separate layers and add objects to them. Typically, you copy and paste elements from one part of your image, or from a different image, and paste them to place them into new layers.
When you create a new layer, the layer appears in a list in the Layers panel. Layers higher in the list appear above and can cover layers lower in the list. To rearrange layers that you have created, see the section “Reorder Layers.” To get rid of layers in your image, see the section “Delete a Layer.”
Create and Add to a Layer
Create a Layer
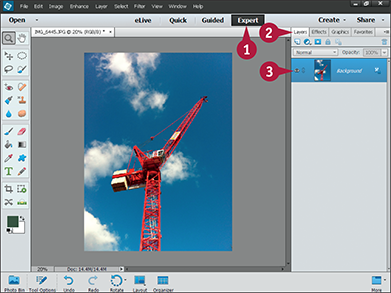
 In the Editor, click Expert.
 Click Layers to open the Layers panel.
Note: For more on opening the Editor or panels, see Chapter 1.
 Click a layer.
Note: Selecting a layer tells Photoshop Elements that you want to create a new layer immediately above it in the layer list.
Note: If you have not yet created any layers there, Photoshop Elements lists a single layer named Background.

 In the Layers panel, click the Create a New Layer icon (
 ).
).
Note: Alternatively, you can click Layer ⇒ New ⇒ Layer.
A Photoshop Elements creates a new, transparent layer.
Note: To change the name of the layer, see the section “Rename a Layer.”
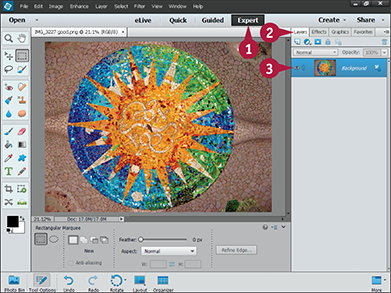
Copy content into a new Layer
Open an image.

Select an area using any selection tool.
Note: See Chapter 1 for more on opening an image. See Chapter 6 for more on selection tools.
Note: This example uses the Elliptical Marquee tool ( ) to select the circular mosaic.
Right-click ( +click on a Mac) anywhere on the image.

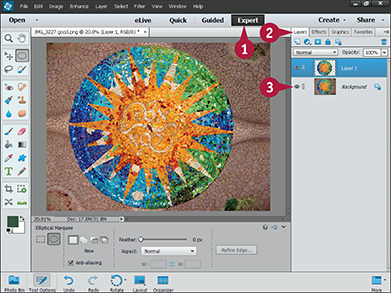
B The selected area appears as a new layer.
Note: The copy keeps its location in the canvas. In the new layer, the pixels outside the selection are transparent. Because the background layer is visible the main image does not look different.
TIPS
What is the Background layer?
The Background layer is the default bottom layer. Photoshop Elements creates it automatically. A Background layer cannot contain transparent pixels and cannot be moved. If you want to move it or delete parts of it, copy it to a regular layer.
How do I turn the Background layer into a regular layer?
Select the Background layer. Click Layer ⇒ New ⇒ Layer from Background. You can also press + (
( + on a Mac) to create an editable copy of the Background layer.
Hide a Layer
You can hide a layer to make it disappear temporarily. Use this option when you want to view or edit the layers under it. You can also use it to check the alignment of objects. Hidden layers remain invisible when you print an image or use the Save for Web command.
You can remove a layer permanently by deleting it. See the section “Delete a Layer” for details. Hiding a layer is different from deleting a layer because you can make a hidden layer visible again.
Hide a Layer
In the Editor, click Expert.
Click Layers to open the Layers panel.
Note: For more on opening the Editor or panels, see Chapter 1.
Click the visibility icon ( ) for a layer.
Note: You do not need to select the layer first.
The icon changes to  , and Photoshop Elements hides the layer.

A The layer remains in the Layer list.
B Its content disappears from the Editor window.
To show one layer and hide all the others, press  (
( on a Mac) and click the visibility icon () for the layer you want to show.
Move a Layer
You can use the Move tool to move a layer. Select a layer, select the Move tool, and drag the layer to a new location. The other layers remain where they are.
If you make a selection with a selection tool before using the Move tool, Photoshop Elements moves only the selection. The rest of the layer stays where it is. If the selection creates holes in the layer, they become transparent. For more on selection tools, see Chapter 6. To undo a move, click Undo or press + (+ on a Mac). For more on undoing moves, see Chapter 5.
Move a Layer

In the Editor, click Expert.
Click Layers to open the Layers panel.
Note: For more on opening the Editor or panels, see Chapter 1.
Click a layer to select it.

 Click and drag the layer you selected in the Editor window.
Content in the selected layer moves. In this example, moving the top layer reveals the background layer behind it.
Note: You must click an area with content to move it. In this example, you cannot move the top layer by clicking in the transparent area outside the circle.
Note: You can +click (+click) in the Layer list to select multiple layers and move them together.
Duplicate a Layer
You can duplicate a layer when you want to copy its content to a different location. You can also create duplicates to experiment with filtering or transforming a layer without losing the original layer content. If an experiment fails, you can delete the duplicate. You can make as many duplicates as you want.
When you duplicate a layer, it covers identical content in the original layer. The duplicate appears in the Layer list, but you cannot see it in the Editor window unless you move it or edit it.
Duplicate a Layer

In the Editor, click Expert.
Click Layers to open the Layers panel.
Note: For more on opening the Editor or panels, see Chapter 1.
Click a layer.
Right-click (+click on a Mac) and select Duplicate Layer. . .
A You can type a new name for the layer here.
Click OK.
You can also press + (+ on a Mac) to duplicate a layer after selecting it.

B Photoshop Elements duplicates the selected layer. The duplicate appears in the Layer list but does not change the view in the Editor window unless you edit it.
You can now move the layer to a new location. See the previous section Move a Layer for details.
Delete a Layer
You can delete a layer to remove it from your project. Deleting it removes it from the Layer list. Its content disappears from the Editor window. To undo the deletion, you can click Undo in the taskbar or press + (+ on a Mac).
If you want to make the layer disappear temporarily, you can hide it instead of deleting it. For more details, see the section “Hide a Layer” in this chapter.
Delete a Layer

In the Editor, click Expert.
Click Layers to open the Layers panel.
Note: For more on opening the Editor or panels, see Chapter 1.
Click and drag a layer to the trash can icon ( ).
).
Note: Alternatively, you can click Layer ⇒ Delete Layer in the main menu; you can select a layer and then click the trash can icon (); you can right-click and select Delete Layer.
In all cases, a confirmation dialog box opens unless you check a “Don’t Show Again” option.
Photoshop Elements deletes the selected layer, and the content in the layer disappears from the image window.

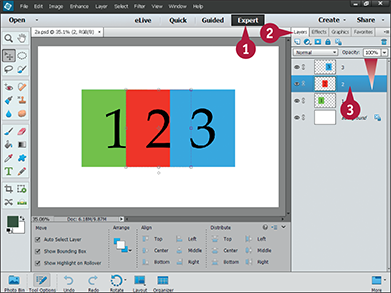
Reorder Layers
You can change the order of layers in the Layer panel to control how layers overlap. The list is drawn bottom-to-top. Layers at the top cover those lower down. To change a layer’s position in the list, drag it up or down and release it. Moving layers changes the order they are drawn in. It does not change their position in the Editor window.
You can drag any layers, including content layers and adjustment layers. Only the background layer is locked. It is always at the bottom of the list, to make sure it works as the image background.
Reorder Layers
Using the Layers Panel
In the Editor, click Expert.
Click Layers to open the Layers panel.
Note: For more on opening the Editor or panels, see Chapter 1.
Click, drag and release a layer to change its position in the list.
A The layer moves up (or down) the list.
B In this example, the Red 2 layer is now above the others, so it covers them in the Editor window.
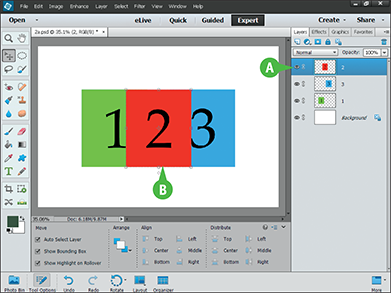
Using the Arrange Commands

Click the bottom layer to select it.
Click Layer ⇒ Arrange ⇒ Bring To Front.

A The layer moves to the top of the list.
B It appears in front of the other layers.
You can choose Bring to Front; Bring Forward; Send Backward; Send to Back; or Reverse. Depending on the layer position, some options are grayed out.
Note: You can use reverse only when you select more than one layer with +click (+click) in the Layer list.
Note: You cannot move a layer behind the background layer. To create the same result, duplicate the background layer, hide the original, and move the new layer behind the duplicate.
TIP
Can I use keyboard shortcuts to reorder layers?
You can use the shortcut keys in this table. For Mac, replace with .

Change the Opacity of a Layer
You can adjust the opacity of a layer to allow layers under it to show through. Opacity is the opposite of transparency — decreasing the opacity of a layer increases its transparency.
Layers have opacities between 0 and 100 percent. A layer with 0 percent opacity is completely transparent. You can move it, edit it, and transform it. But you cannot see it in the Editor window. A layer with 100 percent opacity is completely opaque and hides the content under it.
Change the Opacity of a Layer

In the Editor, click Expert.
Click Layers to open the Layers panel.
Note: For more on opening the Editor or panels, see Chapter 1.
Click the layer whose opacity you want to change.
Note: You cannot change the opacity of the Background layer.

Click the  .
.
Drag the slider.
A You can also type a new value in the Opacity field.
B The opacity changes and the layer appears more or less transparent.
If you are using layer blending, changing the opacity may not modify the transparency in a simple way. For details, see the “Blend Layers” section in this chapter.
Link Layers
You can link layers if you want to move them together. Photoshop Elements uses a link icon to show when layers are linked. You can transform linked layers together to change their dimensions or to rotate them. But you cannot filter or enhance them.
Linking is temporary. You can unlink layers at any time if you want to edit them or move them separately. To link layers permanently, you can merge them. See the next section, “Merge Layers,” for details.
Link Layers

In the Editor, click Expert.
Click Layers to open the Layers panel.
Note: For more on opening the Editor or panels, see Chapter 1.
Click a layer you want to link.
Click the Link Layers icon ( ) in a different layer to link them.
Note: You can repeat step 4 to link further layers.
A The layers become linked. The linking icon on each linked layer becomes orange ( ).
).
B If you select the Move tool ( ) and drag any linked layer, the other layers move with it.
To unlink a layer, click the .
Note: You can link layers to the background layer, but this locks them in place.
Merge Layers
You can merge layers to combine them into a single layer. Merged layers are no longer independent, and they appear as a single layer in the Layers list. There are three merge options. Merge Down (or Merge Layers) merges selected layers. Merge Visible merges layers with visibility turned on. Flatten Image merges all layers.
If Photoshop Elements is running very slowly, save a safety copy of your project with unmerged layers and merge them together. This often speeds up editing. If you make a mistake, you can reload and re-merge the layers before trying again.
Merge Layers

In the Editor, click Expert.
Click Layers to open the Layers panel.
+click (+click on the Mac) to select two or more layers.
Right-click (+click on the Mac) the Layer list, and select Merge Layers.

A Photoshop Elements merges the layers.
B The merged layer keeps the name and list position of the top layer.
Note: Layers with 0 percent opacity disappear after merging.
You can also press + +
+ (++ on a Mac) to merge all visible layers, or +++ (+++ on a Mac) to merge the visible layers into a new layer without deleting the existing layers.
Rename a Layer
You can rename a layer if you want to give it a name to describe its content. For example, in an image that combines flowers on different layers, you can name one layer “red rose” and another “white lily.”
When you create a new layer in the Layers panel, Photoshop Elements gives it the generic name “Layer 1.” When you duplicate a layer in the Layers panel, the duplicate layer has the same name as the original layer with “copy” added. Text layers include the text. After you create or duplicate a layer, you can rename it.
Rename a Layer
In the Editor, click Expert.
Click Layers to open the Layers panel.
Note: For more on opening the Editor or panels, see Chapter 1.
Double-click a layer name.
A A small text box opens.
Type a new name for the layer and press  .
.
B The name of the layer changes in the Layers panel.
Create a Fill Layer
You can use a fill layer to add a layer or color to your image. Fill layers can create colored backgrounds or filter effects. When you create a fill layer, you select its color using a Color Picker box. You can also add a gradient, which creates simple color shadings, or a pattern, which creates a repeating texture.
You can move fill layers up and down the Layer list. This can create very dramatic changes. If a fill layer is the top layer, it hides the others and you see a solid color.
Create a Fill Layer

In the Editor, click Expert.
Click Layers to open the Layers panel.
Note: For more on opening the Editor or panels, see Chapter 1.
Click the layer above which you want the solid color layer to appear.
This example adds a new colored background layer.
Click Layer ⇒ New Fill Layer ⇒ Solid Color.
The New Layer dialog box opens.

A You can type a name for the layer here, or leave this name unchanged to use the default.
B You can click this menu to select a blend mode.
C You can click this menu to change the opacity.
Note: See the sections “Blend Layers” or “Change the Opacity of a Layer” for details.
Click OK.

D A Color Picker dialog box opens.
 To change the base color, drag the slider up or down.
 To set the lightness and saturation, drag the mouse in this box.
E If the layer is visible, you can preview the color in the Editor window.
F Photoshop Elements creates a new layer filled with a solid color.
G In this example, a hot pink layer covers the original white background.
Create an Adjustment Layer
You can use adjustment layers to modify the color, brightness, contrast, and tonal range in an image without making the changes permanent. You can fine-tune the settings in an adjustment layer at any time.
You can also change the opacity of an adjustment layer to lessen its effect, or hide it to turn it off. Adjustment layers are handy for testing editing techniques, colors, or brightness settings. For more about the effects you can apply with adjustment layers, such as levels and curves adjustments, see Chapter 9.
Create an Adjustment Layer
In the Editor, click Expert.
Click Layers to open the Layers panel.
Note: For more on opening the Editor or panels, see Chapter 1.
Click a layer. Photoshop Elements inserts the adjustment layer above the layer you select.
Note: You can add an adjustment layer to a background layer.
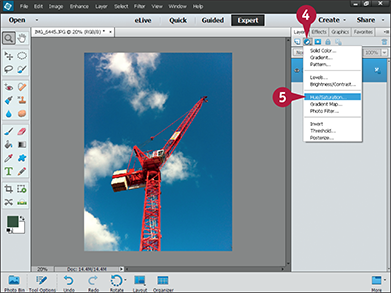
Click the Adjustment Layer icon ( .)
.)
Select Hue/Saturation.
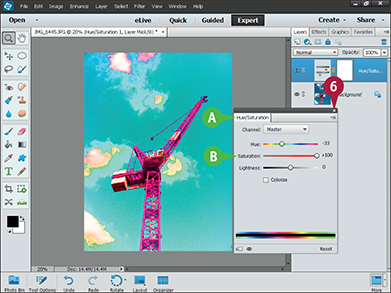
A The Hue/Saturation adjustment dialog box appears.
B You can adjust the hue, saturation, and lightness of the image using the sliders.
Click the dialog box close icon  .
.
The dialog box closes. The changes remain.

Double-click the adjustment icon in the adjustment layer.
C The hue/saturation dialog box appears again.
D You can make more changes to the sliders.
E You can click the Colorize box to apply a uniform color.
 Click the dialog box close icon .
Photoshop Elements applies the changes.
You can open the adjustment dialog box and make changes as often as you want without permanently editing the background layer.
Blend Layers
You can use the blending modes in Photoshop Elements to blend layers in creative ways. The range of effects is almost infinite, from subtle enhancements to exotic visual effects. To learn more, experiment with the different modes using many different photos. If you use many layers and many blending modes, the results can be difficult to predict.
When you create a new layer, the default blending mode is Normal, which simply covers one layer with another. You can switch back to Normal mode at any time to turn off blending effects.
Blend Layers
Pop Colors with an Overlay Blend
In the Editor, click Expert.
Load a photo.
For more about loading a photo, see Chapter 2.
Duplicate the background layer.
See the “Duplicate a Layer” section for details.
Note: For more on opening the Editor or panels, see Chapter 1.
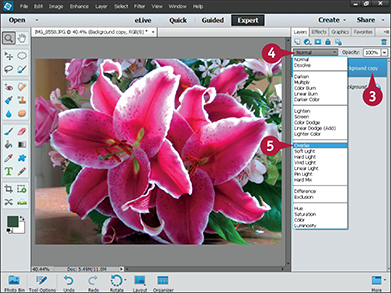
Click the blend mode menu.

A The overlay blend pops the colors.
B If the effect is too exaggerated, you can turn down the opacity to tame it.
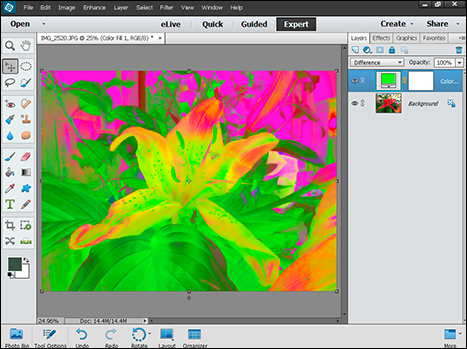
Create Unusual Colors with a Difference Blend
In the Editor, click Expert.
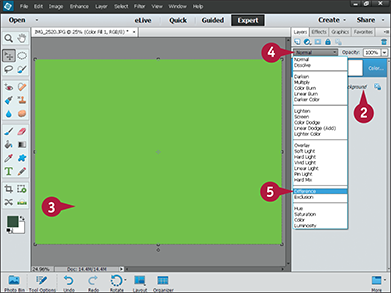
Load any photo to create a background layer.
Create a single color fill layer.
See the “Create a Fill Layer” section for details. This example uses a bright green fill layer.
Click the blend mode menu.
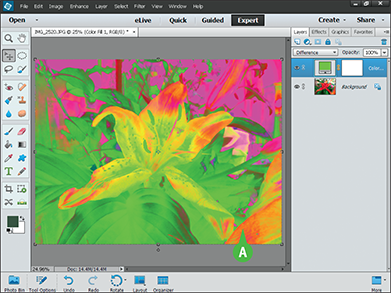
A Photoshop Elements subtracts the green color from the colors in the original photo, creating a brightly colored artistic interpretation of the source photo.
Note: You can double-click the fill color icon to adjust the fill color and create many possible color combinations. If the effect is too extreme, you can tone it down by lowering the fill layer’s opacity.
Note: Some photo and fill color combinations are more successful than others.
Add a Layer Mask
When you change a layer’s opacity setting, it affects the entire layer. You can use a layer mask to vary opacity across the layer. White areas in the mask have 100 percent opacity. Black areas have 0 percent opacity. Gray areas have in-between values controlled by the darkness/lightness of the gray.
You can use a layer mask to cut out an object from a layer. You can always edit a layer mask, so you can keep fine-tuning the mask until you get the object’s edges just right. You can also use masks to create adjustments that vary over the image.
Add a Layer Mask

In the Editor, click Expert.
Load a photo.
Click Layers to open the Layers panel if it is not already open.
Note: For details about opening the Editor or panels, see Chapter 1.
Click the Add Layer Mask icon ( ).
).
Note: Alternatively, you can alternatively click Layer ⇒ Layer Mask, and then Reveal All or Hide All. This creates an all white or all black layer mask, respectively.
Note: If your project has more than one layer, you can click any layer to select it and then add a mask.

A Photoshop Elements adds a layer mask icon to the layer.
The new mask is white, so the entire layer remains visible.
Note: If you add a mask to the background layer, it is “promoted” to a standard layer and is no longer locked.
Note: The mask is selected automatically.
You can now use any of the selection, drawing, painting, fill, and text tools to change the mask.
This example uses the Magic Wand tool to mask out the sky.

Click the Magic Wand tool ( ).
).
Note: In this example, the Contiguous check box is turned off to make it easier to select the sky.
Click the sky areas repeatedly to select all of the sky.
See the “Select an Area with the Magic Wand” section in Chapter 6 for details.

Set the foreground color to black.
See the “Set the Foreground and Background Colors” in Chapter 11 for details.
Click the Paint Bucket tool ( ).
).
 Click the area you selected in Step 6.
B Photoshop Elements fills the selected area in the mask with black.
C The masked area disappears.
Note: The original layer has not changed. You can delete the mask to make it reappear, or you can edit the mask to control how much of it appears.
TIPS
How do I edit a masked layer?
Click the layer thumbnail to the left of the mask in the Layers list. You can then edit the layer in the usual way. To go back to editing the mask, click the mask thumbnail.
Can I apply a mask as a permanent edit?
Yes. Right-click (+click on a Mac) the layer mask icon in the Layers panel, and select Apply Layer Mask from the menu that appears. Photoshop Elements “bakes” the mask opacity into the layer and deletes the mask.
Edit a Layer Mask
After creating a layer mask, you can edit it. You can invert the mask to swap the visible and hidden areas, blur it to soften the mask edges, or paint on it in either black or white to hide or reveal more of the original content.
For more advanced effects, you can apply gradient fills to create a smooth fade over the mask, add type to create text cut out effects, or use the mask to vary the intensity of an effect over the image.
Edit a Layer Mask
Invert the Mask
Add a layer mask to a layer in your image. (See the previous section for details.)
Note: See the previous section, “Add a Layer Mask,” for details.
Click the layer mask thumbnail for the mask you want to edit.
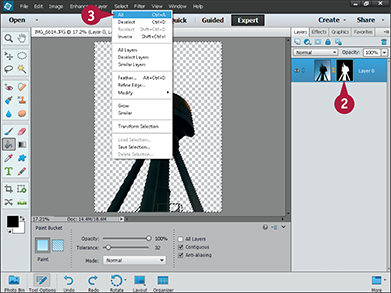
Click Select ⇒ All to make sure the entire mask is selected.
Note: You can also press + (+ on a Mac.)
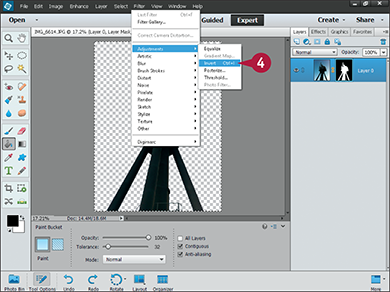
Select Filter ⇒ Adjustments ⇒ Invert.

A Photoshop Elements inverts the mask, swapping white and black areas.
B In this example, inverting the mask hides the object and reveals the background.

Select the Brush Tool ( ).
).
To reveal more of the original layer, change the foreground color to white. “White to reveal, black to conceal.”
See the “Set the Foreground and Background Colors” in Chapter 11 for details.
Paint with the brush in the Editor window to show more of the original layer.
Note: You can use any tool that changes the image, including the text tools, paint bucket, brushes, gradients, and so on.
Note: This is an exaggerated example. In a typical project, you would use a small brush to hide or reveal detail around the edges of an object.