Chapter 9
Enhancing Lighting and Color

Does your photo suffer from shadows that are too dark? Are the colors in your photo faded? Photoshop Elements has an impressive selection of tools for fixing lighting and color.
Change Brightness and Contrast
Use the Blur and Sharpen Tools
Adjust Color with the Sponge Tool
Turn a Color Photo into Black and White
Add Color to a Black and White Photo
Adjust Colors by Using Color Curves
Apply the Auto Smart Tone Tool
Adjust Levels
You can use the Levels dialog box to fine-tune the balance between shadows, highlights, and the areas in between, known as midtones. You can use the Levels tool to bring detail out of shadows and to set the overall brightness and contrast.
The Levels dialog box displays a histogram — a graph that counts the number of pixels at every possible brightness level, with darker pixels to the left and brighter pixels to the right. Adjusting the settings stretches and squeezes the graph to change the lighting in the image.
Adjust Levels
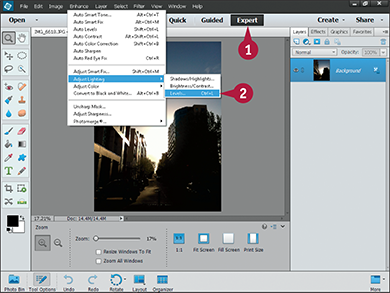
 In the Editor, click Expert.
Note: For more on opening the Editor, see Chapter 1.
 Click Enhance ⇒ Adjust Lighting ⇒ Levels.
Note: Alternatively, you can press  +
+ (
( + on a Mac).

 Make sure Preview is selected (
 changes to
  ).
).
When Preview is selected, Photoshop Elements updates the photo as you make changes.
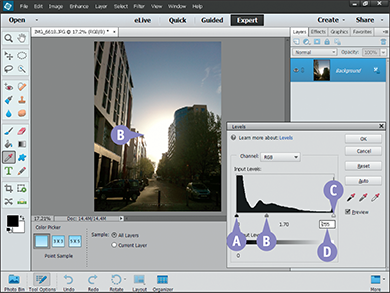
A You can click and drag the black slider to control the shadows.
B You can click and drag the gray slider to control mid-tones.
C You can click and drag the white slider to control highlights and bright areas.
Note: Drag the sliders to the right to make the image darker, and to the left to make it brighter.
D You can also click a box under each slider and type in a number to set the value.
Photoshop Elements displays a preview of the adjustments.

E You can click and drag the black output slider to the right to lighten the image.
F You can click and drag the white output slider to the left to darken the image.
Note: You do not usually need to move these sliders. Bringing them closer shrinks the contrast in the image.
 Click OK.
Photoshop Elements applies the adjustments.
Note: You can make a selection to change the levels in part of an image. See Chapter 6 for more about selections.
TIPS
How do I adjust the brightness levels of an image automatically?
Click Enhance and then Auto Levels. Photoshop Elements sets the lightest pixels to white and the darkest pixels to black. The other brightness levels are stretched or squeezed to fit between these extremes. This improves most photos, but some front-lit or back-lit photos may need manual adjustment.
Can I set the darkest, mid-gray, and brightest light levels directly from the image?
Yes. The Levels dialog box includes three Eyedropper tools, one for the darkest ( ), midtone (
 ), and lightest tones (
 ). Select an Eyedropper tool, and click the image to set the dark/midtone/bright levels. Note that if you click colored pixels instead of black/gray/white pixels, this changes the color balance in your image. Click Reset to restore the original balance and try again.
Adjust Shadows and Highlights
You can use the Shadows and Highlights feature to make quick adjustments to the dark and light areas of your image. The feature is less complicated than the Levels tool but also less flexible.
You can use it to fix poor exposure. Use Lighten Shadows to improve underexposed areas, and use Darken Highlights to tone down overexposed highlights. You can also adjust the midtones to show further detail.
Adjust Shadows and Highlights

In the Editor, click Expert.
Note: For more on opening the Editor, see Chapter 1.
Click Enhance ⇒ Adjust Lighting ⇒ Shadows/Highlights.
The Shadows/Highlights dialog box opens.

Make sure Preview is selected ( changes to ).
When Preview is selected, Photoshop Elements updates the photo as you make changes.
Click and drag the Lighten Shadows slider to the right to make dark areas lighter.
 Click and drag the Darken Shadows slider to the right to make bright areas darker.
Note: This slider does not darken burned-out white areas. It darkens the slightly darker areas with a little less brightness.

 Click and drag the slider to increase or decrease the midtone contrast.
Note: Decreasing contrast brings detail out of darker areas but can also make the image look washed out.
A You can also click any of the boxes and type values for the slider settings.
 Click OK.
Photoshop Elements makes the adjustment permanent.

Change Brightness and Contrast
You can use the Brightness/Contrast dialog box to make simple adjustments to the light/dark balance in your image. Brightness makes the image lighter, and contrast increases the difference between light and dark areas.
The Brightness/Contrast settings are easy to use but not as powerful as the Levels tool. For good results, use this tool for very quick fixes, but take the time to learn how to use the Levels tool so you can rely on it for more complex changes. See the section “Adjust Levels” for more information.
Change Brightness and Contrast
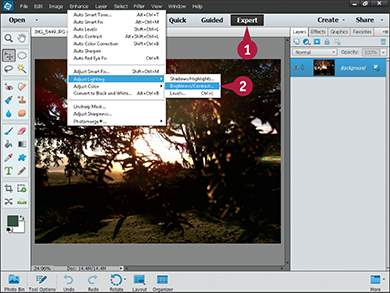
In the Editor, click Expert.
Note: For more on opening the Editor, see Chapter 1.
Click Enhance ⇒ Adjust Lighting ⇒ Brightness/Contrast.
The Brightness/Contrast dialog box opens.
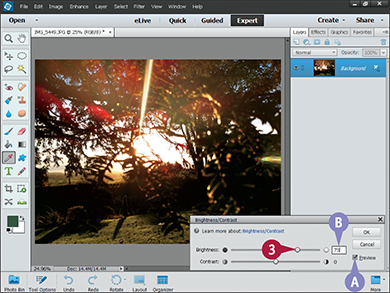
A The Preview check box is selected by default.
Click and drag the Brightness slider to adjust brightness.
Drag the slider to the right to lighten the image.
Drag the slider to the left to darken the image.
B You can also type a number from 1 to 150 to lighten the image or from –1 to –150 to darken the image.
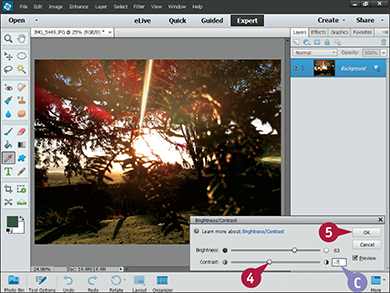
Click and drag the Contrast slider to adjust contrast.
Drag the slider to the right to increase contrast.
Drag the slider to the left to decrease contrast.
C You can also type a number from 1 to 100 to increase contrast or from –1 to –50 to decrease contrast.
Note: You often need to repeat steps 3 and 4 until you get the overall balance right.
Click OK.
Photoshop Elements applies the adjustment.

Use the Dodge and Burn Tools
You can use the Dodge and Burn tools to “paint” on an image to lighten or darken areas. The Dodge tool lightens, and the Burn tool darkens — which may be the opposite of what you expect. The unusual names come from old darkroom processes.
You can change the brush size for these effects, and select whether they work on shadows, midtones, or highlights. These are creative effects, so you can use them to reinterpret an image, adding and removing light from the original scene.
Use the Dodge and Burn Tools
Use the Dodge Tool

In the Editor, click Expert.
Note: For more on opening the Editor, see Chapter 1.
Click the Sponge tool ( ).
).
A If the Tool Options panel is not open, click here to open it.
The Dodge tool shares space with the Sponge and Burn tools in the Tool Options panel.
Click the Dodge tool ( ).
).
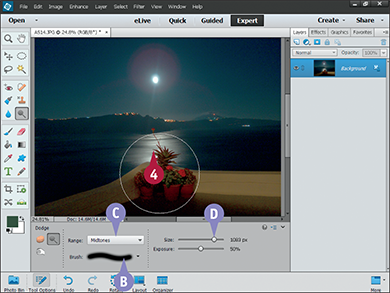
B You can click the menu and choose the brush you want to use.
C You can click this menu to select whether the tool works on shadows, midtones, or highlights.
D You can move the Size slider to change the brush size.
Click and drag over the area that you want to lighten. The brush appears as a circle.
This example lightens the area around the plant pots.
Use the Burn Tool

In the Editor, click Expert.
Click the Sponge tool ().
A If the Tool Options panel is not open, click here to open it.
The Burn tool shares space with the Sponge and Dodge tools in the Tool Options panel.
Click the Burn tool ().

B The Burn tool has the same settings as the Dodge tool.
Click and drag over the area that you want to darken.
This example paints over the cliffs on the horizon to make them stand out more from the sky and the sea.
Fix Exposure
You can use the Photomerge Exposure tool to combine photos of the same scene taken with different exposures. Many cameras have a bracketing feature that takes multiple exposures automatically. You can use the Exposure tool to merge these images and produce a composite with a good mix of visible detail in the shadows and highlights.
You can also use a manual option to select areas from each photo by painting them. This option can be less effective, because the selection tools have hard edges and it is often easy to see the joins.
Fix Exposure

In the Editor, click Expert.
Note: For more on opening the Editor, see Chapter 1.
+click (+click on a Mac) to select the photos in the Photo Bin.
Click Enhance ⇒ Photomerge© ⇒ Photomerge© Exposure.

A The Photomerge Exposure panel opens and produces a composite preview.
B You can click and drag this slider to change the highlights.
C You can click and drag this slider to change the darker areas.
Note: When Smart Blending is selected, the sliders may not do what you expect. For example, moving the Highlight slider to the left may brighten the image.
D You can click and drag this slider to adjust the overall color intensity.
Photoshop Elements applies the adjustments.

E You can click any photo to remove it from the composite.
Click Done to save the changes and to close the Photomerge Exposure panel.
Photoshop Elements merges the photos.

F The merged image appears in the Photo Bin.
G It also appears in the Layer list.
For more about layers, see Chapter 13.
Note: If you bracket without a tripod and do not keep the camera steady, the composite may have white borders. You can crop the image to fix this. See Chapter 5 for details.
Use the Blur and Sharpen Tools
You can use blurring and sharpening to draw attention to parts of your photo. Typically, you blur a background to make it less eye-catching and sharpen a subject to draw the eye toward it.
The Blur and Sharpen tools in this section are very subtle. You may not be able to see the difference they make unless you look closely. For less subtle effects that you can apply to the entire image, see Chapters 8 and 12.
Use the Blur and Sharpen Tools

In the Editor, click Expert.
Note: For more on opening the Editor, see Chapter 1.
Click the Blur tool ( ).
).
A If the Tool Options panel is not open, click here to open it.
The Blur tool shares space in the Tool Options panel with the Sharpen and Smudge tools.
B You can click the menu and choose a different brush.
C You can use these sliders to change the size and strength of the effect.

Click and drag the mouse pointer to blur an area of the image.
Photoshop Elements blurs the area.
The blur is very subtle, even at 100 percent strength. You can only see it if you look closely.
Use the Sharpen Tool
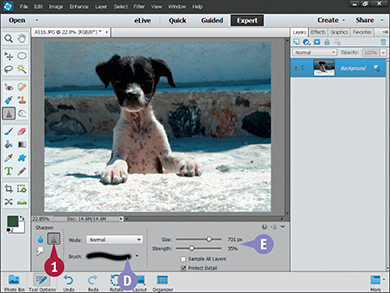
Click the Sharpen tool ( ).
).
The Sharpen tool shares space in the Tool Options panel with the Blur and Smudge tools.
D You can click the menu and choose a different brush.
E You can use these sliders to change the size and strength of the effect.

Click and drag the mouse pointer to sharpen an area of the image.
Photoshop Elements sharpens the area.
The effect is more obvious than the blur, and it is easier to see it working, but it is still a subtle effect.
TIPS
What is the Smudge tool?
The Smudge tool ( ) is another tool you can use to create interesting blur effects in your photos. It simulates dragging a finger through wet paint, shifting and smearing colors in your image. The Smudge tool shares space in the Tool Options panel with the Blur and Sharpen tools.
What does the Mode menu do?
In Normal mode, the tools change the image. In the other modes, they change texture of the image and also adjust color and/or contrast. The best way to understand the modes is to experiment with them. But because these are subtle tools, you can usually ignore these options.
Adjust Skin Color
You can improve skin colors that appear tinted or washed out or that were distorted by poor light. The Skin Tone Adjustment dialog box includes an eyedropper color sampler. Use it to select an area of skin as a color reference.
The adjustment tool uses the reference to guess a better skin tone and to correct other colors in the image. You often need to fine-tune the effect by adding or removing tan (orange) or blush (pink.) You can also shift the color between cool blue and a warmer red/orange.
Adjust Skin Color
In the Editor, click Expert.
Note: For more on opening the Editor, see Chapter 1.
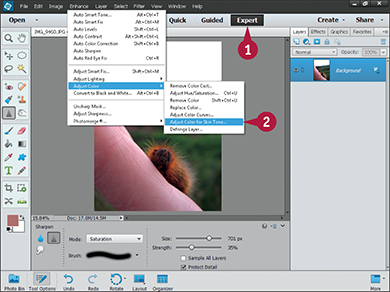
Click Enhance ⇒ Adjust Color ⇒ Adjust Color for Skin Tone.
The Adjust Color for Skin Tone dialog box opens.
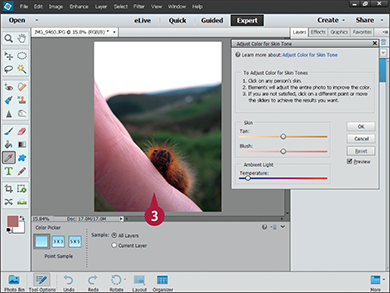
A The mouse pointer changes into an eyedropper.
Click an area of skin to use it as a color reference.
Note: This unusual example shows a close-up of a caterpillar on a model’s hand.
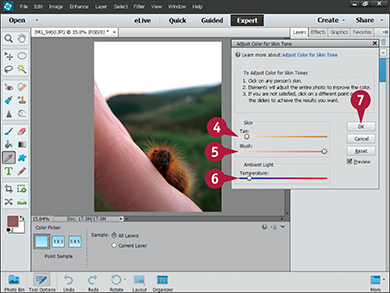
Click and drag the Tan slider to adjust the level of brown.
Click and drag the Blush slider to adjust the level of red/pink.
Click and drag the Temperature slider to adjust the overall coloring of the image.
Dragging to the left creates a cooler, bluish tint; dragging to the right casts a warmer, reddish tint.
Click OK.
Photoshop Elements adjusts the colors in the image. In this example, the result is slightly warmer and more orange than the original.
Note: Skin tone varies depending on ethnicity, location, and even whether or not a subject is feeling too hot or cold. Often, many interpretations are possible. The “right” adjustment is the one that works best for your photo.
Adjust Color with the Sponge Tool
You can use the Sponge tool to “paint” color adjustments onto your image. For example, you can make a person’s clothing more colorful, tone down the color in some objects but not others, or even remove the color from most — but not all — of the image.
You can adjust the size and softness of the brush to customize it. You can also “paint” multiple times to increase the effect.
Adjust Color with the Sponge Tool

In the Editor, click Expert.
Note: For more on opening the Editor, see Chapter 1.
Click the Sponge tool ().
A If the Tool Options panel is not open, click here to open it.
The Sponge tool shares space with the Dodge and Burn tools.
B You can click this menu to select a different brush.
C You can click and drag the slider to change the brush size and flow.
Click the menu, and select Desaturate.

Click and drag the mouse pointer to tone down or remove color from the image.
Note: Even with 100% flow, you need to paint over an area a few times before the color disappears.
In this example, all the limes but one lose their color.
To confine the effect to a particular area, you can make a selection prior to applying the tool. See Chapter 6 for more on making selections.
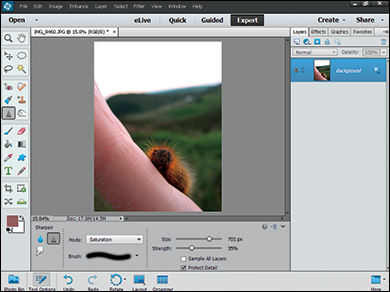
Increase Saturation
Perform steps 1 to 3 in the subsection “Decrease Saturation.”

Click the menu, and select Saturate.

Click and drag the mouse pointer to increase the saturation of an area of the image.
Note: You can also click areas instead of painting them.
In this example, the colors in the fish become more saturated.
Replace a Color
You can use the Replace Color feature to alter a color range in your image. First, click the image to select a color. Next, use a Fuzziness slider to include a range of similar colors. You can also use eyedroppers to add or remove colors. Finally, modify the colors with hue, saturation, and lightness sliders.
Colored objects often have fringes and shadows, and colors can also spill across objects. It is not always easy to get a good result with this tool. It can take several attempts to create an effect that looks natural.
Replace a Color
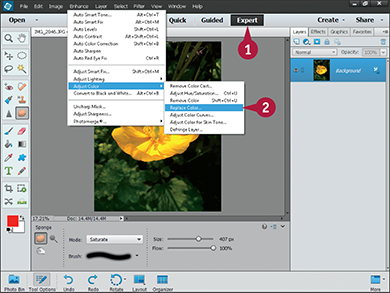
In the Editor, click Expert.
Note: For more on opening the Editor, see Chapter 1.
Click Enhance ⇒ Adjust Color ⇒ Replace Color.
The Replace Color dialog box opens. The mouse pointer changes to an eyedropper.
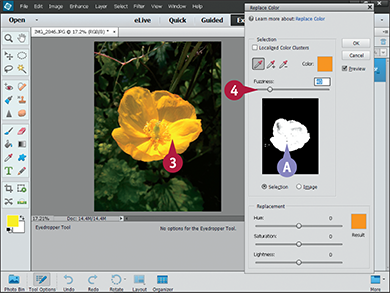
Click in the image to select the color you want to change.
A The preview area shows where that color appears in the image.
Click and drag the Fuzziness slider to add or remove similar colors.
You can also type a value for the fuzziness.
The white areas in the preview expand or shrink to show the selected color range in the image.

Click and drag the Hue slider to change the color.
Click and drag the Saturation slider to change the intensity of the color.
B You can click and drag the Lightness slider to change the lightness/darkness of the color, but you do not often need to do this.
You can also type values for the hue, saturation, and lightness.
Click OK.
Photoshop Elements replaces the selected color range.

TIPS
How can I replace more than one area of color?
You can press  and then click inside your image to add other colors to your selection. The white area inside the preview box expands as you click. To deselect a color, press
  (
( on a Mac) and click the color inside the image.
How can I avoid color spill?
Colors often spill across objects. Selecting colors in a foreground object sometimes selects the same colors in background areas you do not want to change. To avoid this, paint a selection around your object before using this tool. See Chapter 7 for more about selections.
Turn a Color Photo into Black and White
You can remove the colors from an image to create a black and white photo. The Convert to Black and White tool includes a range of creative options. You can use them to add drama or to change the light/dark balance for other creative reasons.
You may want to save the original color image and various versions of the black and white image as you work. See Chapters 2 and 3 for more about saving and viewing versions.
Turn a Color Photo into Black and White
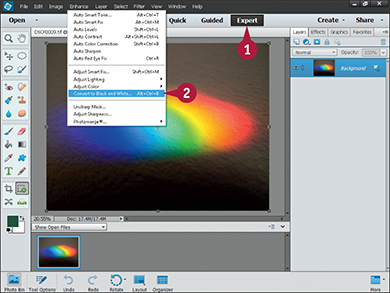
In the Editor, click Expert.
Note: For more on opening the Editor, see Chapter 1.
Click Enhance ⇒ Convert to Black and White.
The Convert to Black and White dialog box opens.
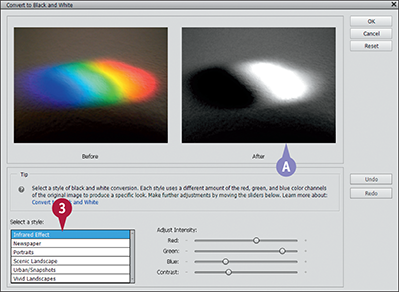
Click any style in the list to select it.
A Photoshop Elements displays a preview of the black and white version.
Note: Each style creates a different effect by varying the brightness of red, green, and blue separately and setting the overall contrast.

B You can click and drag the sliders to set the lightness/darkness of red, green, and blue manually.
C You can also click this slider to increase or decrease the contrast.
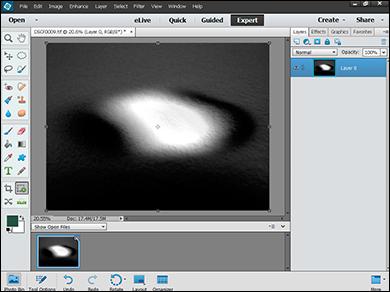
Click OK.
Photoshop Elements converts the image to black and white.
This example shows the result with the green slider set to maximum and the other sliders moved toward the left.
Add Color to a Black and White Photo
You can enhance a black and white photo by adding color with the painting tools in Photoshop Elements. For example, you can add color to a baby’s cheeks or to articles of clothing. You can also simulate the hand-tinted color effects used in vintage photos.
Hand-tinting is an artistic process, so you may need to try different colors and opacities before you create a good result. For many photos, an opacity of less than 30 percent works colors with less than 50 percent saturation can work well. Brighter saturated colors can look garish and unconvincing.
Add Color to a Black and White Photo

In the Editor, click Expert.
Note: For more on opening the Editor, see Chapter 1.
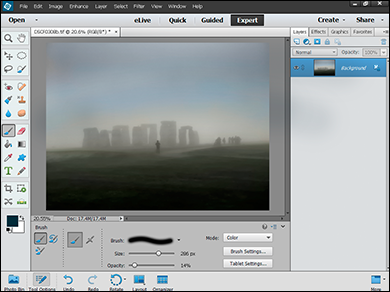
Click the Brush tool ( ).
).
A You can click this menu to select a different brush preset.

Click the foreground color box, and select a color using the color picker dialog box that appears.
For more about setting the foreground color with the color picker, see Chapter 11.
Click the blending mode menu, and select Color.
This sets up the brush tool so it paints colors over the black and white content.

Click and drag the slider to set the brush size.
Use a large brush to cover a large area with a few strokes and a small brush to fill in details.
Click and drag the slider to set the opacity of the color.
Click and drag to paint a color onto the image.
B You can repeat steps 2 to 7 to paint more colors onto the image.
Photoshop Elements creates a tinted image.
Adjust Colors by Using Color Curves
You can make your images look less muddy and more punchy by using the Color Curves dialog box. The tool graphs the relationship between shadows, midtones, and highlights. You can change the shape of the graph to improve your image.
The dialog box includes a small selection of presets. Click a preset to select it. For the best results, use the sliders to adjust the graph manually. Note that you cannot click and drag points on the graph directly. You must use the sliders to change the shape.
Adjust Colors by Using Color Curves

In the Editor, click Expert.
Note: For more on opening the Editor, see Chapter 1.
Click Enhance ⇒ Adjust Color ⇒ Adjust Color Curves.
The Adjust Color Curves dialog box opens.

Click a style preset.
A The curve changes to match the new setting.
B The window previews the result.
In this example, choosing the Increase Contrast style gives the graph a slight S shape.

C You can click and drag the four sliders to fine-tune the result.
Click OK.
Photoshop Elements applies the adjustment to the image.

Apply the Auto Smart Tone Tool
You can use the Auto Smart Tone tool to improve lighting and contrast. Auto Smart Tone combines Levels, Shadows/Highlights, Brightness/Contrast, and Curves corrections introduced earlier in this chapter, and hides the details behind a simple and intuitive interface.
To use the tool, click the grid and drag the mouse in any direction. Each corner of the grid has a preview to show how each direction changes the image. A bigger active preview appears behind the grid.
Apply the Auto Smart Tone Tool

In the Editor, click Expert.
Note: For more on opening the Editor, see Chapter 1.
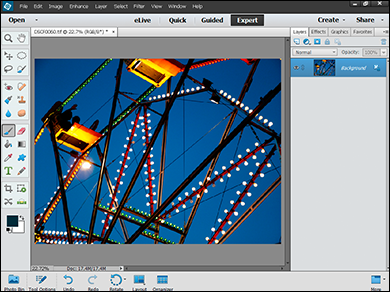
Click Enhance ⇒ Auto Smart Tone.
The Auto Smart Tone interface appears.
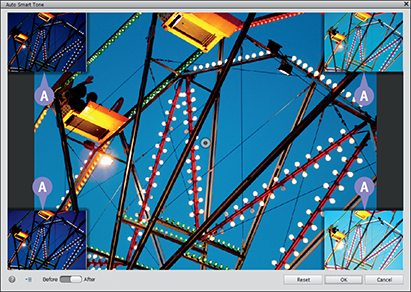
A Thumbnails in each corner show how the photo changes as you drag the cursor toward them.

Click and drag the cursor.
B A grid appears to help you gauge dragging distances.
Dragging from upper left to the lower right changes the lightness.
Dragging from the upper right to the lower left changes the contrast.
Click OK.
Photoshop Elements corrects the image.
TIPS
What does the dialog menu do?
You can click the dialog menu ( ) and select Learn from this correction to tell Photoshop Elements to remember your edit. If you load another photo and use the tool again, Photoshop Elements remembers the previous cursor position. You can also deselect Show corner Thumbnails to hide the thumbnails.
What does the Before/After switch do?
If you set this switch to Before, you can see the unedited image. This is not usually useful while editing, but you can use it to compare edited and unedited versions of the image when you find a setting you like.