Chapter 8
Enhancing and Retouching Photos

Do you need to fix a photo fast? This chapter offers quick-fix techniques for retouching digital photos. You can correct color problems, remove flaws, fix problems with perspective, and combine elements from different photos.
Retouch with the Clone Stamp Tool
Quickly Fix a Photo
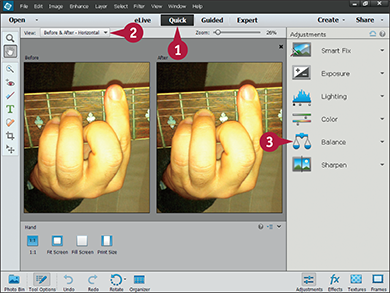
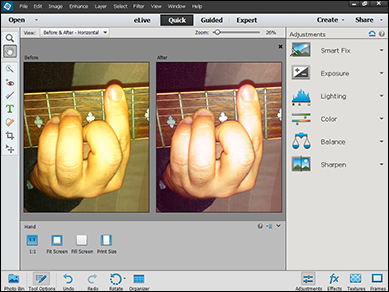
You can use the Quick mode in Photoshop Elements to make instant corrections. You can adjust lighting, contrast, color, and focus. You can also see Before and After views of your edits.
The Quick mode pane includes a selection of tools designed for ease of use. The Smart Fix tool automatically corrects lighting, color, and contrast; the Exposure and Levels tools fix lighting problems; the Color and Balance tools fix color problems; and the Sharpen tool sharpens photos.
Quickly Fix a Photo
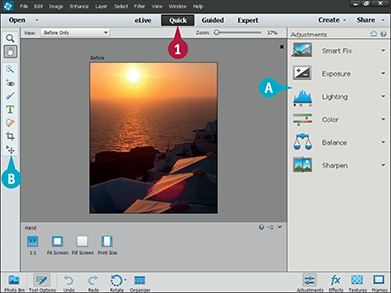
 In the Editor, click Quick.
Note: For more on opening the Editor, see Chapter 1.
A Quick mode opens, and the Quick mode pane shows a selection of quick-fix retouching tools.
B You can use the items in the toolbar to zoom/drag the image and perform basic edits such as cropping, adding text, and removing red-eye. For details, see Chapter 5.
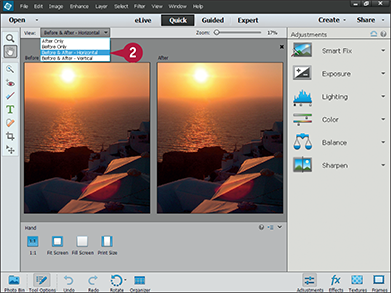
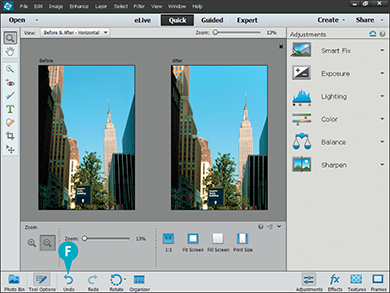
 Click the menu to see a selection of view modes, and select Before & After - Horizontal.
The After Only view shows your photo after editing.
The Before Only view shows your photo before editing.
The Before and After views show both. Horizontal mode places the images side by side; Vertical mode places them on top of each other.
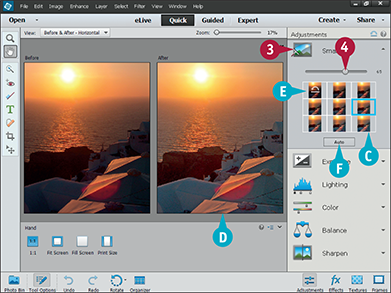
 Click Smart Fix.
The Smart Fix tool opens.
 Click and drag the slider to improve the image.
C You can also click a thumbnail.
D Photoshop Elements makes immediate adjustments to the lighting, contrast, and colors in the image.
E You can click the reset thumbnail to return to the original settings.
F You can click Auto, and Photoshop Elements applies a “best guess” setting.
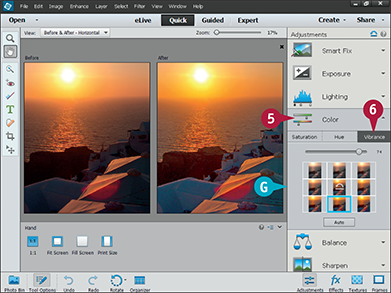
 Click the Color tool.
 Click Vibrance.
Note: The Vibrance tool always boosts colors in a more natural way than the Saturation tool.
G You can use the thumbnails, slider, auto, and reset buttons to enhance the color in the image.
Photoshop Elements enhances the image.
You can follow similar steps to use the other Adjustments to improve exposure, lighting, sharpness, and overall balance.
TIPS
Why does Photoshop Elements duplicate the same edit options elsewhere?
Quick mode is designed for quick edits. It gives you simple tools that apply useful edits. The items in the Enhance menu and in Expert mode offer more control over similar edits, but they give you more options and finer control.
How can I improve the look of teeth in Quick mode?
You can use the Whiten Teeth tool ( ). Click and drag the tool over a smile; it selects the teeth and whitens them all at once. The result is similar to using the Quick Selection tool (see Chapter 6) to select the teeth and then applying the Dodge tool (see Chapter 9) to lighten them and the Sponge tool (see Chapter 9) to remove any colorcast.
Remove Red Eye
You can use the Red Eye Removal tool to remove red eye — a common problem in photos taken with a flash. The red color appears because light bounces off the blood vessels at the back of the eye. Animal eyes can show a similar effect, but the color may be yellow, blue, or green.
With the Red Eye Removal tool, you can fix eye color without changing the shape of the eyes. The tool paints a dark circle over red areas and adds a small highlight. It includes an option for fixing the eyes of pets and other animals.
Remove Red Eye
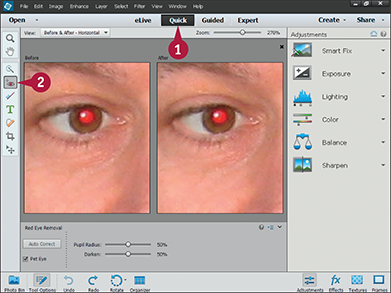
In the Editor, click Quick.
Quick mode opens.
Note: For more on opening the Editor, see Chapter 1.
Click the Red Eye Removal tool ( ).
).
Note: This tool is also available in Expert mode.
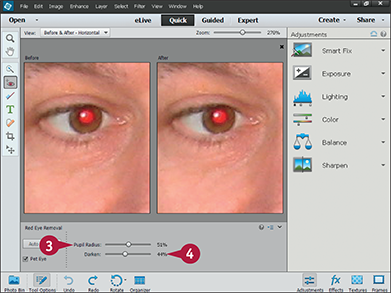
Click and drag the slider to set the size of the area you want to fix.
Click and drag the slider to the adjust how much the tool replaces red areas with black areas.
Note: You often need to experiment with these values until you get a good result.

Click the pupil of the eye you want to fix.

A Photoshop Elements repairs the color.
B If you need to try again with different settings, you can click Undo to undo the color change.
TIPS
My pet photos have a yellow, blue, or green eye problem. How do I fix this?
Click the Red Eye Removal tool (), and then click Pet Eye in the Tool Options panel ( changes to
  ). You can then use the tool to remove the colors that can sometimes appear in non-human eyes.
How can I get a more natural result?
For a better effect, select Expert mode, create a selection for the red area, and select Enhance ⇒ Adjust Color ⇒ Remove Color. Then use Enhance ⇒ Adjust Lighting ⇒ Levels to darken the pupil while leaving any highlights. Manual fixes take much longer but often look more realistic.
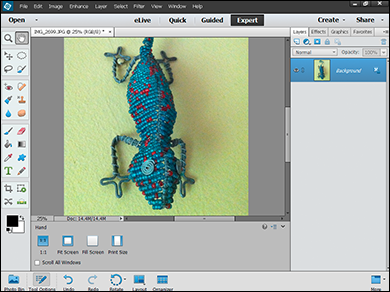
Retouch with the Clone Stamp Tool
You can clean up flaws or erase elements in your image with the Clone Stamp tool. The tool copies — “clones” — part of an image. You can then paste — “stamp” — the detail to a different area. To remove blemishes, you often clone the area around the blemish to cover it.
You can adjust the opacity of the tool to let some of the original detail show through. Copying from multiple areas in an image is often a good way to remove an unwanted object. For good results, clone areas with matching textures, and try not to break or distort lines and edges.
Retouch with the Clone Stamp Tool
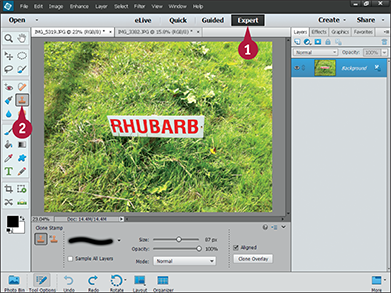
In the Editor, click Expert.
Note: For more on opening the Editor, see Chapter 1.
Click the Clone Stamp tool ( ).
).

A You can click the menu to choose a brush size and type.
B You can also click and drag the slider to change the brush size.
You can change the brush size by pressing  and
and  .
.
C You can click and drag the slider to set the opacity (transparency) of the cloned copy.
A setting of 100% opacity is completely opaque and does not allow any of the original content to show through.
Note: Experiment with the default settings before changing them.
Press and hold  (
( on a Mac), and then click the image to set the content to be cloned.
In this example, the Clone Stamp removes a sign by cloning the grass around it.
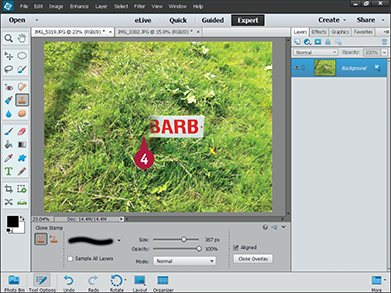
Click and drag the area of the photo that you want to correct.
Photoshop Elements copies the cloned area to where you click and drag.

Continue clicking new areas to clone and dragging over the area as many times as needed to achieve the desired effect.
Photoshop Elements replaces old content with cloned content.
Note: Long strokes can copy content from areas you do not want. Short strokes can create repeating textures. Try to avoid obvious artifacts. You may have to make a few attempts before you get a good result.
C You can click Undo to undo the tool’s effects.
TIPS
How can I make the Clone Stamp’s effects look seamless?
To erase elements from your image with the Clone Stamp without leaving a trace, try the following:
• Clone between areas of similar color and texture.
• To apply the stamp more subtly, lower its opacity.
• Use a soft-edged brush shape.
What can I do with the Pattern Stamp?
You can use the Pattern Stamp tool ( ), which shares space in the Tool Options panel with the Clone Stamp tool (), to paint repeating patterns on your images. You can select a pattern, brush style, and brush size, and then stamp the pattern on your photo by clicking and dragging.
Remove a Spot
You can use the Spot Healing Brush to quickly repair flaws or remove small objects in a photo. The tool works well on small spots or blemishes on both solid and textured backgrounds. For good results, adjust the brush size to cover the feature you want to remove.
The tool’s Proximity Match analyzes pixels surrounding the selected area and replaces the area with a patch of similar pixels. The Create Texture setting replaces the area with a blend of surrounding pixels. The Content Aware setting, which is often the most useful, is similar to Proximity Match but recognizes and keeps patterns in the surrounding pixels.
Remove a Spot

In the Editor, click Expert.
Note: For more on opening the Editor, see Chapter 1.
Click the Spot Healing Brush tool ( ).
).
A You can click the menu to choose a brush size and type that will cover the spot.
B You can also set a brush size by clicking and dragging the slider.
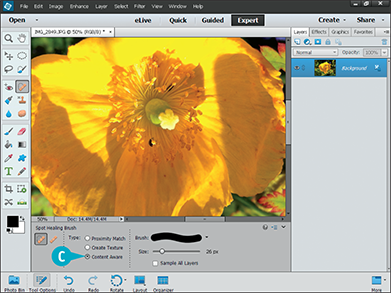
C You can use the radio buttons to select the type of healing effect.
The Content Aware option is often a good choice.
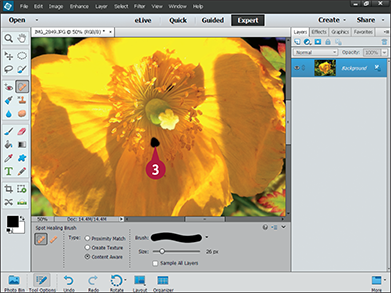
Click and paint the spot you want to correct.
Photoshop Elements covers the spot with black as you draw.
Note: The black is a temporary marker. It is not painted permanently onto the image.
Release the mouse.

D Photoshop Elements selects nearby pixels and replaces the area you painted on.
E You can click Undo to undo the change.
TIP
What is the difference between the Spot Healing Brush and the Healing Brush?
The Spot Healing Brush tool () works on small areas. The Healing Brush tool ( ) works like a version of the Clone Stamp tool (). Instead of copying from a source area, it uses the pixels as guide and copies related content. To use the Healing Brush tool, press and hold ( on a Mac) and click the area you want to use as a source. Click and drag over the problem area to blend the cloned pixels into the new area.
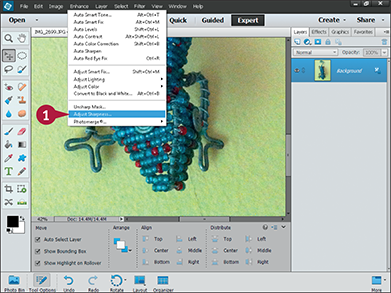
Sharpen an Image
You can use the Adjust Sharpness dialog box to sharpen an image. This tool can improve soft images, but it is not a complete cure for focus problems. It cannot transform a badly blurred image into a sharp one.
Sharpening can bring out grain and noise in image. You often need to adjust the amount of sharpening to get a good balance between noise and sharpness.
Sharpen an Image
In the Editor, click Expert.
Note: For more on opening the Editor, see Chapter 1.
Click Enhance ⇒ Adjust Sharpness.
The Adjust Sharpness dialog box opens.

A You can click Preview to preview the effect in the main window ( changes to .)
B You can click plus or minus ( or
or  ) to zoom in and out.
C You can set the Amount slider to control the intensity of the effect.
D You can set the Radius slider to make the effect bigger or smaller.
Note: If you set a large radius and a high intensity, the effect creates haloes and blobs of color.
E You can click the menu to fix different types of blur. The Gaussian Blur option applies sharpening across the image. Lens Blur sharpens details. Motion Blur removes blur caused by camera or subject motion and includes a control to set the direction.
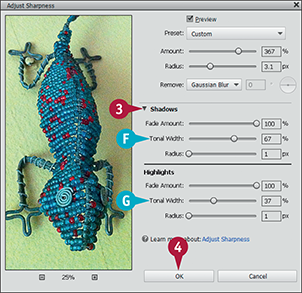
If you have applied a large amount and a high radius and the image looks unrealistic, click Shadows/Highlights.
The dialog box expands and shows further options for Shadows and Highlights.
F You can increase the Tonal Width slider to make the effect look more natural around dark areas.
G You can increase the Tonal Width slider to make the effect look more natural around bright areas and to minimize “salt and pepper” noise.
Photoshop Elements applies the enhancement.
Note: For good results, avoid adding artifacts and noise.
Remove a Color Cast
You can use the Balance tool to fix a color cast. Photos can have a color cast when a camera is set up incorrectly — for example, when it is set to take photos in daylight but you are shooting indoors.
The Balance tool applies two color shifts — red to blue, and green to pink. Use a red-to-blue shift to correct for indoor/outdoor colors, and use the green-to-pink shift to fix skin tones.
Remove a Color Cast
In the Editor, select Quick mode.
Note: For more on opening the Editor, see Chapter 1.
Use the menu to select simultaneous Before & After previews.
For details, see the Quickly Fix a Photo section in this chapter.
The Balance Adjustment panel opens.
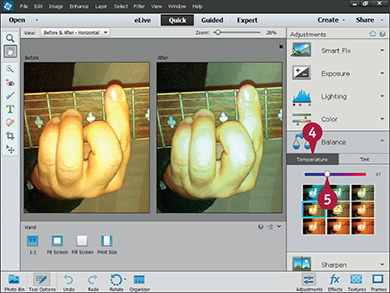
Click Temperature.
Use the slider to correct the red/blue balance.
Note: This example looks orange, so it needs more blue and less red.
Note: If skin tones look pale after this step, you can correct them in the next step.
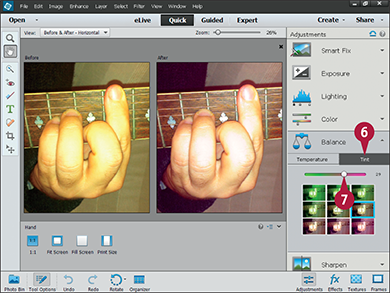
Click Tint.
 Use the slider to correct the green/pink balance.
Note: This example looks green and unhealthy after the previous correction, so it needs more pink.
Photoshop Elements applies the correction.
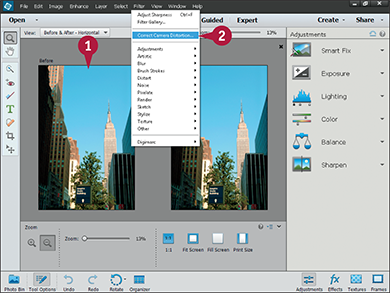
Fix Keystone Distortion
You can use the camera distortion tools in Photoshop Elements to fix perspective problems. Keystoning appears when you take a photo by tilting your camera and can make buildings look like they’re leaning.
You can use the Correct Camera Distortion tool to stretch and squeeze an image to remove this distortion. The tool includes a vignette — lens shadow — option that can fix the darker areas at the edges of an image introduced by cameras or lenses.
Fix Keystone Distortion
In the Editor, open a photo that has keystone distortion.
Note: For more on opening the Editor, see Chapter 1.
Click Filter ⇒ Correct Camera Distortion.
The Correct Camera Distortion window opens.
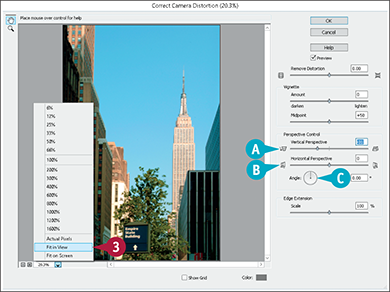
Click the menu, and select Fit in View.
Note: For good results, view the complete image while correcting perspective.
A You can click and drag the slider to correct vertical distortion.
Photoshop Elements tilts the image up and down around a horizontal centerline.
Note: Use this feature to fix vertical lines.
B You can click and drag the slider to correct horizontal distortion.
Photoshop Elements tilts the image left and right around a vertical centerline.
Note: Use this feature to balance left and right perspective.
C You can click and drag the Angle tool to rotate the image.
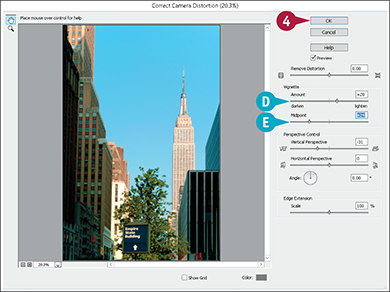
D You can click and drag the slider to lighten or darken the corners of the image.
E You can click and drag the slider to adjust the overall lightness.
Click OK.
Note: This example fixes some very subtle darkening introduced by the camera lens.
Photoshop Elements corrects the perspective in the photo.
F You can click Undo to undo the correction.
TIPS
How can I use the Perspective command to correct buildings with keystone distortion?
In some cases, you may want to have more control over how you correct an image. Click Image ⇒ Transform ⇒ Perspective. Handles appear on the edges and corners of the image. Drag the top corner handles outward and the lower corner handles inward to fix the distortion. Click  or press
  to confirm your changes.
Why does the perspective still look wrong?
If you have many different vertical elements in an image, it can be impossible to get them all pointing in the same direction. Some images cannot be fixed.
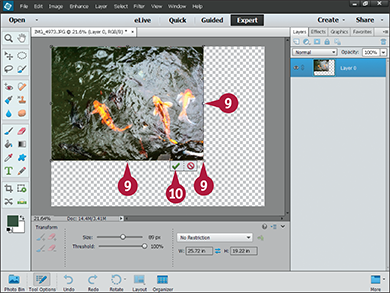
Recompose a Photo
You can recompose a photo to change its size while keeping important objects within it intact. Recomposition is an alternative to cropping for when you want to reduce an image’s size without trimming or deleting some of the content. For more on using the Crop tool, see Chapter 5.
Before you apply the Recomposition tool, you select areas of your photo that you want to keep by painting over them. You also paint over areas that you would prefer to eliminate. Photoshop Elements intelligently rearranges your selections as you resize the photo.
Recompose a Photo

In the Editor, click Expert.
Note: For more on opening the Editor, see Chapter 1.
Click the Recompose tool ( ).
).
Click the Mark for Protection button ( ).
).
Click and drag the slider to specify a brush size.
Note: The best size depends on the resolution of your image and the size of the objects you are keeping. Make the brush slightly wider than the objects.
Click and drag to paint a green protection mask over the objects and areas you want to keep.
Note: You do not need to paint accurately.

Click the Mark for Removal button ( ).
).
Click and drag the slider to specify a brush size.
 Click and drag to paint a red mask over areas and objects you do not want to keep.
Note: You can paint multiple areas. They can be in different parts of the photo.
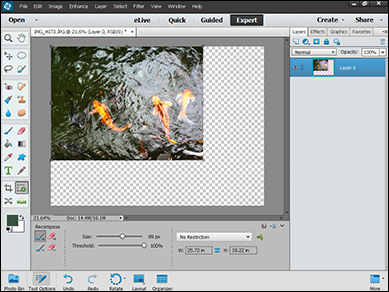
 Click and drag the side and corner handles to resize the image.
 Click or press to confirm your changes.
Photoshop Elements rearranges the objects and backgrounds in the image, keeping the objects you protected.
Note: You can now crop the image to remove the empty areas. See Chapter 5 for details.
TIPS
Can I edit the selection areas?
You can click Erase Highlights Marked for Protection ( ) and drag the mouse to remove part of the area you protected in steps 3 to 5. You can also click Erase Highlights Marked for Removal (
 ) to remove some of the area you selected for deletion in steps 6 to 8.
Why do I get a distorted result?
This tool works best when you use it with objects placed on an unvarying background, such as a beach, an area of water, or the sky. If the background changes — for example, if it is shaded or if the texture changes across it — the tool may not give a seamless result. You can sometimes fix this with the clone and healing tools introduced earlier in this chapter.
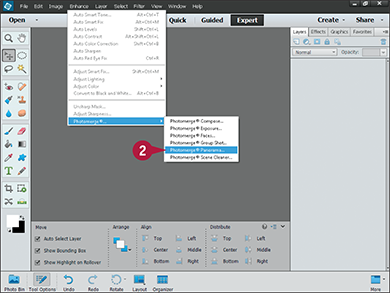
Create a Photo Panorama
You can use the Photomerge Panorama feature to stitch several images together into a single panoramic image. Photoshop Elements can find the common features in the photos, arrange them in order, and paste them into a single wide image. Use this feature to create wide landscapes or unusually detailed location shots.
You can specify how the images are merged, or you can leave Photoshop Elements to guess the best option for you. Optionally, you can fill any space left at the sides of the panorama with computer-generated content.
Create a Photo Panorama
Before starting, copy the images you want to use into a separate folder on your hard drive.
Note: This step avoids a bug in the software. Do not try to load the images from the Organizer or the Editor Photo Bin.
In the Editor, click Enhance ⇒ Photomerge© ⇒ Photomerge© Panorama.
The Photomerge dialog box opens.

Select one of the Layout options.
Note: Auto is a good first choice. You can experiment with the other options if Auto does not give a good result.
Click Browse (not shown).
The Open dialog box opens.
Navigate to the folder that contains your images and open it.
Select all the files in it.
Click Open.

A The filenames of the images appear in the Source Files list.
Click OK to build the panoramic image.
Photoshop Elements merges the images into a panorama.
Note: The process goes through various stages and can take a few minutes.

B The images are combined into layers and masks.
Note: For more about layers and masks, see Chapter 13.
C The stitching process can leave empty areas around the panorama.
D In the Clean Edges dialog box that appears, you can click Yes to automatically fill in the edges.
Note: Alternatively, you can crop the panorama to a rectangle if you have enough space around it.
Photoshop Elements combines the photos into a panorama.