Chapter 5
Applying Basic Image Edits
Are you ready to start working with images? This chapter shows you how to fine-tune your workspace. You also learn how to resize your image, crop it to remove unwanted content, and make speedy edits in Quick mode.
Manage Open Images
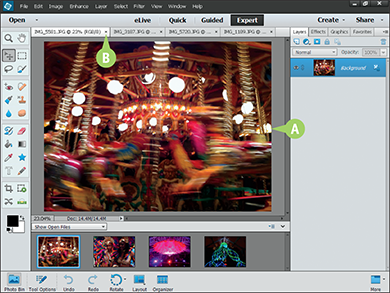
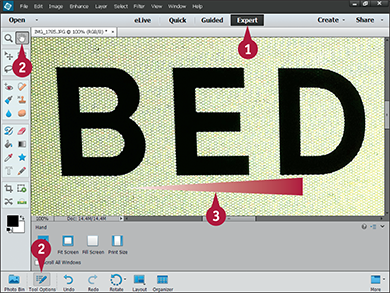
Each image you open in Photoshop Elements appears in its own window. A single window gives you the maximum space for editing, but you can have many windows open at once to compare images or copy content between them.
In Expert mode, you can use tabs at the top of each window to switch between images. Each tab lists the name of the image file, the current magnification, and the image mode. You can also use the Photo Bin or Window menu to switch between different open images. This switching works in all three modes — Quick, Guided, and Expert.
Manage Open Images
Using Tabs

 In the Editor, click Expert.
 Open two or more images.
Note: For more on opening the Editor, see Chapter 1. For more on opening image files, see Chapter 2.
A The Editor preview area shows the currently selected image ready for editing.
B Tabs for each image appear here and show the filename and display magnification (zoom).
 Click a tab to select a different image in the preview area.
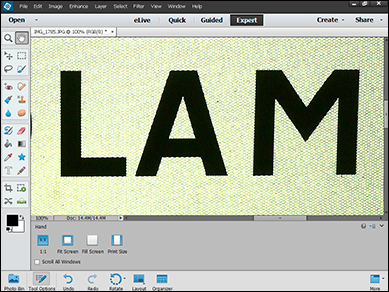
Using the Photo Bin
The Photo Bin usually displays thumbnails (small versions) of all the images open in the Editor.
Note: See the tip for more on how to display other images in the Photo Bin.

A If the Photo Bin is closed, you can click Photo Bin to open it.
Double-click a thumbnail.
The photo becomes active.
Using the Window Menu

Click Window.
A The photo becomes active.
B You can click  to close a tab.
Closing a tab also closes its image in the Editor.
Note: If you loaded the files from the Organizer, closing all open tabs closes the Editor. If you open files directly into the Editor, it remains open.
TIPS
How do I load more than one file at once?
You can use  +click (
 +click on the Mac) or
  +click to select more than one image in the Organizer. If you click the Editor button in the toolbar, all the images are loaded into the Editor.
How do I display images from the Organizer in the Photo Bin?
By default, the Photo Bin shows open files. Click the menu above the photo at the left of the bin to change this. Click an album name to load thumbnails of the photos in the album. Click Show Files Selected in Organizer to tell the Photo Bin to load files as soon as you as click them in the Organizer. This option can save a step, but it forces you to switch between the Organizer and Editor.
Using Layouts
You can use layouts to view more than one image at a time in the Editor. Layouts can arrange images in columns, in a grid, or in rows. You can use this option to compare images or to select and copy content between them.
When viewing multiple images at once, only one of the windows is active. Choose the active window by clicking its tab, clicking inside the window, or selecting the image from the Photo Bin or the Window menu.
Using Layouts

Click Layout.
Photoshop Elements displays a menu of layouts.
Select a layout from the menu.
Photoshop Elements displays multiple windows, each with a different image.
This example shows the All Columns option.

Click an image or a tab to select it.
A You can use the scroll bars to position each image in its window.
Note: You can also change the image magnification and move images with the Zoom ( ) and Hand (
 ) tools in the toolbar. For details, see the next two sections.

 Click Layout.
B You can click Column and Rows or Rows and Column to display three images at a time.
 Click one of the combined row/column layouts.
Photoshop Elements displays a split layout.

C You can click the tabs to select the image that appears in each layout area.
D You can click the arrows to see more windows.
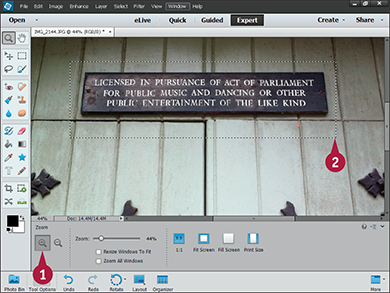
Using the Zoom Tool
You can use the Zoom tool to change the preview magnification. You can zoom in to view/edit fine details or zoom out to see the complete image. You can click the tool to zoom in or out, or you can set an exact zoom by typing a percentage into a box.
Zooming changes the magnification in the Editor preview area. It does not resize the image or add/remove pixels.
Using the Zoom Tool
Increase Magnification
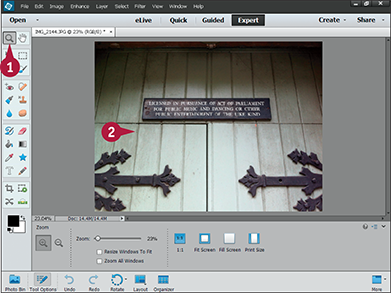
In the Editor, click the Zoom tool ().
You can also press  .
.
Note: For more on opening the Editor, see Chapter 1.
Photoshop Elements increases the magnification of the image. By default, the Zoom tool zooms in when you click the image.
The current magnification shows in the image title bar and the Tool Options panel.
The Tool Options panel is available only in Expert mode.

A You can change the zoom by clicking and dragging the slider in the Tool Options panel.
B You can change the zoom by clicking the percentage box and typing a new value, followed by %, followed by  .
.
Decrease Magnification

Click the Zoom Out button ( ).
).
You can also press and hold  (
( on a Mac).
Click the image.
Photoshop Elements decreases the magnification of the image.
Click the Zoom In button ( ).
).
Click and drag with the mouse pointer to select an area.
The area appears magnified.
The more you zoom in, the larger the pixels appear and the less you see of the image’s content.
TIPS
What is the quickest way to reset the magnification to 100%?
Double-click the Zoom tool. But you may find the Fit Screen option more useful. Click the Fit Screen button when the Zoom tool options are open. You can also click + (+ on a Mac) on the numbers on your keyboard, not on the keypad.
Why do lines and details disappear at different magnifications?
The calculations Photoshop Elements uses to resize the image on the screen have to work very quickly. They are not as sophisticated as the slower math used to stretch or shrink an image when you resize the canvas. If an image has fine lines or text, they can vanish or double in thickness if the zoom factor is not 100%. If this happens in your image, set the zoom to 100% to check if the problem disappears.
Pan the Image
When an image is too big to fit into the Editor preview area, you can use the Hand tool to drag it within the window. You can also use scroll bars to move the image left and right or up and down. This is called panning the image.
Use the Hand tool to look at details in an image at high zoom. If you have a small monitor, you must use this tool to pan your images so you can see them with adequate detail.
Pan the Image
Using the Hand Tool
In the Editor, click Expert.
Note: For more on opening the Editor, see Chapter 1.
Click the Hand tool ().
You can also press  .
.
Note: The Hand tool works only if the image is magnified and does not fit into the Editor preview area.
Click and drag inside the image window.
The view of the image shifts inside the window.
Using the Scroll Bars

Click and drag the horizontal scroll bar to move the image left or right.
Click and drag the vertical scroll bar to move the image up and down.

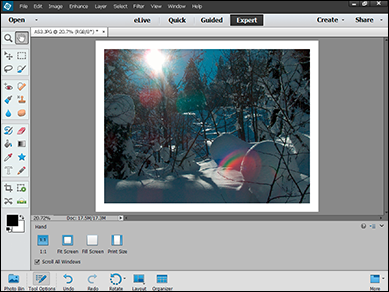
Click the Fit Screen button.
Photoshop Elements resets the magnification to fit the entire image into the Editor preview area.
The Hand tool does not work at this magnification. Clicking and dragging has no effect.
Change the Canvas Size
You can change the canvas size to crop an image or add a one-color frame — sometimes called a mat or matte (mount in the U.K.) — around it. Changing the canvas size is like making a photo smaller by cutting off the edges with scissors or making it bigger by gluing card around it. The photo is not stretched or squashed.
Making the canvas smaller than the photo crops it by cutting away the edges. Photoshop Elements warns you when this happens. Making the canvas bigger adds colored space around it. The default color is white, but you can select some other color.
Change the Canvas Size

In the Editor, click Image ⇒ Resize ⇒ Canvas Size.
Note: For more on opening the Editor, see Chapter 1.
The Canvas Size dialog box opens.

A You can see the current photo/canvas dimensions here.
B You can click these menus to change the units of measurement.
C Check this box ( changes to
  ) to specify relative instead of absolute dimensions for the new canvas.
Note: In relative mode, you can specify how much you want the dimensions to change; Photoshop Elements works out the new dimensions for you. Negative numbers crop the canvas.
Type the new canvas dimensions.
This example uses relative mode to expand the canvas with a three-inch border.
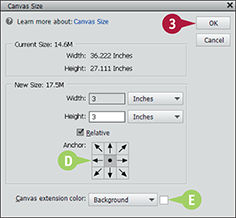
D You can click the arrows in these boxes to move the image after resizing the canvas.
Note: For example, the top-left arrow moves the image to the top left of the canvas: if cropping, this removes the content at the bottom and right of the photo.
Note: If you do not change the default, Photoshop Elements leaves the image in the center of the canvas.
E You can click this color picker to open a color selector and choose a new border color.
Note: This option works only when you increase the canvas size. It does nothing when cropping.
Note: For more about using a color selector, see Chapter 11.
Click OK.
Note: If you decrease a dimension, Photoshop Elements displays a dialog box asking whether you want to proceed. Click Proceed.
Photoshop Elements changes the image’s canvas size.
In this example, the canvas is resized to add a symmetrical three-inch border around the image.
Resize an Image by Resampling
You can resample an image to make it bigger or smaller — for example, to save a version of a large photo optimized for a web page or to make a large high-quality print.
Resampling squeezes or stretches the image like a rubber sheet. It also changes the canvas size. Because the image is “pinned” to the corners of the sheet, resampling does not crop the image or add a border. Resampling always loses detail. If you expand or shrink an image by more than a factor of two, sharp features become soft.
Resize an Image by Resampling

In the Editor, click Image ⇒ Resize ⇒ Image Size.
Note: For more on opening the Editor, see Chapter 1.
The Image Size dialog box opens.

A You can see the current image dimensions here.
B You can click these menus to change the width and height units.
To resize by a certain percentage, click the menu and select Percent.
Make sure Resample Image is checked ().
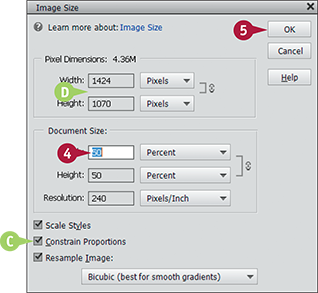
C You can uncheck Constrain Proportions ( changes to ) if you want to stretch the width and height by different amounts.
Note: You can do this, but you do not usually need to.
Type a percentage here.
Note: A setting of 50% halves the width and height, and a setting of 200% doubles the width and height.
Note: When Constrain Proportions is checked (), typing a number into the width box copies it to the height box, and vice versa.
D Photoshop Elements calculates the new dimensions and shows them here.
Photoshop Elements resizes the image.
In this example, the image is resampled to half its original size.
Note: If you zoom in to magnify the image, you will see that it is less sharp than the original.
Crop an Image
You can use the Crop tool to remove unwanted content around the edges of an image. Cropping can help you remove clutter. You can also use it to reposition a subject in the photo frame. Note that cropping a photo cuts off content around the sides of the image and shrinks the canvas size.
When use the Crop tool, it suggests possible cropping options. You can accept these suggestions or set up a crop manually.
Crop an Image

In the Editor, click Expert.
Note: For more on opening the Editor, see Chapter 1.
Click the Crop tool ( ).
).

A You can click and drag to select a crop area.
B Photoshop Elements shows the selected area as you drag.
C Photoshop Elements shows the dimensions of the area.
When you release the mouse, the crop preview appears.

D You can click the menu to select an aspect (height/width) ratio for the crop suggestions.
Note: The ratios match popular photo formats and standard print sizes.
Note: You can set a different aspect ratio by typing numbers into the W (Width) and H (Height) boxes.
E Click one of the Crop Suggestions to show it in the preview area.
Fine Tune the Crop

F You can click and drag the corners of the preview to fine-tune the crop. You can also hover over a corner to rotate the crop.
G You can drag the crop area to reposition it on the photo.
H You can type a number here to resample the image at the same time as you crop it.
Note: Use the Resample dialog box for better results. See the “Resize an Image by Resampling” section for details.
I You can click these buttons to select a different preview grid to help you position and resize the crop.
Click the  to crop the photo.
Photoshop Elements crops the image, shrinking the photo to the boundary you select.
TIP
What does the Cookie Cutter tool do?
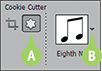
Select the Cookie Cutter tool (A), and click the menu (B) to select a shape. You can now crop your photo to the shape, instead of to a rectangle. You can drag the shape to position it over the photo before you confirm the crop.
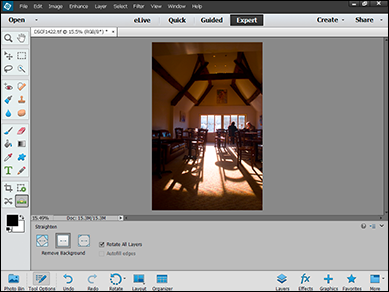
Straighten an Image
You can use the Straighten tool to fix a slanted horizon. The Crop tool includes a similar feature, but the Straighten tool is easier to work with. Typically, you straighten an image and then crop it to match an aspect ratio.
To use the tool, select it and draw a line along the horizon or some other horizontal feature in a photo. Note that some photos need extra editing to correct for curves introduced by the lens or perspective distortions such as keystoning, which is described in Chapter 8.
Straighten an Image

Note: For more on opening the Editor, see Chapter 1.
Click the Straighten tool ( ).
).
Click the Remove Background option.
Note: You can also select Crop to Original Size and click the AutoFill Edges check box ( changes to ).
Click and drag along a horizon line or other horizontal feature.
Photoshop Elements rotates the image and crops the corners.
If you selected AutoFill Edges, Photoshop Elements fills in extra content at the edges to avoid white space.
Note: Some photos have multiple conflicting horizontals and verticals. You may need to try different versions to see which works best.
Rotate an Image
You can use a selection of tools and options to rotate an image. The simplest option rotates your photo by 90 degrees left or right. You can use this tool to correct the orientation of phone camera shots.
You can also use the Image ⇒ Rotate menu to select a range of options. You can rotate an image by 180 degrees, flip it horizontally or vertically, or display a dialog box to rotate an image by any number of degrees.
Rotate an Image
To Rotate or Flip

In the Editor, click Expert.
Note: For more on opening the Editor, see Chapter 1.
A You can click the Rotate button to rotate an image 90 degrees to the left.
B You can click the menu triangle ( ) next to the Rotate button and select the Rotate Right option to rotate the image 90 degrees to the right.
C You can select Image ⇒ Rotate to select a range of other options.
To Rotate by an Arbitrary Amount

Select Image ⇒ Rotate ⇒ Custom.
Type a rotation angle into the dialog box.
Use the radio buttons to select left or right rotation.
Click OK.
Photoshop Elements rotates the image.
Note: Photoshop Elements creates a rectangle in the background color around the rotated image. To remove the corner wedges, use the Crop tool (.)
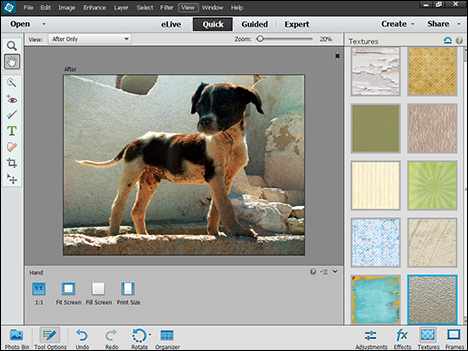
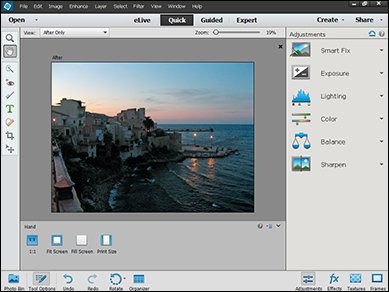
Work in Quick Mode
In Quick mode, you can enhance your photos using a simple interface that includes all the most useful tools. Use the Zoom and Hand tools to see details in your photo, and use the Quick Selection tool to select an area for editing. For more about these and the other tools in the Quick mode toolbar, see Chapters 8, 9, and 11.
Quick Mode includes a selection of quick editing tools in the panel at the right, with one-click presets and useful settings. For finer control, use Expert mode, which is described throughout the rest of this book.
Work in Quick Mode
In the Editor, click Quick.
Note: For more on opening the Editor, see Chapter 1.
Click the Zoom tool ().
Note: For more about the Zoom tool, see the section “Magnify with the Zoom Tool.”
Click and drag a box around an object or detail.
Photoshop Elements zooms the image and enlarges the detail.
A After zooming, you can click the Hand tool () to move your image within the image window.
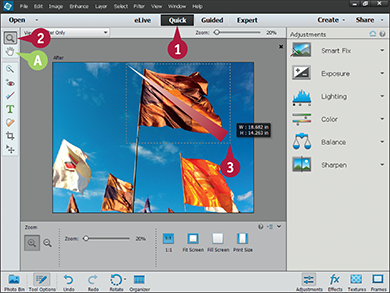
Select an Area for Editing

Click the Quick Selection tool ( ).
).
B You can set the brush size by dragging with the Size slider.
Click and drag over an object in your image.
For good results, select an object with strong edges and contrasting color against the background.
Repeat Step 2 until the entire object is selected.
C Photoshop Elements selects the object.
Note: For more about making selections, see Chapter 6.

Click a tool in the Adjustments panel.
The tool displays settings for adjusting a photo.
A Some tools include a number of tabs. You can click the tabs to select further adjustments.
B You can hover the mouse over a preset preview to see how it changes the image and click the preview to apply the change.
C You can click and drag the slider to make more precise changes.
If you have selected an object, the adjustments change only the object, not the background.
Photoshop Elements applies the changes.
This example uses the Hue slider to shift colors in the selected object.

D You can reset all adjustments and undo the change by clicking the Reset button ( ).
).
Note: To save your changes, see Chapter 2.
Apply an Effect in Quick Mode
You can apply a selection of preset effects in Quick mode. The effects change the tone and color of a photo to add atmosphere and character. Similar effects are very popular on social networking sites.
To use the effects, click the Effects panel to see a list of effects. Click an effect to see previews of possible variations. Click a variation to apply it to your photo.
Apply an Effect in Quick Mode
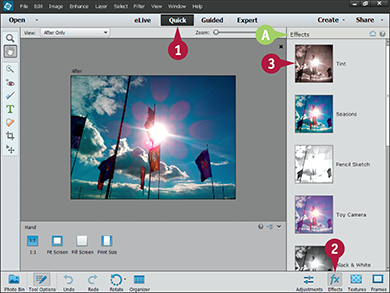
In the Editor, click Quick to enter Quick mode.
Note: For more on opening the Editor, see Chapter 1.
Click Effects.
A The Effects panel opens, listing example effects.
Click an effect.

Click the variations to see which works best.
Photoshop Elements applies the effect to your image.
C You can remove the effect by clicking the Reset button ().
Add a Frame in Quick Mode
You can add surrounding decoration to a photo by adding a frame. Quick mode offers a variety of frame styles to add elegance or whimsy to your project.
The frame effects are applied to the image as layers. If you switch to Expert mode and view the Layers panel after adding a frame, you can temporarily turn off the frame by hiding the frame layers. For more about layers, see Chapter 13.
Add a Frame in Quick Mode

In the Editor, click Quick to enter Quick mode.
Note: For more on opening the Editor, see Chapter 1.
Click Frames.
The Frames panel opens with a collection of border graphics.
Click a frame.
Photoshop Elements applies the frame to your image.
Note: You can drag the photo within the frame to position it. You can also drag the edges to stretch it or shrink it.
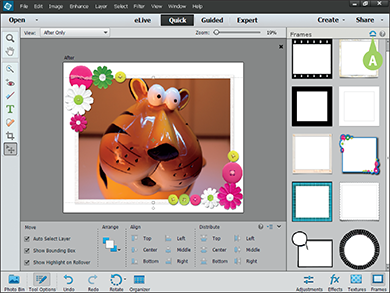
A To remove the frame, click the Reset button ().
Apply Automatic Enhancements
All of the standard Photoshop Elements enhancement tools are available in Quick mode. The tools have Auto versions that can apply easy one-click fixes.
To use the enhancements, click the Enhance item in the main menu and select one of the options. This section introduces a couple of the more useful enhancements. The more complex adjustable enhancements are described in later chapters.
Apply Automatic Enhancements
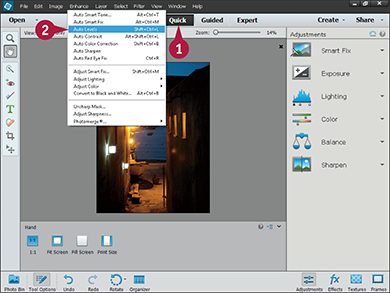
Auto Smart Fix
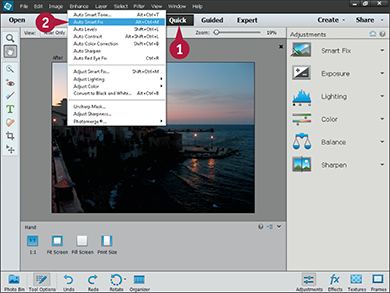
In the Editor, click Quick.
Note: For more on opening the Editor, see Chapter 1.
Click Enhance ⇒ Auto Smart Fix.
Photoshop Elements automatically fixes exposure and color.
Note: To adjust the effect, select Enhance ⇒ Smart Fix and drag the slider in the dialog box to modify the result. Click OK to apply the enhancement.
Auto Levels
In the Editor, click Quick.
Note: For more on opening the Editor, see Chapter 1.
Click Enhance ⇒ Auto Levels.
Photoshop Elements adjusts the exposure to make dark areas as dark as possible and bright areas as bright as possible.

Note: Try this tool when Smart Fix makes the midtones too bright and washes out the photo. In this example, the enhancement subtly lifts some of the colors.
Note: To adjust the effect, select Enhance ⇒ Adjust Lighting ⇒ Levels. For details, see Chapter 9.
Note: To save your changes, see Chapter 2.
TIP
What do the other enhancements do?
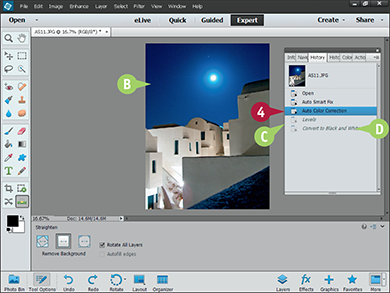
Use Auto Smart Tone to adjust brightness and contrast in two dimensions. Auto Contrast tries to fix contrast issues. Auto Smart Fix and Auto Levels are more complex effects and better at fixing problems with exposure. Auto Color Correction can remove color casts. For details, see Chapter 9. Auto Sharpen subtly sharpens the image to bring out the textures. Auto Red Eye Fix attempts to fix red eye — the effect that sometimes appears when you take a face-on photo of a model using a flash. It is not as effective as the Red Eye Removal tool in the tool bar ( ).
).
Add a Texture
You can use the Quick mode textures to add character to a photo. Photoshop Elements blends the textures with your photos to add depth and atmosphere. Use textures for creative effects. They are not intended for corrective adjustments.
To add a texture, click the Textures button in the toolbar and click a texture to apply it. Different textures work well with different photos. You may need to try them all to find the one that creates the best result.
Add a Texture
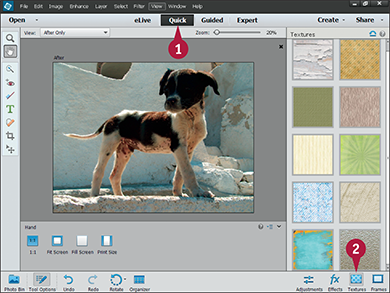
In the Editor, click Quick.
Note: For more on opening the Editor, see Chapter 1.
Click Textures.
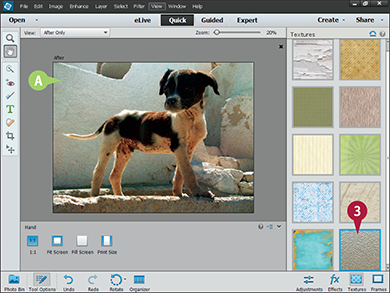
Click a texture to apply it.
A Photoshop Elements blends the texture with the photo, changing the color, tone, and mood.
Note: This example warms the original photo, adding more orange and toning down the blue.

Click a different texture.
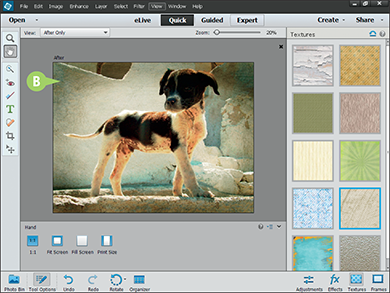
B Photoshop Elements removes the old texture and applies the new one.
Undo Edits
You can undo edits in Photoshop Elements in two ways. The simple option is to type + (+ on the Mac), click the Undo button in the toolbar, or select Edit ⇒ Undo in the main menu. This option reverses the last edit. You can repeat it to step back through the last 50 edits.
You can also use History Window to see the last 50 edits, displayed as a list. Click any item in the list to return your photo to that edit. You can use this option to skip back over mistakes or to experiment with new edits.
Undo Edits

In the Editor, click Expert.
Note: For more on opening the Editor, see Chapter 1.
Note: You can use the History window only in Expert mode.
Apply a series of edits.
Click Window ⇒ History, or press  .
.
A The History window opens, showing your edits.
Click any item in the edit list.
B Photoshop Elements restores the photo to that edit state.
C Later edits are grayed out to show they are not active.
D You can click a later edit to move forward to that state.
Note: If you make a new edit, Photoshop Elements updates the list and deletes any grayed out items because they are no longer available.
Note: You can change the maximum number of edits stored in the list in the Preferences. For details, see Chapter 1.
Revert an Image
If you do not like your edits, you can Revert a photo. This option reloads the file from disk. If you have not saved the file, it restores the original unedited content. If you have already saved the file, it reloads the last saved version.
Revert an Image

Open a file in the Editor, and make some changes to it.
Note: For more on opening the Editor, see Chapter 1.
Click Edit ⇒ Revert.
Note: You do need to have the History window open to use the revert option. This example includes the History window so you can see its contents.
Note: Revert counts as an edit operation. You can undo it.
Photoshop Elements reloads the image from disk.
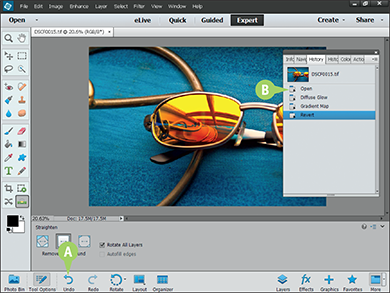
A You can click Undo to un-revert the image.
B You can also click an earlier item in the History list.
Note: The History list is available until you close a photo. You can even use it to restore a photo to an edit state before your last save.
Import a RAW Image
If your camera creates RAW files, you can open them in Photoshop Elements. Loading the file into the Editor displays a special RAW dialog box that you can use to “develop” your photos digitally. Use the dialog box to fine-tune the color and exposure. You can then use the Editor tools to apply more creative effects and to select/copy/paste objects in the image.
The RAW dialog box includes its own version of the Quick mode toolbar and a set of sliders for adjusting color, exposure, and balance. The RAW dialog box works like the Quick mode adjustment pane, with a few differences: There are no one-click previews, there is no hue adjustment, and you can see all the sliders at once.
Import a RAW Image
Explore the RAW Dialog Box

In the Organizer, click a RAW file to select it.
Note: If you set up your camera to create RAW files, the Organizer loads them in the usual way and creates a thumbnail when you import files from the camera or a memory card.
Click Editor to load the RAW dialog box.
Photoshop Elements loads the RAW dialog box instead of the Editor.

A You can click these icons to zoom and pan the image.
Note: The RAW dialog box toolbar is almost identical to the Quick mode toolbar and has similar icons.
B You can click this icon to apply a crop tool to the image.
C You can click this icon to apply a straighten/rotate tool to the image.
D You can click this icon to fix red-eye.
E You can click these icons to rotate the image left or right.
Adjust the White Balance
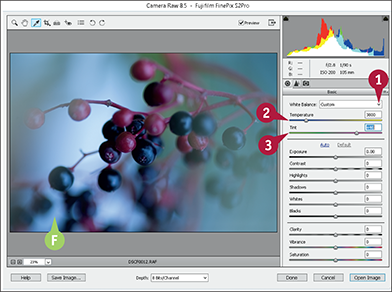
Click the menu, and select Custom.
F The color balance of the image changes.
Adjust the Temperature slider to set the Blue/Yellow color balance.
Adjust the Tint slider to set the Green/Pink color balance.
Note: If you move the Temperature and Tint sliders after selecting a preset, the menu automatically selects Custom.
Note: If the Custom option does not improve for your image, try the other menu items in order until you find a preset that does.
Adjust the Color

Move the Clarity slider to the left to blur colors and to the right to bring out color detail.
Move the Saturation slider to the left to remove color and to the right to make it more intense.
Note: This slider does not create grainy and noisy over-saturated colors produced by saturation adjustments in the Editor.
Adjust the Vibrance slider to adjust color contrast.
Note: You may want to fine-tune the Temperature and Tint sliders slightly after these steps to further correct the color.
Import a RAW Image (continued)
The RAW dialog box includes comprehensive control over exposure, tone, and contrast. Use the Exposure and Contrast sliders to make changes across the image. Use the Highlights and Whites sliders to set the exposure of brighter areas, and use the Shadows and Blacks to do the same for darker areas.
When you use the RAW dialog box, it automatically saves the dialog box settings with the RAW file. Click Done to save the settings, and click Open Image to save settings and open the image in the Editor. Click Save Image to save settings to a new file. You can create as many versions as you want.
Import a RAW Image (continued)
Adjust Exposure and Contrast

Adjust the Exposure slider to make the photo brighter or darker.
Adjust Contrast to add or remove contrast.
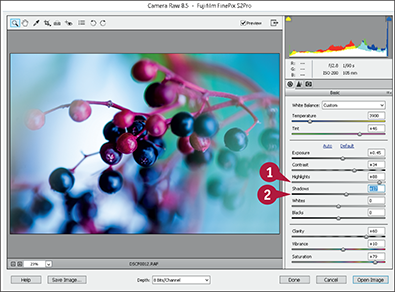
Adjust the Highlights slider to bring out brighter areas.
Adjust the Shadows slider to add light to darker areas.
Note: Drag Shadows to the right to lighten darker areas and to the left to darken them.
Adjust Whites and Blacks

Adjust the Whites slider to bring out brighter areas.
Adjust the Blacks slider to add light to darker areas.
Note: As a guideline, Highlights brightens whiter areas, while Whites expands the contrast in brighter areas. Similarly, Shadows darkens dark areas, and Blacks expands the contrast.
Note: This explanation is a rough guideline. The details are complex and outside the scope of this book. For an intuitive understanding, experiment on a selection of photos.
Save and/or Open the Image

A Click Save Image. . . to copy the file and save it with the current RAW settings.
Note: Photoshop Elements saves the file with a DNG (Digital Negative) extension and adds a thumbnail to the Organizer. You can save many different versions of the same file.
B Click Done to write the dialog box settings to the RAW file and close the dialog box.
Note: This option updates the RAW file and the thumbnail, but it does not save a new version.
C Click Open Image to save the settings and also open the image in the Editor.
Photoshop Elements “develops” the RAW file using your settings, with improved color, exposure, contrast, and overall impact.