Chapter 15
Saving and Sharing Your Work
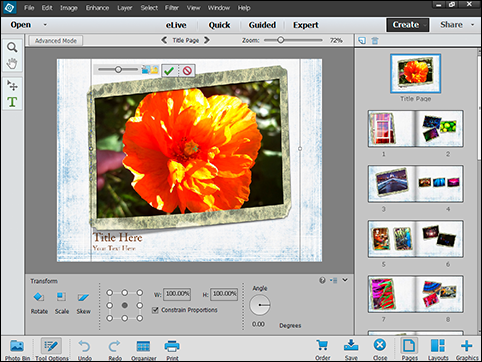
You can save your photos in different file formats, print them, store them on CD or DVD, or share them online via Facebook. You can also create slide shows and photo books.
Share an Album with Adobe Revel
Save a Photo for the Web
You can use the Save for Web. . . dialog box to resize and compress a photo so you can include it in a web page. Uncompressed photos take too much space in the design, and download slowly. You should make your photos as small as you can, without losing impact or detail. As a guide make each web page smaller than 200kb, including all text and images.
Use this tool for your own web pages, but not for photo-sharing sites such as Flickr (www.flickr.com). These sites resize and compress photos for you automatically after you upload them.
Save a Photo for the Web

 In the Editor, click Expert.
The Save For Web dialog box opens.

A The original image appears in the top/left pane.
B The compressed image appears in the bottom/right pane.
C You can use the zoom factor menu and the zoom buttons ( and
and  ) to zoom into the image and look at fine detail.
 Click the Preset menu, and select a compression preset.
This example shows the Low JPEG preset, which creates very small JPEG files with low image quality.

D You can see the uncompressed file size in the info panel.
E You can compare it with the compressed file size here.
F You can see the estimated download time here.
Note: You can click the panel menu ( ) to select a different download speed. The default uses old modem speeds, which are not a good guide for new site designs.
G You can preview the quality of the compressed image here.
In this example, zooming in shows that the file is too compressed, with blocky details.

H You can check the original image dimensions here.
I You can shrink the image by typing a number smaller than 100% into the Percent box, followed by  .
.
Note: Shrinking the dimensions lowers image quality. Check the image preview again.
J You can check the new dimensions here.
K You can check the file size and download time of the resized file here.
 Click Save to open a file view, navigate to a save destination, and click Save again to save the file. Optionally, you can also type a new name for the file.
Photoshop Elements saves the compressed file to the location you select.
Convert File Types
You can convert multiple files from one format to another using the Process Multiple Files feature. For example, you can convert a batch of PSD files into JPEG files.
This feature can resize the images as its converts them. It can also rename them with the current date, a serial number, and other details. To use this feature, move or copy the source files to a folder, select a destination folder, and set up the options. Photoshop Elements automatically opens each file in turn, processes it, and saves it.
Convert File Types
 Copy or move the images you want to convert to an empty folder.
You can also create a separate empty destination folder if you want to keep the processed files separate from the source files.

 In the Editor, click File ⇒ Process Multiple Files.
Note: If a dialog box appears warning about multipage documents and project files, click OK.
The Process Multiple Files dialog box opens.
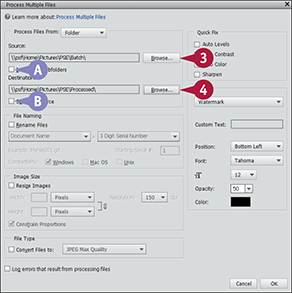
 Click Browse, and navigate to the folder you used in step 1.
A You can check the box ( changes to
  ) if you want to include sub-folders within the source folders.
 If you are saving the processed files to a separate destination folder, click Browse and select it.
B You can check the box ( changes to
  ) if you want to save the processed files to the source folder instead of a separate destination folder.

 To rename the files, check the Rename Files box (
 changes to
  ).
).
 Click the menu, and select the first part of the new name.
C By default the second part of the new name is a serial number. You can click the menu to select a different option.
Note: Both menus include the same list of options.
D You can click this box to type a different initial serial number.
E You can click these check boxes to apply quick fixes to the photos before they are saved.
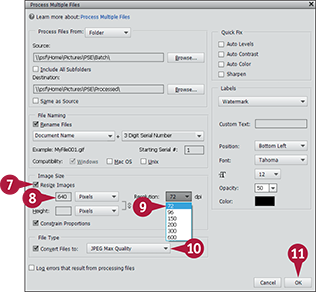
 Check the box to resize the images (
 changes to
  ).
).
 Type the new width in pixels into the box.
Note: When Constrain Proportions is selected, Photoshop Elements calculates the other dimension, so you do not need to enter it.
 Click the menu, and select a new resolution.
 Click the menu, and select the target file format and compression factor.
 Click OK.
Photoshop Elements processes the files and saves the new versions to the folder you selected.
E-mail Images
You can embed your images in an e-mail message and then send them to others by using the mail feature built into Photoshop Elements. To use the feature, you must set up at least one e-mail account. You can then drag and drop images from the Organizer to an e-mail message.
Previous versions of Photoshop Elements included customized e-mail templates with graphics. This option has been removed from Photoshop Elements 13. But you can still use the Editor to add graphics and frames to images before sending them as e-mails.
E-mail Images
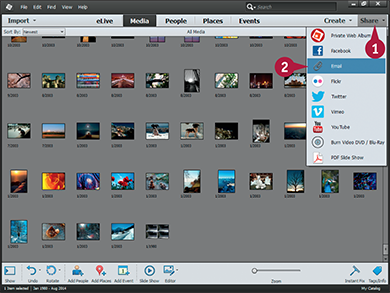
 In the Organizer, click Share.
Note: For more on using the Organizer, see Chapter 3.
 If you have not yet set up an e-mail account, click New.
 Type a name into the Profile Name box (not shown).
Note: You can use any name. Pick a name that reminds you of your e-mail service.
 Click the Service Provider menu (not shown), and select your e-mail service.
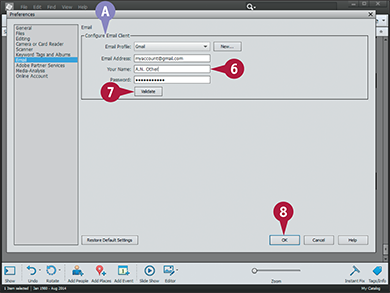
 Enter your e-mail settings.
 Click Validate to confirm they are correct.
Note: If you do not know the correct settings for some of the options, check with your e-mail provider.

 Click and drag images from the main Organizer window to the Email Attachments pane.
 Click the menu, and select the maximum pixel dimensions.
Note: Use the smallest size possible unless you know that your recipient wants large images.
 Click and drag the slider to set the image quality.
Note: The lower the quality, the smaller the image. Use a minimum of 4 for low-quality images.
B Photoshop Elements shows the estimated size of each photo. Multiply by the number of photos for the total size.
 Click Next.

 Check the box of each person to whom you want to e-mail the photos (
 changes to
  ).
).
Note: If there are no recipients, click the Edit Recipients in Contact Book icon ( ) and select Import to load the list from your standard Windows or Mac address book. You can also add names manually.
C You can change the default e-mail subject by typing in this box.
D You can change the text of the e-mail message by typing in this box.
 Click Next.
Photoshop Elements e-mails the photos.
Print Photos
You can print your photos on a standard desktop printer. Many printers are compatible with high-quality photo paper, so you can make photo prints at home.
The print feature includes a number of hidden options. You can print single images, a contact sheet with thumbnails of many images, or a picture package with a selection of layout and labeling options. Note that on the Mac, you can select photos for printing in the Organizer, but the print dialog appears in the Editor.
Print Photos
 In the Organizer, select the photos to print.
Note: For more on using the Organizer, see Chapter 3.
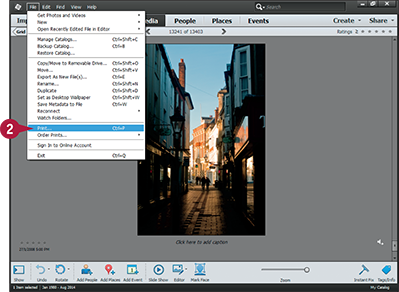
 Click File ⇒ Print.
You can also print by pressing  +
+ (
( +
+ on a Mac).
The Prints dialog box opens.

A You can click this menu to select a printer.
B You can click this menu to select a paper size.
Note: Select the size you have loaded into your printer.
C You can click this menu to select Individual, Contact Sheet, or Picture Package modes.
D You can click this menu to select a print size. The default is Actual Size.
 If this option is available, click here to change your printer settings.
A printer settings dialog box appears.

E If you are using special photo-quality paper, you can select it with this menu.
F You can click Advanced Settings to access color control and other settings. The settings you see depend on your printer and your operating system.
 Click OK to close the dialog box.

 Click More Options to show further settings.
The More Options dialog box appears.
G You can click items in the list to show further options.
This example shows the Printing Choices dialog box.
H You can click the check boxes to print the date, caption, and filename of the photo.
I You can click the check box and select a number to print more than one copy of each photo.
 Click OK to close the dialog box.
 Click Print to begin printing.
Create a Slideshow
You can use the Organizer to create slideshow that includes photos, music, and text. The slideshow tool has been simplified in Photoshop Elements 13. You cannot add graphics or control transitions — cross fades and other changes — between slides. However, you can select a number of themes for your slideshow with preset backgrounds and complex transitions.
Create a Slideshow

 In the Organizer,
  +click (
 +click on a Mac) the images you want to put in your slideshow.
Note: For more on using the Organizer, see Chapter 3.
The Slide Themes dialog box opens.

 Click and drag the scroll bar to view the themes.
 Click a theme to select it.
 Click Next.
Note: If you click the Slide Show button in the Organizer toolbar, you can skip this step and either use the default theme or select a theme while creating your slideshow.
Photoshop Elements applies the theme, selects a music track, creates a slideshow, and displays it full screen. This can take a few minutes on a slow computer.
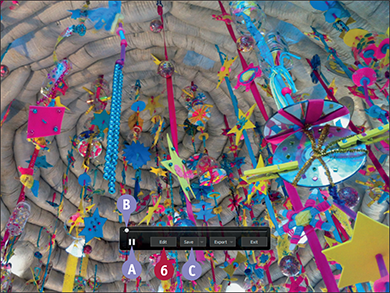
A You can click the Pause button to stop the slideshow.
B You can click and/or drag the slider to change the play position.
C You can click the Save button to save the slideshow.
Note: This option saves the slideshow project to a file and adds it to the Organizer. You can double-click the file in the Organizer later to reload the file into the Slideshow Builder.
 Click Edit to open the Slideshow Builder.
The Slideshow Builder dialog box opens.

D To add more images, click Add Media and select either Photos and Videos from Elements Organizer or Photos and Videos from Folder.
 Drag a photo and release it to move it to a different location in the slideshow.
E To delete an item, right-click it and select Remove item from slideshow.
 Click Preview to rebuild the slideshow and preview it.
Create a Slideshow (continued)
You can save the slideshow as a video file in both standard and HD resolutions. You can then share the file by e-mail, or by uploading it to YouTube or your own web pages. You can also import it into a video editing package such as Adobe Premier Elements.
Create a Slideshow (continued)

 Click the Audio button.
The Add Audio dialog box appears.
 Click a file to select it.
 Click Play to preview it.
 Click OK to select the file and add it to your slideshow.
Note: If you have a collection of MP3 files in a folder, you can click Browse to open the folder and select a file.
A You can click the Speed menu and select Brisk, Normal, or No Sync options to control how quickly items change and whether they follow beats in the music.
To Add a Text Slide

 Click Add Text Slide.
 Type your text into the slide.
You can drag and drop the slide to change its position in the list.
Note: You cannot decorate the slide, use a different font, or add a background within the Slideshow Builder.
To Select a Different Theme

 Click Themes.
A The theme list appears.
 Drag the scrollbar to view all the themes.
 Click a theme to select it.
 Click Apply to apply the theme and close the theme list.
To Export the Slideshow to a Video File

 Click the Export button, and select Export to Local Disk.
Note: You can also export to Facebook. You typically want to preview the theme from your disk first. You can upload it to Facebook in a separate step.
The Export dialog box appears.
 Type a filename.
A You can click Browse and navigate to a folder to save the file to it.
 Click the menu, and select a quality preset.
Note: A setting of 640x480 is a small format for custom websites. The other formats work with YouTube and video editors. Select 720p if you have dial-up or slow broadband.
 Click OK
Photoshop Elements exports the slideshow to a file, including the music you selected.
Create a Photo Book
You can create a photo book to show off your favorite photos in a printed mini-album, with a selection of themes that include page backgrounds, virtual frames, graphics, and styled title text you can edit.
You can add photos from an album, from an Organizer selection, or manually from the Photo Bin or any photo file. You can customize the layout and graphics used in the photo book. The default options often create a good result that does not need to be edited.
Create a Photo Book
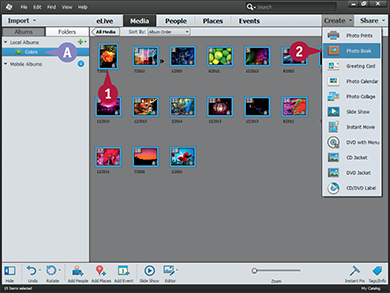
A You can collect the photos into an album and reorder them to set their order in the photo book. See Chapter 3 for details.
 In the Organizer,
  +click (
 +click on a Mac) the images you want to include in your photo book.
 Click Create ⇒ Photo Book.
The Photo Book dialog box opens in the Editor.

 Click a book size and printing option.
Note: You can select a size that works with standard U.S. paper sizes or formats the book for a printing partner such as Photoworld in the U.K. or Shutterfly in the U.S.
Note: If you select the local printing partner, an order button appears after you create your book.
 Drag the scroll bar to view all the available themes.
 Click a theme to preview it.
B An animated theme preview showing the page background and virtual frame graphics appears.
Photoshop Elements creates the photo book using the photos you selected.

 If a photo is not selected for editing, double-click it.
C You can click the Move tool ( ) and drag the photo within the frame.
Note: If you drag the frame instead of the photo, right-click the photo and select Position Photo in Frame.
D You can drag the slider to change the photo zoom within the frame.
E You can drag the edges of the photo to resize it, or hover at the corners and then click and drag to rotate it.
 Click
Click  to confirm.
To Change Titles and Text

 Click the Horizontal Type tool (
 ).
).
 Click a box with dummy text.
 Drag the mouse to highlight the text.
 Type new text.
 Click
Click  to confirm.
Create a Photo Book (continued)
You can edit and customize the photo book to change the theme graphics and the photo layout. You can also replace individual photos.
After you complete your photo book, you can save it as an Organizer project. You can also print it at home. For better results, with professional binding and high-quality paper, you can use a Printing Partner service.
Create a Photo Book (continued)
To Move, Resize, or Rotate a Frame

 Click the Move tool (
 ).
).
 Click a photo to select it, and drag its frame to move it.
 Drag the edges of the selection box to change the size of the frame.
 To rotate the frame, hover just outside a corner until the cursor changes to a curved double arrow, and then click and drag.
 Click
Click  to confirm.
To Place Photos Under or Over Other Photos
 Right-click a photo.
 To place it over other photos, select Bring to Front.

 To move it up one level, select Bring Forward.
 To move it under other photos, select Send Backward to move it back one level, or Send to Back to move it to the back of the layout.
Note: Depending on the photo’s position in the layout, some options are grayed out.
To Replace a Photo
 Right-click a photo.

 Select Replace Photo.
 Navigate to the new photo, and click OK.
Note: You cannot see the new photo as you select it. You may find it easier to return to the Organizer, rearrange the photos in the source album, and reload the album as a photo book.

 Click Layouts.
 Drag the scroll bar to see all the layouts.
 Double-click a layout to apply it.
Note: Photoshop Elements redistributes the photos on the current page. If you pick a layout with extra frames, you must load them manually.
Note: Currently, Photoshop Elements applies the layout to both pages in a double page spread. This may change in a future update.
Share Photos on Facebook
You can select photos in your Organizer catalog and post them to an album on the social network Facebook. You can upload the photos directly to Facebook by giving Photoshop Elements permission to communicate directly with your Facebook account. After the photos are posted, your Facebook friends can view the photos.
This sharing feature requires an Internet connection and a Facebook account. You can visit Facebook at www.facebook.com. Users must be 13 or older.
Share Photos on Facebook
 In the Organizer,
  +click (
 +click on a Mac) to select the photos you want to share.

 Click Share ⇒ Facebook.
An authorization dialog box appears.

 Click Authorize.
A By default, Photoshop Elements downloads your list of friends from Facebook and makes them available when you define people in the Organizer. For more about defining people in your photos, see Chapter 4.
A Facebook login page opens in a web browser.

 Type the e-mail address for your Facebook account.
 Type your Facebook password.
B If you do not have a Facebook account, you can click the link to sign up for one.
 Click Log In to sign in to Facebook.
Note: You may see a notice asking you to save the browser you are using. Click Save Browser if you are logging in from a private computer at home or work, or click Don’t Save if you are logging in from a public computer. Then click Okay.
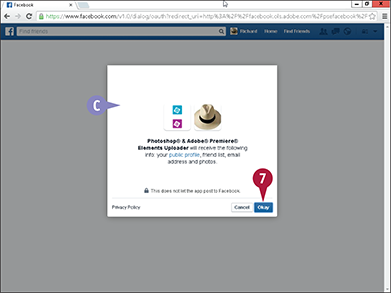
C A pop-up appears asking you to give the Adobe software access to the information held in your Facebook account.
 Click Okay.
Share Photos on Facebook (continued)
Facebook organizes your photos into albums, which enables you to keep photos of specific events in one place. You can control who can view the albums that you post. In the Share to Facebook dialog box in Photoshop Elements, you can specify whether just your Facebook friends, friends of your friends, or everyone on Facebook can see the photos.
You can also upload the photos in one of two different resolutions. The higher resolution offers better viewing quality online but takes longer to upload.
Share Photos on Facebook (continued)
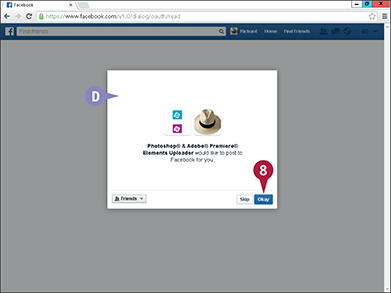
D A pop-up appears asking you to give permission for Photoshop Elements to post on your account.
 Click Okay.
After you give permission, a Thank You page appears.

 Close or hide your web browser to return to Photoshop Elements.
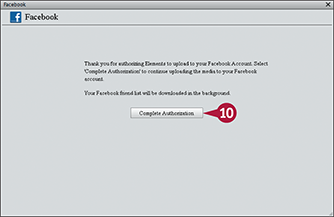
 Click Complete Authorization.
The Facebook dialog box appears.

E You can click the plus sign ( ) to add more photos from the Organizer. To remove a photo from the album, click a thumbnail and then click the minus sign (
 ).
).
F You can click this option ( changes to
  ) to add your photos to an existing album on Facebook.
 If you are uploading to a new album, type a name, optional location, and description for your album.
 Click the menu to set who can see the photos.
 Click an option (
 changes to
  ) to specify normal or detailed (large, high-quality) photos.
 Click Upload.
Photoshop Elements uploads the photos to Facebook.
Click Visit Facebook in the confirmation dialog box to view your Facebook account.
Share a Photo on Twitter
You can select a photo in the Organizer and post it to Twitter, adding up to 140 characters of text. Twitter is a microblogging service for short messages or tweets. When you post an image with a tweet, a link appears with the text in your Twitter feed. When your followers click the link, they see the photo.
Anyone with an e-mail address can sign up for a Twitter account. You can visit Twitter at www.twitter.com.
Share a Photo on Twitter

 Click the photo you want to share.
You can share only one photo at a time.
 In the Organizer, click Share ⇒ Twitter.
An authorization dialog box appears.
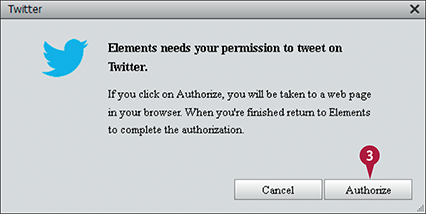
 Click Authorize.
The first time you share via Twitter, a Twitter login page opens in a web browser.

 Type your Twitter login name.
 Type your Twitter login password.
A If you do not have a Twitter account, you can sign up for one.
 Click Authorize app.
 Close your web browser when the Thank You page appears.
 In the Twitter dialog box in Photoshop Elements, click Done.

 Type the text for your tweet.
B Numbers show you how many characters you have left.
Note: The image link in the Tweet uses some of the 140 characters.
 Click Tweet to post the photo with your text.
Photoshop Elements sends the tweet and shows a confirmation dialog box. You can click Done to close the dialog box or Visit Twitter to view your tweet.
Export Photos
You can export selected photos from the Organizer to a folder. Use this option if you want to copy the photos to another computer, save them for a feature such as Photomerge Panorama (see Chapter 8), write them to a USB stick or external hard drive, or import them into a blog or custom web gallery.
When you export, you can convert your images to a different file format. If you save the files as JPEGs, you can change the image quality and resize them. PNG and TIFF files do not lose quality and cannot be resized. Save the files as PSDs for use with other Adobe products.
Export Photos

 In the Organizer,
  +click (
 +click on a Mac) to select the photos you want to share.
Note: For more on using the Organizer, see Chapter 3.
If you do not select any photos, Photoshop Elements exports all the photos in the Organizer.
 Click File ⇒ Export As New File(s).
The Export New Files dialog box opens, showing the selected photos listed.
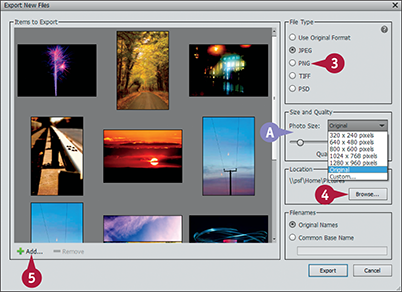
 Click the radio buttons to select a file type.
Note: Leave Original Format selected if you do not want to convert the files.
A If you select JPEG, you can click and drag the slider to set the JPEG quality and click the menu to select a new image size.
 Click Browse to choose a destination folder for the images.
 Click Add... to select and add photos from Organizer albums and tag groups.
The Add Files dialog box opens.

 Click the Advanced arrow to show advanced options (
 changes to
  ).
).
 Click a radio button to select photos grouped by albums, keyword tags, people, places, or events.
 Click a menu to select the media in each group.
B You can use the check boxes to show media with star ratings or which are hidden.
Note: This feature shows media with any star rating. You cannot select a rating.
 Click Done to add the media and close the dialog box.
Photoshop Elements adds the photos.

C To remove a photo, click the photo then click Remove.
 You can use the radio buttons to keep the original filenames or add a common base name.
 Type the base name.
 Click Export.
Photoshop Elements exports your images.
Set up Adobe Revel
You can export photos from Photoshop Elements to Adobe Revel, Adobe’s cloud-based photo storage service. Photos in Revel are stored on Adobe’s servers.
You can use Revel to keep online copies of your photos and to access your photos from different devices. Your device must be connected to the Internet before you can use Adobe Revel.
Set Up Adobe Revel

 In the Organizer, click File ⇒ Sign In to Online Account.

A If you do not have an Adobe ID to sign in with, click Create an Adobe ID to create one.
 Type your Adobe ID. It is the e-mail address you signed up with.
 Type your password.
 Click Sign In.
A welcome screen appears.

 Click here to upload a selection of media.
B You can click here to share all your media.
Note: You cannot share all your media without a subscription. Fast broadband is essential.
Note: It can take a very long time to upload a large photo collection, even with fast broadband.
 Click Next.
A confirmation screen appears.
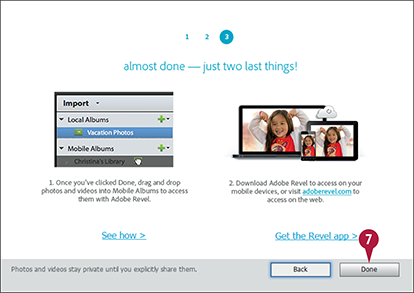
You can now use Revel to share photos and albums.
Share an Album with Adobe Revel
You can upload photos to Adobe Revel and share them with friends and family. The Share Private Album feature in Photoshop Elements uploads the photos and creates a link you can e-mail to friends and relatives.
If you want to upload an album quickly without setting up sharing, you can drag the album icon into the Mobile Library. This option bypasses the Share Private Album dialog box, uploads the photos, and deletes the original Local Album. You can then log in to the Revel website and enable sharing for the album.
Share an Album with Adobe Revel

 Create or select a local album in the Organizer.
Note: See Chapter 3 for more about working with albums.
 Click Share ⇒ Private Web Album.

 Click Done in the dialog box that appears to confirm.
The Private Web Album dialog box appears.
 Click Adobe ID to sign in with your Adobe ID.
A browser window appears.
 Close or hide the browser window.
 Click Complete Authorization in the Private Web Album dialog box.
The Private Web Album dialog box displays share options.

 Click the
  to create a new album.
Note: This dialog box does not create a new online album automatically when you share a local album.
Note: You can add photos to an existing album by selecting it from the menu.
 Check Allow Downloads (
 changes to
  ) if you want to allow visitors to download your photos.
 Click Start Sharing.
Photoshop Elements uploads the photos or the album you selected.
The Private Web Album dialog box reappears when the photos have uploaded.

A You can click the link to view the album online.
B You can click Email Link to e-mail the link to friends and family.
Back Up a Catalog
You can back up your digital photos with the Organizer’s backup tool. The tool creates a single backup file. It does not copy the photos to a new folder you can access.
You can use this option to back up files to a CD or DVD. But you should use an external hard drive or USB stick for reliability. Writeable CD and DVD disks can lose their contents after only a few years, especially if left in sunlight.
Back Up a Catalog

 In the Organizer click File ⇒ Backup Catalog.
You can also type  +
+ (
( +
+ on a Mac.)
Note: Photoshop Elements may display a warning about missing files. If this happens, click Reconnect to perform a check. See the tip for more details.
Photoshop Elements displays a Preparing Files alert. It can take a few minutes to prepare the files for a large catalog.
The Backup Catalog to CD, DVD, or Hard Drive dialog box opens.

 If this is your first backup, leave Full Backup selected.
A For subsequent backups, you can click Incremental Backup ( changes to
  ). Incremental Backup backs up files that have changed or been added since the last backup and is faster than a full backup when you have saved a catalog previously.
 Click Next.

 Click to select the drive to which you want to copy the backup files.
B You can type a name for the backup in this text box.
 Click Browse, and create and/or select a folder for the backup.
C You can see the estimated size of the backup here.
 Click Save Backup.
Photoshop Elements backs up your photos.

D An alert confirms the backup. Click OK to continue.
 ).
).