3 |
Examination of Vision |
Seasons return; but not to me returns Day, or the sweet approach of even or morn, Or sight of vernal bloom or Summer’s rose, Or flocks, or herds, or human face divine.
I. ANATOMY OF THE EYEBALL
Learn to draw Fig. 3-1 sight unseen.

FIGURE 3-1. Horizontal section of the right eye, seen from above.
II. DUAL ORGANIZATION IN THE OPTIC SYSTEM
A. Two cranial nerves, II and V, convey afferents from the eye to the brain
1. The optic nerve, cranial nerve (CrN) II, conveys the afferent axons for two functions, the special sense of vision and pupilloconstriction.
2. The trigeminal nerve, CrN V, conveys the afferents for general sensation:
a. Ocular pain.
b. Tearing reflex.
c. Corneal reflex.
d. Proprioception from the extraocular muscles.
B. Two motor systems, peripheral and central, innervate the intra- and extraocular muscles
1. Peripheral ocular motor nerves consist of CrNs III, IV, and VI and the carotid sympathetic nerve.
2. Central ocular motor systems control the peripheral movements. The central system find, fixate, focus/align on, and follow visual targets. CrNs III, IV, and VI innervate the extraocular muscles for these actions.
C. Two images, a real retinal image and a mental or visual image, made by the mind
1. Start with an arrow as the visual target (Fig. 3-2).
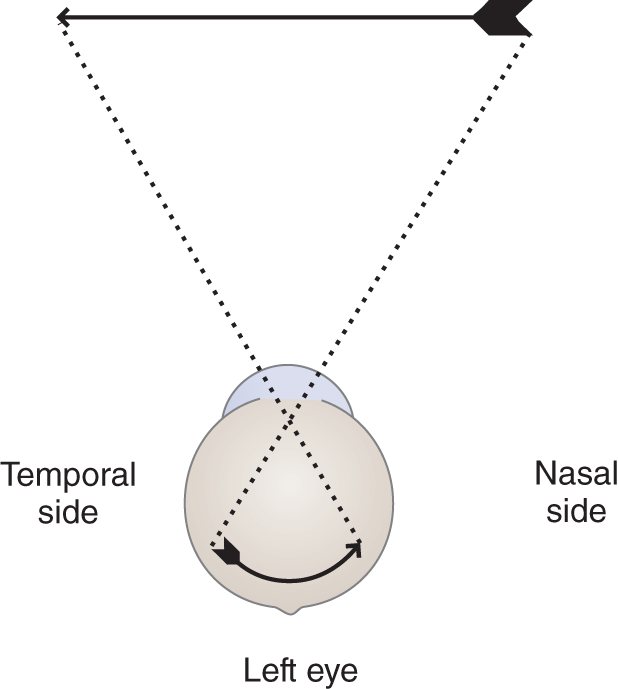
FIGURE 3-2. Retinal image formed during monocular fixation with the left eye.
a. Each retina receives an inverted real or actual image, due to the physical optics of the eye.
b. Neurophysiologic processing then converts this real retinal image into an abstraction called a visual image.
2. Projection of the visual image by the mind
a. As Fig. 3-2 shows, the light rays that form the nasal half of the retinal image come from the  temporal/
 nasal half of the object viewed.
b. By a process of learning, we associate the point of retinal stimulation with the reverse half of space. Hence, if light rays fall on the temporal half of the retina, the mind perceives the object as located in the  temporal/
 nasal half of space. (
 nasal half of space)
c. If the image of an object falls on the nasal side of the retina, we would reach for the object in the temporal half of space. Similarly, if the image falls on the upper half of the retina, we would reach for the object in the _________
d. Thus, the law of projection of the visual image states that the mind projects the visual image derived from one half of the retina to the _________
e. This particular law exemplifies a general law of sensation: The mind projects afferent impulses to their usual site of origin in all sensory systems. If an electrode stimulated your right auditory nerve, you would experience a sound as if it came from the right side of space. If you bump your ulnar nerve at the elbow, you would feel a shock down your forearm into your little finger, even when no afferent impulses arose from the finger itself. In each case, we say that, when afferent impulses reach the brain, the mind projects or refers them to their usual site of origin.
D. Two areas of the retina: central and peripheral areas
1. The retina consists of a central circular macula and a peripheral zone that concentrically surrounds the macula (Fig. 3-3).
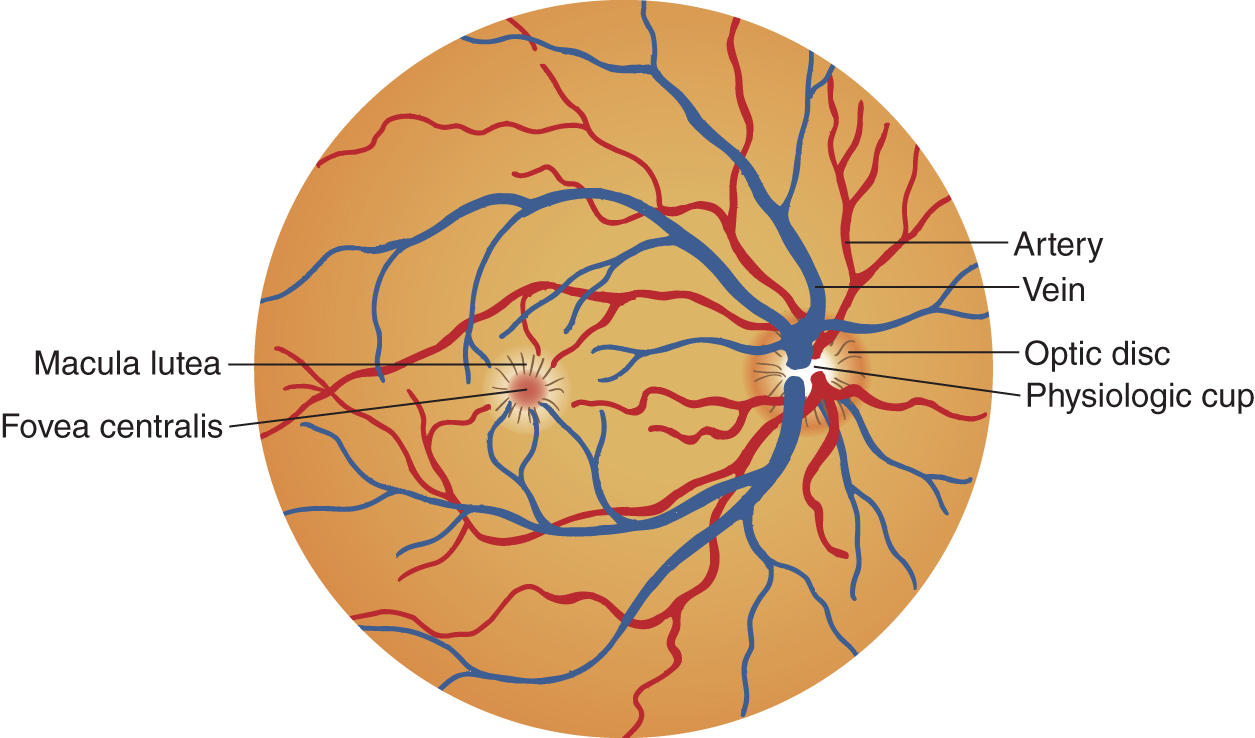
FIGURE 3-3. Drawing of the fundus of the right eye.
2. The retina has two types of receptors:
a. Cones in the macula.
b. Rods in the periphery.
3. The retina provides two fields of vision, central and peripheral. Each field has two functions:
a. The cone receptors of the macula mediate the two functions of the central field of vision:
i. Visual acuity.
ii. Color vision.
b. In the periphery of the retina, concentrically surrounding the macula, rod receptors mediate the two functions of the peripheral field of vision:
i. Night vision.
ii. Motion detection.
4. Neuronal layers of the retina.
a. Light initiates afferent impulses for vision and pupilloconstriction by exciting the rod and cone receptors of the retina.
b. The unipolar rod and cone neurons synapse on the bipolar neurons of the adjacent layer of the retina.
c. The bipolar neurons synapse on multipolar neurons of the ganglion cell layer. The axons from the multipolar neurons converge on the optic disc in a special pattern, pierce the lamina cribrosa of the sclera, and form the optic nerve that emerges from the back of the eyeball and joins the optic chiasm.
E. Dual pathways in the optic nerve
The optic nerve runs from the retina posteriorly through the optic chiasm where it divides into two optic tracts. Each optic tract contains two sets of axons.
1. One set of axons comes from the ipsilateral, temporal half of the retina (Fig. 3-4).

FIGURE 3-4. The visual pathway from the retinal images to the calcarine cortex of the occipital lobe, as seen from above. The letters on the left indicate lesion sites and the visual field defects they would cause.
A. Complete blindness, L eye
B. Complete bitemporal hemianopia
C. Complete nasal hemianopia, L eye
D. Complete R homonymous hemianopia
E. Complete R superior homonymous quadrantanopia
F. Complete R inferior homonymous quadrantanopia
G. Complete R homonymous hemianopia
2. A second set of axons comes from the contralateral, nasal half of the retina. These two groups of axons unite the right and left visual half fields from each eye.
F. Dual pathways branch from the optic tract
The optic tract conveys visual and nonvisual axons posteriorly from the chiasm.
1. The nonvisual axons of the optic tract go to the pretectum of the midbrain and to the hypothalamus.
a. The retinopretectal tract synapses in the pretectum and midbrain for pupilloconstriction to light (Fig. 4-30).
b. The retinohypothalamic tract synapses on the paraventricular nucleus and mediates the diurnal cycle of sleep and wakefulness.
2. The visual axons in the optic tract, the retinogeniculate tract, synapse on the lateral geniculate body of the thalamus (Fig. 3-4).
a. The geniculocalcarine tract then synapses on the primary visual (calcarine) cortex (Figs. 3-4 to 3-6).
b. The association cortex surrounding the calcarine cortex then interprets the significance and meaning of the visual image.
G. Dual banks of the calcarine cortex
1. The primary visual cortex forms dual, upper and lower, banks along the calcarine fissure on the medial surface of the occipital lobe (area 17 of Brodmann; Figs. 2-2, 3-4, and 3-5A).

FIGURE 3-5. (A) The visual pathway from the retina to the calcarine area, as seen from the right side. (B) The visual pathway from retina to the calcarine area, as seen from the side with a hemisectioned eyeball moved back to cap the occipital pole of the cerebrum.

FIGURE 3-6. The visual pathway from the retina to the calcarine area, as seen from below.
2. The macula is represented toward the occipital pole of area 17. The remaining retina is topographically represented forward (Fig. 3-5B).
H. Review of the visual pathway
Think through the afferent pathway for vision until you know it. First of all, notice in Fig. 3-4 that, when both eyes focus on the arrow, the real images fall on corresponding parts of the retina. Then proceed through the retinal rods and cones; bipolar layer; multipolar layer, optic nerve, optic chiasm; optic tract; geniculate body synapse; and geniculocalcarine tract to the primary visual cortex around the calcarine fissure.
III. THE VISUAL FIELD
The visual field is… “an island of vision surrounded by a sea of blindness.”
A. Definition of the visual field
Cover one eye and stare fixedly straight ahead. The entire area of vision is the visual field of that eye.
B. Duality of the visual field
1. The entire visual field consists of a central field and a peripheral field, based on the duality of the cone and rod receptors of the retina.
2. If a patient (Pt) reported decreasing visual acuity and had no opacities such as a cataract, the lesion would most likely affect the  cones/
 rods in the retina or their pathway to the cerebrum. (
 cones)
3. If a Pt reported decreasing ability to see in dim light but acuity was preserved, the lesion would most likely affect the  central/
 peripheral part of the retina that contains the
  rods/
rods/ cones. (
 peripheral;
  rods)
rods)
C. Self-demonstration of the central field of vision
1. Do this experiment to demonstrate the surprisingly limited field of central vision:
The central field extends only about 30°, whereas the total field of peripheral vision when you look straight ahead is nearly 180° wide.
a. Position yourself 1 m from a long row of books or get closer to a short row, so that the books extend beyond the limit of your peripheral vision.
b. Stare fixedly at the title of a book in the middle of the row. Without moving your eyes at all, can you read more than one book title on either side?  Yes/
Yes/ No. (
No. ( No. If you could read more than one, you shifted fixation. Repeat the experiment.)
2. Do this experiment to demonstrate color vision in the central field:
a. Fixate on the same book in the middle of the row. Be sure to position yourself so that the row of books extends to the peripheral limit of your field.
i. While staring at the book directly in front of you, try to determine the color of the most distant book that you can see in the periphery. Do not shift your vision.
ii. After trying to determine the color, shift your gaze to look straight at the book. How does the color of the book differ when seen by your central field of vision as contrasted to its color when seen in the peripheral field? _________
3. Now do this experiment concerning color vision:
a. Hold out, at the periphery of your temporal field, a colored pen, preferably red, or any other small, colored item.
b. Stare fixedly straight ahead and move the colored item until it is in line with your central vision. How does the color differ as the item moves from peripheral to central vision?
_________
4. Self-demonstration of the perimeter of the peripheral fields.
a. Close or cover one eye and fixate straight ahead with the other. Extend the arm that is ipsilateral to the fixating eye straight out to the side and point your index finger up. Now, keeping the elbow extended, rotate the arm forward from the shoulder. The point at which you first see the finger defines the temporal perimeter of your visual field.
b. Repeat the experiment, fixating with the same eye and closing the other. This time extend the arm that is contralateral to the fixating eye and rotate the arm forward until your finger just becomes visible. Did you have to move it farther forward than the ipsilateral arm?
_________
c. Ostensibly, the nose would seem to limit the nasal part of the visual field. Phylogenetically this may be true, but the extent of the retina itself limits the extent of the nasal field.
d. To locate the vertical perimeter of the visual field, fixate straight ahead with one eye and bring your index finger down from above and then up from below. Which structure limits the height of the visual field?
_________
5. The importance of testing central and peripheral vision: Diseases, such as retinitis pigmentosa and glaucoma, and some drugs, such as vigabatrin, affect the rods first and cause constriction of the peripheral fields. Other disorders, such as the macular degeneration of aging, impair the cones and cause loss of central vision, and yet other diseases affect both rods and cones and cause loss of central and peripheral vision. Hence, the examiner (Ex) must test for these two types of visual loss.
D. Nomenclature for the visual fields and visual field defects
1. Learn the nomenclature of the visual fields in Fig. 3-7.

FIGURE 3-7. Nomenclature of the normal visual fields.
2. Visual field defects tend to fall into patterns of one-quarter or one-half of the visual fields (Figs. 3-4 and 3-8). Blindness in one-quarter of a field is called quadrantanopia (literally: quadrans = one-quarter; an = without; opia = vision). Because of complete blindness in the superior temporal quadrant, as shown in Fig. 3-8A, the full name is complete left superior temporal ________________

FIGURE 3-8. Patterns of visual field defects (A-I). The darkened area is the area of blindness. The patient’s left eye is to the reader’s left. Imagine that you are looking through the patient’s eyes.
3. Blindness in one-half of a field, or a hemidefect, as in Fig. 3-8B, would be called hemianopia. The complete name for the field defect is complete temporal hemianopia of the left eye.
4. With the involvement of corresponding quadrants or halves of the fields, for example, the right halves, the defect is termed homonymous, and described as right or left. Give the complete name for the field defect shown in Fig. 3-8C._________
5. The terms homonymous or corresponding as applied to visual field defects mean that the defect corresponds to the way the visual pathways represent the retinal and visual images of the right and left visual fields during binocular vision. Refer to Fig. 3-4. When the Pt with a complete right homonymous hemianopia looks straight ahead, he would be blind in the  right/
 left half of space and see in the
  right/
 left half. (
 right;
  left)
left)
6. Name the defect shown in Fig. 3-8D.
_________
7. Noncorresponding field defects are sometimes called heteronymous to contrast them with homonymous (Fig. 3-8E). It is simpler to describe them directly. Thus, the defect shown in Fig. 3-8E would be called complete superior bitemporal _________
8. The defect shown in Fig. 3-8F is called
_________
9. The defect shown in Fig. 3-8G is called_________
_________
10. Why would the field defects shown in Figs. 3-8E to 3-8G not be homonymous?_________
11. An irregular field defect not approximating a quadrantic defect is called a scotoma. A scotoma may be central, centrocecal, paracentral, or peripheral. The defect shown in Fig. 3-8H would be called a _________
12. A central scotoma that blends with the blind spot is called a centrocecal scotoma (caecum = blind). A paracentral defect would be near the point of central vision but detached from it.
E. Review of the anatomic basis of visual field defects
Return to Fig. 3-4 and use these instructions to learn it thoroughly.
1. Review and learn the names down the right side of Fig. 3-4.
2. Notice that light rays from the right half of space fall on the nasal side of the right retina and on the temporal side of the left retina.
3. At the chiasm, axons from the nasal half of the right retina decussate to travel through the optic tract with the axons from the temporal half of the left retina.
4. The retinal axons synapse on neurons of the lateral geniculate body, a thalamic nucleus that relays sensory impulses to the cerebral cortex. The tract of axons formed by geniculate body neurons is called the optic radiation or geniculocalcarine tract.
5. Using a colored pencil, draw in Fig. 3-4 the retinal pathway from the nasal half of the left retina and temporal half of the right. Include the geniculate body synapse. Make sure you draw a mirror image of the corresponding axons already in the drawing.
6. The bars drawn across the optic pathways from A to G of Fig. 3-4 simulate lesions at various sites. At the left, label the field defects resulting from the lesions.
7. Note that lesions of the inferior fibers, E, of the geniculocalcarine tract in Fig. 3-4 cause contralateral superior homonymous quadrantanopia (Ebeling and Reulen, 1988; Hughes et al, 1999; Lepore, 2001). Study Fig. 2-27 in relation to Fig. 3-5B to understand this finding.
8. Practice drawing the entire optic pathway from the retina to the occipital cortex.
9. Figures 3-5A and 3-6 show the actual course of the optic pathways through the cerebrum. Note that visual field testing assays the integrity of large parts of the temporal and occipital lobes and the inferior margin of the parietal lobe.
10. To test whether you have mastered the anatomy of the visual fields and the hemisected eyeball mnemonic, move the eyeball well forward over the temporal lobe and reason out the field defect that interruption of the anterior part of loop of the geniculocalcarine tract would cause. Remember that the upper half of the visual field falls on the lower half of the retina._________
IV. CLINICAL TESTING OF CENTRAL VISION
A. Tests of visual acuity
1. For crude screening of visual acuity, have the Pt read newsprint held at an arm’s length. Test each eye separately. The Pt keeps eye glasses on. Although glasses improve acuity by correcting for a refractive error, they do not improve acuity impaired by opacities of the refracting media of the eye or retinal or optic nerve lesions.
a. If the history or screening test suggests a visual complaint, use a Snellen or Jaeger chart or a Rosenbaum Pocket Vision Screener for a numerical evaluation of acuity and consider referring the Pt to an ophthalmologist for visual field testing, as explained in point b.
b. For a small child or mentally impaired Pt, use a large E printed on a card and have the Pt point in the direction that the cross bars point after you direct E up and down and right and left.
2. Test the acuity of partially blind Pts by having them count the number of fingers held up at various distances. If the Pt cannot see to count fingers, find out whether the Pt can see hand movements. If this fails, see if light perception remains. That is to say, push the analysis to the limit. If the Pt cannot see even a bright light, the vision in the involved eye is NLP (no light perception).
3. The standard neurologic examination does not include color testing. If necessary, use Ishihara or similar color vision cards.
B. Screening central vision with an Amsler grid
1. With each eye separately, the Pt fixates on a dot in the center of a grid work held about 30 cm away (Fig. 3-9).
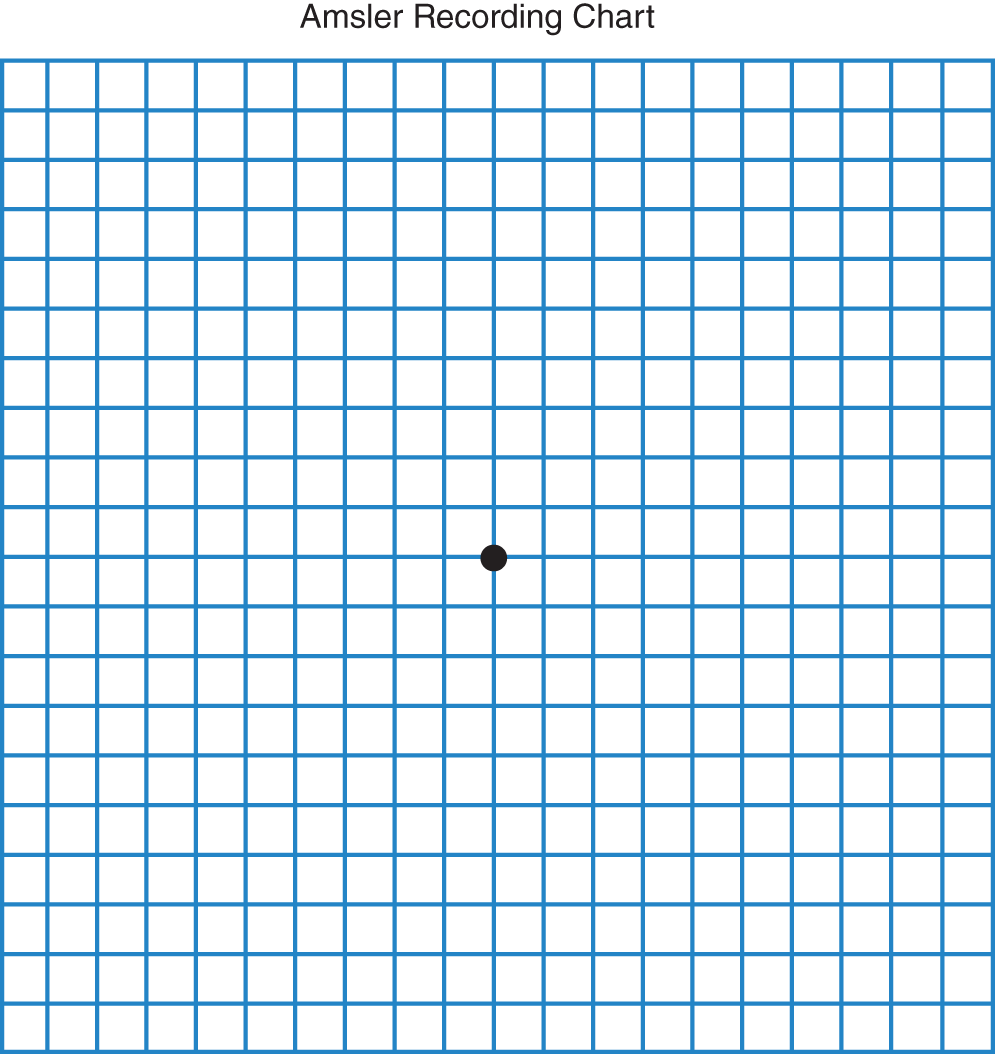
FIGURE 3-9. Amsler grid for screening for scotomas in the central visual fields.
2. The Ex asks whether the Pt can see each of the four corners and whether any of the squares in the grid are missing or distorted.
C. Tangent screen testing of central vision
1. The Amsler grid serves as a quick screening test, but the tangent screen maps out field defects precisely.
2. The Pt sits 1 or 2 m away from a black screen 1 or 2 m2 while fixating on its center (with the other eye covered).
3. The Ex moves a 1- to 5-mm white body through the field of vision. After mapping the physiologic blind spot, the Ex systematically searches the central field for pathologic blind spots, called scotomas. The chart becomes part of the medical record (Fig. 3-10).
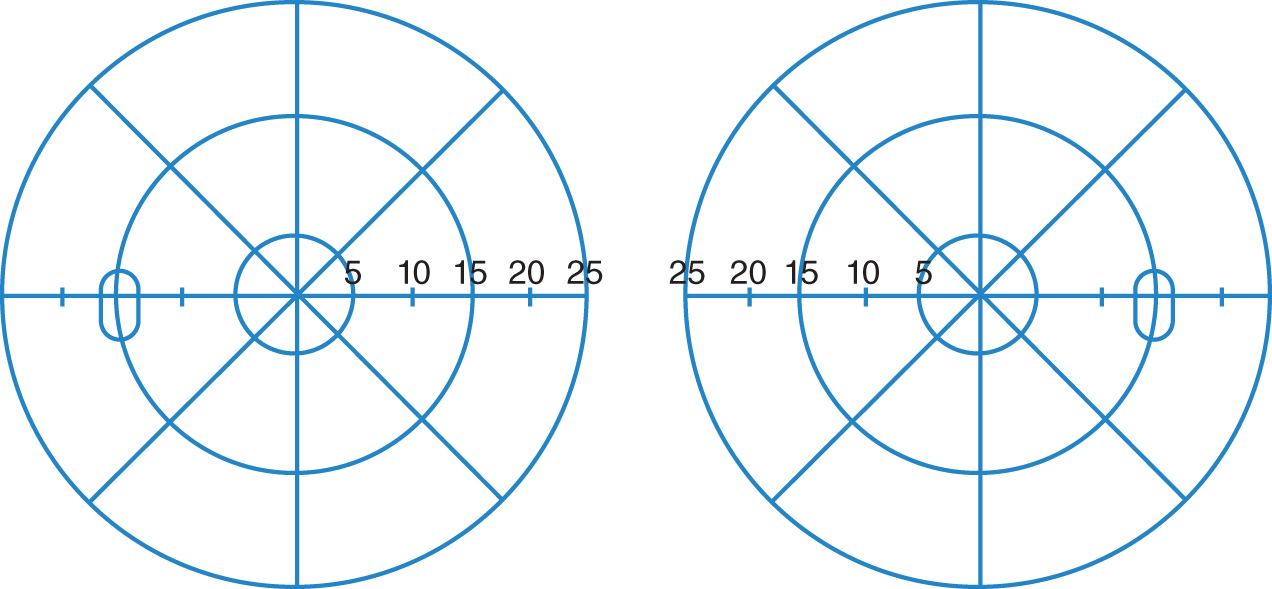
FIGURE 3-10. Chart for recording the central portion of the visual fields, as determined by tangent screen examination.
4. When no tangent screen is present, at the bedside or clinic, the Ex may select a fixation point on the wall and use a laser pointer as a substitute for the white spot.
D. Mapping the physiologic blind spot
1. Do this experiment with Fig. 3-11.

FIGURE 3-11. Demonstration of the blind spot. L = left; R = right.
a. Hold the page about 30 cm away.
b. Cover your left eye.
c. Fixate on the left cross. Make sure you keep fixating on the left cross all of the time, but you should also attend to the right cross.
d. As you maintain fixation on the left cross and continue to attend to the right cross, move your face slowly toward the page.
e. At a point with your eye a few inches from the page, the right cross disappears. As you continue to move closer, it reappears. If this does not happen, you broke your fixation on the left cross—try again.
f. Again cover your left eye, fixate on the left cross, and position your head so that the right cross disappears. Put your pencil point in the blind spot and move it very slowly toward the left cross. Make a mark on the paper when the point just becomes visible. By working around the blind spot, you can map out its perimeter. Be careful: If your fixation wavers, your blind spot will have irregular borders. The blind spot or other scotomas are mapped more accurately on a distant tangent screen than with the short target distance of this experiment.
2. Get a partner. Draw a small X on a piece of paper to fixate on and fasten the paper to a wall, making your own tangent screen. Seat the partner 100 cm away and map out the blind spot, moving the test object from the far right through the blind spot, toward the fixation point. Then work from the center of the blind spot to its periphery to outline it.
3. We do not ordinarily recognize our own blind spots. We attend to the fixation point of the visual axes and ignore it.
4. The absence of receptor neurons at the optic papilla or optic nerve head causes the blind spot. Normally the diameter of the blind spot depends on the diameter of the optic disc (Fig. 3-12).
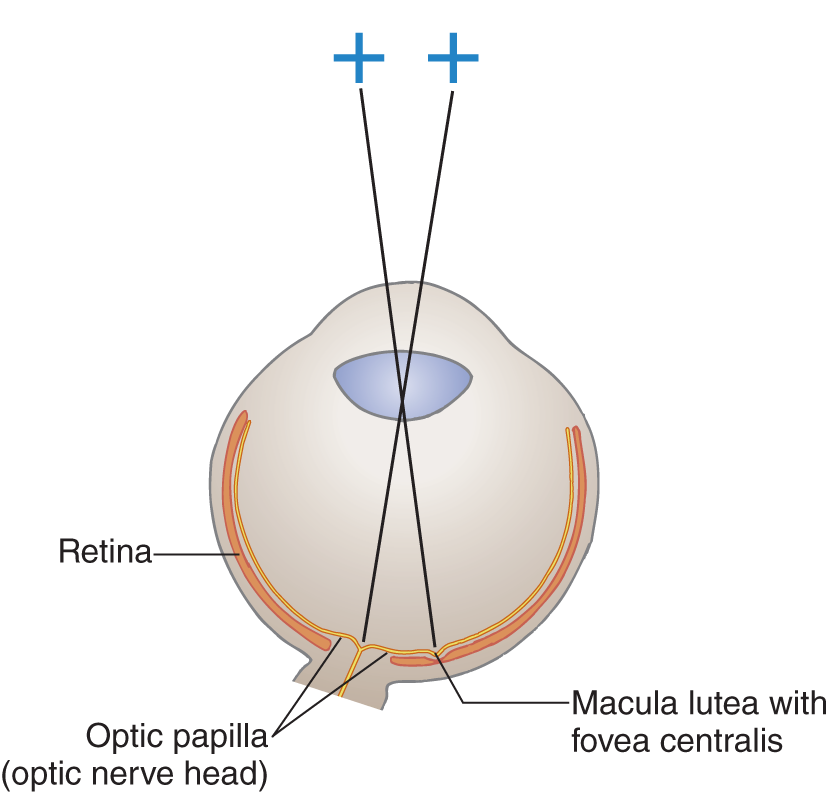
FIGURE 3-12. Horizontal section of the right eye to explain the blind spot.
5. Effect of papilledema on the size of the blind spot: Swelling of the optic papilla increases the size of the blind spot because the swelling impairs the function of the retina that surrounds the papilla (see Section VII, Ophthalmoscopy).
E. Location of lesions that cause scotomas or quadrantic/hemianopic field defects
1. Retinal lesions such as hemorrhages or exudates block penetration of light rays to the receptor neurons or destroy them. The scotoma produced depends on the size and location of the lesion.
2. Although in theory retinal or optic nerve lesions might cause quadrantic or hemianopic field defects; in practice, this virtually never occurs. Retinal or optic nerve lesions generally cause central scotomas, centrocecal (a central scotoma connected to the blind spot), or paracentral scotomas. The Pt with these scotomas loses acuity and color vision.
3. Lesions of the chiasm, optic tract, geniculocalcarine tract, or occipital lobe usually are the causes of hemianopic or quadrantanopic field defects (Fig. 3-4).
4. From the chiasm on back to and including the calcarine cortex, the more posterior the lesion in the optic pathway, the more congruent the field defect in the two eyes.
5. A Pt who suddenly lost visual acuity without blindness would most likely have a macular lesion, if the lesion affects the retina. If the scotoma is large, the Ex can detect it by carefully moving a pencil tip or small white object, the size of a small pearl, very slowly through the central field. Ophthalmoscopic examination, of course, will disclose many retinal lesions. With an acute lesion in the optic nerve, the retina may look normal for some weeks before optic atrophy becomes visible. Demonstration of a scotoma by tangent screen examination would establish an organic cause for the loss of acuity.
6. Figure 3-8I shows the visual fields of a 53-year-old hypertensive Pt who complained of headaches, sudden loss of vision on the right side, and blurring of vision in the left eye. Write out the name of the defects._________
_________
F. Generalized constrictions of the visual field
In addition to the patterned field defects already discussed, some Pts have a generalized constriction of the visual field. The most common causes are
1. Hysteria (Fig. 14-6)
2. Malingering
3. Optic disc drusen
4. Postpapilledema optic atrophy
5. Retinitis pigmentosa (degeneration of the periphery of the retina, as contrasted to macular degeneration)
BIBLIOGRAPHY · Visual Fields
Bender MB, Bodis-Wollner I. Visual dysfunctions in optic tract lesions. Ann Neurol. 1978;3: 187–193.
Brazis PW, Masdeu JC, and Biller J. Localization in Clinical Neurology, 7th ed. Philadelphia, PA: Lippincott Williams and Wilkins, Wolters Kluwer Health, In Press. 2016.
Ebeling U, Reulen HJ. Neurosurgical topography of the optic radiation in the temporal lobe. Acta Neurochir. 1988;92:29–36.
Hughes TS, Abou-Khalil B, Lavin PJM, et al. Visual field defects after temporal lobe resection. A prospective quantitative analysis. Neurology. 1999;53:167–172.
Lepore FE. The preserved temporal crescent: clinical implications of an “endangered” finding. Neurology. 2001;57:1918–1921.
Trobe JD, Acosta PC, Krischer JP, et al. Confrontation visual field techniques in the detection of anterior visual pathway lesions. Ann Neurol. 1981;10:228–234.
V. TECHNIQUE FOR CONFRONTATION TESTING OF THE PERIPHERAL VISUAL FIELDS
A. Positioning of examiner and patient
1. Confront the Pt by stationing yourself directly in front. Start with your left eye directly in line with the Pt’s right eye, at a distance of about 50 cm—eye to eye but not breath to breath. The Pt covers the left eye with the left hand (Fig. 3-13) (Video 3-1).
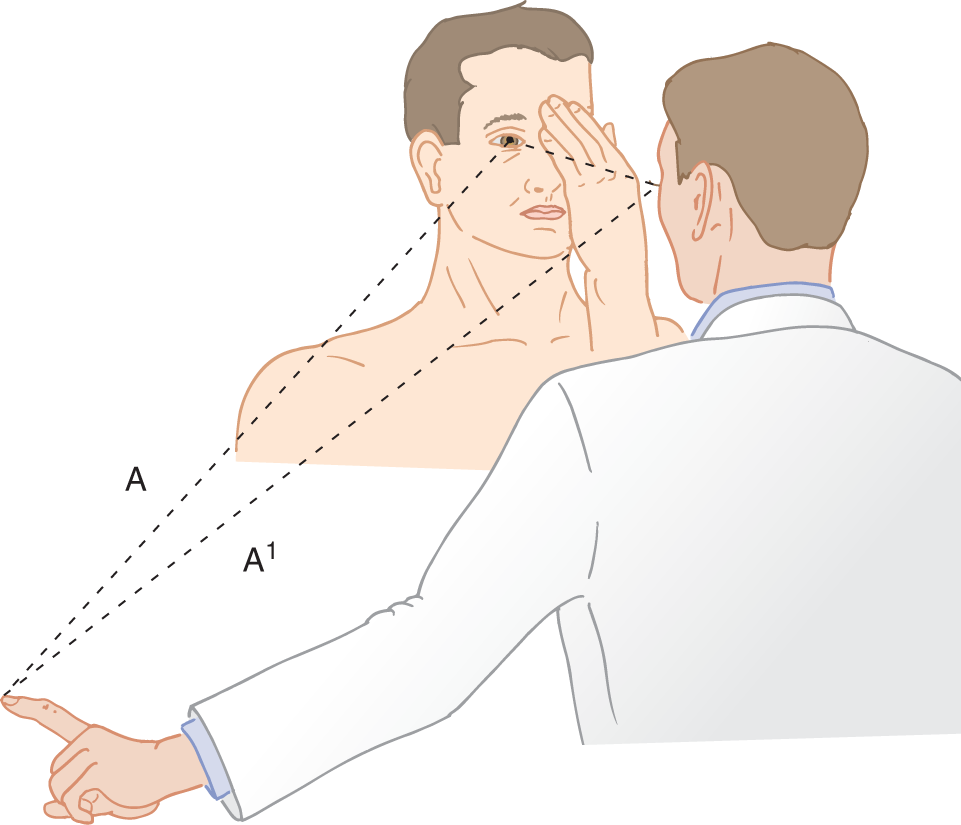
FIGURE 3-13. Position of doctor and patient for testing the visual fields by confrontation. Distance A = A′.

Video 3-1. Congruous left homonymous hemianopia due to a right posterior cerebral artery infarction.
2. Hold up your left index finger just outside your own peripheral field, in the inferior temporal quadrant. Hold the finger about equidistant between your eye and the Pt’s, as shown in Fig. 3-13, A = A′. Ideally the finger should extend beyond the perimeter of the field. Wiggle the finger slowly and move it very slowly toward the central field. Request the Pt to say “now” as soon as the wiggling finger is seen. Try to match the perimeter of the Pt’s visual field against your own. Test all quadrants of each eye separately, each time starting at the limit of the field.
3. After surveying the visual field by the wiggling finger, you can refine the test by asking the Pt to count the number of fingers presented in each of the four quadrants of the visual field of each eye. Have the Pt close or cover the eye not being tested. Then randomly hold up one, two, or five digits (three or four is too complicated) in each quadrant for the Pt to count.
4. As a further refinement, the Ex may present the fingers for counting simultaneously in two separate quadrants of one eye or present wiggling fingers to each field.
5. In addition to testing the periphery of each quadrant, the Ex may use the finger-counting technique for the inner part of each quadrant, within the central 10° (Bender and Bodis-Wollner 1978; Trobe et al, 1981).
B. Technical pointers for confrontation testing
1. Position yourself and the Pt comfortably.
2. State clearly what you want the Pt to do. The best instructions are: “I want you to look directly into my eye. Do not look away. Now I want to find out how far you can see out of the corner of your eye. Say, “Now” as soon as you see my finger wiggle.” Instruct the Pt not to look at your nose. The Pt’s eyes will converge, and your fields will not match the Pt’s. Try to fit or titrate your island of vision against the Pt’s.
3. Test the midpoint of the quadrants, about 45°, 135°, 225°, and 315° (Fig. 3-14) rather than 0°, 90°, 180°, and 270°. If you test along the vertical or horizontal axis, you may miss a full quadrant defect, because of the intact fields on the border of the defect. See the left eye in Fig. 3-8A.
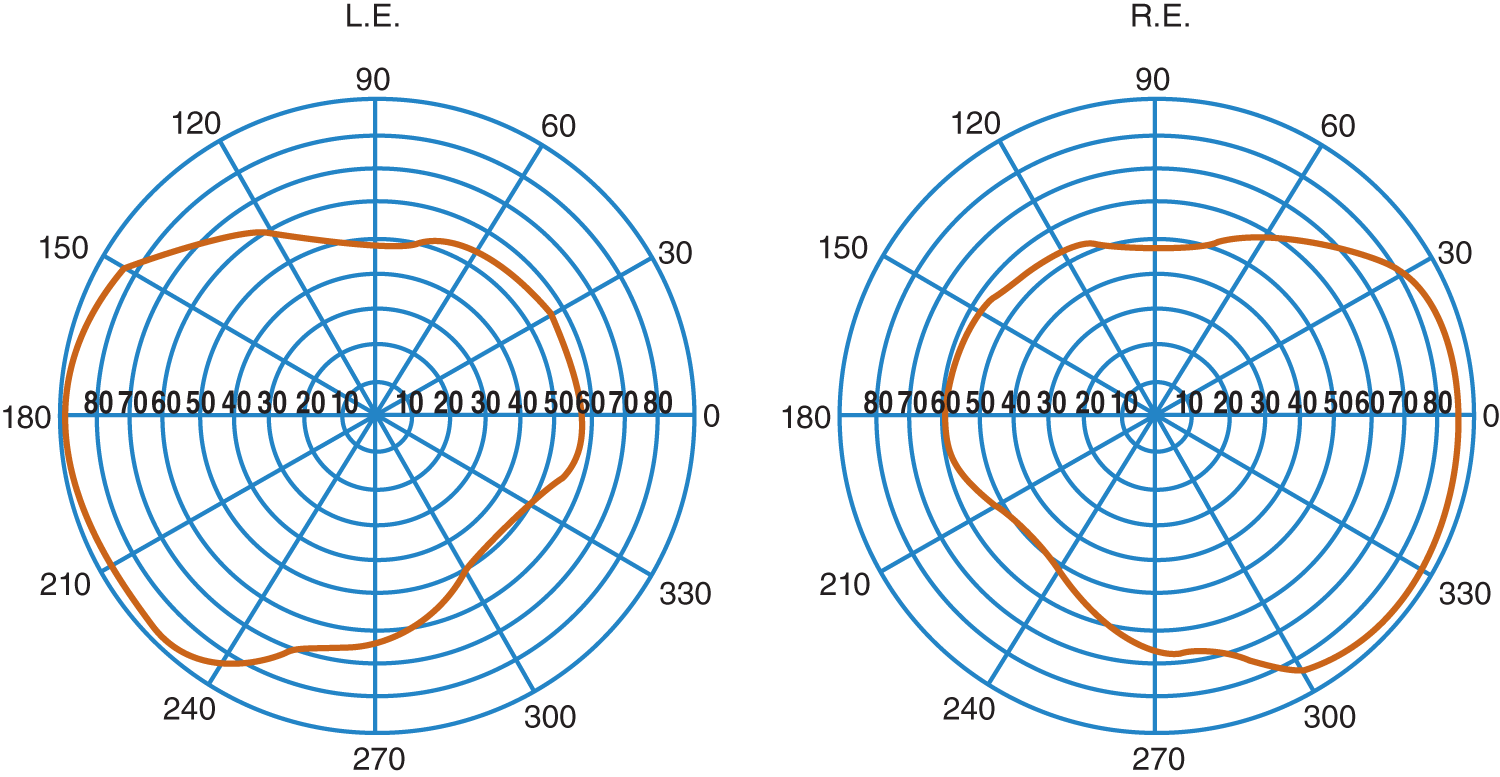
FIGURE 3-14. Actual outline of visual fields charted by perimetry. The numbers are readings in degrees from the center. L.E. = left eye; R.E. = right eye.
4. Confrontation is suitable for detecting large erosions of the island of vision by the sea of blindness. Practice testing the visual fields on a normal person. The combination of acuity testing, Amsler grid, and confrontation testing, all of which you can complete in a few minutes, will usually disclose visual defects or at least disclose the need for further testing by tangent screen and perimetry.
C. Quantitative mapping of the visual fields and blind spot
1. Detailed mapping of the peripheral fields requires perimetry by an ophthalmologist or neurologist. Accurate plotting of the fields discloses the somewhat irregular outline in Fig. 3-14, rather than being exactly round as the text depicts them. The tangent screen and perimeter, although valuable in themselves, only extend, but do not supplant, confrontation and the other visual tests by the attending physician.
2. Perimetry by the Goldmann manual kinetic perimeter or automated static perimetry of the central visual field can extend the tangent screen and confrontation test. Of the two, the Goldmann test includes more of the temporal field, whereas the automated tests include only the central 30° of the visual field (Lepore, 2001).
VI. SUPPRESSION OF VISION
A. Do this experiment to demonstrate physiologic suppression of vision
1. Fixate on a distant point straight ahead. Place your palm on your forehead with your wrist directly between your eyes, while maintaining fixation on a distant point. Close one eye and then open it. Under which condition do you see more of your wrist?  one eye open/
 both eyes open. (
 one eye open)
2. By closing one eye, you prove that the light rays from the wrist are striking photosensitive areas of the retina, yet the wrist, although visible with one eye open, nearly vanishes with both eyes open. The experiment shows that the medial, overlapping portions of the visual fields undergo suppression during binocular vision (Fig. 3-15). This physiologic suppression of the overlapping fields of the two eyes rids the visual image of confusing elements.
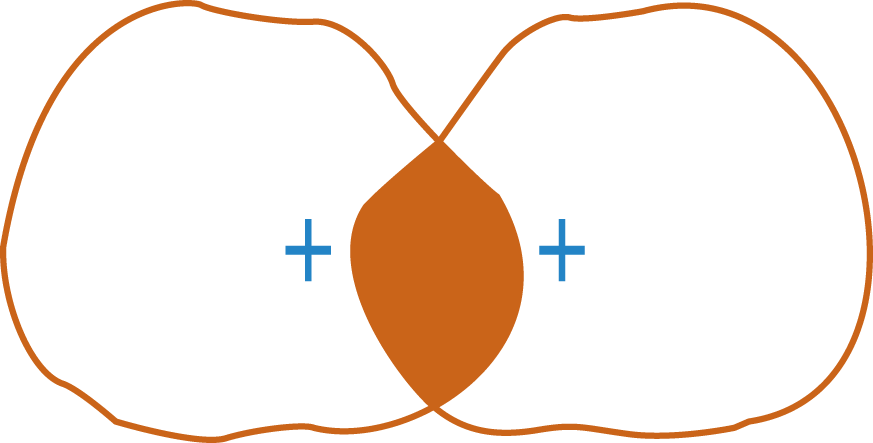
FIGURE 3-15. The overlapping, shaded area of the visual fields undergoes physiologic suppression.
B. Pathologic suppression of vision
1. Suppression amblyopia (amblyopia ex anopsia): If one eye in an infant turns in or out, the infant learns to suppress the image from the errant eye. If suppression continues for the first few years of life, the Pt ultimately becomes completely blind in the deviating eye, even though the retina and visual pathways remain structurally intact.
2. Visual inattention or visual extinction to double simultaneous stimulation:
a. Fixate straight ahead.
b. Hold your arms out to the sides, in the upper or lower quadrant, with your index finger pointing up.
c. Rotate your arms forward until your index fingers just come into view in each eye. Notice that you can make out both fingertips at the periphery of your fields, even though you are looking straight ahead. The presentation of two stimuli, such as the two fingers, on opposite sides, is called double or simultaneous stimulation.
d. Technique for simultaneous stimulation of visual fields: Assume the same position as for regular confrontation, but with the Pt keeping both eyes open. Extend your fingers into your inferior temporal quadrants, near, but not beyond, the periphery of your own visual fields. Wiggle one finger and request the Pt to point to the finger that moves. Then wiggle both fingers simultaneously and ask the Pt to point to any finger that moves. The normal person, perceiving both stimuli, points to both fingers. Repeat the test in the upper temporal quadrants and then simultaneously stimulate upper and lower nasal and temporal quadrants of one eye at a time.
e. Results and interpretation of inattention to simultaneous stimulation
i. Patients with parietal or parieto-occipital lobe lesions, usually on the right side of the cerebrum, will not attend to the stimulus from the contralateral side when presented with simultaneous stimuli on both sides. In the usual case, when the Pt does not attend to stimuli from the left half of space, the lesion is in the  right/
 left parietal lobe. (
 right)
ii. However, when tested by confrontation with one finger in the left visual field, no defect is demonstrated. The Pt is then said to have visual inattention for the left side of space.
f. Hemianopia is detected by using one stimulus, whereas visual inattention is detected by using _________
g. Blindness in one-half of the visual field is called _________
h. Explain the difference between hemianopia and visual inattention._________
i. Patients with right parietal lobe lesions also may fail to attend to auditory or tactile stimuli from the left side (Chapter 10).
C. Neuro-ophthalmologic findings in cortical blindness (double hemianopia)
1. Bilateral destruction of the visual cortex, as from infarction including hypoperfusion-related watershed infarcts, hypoxia, preeclampsia-eclampsia, posterior reversible encephalopathy syndrome (PRES), mitochondrial encephalomyopathy, lactic acidosis with stroke-like episodes (MELAS), trauma, minor head injuries in children, or cardiovascular and cerebral angiography procedures results in cortical blindness (Acheson and Sanders, 1995; Aldrich et al, 1987; Gross CG, 1997; Harrington, 1971; Liu et al, 2001; Saigal et al, 2004; Shingleton et al; 2000), characterized by:
a. Complete blindness, with no light perception and no response to a menacing gesture.
b. Loss of smooth pursuit of the Ex’s moving finger in testing the range of eye movements but preservation of volitional movements.
c. No optokinetic nystagmus.
d. Normal pupillary reactions, funduscopic examination, and no nystagmus.
e. Sometimes the Pt will deny the blindness and will claim that vision is present Anton syndrome or visual anosognosia.
2. Magnetic resonance imaging will confirm the bi-occipital lesions.
BIBLIOGRAPHY
Acheson JF, Sanders MD. Vision. J Neurol Neurosurg Psychiatry. 1995;29:4–15.
Aldrich MS, Alessi AG, Beck RW, Gillman S. Cortical blindness: etiology, diagnosis, and prognosis. Ann Neurol. 1987; 21(2):149–158.
Bender MB, Bodis-Wollner I. Visual dysfunctions in optic tract lesions. Ann Neurol. 1978;3:187–193.
Brazis PW, Masdeu JC, and Biller J. Localization in Clinical Neurology. 7th ed. Philadelphia, PA: Lippincott Williams and Wilkins, Wolters Kluwer Health, In Press. 2016.
Gross CG. Leonardo da Vinci on the eye and brain. Neuroscientist. 1997;3:347–354.
Harrington D. The Visual Fields: A Textbook and Atlas of Clinical Perimetry. 2nd ed. St. Louis, MO: C.V. Mosby; 1971.
Lepore FE. The preserved temporal crescent: clinical implications of an “endangered” finding. Neurology. 2001;57:1918–1921.
Liu GT, Volpe NJ, Galetta SL. Neuro-ophthalmology. Philadelphia, PA: W.B. Saunders; 2001.
Saigal G, Bhatia R, Bhatia S, Wakhloo AR. MR findings of cortical blindness following cerebral angiography: is this entity related to posterior reversible leukoencehalopathy? AJNR. 2004;25:252–256.
Shingleton BJ, O’Donoghue MW. Blurred vision. N Engl J Med. 2000;343:556–562.
Trobe JD, Acosta PC, Krischer JP, et al. Confrontation visual field techniques in the detection of anterior visual pathway lesions. Ann Neurol. 1981;10:228–234.
VII. OPHTHALMOSCOPY
A. Introduction
1. By now, you know what we would ask you do to learn ophthalmoscopy. Sit down with a normal person and, using colored pencils, draw the optic fundus and its vessels. Draw them faithfully, precisely, and in exquisite detail. You will never do competent ophthalmoscopy unless you can draw the fundus. Moreover, you often should use drawings in your clinical notes rather than laborious written descriptions.
2. Making a drawing that forces you to search the fundus systematically.
B. Technique of ophthalmoscopy
1. Remove your and the Pt’s glasses, unless one or both of you have a severe refractive error. The closer you can get your eye to the ophthalmoscope and the closer the scope to the Pt’s eye, the larger the area of fundus visible.
2. Darken the room, leaving only a little background illumination.
3. Ask the Pt to fixate on a specific point straight ahead.
4. Instruct the Pt to blink as needed and breathe normally, but the Ex should avoid exhaling in the Pt’s face. Both Pt and Ex should be in a comfortable position. Establish a “proprioceptive circuit” to steady the Pt’s head and your hand (Fig. 3-16).

FIGURE 3-16. “Proprioceptive link” to steady the patient and examiner for ophthalmoscopy. The link is between the examiner’s two hands and the patient’s head.
5. Turn the rheostat on the ophthalmoscope down a little to avoid too strong a beam of light. With too bright a light, the pupil constricts strongly, thus reducing the view of the retina, and photophobic Pts will flinch to avoid discomfort.
6. Hold the ophthalmoscope in your right hand and move your right eye to the Pt’s right eye; hold the scope in your left hand and move your left eye to the Pt’s left eye. Otherwise you are nose to nose. When looking through the scope, keep both eyes open. Attend only to the image from the eye that looks through the scope. Learn this art. It well repays the time required because it will enable you to relax during the procedure. Start with the ophthalmoscope 10 to 15 cm from your partner’s eye and, with a strong positive lens, focus on the media in succession from cornea to lens to vitreous, using successively weaker lenses. Inspect the cornea with and without the scope for opacities and for a circular ring near the limbus, which, if grayish-white, is an arcus senilis, or, if greenish-brown, a Kayser–Fleischer ring pathognomonic of Wilson hepatolenticular degeneration.
7. Next focus on a retinal vessel by using whatever lens setting, from 0 to a strong plus or minus that is required to overcome refractive errors. After locating a retinal vessel, follow it along until you find the optic disc (optic papilla). Now study Figs. 3-3, 3-17, and 3-18A before continuing.

FIGURE 3-17. Normal variation in the size of the physiologic cup of the optic papilla. The cup size depends on whether the nerve fibers perforate the lamina cribrosa at its periphery (A) or all over its surface (C). (A) Large cup. Notice the large white ring of lamina cribrosa between the nerve fibers and the central vessels. Notice the spread of the vessels where they perforate the lamina cribrosa. (B) Medium-size cup. Notice the small white ring and the more compact relation of the vessels. (C) Absence of a physiologic cup in an otherwise normal disc. The vessels originate as from a point. The disc appears like this in pseudopapilledema.

FIGURE 3-18. Photographs of optic papilla in various conditions. (Used with permission from Drs. Kathleen B. Digre and James J. Corbett. Practical viewing of the optic disc. Boston, MA: Butterworth Heinemann; 2003). (A) Normal. (B) Papilledema. Notice how the edematous swelling engulfs and obscures the proximal segments of many vessels. (C) Pseudopapilledema. (D) Primary optic atrophy. (E) Secondary optic atrophy. (F) Large physiologic cup, a normal variation.
8. Next, identify the pigment ring around the disc, note the disc color, and the presence or absence of a physiologic cup. If present, the physiologic cup is white as compared with the rest of the disc. Identify the arteries, the thin, brighter appearing vessels, and the thicker, duller appearing veins.
9. Look for venous pulsations where the veins bend over the edge of the physiologic cup. Venous pressure slightly exceeds the intraocular pressure. Visible pulsation occurs in nearly 90% of normal Pts when both eyes are examined (Levin, 1978). Venous pulsations disappear at intracranial pressures above 190 mm H2O. Because of the absence of visible pulsations in some normal persons, the presence of pulsation is more important than its absence.
10. Follow each artery out as far as possible. Locate the macula, a darker, avascular area two disc diameters lateral to the disc. Note the pearl of light reflecting from the fovea centralis, the center of the macula. This light reflection fades in older persons.
11. Now make a drawing of your partner’s fundus. To check how observant you have been, answer questions 11a to 11l. Write your answers in the left-hand margin, and you will have created your own program.
a. What is the normal ratio of arterial to venous diameter?
b. What is the width of the stripe of light reflection from the arteries?
c. Do the arteries normally nick or indent the veins where they cross?
d. Between the superior and inferior temporal branches of the retinal artery, how many blood vessels can you count coursing over the disc? Be sure to have the disc sharply in focus.
e. Which margin of the disc shows the most pigment?
f. Which borders of the disc—the superior, inferior, nasal, or temporal—normally look more blurred than the other borders?
g. What is the normal color of the disc?
h. Which half of the disc, nasal or temporal, is the palest?
i. What is the range of normal variability in the diameter of the physiologic cup? (Answer only after you have looked at several eyes.)
j. How many disc diameters lateral to the disc is the macula?
k. Describe the macula.
l. Does the fundus appear perfectly smooth or does it have a leathery texture?
12. Now, after trying to answer the questions, decide whether you should repeat the drawing. The questions cannot be bluffed. Either you know the answers or you do not. Should you try again? While wrestling with your conscience, listen to Walt Whitman:
Failing to fetch me at first keep encouraged,
Missing me one place, search another,
I stop somewhere waiting for you.
13. Table 3-1 summarizes common vascular lesions visible by funduscopy.
TABLE 3-1 • Vascular Lesions Disclosed by Funduscopy
Emboli: talc/corn starch emboli in IV drug users; Hollenhorst plaques: yellow cholesterol emboli in retinal arterioles; fibrin–platelet emboli: white emboli in arterioles; septic emboli: small retinal hemorrhages with a central white spot (Roth spots) Trauma/subarachnoid hemorrhage: subhyaloid hemorrhages between the retina and the vitreous, characteristic of battered infants Central retinal artery occlusion: pale retina, attenuated arterioles, and red macula (cherry-red spot) Central retinal vein occlusion: widespread intraretinal hemorrhages and dilated retinal veins Hypertensive retinopathy: “copper or silver wire” arteries, A-V nicking, flame hemorrhages,” cotton-wool” exudates, and papilledema Diabetic retinopathy: microaneurysms, “hard” exudates, retinal hemorrhages; vitreous hemorrhage |
ABBREVIATIONS: A-V = arterial to venous diameter ratio; IV = intravenous. |
C. Papilledema
1. Definition: Papilledema means a blurred or elevated optic papilla (optic nerve head or optic disc) resulting from edema fluid in the nerve fibers as they cross the disc to perforate the lamina cribrosa and enter the optic nerve. Papilledema is classed as early, fully developed, chronic, and chronic atrophic (Video 3-2).

Video 3-2. Severe bilateral asymmetric papilledema due to superior sagittal sinus thrombosis.
2. Pathophysiology: Most often, papilledema results from transmission of increased intracranial pressure into the eye via the subarachnoid space, which extends out along the optic nerve (Fig. 3-19). Other causes include direct pressure on the optic nerve from retrobulbar lesions.
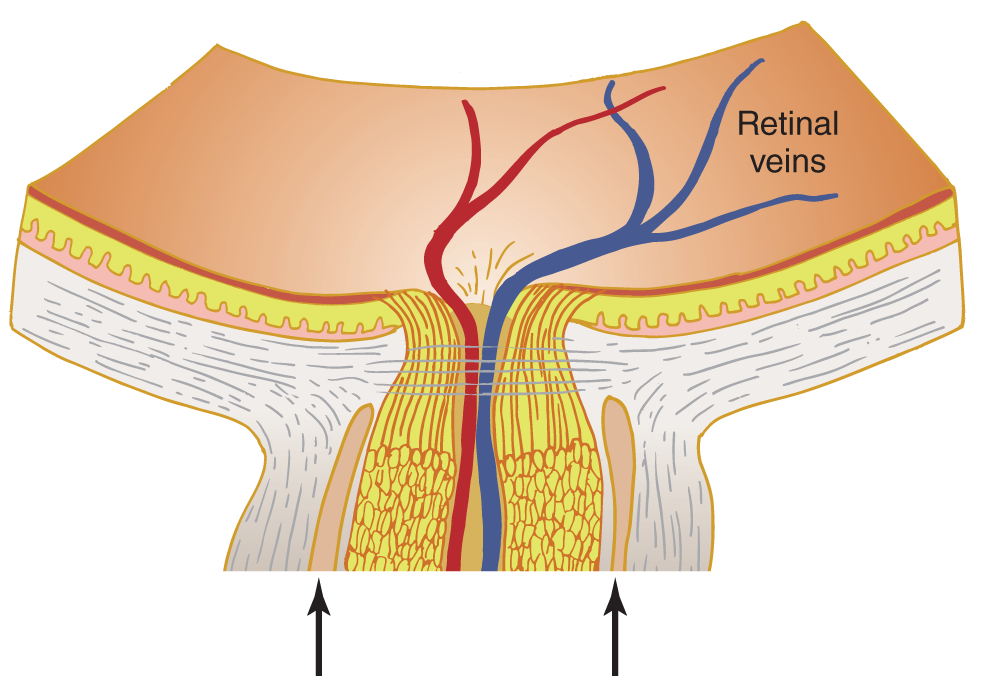
FIGURE 3-19. Section of optic papilla and optic nerve. The arrows show how the subarachnoid space extends around the optic nerve.
a. The retinal veins converge on the optic papilla to form the ophthalmic vein, which enters the retinal end of the optic nerve. If the pressure around it increases, the ophthalmic vein, being thin walled, collapses, obstructing the retinal veins (Fig. 3-19).
b. The retinal veins and papillary capillaries distend and leak fluid into the nerve fibers on the optic papilla and into the surrounding retina. The veins may rupture, causing visible hemorrhages on or around the papilla.
3. Ophthalmoscopic features of progressive papilledema are as follows:
a. Engorged veins cause hyperemia (increased redness) of the disc and loss of venous pulsations.
b. The nerve fibers blur as they converge on the disc. Then the blurred margins become elevated. To see the elevation, start with a positive lens (+8) in the ophthalmoscope, find the disc, and focus on it by reducing the power of the lens. The upper and lower poles of the disc blur first, then the nasal side of the disc, and then the lateral. Some blurring of the upper and lower poles is normal, particularly in emmetropic or hyperopic eyes. After focusing on the elevated disc, focus on the retina.
c. As the disc elevates, the physiologic cup obliterates. Linear, peripapillary hemorrhages and splinter and flame-shaped retinal hemorrhages and cotton-wool exudates then appear.
d. As the edema spreads from the papilla outward, peripapillary folds may also appear in the retina adjacent to the elevated disc.
e. From Fig. 3-18, pick out the retina that shows papilledema (and one hemorrhage):  A/
A/ B/
B/ C/
C/ D/
D/ E/
E/ F. (
F. ( B. The linear peripapillary hemorrhage is at the vein bifurcation, just superior to the optic disc.)
D. Differential diagnosis of papilledema, other disc lesions, and pseudopapilledema
1. Table 3-2 lists some conditions that resemble papilledema.
TABLE 3-2 • Optic Disc Anomalies Confused with Papilledema
Medullated nerve fibers: a whitish-yellow patch of fibers that radiates into the retina from the disc Congenital vascular anomalies of the vessels with glial overgrowth Small scleral aperture: the disc appears protruded; usually seen in a hyperopic eye with a short sagittal axis Drusen (waxy-appearing bodies that push up from beneath and may protrude through the disc) Pseudopapilledema and papillitis; see later sections |
2. Differential diagnosis of true and pseudopapilledema.
a. Perhaps 5% of normal individuals have some blurring and even slight elevation of the optic papilla, a condition called pseudopapilledema, that has to be distinguished from early papilledema. The experienced Ex readily recognizes advanced papilledema when it shows extreme papillary swelling, venous congestion, and hemorrhages. Pseudopapilledema often may lead to unnecessary tests when, in most instances, careful clinical observations, based on drawings and periodic assessment of the disc, would lead to the correct, benign diagnosis of pseudopapilledema.
b. In pseudopapilledema, the disc margins look blurred, but the central rather than the peripheral portion of the disc protrudes, as in true papilledema, and the vessels show preretinal branching (Fig. 3-20).

FIGURE 3-20. Optic papilla in horizontal sections of the eye. (A) Normal optic papilla, showing slight elevation of the papillary margins and normal depth of the physiologic cup. (B) Early true papilledema, showing elevation of the papillary margins and beginning obliteration of the physiologic cup. (C) Pseudopapilledema, showing preretinal branching of the vessels, central elevation of the optic papilla, and absence of a physiologic cup.
c. The elevated disc of pseudopapilledema in some Pts may come from drusen (hyaloid bodies) pressing up from beneath the nerve fiber layer.
d. Drusen and pseudopapilledema most frequently affect blond Caucasians and hyperopic rather than myopic Pts. If you suspect pseudopapilledema in a blond Caucasian or hyperopic Pt, inspect the fundi of family members. The answer becomes clear if other family members also have blurred discs. From Fig. 3-18, select the disc which shows pseudopapilledema:  A/
A/ B/
B/ C/
C/ D/
D/ E/
E/ F. (
F. ( C)
C)
3. Two further tests help identify papilledema in doubtful cases: Measurement of the blind spot size and the fluorescein dye test:
a. Measurement of the blind spot.
i. Edema from the swollen disc enlarges the blind spot. In pseudopapilledema caused by drusen, the blind spot also increases.
ii. What type of visual field examination would best measure the blind spot?  confrontation/
 perimetry/
 tangent screen (
 tangent screen)
iii. Although papilledema increases the size of the blind spot, papilledema per se does not generally impair visual acuity until later, after weeks to months.
b. The fluorescein dye test: After injection of fluorescein into an arm vein, the fundus is photographed. In papilledema, fluorescein passes through the leaky walls of the distended retinal vessels into the optic papilla.
c. Name the two tests in addition to ophthalmoscopic examination to diagnose papilledema? _________
4. To summarize the differential diagnosis of papilledema and pseudopapilledema, complete Table 3-3. Place a + or 0 in the right-hand columns.
TABLE 3-3 • Differentiation of True Papilledema and Pseudopapilledema
Papilledema |
Pseudopapilledema |
|
DISC CHARACTERISTICS |
||
Hyperemic, pink color (vascular distention) |
—— |
—— |
Physiologic cup present (early) |
—— |
—— |
Sparing of temporal margin (early) |
—— |
—— |
High point of elevation central (see Fig. 3–20B) |
—— |
—— |
Drusen (hyaline bodies) submerged in children, exposed in adults, gray-yellow translucent color of disc; applies only to blond Caucasians |
—— |
—— |
VESSEL CHARACTERISTICS |
||
Dilated veins |
—— |
—— |
Venous pulsation present |
—— |
—— |
Disc obscures origin of vessels |
—— |
—— |
Arteries appear tortuous, show preretinal branching; disc does not obscure the origin of the vessels |
—— |
—— |
Prominent choroidal vessels (from lack of retinal pigment) |
—— |
—— |
HEMORRHAGES |
—— |
—— |
HYPEROPIA |
—— |
—— |
ENLARGED BLIND SPOT |
—— |
—— |
FLUORESCEIN DYE TEST: shows leaky vessels |
—— |
—— |
+ |
0 |
+ |
0 |
+ |
0 |
0 |
+ |
+ |
0 |
|
|
|
|
0 |
+ |
+ |
0 |
0 |
+ |
|
|
|
|
0 |
+ |
+ |
0 |
0 |
+ |
+ |
0* |
+ |
0 |
*if drusen cause pseudopapilledema |
|
E. Summary of procedures to diagnose papilledema
1. Make drawings or photographs and keep careful clinical notes that describe the retina:
a. The color of the disc.
b. Degree of blurring of disc margins and location of blurring. Record any measurable elevation of the disc as the diopter difference between the elevation of the disc margin and the adjacent retina.
c. Presence or absence of the physiologic cup.
d. Venous congestion and pulsation.
e. Peripapillary wrinkles and folds.
f. Hemorrhages or exudates.
2. Measure the Pt’s visual acuity. It is generally preserved in early papilledema, but the Pt may complain of obscurations of vision, episodic blurring of vision or blindness lasting seconds. Disc swelling from optic neuritis or papillitis causes severe central visual loss and is generally unilateral, whereas papilledema is usually bilateral.
3. Chart the blind spot in the visual field.
4. Consider the anomalies confused with papilledema (Table 3-2).
5. Make careful serial examinations.
F. Optic atrophy, primary and secondary
1. Definition: Optic atrophy means degeneration and disappearance of the optic axons that originate in the ganglion cell layer of the retina and penetrate the optic disc (Videos 3-3 and 3-4).

Video 3-3. Bilateral sequential optic neuritis with secondary optic atrophy.

Video 3-4. Leber’s hereditary optic neuropathy (LHON).
2. Pathogenesis of optic atrophy (anterograde or retrograde axonal degeneration)
a. If a retinal lesion destroys neurons of the ganglionic layer of the retina or interrupts the axons before they penetrate the lamina cribrosa, the axons undergo Wallerian (anterograde) degeneration and disappear.
b. If a lesion interrupts optic axons behind the optic papilla, in the optic nerve, chiasm, or tract, the axons undergo retrograde degeneration that also causes them to disappear from the optic papilla and retina. Thus, after retinal or optic nerve lesions, the optic disc becomes denuded of axons and appears white, which brings us to a profound secret: The optic axons and retinal neurons are transparent and colorless. Why then does not the optic disc normally appear white, being backed by the white lamina cribrosa of the sclera? The physiologic cup appears white because no optic axons perforate the white lamina cribrosa at the site of the physiologic cup.
i. One theory proposed that the capillaries that accompany and nourish the nerve fibers cause the pinkish color of the disc. When the axons, or the parenchyma atrophy, so do the capillaries that give the axonal layer its color. The loss of capillarity in optic atrophy reflects a general rule: whenever the parenchymatous elements of an organ degenerate, so does its blood supply. Compare the capillarity of the pre- and postmenopausal ovary. With optic atrophy or retinal destruction, the arteries and veins also become smaller (Kaufman and Alm, 2002).
ii. Another theory holds that the loss of axons changes the refraction of light at the disc, causing the pallid appearance.
3. Primary optic atrophy: Depletion of the optic axons and capillaries exposes the full extent of the chalk-white lamina cribrosa, which then appears as a flat white disc with a cookie-cutter sharp border against the retina, a condition called primary optic atrophy. In Fig. 3-18, select the disc showing primary optic atrophy:  A/
A/ B/
B/ C/
C/ D/
D/ E/
E/ F. (
F. ( D)
D)
4. Secondary optic atrophy: This follows longstanding disc lesions, such as chronic papilledema or papillitis. The optic nerve fibers disappear, but connective tissue proliferation incited by the lesion causes the disc to become gray with shaggy, ragged borders due to glial scarring. In primary and secondary optic atrophy, the nerve fibers crossing the disc disappear, but connective tissue proliferates on the disc only in  primary/
 secondary optic atrophy. (
 secondary)
5. Table 3-4 summarizes the differential features of primary and secondary optic atrophy.
TABLE 3-4 • Differentiation of Primary and Secondary Optic Atrophy
Primary optic atrophy |
Secondary optic atrophy |
Follows acute or chronic lesions of optic nerve or retina |
Follows chronic lesion of optic papilla, usually papilledema or papillitis |
Disc is chalk-white with cookie-cutter sharp borders |
Disc is gray with shaggy borders from connective tissue proliferation |
Lamina cribrosa exposed |
Lamina cribrosa obscured |
Arteries and veins reduced in size if optic atrophy is severe and prolonged |
Arteries thin; veins may be dilated |
May affect only one sector of the disc |
Not limited to a sector, affects entire disc |
6. From Fig. 3-18, select the disc that shows secondary optic atrophy:  A/
A/ B/
B/ C/
C/ D/
D/ E/
E/ F. (
F. ( E)
E)
7. Two conditions to distinguish from optic atrophy are
a. A very large physiologic cup that occupies much of the disc.
b. Optic nerve hypoplasia, a congenitally small optic disc and nerve, often associated with underdevelopment of septal region, hypothalamus, and pituitary gland, a condition called septo-optic dysplasia (SOD), also known as de Mosier syndrome.
G. Differential diagnosis of papilledema, papillitis, and acute retrobulbar neuritis
1. Inflammatory or toxic processes may attack the optic papilla, causing papillitis. Inflammatory, toxic, or demyelinating processes may affect the optic nerve behind the eyeball (where the optic axons become myelinated), causing acute retrobulbar neuritis (Fig. 3-21C). The Pt loses visual acuity and color vision with acute retrobulbar neuritis.

FIGURE 3-21. Sites of lesions affecting the optic papilla and nerve. (A) Papilledema. (B) Papillitis. (C) Retrobulbar neuritis.
2. With the ophthalmoscope alone, the Ex may not be able to distinguish papillitis from papilledema. With papillitis, the Pt loses vision early; with papilledema, the Pt retains vision until late in the disease.
3. With acute retrobulbar neuritis, the disc and vessels look normal early in the course, but if the process destroys optic axons in the optic nerve, what happens to the nerve fibers and capillaries on the disc?_________
a. The optic disc then has the ophthalmoscopic appearance called _________
4. Note this critical fact: The degeneration of optic nerve fibers and capillaries takes several weeks. Thus, the Ex will not see optic atrophy early in acute retrobulbar neuritis. Even though the Pt lacks vision, the optic disc may look normal. The Pt sees nothing and neither does the Ex.
5. Mnemonic for differential effects of papilledema, papillitis, and acute retrobulbar neuritis on appearance of the disc and visual acuity.
a. If the Ex sees a swollen disc and the Pt sees as usual, it is papilledema.
b. If the Ex sees a swollen disc and the Pt does not see well, it is papillitis.
c. If the Ex sees nothing abnormal and the Pt does not see well or is blind, it is acute retrobulbar neuritis.
6. Many conditions damage the optic nerve and give a clinical picture of optic neuritis. Those conditions include methanol intoxication, collagen-vascular disease, and autoimmune diseases such as multiple sclerosis.
7. A notable exception to preserved vision with papilledema is ischemic optic neuropathy. It leads to a sequence of sudden onset of blindness, optic disc swelling, and secondary optic atrophy. It is relatively common in Pts older than 50 years, but it also affects children (Chutorian et al, 2002).
H. Summary of causes for blurred discs
See Fig. 3-22.

FIGURE 3-22. Dendrogram listing common causes for blurred optic discs.
BIBLIOGRAPHY · Ophthalmoscopy
Chutorian AM, Winterkorn JMS, Geffner M. Anterior ischemic optic neuropathy in children: case reports and review of the literature. Pediatr Neurol. 2002;26:358–364.
Digre KB, Corbett JJ. Practical Viewing of the Optic Disc. Boston, MA: Butterworth Heinemann; 2003.
Kaufman PL, Alm A. Adler’s Physiology of the Eye. 10th ed. St. Louis, MO: C.V. Mosby; 2002.
Levin BE. The clinical significance of spontaneous pulsations of the retinal vein. Arch Neurol. 1978;35:37–40.
VIII. SUMMARY OF CLINICAL AND ANCILLARY TESTS OF VISION, THE VISUAL FIELDS, AND THE OPTIC DISCS
A. Routine tests: visual acuity, direct ophthalmoscopy, Amsler grid, and confrontation testing of visual fields
B. Special ancillary tests: fluorescein angiography, blind spot measurements
See Section III D of Chapter 5 and Table 5-7 for a complete summary of ancillary tests for the optic system.
BIBLIOGRAPHY · General References
Acheson JF, Sanders MD. Vision. J Neurol Neurosurg Psychiatry. 1995;29:4–15.
Brazis PW, Masdeu JC, and Biller J. Localization in Clinical Neurology. 7th ed. Philadelphia, PA: Lippincott Williams and Wilkins, Lippincott Williams and Wilkins, Wolters Kluwer Health. In Press. 2016.
Gross CG. Leonardo da Vinci on the eye and brain. Neuroscientist. 1997;3:347–354.
Liu GT, Volpe NJ, Galetta SL. Neuro-ophthalmology. Philadelphia, PA: W.B. Saunders; 2001.
 Learning Objectives for Chapter 3