You probably bought a dSLR camera to take pictures, not to manage them. (I did.) I realized early on, though, that hundreds of photos quickly turn into thousands of photos and thousands multiply into tens of thousands. Photos are like rabbits, I tell ya!
At some point, you have to get serious and start laying down the law of photo management, which is the subject of this chapter. I show you which software to use, how to track your photos, and how to establish a big-picture workflow.
Getting a Workflow
Workflow is a hot topic in the digital SLR world because we can do much more with our creations than people who take photos with smartphones. We don’t simply upload photos from our smartphones to Instagram. It begins with uploading photos from the camera to a computer, of course. Afterward, you can choose to organize, sort, rate, tag, process, edit, print, and archive photos.
A photography workflow has a couple of meanings. In a larger sense, it describes the process you follow as you work with your photos, beginning when you take them to when you’re ready to archive them for long-term storage. Workflow also means the more limited process you follow to edit and publish your shots.
Workflow is a huge topic of debate, and the more detailed the workflow, the more people love debating it. Favorite topics include whether you should sharpen before you reduce noise or whether you should adjust brightness and contrast before you correct color. No universal workflow exists — all are based, in part, on opinion.
The following general workflow is a good one to start with:
Set up the camera. Your workflow starts with the decisions you make when setting up the camera to take photos. Your choices here affect later steps.
Transfer (and import) photos. Moving photos from your camera to the computer is to transfer. In many cases, this means simultaneously importing them into your photo management software. I like to immediately back up my photos after I transfer them to my computer.
Manage. Organize, sort, rate, geotag, filter, delete, and add keywords to your photos.
Fast processing. Quickly develop the photos that you think are worth keeping using a photo-processing application such as Adobe Lightroom. For example, you can make many photos look a lot better by tweaking brightness, contrast, and color, and making a few other basic adjustments. The idea is to spend a little time improving your photos and getting them printed or posted online. This step applies to Raw and JPEG images.
Complex editing. If you want to spend more time working on your photos, you can perform more complex work using a photo editor such as Adobe Photoshop. For example, you can make targeted adjustments with masks, mash up different versions of the same shot, exercise more control over removing dust and other distractions, and more. Some photos (especially HDR and panoramas) require special software.
Publish. The entire point of the workflow is to create materials worth publishing, such as a JPEG to place on your web page or Flickr photostream, or a high-quality TIFF file to print.
Archive. Back up the original photos. In addition, save any additional processing or editing you’ve done, either in the form of edited files or photo catalogs, in long-term storage.
You can tailor this workflow example to suit your needs. In fact, you’ll do a lot of tailoring, depending on several factors:
Movies: Do you need to change your workflow to work with movies that you've shot with your dSLR? That means more software and a substantially different editing and publishing process.
Other people: Do you have to fit into a process created by other people? Does someone else need to view or approve your work? Are you doing the approving?
Time: How much time do you have? Do you want to spend a lot of time or as little as possible per photo?
Photos: How many photos do you take? Must your workflow be able to handle tens of photos a week, or thousands?
Hardware: Do you have the camera and computer hardware to manage your workflow and run the software? Over time, of course, you will need to upgrade your system. Will you be working in an office/studio or on location? Weekend photo trips are fantastically fun. I like having a laptop with me to review photos and make backup copies. If you would rather travel light, take extra memory cards. You can preview photos on a TV, should you find yourself near one (in a hotel room, perhaps), so remember to take the correct cabling with you.
Software: What applications are you using? Are they current? Can they handle Raw files from your dSLR? Do you need anything else (panorama or HDR software, noise-removal plugins, other creative solutions)?
Priorities: In the end, deciding what to do (and what not to do) has a lot to do with your priorities. What's most important: speed, quality, compatibility, mobility, or something else?
The rest of this chapter walks you through each step.
Early Decisions
Your workflow begins with setting up your camera and taking photos. The most important decisions you have to make is what format, size, and quality you want the camera to record your photos in.
If you want more control over photo processing and editing, you should choose Raw or Raw+JPEG. Raw photos take the raw image data and store it so that you can use it later.
If you want a finished product right out of the camera, choose JPEG. JPEGs are created from the raw data, and then compressed to make them smaller. Unfortunately, the original data is lost in the process.
Think of it this way: Raw images are like negatives. You can develop them any way you like and print them later. JPEGs are like prints you get from the camera shop or kiosk. They’re done. That’s nice, but if you want to tweak the exposure or there’s something about the color you don’t like, it’s much harder to correct. You won’t get the same quality as if you were working with the original negative.
If you choose JPEG, you have a host of other decisions to make: the image size, quality, style, color, color space, orientation, aspect ratio, and so forth. You make these choices in-camera before you ever take the shot, and they are final.
Transferring Photos
Transferring (also known as downloading or uploading) photos and movies to your computer is a pretty simple process. You can transfer several different ways. Each has its pros and cons. Some methods require additional hardware, such as a card reader.
Connecting
Before you start transferring photos to your computer, you have to make a connection. This connection can be between your camera and a computer or, if you’d rather use a memory card reader, between the card reader and your computer.
Built-in Wi-Fi
Some digital SLRs have built-in Wi-Fi, which allows you to wirelessly upload photos to your computer or a smart device via a dedicated app. So cool, and about time. Upsides: No wires, no readers, no mess.
Downsides:
Not all cameras have built-in Wi-Fi.
Those that do may not support file transfer.
Wi-Fi can be difficult to set up, understand, and accomplish. I am pairing a Canon dSLR with my computer in Figure 1-1. This is just one of several involved steps required to get them to connect.
Wireless transfer uses battery power and may be slow, depending on your connection speed.
FIGURE 1-1: Pairing enables the camera to connect to the Canon software.
Direct USB connection
Directly connecting your camera to your computer is the most straightforward, easy method. Connect your camera using the USB terminal, which is probably on the left side of your camera. Upside: The only thing you need, besides your camera, is the USB cable that came with the camera.
Downsides:
Your camera has to be on. If your battery is low and you have no backup, recharge the battery a bit so your camera won't die in the middle of a transfer. Should the camera power off, don’t panic. The files on the camera should still be there. Simply recharge the camera battery and then restart the transfer. While the battery is charging, check the files that were transferred to make sure they are viewable. Delete anything on the computer that didn’t transfer completely. If you were moving files, not simply copying them, you should check the file that was being moved for any damage by trying to view or edit it. The photos on either side of the power outage should be fine on both the camera and the computer.
When you put your camera on a table and connect it to a computer (see Figure 1-2) with a cord that can be snagged, tripped on, pulled, or yanked (by you, your kids, your cats, or your dogs), you risk pulling the camera off the table. That will ruin your day.
FIGURE 1-2: Secure your camera when it’s connected to a computer.
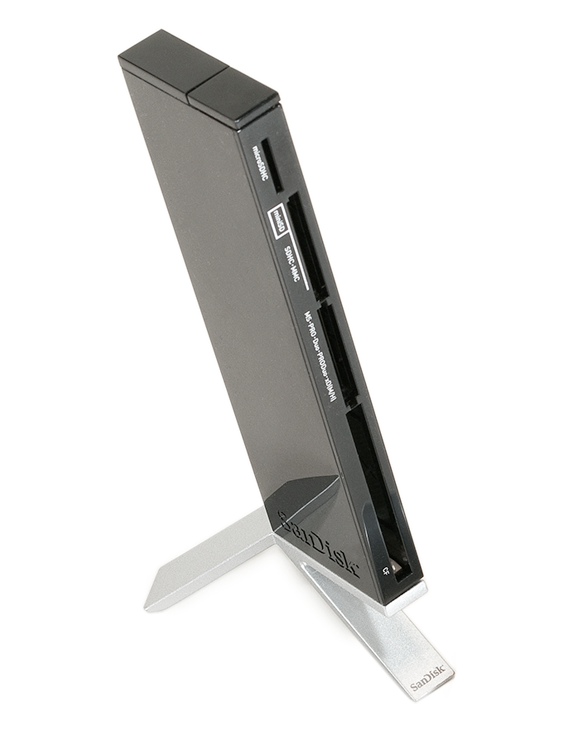
External USB card reader
External USB card readers take the camera out of the transfer equation. The card reader (see Figure 1-3) plugs into your computer. You feed the memory card into it and it handles the transfer. Upsides: You don't have to use your camera's battery and you don't have to worry about running out of juice in the middle of the transfer. You aren't endangering your camera. Also, if the card reader goes bad or gets broken, you can replace it quickly and cheaply.
FIGURE 1-3: Card readers that can use different card types are very helpful.
Downsides:
You have to either buy a card reader that handles multiple card types or buy a card reader for each type of memory card you have. (For example, the Sony A77 shown in Figure 1-3 can use either Memory Stick PRO Duo or SD cards, and other cameras may use different types.)
External readers can litter your desktop. They also tend to fall off, forcing you to get on your hands and knees and look behind the computer to retrieve them.
If you have multiple computers to transfer files to, you must either buy more card readers or move the one you have back and forth.
Built-in card reader
Some computers and printers have built-in card readers. New iMac desktop computers, and MacBook Air and MacBook Pro laptops have built-in SD card slots. If you own a Windows computer, it might have come with an internal card reader. If not, you can install one. Upsides: Built-in models aren't as slippery as portable card readers, and can't fall off your desk.
Downside: Internal card readers aren't portable, unless you're using a portable computer.
Wireless file transfer adapters
For compatible cameras that don’t have Wi-Fi, Canon's Wireless File Transmitter and Nikon's Wireless Mobile Adapter let you wirelessly transfer files from your camera to a computer or smart device (such as an iPhone). Upside: Get files off your camera when you want without tripping over cords.
Downsides:
You have to buy more hardware.
Wireless transfer sucks up lots of battery power.
Wireless memory card technology
An Eye-Fi card (www.eye.fi) transfers files from your camera to your computer. Upsides: It's portable, doesn't require additional hardware (beyond the memory card), is cool, and it gives you an unlimited amount of storage while you shoot.
Downsides:
Eye-Fi cards use your camera's battery to transfer, are slower than the other methods, and require a wireless network.
You have to install and set up software.
Downloading
After you’ve decided on a connection type, you choose a download method.
Automatic download
You can use a small computer program that automatically downloads the photos to the location you choose. Some are built into your computer's operating system. Others are extra software applications that come with your camera (such as Canon EOS Utility) or part of your image editor applications (such as Adobe Bridge or Lightroom). These programs often run in the background. They're ready to bounce into action the moment they sense a camera or card reader with a memory card has been connected. The programs normally have options for where photos are saved (plus folder names and whether to erase the photos from the card when you're done). I may be in the minority, but I can’t stand these automated applications.
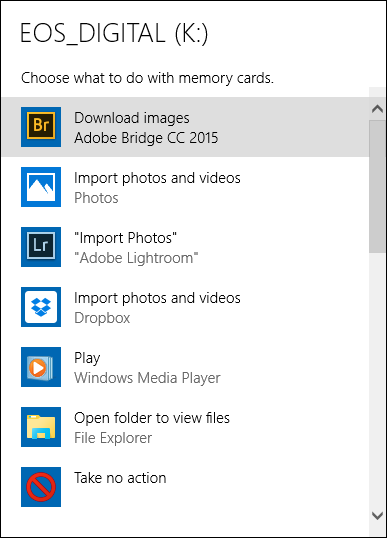
To choose a method, you must select the program you want to handle things when you insert a memory card into an external card reader or connect your camera to the computer, as shown in Figure 1-4.
FIGURE 1-4: Choose an auto import option from the operating system.
The program you choose opens the next time you connect a memory card to your computer. As Figure 1-5 shows, my choice of Adobe Bridge opens the Bridge Photo Downloader.
FIGURE 1-5: Automatically download photos with Bridge.
Manual download
You can download photos yourself.
Drag the folder from the card reader to your drive and rename it.
Create folders for photos using your operating system and then select the photos and drag them to the appropriate folder.
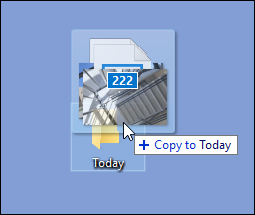
I’m a hands-on kind of guy. I like to create folders and drag files myself, as shown in Figure 1-6. I organize my photos by camera and then by the date I downloaded them. I like being able to make a backup copy immediately.
FIGURE 1-6: I like dragging and dropping files myself.
Getting a Grip on Your Pictures
Managing your photos involves finding the best way to name, store, edit, process, and keep track of the photo files on your computer. The more photos you have, the more you’ll find it helpful to have a program assist you. I’ve split this section into several parts. One, which is quite short, discusses manual management. (Don’t do it.) The next section is a software review. You should be aware of which software is available and know what each one can do. Although I can’t describe single applications in depth, I can offer enough information to establish a general starting point as you decide where to spend your time and money. Knowing what you need and having a list of candidates is half the battle.
Manual management
If you like to start fires by rubbing two sticks together or you like to catch fish with your bare hands, this solution is right up your alley. File under R for ridiculous.
If you (or your spouse, significant other, special friend, or kids) feel the need to rename photos, tag and categorize them using a good organizer like Adobe Lightroom, I understand the need to make sense of things. It’s hard to know what’s what with a thousand photos named IMG_0641 through IMG_1641. If you must rename the files, make a copy of the photos to work on. Keep the originals somewhere safe and don’t rename them.
Media management software
You have a lot of choices, ranging from pure media managers to applications that focus on Raw photo workflow and development. Plenty of basic photo editors have built-in basic management tools.
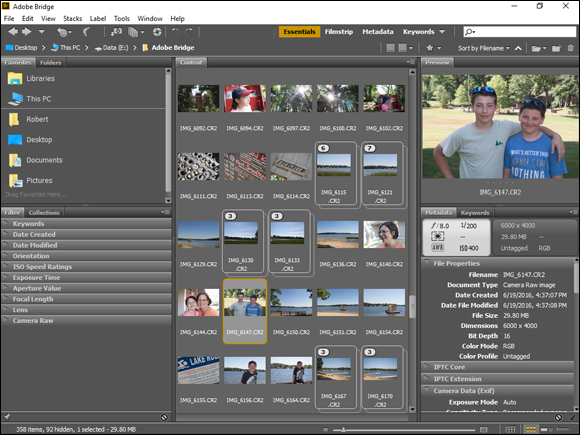
Adobe Bridge (see Figure 1-7) is one of the best (Adobe devotees would say the only) pure media managers. It’s big, credible, versatile, well supported, and backed by a powerful company. Bridge is truly a bridge. It links your photos to your other applications in a way that lets you manage thousands of photos seamlessly. You can create and manage collections, rotate photos, apply different Camera Raw settings, and more from within Bridge, but you call on other applications to complete most development and editing tasks.
FIGURE 1-7: Bridge is a professional media manager that has a great many useful features.
You don’t buy Bridge by itself. Normally, it’s included with a Creative Cloud subscription. You can download it for free using the Creative Cloud app.
Processing and managing software
This type of application focuses on photo processing and management. Photo enthusiasts can work with these applications, but they have features and capabilities that appeal to professionals, too.
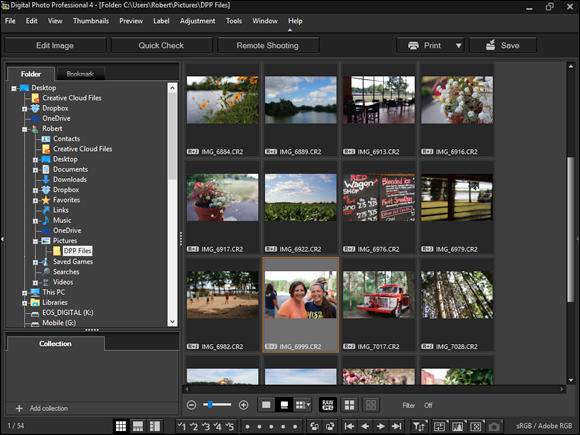
Camera manufacturer software
Most camera manufacturers include free software that enables you to organize and process the photos you take with that camera. Canon calls its software Digital Photo Professional (see Figure 1-8). Nikon’s free software is Capture NX-D. Sony’s is Image Data Converter. Pentax ships Digital Camera Utility with its cameras.
FIGURE 1-8: Digital Photo Professional is Canon’s photo management and editing app.
I have dabbled with these applications in the past. They all have their strengths and weaknesses. Their main draw is that the same people who encode data into the camera’s Raw file are the people who created the software that allows you to decode it. The camera manufacturer knows more about its files and proprietary settings than anyone else. If you are dedicated to a single brand and don’t plan on changing, you should consider this approach.
Adobe Photoshop Lightroom
The most popular photo management and processing application is Adobe Photoshop Lightroom. It’s moderately priced and available by monthly subscription. It’s my tool of choice.
This Macintosh/Windows application is made for photographers. It has just about everything you need in order to import, manage, develop, and publish Raw and JPEG photos. Figure 1-9 shows the Library tab. (Look at all those cool photo-management tools.) From this tab, you organize, sort, tag, rate, select, and more.
FIGURE 1-9: Adobe Photoshop Lightroom is a fantastic tool for photographers.
In Lightroom, you can create a single massive, all-inclusive catalog or create different catalogs based on different cameras, projects, or years. When you import photos into an open catalog, they show up as thumbnails in the Library tab, where you manage them. You can view, sort, filter, rate, delete, search for, compare, create, and assign keywords, quickly develop photos, and edit metadata. You can also export photos in a number of different formats. I cover the Lightroom processing features (you can use them for JPEGs or TIFFs, if you want) in more depth in Book 5, Chapter 2.
To work with layers, masks, adjustment layers, artistic filters and effects, vector shapes, 3D support, text, frames, and other aspects unique to photo editors, you need to get a photo editor other than Lightroom.
Other applications
There are a host of other products available. This list is by no means all-inclusive:
Capture One: Created by Phase One, Capture One isn’t well known outside of professional circles, but it should be. Its bevy of management features are comparable to Lightroom. Import photos and then sort, rate, preview, organize, tag (add keywords to), develop, and publish them. Organize your photos in catalogs or work one-on-one with photos by using sessions. Capture One also has albums, which are virtual collections. I can’t say enough good things about Capture One. It’s fantastic, powerful, and professional, and it focuses on workflow and photo quality. Capture One Pro also has a very useful tethered shooting feature, which lets you control your camera from within the application and import the photos (and even apply processing to them) as you take them. It even supports Live View mode.
Google Photos: Google’s new photo organizer (with minimal editing tools) is called Google Photos. It replaces Picasa, which has been retired. All your photos are stored online and organized in albums. You have unlimited storage in the cloud for free.
Photos: Apple has recently come out with its Photos app to replace iPhoto. It features photo editing and managing tools, and integrates seamlessly with the iCloud Photo Library. Import and organize photos, view, rate, tag, title, edit, and publish them. Photos is excellent for Macophile hobbyists.
Photo editors
This section lists three well-known photo editors.
Adobe Photoshop
Photoshop is the industry standard graphics editor. It has no photo management tools. Photoshop is available by subscription from Adobe, through Creative Cloud.
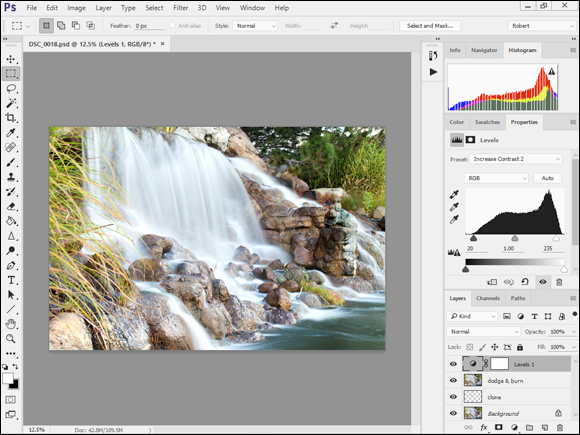
I used Photoshop for things that Lightroom can’t do, or does poorly. I handle all basic image processing in Lightroom and, if necessary, export the photo to Photoshop to finish it. I can remove distractions from photos, create complicated layers to isolate adjustments to certain parts of the photo (the background, for example, or a person’s face), apply creative filters, and more. Figure 1-10 shows that I’ve created several layers to handle different edits in this photo of a waterfall. Photoshop also opens and processes Raw photos with the help of Adobe Camera Raw.
FIGURE 1-10: Use Photoshop for more complex photo-editing tasks.
Corel PaintShop Pro
PaintShop Pro (X9 is the latest version) is an all-in-one photo editor that feels a bit like a cross between Adobe Lightroom and Photoshop. You can manage, adjust, and edit photos using one application. PaintShop Pro supports Raw files from most cameras.
GIMP (GNU Image Manipulation Program)
GIMP is basically free Photoshop. Do you need more? Okay. The main drawback for photographers is the lack of built-in Raw support. If you need that, pass on GIMP. If you use JPEGs only and want to try out an advanced image editor with plenty of other features for free, give it a try.
Managing Photos
Get familiar with these management tasks as you try or invest in a particular piece of software. Think about how these tasks fit into your workflow:
Flagging allows you to flag some photos as keepers, some as rejects, and leave the rest alone. I prefer to flag first, because it’s faster and easier to tell if you want to work with a photo than it is to figure out if it’s worth 4 or 5 stars. After you flag photos you may be able to hide photos in the interface by filtering non-flagged photos out.
Rating allows you to rate your photos from one to five stars. Great if you need that level of discrimination. Once you rate photos, you can filter your collection by the number of stars a photo has.
Grouping creates different structures to hold and organize your photos. It might be called a library, catalog, project, album, or folder, depending on the application. After it's created, you import photos into this structure, which keeps or separates one set of photos from another. That way, you don’t have 10,000 pictures flopping around with no rhyme or reason.
Sorting is when you identify a criterion, such as the date or time that you took a photo, or its filename, keyword, rating, or other EXIF data; the program sorts the photos or working files by that criterion.
Filtering is similar to sorting, but weeds out photos based on the criteria you choose. You can make it so that you see only five-star photos, or those you took with a particular lens, or perhaps when the flash fired; all the rest are hidden.
Face Recognition can be a great way to organize photos. If your photo management software supports this feature, you can use it to find photos of people, tag them with their names, and then use that information to search for or sort your collection.
Keywording or tagging is a straightforward concept that's infuriating in practice. You tag every photo with descriptive keywords that help you organize, sort, find, and otherwise keep track of similar photos. The problem is coming up with a list of standard keywords and using them. For example, you might tag the same photo this way: 80D, landscape, f/8, sunset, Sigma, ultra wide-angle.
Don’t get too detailed when you’re tagging.
Geotagging identifies where a photo was taken. Most often, you identify where one or more photos were taken on a map and the coordinates are written to the photo file’s metadata (helpful data, stored in the file, that isn’t part of the photo itself; access it by looking at the photo's info with your operating system or photo program).
Stacking different versions of the same photo on top of each other allows you to declutter the workspace.
Quickly Processing the Good Ones
Even casual photographers rarely have the time or need to process every single photo they shoot. Process good photos, not bad ones. Don’t waste your time with them unless you have no other choice. You can find more details on how to quickly process your photos in Book 5, Chapter 2.
Advanced Editing When Desired
Many photos look fantastic when processed using applications like Lightroom. However, photo editors feature a different set of tools that open a world of advanced photo editing. These applications are optimized to work in layers, blend with opacity, use masks, and so forth.
Deciding whether you want to use a photo editor on some shots depends on finding the right balance for you. It takes extra effort, additional software, more time, and a certain amount of practice. However, you should know that many times it is very hard to perfect some photos without going this extra mile. I cover several advanced editing techniques in Book 5, Chapter 3.
Aside from the practical reasons, there are artistic benefits of using a photo editor in conjunction with your normal photo processor. I cover this aspect of using Photoshop in Book 5, Chapter 4.
Publishing
The process of exporting or saving your final files from your photo editor is called publishing. You might need to publish your work for any number of reasons: to print, upload to the Internet, send via email, or to use as a new desktop background. The sky is the limit.
General considerations
Read your software manual to find out the exact steps required to export or save your work. However, consider some general thoughts:
Preserve original material. I can’t stress this advice enough. Never save and overwrite original files. Always track names and versions so that when you select Save As, you aren’t making a big mistake. JPEGs in particular suffer from lossy compression — they lose some quality every time you open, edit, and save them. If you’re working with JPEGs, open, edit, and save as a lossless file type such as TIFF or a working format such as Adobe's PSD.
Preserve working copies. If you need to export your photo to an editor like Photoshop and create things like multiple layers, masks, and adjustment layers, do yourself a favor — save those working copies. If you flatten (compress all the layers into a single background layer) or delete them, you can't easily go back and change or update your work.
Consider quality. When saving and exporting, you'll have several file type and bit depth options. (You can read more about that in Book 5, Chapters 2 and 3.)
When emailing or uploading to the Internet, use JPEG.
When printing or archiving a high-quality copy, use TIFF.
Enter copyright and other descriptive information in metadata. That’s what metadata is for. If you publish your photos to the web, think about adding this hidden layer of protection to your photos.
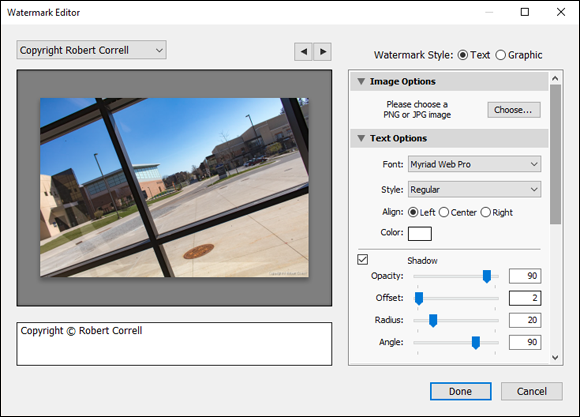
Add a visible copyright or watermark. This is another way to protect your photos. Whereas copyright and descriptive metadata are invisible, a watermark, mark, or copyright on a photo is visible for all to see. In Figure 1-11, I’ve created a copyright watermark in Lightroom that stamps my information in the lower-right corners of photos as I export them.
Strip metadata, if you want. On the other hand, you may want to strip out any metadata to protect your secrets. Not all applications remove data, but you can save copies of final files to a format that doesn’t have metadata and then open and save those versions to your final format.
Resize for the web. Unless you want your full-size photos to be posted somewhere online, such as at Flickr or SmugMug, you should resize images to make them quite a bit smaller. On the web, 24 megapixels is serious overkill. (The pixel count is the total number of picture elements, or dots, in a photo; in this case, 24 megapixels stands for 24 million pixels.) Some sites may reduce the size of your photos anyway.
FIGURE 1-11: Adding a copyright watermark in Lightroom.
Resizing options
Pay attention to the resizing method you choose.
For example, Photoshop has these resizing options that appear on a drop-down menu in the Image Size dialog box (shown in Figure 1-12):
Automatic: Chooses the one Photoshop thinks will work best, based on the type of image you’re resizing and whether you’re enlarging or reducing it.
Nearest Neighbor: Preserves hard edges. Pay careful attention when you use this method. Examine the edges at 100 percent magnification to see whether the sharp edges cause jaggedness.
Bilinear: A good method in which colors are preserved and the image is smooth. You lose a bit of sharpness, however.
Bicubic: Works best for smooth gradients, such as a blue sky that transitions from dark to light; produces results similar to Bilinear, except a bit sharper.
Bicubic Smoother: Works best if you're enlarging an image. When you're reducing, this method looks almost indistinguishable from plain old Bicubic.
Bicubic Sharper: Works best if you're reducing an image. Distinctly sharper than all other methods, and much better than Nearest Neighbor. It produces sharpness without creating jagged edges. Still, pay attention to whether the level of sharpness suits your needs. If not, resize using Bicubic, and then come back and apply an Unsharp Mask and sharpen the image to the exact degree you want.
FIGURE 1-12: Resize images to post on the web; no need for a 24 megapixel image on Facebook.
To display on the web, 800 to 1,000 pixels wide is a good start. That number is large enough to see detail yet doesn’t produce a huge file size. Sites like Flickr accept the original photo sizes with no problem.
Saving and exporting
You often have plenty of detailed methods with which to publish photos. Choose the one that best fits your target media requirements. Table 1-1 summarizes several typical options.
Saves the file as a new type. Type a new name and choose other file options. Use instead of Save when you want to preserve a copy of your file or create a new type.
Save for Web
Saves a new file in a web-friendly format, such as GIF, JPEG, or PNG.
Export
Saves a copy of your file as a new file type. You can often change the image size, resolution, and attach color profiles when exporting. Some applications let you export data to other programs for further editing. If using a commercial printer, check to see if it prefers that you use this method, and what settings it suggests for your print.
Share
When set up with the proper username and password, this option saves your file online.
Print
Prints your photos on a printer connected to your computer or network.
Order Prints
Orders prints from a company. You will have to have an existing account or be ready to set one up and establish a payment method.
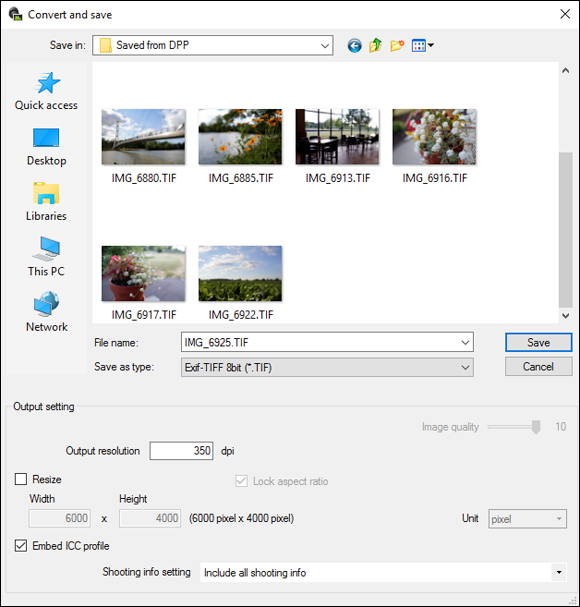
Figure 1-13 shows the Convert and Save dialog box from Canon’s photo-editing application, Digital Photo Professional. Notice that you can change the image type, including the bit-depth, the resolution, resize it if you like, embed the color profile, and choose how much shooting information to leave in the file.
FIGURE 1-13: Converting and saving a photo in Digital Photo Professional.
On the other hand, you may be working in a professional environment where documents run through Adobe Bridge. You can publish PDF contact sheets or web galleries using the optional Adobe Output Module, which is installed separately from Bridge CC. If you use Lightroom or Photoshop, you’ll likely print, export, or save archive copies from within those applications.
Archiving
Archiving preserves a copy of your photos (and working files) for long-term storage. Your digital photo collection is in some ways easier to safeguard than photo prints and negatives. The electronic files themselves are, for all intents and purposes, indestructible — as long as you ensure the safety of the media you store them in. You don’t have to worry about prints getting bent or soaked with humidity, or about boxes of them occupying an entire room.
Take time to plan your backup and archive process, and diligently carry out your plans. You can’t throw a sleeve of negatives into a cardboard box and tuck them away in a closet.
Playing it safe
First, decide how you want to back up and archive your photos. You have to consider issues such as storage capacity, availability, and organization, in addition to the categories in this list:
Cost: You want to pay as little as possible, but you have to strike a balance between being cost-effective and being simply foolish. Don’t buy the cheapest (and possibly least reliable) equipment known to mankind to protect your valuable files.
Capacity: Digital photos and movies take up a lot of space. Choose a storage medium that fits your current and anticipated future workload. Table 1-2 lays out your options.
Access: Determine whether you can easily access your backups and whether an unforeseen circumstance (like a company going out of business and never updating its software) can prevent you from protecting your work.
Security: Assess your security situation to determine how safe (physically, and from a computer networking standpoint) the files are. Put the appropriate safeguards on your home or local network, such as Internet firewalls and password protection. In addition, files can be easily damaged if you store them at home and your house burns down. If that's your only backup copy, you've lost them.
The future: Consider how easy or hard it will be to transfer archived files from one storage device to another. For example, old hard drives may require a connection that will someday be obsolete unless you occasionally update your backup technology. In the very long term, provide thumbnails (small pictures) or a printed index or another form of inventory that, for example, your kids or their kids can easily figure out when you're long gone.
Data can’t be erased; price per gigabyte isn’t bad; no moving parts to the CD/DVD itself.
Limited capacity; most camera memory cards have more space; questionable media longevity.
Tape backup
Large capacity and longevity.
Cost for tapes, drive, and software; often uses file formats specific to one system; may require special software to back up and restore; can be “eaten” by disgruntled machines; data can be erased by strong magnetic fields. Feels like a 1980s solution.
Memory card or flash drive
Easy to use; doesn't occupy much space; no moving parts.
Cost per gigabyte makes for an impractical solution; would require 125 8GB digital camera memory cards to match the storage space of a single 1 terabyte drive.
Internal hard drive
Affordable; holds lots; fast; useful for temporary backups.
Moving parts; susceptible to crashing; difficult to swap in or out; data can be accidentally erased.
External hard drive
Affordable; holds lots; portability; can be stored off site; great for long-term storage.
Moving parts; not as accessible as an internal hard drive.
Solid State Drive (SSD)
Essentially a huge flash drive; no moving parts; exceptionally fast; can be internal or external.
Smaller capacity and higher price than normal hard drives, questionable longevity (yes, you read that right — SSD data degrades over time as you use the drive).
Network storage
Reliable, fast, networked RAID storage increases capacity, performance, and reliability.
Requires a network, must set up and administer, can be technically demanding, can crash, stored onsite.
Online/Cloud
The ultimate in off-site storage; no additional hardware needed; can be accessed from anywhere at any time.
Time and bandwidth required for initial backup; requires computer with Internet access; requires service subscription and an account in good standing; long-term viability depends on company health; vulnerable to unauthorized access, especially if you’re famous.
Putting the plan into action
All the cool storage devices in the world are useless if you never use them. Have a plan for backing up and archiving your files. The key to making backups work is to develop a routine that matches the time and energy you’re willing to invest. If the process becomes so laborious that you quit, it's worthless.
Follow these steps to walk through the type of plan I recommend, using a combination of extra internal (in your computer case; you’ll have to install them yourself or find someone who knows how to do this) and external (sitting on your desktop in an enclosure of some sort) hard drives:
Complete an initial photo backup.
Back up new photos on internal or external (preferred) hard drives when you transfer photos and movies from camera to computer. You can’t afford to lose the initial transfer. These files form the basis of your collection and can’t be re-created.
The mechanics of the initial backup are up to you. I simply copy and paste the photo folder to another location on an external drive. You may want to export photos from your photo-management software or use a backup program to copy a smaller bunch. This advice applies to each of the following steps.
Perform a weekly internal (on your computer) backup of photo catalogs and working files.
Back up catalogs (which may contain the bulk of your adjustments) and any other working files to internal hard drives. If you can’t afford to lose a single day’s worth of productivity, consider daily backups. For a more relaxed timeline, back up catalogs, edited, and final files monthly.
Perform an end-of-month external backup.
Back up everything to external hard drives, a file server, or a network. For a more relaxed timeline, back up quarterly or by project.
Perform a biannual off-site backup.
Create an off-site backup with all original photo files, catalogs, working, and final files. Put them in a storage barn on your property, rent a safety deposit box from a bank, or ask your grandparents to put them in their attic. Just make sure that they're physically separated from your computer and the building you're in. That way, if anything happens to your building, your photos and work files remain safe. For a more relaxed timeline, back up annually.
The plan I suggest may not work for everyone. One alternative, keyed toward a business environment, is to treat every job as a discrete unit and back up photos, catalogs and work files according to job number. When you transfer the initial photos, back them up. When you finish the job, back up everything and tuck things away on a hard drive devoted to that client. Depending on your workload and client list, you may have one hard drive for many clients or many hard drives for one client.
 Downloading photos
 A photography workflow has a couple of meanings. In a larger sense, it describes the process you follow as you work with your photos, beginning when you take them to when you’re ready to archive them for long-term storage. Workflow also means the more limited process you follow to edit and publish your shots.
 The following general workflow is a good one to start with:
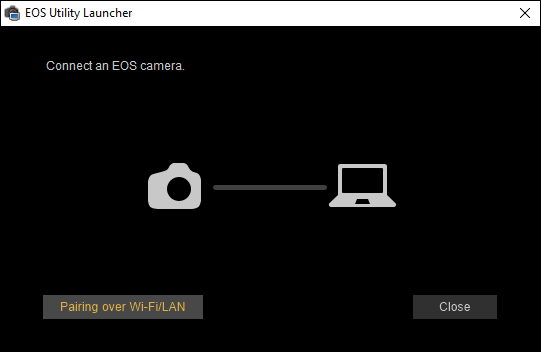
 When you put your camera on a table and connect it to a computer (see


 On the other hand, you may be working in a professional environment where documents run through Adobe Bridge. You can publish PDF contact sheets or web galleries using the optional Adobe Output Module, which is installed separately from Bridge CC. If you use Lightroom or Photoshop, you’ll likely print, export, or save archive copies from within those applications.