Part Four
Binding Knots
Binding knots are tied tightly around an object or objects, either to secure the object itself (as when tying up a package or bundle), or to anchor one end of the rope solidly to an object as a first step in making a solid connection with another object—for example, when lashing two poles together to build a shelter (see Lashings).

17. Square Knot
Uses: packages, bundles, reefing sails, bending ropes end-to-end
Pros: simple to tie and untie; fairly secure
Cons: can slip; works as a bend only with ropes of equal diameter; difficult to untie under load; difficult to make tight as a binding

Uses: packages and bundles that must be untied easily; bootlaces
Pros: easy to tie; secure under load; unties easily
Cons: not very secure if not under load

20. Thief Knot
Uses: binding packages or sacks
Pros: fairly secure; signals pilferage
Cons: can’t be tied tightly

21. Surgeon’s Knot
Uses: packages, bundles, surgical ligatures
Pros: secure, resists slipping, easier to tie tight under load than a Square Knot
Cons: requires more force than a Square Knot to tighten; more difficult to untie

22. Surgeon’s Knot with Second Tuck
Uses: packages, bundles, slippery items
Pros: more secure than a regular Surgeon’s Knot, good for slippery rope
Cons: more difficult to untie than a regular Surgeon’s Knot

23. Strangle Knot
Uses: temporary rope whipping, bag closure, general-purpose hitch
Pros: fairly secure; easy to tie
Cons: less secure than Constrictor Knot; difficult to untie

24. Miller’s Knot
Uses: bag closure
Pros: secure; easy to tie with one or both hands
Cons: not as secure as a Constrictor Knot; can be difficult to untie

25. Packer’s Knot
Uses: packages, bundles
Pros: adjustable for tightness; works in thin or medium cordage
Cons: more complex than a Square or Surgeon’s Knot
17. Square Knot
Also known as: Reef Knot, Hercules Knot
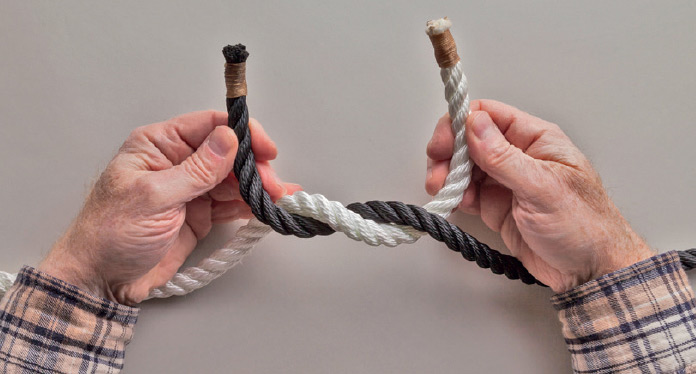
Composed of one Half Knot on top of another, the Square Knot is supremely useful both as a binding knot (when tying the rope to itself around another object), and as a bend (to tie the ends of two ropes together). A good mnemonic for tying it correctly is “right over left; left over right.” It can be readily reversed, tying it “left over right; right over left.”
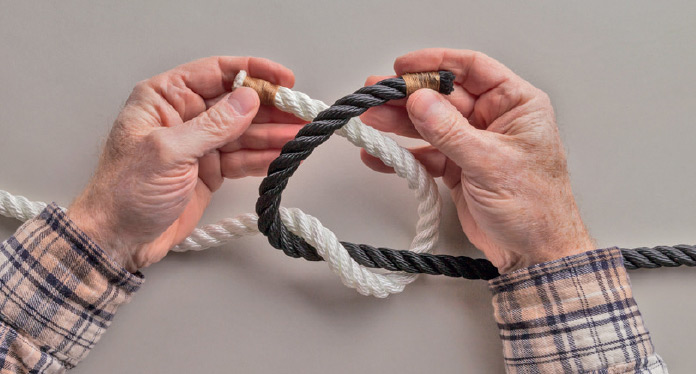
2. Bend both working ends back toward their own standing parts. Take the working end that is now on the left and pass it over the one that is now on the right.
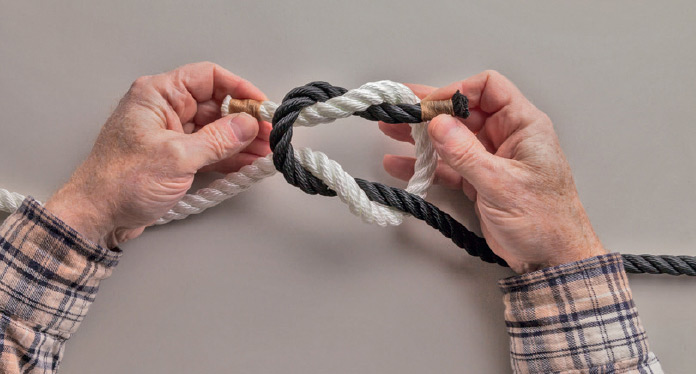
3. Pass the first working end through the bight that has formed in the other rope, from back to front. You’ve just made a second Half Knot in the opposite direction. Pull both working ends tight.
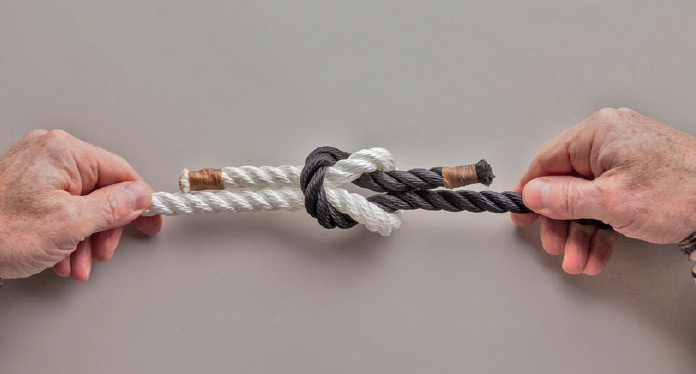
4. Pull both standing parts tight.
18. Slipped Square Knot
Also known as: Reef Knot or Hercules Knot with a Drawloop
A single drawloop makes this simple variation of the Square Knot (opposite) easy to untie, even under tension. You probably know another variation, called a Double Slipped Square Knot, in which drawloops are added to both ends: it’s how you tie your shoes.
Instructions (NB R1 = Rope 1, R2 = Rope 2)
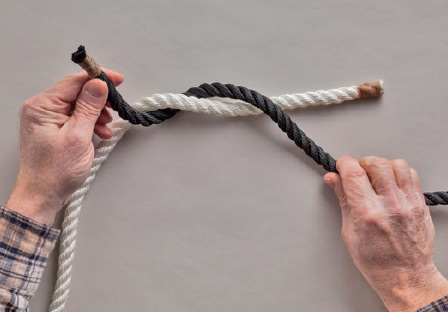
1. Make a Half Knot, placing the working end of the rope to the right (henceforth, R1) over, then under, the working end of the rope to the left (henceforth, R2), as if you are about to tie a Square Knot (opposite).
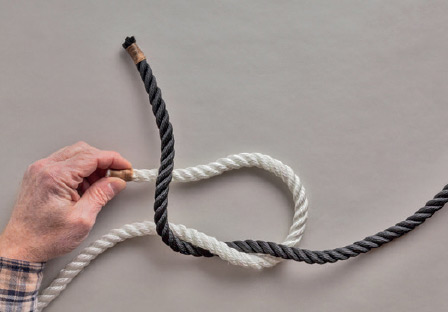
2. Make a bight in the working end of R2. Cross the working end of R1 over the working end of the bight.
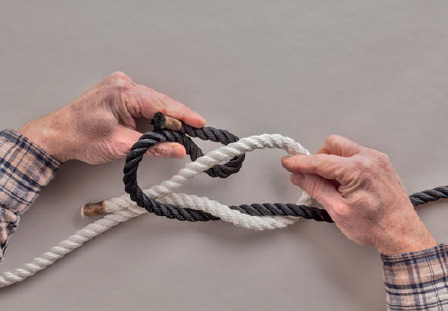
3. Make a bight in the working end of R1. Reach through the front of the bight in R2 to grab it.
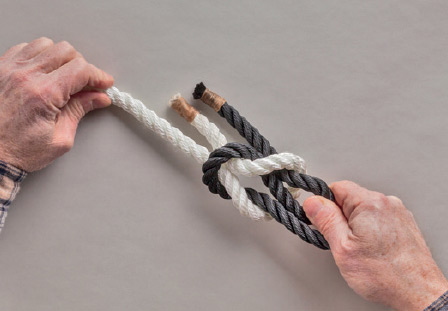
4. Pull the new bight through the first bight from back to front.
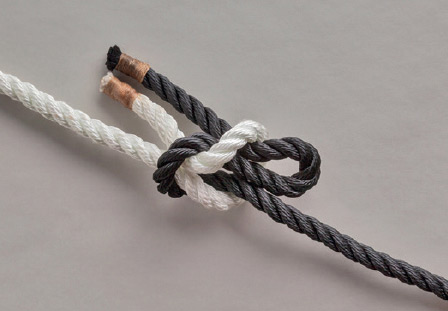
5. Tighten by pulling the second bight in one hand and the opposite working end in the other.
19. Granny Knot
Also known as: Lubber’s Knot, False Knot, Calf Knot, Booby Knot
A Granny Knot is an incorrectly tied Square Knot. While it will hold in some noncritical applications, there is never a good reason to use it, as it takes exactly as long to tie, and uses exactly the same amount of rope, as a Square Knot, while offering no advantages whatsoever. It’s included here simply to show how not to tie a Square Knot.
Instructions
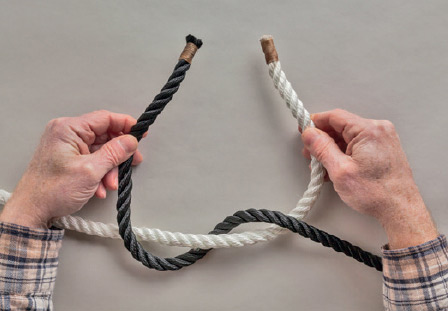
1. Pass the right working end over then under the left working end, making a Half Knot.
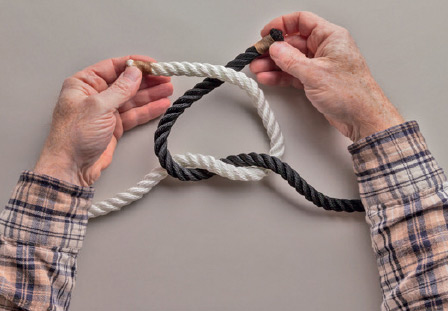
2. Instead of “right over left; left over right,” as you would for a Square Knot, pass the new right working end over the new left working end. (Right over left; right over left.)
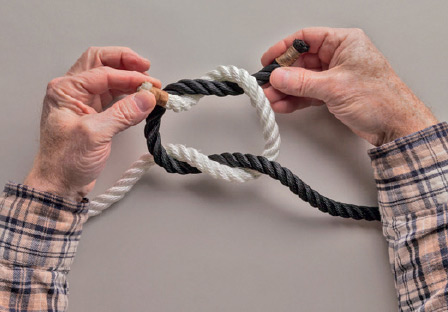
3. Pull each working end through the bight made by the other end. Hold the working and standing parts of one rope together in each hand, and pull to tighten.
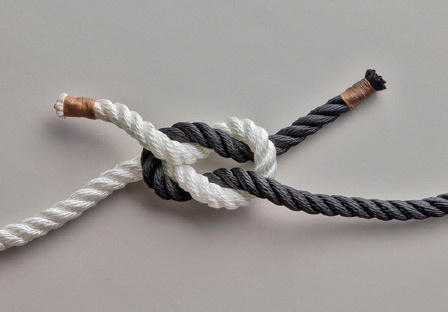
4. The right working end passes first over, then under the bight of the left working end, and vice versa. In a Square Knot, in comparison, one end crosses the bight above-and-above, while the other crosses below-and-below.
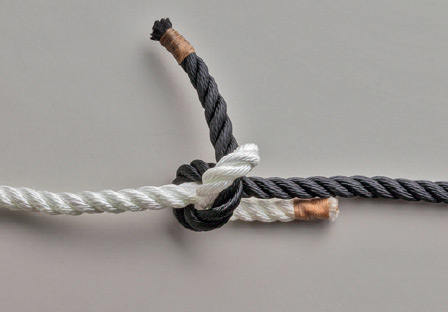
5. Pulled tight, the Granny Knot collapses. Pulled even tighter, it will probably slip.
20. Thief Knot
Also known as: Bag Knot, Bread Bag Knot
The Thief Knot is designed to resemble the Square Knot. The idea is that a thief who steals something from a sack of provisions will retie a proper Square Knot to cover his tracks, but the owner will notice the difference. (Of course, the missing provisions will also tip off the owner, but that’s folk wisdom for you.)
Instructions
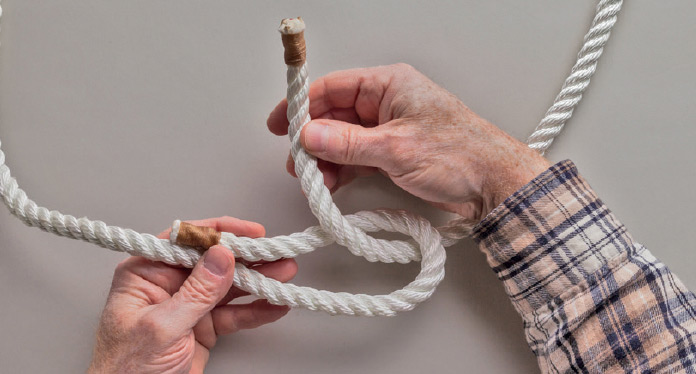
1. Imagine that we have made a tight round turn around the neck of a sack out of the frame at the top of the photo. Make a bight in the left end of the rope. Pass the other end through the bight from back to front.
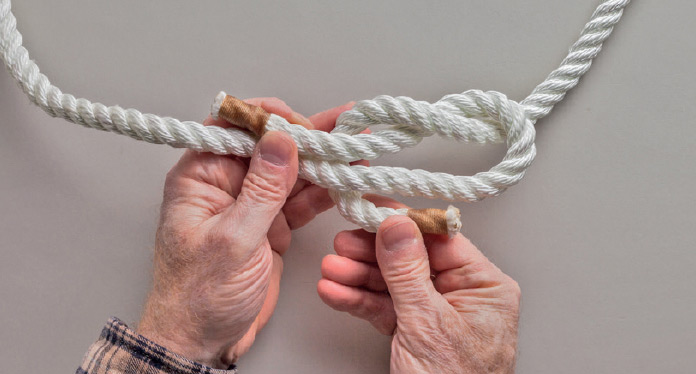
2. Pass the working end around the bight, going first over the working end of the bight, next around the back of the bight, then forward.

3. Pass the working end through the bight from front to back. Pull both working ends, then the standing parts tight.
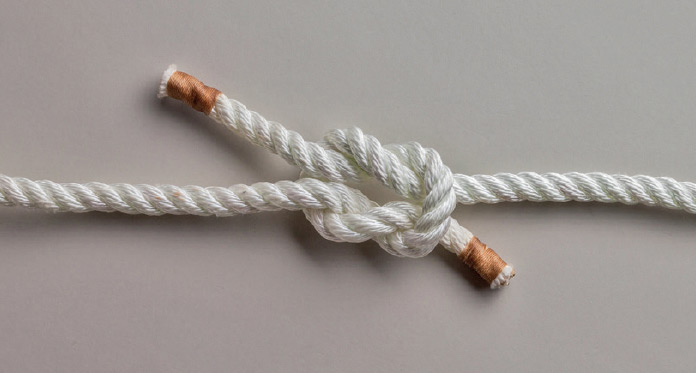
4. The finished knot has some of the Square Knot’s symmetry, in that both strands of the right end of the rope pass under the bight of the left end, and both strands of the left end of the rope pass over the bight of the right end. But where both working ends are on the same side of a Square Knot, the working ends are on opposite sides of the Thief Knot—a subtle difference.
21. Surgeon’s Knot
Also known as: Ligature Knot
Another variation of the Square Knot, this one holds better and is easier to tie tightly as a binding knot. The second tuck provides extra friction, holding the structure tight until the knot is finished. Surgeons used this knot to tie off slippery blood vessels.
Instructions
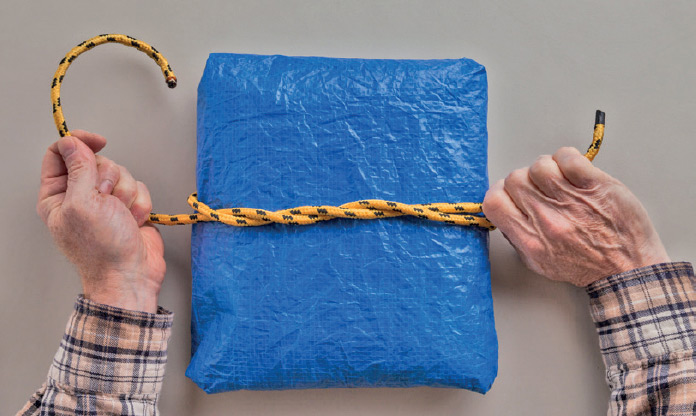
1. Start as if you are tying a Square Knot around an object, but tuck the right working end over and under the left working end a second time before pulling tight.
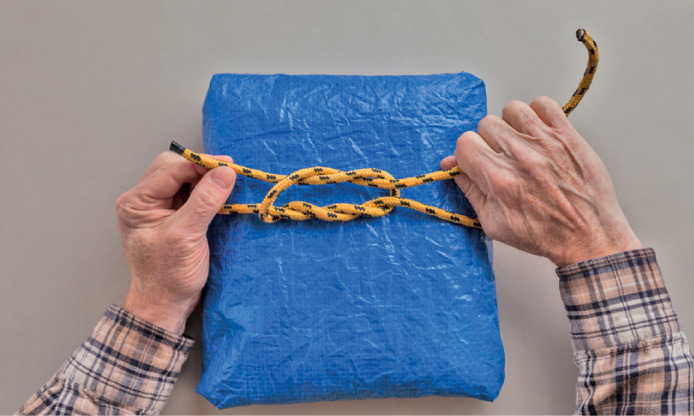
2. Bring the working end that is now on the left and pass it over and under the other working end, like finishing a Square Knot. Pull tight.
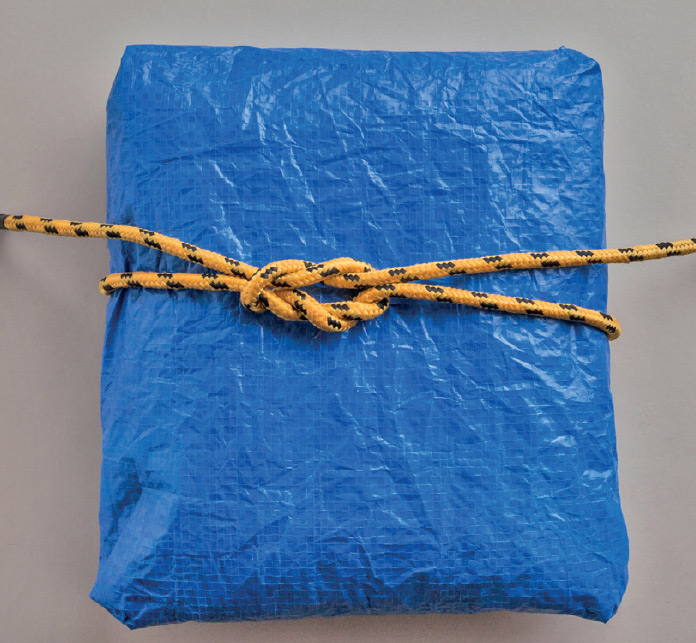
3. The finished Surgeon’s Knot looks like what it is: a Square Knot with an extra tuck.
22. Surgeon’s Knot with Second Tuck
Also known as: Doubled Surgeon’s Knot
This variation of the Surgeon’s Knot adds a second tuck to the top Half Knot for extra security.
Instructions
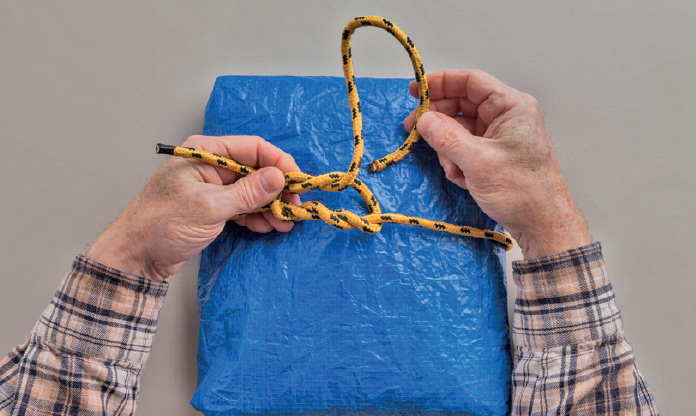
1. Start by tying a Surgeon’s Knot (opposite), but don’t pull it tight yet.
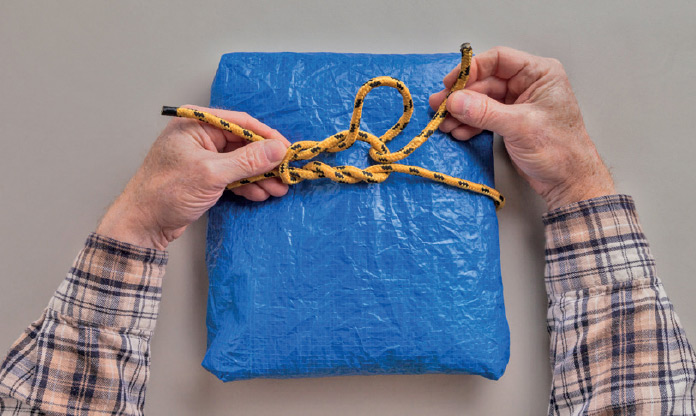
2. Take one of the working ends and tuck it through the bight in the other end a second time.
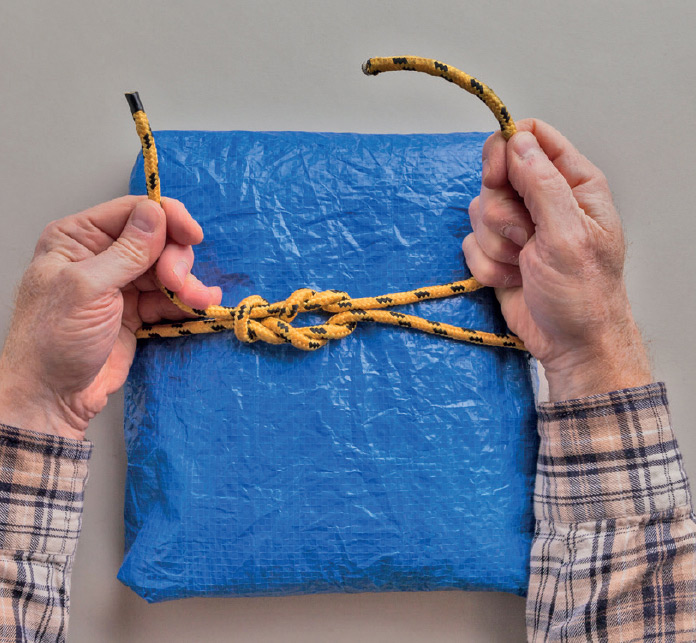
3. Pull both working ends to tighten.
23. Strangle Knot
Also known as: Double Overhand Knot
The Strangle Knot is often tied with small-diameter stuff around a large-diameter rope that is about to be cut, to hold the strands in place until permanent whipping can be applied. It can also serve as a bag closure and as a more secure alternative to a Clove Hitch. For even greater tenacity, however, use a Constrictor Knot.
Instructions
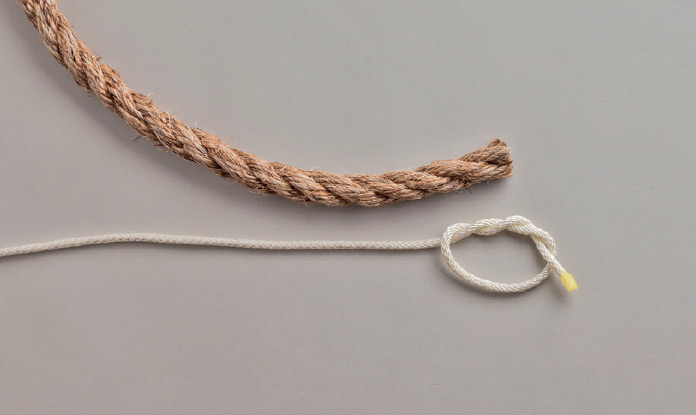
1. Tie a Double Overhand Knot around the object being “strangled.” Or you may tie the knot in hand, making the crossing turn large enough to then slip over one end of the object when it’s ready.
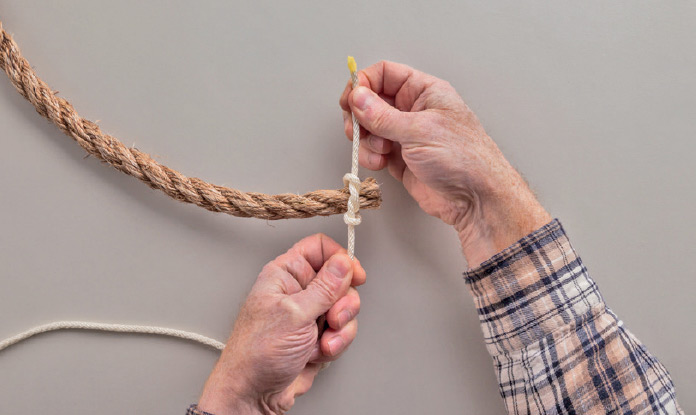
2. Pull both ends tight.
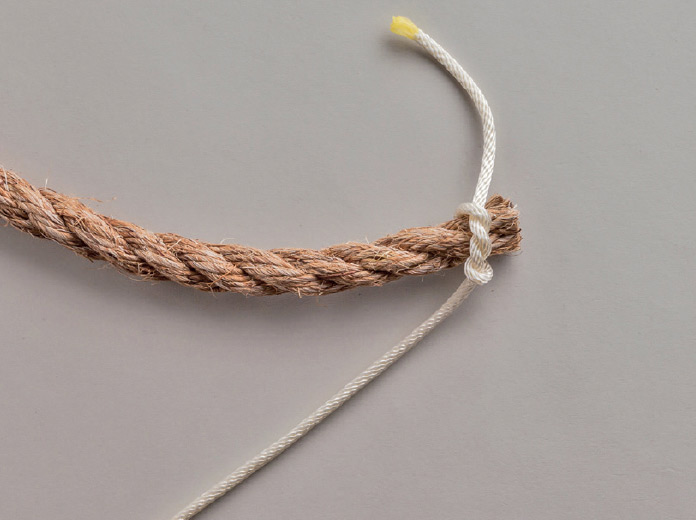
3. The finished Strangle Knot.
24. Miller’s Knot
Also known as: Sack Knot, Bag Knot
This is a good knot to close the top of a sack. It tightens down well and holds securely against a high-friction surface like a canvas or burlap bag. It may be tied with a drawloop to make it easier to untie.
Instructions
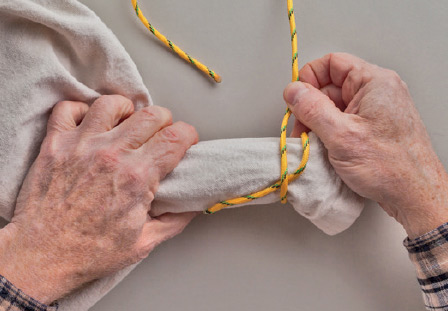
1. Make a Single Hitch around the neck of the bag, holding the standing part down with the longer working end.
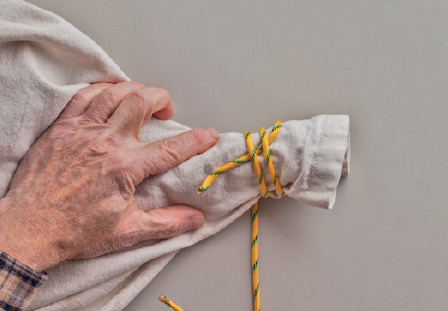
2. Bring the working end around the bag to make a round turn over the standing part.
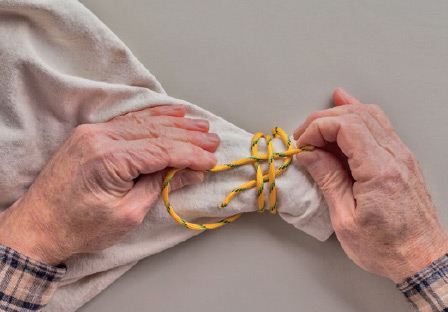
3. Pass the working end over the round turn and through the Single Hitch.
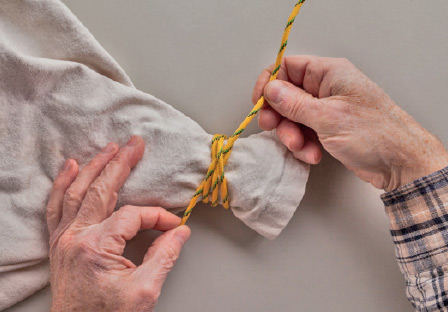
4. Pull both ends to tighten.
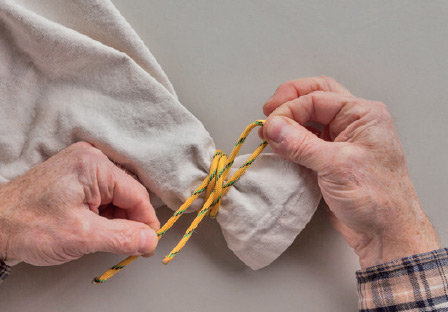
5. To form a drawloop that will make the knot easier to untie: at step 3 make the working end into a bight before passing it over the round turn and through the Single Hitch.
25. Packer’s Knot
When butchers used to wrap orders in paper, they would tie this knot in string to secure the packages. The standing part can be snugged up as tight as you wish through the Figure 8 Knot in the working end.
Instructions

1. Bring the rope or string around the package and cross the ends as shown. We will refer to the end on the right side of the photograph as the working end.
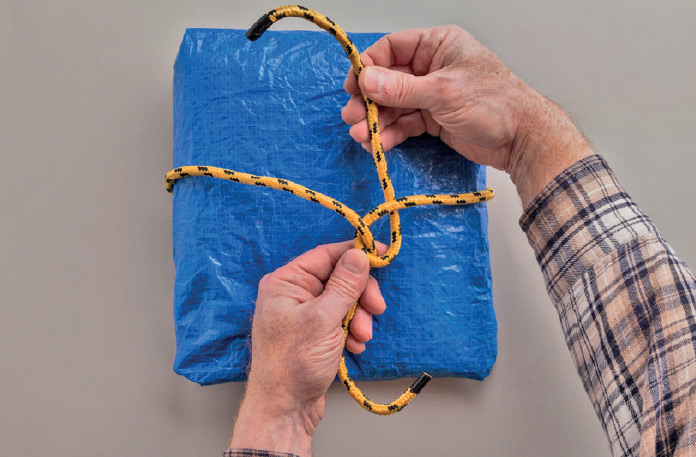
2. With the working end, make an underhand crossing turn counterclockwise around the standing part. Note how the standing part passes through the crossing turn from front to back.
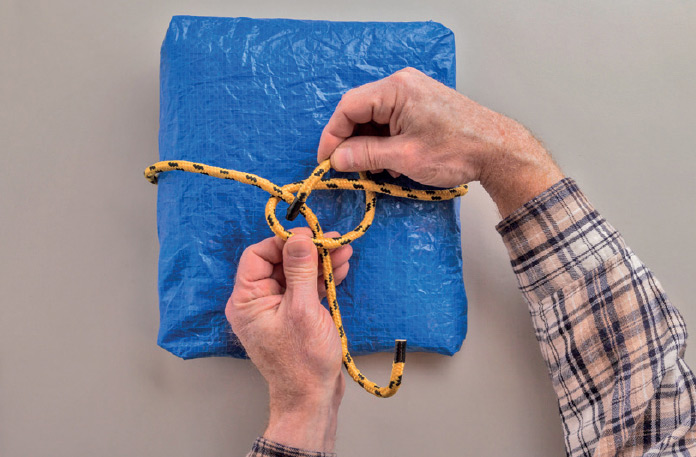
3. Bring the working end to the front, and pass it through the crossing turn from front to back, over the standing part. You are tying an Overhand Knot around the standing part.
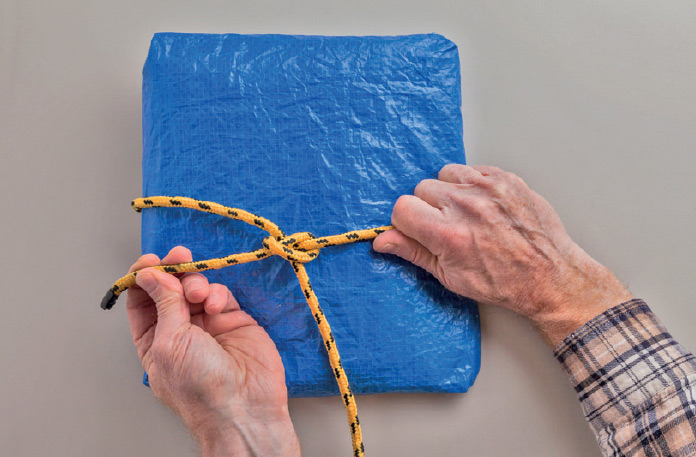
4. Pull the Overhand Knot tight.
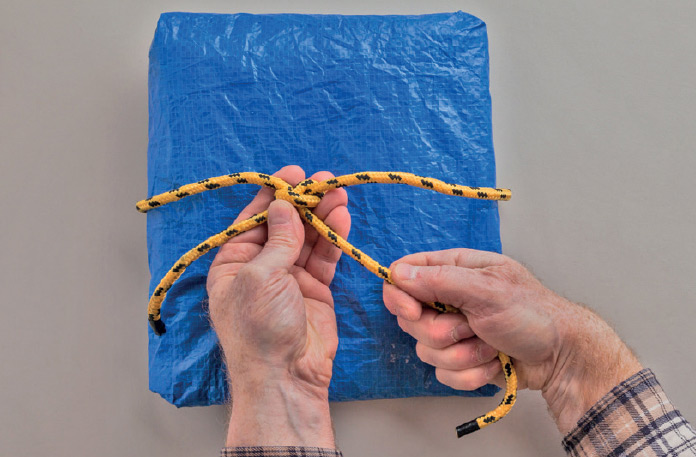
5. Pull the standing part through the Overhand Knot to tighten the rope around the package.
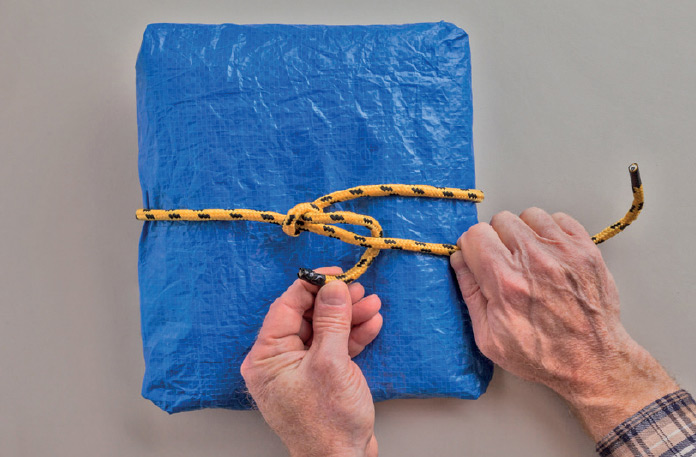
6. Pass the working end behind the standing part.
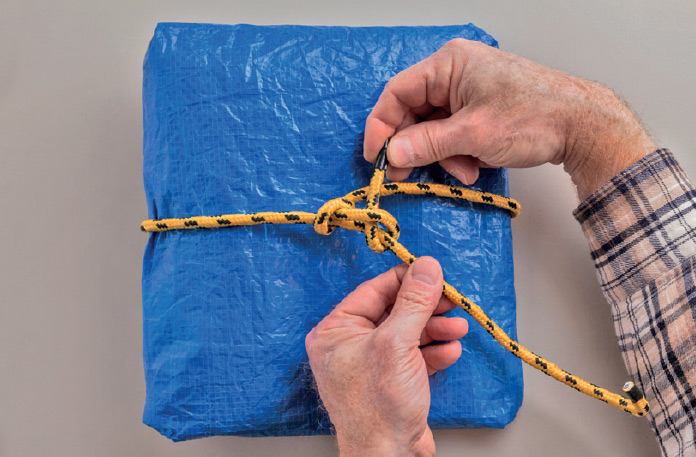
7. Pass the working end under itself to complete a Half Hitch around the standing part. Pull the Half Hitch tight.
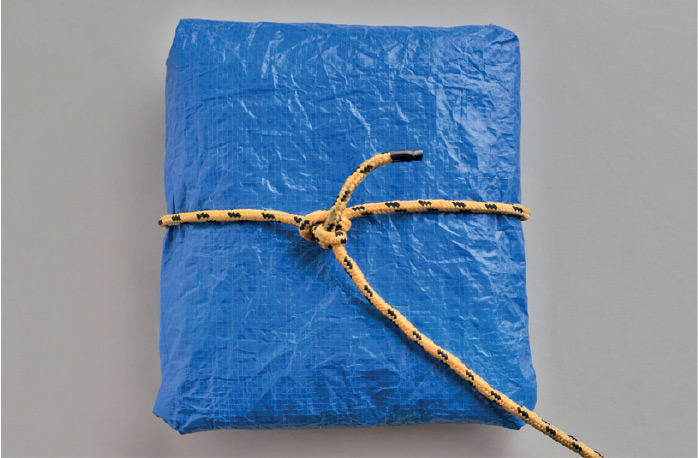
8. The finished Packer’s Knot.

