Chapter 13. Lighting
Lighting is perhaps the aspect of an image that most impacts how we perceive it. Lighting can change the tone of an image and make characters and scenery look either dark and sinister or warm and inviting. In this chapter, I’ll work on lighting the projects I’ve built so far using a variety of techniques, including both Blender Internal’s array of lighting options and Cycles’ more physically accurate methods for creating different kinds of lights.
Blender Internal vs. Cycles Lighting
Both Blender Internal and Cycles have a wide variety of powerful tools for lighting. Blender Internal supports a range of lights that behave in different ways, as well as two methods for rendering shadows—using either shadow buffers or ray tracing—both of which will be discussed shortly.
Cycles uses only ray tracing for lighting, and its results are more realistic than those of Blender Internal. It also supports the emission of light from meshes, allowing you to create lights of any shape. But while Cycles is the more realistic lighting renderer, neither Cycles nor Blender Internal is the right choice for everything, and both have advantages. For example, Blender Internal’s lights are quick to render and offer a wide variety of uses and styles, while Cycles offers a reliable and realistic way of working with lights that doesn’t require much tweaking to produce good results. We’ll use both renderers in this chapter as we light the Bat Creature for rendering in Blender Internal and the Spider Bot and Jungle Temple for rendering in Cycles.
Lighting in Blender Internal
Blender Internal uses Blender’s lamp objects to light a scene. To create a lamp, press SHIFT-A in Object mode and choose one of the following under Lamp:
Area. This creates a square- or rectangular-shaped lamp that emits light from all over its area. Area lamps support ray-traced shadows and are well suited for creating soft shadows and studiostyle lighting, but they can slow render time significantly because they require more samples than other lamp types to produce noise-free results.
Hemi. This lamp lights the entire scene in a diffuse way, similar to outdoor light from the sky. Because it doesn’t support shadows, it’s very quick to render but of limited use.
Point. This creates a point light, which emits light in all directions from the lamp’s center. It supports ray-traced shadows and is a good general purpose lamp.
Spot. Spot lamps are like a spotlight at a theater or a flashlight. They emit light in a cone from their origin, making them a good tool for lighting specific areas. They support both ray-traced shadows and shadow buffers. Shadow buffers produce shadows without ray tracing and are generally significantly faster to render. This makes them very versatile and useful for scenes that need a high degree of control over lighting.
Sun. This lamp lights an entire scene from one direction, just as the sun might. It supports ray-traced shadows.
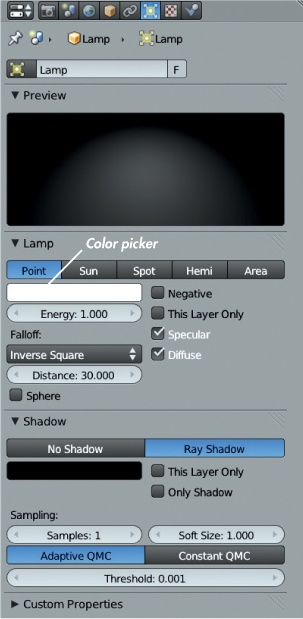
The settings for each lamp can be altered from the Object Data tab of the Properties editor, which has a lamp icon when a lamp is selected as the active object. You can adjust a lamp’s brightness and falloff—the distance over which the strength of its light fades—as well as the settings for shadows, colors, and so forth. While different lamps—particularly spot lamps—have certain unique features, they generally share the same settings. The settings for a point lamp are shown in Figure 13-1 and discussed below.
Light Color. This color picker lets you choose the color of your light.
Energy. This determines the overall intensity of your light.
Falloff. Available only for point and spot lamps, this controls the distance and curve over which the strength of the light fades. The drop-down menu lets you specify the falloff curve for the fade (choose Inverse Square for realistic falloff and experiment with the others). Distance lets you specify the overall distance for the fade—the higher the setting, the farther the light will spread. The Sphere setting causes the intensity of the light to fade to zero over the determined distance rather than tapering off indefinitely.
Negative. This turns the light into an “anti” lamp that removes light from the scene instead of adding it. This setting can be useful for creating dark corners or hiding areas of a scene in shadow.
This Layer Only. This causes lights to illuminate only objects on their same layer. This setting can be useful for lighting individual objects.
Specular/Diffuse. These settings let you control whether a light will contribute to specular and diffuse reflections. It can be handy to turn off a lamp’s specular reflections in order to add soft illumination to an area without creating highlights. By turning off diffuse reflections, you can position a light to place highlights precisely without changing the overall diffuse lighting.
Shadows in Blender Internal
Blender offers two ways to render shadows: ray tracing and shadow buffers.
Ray Tracing
The first method uses ray tracing to determine the parts of a mesh in shadow. Ray tracing “fires” rays out from the camera for each pixel in an image and draws them to the surface the pixel is facing. Further rays are drawn to the lights in the scene to determine whether that point is in light or shadow: If a ray can be drawn to the light without intersecting another object, the point is lit; otherwise, it is in shadow.
When there are multiple lights or soft shadows, multiple rays must be cast per pixel, increasing render times. The same goes for ray-traced reflections and transparency, where rays may be reflected or refracted multiple times. Ray tracing can produce crisp, pixel-perfect shadows as well as soft shadows, and it’s more accurate but generally slower than shadow buffers.
Shadow Buffers
The other method uses shadow buffers and is only available for spot lamps. Shadow buffers take advantage of the spot lamp’s restricted cone of illumination to create a map of which areas are in shadow over the range of angles that the lamp covers. Essentially, Blender creates a basic render of the scene from the lamp’s point of view: Areas that can be seen from the lamp’s viewpoint are lit, while areas that cannot are in shadow.
Shadow-buffer shadows are generally faster to render than ray-traced ones and are also compatible with the strand renderer for hair. In fact, the deep shadow-buffer option for spot lamps is ideally suited to rendering shadows cast by hair. But getting accurate buffered shadows, which you do by increasing the resolution of the shadow-buffer map, can use a lot of memory, and the borders of low-resolution buffered shadows can look jagged (see Figure 13-2), so be sure to set them up correctly.
Common Shadow Options
In the Shadow panel of the lamp settings, the following options are common to both ray-traced and buffer shadows.
Shadow Color. This option lets you set a color for the shadow. Of course, in reality, shadows have no color, so this is actually a trick designed to help change the aesthetic of your lighting. Leave it set to Black for normal (uncolored) shadows.
This Layer Only. This causes only objects on the same layer as the lamp to cast shadows, though objects on any layer may be lit by the lamp as long as the corresponding option isn’t turned on in the Lamp panel.
Only Shadow. This causes the lamp to cast only shadows, meaning that you will need other lights in your scene to light your objects. This option can be used to create a shadow in a specific place without affecting the overall look of your lighting.
Ray-Traced Shadow Options
Enabling Ray Shadow for a lamp gives the following options:
Samples. This determines the number of samples taken per pixel for soft shadows in order to determine the amount of shadowing. Higher sample numbers give less noisy results. Setting Samples to 1 gives hard-edged shadows regardless of the Soft Size setting.
Soft Size. This setting is designed to produce soft shadows by spreading out the area the light comes from. The larger the soft size, the softer and less defined shadows become. Larger sizes require higher numbers of samples to produce noise-free results.
Adaptive/Constant QMC. This sets the sampling method used to determine whether a point on a surface is in shadow. For Constant QMC, the number of samples taken is always that specified by the Samples setting. For Adaptive QMC, fewer samples may be taken for areas that are obviously either in or out of shadow. The threshold value dictates the level of certainty required to determine how many samples are needed: Higher threshold values are more tolerant and faster, but they can produce noisier results.
Shadow-Buffer Options
Opting for shadow-buffer shadows for spot lamps gives the following options:
Buffer Type (Classical/Classic-Halfway/Irregular/Deep). The specifics of these types are quite technical (you can find the details with a bit of googling), but the differences are really pretty straightforward.
Classical. These buffers are the simplest and can suffer from biasing artifacts (see Figure 13-2).
Classical-Halfway. These buffers improve on Classical and suffer less from biasing artifacts.
Irregular. These shadow buffers always produce crisp, clean shadows with no aliasing, but they can’t be used to produce soft shadows, and the shadows they create don’t show up in ray-traced reflections.
Deep. These shadow buffers are the most advanced and can store transparency information, allowing for partial shadowing from transparent objects. They are ideal for rendering shadows from materials like hair and fur, as well as volumetric materials.
Filter Type. The filter type used to blend shadow borders. Gauss gives the smoothest results.
Soft. This sets the softness of your shadows in terms of the size of the lamp used to cast shadows. Larger values give softer shadows but require more samples.
Bias. This adjusts how the shadow buffer is calculated. It’s used to prevent artifacts that are caused by faces at a low angle to the lamp casting shadows on themselves (see Figure 13-2). Higher values reduce bias artifacts but can cause some parts of a mesh not to cast shadows where they should, so set this as low as you can without introducing artifacts.
Sample Buffers. This determines the number of shadow buffers that are rendered. Higher values give better anti-aliasing of hard-edged shadows, but more buffers use more memory, so tread carefully.
Size. This sets the resolution of the shadow-buffer map (see Figure 13-3). The higher the value, the greater the detail that can be captured in the map and the more memory required for rendering. If you want soft shadows, you won’t be able to see that much detail in them anyway, so use high resolutions only for harder shadows.
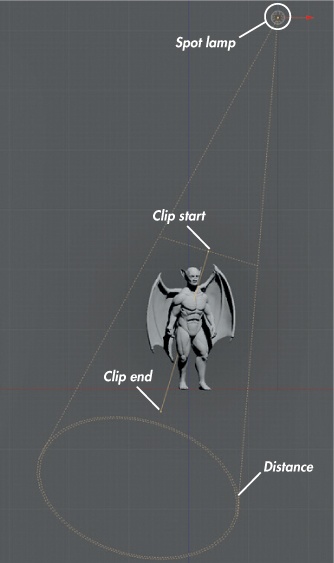
Clip Start/End. These settings define the range of distances over which objects will cast shadows in the shadow buffer. Objects outside this range will still be lit by the spot lamp but will not cast shadows. The extent of this range is displayed in the 3D Viewport as a solid line extending outward from the lamp’s center between the clip-start and clip-end distances (see Figure 13-4).
Autoclip Start/End. Turning on these options leaves it to Blender to set the clip-start and clip-end distances automatically based on the vertices visible from the point of view of the lamp.
Lighting in Cycles
In Cycles, lighting is broadly similar to that of Blender Internal but with fewer options. Setting up lighting in Cycles is easier because you get instant feedback from the render preview. Lights in Cycles are node based and consist of shaders, just as with materials. In fact, Cycles allows you to incorporate the emission of light into materials and lamp objects. We’ll discuss both here.
Lamp Objects in Cycles
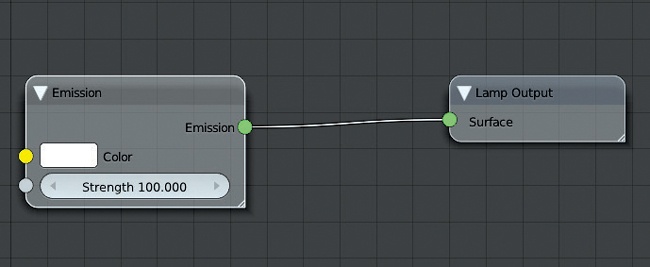
Cycles supports most of the same lamp types as Blender Internal, except for Hemi lamps. Adding a new lamp object in Cycles adds a standard emission shader connected to the lamp’s output node, as shown in Figure 13-5. This shader can be used to adjust the intensity and color of the light. To adjust the softness of the shadows the lamp generates, use the lamp’s Size setting in the Object Data tab of the Properties editor.
Mesh-Emitter Objects in Cycles
Cycles supports the emission of light from materials, meaning that you can turn any mesh into a light by applying a material that contains an emission shader. This feature is great for creating unique lighting setups and for lights that appear in glossy reflections. (We’ll look deeper into this when lighting the Spider Bot.) In the case of mesh emitters, you can combine emission shaders with other shaders using the Add and Mix nodes (as discussed in Chapter 12).
World Settings and Ambient Light and Occlusion
In Chapter 10, we baked ambient occlusion maps for our projects. Ambient occlusion maps are textures that mimic the effect of light coming from all around an object that is occluded, or blocked, by parts of the object itself. This effect is similar to what we see in the sky on a sunny day. The main source of light is the sun, but light also scatters throughout the atmosphere so that it comes from all directions and even illuminates the shadows. (This effect is even more apparent on an overcast day when the lack of direct sunlight means things are lit more evenly from all directions.)
To achieve the effect of light coming from a scene’s surroundings, we can use Blender’s World settings, accessible from the World tab of the Properties editor. These settings determine the look of your scene’s background and how the background contributes to the scene’s lighting. Both Blender Internal and Cycles support world lighting, though in slightly different ways.
World Settings in Blender Internal
Blender Internal’s World settings are shown in Figure 13-6. The most important ones are as follows:
Horizon Color/Zenith Color/Ambient Color. By default, the sky in a scene will simply be the Horizon Color. The Zenith Color is used when Blend Sky is turned on, rendering the background as a gradient from the horizon color to the zenith color. The Ambient Color is a fixed color that is added to the lighting of every surface in the scene, brightening the shadows, but the effect is very unrealistic, so it’s best to leave this set to black.
Paper Sky/Real Sky. Paper Sky applies any texture or blend applied to the background to the camera coordinates. This can be useful when you have a background photo or image that you want to use as is, without distortion. Real Sky creates a background with a real horizon in the plane of the scene’s global coordinates so that any textures remain static as the camera is rotated and any blend in the sky occurs from the “real” horizon upward (and downward). Real Sky is useful when panoramic or mirror-ball textures are used as backgrounds.
Ambient Occlusion. We encountered ambient occlusion in Chapter 10. Ambient occlusion lights or adds shadows to a surface based on the surrounding geometry. Areas with geometry around them that blocks light will be darkened, while the exposed parts of a mesh will remain well lit. The Ambient Occlusion option can be set to Add or Multiply with the other lighting in the scene. Additive ambient occlusion brightens the existing lighting, while Multiply adds shadows. Multiply is the more “realistic” option and is more suitable to most scenes. (The environment lighting settings offer better tools for adding further light to the scene anyway.)
Environment Lighting. This adds light to a scene, coming from all directions (though blocked by nearby geometry, as with ambient occlusion). The Environment Lighting setting can be used to mimic scattered light from the sky in an outdoor scene or to approximate the effect of light bouncing around and illuminating a scene. The color of the environment lighting can be set to white, to the sky color (where it will use the horizon color or both the horizon and zenith colors if you have a blend sky), or the sky texture if you are using a background texture.
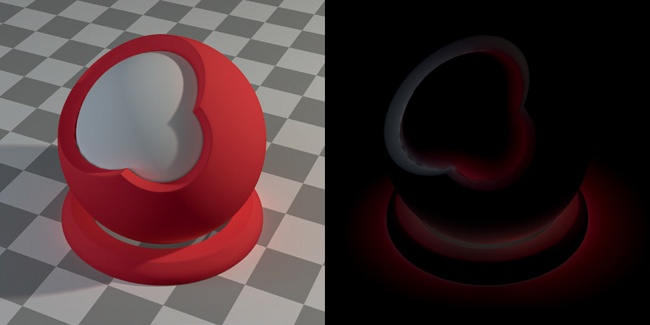
Indirect Lighting. This setting allows Blender Internal to simulate the effect of light bouncing repeatedly, and thus illuminating more of a scene, before entering the camera or eye. The result can be color bleeding, where the color of a brightly colored diffuse material is reflected onto nearby objects (as shown in Figure 13-7). The method is only compatible with the Approximate Gather method (discussed below). The Factor setting affects the strength of this effect, and the Bounces setting determines how many times light may bounce off a surface and still be rendered.
Gather (Ray Trace and Approximate). These settings let you choose between Blender Internal’s two options for rendering world lighting. As with lamps, Ray Trace takes multiple ray-traced samples per pixel to determine the amount of world lighting. This process gives more accurate results, typically at the cost of extra render time and noise (if the number of samples is set too low). The Approximate setting does not require ray tracing and is noise free, but it can produce other artifacts, such as overocclusion in some areas. Turning up the number of passes and setting the error value lower gives better results but takes more time to preprocess when rendering. Alternatively, using the Correction parameter reduces the strength of the occlusion to compensate for the artifacts. When using the Approximate Gather method, turning on Pixel Cache generally gives much faster results.
Attenuation. The Falloff setting under Attenuation causes ambient occlusion, environment lighting, and indirect lighting to fade out over a certain distance, reducing the effect of far away geometry on a surface and lightening the surface. Falloff also speeds up rendering because calculating the lighting for a surface point only requires taking nearby geometry into account. The Strength setting determines how strong the attenuation is, while the Distance setting (only with the Ray-Trace Gather method) determines the range of the falloff.
World Settings in Cycles
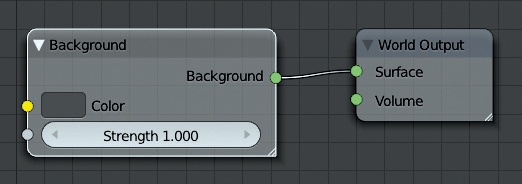
In Cycles, World settings are node based and use the same shader system as do materials and lights. The World settings use the Background Shader node exclusively, which lights the scene and sets the background color or texture (depending on the inputs you supply it with) and the strength of the lighting that the background contributes. The standard background node tree is shown in Figure 13-8.
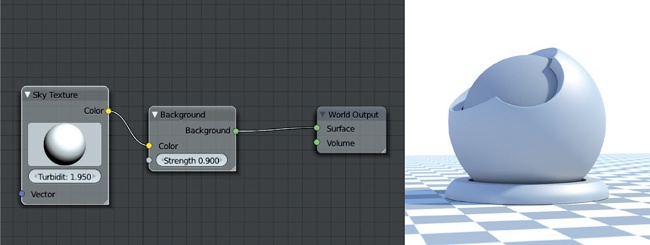
You can influence the color of the background as with other materials by using textures, images, and colors. Particularly useful for this are the Sky Texture and Environment Texture nodes. The Sky Texture node creates a procedural sky, using the direction you set by dragging the sphere input of the node, with the level of atmospheric scattering determined by the Turbidity setting. This effect works particularly well when combined with a sun lamp with a yellow-orange (sunlight) color to get some basic outdoor lighting (see Figure 13-9).
Cycles also supports ambient occlusion, which can be used to add white ambient light to a scene, with occlusion based on the distance between faces. You can turn this effect on in the World tab of the Properties editor by using the Ambient Occlusion tab.
Also in the World tab under Settings is the option to sample the background as a lamp. Enable this when using a textured background, particularly when using HDRI (high-dynamic-range image) maps for background lighting to dramatically speed up rendering (see Figure 13-10).
Lighting the Bat Creature
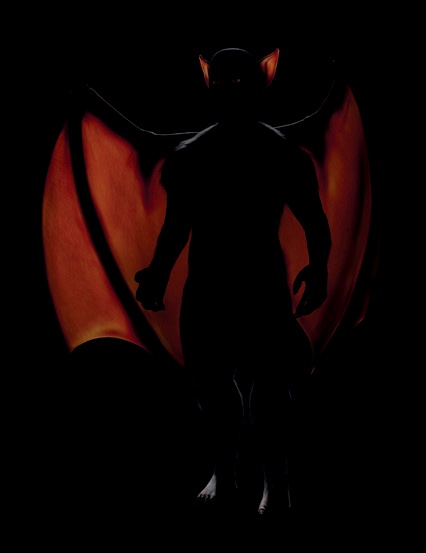
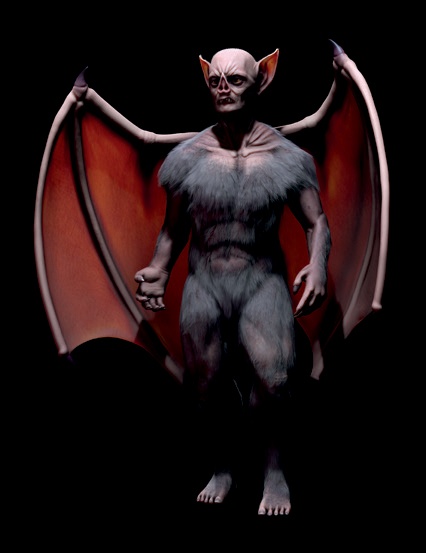
For the Bat Creature, I wanted dramatic lighting to make the character look dangerous and foreboding. I needed some dark shadows and stark lighting that wouldn’t give too much away. To create this effect, I used a three-point lighting setup, which is commonly used to light characters and portraits. Additionally, I needed to set up my lights to create good shadows with the creature’s hair and to light the creature from behind so that light would be seen scattering through the skin of the wings (using the subsurface scattering material we created in Chapter 12).
Three-Point Lighting
Three-point lighting is considered the “standard” lighting setup for a lot of portraiture and cinematography because the use of three lights achieves a pleasant, natural look that can be adapted to many circumstances with good results.
The Key Light
The first of the three lights—the key light—is the main source of light in a scene and is generally placed so that it lights the subject from the side and slightly above to provide some interesting illumination.
For the Bat Creature, I added a spot lamp above and slightly to the left (from the camera’s perspective) of the character, as shown in Figure 13-11. The key light would provide most of the illumination, so I set its intensity quite high (to about 12) and the distance low (around 3) so that the intensity of the light would fade relatively quickly. I gave the light a bluish tint, as shown in the figure.
The Fill Light
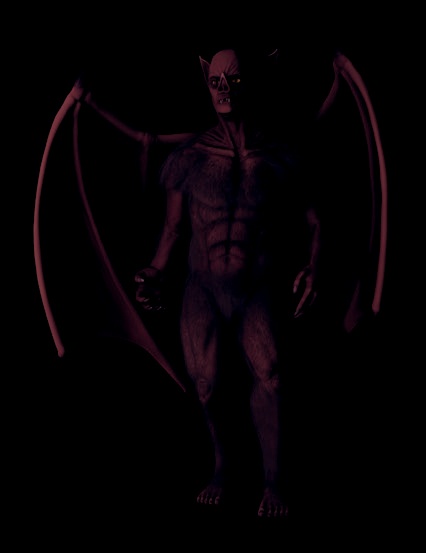
The next light—the fill light—is placed opposite the key light, usually illuminating the subject from the other side and generally adding some subtle light to the shadows cast by the key light. Because I wanted the Bat Creature to have really dark shadows, I set the intensity of the fill light to 0.5 and its distance to 6. I set its color to a reddish hue to contrast with the blue key light. The effect of the fill light is shown in Figure 13-12.
The Back Light
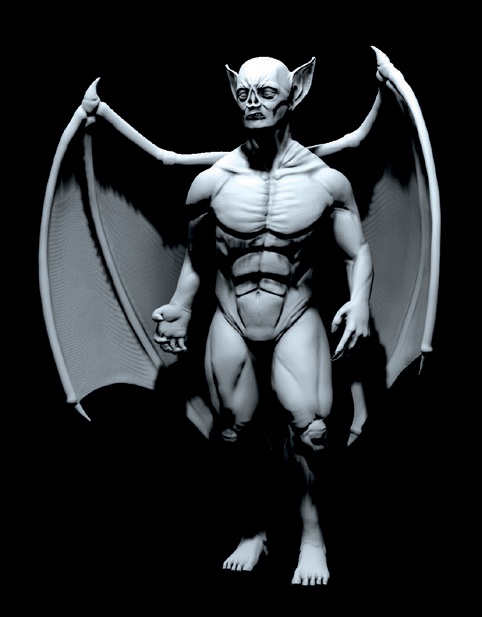
The back light (sometimes called a rim light) lights a subject from behind, usually adding a subtle highlight around the edges of a subject on one side. This light was especially important for the Bat Creature because it provided scattered back lighting through the wings and ears. I set its intensity high (to 10) and its distance to 10 to give the light enough brightness to shine through the wings (see Figure 13-13). Together, the key, fill, and back lights produce the final lighting, as shown in Figure 13-14.
Positioning the Lights
Positioning the three lights involves thinking about what aspects of your model you want to light and where you want the light to come from and then exercising a bit of trial and error. To help with the process and to get quicker feedback on how your lights look (without having to render each time), use Blender’s GLSL shading mode to see how your lights will look in real time in the 3D Viewport (see Figure 13-15). This works particularly well for spot lamps as GLSL also supports buffered shadows, meaning the GLSL preview will look pretty close to your final renders. Turn on this shading mode by going to the 3D Viewport header and setting the shading to Textured. Then, look in the Properties region under Display and set the shading type to GLSL (press N to bring up the properties region in the 3D Viewport). You can then move your lights around as you please and get instant feedback on how they look.
GLSL shading supports all but area lights, though it only renders shadows for spot lamps with buffered shadows.
Clay Renders and Material Override
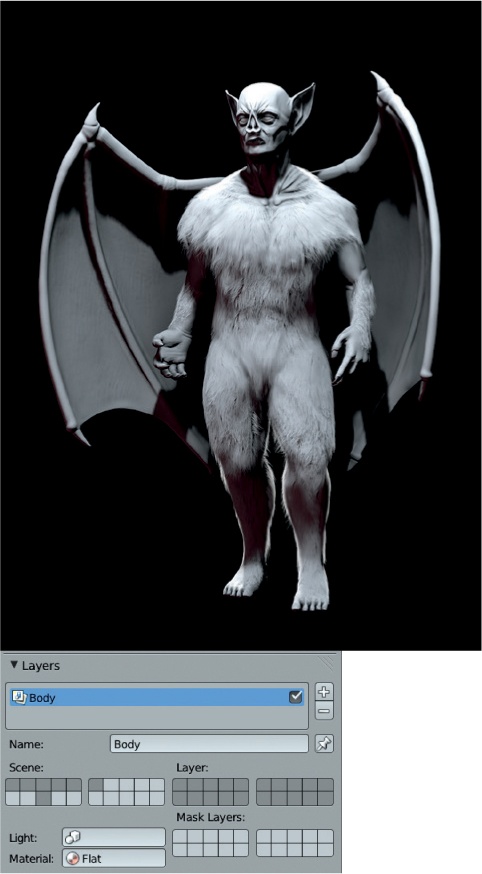
Another way to get a feel for how your lighting is working is by rendering your scene and applying the same material (usually a flat, diffuse one) to every object. Often called a clay render, this lets you see how the lighting is working in isolation and can be useful for checking whether an issue with your renders is due to lighting or materials.
To quickly set up a clay render, use the Material Override option in the Render tab of the Properties editor. Create a new, flat, gray material (just use the default material and turn down the specularity) and assign it to the Material Override option in the Layers panel to render the scene without textures and materials, as shown in Figure 13-16. Press F12 to render. (See Chapter 14 for more on rendering.)
Shadows and Fur
While ray-traced or buffered shadows would both be appropriate for most of the Bat Creature, our fur has more specific lighting requirements. For best results, use deep shadow buffers on each of the key, fill, and back lights and adjust the other settings as shown in Table 13-1.
Lighting the Eyes
Eyes are a critical part of most characters, and it’s important to make sure they’re lit as you want them. Sometimes this can mean cheating by adding some separate lighting to the eyes to get the look you want. For the Bat Creature, I placed the two eye objects on their own layer (press M to move objects to other layers) and pointed a Hemi lamp at them. I set the lamp’s intensity low (to about 0.05) so that the lighting would come predominantly from the existing spot lamps. Then, I turned off the light’s Specular option to prevent it from contributing to specular reflections. Next, I turned on This Layer Only in the lamp’s settings so that the lamp would light only the eye objects, adding a bit of extra illumination to the eyes to help them stand out more.
Floor Shadows
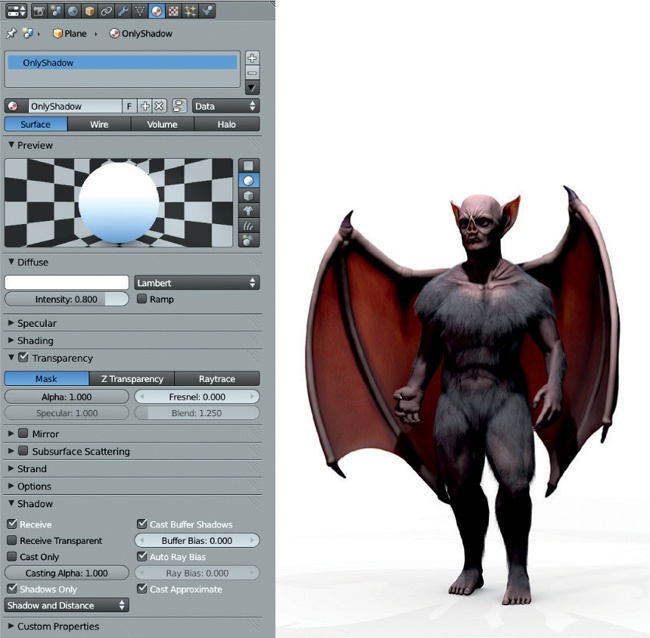
While I didn’t create a backdrop for the Bat Creature, I knew some shadow around his feet would improve my final render. To produce the shadows on their own, I used the Only Shadows option for materials. I added a plane to the scene and assigned a new material to it. Then, in the materials settings, I turned on Transparency (set to Mask), and in the Shadows panel, I turned on Only Shadows. This new material (shown in Figure 13-17) then renders as just the shadows cast by other objects, with the rest of the mesh rendering completely transparent. Later on, this will allow me to easily composite these shadows onto the background of the final render. I scaled the plane up to pick up all the shadows from the Bat Creature, using the GLSL shading mode as a guide.
World Settings for the Bat Creature
I didn’t need to do much in the way of World settings for the Bat Creature since I would be compositing in a simple background later; I just needed to turn on Ambient Occlusion. To do so, I enabled Ambient Occlusion in the World tab of the Properties panel and set it to Multiply with a factor of 1.0. For the Gather method, I chose Approximate. I set the number of passes to 1 and turned on Falloff with a strength of 1. These settings work well with hair, and using them meant that I wouldn’t have to do any ray tracing when rendering since I was using buffer shadows for the rest of my lighting.
This completes lighting the Bat Creature. We’ll return to rendering it in Chapter 14.
Lighting the Spider Bot
We’ll be rendering the Spider Bot with Cycles. For this project, I wanted bright, dynamic lighting to show off the character’s shiny surface. I accomplished this with a mix of mesh lights and lamp objects. Since I wouldn’t be using world lighting, I set the color of the world background to black in the World tab of the Properties editor, and I set its intensity to 0 before continuing.
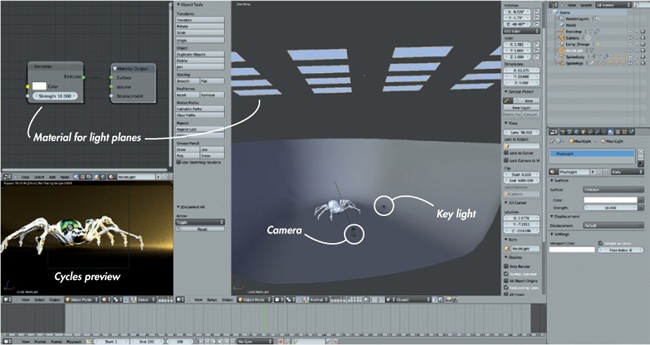
The principal lighting for the Spider Bot comes from the right from a point-lamp object with an orange color and high strength, as shown in Figure 13-18. This lamp is supplemented by a mesh light overhead that is composed of multiple planes with a light-emitting material. To create this light, I added a new plane object and moved it above the scene. Then, I duplicated the face several times in Edit mode, using Blender’s snapping tools (set to Increment) to keep the planes aligned in a grid. I then scaled the whole array of planes along the x-axis to make them rectangular.
To make these planes emit light, I assigned a new material to them, and in the Node editor, I added an Emission Shader node and attached its output to the Material Output node (see Figure 13-18). I gave the Emission shader a bluish color and set its strength to 10. Because these lights are meshes, not only do they light the scene, but they also show up in the reflections on the Spider Bot’s shiny green surfaces, particularly on the back, as seen in the figure.
It’s simple to tweak the strength and color of lights in Cycles, thanks to the render preview shading mode of the 3D Viewport, which can give instant feedback on how your lighting looks as you adjust lights. (For more on the 3D Viewport render preview, see Chapter 14.)
Lighting the Jungle Temple
The Jungle Temple required a more complex lighting setup, but again, we have the Cycles render preview to give instant feedback on how our lighting looks. For this scene, I wanted to create a nighttime atmosphere with a bright, fiery orange light coming from the entrance to the temple.
World Background
Because I would be lighting the Jungle Temple scene without world lighting, I set the world background color to black with 0 intensity.
Temple Entrance Lighting
Let’s start with the light coming from the temple entrance, as this is the light source with the most impact on the scene. I used a couple of light sources to create this lighting. The first is a mesh emitter at the end of the tunnel (out of sight of the camera); I assigned red and orange emission materials to it to provide orangish light throughout the tunnel and a bit beyond. I set the intensity of these emission materials to about 40.
To help spread this light further into the surroundings, I created a point-lamp object with a yellow-orange color nearer the mouth of the tunnel. I gave it a high intensity to light more of the surrounding areas and set the point-light size to 1.5 to give soft shadows. These lights can be seen in Figure 13-19.
Fill Lighting
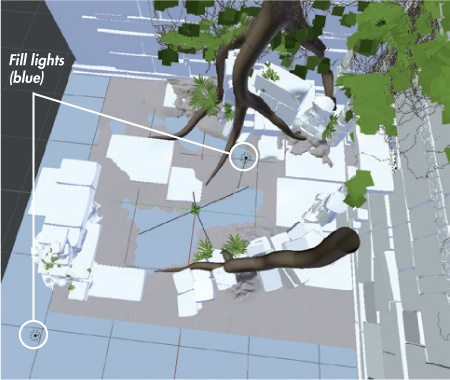
To add further light, I created a soft (large size) point lamp hovering over the middle of the scene to provide some general lighting. I also added a harder (small size) light behind the camera and off to one side to illuminate the foreground objects a bit. I gave both lamps a bluish color, which lent the scene a blue, moonlit look where it was not illuminated by the orange light from the tunnel. (Blue and orange also oppose one another nicely.) These lights can be seen in Figure 13-20.
Back Light
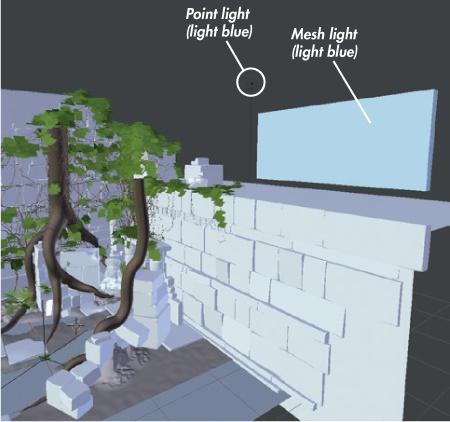
I also added some illumination from the right, coming from behind the temple, to highlight the leaves and give a slight rim light to the rocks of the temple walls. This light comes from two lights: a long, shallow mesh light that illuminates mainly the backs of the leaves and a point light that provides some extra illumination from this direction (see Figure 13-21). The overall effect is shown in Figure 13-22.
A Note on Soft Shadows
While soft shadows look nice, they can really bump up your render times. I ended up using quite a few lamps with soft shadows for this scene, and as a result, it took quite a while to render. This isn’t really a problem for stills, but bear it in mind if you want to render an animation or if you want quick results, and consider using lights with harder shadows or having some lights that don’t cast ray-traced shadows at all.
General Lighting Tips
Lighting makes a big difference to the feel of an image, and you can do a lot with lighting to change how your subject is perceived. Here are some tips to make your lighting render more efficiently and work better artistically.
Experiment. I tried a lot of different lighting setups for all of my projects. For the Jungle Temple scene, I tried both daylight and nighttime lighting, and for the Bat Creature and Spider Bot, I experimented with many directions and colors. Coming up with something good requires experimentation.
Use test renders and previews. Use Blender Internal’s GLSL shading and Cycles’s render preview for real-time previews of your lighting. Do test renders to make sure your lighting works.
Less is more. Try to use fewer lights where possible to simplify the process of tweaking your lighting and to make it easier to see which lights most influence your image.
Shadow settings. While it can be tempting to turn up all the settings for your lamps to try to get the nicest shadows, it’s often not necessary to do so. Experiment and try to minimize the use of settings that increase render time significantly, such as shadow samples and shadow-buffer sizes. For example, soft shadows don’t need high-resolution shadow buffers, and crisp, hard-edged shadows don’t need lots of samples. Once you have lighting you like, try to determine which settings you can turn down without affecting the look of your lighting in order to speed up renders.
Make the most of shadow buffers. The resolution of a shadow-buffer lamp is spread out over the lamp’s cone. To make the most of it, restrict the lamp by reducing its angle to cover only the model (go to Size under Spot Shape in the Object Data tab) and to make sure that you’re not wasting any of the shadow buffer’s resolution on areas that aren’t casting shadows.
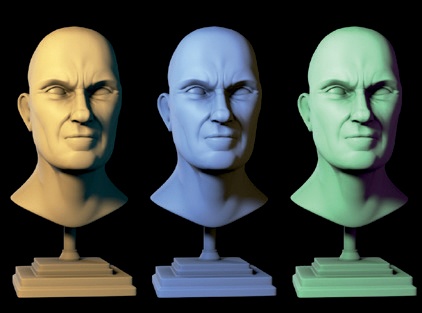
Use opposing colors. Use color theory to your advantage when lighting. Often, opposing colors (pairs of colors on opposite sides of the color wheel, such as orange and blue or green and purple) work well when used as opposing key and fill lights (see Figure 13-23). Natural light often follows this example: Sunlight is orange, while scattered light from the atmosphere is blue.
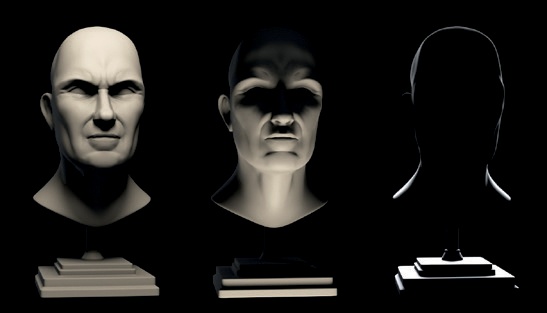
Directional lighting and characters. The direction you choose to light a character from can change the way it’s perceived. Lighting from above often looks regal and dignified, while lighting from below looks scary and menacing. A few examples are shown in Figure 13-24.
In Review
In this chapter, we looked at lighting for both Blender Internal and Cycles, beginning with a discussion of the different types of lamps that Blender offers and their functional differences in Blender Internal and Cycles. We examined different methods for dealing with shadows, both ray traced and buffered, and explored their advantages and disadvantages. We also looked at Blender’s World settings and how they impact lighting.
For the Bat Creature, we covered creating a three-point light setup to give dramatic flair to the model and looked at how best to set up shadows for characters with hair. For the Spider Bot and Jungle Temple projects, I lit the scenes using a mix of lights and mesh-emitter objects to create dynamically lit scenes. When I worked with lighting in Cycles, the Cycles render preview came in handy for getting real-time feedback on the effect of our lights. And even in Blender Internal, I used GLSL shading to get some rudimentary feedback on the lighting and shadows in the scene.
In the next chapter, we’ll render the scenes and do some final color correction and compositing for our projects. I will cover render options for both Cycles and Blender Internal and how best to optimize render times while getting the best possible renders. We’ll look at node-based compositing using Blender’s compositor, as well as creating backgrounds and doing final tweaks in GIMP.
