Of all the steps involved in the process of transforming muscle into beef, butchering is the last step and a crucial one in determining the quality of the meat. It is surprisingly bloodless, a fact I learned at Valley Meat Services.
This custom meat processor occupies a white storefront in Wallowa, Oregon, the first town you reach after winding through the river canyon to emerge into this wide valley. The butcher shop sits one block behind Food City market, out of sight of the main highway and the tourists in RVs headed for Wallowa Lake. But hunters and all of the local ranchers depend on the services offered within by butcher Kevin Silveira.
A former log truck driver, Kevin opened his state-inspected custom meat cutting shop in 2004, the days before butchers were rock stars. He’s cut all my meat—lambs, hogs, and beef—ever since. Bald and bearded, with a middleweight boxer’s build, Kevin trained with a world-weary and talented meat cutter. He can singlehandedly break down a 350-pound side of beef and then piece it back together again like a 3-D jigsaw puzzle. Few of today’s butchers have those skills, never mind the time or space to handle whole sides. Most are used to working with smaller animals and the beef sections called sub-primals that arrive boxed and wet-aged in bags from big meat processing plants. (New-wave butchers are trying to learn the craft from veterans like Kevin to get up to speed.)
Kevin is a jovial guy who laughs often and heartily—especially when customers assume that their cow share will yield nothing but pure steak—but his smile can disappear in the flash of his knife from July through February, when he’s slammed and in no mood for chit chat. This is why I picked late spring to spend as much time as possible observing Kevin at work.
Cattle arrive at Valley Meat already killed, skinned, eviscerated, and divided into the symmetrical halves called sides (Harvest Day, page 39). This is unlike other meat processing plants, such as Dayton Natural Meats, a small USDA-inspected facility in Oregon’s Willamette Valley where the cattle arrive live and walk onto the kill floor. Stunned unconscious with a captive gun, they are hung upside down and bled. Once the head and hooves are removed, the animals are skinned, eviscerated, and split into sides. They’re washed, inspected, treated with an antimicrobial, and chilled in a drip cooler for twenty-four hours to below 40°F—some of the many food safety firewalls in the process.
Kevin and his crew can cut and wrap a side of beef every thirty minutes—a total of eight whole animals within a ten-hour workday. Compared to the two thousand per day at the giant Tyson processing plant just over the Washington border, or the forty head each day at Dayton, that’s peanuts. No matter the scale, the process of breaking down each side of beef into pieces that fit in a skillet calls for formidable levels of endurance, skill, cold hardiness, and a fearlessness of sharp objects.
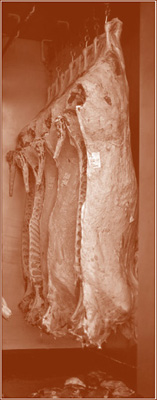
One day at Valley Meat, a dozen sides of grassfed beef hung dry-aging inside the shop’s walk-in refrigerated meat locker. In most meat processing plants, dry aging has gone by the wayside because the necessary fourteen to twenty-eight days take up too much precious time and space and reduce yields through moisture loss. It’s all a matter of taste, but many people find dry aging critical to giving the muscles their due time to dry and contract, concentrating the flavors, and letting the calpain enzymes do their tenderizing work.
As I watched Kevin’s workers muscle in six sides of grain-fed beef along a system of rails and pulleys hung from the ceiling, I saw that the contrasts with the grassfed bodies were dramatic. Corn-finished at a local farm, the carcasses wore a thick coat of fat, and each side outweighed the grassfed by one hundred pounds.
Between the twelfth and thirteenth ribs is the place where USDA inspectors peek inside the ribeye muscle to gauge yield and grade the meat on a scale of standard, select, choice, and prime. They look for the thickness of the fat around the muscle and the marbling within it. Grassfed beef hardly ever rates above select because the intramuscular fat doesn’t develop from grass the way it does from high-carbohydrate feedlot diets. (These days, less beef than ever—no matter where it comes from—is making prime and choice, the two highest grades, which may call into question the preeminence of the USDA’s rating scale in judging beef. It’s only one measure of quality, and a shallow one at that. Sure, fat is flavor, but that grassfed is so much beefier has something to do with amino acids, turpenes, and a host of flavonoid mysteries that demand far more research.)
The cutting room was outfitted with band saws, stainless steel cutting tables, and a washing machine–sized meat grinder. It felt as cold as the meat locker and I kept my fleece on under the white coat Kevin had loaned me. Three fresh-faced apprentices stood by to trim, grind, and wrap according to each customer’s cutting order and Kevin’s explicit instructions.
The carcass hung upside down from the gambrel cord, the loop of the achilles near the hock, its neck aimed at the ground. With the tip of his slender boning knife, Kevin counted the ribs upward, to find the place where he would divide the hulk of the shoulder called the chuck from the chest cavity. He lifted an electric saw off its hook on the wall and cut horizontally through the backbone, and hoisted the chuck onto his table saw. He pointed to the ruby muscles at the cut line and said, “I could get two more rib steaks off of there if I wanted to.” Then flicked on the machine and sliced off the neck and the forearm, tossing the parts onto the table where his assistants boned it for the grind. Without wasting a moment, he measured off and cut three-inch-thick chuck roasts with the band saw. As quickly as I could dice an onion, he had dismantled that entire primal into cuts for packaging, ready to cook.
He was methodical and watchful as he worked, neither wasteful nor stingy. As a cook and a long-time customer, I appreciated his high standards when he removed bone chips and sinew from the trim meat slated for the grinder. “I don’t put anything into the ground beef that I wouldn’t want to eat myself,” he said with a grin.
The art of butchery, despite its gory associations, has an element of finesse. Smooth and even, well-trimmed, manageably-sized, and correctly labeled cuts are part of what quality-conscious butchers like Kevin offer their customers. As he expertly tied a rib roast and took the time to trim a sirloin roast into a shape that would cook evenly, it seemed he had in mind the cook who would next handle this meat.
Kevin scoffed about the new trendy cuts when I asked him on other visits to show me the location of muscles marketed as flatiron, bavette, and culotte. Butchery is a trade learned the old-fashioned way, and Kevin is old-school. Those fancy, foreign names amused him. Nevertheless, he indulged me, and as he butterflied the top blade roast—the now-famous flatiron—to remove the sheath of gristle between the marbled meat, he appeared a bit interested in it himself.
The chilled room took on the faint scent of tin and a vague savoriness as he sawed, sliced, and carved his way through the rib, loin, and round. Bits of meat littered the concrete floor. Kevin paused to point out the color differences in the flesh, from the deep red of the sirloin to the blush of tenderloin. “The most-used muscle has the most amount of flavor,” Kevin said. He mentioned how he liked to make corned beef out of bottom round roast, aka rump roast, that ultra-lean, troublesome cut, and cast off other bits of culinary know-how.
As a rule, butchers are no-nonsense, with little time on their hands for pleasantries, but ask for their opinion with genuine curiosity and they open up. From my time at Valley Meat and at other butcher shops, I appreciate how a butcher can be a cook’s best resource. I’ve come to think of their pragmatic and penny-wise approach as cooking like a butcher, and it’s formed the basis for these cooking principles I swear by:
•Cooking like a butcher is being smart about how you cook each cut. It entails applying the correct cooking methods for the right amount of time to bring out the meat’s best potential, no matter if it’s a T-bone steak or a cube steak.
•Cooking like a butcher is using each cut scrupulously, such as selecting the plentiful, cheaper round cuts—thinly sliced—for stir-fries and reserving premium steaks for the grill.
•Cooking like a butcher is knowing what you like from the direct experience of handling it, cooking it, and forming your own opinions.
•Cooking like a butcher is practicing good sanitation and safe meat handling practices at all times and treating the meat with care from start to finish.
•Cooking like a butcher is stepping beyond the safety of steak to try grilling a roast, making corned beef, or grinding sausage to appreciate all that beef can be.
•Cooking like a butcher is recognizing that price is not the same as value, which is what the most versatile cuts like brisket, chuck roast, and top round roast have in spades.
•Cooking like a butcher is appreciating the tastiest, underappreciated cuts, like top round and chuck-eye steak (the “poor man’s Delmonico”), and eschewing the overrated tenderloin.
•Cooking like a butcher is having the skills that can make you a more versatile and confident cook, including deboning a roast to cut your own steaks, trimming your own meat, and always slicing against the grain.
•Cooking like a butcher is leaving well enough alone when it comes to a rib-eye steak or strip loin, because it’s hard to improve on them.
•Cooking like a butcher means always having a sharp knife.
 HARVEST DAY
One evening in Portland, Oregon, I attended a dinner celebrating Wallowa Valley cattle ranchers and organized by Slow Food, the international organization devoted to sustainable foodways. All three ranchers were women, who gave short talks to the fifty diners about to sample their grassfed beef. One rancher, 6 Ranch owner Liza Jane Nichols, dove into talking about her Corriente, purebred descendants of the first Spanish breeds introduced to the Americas. In describing the cattle’s healthy, free-ranging life on her family’s ranch, she mentioned the quickness with which they were killed. “Happy cow, dead cow,” she said. Shocked laughter ripped through the room, and then silence for three slow heartbeats.
Killing animals is our last great taboo, wrote farmer, poet, and essayist Brian Brett. Death is the unspeakable truth of beef eating that most people don’t want to think about, never mind discuss. Perhaps that is why it’s called “harvesting.”
Rancher Cory Carman once confided that she used to lie awake at night before every slaughtering day. After many harvests, she says, she now understands that she and the cows have a nonverbal contract. “I promise them a comfortable life,” she said, “and then it ends one day.” Bob Dickson who runs Dayton Natural Meats said that the slaughter is the most difficult part of the process, for his staff and the USDA inspector alike.
There is such a thing, I’ve learned, as a good kill: when the cattle are clueless and it’s quickly done. No happy accident, a good kill is the result of calculated efforts to keep the animals calm, whether they’re slaughtered in a processing facility, large or small, or on the farm. By acknowledging and even witnessing this killing—not denying or glossing over it—I have become more aware of what the meat means.
On the morning I watched an on-farm harvest, a traveling butcher arrived at the McClaran Ranch in Joseph in his enclosed trailer. One of the oldest and largest family ranches in the county, the McClarans run one thousand head on their own lands and on public land allotments. Longtime members of Country Natural Beef, the family still sells a portion of their cattle to the commodity, or generic market. But the McClaran daughters, who are in their twenties and taking over the ranch, are most interested in grassfed beef production. On this day, twelve of their grassfed animals were to be harvested, exempted from USDA inspection when purchased live as in a cow-pool (page 32). (For all other sales, ranchers must haul their animals a minimum of three hours to the nearest USDA-approved facility. The scarcity of slaughtering facilities is a hardship on them all.)
Bearded, with weary blue eyes, the slaughterer I’ll call Don wore a gown-length green rubber apron. A scabbard on a chain hung low on his waist. A hero in this community, Don travels from farm to farm, harvesting pigs, sheep, goats, and cattle. He’s expert and irreplaceable, but wary of any attention to his craft. His assistant that day was Kevin, my butcher from Valley Meat, who was pitching in for the day. This job is so arduous that Don was having a hard time keeping good help. One of the McClaran cowboys and I watched from a distance, talking in whispers, as Don set to work.
“C’mon girl,” he said softly, leading a Black Angus heifer into the pen. The moment was tense as he took aim with his rifle and dispatched her with a single shot. She fell, and without delay, he slashed her throat with a smooth stroke of his short-bladed knife. For several uncomfortable moments, I watched the body quiver. Her hooves thrashed three times, and then she lay still.
With death behind us, everyone breathed again as Don set to work. He used that same knife, pausing to sharpen it with the steel on his chain belt, to remove the head and hooves and slit the belly. He obliged me by cutting out the cheeks, some of the parts and offal I’d come to claim. He slipped the hook at the end of a hydraulic lift through the gambrel cord loop and switched on the lift, hoisting the animal off the ground to peel off the hide. Upended, the distended four-chambered stomach fell from the abdominal cavity into Don’s arms. He heaved it aside and cut out the heart and watermelon-sized liver. With an electric saw, he divided the whole into halves straight down the spine. He loaded the dressed carcass into the van for delivery to Valley Meat’s locker and turned, straightened up his back, and with a solemn look on his face, walked toward the animals awaiting him in the pen.
The Pure Beef Cut Guide
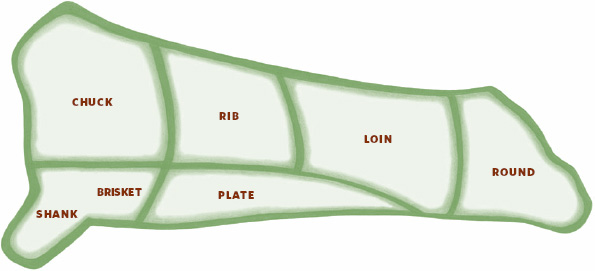
Consider this custom-made beef cut guide like a map. The geography of the large muscle groups, their fat rivers and bone borders will, like a good map, help you navigate in the kitchen. Putting the beef cuts in context can broaden your understanding of why certain cuts respond best to specific cooking methods. And, with time and familiarity, this giant beef cut chart will make sense to you.
Every country has its own meat cutting traditions, and it’s freeing simply to note that cut charts vary; the placement of those divisions is not based on universal law. The Italians map the parts much differently than the Argentinians, as well as the French, the British, and the Japanese. Cut lines reveal how each cuisine values the various parts of the carcass and determine how those parts are cooked.
Cutting decisions are judgments, preferences, and practices that are as arbitrary as the state lines on the US map. Some of the divisions are natural, such as the seams between muscles, but most are like a border cutting across a river—necessary to create order in the natural world. There was a period of time when you’d get different cuts from a Chicago butcher than from a California butcher, based on passed-down knowledge. The concentration of the beef processing and packaging, and the publication of The Meat Buyer’s Guide by the North American Meat Processors Association, have standardized the cut chart nationwide.
With the resurgence of beef butchery, times are changing once again. Custom butchers can make cutting decisions that vary from the industry standards to meet customer requests and interest. Meat cutting is also shifting in response to the rigorous muscle research funded by the beef industry to locate new value-added cuts. Two steaks, the top blade, aka flatiron, and shoulder tender, aka teres major, are recent success stories, propelled to popularity by restaurants and chefs. Excavated from the chuck, these single-muscle cuts were found through a series of university-based studies to test for color, connective tissue quantity, flavor, juiciness, and tenderness. So far, the new cuts from the bottom round, like the Western Griller, have proved less popular. Ongoing research of the terra incognita will likely bring more beef discoveries—and new cut names—down the road.
PURE BEEF CUT GUIDE
CHUCK
Cuts for braising (chapter 5, page 100); slow roasting or smoking (chapter 8, page 197); simmering (chapter 9, page 224); or in charcuterie (chapter 10, page 251). In addition, Shoulder Tender and Top Blade Steaks are suited to grilling or pan searing (chapter 7, page 162)

CHUCK ROAST (BONE-IN)

CHUCK ROAST (BONELESS)

SHORT RIBS (BONELESS)
SHOULDER TENDER

TOP BLADE STEAK

ARM POT ROAST

CROSS RIB ROAST

STEW BEEF

GROUND BEEF*
RIB
Cuts for roasting (chapter 8, page 197) or grilling or pan searing (chapter 7, page 162).

RIB ROAST (BONE-IN)

RIB STEAK (BONE-IN)

RIB STEAK (BONELESS)

RIB-EYE ROAST
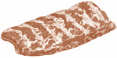
BACK RIBS
LOIN
Cuts for quick cooking (chapter 6, page 132); roasting (chapter 8, page 197); or grilling or pan searing (chapter 7, page 162).

STRIP LOIN STEAK (BONE-IN)

STRIP LOIN STEAK (BONELESS)

STRIP LOIN ROAST

T-BONE STEAK

TENDERLOIN STEAK (FILET MIGNON)

TENDERLOIN

SIRLOIN CAP (CULOTTE)

TOP SIRLOIN STEAK

FLANK STEAK

SIRLOIN FLAP (BAVETTE)

TRI-TIP ROAST

TOP SIRLOIN ROAST
ROUND
Cuts for quick cooking (chapter 6, page 132); or roasting (chapter 8, page 197); or charcuterie (chapter 10, page 251).

TOP ROUND STEAK

TOP ROUND ROAST

EYE ROUND

CUBE STEAK

GROUND BEEF*

SIRLOIN TIP STEAK

SIRLOIN TIP ROAST

TOP ROUND ROAST
SHANK
Cuts for braising (chapter 5, page 100) or simmering (chapter 9, page 224).

SHANK

MARROW BONES

STEW BEEF (ALSO FROM OTHER PRIMALS)
BRISKET
Cuts for braising (chapter 5, page 100); slow roasting or smoking (chapter 8, page 197); simmering (chapter 9, page 224); or in charcuterie (chapter 10, page 251).

BRISKET (POINT)
BRISKET (FLAT)
PLATE
Cuts for braising (chapter 5, page 100) or in charcuterie (chapter 10, page 251).

SHORT RIBS

STEW BEEF

GROUND BEEF*
Cuts for quick cooking (chapter 6, page 132) or grilling or pan searing (chapter 7, page 162).
SKIRT STEAK

HANGER STEAK
*for all ground beef preparations see chapter 4 (page 68) and chapter 10 (page 251)
HOW TO READ A BEEF CUT GUIDE
I understand why there is so much confusion over beef cuts every week when I receive the circular from Joseph Family Foods market. London broil is on sale one week, but what is it, exactly? When I was growing up, it meant flank steak, but now it usually signifies a top-quality top round steak. Care for a New York steak? That can be a boneless steak from the sirloin or from the strip loin. How about a pot roast? That name gets slapped on any chuck roast. It’s enough to make anyone stick to steaks and burgers.
Many people try to learn beef cuts by studying those cut charts printed in every meat book—the diagram of a steer in profile with dotted lines separating it into big sections with pictures of meats orbiting around it. I spent hours studying those beef charts, but it never sank in. Even if I memorized a few facts, such as that the cross rib roast is cut from just above the brisket or that the top round is the inside of the cow’s leg, it didn’t relate to what I did in the kitchen.
One day it dawned on me that learning beef cuts is just like that joke about eating an elephant. You have to do it in small bites. Nobody starts with a whole cow, even people like me who get a year’s supply of beef in one lump delivery. When the bulk of boxes arrive containing one- to five-pound vacuum-sealed packages, it does not resemble any animal, only a jumbled meat section at the supermarket.
If I could learn the animal cut by cut, I reasoned, perhaps I could work my way toward understanding the whole. I focused on one cut at a time—the one I wanted to cook. At first, I referred to the cut chart only to locate the general area it came from, which steered me toward a slow cooking method, like braising or slow-roasting, or toward a fast cooking method, like pan-searing or high-heat roasting. The fact is, other than the rib and loin primals—the tender middle section—most beef cuts prefer gentle heat, so it wasn’t hard to catch on. Piece by piece, I learned each cut’s attributes and cooking qualities, and began to recognize them by their shapes, fat contours, and bones, if any. It all came slowly, by handling the meat myself. Once I’d sliced a top round roast into steaks, deboned a rib roast, and ground my own beef from chuck roast trim, the cut chart started to make sense.
Butchering for Home Cooks
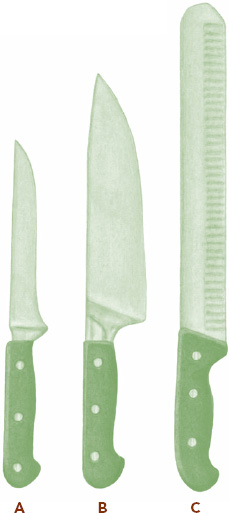
Butchering a gigantic beef carcass takes years to master, but anyone can start small. Hands-on practice and repetition are the steps to progress. Everyone feels tentative at first (even professional chefs who are only used to ready-to-cook steaks), but give it a try—you can’t hurt the meat. To prepare yourself, watch a video demonstration online (that’s how I learned to clean and trim beef heart, and now I’ve got it down) or find a butchery class near you. You could even try asking an amenable butcher if you may observe during a slow period in the shop. With guided instruction, you’ll not only become more familiar and confident handling all the beef you cook, you’ll approach the meat counter empowered with enough information to talk with the butcher and make your purchases. The skills in this list are useful for anyone. Just equip yourself with the largest cutting board you can find (I use plastic so that I can sterilize it in the dishwasher) and good-quality (that doesn’t mean expensive) knives. Have a flexible five- or six-inch boning knife (A) for trimming fat and removing bones, a chef’s or utility knife (B) for chopping and slicing raw meat, and a long-bladed slicer for cooked meat (C).
No matter the knife, a sharp edge will make you more proficient. Only a well-honed knife lets you make the gliding, smooth strokes that produce clean cuts and keep you safe from slippage. To maintain sharpness, make a habit of running the blade along the steel—the long lance that comes with every knife set—ten to twelve times every time before you use it. (It’s just one of those pesky things, like flossing regularly). If your knife has grown too dull to cut cleanly into a piece of paper towel held up with one hand, it’s time to sharpen your knife. Use any one of the no-brainer sharpeners on the market and store it in the knife drawer as a reminder to practice what the butchers teach. Or, you can pay to have your knives professionally sharpened.
For reference purposes only, I’ve organized this list alphabetically by topic. Skim it to find the essentials. Take note of special occasion skills, including tying a roast, boning, and cutting your own steaks—among many others—so that you can come back to them when you have an opportunity to try them out.
BONING
To remove bones before cooking, use a flexible boning knife. Use the blade to feel and hear where it scrapes against the bone and follow the contours to trim off all the meat as cleanly as you can. Short ribs, if you have some on hand, are a great way to practice boning raw meat, and you can use the meat to braise or grind it for hamburger patties or sausage. A four-bone rib roast is the ultimate challenge, not because it is difficult but because it’s a precious piece of meat. Use a boning knife to pry around the rib bones, then slice with long shallow strokes along the backbone to free the whole rib-eye muscle.
To bone a cooked steak or roast for easy slicing, let it rest first. Use a boning knife to separate the meat from the bone and switch to a slicing knife to make serving slices. Be sure to collect any bones in the freezer for future stock making.
BUTTERFLYING
To prepare a roast—small or large—with a rounded shape for stuffing, place the meat on your cutting board running away from you the long way. Hold your boning knife parallel to and one inch above the cutting board. Use the tip of the knife to make one long cut down the full length of the roast about one inch deep. Use the fingers of your other hand to pry the cut open and repeat the cut over and over again, keeping the one-inch thickness of the meat until it unrolls to lie flat.
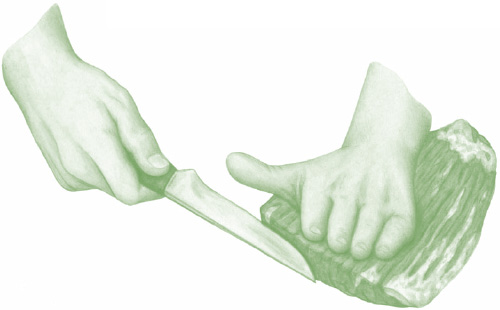
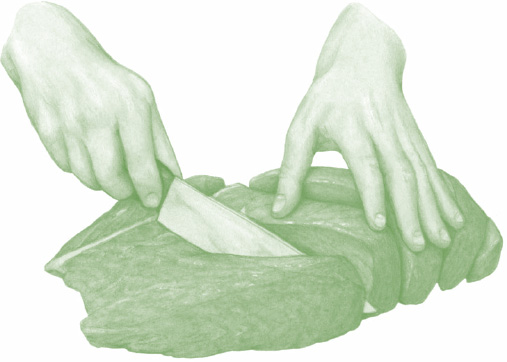
If the meat is flat like flank steak, position a chef’s knife, eight inches or longer, to divide its thickness in half. Keep the blade parallel to the cutting board. With the palm of your non-cutting hand on top of the steak to hold it firmly, slice through the meat using long, shallow strokes to come within one to one-half inch of the edge (see illustration below). It will open like a book.
In all cases, smooth slicing—not a sawing motion—prevents raggedness, but, once rolled and tied, even your first efforts will be quite presentable.
CHOPPING AND MINCING
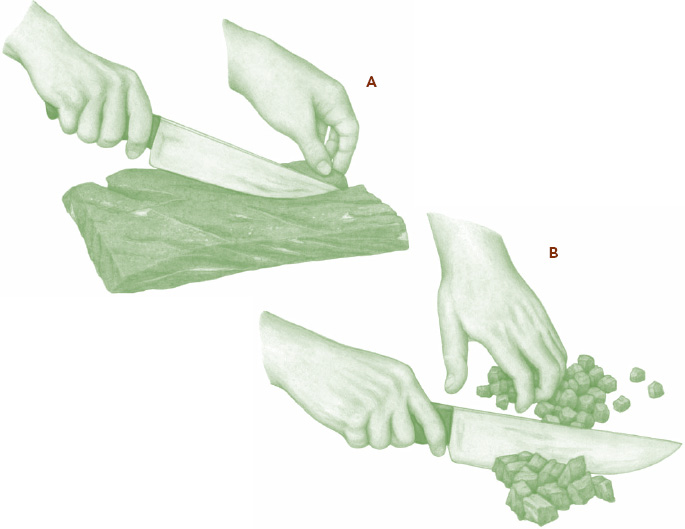
To dice meat for tacos, empanadas, or dishes that call for sautéing or stir-frying chopped meat, chill the steak in the freezer for twenty minutes. Use a chef’s or utility knife to slice the meat ¼ inch thick (see illustration A below). Turn each slice on its side and cut it into ¼-inch strips, then cut these strips across ¼ inch thick to make even ¼-inch dice (see illustration B below). You’ll get more consistent cuts if you chop the meat by hand, though you may use a food processor when you’re not concerned about uniformity. When using a food processor, first cut the meat into 1-inch cubes and then pulse it in the machine with rapid-fire bursts until the meat is finely chopped but before it gets puréed.

CLEANING OFFAL
HEART: Cut the heart in half or into quarters if you’ll be cutting it into strips. Use a boning knife to trim off all of the outside fat and the vessels from the interior chambers until what remains is pure maroon muscle. Cut into strips for marinating and grilling, slice very thin or chop to stir-fry or sauté it.
KIDNEYS: Fresh kidneys, when you can get them, have a mild odor; soak them in a bowl of cold water for two to four hours to diminish it. Use a paring knife to trim off the thin outer membrane, cut in half to remove the vessels, and cut the kidney along the segments to make bite-size pieces.
TONGUE: Trim the underside and base of the tongue before simmering or curing to make corned tongue. Once you’ve cooked it until a wooden skewer slides through the tongue with ease, let the meat cool just until you can handle it and peel off all of the skin with your fingers while it’s still warm. Slice, cube, or dice the tongue to eat it as is or to pan-fry, sauté, or grill it.
CUTTING STEAKS
FROM A BLADE CHUCK ROAST: Typically used for pot roast, this cut has two tender steaks—top blade (aka flatiron) and chuck-eye—that you can prize out yourself to cook with a high-heat method. Blade chuck is recognized by the slender bone running through it and is the first cut off the chuck primal next to the rib section. To free the top blade steak, aka flatiron, simply run your knife blade along the bone (freeze the bone to make stock later). Cook it as a steak or slice it into strips for satay. The chuck-eye is the more rounded collection of muscles above the bottom bone (the chine bone). To remove it, cut along the fat seam just above it and trim off the bone; you now have a premium grilling steak. What remains is a tougher strip of meat that you can braise whole, cube for stew meat, or grind.
FROM A BONELESS ROAST: Cutting your own steaks from boneless rib-eye, strip loin, sirloin, sirloin tip, aka round tip, and top round roast is a smart way to save money. Use a chef’s knife with an eight-inch or longer blade and decide on the thickness—¾ inch is a thin steak that cooks quickly, 1 inch is a nice standard, 1½ inches is the thickest I like. Tip the blade forward and push straight down through the meat, ideally in a single, smooth motion (see illustration below).
FROM A THICK T-BONE OR PORTERHOUSE: You can get two medallions from a single steak that’s at least 1½ inch thick. By cutting along the bone to remove it (freeze the bone to make stock later), you’ll get one tenderloin and one boneless strip loin. If you like, trim the fat to make a pleasing shape to grill or sauté.
CUTTING STEW MEAT
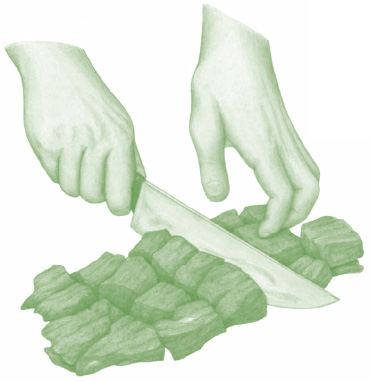
To cut your own beef for stew, trim the exterior fat from any chuck roast, brisket, or sirloin tip roast, aka round tip roast. (Round roasts, I have consistently found, make dry stew meat; reserve them for slow-roasting, stir-frying, chopping, or grinding.) Depending on the size of the serving pieces you want, or to control the timing (smaller cubes will cook in less time), use a chef’s or utility knife to cut the meat into strips one-half to three inches wide. Crosscut the strips into cubes, making them as uniform as you can for even cooking (see illustration below). As you cut, trim away any excess fat and discard it.
Use this same method for cutting your own kebab meat.
GRINDING BEEF
Set up a hand-cranked or electric meat grinder with the blade and the plate size called for in the recipe. Cut the meat into one-inch cubes and chill it well, or freeze it for twenty minutes. Push the cubes into the feeder tube and collect the grind in a cold metal bowl. Only use a food processor for grinding whole muscle meat cuts, since the blade will not sever sinew (a fact I learned the hard way when I ground short ribs in the food processor only to create an inedible burger). Process up to eight ounces at a time, pulsing the beef just until it becomes finely chopped.
SLICING AGAINST THE GRAIN
Cutting across the meat fibers for serving makes the meat easiest to chew. The grain is more visible when the meat is raw, so take a long look before you cook it. After cooking, slice off the end of the steak or roast and examine it carefully. If you see long strands of meat running parallel to one another, you’re cutting with the grain. Stop, turn the meat ninety degrees, and start again. If your first slice looks like the cut end of a thick rope, you’re slicing against the grain and all is well.
TRIMMING
Exterior fat is the easiest to remove with any sharp knife. Exterior fat insulates and bastes beef while it cooks, so it’s a good idea to leave it at least ¼ inch thick when using high-heat methods with the tenderest cuts.
Some steaks, including hanger steak and some top blade steaks, aka flatiron, have a thin line of gristle running through them. It will not break down during cooking, so you’ll need to decide whether to slice it out before or after cooking. Either way, you need to cut all the way through the meat to make two thin steaks.
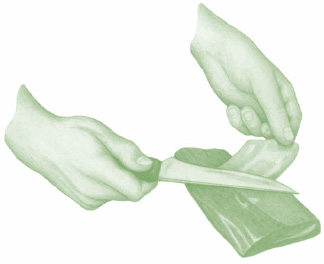
Silver skin, or elastin, is a shiny, skin-thin fat that does not break down during cooking. It’s common on tenderloin and flank steak, and you may find traces of it on other cuts as well. To trim it off, slip a boning knife just under the silver skin and make a short slice to lift a piece of it up for a handle. Grab the handle with your free hand and pull, while slicing in the opposite direction to remove a thin strip (see illustration below). Repeat this two-step process until you’ve removed it all.
FOR SHORT RIBS: To reduce the amount of defatting after cooking, trim the exterior fat on short ribs to ¼ inch. With the blade of a boning knife parallel to the cutting board, slip the tip into the fat and cut away strips of fat, repeating until the exterior fat is as thin as you want it.
FOR SKIRT STEAK: This cut sometimes comes with a thin, papery membrane attached, which is easy to peel off by hand. Use a boning knife to slice under the membrane to free up one end and make a handle. Put your palm flat on the free end of the skirt steak and pull on the handle firmly to strip off the membrane.
FOR STEW BEEF: Cut the beef into cubes and remove any surface fat with a slice of your knife.
FOR STEAKS AND ROASTS: Trim off fat after cooking, depending on your taste, by tracing your knife between the fat and the lean muscle. On large roasts, you may choose to leave the fat cap in place before serving, since many people enjoy eating it, especially when it’s beautifully browned.
TYING A ROAST
Tie up a roast when you want to maintain an even shape for uniform cooking or need to contain a stuffing. Knot strands of butcher’s twine or place silicone bands (Sources, page 270) along the roast, evenly spaced every two to three inches, to secure it. When the roast is cooked, clip off the twine or bands with kitchen shears while the meat rests so they won’t get in the way of slicing.
Beef Cooking Basics
When beef meets heat, many biochemical changes occur within the proteins and fats. Much of what transpires is within your control, and an understanding of basic meat science in beef cookery can help you become more self-assured and versatile in handling any cut. These principles hold true no matter if the beef you buy is grassfed, natural, organic, or standard commodity (and they apply to other meats, including veal, game, lamb, and pork).
SLOW METHODS
Braising, stewing, simmering, slow roasting, and smoking call for low temperatures (typically below 300°F) and long cooking times (often an hour or more). Most of these techniques rely on moisture—either added in the form of water or stock or the liquid present within the muscle—to convey the heat that melts the collagen beginning at 150°F. Slow-roasting and smoking are dry-heat methods that heat the meat gradually so that the proteins do not bind up and harden as they do when blasted with heat.
FAST METHODS
Grilling, roasting, broiling, pan searing, sautéing, and stir-frying employ high temperatures (typically over 400°F) for short time periods (often ten minutes or less). The surface browns rapidly and heat radiates toward the meat’s interior, which causes the muscle fibers to contract and lose moisture. In the dry heat conditions in the oven or on the grill, the muscle fibers squeeze out water within the protein cells while the fats soften and begin to melt. Short cooking preserves moisture and leaves the meat juicy. Monitoring the internal temperature prevents the meat from reaching above 149°F, the stage where protein hardening begins and meat fibers toughen.
SOUS-VIDE, A MODERN SLOW METHOD
This temperature controlled, hot water immersion technique is the ultimate in slow cooking. Restaurant chefs love sous-vide—a cooking technology that originated in France and means “under pressure”—because it allows them to calibrate the doneness of a steak to medium-rare, for example, and then keep it ready to serve for hours. Like poaching, sous-vide does not achieve high enough temperatures to brown meat, so chefs sear or use a blow torch to sear their steaks.
I’ve cooked sous-vide enough to recognize that it works wonders on meat fibers and fat while preserving every drop of juice. Sealed in a vacuum packaging and submerged into water anywhere from 132°F to 145°F depending on the cut, the beef cooks ever so slowly—up to 72 hours—and precisely. The downside is that this modern method requires specialized equipment, longer cooking durations and critical calibrations of time and temperature compared to traditional cooking techniques. Although you won’t find sous-vide among the recipes in Pure Beef, anyone with a taste for cooking adventure can explore the range of equipment options online (from the high-tech SousVide Supreme methods) and apply them to any beef cut covered in the book.
The Cut-Cook Connection: A Nose-to-Tail Guide
To cook beef with confidence and consistency, you do not need a complete cow anatomy course. All you need to know is whether the cut you have in hand is naturally tender or tough. If it’s one of the tough cuts from the ends of the cow, you want a slow method that releases the meat bundles from the fats that bind them. If it’s one of the tender middle cuts, you can use a fast method that creates tasty surface browning while cooking the interior as quickly as possible. (Not to confuse matters, but you can also use slow methods with the tender cuts. In general, we stick to high-heat methods whenever possible for that unbeatable browning effect. See Essential Browning, page 61.)
So, how do you tell the tough and slow from the tender and fast?
The most useful tool for understanding beef cuts is one I learned from meat scientist Bob Dickson, who taught butchery for twenty-five years at Oregon State University: Our own bodies. I’d often notice how in conversations about meat cuts with experts, they’d slap their thigh or reach around to their shoulder blade, but Bob put it all together for me. Granted, we are not remotely related to bos Taurus, but the physiology is less important than the activity that each body part gets in the course of a day.
In the simplest terms, exercised muscles are tough, while supportive muscles are tender. Just as in cows, our midsections contain the least-used muscles, so they are the tenderest muscles in our bodies. Tender muscles have more intramuscular fat and fine fibers gently stretched like a hammock. Those tough muscles at our active upper and lower extremities are threaded with rubbery connective tissue and have thick, coarse fibers from a lifetime spent contracting in exertion. These basic body parts—the two tough ends and the long tender middle—relate to the four major sections of the cow called primals: the chuck in the front and round in the rear are the tough ends; the rib and loin are the tender middles.
THE TOUGH ENDS
Chuck is the term used for the shoulder on beef cattle. As on our own bodies, the shoulder contains a complex network of highly active muscle groups. They allow a wide range of motion while supporting our necks and heads, even when we’re at rest. For cows that spend their lives hoisting a fifty-pound head up and down to eat, these are the heavy-lifting muscles, riddled with the connective tissues that make them some of the toughest cuts. They are also among the tastiest.
As established by the North American Meat Processors Association, the chuck primal consists of the neck to the first five of the thirteen rib bones, down to just above the elbow. This is a big area on a broad-shouldered animal, and makes up 29 percent of the total yield from a whole beef carcass. If the label on a large roast reads “chuck,” you have one of the classic pot roast cuts. You can trust it in any slow method that cooks the collageny connective tissue over low, moist heat with ample time, especially braising and stewing, which are explored in chapter 5. Slow-roasting and smoking are two dry-heat methods (the moisture from within the meat cooks the collagen) ideal for chuck roast and are covered in chapter 8. Much of the chuck ends up as trim or, in butcher’s parlance, “the grind,” which makes excellent ground beef, the basis for a range of dishes in chapter 4. While most chuck cuts are too sinewy for fast methods, there are rare exceptions, such as the new steaks like top blade, aka flatiron, in chapter 7.
Round is the name for the cattle’s hindquarters. It corresponds to our buttocks and upper thighs, which consist of large, lean muscle groups that get loads of exercise (even though it may not seem like it). In cattle, these muscles work all day, every day standing and ambling around while out with the herd. Toughness is only part of the issue with the round. Its leanness—a lack of intramuscular fat—coupled with thick muscle fibers makes this primal one of the most challenging for cooks. At the same time, cuts from this primal are the most economical.
The round is the second largest of all the primals but yields the most beef per animal with little fat going to waste. It begins at the hip joint and reaches all the way to the hock. Many retail round cuts from the thigh are sold as roasts. They include top round (the inner thigh and most tender) and bottom round (the outer thigh and the least tender), and eye round (a not-so-tender muscle that sits between them). Slow-roasting is the best cooking method for these boneless, lean, and flavorful roasts (along with thin slicing, as in deli-style roast beef, to optimize tenderness), which is addressed in chapter 8. Round roasts are never used in this book for pot roast or stew because they turn out stringy and dry; only sirloin tip roast, aka round tip roast, a cut that sits at the juncture of the loin and the round, results in braises and stews worth eating and is included in chapter 5.
There are just three exceptions to this slow-cooking rule of thumb for the round primal—sirloin tip, top round, and mechanically tenderized round steaks. Both sirloin tip steaks, aka round tip steaks, and top round steaks can handle the fast, high-heat cooking methods of grilling or pan-frying, provided they are cooked quickly to medium rare. Cubed, Swiss, or pounded steaks from the round are suitable, though still chewy, options for pan-frying and are the popular chicken fried steak cut. Chapter 7 includes several examples. Once sliced into slivers, chopped, or minced, the round cuts are also perfect for stir-frying, the ultimate fast and hot method picked up in chapter 6. What doesn’t become a round roast or steak gets ground to make extra-lean ground beef for recipes in chapter 4 and chapter 10.
THE TENDER MIDDLE
Rib is the name for the primal cut containing most of the rib cage. On our bodies, it would extend from just below the sternum to the floating ribs, wrapping around the back. It plays a supportive role in cattle, too, encasing their vital organs and staying relatively stationary. The main muscle called the rib-eye hugs the spine and wears a cap of flat muscle. Fine grained and tender with constellations of fat, it is one of the most revered cuts on the whole carcass, sold for a premium as roasts or steaks.
The smallest primal, the rib, begins where the chuck is cut off at the fifth rib and ends at the twelfth. It is also the most uniform, with a ladder of rib bones and a cylinder of lean muscle capped with a blanket of fat. When the tips of the meaty rib bones are cut into short ribs, it presents a monumental seven-bone rib roast, which is often divided into one four-bone and one three-bone roast. Or, the back ribs can be removed so it becomes the boneless rib roast often called prime rib. Both of those imperial, special-occasion roasts are included in chapter 8. Most rib sections get sliced into steaks. Cut with the bone in, they are called rib steaks; without, they become rib-eyes. (This is one way a single cut goes by many names.) You’ll find this supreme steak in chapter 7.
In roast or steak form, rib cuts take to fast cooking methods because they’re naturally tender and marbled. Marbling—the wisps of intramuscular fat within the muscle—insulates the proteins and bastes the meat internally for high-heat grilling or roasting. Seared to a burnished brown with a perfectly pink interior, rib has become the ideal, what most people picture when they think about eating beef.
Loin is a long primal on the mid-section that follows the backbone from the last rib to the base of the sacrum. As we know too well, it’s difficult to exercise the abdomen enough. The same goes for cattle, and it results in tender muscles that are the most desired on the entire beef carcass. Like luxury real estate, this primal commands top dollar.
On the beef cut chart, the loin extends from the thirteenth rib to the hip joint, excluding the belly. Two valuable muscles sit on either side of the loin bones: the tenderloin and the loin eye muscle. When the whole primal is cut into cross sections, you get the famous T-bone or porterhouse steaks, each containing a portion of both the tenderloin and loin eye muscles separated by bone. Often the tenderloin is removed whole to be sold as a roast or sliced into medallions, the famous filet mignon. What remains on the bone is called the strip loin, which is cut into another pricey steak—the strip loin steak, aka New York strip—bone in or boneless. Like the rib primal, the loin’s lean, fine muscle fibers and marbling qualify it for any fast method. Steaks from this primal are included in chapter 7 and roasts in chapter 8.
The rear section of the loin is the sirloin, a jumble of muscles that become less tender as they near the round primal. The top sirloin is the most valuable of all, another fine roast or steak for fast methods of roasting, grilling, or pan-searing. The sirloin section also produces less costly but tasty and interesting steaks, including tri-tip, flank, and sirloin flap, aka bavette. Collected into a category called “bistro steaks,” they get appropriate high-heat cooking treatments in chapter 7. Sirloin steaks are also good for cutting into chunks, strips, and cubes for grilling or broiling as used in the global cuisine recipes to be found in chapter 6.
MINOR PRIMALS
The brisket, foreshank, and plate are the industry names for the upper chest, front leg, and under-belly, respectively. Bony or with strata of fat, these are the least valued sections. But, for the motivated cook, there are interesting and valuable uses for these lesser parts.
Of all these, the brisket is the meatiest. In fact, this muscle is one ranchers use to gauge fat gain (they also measure at the pelvis and the top of the tail). A plump brisket is one sign that the animal is finished and ready for slaughter. The classic barbecue, corned beef, and pastrami cut, brisket demands slow cooking. There are two briskets per animal, and each is shaped like a torpedo. The tip is called the point, and it has a band of fat running through it; the flat is more uniform and lean under its fat cap. There are slow-cooking recipes for brisket in chapters 5, 8, and 10.
The foreshank is one tough cut, and what doesn’t end up ground is simmered slowly to make exceptional stocks and soups. Likewise, the short ribs that are cut from the plate contain a lot of bone and cartilage. Only slow cooking brings forth their rewards. Both cuts are featured in chapter 9.
The plate contains the diaphragm—the thin skirt steak on the sides with the thicker hanger steak suspended in the middle. Both have become popular bistro-style steaks—coarse-grained, chewy, and flavorful—ideal for a fast sizzle on the grill, and are included in chapter 7.
BONES
Stripped of all the major muscles and cut through with band saws, the gigantic beef carcass becomes a weighty pile of bones. They have little market value, but are a plentiful and inexpensive resource for cooking. Chapter 9 explores their uses in depth.
There are three types of useful bones: meaty bones, collagen-rich bones, and marrow bones. Meaty bones, namely oxtail, short ribs, and shank, deliver loads of flavor into a simmering liquid over time. With the meat left on the bone or picked off, they yield just enough for a meal. Knuckle bones contain the most collagen, which gives body along with beefiness to the water in which they simmer for hours. But other beef bones make excellent stock, too, especially once roasted until the proteins brown delectably. For some, the marrow within the humerus and femur bones is a delicacy. These hollow bones are cross cut into sections to access the fatty beef essence within. Soaked and then roasted, marrow can be spread on toast, dabbed on a just-seared steak, or swirled into braised and stewed dishes—or a risotto (page 247)—to great effect.
OFFAL
Also known as organ meat, offal is becoming more accepted in this country as people embrace nose-to-tail eating, but you have to search for it (it’s even last in this list). Most of the offal from slaughterhouses goes to the export markets of Asia and South America where they are delicacies.
Cooking with organ meats is the final frontier of beef cookery. To handle, clean, and trim these slippery parts takes some getting used to. Part of the problem is that offal resembles the living animal part, whereas a steak does not. Take tongue. Ignore the nubby taste buds and simmer it gently, peel it while it’s warm, slice it thin, and you have at your disposal one of the beefiest cuts to eat as is, to bread and fry into cutlets, or to dice for tacos.
It’s unfortunate that squeamishness (my own included) can get in the way of enjoying offal like beef heart—the leanest, meatiest muscle there is. Trimmed and thinly sliced, it can stand up to potent marinades for quick high-heat grilling or stir-frying, and it can be roasted. Kidneys, too, have a smooth texture, and are good seared in a skillet or slipped into a stew. Only beef liver, although I tricked it out with bacon and booze, was too mealy to chew and too potent to swallow though ground it makes great dog food. As for tripe, I did not find any available from grassfed beef producers who do not, as yet, have the processing options to utilize “everything but the moo.” All the rest, you’ll encounter here and there throughout the recipe chapters, most often listed under “More Choice Cuts.”
GET A LITTLE TENDERNESS
Most beef cuts are not naturally butter-knife tender, but there are many ways for resourceful cooks to enhance that quality. All of them manipulate the connective tissues that bind the meat fibers.
Slow cooking is the most common and effective way to break down the connective tissues gradually until the meat is fall-apart tender. You can achieve this through simmering meat in a liquid, baking it in a low oven, or smoking it for hours. Mechanical tenderizing before cooking, by scoring, piercing, or pounding, also severs the tough connective tissues and does advance work so that your teeth don’t have to. (Still, a cube steak will never trick your mouth into believing that it’s chewing rib-eye.) Hand chopping or slicing beef cuts very thin for a satay or stir-fry achieves the same tenderizing result. The ultimate tenderizing method is grinding, which takes care of any toughness and leaves you with easy-to-chew ground beef ready for anything, from grilling to stewing to sausage-making.
Contrary to popular belief, marinating is not an effective method for tenderizing the tougher cuts. Marinades with an acidic ingredient, like lemon juice or vinegar, affect only the surface area of the meat. If exposed for too long, the meat can become unpleasantly mushy. The only success I’ve had tenderizing with marinades is with open-grained meats like skirt, which absorbs moisture readily, and when the beef is sliced very thin as in Coca-Cola Jerky (page 269). Overall, marinades are best as flavor boosters.
Finally, slicing against the grain is key to a tender eating experience. And for coarse-grained cuts, such as flank and sirloin flap steak, aka bavette, make those slices thin.