
In this beginning class, we’re going to give you the basics you need to know to get started, from setting up a simple sewing area to collecting the basic tools. This is the very first step in your quiltmaking adventure. We know it’s dry stuff, but it’s really important!
how to use this book
Because our approach to teaching the skills of quiltmaking is different from what anyone else has yet done, there are two ways to use this book. If, like Harriet, you want all the “meat and potatoes”—what to look for and do, how to set up everything before you start sewing—you can read ahead to get the more detailed information in this book. If, like Carrie, you want to get started making a quilt top and will gradually create a dedicated sewing, ironing, and cutting space as you need it, work your way through this book class by class, lesson by lesson. By the end, you will have a number of lovely quilt tops ready to quilt, and you’ll be well on your way to being a quilter!
If you are just starting out, this lesson will give you an idea of the bare minimum you need in terms of work space to be able to create the quilt tops that we will make in this book. It may be daunting to think about all the equipment needed to start quilting if you are just beginning. If you already have a sewing room…great! You are ready to jump in and begin. However, while having a dedicated sewing space is nice, be assured that it is not really necessary for making a quilt. We’ll show you how to set up a simple layout that will get you started. We’ll give you more details about ergonomics and space requirements when you get to Class 140.
Piecing does not require an extensive work area like machine quilting does. The rough minimum sewing space you need for making a quilt top is about 3 feet by 4 feet, mostly to your left and behind your sewing machine. If your machine is on a tabletop instead of in a cabinet, you will need a good support system around the machine. If you are sewing on a dining room or kitchen table, the photo shows a great setup for a sewing machine. It is easily taken apart and put away when the space is needed for other things.
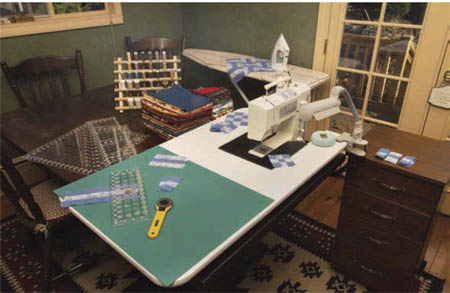
Setup of a basic sewing area
If you cannot find someone to make a table like the one pictured on page 5, you can buy one that is cut to fit your machine, like the Sew Steady Portable Sewing Table by Dream World (which comes in several sizes).
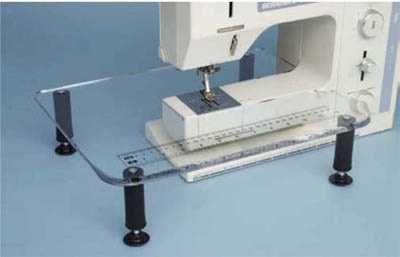
Sew Steady table
Your ironing board is a major workstation when you are piecing. Be sure that it is heavy, stable, and not warped. If yours has any of these issues, shop for a new one.
When ironing (even clothing), be aware that too much padding can lead to distortion. When you are piecing a quilt, inaccurate pressing of the pieces can ruin your project. A thin layer of 100% cotton batting (not more than ⅛ inch thick) makes an ideal ironing pad under the ironing board cover. A gridded ironing board cover is helpful. If the cover is stretched onto the board tight and straight, the lines of the grid can be used as guides to keep strips straight when pressing. See Class 140, Lesson Two, for more information about your pressing area page 39).
It can be difficult to handle larger pieces on an ironing board because of its shape. It’s helpful to turn the ironing board around so you are working on the wider end.
tip
Avoid using a Teflon ironing board cover. The slippery surface makes it hard for the fabric pieces to get a grip and create resistance for the iron. Also, the fabric does not dry after you have steamed or starched it. Cotton is preferable because cotton sticks to cotton and absorbs moisture, and a cotton ironing board cover will keep the pieces from sliding when you are ironing seams. It also allows the pieces to dry quickly between steaming and starching.
Kitchen or laundry room counters, or even the top of the clothes dryer, are good places to set up a makeshift cutting area. Just make sure it’s not too far from your sewing and ironing area.
Find a place that’s at a comfortable height. If you are over 5 feet tall, about 36 inches is the best height. If you are under 5 feet tall, 32 inches or less will work for you. The main idea is that you do not want to lean over too much (ideally not at all) in order to be comfortable and to have the strength and power to cut the fabric cleanly and accurately. See Class 140, Lesson Two, page 39), for more information about ergonomics.
Of course, if you are going to learn to machine piece, you need a sewing machine. Today’s sewing machine companies put a great deal of effort into making machines (even midline machines) that do everything, from straight stitch to digitized embroidery. The real story is that to excel at machine piecing, appliqué, and quilting, you need only a very basic machine. Few stitches beyond straight stitches are required, but there are some basic things you should consider when choosing a machine.
We strongly advise you to avoid buying a cheap sewing machine at a big box store. It is best to choose a quality machine that not only gives you the features you need to start out but also allows you to grow into other techniques.
An excellent way to get a high-quality machine at an affordable price is to look for a good used machine. The used machines of today were the top-end machines of a few years ago. A reliable sewing machine dealer generally has trade-in machines that are worth looking at. Try to test drive as many models and brands as you can, and make sure you actually sew on the machine you like best before you buy it. Many newer computerized machines are difficult for new sewers to understand, and you will be frustrated because the machine is in control instead of you!
If you don’t want to invest in a machine, borrowing one from a family member or a friend is a good way to get started. If you already have a machine (or you borrow one), take it to a qualified mechanic and have it cleaned, oiled, and adjusted.
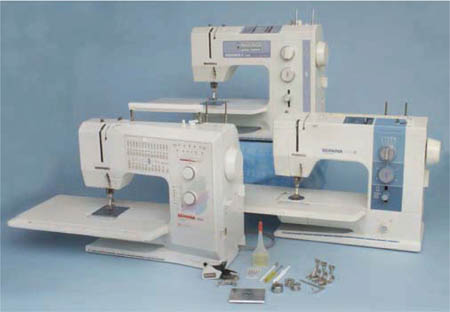
High-quality older equipment is a good place to start.
When you choose a machine, make sure that it is easy to regulate and understand. As you test it, note the sound of the machine, the placement of your foot on the foot control, the way the fabric feeds through the machine while you are sewing, the brightness of the machine light, and the machine’s functions and accessories. Following are some functions and accessories that we recommend:
 Fully adjustable stitch width and length capabilities. Many machines have stitch length and width settings in predefined increments. This can hinder the ability to adjust the machine to any setting you need or want. A dial that has infinite settings between the numbers is ideal.
 A bobbin with a case that inserts from the front of the machine instead of dropping in from the top. These bobbin cases are more easily adjustable than the top, drop-in models. Placement of a seam guide (page 22) can be a problem with a drop-in system. Also consider bobbin size: the more thread it holds, the better.
 A top tension adjustment dial that is easily accessible. Numbers on the dial are also necessary.
 Presser feet that change easily and are stable (that do not wobble on the shank).
 A feed-dog drop system that is easily accessible.
 A good-sized work surface around the machine, or a tightly fitting portable sewing table that is made to go with the machine (see page 6).
 A foot control that is at a comfortable angle for your foot, so you can maintain control of the speed for long periods.
 Presser feet and accessories that really do the job:
• ¼″ foot
• Straight-stitch foot (available for Bernina)
• Seam guide bar (available for Bernina)
• Open-toe appliqué foot
• ¼″ round free-motion (darning) foot
• ¼″ round open-toe free-motion foot
• Walking foot
• Straight-stitch throat plate
The following are good used machines that you might want to look for and try out.
 Bernina mechanical machines – Models 930, 1020, 1030
 Bernina computerized machines – Models 1090, 1130, 1230, 1260
 Pfaff – Models 1475 through 7570
 Viking – Lily, Rose, 1+
The importance of presser feet cannot be overstated. They affect your view as you sew, the feeding of the fabric, and the accuracy of your seams. Most sewing machines come with a variety of presser feet, but most of these are for dressmaking and do not work for the narrow seam allowances used in patchwork.
In the past few years, we have seen presser feet developed especially for piecing ¼″ seams. A universal ¼″ foot is the Little Foot, developed by Lynn Graves. This foot is designed to be a perfect ¼″ on the right side of the needle. The foot has ¼″ markings on the side to indicate the needle position: ¼″ behind the needle for starting the seam; a line directly across from the needle; and ¼″ in front of the needle, to indicate when to stop ¼″ from the edge. This foot is available in several shank sizes to adapt to most machines and is a good choice if your machine does not have a ¼″ foot available.
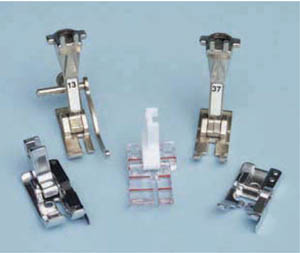
Various ¼″ piecing feet
Most sewing machine companies have made ¼″ feet for their specific brands for several years now, and the theory is that on all ¼″ feet, it’s exactly ¼″ from the needle to the right-hand edge of the presser foot. However, because these feet aren’t necessarily totally accurate, not all quilters like using them.
Harriet’s favorite foot is the Bernina #13, an old-fashioned straight-stitch foot like the one found on the Singer Featherweight. This foot has a very narrow toe on the right side and a wider one on the left. A guide bar can be placed in the back of the foot and positioned to whatever width from the foot you want the seam. The guide bar allows you to see the fabric pass to the side of the toe and watch it ride alongside the guide bar. This gives you much more control as the fabric passes under the foot and will automatically help clean up many accuracy issues in piecing.
hint
When the Bernina #13 foot is set up with the guide bar, you can cut off the extra bar that extends to the left of the presser foot, thus making it a very compact, usable foot. The bar extension won’t hurt anything, but it’s cumbersome.
After being introduced to this foot by Sharyn Craig, Harriet has never gone back to the ¼″ foot. Unfortunately, not every machine manufacturer makes this foot, but it is worth looking into.
For more about presser feet and accurate seams, see Class 130, page 20.
hint
Not all sewing machines have this foot available because the manufacturers have made their straight-stitch feet wide like zigzag feet, with a single hole where the needle passes through. This foot does not meet our needs.
The throat plate is the metal piece that surrounds the feed dog. The standard throat plate on a modern machine has an oval opening that accommodates a zigzag stitch, which doesn’t work well for piecing. The oval hole allows the needle to push fabric down with it, and the stitch may not be made cleanly. Also, strips tend to veer away from the edge of the seam guide as you approach the ends, so it is hard to keep them straight and even while sewing.
A straight-stitch plate will help eliminate this problem. This plate’s opening is too small to allow the fabric to enter with the needle. Straight-stitch machines such as Singer Featherweights make perfect stitches, and many quilters still prefer to piece on their old machines because of the stitch quality.
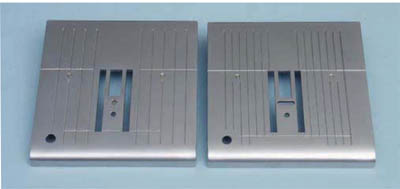
Straight-stitch and zigzag throat plates
The variety of rotary cutters and mats available today is amazing. When Harriet started quilting in the 1970s, rotary cutters had not been invented yet! Once they hit the market in the early 1980s, they revolutionized cutting fabric for quilting.
A rotary cutter is like a round razor blade with a handle. Rotary cutters are available in 18mm, 28mm, 45mm, 60mm, and 65mm blade sizes. There are several brands of rotary cutters, each with slightly different features. We suggest that you go to various quilting stores and ask to test-drive the brands and styles of cutters they carry. You will find that there is a vast difference in how they are held and where the pressure is applied as you cut with them.
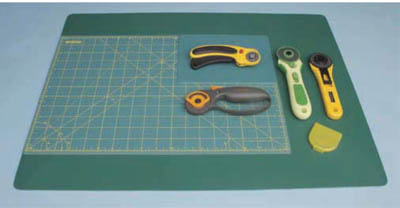
Rotary cutting supplies
Cutting fabric correctly is critical to good piecing, and cutting is where beginners have the most difficulty. If your cutter does not fit your hand properly, or you can’t apply even and steady pressure to the blade for the entire length of the cut, the cut will not go through the fabric layers and/or the edge will not be cut cleanly.
hint
Please don’t let the preferences of your friends, your mom or grandma, or a salesclerk influence what you buy. Try what they like and recommend, but form your own opinion after trying several different cutters.
We recommend starting with the 45mm size. It is easy to cut with, goes through four layers of fabric easily, rides above the thickness of a rotary ruler, and comes in models with many different shapes and handles. This is the only size you need to get started.
safety note
Be very careful when using rotary cutters. They are razor sharp! Make it a habit to close your cutter every time you lay it down. Never leave a cutter lying around, open or closed, where small children can get hold of it.
Many books, as well as the instructions on cutter packages, suggest that you hold the cutter with a closed fist. This method doesn’t help direct the energy of your arm and hand onto the blade. Instead, let the handle of the cutter rest comfortably in the palm of your hand. Your index finger should extend forward, resting on the grooved space at the top edge of the handle (if the cutter has this). Your thumb should be on one side of the handle, and the other three fingers should curl gently around the other side.
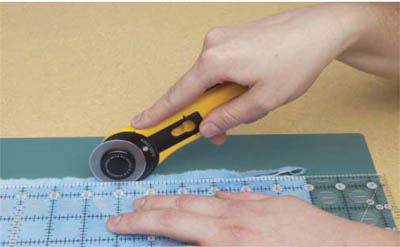
Holding a rotary cutter properly
Always cut away from your body. The muscles you use when pushing are stronger than those you use when pulling. You also eliminate the possibility of losing control of the cutter and hurting yourself!
The rotary cutter blade is razor sharp when new, but after dozens of cuts it can start to dull. A dull blade requires more force than a sharp blade to do the same work, which can be tiring and can make your cutting inaccurate. Make sure you have one or two new blades on hand.
Several newer cutters on the market have easy blade-changing systems. When changing the blade on one of the other cutters, lay out the parts in the order you take them off the handle. Wipe any lint from the back of the handle area that the blade rests on. Change the blade, making sure you select only a single blade if you purchased a multipack, and reassemble the parts in reverse order. You will notice that the new blade has a thin film of oil on it. Do not wipe this off, because it helps lubricate the blade while cutting.
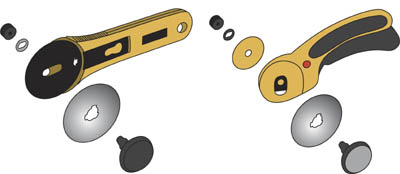
Lay out parts of cutter in order as you disassemble it.
The cutting surface is just as important as the cutter you use. The mat allows you to press down on the cutter and let the blade sink slightly into the surface of the mat. Rotary cutting mats come in different sizes and materials, so you’ll need to try a few to find your preferences as to thickness, hardness, and ease of cutting.
 Three-layer mats (made by Elan and Olfa) are made of two layers of PVC plastic, with a softer center layer. They are “self-healing,” meaning that the cuts do not stay in the surface. Either side can be cut on. Store them flat and away from heat; they will warp if exposed to a heat source or left in a hot car.
 The harder, thinner version of the three-layer mat (made by Olfa, Omnigrid, and Ginger) feels flatter and harder when cutting. This type is also self-healing, and either side can be used to cut.
 Soft plastic mats are solid translucent white plastic with a textured side (the cutting side) and a smooth side. They are usually not self-healing—the cutter may leave marks on the surface. Cuts can be smoothed with emery cloth or very fine sandpaper, but over time the board can become grooved and will distort the path of your cutter. It also dulls blades faster.
 A few mats (made by June Tailor and Fiskars) are very hard plastic and have a textured cutting surface. Only one side of these mats can be used for cutting, and, of all the mats, these seem to be the hardest to cut accurately on.
Rotary mats come in a variety of sizes. The most versatile size, 18″ × 24″, is what we recommend to start. If or when you get a large cutting table, the 24″ × 36″ mat is more efficient for doing a lot of cutting. There are also small mats that are handy for quick trimming at the machine and for taking to classes. Finally, there are mats that attach to ironing surfaces for use in very confined spaces.
All mats come with a 1-inch grid printed on one side. Many books will tell you to work with this grid, but rarely do the mat lines match the lines of your ruler, and you will have too many lines to look at. Therefore, work on the solid side only, and rely on your ruler for accurate measurements.
Along with rotary cutters and cutting mats, rulers make up the foundation of the rotary revolution. A clear, accurate ruler is as important to guiding the cutter as a sharp blade is to cutting. There are many different rulers available for both general and specialty use. Rotary rulers are made of thick, clear acrylic and have lines and numbers evenly spaced across them. The number of lines and their spacing varies between brands, as do the color and thickness of the lines. Rulers that have numbers running in both directions are easy for both right- and left-handed quilters to use.
When deciding on a ruler brand, keep the following in mind:
 Do not change brands of rulers in the middle of a project! We cannot stress enough how important this point is. The measurements marked on the different brands will vary slightly. Find a brand you like, and stick with it.
 Make sure that the brand you choose comes in a fairly large selection of sizes and shapes.
 Be sure to place the rulers on top of both dark and light fabrics to check that the color of the lines shows enough to enable you to work with the ruler easily and accurately.
 Check the thickness of the printed lines. The thicker the line, the greater the chance that you will measure and cut inaccurately.
 It is handy to have a ruler marked with a 45°-angle line, as well as 30°- and 60°-angle lines.
 Some brands have a ½″ measure on one side and end. Be sure to keep this in mind when cutting. The ½″ is added so that you only have to think about the finished strip size you need—the ½″ seam allowance is already added. This can cause trouble if you don’t pay attention to it.
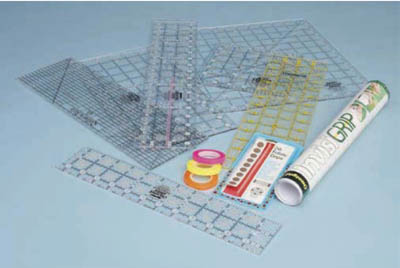
Variety of rulers in basic sizes
To start with, you will need a limited number of rulers. Good sizes to start with are any combination of the following:
note
Some brands add a ½″ measure to two sides of their rulers; others do not. The sizes below are the general sizes of the rulers, whether the ½″ is added or not. Creative Grids all have ½″ added. Some Omnigrid rulers do and some don’t. It would be advisable to be consistent in this when buying rulers.
 2½″ × 12½″
 3½″ × 18½″
 4″ × 12″ or 14″
 6½″ × 12″ or 18½″
 6½″ square
 9½″ square
 12½″ square
 18½″ square
The four “bare-bones” basic sizes you will need to make most of the quilts in this book are a 2½″ × 12½″, a 4″ × 12″ or 14″, a 6½″ × 12″ or 18½″, and a 6½″ square. Add the other sizes once you get into adding borders, and for continuing in your quilting.
tip
While it may be temping to go to a large chain store and use a 40%-off coupon to buy these basic supplies, we highly recommend that you shop your local quilt shop. It will usually carry a larger variety of “quilter-friendly” notions and tools, and the salespeople will explain the features and uses of the tools to you.
Before investing in a ruler, test-drive several brands and sizes, especially to see how well you can read them. Many quilters find that certain color markings or too many lines make cutting very confusing and fatiguing. Be sure that you can easily read the measurements and follow a line the length of the ruler without your eyes blurring. (Confusion in reading the lines will lead to inaccurate cutting.) Strips of self-stick plastic called Glow-Line Tape can be placed along a measure line to help you with ruler placement.
Ruler slippage is a common problem when cutting. Quilter’s Rule rulers have a molded side with a raised grid to prevent slippage. Creative Grid rulers have built-in grips on the back along the sides.
Some products can be placed on the back of any ruler. Invisi-Grip by Omnigrid “disappears” but stops a lot of the slippage. Fabric Grips by Collins are small sandpaper circles with self-adhesive backing. EZ Clear Fabric Grabbers are clear, but thicker. They really grab the fabric, but they make the ruler sit above the surface of the fabric.
If you don’t want something permanently stuck to your ruler, you can use small pieces of plastic shelf liner or rug backing. These stick to the ruler when you apply pressure but peel off easily.
We have found that slippage often occurs when using a ruler that is wider than needed. Use the narrowest ruler you can for the size of strips you are cutting, and slippage will be less of a problem.
note
All the factors we have discussed in this class affect your ability to cut easily and accurately. The table height must be correct, the mat a correct size, the rotary cutter comfortable, and the cutter blade sharp. If you have problems cutting, consider all of the above. Your hand position on the ruler is dependent on how you stand at the table and how much pressure you can apply to the ruler. We will walk you through this process in Class 120 page 19).
All right! You made it through the nuts-and-bolts section—now on to fabric!