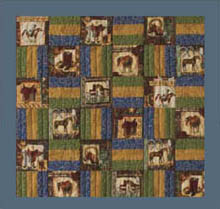

You are actually going to get to sew in this class! Once you learn to sew accurate seam allowances and press properly, you will be ready to work on the small sampler quilt that Carrie designed as she took the classes in this series we teach at our store.
For years the quilt world has been obsessed by the myth of the ¼″ seam allowance. By believing that a ¼″ seam allowance is sacred, we have lost the ability to make perfect-sized quilt blocks.
One of the primary goals of this book is to help you achieve the correct size block instead of worrying about the size of the seam allowance. Making accurate-sized blocks is not all about the measurement of the seam or the foot on your machine—although these, as well as other factors, do affect the final finished size of the block. As you will eventually find out from doing the exercises in this class, you must work back from your finished sewn units and adjust your seam allowances to achieve an accurate-sized block. Read on and find out why the ¼″ seam does not work.
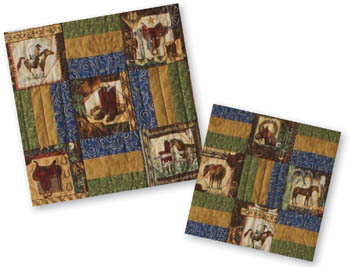
The relationship of thread weight to seam allowance width is an important factor in accurate sewing. Traditionally, quilters have pieced with 50-weight three-ply 100% cotton sewing thread, an appropriate weight for quilt fabrics. Thread size should be as fine as possible, consistent with the strength requirements of the seam. The “50” designates the yarn count of the thread, or the weight and diameter. The “three” indicates the number of plies twisted together. The higher the first number, the finer the thread. The more plies, the stronger the thread.
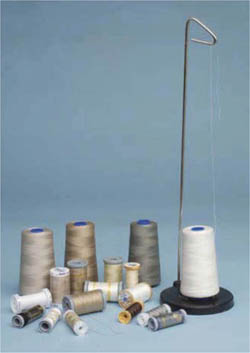
Variety of threads
The problem you encounter when you use 50/3 thread with a ¼″ foot and sew a perfect ¼″ seam is that there is no allowance for the weight of the thread and the bend of the fabric as you press the seam. You will find that the seam allowance is the perfect size, but the finished unit is too small.
In recent years, quilters have started using two-ply embroidery thread to piece their quilts because it is so fine that it does not create bulk in a seam and therefore, with a ¼″ foot, will produce accurate-sized units. We ask that you please think twice about doing this. Three-ply thread is needed for strength in the seam. Two-ply threads are too weak to hold up under the weight and wear and tear of a quilt, especially if the quilt is not quilted heavily.
A fairly new thread size on the market—60/3, manufactured by Presencia Hilaturas (Staple Fibre), a thread manufacturer from Spain, and introduced to Harriet through Carrie’s master’s study in textiles—solves this problem. The 60 weight makes it a very fine thread, but the three plies make it very strong in relation to the fineness. This thread is an excellent choice if you want to work with your ¼″ foot because it buys back the space taken by a heavier thread and the bend of the fabric when pressing. It also allows you to sew with a smaller needle, which eliminates the fabric distortion that larger needles can cause. Be sure that you always use 100% cotton thread in your quilts.
The right needle is critical for a smooth stitch. Use only high-quality needles, and start each new project with a new needle. Check your sewing machine manual for the recommended type and brand of needle.
For now, universal-point needles will serve you just fine. If you use 50/3 thread, it is recommended that you use an 80/12 needle. If you choose the 60/3 Presencia, a 70/10 or 75/11 is the correct size.
|
Thread weight |
Needle size |
|
50/3 threads |
75/11 or 80/12 needles |
|
60/3 threads |
70/10 or 75/11 needles |
In Class 110 we introduced you to the ¼″ foot. However, there is some discrepancy in the accuracy of the ¼″ feet that come with machines. The theory is that the needle is exactly ¼″ from the right-hand edge of the presser foot.
We recommend that you check the accuracy of the needle position yourself by placing a piece of ¼″ (4-squares-to-the-inch) graph paper under the presser foot and carefully lowering the needle until it goes into the paper on a line. Check that the right edge of the presser foot is exactly on the next ¼″ line.
If the edge of the foot does not fall exactly on the graph-paper line, the problem is generally not with the width of the foot but with the position of the needle. We assume that the needle is always exactly centered with the center of the foot, but often it is not. If the needle is too far to the left, you will be taking a slightly wider seam; if it is a bit to the right, the seam will be narrower. Using a seam guide (see page 23) will help eliminate problems.
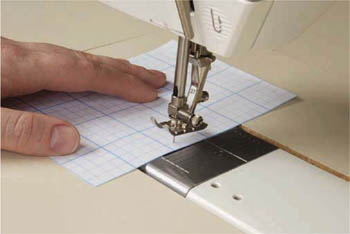
Using graph paper to measure for ¼″
note
Some people suggest moving the needle position to the right to create an accurate seam allowance measurement. We strongly recommend that you avoid this practice because an off-center needle is mentally challenging to work with and can cause problems if your needle inadvertently gets moved to another position. Also, if you use a straight-stitch throat plate (see page 8), your needle must be in the center position.
HINTS FOR
ACCURATE SEWING
Here are a few things to check when setting up your sewing machine:
 Check your body position when sitting at your machine. You should be facing the presser foot straight on when you align the fabric with the edge of the foot. If your body is angled, your perception of the edge of the fabric and the edge of the foot will be incorrect, and your seams will be less accurate.
 Be aware of the time of day and the position of the light around your work. If you start piecing in the morning with natural light on your left side and finish up at night with artificial light above you, your eyes are apt to see the edge of the foot differently. Keep the light consistent at all times if possible.
 Check that the foot is stable on the machine. Many clip-on feet wobble as you sew, and this play in the foot position will affect the accuracy of the seams. This is especially true if the foot has a little guide built onto the right side of it. These guides aren’t always an accurate ¼″ to start with, and any movement while sewing will throw off your seam allowance just enough to cause problems.
 Check the fabric position. If you see a bit of fabric beyond the right side of the ¼″ foot, you are taking too wide a seam. If you don’t see the edge of the fabric, where are you looking to guide the fabric under the foot? Is it going through the machine straight?
There are several ways to ensure that a seam guide is positioned accurately. One of the cleverest tools to come along in quite a while is the Perkins Dry Goods Perfect Piecing Seam Guide. This little ruler allows you to mark your sewing machine for a consistent and accurate seam allowance every time. It actually measures a scant ¼″, which allows for the weight of the thread and the bend of the fabric in each seam. It will also check the accuracy of the needle position in relation to the edge of the foot.
Place your needle in the hole of the Seam Guide ruler. Lower the presser foot to hold the Seam Guide ruler firmly in place, and straighten the Seam Guide ruler so it is parallel with the edge of the throat plate. Place the seam guide of your choice (see page 23) against the side of the Seam Guide ruler to mark a perfect scant ¼″. Remove the Seam Guide ruler.
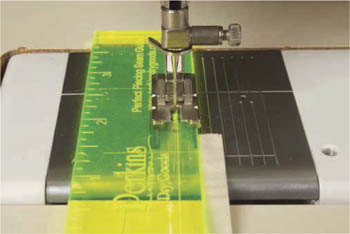
Placing tape alongside ruler
As stated earlier, using ¼″ graph paper is another very accurate way to measure. Place the needle on a grid line of the graph paper. If the side of the foot does not match the next grid line to the right exactly, use a seam guide or piece of tape to mark the correct position.
If you use a ruler, be consistent as to which side of the line you put the needle on, and make sure that the ruler’s ¼″ is accurate. (Many rulers are not printed with exact measures!) A steel draftsman’s ruler is preferable to an acrylic rotary ruler for this purpose.
Once you have selected a presser foot for your machine (see Class 110, page 7), you will want to find a seam guide that works with that foot to help you sew straight and accurate seams and create accurate sewn units.
You have several options, from simple, homemade guides to manufactured ones. These guides will provide a barrier for the edge of the fabric to glide against.
Masking tape. Harriet’s students have great success using layers of ¼″ masking tape, available at quilt stores. A ⅛″-thick section of tape 2″ long secured to the throat plate and bed of your machine will create an excellent barrier guide to run the fabric edge against. (Make deep cuts into the roll of tape, and peel off a thick section between the cuts.) Place the tape in front of the right toe of the foot, especially if the foot is too wide for the seam allowance you need to use.
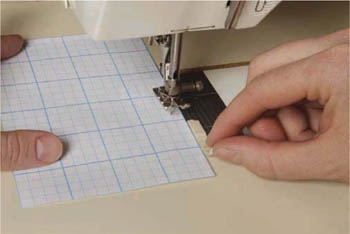
Using ¼″ masking tape as seam guide
Straight-stitch foot. Harriet’s favorite foot, the Bernina #13 straight-stitch foot (see Class 110, page 7), has a guide bar that attaches to the foot. It makes sewing perfect seams easy, once you have positioned it accurately. After the guide bar is in position, the extra arm of the guide bar that extends to the left can be cut off to about ¾″.
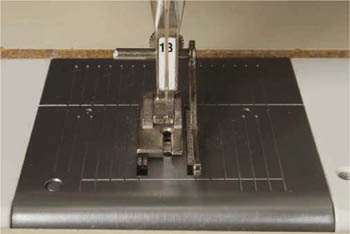
Bernina seam guide sits on top of right feed dog.
Mole foam. This adhesive padding, made to protect pressure points on people’s feet, is also a commonly used seam guide. Use a ruler and a rotary cutter with an old blade inserted to cut the foam sheet into ¼″ × 2″ strips. Expose the adhesive, and position the strips on the bed of the machine. The only drawback to mole foam is that a groove will wear into the side over time. Keep an eye on this, and replace the foam as necessary, or your piecing can become inaccurate.
Other guides. Two-piece guides that screw into the bed of the machine have long been available. They are very accurate, and vibration from the machine never moves them out of place. Magnetic guides are available from various manufacturers, but they have drawbacks. Vibration can move them slightly, and they won’t work on a machine with a plastic bed unless there is a large metal throat-plate area. If you have a computerized machine, check with your dealer to make sure this kind of guide can be used.
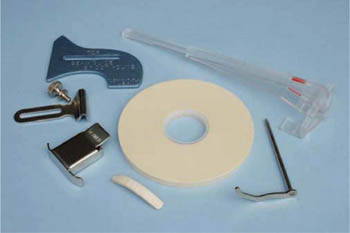
Various seam guides
Once you have chosen a foot and placed a seam guide on your machine, you will need to set the machine to a stitch length that will give you a secure seam but will be long enough to rip out if necessary. It is important that you understand a little about stitch length and know the minimum, average, and maximum stitch length your machine can produce.
Your machine measures stitch length in either millimeters or stitches per inch. Most of the newer machines have stitch lengths measured in millimeters. Here is a basic guideline for what your machine is telling you if it measures in millimeters: 6 millimeters equals about ¼″, so if you have the stitch length set at 6, your stitches will be about ¼″ long. Another way to think about it is that if your machine is set at 2, then the stitches will measure 2mm long, and if we know that 6mm equals about ¼″, then 2mm stitches are about  ″, or 12 stitches to the inch.
The chart below shows you how these two measurements compare.
|
Stitches per inch |
Millimeters (mm) |
|
50 |
.5 |
|
25 |
1 |
|
16 |
1.5 |
|
12 |
2 |
|
10 |
2.5 |
We recommend that you set the stitch length between 12 and 14 stitches per inch, or 1.75 to 2 on a machine measuring in millimeters. This length will yield a secure seam and will allow you to slip a seam-ripper blade easily under a single stitch if you need to rip out a seam. Sew a couple of seams to see which stitch length you prefer.
 EXERCISE: TESTING YOUR SEAM ALLOWANCE
Materials:
⅛ yard dark cotton fabric
⅛ yard light cotton fabric
Now you’re ready to sew a test sample to check for accuracy. As you do this exercise, use the techniques you learned in Class 120, Lessons Three through Five. Select a dark fabric and a light fabric for contrast, and make sure that they both have the same thread count. Straighten the grain before cutting.
note
Here and throughout this book, we suggest that you read through the complete class before starting any exercises or projects, so that you understand all the steps before you actually perform them.
1. Cut a strip 2″ wide from each fabric. Cut each strip into 7″-long pieces.
2. At the machine, place 2 strips right sides together with right edges aligned exactly.
3. Begin stitching at the end of the strips. (It is not necessary to backstitch at the beginning or end of seams, because intersecting seams at many points in the quilt will eventually hold those ends in place.) To keep the thread from getting jammed, hold the top and bottom threads together in your left hand as you begin to stitch.
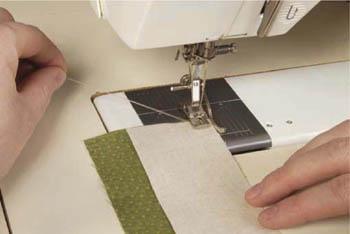
Hold threads as you begin to sew.
You may want to start with a small fabric scrap. Stitch on the scrap first, then feed in the strips. End the seam with a small scrap, too. Clip the scraps off the ends of the strips when you’ve finished sewing the seam.
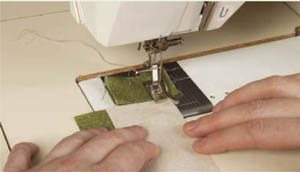
Sewing on scrap to keep thread in order
4. Start stitching slowly to give the feed dogs a chance to grab the fabric. Let the machine do all the feeding. Avoid pushing or pulling at the fabric, as uneven, puckered seams can result. If you are new to sewing, run the machine at a fairly slow speed so that you have control in guiding the fabric. Keep your eye on the right edge of the fabric as it glides alongside the seam guide. There is no need to watch the presser foot or the needle.
5. When you’ve finished stitching, cut the thread tails even with the ends of the strips. Because you are just starting the learning process and we want to instill in you good habits, we want to stress how important this is. Do not use the thread cutter on your machine, and do not leave little tails, even ¼″, dangling on the ends of your strips. This makes for very messy quilt backs and will add to your work when the quilt top is finished, because those little threads can get caught in other seams and show on the front. So please, start now and train yourself to trim the thread tails right down to the end of the fabric.
6. Press (see Lesson Four, page 26). Stitch a third strip to the first 2 so that you have a light-dark-light or dark-light-dark combination, trim the threads, and press again.
Here is where you will see the importance of an accurately sewn unit, and how you must work back from the finished sewn unit and adjust your seam allowance in order to end up with an accurate-sized unit. The finished unit should measure 5″ wide. More importantly, the center strip should be a perfect 1½″ wide. If you don’t get these measurements, adjust your seam guide. If the center strip is narrower than 1½″, the seam allowance was sewn too wide, and you must position the seam guide closer to the needle. If the center strip is wider than 1½″, the seam allowance was sewn too narrow, and you must position the seam guide farther away from the needle. You may have to place the seam guide in front of the toe of the foot instead of to the side in order to get it in the correct position.
Repeat the test with new strips to make an accurate finished unit.
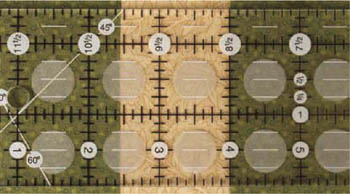
Seam allowance too narrow
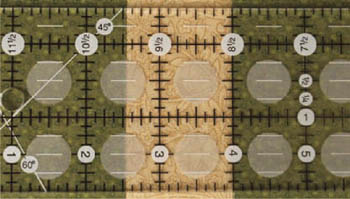
Seam allowance too wide
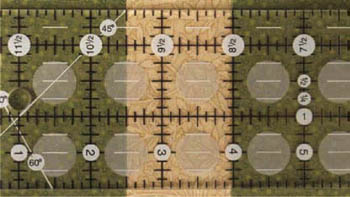
Seam allowance exactly right
note
If the ¼″ presser foot for your machine has a built-in guide on the side, you are probably taking a full ¼″ seam allowance. Using Presencia 60/3 sewing thread will often allow you to sew accurately with this foot. If your foot is adjustable or slightly narrower than ¼″, you can probably use a 50/3 thread and get a perfect finished unit. Test to see which thread weight works best for your machine and foot choice.
If you iron your patchwork pieces with the vigorous approach that you use for a shirt, your quilt could be in trouble. Incorrect pressing can stretch, distort, and heat set the pieces into a real mess. However, if done correctly, pressing can truly enhance your piecework.
For most of the quilts in this book, you will press the seam allowances to one side. You will be pressing every seam (or, when chain piecing, a series of seams) as it is sewn instead of sewing several units and then trying to press accurately.
When you take two sewn pieces to the ironing board, consider the direction in which you’re planning to press the seam allowance. Normally we press the seam allowance toward the darker fabric. Experience (or a sample block) will tell you whether or not this will work in a particular situation. To help you become familiar with the system, we provide a pressing plan for each of the quilts in this book.
When you are pressing, spray starch will become your best friend. It gives the fabric a crispness that makes it stay in place and track straight through the machine—no stretching or distortion. The finished block will be very straight and square and have a crisp, firm finish.
 EXERCISE: PRESSING A SEAM
Materials:
Sample from Exercise: Testing your seam allowance (page 25)
Iron
Faultless Heavy spray starch
1. Place the sewn pieces on the ironing board with the seam allowance away from you and whichever piece of fabric the seam allowances will be directed toward on top. Using steam, press in the closed position first to set the stitches. Steam softens the fabric, helps it bend more easily, and aids in preventing stretching and distortion.
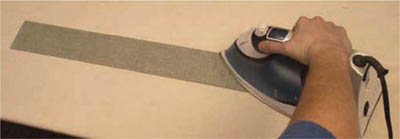
Setting seam in closed position
2. Lift up the top strip and glide the iron gently up against and over the seam allowance. If you set the iron down on top of the opened pieces without first directing the seam allowance, you run the risk of pressing in glitches, pleats, and puckers. Use the iron’s side edge, not the point. Here, a heavy iron is to your advantage because its weight does the work for you. Do not pull on the strip with your fingers. Use only the pressure on the iron.
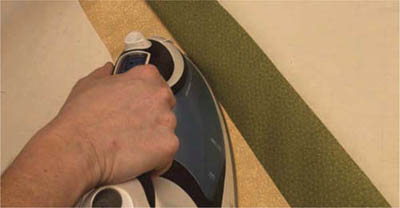
Pushing seam allowance to side
tip
Remember to always press from the right side of the fabric.
3. Once the seam has been pressed over, apply a very light misting of spray starch to the seam. (If the fabric appears wet, you are using too much starch!) Turn the steam off, and press the starch dry. Each time you press, you are applying light pressure and pushing against the seam with the side of the iron.
4. Apply up to 3 light layers of starch. The starch will give the seam a very sharp, flat edge, which will keep the piecing accurate each step of the way. As each seam is added to the unit, this process is repeated before you proceed to the next step.
tip
If you press a seam allowance in the wrong direction, don’t just flip it the other way and run the iron over it. Fold the two pieces together again, and reset the seam closed; then open it, and re-press in the opposite direction.
Now you are ready to construct your first patchwork! You’ll start by making the center quilt block for Carrie’s sampler quilt. As you make the sample units in the exercises, they will eventually be put together into a small quilt that you will complete in Volume 2 of this series. This is a perfect way to learn the techniques in this book, because it allows you to try each technique and get it right before starting on the larger projects assigned at the end of each class.
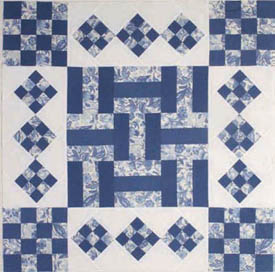
Sampler quilt that you will construct during practice sessions
 EXERCISE: SAMPLER QUILT BLOCKS
Materials:
½ yard solid blue fabric (Fabric A, dark)
½ yard blue print fabric (Fabric B, light)
½ yard white background fabric (Note: This will be used in Volume 2 when you learn diagonal settings for the Nine-Patch blocks made later in this book.)
The blocks you will construct are made in a pattern called Fence Post. As you complete this exercise, please keep in mind these objectives:
 Cut extremely accurate strips.
 Watch carefully that all raw edges are exactly and constantly aligned with each other.
 Sew exact, straight seams.
 Double-check your cutting and sewing by remeasuring the strips after pressing and trimming off threads.
1. Tear the ends of the fabrics and straighten the grain as described in Class 120, page 16).
2. Cut 3 strips 2″ wide from each of the A and B fabrics as described in Class 120.
3. You will be sewing these into strip sets. One set will be dark-light-dark, and the other set will be light-dark-light.

Strip set combinations
4. Align a Fabric A strip and a Fabric B strip right sides together, making sure that the raw edges are EXACTLY aligned. (If the edges are not aligned, the strips won’t be the correct width after sewing, and the accuracy of the entire unit will be off.) Stitch them together. Repeat with another set of strips. This is the beginning of both strip sets. Remember—when you take the sewn strips off the machine, trim those threads down to the fabric!
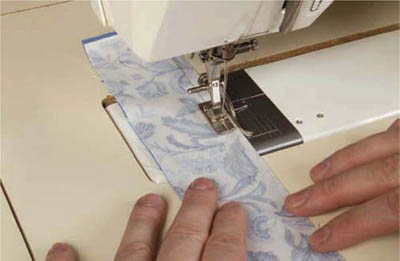
Perfectly aligned edges
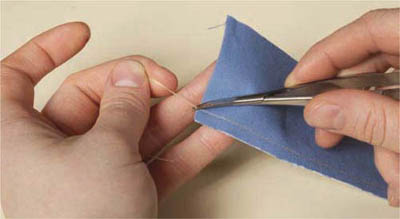
Always trim threads close.
5. Press both strip sets as described in Exercise: Pressing a seam (page 26). The seam allowances should be pressed toward the darkest fabric. As you press, make sure the strips stay arrow straight. Avoid letting them bend into an arc. Lightly starch, misting and pressing with a dry iron up to 3 times until the seam is perfectly straight and flat.
6. Lay the pressed strip sets on the cutting mat, and, with a ruler, check to see that they are both exactly 1¾″ wide. If they are a tiny bit wider, trim off any extra fabric to make each strip exactly 1¾″ wide. If they are narrower, check to see whether the seams are both pressed and sewn straight, and double-check the seam guide placement. Pressing is often the biggest problem in piecing. If you can pull on the seam and it gives at all, it is not pressed properly.
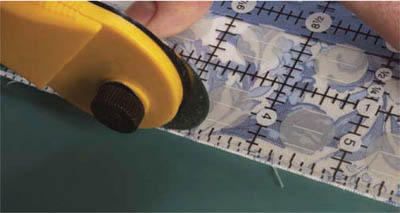
Ruler placement to check strip width
hint
For easy ripping when a seam needs to be done over, use a seam ripper to cut every third stitch on one side and unravel the thread from the opposite side.
7. You are now ready to add the third strip to each strip set, making a dark-light-dark and a light-dark-light combination. Sew, press, starch, and measure as above. This strip should also be exactly 1¾″ wide. After the third strip has been added, check that your seam allowance is still accurate by measuring the center strip and making sure it is 1½″ along the entire length of the strip.
Each strip set should measure 5″ wide down the entire length of the strips. If there is a waver anywhere along the length, cut out and discard that portion, or rip out and resew.
Now you’re ready to cut the strip sets into segments.
Check your work from the last lesson. After you have sewn the three strips together and trimmed the edges even, the width of the three strips (strip set) should be exact along the entire length of the strip set. If it is not, consider these questions:
 Were the strips cut accurately?
 Were the edges of the strips aligned exactly when you were stitching?
 Are all the seams sewn straight and accurately? Cutting the strip sets into segments accurately in the next steps is very important. The seams will be what you measure from, not just the raw edge.
 Have you pressed any folds into the seams that caused the strip sets to be uneven?
Make sure the strip sets are accurate before continuing. Remember, this is the key to making accurate blocks.
1. Place a strip set on the cutting mat, and lay a ruler across the strips. Align the cross lines of the ruler evenly with the sewn seams. This will tell you whether the strips are perfectly straight and all the same width. Trim the end off the strip set, wasting as little fabric as possible but removing the selvages completely.
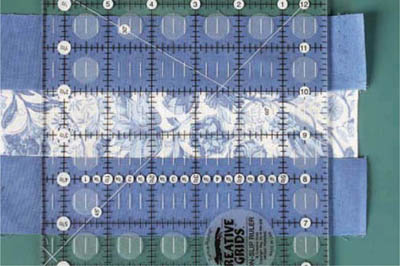
Trimming the end using proper ruler alignment
2. Turn the strip 180°, so that the length of the strip is on the same side as the hand you cut with. Next, align the measurement needed with the cut edge. The strip sets are 5″ wide, so you will cut segments 5″ long. Be sure the 5″ ruler line is exactly aligned with the cut edge of the fabric, and the perpendicular ruler lines are exactly aligned with the seamlines. Cut 5 segments 5″ long of the dark-light-dark strip set and 4 segments 5″ long from the light-dark-light strip set.
note
Cut only one strip set at a time. Many quilt project instructions tell you to stack the sets and cut multiples, but the chance of inaccurate cuts is very high. Cut two to three segments as instructed and realign the edge if it is getting out of square. The cut edge and the perpendicular seams must always stay in alignment.
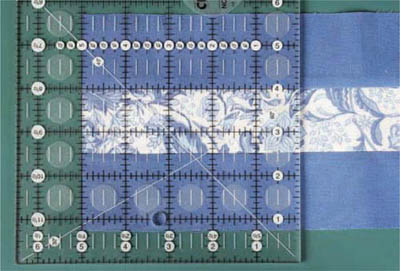
You are now ready to lay out the blocks to form the center section of the sampler quilt. This is a perfect time to learn how to chain piece and how to butt seams.
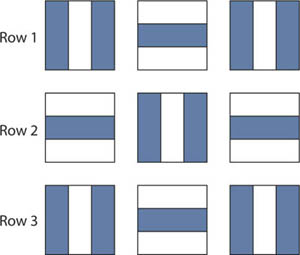
Block layout
Chain piecing is a quick and efficient way to stitch identical units together. You feed and stitch the units one after the other, without lifting the presser foot or cutting the thread in between. To begin, lay out the blocks as shown in the photo on page 27. You now need to pick them up in the correct order to get them to your sewing machine. Here’s a foolproof way to do it.
1. Starting with Row 1, pick up the first block on the left, lay it on top of the second block, and lay those on top of the third block. Pin the pile together at the top of the block to remind you which way is “up,” and lay the stack back down. This stack is Row 1. Repeat with the second and third rows. You now have 3 stacks with 3 blocks in each, with the first block of each row on top of each stack. Place the Row 1 stack on top of Row 2, and place those stacks on top of Row 3.
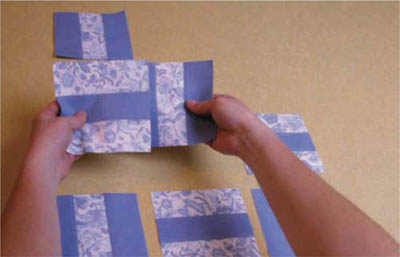
Stacking up rows
2. Take the stacks to the machine. Lay them out in order to the right of the machine. Select something like a paperweight, a bobbin, or a small pair of scissors to use as a marker. Unpin the stacks, and place the marker on top of Row 1.
3. Immediately move the marker to Row 2, and pick up the first block from Row 1 in your left hand and the second block from Row 1 in your right hand. Place the second block on top of the first, right sides together, and stitch together the right-hand edge.
Block 2 on top of Block 1
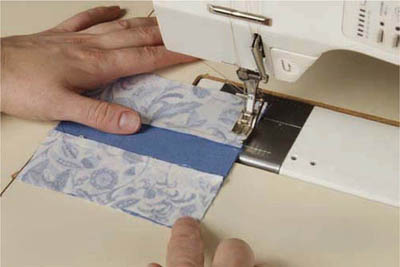
Sewing the right edge
4. When you come to the end of the seam, stop. Do not cut the thread. You will be chain sewing another set of blocks onto this set.
5. Move the marker from Row 2 to Row 3. Pick up the first and second blocks from Row 2, and stitch as in Step 3, leaving about ¼″ of thread between the blocks for Row 1 and Row 2.
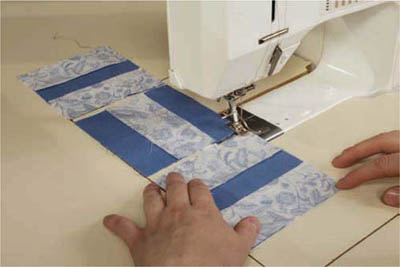
Chain feeding
6. Stop at the end of the seam. Move the marker back to Row 1, pick up the first 2 blocks of Row 3, stitch as in Step 3, and cut the threads. Now the first 2 blocks from each row are stitched to each other and chained together in the order of the rows.
7. Press all the seams. (You do not need to cut the rows apart, but you can if you feel it is necessary. If you do cut them apart, be sure to keep the rows in order.) Press each seam closed first. Next, if you do not cut the rows apart, let Rows 2 and 3 hang off the edge of the ironing board while you press the seam for Row 1 to the left, working from the right side of the fabric. Pull up Row 2, and, working on the edge of the ironing board, press this seam to the right, from the right side. Finally, bring up Row 3, and press again to the left, just like Row 1. You are pressing the seams toward the vertical strip so that the seam allowances are not pressed back on top of themselves.
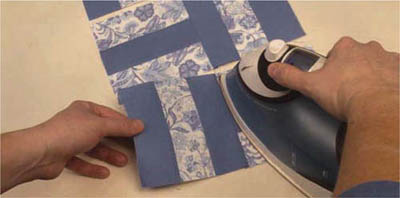
Pressing seams of each row
8. Now sew the third and last block from each stack to its row. Pick up the last block from Stack 1 and stitch it to the second block of Row 1, right sides together, along the right edge. Next comes Row 2, still attached to Row 1. Stitch the last block of Row 2 onto the second block. Repeat for the last block on Row 3.
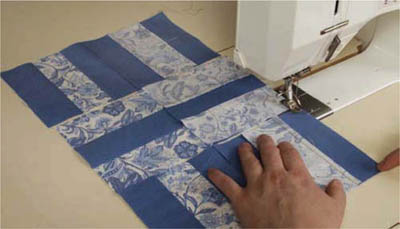
Adding Block 3
9. You are now out of blocks, and all 3 rows have been constructed. When the rows are complete, you might find it helpful to separate them by cutting the chain threads, but you can keep them attached. Press the seams toward the vertical strips at every seam. Press from the right side.
tip
This stacking method can be used for any size quilt. Once you work out the system, you will find that it is fast and efficient, and you can check the pattern layout as you go. It eliminates all the getting up and down needed to pick up a few blocks at a time.
As you prepare to sew rows together, you will need to butt the seams, meaning that you will nest them together (but not on top of each other) so they lie flat. The ability to butt seams successfully is very dependent on the accuracy of your cutting and sewing. If you are trying to join units that are different sizes, it will be difficult to get anything to fit and stay in position.
Place Row 1 on top of Row 2. Using your fingers, bring the seam allowances together, aligning the seams. Because you have pressed the seam allowances in opposite directions, the seam ridges will “butt” together. This is something you feel with your fingers. If there is a bump in the middle of the seam, the seam allowances are probably on top of one another, and the seams are not aligned properly. If there is a “valley” or spread between the seams, they are too far apart. When the area feels flat and even, the seams are interlocked and ready to sew.
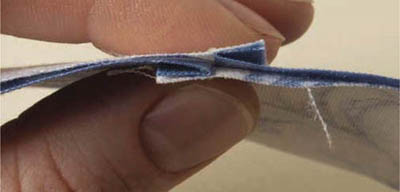
Seams perfectly nested or butted
You will find that as you gain experience, you will be able to hold the seams in place and stitch right up to your fingers, and the seams will butt perfectly. Butting seams accurately is critical to good piecing as well as to successfully quilting the top later.
SUCCESSFUL
PINNING
In the beginning, you may feel the need to pin these seams together to keep them from shifting when you are stitching. If so, use the finest pins available. The thicker the pin, the more distortion will occur when the pin is inserted into the seam allowance. Following are three pinning methods.
 With seam allowances aligned, place a pin on each side of the stitching so the pinheads extend beyond the fabric edge. Remove them, one at a time, just before you stitch over them.
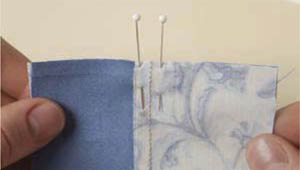
Pinning on both sides of seam
 Place the pin parallel to the fabric edge on the stitching line. Remove the pin as the needle approaches it.
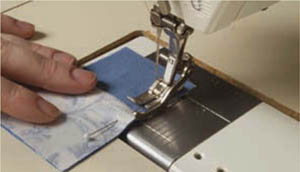
Pinning through the seam allowance, parallel to edge
 If you are using very fine pins, such as Clover Patchwork Pins, you can pin with the heads inside the body of the block and the points along the fabric edge, and simply sew over the points. If you are using a barrier-type seam guide such as tape, mole foam, or a screw-on or magnetic seam guide, you do not need to remove the pins when you come to them.
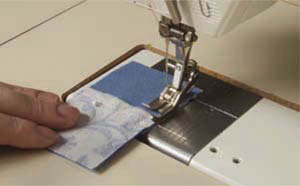
Pin points at edge
1. Hold or pin Row 1 to Row 2, and stitch the rows together.
2. Press the seam allowance to set it, and then press it toward Row 1. (Let Row 3 hang off the front edge of the ironing board.) Stand Row 1 up, and, with the edge of the iron, carefully push Row 1 over to lie flat on the ironing board. Gently work the seam with the edge of the iron until it is flat and perfect. You will be going over the lumps of the seam allowances, so work carefully to keep from distorting the seam.
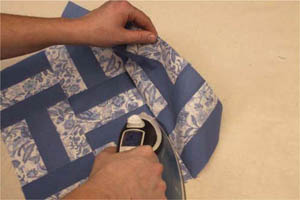
Stand Row 1 up.
3. Stitch Row 3 to Row 2, butting each seam exactly. Direct the seam toward Row 2, and press, following the same steps as above.
Now you have a square patchwork piece made up of three rows of three blocks each. This small piece should measure 14″ × 14″ from raw edge to raw edge in both directions. Check for squareness, flatness, and dimension. Check that all the seams are butted exactly.
Congratulations! You have completed your first piece of patchwork. You will use these methods and techniques throughout this book and all the books in the series, so if you are having any problems with accuracy now, go back and repeat the steps until you work out where the problems are. We can’t stress accuracy enough! If your work starts out with problems, the piece will only get worse as you continue. It is so much easier to get it right every step of the way.
Next, you get to put your new skills to use to construct a simple quilt.
For your first two projects, we present a choice of two small quilts that are basic in design and simple to make. You might be tempted to jump ahead to more flashy designs, but please take the time to make one of these basic quilts so that you can start at the beginning and develop your skills as you go. With precise cutting, sewing, and ironing, you will have a wonderful experience on your first try. We offer you two options: Harriet’s Woodland Winter and Carrie’s Cowboy Corral. Both feature Fence Post blocks and fun prints used in different ways.
note
In these and subsequent quilt projects, we will explain how to figure out the number of strips you need to cut and sew. This will gently lead you into learning how to figure yardage, which will be taught in detail in Class 170. Right now, the basic information you need is the answers to the following questions:
How many blocks are needed for the quilt?
How many inches does each block require from each strip set?
How many strip sets does it take to accommodate that many blocks?
We have always figured on fabric being 42″ wide, once the selvages have been removed. Other books set the standard at 40″. We suggest that you measure the width of your fabrics before cutting, and rework our figures to fit your needs. If your fabrics all give you 42″ or more of length per strip, you might not need to sew that extra strip set. However, if your fabrics are running short, you will be glad that you don’t have to go back and cut strips for one more set. It is well worth your time to do the math first!
Woodland Winter is a small children’s quilt that uses a single set of strips and a fun print border. The strips are of a predetermined width, and the plain squares are cut the size of the finished Fence Post blocks.
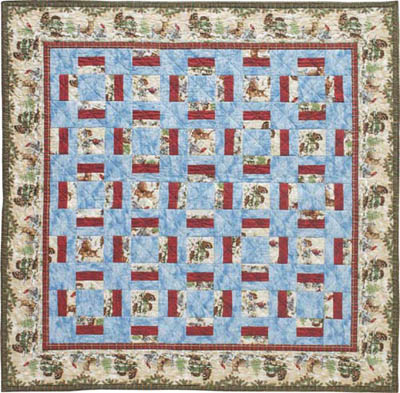
Woodland Winter
Quilt top size: 33″ × 33″ (without border)
Grid size of strip: 1″ (1½″ cut)
Block size: 3″ × 3″
Blocks:
60 pieced Fence Post blocks
49 blue squares
12 white print squares
Layout: 11 rows of 11 blocks each
Yardages for quilt top:
¾ yard blue fabric
⅜ yard red fabric
⅓ yard white print fabric
1¼ yards border stripe if fabric has 4 repeats across the width, dependent on the width of the stripe (Read Class 180 before purchasing a border stripe.)
Study the photo of the quilt and identify the different units needed for this project. You will see that only one set of strips is needed to make the Fence Post blocks. The strip set is made up of blue, red, and white fabrics. The pattern is developed by turning the pieced blocks differently in each row. Each pieced block is next to a plain block.
Before you begin, be sure to straighten your yardage as described in Class 120, Lesson Three.

Units needed for quilt

The strip set needed
1. Determine how many strips you must cut. There are 60 blocks. If the fabric is cut on the crosswise grain, you have 42″ of usable fabric (see Note, page 32). The grid is 1″, meaning you will cut the strips 1½″ wide. These strips will be sewn into strip sets, which will be cut into 3½″ × 3½″ units. Divide the strip length (fabric width—42″) by the strip set width (3½″) to get 12 units from 1 set of strips. We need 60 blocks, so divide 60 by 12 to get your answer—5 strip sets.
note
Measure the width of your fabric. If you have 40 usable inches, you will get 11 blocks 3½″ × 3½″ per strip set. To make 60 blocks, you need six strip sets, but you may use little of the sixth one. This is why it is important to know how wide your fabric is—you may need to make an extra set if your fabric is unusually narrow.
2. Cut 5 strips 1½″ wide from each of the 3 fabrics you’ve chosen for the Fence Post blocks of your quilt. Lay each color in stacks, and lay the stacks beside your machine in the order they will be sewn: blue-red-white (see Chain piecing, page 30). Working from left to right with the strip stacks, stitch all the blue and red strips right sides together, placing a red strip on top of a blue strip.
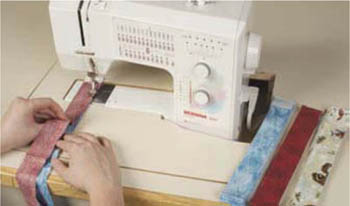
Layout of stacks and strip orientation
3. Press the seams to one side, starching as you go. Remember to measure the width of each strip to make sure each strip is now exactly 1¼″ wide. If the strips are too narrow, check your sewing and pressing, and resew if necessary. If they are a bit too wide, trim them. Next, sew the white strip to the red strip, and repeat for all 5 sets. Refer to the photo on page 33 for guidance.
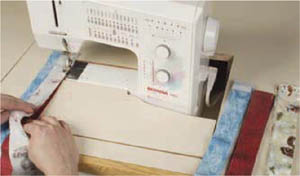
Adding last strip
4. Press and starch again, directing the seam allowance as for the first seams (Step 3).
note
Check your work once more. The strips should be straight. The outer strips should measure exactly 1¼″ wide, and the center strip exactly 1″ wide for the entire length of the strip set. If there is a problem, check your seam guide to make sure you are sewing the correct seam allowance. Also check the following:
Were the strips cut exactly 1½″ wide?
Are the seams sewn perfectly straight?
Has pressing caused stretching or pleats?
Correct any problems before going on to the next step.
5. To cut the strip sets into segments, lay a ruler on top of the strip set and align the ruler lines with the seams, not the raw edges. Trim off the end to create a straight and square edge. Refer to the photo in Cutting segments (page 28) for guidance.
6. Turn the strip 180° and lay the 3½″ ruler line on the edge you just cut. Align the ruler lines again with the seams and cut. You now have a 3½″ × 3½″ square. Continue cutting all 5 strip sets to make 60 Fence Post blocks. Refer to the photo in Cutting segments (page 29) for guidance.
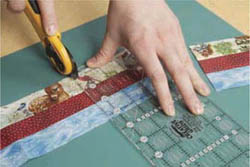
Measure from raw edge and seamlines.
1. From the blue fabric, cut 5 strips 3½″ wide. Cut those strips into 3½″ × 3½″ squares. You will need 49 blue squares.
2. From the white print fabric, cut 1 strip 3½″ wide. Cut the strip into 12 squares 3½″ × 3½″.
1. Lay out the squares and Fence Post blocks, using the illustration below as a guide. Row 1 uses only the blue squares, and the Fence Post blocks are turned 180° in every other position, with their seams running horizontally. Row 2 uses both the white print and blue squares, with the Fence Post blocks again turned 180° each time, but now the seams are vertical instead of horizontal.
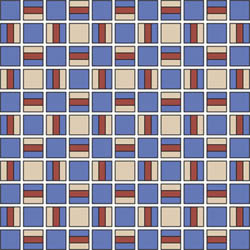
Block layout
2. With all the blocks and squares positioned, start in the top left corner and stack Block 1 on top of Block 2, on top of Block 3, and so forth, until all the Row 1 blocks (working left to right) are in 1 stack. Pin the stack together at the top of the block to remind you which way is “up.” Repeat for the remaining rows, making sure the rows are in order, with Block 1 from each row on top.
3. Place the stacks to the right of your machine, laying them out in rows, and in order.
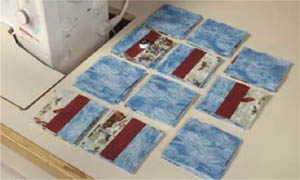
Blocks laid beside machine in sewing order
4. Remove the pins from the stacks. Using the technique you learned for chain piecing, page 29), begin sewing the rows together. Place Block 2 from Row 1 (Stack 1) on top of Block 1, right sides together, and stitch together the right edges of the blocks. Repeat with Row 2 (Stack 2), and follow through until the first 2 blocks of all 11 rows have been chain stitched together.
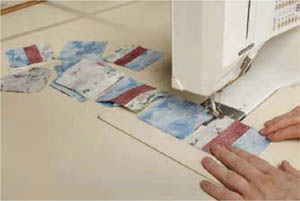
Sewing first two blocks of all rows together
5. Do not cut the threads between the blocks. Press the seam allowances toward the solid blocks.
6. Next, sew the top block of Row 1 (Block 3) to the first pair of the chain, right sides together. Similarly, sew the top block of Row 2 to the next pair of the chain. Continue until the remaining top blocks have been added to all the rows. Press the seams toward the solid blocks.
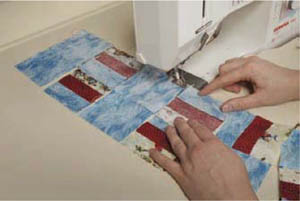
Adding third block to all rows
7. Continue adding blocks to each row until all 11 blocks have been sewn together. Press after each addition.
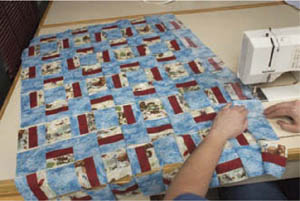
All blocks have been added to every row.
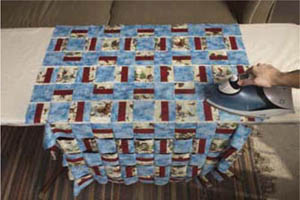
Let rows hang off edge of ironing board when pressing seam.
8. Because every other block is a solid square, and all the seam allowances are pressed toward a solid square, the seams should easily align to butt together. Lay Row 1 on top of Row 2, right sides together, and align the seams, pinning if necessary. Stitch.
9. Press the seam toward Row 1. To make it easy to press one row at a time, place only Rows 1 and 2 on top of the ironing board and let the rest of the rows hang off the edge. Starch once the seam allowance has been pressed, and continue to sew the rows together, pressing each row as you go.
border information for this quilt
The border for this quilt is a printed border stripe that has multiple small stripes in it. This border stripe finishes to be 5½″ wide.
Congratulations! You have finished your first quilt top. We hope you have a fun border print picked out to frame this little quilt. Adding borders will be taught in Class 180, so lay aside your new creation for now, and let’s move on to another project!
This quilt uses a fabric featuring small square panels printed with cowboy motifs. If you use a fun fabric with pictures that can be cut into squares, those squares will determine the size of the strips, as well as how many units you need in order to make a quilt the size you want. You will need to fussy cut the squares, as described on page 37.
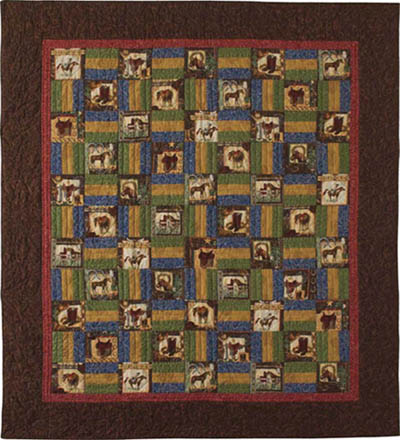
Cowboy Corral
Quilt top size: 40½″ × 49½″ (without borders)
Grid size of strip: 1½″ (2″ cut)
Block size: 4½″ × 4½″
Blocks:
50 panel squares
49 Fence Post blocks
Layout: 11 rows of 9 blocks each
Yardages for quilt top:
Panel print or large-print fabric (see below) for the squares
For the Fence Post blocks:
½ yard blue fabric
½ yard green fabric
½ yard gold fabric
¼ yard red fabric for border
⅞ yard brown fabric for border
The layout and construction for this quilt top are the same as for Woodland Winter (page 33).
First cut out the panel squares. Next, cut strips from the blue, green, and gold fabrics to make the Fence Post blocks.
Make 7 strip sets of the blue-gold-green combination. How did we get this number? The finished panel square is 4½″ × 4½″ (5″ × 5″ cut). The strips are cut 2″ wide and finish at 1½″ wide. Three strips are sewn together, so 1½″ × 3 = 4½″ + ½″ seam allowance = strip set width. Each strip set is 42″ long and 5″ wide with seam allowances. The quilt calls for 49 Fence Post blocks. Each strip set yields 8 units. 49 ÷ 8 = 6.125, which is rounded up to 7 strip sets needed. 7 strips × 2″ cut = 14″ fabric needed. This would be ½ yard of each, including a 4″ margin for error.
Once you have the Fence Post blocks assembled, follow the steps for Woodland Winter to complete the quilt top.
border information for this quilt
The small inner border for this quilt is cut from the red fabric and finishes to be 1¼″ wide. The outer border is brown and is 5¾″ wide, finished.
Have fun!
FUSSY CUTTING FROM PANEL PRINTS
Quilt patterns such as Cowboy Corral give you a great opportunity to use fabrics that have large prints or fun motifs. To target and cut out a certain element or motif, you will do what quilters call fussy cutting. This requires more fabric than you would need if you were just cutting strips for pieced blocks, as for Woodland Winter. If you’re not sure at the time you buy the fabric how big your quilt is going to be or what quilt pattern you are going to make, buy at least twice the amount you would normally need.
If you’re buying fabric to make a specific quilt, count how many motifs you can cut from a yard, and figure how many you need. In Cowboy Corral, the motifs are used in every solid square, so you need 50 motif panels. But you could create a secondary design with the motif fabric and use a second fabric for the alternating solid squares, thus reducing the yardage you would need. Be sure to allow for the space needed for a seam allowance around the picture. This often cuts into a neighboring picture, reducing the number of usable motifs you can get from the yardage.
There are several rulers and tools on the market that can help you cut the panels. A ruler made by Creative Grid lets you lay the ruler over the area you want to cut, mark the corners of the square as registration marks, and then use a smaller ruler to align those marks and cut out the square. Many ruler companies offer square rulers in different sizes. Smaller sizes such as 2″, 2½″, 3″, 3½″, 4″, or 4½″ square will help you cut out those squares easily and accurately.
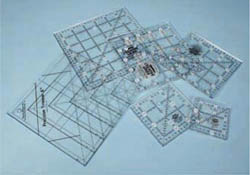
Rulers to help with fussy cutting
First iron and starch the fabric well. Don’t worry about straightening the fabric; large printed designs are rarely perfectly on-grain. Starching the fabric well will help counteract problems with fabric that is a little off-grain.
Lay out the fabric on your cutting surface in a single layer. Place a square ruler over the design you wish to capture, and, if you are using a ruler that is exactly the size of the square, cut carefully around all 4 sides of the ruler. If you are using a larger ruler, cut the side and the top of the square, then turn the ruler and align the edges you just cut with the lines on the ruler that correspond to the size of the square you are cutting. Now cut the other 2 sides of the square.
Make sure that you are cutting a measurement that is divisible by 3. Because you will sew together 3 strips for the Fence Post blocks, which have to equal the size of the panel, you want quilter-friendly numbers. Cutting ⅛″ increments can be tricky for a beginner, so if you can work with ¼″ increments it makes the cutting easier.
 3½″ cut panel square = 1½″ cut strips for Fence Post block (1″ grid, 3″ finished panel square)
 4¼″ cut panel square = 1¾″ cut strips (1¼″ grid, 3¾″ finished panel square)
 5″ cut panel square = 2″ cut strips (1½″ grid, 4½″ finished panel square)
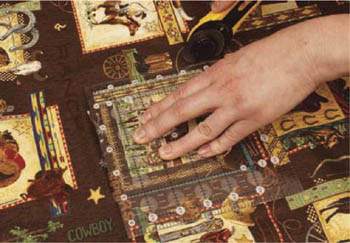
Cutting with larger ruler