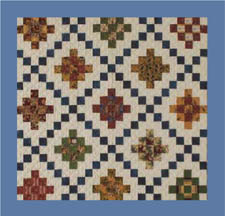

One of the most useful things that you can learn right from the beginning is how to calculate yardage for your projects. When you figure your own yardage, you have the assurance that you have enough fabric to complete the project without having too much left over. Often patterns load up the yardage, and you buy more than you need. At today’s prices, this can really cut into your fabric budget. You will also find that as you figure the yardage, you can make your own “recipe” for the cutting and construction of the blocks. This will help you work more efficiently and confidently.
As you work through this class, you will learn to figure the yardage needed for the blocks, borders, and backing of your projects.
note
Important: Always figure yardage using cut sizes!
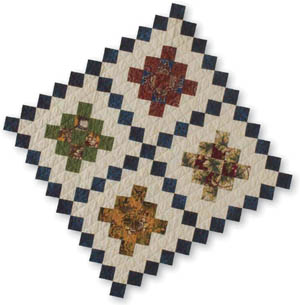
The fabric produced for quilting today is generally 44″–45″ wide. Once you take off the selvages and allow for possible shrinkage if you choose to prewash, consider the usable width of the fabric to be 40″–42″ wide.
note
If you prewash your fabric, we suggest that you check the width after drying. If your fabric is less than 42 usable inches, use your measurement instead of 42″ when working through the exercises throughout this book.
As you study your quilt design, determine whether you’ll be cutting strips for the project, and if so, whether you will cut them across the width (crosswise) or along the selvage edge (lengthwise) of the fabric. If the strips are cut cross-wise, the strip measurement will be 42″. If you choose to cut the strips lengthwise, the measurement can vary with the length of fabric available, so the strip length measurement will need to be determined.
Many quilters work with the fat quarters of fabric found in quilt stores. A fat quarter is a piece of fabric 18″ long by 22″ wide; it is a half-yard cut in half lengthwise. If you are working with fat quarters, the strip length would be either 18″ (crosswise grain) or 22″ (lengthwise grain).
For the following examples we will be working with 42″ strips.
Once you begin to think in terms of strips, squares, rectangles, and other shapes, figuring yardage is greatly simplified. In a quilt made only with strips, everything is being cut from strips. Once you know how long the strips will be, think of how many units you can obtain from each strip, and thus how many strips are needed to produce the required number of units for the quilt. When a quilt contains blocks with several different shapes, you need to identify every different shape, size, and color planned for the quilt, and how they can be cut from strips to simplify figuring yardage.
tip
quilt terminology
Terminology can sometimes be confusing, so following are brief definitions of the terms used when figuring yardage.
Like units: Pieces that are the same color, shape, size, and position in the block
Running inches: The length of each unit that is cut from a strip or set of strips
Strip sets: The combination of strips sewn together to accommodate the pattern of each row
Like blocks: All blocks that are the same in shape, size, color, and construction
Grid size: The finished size of each unit
Cut size: The size each unit is cut before sewing
There are a few givens when figuring yardage. When figuring the sequence of the strips to be sewn together, we read across the top of the block. This also tells us the cut width of each strip. Running inches of each unit are read down the side of the block. This tells us how long each segment is cut from the strip set. For the following examples, the running length of each strip will be figured on 42″.
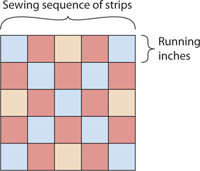
Reading the block for measurements
tip
the formula
Step 1: Count the total number of like units in a block.
Step 2: Multiply that number by their cut length. (Do this for each different color, shape, and unit’s position in that block.)
Step 3: Multiply this number by the total number of like blocks.
Step 4: Divide this number by 42″. This will give you the number of 42″-long strips of that color needed for the unit of that block. (Round this number up if it is a fraction.) This number is the number of strips you need to cut.
Step 5: Multiply this number by the cut width of the strip to get the yardage you need. This measurement is found by reading across the top of the block or row.
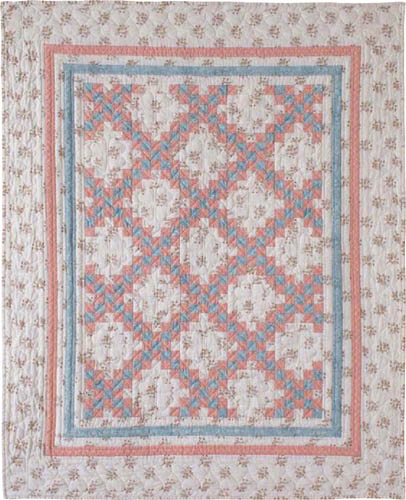
Double Irish Chain baby quilt
You will be making this baby quilt in this class, so it’s a good example to use in learning to figure yardage. This quilt has 2 different blocks: 18 of Block A and 17 of Block B. To figure the yardage, let’s look at how the formula works. Remember to always use cut sizes when figuring yardage.
The blocks in this quilt will be a 1″ grid, making the cut size of each square 1½″. This is a five-patch block, so the blocks will finish out to 5″. Let’s start with Block A to work through the formula.
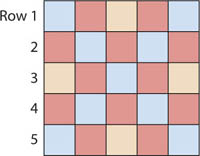
Block A
Step 1: Count the total number of like units.
In this block, there are 3 different units. Each color square in the block—pink, blue, and white—is a different unit. There are:
9 blue units
12 pink units
4 white units
Step 2: Multiply that number by their cut length.
Do this for each different color, shape, and unit’s position in that block. For the example, when you read the side of the block, you know that the squares are finished to 1″, so the cut size is 1.5″.
9 blue units × 1.5″ = 13.5″
12 pink units × 1.5″ = 18″
4 white units × 1.5″ = 6″
Step 3: Multiply this number by the total number of like blocks.
Refer to the photo of the quilt and count the number of blocks that look like Block A. There are 18. You need 13.5″ of pink from a strip for 1 block. You need to make 18 of Block A.
Blue: 13.5″ for 1 block × 18 = 243″
Pink: 18″ for 1 block × 18 = 324″
White: 6″ for 1 block × 18 = 108″
Step 4: Divide this number by 42″.
This will give you the number of strips needed of that color, for the unit of that block. If you are using a different strip length, use that measurement instead of 42″. (Round this number up if it’s a fraction.)
Blue: 243″ ÷ 42″ = 5.79, rounded up to 6 strips
Pink: 324″ ÷ 42″ = 7.71, rounded up to 8 strips
White: 108″ ÷ 42″ = 2.57, rounded up to 3 strips
Step 5: Multiply this number by the cut width of the strip.
This measurement is determined by reading across the top of the block or row. In this case, because all the units are square, you know that the width is the same as the length: 1.5″.
Blue: 6 strips × 1.5″ = 9″ needed
Pink: 8 strips × 1.5″ = 12″ needed
White: 3 strips × 1.5″ = 4.5″ needed
The above answers tell you how much fabric you need to buy to accommodate Block A throughout the quilt. Do not convert it into yardage cuts yet, as we will have more to add to it as we work through the second block.
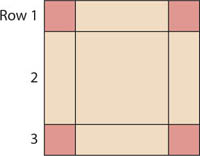
Block B
Using the Formula again, let’s determine the needed fabric for Block B.
Step 1: Count the total number of like units.
There are 4 different like units in this block. Unlike Block A, in which all the units are the same shape and size, Block B has combined grids on the top and bottom of the block as well as along the sides of the block, and it has a center square, totaling 4 different units. The long pieces on the top and bottom are not the same as the sides. The top and bottom units are wide and short, and the side units are long and narrow. This is one of the most confusing aspects of identifying shapes and position, but it must be considered if the yardage is to be accurate.
Pink: 4 units
White: 2 top and bottom units
2 side units
1 center square
Step 2: Multiply that number by their cut length.
Do this for each different color, shape, and unit’s position in that block.
Pink: 4 units × 1.5″ = 6″
White: 2 units × 1.5″ = 3″
White: 2 units × 3.5″ = 7″
White: 1 unit × 3.5″ = 3.5″
Step 3: Multiply this number by the total number of like blocks.
Refer to the photo of the quilt and count the number of blocks that look like Block B. You need 17 of Block B.
Pink: 6″ × 17 blocks = 102″
White: 3″ × 17 = 51″
White: 7″ × 17 = 119″
White: 3.5″ × 17 = 59.5″
Step 4: Divide this number by 42″.
Pink: 102″ ÷ 42″ = 2.43, rounded up to 3 strips
White: 51″ ÷ 42″ = 1.21, rounded up to 2 strips
White: 119″ ÷ 42″ = 2.83, rounded up to 3 strips
White: 59.5″ ÷ 42″ = 1.42, rounded up to 2 strips
tip
If you come up with numbers like 2.02, quickly do the math: 0.02 × 42″ = 0.84″. If your fabric is actually a bit wider than 42″, numbers ranging from 0.01 to 0.05 are so small that one more unit could possibly be accommodated by the extra length, allowing for two strips instead of three. Check the size of the unit needed against the width of the fabric.
Step 5: Multiply this number by the cut width of the strip.
Pink: 3 strips × 1.5″ = 4.5″ needed
White: 2 strips × 3.5″ = 7″ needed
White: 3 strips × 1.5″ = 4.5″ needed
White: 2 strips × 3.5″ = 7″ needed
You now know how much fabric you will need to make all 35 blocks.
Blue: 9″ = ¼ yard (6 strips 1.5″ wide)
Pink: 12″ + 4.5″ = 16.5″ = ½ yard (11 strips 1.5″ wide)
White: 4.5″ + 7″ + 4.5″ + 7″ = 23″ = ⅔ yard (6 strips 1.5″ wide; 4 strips 3.5″ wide)
|
Yardage to decimals & inches |
||
|
Fractions |
Decimals |
Inches |
|
⅛ |
0.125 |
4½ |
|
¼ |
0.25 |
9 |
|
⅓ |
0.333 |
12 |
|
⅜ |
0.375 |
13½ |
|
½ |
0.5 |
18 |
|
⅝ |
0.625 |
22½ |
|
⅔ |
0.666 |
24 |
|
¾ |
0.75 |
27 |
|
⅞ |
0.875 |
32½ |
|
1 |
1 |
36 |
note
As discussed in Class 120 (page 13), you must consider whether fabric is torn or cut from the bolt when you figure yardage. If the fabric has been cut, you might need to add up to ¼ yard to your final figures (beyond the ⅛ yard you added for safety when figuring strips needed), so that the ends can be torn and the fabric can be straightened before cutting.
note
This method of figuring yardage is a continuous formula on a calculator and works quickly and simply for small grids and blocks with many units. As the blocks become larger in later books, we will add methods that are appropriate at the time.
Following are your first combined grid quilts. As explained in Reading the Blocks (page 81) and in Class 150, where you learned about drafting, a combined grid is a design in which 1 or more parts of the design are a solid piece that is 2 or more times the size of the grid.
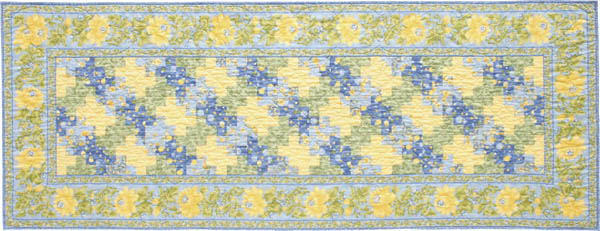
Inlaid Tile table runner
Quilt top size: 15″ × 60″ (without borders)
Grid size of smallest unit: 1¼″
Block size: 5″ × 5″
Blocks: 36
Layout: 3 rows of 12 blocks each
Yardage requirements:
⅜ yard yellow fabric
⅜ yard green fabric
⅜ yard light blue fabric
⅜ yard dark blue fabric
2 yards border strip (Note: This is if the border strip runs parallel to the selvage and there are at least 3 repeats across the width of the fabric.)
For this quilt, you have only 1 type of block to construct. That 1 block is made from 4 different strip sets.
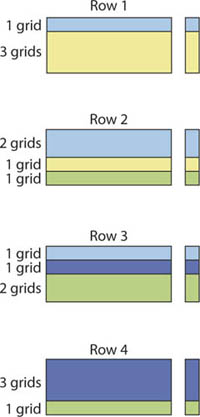
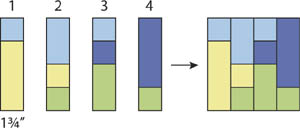
Inlaid Tile strip sets
To make enough strip sets for 36 blocks, you need 36 segments 1¾″ wide. So, 36 × 1.75″ = 63″ ÷ 42″ = 1.5, or 2 strips of each. Before you precut all the strips to make the strip sets, let’s focus for a moment on constructing combined grids. In order to have the parts of the block that are a combined grid come out to be the exact size, you will need to cut and construct the strips that are the size of the grid (the smallest) and then measure those for size. Then you will cut the next widest strip to that size and sew it, and so on, if you have multiple combined grids as this Inlaid Tile quilt does. Sound a little confusing? It really isn’t, and it will make more sense as you do it, so off we go!
note
In quilting, we all have to have our little sayings and catchphrases. Mary Ellen Hopkins coined “personal private measurements,” Marti Michelle uses “mathematically correct measurements,” and we have come up with YUMs—“Your Unique Measurements.” You will only encounter YUMs when you are making combined grid quilts, where parts of the quilt must be measured so that another part of the quilt will fit the measured part exactly to create a perfectly square block. We do this with combined grids so that you are not stretching or easing things in to “make them fit.” So, remember your YUMs when you are working through the last quilts in this book. We’ll remind you where you need to measure for them.
Rows 2 and 3 have the most seams, so they must be made first, just as we did with the Country Lanes and Interlacing Circles quilts (pages 60 and 75). This way you can be sure that the mathematical measurements agree with your measurements after you sew the seams. If they are off, you can adjust the width the strips are cut if necessary to correct for any discrepancy when piecing the strip sets for Rows 1 and 4, which have fewer seams.
1. Cut the narrow strips for Rows 2 and 3 first. You need 2 strips 1¾″ wide of each color—yellow, green, light blue, and dark blue. Lay out the strips so that they match the diagrams on page 84, and sew the 2 narrow strips of each strip set together.
2. Press the seam toward the green fabric for Row 2, and toward the light blue fabric for Row 3. At the cutting table, measure from the seamline to ensure that the strips are now 1½″ wide, and trim if necessary.
3. Now you need 2 strips each of light blue and green, cut 3″ wide. This is the first place where combined grids come into play. The measurement of the wide strip should be exactly the same as the measurement of the 2 narrow strips sewn together. If you were not accurate with your cutting or sewing, you can compensate for size discrepancy by working from your unique measurements (YUMs). Sew the light blue fabric to the Row 2 strip sets, and the green fabric to the Row 3 strip sets. For Row 2, press this seam toward the light blue, and for Row 3, press toward the green. Again, measure from the seam allowance for strip width accuracy. This new wide strip should measure 2¾″; trim to this width if needed.
4. Turn the strip sets wrong side up. On all 4 of the strip sets, measure from the raw edge of the wide strip (light blue in Row 2, green in Row 3) to the raw edge of the first narrow strip to which the wide strip is sewn (yellow in Row 2, dark blue in Row 3).
5. If you come up with 4¼″, go ahead and cut the strips for Rows 1 and 4. If your measurement is different (either smaller or larger), you will need to cut the 3-grid-wide strips in Rows 1 and 4 to the width of the measurement you came up with. For example, if your measurement comes up at 4⅛″, then you will cut your wide strips of yellow and dark blue to 4⅛″ wide instead of 4¼″. This is “your unique measurement,” or YUM.
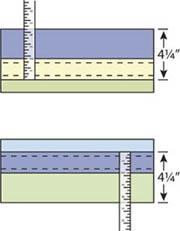
Measuring back side of strips to determine measurement for next strip
6. Now you’re ready to sew the strip sets for Rows 1 and 4. We already figured that you need 2 strips of each fabric in each row to make 36 blocks. That means you need 2 strips 1¾″ wide each of light blue and of green, and 2 strips 4¼″ wide (or YUM) of yellow and of dark blue.
7. There is only 1 seam to sew for each row. Sew the strips together, and press the seam allowance toward the yellow for Row 1, and toward the dark blue for Row 4. Take these strip sets to your cutting mat and measure from the seam allowance to make sure that the strips are the correct size. If not, trim.
1. From each of the strip sets, cut 36 segments 1¾″ wide. Place the stacks of segments to the right side of your sewing machine in the order shown on page 85: Row 1 on the left, then Row 2 to the right, Row 3 to the right of that, and Row 4 at the right end.
2. Sew Rows 2 and 3 together first, making sure that all the seams butt up perfectly. Before you press, fan the butted seams in the center of the block to help eliminate the bulkiness of all the seams coming together and to alleviate any distortion in the wide strips from the seam allowances being pressed onto them.
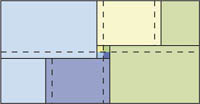
Fanning seam between Rows 2 and 3
3. Press the seam allowances in each direction, and starch lightly. Take these partial blocks to your cutting table, and measure from the seam allowance. Each of the row segments should measure 1½″. Trim off any excess.
4. Add Row 1 onto the Row 2 side of the block. Press the seam allowances open to reduce bulk, and starch and trim the Row 1 segment as before. Finally, add on the Row 4 segments, press the seam open, starch, and trim.
Layout time! This quilt can be a little bit of a brain bender until you have the first few blocks of Rows 1 and 2 established. We highly recommend that you build this quilt in sets of 4 blocks, making a square at a time so that you start to see the pattern develop. Once you see the pattern, it becomes much easier to flip the blocks the correct direction to keep the pattern going.
Use the quilt layout to the right as a guide. This layout is for a square quilt, 6 blocks wide by 6 blocks long. If you want to make a table runner like Carrie’s, then refer to the photo at the beginning of this section. The table runner is 3 blocks wide by 12 blocks long. You are by no means restricted to just these 2 layouts. Play around with your blocks and see what happens if you make a wider, shorter table runner that is 4 blocks wide by 9 blocks long. Have fun with this one!
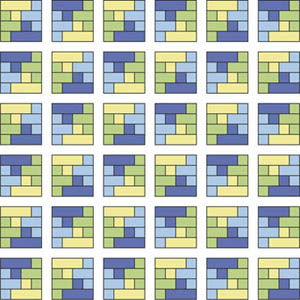
Square Inlaid Tile quilt layout
1. Once you have the quilt laid out the way you want it, repeat again what you learned in Class 130. Gather all the blocks in each row into stacks, and take the complete quilt to the machine. For the 6 × 6 quilt you will have 6 stacks of 6 blocks each beside your machine. If you are making the table runner, you will have 3 stacks of 12 blocks each. Or you will have stacks numbering whatever number of rows you have created, with the number of blocks in those piles equal to the number of blocks you have running across the width of the quilt. Start sewing.
2. Press all the seams of Row 1 to the right, all Row 2 seams to the left, all Row 3 seams to the right again, and so on, so that all the seams will butt when you join the rows together.
3. Once the blocks have been joined into rows and the rows have been joined, you are ready to add borders. Set the quilt top aside until you get to Class 180.
border information for this quilt
For the border of this quilt, Carrie chose a printed stripe that ran parallel to the selvage of the fabric. The corners are mitered so that the flowers trail around the corners of the quilt instead of dead-ending. Instructions for creating perfect mitered corners can be found in Class 180 (page 98). This border stripe finishes at 6½″ wide.
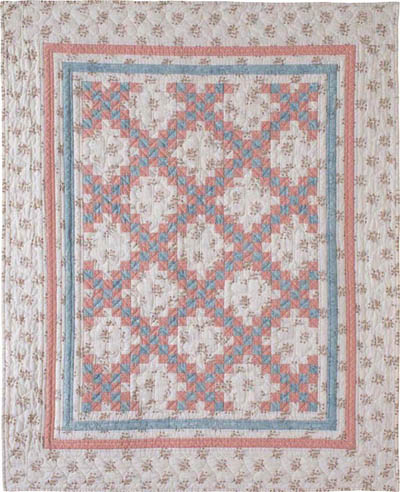
Double Irish Chain baby quilt
Quilt top size: 25¾″ × 35¾″ (without borders)
Grid size of smallest unit: 1″
Block size: 5″ × 5″
Blocks:
18 Block A
17 Block B
Layout: 7 rows of 5 blocks each
Yardage requirements:
⅓ yard blue fabric
½ yard pink fabric
¾ yard white fabric
The Double Irish Chain is a classic quilt pattern with timeless appeal. In the exercise for this class, you figured the yardage for this quilt (page 82), so we are going to dive right into constructing the blocks.
For Rows 1 and 5, you need 3 strips of blue and of pink, and 1½ strips of white, all cut 1½″ wide.
For Rows 2 and 4, you need 3 strips of blue, 4½ strips of pink, and 3 strips of white, all cut 1½″ wide.
For Row 3, you need 1½ strips of blue, 3 strips of pink, and 3 strips of white, again all cut 1½″ wide.
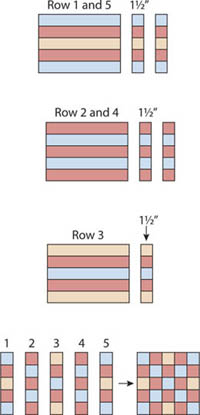
Strip sets for Block A
1. Cut the strips, lay them out in the order of the rows, and start sewing them together. For Rows 1 and 5, and Rows 2 and 4, you will have 1½ strip sets of each to sew together, and only 1 set for Row 3. Press all the seams for all the strip sets toward the pink. After you press, remember to trim the strips to the correct width. Each strip with 1 seam taken up will measure 1¼″ from the seam allowance.
2. Cut the strip sets into 1½″ segments. You need 36 of Rows 1, 2, 4, and 5 and only 18 of Row 3. Make stacks for each row from the strip sets.
3. To assemble Block A, transfer the stacks to the right side of your sewing machine. Start with Row 1 and Row 2 (2 on top of 1), butting the seams carefully. Chain sew the units.
4. Fan just the seam allowance for the white square (it should fold back on itself). Press the rest of the seam allowances on either side toward Row 2. Starch and trim.

Fanned seam for Block A, Rows 1 and 2
5. Add Row 3, and again fan just the seam of the middle block (the blue square) so that it folds back on itself and the rest of the seam folds onto Row 2 again. Press, starch, and trim.

Fanned seam for Block A, Rows 1, 2, and 3
6. Add Row 4. Fan the middle pink block seam toward Row 3, and the rest of the row back onto itself. Press, starch, and trim.
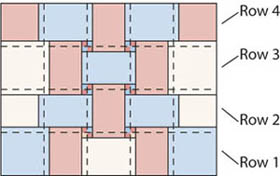
Fanned seam for Block A, Rows 1, 2, 3, and 4
7. Finally, sew on Row 5, and fan the middle white square back onto itself as for Row 1, pressing the rest of the seams on either side toward Row 4. Press, starch, and trim.
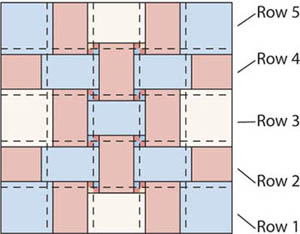
Fanned seam for Block A
8. Turn the block over and measure from raw edge to raw edge, from the pink square in Row 1 to the raw edge of the other pink square. (You will have to hold open the seam allowance to do this.) Did you come up with 3½″? If so, your seam allowance is great, and your fabric is working with you.
Do you remember what to do if it does not come out to 3½″? Remember YUM (page 85)? If your measurement is smaller or larger than 3½″, you must make adjustments to the width you cut the middle strips for the 2 strip sets for Block B. For example, if you came up with 3⅝″, this is YUM. Instead of trying to stretch out Block B to “make it fit,” you are going to compensate in your cutting. The wide white strip for Rows 1 and 3 will be cut at YUM (3⅝″) instead of 3½″. The same goes for the wide white strip for Row 2.
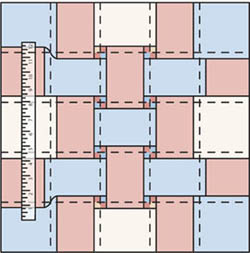
Measuring for YUM for Block B
Again, if your measurement came out right at 3½″ (or 1 or 2 threads under or over), you are ready to make Block B.
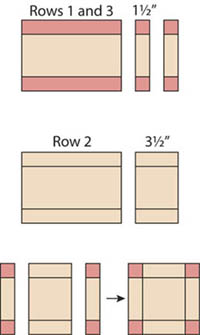
Strip sets for Block B
For Rows 1 and 3, you will need to cut 3 strips of pink 1½″ wide, and 1½ strips of white 3½″ wide (or YUM). For Row 2, you will need 3 strips of white cut 1½″ wide, and 1½ strips of white cut 3½″ wide (or YUM). You will need 1½ strip sets of each.
1. Sew the strip sets together as you did for Block A. For the Row 1 and 3 strip set, press the seams toward the pink. For Row 2, press the seams in toward the large square. Press, starch, and (if necessary) trim the strips.
2. Once the strip sets have been assembled, cut the Row 1 and 3 strip set into 34 segments 1½″ wide. Cut the Row 2 strip set into 17 segments 3½″ wide.
3. Make stacks of the rows and sew these together—Row 2 to Row 1. Press the seam toward Row 1, starch, and trim.
4. Sew Row 3 to Row 2, press toward Row 3, starch, and trim. That’s it for block construction!
Lay out your quilt as shown below.
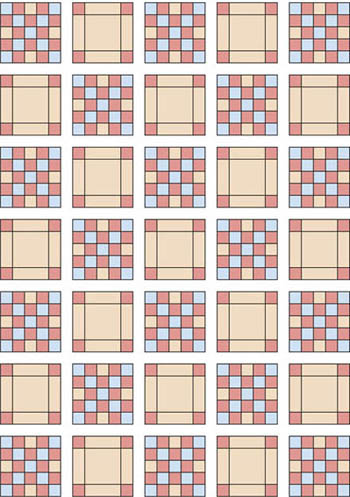
Double Irish Chain baby quilt layout
Because of the way you pressed the seams, no matter which way Block A is turned, its seams will butt up perfectly with Block B.
1. Once your quilt has been laid out, pick up the rows of blocks as you have done with other projects. You will have 7 stacks of 5 blocks each.
2. Set the stacks beside your machine, and sew Block 2 for all rows to Block 1, and so on. In each row, press the seams toward Block B, so that everything will butt up when you sew the rows together.
And that’s it. You have yet another pretty little quilt made!
border information for this quilt
The first four small borders on this quilt all finish to 1″ wide, and the outer border finishes at 5″ wide. Refer to Class 180 for details.
This quilt introduces the idea of using a variety of fabrics. This gives it a more “scrappy” look than the other quilts in this book. It has two different blocks. Each of the A blocks is made up of two different fabrics plus the background. The B block consistently uses two colors—the chain color and the background. Feel free to make all the A blocks the same fabric combination if that is more to your taste.
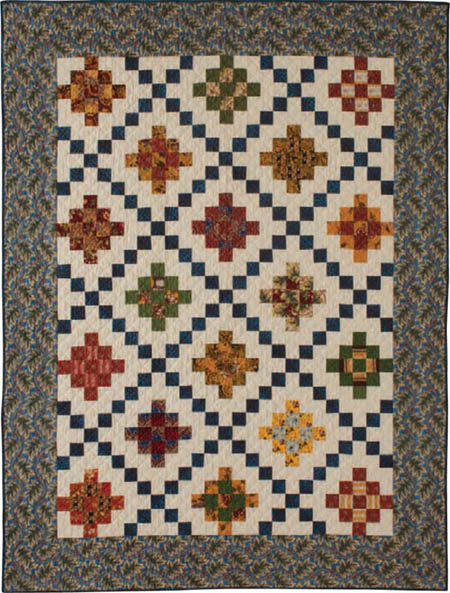
Irish Chain Variation
Quilt top size: 37½″ × 52½″ (without borders)
Grid size: 1½″
Block size: 7½″ × 7½″
Blocks:
18 Block A
17 Block B
Layout: 5 rows of 7 blocks each
Yardage for quilt top:
1 strip 2″ wide of up to 36 different fabrics
½ yard blue fabric (chain fabric)
2 yards background fabric
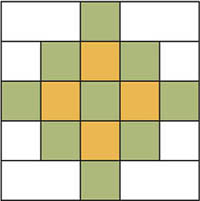
Block A
There are 2 different approaches to piecing Block A. If you are using only a limited number of colors and repeating them several times, it would be easiest to make the nine-patch that is in the center of each block, then build around it. You could make short strip sets and get several of the same color combination quickly. Because this quilt is so scrappy, it is more efficient to cut the pieces to size and piece them together in rows.
As in Double Irish Chain, there are 3 different rows, 2 of them repeated twice.

Rows 1 and 5

Rows 2 and 4

Row 3
You will be making 18 blocks, using different dark and light combinations for each. The background remains the same for all blocks.
Rows 1 & 5
For each block cut:
2 pieces 3½″ × 4½″ of the background fabric
1 piece 2″ × 4½″ of the dark print fabric
Stitch the first 2 strips together using the illustration below for color placement. Press the seam allowances toward the dark square, and measure the width to ensure the accuracy of the strips. Add the third strip, and repeat pressing and measuring. Cut 2 segments, each 2″ wide, from this strip set.
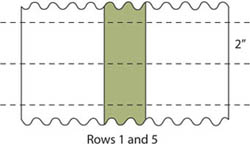
Cutting segments
Rows 2 & 4
For each block cut:
1 piece 2″ × 8½″ of the background fabric
1 piece 2″ × 8½″ of the dark print fabric
1 square 2″ × 2″ of the medium print fabric
Stitch the two 8½″ strips together. Press toward the dark strip. Cut 4 segments 2″ wide from the strip set. Join 2 of the segments by adding the 2″ square of medium print between them, the dark print next to the medium print, and the background at the ends. Press again toward the dark. Repeat for Row 4.
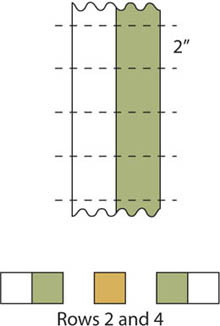
Join two strips, cut, and add single unit
Row 3
For each block cut:
1 piece 2″ × 4½″ of the dark print fabric
1 piece 2″ × 4½″ of the medium print fabric
Stitch these 2 strips together. Press the seam toward the dark print. Cut into 2 segments 2″ wide. Lay these segments end to end, and join. Add a 2″ square of dark print at one end of the segments.
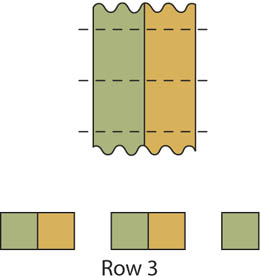
Joining segments and square
Now you are ready to sew the 5 rows together. Lay them in order and sew 2 rows at time, pressing after each seam. When pressing Rows 1 and 2, as well as Rows 4 and 5, press the seam allowances toward Row 1 and Row 5. This will allow the 2 blocks to have seams that will butt together when you start to join the blocks into rows. Because this block is a checkerboard, and all the seams were pressed toward the fabric used most—the dark print—all the seams are ready to butt exactly.
Continue to make A blocks until you have 18.
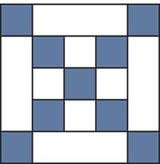
Block B
Because there are only 2 fabrics used in all the B blocks, construction can be a bit different. You will see a nine-patch in the center of the block. You can make these units first from a long strip set, and then make strip sets to accommodate the top and bottom rows as well as the side units.
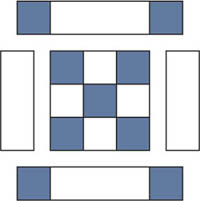
Breakout of rows
To make the 17 nine-patch units, you will need to cut:
Rows 1 & 3
2 strips 2″ × 42″ wide of chain fabric
1 strip 2″ × 42″ wide of background fabric
Sew 2 strip sets from the above strips. The background strip is between the chain fabric strips. Press the seams toward the chain fabric.
Cut 34 segments 2″ wide from this strip set.

Rows 1 and 3
1 strip 2″ × 42″ wide of chain fabric
2 strips 2″ × 42″ wide of background fabric
Sew 2 strip sets from the above strips. The chain fabric is between the background strips. Press the seams toward the chain fabric.
Cut 17 segments 2″ wide from this strip set.

Row 2
Lay out the rows and construct the nine-patch units. You can fan the seams if you wish.
Next, you will add the strips of background to the sides of the nine-patch units.
Cut 34 pieces of background fabric 2″ × 5″. Stitch onto opposite sides of each nine-patch unit. Press the seams toward the background strips. Using a narrow ruler, check that the block is perfectly square so far, measuring from the seams.
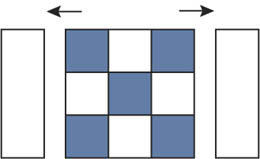
Add side strips.
The last part of this block is the Row 1 and 5 section. This will be another strip set.
Cut 2 strips 2″ × 42″ wide of chain fabric.
Cut 1 strip 5″ × 42″ wide of background fabric.
note
Remember to measure from raw edge to raw edge of the nine-patch to make sure that the measurement is 5″. If it is not, cut the background to the exact same measurement as the nine-patch. We are determining YUMs again!
Sew the strips together, placing the background between the 2 chain fabric strips. Sew the first 2 strips, press toward the background fabric, and measure for width accuracy. Add the opposite chain fabric strip, press, and measure.
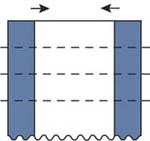
Rows 1 and 5
Cut 34 segments 2″ wide from this strip set.
Stitch these sections to opposite sides of the nine-patch unit.
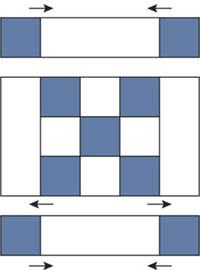
Add Rows 1 and 5 onto nine-patch unit.
On your design wall or a large open area on the floor, begin laying out the blocks as illustrated. Because the A blocks are scrappy, you might find that you don’t care for some color combinations to sit next to one another. Moving the blocks around to create a pleasing appearance can be fun. Once the blocks are where you want them, pick up the rows in stacks, and proceed with constructing the rows and finally the quilt top.
We hope you have had fun working with a scrappy quilt for a change. There will be more to come in future books in this series.
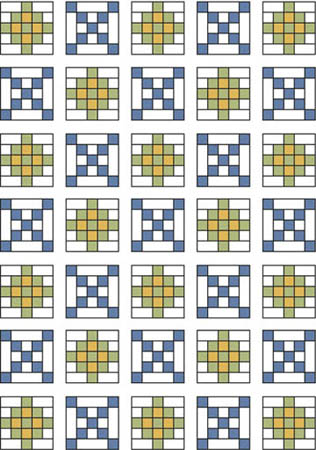
Layout for quilt top
border information for this quilt
This quilt has a single wide border that finishes at 6″ wide.