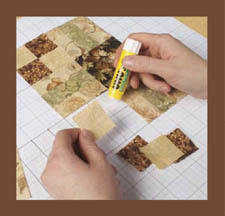

Learning to draft and design your own quilts will enable you not only to make original pieces that are yours alone, but also to look at any block or quilt and be able to break it down into its basic elements, calculate the measurements to make any size quilt, and be on your way. In this chapter, we aim to get you intrigued by the elements that make a pattern happen and to get you excited about planning and mocking up your own original quilts.
Today, computer-aided drafting programs such as Electric Quilt, as well as a plethora of books and patterns, make it easy to avoid drafting. As a beginner, you can start with everything done for you except the sewing. The problem with this method of learning is that you jump into a project and do what you are told without having a true understanding of what makes it all work and fit together. If you encounter a problem, there is no answer for it in the pattern, and you are lost because you lack basic knowledge of drafting and design.
For example, Harriet is inspired by antique quilts. When she wants to make a replica, there is seldom, if ever, a pattern available. The quilt lives in a museum, out of sight, or it is pictured in a book. If she is lucky, the size of the quilt is listed in the caption. If she weren’t able to assign a size to the block and build on that, she would never be able to reproduce and own a quilt that makes a room in her house shine!
Carrie is inspired by fabric. When she sees a new fabric she likes, she goes on a hunt for a pattern that feels right. However, she seldom makes the quilt exactly like the pattern. Carrie has always loved to color, and her favorite part of planning a quilt is drawing it on graph paper and coloring in the fabric colors.
To introduce you to the world of drafting and designing a quilt, we will start with the basic concepts of drafting, and in each book after this, we will add the details that are needed for the quilts addressed in that book. By the end of the series, you will be able to draft anything you want, learning the skills a bit at a time.
note
For now, we highly recommend that you steer clear of computer-aided design (CAD) tools. Please don’t get us wrong—there are great programs available. But as a beginner, you will end up spending more time learning the ins and outs of the program than you will creating the quilt. Therefore, throughout this series of books you will be working on graph paper with colored pencils and mock-ups—a more hands-on approach.
The key to pattern drafting lies in understanding basic patchwork structure. Most patchwork blocks are the result of dividing a square into an equal grid vertically and horizontally. Think of it as a checkerboard. Patchwork designs are created when squares, rectangles, and other shapes are superimposed over this base grid. Understanding base grids will help you see how a design fits together and in what order the pieces are to be sewn.
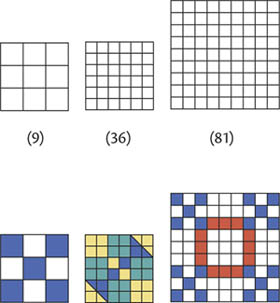
A grid is the number of squares a block pattern is divided into. Most patchwork fits into one of the four basic grid categories: four-patch, five-patch, seven-patch, and nine-patch. The terms four-, five-, seven-, and nine-patch indicate that the block is divided into exactly that number of total divisions, or multiples of that number. These terms have been in use for generations; you will find them repeated in every book that provides patterns according to grid category.
You will need to learn to look at a block design or pattern, and visually divide it into equal grids or units. The easiest way to do this is to create and then read the number of equal divisions across the top or down the side of the block.
If you count two, four, or eight equal divisions along the edge of the block, the block is a four-patch.
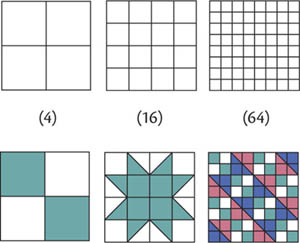
Four-patch blocks
If you count five or ten equal divisions, the block is a five-patch.
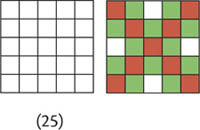
Five-patch blocks
If you count seven or fourteen equal divisions, the block is a seven-patch.
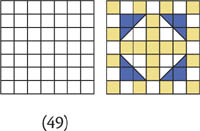
Seven-patch blocks
If you count three, six, or nine equal divisions, the block is in the nine-patch category.
Nine-patch blocks
The lines of the base grid may not be visible in the design of the finished block. Some shapes used in a quilt block may fill more than one grid division. The Puss-in-the-Corner block is a good example.

Puss-in-the-Corner block
Grid size = finished size of unit
Cut size = grid size + ½″ (the seam allowances)
Always remember that drafting does not include any seam allowances.
Changing the grid size to change the block size is the basis of drafting. Let’s walk through the basic steps of working with base grids.
Identify the base grid of the block as described. Once you understand that this grid exists, you next need to understand what to do with this information. Refer to illustrations at left.
Determine the block size. Let’s use a simple nine-patch block for our example.

Determining block size for nine-patch block
Assign a measurement to the base unit and multiply it by the number of units across the block. In the illustration above, there are 3 equal divisions across the block. If each division were equal to 1″, then the finished block would be 3″ (3 divisions × 1″ = 3″). If each division were 2″, then the finished block would be 6″ (3 divisions × 2″ = 6″).
Pick a size that you want the finished block to be. If you select 6″ as the finished block size, divide 6″ by the number of equal divisions (in this case, 3) to determine that each individual unit is equal to 2″ (6″ ÷ 3 = 2″).
Sometimes, when you start with the block size, you pick a measurement that doesn’t result in a “quilter friendly” number. For example, if you selected 8″ for the finished nine-patch, each individual unit would be equal to 2⅔″ (8″ ÷ 3 = 2⅔″). This measurement isn’t easy to work with. If you don’t like the answer, choose a new size and try again.
If the entire quilt is the same block, you can make the blocks almost any size you want. It’s when you’re making a quilt with 2 or more different block patterns that you may be confronted with the dilemma of how to work with numbers like 2⅔″. For now, let’s stick with simple “happy” numbers.
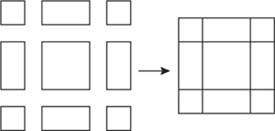
Determine how many pattern pieces you need. To make a simple nine-patch block, you need only 1 size square. To make the Puss-in-the-Corner block, you need 2 squares of different sizes, plus a rectangle.
Puss-in-the Corner block
Determine the size of the pattern pieces. For our nine-patch block, the 6″ finished block requires a 2″ finished square. The 3″ finished block would require a 1″ finished square. (Note: We always talk in terms of finished sizes at this point.)
The Puss-in-the-Corner block is measured differently. The block is a four-patch. If we are making a 6″ finished block, we need to divide the grid by 4 instead of 3 (6″ ÷ 4 = 1½″).
Each grid will finish to 1½″ instead of the 2″ in a nine-patch grid. In the first row, there are 2 squares, 1 in each corner. There are 4 corners, so you will need 4 squares 1½″ × 1½″.
The 2 center grids are actually the same fabric, which can be cut as a single unit instead of cutting 2 separate small units and sewing them together. We use the term combined grids for this situation (2 grids × 1½″ = 3″). If you look down the side of the block, you see that the rectangle is 1 grid wide by 2 grids long. This shape is 1½″ × 3″. There are 4 of these units in this block.
The center square is 2 grids wide and 2 grids long, making it a 3″ × 3″ square.
Now you know the finished sizes of the different block units used in these two blocks.
Okay, you have survived the tedium of learning about grids. Here comes the fun part—you get to “go back to kindergarten” and color!
Many people think that drafting is the four-letter word of quilting. It doesn’t have to be! Drafting can be as creative a process as picking the fabrics and piecing the quilt top. Here, we will begin simply and walk you though the basics of putting your layout design on paper and playing with the grid size of your quilts to see how this will affect the final product.
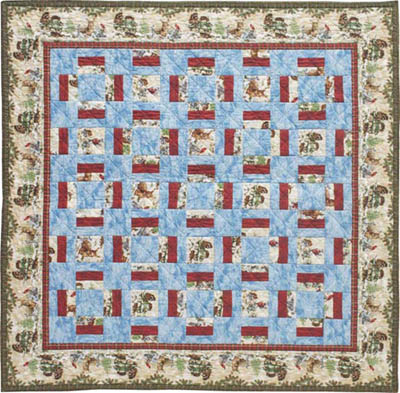
To begin, you are going to draft the layouts of Harriet’s Woodland Winter or Carrie’s Cowboy Corral from Class 130. At this point, don’t worry about using graph paper with a grid that matches the grid of the quilt. Take a deep breath, and relax…we promise this will be fun!
Woodland Winter
Cowboy Corral
 EXERCISE: DRAWING A SIMPLE QUILT
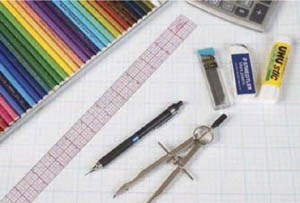
Materials:
Graph paper (4 squares to the inch)
Basic calculator
Small see-through ruler (such as C-Thru brand, available at office or art supply stores)
Basic mechanical lead pencil
Eraser
Set of colored pencils with at least 64 colors
Drafting supplies
1. With a pencil, draw squares that are 3 graph-paper squares wide by 3 squares tall, all attached to one another. You are creating the seams of the quilt.
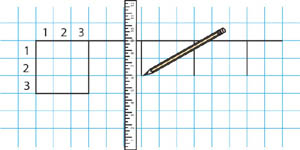
Starting to draw blocks
2. Do you see where we are getting the 3 × 3? These quilts are based on the Fence Post block and are made wholly of square blocks. The Fence Post block has 3 rails and is square, so that tells us that no matter what the finished size of the quilt, the blocks are all divisible by 3, making all the squares in the quilt 3 × 3 graph-paper grids. While we are drawing blocks, let’s make our drawn quilt match the size of Harriet’s quilt, so you will need 11 blocks across and 11 blocks down.
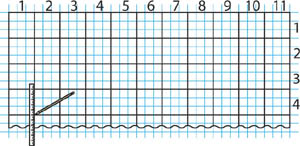
Drafting a full quilt
3. Looking at the picture of the quilt, begin to draw in the Fence Post blocks’ seamlines. In this case, the pieced block is the only complicated block. You will notice in this quilt that the Fence Post blocks alternate their position. Half the time the rails run horizontally; the other half, they run vertically. While you are drawing in these seamlines, make sure you keep the pattern going the right way.
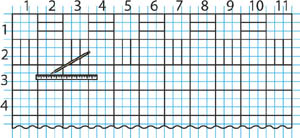
Creating the blocks
4. Now comes the fun part—you get to color! Think of it as preparation for going to the quilt shop and “petting” all those wonderful bolts of fabric! Pick your favorite colors or a color combination you like, or use 1 of the 2 color combinations from Harriet’s or Carrie’s quilts. Color all the Fence Post blocks, first mimicking the color layout of 1 of the 2 quilts.
5. Next, color the solid alternate blocks. In Harriet’s quilt, there are 2 different colors of alternate blocks that create a secondary pattern. In Carrie’s quilt, they are all the same color. Compare the drawings below to see how the different placement of color in the blocks can change the feeling and look of the quilt.
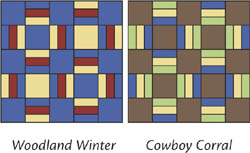
Color layouts for Harriet’s quilt (left) and Carrie’s quilt (right)
6. Try doing a few drawings placing different colors of the solid alternate square in different configurations. What happens when you color the Fence Post block differently? Do you like the quilt better?
Remember that when you choose fabric, you are not committed to the color you have used on your drawing. Say you have chosen three colors of blue for your rail blocks and two purples for your solid square blocks. Perhaps you decide that the Fence Post blocks look too “blah” with only three shades of the same color. Instead of redrawing and recoloring the whole quilt, wait until you get to the quilt shop and find a fabric that “speaks” to you. Imagine where that fabric will fit with your drawing. Note in the drawing which color you are substituting this fabric for, and build from there.
Let the fabric you fall in love with determine what your quilt will ultimately look like.
 EXERCISE: DRAWING A MORE COMPLEX QUILT
Now that you have drawn an easy quilt, let’s draw out another, slightly more challenging quilt. Carrie’s Interlacing Circles is a quilt you will be making in Class 160 page 75).
1. Look closely at this quilt. You will notice that it is the same 3 × 3 grid as Rail Fence. To begin, draw 7 grid blocks, 3 × 3, across the paper and 7 grid blocks down, using 3 squares of the graph paper for each.
2. Next, draw the most complicated block: the Nine-Patch. There should be a total of 16 Nine-Patch blocks in your drawing—every other block in every other row.
3. Draw in the seamlines for the rail blocks.
4. Now you’re ready to color. This quilt’s color placement can be confusing. To achieve the interlacing circle effect, you have 2 different sets of rails…see them in the photo? If not, refer to the drawing below to see how this color placement creates the design.
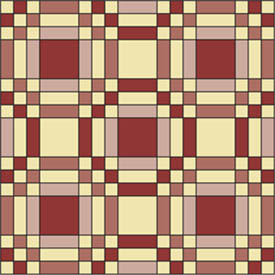
Interlacing Circles drawings with color placement exaggerated
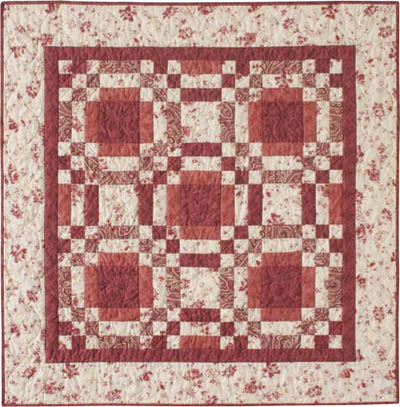
Carrie’s Interlacing Circles
 EXERCISE: DRAWING A COMBINED GRID QUILT
The third quilt we will walk through together to draw is Harriet’s Irish Chain Variation quilt from Class 170, Lesson Four page 90). It’s an example of a combined grid quilt, meaning that sections of each block have areas that are two, three, or four times the width or length (or both) of the grid of the quilt. Because the blocks in combined grid quilts are not as easy to discern as those in simpler quilts, it is important that you learn early on to break apart these less obvious block designs.
1. Count how many grid units there are across the quilt (start counting at the widest part of the colorful blocks). Did you get 25? If not, did you count the white areas as 1 or 2 grids?
2. Look at how many “blocks” there are across the quilt. Did you count 5 (3 “scrappy” blocks and 2 blue-and-white blocks)? If so, you have 25 grids divided between 5 blocks, making each block 5 grids wide. Since the blocks are square, you know they are a five-patch grid.
3. Let’s draw the first row. Draw 5 blocks with 5 squares in each across the graph paper.
4. Draw in the seamlines. In the “scrappy” blocks (Block A), the first row of the block has a white rectangle, a colored square, and another white rectangle. Draw that in. Don’t divide the large solid areas with seams, no matter the division of the block, until you have the whole block diagrammed. When you go back and start thinking about how to piece the block(s), you can make the decision as to whether and where those areas need seams.
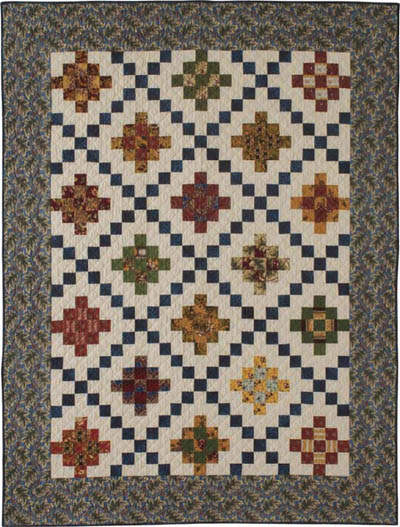
Irish Chain Variation

Block A: Irish Chain Variation
5. In the blue-and-white blocks (Block B) the first row has a blue square, a white rectangle, and then another blue square. Note that both the left and right sides of the block also have large white rectangles running down the sides. Again, don’t draw in the seamlines in those rectangles.
6. Continue drawing out Row 1, and finish by drawing out the whole quilt…easy enough, right?
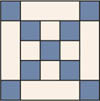
Block B: Irish Chain Variation
The elements in this quilt are what make it a combined grid, in which sections of each block have areas that are two, three, or four times the width or length (or both) of the grid of the quilt. “Combining” the grids of these areas into one results in less sewing and a more pleasing look to the finished piece. You will learn more about combined grids in Class 170 (page 86).
 EXERCISE: CHANGING GRID SIZES
Continue to practice by drafting out the various quilts in this book to get an idea of how to correctly identify the blocks in the quilts and the color placement. Once you get the hang of it, you can start to play with the block orientation. Following are two examples of Carrie’s Country Lanes table runner (page 60). You can see that simply changing the placement of the four-patches changes the secondary pattern in the table runner.
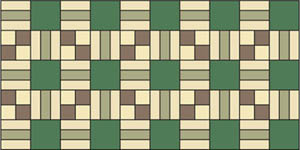
Country Lanes blocks laid out as table runner
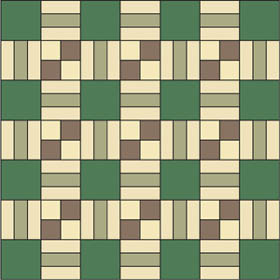
Country Lanes blocks laid out square for quilt
By now, you have the basic idea of how to get a picture of a quilt you like transferred onto graph paper. By looking at the elements of the quilt, you can assign a grid size to them to get the size quilt you want to make. The nice thing about working on 4- or 8-to-the-inch graph paper is that you can simply assign each of those squares a grid size, regardless of the grid of the graph paper.
Go back to the drawing you did of either Harriet’s or Carrie’s quilt in Exercise: Drawing a simple quilt (page 51), and let’s play around with grid sizes. We are going to start big, so let’s assign each square of the graph paper a size of 2″. This should be easy for you to work out.
If each graph paper square equals 2″, and each block is 3 squares by 3 squares, then 2″ × 3 = 6″ (this is the finished size of the blocks for your quilt). Now look on a ruler. Does 2″ seem a little chunky to you? Well, let’s try 1½″. Do the same math: 1½″ × 3 = 4½″. Does that seem a little nicer? How about a little smaller yet—let’s try 1¼″. That’s 1¼″ × 3 = 3¾″. Play with the math to your heart’s content.
For Cowboy Corral, Carrie did not pick the size of her blocks first. The pictures in the fabric she chose for the solid squares dictated the size those blocks needed to be, and then she sized the Fence Post blocks to fit. In that fabric, the motif squares measured 3½″ × 3½″. She calculated 3½″ ÷ 3 = 1.16″, but that was not a quilter-friendly number. By using a square ruler, you can size up the square to be divisible by three. With Cowboy Corral, the solid blocks were cut 5″ so that the finished size would be 4½″. This is a special case. If you look at Interlacing Circles, you will notice that again there are large solid squares, but this time you are able to determine the size you want your Nine-Patch and Fence Post blocks to be and then simply cut the fabric you are using for the solid squares to the size you need.
All right! You have the basics of drafting! Not too hard, was it? In Class 170, you will start the process of figuring yardage, so keep your drawings and set them aside to use as worksheets when you get there.
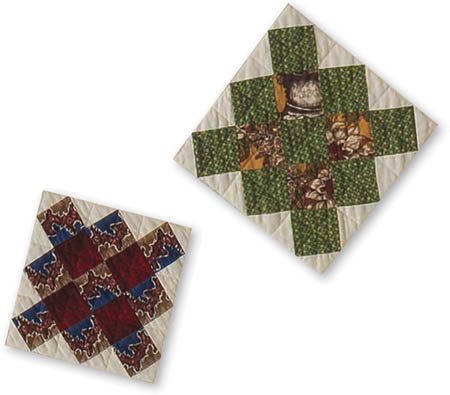
Now it’s time to go one step further in the quilt planning process. Once you have chosen the fabrics you think you want to work with, you might want to buy ⅛ yard of each to experiment with before buying large quantities. There are different ways to experiment. Some quilters are okay with just cutting fabric and charging right into a project, making the whole quilt a bit of an experiment, while others like the security of seeing the quilt first by making mock-up blocks.
If you buy ⅛-yard pieces of fabric, remember that fabric can sell out fast, so make your mock-up as soon as possible. If you are purchasing the fabric anyway, buy an extra ⅛ yard to play with. If you are working out of your stash of fabric and are afraid you may run short, you can make a color photocopy of the fabric and use that, without actually cutting into the fabric. Either way, it is a small investment to make in order to be sure that your quilt turns out just the way you envisioned it!
 EXERCISE: MAKING A MOCK-UP
Materials:
Large pad of 18″ × 24″ graph paper (4-to-the-inch)
⅛ yard of each fabric in the block(s)
To make a mock-up block or blocks of a quilt to scale, work with 4-to-the-inch graph paper. This is where a large pad of graph paper will come in extremely handy. We will be using Carrie’s Country Lanes table runner (below) for this first project.
1. Determine the grid of the quilt, which is 1″. Because the Fence Post blocks are the smallest scale, start by drawing these blocks. On the graph paper, draw at least 2, if not 3, squares 3″ × 3″.
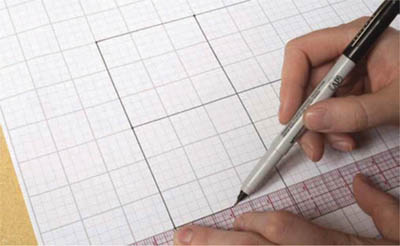
Drawing block to scale
2. Draw in the seams, just as we did in the previous exercise, starting with the most “complicated” block.

Country Lanes table runner
3. Cut strips or photocopies of fabric the size of the squares or rectangles that are now marked on the graph paper, and glue them in place according to the color layout you think you want to work with.
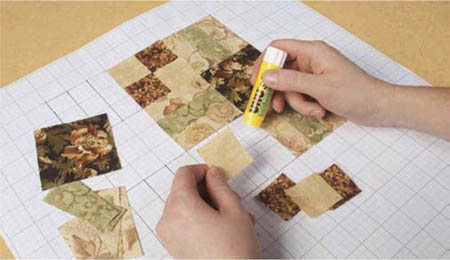
Gluing fabric to mock-up block
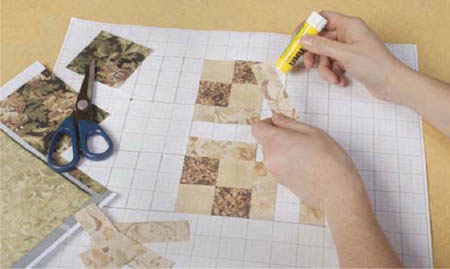
Gluing photocopied fabric to mock-up block
tip
If you just don’t have much fabric or access to a color photocopier, make the blocks to scale but in a reduced grid. For example, if your quilt is a 1″ grid, mock it up in a ½″ or even a ¼″ grid, as Harriet did when she was working on her Town Square quilt for this book.
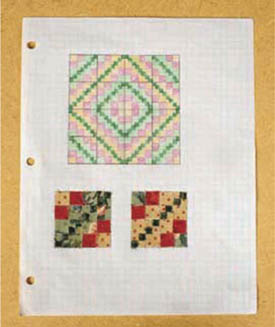
Harriet’s Town Square mock-up
Whichever method you use, take some time with these first quilts, and do the drafting and block mock-ups. It’s a fun and easy way to build your confidence in drafting and color selection for all your quilts.
Many quilts will never see a bed. They hang on the wall, cover the dining room table, or keep the baby warm in the car seat. Many others are made just because we wanted to work in certain colors, and we weren’t too concerned about the size of the finished product. But what happens when you want to make a quilt for a particular bed or need the quilt to finish a particular size? How do you plan it?
About now, we realize that you may be thinking that it would be easier just to buy a pattern or book and be done with it! All the work and decisions have already been made! However, when you rely on patterns, you’re not developing the skills that will enable you to take a picture or conceive an idea and work it through to make it a reality.
Our goal is to teach you to look at a quilt and assign a desired size to it, figure out what size block is needed to accommodate that size, and go forward. We want you to be confident enough in design that you don’t feel the only way to make a quilt larger is to add more borders, regardless of their proportions and suitability.
In order to have a structure to work with, you first need to determine what size the finished quilt will be.
 Is the quilt for a bed? What size is the bed?
 How far do you want the quilt to hang over the edges—to the mattress, a few inches over the dust ruffle, or to the floor?
 Do you need a pillow tuck, or will shams be on top of the quilt?
 Is the quilt for a wall? If so, what dimensions are needed to fill the space adequately?
Once you know what size the quilt needs to be, choose any pattern in the book and find the block or blocks that make up the layout. The quilts in this book are all simple straight set layouts, meaning that the blocks sit side by side and are parallel to the outside edges of the quilt. This makes the quilt easy to size.
Divide the width of the quilt by the width of the quilt block to determine the number of blocks in a horizontal row. Now divide the quilt length by the length of the quilt block to determine the number of blocks in a vertical row.
You will find that these rarely come out even. This is when you need to decide whether to (a) enlarge the overall quilt size in order to use the quilt block in the chosen size, (b) add borders so that the chosen quilt block can be used, or (c) resize the quilt block itself.
Let’s walk through an example. The Triple Rail Fence quilt in Class 140 is a simple straight set. The quilt is small, with a fairly small grid. What if you wanted to make this into a sofa throw about 58″ square? If the blocks are 3¾″ × 3¾″ as in the project, you would divide 58″ by 3.75″ to get 15.46. That would be 15 or 16 blocks across and 15 or 16 rows, needing at least 225 blocks to fill the space. That’s a lot of blocks, and the grid size might look too small and busy for a larger quilt.
Let’s change the block size. If you use a 2″ grid, the blocks would be 6″ square. For a 58″ square throw, figure 58″ ÷ 6″ = 9.67. That would be 9 or 10 blocks in each of 9 or 10 rows. Let’s go with 9 blocks. That would require 81 blocks. However, you might find that the 6″ blocks look bulky, and you want something a bit smaller.
The first example was a 1¼″ grid and the second a 2″ grid. Let’s split the difference and try a 1½″ grid. That would make the blocks 4½″ square. Figure 58″ ÷ 4.5″ = 12.88, or 13 blocks in each of 13 rows. That requires 169 blocks.
This is all fairly simple when you understand grids and how every block can be changed to meet the needs of the quilt you are planning.
Any of the quilts in this book can easily be made larger or smaller by simply changing the size of the grid to accommodate the new size you want. A perfect example is the 48″ × 64″ Asian Nights quilt (page 66). It was created by simply adding more blocks to the 32″ × 32″ Town Square quilt (page 63). If you didn’t want to make more blocks with the 1″ grid used in the project, the grid size could be increased by ¼″ or ½″ to make the blocks larger. This would require less sewing, and the larger blocks would fill more space more quickly.
Design is very personal, and once you start to explore how grid size and setting affect the look of the final project, you will be able to fill any needs you have with each of your projects. If you want to make a quilt quickly, increase the grid, and therefore the block size. If you love detail, use a smaller block, and add more of them for a larger size. The choice will be all yours.
terminology to know
Grid: the finished size of the unit
Cut size: the grid size plus ½″ for seam allowances
Block A: the block with the most seams or smallest pieces in the quilt
Block B: a block with fewer seams and pieces than the A block, or a different color layout
As you progress through the rest of the quilts in this book, we will look at what units make the blocks, how to break the blocks apart to start construction, and how to determine how many strips to cut and sew for each unit. We are not going to just present a recipe for cutting and sewing. We want you to start thinking through the entire process so that you know where we got our measurements and numbers. Once you work through this next set of quilts, you will be better prepared to understand the yardage calculations taught in Class 170. You’ll also have a better understanding of all the drafting “mumbo jumbo” we talked about at the beginning of this class.
 EXERCISE: CONSTRUCTING FOUR-PATCH BLOCKS FOR THE SAMPLER QUILT
This exercise will refresh the skills you learned in the Fence Post exercise (page 27)—cutting, sewing, pressing, and butting seams, as well as chain piecing. The four-patch units we make here will be the corner blocks for the sampler quilt. The exercise will also prepare you for making the next quilt projects.
1. Cut 2 strips 2″ wide from both the light and the dark fabric. Stitch a dark and a light strip together, making sure the edges align exactly. Repeat to create a second strip set.
2. Do you remember the pressing sequence (page 26)? Using steam, first press the strips closed as they came off the machine to set the seams, then press the seams to one side. Finally, lightly spray the pieces with starch—up to 3 times—so they are flat and sharply creased.
3. Check the width of the strips by measuring off the seam, as we have done in each previous project. Refer to page 28 for a reminder. The strips should be exactly 1¾″ wide from the seam. If there is a narrow space, that will need to be cut out. If there are any wide spaces, trim the edge to achieve the exact 1¾″.
4. Now cut the strip sets into segments. Using a ruler, place a cross line on the seam (you have turned the strip to lie left to right on the mat), and square off one end. The cut end and the seam should be exactly perpendicular to each other at a true 90° angle.
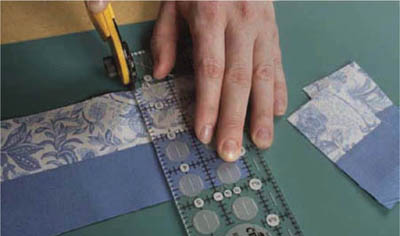
Strip cut into segments
5. Rotate the strip set and start cutting from this trimmed end. Align the 2″ line on the ruler with the cut edge, and be sure that the cross line on the ruler is exactly on top of the seam. Cut. Repeat this until you have 32 segments 2″ wide.
6. Divide the 32 segments into 2 stacks of 16, with 1 stack turned the opposite direction from the other so that you have a checkerboard effect.
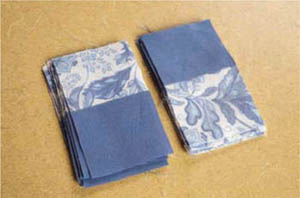
Rotate to form checkerboard.
tip
When laying out the units, have the raw edges of the seam allowances of the right-hand stack leading into the machine. As the units go through the machine, the pressure of the foot will push the top seam allowance into the bottom one, giving you a better chance to perfectly butt the seam. The pieces don’t always let you do this, but when they do, it can really help accuracy.
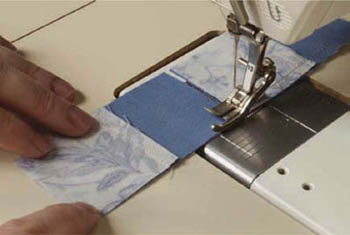
Seam allowance leading into machine
1. Lay the stacks to the right side of your machine. Pick up 1 segment from the left stack with your left hand and 1 from the right stack with your right hand, and pair them together—right (2) on top of left (1)…remember? Be sure that the seam locks (butts or nests) together over the entire length of the seam. Hold the seams together and stitch the segments together. Pick up 2 more units, place 2 on top of 1, butting or nesting seams, and stitch. There should be a ¼″ chain of thread between the 2 units now. Continue with this system until you have 16 pairs stitched together.
2. Open the units and check for perfectly butted seams. If any are not butted dead-on, take out the stitches and repeat until you are successful. Pin if necessary, as discussed in Class 130, page 31.
FANNING THE SEAMS
If the seams are pressed to one side, a lump will be created by the seams lying on top of one another. There is a really slick way to eliminate this by “fanning” the seams.
 With the four-patch wrong side up, position it so that the seam you just stitched is parallel to you (running left to right). You will notice that the top left square has no seam allowance pressed onto it; neither does the lower right square. We are going to push the horizontal seam toward these 2 squares, splitting the stitches in the center.
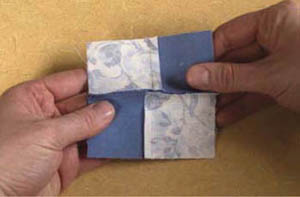
Seam parallel to your body
 Place your thumbs on either side of the center vertical seam, pushing the seam allowance up on the left side and down on the right side.
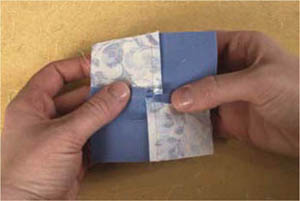
Twist to open stitches.
 Twist your thumbs slightly while you do this, and the stitches in the seam will release, allowing the seam allowances to lie in 2 different directions. You should get a tiny four-patch in the very center where all the seams meet.
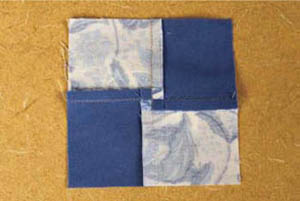
Correctly fanned seam
 To press, turn the block over to the right side and press one side in the direction the seam allowance is lying, then rotate the block and press the other seam. Do this gently, using the point of the iron. Lightly starch. The block will be flat with no lump in the center.
Any time you have checkerboard-like four-patch and nine-patch blocks, you can use this technique. Would you always use it? Not necessarily, nor can you always use it. But once you know how to do it, you can determine for yourself when the reduction of bulk is a big plus.
3. Again check the width of each side of the blocks. Measure from the seam to the raw edge of the units, and trim if necessary. Square from both seams so you know that the block is perfectly square as you trim. You can either use a straight ruler and do 1 side at a time, or use a square ruler and check 2 sides at once. Check all 4 sides of each block. The blocks should now be exactly 3½″ square, 1¾″ from each seam.
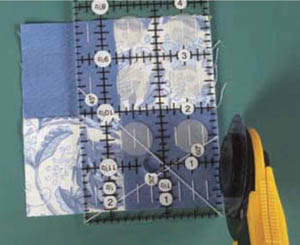
Ruler line placement to check size
4. The corner blocks of the sampler are made up of 4 four-patch units joined together. Using the photo on page 27 as a guide, lay out 1 corner (4 units) and stack up the other 3 corners on top of these. You will now construct all the corner blocks at once.
5. Pick up the left top unit and place the right top unit on top of it. Align and butt all the seams to ensure that the block stays square. Stitch the right edge. Repeat with the next units in these stacks 3 more times, until the stacks are gone. You have now joined the top units of all 4 blocks. Repeat this process for the remaining 2 stacks.
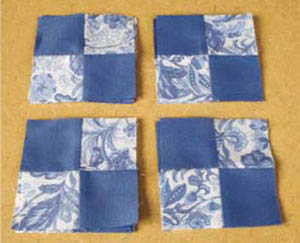
Stacking four corner blocks at once
6. At the ironing board, fan the seam intersections and press the seams of all 8 half-blocks. Starch lightly.
7. At the machine, lay out the 2 rows, each 4 units deep, and stitch the rows together. The seam intersections of this long seam will also be fanned. Press and starch this seam. You now have 4 corner blocks, each containing 16 squares, 1½″ × 1½″, creating a checkerboard.
8. Again, measure off the outside seams, and make sure that the small squares along the outside edges of the blocks are exactly 1¾″, and that each block is exactly 6½″ square. If you have achieved this, you will have no problem constructing the following quilts. If you have encountered problems with this exercise, repeat it until you find where the problems are.
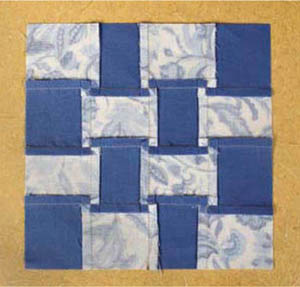
All seams fanned
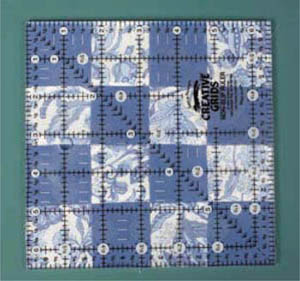
Sides are 1¾″; block is exactly 6½″ square.
Our goal is to have you learn to slow down, take a breath, and enjoy the process of piecing. This is not a race. You will save hours of time ripping and much frustration if you will take the time to learn accuracy from the very start. Once you learn to quilt, you will be amazed at how easy it is to quilt a well-pieced, well-pressed top with seams that make the back of the quilt top as neat as the front.
PIECING CHECKLIST
Make sure the strips are cut accurately from the yardage. If the strips aren’t cut accurately, nothing else will fall into place. Review Class 120, Lesson Five, page 19.
 Straight stitching is critical. If you are having problems sewing a straight seam, do you have a barrier-type seam guide on your machine? Are you looking at the guide and not the foot when sewing? Straight stitching is mandatory for accurate piecing. Experiment with different feet and seam guides before going any further, and practice until you are able to sew a straight seam. Review the information about presser feet in Class 130, Lessons One to Three, pages 20–25.
 Check your pressing. All too often, the cutting and sewing are accurate, but the pressing is poor. If the strips are wavy and look stretched, you are likely pulling on the strips as you are pressing them. This causes the fabric to stretch. Let the iron do the work. You are not pressing with an up-and-down motion; you are actually pushing against the sewn seam with the edge of the iron. Be sure not to use the point of the iron, as it will stretch the fabric. Steam will soften the fabric so that it will move easily, but be careful not to steam too much. The fabric should not be damp.
 If the units or blocks are not square, did you remember to measure and trim the strips after each step of the construction? It is common to skip this step, as it seems tedious and redundant, but if the units are not square and straight, and you sew two of them together, the problems start to snowball and the end result is blocks that are not square and straight.
PROJECT: CARRIE’S COUNTRY LANES TABLE RUNNER

Country Lanes
Quilt top size: 15″ × 66″ (without borders)
Grid size of smallest unit: 1″
Block size: 3″ × 3″
Blocks:
49 Rail Fence blocks
18 Four-Patch blocks
36 solid blocks
Layout: 5 rows of 19 blocks each (95 total), plus the 2 graduated ends of 4 blocks each (8 total), for a grand total of 103 blocks
Yardages for quilt top:
½ yard cream floral print fabric
¼ yard light green print fabric
 yard tan tonal fabric
 yard brown print fabric
⅓ yard large-scale green floral fabric
½ yard large-scale green floral fabric for border
Three different blocks make up the design: a Rail Fence block, which you perfected in Class 140; a Four-Patch block, which you just mastered; and a solid block.

Three blocks used in Country Lanes
Which block do you cut your fabric for first? Normally, you would start with the easiest block and then move on to the hardest. But in this case, we will start with the Rail Fence block—the one with the smallest grid. These blocks are constructed like the Fence Post blocks you made for the sampler quilt (page 27) and have only two fabrics instead of three fabrics, as in the quilts in Classes 130 and 140. So, how many strips do you need to cut to make the Rail Fence blocks? There are two strips of the cream floral in each block and only one strip of the light green print.
Cut:
9 strips 1½″ wide of the cream floral print fabric
5 strips 1½″ wide of the light green print fabric
Wonder how we arrived at these numbers? Well, you need 49 Rail Fence blocks for this quilt. The cream fabric appears twice in the block and the green fabric only once, so right there you know that you will need half as many strips of the green as you will the cream.
Let’s figure for the cream. There are 49 blocks, each of which has 2 cream units, so 49 × 2 = 98 units of cream needed. One strip yields 12 units. Each block is cut 3½″ square, so 98 units ÷ 12 = 8.16 strips needed, rounded up to 9 strips.
For the green fabric, figure on 49 blocks, and 1 green unit per 3½″-square block. The math would be: 49 ÷ 12 = 4.08 strips needed. Round this up to 5, but you will actually need 4 strips plus a bit more of green. Cut a cream strip in half so you have 8 full strips and 2 half strips, which will give you a total of 4½ strip sets for the Rail Fence blocks.
1. Sewing the strips together for this quilt is no different than sewing the strips for Woodland Winter (page 33). There are just fewer of them, and only 2 colors. Lay out the strips beside your machine in the following order: cream-green-cream.
2. Place a green strip on top of a cream strip and sew them together. Continue until all of the first stack of cream strips and all of the green strips are gone. Sew the half strip last. Press the seams toward the green, starch, measure, and correct as necessary. Each strip should measure 1¼″.
3. Sew the other cream strip to the green side of the strip set. Press again toward the green strip, starch, and measure for accuracy. The finished strip set should measure 3½″ wide down the entire length of each strip set.
4. To cut the blocks, align a ruler with both of the internal seams of a strip set, and cut off the selvage end of the strip, creating a straight line to measure from. Turn the strip around and measure 3½″ from this edge, using the seams and ruler lines to keep everything aligned perfectly.
5. Cut 49 Rail Fence blocks 3½″ × 3½″. Set these aside.
Cut:
2 strips 2″ wide of the tan tonal fabric
2 strips 2″ wide of the brown print fabric
To figure out how we got these numbers, follow along again. There are 18 Four-Patch blocks in this quilt, and each is made up of 2 strips—a tan fabric and a brown print fabric. There are 2 segments of the tan and brown in each block; 18 blocks × 2 segments = 36, so you will need to cut 36 segments from the strip sets. Each segment will be cut 2″ wide. Remember that the grid size is 1″, as established by the Rail Fence block, which is divided into 3, making the finished block size 3″. Four-Patch blocks are only divided by 2, so 3″ blocks ÷ 2 units = 1½″ grid plus ½″ for seam allowance = 2″.
You need 36 segments, each cut 2″ wide. Each 42″ strip yields 21 units 2″ wide. 36″ ÷ 21 units = 1.71, or 2 strips. That is how you figure out that you need 2 strips each of the tan and the brown print.
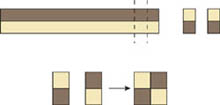
Four-Patch strip set
1. Sew both strips of brown to both strips of tan. Press the seam allowances toward the brown strips. Starch lightly. Check for strip width accuracy. The strips should be 1¾″ from the seam to the raw edge. The total strip width should measure 3½″. If it does not, check your seam allowance and pressing for any problems, and correct if necessary.
2. Cut the segments for the four-patches. Using the techniques you learned in the exercise in Lesson Six (page 56), cut 36 segments 2″ wide from the strip sets.
3. Make 2 stacks of 18 segments each, and turn 1 stack to be opposite the other to form a four-patch. Lay out the colors so that the brown square is at the top of the segments in the right stack.
4. Place 1 segment from the right-hand stack on top of 1 segment from the left-hand stack. Remember the #2 on top of #1 rule? Refer to Making the strip sets in the Triple Rail Fence project (page 42) as a reminder.
5. Place the segments under the machine and start to stitch. They are aligned properly if the brown is on top and leading in, and the raw edge of the seam allowance is heading toward the presser foot. Do not deviate from this. The brown square must be on top and under the machine first every time. Refer to the photo on page 57 as a reminder.
6. Continue chain sewing the units together until you have 18 pairs sewn together. Check that every seam is perfectly butted, and press, fanning the intersecting seams as you did on the sampler Four-Patch blocks (page 58).
7. Square up each four-patch unit. Lay the 1¾″ line of the ruler on the seam and trim all 4 sides, 1 at a time, to ensure that every four-patch is exactly 3½″ square.
8. You now have 18 Four-Patch blocks. Set these aside.
Cut:
4 strips 3½″ wide of the large-scale green floral fabric
Here is the last bit of math for this quilt, and it is easy! You need 36 solid blocks, and these blocks need to be cut 3½″ square. Each 42″ strip yields 12 units. So, 36 ÷ 12 = 3 strips of fabric needed. Cut these strips into 3½″ segments until you have 36 solid squares. You are now ready to lay out your table runner and sew it together.
1. Lay out the blocks as shown in the layout diagram.
2. Now you can again use the system of picking up all the blocks and making stacks as described in Constructing Fence Posts, page 29. You will find it easier to sew the table runner together if you have only 5 rows down and 19 rows across, and then sew all the rows together from those stacks, as we did in all the previous projects (except for the Log Cabin). You can then construct the 4 end pieces separately. As you are sewing, you will be able to double-check that the blocks are turned correctly, because the Rail Fence and Four-Patch blocks will begin to form a pattern as each row grows. You will notice right off if one is turned wrong.
3. If you want to create the diagonal ends for this table runner, you will now need to sew together the blocks for the 2 ends.
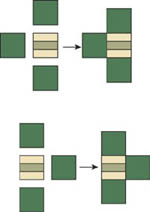
End pieces for table runner

Block layout for Country Lanes
4. Sew these end pieces to the constructed table runner. To create the diagonal cut, turn the quilt to the right side and align the ¼″ line of a ruler with the seam junction of the Rail Fence and solid blocks that make up the end of the table runner. This will give you a ¼″ seam allowance to sew the border onto when you are ready.
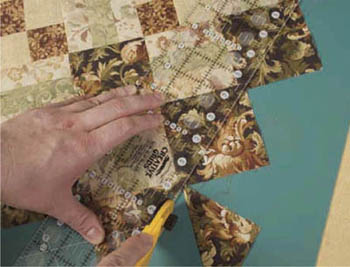
Ruler placement for trimming down table runner
border information for this quilt
There is a single border on this table runner that has been mitered in 6 places to create the triangles at both ends. The border finishes to be 3″ wide.
You’ve done it! You’ve made a great table runner to dress up any table, and it was easy to make, right? Now on to the next, more challenging quilt!
note
Borders will be discussed and yardage determined in Class 180. Please do not skip ahead. Just fold all of the quilt tops you have made so far and lay them aside until toward the end of this course.
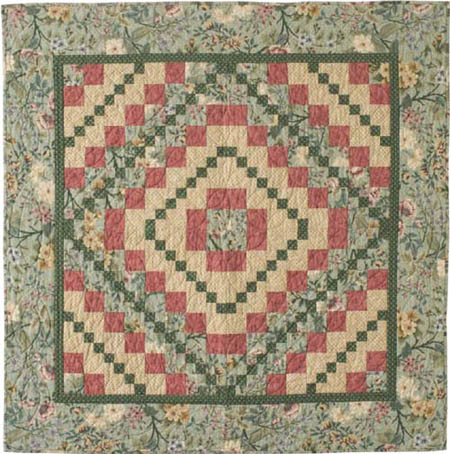
Town Square
Quilt top size: 32″ × 32″ (without borders)
Grid size of smallest unit: 1″
Block size: 8″ × 8″
Blocks:
8 Block A
8 Block B
Layout: 4 rows of 4 blocks each
Yardages for quilt top:
½ yard tan fabric
⅓ yard pink fabric
½ yard green print fabric
⅜ yard dark green fabric
¼ yard dark green fabric for inner border
⅝ yard green print fabric for outer border
In this quilt, each block contains 2 large and 2 small four-patch units. The blocks are referred to as Block A and Block B; they are different only in their fabric color placement. You can make both blocks at the same time if you are careful to keep the color placement correct. It is always a good idea to make a mock-up of these blocks, either with colored pencils or tiny snippets of fabric, so that you can easily refer to a sample that shows fabric and color placement (see Making a mock-up, page 55).
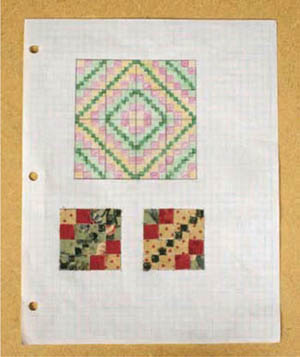
Mock-up of color placement
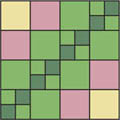
Block A
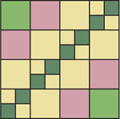
Block B
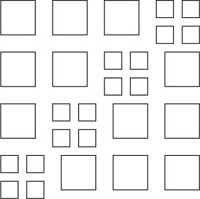
Block broken out into units
note
It is extremely important to remember this from here on out: always start by making the smallest unit in the quilt first.
For this quilt, the smallest units are the small four-patch units in both blocks. When it is separated out from the block, you will see that this four-patch is made from 2 strips, each cut 1½″ wide. We have an established 1″ grid, plus ½″ for seam allowance.

Strip set Block A

Join units.

Strip set Block B

First strips and segments to make
How many strips do we need for the small four-patch units? Let’s start with Block A. There are 8 of Block A, and 4 small four-patch units in each block. It takes 2 segments—each 1½″ long—to make each small four-patch. Let’s do a bit of math to see exactly how many strips we need to sew to accommodate the small four-patch units needed.
Four four-patch units per block = 2 segments for each unit = 8 segments. Each segment is a 1½″ cut. There are 8 blocks and 8 segments each = 64 units total. Each 42″ strip yields 28 units 1½″ wide. 64 ÷ 28 = 2.28 strips needed, rounded up to 3 strips.
Block B strips and yardage are figured in exactly the same way.
Cut:
6 strips 1½″ wide of dark green fabric (4 for Block A, 4 for Block B)
3 strips 1½″ wide of green print fabric for Block A
3 strips 1½″ wide of tan fabric for Block B
1. Sew together 4 strips of dark green fabric and 4 strips of light green fabric. Press the seam allowances toward the dark green strips. Starch lightly. Check for strip width accuracy. The strips should be 1¼″ from the seam to the raw edge. The total strip width should measure 2½″. Correct any problems. If you are making both blocks at the same time, sew 4 strips of dark green to 4 strips of tan in the same way.
2. Using the ruler lines to align perfectly with the seam, trim off the right end of a strip set, removing the selvage and squaring the strip set. Cut segments as in Step 2 for Making the Four-Patch blocks, page 57. Cut 64 segments 1½″ wide from each color combination.
3. Make 2 stacks of 32 segments each, and turn 1 stack to be opposite the other to form a four-patch. Lay out the colors so that the dark green square is at the top of the segment on the right stack.
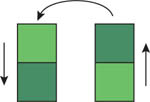
Dark green on top right, #2 on top of #1
4. Place 1 segment from the right-hand pile on top of 1 segment from the left-hand pile as in Making the Four-Patch blocks, page 57. Place the segments under the presser foot, and start to stitch. They are aligned properly if the dark green is on top and leading in, and the raw edge of the seam allowance is heading toward the presser foot. Do not deviate from this. The dark green square must be on top and under the machine first every time.

Chain stitching with same color square always leading into machine
5. Repeat for the Block B color combination. Check that every seam is perfectly butted, and fan the intersecting seams as you press, as you did for the sampler Four-Patch blocks, page 58.
6. Square up all the four-patch units. Lay the 1¼″ line of the ruler on the seam, and trim all 4 sides, 1 at a time, to ensure that every four-patch is exactly 2½″ square. You now have 32 small four-patch units each for Blocks A and B.
Refer back to the block illustrations (page 63), and you will see that the four-patches are attached to a square of the same fabric that is opposite the dark green in each four-patch combination. Instead of cutting and sewing squares onto squares, we can attach the four-patches to a strip. This will allow you to square off from the seam and keep the 2 pieces in perfect alignment. You need 32 squares from strips of 2 colors for both Block A and B—each 2½″ wide. So, 42″ (strip length) ÷ 2.5″ (unit length) = 16.8, and 32 (units needed) ÷ 16 (units per strip) = 2 strips.
Cut:
2 strips 2½″ wide of the green print fabric
2 strips 2½″ wide of the tan fabric
1. Starting with the light green strip lying face up, position a Block A four-patch on top, right sides together. Always have the dark green square of the four-patch at the top right corner. Stitch the right side onto the strip. Leave about ¼″ of strip, and position another four-patch unit, making sure that the dark green square is in the top right position.
2. Continue with all 32 four-patches and both strips. If you run short of the wide strips, cut enough to finish. This might happen because of too much space between the four-patch units.
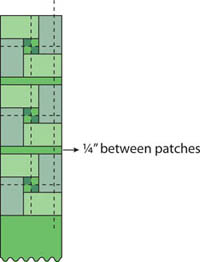
Four-patches being sewn onto a strip
3. Using scissors, cut between the ¼″ space that separates the units. Press the seam toward this large piece and starch lightly. Using a ruler, align with the seams and the cut edge of the four-patch, and cut the wide strip unit to exactly 2½″ wide. You will have 32 units 4½″ × 2½″.
4. Repeat Steps 1 through 3 for Block B, using 2 strips 2½″ wide of tan fabric.
5. Using the units you have made, make 2 stacks of 16 units, 1 turned opposite the other. Stitch these together; then fan the intersecting seam, and press the seams flat.

Units stitched and trimmed
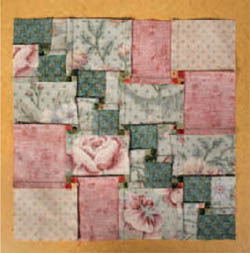
Pressing is neat and tidy on back.
6. Repeat for Block B. You now have half of the quilt top finished.
7. For the second half of the block, only 2½″ strips are needed. The pink is used in each strip set.
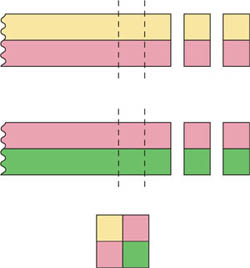
Color order for strip sets
8. You will need to make 32 of these units. There are 2 in each block, and 16 blocks total. They are the same for each block, just positioned differently. For each color combination and strip set, you will need 32 units, each 2½″ long. So, 42″ ÷ 2.5″ = 16.8, and 42″ strip length ÷ 16 = 2 strips. You will need to make 2 strip sets of each combination.
Cut:
2 strips 2½″ wide of the tan fabric
2 strips 2½″ wide of the green print fabric
4 strips 2½″ wide of the pink fabric
9. Sew 2 tan and 2 pink strips together. Press toward the tan.
10. Sew 2 green print and 2 pink strips together. Press toward the green print. Check that each strip is exactly 2¼″ wide from the seam.
11. Cut each color-combination strip set into 32 segments 2½″ long. Lay out the segments in 2 stacks of 32, with the pink corners opposite each other. Stitch them together, fan the seams, and press. Square up with a ruler to make every side of each square exactly 2½″. You are now ready to lay out the units to make the blocks.
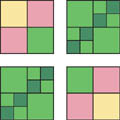
Block A layout
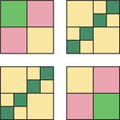
Block B layout
12. Stitch the first block of Row 1 to the second block. When aligning, make sure all seams, both vertical and horizontal throughout the units, butt properly. By aligning all the seams, you are ensuring that the block stays square. Continue until all 8 Block A units in Row 1 have been joined.
13. Repeat with Row 2. Fan seam allowances. Stitch Row 1 to Row 2, matching and butting every seam.
14. Repeat this process for Block B. Check against Block A for direction to press seams. You will plan the direction the seams will be pressed for Block B once the blocks are laid out in the pattern of the quilt.
Once all the A and B blocks are constructed, lay out the blocks on a table, the floor, or a bed, and work out the pattern of the chains. If you don’t like the original color placement, it can be reversed at this point. Play with placement until you are totally satisfied. Examine all the seams to be sure the blocks are positioned so that all interior seams lie in opposite directions and are ready to butt together. By planning this way, you can determine which direction the final seam should be pressed.
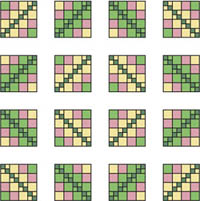
Quilt layout
To stitch the blocks together, we are going to work in another four-patch configuration. Divide the quilt top into quarters. There will be 4 blocks in each corner. You will be stitching the first 2 blocks, then the second 2 blocks, and then joining them together into a big four-patch. By doing this instead of sewing long rows together, you have more control over seam allowances and the direction in which the final ones need to be pressed.
Once you have joined the 4 blocks of each corner, sew the top 2 units together, then the bottom 2 units. Next, join the 2 halves, and press. You should have found that every seam was pressed the correct direction to automatically butt properly. Planning the pressing every step of the way makes the final construction a breeze!
border information for this quilt
The inner border for this quilt is dark green and is ⅞″ wide, finished. The outer border is cut from the light green fabric and is 5″ wide, finished.
If you are interested in making the Asian Nights version, following are the yardages and blocks needed. The grid size and block size are the same as for Town Square, above.
Quilt top size: 48″ × 64″ (without borders)
Grid size: 1″
Layout: 8 rows of 6 blocks each
Blocks:
24 Block A
24 Block B
Yardage needed:
⅔ yard blue fabric
1¼ yards tan fabric
1¼ yards medium brown fabric
1 yard dark brown fabric
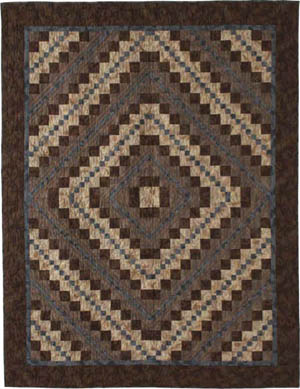
Asian Nights
border information for this quilt
The small inner border is cut from the blue fabric and is 1″ wide, finished, and the outer border is cut from the dark brown fabric and is 4¾″ wide, finished.
Wow! You have just completed a stunning quilt top that appears much more difficult than it actually was. Your new skills prepare you to make the quilts in Class 160.