RECIPES
Springtime Whole Wheat Spaghetti with Fresh Favas, Peas, and Asparagus
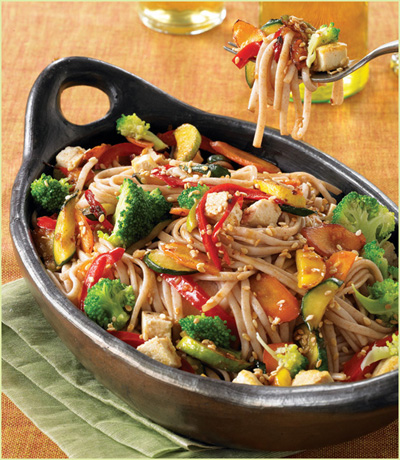
Buckwheat Pasta with Tofu and Sesame Vegetables
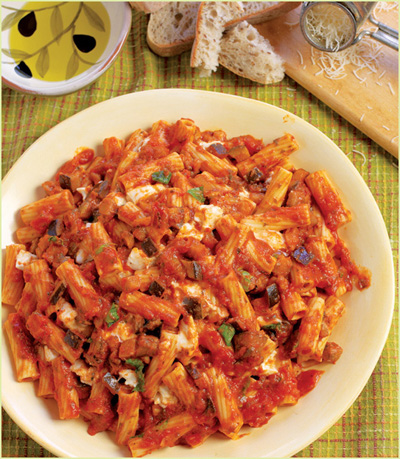
Rigatoni with Eggplant and Buffalo Mozzarella
Barley “Risotto” with Spinach and Mushrooms
Spinach, Mushroom, and Gruyère Crêpes
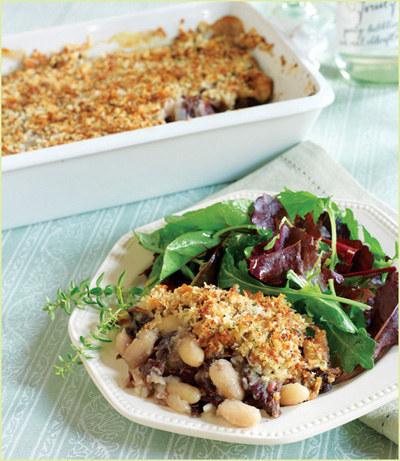
White Bean and Radicchio Gratin
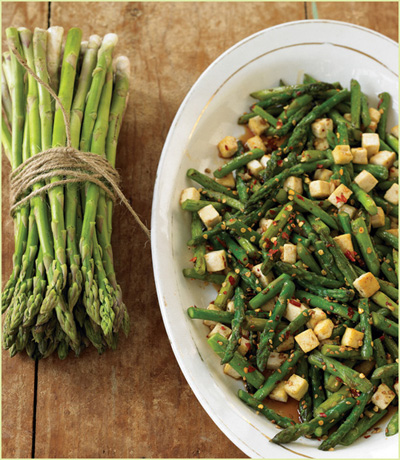
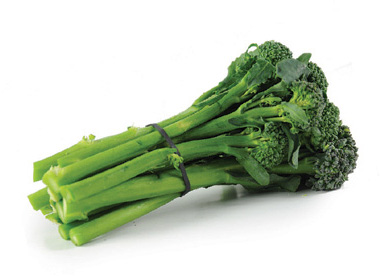
Sesame-Ginger Asparagus with Tofu
Pumpkins Stuffed with Quinoa, Butternut, and Cranberries
ECO-MINDED LIVING
WANT TO REDUCE YOUR CARBON FOOTPRINT? EAT LESS MEAT
A QUICK PRIMER ON GLOBAL WARMING
WE ARE WHAT WE EAT … AND SO IS OUR PLANET
SELECTED PRIMERS
Plus 10 more useful tips.
WHILE I’M NOT A VEGETARIAN, MY FAMILY AND I ENJOY EATING meatless meals on a regular basis. I try to be aware of where my food comes from and its effect on the environment, so during the week I’m mindful of trying to balance our meals with vegetarian options. But to tell you the truth, most of the time I choose a meat-free soup, crêpe, pasta, or salad because I’m craving the delicious taste of that particular dish. I’m not thinking we need to “deprive” ourselves of meat for that meal.
Eating vegetarian is a great way to tread more lightly on the earth. Generally speaking, it takes more than 11 times as much fossil fuel to make 1 calorie of animal protein as it does to make 1 calorie of plant protein. And if every American who eats meat daily committed to eating meat-free one day a week, it would be the CO2-reducing equivalent of taking 8 million cars off the roads!
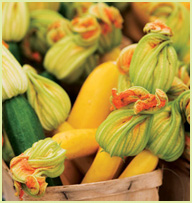
Summer squash so fresh their blossoms are still attached.
If you’re new to vegetarian entrées, I hope you’ll be pleasantly surprised by the wonderful flavors of healthy whole grains, vegetables, beans, nuts, and soy in this chapter. I think you will agree that these recipes are so delicious and satisfying, no one will ask, “Where’s the meat?” Even if you’ve been cooking vegetarian for years, there’s plenty of inspiration here, with a wide variety of flavorful ingredients and taste combinations that I hope will soon become dishes your family asks for again and again.
One of my all-time favorite foods is savory crêpes, and I’ve included a recipe for one particularly tasty variation: Spinach, Mushroom, and Gruyère Crêpes. Making crêpes takes a bit of practice, but they’re well worth the effort. For me these delicate, super-thin “pancakes” are special not only because they’re so tasty, but also because they’re full of delicious memories. My first date with my husband, Drew, was at a crêpe restaurant in Berkeley after a concert. I was surprised, and impressed, that he ordered two entrées: crêpes florentine and a huge spinach salad with warm bacon dressing. There was just something so appealing about someone with such an appetite for really good food. I also met Trudy, my first friend in Carmel, at a restaurant that sold crêpes. She was a waitress there, and we started a conversation after Drew ordered his usual two entrées. She said that her boyfriend was the only other person she knew who did that. Trudy is now one of my longtime nearest and dearest friends, so you could say that in my life, eating crêpes and getting to know special people seem to go together!
Another of my favorite recipes is the Rigatoni with Eggplant and Buffalo Mozzarella. I fell in love with this dish on a family trip to Italy and learned to duplicate it at home. The tender chunks of eggplant, fresh basil leaves, light tomato sauce, and buffalo mozzarella—which magically retains both its resilient texture and its creaminess—vividly bring back the flavors of Italy. Served over al dente rigatoni pasta, this dish is a joy to the senses. Maybe it will even send your taste buds traveling to a place where the pace is less hurried, and meals are lingered over and savored.
And I think you’ll find our Homemade Veggie Burgers deliciously satisfying, with a flavor and texture you just can’t find in frozen ready-made veggie burgers.
For me, this kind of food represents wonderful flavors to be shared with family and friends. Eating lower on the food chain does have a powerful impact on the environment, but it’s appetite-appeal that draws me to these dishes. As I look over the recipes in this chapter, I just want to get cooking. Wait till you taste our Springtime Whole Wheat Spaghetti with Fresh Favas, Peas, and Asparagus. Experience the comfort-food satisfaction of autumn-inspired Pumpkins Stuffed with Quinoa, Butternut, and Cranberries, and splurge by treating yourself to the creamy, slightly nutty flavor of the Roasted Cauliflower Tart. I hope you will enjoy exploring these recipes and other meatless options throughout this book. There are dozens more vegetarian recipes in the Soup, Leafy Green Salads, Vegetable and Grain Salads, and Side Dishes chapters. So bon appétit … without the meat!

Spinach, Mushroom, and Gruyère Crêpes (page 175)
GREEN IS THE COLOR OF SPRING. To celebrate the beautiful green vegetables that epitomize the season, we’ve combined fava beans, fresh English peas, and tender asparagus in a very light and healthful pasta dish. The Parmesan Stock adds great flavor, but if you don’t have time to make it, a good-quality vegetable broth will suffice. Whole wheat spaghetti is my pasta of choice; it’s a much more nutritious option than pasta made from white flour and we like its nutty flavor. Look for thin whole wheat spaghetti so the dish stays light and the focus remains on the glorious green vegetables.  Serves 4 to 6
Salt
1½ cups shelled fresh English peas
16 asparagus spears, woody ends trimmed, spears peeled if desired, cut on the diagonal into 2-inch lengths
1 pound thin whole wheat spaghetti
2 tablespoons olive oil
2 medium leeks (white and light green parts only), cut in half lengthwise, then thinly sliced crosswise and rinsed well
Pinch of dried red pepper flakes, or to taste
4 large garlic cloves, peeled and minced
⅓ cup white wine
About 1 cup Parmesan Stock (page 408), Vegetable Stock (page 410), or store-bought low-sodium vegetable broth, heated
Grated zest of 1 lemon
1½ tablespoons minced fresh tarragon
2 tablespoons butter (optional)
1 cup shelled and peeled fava beans (see sidebar, this page)
Freshly ground black pepper
½ cup freshly grated Parmesan cheese
THE BASICS: How to Peel Fava Beans
Fava beans require a little extra work, but their fresh, delicate taste is reward enough for the effort. Shell the beans, discarding the thick pods. Blanch the beans in boiling salted water for 30 seconds if they are tiny, or 60 seconds if they are large. Immediately drain the beans and plunge them into a bowl of ice water to stop the cooking. Drain the beans again in a colander. When the beans are cool enough to handle, peel off the tough outer skins to release the tender inner beans.
1. Fill a medium-size bowl with ice water and set it aside.
2. Fill a medium-size saucepan with salted water, cover, and bring it to a boil over high heat. Blanch the peas in the boiling water for 30 seconds. Using a slotted spoon, transfer the peas to the ice water and submerge them to stop the cooking.
3. Blanch the asparagus in the same saucepan of boiling salted water, cooking the spears for 60 seconds. Drain, and plunge the asparagus into the ice water. Drain the vegetables, and set them aside.
4. Bring at least 4 quarts water to a boil in a large covered saucepan over high heat. Add 2 tablespoons salt to the boiling water, and stir in the pasta. Cook the pasta according to the package directions until it is al dente, 5 to 8 minutes.
5. Meanwhile, heat the olive oil in a large skillet over medium-low heat. When the oil is warm, add the leeks and red pepper flakes. Cook, stirring frequently, until the leeks are soft, about 5 minutes, taking care not to let them color. Then add the garlic and cook, stirring frequently, for 2 minutes.
6. Add the wine to the skillet and raise the heat to medium-high. Cook until the wine has evaporated, 3 to 5 minutes. Add ½ cup of the hot Parmesan Stock, the lemon zest, and the tarragon.
7. Using tongs, transfer the cooked spaghetti to the mixture in the skillet (or drain it in a colander and then add it to the skillet). Cook the pasta, stirring constantly, until it is coated with the sauce, about 2 minutes. If the pasta seems dry, add another ¼ cup stock to the skillet.
8. Stir in the butter (if using), the reserved peas and asparagus, and the fava beans. Cook until heated through, 1 to 2 minutes, adding the remainder of the stock if needed. Season with salt and black pepper to taste.
9. Divide the pasta among shallow bowls, and garnish each serving with a sprinkling of Parmesan cheese. Serve hot.
MY FAMILY IS A HUGE FAN OF FARRO PASTA. We eat much less white pasta since we discovered it a few years ago. Farro pasta retains the nutty flavor of the grain, but it has a smooth texture with no hint of graininess. I make big batches of pesto when basil is flourishing, and with the pesto ready to go, pasta with pesto is one of my fastest, yet most appreciated, meals. Sometimes I throw in a handful of toasted pine nuts or chopped sun-dried tomatoes to vary the dish a bit. Chopped grilled vegetables are a delicious addition as well. Serves 4
Coarse sea salt or kosher salt
4 cups (about 9 ounces) farro penne
About 1 cup Pesto (recipe follows)
Freshly ground black pepper
1 cup freshly grated Parmesan cheese
1. Bring 4 quarts of water to a boil in a large covered pot over high heat. Add 2 tablespoons coarse sea salt, and stir in the penne. Cook, stirring once or twice, according to the package directions until al dente, 10 to 12 minutes.
2. Drain the pasta in a colander, setting aside 1 cup of the cooking water. Return the pasta to the pot. Add ¾ cup of the Pesto and stir to combine. If the pasta is too dry, add ⅓ cup or more of the reserved cooking water.
3. Taste the pasta, and season with coarse sea salt and pepper to taste. Add more Pesto if desired.
4. Divide the pasta among four warmed bowls, and sprinkle each serving with the Parmesan cheese.
Pesto is an all-purpose sauce based on fresh basil, olive oil, Parmesan cheese, and lots of garlic that enhances everything it encounters, from pasta, pizza, and vegetables to grilled meats and fish. Even though commercial preparations are readily available in markets today, they rarely compare to homemade pesto. Makes about 3 cups
3 large garlic cloves, peeled
6 cups (packed) fresh basil leaves
¼ cup (packed) fresh flat-leaf parsley leaves
½ cup pine nuts
1 cup olive oil, plus more if storing the pesto
1 cup (3 ounces) fresh finely grated Parmesan cheese
1 teaspoon salt, or more to taste
Freshly ground black pepper, to taste
1. Place the garlic, basil, parsley, and pine nuts in a food processor and pulse until coarsely chopped.
2. With the machine running, add the 1 cup olive oil in a slow, steady stream, processing until the pesto is smooth and stopping when needed to scrape the sides of the bowl with a rubber spatula.
3. Transfer the pesto to a medium-size bowl. Add the Parmesan, and season with the salt and pepper. Use immediately, or store for up to 1 month in the refrigerator. To preserve its vivid green color while it is stored, pour a thin film of olive oil over the pesto to seal out the air, and then cover the container. Pesto can also be frozen for up to 3 months; cover the top layer with olive oil as described. For handy small portions, freeze the pesto in ice cube trays and then transfer the cubes to a zip-lock freezer bag or a plastic container; defrost the frozen cubes for several hours in the refrigerator.
 LIVING GREEN
A half pound of conventionally produced ground beef is responsible for 50 to 60 times the greenhouse gas emissions of a half pound of fruits or vegetables.
THE KEY TO THIS RECIPE lies in having everything prepped and ready to go before you start cooking. First the tofu is sautéed to give it a golden crust; then while the pasta is cooking, the vegetables are quickly stir-fried. The result is an easy vegetarian dish loaded with tasty vegetables, beautiful colors, and varying textures. One thing that I especially appreciate about this dish is that it’s great hot, at room temperature, or cold right out of the fridge. This is a perfect budget-friendly recipe that’s great to remember when you need to make a dish for a potluck or a party. Serves 4 to 6
½ cup soy sauce
1 tablespoon fresh lemon juice
2 tablespoons unseasoned rice vinegar
2 tablespoons toasted sesame oil (see sidebar, page 25)
1 teaspoon ground ginger
1 teaspoon garlic powder
14 to 16 ounces firm tofu, drained and cut into ½-inch-thick slices
2 tablespoons kosher salt
8 ounces buckwheat (soba) noodles
3 tablespoons plain sesame oil
3 tablespoons minced shallots
1 tablespoon finely grated peeled fresh ginger
1 tablespoon minced garlic
2 cups (6 ounces) broccoli florets
1 red bell pepper, stemmed, seeded, and cut into ⅛-inch-thick strips (about 1½ cups)
1 large carrot, peeled and cut into ⅛-inch-thick rounds (about 1 cup)
1 small zucchini, cut in half lengthwise and then cut crosswise into ⅛-inch-thick slices (about ¾ cup)
Salt, to taste
2 teaspoons sesame seeds, toasted (see box, page 31)
1. Place the soy sauce, lemon juice, vinegar, toasted sesame oil, ginger, and garlic powder in a large bowl and whisk to blend. Add the slabs of tofu and let marinate for 5 minutes.
2. Heat a large skillet, preferably cast-iron, over medium-high heat and add the tofu (reserving the bowl of marinade). Cook on one side until browned, about 2 minutes. Then turn the tofu over with a spatula and cook until nicely browned on the other side, 2 minutes. Transfer the tofu to a cutting board and cut it into ¾-inch cubes. Return the tofu to the bowl containing the marinade.
3. Bring 4 quarts of water to a boil in a large covered pot over high heat. Add 2 tablespoons salt, and stir in the noodles. Cook according to the package directions until al dente, about 7 minutes.
4. While the pasta is cooking, heat the plain sesame oil in a cast-iron skillet over medium-high heat. Add the shallots, ginger, and garlic, and cook, stirring constantly, until aromatic, about 1 minute. Then add the broccoli, bell pepper, carrot, and zucchini and stir-fry until the vegetables begin to soften, about 4 minutes. Cover the skillet and cook until the vegetables are crisp-tender, another 2 to 4 minutes.
5. Meanwhile, drain the noodles and add them to the tofu.
6. Season the vegetable mixture with salt, and add it to the tofu and pasta. Toss to combine, sprinkle with the sesame seeds, and serve.
Buckwheat Pasta with Tofu and Sesame Vegetables
ORECCHIETTE MEANS “LITTLE EARS” IN ITALIAN; the shell-shaped pasta is a terrific vehicle for flavorful sauces. The classic Italian trio of oil, garlic, and anchovies forms the flavor base of this pasta dish, which goes together in a flash. Once the water boils, the pasta will be ready to serve in less than 20 minutes. And you only need to use one pot, because the broccolette is cooked with the pasta. This is one presentation where the starring vegetable is not meant to be al dente, or crisp-tender—the broccolette needs to be fully cooked so that it melts into a creamy sauce. Be sure to save some of the pasta cooking water if you drain the orecchiette and broccolette, as it both thickens and flavors the dish. Serves 4
Broccolette tops resemble broccoli florets.
Coarse sea salt or kosher salt
4 cups (12 ounces) orecchiette
10 ounces broccolette (see box, facing page), ends trimmed, stalks cut into 1½-inch pieces (4 cups)
¼ cup olive oil or oil from Garlic Confit (page 414)
5 canned anchovies (optional; good but not vegetarian), mashed to a paste
4 garlic cloves from Garlic Confit, smashed; or 4 fresh garlic cloves, peeled and minced
Pinch of dried red pepper flakes, or more to taste
Grated zest of 2 lemons, preferably Meyer lemons
1½ cups freshly grated Parmesan or Pecorino Romano cheese
1. Bring 4 quarts water to a boil in a large covered pot over high heat. Add 2 tablespoons coarse sea salt, and stir in the orecchiette. Cook, stirring once or twice, for 6 minutes. Then add the broccolette and cook until the pasta is al dente and the broccolette is tender, 6 more minutes.
2. A few minutes before the pasta and broccolette are cooked, pour the olive oil into a large skillet (at least 12 inches in diameter) and heat it over medium heat. When the oil is hot, add the anchovies (if using), garlic cloves, and red pepper flakes. Cook, stirring frequently, until the anchovies dissolve and the mixture is hot, about 2 minutes.
3. Drain the contents of the pot in a colander, reserving 1 cup of the cooking liquid. Transfer the mixture to the skillet. Add the lemon zest and 1 cup of the cheese, stirring to coat. Cook the mixture for 2 or 3 minutes, stirring frequently, adding some of the hot pasta cooking water to the skillet if the mixture seems dry.
4. Transfer the pasta to a warmed platter, and sprinkle with the remaining ½ cup cheese. Serve hot.
Broccolette, also called “broccolini” and “baby broccoli,” is a hybrid cross between broccoli and gai lan (confusingly known as both Chinese broccoli and Chinese kale). This elegant, versatile vegetable has long, slender, juicy green stalks topped with clusters of tiny florets. Although broccolette does resemble miniature broccoli, its stalks are sweeter and less fibrous, and do not require peeling. It tastes like broccoli but with an intriguing hint of pepper and mustard and none of broccoli’s cabbage-y flavor.
Broccolette is sold in small bunches in most supermarkets and specialty stores and is available year-round. Look for slim, vibrant green stalks that are firm and crisp; the heads should have tightly closed buds. If the stalks are thicker than a pencil, it is best to cut them in half lengthwise so that the stems and florets will cook in the same amount of time. Store unwashed broccolette in a perforated plastic bag in the refrigerator; it will keep for up to 14 days.
Broccolette is as versatile as broccoli and can be steamed, stir-fried, roasted, or eaten raw. Be careful not to overcook it—it should remain juicy and crunchy for most recipes. It generally needs no preparation other than trimming about ½ inch off the bottom of the stems. Rinse it under cold water and pat it dry with a clean kitchen towel. One cup (about 8 stalks) contains only 35 calories and provides 130 percent of the daily recommended requirement for vitamin C, as well as significant amounts of fiber and vitamin A.
Rigatoni with Eggplant and Buffalo Mozzarella
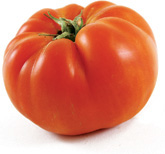
I DISCOVERED THIS AMAZINGLY SIMPLE but intensely flavorful pasta dish when our family traveled to Italy a few summers ago. It was so memorable that it made the top of my list of recipes to try to replicate. Chunks of succulent eggplant get a quick sauté to set their flavor, then are simmered in a light marinara sauce until tender. At the last minute, cubes of mozzarella di bufalo are added, quickly becoming soft and creamy as they melt into the sauce. This dish goes together in no time, especially if you have marinara sauce on hand. If you don’t have time to make my Heirloom Tomato Sauce or the Quick Tomato Sauce, you can fast-track the recipe by using a store-bought version.
A word about the eggplant, which is at the heart of this dish: Salting is not required, but it’s important to sauté the eggplant over high heat in the amount of oil specified. You need very high heat to force the eggplant to brown and develop flavor. In the absence of high heat, the vegetable will simply soak up the oil, become soggy, and taste flat.
I serve this dish with a warmed baguette to sop up the extra sauce, and with a light salad of lettuce and endive dressed only with olive oil, balsamic vinegar, and salt and pepper. Serves 4
4 tablespoons olive oil
Pinch of dried red pepper flakes, or to taste
1 large eggplant (1¼ pounds), peeled or unpeeled, cut into ½-inch dice
3 cups Myra’s Heirloom Tomato Sauce (page 416), Quick Tomato Sauce (page 417), or good-quality store-bought marinara sauce
Salt and freshly ground black pepper
12 ounces rigatoni pasta, or other short tubular pasta such as penne or ziti
1 ball (4 to 5 ounces) imported mozzarella di bufalo or fresh milk mozzarella, cut into ½-inch cubes (about ¾ cup)
6 fresh basil leaves, roughly torn
½ cup freshly grated Parmesan or Pecorino Romano cheese
1. Bring 4 quarts water to a boil in a large covered pot over high heat.
2. While the water is heating, heat the olive oil in a large skillet over high heat. When the oil is very hot, add the red pepper flakes and the eggplant. Cook, turning the eggplant frequently, until it begins to brown and soften slightly, about 2 minutes.
3. Add the tomato sauce to the skillet and reduce the heat to low. Simmer gently until the mixture is hot and the eggplant is almost tender, 2 to 3 minutes. Remove the skillet from the heat. Season with salt and pepper to taste.
4. Add 2 tablespoons salt to the boiling water, and stir in the rigatoni. Cook, stirring once or twice, according to the package directions until the pasta is al dente, 10 to 12 minutes. Just before the rigatoni is done, reheat the eggplant mixture over medium heat.
5. Drain the pasta and immediately transfer it to a warmed bowl. Pour the sauce over the rigatoni, and toss thoroughly to distribute the sauce evenly and coat all the pasta. Add the mozzarella and basil, and toss to combine. Serve hot, with the grated cheese on the side.
ARBORIO RICE MAKES A GREAT BASE for this tasty combination of leeks, feta, and Parmesan. If you happen to have leftover risotto, this is a great way to turn it into another meal or a first course: Just add minced cooked vegetables, herbs, and cheese for a quick batch of risotto cakes. It’s important to note that the cakes need to be completely cold before you cook them, or they will fall apart in the skillet. Chilling the cakes allows the starches to harden and makes them fry-able. For a satisfying meal, serve the risotto cakes with a vegetable side or two. Makes 12 cakes; serves 4 to 6
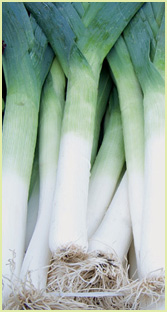
Soil tends to lodge in between the layers of a leek, so rinse them thoroughly before using.
4 tablespoons olive oil
½ cup finely chopped yellow onion
2 large leeks (white part only), well-rinsed and finely chopped (about 2 cups)
2 teaspoons minced garlic
1 tablespoon butter
1 cup Arborio or Carnaroli rice
¼ cup white wine
3 cups Vegetable Stock (page 410) or store-bought low-sodium vegetable broth, heated
½ cup crumbled feta cheese
¼ cup freshly grated Parmesan cheese
2 large eggs, lightly beaten
¼ cup snipped fresh chives
2 tablespoons chopped fresh flat-leaf parsley
Salt and freshly ground black pepper
1. Heat 2 tablespoons of the olive oil in a medium-size saucepan over medium heat. Add the onion, leeks, and garlic, and cook, stirring frequently, until the vegetables are soft, 6 to 8 minutes.
2. Add the butter and the rice. Cook, stirring constantly, until the rice is hot, 1 to 2 minutes. Then stir in the wine and cook until all of the liquid has evaporated, about 2 minutes.
3. Add 1 cup of the vegetable stock, stirring constantly to bring out the starch in the rice. When almost all of the stock has been absorbed, add another cup. Repeat until all of the stock has been absorbed, about 20 minutes total. (The risotto is meant to be fully cooked and not al dente for this recipe.) Remove the pan from the heat and let the mixture cool for 20 minutes.
4. Stir the feta, Parmesan, eggs, chives, and parsley into the risotto. Season the mixture with salt and pepper to taste. When it is cool enough to handle, form the mixture into twelve ½-inch-thick cakes, about ⅓ cup each, and refrigerate them, uncovered, until they are completely cold, at least 4 hours. (The cakes can be refrigerated, well wrapped, for up to 2 days before cooking.)
5. Just before serving, heat the remaining 2 tablespoons olive oil in a large nonstick skillet, preferably cast-iron, over medium-high heat. Arrange the cakes in the skillet so that they do not touch (it may be necessary to do this in two batches), and cook until the bottom is crisp and browned, about 3 minutes. Turn the cakes over and cook on the other side until golden and warmed through, about 3 minutes. Serve immediately.
LIVING GREEN
Concerns persist over the safety of nonstick cookware, although many experts are confident that cooking with nonstick is safe if it is used properly. Because nonstick coatings break down and can release potentially toxic fumes when heated above 500°F, don’t use heat settings higher than medium-high. Because some of the chemicals used to create the nonstick surface are potentially toxic, it is recommended that pans that are chipped or scratched be discarded.
I LOVE THE RUSTIC FLAVOR and chewy texture of barley, yet I realized that I hardly ever eat it except in mushroom barley soup. So I thought it was time to figure out a vegetarian barley entrée that my family would enjoy, and this one gets rave reviews from everyone. A variation on the traditional Italian rice dish, barley risotto is rich and satisfying enough to work as a main course when served with a big salad and whole wheat rolls. It is also great as a side dish for any meat, especially pork or lamb. I splurge on organic Parmigiano-Reggiano to go with it because the aged cheese adds tons of flavor. Serves 4
About 1½ cups diced yellow onion (¼-inch dice)
2 garlic cloves, peeled and finely chopped
4 cups (8 ounces) sliced brown (cremini) or white mushrooms (⅓-inch-thick slices)
2 teaspoons fresh thyme leaves
2 cups hulled barley (see box, this page), rinsed
6 cups Vegetable Stock (page 410) or store-bought low-sodium vegetable broth
1 teaspoon salt
Pinch of freshly ground black pepper
8 ounces (6 cups packed) baby spinach, well rinsed and patted dry if needed
1 teaspoon soy sauce
½ cup freshly grated Parmigiano-Reggiano cheese, plus more for garnish
1. Pour the olive oil into a large saucepan or Dutch oven, and place it over medium heat. When the oil is hot, add the onion and cook, stirring frequently, until it is soft and translucent, 7 to 10 minutes. Add the garlic and cook, stirring frequently, for 1 to 2 minutes, taking care not to burn the garlic.
2. Add the mushrooms and thyme, and cook until the mushrooms soften, about 5 minutes. Add the barley and cook, stirring constantly, until the grains are hot to the touch, 2 to 3 minutes. Add the vegetable broth, and salt, and pepper. Cover the pan and bring the mixture to the start of a boil. Then reduce the heat to low, cover the pan, and simmer, stirring occasionally, until the barley is tender and most of the liquid has been absorbed, about 1 hour.
3. Remove the lid and raise the heat to medium. Stir in the baby spinach and the soy sauce. Cook, uncovered, stirring frequently, until the spinach wilts, about 3 minutes. Then stir in the cheese, remove the pan from the heat, and let the barley risotto sit, covered, for 2 minutes.
4. Divide the risotto among warmed shallow bowls, and sprinkle with additional cheese.
CREPES ARE ONE OF MY ALL-TIME FAVORITE FOODS. I fell in love with them as a teenager when my family took a trip to Paris. French crêpes—wow! So delicious! I taught myself to make crêpes years later, and now it’s one of my family’s most anticipated dinners. At home I make them for one person at a time, filling them and finishing them right in the pan—and then we make dessert crêpes with any leftover batter. But it’s also easy to make the crêpes ahead of time and then fill them—especially if you’re cooking them for company or for a larger group. Spinach, mushrooms, and Gruyère cheese make a fabulous filling, but crêpes are incredibly flexible. Add anything you might use in an omelet or pizza—including small amounts of leftovers that might otherwise go to waste. If you like a creamy filling, add the crème fraîche. Make sure you plan for enough time to refrigerate the batter. Serves 4 (2 crêpes per person)
WHOLE WHEAT CREPES
(Makes about 8 crêpes)
1 cup whole wheat pastry flour
⅛ teaspoon salt
1 cup whole milk
2 large eggs, lightly beaten
2 tablespoons unsalted butter, melted
FILLING
2 tablespoons olive oil
½ cup minced shallots
3½ cups (10 ounces) chopped white, cremini, or other fresh mushrooms
½ cup dry white wine
Salt and freshly ground black pepper
1 pound baby spinach, well rinsed and patted dry if needed
⅓ cup Crème Fraîche (page 415; optional)
COOKING THE CREPES
¼ cup milk, if needed
2 tablespoons unsalted butter, melted, for cooking the crêpes
2 cups (7 ounces) grated Gruyère cheese
1. Prepare the crêpe batter: Place the flour and salt in a medium-size bowl and whisk to combine. Add the milk and the eggs, and whisk to combine. Add the melted butter and whisk until the batter is smooth. You can also make the batter in a blender or with an immersion blender if you prefer. Cover the bowl with a plate and refrigerate 1 to 3 hours.
2. Prepare the filling: Heat the olive oil in a large skillet over medium heat. Add the shallots and cook, stirring frequently, until they soften, about 3 minutes. Add the mushrooms and wine, and season with salt and pepper to taste. Cover the skillet and cook, stirring occasionally, until the wine has evaporated and the mushrooms are tender, 8 to 10 minutes.
3. Add the spinach to the mushroom mixture and cook, covered, stirring frequently, until the spinach wilts, about 5 minutes. (It may be necessary to add the spinach in two or three batches, depending on the size of your skillet.) Remove the cover and continue cooking until all the liquid has evaporated, about 5 minutes. Add the crème fraîche, if using, and stir to combine. Set the filling aside and keep warm.
4. When you’re ready to make the crêpes, if the batter is too thick—it should have the consistency of thin pancake batter—add 2 tablespoons of milk and whisk to combine.
5. Place a 12-inch cast-iron skillet, or a crêpe pan over medium heat and when the pan is hot, brush with some of the melted butter. Pour or ladle ¼ cup of batter into the center of the pan, lift the pan off the stove, and tilt and swirl the pan so that the batter spreads thinly across the bottom of the pan in a widening circle; don’t worry if the crêpe is not a perfect circle. There may be some small holes, but again this is not of consequence as the crêpes are meant to be thin. If the holes are large, you can immediately dot a bit of batter on them to fill them. Cook until tiny bubbles begin to appear in the crêpe batter; depending on how hot the pan is, the crêpe will be ready to flip in 15 to 30 seconds. With a spatula, lift up one corner of the crêpe to check if the cooked surface is lightly golden around the edges, and if so, flip the crêpe.
6. Sprinkle the cooked side with ¼ cup of cheese, and spoon a scant ⅓ cup of warm filling in a strip down the middle. By this time the second side of the crêpe should be a light golden brown. Fold all four sides of the crêpe into the center to enclose the filling. Turn the crêpe over with a spatula, and cook until both sides are golden brown, about 1 minute. Serve immediately, folded side down. Alternatively, keep the crêpe warm in a 250°F oven while you repeat with the remaining crêpes and filling.
7. Repeat with the remaining batter and filling, whisking before making each crêpe. Make sure to also grease the pan lightly between each crêpe. The batter may thicken as it rests. If so, thin it with a tablespoon or two of milk as needed.
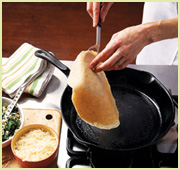
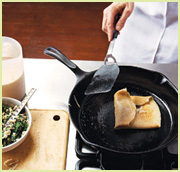
Making Crêpes
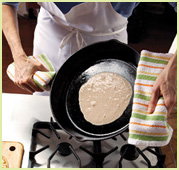
1. Pour the batter into a cast-iron skillet or crêpe pan and tilt to get a round shape.
2. When golden brown on one side, carefully flip the crêpe using a spatula and your fingers.
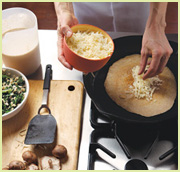
3. While the second side cooks, sprinkle cheese down the middle of the crêpe, then add a strip of filling.
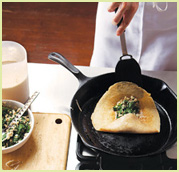
4. Fold the top and bottom of the crêpe in toward the middle.
5. Fold the two sides in toward the middle.
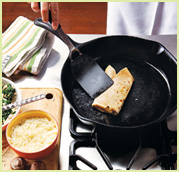
6. Once folded, flip the crêpe over. Cook until both sides are golden brown.
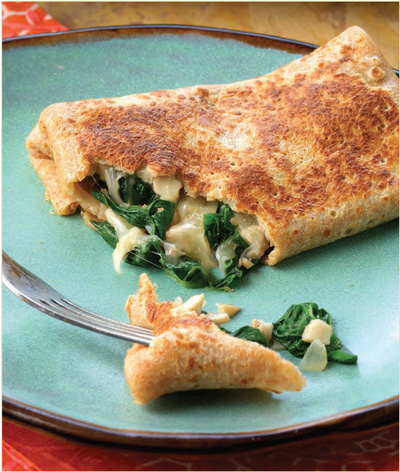
Spinach, Mushroom, and Gruyère Crêpes (page 175)
White Bean and Radicchio Gratin
THIS UNUSUAL DISH has its roots in Italy, where both white beans and radicchio are popular ingredients. The beans are cooked with onion and garlic to infuse them with flavor. Then half of the bean mixture is pureed with the cooking liquid, which creates a creamy base for the radicchio. A mixture of nutty Gruyère cheese and bread crumbs creates a tasty topping for this unique vegetarian dish that is loaded with protein and nutrients. Serves 8 to 10
1 pound dried Great Northern or cannellini beans (about 2½ cups)
10 to 12 cups cold water
About 4 cups diced yellow onions (¼-inch dice)
1 tablespoon plus ½ teaspoon minced garlic
2 tablespoons olive oil
1 tablespoon white wine vinegar
2 teaspoons salt, or to taste
½ teaspoon freshly ground black pepper
1 small head (4½ ounces) radicchio, cut in half through the core, then thinly sliced crosswise (2 cups)
1 cup dry unseasoned bread crumbs (see sidebar, this page)
1 cup grated Gruyère cheese
½ teaspoon dried thyme
½ teaspoon dried basil
1. Pick through the beans, discarding any stones, and rinse them in a colander under cold running water. Place the beans in a large saucepan and add enough cold water to cover by 2 inches. Cover the pan and bring the water to a boil over high heat. Then reduce the heat to medium-low, partially cover the pan, and cook the beans for 30 minutes.
2. Add the onions and the 1 tablespoon garlic, and continue to cook until the beans are tender, 30 to 45 minutes, depending on the age of your beans.
3. Position a rack in the middle of the oven and preheat the oven to 425°F.
4. Drain the beans, reserving 1 cup of the cooking liquid, and transfer half of the beans to a large bowl and puree them with an immersion blender or by hand with a potato masher. (Alternatively, puree them in a food processor.) Add the remaining whole beans, the reserved cooking liquid, and the olive oil, vinegar, salt, pepper, and radicchio. Stir to combine. Transfer the mixture to an 8 x 10-inch baking dish.
5. Combine the bread crumbs, Gruyère, remaining ½ teaspoon garlic, thyme, and basil in a bowl, and stir to blend. Cover the bean mixture with the bread crumb topping.
6. Bake the gratin until the mixture starts to bubble and the topping turns golden brown, 20 to 30 minutes. Serve hot.
7. The gratin can be refrigerated, covered, for up to 5 days. Reheat in the microwave to serve.
ASPARAGUS IS PERFECTLY SUITED to quick and easy stir-fry cooking. High heat, combined with a short cooking time, ensures that the spears retain their fresh flavor and bright emerald color. An Asian combination of ginger, garlic, and sesame oil subtly flavors the asparagus and tofu mixture here. The simple sauce concentrates to become a light glaze. If you can find black sesame seeds (available at Asian markets and some supermarkets), sprinkle a combination of white and black seeds over the asparagus to make an especially attractive presentation. Serve it over brown rice or noodles. Serves 4
1½ pounds fresh asparagus, woody ends trimmed, spears peeled if desired
2 tablespoons canola oil
1 tablespoon plain sesame oil (see sidebar, page 25)
7 ounces firm tofu, cut into ½-inch cubes (about 2 cups)
1 tablespoon grated peeled fresh ginger
2 garlic cloves, finely minced
Pinch of dried red pepper flakes, or to taste
2½ tablespoons soy sauce or tamari (see sidebar, this page)
1½ tablespoons mirin (Asian sweet rice wine)
1 tablespoon fresh lemon juice
2 tablespoons sesame seeds, toasted
Brown rice or noodles, for serving
1. Slice the asparagus spears on the diagonal into 1½-inch-long pieces, and set them aside (see Note).
2. Heat a wok or a large skillet, preferably nonstick, over medium-high heat. When the wok is hot, add the canola and sesame oils and heat until the oil is shimmering but not smoking. Add the tofu and stir-fry until it starts to turn golden, 2 to 3 minutes.
3. Add the ginger, garlic, and red pepper flakes, and cook, stirring frequently, until the mixture is fragrant, about 1 minute. Add the asparagus and stir-fry until it is just crisp-tender, 3 to 5 minutes, depending on the thickness of the spears.
4. Add the soy sauce, mirin, and lemon juice and cook, stirring frequently, until the liquid reduces and lightly glazes the mixture, 2 to 3 minutes.
5. Transfer the mixture to a warmed platter, sprinkle with the sesame seeds, and serve hot over brown rice or noodles.
Note: If your asparagus spears are fat, stir-frying might leave them too crunchy. You can either cut the spears in half lengthwise or blanch the spears in boiling water for 45 to 60 seconds to parboil them slightly before adding them to the skillet.
Sesame-Ginger Asparagus with Tofu
A big part of being an Earthbound Cook is becoming more mindful of how our actions affect the planet. For this reason, it’s important to understand the basics of global warming to better visualize why and how changing some simple everyday things we do can help. Here’s a simplified explanation.
The sun’s radiation travels to the Earth in the form of light waves. Most of this radiation is absorbed and warms the Earth before being radiated back out into space as infrared heat. Some of this heat is trapped by naturally occurring gases in our atmosphere. This occurrence, called the greenhouse effect, keeps our planet at a relatively stable temperature, warm enough for us to live here. If our atmosphere weren’t able to keep some of this heat, our Earth would be a frozen desert.
Problems arise, however, when we thicken our atmosphere with a blanket of excess man-made emissions from sources like fossil-fuel power plants (burning coal, fuel oil, or natural gas), gas-burning vehicles, and intensive conventional farming practices. Deforestation is also a big part of this problem because vegetation that usually absorbs some of the heat-trapping carbon dioxide (CO2) in the atmosphere is eliminated. Our planet’s natural heat-exchange system is thrown out of balance when a greater concentration of greenhouse gases—such as CO2, methane, nitrous oxide, and ozone—trap excess heat in our atmosphere instead of allowing it to radiate into space.
The result is rising global temperatures that contribute to a number of serious environmental problems, which include increasingly frequent and severe droughts and floods, declining snow accumulation, more frequent and more violent storms, melting polar ice caps, and severe coastal erosion from rising seas. According to the Natural Resources Defense Council, rising global temperatures could also lead to health problems, such as increased spread of infectious diseases and more lung problems; weather changes, such as fiercer and more frequent hurricanes and deadly heat waves; and serious shortages in food supplies caused by drought and the destruction of marine-life habitat.
As each of us goes about our daily lives, we leave a carbon footprint that is made up of the CO2 and other greenhouse gases generated by the energy and resources we use to do everything from driving our cars and powering our homes to bathing, clothing ourselves, and so much more. The foods we choose to eat and how we prepare them can have a big impact on our carbon footprint. So with every meal, we have the opportunity to tread more lightly on the planet.
Sweet Dumpling Squash Stuffed with Quinoa, Butternut, and Cranberries
SMALL EDIBLE PUMPKINS AND WINTER SQUASHES make gorgeous serving dishes, especially festive during the holiday season. I’ve chosen sugar pie pumpkins, which are easy to work with and readily available in the autumn months. Sweet Dumpling and acorn squash can also be used, or if you’re in a hurry, serve the quinoa stuffing on its own—it’s delicious either way. If you’re unfamiliar with quinoa, it’s an easy-to-prepare grain that makes a nice change from rice or couscous. Quinoa was the staple grain of the Incas and it remains an important ingredient in South American cuisines to this day. You can feel virtuous eating it, too—quinoa has more protein than any other grain. Serves 4
3 tablespoons olive oil
About 1 cup diced yellow onion (¼-inch dice)
2 teaspoons ground cumin
1 cup quinoa (see sidebar, this page), rinsed in cold water and drained
2 cups Vegetable Stock (page 410), or store-bought low-sodium vegetable broth
½ cup dried cranberries
4 small edible pumpkins, Sweet Dumpling squash, or small acorn squash (1½ to 2 pounds each)
1½ cups diced butternut squash (¼-inch dice)
¼ cup pepitas (raw pumpkin seeds), pine nuts, or chopped walnuts, toasted (see box, page 31)
½ teaspoon ground cinnamon
1 teaspoon fresh lemon juice
Salt and freshly ground black pepper
1. Place 2 tablespoons of the olive oil in a heavy-bottomed saucepan or Dutch oven, and heat over medium heat. When it is hot, add the onion and ground cumin and cook, stirring frequently, until the onion is soft and golden brown, about 10 minutes.
2. Add the quinoa to the saucepan and stir to coat the grains. Add the stock and raise the heat to high. When the liquid comes to a boil, reduce the heat to low, add the cranberries, and cover the pan. Cook at a slow simmer until the liquid has been absorbed, 15 to 25 minutes.
3. Meanwhile, cut the top off each pumpkin, reserving the tops, if desired, for decorative effect. Scoop out and discard the seeds and fibers. If the pumpkins do not sit flat, trim a small slice off the bottom to create a flat base. Place the pumpkins on a rimmed baking sheet and set it aside.
4. Place the remaining 1 tablespoon oil in a large skillet, preferably nonstick, and heat it over medium-high heat. When it is hot, add the cubed butternut squash and cook without stirring until the squash is browned on the bottom, 2 minutes. Toss to turn the pieces (or use a spatula to accomplish this) and cook, stirring frequently, until the squash is just tender, about 2 minutes more. Set aside.
5. When the quinoa is cooked, remove the pan from the heat and stir in the toasted pepitas, cinnamon, and lemon juice. Add the butternut squash, and season with salt and pepper to taste.
6. Position a rack in the lower third of the oven and preheat the oven to 375°F.
7. Divide the quinoa filling among the pumpkin shells; do not pack the mixture. Transfer the baking sheet to the oven and roast until the quinoa is hot and the flesh of the pumpkins is tender when pierced with a skewer or fork, 45 to 60 minutes. Avoid overcooking, because the pumpkins may collapse. If you intend to use the pumpkin tops, add these to the oven during the last 15 minutes of cooking.
8. Serve hot or warm, with the tops (if using) leaning against the stuffed pumpkins.
IF YOUR MISSION IS TO EAT MORE MEATLESS MEALS, this recipe is a very good starting point. These veggie burgers are bold and satisfying, with a surprisingly complex flavor. Full of super-healthy ingredients like walnuts, bulgur, and pinto beans, and flavored with Middle Eastern spices, the patties have good texture and a dynamic taste. The egg whites can be eliminated if you wish: The mixture will taste the same but the texture of the burger will be a bit heavier. The burger patties do need to be refrigerated until they are completely chilled before cooking, for at least 4 hours, so be sure to plan accordingly.
I enjoy these with a side of Yogurt Sauce with Red Onion and Cucumber. You can sandwich the burger and sauce in a whole wheat pita (see recipe, page 287), or serve the burgers on whole wheat buns with lettuce, tomatoes, and red onion slices. Makes 6 burger patties; serves 4 to 6
½ cup bulgur wheat
1½ teaspoons salt
1½ cups walnut pieces
2 large garlic cloves, peeled
1 cup (packed) fresh cilantro leaves
2 cups cooked pinto beans (see box, page 422), rinsed and drained if canned
3 tablespoons soy sauce
1½ teaspoons ground cumin
¼ teaspoon cayenne pepper
2 large egg whites
2 tablespoons canola oil
Yogurt Sauce with Red Onion and Cucumber (recipe follows), for serving (optional)
It’s always a good idea to assemble your ingredients before you start to cook.
1. Place the bulgur, 1 cup water, and ½ teaspoon of the salt in a saucepan. Cover and bring to a boil over high heat. Reduce the heat to medium-low and simmer until the water has been absorbed, 10 to 15 minutes. Let the bulgur cool for 10 minutes.
2. Place the walnuts, garlic, and cilantro in a food processor and process until the mixture is roughly chopped. Add the bulgur, pinto beans, soy sauce, cumin, remaining 1 teaspoon salt, and cayenne pepper, and process until the mixture is finely chopped.
3. Add the egg whites and process again until combined.
4. Refrigerate the mixture, covered, until it is completely cold, at least 4 hours or as long as overnight.
5. Form the mixture into 6 patties, each about 3½ inches in diameter (about ½ cup per patty).
6. Heat the canola oil in a large skillet, preferably cast-iron, over medium to medium-high heat. Add the burgers and cook until they are browned and crisp, 4 to 6 minutes. (Do not crowd the pan; cook in two batches if necessary.) Carefully turn the patties over and cook on the other side until browned and heated through, about 5 minutes.
7. Serve the burgers hot, with Yogurt Sauce with Red Onion and Cucumber on the side if desired.
I enjoy this chunky sauce all by itself, but it goes especially well with our Homemade Veggie Burgers. The smoky flavor of grilled red onion is distinctive, and the tahini-mint dressing, which relies on yogurt rather than oil for its creaminess, mellows the piquancy of the capers. If you are in a hurry, skip the grilling step and just use raw red onion—the sauce will still taste great. Use any leftover sauce on grilled or smoked salmon. Makes about 2 cups
1 red onion, cut into 1-inch-thick rounds
1½ tablespoons olive oil
Salt and freshly ground black pepper
1 cucumber, peeled, seeded, and thinly sliced
2 tablespoons capers, drained
½ cup plain yogurt
1 tablespoon tahini
1 tablespoon fresh lemon juice
1 teaspoon minced garlic
¼ teaspoon ground cumin
¼ cup chopped fresh mint
1. If you will be grilling the onion, preheat a grill to medium-high.
2. Brush the onion slices with some of the olive oil, and season them lightly with salt and pepper. Grill them over medium-high heat (or cook them on a cast-iron grill pan on the stovetop), turning them once, until the slices are tender, about 10 minutes.
3. When the onion slices are cool enough to handle, chop them into ½-inch dice and place them in a bowl. Add the cucumber and capers, and stir to blend.
4. To make the sauce, combine the yogurt, the remaining olive oil, and the tahini, lemon juice, garlic, and cumin in a small bowl and whisk to blend. Stir in the mint, and season with salt and pepper to taste.
5. Add half of the sauce to the onion mixture, stirring to coat. Then add more dressing if desired. Serve immediately, or refrigerate the sauce, covered, for up to 5 days.
THIS CHILI IS SO HEARTY AND SATISFYING, you’ll never miss the meat. Jalapeño peppers vary in heat intensity, so if you don’t like your chili spicy, reduce the cayenne pepper to ¼ teaspoon. Although canned beans make this quicker to prepare, cooking your own from scratch is super-easy and eco-friendly, too. See page 422 for instructions; you’ll need 1¾ cups cooked beans (6 ounces, or a scant 1 cup, uncooked) of each of the three varieties. Serves 4
2 tablespoons olive oil
About 1 cup diced yellow onion (¼-inch dice)
1 cup diced red bell pepper (¼-inch dice)
1 jalapeño pepper, seeded and finely chopped
1 tablespoon ground cumin
1 tablespoon dried oregano
1 teaspoon ground coriander
½ teaspoon cayenne pepper, or to taste
1½ teaspoons chili powder
1 cup Vegetable Stock (page 410), store-bought low-sodium vegetable broth, or water
1¾ cups cooked red kidney beans, rinsed and drained if canned
1¾ cups cooked white beans, rinsed and drained if canned
1¾ cups cooked black beans, rinsed and drained if canned
1 cup canned tomato puree
1 large can (28 ounces) diced tomatoes, with their juices
1½ cups fresh or frozen corn kernels (no need to thaw)
1 tablespoon salt, or to taste
Freshly ground black pepper, to taste
1. Heat the oil in a large stockpot or Dutch oven over medium heat. Add the onion, bell pepper, and jalapeño, and cook, stirring frequently, until the vegetables soften, 6 to 8 minutes.
2. Add the cumin, oregano, coriander, cayenne, and chili powder to the pot and cook, stirring constantly, for 1 minute to blend the spices. Then add the stock, all the beans, and the tomato puree, diced tomatoes, and corn. Cook over medium-low heat, stirring often to prevent the mixture from burning, until the chili thickens, 20 to 30 minutes. If the mixture seems too dry as it is cooking, stir in ½ cup water and cover the pot.
3. Season with the salt and pepper, and serve hot. The chili can be refrigerated, covered, for up to 5 days. Reheat over low heat or in the microwave to serve.
I LOVE DISHES THAT ARE FAST AND SIMPLE yet have a real depth of flavor. In this recipe, chickpeas are simmered in a tomato sauce that’s been spiced up with the heat of ginger and curry. My favorite way to eat these is over brown rice and topped with a generous dollop of plain yogurt. Serve the chickpeas hot or at room temperature with some steamed vegetables, and you have a very satisfying and nutritious meal. Serves 4
2 tablespoons canola oil
1 small red onion, cut into ¼-inch dice (about 1 cup)
1½ tablespoons finely grated peeled fresh ginger
½ tablespoon minced garlic
1 tablespoon curry powder
3 cups cooked chickpeas (garbanzo beans; see box, page 422), rinsed and drained if canned
2 cups Myra’s Heirloom Tomato Sauce (page 416), Quick Tomato Sauce (page 417), or good-quality store-bought marinara sauce
2 tablespoons chopped fresh flat-leaf parsley 1½ teaspoons salt
1. Heat the oil in a large skillet, preferably cast-iron, over medium heat. Add the onion, ginger, and garlic and cook, stirring frequently, until the onion is soft, 6 to 8 minutes. Add the curry powder and cook for another minute, stirring constantly.
2. Add the chickpeas and tomato sauce and cook, stirring occasionally, until the sauce has thickened, about 5 minutes.
3. Remove the skillet from the heat, and stir in the parsley and salt. Serve hot or at room temperature.
LIVING GREEN
If you spend some time seeing how long it takes your oven to preheat to various temperatures, you’ll save energy down the road by no longer preheating too far in advance. Most ovens will get to 350°F within 15 minutes, and newer ovens will heat up faster. No need to preheat it 30 minutes in advance and waste the heat!
I HAD ALMOST FORGOTTEN about this classic, timeless dish until a summer trip to Italy a few years ago. It was served frequently there, as was a version using zucchini instead of eggplant. It does take a bit of time to cook the eggplant, but this step creates the special melt-in-your-mouth texture and is worth the effort. Whatever sauce you choose to pair with the eggplant, it should be light and fresh-tasting so that it doesn’t overwhelm the delicate flavor of the vegetable. Serves 6
1 large eggplant (about 1¼ pounds), peeled or unpeeled
Kosher salt
⅔ cup unbleached all-purpose flour
Freshly ground black pepper
2 large eggs
1 tablespoon cold water
1 cup fine dry unseasoned bread crumbs
About 6 tablespoons olive oil
2½ cups Myra’s Heirloom Tomato Sauce (page 416), Quick Tomato Sauce (page 417), or store-bought marinara sauce
20 fresh basil leaves, torn
1 cup freshly grated Parmesan cheese
1 tablespoon chopped fresh flat-leaf parsley
8 slices (about 7 ounces) provolone cheese, or ¾ cup grated provolone
1. Slice the eggplant into ¼-inch-thick rounds. Sprinkle both sides of the eggplant slices with about 2 tablespoons kosher salt, and set them aside to drain on a rack or in a colander for 30 minutes.
2. Using a clean kitchen towel, thoroughly blot the liquid and salt from the eggplant slices.
3. Spread the flour on a piece of parchment paper or on a flat plate, season it with kosher salt and black pepper to taste, and stir to combine. Combine the eggs and the cold water in a small shallow bowl, and whisk to blend. Spread the bread crumbs on a piece of parchment paper or on a flat plate.
4. Position a rack in the middle of the oven and preheat the oven to 350°F.
5. Dip the eggplant slices in the seasoned flour, coating both sides lightly. Then dip the eggplant in the egg, coating both sides completely. Finally, dip the eggplant in the bread crumbs, pressing them lightly with dry fingers to ensure that the coating sticks. Set the breaded eggplant aside on a baking sheet.
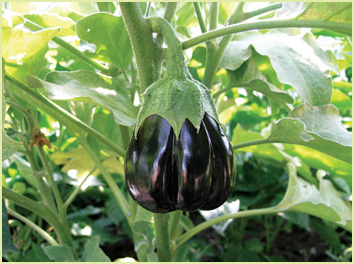
Eggplant, ripe and ready for picking.
6. Heat 3 tablespoons of the olive oil in a large skillet, preferably cast-iron, over medium-high heat. If you have two skillets, heat another 3 tablespoons oil in the second one and you can cook all of the eggplant simultaneously. Otherwise, when the oil is hot, add half of the breaded eggplant slices in a single layer, making sure not to crowd the skillet. Cook until the coating is lightly browned, about 2 minutes. Flip the slices over, and cook on the other side for 1 to 2 minutes. It is important to cook the eggplant only until it is barely crisp-tender; do not overcook it. Transfer the slices to a baking sheet lined with several layers of paper towels.
7. Add the remaining 3 tablespoons oil to the skillet and repeat with the remaining eggplant slices.
8. Arrange half of the eggplant in a 9-inch square or a 7 x 10-inch baking dish. If necessary, cut some of the slices to fill in the gaps so you create a single layer of eggplant without any large holes. Cover the eggplant with about 1 cup of the tomato sauce. Sprinkle half of the basil over the sauce, and cover with ½ cup of the grated Parmesan.
9. Arrange the remaining eggplant slices in over the Parmesan, cover with the remaining 1½ cups tomato sauce, and sprinkle with the remaining basil and the parsley. Cover with the remaining ½ cup Parmesan cheese. Top with the slices of provolone cheese, cutting the cheese as required to cover the entire dish (or scatter the grated provolone over the top).
10. Bake until the cheese melts and the sauce bubbles around the edges of the dish, 15 to 20 minutes. Let sit for 10 minutes before cutting and serving. In the unlikely event that you have some left over, it can be refrigerated, covered, for up to 3 days. Reheat it in a 350°F oven until hot, 15 to 20 minutes.
Note: For a change of pace, try this classic dish with zucchini: Cut 1¼ pounds medium-size zucchini lengthwise into ¼-inch-thick slices, and cook as described starting at Step 3 of the recipe. Be sure not to overcook the zucchini when sautéing it, as it will continue to cook as it drains on paper towels and while it bakes.
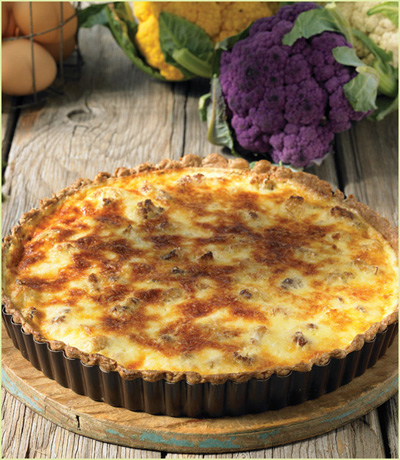
Roasted Cauliflower Tart
CREAMY WHITE CAULIFLOWER is available year round, and I’m always looking for new and interesting ways to cook it. This elegant, decadently rich tart certainly puts a new spin on a vegetable that’s often unappreciated. Who knew that cauliflower could taste so sumptuous: roasted until golden brown and crispy, then combined with sweet caramelized onions in a rich cheesy custard. The cauliflower and onions can be prepared up to 2 days in advance of assembling the tart, and the pastry crust can be prebaked early in the day before you fill and bake the tart. The finished tart does not keep well, however, because if it sits too long the crust gets soggy (even with the blind baking step), so serve it the same day it’s made. Makes one 9-inch tart
1 small head of cauliflower (about 1 pound), separated into 1-inch florets (about 5 cups)
2 tablespoons truffle oil (see box, page 217) or olive oil
Sea salt and freshly ground black pepper
Flaky Multigrain Pie Crust dough for a single-crust pie (page 426), wrapped in parchment and refrigerated
Unbleached all-purpose flour, for rolling the dough
1 tablespoon Dijon mustard
2 tablespoons olive oil
1 large yellow onion, cut in half through the stem end and then cut crosswise into ⅛-inch-thick slices (about 3½ cups)
2 large eggs
1 cup mascarpone cheese
½ cup heavy (whipping) cream
¼ teaspoon freshly ground white pepper
Pinch of freshly grated nutmeg
1 cup (3½ ounces) shredded Gruyère cheese
⅔ cup (about 1½ ounces) freshly grated Parmesan cheese
1. Position a rack in the middle of the oven and preheat the oven to 425°F.
2. Place the cauliflower florets in a large bowl, add the truffle oil, and toss to coat. Transfer the florets to a rimmed baking sheet, arranging them so they don’t touch one another, and season generously with sea salt and black pepper. Roast for 15 minutes. Then flip the florets with a spatula and continue cooking until the cauliflower is tender and browned, 15 to 20 minutes. Set the florets aside to cool.
3. Reduce the oven temperature to 375°F.
4. Remove the dough from the refrigerator and open the parchment paper to a flat rectangle. Let the dough sit at room temperature for 10 to 20 minutes to soften. (If the dough is too cold or firm, it will crack when you try to roll it out.)
5. Lightly dust a rolling pin and the top surface of the dough with flour. Roll the dough into an 11-inch round, and transfer it to a 9-inch tart pan with a removable bottom. Line the tart shell with parchment, and fill it with pie weights or dried beans. Place the tart pan on a rimmed baking sheet and bake for 20 minutes.
6. Remove the baking sheet from the oven and lift out the paper and pie weights. Lightly prick the bottom of the pastry with a fork, and return the baking sheet to the oven. Bake the pastry until it dries slightly and begins to take on a faint color, 8 to 10 minutes.
7. Remove the baking sheet from the oven, set the tart pan on a wire rack, and allow the crust to cool slightly, about 10 minutes. Then carefully brush the bottom and sides of the pastry shell with the mustard. Set it aside at room temperature.
8. Heat a large skillet, preferably cast-iron, over medium-low heat. When it is warm, add the olive oil. Add the onion slices and cook, stirring frequently, until they soften and caramelize, 30 to 40 minutes. Be patient and do this slowly: The onions should be golden, not brown.
9. While the onions are cooking, thinly slice the roasted cauliflower florets and set them aside.
10. Transfer the caramelized onions to the prebaked tart shell and spread them out in a thin layer. Top with the sliced roasted cauliflower. Transfer the tart pan to a rimmed baking sheet.
11. Combine the eggs, mascarpone, cream, white pepper, and nutmeg in a medium-size bowl, and whisk to combine. Stir in the Gruyère. Pour the mixture over the cauliflower and onions in the tart shell, and sprinkle the Parmesan over the top. Bake until the tart is puffed, set in the center, and golden brown, 30 to 40 minutes.
12. Transfer the tart to a wire rack and let it cool for at least 15 minutes before serving.
Nestled within their greens sit firm white heads of cauliflower.