RECIPES
Tenderloin of Beef with Brandied Mushrooms
Crazy, Messy, Delicious Buffalo Burgers
Easy Garlic-Thyme Pork Tenderloin
Pinwheels of Pork with Spinach and Sun-Dried Tomatoes
Italian Sausage with Fennel and Grapes
Orzo with Prosciutto, Broccolette, Zucchini, and Peas
Chicken Breasts Stuffed with Chard, Gruyère, and Prosciutto
Herb-Marinated Chicken Breasts with Pesto
Chicken and Green Olive Enchiladas
Duck Breasts with Dried Cherry Sauce
Braised Duck with Quince and Apples
ECO-MINDED LIVING
MAKING ECO-FRIENDLY MEAT CHOICES
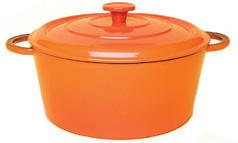
MY FAVORITE COOKWARE: CAST-IRON
BUDGETING FOR ECO-FRIENDLY MEAT
UNDERSTANDING ECO-LABELS FOR MEAT
SELECTED PRIMERS
Plus 16 more useful tips.
MANY PEOPLE THINK THAT BECAUSE I AM AN ORGANIC FARMER, I’M ALSO a vegetarian. The truth is that my family and I really enjoy meat and poultry dishes. But I pay close attention to the kinds of meat I buy—seeking out the most eco-friendly, healthy, and humane choices. Also, I look for ways to enjoy the flavors of meat and poultry by focusing on quality rather than quantity—eating smaller portions, savoring the flavors.
Most mainstream meat and poultry are extremely resource- and energy-intensive foods. They also contribute significantly to global-warming gases and pollution. Not all meat and poultry are created equal, however; some ways of raising cattle, pigs, lambs, bison/buffalo, and fowl are much kinder to the environment … and to the animals themselves. In this chapter, I include lots of information about different types of meat and their relative eco-impacts so you can choose what feels best for you and your family. I also clarify some eco-labels associated with meat so you can know more about what you’re buying.
Like using the extra hot water to take a long bath instead of a quick shower, I know eating meat is a splurge. When I eat meat, I want to enjoy every morsel, so the recipes in this chapter are packed with lots of great flavors and variety. If you feel you’ve gotten into a bit of a recipe rut, you’ll find plenty of inspiration here.
The Buffalo Shepherd’s Pie is a true comfort food with a health update, because buffalo (also called bison) or grass-fed beef causes less of an environmental burden and is much leaner and more healthful than typical conventional beef. The tasty filling of the meat complemented by porcini mushrooms, red wine, and fresh thyme is hearty but not heavy.
“Amazing” isn’t a word I use lightly, but the flavor of our Amazing Turkey Chili is truly … well, amazing. My husband, Drew, was skeptical at first because he’s not a big chili fan, but he wound up asking for three helpings! The combination of three types of chile powder—ancho, pasilla, and chipotle—with other spices like cumin, coriander, thyme, and oregano adds a sophisticated flavor to the vegetables and beans. And using lean ground turkey with a touch of lime juice in the sauce makes this dish lighter than your standard “cowboy” chili.
I’m always encouraging people to try new things in the kitchen, but I realized that I had never cooked duck before working on this book. Duck is one of Chef Pam’s specialties, and here she reveals her cooking techniques for keeping the meat moist and tender. Braised Duck with Quince and Apples is delicious—the pairing of quince and duck is perfect.
And on a day when you feel like having an adventurous chicken dish, Saigon Caramel Chicken is an outstanding recipe we’ve created to give you all the flavor of Vietnamese clay-pot cooking without any special equipment. Another favorite is our Chicken Breasts Stuffed with Chard, Gruyère, and Prosciutto.
In addition to protecting the environment, it’s important that we honor our food traditions and savor our food memories. They bond us to loved ones and to our past, and carry us into a more grounded future. Two treasured recipes my mother brought with her from Hungary are now saved for my children and grandchildren in this book: Hungarian Goulash and Edith’s Stuffed Cabbage. They may sound standard, but my mom tells me that different families have different ways of making these dishes. This is her way of making them. I think of all the miles she traveled with these recipes, and the experiences she had. They were never written down because she considered this information so ordinary. According to my mom, who is 81 as I am writing this, “Everybody knows how to roll cabbage and make goulash!” Well, now I’ve taken the time to document exactly how she does it so this skill and this flavor, my heritage and my food history, from a land I’ve never been to but tasted all my life, will never be lost.
Herbed Rib Roast of Pork (page 92)
WHEN YOU WANT TO SPLURGE OR CELEBRATE, one of the most sumptuous and impressive meals you can make is a whole tenderloin of beef. Although this is one of the most expensive cuts in the butcher’s shop, a small piece of beef is very satisfying because it’s rich tasting and has a succulent texture. Tenderloin is delicious when served unadorned, but the Brandied Mushrooms are easy to make and deeply flavorful—a perfect accompaniment to the tender beef.  Serves 4 to 6
1 small tenderloin of beef (2 to 3 pounds), trimmed, silver skin removed
1 tablespoon extra-virgin olive oil
Salt and freshly ground black pepper
¼ cup fresh tarragon leaves
Brandied Mushrooms (recipe follows)
1. One or 2 days ahead, rub the meat all over with the olive oil. Season it with salt and pepper, and press the tarragon leaves against the meat. Wrap the tenderloin very tightly in plastic wrap and refrigerate it.
2. Two hours before you plan to cook the tenderloin, remove the meat from the refrigerator and let it come to room temperature, still in its wrapping.
3. Position a rack in the middle of the oven and preheat the oven to 450°F.
4. Unwrap the tenderloin and discard the tarragon leaves. Place the tenderloin on a rimmed baking sheet, and roast until the meat is cooked to the desired degree of doneness: An instant-read thermometer should register 130°F for rare, 135°F for medium-rare, and 140°F for medium.
5. Transfer the tenderloin to a cutting board and tent it loosely with a piece of aluminum foil (preferably recycled). Let the beef rest for 10 minutes before cutting it into thick slices. Serve with the Brandied Mushrooms.
The combination of dried porcini and fresh cremini mushrooms adds an earthy richness to this dish, which is further enhanced by brandy and red wine. To add depth to these flavors, intensely flavorful chicken stock is reduced with the porcini soaking liquid. If you happen to have homemade veal or beef stock on hand (lucky you!), then either of these can be substituted for the chicken stock. A splash of aged balsamic vinegar and a sprinkling of fresh tarragon perfectly balance the rich, woodsy notes to round out the dish. If you feel indulgent, add the crème fraîche, which will both mellow the flavors and add a bit of creaminess. We love this served with Tenderloin of Beef, but it also complements venison and duck dishes beautifully. Makes about 1½ cups
1 ounce (about 1 cup) dried porcini or wild mushrooms (see sidebar, page 23)
1 cup very hot water
1½ cups Chicken Wing Stock (page 403)
2 tablespoons unsalted butter
¼ cup finely minced peeled shallots
4 ounces brown (cremini) mushrooms, sliced ¼-inch thick (about 2 cups)
Salt and freshly ground black pepper
2 cloves garlic, peeled and crushed
3 tablespoons Cognac or brandy
½ cup dry red wine, such as syrah or Zinfandel
1 teaspoon aged balsamic vinegar
2 tablespoons Crème Fraîche (optional, page 415)
1 tablespoon chopped fresh tarragon or flat-leaf parsley
1. Place the dried porcinis in a small bowl and cover with the hot water. Set aside until softened, about 20 minutes. Place a fine-mesh sieve over a clean bowl, and strain the mushrooms, reserving the soaking liquid. Coarsely chop the porcinis and set aside.
2. Combine the Chicken Wing Stock with the porcini soaking liquid in a small pan and simmer over medium heat until the mixture is reduced by two thirds, about 15 minutes. Set aside.
3. Melt the butter in a medium-size skillet over medium heat. Add the shallots and cook, stirring occasionally, until they begin to soften, about 3 minutes. Add the fresh mushrooms and season with salt and pepper to taste. Cook over medium-high heat, stirring frequently, until the mushrooms exude their juices and soften, 5 to 10 minutes. Add the chopped porcinis and the garlic, and cook for 1 minute, stirring constantly.
4. Add the Cognac to the skillet and cook until the Cognac evaporates, about 2 minutes. Then add the red wine and cook until the wine has almost completely evaporated, 3 to 5 minutes.
5. Add the chicken-porcini stock and the balsamic vinegar. Taste, and season with salt and pepper as needed. Stir in the crème fraîche, if using, and the tarragon. Serve hot. (The mushrooms can be refrigerated, covered, for up to 3 days. Reheat gently over low heat to serve.)
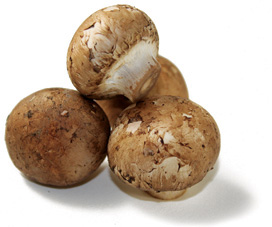
Cremini mushrooms
Like most environmental issues, meat production is a complex one. Eating foods that are high on the food chain is resource-intensive and contributes disproportionately to global warming; for example, industrial feedlot meat production requires about 16 times more fossil fuel energy and generates about 24 times more greenhouse gases than producing the same number of calories of vegetables and rice. The Natural Resources Defense Council estimates that if every American eliminated just 4 ounces of beef a week, the reduction in global-warming gas emissions would be equivalent to taking 4 to 6 million cars off the road!
When you’re making meat choices, it’s important to consider the type, such as beef or chicken, as well as how that meat was produced. Your food-buying dollars are a powerful force for change in the food industry, and consumer demand drives the popularity of more eco-conscious organic or grass-fed meat.
• Conventional Feedlot Beef: the worst choice for the environment Thousands of cattle confined in tight quarters, eating large amounts of conventionally produced grain, soy, and silage, result in far-reaching burdens on the environment, which include the use of large amounts of chemical fertilizers and toxic pesticides to grow the animals’ feed. Conventional cattle are usually given hormones and regular sub-therapeutic doses of antibiotics to keep them “healthy” in this environment. These feedlots also generate large amounts of animal waste that can pollute water sources and contribute to greenhouse gases.
• Organic Beef: a better option Organic beef cows must be fed a completely organic diet, so the considerable amount of land dedicated to growing their feed is farmed without toxic pesticides and synthetic fertilizers, which can pollute the environment. Organic farming methods also minimize soil erosion and preserve soil nutrients.
Organic beef cattle are not given hormones or antibiotics, and they are not raised in crowded feedlots. Producers must also maintain organic pasture for the cattle to graze on throughout their lives, and they must adhere to humane standards as required by USDA Organic Standards. Organic beef cattle may be supplemented with organic grain. A cow is still a cow, but just the elimination of a conventional diet, the use of smaller, less crowded herds, and the absence of hormone and antibiotic contamination of soil and water make this choice lighter on the environment. (See page 112 for a definition of the “organic” label for meat.)
Global Warming Pollution Released by the Production of Certain Foods
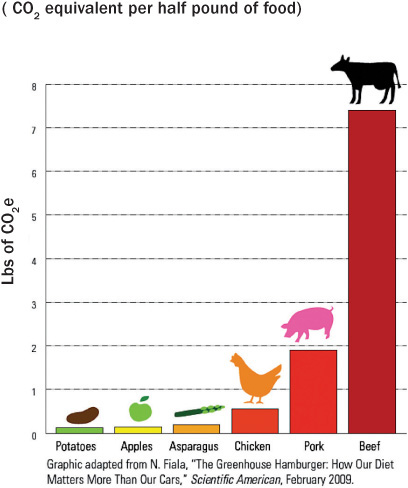
This graphic from the NRDC website represents the effects of the production of conventionally produced foods.
• The Grass Is Greener True grass-fed animal products come from ruminant animals that have eaten only mother’s milk, then fresh grass or hay all of their lives. This type of animal husbandry keeps land in permanent pasture, which is more ecologically sound than growing crops and shipping them over long distances to feed cattle. The need for pesticides and herbicides is greatly reduced or eliminated, soil erosion virtually ceases, and soil fertility is enhanced. The need for fertilizers is also minimized on pasture, which protects water supplies from contamination by excessive nitrogen or phosphorous levels. Permanent pasture fixes carbon into the soil, which helps combat the greenhouse effect and global warming. Pastures also provide habitat and additional forage for wildlife. (See page 112 for a definition of the “grass-fed” label.)
• Pork Pigs are much more resource-efficient and have a smaller carbon footprint than beef. Producing a pound of beef generates nearly 4 times as much climate-warming emissions as a pound of pork. Conventionally raised pigs are fed grains that have been grown with chemical fertilizers and toxic pesticides; they are also routinely given antibiotics. Many swine farms raise pigs in severely crowded conditions and produce large quantities of animal waste. For these reasons, it’s best to choose organic pork, which ensures that animals are raised in less crowded, more humane conditions, fed organic feed, and not given antibiotics. (See page 112 for a definition of the “organic” label for meat.)
• Chicken, Turkey, and Duck As far as greenhouse gas emissions go, fowl have even less of an environmental impact than pork—roughly one third less. And while it takes about 2 pounds of feed to produce 1 pound of chicken, it takes between 10 and 20 pounds of feed to produce a pound of beef. Unless they are certified otherwise, fowl are given conventional grain as feed, and they are usually given doses of sub-therapeutic antibiotics. Organic poultry is usually the best choice. (See page 112 for a definition of the “organic” label for meat.)
MY MOTHER IS HUNGARIAN, and she grew up with goulash made with beef and potatoes. There are many versions of this stew, as different families made it with different ingredients. Some recipes insist on bell peppers, and those can certainly be added if you like. Goulash, like all stews, gets even better a day or two after it’s made as its flavors meld together and intensify. It’s especially good served over hot egg noodles. Serves 4 to 6
8 tablespoons olive oil
2 pounds boneless beef stew meat, cut into 1-inch cubes
4 cups diced yellow onions (¼-inch dice)
½ cup chopped garlic
2 tablespoons sweet Hungarian paprika
2 tablespoons dried oregano
2 tablespoons dried thyme
1 teaspoon hot Hungarian paprika
Salt and freshly ground black pepper
1 cup tomato sauce
4 to 5 cups cold water
3 pounds Yukon Gold or russet potatoes, cut into 1¼-inch cubes (about 6½ cups)
1. Heat 2½ tablespoons of the olive oil in a large, heavy pot or Dutch oven over medium-high heat. Add half of the meat and cook, stirring frequently, until browned all over, 5 to 7 minutes. Transfer the meat and any pan juices to a bowl, and set aside. Repeat with another 2½ tablespoons oil and the remaining beef, and set aside.
2. Add the remaining 3 tablespoons oil to the pot and reduce the heat to medium. Add the onions, garlic, sweet paprika, oregano, thyme, hot paprika, 1 teaspoon salt, and ½ teaspoon black pepper. Cook, stirring frequently, until the onions are soft, 5 to 8 minutes.
3. Add the beef, with any accumulated juices, and the tomato sauce to the pot and raise the heat to medium-high. Add enough cold water to cover the meat, cover the pot, and bring the mixture to the start of a boil. Reduce the heat to maintain a slow simmer and cook until the beef is tender, about 1¼ hours.
4. Add the potatoes and 1 tablespoon salt to the pot. There should be enough sauce to almost cover the potatoes; add ½ cup more water if needed. Cover the pot and simmer the stew until the potatoes are just tender, 20 to 30 minutes. Do not overcook or the potatoes will fall apart.
5. Season the goulash with salt and pepper to taste, and serve hot. (The goulash can be refrigerated, covered, for up to 3 days.)
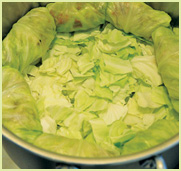
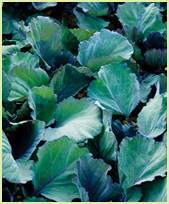
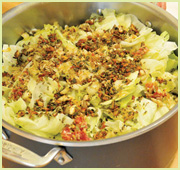
THERE IS NO DISH I ASSOCIATE MORE WITH MY MOM than her stuffed cabbage. She always makes it in her largest stockpot and cooks a massive quantity so there is plenty for everyone in our family to take some home to eat for days. It was a big challenge to adjust this recipe to serve just six! Whenever she makes it, it feels like a special occasion. In fact, I didn’t learn how to make it myself until I wanted to immortalize it in this cookbook, because, frankly, I love it when she cooks it for me. That’s always been part of the magic of this dish. But now I realize it’s equally delicious and full of memories when I make it.
To make these cabbage rolls, ground beef is combined with uncooked rice and liberal amounts of onions, garlic, and spices, then rolled in cabbage leaves and simmered in a rich tomato sauce. Beef and white rice is the classic combination, but as my mom has gotten more health-conscious over the years, she has started to make this dish with ground turkey and brown rice instead of white. She actually prefers it this way now, and I really like it too. If you decide to make the brown rice version, add an extra ½ cup of water since brown rice will absorb a bit more liquid, and cook it for an extra 30 minutes (a minimum of 2 hours). One of the keys to keeping the stuffed cabbage intact is to roll the meat securely and arrange the rolls in a tight circle in the pot. You need a very large pot (at least 12 quarts) for this recipe in order to accommodate the sauce, much of which is absorbed by the rice during cooking. This dish reheats well in the microwave, and can be refrigerated, covered, for up to 3 days. Serves 6 (2 rolls per person)
3 large heads of green cabbage
1½ pounds lean ground beef
1½ cups white rice
2 large yellow onions, grated (about 2 cups)
⅔ cup olive oil
⅓ cup chopped garlic
2 tablespoons dried oregano
2 tablespoons dried basil
4 teaspoons salt
4 teaspoons sweet Hungarian paprika
½ teaspoon cayenne pepper
4 cups tomato juice
2 large cans (28 ounces each) tomato sauce
½ cup ketchup
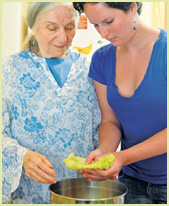
My mom, Edith, showing my daughter, Marea, how to roll stuffed cabbage, a task she learned from her mother when she was a girl in Hungary.
1. Remove the cores from 2 of the cabbages, leaving the heads intact. Place one of the cored cabbages in a large microwave-safe bowl, and cover it with a kitchen towel. (If you do not have a microwave oven, see the Note on page 84.) Microwave the cabbage on high power until the leaves are pliable and can be detached easily, 6 to 10 minutes. Repeat with the second cabbage. Let the cabbages cool until they can be handled comfortably, at least 15 minutes.
2. Carefully remove the outer leaves of the cabbages, keeping them whole. As you move closer to the center of the heads, the leaves will become smaller. Set aside 12 of the largest leaves. Slice the remaining steamed leaves into 1-inch-wide pieces, and reserve. Core, then cut the remaining uncooked cabbage into 1-inch pieces and set aside. (The cabbage leaves can be prepared to this point up to a day ahead and refrigerated, covered.)
3. Place the ground beef, rice, onions, ⅓ cup of the olive oil, and half of the garlic in a large bowl. Add 1 tablespoon of the oregano, 1 tablespoon of the basil, 1½ teaspoons of the salt, 2 teaspoons of the sweet paprika, and ¼ teaspoon of the cayenne pepper. Using your hands, knead the mixture together until combined.
4. Place a 1-inch-deep layer of the cut cabbage in the bottom of a 12-quart stockpot, to form a bed for the rolls. Reserve the remaining cut cabbage.
5. With your hands, form about ⅓ cup of the meat mixture (this will vary, depending on the size of the cabbage leaves) into a log. Place the meat in the center of a reserved cabbage leaf. Fold the bottom of the leaf over the filling, and roll the leaf up tightly to create a tidy roll. Using your finger, poke the edges of the leaves into the center of the roll to create a fairly tight and secure roll. Place the roll, seam side down, along the outer edge of the stockpot. Stuff and roll the remaining cabbage leaves as described, placing the rolls along the outside edge of the pot and then filling in the middle area. The cabbage rolls should be tightly packed in a single layer. Reserve the leftover meat mixture.
6. Cover the rolls with a 2-inch layer of the remaining cut cabbage (you may have some left over). Add the remaining ⅓ cup olive oil, remaining garlic, and remaining 1 tablespoon oregano, 1 tablespoon basil, 2½ teaspoons salt, 2 teaspoons sweet paprika, ¼ teaspoon cayenne pepper, and the leftover meat mixture to the pot. Pour the tomato juice, tomato sauce, and ketchup into the pot. The liquid must cover the cabbage rolls by at least 3 inches; add water or more tomato juice if needed. Do not stir—just lightly swirl the ingredients together without disturbing the cabbage.
7. Cover and bring the mixture to the start of a boil over high heat. Reduce the heat to medium-low to maintain a simmer and cook for at least 1½ hours. Check once or twice to make sure that the sauce is simmering, not boiling vigorously, and that there is enough liquid to cover the cabbage rolls.
8. Check one of the rolls to see if the rice is fully cooked. This recipe is very forgiving and it is better to cook the cabbage rolls for a few extra minutes rather than undercook them. If the cabbage isn’t soft and tender, cover the pot and continue cooking for another 15 minutes, or until the rice tastes fully cooked and the cabbage is soft.
9. Turn off the heat and let the cabbage rolls rest for 20 to 30 minutes.
10. Using tongs, carefully remove the cabbage rolls from the pot and transfer them to individual plates or a large platter. Spoon the sauce over the rolls, and serve hot.
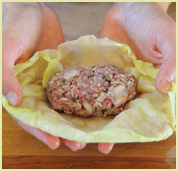
1. Place the meat mixture in the center of a whole cabbage leaf.
2. Bring the stem end of the leaf over the meat.
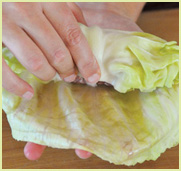
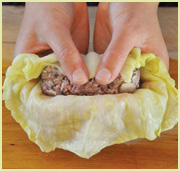
3. Begin rolling the meat toward the top of the leaf.
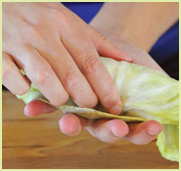
4. Roll the leaf as securely as possible without squeezing the filling.
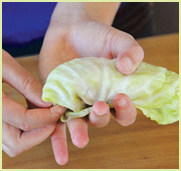
5. Use your finger to poke one side of the leaf in toward the center.
6. Poke in the second side to complete the roll.
7. Place a 1-inch layer of cabbage pieces in the bottom of a large pot and arrange the cabbage rolls, seam side down, in concentric circles in a single layer on the pieces.
8. Cover the rolls with more cut cabbage and sprinkle the remaining spices and meat mixture over the cabbage.
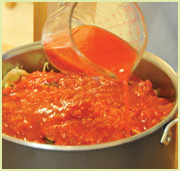
9. Pour on the tomato liquids and you’re ready to cook.
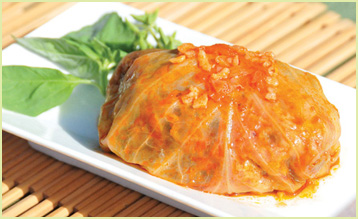
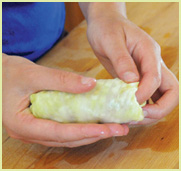
A perfect stuffed cabbage, ready to be eaten.
Note: If you don’t have a microwave oven, bring a large covered pot of water to a boil. Place a rimmed baking sheet near the stove. Stick a long cooking fork into the core hole of one of the cabbages, and plunge the cabbage (carefully, so you don’t splash yourself) into the pot of rapidly boiling water. The outer leaves will begin to fall off. Leave them in the boiling water for a few minutes, until they’re limp and flexible enough for stuffing; then take them out one at a time, and place them on the baking sheet. Try not to tear the leaves. After you have removed the outermost 6 or 7 leaves, remove what is left of the cabbage head from the water and set it aside to cool. Repeat with the second head of cabbage. You will need 12 leaves that are soft and pliable enough to be rolled.
MANY PEOPLE HAVE A MEATLOAF RECIPE THEY’RE LOYAL TO, but I still wanted to share this simple family recipe that my husband, Drew, grew up eating. It is very delicious and easy. One thing that makes it so good is the tomato sauce poured over the meatloaf just before it goes into the oven. The sauce glazes the top and is absorbed into the meat, creating a moist and tasty wonder. Parmesan cheese also adds flavor to the meatloaf, which is terrific eaten cold. If you double the batch, one bonus could be meatloaf sandwiches the next day. Serves 6
2 pounds lean ground beef, preferably grass-fed
2 teaspoons garlic powder
2 teaspoons onion powder
1½ teaspoons salt
½ teaspoon freshly ground black pepper, or more to taste
1 cup freshly grated Parmesan cheese
1 large egg
1 can (15 ounces) tomato sauce
1. Position a rack in the middle of the oven and preheat the oven to 375°F.
2. Place the beef, garlic powder, onion powder, salt, pepper, ⅔ cup of the cheese, and the egg in a large bowl and stir to combine. (It may be easiest to do this with your hands.)
3. Form the mixture into a loaf shape and transfer it to an 8½ x 4-inch loaf pan, preferably glass. Pour the tomato sauce over the meatloaf, place it in the oven, and bake for 45 minutes.
4. Sprinkle the remaining ⅓ cup Parmesan cheese over the meatloaf and continue baking until an instant-read thermometer inserted into the center registers 165°F, about 15 minutes.
5. Let the meatloaf cool in its pan on a wire rack for 15 minutes to allow it to absorb some of its juices and to firm slightly for easier slicing. Serve hot or warm, with any extra pan juices passed in a pitcher.
SHEPHERD’S PIE IS SOMETHING OF A BRITISH INSTITUTION and definitely falls into the category of comfort food. Ground or diced meat (traditionally lamb or mutton) is combined with gravy and (sometimes) vegetables and topped with mashed potatoes. The “pie” is baked until the potato “crust” browns. It was originally created as an economical way to use leftovers from a Sunday roast, but today shepherd’s pie is made any day of the week, with or without leftovers. Our version uses porcini mushrooms, red wine, and beef stock to create a very flavorful base for the meat and vegetables. I like to make this dish with buffalo (bison) because it is a much healthier choice than grain-fed beef, with a lower impact on the environment (see page 91). It tastes great—slightly sweet, rich, and flavorful—but you can substitute ground beef, lamb, or turkey.
One of the things I especially like about this recipe is the way you can vary the flavor by using different toppings. Here we adhere to tradition with a mashed-potato crust. If you want something a little unusual, you can substitute yams for the Yukon Gold potatoes or top the pie with the assertive Celeriac and Potato Mash on page 211. Serves 8
1 cup (about 1 ounce) dried porcini mushrooms (see sidebar, page 23)
¾ cup hot water
3 tablespoons olive oil
2 pounds ground buffalo (bison) or ground beef, preferably grass-fed
2 cups diced yellow onion (¼-inch dice)
1 medium carrot, peeled and cut into ¼-inch dice (about ½ cup)
1 tablespoon tomato paste
1 tablespoon Worcestershire sauce
2 tablespoons chopped fresh thyme leaves, or 1 tablespoon dried
2 tablespoons unbleached all-purpose flour
1 cup store-bought beef or chicken stock or broth, preferably low-sodium
½ cup dry red wine, such as merlot or zinfandel
1 cup frozen sweet corn (no need to thaw)
Salt and freshly ground black pepper
3 pounds Yukon Gold potatoes, peeled and cut into ¾-inch pieces (about 6½ cups)
3 tablespoons butter, at room temperature
3 tablespoons heavy (whipping) cream
Sweet paprika, for garnish (optional)
1. Place the dried mushrooms in a small bowl and add the hot water. Let the mushrooms soak at room temperature until they soften, about 20 minutes. Drain the mushrooms, reserving ½ cup of the soaking liquid and avoiding any grit that may have settled. Chop the mushrooms and set aside.
2. Place a large skillet or Dutch oven over medium-high heat, and when the pan is hot, add 1 tablespoon of the oil. Add the buffalo meat and cook, stirring to break it up, until it is browned, about 5 minutes. Transfer the meat to a bowl and set aside.
3. Add the remaining 2 tablespoons oil to the same skillet and set it over medium-high heat. Add the onion and carrot and cook, stirring frequently, until the vegetables begin to soften, about 8 minutes. Add the tomato paste, Worcestershire sauce, thyme, and flour and stir the mixture for 2 minutes to cook off the raw flour taste. Then add the reserved porcini liquid, the stock, and the wine to the skillet and bring the mixture to the start of a boil. Stir in the buffalo, with any accumulated juices, and the reserved chopped porcinis, and reduce the heat to maintain a simmer. Cook, stirring occasionally, until the mixture thickens and the liquid has reduced by two thirds, 8 to 10 minutes.
4. Remove the skillet from the heat and add the frozen corn. Season the mixture with salt and pepper to taste, and transfer it to a 9 x 13-inch baking dish or a 2-quart rectangular casserole. Set it aside.
5. Position a rack in the middle of the oven and preheat the oven to 375°F.
6. While the oven is heating, bring a large covered pot of salted water to a boil over high heat, add the potatoes, and cook until tender, 15 to 20 minutes. Drain, reserving about 1 cup of the cooking liquid.
7. Combine the potatoes and the butter in a bowl, and mash them together with a potato masher, adding the cream and some of the reserved potato liquid, as needed, to obtain the correct consistency. Season with salt and pepper to taste.
8. Spread the mashed potatoes over the meat mixture, covering it completely. Swirl the top with a knife to create decorative peaks, or use a fork to crosshatch the top. Sprinkle with paprika, if using.
9. Place the casserole on a rimmed baking sheet and bake the pie until the top is lightly browned and the meat is heated through, 40 to 50 minutes. Serve hot.
 LIVING GREEN
Resist the urge to open the oven door during roasting or baking. Each time you take a peek, the temperature can drop by as much as 25°F.
MY DAUGHTER, MAREA, TOOK A TRIP TO EUROPE after graduating high school and came home with some interesting food discoveries—such as this burger, which she found in a little restaurant in Berlin. Wanting to be adventurous on her adventure, she tried this unusual menu offering and couldn’t believe how good it was—albeit messy, with sauerkraut and barbecue sauce spilling out. She raved about it so much that it was one of the first things we cooked for dinner when she got home, and now we have the burgers often. The combination of cheese, bacon, grilled onions, sauerkraut, and barbecue sauce is unexpected and delicious. Although we prefer buffalo, you can substitute regular ground beef. The easiest way to serve this meal is to cook the patties and then let everyone assemble their own burgers, choosing from an array of condiments. Buffalo meat is very lean, so take care not to overcook it. Serves 4
8 strips thick-sliced bacon
1¼ pounds ground buffalo (bison)
Salt and freshly ground black pepper
3 tablespoons olive oil
1 large yellow onion, cut in half through the stem end, then thinly sliced crosswise
4 slices Swiss cheese
4 good-quality rolls or burger buns, split
½ cup barbecue sauce, warmed
2 cups sauerkraut (packaged in plastic bag or jar), drained and heated until warm
2 ripe tomatoes, cut into thick rounds
Sliced dill pickles
Ketchup
Dijon mustard
LIVING GREEN
It turns out that one of the best ways to save a domesticated species, ironically enough, is to eat it. At the end of the 19th century only about 1,000 bison remained in this country. Now, thanks in large part to a rise in the consumption of buffalo meat, their population has rebounded to nearly a half million.
1. Cook the bacon in a skillet over medium-low heat, turning it occasionally, until crisp, about 15 minutes. Set the slices aside to drain on a plate lined with paper towels.
2. Gently form the buffalo into 4 round patties. Season the meat on both sides with salt and pepper to taste.
3. Heat 2 tablespoons of the oil in a cast-iron skillet over medium-low heat. Add the onion slices and cook slowly, stirring occasionally, until they begin to caramelize, about 20 minutes. Lower the heat if the onions begin to cook too quickly. Transfer the onions to a plate and set aside. (The caramelized onions can be made 3 days ahead. Cool, cover, and refrigerate.)
4. Return the skillet to medium-high heat, and film the bottom with the remaining 1 tablespoon olive oil. Arrange the buffalo patties in the pan so that they do not touch. Reduce the heat to medium and cook for 5 minutes to sear the meat. Turn the patties with a spatula. Place a slice of cheese on each burger, cover the skillet, and cook until the cheese melts and the meat is cooked to your preference, 3 to 7 minutes. (Alternatively, you can grill the buffalo burgers on a barbecue grill.)
5. Set out the rolls, burger fixings, and condiments, and let your guests build their own burgers by adding bacon, caramelized onions, barbecue sauce, sauerkraut, tomato, pickles, ketchup, and mustard as desired.
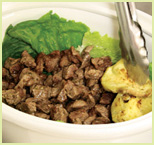
Crazy, Messy, Delicious Buffalo Burgers
Setting out the burger fixins.
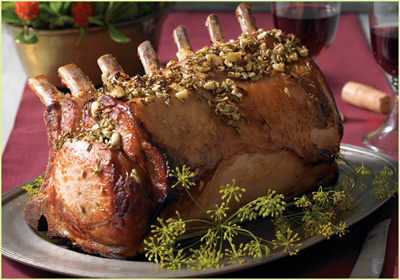
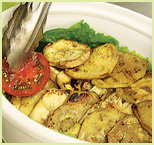
A STANDING RIB ROAST (RACK) OF PORK makes a truly delicious and most impressive centerpiece for a holiday or special-occasion dinner. If you’ve never seen this cut of meat at your market, don’t be surprised—it is generally a custom order, except during the Christmas season. Any market that has an in-house butcher will be able to prepare a rack of pork with a day’s notice. Request that the rack be frenched, which means that the meat is removed from the ends of the rib bones to make for a more attractive presentation. This same cut of meat, when 2 racks are tied together in a circle, is called a crown roast of pork. Pork loin on the bone is so juicy and succulent that it needs little enhancement other than a rub of oil, fennel, herbs, and garlic. For maximum flavor, prepare the pork 1 to 3 days ahead of time so that the flavors have time to infuse into the meat; then, before you cook the roast, let the pork sit at room temperature for 2 hours so the meat cooks more evenly. Serves 8
1 rib roast (rack) of pork (5 pounds), frenched
¼ cup extra-virgin olive oil
Coarse sea salt and freshly ground black pepper, to taste
2 tablespoons ground fennel seed (see sidebar, page 94)
6 large garlic cloves, crushed, peeled, and halved
2 tablespoons chopped fresh thyme leaves
8 fresh sage leaves, thinly sliced
2 tablespoons chopped fresh rosemary leaves
1 tablespoon fennel pollen (see sidebar, this page)
1. At least 1 and up to 3 days ahead, prepare the pork: Massage the pork with the olive oil, rubbing it in with your fingers. (You need the oil so that the herbs will stick to the meat, so don’t skimp on the massage.) Sprinkle the meat with sea salt and pepper, and then with the ground fennel. Tuck about half of the garlic between the ribs and into all crevices.
2. Mix the thyme, sage, and rosemary in a small bowl to blend. Press the herbs and the remaining garlic over all the meat and fat sides of the roast. Wrap the pork tightly in plastic wrap so that the herbs and garlic stay pressed against the meat. Place the pork in a baking dish or on a rimmed baking sheet, and refrigerate for at least 1 and up to 3 days.
3. On the day of serving, remove the pork from the refrigerator, and let it sit, still wrapped, at room temperature for 2 hours. Ideally the temperature of the pork should be 50°F at the center of the thickest section when checked with an instant-read thermometer.
Herbed Rib Roast of Pork
4. Position a rack in the lower third of the oven and preheat the oven to 425°F.
5. Unwrap the pork and transfer it to a roasting pan, arranging it bone side down. Sprinkle the fennel pollen, if using, over the meat. Roast the meat until it registers 145°F on an instant-read thermometer or a remote digital thermometer. (The internal temperature of the meat will rise about 10 degrees while it rests.)
6. Remove the pork from the oven and cover the roast loosely with aluminum foil (preferably recycled), or partially cover it with an upside-down metal bowl. Allow the meat to rest for 15 to 20 minutes before carving it between the rib bones.
7. If you like, drizzle some of the pan juices over the slices before serving.
SO EASY, SO DELICIOUS—THIS IS THE DISH I OFTEN PLAN TO make when I know I’ll arrive home from work late, without a lot of time to spend in the kitchen. I’ve given this simple recipe to many friends who were looking for something quick, easy, and tasty, and they all tell me it’s now part of their regular repertoire. The flavors of garlic, lemon, mustard, and thyme complement this cut of meat perfectly. The pork is best if it can be marinated for 8 to 24 hours before cooking, but even 30 minutes will do. This dish is great served with any type of potato. Serves 4
3 large garlic cloves, crushed and peeled
¼ cup fresh lemon juice, preferably from Meyer lemons
2 tablespoons Dijon mustard
1 tablespoon extra-virgin olive oil
1 teaspoon dried thyme
½ teaspoon salt
Freshly ground black pepper
1 or 2 pork tenderloins (about 1½ pounds total)
1. Combine the garlic, lemon juice, mustard, olive oil, thyme, salt, and black pepper to taste in a small bowl and whisk to blend.
2. Trim any fat off the tenderloin and remove the tough silver-skin membranes, if any. Place the tenderloin in a 1-gallon zip-lock and add the marinade. Seal the bag, pressing out any excess air, and refrigerate the pork for up to 24 hours, turning the bag occasionally to distribute the marinade evenly.
3. Position a rack in the middle of the oven and preheat the oven to 375°F.
4. Remove the tenderloin from the bag, reserving the marinade.
5. Place a large, heavy ovenproof skillet, preferably cast-iron, over medium-high heat. When the skillet is hot, add the pork and sear it on all sides, turning it with tongs, about 8 minutes.
6. When the meat is nicely browned, add the reserved marinade to the skillet and cook until the sauce begins to simmer. Transfer the skillet to the oven and cook until the tenderloin is slightly pink inside but still moist, and an instant-read thermometer inserted in the center registers 145°F, 10 to 20 minutes.
7. Transfer the tenderloin to a cutting board and let it rest for 10 minutes. Reserve the sauce.
8. Slice the tenderloin into 1-inch-thick pieces and serve with the pan sauce.
Note: Depending on how much time I have, I sometimes vary the way I cook this pork. Although we especially like the brown, seared crust that develops in the cast-iron pan, sometimes I skip the pan-searing step and pop the tenderloin with its marinade right into the oven. Other times, I skip the oven roasting altogether and just cook the pork in the skillet until it’s done, then turn off the heat and add the marinade, which bubbles and reduces from the residual heat in the skillet. Then I cut the meat into thick slices, add them to the sauce, and serve the pork right from the skillet rather than dirty more dishes.
SARAH AND I CAME UP WITH THIS RECIPE FOR A CATERING MENU one holiday season when we wanted a presentation that was both beautiful and unusual. While the red sun-dried tomatoes and the bright green spinach are ideal colors for the winter holidays, this is a dish to enjoy year-round. The tenderloins are pounded thin, layered with the savory spinach mixture, then rolled into a cylinder and baked. When sliced, the pretty pinwheels do double duty—meat and vegetable all in one. The pork is also delicious served cold. Serves 6 to 8
2 tablespoons olive oil
1 cup diced yellow onion (¼-inch dice)
2 tablespoons minced garlic
12 cups (packed) baby spinach leaves, rinsed and dried if not prewashed
2 ounces sun-dried tomatoes, cut in thin julienne strips (about ⅔ cup), reconstituted in 2 tablespoons warm water if not soft and pliable
2 pork tenderloins (about 1¾ pounds total), trimmed
Salt and freshly ground black pepper, to taste
½ teaspoon sweet paprika
2 tablespoons canola oil
1. Heat the olive oil in a large skillet over medium heat. Add the onion and cook, stirring frequently, until it is soft and translucent, about 8 minutes. Add the garlic and cook until it is fragrant, about 2 minutes.
2. Add the spinach and 1 tablespoon water to the skillet. (It may be necessary to add the spinach in batches.) Cook, stirring frequently, until all the spinach is wilted, about 8 minutes. Stir in the sun-dried tomatoes. Remove the skillet from the heat and let the mixture cool while you prepare the meat.
3. Place the pork tenderloins on a large sheet of parchment paper, arranging them next to each other so that the large end of one is next to the small end of the other. Cover the meat with a large piece of plastic wrap, and using the smooth side of a meat tenderizer or a rolling pin, pound the pork into a ¼-inch-thick rectangle. (The pork pieces need to overlap each other by 1 inch at the seam, so that one large piece of pork is created.) Season the top surface of the pork with salt, pepper, and ¼ teaspoon of the paprika.
4. Position a rack in the middle of the oven and preheat the oven to 350°F.
5. While the oven is heating, spread the spinach mixture over the pork, leaving a ½-inch border all around. Starting from the long side, roll the meat into a tight log. Using kitchen string, tie the roll at 2-inch intervals. If the meat is too long for your skillet, cut it in half to create 2 pieces. Season the exterior of the roll with salt, pepper, and the remaining ¼ teaspoon paprika.
6. Heat the canola oil in a large cast-iron or other heavy ovenproof skillet over medium-high heat. Carefully transfer the pork to the skillet, placing it seam side down. Sear the meat on all sides, 5 to 8 minutes total.
7. Transfer the skillet to the oven and roast until the pork is cooked through, or until an instant-read thermometer inserted into the center of the roll reads 140°F, 30 to 35 minutes.
8. Let the pork rest at room temperature for 15 minutes before removing the string and cutting the roll into ½-inch-thick pinwheels.
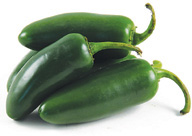
INSPIRED BY THE DISTINCTIVE CUISINE OF NEW MEXICO, this stew combines tender chunks of pork with roasted tomatillos, garlic, and green chiles. We like its rich, complex flavors that evolve through the slow cooking. It’s delicious served over rice, and it also makes a terrific filling for burritos or enchiladas. Serves 8
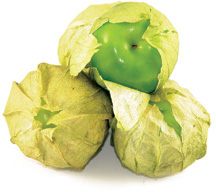
12 tomatillos, husked and cored (see sidebar, page 98)
1 tablespoon olive oil
1 teaspoon dried oregano
Salt and freshly ground black pepper
1 whole garlic head
8 ounces bacon, cut into ¼-inch pieces
¼ cup plus 1 tablespoon unbleached all-purpose flour
2 tablespoons ground cumin
3 pounds boneless pork shoulder (Boston butt), trimmed and cut into 1-inch pieces, fat discarded
2 cups diced yellow onion (¼-inch dice)
4 large garlic cloves, peeled and finely minced
Pinch of dried red pepper flakes, or more to taste
4 cups Chicken Wing Stock (page 403) or store-bought low-sodium broth
1 tablespoon tomato paste
1 large can (28 ounces) roasted chopped green chiles, drained
¼ cup chopped fresh cilantro, for garnish (optional)
8 lime wedges, for garnish (optional)
1. Position a rack in the middle of the oven and preheat the oven to 400°F.
2. Place the tomatillos in a bowl and toss with the olive oil, oregano, and some salt and pepper. Transfer the mixture to a rimmed baking sheet. Cut off and discard the top third of the head of garlic. Wrap the garlic bulb tightly in aluminum foil, and place it on the baking sheet. Bake until the tomatillos have slumped and are juicy, 35 to 40 minutes.
3. Remove the baking sheet from the oven and let the mixture cool for 15 minutes. Then transfer the tomatillos and their juices to a blender. Squeeze the roasted garlic from the skins and add to the blender. Puree until almost smooth. Set aside or refrigerate, covered, for up to 1 day.
4. Place the bacon pieces in a large skillet and cook over medium-low heat until they are crisp, about 15 minutes. Transfer the bacon to a plate lined with several layers of paper towels and set it aside to drain. Reserve all of the bacon fat.
5. Mix the ¼ cup flour, the cumin, and some salt and pepper in a medium-size bowl. Dredge the meat in the flour mixture, a few pieces at a time, until all sides are lightly coated.
6. Add 2 tablespoons of the reserved bacon fat to a large (4-quart) Dutch oven or heavy pot. Set the Dutch oven over medium-high heat, and when the fat is hot, add the pork pieces and cook until the meat is browned, 5 to 8 minutes. Do not crowd the pan; brown the pork in batches if necessary. Transfer the browned meat to a platter and set it aside.
7. Heat another 2 tablespoons of the reserved bacon fat in the same Dutch oven over medium heat. When it is hot, add the onion and cook, stirring frequently, until it is soft, 5 to 8 minutes.
8. Add the garlic cloves and red pepper flakes, and cook until fragrant, 2 to 3 minutes. Return the pork, any accumulated juices, and the tomatillo puree to the Dutch oven, and set it aside.
9. Heat 1 tablespoon of the reserved bacon fat in a large skillet over medium heat. Stir in the remaining 1 tablespoon flour and cook for 2 minutes, stirring constantly, to make a roux (a mixture of flour and fat, used to thicken a sauce or soup). Add the chicken stock, raise the heat to medium-high, and cook, stirring frequently, until the roux is blended in and the stock has thickened slightly. Stir in the tomato paste, the chopped green chiles, and the bacon pieces. Pour the mixture into the Dutch oven and stir to combine.
10. Place the Dutch oven over medium-high heat, cover, and bring to the start of a simmer. Then reduce the heat to low, cover the pan, and simmer gently, stirring occasionally, until the meat is fork-tender, 1¼ to 1½ hours. (Alternatively, you can put the pot in a 300°F oven and cook the pork until tender.)
11. Serve hot, sprinkled with the chopped cilantro and garnished with the lime wedges, if desired. (The stew can be cooled to room temperature, placed in an airtight container or zip-lock bag, and refrigerated for up to 3 days or frozen for up to 3 months. If it is frozen, thaw the stew in the refrigerator for 24 hours before reheating.)
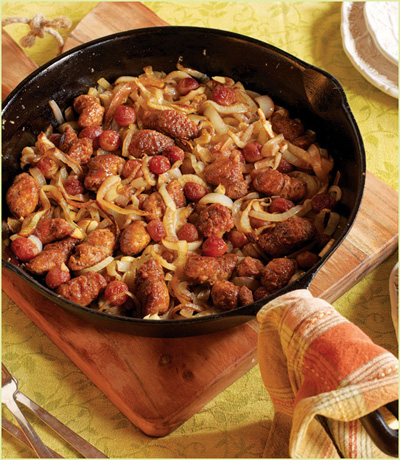
Italian Sausage with Fennel and Grapes
THE PAIRING OF SAUSAGES AND GRAPES, which may seem unusual, has a long history in Italian cuisine and is really delicious. This hearty country-style dish is very easy to prepare. We like the way the sweetness of roasted grapes, fennel, and onion forms a perfect backdrop for the spicy sausage. Choose whatever type of sausage you like: hot or sweet Italian, chicken and apple, or andouille, for example. This rustic dish makes a great autumn or winter dinner when partnered with some hot crusty bread and a glass of full-bodied red wine. Serves 4
1 tablespoon olive oil
1 pound uncooked sausage, such as sweet or hot Italian, cut on the diagonal into 1-inch-thick slices
1 tablespoon balsamic vinegar
1 to 2 large yellow onions, cut in half through the stem end, then cut crosswise into ¼-inch-thick slices (about 3½ cups)
1 large fennel bulb, cut in half lengthwise, core removed and outer layer discarded if discolored or very thick, then cut crosswise into ⅛-inch-thick slices (about 2 cups)
5 large garlic cloves, crushed, peeled, and halved lengthwise
2 cups seedless red or black grapes, such as Flame grapes
Salt, to taste
2 teaspoons ground fennel seed (see sidebar, page 94)
1. Position a rack in the lower third of the oven and preheat the oven to 400°F.
2. Heat the oil in a large cast-iron skillet or Dutch oven over medium-high heat until it is shimmering hot. Add the sausage and cook, turning occasionally, until it is well browned and the fat is beginning to render, about 8 minutes. Transfer the sausage to a plate lined with several layers of paper towels and set aside to drain at room temperature. Reserve the fat in the skillet.
3. Place the vinegar in a medium-size bowl and add the onion, fennel, and garlic. Toss to combine. Then add the grapes (leaving them whole), salt, and ground fennel and toss again to coat all surfaces. Transfer the mixture to the skillet and stir to combine. Cook over medium heat, stirring frequently, until the onion and fennel begin to soften, about 8 minutes.
4. Add the sausages, pressing them down into the vegetables so they are partially covered. Transfer the skillet to the oven and roast until the fennel and grapes are tender and the sausage is cooked through, 40 to 50 minutes. Serve hot.
THIS IS A DELICATE DISH full of light flavors and contrasting textures. The prosciutto, Parmesan stock, and fresh mint contribute an elegant taste, while the crisp-tender trio of broccolette, peas, and zucchini add a pleasant textural contrast. One great thing about this pasta is that it’s just as delicious cold as hot. This is a perfect dish to make for dinner with the idea of saving some for leftovers. Then when you need a quick lunch a few days later, you have a meal all ready to go. The pasta is also a terrific addition to a party or picnic because it tastes so good at any temperature. Serves 4 to 6
Salt
2 cups (12 ounces) orzo
2 bunches broccolette, trimmed and cut into 1-inch pieces (see box, page 169)
2 tablespoons olive oil
1 cup thinly sliced yellow onion
2 small zucchini, cut in half lengthwise, then cut into ¼-inch-thick slices (about 2 cups)
1 cup shelled fresh English peas
2 cups (8 ounces) diced prosciutto
⅔ cup Parmesan Stock (page 408), Chicken Wing Stock (page 403), or store-bought low-sodium chicken broth
⅓ cup thinly sliced fresh mint leaves
Freshly ground black pepper
½ cup freshly grated Parmesan cheese
1. Bring 4 quarts water to a boil in a large covered pot over high heat. Add 2 tablespoons salt and the orzo. Stir the pasta for 30 seconds. Then cook for 3 minutes. Add the broccolette and continue cooking, covered, until the broccolette is crisp-tender and the orzo is al dente, 7 to 8 minutes more.
2. Meanwhile, heat the olive oil in a large skillet over medium heat. Add the onion and cook, stirring frequently, until it just begins to soften, about 4 minutes. Add the zucchini and raise the heat to medium-high. Cook, stirring frequently, until the zucchini is just crisp-tender, about 3 minutes. Add the peas, prosciutto, and stock, and cook until the peas are crisp-tender, 2 to 3 minutes.
3. Drain the pasta and broccolette thoroughly in a colander.
4. Add the orzo and broccolette to the skillet and cook, stirring constantly, until the mixture is very hot, about 2 minutes. Add the mint and stir to combine. Season to taste with salt and pepper.
5. Transfer the pasta to a heated bowl or individual serving plates, and sprinkle each serving with some of the Parmesan cheese. Serve hot.
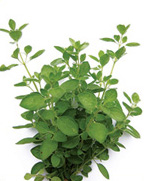
A TASTY MARINADE OF OREGANO, LEMON, GARLIC, AND OLIVE OIL adds great flavor to loin lamb chops. Be sure to plan ahead to allow enough time to let the meat marinate for at least 4 hours. In true Greek style, the heady fragrances of oregano and garlic dominate. The herb soaks up much of the marinade, so be sure to generously coat all sides of the lamb with the mixture for maximum flavor. I like to sear the chops in a hot cast-iron skillet, then finish the meat in the oven, but they are also terrific grilled. Serves 4
⅓ cup olive oil
⅓ cup fresh lemon juice
¼ cup dried oregano
2 tablespoons finely minced garlic
Grated zest of 1 lemon
Salt and freshly ground black pepper
8 lamb loin chops, 1½ to 2 inches thick (about 2 pounds total)
1. Place the oil, lemon juice, oregano, garlic, lemon zest, 1 teaspoon salt, and ½ teaspoon black pepper in a baking dish and whisk to blend. Add the lamb chops, turning them to coat all sides in the marinade. Cover the dish and refrigerate the meat for at least 4 hours or up to 24 hours.
2. One hour before you plan to cook the chops, remove them from the refrigerator and let them come to room temperature (in the marinade).
3. Position a rack in the middle of the oven and preheat the oven to 375°F.
4. Remove the chops from the marinade, reserving the marinade. Lightly season the chops with salt and pepper.
5. Place a large cast-iron skillet over medium heat, and when it is hot, add the lamb chops in a single layer, taking care not to crowd the pan. Cook on each side for 3 to 5 minutes to sear the meat until it is nicely browned. Then pour the reserved marinade over the chops, and transfer the skillet to the oven. Cook until the chops are done to your liking, about 5 to 10 minutes for medium-rare. (To test for doneness, insert an instant-read thermometer through the side into the center of a chop, without touching the bone. It will register 145°F when the chop is medium-rare.) Serve hot.
Note: To grill the lamb chops, preheat a barbecue grill to medium. Remove the chops from the marinade and place them on the hot grill grate. Cook them for about 3 minutes on each side, basting with some of the marinade. Then cover the grill and cook the chops, turning them once, until cooked to taste, 4 to 5 minutes more for medium-rare.
Marjoram is a member of the mint family and was used in medieval times as an air freshener when bathing was only a once-a-year event. In ancient Greece it was a symbol of wedded bliss. This aromatic herb tastes like a combination of thyme and oregano with a hint of pine, and is popular in Middle Eastern, North African, and Mediterranean cuisines. If you can find it fresh, substitute 1 tablespoon chopped marjoram for the dried marjoram in our Maklube.
THIS RECIPE WAS GIVEN TO ME BY SAMANTHA CABALUNA, a long-time Earthbound Farm employee. Her family has a Middle Eastern heritage, and this was one of her grandmother’s special dishes and Samantha’s favorite growing up. Maklube means “upside down,” which accurately characterizes this presentation. Lamb, vegetables, and rice are layered in a Dutch oven. After cooking and resting, the dish is flipped upside down and the pan is removed. Maklube is traditionally served with pine nuts and leban (Middle Eastern yogurt), but it tastes great with regular plain yogurt. Serves 6
7 tablespoons olive oil
2 pounds boneless lamb stew or leg meat, trimmed of fat and cut into 1-inch cubes
Salt and freshly ground black pepper
1½ teaspoons dried marjoram
3 cups warm water
2 large eggplants, peeled and cut into ¼-inch-thick rounds
3½ cups thinly sliced yellow onion
3 large cloves garlic, minced
3 large romaine lettuce leaves
4 large tomatoes, cut into ¼-inch-thick rounds
1½ cups basmati rice
⅓ cup pine nuts, toasted, for garnish
¾ cup plain yogurt, for garnish
1. Place a large skillet, preferably cast-iron, over medium-high heat, and add 2 tablespoons of the olive oil. Add the lamb in a single layer, taking care not to crowd the pan. (It may be necessary to do this in batches.) Brown the meat, turning it with tongs to brown all the surfaces, about 8 minutes total. Season the meat with salt and pepper to taste, and sprinkle with the marjoram. Add the warm water to the skillet, cover, and reduce the heat to medium-low. Simmer until the lamb is tender, 1 to 1½ hours.
2. Meanwhile, lightly sprinkle both sides of the eggplant slices with salt, and set them aside on a rack or plate to drain for 1 hour.
3. Using a clean kitchen cloth or paper towels, blot the water and salt from the surface of the eggplant slices. Heat 2 tablespoons of the olive oil in a large skillet, preferably cast-iron, over medium-high heat. When the oil is hot, add half of the eggplant slices in a single layer, making sure not to crowd the pan. Cook until lightly browned, about 2 minutes. Flip and cook on the other side for 1 to 2 minutes. It is important to cook the eggplant only until it is barely crisp-tender; do not overcook it. Transfer the slices to a baking sheet lined with several layers of paper towels.
4. Add 2 more tablespoons of oil to the skillet and repeat with the remaining eggplant.
5. Add the remaining 1 tablespoon oil to the skillet, reduce the heat to medium-low, and cook the onion, stirring frequently, until it is soft and tender, 8 to 12 minutes. Add the garlic and cook, stirring frequently, until fragrant, about 2 minutes. Set aside at room temperature.
6. Line the bottom of a 3-quart Dutch oven with the romaine leaves, arranging the lettuce so that it comes halfway up the sides of the pan. Transfer the lamb to the pan, reserving the pan juices in the skillet. Spread the meat out in an even layer, top it with the eggplant slices, and then cover them with the tomatoes. Scatter the onion mixture over the top, and press lightly with a spatula to compress and even the surface of the layers. Sprinkle the rice over the top.
7. Pour the reserved pan juices into a liquid measuring cup and add enough very hot water to make 3 cups of liquid. Carefully pour the liquid down the sides of the Dutch oven, disturbing the layers as little as possible. Cover the Dutch oven and place it over medium-low heat. Cook for exactly 40 minutes.
8. Remove the Dutch oven from the heat and let it sit, still covered, for 40 minutes to allow the layers to set.
9. To serve, remove the cover of the Dutch oven. Invert a large platter over the Dutch oven, and holding the platter and Dutch oven together firmly, carefully invert the Dutch oven. Lift off the Dutch oven and carefully remove the lettuce. Garnish the Maklube with the toasted pine nuts and yogurt, and serve immediately.
1. After lining the pot with romaine leaves, spread out the meat in an even layer, then top it with a layer of eggplant slices.
2. Top the eggplant with a layer of tomato slices.
3. Cover the tomatoes with the cooked onions.
4. Complete the layering with a layer of rice, then pour in the liquid, slowly so as not to disturb the layers.

5. After cooking, invert the Maklube onto a platter. Don’t worry if it doesn’t all stay mounded. The results will be delicious. Remove the lettuce leaves before serving.
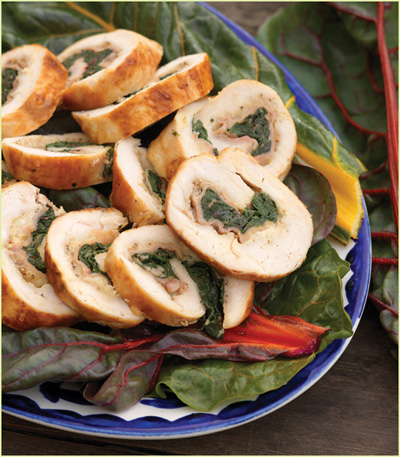
Chicken Breasts Stuffed with Chard, Gruyère, and Prosciutto
CHICKEN IS ONE OF THE MOST VERSATILE OF MEATS—as highlighted in this recipe, where you pound it thin and add a lively stuffing that combines salty prosciutto, sweet and nutty Gruyère cheese, and earthy chard. The rolls are quickly browned on the stovetop and then finished in the oven. The result is a tender, juicy chicken that is incredibly flavorful. Serves 4 to 6
3 tablespoons olive oil
1 large bunch Swiss chard, rinsed, stemmed, leaves stacked, rolled, and sliced into 2-inch-wide strips (8 cups)
2 teaspoons minced garlic
1 teaspoon dried oregano
4 skinless, boneless chicken breast halves (8 ounces each)
Salt and freshly ground black pepper
½ cup (2 ounces) grated Gruyère cheese
8 slices (about 4 ounces) prosciutto
1. Heat 1 tablespoon of the olive oil in a large skillet over medium-high heat. Add the chard, garlic, oregano, and 1 tablespoon water, and cook, stirring frequently, until the chard wilts, about 2 minutes. Then cover the skillet and cook until the chard is tender, 3 to 5 minutes more. Remove the skillet from the heat, uncover it, and let the chard cool.
2. Place the chicken, one breast piece at a time, between pieces of plastic wrap or in a large zip-lock bag, and pound the meat with the smooth side of a meat pounder or with a rolling pin until the meat is ¼-inch thick. Repeat with all the chicken.
3. Season one side of each of the chicken breasts with salt and pepper to taste. Sprinkle the cheese over the meat, covering only about two thirds and leaving the end of the chicken that is farthest from you uncovered. Place 2 slices of prosciutto, then add one-quarter of the chard on each breast, again covering only two thirds of the meat. Starting from the end nearest to you, roll the meat up. As you roll, the stuffing mixture will be pushed forward, toward the end of the chicken that was left uncovered. Tightly wrap each roll in plastic wrap, twisting the ends to create a tight, sausagelike roll. Refrigerate for at least 30 minutes or up to 8 hours.
4. Position a rack in the middle of the oven and preheat the oven to 350°F.
5. Heat the remaining 2 tablespoons olive oil in a large ovenproof skillet, preferably cast-iron, over medium-high heat. Carefully unwrap the chicken rolls and place them, seam side down, in the skillet, resting them against the sides of the pan so that they are less likely to unroll. Sear the meat for 3 minutes. Then turn the rolls with tongs and brown them on all sides, about 8 minutes total. (If the chicken starts to unroll, use toothpicks to pin it closed.)
6. Once all sides have been browned, return the rolls to the seam-down position and transfer the skillet to the oven. Bake until the chicken is cooked through, or until an instant-read thermometer registers 165°F when inserted into the thickest part of the roll, about 10 minutes.
7. Let the rolls rest for 5 minutes before cutting them into ½-inch-thick slices. Serve hot.
THIS QUICK AND EASY RECIPE PRODUCES MOIST, TENDER CHICKEN breasts with lots of fresh herb flavor. Marinating the breasts requires only 20 minutes, giving you just enough time to toss together a salad and steam a fresh vegetable to round out the meal. If you’re looking for a delicious meat dish that’s simple to prepare, this one fits the bill nicely. And if there happens to be any left over, the chicken tastes great the next day for lunch. Serves 6
3 tablespoons chopped fresh basil, or 2 tablespoons dried
3 tablespoons minced fresh flat-leaf parsley
2 tablespoons chopped fresh sage leaves, or 1 tablespoon dried rubbed sage
1 tablespoon minced garlic
3 tablespoons olive oil
2 tablespoons fresh lemon juice
6 skinless, boneless chicken breast halves (6 ounces each)
1 tablespoon canola oil
½ large lemon
2 tablespoons Pesto (page 164)
1. Place the basil, parsley, sage, garlic, olive oil, and lemon juice in a large mixing bowl and whisk to blend. Add the chicken breasts, and turn them to coat all the surfaces. Cover the bowl with a plate and let the chicken marinate in the refrigerator for 20 to 60 minutes.
2. Position a rack in the middle of the oven and preheat the oven to 375°F.
3. Place a large ovenproof skillet, preferably cast-iron, over medium-high heat, and when it’s hot but not smoking, add the canola oil. Arrange the chicken breasts in a single layer in the skillet. (If all the breasts will not fit comfortably without touching, cook the chicken in two batches, adding more canola oil if needed.) Raise the heat to high and cook for 4 minutes to sear the chicken. (Watch to ensure that the garlic does not burn, reducing the heat slightly if necessary.) Turn the breasts over and cook on the other side for 2 minutes. If you’ve seared the breasts in batches, return all the breasts to the skillet. If they don’t fit in a single layer, transfer them to a baking pan.
4. Squeeze the juice from the lemon half over the chicken breasts, and then spread the pesto over them. Transfer the skillet to the oven and bake until the chicken is cooked through, 4 to 6 minutes, or until an instant-read thermometer registers 165°F when inserted into the thickest part of the meat.
5. Let the chicken rest for 5 minutes before cutting it into ½-inch-thick slices. Serve hot.
THESE UNUSUAL ENCHILADAS HAVE A ZESTY FLAVOR thanks to the combination of spices and green olives. In our version, we don’t cook the tortillas in oil, which makes for a lighter and more healthful dish. If you don’t have time to roast a chicken, buy a rotisserie chicken at the grocery store. Remove the meat and save the bones for a quick chicken stock (see page 7). Enchiladas make a great casual supper and are also terrific for a party. Try them with Chili Rice, sour cream, and the very tasty Roasted Tomatillo Salsa, or use a store-bought tomatillo salsa. To save time, you can substitute 2 cans (15 ounces each) of store-bought enchilada sauce for the homemade version. Serves 4 (2 enchiladas per person)
LIVING GREEN
Reuse aluminum foil whenever possible. If it’s dirty, wash it thoroughly in cold water, spread it flat to dry, and fold it neatly to store.
ENCHILADA SAUCE
3 tablespoons canola oil
2 cups diced yellow onion (¼-inch dice)
3 tablespoons minced garlic
1 teaspoon dried oregano
1 teaspoon ground cumin
5 tablespoons chili powder
1½ tablespoons unbleached all-purpose flour
4 cups Chicken Wing Stock (page 403) or store-bought low-sodium chicken broth
Salt and freshly ground black pepper
ENCHILADAS
8 fresh corn tortillas (6-inch diameter)
2⅔ cups shredded cooked chicken
3 cups grated cheddar cheese
1½ cups pitted green olives, chopped
Chili Rice (page 227, optional)
Sour cream
Roasted Tomatillo Salsa (page 418, optional)
1. Prepare the sauce: Heat the oil in a large skillet or Dutch oven over medium heat. Add the onion, garlic, oregano, and cumin, and cook, stirring frequently, until the onion is soft but not browned, about 8 minutes. Stir in the chili powder and flour, and cook, stirring constantly, for 1 minute to eliminate the raw flavor of the flour.
2. Slowly add the stock, whisking to blend. Raise the heat to medium-high and cook, uncovered, until the sauce begins to thicken, 15 to 20 minutes. (You need about 3½ cups of sauce.) Season with salt and pepper to taste. Transfer the sauce to a medium-size bowl and let cool.
3. Position a rack in the middle of the oven and preheat the oven to 350°F.
4. Spread ½ cup of the enchilada sauce over the bottom of a 9 x 13-inch baking dish.
5. Prepare the enchiladas: Dip both sides of 1 tortilla into the sauce in the bowl, and shake off any excess. Transfer the tortilla to the baking dish. Place ⅓ cup of the shredded chicken at one end of the tortilla. Top the mixture with ¼ cup of the cheese and 2 tablespoons of the olives. Roll the tortilla up tightly and place it, seam side down, at one end of the baking dish. It’s okay if the tortillas crack during the rolling process. Repeat with the remaining tortillas.
6. Cover the tortillas with the remaining sauce, and sprinkle with the remaining cheese. Cover the baking dish with aluminum foil (preferably recycled), and bake until the sauce is bubbling and the filling is hot, about 20 minutes. Serve with Chili Rice, sour cream, and Roasted Tomatillo Salsa, if desired.
Note: You can make the enchiladas a day ahead. Place them in the baking dish, pour the sauce over the rolled tortillas, and refrigerate, covered with aluminum foil. The next day, let them sit for an hour at room temperature before baking.
Chicken and Green Olive Enchiladas
Some of the labels you see on meat packaging can be confusing when you’re trying to make better choices for the environment and your health. What’s the difference between “Natural” and “Organic”? Does organic beef come from 100-percent grass-fed cattle? These issues become more complicated because some standards for labels do overlap. Humane treatment for animals is built into USDA Organic Standards, which is the most inclusive eco-label. Organic standards do not, however, cover all label claims in this section. Grass-fed animals are never given grain or soy. Organic production methods require access to pasture, but allow feeding of organic grain and hay. So if you want to be assured that your meat is organic and grass-fed, both labels must be present.
It is important to remember that all these labels have separate certifiers and their own sets of standards. While I can’t list all the requirements for these labels here, this overview of the broad points will help you to navigate these claims.
• Natural The USDA definition of “natural” is “Meat that is minimally processed and free of additives such as preservatives, artificial flavors, or colors.” This is a processing claim for the finished product only (the meat after slaughter) and has nothing to do with how the animal was raised or handled.

• USDA Certified Organic This is the strictest and most regulated label. Animals certified under the USDA National Organic Program (NOP) must be fed a 100-percent organic diet; they are never given hormones or antibiotics; they are never exposed to synthetic pesticides. Cattle may be pasture-fed their entire lives, or be fed a combination of grass and organic grain. Organic feed may not contain animal by-products. Standards require that all animals be raised in a humane manner with access to the outdoors, shade, shelter, exercise areas, fresh air, and sunlight. Only meats that have been produced and processed in strict compliance with USDA Organic Standards may bear the organic seal. The Organic Seal does not claim that animals were 100-percent grass fed.

• American Grassfed Association This organization defines grass-fed products from ruminants—including cattle, bison, goats, and sheep—as those foods from animals that have eaten nothing but their mother’s milk and fresh grass or grass-type hay. Many products are marketed as “grass-fed” when grass has been only part of the animal’s diet. Animals may also have been confined, given grain, antibiotics, or synthetic hormones. For this reason the Association is the only seal that provides assurance that the products you purchase are from 100 percent grass-fed animals. The grass-fed label does not claim that the meat is also organic.

• Certified Humane Raised and Handled Overseen by the Humane Farm Animal Care since 2003, this certification program ensures that a producer meets humane standards for animals from birth through slaughter. Animals must have ample space, shelter, gentle handling to limit stress, ample fresh water, and a healthy diet of quality feed, without added antibiotics or hormones. Therapeutic administration of antibiotics under the care of a veterinarian is allowed. Cages, crates, and tie stalls are among the forbidden practices, and animals must be free to do what comes naturally. Chickens, for example, must be able to flap their wings and dust-bathe, and pigs must have the space to move around and root. The program also requires higher standards for humane slaughtering methods. This label does not claim that the meat is organic or grass-fed.

• American Humane Certified (formerly Free-Farmed) Overseen by the American Humane Association, a 133-year- old humane agency that has been offering this certification since 2000, certification includes third-party verification that science-based standards are being met as well as a monthly auditing process. Standards include the following: Animals must be free to move around and express normal behavior. Producers must provide proper medical care, diet, and water. No antibiotics or hormones may be given in feed; therapeutic administration of antibiotics under the care of a veterinarian is allowed. Animals must be free from fear and distress, and be provided with appropriate shelter for comfort and rest. This label does not claim that the meat is organic or grass-fed.
• Raised Without Antibiotics “Raised without antibiotics” is a general claim, which implies that subtherapeutic antibiotics were not used in the production of a food product. The USDA has defined “raised without antibiotics” to mean that animals used for meat were raised entirely without the use of low-level (subtherapeutic) doses of antibiotics. Claims on these products do imply that the manufacturer has gone beyond USDA regulations for conventional meat production.
• Hormone Free “No hormones administered” and “hormone free” are general claims that imply that no hormones were given to meat or dairy animals. There is currently no standard definition for the term except for meat products. Unless otherwise specified, there is no organization independently certifying this claim.
It’s important to note that the USDA prohibits the use of hormones for pigs and poultry in the United States. Therefore producers who label pork and poultry products as “no hormones administered” are not doing anything beyond what all conventional producers are required to do.
IF YOU’RE FAMILIAR WITH VIETNAMESE CUISINE, you may know that clay pot cooking is a standard technique. With this recipe, we’ve re-created one of our favorite restaurant dishes for the home kitchen—and it works perfectly well without any special equipment. Tender pieces of chicken are cooked in a deceptively simple combination of chicken stock, sugar, soy sauce, and fish sauce, with a result that is rich and full of complex flavors—sweet, salty, and hot, all at once. Fish sauce is a mainstay of Vietnamese cuisine and is a key element of this dish. Look for it in Asian markets, as high-quality brands are rarely carried in mainstream grocery stores. The chicken needs to marinate for a few hours before being cooked, so plan ahead. Serve the chicken over steamed jasmine rice or cellophane noodles in shallow bowls. Serves 4
MARINADE AND CHICKEN
¼ cup canola oil
2 tablespoons soy sauce, preferably low-sodium
2 tablespoons fish sauce (see box, page 156)
2 tablespoons grated peeled fresh ginger
2 tablespoons finely minced fresh lemongrass (from 2 stalks; see sidebar, page 19)
1½ pounds boneless, skinless chicken breast or thigh meat, cut into ¾-inch cubes
SAUCE
¼ cup (packed) dark brown sugar
1¾ cups Chicken Wing Stock (page 403) or store-bought low-sodium chicken broth
½ jalapeño pepper, seeds and ribs removed if desired, or 2 or 3 dried hot chiles
3 large garlic cloves, peeled and halved
4 slices (¼-inch thick) peeled fresh ginger
3 tablespoons fish sauce (see box, page 156)
1 tablespoon soy sauce, preferably low-sodium
1 bunch (6 to 8) scallions, top 2 inches discarded, remainder cut on a diagonal into 1-inch lengths
GARNISH
2 tablespoons chopped fresh cilantro (optional)

Fresh cilantro
1. Prepare the marinade: Place the oil, soy sauce, fish sauce, ginger, and lemongrass in a medium-size bowl and stir to combine.
2. Add the chicken to the marinade and stir to coat the pieces. Cover the bowl and refrigerate for 2 to 3 hours to allow the flavors to develop.
3. Remove the chicken from the marinade and rinse the pieces in cold water. Discard the marinade. Set the chicken aside to drain while you prepare the sauce.
4. Prepare the sauce: Place the dark brown sugar in a small, heavy-bottomed saucepan, and cook over medium-high heat until the sugar is hot to the touch and starting to melt around the edges. Add the chicken stock and stir until the sugar dissolves. Add the jalapeño, garlic cloves, and ginger slices, and cook, uncovered, until the liquid has reduced by half, 5 to 8 minutes. Remove the pan from the heat and let the mixture sit for 15 minutes to infuse the flavors.
5. Set a sieve over a clean saucepan and pour the mixture into it, discarding the solids. Return the pan to the stove and add the fish sauce, soy sauce, and scallions. Reheat over medium heat until the sauce is hot. Then add the chicken, reduce the heat to medium-low, and gently poach the chicken, stirring occasionally, until it is cooked, 5 to 8 minutes.
6. Serve the chicken and sauce garnished with the cilantro, if desired.
THIS IS MY VARIATION ON THE TRADITIONAL ITALIAN PUTTANESCA, a spicy sauce, generally served with pasta, that combines tomatoes with a vibrant cast of ingredients—onion, garlic, anchovies, black olives, and capers. We love the depth and complexity of flavors in this dish—it’s so vivacious that my family never tires of it. The last-minute addition of fresh basil and parsley adds a crucial flash of freshness—you’d miss the herbs if they weren’t there. Serves 4 to 6
¼ cup olive oil
1 cup diced yellow onion (¼-inch dice)
4 large garlic cloves, peeled and minced
Pinch of dried red pepper flakes, or to taste (optional)
Salt
1 pound dry short-cut pasta such as penne or rigatoni
1¼ pounds boneless, skinless chicken breasts, cut into ¾-inch cubes
1 large can (28 ounces) and 1 medium can (15 ounces) crushed tomatoes, with their juices
3 tablespoons tomato paste
5 canned anchovy fillets, finely chopped, or 2 tablespoons anchovy paste (see sidebar, this page)
Freshly ground black pepper
¾ cup (packed) Kalamata olives, pitted, rinsed, and cut in half lengthwise
3 tablespoons capers, rinsed
½ cup chopped fresh basil
⅓ cup chopped fresh flat-leaf parsley
1 cup shredded mozzarella cheese
½ cup freshly grated Parmesan cheese, for garnish
1. Place a large, deep skillet over medium heat, and when it is hot, add the olive oil. Add the onion and cook, stirring occasionally, until it has softened, 5 to 8 minutes. Add the garlic and red pepper flakes, if using, and cook, stirring frequently, until the garlic is fragrant, about 2 minutes. Set the onion mixture in the skillet aside.
2. Bring at least 4 quarts of water to a boil in a large covered saucepan over high heat. Add 2 tablespoons salt and the penne, and stir constantly for 30 seconds. Cook, stirring occasionally, according to the package directions until the pasta is al dente, 10 to 12 minutes.
3. While the pasta is cooking, place the skillet with the onion mixture over medium-high heat and add the chicken. Cook, stirring frequently, until the chicken is no longer pink on the outside, about 5 minutes. Stir in the tomatoes and their juices, and bring the mixture to a simmer. Reduce the heat to medium-low, cover the skillet, and cook until the tomatoes begin to soften, about 10 minutes.
4. Meanwhile, drain the pasta, return it to the pot, and cover to keep it warm.
5. Add the tomato paste, anchovies, ¾ teaspoon salt, black pepper to taste, the olives, and the capers to the chicken mixture. Simmer over medium heat, uncovered, stirring occasionally, until the tomatoes are tender, the chicken is cooked through, and the sauce has thickened, about 10 minutes. Stir in the basil and parsley, and remove the skillet from the heat. (If you need to, you can prepare the sauce several hours before you’re ready to cook and serve the pasta. Reheat the sauce while you cook the pasta.)
6. Spread the hot chicken puttanesca sauce in an even layer in the skillet, and immediately sprinkle the mozzarella over it. Cover, and let the mixture sit for a few minutes to allow the cheese to melt.
7. Divide the hot pasta among individual serving bowls, and top with the puttanesca sauce. (Alternatively, place the pasta in a large bowl, add the sauce, and toss to completely coat.) Sprinkle each serving with Parmesan, and serve immediately.
THREE DIFFERENT KINDS OF CHILES—ancho, pasilla, and chipotle—add depth of flavor and subtle heat to this perennial crowd-pleaser. Everyone has a favorite chili recipe, but this version, with its blend of spices, vegetables, and stock, is so rich and complex that it is outstanding. The chili can be also be made with beef, but ground turkey is a lower-calorie, lower-fat option, and the chili is so flavorful that no one will know the difference. We like a combination of light and dark turkey, but the recipe will work with either cut. The quantities specified here result in a mildly spicy chili. If you like yours south-of-the-border hot, add more chipotles and cayenne pepper. Serve bowls of steaming hot chili with grated cheddar or Monterey Jack cheese, and garnish each serving with dollops of sour cream. The chili freezes well; defrost it overnight in the refrigerator before reheating. Serves 8
¼ cup canola oil
2 medium yellow onions, cut into ¼-inch dice
1 green bell pepper, stemmed, seeded, and cut into ¼-inch dice
3 tablespoons ancho chile powder (see sidebar, this page)
1 tablespoon pasilla chile powder (see sidebar, this page)
2 tablespoons ground cumin
2 tablespoons ground coriander
1 tablespoon sugar
2 teaspoons dried thyme
2 teaspoons dried oregano
½ teaspoon cayenne pepper, or more to taste
5 garlic cloves, peeled and finely minced
2½ pounds ground turkey
2 cups store-bought low-sodium chicken broth
1 large can (28 ounces) diced tomatoes, with their juices
1 cup tomato sauce
¼ cup tomato paste
2 chipotle peppers in adobo sauce, with or without seeds, minced (see sidebar, page 418)
2 cans (15 ounces each) pinto beans, rinsed under cold water and drained
1 tablespoon apple cider vinegar
2 tablespoons fresh lime juice
Salt, to taste
1. Heat the oil in a large stockpot or Dutch oven over medium heat. Add the onions and bell pepper and cook, stirring frequently, until the vegetables soften, 10 to 15 minutes.
2. Meanwhile, combine the chile powders, cumin, coriander, sugar, thyme, oregano, and cayenne pepper in a small bowl.
3. When the vegetables are soft, add the herb/spice mixture and the garlic, and stir constantly until the mixture is hot and fragrant, about 3 minutes. Add the ground turkey and cook, breaking up the meat, until the meat is browned, about 10 minutes.
4. Add the broth, diced tomatoes, tomato sauce, tomato paste, chipotle peppers, pinto beans, and vinegar. Stir to blend, and simmer the chili over medium-low heat, stirring occasionally, until it is cooked through and has begun to thicken, 30 to 45 minutes.
5. Remove the pot from the heat, and stir in the lime juice and salt to taste. Serve hot.
Duck Breasts with Dried Cherry Sauce
DOMESTIC DUCKS CAN BE DISAPPOINTINGLY DRY AND TOUGH, but I’ve found that a short period of brining tenderizes and adds moisture to the meat. This step requires at least 3 hours, so plan accordingly. Duck is traditionally paired with fruit, and our dried cherry sauce offers a delicious, slightly sweet counterpoint to this robust meat. The basis of the sauce is called a gastrique in French, a syrupy reduction of caramelized sugar and vinegar, to which fruit is generally added. Tart dried cherries stand up beautifully to the gastrique and perfectly balance the richness of the duck. Serves 4
BRINE
2 teaspoons fennel seeds
1 teaspoon whole black peppercorns
1 tablespoon agave nectar (see box, page 321) or honey
2 teaspoons coarse (kosher) salt
4 cups cold water
DUCK AND SAUCE
4 boneless, skinless duck breast halves (6 to 8 ounces each)
3 tablespoons sugar
3 tablespoons red wine vinegar
½ cup dried tart cherries, such as Morello
3 tablespoons olive oil
¼ cup thinly sliced peeled shallots
1 cup dry red wine, such as Pinot Noir or Merlot
1 cup Duck Stock (page 404) or Chicken Wing Stock (page 403)
¼ cup heavy (whipping) cream
Salt and freshly ground black pepper
1. Prepare the brine: Place the fennel seeds and peppercorns in a small dry skillet over low heat and toast until hot and fragrant, 2 to 4 minutes. Transfer the mixture to a medium-size bowl. Add the agave, salt, and cold water to the bowl, and whisk until the salt dissolves.
2. Add the duck breasts to the brine, making sure they are completely submerged, cover the bowl, and refrigerate for a minimum of 3 hours and a maximum of 6 hours.
3. When you are ready to cook the duck, first make the sauce: Combine the sugar and 2 tablespoons water in a small saucepan over medium-high heat, and stir until the sugar dissolves. Continue cooking without stirring until the syrup is golden, about 7 minutes, watching carefully so that the sugar does not burn. Immediately remove the pan from the heat and carefully add the vinegar, averting your face in case the mixture spatters. Return the pan to low heat and stir until the hardened sugar melts. Stir in the cherries, and set the saucepan aside.
4. Heat 1 tablespoon of the oil in a medium-size saucepan over medium heat. Add the shallots and cook, stirring continuously, until they soften, about 2 minutes. Add the wine, raise the heat to medium-high, and cook until the wine reduces to about ½ cup, 7 to 10 minutes. Then add the stock and cook until the mixture reduces again to ½ cup, about 15 minutes.

5. Set a fine-mesh sieve over the saucepan containing the cherry mixture, and pour the stock mixture into the sieve; strain, and discard the solids. Return the cherry sauce to medium-high heat and bring to a simmer. Add the cream and cook until the sauce thickens slightly, 5 to 7 minutes. Remove from the heat and season with salt and pepper to taste. Keep the sauce warm while you finish the duck.
6. Remove the duck breasts from the brine and pat them dry. Season the duck with salt and pepper.
7. Place a large skillet, preferably cast-iron, over medium heat. When it is hot, add the remaining 2 tablespoons olive oil and arrange the duck in a single layer in the skillet. Cook until the flesh browns, about 5 minutes. Using tongs, turn the duck over and cook on the other side until the meat reaches the desired degree of doneness, 5 to 8 minutes for medium-rare.
8. Transfer the duck to a cutting board and let it rest for 5 minutes. Then cut the breasts crosswise into ⅓-inch-thick slices, and arrange them on warm plates. Spoon some of the sauce over each serving, and serve immediately.
BRAISING IS A TERRIFIC COOKING METHOD FOR DUCK. Slow simmering in homemade duck stock, enriched with brandy and quince for more depth of flavor, results in succulent, melt-in-your-mouth tender meat.
The rich, complex flavor of the sauce in this dish begins with homemade duck stock. If you don’t have duck stock on hand, cut up the ducks as described in Step 1 a day ahead of cooking. Use the carcasses to make the stock. Wrap the deboned duck pieces tightly, and refrigerate them until the day of cooking.
If you’re pressed for time, use homemade or the best quality chicken stock that you can find. The sauce will be lighter and less complex, but still flavorful. The braised duck is delicious served with Creamy Baby Turnips (page 221) or mashed potatoes. Serves 4 to 6
2 ducks (5 to 6 pounds each)
Salt and freshly ground black pepper
1 small onion, quartered through the stem end
3 cloves Garlic Confit (page 414), mashed, or fresh garlic, minced
1 dried bay leaf
1 tablespoon fresh thyme leaves
⅓ cup brandy
2½ cups Duck Stock (page 404)
3 quinces: 1 left whole; 2 peeled, cored, and cut into 8 wedges each
4 tablespoons (½ stick) unsalted butter
4 teaspoons sugar
3 small sweet, crisp apples, such as Gala or Fuji, unpeeled and uncored, cut in half crosswise
2 tablespoons Crème Fraîche (page 415)
2 tablespoons chopped fresh flat-leaf parsley
LIVING GREEN
Fill up your freezer: A freezer full of food uses less energy than an empty one. A well-stocked pantry and freezer can also save trips to the market.
1. Cut the ducks into pieces by removing the drumsticks and thighs as one piece. Remove all of the fat and some of the skin from the thigh area. Cut the breasts from the bone, and slice each breast piece in half crosswise. You should have 4 leg pieces and 8 boneless breast pieces. Reserve the wings and carcasses (and necks, if available) for making Duck Stock. Season the duck pieces all over with salt and pepper.
2. Place a large Dutch oven or heavy skillet, preferably cast-iron, over medium-high heat. When the pan is hot, add the duck pieces, skin side down, and cook until golden, about 5 minutes. Turn the pieces over and cook on the other side until browned, about 5 minutes. Do not crowd the pan or the meat will steam; it may be necessary to do this in batches. Transfer the duck to a plate and set aside. When the meat is cool enough to handle, discard the skin from the breast pieces.
3. Discard all but 1 tablespoon of fat in the Dutch oven. Add the onion, garlic confit, bay leaf, thyme leaves, and brandy, and bring to a simmer over medium-high heat. Cook for 2 minutes. Then add the duck stock, cover, and bring to a simmer. Add the duck pieces and any accumulated juices, cover the Dutch oven, and cook at a very slow simmer over medium-low heat until the duck is very tender, 1 to 1½ hours.
4. Meanwhile, peel and core the whole quince, and chop it into small pieces. Place the pieces in a small saucepan and add ¾ cup water. Cook over medium heat until the quince is very soft, 10 to 15 minutes. Drain and mash the quince. Add the quince puree to the Dutch oven.
5. Combine 2 tablespoons of the butter and 2 teaspoons of the sugar in a medium-size skillet, and cook over medium heat until the butter has melted and the sugar has dissolved. Add the apples, cut side down, and cook until the apple flesh is golden brown, about 10 minutes. Flip the apples and cook on the other side until they are just tender, 8 to 10 minutes. Remove from the skillet and set aside at room temperature. When cool enough to handle, remove the seeds and cores.
6. Heat the remaining 2 tablespoons butter and 2 teaspoons sugar in the same skillet. Add the quince wedges and cook, turning to cook all sides, until the fruit is golden brown and just tender, about 10 minutes. Set aside at room temperature. The skillet will be used again, so there is no need to wash it.
7. When the duck is very tender, use tongs to transfer the meat to a platter, and tent it loosely with aluminum foil. Strain the braising liquid through a fine-mesh sieve into a clean saucepan, and discard the solids. Place the pan over high heat and cook, uncovered, to concentrate the flavors and slightly thicken the sauce, 7 to 10 minutes.
8. While the sauce is reducing, reheat the apple halves and quince wedges in the skillet until warmed through.
9. Remove the sauce from the heat, and whisk in the crème fraîche and parsley. Season with salt and pepper to taste.
10. To serve, arrange 2 pieces of duck on each plate or shallow bowl. Nap them with the sauce, and arrange an apple half and several wedges of quince next to the meat. Serve hot.
THE BASICS: Dutch Ovens
A good Dutch oven is a kitchen essential. Dutch ovens are heavier and thicker than a stockpot, allowing them to conduct heat more effectively. And they’re deeper than a skillet, so they can accommodate large quantities of meat and liquid. These qualities make Dutch ovens the best choice for braises, pot roasts, and stews, especially as they can be used both on the stovetop and in the oven.