Chapter Four

Noshes and Nibbles

Mushy Green Goodness

guacamole

makes 2 cups

MadHungry2_529.tif

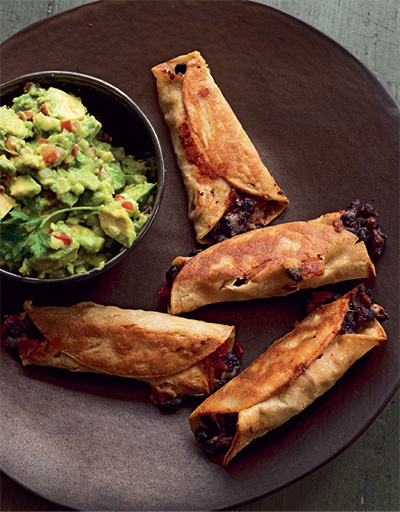
Guacamole and Fake-Out Flautas (page 117)

Store-bought guacamole mystifies me. Why buy something that simply requires mashing up a few items? And the homemade version is so much better. There are many riffs on guacamole these days, with various vegetables, fruits, or smoked chorizo added to personalize and differentiate them. But my old-school preference is for this version: it was the first Mexican recipe I learned. My early training in Mexican cooking came from Diana Kennedy, an absolute purist author-teacher of authentic regional Mexican food.

¼ cup finely chopped white onion

2 serrano chilies, minced (about 2 tablespoons)

3 tablespoons chopped fresh cilantro

1 teaspoon coarse salt

3 ripe Hass avocados, halved, pitted, and flesh scooped out of skin

1 small tomato, chopped

Tortilla chips, warm tortillas, or flautas for serving

  1. Mix together the onion, chilies, 2 tablespoons of the cilantro, and the salt in a large bowl. Using a large fork, crush the avocados into the onion mixture, leaving the mixture somewhat chunky. Fold in the tomatoes. Sprinkle the remaining tablespoon of cilantro over the mixture.
  2. Serve with tortilla chips, warm tortillas, or flautas.

Avocados

Perfectly ripe avocados are the key to this recipe, so you will probably have to plan ahead. Either find where to buy avocados that are cared for by a produce manager who knows how to keep ripe ones at the ready, or buy them in advance and let them ripen on your counter. Put the avocados in a paper bag or wrap in newspaper to mature—a process that will be hastened by snuggling an apple or tomato next to them. Check them every day, and don’t let them get overripe.

Craving Crispy Mexican

fake-out flautas

makes 12 flautas; serves 6

When I first made these at home, the fam asked if I’d ordered from the local taqueria. Talk about a coup! Flautas are those addictive deep-fried skinny tacos. This version became a total repeat-recipe hit. I call them “fake-out” because unlike their messy, deep-fried cousins, they are a quick low-fat, baked, vegetarian gem of a recipe. Serve with Guacamole, the ultimate scoopable flavor bomb.

12 corn tortillas

6 ounces Monterey Jack cheese, grated

2 tomatoes, chopped

One 15-ounce can black beans, drained and rinsed

½ teaspoon coarse salt

Juice of ½ lime

1 tablespoon safflower or other vegetable oil

  1. Preheat the oven to 425°F with the racks in the upper and lower third positions. Lay out the tortillas on two rimmed baking sheets and scatter the cheese over them. Place in the oven for 1 to 2 minutes to melt the cheese.
  2. Meanwhile, toss the tomatoes, black beans, salt, and lime juice together in a bowl.
  3. Distribute the bean mixture evenly over the melted cheese and roll up the tortillas. Arrange side by side, seam side down, on one baking sheet. Brush the oil over the tops. Bake for 8 minutes, or until golden and crispy.

Oven-Frying Versus Deep-Frying

Any deep-fried food, such as these flautas or Potato Poppers (page 214), that can be reasonably replicated by oven-frying is worth a try. Oven-frying is easier to do and doesn’t require the careful handling that deep-frying does (see page 135). Here are a few tips:

Melty Gooey Snack

queso fundido

serves 2

MadHungry2_473.tif

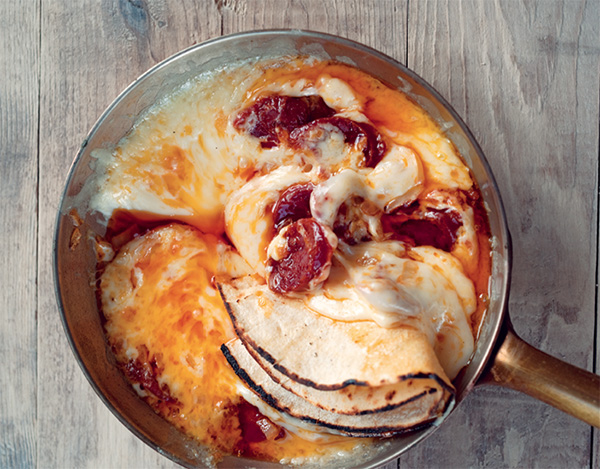
There are few things more divinely swoon-worthy than this concoction, which should almost be labeled an illegal substance. Queso fundido is insanely easy to replicate at home, and you’ll be spared any cleanup hassle, because every last bit of the crispy cheese that crusts up at the bottom of the pan will be scraped up and devoured. Serve with tortillas and Roasted Salsa Verde (page 211).

4 ounces smoked chorizo, cut into ¼-inch pieces

½ small yellow onion, finely chopped

12 ounces Monterey Jack cheese, shredded

Eight 6-inch corn tortillas, warmed over a flame (see Note)

  1. Preheat the broiler. Cook the chorizo in a 6-inch ovenproof skillet over medium heat until the fat begins to render, about 2 minutes. Add the onions and cook, stirring occasionally, until they soften and become translucent, about 3 minutes. Stir in the cheese.
  2. Transfer the skillet to the broiler and broil until the cheese is bubbly and golden brown in places, 2 minutes. Serve immediately, with the tortillas.

Smoked Chorizo

Spanish smoked chorizo is made from ground pork seasoned with smoked paprika (pimentón) and salt and then cured by hanging for 3 months. It should not be confused with its fresh, raw cousin, which needs to be cooked. The small firm links will keep for a long time in the refrigerator. A little goes a long way: dice one and add to scrambled eggs, frittatas (see itun), or hash browns (see page 40) for a big flavor boost.

common-note.png

I like to toast the tortillas first to get that charred edge, then stack them to steam and become pliable for use. Toast them one at a time, on a direct flame or in a hot skillet or comal (a smooth flat Mexican griddle) until the edges start to darken, about 1 minute; flip and toast for another minute (some will puff up once you flip them). If they seem too toasted, almost crisp, stack them on top of one another wrapped in a cloth. To keep them fresh for 30 minutes, wrap the cloth stack in foil and keep in a warm place.

Have Chip Will Dip

caramelized onion and bacon dip

makes 2 cups

MadHungry2_105.tif

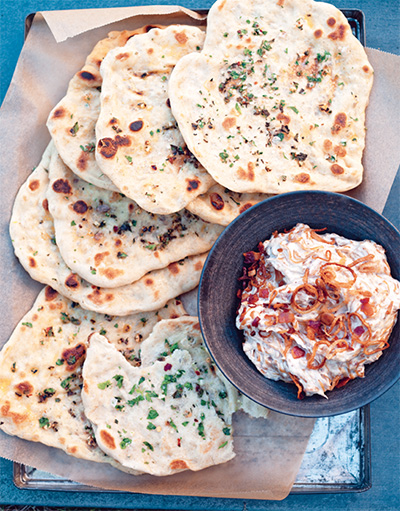
Herb Flatbreads (page 122) and Caramelized Onion and Bacon Dip

If you love yet hate that packaged onion soup mix dip, this is the version for you. It is a richer, deeper-flavored, cleaner-ingredient excuse for a potato-chip-dipping marathon. Or smear it over Herb Flatbreads (page 122) for a classier affair. For a sip with your dip, try Grapefruit Thyme Cocktail (page 245). The dip can be refrigerated for up to 3 days.

¼ cup extra virgin olive oil

3 pounds yellow onions, halved lengthwise and thinly sliced crosswise

1 teaspoon coarse salt

2 tablespoons white wine vinegar

⅓ pound bacon, chopped

1½ cups mayonnaise

1 cup sour cream

Optional Garnish

¼ cup safflower oil

3 shallots, thinly sliced into rings

  1. Heat a large skillet. Add the olive oil (see Note, page 171). When it shimmers, add the onions and salt and cook over low heat, stirring occasionally, until the onions are deep golden in color, 45 minutes to I hour; add a little water if needed to prevent sticking. Add the vinegar during the last minute of cooking. Let cool.
  2. Meanwhile, cook the bacon in a small skillet until it has rendered its fat. Using a slotted spoon, transfer the bacon to a paper-towel-lined plate; reserve the fat in the pan if you will be frying the shallots. Let the bacon cool.
  3. Stir together the mayonnaise, sour cream, onions, and bacon in a large bowl.
  4. For the optional garnish, add the vegetable oil to the skillet with the bacon fat and heat over medium-high heat until the oil shimmers. Add the shallots, lower the heat, and cook, stirring occasionally, until golden brown, about 2 minutes. Drain the shallots on a paper-towel-lined plate.
  5. Garnish the dip with the fried shallots, if using, and serve.
common-goodtoknow.png

Fried Alliums You don’t really need fried shallots on top of this dip, or fried leeks on top of the Greek salad (see page 107). But you want them! Take a cue from the onion rings (see page 134), and a simple recipe ascends to a whole new level. Frying little onion bits until golden and crunchy will definitely take you there.

Perfect Platform

herb flatbreads

makes twelve 6-inch flatbreads

Pizza-parlor dough is a quick road to a “home-baked” bread. For these flatbreads, just portion out the dough, roll into balls, stretch into rounds, season, and char on both sides: this can be done in a cast-iron skillet or other heavy pan or on the grill. Try serving the flatbreads with Caramelized Onion and Bacon Dip (page 120).

1 pound pizza dough—thawed frozen store-bought or from the pizza parlor

Extra virgin olive oil for rolling the dough

2 garlic cloves, minced

2 tablespoons finely chopped fresh parsley

1 tablespoon finely chopped fresh oregano

2 teaspoons flaky sea salt, such as Maldon, or coarse salt

⅛ teaspoon red pepper flakes

  1. Oil a rimmed baking sheet. On a lightly floured work surface, divide the dough into 12 pieces. With lightly oiled hands, roll each piece into a ball and transfer to the baking sheet.
  2. Combine the garlic, parsley, oregano, salt, and red pepper flakes in a small bowl.
  3. Heat a large cast-iron or other heavy skillet over medium-high heat. Hold a piece of dough in midair and stretch it into a 6-inch circle with your fingers, then place in the skillet, sprinkle with a pinch of the herb mixture, and cook undisturbed until the dough bubbles and blackens in spots on the bottom, about 1½ minutes. Flip and continue cooking until blackened in spots on the second side, about 1 minute more. (If using a grill, cooking time totals 5 minutes.) Transfer to a serving board or platter and repeat with the remaining dough. Serve warm or at room temperature.

Flatbread

Many cultures have their own versions of flatbread, the perfect platform for all manner of savory and sweet toppings and fillings.

Boatload of Goodness

loaded potato skins

makes 12 potato skins

When my oldest son, Calder, went off to college, I was a little nervous about how he would fare foodwise. My suspicions were realized by the first culinary report I got describing the previous night’s “amazing” dinner—take-out chicken wings and delivery pizza. I thought living off this type of food sounded disgusting but tried my best to understand his newfound habits—and I realized that even though college students can hardly be considered to have discriminating palates, they’re onto something. Familiar foods that make us happy transport us back to our earliest tastes of deliciousness, memories often associated with pleasure and peace. So I started making this sort of recipe whenever he came home, based on ingredients like chicken and potatoes. Needless to say, this potato-based dish is hedonistically delicious, and only an active someone the age of a college student could handle a steady diet of these calories.

6 large russet (baking) potatoes (about 3½ pounds), scrubbed

6 slices bacon

⅓ cup extra virgin olive oil

1 teaspoon coarse salt

¼ teaspoon white pepper

4 ounces sharp white cheddar cheese, shredded

4 ounces Monterey Jack cheese, shredded

1 cup sour cream

¼ cup chopped fresh chives

  1. Preheat the oven to 375°F with a rack in the center position. Prick each potato several times with a fork (see Note) and bake for about 1 hour, until the potatoes can be easily pierced with a toothpick. Remove from the oven and raise the oven temperature to 450°F.
  2. Meanwhile, cook the bacon in a large skillet until crisp. Transfer to a paper-towel-lined plate to drain. Chop the bacon and set aside.
  3. When the potatoes are cool enough to handle, halve them lengthwise and scoop out most of the flesh, leaving a ¼-inch-thick layer of flesh attached to the skins. Reserve the scooped flesh for another use, such as mashed potatoes.
  4. Brush the skins with the olive oil and season with the salt and pepper. Place skin side down on a rimmed baking sheet and bake for 18 to 20 minutes, until crisp and golden.
  5. Scatter the cheeses and bacon over the skins and bake 5 minutes more, until the cheese is melted and bubbly. Dollop with the sour cream and chives and serve.
common-note.png

Prick the potatoes in order to avoid a possible explosion. As I’ve learned the hard way, raw potatoes really have to be pricked before baking.

Wing Weakness

teriyaki-glazed wings

serves 4 normal people or 2 college students

MadHungry2_1046.tif

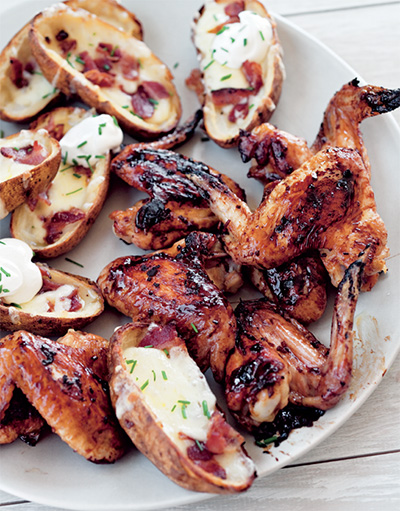
Loaded Potato Skins (page 123) and Teriyaki-Glazed Wings

I’m a wing girl—always have been—and for the longest time that was never a family conflict. With any given roasted whole chicken dinner, there was no dispute: Mom got the wings. But over the years, my family caught on to the skin-crunch-meat-bone wing attributes, and now they all want the wings. So we buy large pallets of them in the grocery store for home cooking. For a straight-up collegiate-style chow-down, serve with Loaded Potato Skins (page 123).

Glaze

⅔ cup low-sodium soy sauce

1⅓ cups sake or dry white wine

¼ cup mirin

One 1-inch piece ginger, peeled and minced

2 garlic cloves, minced

2 tablespoons sugar

2 pounds whole chicken wings

1 tablespoon vegetable oil

½ teaspoon coarse salt

  1. Preheat the oven to 375°F with a rack in the center position. For the glaze, combine the soy sauce, sake, mirin, ginger, garlic, and sugar in a small saucepan and boil until reduced to ½ cup, about 15 minutes. Transfer to a bowl and let cool to room temperature.
  2. Toss the wings with the oil and salt in a bowl and transfer to a rimmed baking sheet. Bake for 30 minutes, then brush generously with the glaze. Bake for 15 minutes, basting and turning every 5 minutes until the wings look caramelized.

wing variations

Hot wings, garlic wings, honey-mustard wings, barbecue wings, and teriyaki wings are being scarfed down all over the country. Analyze your favorite take-out tastes and replicate the flavors at home, using the basic cook time given here. For instance, honey-mustard-glazed wings are easy: whisk equal parts of honey and your favorite mustard, add some lemon juice, and you’re set. When using most glazes, you want to get the wings cooked and golden before adding the glaze, or it will burn before the chicken is cooked through—and the result won’t be as crunchy.

Salty Craving

street-corner pretzels

makes 12 pretzels

MadHungry2_783.tif

On my very first trip to New York City, the first thing I noticed when I emerged from the train station was the aroma of roasting chestnuts wafting from a vendor’s cart. Also on offer were big, fluffy, salty, doughy pretzels. You can still find the same type of pretzel everywhere on the streets of New York. One pound store-bought bread dough can be used in place of the homemade.

1 cup warm water

2 teaspoons sugar

¼ teaspoon coarse salt

One ¼-ounce package (2¼ teaspoons) active dry yeast

3 cups all-purpose flour, plus more for dusting

2 tablespoons unsalted butter, at room temperature

3 tablespoons baking soda

2 tablespoons pretzel salt or coarse salt

Mustard

Combine the water, sugar, salt, and yeast in a small bowl and let stand for about 5 minutes to dissolve the yeast.

  1. Put the flour in a large bowl. Using a pastry cutter or your fingers, cut the butter into the flour until the mixture resembles coarse crumbs. Slowly pour in the yeast mixture, stirring to combine. Using your hands, gather the dough together, turn it out onto a lightly floured surface, and knead until it is no longer sticky, about 5 minutes. Cover with plastic and let rise for 30 minutes.
  2. Cut the dough into 12 pieces. One at a time, roll each one into an 18-inch-long rope. Form a U shape, and twist the ends together twice. Fold the twisted portion backward over the center of the U shape to form a circle, then gently press the ends of the rope onto the dough to seal. Transfer to an oiled baking sheet (you will probably need two). Let rise for 20 minutes.
  3. Preheat the oven to 475°F with a rack in the center position. Bring a large pot of water to a boil and add the baking soda.
  4. Boil the pretzels in batches, without crowding them, until puffed and slightly shiny, 1 to 2 minutes per side. Transfer to wire racks to drain.
  5. Return the pretzels to the baking sheet and sprinkle with the pretzel salt. Bake for about 15 minutes, until golden brown and puffed up; the pretzels will keep, uncovered, at room temperature for up to 12 hours. Rewarm in a 250°F oven if desired, and serve with your favorite mustard.
common-goodtoknow.png

Pretzel making, like bagel making, involves both boiling and baking. The boiling cooks the interior of the dough for the initial puff and creates a chewy texture. Adding baking soda to the boiling water alkalizes it, which accounts for the shiny brown crust and unique flavor. You must drain the boiled pretzels on wire racks, but don’t let too much time elapse before baking, or the pretzels will deflate. The ideal baked pretzel is soft inside with a thin, golden outside layer that is firm and slightly crunchy.

Doughy Deliciousness

sicilian-style deep-dish pizza

serves 4 to 6

This beautiful soft yeast dough is the basis for a Chicago-style deep-dish pizza or what they call a Sicilian in New York City pizza parlors. Basically it’s a thick, doughy, focaccia-like crust instead of the thin, crispy, and chewy variety. This one, baked with one of my favorite toppings of all time—slow-roasted tomatoes—rather than laden with mozzarella, harks back to my grandmother’s house, where she and her sisters embedded this scent and taste memory in my mind. The tomatoes can be made in advance, as can the dough, which needs to rise overnight in the refrigerator. Then simply roll out the dough, let it rest, and assemble the pizza just before baking.

Pizza Dough

1⅓ cups water

1 teaspoon sugar

One ¼-ounce package (2¼ teaspoons) active dry yeast

3 cups plus 1 tablespoon all-purpose flour

¼ cup cornmeal

1 teaspoon coarse salt

¼ cup olive oil, plus more for the bowl

Slow-Roasted Tomatoes (recipe follows)

¼ cup grated Parmesan or Pecorino Romano cheese

  1. Combine the water, sugar, and yeast in a medium bowl and let stand for 3 to 4 minutes to dissolve the yeast.
  2. Whisk together 3 cups of the flour, the cornmeal, and salt in another medium bowl. Slowly add one-third of the flour mixture to the yeast mixture, stirring with a wooden spoon; then add another third and stir. Add the olive oil, then the remaining flour, and stir.
  3. Sprinkle the remaining tablespoon of flour on a countertop, turn out the dough, and knead until smooth. Transfer the dough to a large oiled bowl and turn to coat in oil. Cover and let rise overnight in the refrigerator.
  4. The next day, oil a rimmed baking sheet. On a lightly floured board, roll the dough out to the size of the pan. Fit the dough into the pan and let rest for 30 minutes.
  5. Preheat the oven to 450°F with a rack in the center position. Spread the tomatoes evenly over the dough. Bake for about 30 minutes, until the tomatoes are bubbling and the dough is golden brown. Remove from the oven and sprinkle on the grated cheese.

slow-roasted tomatoes

makes 4 to 6 cups

These can be made up to 2 days ahead.

12 medium tomatoes, sliced ¼ inch thick

4 shallots, thinly sliced

10-12 thyme sprigs

½ cup olive oil

1 teaspoon coarse salt

  1. Preheat the oven to 300°F with a rack in the center position. Arrange the tomatoes in a single layer on two baking sheets. Scatter the shallots and thyme sprigs over the tomatoes, drizzle with the olive oil, and sprinkle with the salt.
  2. Roast for 2 to 2½ hours, turning the tomatoes a few times, until wilted and browning in places. Let cool. Store in a sealed container in the refrigerator.
common-goodtoknow.png

Slow-roasted tomatoes are very versatile.

Feels Fancy

sun-dried tomato–parmesan crisps

makes 24 crisps

MadHungry2_57.tif

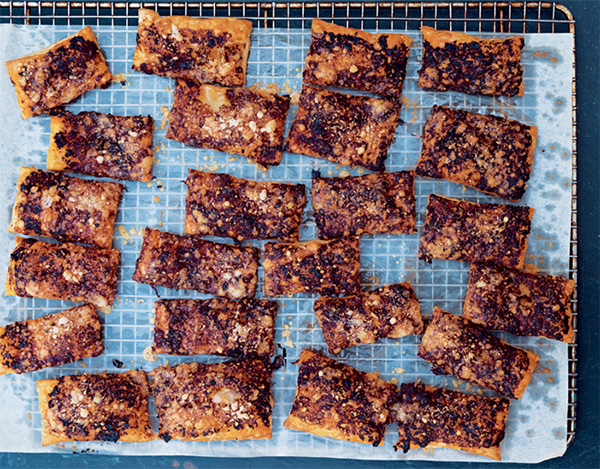
These savory nibbles—inspired by ’wichcraft, a take-out lunch spot near my office—are great appetizers with wine. Or serve them with Classic Tomato Soup (page 61). Using that versatile convenience item, frozen puff pastry, makes them easy to put together. If you can’t find sun-dried tomato paste (see page 23), substitute good-quality regular tomato paste.

3 tablespoons sun-dried tomato paste

1 tablespoon extra virgin olive oil

1 piece store-bought puff pastry (such as a 17.3-ounce package Pepperidge Farm), thawed

½ cup grated Parmesan cheese

¼ teaspoon freshly ground black pepper

  1. Preheat the oven to 375°F with a rack in the center position. Combine the tomato paste and olive oil in a small bowl.
  2. On a lightly floured surface, roll out the puff pastry to a 12-inch square. Transfer to a parchment-lined baking sheet.
  3. Spread the tomato paste mixture evenly over the pastry with a rubber spatula. Sprinkle with the cheese and pepper. Using a pizza wheel or a sharp knife, cut into quarters in one direction and then into sixths in the other, to make 24 pieces.
  4. Bake for 20 to 22 minutes, until puffed and golden. Transfer to a wire rack and cool to room temperature before serving.
common-freezer.png

Puff pastry is one of the heavy lifters of convenience items. Whether your garden-variety puff pastry sheets, resplendent with the impolitic ingredients of vegetable shortening and high-fructose corn syrup, or artisanal brands like Dufour (www.dufourpastrykitchens.com) that are made with all butter, frozen puff pastry is a boon to home cooks. Different fillings and shapes become old-fashioned cocktail canapés like pigs in a blanket or mini-spinach triangles. Dessert turnovers need only a scoop of jam or a chocolate square wrapped inside a rolled-out 4-inch square of pastry and baked for 20 minutes at 400°F.

Step Away from the Biscuits

cheddar drop biscuits

makes 18 biscuits

Your only problem with these great biscuits will be the irresistible force drawing you to eat too many, especially when they’re still warm. You can use this good, reliable recipe any time you’re craving a moist and savory drop biscuit. I love to serve these with Butterfield Stageline Chili (page 156), broken up into little pieces and stirred into the bowl. You can also keep them at the ready wrapped in resealable plastic bags in the freezer—reheat in a 275°F oven for 5 minutes, or let defrost at room temperature for 30 minutes before heating in the microwave briefly. Reheated frozen biscuits taste just like fresh-baked.

2 cups all-purpose flour

2 teaspoons baking powder

½ teaspoon baking soda

1 teaspoon sugar

½ teaspoon coarse salt

Pinch of cayenne pepper

6 tablespoons cold unsalted butter, cut into small cubes

6 ounces sharp white or orange cheddar cheese, shredded

1⅓ cups buttermilk (shaken well before measuring)

2 tablespoons chopped fresh chives

  1. Preheat the oven to 425°F with the racks in the upper and lower third positions. Line two baking sheets with parchment.
  2. Whisk together the flour, baking powder, baking soda, sugar, salt, and cayenne in a large bowl. Work in the butter with a pastry cutter or your fingers until the butter is incorporated but some pea-sized lumps remain. Stir in the cheddar, then add the buttermilk and chives, stirring just until the dough comes together.
  3. Using two large spoons, drop ¼ cupfuls of the dough onto the prepared baking sheets, spaced 2 inches apart. Bake for 12 to 14 minutes, rotating the baking sheets once, until golden brown. Serve warm.
common-goodtoknow.png

If you’re serving these with chili, you can drop the batter in large dollops right on top of the chili pot about 15 minutes before the chili is done. The result will be a moist, soft version instead of the crunchy contrast of oven-baked biscuits. Scoop up a cheddar “dumpling” with each portion of chili. I even drop smaller dollops of this dough over my favorite chicken chowder as it cooks, for quick chicken and dumplings.

Shortcut Impostor

english muffin tidbits

serves 6 to 8

Straight from my grandmother’s recipe file, title and all, these little bites have all the flavor and appeal of an everything bagel, what with the poppy seeds, garlic, and onion. Serve with soups or alongside some cheese for nibbling.

6 English muffins

8 tablespoons (1 stick) unsalted butter, at room temperature

1 garlic clove, minced

1 small onion, minced

1 teaspoon poppy seeds

  1. Preheat the broiler. Split the English muffins open and spread with the butter. Combine the garlic and onion and sprinkle evenly over the muffins. Sprinkle on the poppy seeds.
  2. Arrange the muffins on a baking sheet and broil until lightly golden. Serve warm.

English Muffins

English muffins are one of the great shortcut foods. Whoever coined the term “nooks and crannies” to describe their mini-potholes, which capture melting butter, peanut butter, honey, or jam, deserves an award. English muffins are also an excellent burger bun alternative. The hamburger patty sandwiched inside oozes its juicy, beefy condiment runoff into those same nooks and crannies.

Favored Fry

crispy crunchy onion rings

serves 4

Faced with a choice between French fries and onion rings, my crunchy side will always choose onion rings. Something about onion rings just puts me over the edge—perhaps it’s the crunch of the fried coating surrounding the soft-sweet slivers of onion. Soaking the onions in cold water for 10 minutes will dilute their sulphur content, making them sweeter and milder.

2 large Vidalia or other mild onions, cut into ¼-inch-wide rings

Vegetable oil for deep-frying

1 cup plus 2 tablespoons all-purpose flour

¼ cup cornstarch

2 teaspoons baking powder

1 teaspoon coarse salt, plus more to taste

1⅓ cups ice-cold water

  1. Put the onions in a large bowl filled with cold water and soak for 10 minutes.
  2. Heat 2 inches of oil to 365°F in a deep heavy-bottomed pot or prepare your electric deep-fryer.
  3. Whisk together the flour, cornstarch, baking powder, and salt in a medium bowl. Whisk in the ice-cold water and set the bowl of batter in a bowl of ice.
  4. Drain the onions well and dry thoroughly between layers of paper towels. Working with one handful at a time, dip the onions in the batter, allowing the excess to drip back into the bowl, and carefully place in the oil. Fry, turning once, until crisp and golden, about 3 minutes per batch. Transfer to a paper-towel-lined tray to drain, and sprinkle with salt.
common-howtopull.png

All fried onion rings are not created equal. The batter must be light, not thick and gloppy—this is achieved by the correct proportion of flour to water. The final product must be crispy, not cakey; here the cornstarch promotes crunchiness. Use sweet Vidalia onions or another similar mild-mannered onion. And the onions should not be cut too thick. Make sure you have a sharp knife and a firm grip (fingertips turned under, please). Cook fast and hot—oil management is crucial to success. A deep-fry/candy thermometer is a good investment if you deep-fry often—you can also use it for Brined and Fried Chicken (page 170) and Candied Apples (page 281).

deep-frying

I understand it can be daunting to face a vat of hot oil with visions of singed hair and fire swirling in your head, but it’s time to get over your fear of deep-frying! If you already love to cook fried foods, buy a commercial deep-fryer; they are available for under $100 and are foolproof. But if you fry rarely, you just need to follow a few simple rules for success and safety.

When foods are fried correctly, the outside will be sealed into a crispy (not oily) crust while inside the food steams itself.

Roll with It

shrimp summer rolls

makes 12 rolls

MadHungry2_739adj.tif

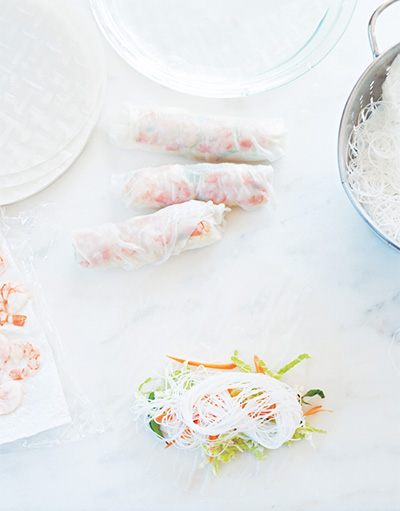
Summer rolls are a healthful way to satisfy an Asian food craving. They are fresh room-temperature rolls, not deep-fried. Here, julienned veggies (see page 83), blanched shrimp, herbs, and thin noodles are wrapped in rice papers and served with a flavorful dipping sauce. Set up an assembly line to make them—it’s a great family activity.

24 medium shrimp (about 1 pound)

Coarse salt

4 ounces rice vermicelli noodles

12 spring roll skins

1 cup fresh Thai basil leaves or Italian basil leaves

1 packed cup finely shredded Napa cabbage

1 medium carrot, peeled and julienned

Dipping Sauce

3 garlic cloves, minced

1 jalapeño, minced

¼ cup chopped palm sugar or packed light brown sugar

Juice of 2 limes (¼ cup)

⅓ cup fish sauce

2 scallions, white and pale green parts minced, dark green tops thinly sliced

  1. Put a large pot of water over high heat. Meanwhile, peel and devein the shrimp. When the water comes to a boil, add a generous pinch of salt, then add the shrimp, and cook until opaque, about 2 minutes. Using a slotted spoon or spider, transfer the shrimp to a bowl of ice water. This will stop the cooking and ensure the shrimp remain tender and moist.
  2. Put the noodles in a baking dish, cover with hot water, and soak until softened, 8 to 10 minutes. Drain in a colander and rinse under cold water.
  3. Cut the shrimp in half lengthwise. Pour ½ inch of cool water into a pie plate. Submerge a spring roll skin in the water for 10 seconds, then remove and transfer to a clean work surface. Place 4 shrimp halves cut side up in a straight row across the lower third of the skin. Top the shrimp with a few basil leaves, a few tablespoons of the shredded cabbage, a pinch of the carrots, and ⅓ cup of the rice noodles. Carefully lift the edge of the spring roll skin nearest you up and over the filling. Fold the sides over, and continue to roll up. Transfer to a platter, seam side down, and cover with a damp paper towel. Continue building the remaining rolls.
  4. For the dipping sauce, whisk the garlic, jalapeño, sugar, lime juice, fish sauce, and minced scallions in a medium bowl. Transfer to individual dipping bowls and garnish with the sliced scallion tops.
  5. Serve the summer rolls with the dipping sauce.
common-goodtoknow.png

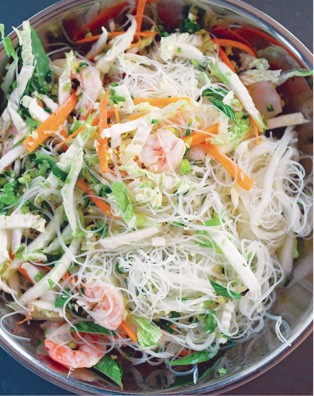
Summer Roll Salad When a friend with three young boys—so no time for wrapping and rolling—saw me making these, she commented that she’d rather just dump all the elements in a bowl, mix it with the dipping sauce, and call it a salad. We tried it, and it’s a great idea.

MadHungry2_1069.tif

Punch Up the Package

ramen noodle upgrade

serves 1

My son Calder’s all-time favorite late-night snack is only in need of a small pot of boiling water. He figures that even a single guy who gets home late, when the local pizza joint and corner deli are closed, needs to eat. Starving and desperate—with no options left? This recipe is a clever abbreviated adaptation of the favorite Chinese takeout cold sesame noodles.

One 3-ounce package ramen noodles with flavoring

1 tablespoon soy sauce

2 tablespoons chunky peanut butter

2 teaspoons Sriracha sauce

½ scallion, thinly sliced (optional)

  1. Boil the noodles with the flavor pack as directed; drain off most of the liquid. Toss with the soy sauce, peanut butter, and Sriracha. Garnish with the scallion, if you like, and eat immediately.

Crunchy Peanut Butter Snacking

Keep a good variety of this on hand, and it will afford you many different munchable moments.

common-goodtoknow.png

Asian Ingredients A little planning-ahead allows you to transform the way you cook at home. Once your pantry is stocked with a few specialty items like the rice noodles and wrappers, all that stands between you and seemingly exotic homemade takeout are a few everyday supermarket ingredients. See Asian Pantry, page 16.

Flavor Strip on a Stick

beef satay with thai peanut sauce

makes 20 skewers; serves 6 to 8

Take your young kids to a Thai restaurant, and one of them is sure to order satay. The marinated meat, whether chicken or beef, is threaded on skewers and grilled, but it’s the creamy peanut sauce that really grabs their attention. These skewers will be a smash hit at your table. Thinly sliced boneless chicken can be substituted for the beef.

¼ cup peanut oil

1 large shallot, minced

2 garlic cloves, minced

One 2-inch piece ginger, peeled and minced

¼ cup low-sodium soy sauce

1 teaspoon turmeric

1 teaspoon ground coriander

¼ cup fresh lime juice

¼ teaspoon freshly ground black pepper

1 pound flank steak, sliced ⅛ inch thick against the grain (see page 68)

Thai Peanut Sauce (recipe follows)

About 20 wooden skewers

  1. Whisk together the peanut oil, shallot, garlic, ginger, soy sauce, turmeric, coriander, lime juice, and pepper in an 8-inch square baking dish or wide shallow bowl. Add the beef, tossing to combine, and marinate up to 1 hour at room temperature, or up to 4 hours in the fridge.
  2. Meanwhile, soak the skewers in water for 30 minutes (see Note); drain.
  3. Preheat an outdoor grill or a grill pan over medium-high heat. Thread 1 slice of beef onto each skewer. Grill the beef, turning once, just until cooked through, about 2 minutes total. Serve with the peanut sauce.
common-note.png

Wooden skewers must always be soaked in water before using on a grill. Otherwise, the wood will burn before the meat is cooked.

thai peanut sauce

makes about 3 cups

1 cup plus 1 tablespoon unsalted roasted peanuts

1 garlic clove, smashed and peeled

2 tablespoons finely chopped palm sugar or light brown sugar

2 tablespoons fish sauce

1 tablespoon low-sodium soy sauce

1½ cups unsweetened coconut milk

1 teaspoon Asian sesame oil

1 tablespoon fresh lime juice

¼ cup unsweetened shredded coconut

  1. Combine 1 cup of the peanuts with the remaining ingredients in a blender and blend until smooth. Transfer to a serving bowl.
  2. Chop the remaining tablespoon of peanuts and sprinkle over the sauce before serving.